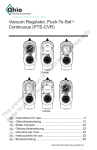
1
ONESOURCE
Uncertain Tax Positions
®
v5.0 UNCERTAIN TAX POSITIONS
RELEASE DATE: APRIL 25, 2011
TAX & ACCOUNTING
PROPRIETARY MATERIALS
No use of these Proprietary materials is permitted without the
express written consent of or license from Thomson Reuters/Tax &
Accounting, ©1999-2011. Altering, copying, distributing, or
reproducing any of these proprietary materials in any manner is
expressly prohibited.
SOFTWARE LICENSE AGREEMENT
The right to use the software product described in this document is
specifically conditioned upon your execution of and compliance with
the Tax Software and Services Agreement with Thomson
Reuters/Tax & Accounting, ©1999-2011.
All contents copyright ©1999-2011, Thomson Reuters/Tax &
Accounting. All rights reserved.
3
Table of Contents
OVERVIEW
8
WEB ADDRESS and
BROWSERS
LOGIN
PASSWORDS
TEXT SIZE
MENU
................................................................................................................................... 8
................................................................................................................................... 9
................................................................................................................................... 17
................................................................................................................................... 17
18
................................................................................................................................... 18
HOME
CONTACT
HELP
SIGN OUT
................................................................................................................................... 18
................................................................................................................................... 19
................................................................................................................................... 19
ADMIN CENTER
20
................................................................................................................................... 20
USERS
USER ADMIN .......................................................................................................................................................... 20
USER RIGHTS.......................................................................................................................................................... 21
.......................................................................................................................................................... 22
USER ASSIGNMENT
..........................................................................................................................................................
24
MANAGE USER
ASSIGNMENT
COMPONENTS
................................................................................................................................... 25
.......................................................................................................................................................... 25
COMPONENTS
..........................................................................................................................................................
27
UNIT-COMPONENT
ASSIGNMENT
..........................................................................................................................................................
28
IMPORT/EXPORT
CATEGORIES
DATASETS &
REPORTING
DATASETS
DATASETS
3
................................................................................................................................... 29
.......................................................................................................................................................... 29
.......................................................................................................................................................... 30
DATASET MAINTENANCE
.......................................................................................................................................................... 31
REPORTING DATASETS
DOCUMENTATION
© 2011 Thomson Reuters
................................................................................................................................... 32
4
v5.0 UNCERTAIN TAX POSITIONS
INTEREST AND
PENALTIES
FX RATES
LABELS
................................................................................................................................... 33
................................................................................................................................... 35
................................................................................................................................... 36
LABEL ADMIN.......................................................................................................................................................... 36
.......................................................................................................................................................... 37
LABEL GROUPS
.......................................................................................................................................................... 38
ASSIGNMENTS
..........................................................................................................................................................
39
IMPORT/EXPORT
LABELS, LABEL GROUPS,AND ASSIGNMENTS
................................................................................................................................... 39
AUDIT TRAIL
JOB HISTORY
................................................................................................................................... 40
SETTINGS
41
DATASET/UNIT
SELECT
................................................................................................................................... 41
MY UTP
43
NEWS &
ANNOUNCEMENTS
................................................................................................................................... 43
QUICK LINKS.......................................................................................................................................................... 43
.......................................................................................................................................................... 44
DATASET MERGE
..........................................................................................................................................................
45
DATASET MERGE
APPROACH
UTP GUIDES
.......................................................................................................................................................... 46
.......................................................................................................................................................... 46
UTP CALCULATIONS
.......................................................................................................................................................... 47
KNOWN ISSUES
..........................................................................................................................................................
47
RELEASE NOTES
ARCHIVE
..........................................................................................................................................................
47
RELEASE BLACKOUT
PERIODS
UNCERTAIN POSITIONS
ADD A NEW
POSITION
47
................................................................................................................................... 47
..........................................................................................................................................................
47
ADD A NEW POSITION
IN A GAAP DATASET
..........................................................................................................................................................
52
ADD A NEW POSITION
IN AN IFRS DATASET
..........................................................................................................................................................
53
NON-CASH AND
EQUITY
..........................................................................................................................................................
55
INTEREST AND
PENALTIES
..........................................................................................................................................................
56
FEDERAL AND
INTERNATIONAL FEDERAL POSITIONS
© 2011 Thomson Reuters
5
..........................................................................................................................................................
58
STATE AND INTERNATIONAL
POSITIONS
..........................................................................................................................................................
59
INTERNATIONAL
RATE TABLES
..........................................................................................................................................................
60
CUSTOM RATE
TABLE
..........................................................................................................................................................
62
ABOVE/BELOW
THE LINE
..........................................................................................................................................................
62
UNDERPAYMENT
AND OVERPAYMENT RATES
..........................................................................................................................................................
63
REMOVING INTEREST
RATES
HISTORIC CTA.......................................................................................................................................................... 63
.......................................................................................................................................................... 65
COPY POSITION
MODIFY A POSITION
................................................................................................................................... 65
.......................................................................................................................................................... 67
NON-FINAL MODIFICATIONS
.......................................................................................................................................................... 67
FINAL MODIFICATIONS
RELOAD
CONTENGENCIES
FX RATES
ACTION MENU
................................................................................................................................... 68
................................................................................................................................... 68
................................................................................................................................... 69
..........................................................................................................................................................
70
REMOVE/MARK
as NLU
.......................................................................................................................................................... 70
ADD NOTES/ATTACHMENTS
.......................................................................................................................................................... 70
ASSIGN LABELS
..........................................................................................................................................................
71
UPDATE INTEREST
END DATES
..........................................................................................................................................................
71
RECALCULATE
INTEREST
72
BATCH PRINT..........................................................................................................................................................
SCHEDULES
75
EXPIRED DUE..........................................................................................................................................................
TO STATUTE
INDIVIDUAL ITEM
SCHEDULES
................................................................................................................................... 75
..........................................................................................................................................................
75
CALCULATION
SUPPORT
ITEM DETAIL
.......................................................................................................................................................... 75
..........................................................................................................................................................
75
INTEREST AND
PENALTIES
AUDIT HISTORY
DOCUMENTATION
LABELS
VIEW OPTIONS
FILTER
© 2011 Thomson Reuters
................................................................................................................................... 76
................................................................................................................................... 76
................................................................................................................................... 77
................................................................................................................................... 78
.......................................................................................................................................................... 78
5
6
v5.0 UNCERTAIN TAX POSITIONS
SORT
.......................................................................................................................................................... 79
.......................................................................................................................................................... 79
REORDER COLUMNS
GRID TOOLS .......................................................................................................................................................... 79
BATCH PRINT
REPORTS
IMPORT
................................................................................................................................... 79
................................................................................................................................... 82
.......................................................................................................................................................... 82
IMPORT TEMPLATE
IMPORT TIPS.......................................................................................................................................................... 83
EXPORT
REPORTING
PRINTING
MAIN REPORTS
................................................................................................................................... 83
84
................................................................................................................................... 84
................................................................................................................................... 84
.......................................................................................................................................................... 85
EXPLANATIONS
VIEW OPTIONS
................................................................................................................................... 86
..........................................................................................................................................................
87
REPORT SPECIFIC
VIEWS
87
REPORT VIEW..........................................................................................................................................................
DIFFERENCES
.........................................................................................................................................................
87
DEFERRED WITH
FUTURE BENEFIT
.........................................................................................................................................................
88
TABULAR PAYABLE
ROLLFORWARD
.........................................................................................................................................................
88
UNCERTAIN JOURNAL
ENTRY
......................................................................................................................................................... 88
UNCERTAIN EXPENSE
......................................................................................................................................................... 89
ITEM INVENTORY
......................................................................................................................................................... 89
ITEM DOCUMENTATION
.........................................................................................................................................................
90
UTP OPEN YEARS
AND JURISDICTIONS
.........................................................................................................................................................
90
SCHEDULE UTP
REPORT
UNCERTAIN TAX
POSITION
DISCLOSURE
STATEMENTS
................................................................................................................................... 92
.......................................................................................................................................................... 93
REPORT FOOTNOTES
INTERIM REPORTING
AND Uncertain Tax
................................................................................................................................... 94
Positions
.......................................................................................................................................................... 94
BEST PRACTICE
© 2011 Thomson Reuters
7
TERMINOLOGY
96
UNCERTAIN TAX PROVISION
98
ONESOURCE TAX
PROVISION
................................................................................................................................... 99
.......................................................................................................................................................... 99
MANUAL APPROACH
.......................................................................................................................................................... 100
EXPORT APPROACH
FREQUENTLY ASKED QUESTIONS
100
7
© 2011 Thomson Reuters
v5.0 UNCERTAIN TAX POSITIONS
OVERVIEW
The Application menu and Navigation bar are referred to throughout this Uncertain Tax
Positions (UTP) Application user manual.
WEB ADDRESS and BROWSERS
CURRENT SIGN ON
Currently, you access the ONESOURCE® Uncertain Tax Positions Application (UTP
App) by going to the login page. The recommended browsers for the UTP App are Microsoft
Internet Explorer® 7 and 8 and Mozilla Firefox® 3.5 or higher. It is highly recommended that
you use Mozilla Firefox. If you are unable to install the Mozilla Firefox browser, you should
download the desktop application from the My UTP page of the UTP App by opening up the
last news item, the Internet Explorer 6.0. Notice, and follow the instructions.
Note: In Internet Explorer, pop-ups may appear in connection with a script on the page. You
should disable script debugging in Internet Explorer by going to the Tools menu and clicking
Internet Options. On the Advanced tab, make sure the Disable script debugging
(Internet Explorer) check box is selected. If pop-ups continue to appear, refresh the UTP
App.
8
v5.0 UNCERTAIN TAX POSITIONS
LOGIN
SINGLE SIGN ON
Existing users will be able to migrate to the ONESOURCE platform and will easily be able
to utilize Single Sign On. This will be made possible by a single user ID that will be used
across all Thomson Reuters ONESOURCE products. The ONESOURCE Universal User
ID provides Uncertain Tax Positions users the ability to seamlessly access other
ONESOURCE applications without re-entering user credentials. Once you log in to the
ONESOURCE platform, you will be able to access UTP. Also, the creation of new users
within ONESOURCE will be available.
LOGGING INTO THE UTP APP
The URL for the ONESOURCE platform has been provided to you in a welcome email. If
logging into the ONESOURCE platform to access UTP, Internet Explorer is the
recommended browser.
PHASE 2:
You now have the option to migrate to a Universal ID and log into the ONESOURCE
platform to access the UTP App.
Users will now see the following additional options on their login screen
I HAVE A ONESOURCE USER ID
CREATE A NEW UNIVERSAL ID
LOGIN TO UNCERTAIN TAX POSITIONS
I HAVE A ONESOURCE USER ID
If you have a ONESOURCE USER ID from using other ONESOURCE applications such as
ONESOURCE Tax Provision or ONESOURCE Income Tax then, go to the Uncertain Tax
Positions login page. You will need to enter your original Uncertain Tax Positions login
and click I Have A Universal ID. Your Universal ID will be authenticated. Then, you
need to follow a series of steps to link your Uncertain Tax Positions login to your existing
ONESOURCE Universal ID.
Step 1: Go to your Uncertain Tax Positions login site.
9
v5.0 UNCERTAIN TAX POSITIONS
Step 2: At the login page, enter your existing User name and Password and click I
HAVE A ONESOURCE USER ID
Note: When you provide your old login information, the registration process knows who you
are, and will link your new account to your old account
Step 3: You will be redirected to log into the ONESOURCE platform.
Enter your Password and click REGISTER
Next, click
Enter your Universal ID and Password, then click LOGIN
10
v5.0 UNCERTAIN TAX POSITIONS
11
v5.0 UNCERTAIN TAX POSITIONS
Step 4: You are now in the ONESOURCE platform.
On the menu bar, click Applications
Click ONESOURCE Uncertain Tax Positions. Once the application opens,
you can enter your Uncertain Tax Positions as you have in the past.
Note: The next time you log in, ONESOURCE Uncertain Tax Positions will be available.
12
v5.0 UNCERTAIN TAX POSITIONS
CREATE A NEW UNIVERSAL ID
Step 1: Go to your URL for the Uncertain Tax Positions login site.
Step 2: At the login page:
Enter your existing Username and Password.
Click CREATE MY ONESOURCE USER ID
Step 3: The Universal ID registration page will open
Enter a Password (it can be the same as your old password)
Enter Email Address
Confirm Email Address
Click REGISTER
Note: If your UserID is already taken, you are allowed to create a new one
13
v5.0 UNCERTAIN TAX POSITIONS
Step 4: You will receive an email from ONESOURCE Support, with the subject...Important
ONESOURCE Notification message
Click on the link provided to activate your account...Click here to complete the
registration process
Next, you will receive the message Your registration is complete. Click the link below to get
started!
Login to ONESOURCE platform
14
v5.0 UNCERTAIN TAX POSITIONS
Step 5: Go to the site the ONESOURCE platform.
Please, bookmark this link to for quick access to Uncertain Tax Positions, in the future
Login using your new Universal ID and Password
Step 6: You are now on the ONESOURCE platform
On the menu bar, click Applications
Click ONESOURCE Uncertain Tax Positions.
15
v5.0 UNCERTAIN TAX POSITIONS
Once the application opens, you can enter your Uncertain Tax Positions as you have in the
past
PHASE 3 IS IN FEBRUARY 2012!
You will be required to migrate to using a Universal ID and log into the ONESOURCE
platform in order to access the UTP App.
The LOGIN button will no longer be available, leaving only the two REGISTER buttons.
You log in using the ONESOURCE login screen; your option is to migrate to the
ONESOURCE platform. You now must log in using the ONESOURCE platform.
Note: On the log in screen, click on GET STARTED TODAY! for migration information
TO LOG IN:
1. Enter your username and password in the LOGIN dialog box. The username and
password are case-sensitive
2. Click LOGIN to be directed to the homepage
16
v5.0 UNCERTAIN TAX POSITIONS
PASSWORDS
You can now change your own password. Be sure to change your password regularly to
ensure the safety of data.
1. On the homepage, click the Manage Passwords link under ADMINISTRATION.
2. Enter your current password and a new password.
3. Select Change Password. You should receive a confirmation message, "Password
successfully changed" and you will be redirected to the homepage
Note:
A password should be complex and unique. Passwords must be at least eight (8)
characters, and contain at least one of each of the following: lowercase letters,
uppercase letters, and numbers.
If you are unable to remember your password or are unable to log in, please
contact the Support Group.
Note: If you have migrated your username and login using the ONESOURCE platform, this
step has changed. Instead, you will select the Menu | Setup area of the ONESOURCE
platform.
TEXT SIZE
The font on the page can be adjusted to make text larger or smaller. To adjust text size,
select the View menu option, click Text Size, and select a font size.
Internet Explorer
Mozilla Firefox
17
v5.0 UNCERTAIN TAX POSITIONS
MENU
The UTP App Menu is in the upper left corner.
HOME
Click Home to return to the homepage.
CONTACT
Click Contact to display a blue pop-up box with contact information for the ONESOURCE
Tax Provision Support Group and the UTP Committee.
If you are having trouble with the software and aren't sure how to proceed, call or
email the Support Group for guidance.
If you have suggestions, comments, constructive criticism, or new feature/
functionality requests, email the UTP Committee so that your feedback can be
taken into consideration when determining future development of the UTP App.
18
v5.0 UNCERTAIN TAX POSITIONS
HELP
Click Help to display the UTP App User Manual.
SIGN OUT
Click Sign Out to sign out of the UTP App and ONESOURCE Tax Provision.
Note: If you are idle for more than 30 minutes, you will be logged out of the UTP App. You
will be warned when you are about to be logged out and you will have the option to extend
your timeout. When you attempt to perform an action after you have been logged out, a
warning message displays letting you know you have been logged out. Click OK to be
redirected to the Login page.
Note: If you have migrated your Username and log in using the ONESOURCE platform,
this step has changed. Instead, you will select Log off from the Menu area of the
ONESOURCE platform.
19
v5.0 UNCERTAIN TAX POSITIONS
ADMIN CENTER
The Admin Center section is where Administrative users can view and manage Job
History, Audit Trail, Documentation, Labels & Groups, FX Rates, Interest & Penalties,
Users, Datasets & Reporting Datasets, Components and Admin Params. Read/Write &
Read Only users will also have access to select areas of the Admin center based on their
permissions.
USERS
Select the Users tab.
USER ADMIN
From the Manage drop-down menu, select Users.
TO ADD A NEW USER:
To create new users, you must contact the Support Group. You will be asked to provide a
written request that states that the user should have the right to access your data. Include
the user's name, email address, and the level of access they should have (Admin, Read/
Write, Read-Only) in the request.
TO EDIT A NEW USER:
1. Double click the field to edit and make your changes
2. Click Save
Note: All fields are editable, except the User Login field.
TO DISABLE A USER:
1. Double-click the Disabled? column for the user you would like to disable
2. Select Yes from the drop-down list
3. Click Save
Note: Users cannot be deleted - only disabled.
TO CANCEL CHANGES:
After editing a user, you may wish to cancel the changes you made. This option is available
before clicking Save.
1. Click Cancel
2. Click Yes
20
v5.0 UNCERTAIN TAX POSITIONS
USER RIGHTS
After users have been created, you may need to change their level of access in the UTP
App. To do so, click the Users tab and select User - Role Assignment from the Manage
drop-down menu.
Note: If you have migrated to the ONESOURCE platform, then you will need to manage
users in the Menu | Setup area of the platform.
Each user can have different rights in the application, depending on the activities they are
required to perform:
Non Administration – Read Only
Allows a user to see and export data and reports for assigned units and subconsolidations
Provides no access to Admin Center
Provides no access to Merge Datasets in MY UTP Tab’
Non Administration – Read/Write
Allows a user all the rights of Read-only users
Allows a user to enter, import, modify and/or delete data in the system
Provides a user access to select areas of the Admin Center
Job History, Audit Trail, Documentation, Labels & Groups, FX Rates and Interest
& Penalties
Administration – Read/Write
Allows a user all the rights of a Non Administration - Read/Write user
Provides a user access to the rest of the Admin Center
Users (if Admin has adequate permissions), Datasets & Reporting Datasets,
Components
TO ASSIGN USER RIGHTS:
For One user:
1. Select the user to which you wish to assign rights
2. Click the desired Role Name (Admin, Read/Write, Read Only) for that user
3. Click Save. A User-Role Assignment Saved Successfully message displays in a
yellow box at the top of the page
For Multiple users:
1. Hold Ctrl while selecting the users to which you wish to assign user rights
2. Click the desired Role Name (Admin, Read/Write, Read Only) for those users
3. Click Save. A User-Role Assignment Saved Successfully message displays in a
yellow box at the top of the page.
Note: To select all users in the table, hold Shift while clicking the first and last users.
TO EDIT USER RIGHTS:
Follow the same steps as for assigning user rights above.
21
v5.0 UNCERTAIN TAX POSITIONS
TO CANCEL CHANGES:
After editing a user's rights, you may wish to cancel the changes you made. This option is
available before clicking Save.
Click Cancel
USER ASSIGNMENT
After users have been created, you may need to adjust their access to units and
subconsolidations. When a new user is created, the user is assigned to all your units, but to
none of your subconsolidations.
TO ASSIGN UNITS:
1. Select User - Unit Assignment from the Manage drop-down menu.
2. Select the user(s) to whom you wish to assign units.
To select multiple users, hold Ctrl while selecting users
To select all users, hold Shift while clicking the first and last users
3. Select the units to which users should have access by holding Ctrl while selecting
units.
To select all units, hold Shift while clicking the first and last units
4. Click Save. A User successfully assigned message displays in a yellow box at the top
of the page.
TO ASSIGN SUBCONSOLIDTIONS:
1. Select User - SubConsolidation Assignment from the Manage drop-down menu.
2. Select the user(s) to whom you wish to assign SubConsolidations.
To select multiple users, hold Ctrl while selecting users
To select all users, hold Shift while clicking the first and last users
3. Select the SubConsolidations to which users should have access by holding Ctrl
while selecting SubConsolidations.
To select all SubConsolidations, hold Shift while clicking the first and last unit in
the box
4. Click Save. A User successfully assigned message displays in a yellow box at the top
of the page.
TO VIEW ASSIGNMENTS:
To view the Units/SubConsolidations assigned to a user, click on the user. Assigned Units/
SubConsolidations are highlighted in blue.
TO UNASSIGN COMPONENTS FROM USERS:
1. Hold Ctrl while de-selecting Units/SubConsolidations.
2. Click Save.
TO CANCEL CHANGES:
If you accidentally added or removed Units/SubConsolidations to/from a user, click Cancel to
revert back to the original assignments. This option is only available after changes have been
made, but before clicking Save.
22
v5.0 UNCERTAIN TAX POSITIONS
TO IMPORT:
User assignments can be edited through an Import spreadsheet. Refer to the Import/Export
Categories section for more information.
23
v5.0 UNCERTAIN TAX POSITIONS
MANAGE USER ASSIGNMENT
Note: You must Contact Support to create NEW users. This only applies to users that are
new and therefore can not migrate. The following steps are for users that have migrated.
To manage the assignment of users:
CREATE THE USERS IN ONESOURCE PLATFORM IN MENU | SETUP
1. Select Users
2. Actions | Add New
Enter:
1. Login
2. Full Name
3. Email
4. Password
5. Verify Password
In Group Assignment:
1. In the Available Groups box, select UTP_ System _ OSW
2. Select the top arrow to move UTP_ System _ OSW to the Member of box
3. Select Create
4. Log out of ONESOURCE platform
Note: No other assignments need to be made at this time regarding the UTP user
assignment.
Next, you will need to log in to the UTP URL.
SELECT MANAGE ONESOURCE USER ASSIGNMENT
1.
2.
3.
4.
In the Username list find the username, click the box
In the Firm Name find the Firm and click the box
Select Save Users
Log out of the UTP software
Note: Once this process is completed, the user will no longer be available in the Username
list.
YOU WILL RECEIVE EMAIL NOTIFICATION FROM ONESOURCE
SUPPORT WITH LINK TO COMPLETE REGISTRATION
1. When you select the link you will receive a message that says "Your registration is
complete. Click the link below to get stared!
2. Click Login to ONESOURCE platform, you select this link to login to the
ONESOURCE platform.
3. At this time, you will be required to change your password.
4. Once you type in the password information, click Save
24
v5.0 UNCERTAIN TAX POSITIONS
For the final step, in ONESOURCE platform go to Applications | Launch UTP
You will only need to launch the application once in the ONESOURCE platform.
ONESOURCE remembers the application was opened and will save the application on the
page. You could go to Pages and select delete page if you don't like which page it opens on.
COMPONENTS
Select the Components tab to manage components and unit-component assignments.
COMPONENTS
Components are also referred to as Categories in the UTP App and ONESOURCE Tax
Provision.
Note: If a category is deleted from the Provision side (Permanent Difference, Temporary
Difference, or Tax Adjustment), but is used by the UTP App (i.e., a position with that code
exists in one or more datasets), the associated positions are deleted from the dataset. With no
category to reference, the data in the system has nowhere to go. Be cautious when deleting
categories on the Provision side. It is recommended that you use the Admin Center:
Components in the UTP App to manage categories.
UNITS
1. From the Manage drop-down list, select Units
2. Select Add
3. Enter the Code and Name
4. Select the Type, Country, and Currency from the drop-down lists
You can type in the country or currency for which you are looking in the dropdown field to easily locate it
5. Select Save. A Unit successfully created success message displays in a yellow box at
the top of the page.
Note: If you select USD, CAD, EUR, GBP or JPY as the currency for the unit (from
the final drop-down list), the corresponding symbol displays when viewing reports in the
UTP App in Local Currency.
STATES
1.
2.
3.
4.
From the Manage drop-down menu, select States.
Select Add.
Enter a unique code and the name of the custom jurisdiction.
Select Save. A State successfully created message displays in a yellow box at the top
of the page.
Note: Many jurisdictions are in the system by default. You do not need to create these
jurisdictions.
United States: The 50 states, AO (All Other), BS (Blended State), and Federal
25
v5.0 UNCERTAIN TAX POSITIONS
Canada: 13 Provinces (AB - Alberta, BC - British Columbia, MB - Manitoba, NB New Brunswick, NL - Newfoundland and Labrador, NT - Northwest Territories,
NS - Nova Scotia, NU - Nunavut, ON - Ontario, PE - Prince Edward Island, QC Quebec, SK - Saskatchewan, YT - Yukon) and Canada
Other: National, Great Britain
SUB-CONSOLIDATIONS
1.
2.
3.
4.
From the Manage drop-down menu, select SubConsolidations.
Select Add.
Enter a Name for the SubConsolidation.
Select Save. A SubConsolidation successfully created message displays in a yellow
box at the top of the page.
To assign units to SubConsolidations:
1. Select the SubConsolidation you to which you wish to add units.
2. Select the Assignment Mode button.
3. Select the Code/Unit you wish to add to the SubConsolidation. You can select
multilple Code/Units by holding the Ctrl key while selecting them.
4. Select Save Assignments. A SubConsolidation successfully updated message
displays in a yellow box at the top of the page.
To Unassign Units from a SubConsolidation:
1. Hold down Ctrl while de-selecting the units.
2. Select Save Assignments. A SubConsolidation successfully updated message
displays in a yellow box at the top of the page.
TO CANCEL CHANGES:
If you accidentally add a unit to a SubConsolidation or accidentally remove a unit from a
SubConsolidation, select Cancel to revert back to the original assignments. This option is only
available after changes have been made, but before clicking Save Assignments.
Note: Select the Assignment Mode button to leave assignment mode.
Permanent Differences
1. From the Manage drop-down menu, select Permanent Differences.
2. Select Add.
3. Enter a unique Code and the Name of the Permanent Difference.
4. Select Save. A Permanent Difference successfully created message displays in a
yellow box at the top of the page.
Temporary Differences
1. From the Manage drop-down menu, select Temporary Differences.
2. Select Add.
3. Enter a unique Code and the Name of the Temporary Difference.
4. Select Save. A Temporary Difference successfully created message displays in a
yellow box at the top of the page.
26
v5.0 UNCERTAIN TAX POSITIONS
Tax Adjustments
1. From the Manage drop-down menu, select Tax Adjustments.
2. Select Add.
3. Enter a unique Code and the Name of the Tax Adjustment.
4. Select Save. A Tax Adjustment successfully created message displays in a yellow
box at the top of the page.
To Edit a Component
1. Select the component you wish to edit from the Manage drop-down menu.
2. Double-click the field to be edited.
3. Make your changes.
4. Select Save.
Notes:
All fields are editable, except the Code field for Units, Permanent Differences,
Temporary Differences, and Tax Adjustments.
For units associated with a dataset, you cannot make changes to the Unit Type or
Country. A lock displays to the left of the code for these units.
To Delete a Component:
1. Select the component you wish to delete from the Manage drop-down menu.
2. Select the Unit, State, SubConsolidation, Permanent Difference, Temporary
Difference, or Tax Adjustment you would like to delete.
3. Select Delete.
4. Select Yes to permanently delete the selected component.
Note: Permanent Differences, Temporary Differences, and Tax Adjustments that are in use
in the UTP App cannot be deleted. When you try to delete such a category, a Could not
delete: *Component Type* is associated with # UTPs error message displays.
TO CANCEL CHANGES:
After editing a component, you may wish to cancel the changes you made. This option is
available before selecting Save.
1. Select Cancel.
2. Select Yes.
UNIT-COMPONENT ASSIGNMENT
After you have created components, you may need to make changes to component-unit
assignments. Permanent Differences, Temporary Differences, and Tax Adjustments created
are automatically assigned to all of your units.
TO ASSIGN COMPONENTS TO UNITS:
1. Select the component type (Permanent Differences, Temporary Differences, or Tax
Adjustments) you wish to assign to units from the Manage drop-down menu.
2. Select Assignment Mode
27
v5.0 UNCERTAIN TAX POSITIONS
3. Select the Code/Unit to which you wish to assign components
4. Select the components you wish to assign to the unit by holding down Ctrl while
selecting them
5. Select Save Assignments. A Components successfully assigned message displays in
a yellow box at the top of the page
Notes:
While in Assignment Mode, you can switch between Permanent Differences,
Temporary Differences, and Tax Adjustments to assign them to all your units. You
can also switch to SubConsolidations in order to assign units to them.
While in Assignment Mode, you cannot add, edit, or delete components.
Select Assignment Mode to leave assignment mode
TO VIEW ASSIGNMENTS:
To see which components are assigned to a unit, select the unit. Assigned components are
highlighted in blue.
TO UNASSIGN COMPONENTS FROM UNITS:
1. Hold Ctrl and de-select components
2. Select Save Assignments
TO CANCEL CHANGES:
If you accidentally added a component to a unit or accidentally removed a component from a
unit, select Cancel to revert back to the original assignments. This option is only available
after changes have been made, but before clicking Save Assignments.
IMPORT/EXPORT CATEGORIES
You can use an Import spreadsheet template to populate UTP categories. If you do not have
an Import Categories spreadsheet template, you can export one from the software.
1. In the Admin Center, select the Components tab.
2. Select Export. Your export will be added to the queue and you will be notified via a
popup in the upper left corner when it is complete.
3. Select With Assignments to export your categories with assignments (the #CUC#
and #CUNC# tabs are populated) or Without Assignments to export categories
without assignments. Job Status : Your Export Job "job number" has completed. Select
the job number link to access the spreadsheet.
4. Select Open the Excel file.
The spreadsheet template will have multiple sheets, each representing a category.
All the sheets that are exported apply to the UTP App.
5. When you finish populating the file, be sure to save it.
Once you finish populating your Import Categories spreadsheet, you can import
it into the UTP App:
1. In the Admin Center, select the Components tab.
2. Select Import
28
v5.0 UNCERTAIN TAX POSITIONS
3. Browse to the file you wish to import.
4. Select Open then Import. Your import will be added to the queue and you will be
notified via a popup in the upper left corner when it is complete.
If the import is successful, the Errors column will contain all zeros. Select Done to
return to the UTP App.
If the import is not successful, the Errors column will indicate how many errors
occurred on the sheet. Select on the sheet to view the corresponding error detail
which provides information about the location of errors in the file.
1. Correct your import template with the information provided.
2. Select Done to return to the UTP App and start again from Step 1 above.
Notes:
For detailed information about the columns in the spreadsheet go to the My UTP
section in the UTP App and refer to the UTP App Import Categories guide.
Users are not exported from the UTP App because users cannot be added or
edited through the Import spreadsheet.
DATASETS & REPORTING DATASETS
Select the Datasets & Reporting Datasets tab to manage datasets and reporting datasets.
DATASETS
Select Datasets from the Manage drop-down menu. Datasets are the way scenarios are
defined in the system. They can represent any period in time: month, quarters, year-to-date,
annual, etc. Datasets can be copied to run multiple scenarios. They are rolled over from
period to period.
TO ADD A NEW DATASET:
1. Select Add
2. Enter a Dataset Name
3. Select whether the dataset should be:
GAAP (UTP calculation based on ASC 740-10-50 (formerly FIN 48))
IFRS (UTP calculation based on IAS 12(ED))
4. Select the No radio button next to for Read-Only. You will not be able to add to this
dataset if you select Yes
5. Select a Fiscal Year for the dataset
6. Select a Fiscal Period (FY for full year, Q1 for the first quarter, M1 for January,
etc.)
7. Select Empty as the Transaction
8. Select Save
TO EDIT A DATASET:
1. Double-click the field to edit and make your changes
2. Select Save
Notes:
Editing of datasets that are a part of Sequential Reporting Datasets is not allowed.
29
v5.0 UNCERTAIN TAX POSITIONS
These datasets have a lock to the left of their Dataset Name
Editing of datasets which are marked as Read-only is not allowed. These datasets
have a lock to the left of their Dataset Name and their Read-only (RO?) column
says Yes
You cannot make any changes to the current dataset you are in. Switch the
dataset via the Settings and then make your changes as needed
TO DELETE A DATASET:
1. Select the Dataset you would like to delete
2. Select Delete
3. Select Yes to permanently delete the dataset
TO CANCEL CHANGES:
After editing a dataset, you may wish to cancel the changes you made. This option is
available before clicking Save.
1. Select Cancel
2. Select Yes
DATASET MAINTENANCE
DATASETS CAN BE:
Marked as Read-Only to ensure changes aren't made to them
Copied to create different scenarios
Rolled over to the next period
READ-ONLY DATASETS
Lock any datasets that are final to ensure that data is preserved, and not accidentally
modified. The data and related reports in a read-only dataset can be viewed, but not modified.
To make changes to the dataset, remove the read-only designation.
1. Double-click in the RO? column
2. Select Yes from the drop-down
3. Select Save. A lock displays to the left of the Dataset Name to indicate the dataset is
Read-Only
TO COPY A DATASET:
1. Select Add
2. Complete the information for the dataset you are creating. (Refer to the Add a New
Dataset section for more information.)
3. Select Copy as the Transaction
4. Select the Dataset from the drop-down list
5. Only datasets which have the same fiscal year and designation as your new dataset
are available from the drop-down list
6. Select Save
TO ROLL OVER A DATASET:
1. Select Add
2. Complete the information for the dataset you are creating. (Refer to the Add a New
Dataset section for more information.)
30
v5.0 UNCERTAIN TAX POSITIONS
3. Select Rollover as the Transaction
4. Select the Dataset from the drop-down list. Only datasets from the previous fiscal
period with the same designation as your new dataset appear in the drop-down list
5. Select Save
Note: Datasets with a fiscal period of Year to Date (YTD) cannot be rolled over.
EXAMPLE:
New Dataset Fiscal Year and
Period
Full Year - 2011
Quarter 2 - 2011
Month 1 - 2011
Datasets Available from Drop-down
Menu
Full Year - 2010 OR Quarter 4 - 2010
Quarter 1 - 2011
Month 12 - 2011 OR Full Year - 2011
REPORTING DATASETS
Datasets can be added/combined together to create a Reporting Dataset:
Sequential Reporting Datasets are used by the UTP App with the Dataset Merge
functionality. They combine datasets from continuous periods.
Additive Reporting Datasets are currently not used by the UTP App and are
therefore not available to be created in the Admin Center. They combine datasets
from the same time period.
Note: For Sequential Reporting Datasets, the ending balances from the first dataset must tie
exactly to the beginning balances from the subsequent dataset. Datasets created using the
rollover functionality (i.e., Q1 into Q2 into Q3, etc.) ensure that the ending balances from the
first period correspond to the beginning balances in the next sequential period.
Select Reporting Datasets from the Manage drop-down menu.
TO ADD A NEW REPORTING DATASET:
1. Click Add
2. Enter the name of the reporting dataset
3. Click Save. The reporting dataset will be added with a Type ID = SEQ
TO EDIT A NEW REPORTING DATASET:
1. Double-click the Name field to edit the name of the reporting dataset
2. Make your changes
3. Click Save
TO DELETE A REPORTING DATASET:
1. Click the reporting dataset you would like to delete
2. Click Delete
3. Click Yes
TO ASSIGN DATASETS TO A REPORTING DATASET:
31
v5.0 UNCERTAIN TAX POSITIONS
1. Select Assignments from the Manage drop-down menu
2. Select the reporting dataset you'd like to assign datasets to from the Select Reporting
Dataset drop-down
3. Click on the first dataset which should be a member of the reporting dataset from the
Available to Add list and click Save Assignment. The selected dataset will then
display in the Already a Member list
Note: The Available to Add list dynamically changes based on the datasets which are added
to your reporting dataset. Only datasets which have the appropriate fiscal year and period
appear in the list.
4. Repeat Step 3 until you have assigned all necessary datasets to your reporting dataset
5. If you make a mistake and need to remove a dataset from your reporting dataset, click
the red X in the last column of the table. Only the last dataset in the reporting dataset
can be removed.
DOCUMENTATION
Select the Documentation tab to work with the attachments. The Documentation tab shows
you the attachments you have on your positions in the UTP App for the current unit, across
datasets. You can see how many items to which a file is attached, as well as how many
times the same file appears in the database. The # Items Attached To and Actual File Count
may not always be the same number because the Create Copy option is available when mass
adding notes and attachments.
RELOAD
If you've added a new attachment and it does not display in the Documentation tab, click
Reload to refresh the table.
EXPORT SELECTED
You can export attachments you have in the UTP App in a zip file. Select the box next to the
attachments and click the Export Selected icon.
VIEW DOCUMENT POSITION-ASSIGNMENTS
1. Click the View Assigned Contingencies icon for the attachment you're interested
in.
2. A box opens to the right of the attachment list which displays the attachment name
and all positions which have the selected attachment in the current unit. The dataset is
the first part of the position description.
Position Description Format: Dataset Name / Position Code / Name / Jurisdiction /
Year
32
v5.0 UNCERTAIN TAX POSITIONS
INTEREST AND PENALTIES
In Admin Center, select the Interest & Penalties tab to Manage interest and penalties.
INTEREST
Select Interest from the Manage drop-down menu. The interest information for all the
positions in the current unit/dataset is in the Interest table.
Positions with International Interest Rate Tables: A Calculator icon displays to the
left of the unit code. The start date in the table is the start date from the first row
of the custom table and the end date is the end date from the last row of the
custom table.
To view the full International Interest Rate Table for a position, click the
Calculator icon. A pop-up displays the table, including the Compounding Option
for the position.
PENALTIES
Select Penalties from the Manage drop-down menu. The penalty information for all positions
in the current unit/dataset is in the Penalties table.
CUSTOM TABLE
Select Custom Table from the Manage drop-down menu. You have the ability to create
custom rate tables with unlimited rows and reference these tables when calculating interest.
The Custom Rate Table can be created in Excel. You can Export Interest table and Import
Custom table to gain efficiencies from the software.
Note:
You have the ability to create a custom rate table which can be applied to other
positions. The custom rate table can have multiple rows. For example, if you
create a custom rate table for Germany you could apply the custom rate table,
Germany, to one or more positions
Positions with International rate tables have an asterisk (*) next to the start and
end dates
The Export I&P icon is greyed out and unavailable when you are in the Custom
Table functionality
EXPORT INTEREST AND PENALTIES
You can export all information in the Interest and Penalties tables to Excel.
1. Click Export I&P. Your export will be added to the queue and you will be notified
via a popup in the upper right corner when it is complete
2. Click OK
Notes:
Interest and Penalties information is located on separate tabs in the same Excel
workbook
This information cannot be imported back into the UTP App in this format. The
export is for your records only
33
v5.0 UNCERTAIN TAX POSITIONS
EXPORT INTEREST AND PENALTIES - CUSTOM RATE TABLE
You can export all information in the Interest & Penalties Custom Rate tables to Excel.
1. Click Export Interest Table. Your export will be added to the queue and you
will be notified via a popup when it is complete
2. Click OK
3. Select the #UTP_TABLE# tab
4. Enter a Table Code
5. Enter a Table Name
6. Enter the Action of A for Add, U for Update, and D for Delete
7. Select the #UTP_TABLE_DETAIL#
8. Enter the Table Code
9. Enter the Start Date]
10.Enter the End Date
11.Enter the Compounding Option
12.Enter the Interest Rate
Notes:
The separate tabs available in the workbook are #UTP_TABLE# and
#UTP_TABLE_DETAIL#
When the custom rate table is exported you will see all the underlying rates for
each Code, previously created
Typically, the Table Code would be the name of a country or something that would
identify it as a certain subset of interests
The Name is to expand upon the code, given
Start Date and End Date are displayed for the custom rate table. The dates must
be sequential and rates entered for the rate table to work
The type of Compounding Option is required, as well. S=Simple, D=Daily,
M=Monthly,Q=Quarterly. These options trigger the time value and tell time value
how to do the math on the rates that are entered
Interest Rate can be entered in increments
This information can be imported back into the UTP App in this format and then
applied to a position
RELOAD
If you add a new position, or change any interest and/or penalties information, click Reload
to refresh the table.
RECALCULATE INTEREST
You can now recalculate interest across more than one unit at a time.
1. Click Recalculate Interest and the Recalculate Interest Across Units box will popup
2. You can select all units (put check in checkbox next to Unit column header) or a
selection of units (put check in checkbox next to individual units) for which to
recalculate interest.
3. Click Recalculate Interest. Your interest request will be added to the queue and
34
v5.0 UNCERTAIN TAX POSITIONS
you will be notified via a popup in the upper right corner when it is complete.
FX RATES
Select the FX Rates tab to Manage FX Rates.
TO IMPORT FX RATES:
1. Click Import Rates
2. Browse to the file you wish to import.
3. Click Open then Import. Your import will be added to the queue and you will be
notified via a popup in the upper right corner when it is complete.
If the import is successful, the Errors column will contain all zeros. Click Done to
return to the UTP App
If the import is not successful, the Errors column will indicate how many errors
occurred on the sheet. Click on the sheet to view the corresponding error detail
which provides information about the location of errors in the file
1. Correct your import template with the information provided.
2. Click Done to return to the UTP App and start again from Step 1
above.
If you attempt to import FX Rates for a dataset which is marked as Read-Only, the import
status will indicate errors occurred on the sheet. The Dataset is Read-Only: Dataset Name
error message displays. If this is the only error in your import, click Done to return to the
UTP App where you will see the other rates you imported in the FX Rates table.
TO EXPORT FX RATES:
Click Export Rates. Your export will be added to the queue and you will be notified via a
popup in the upper right corner when it is complete.
This option exports all units in all datasets that have been created, along with their
associated FX rates. You can easily make changes in the exported Excel file and
re-import the file to bring the changes into the UTP App.
Note: Do not make any changes to the Unit Code or Dataset Name fields in each row of the
Excel sheet. Changes here do not update the units and datasets in the UTP App. They will
cause the import to fail for that row.
TO EDIT FX RATES:
1. Double-click the field to edit
2. Make your changes. A red comment marker displays in the upper left when a change
has been made.
3. Click Save. An All rates successfully updated message displays at the top of the
page.
Note: Read-Only datasets cannot have their FX Rates edited. Datasets which are marked as
read-only have a lock to the left of the Unit column. Edits are not allowed on these rows in
the FX Rates table.
35
v5.0 UNCERTAIN TAX POSITIONS
TO RELOAD THE FX RATES TABLE:
Click Reload to refresh the FX Rates table
TO CANCEL CHANGES:
After editing rates, you may want to erase the changes you made. This option is available
before clicking Save.
1. Click Cancel
2. Click OK
LABELS
Select the Labels & Groups tab to manage labels and label groups. You would create Labels
and Label Groups in order to represent the data as required for Uncertain Tax Positions and
Reserves. A label can be part of a label group. Also, a label group can be part of a label
group.
This is a way to flag different positions and bring them together on reports so that you could
group them one way for management reporting then group them another way for the IRS
Schedule UTP. You also might want to group them at a different way for your Journal
Entries.
LABEL ADMIN
Select Labels from the Manage drop-down menu.
TO ADD A NEW LABEL:
1. Click Add
2. Type the new Label Name
3. Click Save
Note:
Label Codes are a new feature for v.5.0
The preferred format for label names is: Label_Name. Use the underscore ( _ )
instead of creating a label name that contains a space.
Label names are case sensitive.
TO IMPORT A LABEL:
1. Click Import Labels/Groups
2. Type the new Label Name
3. Click Save
TO EXPORT A LABEL:
1. Click Export Labels/Groups
2. Type the new Label Name
3. Click Save
36
v5.0 UNCERTAIN TAX POSITIONS
TO EDIT A LABEL:
1. Double-click the Label Name
2. Make your changes
3. Click Save
TO DELETE A LABEL:
1. Select the Label
2. Click Delete
3. Click Yes
TO CANCEL CHANGES:
After adding or editing a label, you may wish to cancel the changes you made. This option is
available before clicking Save.
1. Click Cancel
2. Click Yes
TO VIEW LABEL POSITION ASSIGNMENTS:
1. Select the Label
2. Click View Assigned
3. A box opens to the right of the label list. The box displays the label name and all
positions that have been assigned the selected label in the current Unit/Dataset.
LABEL GROUPS
TO ADD A NEW LABEL OR GROUP:
1. Click Add
2. Type the new Label Group Name
3. Click Save
Note:
The preferred format for label group names is: Label_Group_Name. Use the
underscore ( _ ) instead of creating a label group name that contains a space.
Label group names are case sensitive.
TO EDIT A NEW LABEL OR GROUP:
1. Double-click the Label Group Name
2. Make your changes
3. Click Save
TO DELETE A NEW LABEL OR GROUP:
1. Select the Label Group
2. Click Delete
3. Click Yes
TO CANCEL CHANGES:
After adding or editing a label group, you may wish to cancel the changes you have made.
This option is available before clicking Save.
37
v5.0 UNCERTAIN TAX POSITIONS
1. Click Cancel
2. Click Yes
TO VIEW LABEL GROUP- LABEL ASSIGNMENTS:
1. Select the Label Group
2. Click View Assigned
3. A box opens to the right of the label group list . The box displays the label group name
and all labels (Type = L) and label groups (Type = G) that have been assigned the
selected label group in the current Unit/Dataset.
ASSIGNMENTS
Select Assignments from the Manage drop-down menu. Labels and Label Groups can be
assigned to Label Groups.
TO ASSIGN LABELS AND LABEL GROUPS TO LABEL GROUPS:
1. Click the Label Group to which you would like to assign labels.
2. Hold Ctrl while selecting labels (Type = L) and/or label groups (Type = G).
Note:
Circular references can not be created when assigning labels and label groups to
label groups and assignments can only be one level deep.
A label group can not be assigned to itself. Once you select a label group (ie.
Label_Group_1) to make assignments to, Label_Group_1 will no longer be
available to be assigned.
If you assign Label_Group_1 to Label_Group_2, Label_Group_1 can not contain
any label groups. Label group to label group assignments can only be one level
deep.
3. Click Save. A Label Group successfully updated message displays in a yellow box at
the top of the page.
TO VIEW ASSIGNMENTS:
To view the labels and label groups assigned to a label group, click on the Label Group.
Assigned labels and label groups are highlighted in blue.
TO UNASSIGN LABELS FROM LABEL GROUPS:
1. Click the Label Group from which you would like to unassign labels or label groups
2. Hold Ctrl while de-selecting the labels
3. Click Save
TO CANCEL CHANGES:
If you accidentally added or removed a label or label group from a label group, click Cancel
to revert back to the original assignments. This option is only available after changes have
been made, but before clicking Save.
38
v5.0 UNCERTAIN TAX POSITIONS
IMPORT/EXPORT LABELS, LABEL GROUPS,AND ASSIGNMENTS
Labels, label groups, and assignments can be imported and exported into the software. You
can use an Import spreadsheet template to populate UTP labels and label groups. If you do
not have an Import label spreadsheet template, you can export one from the software.
1. In the Admin Center, select the Labels & Groups tab.
2. Select Export Labels/Groups. Your export will be added to the queue and you will
be notified via a popup in the upper left corner when it is complete.
3. Select Label then a Job Status : Your Export Job "job number" has completed. Select
the job number link to access the spreadsheet.
4. Select Open the Excel file.
The spreadsheet template will have multiple sheets, each representing a Labels &
Groups
All the sheets that are exported apply to the UTP App
5. When you finish populating the file, be sure to save it.
Once you finish populating your Import Labels & Groups spreadsheet, you can
import it into the UTP App:
1.
2.
3.
4.
In the Admin Center, select the Labels & Groups tab.
Select Import Labels/Groups
Browse to the file you wish to import.
Select Open then Import. Your import will be added to the queue and you will be
notified via a popup in the upper left corner when it is complete.
If the import is successful, the Errors column will contain all zeros. Select Done to
return to the UTP App.
If the import is not successful, the Errors column will indicate how many errors
occurred on the sheet. Select on the sheet to view the corresponding error detail
which provides information about the location of errors in the file.
1. Correct your import template with the information provided.
2. Select Done to return to the UTP App and start again from Step 1 above.
Note:
You will have a Label Code for Labels with the default code of LBL
You will have a Label Group Code for Labels with the default code of LBG
AUDIT TRAIL
Select the Audit Trail tab to view the Categories & Numbers Audit Trails.
The Audit Trail is now available for the UTP App. Historical Audit Trails which may be
required for auditing purposes are available on a request-only basis. Please contact Support if
needed.
1. The Audit Trail allows you to filter the Categories and Number audit information in
different ways in order to easily find the information you are looking for. Select the
arrow to the left of each line in the Audit Trail Filters section to see the available
39
v5.0 UNCERTAIN TAX POSITIONS
options.
Available main filters:
Categories: Component or User.
Numbers: Component, Dataset, Jurisdiction, Unit or User
2. After selecting the main filter, select the specific subset of data for which you'd like to
view audit information. For example, if you select Dataset as the main filter for the
Numbers Audit Trail, you will need to choose which dataset's audit information you'd
like to see.
3. Once you select the specific subset of data, all the related data will display to the right
of the Audit Trail Filters. Click the double arrow to the right of the Audit Trail Filters
header to hide the Filters pane.
4. You will most likely have many pages of audit information which display in the table.
Cycle through the pages until you find the item you are looking for.
5. Click the View Detail icon to the left of the position info to bring up the Audit
Documentation window which will show the modification(s) which were made to the
position. The Modified Date, Modified By and Modification # (ex. 1 of 3) display at
the top, followed by a table which reviews the position's information (varies depending
on what you've selected in the filters).
6. Click Next to compare Old Value vs. New Value for the fields and to see
Modification information for each time the position was changed.
JOB HISTORY
Select the Job History tab to view the history of your Import, Export and Interest Jobs
which went through the queue.
The Job History table will provide you with the type of job, job ID, time stamps for when the
job started and ended and the status of the job.
Click the Status icon will provide you with different information depending on the
main type of job:
Imports: Import Status box
Exports: Generated Excel file for the Export
Interest: Recalculate Interest Results box
Select Import Jobs, Export Jobs, or Interest Jobs from the first View drop-down menu
depending on the job history you are looking for. The second View drop-down for Import
and Export jobs allows you to filter the list by type of job.
TYPES OF IMPORT JOBS:
UTP
UTP
UTP
UTP
UTP
Items: Items from Uncertain Positions/My UTP
Categories: Categories/Components from Admin Center
Rates: FX Rates from Admin Center
Interest: Custom Rate Tables from Admin Center
Labels & Groups: Labels & Groups from Admin Center
TYPES OF EXPORT JOBS:
40
v5.0 UNCERTAIN TAX POSITIONS
UTP Categories Summary: Categories to OTP from Uncertain Positions/My UTP
UTP Categories With Assignments: Categories/Components from Admin Center
with Assignments
UTP Categories Without Assignments: Categories/Components from Admin
Center without Assignments
UTP Interest Penalties: Interest & Penalties from Admin Center
UTP Items: Items from Uncertain Positions/My UTP
UTP Numbers: Current: Numbers - Current option to OTP from Uncertain
Positions/My UTP
UTP Rates: FX Rates from Admin Center
UTP IFRS Items: IFRS Items from Uncertain Positions/MY UTP’
UTP Interest Tables: Custom Rate Tables from Admin Center
UTP Label Group with Assignments: Labels & Groups with assignments from
Admin Center
UTP Label Group without Assignments: Labels & Groups without assignments
from Admin Center
INTEREST JOBS
Recalculate Interest: Recalculate Interest from Admin Center
REFRESH
If you run an import, export or interest job and it doesn't display in the table, click Refresh to
update the table.
SETTINGS
DATASET/UNIT SELECT
After a dataset is created for the UTP App, you need to set it as the current dataset to make
it available for population with data:
1. Click Settings. The Dataset / Unit Select box pops up in the middle of the page.
41
v5.0 UNCERTAIN TAX POSITIONS
2. Select the dataset and unit from the drop-down lists. You can choose to have the
Dataset / Unit Select box display every time the application loads by checking the
Always Show box.
3. Click Save. The dataset and unit display in the upper right below the Navigation bar.
The dataset year also displays in parentheses next to the dataset name.
42
v5.0 UNCERTAIN TAX POSITIONS
MY UTP
NEWS & ANNOUNCEMENTS
This section provides you with important news and updates from ONESOURCE Tax
Provision. New release notes, as well as any scheduled downtime for software updates, are
located here. The Import Template is also available, as well as the "desktop" version of the
UTP App for Internet Explorer 6.0 users.
The News & Announcements section default shows the top three stories. However, each
news item can be hidden or shown by clicking the title or the green arrow to the left of the
title.
QUICK LINKS
IMPORT
Import your UTPs into the application. For more information on importing, refer to the Import
section.
EXPORT
Export UTP items, UTP categories, and UTP numbers from the application. For more
information on exporting, refer to the Export section.
BATCH PRINT
Batch Print the main reports from the application into PDF or XLS files. For more
information on batch printing, refer to the Batch Print Reports section.
43
v5.0 UNCERTAIN TAX POSITIONS
DATASET MERGE
Merge multiple datasets to create a Full Year (or other time period) dataset. To create a
merged dataset, you first need to create a sequential reporting dataset that includes all the
datasets for the merged dataset. For more information on dataset merge, click Help in the
Dataset Merge window. Refer to the Dataset Merge Approach section for more information.
Dataset Merge: Help
Steps for Merging Datasets: Available in Help
44
v5.0 UNCERTAIN TAX POSITIONS
DATASET MERGE APPROACH
Dataset Merge allows you to take data from multiple single period datasets to create a yearto-date dataset for disclosure purposes. The beginning and ending balances of the single
period dataset must flow from period to period. Datasets created using the rollover
functionality (i.e., Q1 into Q2 into Q3, etc.) ensure that ending balances from the first period
agree with beginning balances in the next sequential period.
A sequential reporting dataset is created. Single periods are associated with one another by
sequentially adding each dataset to the reporting dataset.
Note: Set one of the “to-be-merged” datasets as your current dataset in order for the
Dataset Merge to be successful.
The Dataset Merge creates the year-to-date dataset when it is selected in the UTP App.
1. Click My UTP on the Navigation bar
2. Click the Dataset Merge option under Quick Links. A dialog box asks you to select
the reporting dataset and the period of the merged dataset.
3. Enter the Weighted Average Rate and a name for your merged dataset
4. Click Merge
5. Once the datasets have merged successfully, set the merged dataset as your current
dataset
MERGED DATASET RESULTS
All positions entered in single period datasets are seen in the reports.
Beginning balances come from the first dataset.
Beginning (spot) FX Rates come from the first dataset.
The NCS/EQ determination (prior) comes from the first dataset.
Ending balances come from the last dataset in which a position was active.
Ending (spot) FX Rates come from the last dataset.
The NCS/EQ determination (current) comes from the last dataset in which a
position was active.
No distinction is made as to when a position was finalized. Reports will not display
that a position was settled in Q2 as opposed to Q3.
All notes and attachments added throughout the position's life are viewable in the
merged dataset.
Label assignments and the positions’ status come from the last dataset in which a
position was active.
Footnotes on reports come from the last dataset.
Note: If there is a subsequent change to any of the underlying datasets in the original
reporting dataset, then the Dataset Merge needs to be redone in order to view the effect of
the change in a new merged dataset.
45
v5.0 UNCERTAIN TAX POSITIONS
NOTE REGARDING FX RATES:
The Weighted Average rate which is entered when the merge occurs is initially applied to all
units in your merged dataset. After you have your merged dataset, you will be able to make
adjustments to your FX Rates across all your units. Refer to Administration Center: FX Rates
section for more information on updating your FX rates across all units.
NOTE REGARDING NCS/EQ DETERMINATION:
If a position is NCS in the first dataset and EQ in the last dataset (or vice versa), the
position's current designation will switch to the prior during the merge, (i.e., if the position is
NCS (prior) and EQ (current), the position will come into the merged dataset as NCS (prior)
and NCS (current). The UTP App does not support the movement from NCS to EQ or EQ
to NCS.
UTP GUIDES
Documentation regarding the functionality of the UTP App is located in several guides.
IMPORT TEMPLATE GUIDE
Details about Import Template columns and importing templates into the UTP App.
IMPORT CATEGORIES GUIDE
Details about Import Categories columns and importing categories into the UTP App.
QUICK START GUIDE
Initial setup of and navigation through the UTP App.
CALC FUNCTIONALITY GUIDE
Examples of entering positions into the UTP App:
Permanent Difference example
Temporary Difference example
State Nexus example
SETTLEMENT GUIDE
Details about the Full and Partial Settlement workflows, as well as examples.
UTP CALCULATIONS
Explanations of the calculations in the UTP App have been provided
ITEM INVENTORY CALCULATIONS
All calculations on the item inventory report are listed here for the various views.
CURRENCY TRANSLATION ADJUSTMENT (CTA) EXPLANATION
Explanations of the CTA calculations used in the UTP App.
NCS/EQ EXPLANATION
Explanations of the NCS & EQ options as well as the various results of changing this
designation.
46
v5.0 UNCERTAIN TAX POSITIONS
KNOWN ISSUES
A list of Known Issues in the UTP App, along with suggested solutions (if available) and
expected resolution dates (if available).
RELEASE NOTES ARCHIVE
An archive of past Release Notes for the UTP App.
RELEASE BLACKOUT PERIODS
Indicates when releases and/or patches may be expected during the year.
UNCERTAIN POSITIONS
The Uncertain Positions section is a unit level summary of all the positions entered for a unit
in the current dataset. From the Contingencies table, you can view and manage all
positions for a unit. This section allows you to enter and modify positions, as well as add and
view supporting documentation for a position.
Note: The number of rows in the Contingencies table displays in the lower left.
ADD A NEW POSITION
The Main Contingency Menu drop-down is to the right in the Uncertain Positions section.
ADD A NEW POSITION IN A GAAP DATASET
TO ADD A NEW POSITION:
47
v5.0 UNCERTAIN TAX POSITIONS
1. Select the Main Contingency Menu drop-down
2. Click Add New Position. The workflow to add a new position begins
3. Select the Type of Position you are entering. The selection you make here determines
the information required during the workflow
4. Click Next
TO IDENTIFY A POSITION:
1. Select the Code + Name of the UTP you are adding from the first drop-down menu
2. Select the Year in which the issue arose
3. Select the Jurisdiction for the position. This selection also determines the information
required during the workflow
The country of the unit you are in determines the Federal/National jurisdiction option
available, i.e., United States - Federal; Canada - Canada; United Kingdom - Great
Britain; Other (including Undetermined) - National
4. Select the Classification (STAT to TAX or GAAP to TAX). This selection has no
impact on any calculations or reports. It is recommended that you use this as a way to
create a duplicate position
5. Select whether the position should be marked as Non-Cash, Equity, or None. For
more information on this selection, refer to the Non-Cash and Equity section
6. If you have selected Temporary Difference as the Type of Issue, you also need to
select the Deferred Category (C or NC) for the position
7. Click Next
48
v5.0 UNCERTAIN TAX POSITIONS
TO INPUT INFORMATION FOR THE AMOUNT IN QUESTION (AIQ):
1. Select the Resolved In quarter and year from the drop-down menus. The resolved-in
quarter and year determine whether the related Taxes Payable should be classified as
current or non-current. The UTP App compares the dataset year with the resolved-in
year. If the difference is 12 months or less, the Taxes Payable are current.
Select N/A for the Resolved in Year, if appropriate. Positions with a Resolved in
Year of N/A display as non-current on the Payable Report and in the Payable
sections of the Journal Entry Report
2. Select the Statute of Limitations quarter and year from the drop-down menus
Select N/A for the Statute of Limitations Year, if appropriate
3. Enter the AIQ as a negative number if the amount was a decrease to taxable income
when it was originally taken on the return/provision
4. Enter the requested rates. Depending on the Type of Issue and the Jurisdiction you
have selected, different Tax Rate fields display. The rates you enter here on the Issue
Details - As Filed page default to the Issue Details - Unrecognized Position page
5. Click Next
49
v5.0 UNCERTAIN TAX POSITIONS
TO MAKE THE MORE LIKELY THAN NOT DETERMINATION FOR
PERMANENT DIFFERENCES AND TAX ADJUSTMENTS:
1. Make a selection and click Next
If you select the No radio button: The Amount Expected to be Sustained (AETBS)
is set to zero and the Probability Table does not display.
If you select the Yes radio button: The Probability Table displays .
TO DETERMINE THE LIKELIHOOD ANALYSIS:
1. After selecting the Yes radio button on the previous page, the Probability Table
displays.
2. Click Recalculate to populate the Amount Sustained Current column with 1/8th
increments of the total Amount in Question. The incremental amounts in buckets 2 - 8
can be edited as needed, as long as they are in descending order.
3. Assign a percentage, not exceeding 100% cumulatively, for each threshold level of
the Amount Sustained Current. When the cumulative probability is 51% or greater,
the corresponding amount in the Amount Sustained Current column is the AETBS
.
4. Click Next when your cumulative probability equals 100%
50
v5.0 UNCERTAIN TAX POSITIONS
TO INPUT INFORMATION FOR THE AMOUNT EXPECTED TO BE
SUSTAINED (AETBS):
1. For Permanent Differences and Tax Adjustments, the AETBS is populated according
to your entries in the Probability Table. You cannot edit this amount on this page. If
you want to make a change to the AETBS, click the Back button to return to the
Probability Table
2. For Temporary Differences, enter the AETBS in this field
3. Depending on the Type of Issue and the Jurisdiction you have selected, different Tax
Rate fields display. These rate fields contain the rates you entered on the Issue
Details - As Filed page. They are editable fields. Enter the requested rates
4. Click Next
TO INPUT ADDITIONAL INFORMATION ABOUT THE POSITION:
Interest and Penalties
Interest and Penalties can be calculated offline or by using TimeValue TaxInterest.
For more information, refer to the Interest and Penalties section. If you follow a
51
v5.0 UNCERTAIN TAX POSITIONS
Below the Line treatment of interest and penalties, enter the Federal and State Tax
Rates for the interest amounts to ensure that the benefit is calculated correctly.
Hot Interest
Is basically a 2% penalty which is added to the rate for the specified time period.
Other Tax Adjustments
Tax Adjustments can be added to issues to increase or decrease the total amount
to be provided. For instance, if the issue was providing for recognition of income
and there would be an offsetting tax credit associated with recognizing that income,
the credit would be entered here.
ADD A NEW POSITION IN AN IFRS DATASET
The workflow for adding a position in an IFRS dataset is largely similar to adding a position in
a GAAP dataset. This section will only review the non-text differences.
WHEN IDENTIFYING A POSITION:
Select the Classification (STAT to TAX or IFRS to STAT). This selection has no impact on
any calculations or reports. It is recommended that you use this as a way to create a
duplicate position.
SCENARIO ANALYSIS FOR PERMANENT DIFFERENCES AND TAX
ADJUSTMENTS:
1. Make a selection and click Next
If you select the No radio button: The Amount Expected to be Sustained (AETBS)
is set to zero and the Scenario Analysis does not display.
If you select the Yes radio button: The Scenario Analysis displays.
52
v5.0 UNCERTAIN TAX POSITIONS
TO DETERMINE THE SCENARIO ANALYSIS:
1. After selecting the Yes radio button on the previous page, the Scenario Analysis
displays
2. Click Recalculate to populate the Possible Scenario Amount column with 1/8th
increments of the total Amount in Question. The incremental amounts in buckets 2 - 8
can be edited as needed, as long as they are in descending order
3. Assign a percentage, not exceeding 100% cumulatively, for each applicable Possible
Scenario Amount to calculate the Weighted Scenario Result. The Weighted Scenario
Results are summed to arrive at the Cumulative AETBS which becomes your AETBS
4. Click Next when your cumulative Scenario Probability Current equals 100%
NON-CASH AND EQUITY
FOR PERMANENT DIFFERENCES AND TAX ADJUSTMENTS:
You have the option of marking the position as Equity, Non-Cash, or None (if
neither applies) from the drop-down list.
53
v5.0 UNCERTAIN TAX POSITIONS
Positions marked as Non-Cash always display as Non-Current on the Payable and
Journal Entry reports.
Positions marked as None or Equity display as Current or Non-Current, depending
on the Resolved Quarter/Year and Dataset Period/Year.
FOR TEMPORARY DIFFERENCES:
You have the option of marking the position as Equity, Non-Cash, or None (if
neither applies) from the drop-down list.
For all temporary differences, you must also select the Deferred Category for the
position: Current or Non-Current. This category displays on the Deferred report,
regardless of whether Equity or Non-Cash is selected.
Positions marked as Non-Cash display as Non-Current on the Payable and Journal
Entry reports.
Positions marked as None or Equity display as Current or Non-Current, depending
on the Resolved Quarter/Year and Dataset Period/Year.
54
v5.0 UNCERTAIN TAX POSITIONS
AFTER A POSITION HAS BEEN ROLLED OVER, YOU HAVE THE
OPTION TO CHANGE THE EQUITY/NON-CASH OPTION.
Positions cannot be changed from EQ to NCS or from NCS to EQ
The Calculation Support Schedule, as well as the Uncertain Journal Entry and
Uncertain Expense reports, show the reclassification of amounts
For more information about this, please refer to the NCS/EQ Explanation guide on
the My UTP page
INTEREST AND PENALTIES
Interest and Penalties can be calculated using TimeValue's TaxInterest software which is
embedded in the UTP App. Interest can be calculated for both payments and refunds.
Interest and Penalties can also be calculated offline and entered on the final data entry page.
Note: Interest rate tables are provided and updated by TimeValue on a quarterly basis. If
you have any questions about the TimeValue interest tables, please contact them directly
(800-426-4741).
Click Interest & Penalties Calculator button to use TimeValue TaxInterest to calculate your
interest and/or penalties.
55
v5.0 UNCERTAIN TAX POSITIONS
After calculating your interest and/or penalties, you are returned to this page and the View
Report button will appear to view the Interest & Penalties Schedule for the position. If you
follow a Below the Line treatment of interest, remember to enter in rates for interest to
ensure the benefit is correctly calculated.
HOT INTEREST
Hot Interest is basically a 2% penalty which is added to the rate for the specified
time period
Hot Interest cannot be computed on refunds
If you are using the Overpayment rate, Hot Interest will not be calculated if you
enter a date
When mousing over Hot Interest on the I&P Calculator page, For Large Corporate
Underpayments displays offering further clarification
PENALTIES
Penalties cannot be computed on refunds
FEDERAL AND INTERNATIONAL FEDERAL POSITIONS
FEDERAL POSITIONS (DOMESTIC AND INTERNATIONAL)
Federal Positions displays the following page when you click Interest & Penalties
Calculator on the final data entry page.
Note: After you select Domestic, International, or Custom the designation you did not select
is grayed out. If you chose the wrong designation by mistake, uncheck the box next to
Domestic or International Interest to open up both options again.
56
v5.0 UNCERTAIN TAX POSITIONS
1. Select the Domestic radio button to calculate Interest and/or Penalties for the
Domestic Federal jurisdiction, Canadian, or United Kingdom (GBR) jurisdictions that
are pre-defined in the system
2. Select the check boxes for the area(s) you would like to calculate
3. Use the Calendar feature to select dates to ensure entry of dates in the correct format
(MM/DD/YYYY).
4. Click Calculate Interest & Penalties. You are brought back to the previous data
entry page now showing your interest and/or penalties amounts
U.S. FEDERAL PENALTIES
Penalty 6662: Substantial understatement of income tax
57
v5.0 UNCERTAIN TAX POSITIONS
Penalty 6651: Failure to file return when due
UNITED KINGDOM INTEREST TABLE
Available start dates for the UK (GBR) interest table currently start on March 6,
1993. Entering in a date before 03/06/1993 will return an interest amount of zero
Note: Refer to the Custom Rate Tables section for information on the International
designation.
STATE AND INTERNATIONAL POSITIONS
STATE POSITIONS (DOMESTIC STATES AND CANADIAN PROVINCES)
AND CUSTOM JURISDICTIONS (DOMESTIC AND INTERNATIONAL)
State Positions and Custom Jurisdictions display the following page when you click Interest
& Penalties Calculator button on the final data entry page.
Note: After you select Domestic, International, or Custom the designation you did not select
is grayed out. If you chose the wrong designation by mistake, uncheck the box next to
Domestic or International Interest to open up both options again.
1. Select the Domestic radio button to calculate Interest and/or Penalties for a Domestic
State or Canadian Province that is pre-defined in the system. If you have a custom
state designated with code UK, you will be able to access the United Kingdom interest
table.
If you use this page to calculate interest for a custom jurisdiction, the rate table
defaults to Federal and your interest amount may not be what you expected. We
recommend building a custom rate table for custom jurisdictions
States/Provinces without their own rate tables default to Federal/Canada
States: Maine, Montana, Nevada, South Dakota, Washington, and Wyoming
Provinces: British Columbia, Manitoba, New Brunswick, Newfoundland and
Labrador, Northwest Territories, Nova Scotia, Nunavut, Prince Edward Island,
Saskatchewan, Yukon
2. Select the check boxes for the area(s) you would like to calculate
3. Use the Calendar feature to select dates to ensure entry of dates in the correct format
(MM/DD/YYYY).
4. Click Calculate Interest & Penalties. You are brought back to the previous data
entry screen now showing your interest and/or penalties amounts
58
v5.0 UNCERTAIN TAX POSITIONS
Note: Refer to the Custom Rate Tables section for information on the International
designation.
INTERNATIONAL RATE TABLES
TO CALCULATE INTEREST AND/OR PENALTIES:
1. Select the International radio button to calculate Interest and/or Penalties for an
International Federal jurisdiction or a Custom Jurisdiction (a custom state or an
international jurisdiction other than Canada or United Kingdom). Because these
custom jurisdictions do not have a rate table in TimeValue's TaxInterest, you can build
your own rate table for the position and select the type of compounding (Daily,
Monthly, Quarterly or Simple) for computing interest
2. Select check boxes for the area(s) you would like to calculate
3. Use the Calendar feature to select dates to ensure entry of dates in the correct format
(MM/DD/YYYY).
4. Click Calculate Interest & Penalties. You are brought back to the previous data
entry screen now showing your interest and/or penalties amounts
Note: Positions with International rate tables have an asterisk (*) next to the start and end
dates
59
v5.0 UNCERTAIN TAX POSITIONS
TO BUILD AN INTERNATIONAL RATE TABLE:
1. Enter the start dates and end dates and applicable rate for the period. Only valid rates are
accepted:
Rates are available in .25% increments from 1% up to 25%
Rates are available in .50% increments from 25% up to 100%
2. Click Add Another Rate to continue building the rate table over time
The start date is one day after the end date from the previous line and cannot be
modified
The rate table can have multiple rates
The rates must be sequential
Note:
To remove the last row from the rate table, click the X. Only the last line in the
rate table can be removed
Refer to the Custom Rate Tables section for information on the International
designation
CUSTOM RATE TABLE
TO CALCULATE INTEREST AND/OR PENALTIES:
1. Select the Custom radio button to calculate Interest and/or Penalties for an
60
v5.0 UNCERTAIN TAX POSITIONS
International Federal jurisdiction or a Custom Jurisdiction (a custom state or an
international jurisdiction other than Canada or United Kingdom). Because these
custom jurisdictions do not have a rate table in TimeValue's TaxInterest, you can build
your own rate table for the position and select the type of compounding (Daily,
Monthly, Quarterly or Simple) for computing interest.
2. Select check boxes for the area(s) you would like to calculate.
3. Use the Calendar feature to select dates to ensure entry of dates in the correct format
(MM/DD/YYYY). Click Calculate Interest & Penalties. You are brought back to the
previous data entry screen now showing your interest and/or penalties amounts.
TO BUILD A CUSTOM RATE TABLE IN THE IMPORT FILE:
1. Enter the start and end dates and applicable rate for the period. Only valid rates are
accepted:
Rates can be imported/exported in the Interest & Penalties area of the Admin
Center
Rates are available in .25% increments from 1% up to 25%.
Rates are available in .50% increments from 25% up to 100%.
The start date is one day after the end date from the previous line and cannot be
modified.
The rate table can have multiple rates
You can create a custom rate table profile. For example, if you created one for
61
v5.0 UNCERTAIN TAX POSITIONS
Germany you would be able to apply Germany to one or more positions.
Note:
In versions prior to 5.0, you could enter up to five rows of rates. Now, you have
the ability to create a table with unlimited rows and reference these tables when
calculating interest.
To remove the last row from the rate table, click the X. Only the last line in the
rate table can be removed.
ABOVE/BELOW THE LINE
Interest and Penalties on UTP balances can be treated as either Above the Line or Below
the Line, depending on the determined accounting method.
ABOVE THE LINE
Interest and penalties calculated on UTP balances are treated as accrued interest and
accrued penalties.
BELOW THE LINE
Interest and penalties calculated on UTP balances are treated as an additional tax expense. If
you expect to deduct the interest when it is paid, you can provide for the interest, net of
federal or state benefit ,by entering the tax rates in the Fed and State Tax Rate - Interest
fields.
UNDERPAYMENT AND OVERPAYMENT RATES
Interest can be calculated using either the Underpayment or Overpayment rates for
Federal and Domestic States. Underpayment rates are typically higher than overpayment
rates.
UNDERPAYMENT RATES (DEFAULT)
To calculate interest using the underpayment rates, enter the Interest Start and End Dates
and click Calculate Interest & Penalties
OVERPAYMENT RATES
To calculate interest using the overpayment rates, enter the Interest Start and End Dates,
select the Use Overpayment check box, and click Calculate Interest & Penalties
INTEREST AND PENALTIES CALCULATION SUPPORT SCHEDULE
This schedule shows the wrong signs for the calculated interest amount if:
You use the Underpayment rate and your Interest Calc On amount is negative
You use the Overpayment rate and your Interest Calc On amount is positive
Note: This occurs because in these two scenarios, the interest amount TimeValue
TaxInterest generates is the opposite sign of what the interest amount needs to be in the UTP
App.
62
v5.0 UNCERTAIN TAX POSITIONS
REMOVING INTEREST RATES
TO REMOVE INTEREST DATES FOR A POSITION:
1. Open the position's workflow
2. On the Interest & Penalties Calculator tab, delete the Start and End Dates and
deselect the Domestic or International Interest check box
3. On the Interest and Penalties tab, click Save
HISTORIC CTA
You can manually enter the Historic CTA balances to capture the Historic CTA you may
be calculating offline. This allows you to track the currency gain and loss on a position over a
period of time.
In Uncertain Positions select a position and then Edit as New
Select the Interest and Penalties tab then enter the Historic CTA Current balance
63
v5.0 UNCERTAIN TAX POSITIONS
The software can also calculate this Historic CTA for you. In Action Items, select Update
Cumulative Historic CTA
Click Go
In the Reporting area, there are new views to support this Historic CTA amount.
1. Select the Uncertain Deferred Rollforward or the Uncertain Payable
Rollforward report, Jurisdiction, Gross / Benefit Option, Currency, Unit /
Subconsolidation, Label / Label Group
Note: Select the Reporting Currency
2.
3.
4.
5.
Click Get Report
Select the report options, view Historic CTA, group by, show, and detail
Click the Set Report Options button
The reports will display the Unit Code, Year, Country, Jurisdiction, Type, Uncertain
Item, Status, C/NC, CTA Beg Balance, CTA Change, and Total CTA
64
v5.0 UNCERTAIN TAX POSITIONS
COPY POSITION
Positions with a status = New can be copied, allowing you to easily create many positions via
the workflow.
1. Choose the position you would like to copy, click the position's Item Menu and click
Copy. All fields in the workflow are pre-populated based on the position you are
copying
2. Type of Position cannot be modified - click Next
3. UTP Code/Description cannot be modified.You must change either the Year,
Jurisdiction or Classification in order to not create a duplicate position
4. Proceed through the workflow, making changes as necessary. The rates entered on
the As Filed screen do not default to the Unrecognized Position screen
5. Once you are done copying the position, click Save
6. You will then be asked "Would you like to copy to another Jurisdiction?" Click Yes if
you'd like to cycle through the workflow again or No to close the workflow
MODIFY A POSITION
New positions can be modified by selecting Edit as New or removed by selecting Remove.
Once a position rolled over from a prior period, you can modify the item in one of seven
65
v5.0 UNCERTAIN TAX POSITIONS
ways. The type of modification you select determines whether the issue is final and should
not be rolled over to the subsequent period.
TO MODIFY A POSITION- EDIT AS NEW:
1. Click the position's Code (blue hyperlink)
2. Click Modify
3. Select Edit as new
Note: Only current period amounts and dates can be modified in the workflow
TO MODIFY A POSITION - OTHER OPTIONS:
4. Click the position's Code (blue hyperlink)
5. Click Modify
6. Select the appropriate option
66
v5.0 UNCERTAIN TAX POSITIONS
NON-FINAL MODIFICATIONS
Positions that are modified in a non-final way are rolled over to the subsequent period's
dataset.
ADJUST FOR A CHANGE IN JUDGEMENT (CIJ)
Issue existed in a prior period. In the current period, the outlook for the amount or the rate
differs from the prior period, or there is an update to penalties.
ADJUST FOR A CHANGE IN INTEREST (CII)
Update to an existing position for a change in accrued interest.
ADJUST FOR RETURN TO PROVISION (RTP)
Issue existed in a prior period. However, the amount differs from the prior period because of
the impact of a true-up item, or there is an update to interest or penalties.
ENTER A SETTLEMENT - PARTIAL (SET-NF)
Partial settlements allow for a portion of a position to be settled, while the remaining balance
continues to be uncertain.
1. Select Enter a Settlement from the Modify menu.
2. Click Non-Final. Positions modified in this way cannot be modified again in the
current dataset. The position can be rolled over to a subsequent period's dataset and
the position can be modified in that dataset.
3. The Enter Non-Final Settlement page displays.
If you click Save without filling in any fields, all amounts are marked as NLU and
display in the appropriate Change column on reports. A warning pops up. Click
Yes to continue or No to return to the workflow to make changes
Amounts entered in the Settlement Outlook column display in the Settlement
column/row on reports when the appropriate Gross/Benefit option is selected
Amounts entered in the Remaining Balance column display in the Ending
Balance column/row on reports when the appropriate Gross/Benefit Option is
selected
Note: If you make a mistake when entering a Partial Settlement for a position:
1. Click Undo Settlement from the Item's Menu
2. Choose Yes if you'd like to discard the entered Settlement information and reset the
position's status to RO (Rolled Over).
Rollover of Partial SET Positions
Once a position is rolled over, the workflow is complete, based on last known
values and applicable amounts from the Remaining Balance column
FINAL MODIFICATIONS
Positions that are Final Modifications are not rolled over to the subsequent period's dataset.
67
v5.0 UNCERTAIN TAX POSITIONS
ENTER A SETTLEMENT - FULL (SET-F)
An agreement has been reached on the issue, as well as a settlement.
1. Select Enter a Settlement from the Modify menu.
2. Click Final. Positions modified in this way cannot be modified again.
3. The Enter Final Settlement page displays.
If you click Save without completing any fields, all amounts are marked as NLU
and display in the appropriate Change column on reports. A warning pops up.
Click Yes to continue or No to return to the workflow to make changes
Amounts entered in the Settlement Outlook column display in the Settlement
column/row on reports when the appropriate Gross/Benefit Option is selected
MARK AS NO LONGER UNCERTAIN (NLU)
The issue existed in a prior period. However, in the current period, it is determined that the
UTP is no longer necessary. The entire amount provided in the prior period is reversed in the
Change column/row to bring the taxes payable to zero.
WRITE OFF AS EXPIRED DUE TO STATUTE (EXP)
The issue existed in a prior period. However, in the current period it is determined that the
UTP is no longer necessary because the statute of limitations has expired. The entire amount
provided in the prior period is reversed in the Statute column/row to bring the taxes payable to
zero.
Note:
After a position is marked as NLU or EXP, you can no longer modify the position.
If you make a mistake when entering a SET-F for a position:
1. Click Undo Settlement from the Item's Menu
2. Click Yes if you'd like to discard the entered Settlement information and reset the
position's status to RO (Rolled Over)
RELOAD CONTENGENCIES
TO RELOAD CONTINGENCIES:
1. Click the Main Contingency Menu drop-down .
2. Click Reload Contingencies. The Contingencies table, containing a list of all your
uncertain positions, refreshes.
FX RATES
The FX Rates for the current Unit/Dataset display above the Main Contingency Menu.
TO EDIT FX RATES:
1. Click on the rate you wish to modify and type in the new rate.
2. Click Save (the blue disk) to the right of the FX Rates.
68
v5.0 UNCERTAIN TAX POSITIONS
Note: If you accidentally change your rates and would like to revert them back to before
you made changes, click the green Revert Changes arrow to the right of the Save icon. This
option is only available before clicking the Save icon.
ACTION MENU
The Action Menu allows you to manage/edit multiple positions at the same time.
TO VIEW INFORMATION ABOUT AN ACTION MENU OPTION:
1. Select an option from the Select an Action drop-down menu.
2. Select Action Detail option from the Go drop-down list.
TO PERFORM AN ACTION:
1. Select positions from the Contingencies Table by selecting the check box next to
each position code.
2. Select an action from the Select an Action drop-down menu.
3. Select the Execute Action option from the Go drop-down list.
Notes:
You can select all the positions in the Contingencies table by clicking Select All at
the bottom left of the table (in Grid Tools)
You can deselect all selected positions in the Contingencies table by clicking the
Clear Selected button (in Grid Tools)
69
v5.0 UNCERTAIN TAX POSITIONS
REMOVE/MARK as NLU
ADD NOTES/ATTACHMENTS
The Documentation box displays if you select this option. Enter your note and add your
attachments for each position you selected. Click Save.
CREATE COPY
If this option is not selected, a single post is created and attached to each position.
A reply to this post on one item is visible on all other items
If this option is selected, a new post is created for each item. Replying to a post on
one item does not add to the post on any other item. This is equivalent to adding
documentation to positions on an individual basis from the item's menu
ASSIGN LABELS
70
v5.0 UNCERTAIN TAX POSITIONS
UPDATE INTEREST END DATES
The Updating Interest End Dates box displays if you select this option. Select the new
interest end date from the calendar for the positions you have selected, and click Save.
Notes:
After you have updated your interest end dates, you need to Recalculate Interest
for the positions.
Because the status for positions that have been rolled over changes to Change in
Interest (CII) after you update interest end dates, it is recommended that you
update interest end dates before making any other modifications to your positions.
This will ensure that the correct status displays for all your positions.
RECALCULATE INTEREST
After you click Go, your interest request will be added to the queue and you will be notified
via a popup in the upper right corner when it is complete.
Note:
Because the status for positions that have been rolled over changes to Change in
Interest (CII) after you recalculate interest, it is recommended that you recalculate
71
v5.0 UNCERTAIN TAX POSITIONS
interest before making any other modifications to your positions. This will ensure
that the correct status displays for all your positions.
This option only recalculates interest for the current unit. If you want to
recalculate interest across all units or a selection of units, please refer to the Admin
Center: Interest and Penalties.
BATCH PRINT SCHEDULES
The Batch Print Schedules box displays if you select this option. Make your selections
(similar to the Batch Print Reports box) and click Print.
TO BATCH PRINT SCHEDULES:
1. Select positions from the Contingencies Table by selecting the check box next to
each position code.
2. Select the action from the Select an Action drop-down menu, Batch Print
Schedules.
3. Select Go
CHOOSE A TEMPLATE
Select a Template Name from the drop-down. To create a new Template, make the
selections for the Print Options, Report Options, and Report Selection.
Click Save as Template
Click Submit
72
v5.0 UNCERTAIN TAX POSITIONS
Note: The Template Name cannot be changed or deleted once it's created. You can
however change the options on this screen and save them to an existing Template.
PRINT OPTIONS
1. In Print Options, select Output Type PDF or XLS.
2. Select whether or not files should be Compressed.
Selecting the Compressed option generates a separate file for each report and
returns it in a compressed zip file
Opting not to select the Compressed option generates a single report file, with each
report on a separate page (or pages)
SCHEDULE SELECTION
1. Click the plus sign (+) to the left of the available options.
2. Click the box's to make the selections, Calculation Support, Item Detail, and Interest
& Penalties.
3. Click Print
73
v5.0 UNCERTAIN TAX POSITIONS
The naming convention for Item Schedules when batch printed using the Compressed option
is as follows: Report Name_UTP Code_Year Issue Arose_Jurisdiction_Random Number
(Example:CalcSupport_T1000_2001_MA_100916)
Note: A random number is included to ensure no two item schedules are identical.
When Item Schedules are batch printed to Excel and the Compressed option is not selected,
report names are shortened. However, the rest of the naming convention remains the same.
IP = Interest and Penalties Schedule
DT = Item Detail Schedule
CT = Calculation Support Schedule
If you batch print Item Schedules to Excel for a large number of positions and the
Compressed option is not selected, batch printing automatically switches to Compressed. (No
more than 50 tabs are put into one Excel workbook.)
74
v5.0 UNCERTAIN TAX POSITIONS
EXPIRED DUE TO STATUTE
INDIVIDUAL ITEM SCHEDULES
Schedules for individual positions can be viewed by clicking the item code and selecting one
of three schedules:
Calculation Support
Item Detail
Interest and Penalties
CALCULATION SUPPORT
The Calculation Support report displays the components of the calculation to support the UTP
in Local Currency. The report compares the Expected to be Sustained with the Amount in
Question amounts and shows the change in the position for the period.
This report can be accessed from the Contingencies table or by drilling down from the
Uncertain Deferred Rollforward, the Uncertain Payable Rollforward, or the Uncertain
Expense report when these reports display in Local Currency. When selected, the report
displays in a pop-up box in the center of the page.
ITEM DETAIL
The Item Detail report shows all entries made for each item entered in the system. This
report details the entries for amounts; interest, apportionment, and tax rates; and if applicable,
MLTN response and other adjustments on a Prior and Current period basis. The Deferred
Category, for temporary differences, as well as whether the position is Non-Cash or Equity,
also display.
INTEREST AND PENALTIES
Interest and Penalties Calculation Support report in the UTP App is the TaxInterest report,
which supports the computation of interest and penalties that was generated using the
TimeValue software. The report can also be viewed by clicking the View Report button on
the final page of the Item Entry manual entry process after calculating interest and/or
penalties.
Note: This report is only available if you used TimeValue TaxInterest in the UTP App to
calculate your interest and/or penalties.
75
v5.0 UNCERTAIN TAX POSITIONS
AUDIT HISTORY
AUDIT HISTORY IS NOW AVAILABLE FOR EVERY LINE ITEM.
1. Click Audit History from a position's Item Menu to view the Audit Documentation
for the position. A window will popup with reviews each modification of the position.
The Modified Date, Modified By and Modification # (ex. 1 of 3) display at the top,
followed by a table which reviews all fields in the workflow besides Probability Table
and Interest & Penalties.
2. Click Next to compare Old Value vs. New Value for the fields and to see
Modification information for each time the position was changed.
DOCUMENTATION
Documentation (notes and/or attachments) can be added to positions in the UTP App.
To Add Documentation:
1. Click the gray/yellow note icon or select Documentation from an item's menu
to add notes and/or attachments to a position.
2. Type your note in the Note area.
3. Browse to add attachments to the position.
4. Click Save
TO ADD ATTACHMENTS:
If you add an attachment to a position and do not enter a note, a default note is
added, called Added Attachment
Attachment file names should be unique. The UTP App does not distinguish
between different files of the same type with the same name. The Export
Attachment functionality is based on the name of the file. For example, multiple
Excel files containing different information called Support for FIN 48.xls cause the
Export Attachment functionality in the UTP App to not function properly
TO REPLY TO POSTS:
Click the yellow note icon or select Documentation from an item's menu to create a New
Post for the item or to Reply to previously created posts.
76
v5.0 UNCERTAIN TAX POSITIONS
TO EDIT/DELETE DOCUMENTATION:
Documentation added to a position cannot be edited or deleted. Changes need to be appended
as a reply to a previous post.
TO VIEW DOCUMENTATION:
Click the yellow note icon or select Documentation from an item's menu to view notes and/or
attachments to a position. Posts are listed by Post Date, with the most recent posts or replies
at the top of the list.
LABELS
For single position assignments, click the gray or blue symbol next to the item's name. The
symbol is gray if no labels have been assigned to the position. A blue symbol indicates that
labels are assigned. Mouse over the blue symbol to view the labels.
TO CREATE A NEW LABEL:
1. Enter a new label name in the New Label Name field
2. Click Create Label
Note:
The preferred format for label names is: Label_Name. Use the underscore ( _ )
instead of creating a label that contains a space.
Label names are case sensitive.
TO ASSIGN LABELS:
1. Select the labels you wish to assign to the position while holding CTRL
77
v5.0 UNCERTAIN TAX POSITIONS
2. Click Submit Label Assignment
TO UNASSIGN LABELS:
1. Hold CTRL while clicking the labels you wish to unassign
2. Click Submit Label Assignment
VIEW OPTIONS
Positions in the Contingencies table can be viewed in multiple ways, depending on your
needs.
FILTER
Positions in the Contingencies table can be filtered to view only the positions with which you
wish to work. The filter is located at the bottom right of the table.
TO CREATE A FILTER:
1. Begin typing your filter in the box. The filter should begin with the name of the column
header by which you wish to filter. Available options are: Code, Name, Jurisdiction,
Year, Classification, Status, Resolution Year, Expiration Year, and Label
2. Filter options (Equal to, Not equal to, Less than, Greater than) display.
3. Click the filter option you want. Possible values on which to filter then display.
4. Select a completed filter.
5. Click Create Filter.
Note: To view all available filter options (without possible values):
In Firefox: Click the filter box and press the down arrow or the Backspace key.
Then click the filter option you want from the drop-down list and select a value for
the filter.
In Internet Explorer: Click the drop-down arrow in the filter box. Then click the
filter option you want from the drop-down list and select a value for the filter.
CURRENT FILTERS
After you add a filter, it is added to the Current Filters drop-down list. A number displays
next to Current Filters showing how many filters are currently active.
TO REMOVE A FILTER:
1. Click the arrow to the right of Current Filters.
2. Select the filter you wish to remove.
Notes:
To remove all filters, click Clear All.
The number of rows in the table (lower left corner) updates, based on your filter
(s).
78
v5.0 UNCERTAIN TAX POSITIONS
SORT
Any column in the Contingencies table can be sorted in ascending or descending order by
clicking the column heading. A column sorts in ascending order when you click the heading
once and descending order when you click twice.
REORDER COLUMNS
TO CHANGE THE ORDER OF COLUMNS IN THE CONTINGENCIES
TABLE:
1. Click the column heading for the column you wish to move.
2. Drag and drop the column to a new location on the heading bar.
Note: This customization is stored in a cookie. If you clear your browser's cookies, your
settings revert to the default column ordering.
GRID TOOLS
Grid Tools are located in the lower left corner of the Contingencies Table.
HIGHLIGHT EXPIRING
You can highlight positions in the Contingencies Table that are expiring within the dataset
year.
1. Click on Grid Tools.
2. Mouse over Highlight Expiring?
3. Select a color for the highlighting
GROUP BY
You can choose to organize the positions in the Contingencies Table by Component,
Jurisdiction, Year or Status.
1. Click on Grid Tools
2. Mouse over Group By
3. Select a group by option
Note: Both of these options are stored in a cookie. If you clear your browser's cookies, your
settings revert to the default (no highlighting and no group by option).
BATCH PRINT REPORTS
You can save Batch Print setting profiles to easily print your future reports. The Batch Print
will work through the queue system.
TO BATCH PRINT REPORTS:
1. Click the Main Contingency Menu drop-down.
2. Click Batch Print. The Batch Print Reports pop-up box displays.
79
v5.0 UNCERTAIN TAX POSITIONS
CHOOSE A TEMPLATE
Select a Template Name from the drop-down. To create a new Template, make the
selections for the Print Options, Report Options, and Report Selection.
Click Save as Template
Click Submit
Note: The Template Name can not be changed or deleted once it's created. You can
however change the options on this screen and save them to an existing Template.
PRINT OPTIONS
1. In Print Options, select Output Type PDF or XLS.
2. Select whether or not files should be Compressed.
Selecting the Compressed option generates a separate file for each report and
returns it in a compressed zip file
Opting not to select the Compressed option generates a single report file, with each
report on a separate page (or pages)
REPORT OPTIONS
Select filters for the reports you will be printing, Jurisdiction, Benefit, Currency, Unit, and
Label
REPORT SELECTION
1.
2.
3.
4.
Select the report(s) you need to print.
Click the plus sign (+) to the left of the report name to view available options.
Click the box's to make the selections. (Ex., Payable Report options)
Click Print
80
v5.0 UNCERTAIN TAX POSITIONS
81
v5.0 UNCERTAIN TAX POSITIONS
IMPORT
TO IMPORT FILES:
1.
2.
3.
4.
Click the Main Contingency Menu drop-down.
Click Import.
Browse for the file you wish to import.
Click Open then Import. Your import will be added to the queue and you will be
notified via a popup in the upper right corner when it is complete. Click on the link in
the popup to view the Import Status.
If the import is successful, the Errors column will contain all zeros. Click Done to
return to the UTP App.
If the import is not successful, the Errors column will indicate how many errors
occurred per sheet. Click on the sheet to view the corresponding error detail
which provides information about the location of errors in the file.
1. Correct your import template with the information provided.
2. Click Done to return to the UTP App and start again from Step 1 above.
Note: Component - Unit assignment is now being enforced on import. Make sure you assign
components (categories) to units to avoid errors on import.
IMPORT TEMPLATE
The UTP App Import template spreadsheet allows you to use an Excel spreadsheet template
to populate or update multiple entries in the UTP App.
IMPORT SPREADSHEET OVERVIEW
The import begins reading the sheets in the workbook, starting on row 3 and proceeding
downward. It stops when it reaches a blank cell in column A. Rows 1 and 2 are reserved for
headings and descriptions.
Be sure all the corresponding columns with a header are completed for each row
to ensure the spreadsheet is imported correctly. If a duplicate row is found, all
matching rows fail on the import. The detailed error information provides you with
information regarding the position that was duplicated, so you can easily fix the
issue.
Keep in mind that codes and other entries are case-sensitive.
Enter all tax rates as decimals up to 6 places.
Enter probability percentages as whole numbers without the percentage ( % ) sign.
Make sure all cells in Excel are formatted as text.
The Import template is an Excel file with four sheets that populate the following
areas of the software:
#UTP#: Core Data about the issue
#UTP_OTHER#: Other Data about the issue
#UTP_LIKELIHOOD#: Probability Table for issues
#UTP_CUSTOM#: Custom Rate Table for issues
After information is entered in the spreadsheet, you are ready to import the template into the
UTP App. For detailed information about the columns in the spreadsheet go to the My UTP
82
v5.0 UNCERTAIN TAX POSITIONS
page in the UTP App, where you can access a UTP App Import Template Guide.
IMPORT TIPS
CREATING A "DUPLICATE" POSITION
The first seven columns of each sheet of the Import Template represent the defining
characteristics of a position.
DATASET YEAR
This column does not impact any calculations or determinations of Current/Non-Current
status in the UTP App. You can use this column to create duplicate positions. (Refer to the
blue lines in the screen shot below.)
CLASSIFICATION
This column does not impact any calculations in the UTP App. You can use this column to
create duplicate positions. (Refer to the purple lines in the screen shot below.)
EXPORT
TO EXPORT ITEMS:
1. Click the Main Contingency menu drop-down.
2. Click Export
3. Click Export UTP Items to export all UTP items in the dataset to which you have
access, i.e., only items in units assigned to you.
4. Click Summary under Export Categories to OTP to export the categories needed in
ONESOURCE Tax Provision for the Summary Numbers export. This categories
export is neither dataset, nor unit, specific.
5. Click either Current or Deferred (based on how you want benefit exported) under
Export Numbers to OTP to export after-tax and after-benefit amounts you need to
represent Uncertain Tax Positions in your provision. Amounts are exported for all
active units in the current dataset.
Notes:
Items export in the Import Template format
Using the Export UTP Items feature provides a helpful and manageable way to
update several different positions. After making updates, re-import the spreadsheet
into the UTP App
83
v5.0 UNCERTAIN TAX POSITIONS
REPORTING
PRINTING
You can export each Main Report to a PDF or XLS file. To select where to print your report,
right-click the report heading and:
Click Export to PDF to export to Adobe. Click Open or OK when prompted.
Click Export to XLS to export to Excel. Click Open or OK when prompted.
Note: It is highly recommend that you do not print any report from your browser's Print
menu. All reports have been formatted to print to PDF and XLS. This formatting may not
always carry over when the report is printed directly from your browser.
MAIN REPORTS
DEFERRED WITH FUTURE BENEFIT
Displays Deferred Tax Asset/Liability balances (for temporary differences), along with the
benefit amounts accrued on current tax and interest at the beginning and end of the period for
all UTP items. It can be expanded to show components that increased or decreased balances
during the period.
ITEM DOCUMENTATION REPORT
Displays items, along with their notes and/or attachments.
ITEM INVENTORY REPORT
Displays the summary of key data for the issues at the end of the period. It lists the pre-tax
amount in question, the amount expected to be sustained, and all other tax components to
arrive at the ending Uncertain Tax Benefit, as well as other tax adjustments, interest, and
penalties.
84
v5.0 UNCERTAIN TAX POSITIONS
TABULAR PAYABLE ROLLFORWARD
Displays the required ¶ 21(a) Disclosure report that summarizes the Uncertain Tax Benefit
beginning balance, additions based on tax positions related to the current year, additions for
tax positions of prior years, reductions for tax positions of prior years, settlements, and the
ending balance.
UNCERTAIN DEFERRED ROLLFORWARD
Displays Deferred Tax Asset/Liability balances on an item-by-item basis at the beginning and
end of the period for UTP temporary difference items. It can be expanded to show the
components that increased or decreased balances during the period.
UNCERTAIN EXPENSE REPORT
Displays the Current and Deferred Tax Expense generated on an item-by-item basis during
the period for all UTP items. It can be expanded to show the components that increased or
decreased balances during the period.
UNCERTAIN JOURNAL ENTRY
Displays a summary of journal entries required to be booked for activity during the period.
The report is broken out by federal and state entries.
UNCERTAIN PAYABLE ROLLFORWARD
Displays Taxes Payable balances on an item-by-item basis at the beginning and end of the
period for all UTP items. It can be expanded to show the components that increased or
decreased balances during the period.
UTP OPEN YEARS AND JURISDICTIONS
Displays the required ¶ 21(e) Disclosure report that summarizes open positions by year by
major jurisdiction. When expanded, it shows issues for the given year and jurisdiction with a
count, as well as the ending payable balance.
SCHEDULE UTP REPORT
This is a new report in the software. It was originally based on the definition IRS had sent
out. IRS had required you to show your maximum tax exposure. The new Schedule UTP
provides you a way to rank your positions.
EXPLANATIONS
CURRENT/NON-CURRENT DESIGNATION
For Uncertain Payable Rollforward and Payable Sections of Uncertain Journal
Entry, the Current/Non-Current designation is determined by comparing the
Dataset Period/Year with the Resolved Quarter/Year of the position:
If the difference of these time periods is within 12 months: Current
If the difference of these time periods is greater than 12 months: Non-Current
Note: Non-Cash Positions are always Non-Current, regardless of the Resolved Quarter/
Year.
For Uncertain Deferred Rollforward and Deferred Sections of Uncertain Journal
Entry, the Current/Non-Current designation is determined by the Deferred
Category selected when creating the position.
85
v5.0 UNCERTAIN TAX POSITIONS
On the Deferred with Future Benefit report, Permanent Differences & Tax
Adjustments follow the Current/Non-Current logic of the Payable Rollforward
while the Temporary Differences follow the Current/Non-Current logic of the
Deferred Rollforward.
CURRENT YEAR AND PRIOR YEAR COLUMNS/ROWS
For Deferred (+change), Payable (+change), Deferred with Future Benefit (+change),
Tabular Payable, Expense (expanded), compare the Dataset Year with the Position's Year to
determine if it will fall into the Current Year or one of the Prior Year columns.
CTA CALCULATIONS
For information regarding how Currency Translation Adjustment (CTA) is calculated in the
UTP App, refer to the UTP App CTA Explanation Guide, located on the My UTP page of
the UTP App under UTP Calculations.
DEFERRED BENEFIT
Payable, Tabular Payable, UTP Open Years and Jurisdictions. Select Gross/Benefit Option =
Gross.
VIEW OPTIONS
The filters in the Reporting section allow you to select how you would like to view each of
the main reports. If your screen resolution is making it difficult to see the entire filter menu,
click the second icon next to Reporting to view filters vertically instead of horizontally (not
available in Internet Explorer).
After making your selections (all filters except Label must have a selection), click Get Report
to the right of the filters (or below the filters if viewing them vertically) to view the report.
CURRENCY DROP-DOWN MENU
If you select USD, CAD, EUR, GBP or JPY as the currency for the unit, the corresponding
symbol displays when viewing reports in the UTP App in Local Currency.
JURISDICTION DROP-DOWN MENU
If you select State Specific, the list of states populates in the same drop-down menu. To
return to the original drop-down menu, click the first selection, Non-State Specific.
LABEL DROP-DOWN MENU
To reset the label selection, click the green Refresh icon.
Label groups are below the dotted line, just as Subconsolidations are below the
86
v5.0 UNCERTAIN TAX POSITIONS
dotted line in the Unit/Subconsolidation drop-down menu.
REPORT SPECIFIC VIEWS
SHOW (PAYABLE, DEFERRED WITH FUTURE BENEFIT - PARTIAL,
EXPENSE, JOURNAL ENTRY - PARTIAL)
Defaults to all. If you want to isolate a specific component (tax, other tax, interest,
penalties, above the line, above the line – interest only, or interest + penalties), you
can display a single component.
DETAIL (PAYABLE, DEFERRED WITH FUTURE BENEFIT, EXPENSE)
Defaults to hide the detail for each line item.
Payable & Expense: Clicking show displays the breakout of tax, other tax
adjustments, interest and penalties, and deferred (where applicable).
Deferred with Future Benefit: Clicking show displays the breakout of deferred tax,
other tax adjustments and interest.
GROUP BY (DEFERRED, PAYABLE, DEFERRED WITH FUTURE
BENEFIT, EXPENSE, ITEM INVENTORY)
Defaults to none. Allows you to group data in numerous ways. Select an option
from the drop-down menu.
Item Inventory: Defaults to a unit basis.
VIEW (DEFERRED, PAYABLE, DEFERRED WITH FUTURE BENEFIT)
Defaults to the contracted view showing only beginning and ending balances. The
data can show additional breakout.
Expanded shows the activity during the period summarized by event (change,
settlement, statute expiration, and CTA).
+change displays additional details about the increase and decrease of the Change
column.
+cta displays additional details about how the currency translation adjustment
affected each event.
+ both displays +change and +cta details.
REPORT VIEW DIFFERENCES
Certain reports have view options that are unique for that particular report.
DEFERRED WITH FUTURE BENEFIT
This report should be used only if you view Tax and Interest benefit as a Deferred Tax
Asset, rather than Current. This report contains:
Deferred Tax Asset/Liability balances
Current Tax, Other Tax and Interest Benefit balances
SHOW
Interest-Benefit
Breaks out SBOS, FBOF and FBOS of interest
87
v5.0 UNCERTAIN TAX POSITIONS
TABULAR PAYABLE ROLLFORWARD
SHOW
Above the line: Report will display without Interest and Penalties.
Above the line - interest only: Report will display without Interest.
VIEW
Defaults to contract, showing only one column of amounts.
Expand breaks out Tax, Other Tax, Interest, Penalties, and CTA, all of which add
up to the Total column (the only column shown in the contract view).
The CTA column has values only when Reporting Currency is selected from the
Currency drop-down menu.
Additional rows have been added to further break out CTA on the Tabular Payable
Rollforward.
UNCERTAIN JOURNAL ENTRY
SHOW
Above the line: Report will display Payable & Deferred sections without Interest
and Penalties.
Above the line - interest only: Report will display Payable & Deferred sections
without Interest.
Note: The Accrued Interest and Penalties section shows the interest and penalties for
positions when in the above views.
NCS/EQ Detail: Breaks out Non-Cash and Equity on a current/non-current basis
JE Breakout: Breaks out UTP Payable and Expense into its components: tax,
interest and penalties on a current/non-current basis
BENEFIT
Current: Default view.
Deferred: Payable and Deferred sections will be Gross and Benefit section shows
Future Tax/Interest Benefit.
UNCERTAIN EXPENSE
VIEW
Defaults to contracted view, showing only the Current and Deferred Columns
adding up to the Total column. The data can show additional breakout.
The expanded view shows the detail behind the Current and Deferred sections:
Current Year, PY Increases and Decreases, and Statute adding up to Current and
Deferred Totals.
BENEFIT
Current: Default view
Deferred: Tax/Interest Benefit displays in Deferred columns and Current Tax
88
v5.0 UNCERTAIN TAX POSITIONS
Gross displays in Current columns.
Note: This report does not tie back to the Uncertain Deferred Rollforward and Uncertain
Payable Rollforward reports if you have Equity and/or Non-Cash positions. This report does
tie to the P/L lines on the Journal Entry report.
For positions tagged as Equity, only the Interest and Penalties amounts can be
viewed on the Expense report.
For positions tagged as Non-Cash, no amounts for these positions can be viewed
on the Expense report.
ITEM INVENTORY
GROSS/BENEFIT OPTION
Changing the Gross/Benefit option does not change any of the amounts on this report.
VIEW
Defaults to contracted, showing only the position, year, jurisdiction, and associated
amounts for the position.
The expanded view provides additional information about the position, including
resolution, expiration dates, and MLTN response.
The audit view provides additional information, including Current and Deferred Tax
Benefit and Gross Interest amounts for positions.
The audit detail view provides the interest start and end dates (if entered) for the
position, as well as the AIQ current and deferred tax and apportionment rates for
the issue.
The offset view only displays positions that have been marked NCS or EQ. It
shows related information for these positions.
The above the line view displays positions without interest and penalties.
The above the line - interest only displays positions without interest.
SUBTOTAL
Defaults to show the subtotals for each column on the report. Hide removes the calculated
subtotals for each amount column.
BENEFIT
Current: Default view
Deferred: Current Tax/Interest Benefit included in Deferred column(s) in Audit
and Audit Detail views only
ITEM DOCUMENTATION
The Item Documentation report displays only positions that have notes and/or attachments.
SHOW
Defaults to notes + attachments showing positions, along with all their notes and
attachments. When Posted By is indented, this indicates that the note is a reply to a
previous note.
89
v5.0 UNCERTAIN TAX POSITIONS
Attachments only shows the position along with a list of the position's attachments.
To open the attachment in the appropriate program, click the file name.
You can also batch print all or some of the attachments to a zip file.
To batch print the attachments, select the select all attachments check box and
click Print Selected.
To batch print some attachments, select the attachments you wish to print and
click Print Selected.
Note: If there are duplicate attachments, only one copy will print to the zip file.
Notes only shows the position, along with all the position's notes.
UTP OPEN YEARS AND JURISDICTIONS
GROUP BY
Defaults to jurisdiction. Also allows you to group data on a year, unit/jurisdiction, or a unit/
year basis.
VIEW
Defaults to contracted, showing only the jurisdiction and year for open positions.
Open positions: Positions that have a status of anything other than SET-F, NLU, or
EXP.
Expanded provides additional information about the position, including what the
position is and its ending payable balance. A subtotal of the number of UTPs and
ending payables is also provided, based on the group by selection.
SCHEDULE UTP REPORT
This is a new report in the software. It was originally based on the definition IRS had sent out.
IRS had required you to show your maximum tax exposure.
The new Schedule UTP provides you a way to rank your positions. You could show only one
if that is all that is needed. The report discloses only words and rankings The IRS made this
requirement for those with a Balance Sheet over 100 million for the first year and only have
to disclose positions that arose in 2010 and going forward. You could run these on a label or
label group.
SCHEDULE UTP REPORT
In the Reporting area, select the Report, Schedule UTP Report, Jurisdiction, Gross / Benefit
Option, Currency, Unit /Subconsolidation, and Label / Label Group. Click Get Report.
The report will show:
Uncertain Tax Positions for the Current Tax Year
Uncertain Tax Positions for the Prior Tax Year positions
Permanent
Temporary
Maximum Tax Adjustment
Year of Tax Position
90
v5.0 UNCERTAIN TAX POSITIONS
If you have a different year end date you can change the year end date, if
needed.
1. Go to the Admin Center area then select the Admin Params tab.
2. Double-click on the row with the Year and a drop-down will appear. Change the
year and the positions pertaining to that year will be reflected on the report.
3. Click Save
Note:
Use Federal Only filter when running report
Setup a SubConsolidation which contains only your domestic units and run the
report on that SubConsolidation. You could run this on a labels and label group to
ultimately get to what would go on the form.
The code section, pass through, or EIN number are not available.
In order to ensure the report meets your needs, a beta version of the report is now available.
Please review the Schedule UTP Report and the final IRS Schedule UTP form and provide
any feedback you may have by selecting the hyperlink Product Management on the My
UTP page or email [email protected].
Select the help hyperlink to view and/or download a the report. The pdf versions of the
Schedule UTP Form and Instructions are available for you, as well. Thank you - your
feedback is vital to ensuring this report will make your life easier in 2011.
Select Product Management to send feedback.
Select here, to view/download the Schedule UTP Report, Instructions and Form
Schedule UTP Report - Beta Version
91
v5.0 UNCERTAIN TAX POSITIONS
UNCERTAIN TAX POSITION DISCLOSURE
STATEMENTS
REQUIRED DISCLOSURES FOR ASC 740-10-50 (FORMERLY FIN
48)
CLASSIFICATION OF INTEREST AND PENALTIES
Annual Disclosure
Discloses the policy on classification of interest and penalties.
Above or Below the Line.
Solution in UTP App
Report views showing the effect of classification:
Below the Line: All or Interest + Penalties.
Above the Line: Above the Line or Above the Line - Interest Only.
TABULAR PAYABLE ROLLFORWARD - ASC 740-10-50-15 (A) = ¶ 21(A)
Annual Disclosure
Tabular Rollforward of unrecognized tax benefits (UTBs) at the beginning and end
of the period.
SOLUTION IN UTP APP
Tabular Payable Rollforward report using the Gross/Benefit Option = Gross view.
Can be viewed Above or Below the Line.
EFFECT OF ISSUES ON THE EFFECTIVE TAX RATE - ASC 740-10-50-15
(B) = ¶ 21(B)
Annual Disclosure
Total amount of UTBs that, if recognized, would affect the effective tax rate.
Solution in UTP App & ONESOURCE Tax Provision
Uncertain Journal Entry Report - "Change" column for the Current and Deferred
Provision OR the "Total Impact to Effective Tax Rate" column in the Uncertain
Expense report.
Export these amounts to ONESOURCE Tax Provision to view the effect on the
92
v5.0 UNCERTAIN TAX POSITIONS
overall effective tax rate.
INTEREST AND PENALTIES - ASC 740-10-50-15 (C) = ¶ 21(C)
Annual Disclosure
Total amount of interest and penalties recognized in the income statement and
balance sheet.
Solution in UTP App
Uncertain Payable Report using the Show = interest + penalties view.
ISSUES EXPECTED TO SIGNIFICANTLY CHANGE IN 12 MONTHS - ASC
740-10-50-15 (D) = ¶ 21(D)
Annual Disclosure
Positions in which it is reasonably possible that the total amounts of the UTBs will
significantly increase or decrease within one year of the reporting date.
Solution in UTP App
Contingencies Table with additional analysis by the user to determine the nature of
the uncertainty, the nature of events that would cause a change, and the estimate
of range of change.
You can label items which are expected to change significantly in 12 months and
filter them in the Contingencies Table or Main reports to view the total impact.
YEARS WITH ISSUES REMAINING OPEN BY JURISDICTION - ASC 74010-50-15 (E) = ¶ 21(E)
Annual Disclosure
Description of tax years that remain subject to examination by major jurisdiction.
Solution in UTP App
UTP Open Years and Jurisdiction report.
REPORT FOOTNOTES
Nine of the main reports now contain a Report Footnote section that allows you to complete
your entire disclosure in one place. Report Footnotes are dataset/unit specific and do not roll
over at this time. If you print a report that contains a footnote to PDF, the footnote prints on
the page after the report.
TO ADD A REPORT FOOTNOTE:
1. Select the Report Footnote check box.
2. Type your message.
3. Click Save Footnote.
TO EDIT A REPORT FOOTNOTE:
1. Select the Report Footnote check box.
2. Make your changes.
3. Click Save Footnote.
TO DELETE A REPORT FOOTNOTE:
1. Delete the text in the Report Footnote box. The Using 0 of 4,000 characters message
displays under the Report Footnote box.
93
v5.0 UNCERTAIN TAX POSITIONS
2. Click Save Footnote.
3. When asked, "Are you sure you want to delete this footnote?", click OK.
INTERIM REPORTING AND Uncertain Tax
Positions
This section discusses the best practices for Interim Reporting and Uncertain Tax Positions.
BEST PRACTICE
DATASET STRUCTURE
Quarterly datasets are the recommended dataset structure for Interim Reporting
requirements. This allows each quarter of discrete activity to be isolated.
To view your entire year (or year-to-date) of UTP activity, use the Dataset Merge
functionality.
INTEREST AS PART OF THE EFFECTIVE TAX RATE
If you view interest as part of your Effective Tax Rate, rather than a discrete item, you can
use the Above the Line - Interest Only option on reports to arrive at the total discrete impact
of your UTP items.
CORPORATE EDITION INTERIM TAB
If you view all UTP activity as discrete, you can use the Export Numbers to OTP feature to
extract your data from the UTP App. Import this file into the Actual section of the Interim
tab for the appropriate time period.
94
v5.0 UNCERTAIN TAX POSITIONS
95
v5.0 UNCERTAIN TAX POSITIONS
TERMINOLOGY
AS FILED BASIS
The position as it was or as it is expected to be on a tax return.
CHANGE IN JUDGMENT/RETURN TO PROVISION ADJUSTMENT
A previously provided UTP item can change in future periods. Items often need to be
adjusted if there is an announcement of a change in statutory rate or a legislation release, or
after the return to provision adjustments are finalized for a year.
CURRENCY TRANSLATION ADJUSTMENT (CTA)
The interplay of the Weighted Average and Spot rates may require that a currency
translation adjustment be posted to the account for the difference in the rates.
DEFERRED BENEFIT
The Tax and Interest benefit is a component of the Deferred Expense and Deferred Tax
Assets, rather than the Current Expense and Current Payable.
EXPIRATION OF STATUTE
Once the Statute of Limitations on the issue expires and the position is determined to be
unavailable for audit, the position no longer needs to be provided for under UTP.
FINANCIAL BASIS
The combination of the As Filed Basis positions and the Uncertain Tax Positions, ensuring
that all issues are fully accrued for in the payable account.
FULL SETTLEMENT
When an issue has gone through the auditing process and a settlement is reached, the amount
of the settlement is recorded. Any remaining balances are considered no longer necessary.
HIGHLY CERTAIN TAX POSITIONS
Tax positions for which the law is clear and unambiguous as to the deduction that would be
sustained. However, the timing of the item might leave room for interpretation. Highly certain
positions are considered to be 100% probable for recognition purposes.
HOT INTEREST
Underpayments of over $100,000 are subject to a hot interest rate that is 2% higher than the
normal underpayment rate.
INTEREST AND PENALTIES
Accrual for the potential exposure of interest and penalties for an Uncertain Tax Position. An
accounting policy election determines whether the expense for the interest and penalties
should be treated as an interest or penalties expense (above the line) or whether both should
be treated as income tax expense (below the line).
MEASUREMENT (UNCERTAIN TAX POSITIONS STEP 2)
Once a tax position is determined to be recognized from Step 1, the appropriate amount is
96
v5.0 UNCERTAIN TAX POSITIONS
determined using a probability analysis.
NO LONGER UNCERTAIN
A determination that you no longer need to provide for a tax position on a UTP basis because
the position is no longer uncertain.
OVERPAYMENT
C Corporations that have refunds in excess of $10,000 are subject to GATT refund rates.
The GATT refund rate applies to the portion of the refund in excess of $10,000.
PARTIAL SETTLEMENT
When an issue has gone through the auditing process and a settlement is reached on a portion
of a position, the amount of the settlement is recorded and the remaining balance continues to
be uncertain.
PROBABILITY ANALYSIS
Analysis on all non-highly certain issues (e.g., permanent differences and tax adjustments) to
quantify the amount that is not expected to be sustained if the position was lost on audit.
RECOGNITION (UNCERTAIN TAX POSITIONS STEP 1)
Identification of potential tax positions that are not expected to be provided for on the return/
provision. Once identified, the tax position is subject to the more likely than not threshold
standard. Positions with a greater than 50% likelihood of being sustained under audit should
then move to the second step of Uncertain Tax Positions: Measurement.
TAX POSITION
Income or expense item, for which the book treatment differs from treatment by the taxing
authorities.
UNCERTAIN TAX POSITION (UTP)
The difference between the position taken, or expected to be taken, on a tax return and the
potential amount that is expected to be sustained after audit or through litigation.
UNCERTAIN TAX POSITIONS BASIS
The additional exposure on potential audit issues or the UTP that would exceed the amount
provided on an As Filed Basis.
97
v5.0 UNCERTAIN TAX POSITIONS
UNCERTAIN TAX PROVISION
Here is an overview of how the Uncertain Tax Positions and the Tax Provision interact:
“As Filed” (Provision) Data
The As Filed Basis datasets should be populated with the provision information that is
expected to be ultimately reported on a tax return:
Pre-tax book income
Current and deferred tax rates
Permanent differences
Temporary differences
After tax temporary differences
Tax adjustments
State information
Uncertain Tax Positions Data
UTP datasets should be populated with the effect of the uncertain tax positions populated in
the UTP App. UTP amounts are entered on an after-tax basis for both federal and state.
98
v5.0 UNCERTAIN TAX POSITIONS
ONESOURCE TAX PROVISION
Typically, a summary approach is used when viewing your UTP information in
ONESOURCE Tax Provision. There are two different options you can use to migrate your
UTP information from the UTP App to ONESOURCE Tax Provision:
Manual approach
Export approach
MANUAL APPROACH
In the UTP App, go to the Uncertain Journal Entry report and record the following amounts
from the Change column (Be sure to select the correct show option based on your treatment
of interest and penalties.):
FEDERAL
Payable
P/L: Provision for Current Income Taxes
B/S: Non-Cash Offset
EQ: Equity Offset
Deferred
P/L: Provision for Deferred Income Taxes
B/S: Non-Cash Offset
EQ: Equity Offset
STATES
Payable
P/L: Provision for Current Income Taxes
B/S: Non-Cash Offset
EQ: Equity Offset
Deferred
P/L: Provision for Deferred Income Taxes
B/S: Non-Cash Offset
EQ: Equity Offset
In ONESOURCE Tax Provision, in your Provision dataset or a copy of your Provision
dataset, create line items for the following amounts to determine the impact of your UTPs on
your provision and your effective tax rate:
PROVISION FOR CURRENT TAX AMOUNTS
Non-Cash Federal Tax Adjustment (NC_)
Non-Cash State Tax Adjustment (NC_)
PROVISION FOR DEFERRED TAX AMOUNTS
Federal After Tax Temporary Difference – Deferred Only Adjustment
State After Tax Temporary Difference – Deferred Only Adjustment
NON-CASH OFFSET AND EQUITY OFFSET AMOUNTS
Federal After Tax Temporary Difference - Balance Sheet Only Adjustments
State After Tax Temporary Difference - Balance Sheet Only Adjustments
99
v5.0 UNCERTAIN TAX POSITIONS
EXPORT APPROACH
IN THE UTP APP:
1. Export Summary Categories and Numbers for the dataset you are working with. The
Numbers export ties directly back to the Uncertain Journal Entry report. Choose
whether you'd like to export benefit on the Current or Deferred side.
2. Import Summary Categories into ONESOURCE Tax Provision.
3. Import Summary Numbers into ONESOURCE Tax Provision The dataset into which
you import this data depends on your process for UTP. You may be using your
Provision dataset, a copy of your Provision dataset, or a dataset designated
specifically for your UTP items.
Note: If you are using a dataset designated specifically for your UTP items, create a
Reporting dataset containing your Provision dataset and your UTP dataset.
4. View your Federal and State Tax Provision reports, the Effective Tax report, and the
Deferred Balances report to see the effect of UTP on your provision.
FREQUENTLY ASKED QUESTIONS
GENERAL USAGE
1. What do I do if I’m trying to add a new position and the Uncertain Tax Position dropdown keeps displaying Loading?
You have probably not assigned your categories to the current unit. See Unit-Component
Assignments.
2. When I click Dataset Merge, I get the message: "The current dataset is not a member
of any reporting datasets eligible for merging."
There are two reasons you may receive this error message:
You may not have created a sequential reporting dataset, which is required for the
dataset merge. Refer to the instructions on the bottom of the Quick Links page for
more information.
If you have already created a sequential reporting dataset and you are receiving
this message, the current dataset is not a member of the reporting dataset. Click
Settings, select a dataset that is part of the reporting dataset, and click Save.
3. Some of the positions on my reports display without an Item Description and I can't
delete them. What happened?
A user deleted one or more categories (permanent, temporary, tax adjustment) that were
associated with a UTP. Please contact Support to have this issue resolved. (Deleting
categories which are in use is not possible when using the Administration Center:
Components to manage your categories, instead of the Provision side.)
4. How do I enter a Partial Settlement?
100
v5.0 UNCERTAIN TAX POSITIONS
Built-in functionality for Partial Settlements is now available. For information on the new
Settlement workflow, refer to the UTP App Settlement Guide located on the My UTP
page of the UTP App under UTP Guides. The guide should be reviewed before
attempting to settle positions using the workflow. If a mistake is made, you are able to
Undo Settlements (Full or Partial) in the dataset in which they are first settled.
5. Where can I get a breakdown of the interest calculation by year? (This only applies
when using TimeValue TaxInterest to calculate interest.)
The Interest and Penalties schedule breaks down the interest calculation by quarter. You
can export this schedule to Excel and modify it for the breakdown you want. You will
need to Convert
Text to Columns to isolate the interest amount:
1. Select the rows in which the interest information is.
2. Remove the Merge and Center option.
3. Select the interest information.
4. Click Data > Text to Columns.
5. Select Delimited and click Next.
6. Select Space and click Finish.
6. What do I do if I made a final modification (EXP or NLU) on a position by mistake?
A new dataset needs to be created to fix the position(s). If you have already made
several changes in the current dataset, you can:
1. Export the current dataset (Export UTP Items) and save the file.
2. Re-roll the previous dataset to a new dataset.
3. Make necessary modifications to the exported file (change the incorrectly
modified position(s)).
4. Import the file into the new dataset you created.
7. Which states/provinces do not have their own rate tables?
States/Provinces without their own rate tables default to Federal/Canada/United
Kingdom. For a complete list, refer to State and International Positions.
IMPORT
1. If I make a change to one of the first seven columns of data (columns A through G)
and import it into the UTP App, a new position is added.
How come?
Making a change to one of the first 7 columns creates a new position because you
are changing one of the defining characteristics of the position. If you wish to
create a duplicate position (same code, jurisdiction, year), refer to the Import Tips
section.
2. Can custom interest tables be imported into the UTP App?
The ability to import custom interest tables is now available. For more information,
101
v5.0 UNCERTAIN TAX POSITIONS
refer to the Import Template Guide (slides 14-15), which is located on the My UTP
page of the UTP App under UTP Guides.
3. Can settlements (full or partial) be imported into the UTP App?
No. The workflow must be used to enter full and partial settlements.
TECHNICAL
1. What is the preferred browser for using the UTP App?
It is highly recommended that you use Mozilla Firefox 3 (or download the Desktop
App). Internet Explorer 7.0 is also a supported option.
2. What do I need to do to get the latest version of the UTP App?
If you log in to the ONESOURCE platform to access the UTP Application, you
will have the latest version. If this is not how you access the UTP Application,
please contact your Administrator for information on your update schedule.
102