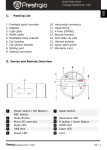
1
NVR User Manual
Preface
Version
Software version: NVR3.0
Target Readers
Operators, Maintenance personnel
About This Manual
The user manual comprises two parts: the text and the appendix. The text
describes interface operations of the NVR, and the appendix presents
some information for your consultation.
Chapter 1 describes operation methods, interface prompts, use of entry
methods and so on;
Chapter 2 ~ 9 illustrates functional operations of the NVR system;
Chapter 10 presents the operation method in case of multiple NVR;
Chapter 11 discusses frequently asked questions;
Glossary presents terminologies used in the manual.
Conventions
Indicates special attention of users, and following these descriptions or
prompts will lead to better application of the NVR system.
Bold: Indicates main features, interface parameters or summary.
We try our best to insure the correctness, and our document will update with the software
without announcement, please ask for your provider to access the document up to date.
General Operations
Contents
1
General Operations .......................................................................................................... 1
1.1
2
3
Operation Mode ........................................................................................................ 1
1.1.1
Remote Control ................................................................................................ 1
1.1.2
Mouse ............................................................................................................... 2
1.2
Menu/Video toggle ................................................................................................... 2
1.3
Icons ......................................................................................................................... 2
1.3.1
Toolbar Icons .................................................................................................... 2
1.3.2
Video Icon ........................................................................................................ 3
1.4
Turn on/Turn off ....................................................................................................... 3
1.5
User Login/Logout ................................................................................................... 4
1.6
Entering Digits/Characters ....................................................................................... 5
1.7
How to Get Help ....................................................................................................... 6
Video Surveillance ........................................................................................................... 7
2.1
PTZ Control .............................................................................................................. 8
2.2
Snapshot ................................................................................................................. 13
2.3
Voice call ................................................................................................................ 13
2.4
Camera Sequence ................................................................................................... 14
2.5
Layout ..................................................................................................................... 15
2.6
Page Sequence ........................................................................................................ 16
2.7
Layout Scheme ....................................................................................................... 16
2.8
Scheme Sequence ................................................................................................... 17
Playing Records ............................................................................................................. 19
3.1
Record Control ....................................................................................................... 19
3.2
Schedule ................................................................................................................. 20
3.3
Record Policy ......................................................................................................... 21
3.4
Replay ..................................................................................................................... 22
I
General Operations
4
5
3.5
Multi-records Replay .............................................................................................. 24
3.6
Synchronous Replay ............................................................................................... 25
3.7
Backup/write in CD ................................................................................................ 25
3.8
BAK Replay ........................................................................................................... 25
Snapshot ......................................................................................................................... 27
4.1
Snapshot ................................................................................................................. 27
4.2
Snapshot Query/Browse ......................................................................................... 28
4.3
Snapshot Settings.................................................................................................... 29
Alarm Management ........................................................................................................ 31
5.1
5.2
6
7
IO Input .................................................................................................................. 31
5.1.1
Access IO Input device ................................................................................... 31
5.1.2
Name the alarm............................................................................................... 32
5.1.3
Alarm Linkage Settings .................................................................................. 32
Service Alarm ......................................................................................................... 35
5.2.1
Motion detection ............................................................................................. 35
5.2.2
Name the alarm............................................................................................... 35
5.2.3
Alarm Linkage Settings .................................................................................. 35
5.2.4
System Alarm ................................................................................................. 35
5.3
Current Alarm ......................................................................................................... 36
5.4
History Alarm ......................................................................................................... 36
TV Wall Management ..................................................................................................... 38
6.1
TV Wall Scheme ..................................................................................................... 38
6.2
TV Wall Video Edit ................................................................................................ 39
6.3
TV Wall Video Sequence ........................................................................................ 39
User Management .......................................................................................................... 41
7.1
Add a new User ...................................................................................................... 41
7.2
Right setting............................................................................................................ 41
II
General Operations
8
9
7.3
Delete a User .......................................................................................................... 42
7.4
Suspend a User ....................................................................................................... 42
7.5
Change Password.................................................................................................... 42
Log Management ........................................................................................................... 43
8.1
View Log ................................................................................................................ 43
8.2
Delete log ............................................................................................................... 44
System Management ..................................................................................................... 45
9.1
General Settings...................................................................................................... 45
9.2
System Information ................................................................................................ 47
9.3
Network Test........................................................................................................... 47
9.4
Dual screen ............................................................................................................. 48
9.5
Image cut ................................................................................................................ 48
10 Operating Multiple NVR ................................................................................................. 49
11
10.1
Setting NVR No. .................................................................................................... 49
10.2
Remote control over NVR ...................................................................................... 49
Question and Answer .................................................................................................... 51
12 Glossary .......................................................................................................................... 53
III
General Operations
1 General Operations
This document describes the operations on Network Video Recorders (NVR) series, which is
applicable to NVR2820, NVR2820E, NVR2860 and KDM201S.The NVR mentioned in this
document refers to all kinds of NVR and KDM201S besides declaration specific.
1.1
Operation Mode
To control the NVR:
♦
♦
♦
♦
Remote control (applicable to NVR2820 and NVR2860)
USB Mouse
Surveillance keyboard
NVR Station, Refer to the help file for details.
1.1.1 Remote Control
Figure 1-1 Remote Control
1
General Operations
1.1.2 Mouse
The NVR supports USB mouse, the following are frequently used:
♦
♦
♦
1.2
Click to open an interface or a configuration item
Right click to return to the previous interface
Rotate the wheel button to enter the digits
Menu/Video toggle
Use one of the follow operations to switch menu/video interfaces:
♦
In the live video screen, press the
switch to a menu, press
press
♦
to return to the previous menu, and then
continuously to back to the video.
In the configuration items, press
and press
button on the remote control to
to return to the previous menu,
continuously to back to the video.
♦
Right-click to select the main menu, and right click once to return to the
previous menu, while continuously to back to the video.
♦
Press
on the keyboard to open the menu, and press
to back
to the previous, while continuously to back to the video.
1.3
Icons
1.3.1 Toolbar Icons
Press any key in the numeric area (except 0) or move your mouse to the under-side area of the
screen, and the toolbar appears which is hidden by default. Press the key
to show the
hotkeys of functions, and press the digit on your remote control to conduct operation.
The toolbar icons and hotkeys:
Full screen 1
Record control 5
PTZ control 2
device management 6
Snapshot 3
Voice call 4
Disk management 7
2
General Operations
Next video 8
Next layout 9
show hotkeys
power off
Main menu
1.3.2 Video Icon
Live video tips icon:
input alarm
Motion detection alarm
video packet loss
Video source loss
playing
recording
lens mask alarm
PU offline
speaking
NVR tips icon:
NVR alarm input
disk error
Disk full
No recording space
NVR offline
Slower network speed
IP conflict
Snapshot space full
Voice broadcast
USB device
ANR
No disk
Click icons on the screen to show the ToolTips.
1.4
Turn on/Turn off
Turn on:
After the power socket is connected, press the power switch on the rear panel of NVR.
Turn off:
♦
Press
on your remote control, and press
again after the
display off, then press the power switch on the rear panel of the device.
3
General Operations
♦
Select
on the toolbar , then click Shutdown.
♦
Click shutdown in the main menu.
Notice: The system will save the current configurations before shutdown, so that it will enter
the status next time when power on.
1.5
User Login/Logout
The NVR show live video screen automatically after it turn on, enter User and Password in the
User Login interface to operate.
The valid time for user can be set in general settings, see Section 9.1 for details.
Figure 1-2 User Login
Notice: Both username and password are admin by default. You may modify the password
in the user management interface. If you forget your password, please select Forget
Password, and contact your supplier according the suggestion on the interface.
4
General Operations
1.6
Entering Digits/Characters
Indication of input method status
Status icon
Content
Soft keyboard
Digits
Lower-case letters
Upper-case letters
Chinese characters
Special symbols
To Switch input method
♦
♦
In the input status, press
on your remote control to switch the input
method;
In the input status, click the status icon after the input box to switch the
input method. Click the input box to open the soft keyboard.
5
General Operations
To enter digits
The
icon show digits input status.
Some input box support input by rotating the wheel button, such as IP address, date, time, and
duration.
To enter letters
The
icon show lower-case letters while
show upper-case.
Continuously press the key rapidly to change the order of letters.
To enter Chinese characters
The
icon show Chinese input, please type in full spelling method.
To enter special symbols
In the
status, enter special symbols as you want. Please refer to the soft keyboard for
correct symbols.
1.7
How to Get Help
Please consult with your network administrator or refer to the NVR Administrator Guide to
install or configure your NVR surveillance system.
Refer to the online help of the NVR Station for details.
Get the latest document and software from your supplier.
6
Video Surveillance
2 Video Surveillance
When power on, the NVR automatically enters the video surveillance screen.
NVR2860 support dual display, and the main output resolution is 1920*1080.
To open the live video menu:
♦
Right-click in the video screen.
♦
Press
♦
Press
Menu
on your remote control.
on the keyboard.
Submenu or
Shortcut
To Do
Full screen
Full screen display of videos from the current video
live
PTZ control
Control the camera, such as zoom and focus
Video view
once
Select a video source to display, and press
to view the next, which increases cyclically according
to the camera sequence in the video source list.
Secondary output
Recording Mode
Voice call
Layout
Auxiliary Picture
TV Wall
Available for NVR2860, Only one video displayed in
the secondary monitor.
set the recording mode of the current camera: Enable,
Auto, Disable. See Section 3.1 for more details.
Call the selected camera
13 optional layouts
Layout scheme
16 preset schemes available
Record replay
Replay selected records.
Main menu
Enter the main menu
7
Video Surveillance
Submenu or
Shortcut
Menu
Picture
adjustment
Snapshot
Advanced
Adjust the brightness, contrast, and saturation of the
picture,, and click Save to take effect.
Take snapshots of video sources.
Camera sequence
Conduct sequence according to the preset sequence
scheme or edit the sequence scheme
Scheme sequence
Edit sequence scheme and enable/disable the scheme
Network test
Current alarm
2.1
To Do
Test the network conditions of the current camera.
Refer to Section 9.3, “Network Test” for details.
View the current alarm.
PTZ Control
PTZ control method:
After choosing a video live, select
on the toolbar (shortcut key 2) or the video live menu to
enter the PTZ Control interface, as shown in Figure 2-1.
Figure 2-1 PTZ Control
8
Video Surveillance
Camera menu, control the camera quickly;
Zoom in or zoom out:
zoom in (shortcut key 3);
zoom out (shortcut key 1);
Screen brightness:
increase (shortcut key 6);
Focus adjustment:
increase focal length (shortcut key 9);
(shortcut key 7);
decrease (shortcut key 4);
decrease focal length
Auto focus (shortcut key 8).
Fast PTZ
Select the video, and click the icon
on the top of the video, then click direction arrows on
the video
Operate on the video directly down and up and right and left, and press the center icon to reset.
9
Video Surveillance
Advanced control
Click the
icon on the PTZ Control interface or press
on your remote control to
enter the PTZ Control-Advanced interface, as shown in Figure 2-2.
Figure 2-2 PTZ Control – Advanced1
Enable camera cruising or set image display mode here.
Control Amplitude: The size of control amplitude indicates the PTZ control amplitude, that is,
the size of remote control step. The greater the amplitude is, the larger the remote control
stepping amplitude will be, or vice versa.
Preset Position: sets the current PTZ status to a preset position or stores and loads a selected
preset position, and 255 presets are maximum.
Click Edit Custom Button, as shown in Figure 2-3.
10
Video Surveillance
Figure 2-3 PTZ Control – Custom Buttons
You may select custom buttons and button-related actions, such as enabling rain brush, turning
on light, cruising or not. For a camera which can receive control commands, you may enter
command strings and specific rules. Please refer to the Camera User Manual.
The other 2 pages can configure IPC’ s parameters, if the IPC be able to configure them.
Figure 2-4 PTZ Control – Advanced2
11
Video Surveillance
Figure 2-5 PTZ Control – Advanced3
12
Video Surveillance
2.2
Snapshot
If the service linkage of the video source (see Section 5.1.3) includes snapshot, when service
linkage takes place, automatic snapshot will be taken. The snapshot pictures will be saved in
the recording partition. For the same alarm, if multiple video sources (that is, cameras) are set,
snapshot will be taken by the principle of “first occupy and first snapshot”. Every time when a
snapshot is taken, the cameras will compete for the snapshot right at an interval of five seconds.
Figure 2-6 Snapshot
Manual snapshot:
Select
on the toolbar, or select Snapshot for the video live;
Enter a name to save the snapshot or directly click OK to save the snapshot.
Notice: Please be sure there are system disk in NVR, otherwise it is not supported snapshot.
2.3
Voice call
Audio device is necessary for the camera to support voice call. Please refer to the user manual
of the camera or video encoder for details.
13
Video Surveillance
Click the live video, to do:
Click the
on the toolbar,calling the dedicated camera;Right-click or press
,select
voice control, and then select call or broadcast.
voice broadcast
dumb
broadcast unavailable
listen
silent
speak
both call and broadcast are unavailable.
Volume: Drag the slide to tune the volume.
2.4
Camera Sequence
Camera sequence is which videos are sequenced according to the preset scheme. Totally 16
Camera sequence scenarios can be set. Select Camera Sequence from the shortcut menu of the
camera. The Camera Sequence Edit interface appears (Figure 2-7):
Figure 2-7 Camera Sequence Edit
14
Video Surveillance
Camera sequence method:
1) Select a camera sequence scenario from the dropdown list;
2) Select start to start camera sequence.
3) Editing camera sequence scenario:
4) Select a video source from the camera list;
5) Set the camera residence time: 5s, 10s, 20s, 30s, 50s or 1 minute;
6) To change the order of camera sequence, select a camera and click UP or
Down;
7) To change the scenario name, select Rename and enter a name.
8) Unified Waiting Time: If the Unified Waiting Time check box is selected,
all cameras in the sequence scenario will have the same residence time.
2.5
Layout
Layout setting:
Layout interface (Figure 2-8): takes effect immediately after being selected. Different models
of NVRs such as NVR2820-4 or NVR2820-9 demonstrate different number of layouts. For
details, refer to Chapter 1 of NVR Administrator Guide.
Figure 2-8 screen layout
15
Video Surveillance
Switch the layout:
Press the
button on the toolbar and switch to the next layout.
KDM201S display video in different tabs according layout, select the tab or list to view the live
video.
2.6
Page Sequence
KDM201S support page sequence, which refer that the video screen switch automatically.
1) Select the
above the screen to open the Page Sequence interface.
2) Select enable sequence.
3) Select the page in the page list.
4) Type sequence time interval.
5) Select the
icon again to open the Page Sequence interface, and
select stop sequence to stop the sequence.
2.7
Layout Scheme
Select Layout Scheme from the shortcut menu of video camera. The Layout Scheme interface
appears (Figure 2-9),
16
Video Surveillance
Figure 2-9 Layout Scheme
Editing layout scheme:
1) Select a scenario from the scenario list;
2) Select a screen from the layout list;
3) On the selected screen, right click or press the key
. A menu
appears. Select a video source.
4) To name the scenario, select Rename and enter a name.
5) Save the changes.
Load: Loads the currently selected scheme;
Current Scheme: Loads the currently monitored layout scenario as a scheme.
2.8
Scheme Sequence
Dynamic switch between multiple layout schemes in a certain order and time constitutes a
sequence scheme. The system provides more than ten layout schemes by default, and random
combination of them generates a sequence scenario scheme.
17
Video Surveillance
Select Scheme Sequence from the shortcut menu of the video camera. The Scheme Sequence
Edit interface appears (Figure 2-10).
Figure 2-10 Scheme Sequence Edit
Editing scheme sequence scenario:
1) Select a sequence scenario;
2) Select a scenario participating into the sequence from the scenario list;
3) Select a residence time for a scenario (5S, 10S, 20S, 30S, 50S, 1min);
4) To change the sequence order, select Up or Down;
5) To name the sequence scenario, select Rename and enter a name.
6) Save the sequence scenario.
Unified Waiting Time: If the Unified Waiting Time check box is selected, all scenarios in the
sequence scenario will have the same residence time. Click Start to start scheme sequence.
18
Playing Records
3 Playing Records
The NVR supports replay and backup of the records as well as setting of recording parameters.
The path for related recording operations is as follows: Main Menu Æ Record.
You may conduct the following operations in the Records menu:
♦
♦
♦
♦
♦
♦
♦
♦
3.1
Record control
Schedule settings
Setting recording policy
Replay
Multi replay
Sync replay
Backup Query
Backup
Record Control
Camera recording mode:
♦
♦
♦
Enable: recording all along
Auto: record according to record trigger mode (schedule, alarm
record and motion detection)
Disable: recording will not be made
The following methods are available for entering record control:
♦
♦
♦
Main menu Æ Records Æ Control
Live Video menu Æ Record Mode Æ Record Control
Select toolbar icon
The Record Control interface is as shown in Figure 3-1. Procedure for recording mode:
1) Select a video source;
2) Set mode: Enable, Disable or Auto.
3) Click OK to validate the settings. Click Cancel to quit without save.
19
Playing Records
Figure 3-1 Record Control
Apply to All: Select a camera, and copy the record control policy of this camera to all the other
cameras.
3.2
Schedule
When the record mode of a camera is set to Auto, the scheduled recording function takes effect.
Path for Schedule:
Main menu Æ Record Æ Schedule
♦
♦
♦
♦
♦
Set recording time, as shown in Figure 3-2:
Select Camera;
Set the specific time (Day, from Monday to Sunday);
Set Recording periods ( four at maximum);
Click Save to save the current settings or click Back to return to
the previous interface. If any parameter changes, the system will
prompt it has not been saved yet.
20
Playing Records
Figure 3-2 Schedule
Copy: This function is used to copy selected camera recording time. The settings of a camera
can be copied to other days of the Day settings of the camera or all the days of the Week of all
cameras, as shown in Figure 3-3:
Figure 3-3 Copy To
3.3
Record Policy
Record policy include insufficient recording space as well as the pre-recording policy for
alarm.
Path for Record Policy: Main menu Æ Records Æ Policy,
21
Playing Records
Figure 3-4 Record Policy
If there is not enough recording space, two policies are available, that is to stop recording or
overwrite the oldest files.
Continue record after alarm for: continuous recording time after alarm generation and recovery
(300 seconds at maximum).
Enable Record-Resave: transfer the record in IPC or video encoder to NVR automatically.
3.4
Replay
Replay a record at a time, click playback in the record management menu:
Enter Main menu Æ Record Æ Playback
1) tick the camera in the list;
2) the date which have records high lightened, and select one among them;
3) click to select the beginning time in the time span axis;
4) Click Play to play the records full screen, as shown in Figure 3-5.
Select camera: enter the first character,
the camera quickly.
and list the camera contain it, which help you locate
Option: set advanced configure here:
22
Playing Records
Display time: the time span axis showed in the playback interface.
Event display: set the event records showed in the playback interface, such as alarm in, motion
detect, video lost or other.
Play option: control to play the next or previous time slice during replay.
Figure 3-5 Replay
Video play control:
23
Playing Records
Next/previous time slice, move to play in Next/previous time slice, which set in the option
Label Records
Recorded files are labeled for the convenience of memory or to query sections of recorded files,
such as, front door, back door, fire, and so on. User-defined labels should not be the same as
system labels. Normally, system labels include alarm records, motion detection records, deleted
terminal records or all types of records.
Click the time span axis when play records, click the label icon, then name the label.
The label name should have a length ranging from 1 to 32 characters, including characters,
letters and digits.
3.5
Multi-records Replay
Multi-records replay means that two or more records are played at the same time. A maximum
of four records are supported.
Enter Main menu Æ Record Æ multi Play
Click the channel, and click the mouse, or press the key
, or press the key
, then
make your choice:
♦
♦
Live video, select a camera for the window;
Record Query, replay record in the window as well as replay
records in section 3.4.
Please control your multi-play by selecting display windows one bye one, and fast play is
disabled.
24
Playing Records
Notice: the layout automatically switches to 2*2 during multi-replay and sync-replay, and it
recovers to the previous layout when the replay finished.
3.6
Synchronous Replay
Synchronous replay means that two or more records overlapped in time are played at the same
time
Enter Main menu Æ Record Æ Sync Play
1) Click to select two or more cameras in the list;
2) Select the date;
3) Select the time to replay, and then click playback.
Upon synchronous replay, unified control of the play speed is supported: that is, play, pause or
stop.
3.7
Backup/write in CD
NVR2820E-9D, 16D and NVR2860 support such features.
Records can be backed up in an USB storage device, or written into an USB DVD. The built-in
hard disk should not serve as backup disk.
Backup:
Enter Main menu Æ Record Æ Backup
Select the channel and date, and the Backup button is enabled;
Enter the Start and End time to play, and click Backup;
Select the destination for backup, then click Backup.
Write in DVD:
The procedure is similar with backup, after selecting destination for backup, the system prompt
that it is DVD writing, confirm it to start writing.
3.8
BAK Replay
NVR2820E-9D, 16D and NVR2860 support such features.
25
Playing Records
Play the backup records by NVR or play on windows with special player.
Play by NVR:
Enter Main menu Æ Record Æ Backup Query
1) Select the volume (USB interface);
2) Select the records in the list;
3) Click Play to play the records.
Play on Windows:
A special player which is localrecplayer.exe is provide with attached CD, double click to run:
1) Click the
icon;
2) Browse and select the folder;
3) Click ok to play.
Click the time on the axis to change the time replaying.
Fast, slow, pause and play are available in the control bar when play.
The
icon is a voice switch, drag the slider to adjust volume.
Notice:The backup folder is read only, it is should not be renamed.
26
Snapshot
4 Snapshot
The NVR supports snapshot and provides snapshot management function:
♦
♦
Query snapshots and browse pictures;
Set snapshot interval, number of pictures and space.
In case of service linkage set for video sources, if the service linkage includes snapshot, when
an service linkage occurs, the system will take snapshot automatically, and the snapshot
pictures will be automatically saved in the recording partition. For the same alarm, if multiple
video sources (that is, cameras) are set, snapshot will be taken by the principle of “first occupy
and first snapshot”. Every time when a snapshot is taken, the cameras will compete for the
snapshot right at an interval of five seconds.
4.1
Snapshot
To take snapshots, the PU (encoder )needs to support snapshot function. To know whether the
PU encoder supports snapshot function, please refer to the user manual for the PU.
Two snapshot modes are available: manual snapshot and service linkage snapshot.
Manual snapshot:
♦
♦
Click
on the toolbar;
Upon live video, select the camera menu Snapshot.
For service linkage snapshot, refer to subsection 5.1.3
Label the picture:
Label the picture when snapshot manually on the popup windows。
27
Snapshot
4.2
Snapshot Query/Browse
Path for Picture Query:
Main Menu Æ Snapshot Æ Picture Query
The Picture Query interface is as shown in Figure 4-1:
Figure 4-1 Picture Query
Operating Procedure:
Enter query conditions: Start Time, Duration, Source and Type (Motion Detection, Signal Loss,
Lens Mask, Level Alarm, PU Offline, Manual Snapshot or All.
1) Select a picture;
2) Click Browse. The Browse interface is as follows:
28
Snapshot
Figure 4-2 Browse
Click Next to browse the next picture. Click Delete to delete the currently browsed picture.
For selected pictures, you may click Delete to delete all searched pictures.
4.3
Snapshot Settings
Path for Snapshot Settings:
Main Menu Æ Snapshot Æ Snapshot Settings
set the following parameters:
♦
♦
♦
Total snapshot space size
Alarm Snapshot Interval(5-60s)
Snapshots after alarm(1-10 pieces)
Total snapshot space: The maximum settable value in the drop-down list will be displayed
according to the actual situations, that is, if the left free space is 5G, the maximum settable
29
Snapshot
space is 5G.
Notice:Please be sure there is a system partition in the device as the snapshots is saved
automatically in this partition.
30
Alarm Management
5 Alarm Management
You may enter the Alarm Management interface from the main menu, including ALM IN,
Service ALM, System ALM, ALM Status and History ALM.
Many conditions may trigger alarm, such as IO Input, service alarm or system error. IO Input is
alarm by detector, such as an entrance guard or a smoke sensor etc. Service alarm is alarm
which is triggered by surveillance video, for example, motion detection, or video loss. System
alarm usually triggered by surveillance system, such as network, disk, etc.
When an alarm occurs, relative actions triggered automatically, such as, IO output, buzzer,
enable record, snapshot pictures, show text tips, switch to view, load the camera preset and
alarm LED blinks. IO output is device action connected in the IO terminal, alarm ring,
loudspeaker, alarm light, etc. Buzzer is NVR buzzer.
5.1
IO Input
Here an entrance guard is set as an example. When the door is opened abnormal, the system
should take such actions automatically: alarm bell ring, NVR buzzing, the video switch to live
display, and recording.
5.1.1 Access IO Input device
Enter the Alarms/ALM IN interface from the main menu. as shown in Figure 5-1
Alarm Input has two types: Normal Open and Normal Close. It is recommended that the
Device Type of alarm input be set by the administrator to avoid mistakes.
Figure 5-1 ALM IN
31
Alarm Management
Alarm output is normal open by default and un-settable, please set your output device in
normal open.
5.1.2 Name the alarm
Name the alarm to help remember different alarm triggered by all kinds of type, refer to Figure
5-2
♦
♦
Select alarm type and source;
Click rename to name the alarm.
5.1.3 Alarm Linkage Settings
Alarm linkage refers to the linkage handling policy in case of an alarm.
Path for service linkage setting:
Main Alarm Æ AlarmsÆService Alarm
The interface is as shown in Figure 5-2.
Figure 5-2 Service Alarm
Operating Procedure:
1) Select Type;
32
Alarm Management
2) Select Source;
3) Select Day (day of the week);
4) Set service linkage period (totally four periods);
5) Select Linkage Edit and set linkage mode.
IO Output
IN the Linkage Edit interface, select the Linkage Device which is NVR, and check out the
linkage actions available (Figure 5-3):
♦
♦
Alarm: There are alarm outputs O1 and O2 on the rear panel of
the NVR connected to alarm output devices such as alarm ring,
loudspeaker, and light.
Buzzer: The buzzer of the NVR gives off buzzes.
Figure 5-3 Linkage Edit 1
Notice:NVR2820E-9D ,NVR2820E-16D and KDM201S have no buzzer.
33
Alarm Management
Record/ Snapshot/ Caption/Switch To live/Camera preset:
If the linkage device is a video camera, the following linkage modes are available (Figure
5-4):
♦
♦
♦
♦
♦
Record: Recording upon alarm
Snapshot: Take snapshots upon alarm
Caption: display captions on the surveillance screen and
indicating the word “alarm”
Switch To live: Automatically switch to the live video windows
and play current video;
Preset Position: Preset position for camera PTZ
Figure 5-4 Linkage Edit 2
As shown in Figure 5-2, you may click Copy to copy a linkage to the related period of other
cameras.
34
Alarm Management
5.2
Service Alarm
Service alarm means alarms arising from change of the video source, such as motion detection
and video loss. And we take motion detection as an example.
Notice: video loss is detective all along, no special setting for it.
5.2.1 Motion detection
Motion detection refers that detect the motion of defined area, when the motion reached the
threshold, then trigger alarm.
5.2.2 Name the alarm
Click the rename button in the Service alarm interface, and name the alarm.
5.2.3 Alarm Linkage Settings
In the Service alarm interface, set alarm type to motion detection, and triggered by camera,
then set linkage time and schedule ;
Click Edit, set linkage policies, please refer to 5.1.3 section for details.
5.2.4 System Alarm
System alarm means alarms arising from exceptions of the NVR surveillance system, such as
disk error, IP conflict and network connectivity.
When an exception occurs to the NVR system, the following linkage handling setting method
is available: Menu entry: Main Menu Æ Alarms Æ System Alarm. The interface is as shown
in Figure 5-5.
35
Alarm Management
Figure 5-5 System Alarm Handling
Select System Alarm Type and Handling Mode. Click Save to validate the settings.
5.3
Current Alarm
Method for entering the interface for viewing the current alarm status:
Main Alarm Æ Alarms Æ Alarm Status
♦
Click
♦
Select Alarm Status from the camera right click menu.
The alarm list gives the current alarm information, including
Alarm Type, Start Time, Source and Details.
Select an alarm., the related device listed below the interface,
and Click Close ALM to clear the current alarm information.
After manual alarm cancellation, if the actual alarm is not
cleared, the alarm message will be triggered again and appears
in the alarm list upon alarm detection.
♦
♦
5.4
on the toolbar;
History Alarm
Main Alarm Æ Alarms Æ History Alarm
The History Alarm Query interface is as shown in Figure 5-6:
36
Alarm Management
Figure 5-6 History Alarm Query
Operating Procedure:
Select Type and Source of the alarm;
1) Select Time;
2) Click Search;
3) For an alarm with alarm recordings, select and click Playback to replay
the recorded file.
37
TV Wall Management
6 TV Wall Management
Please enter the TV Wall interface from the main menu to configure the TV wall. Four layout
styles are available and a maximum of 16 videos can be displayed at the same time. You may
set, save or delete a TV wall view scheme. Furthermore, the TV wall supports camera sequence,
as shown in Figure 6-1:
Figure 6-1 TV Wall Management
Notice: add a decoder to the NVR firstly to enable the TV wall and then configure it
6.1
TV Wall Scheme
Make TV wall scheme
1) Select a scheme from the scheme list (16 schemes are available by
default);
2) Set the Number of TV (options: 1, 4, 9 and 16);
38
TV Wall Management
3) Edit TV wall video (for details, refer to Section 6.2, “TV Wall Video
Edit”)
4) Click Rename to name the TV wall scheme;
5) Click Save Change to save the scheme into the scheme list.
Apply/Stop Scheme:
1) Select a scheme from the scheme dropdown list;
2) Click Load to load the current scheme into the TV wall;
3) Click Stop to stop the application of the current scheme.
6.2
TV Wall Video Edit
In the TV wall management interface, select TV Wall Scheme to edit TV wall channel:
1) Right-click to open a menu.
2) Select Encoding Channel, then select Video Source.
3) Select Decoding channel, then select a decoder.
4) Select Camera Sequence to sequence video in one TV, see “TV Wall
Video Sequence” later.
Figure 6-2 TV Wall Menu
6.3
TV Wall Video Sequence
TV wall channel sequence means the TV wall channel is sequenced according to the preset
channel sequence scenario. Totally 16 channel sequence scenarios can be set.
When editing the TV wall channel (Section 6.2), select Camera Sequence from the TV wall
channel menu. Select Edit/Enable Sequence (as shown in
39
TV Wall Management
Figure 6-3):
Figure 6-3 TV Wall Camera Sequence
1) Select a sequence scenario from the sequence scenario list;
2) Select video sources to be sequenced from the Camera list;
3) et residence time for the selected video sources in Waiting Time (please
do not check the Unified Waiting Time check box);
4) Select video sources and click Up or Down to change the sequence
order;
5) Click Rename to change the scenario name;
6) Click Save to save the scenario into the scenario list;
7) Select Enable to start channel sequence.
When setting the residence time for video sources, if you check the Unified Waiting Time
check box, all selected video sources will have the same residence time.
40
User Management
7 User Management
User type includes administrator and user. The administrator can conduct the following user
management operations:
♦
♦
♦
♦
♦
Adding a new User
Setting right for users (modifying user information)
Deleting a user (the default admin user and the log-in user itself
cannot be deleted)
Disable a user (disabled for 15 minutes to 24 hours)
Changing password (changing its own password or reset the
ordinary user password; the password is reset to admin)
A user can only modify its own password.
Description of user right:
♦
♦
♦
7.1
Admin user: has all operation rights, and reset user’s password is
possible;
User’s operation allowed can be view in the user management
windows.
Enter the User Management interface from the main menu
Add a new User
Enter into the user management interface:
1) click new button to new a user;
2) put into the Username and password;
3) enter the password again to confirm, and click OK;
4) click the right button in the user management interface to set right for the
user.
7.2
Right setting
click the right button in the user management interface:
41
User Management
♦
♦
♦
7.3
login right: limite the users access the NVR throught dedicated
IP;
systerm right: operate right on NVR;
Camera right: set the user’s right to operate camera.
Delete a User
Enter the User Management interface. Select a user. Click Delete. The user will be deleted after
further confirmation.
Notice: the default admin user and the current login user itself cannot be deleted.
7.4
Suspend a User
Enter the User Management interface Select a user., then click Disable to suspend the user.
♦
♦
7.5
Username: Select a user to be suspend;
Disable: Select the suspend time (15 minutes at least, and 24
hours at maximum).
Change Password
The user can change own password, admin can reset the password of other users. The password
is admin after being reset.
Enter the User Management interface from the main menu. Select a user. Click Change
Password, enter the new password in the popup interface:
Username: Read only;
♦
♦
Old Password: enter your old password;
New Password: enter your new password;
Confirm Password: enter the new password again.
42
Log Management
8 Log Management
Log type includes login log, backup log, update log, operation log, alarm log and log of all
alarms not cleared.
Enter system management-> Log Management interface. The following log management can
be made:
♦
♦
View log
Delete log
The Log Management interface is as shown in Figure 8-1.
Figure 8-1 Log Management
8.1
View Log
Enter the Start time and Duration (that is, time period);
1) Select log type (login log, operation log, device log, alarm log, backup
log and update log);
43
Log Management
2) Select user;
3) Click Search;
4) From the search result list, select a log. The details of the log will be
displayed below the list, as shown in the above figure. Log Content:
query responses of the recorded files of the NVR platform.
By default, the search result will be arranged in the descending order of time. If the Time
Ascend check box is selected, the result will be arranged in ascending order.
8.2
Delete log
Select a log from the log list. Click Delete to delete the selected log.
Notice:Please be sure there is a system partition in the device as the log is saved
automatically in this partition.
44
System Management
9 System Management
Enter the System Management interface from the main menu, and then select general, COM,
Disk, Update and so on to conduct related setting and management operations respectively.
9.1
General Settings
Select Main Menu Æ System Management Æ Basic, an interface appears as shown in the
follows. Configure the basic parameters on this interface, such as Device Name, System
Language, System Time and Picture Output Mode, as shown in Figure 9-1:
Figure 9-1 Basic Parameters
Device Name: fill in the device name. A digit will be entered by default. Right click the input
identity or use your remote control to change the input method;
NVR No.: sets the NVR number (8 by default);
System Language: sets the language for interface display;
Time Zone Information: fill in the time zone information;
45
System Management
System Time: sets the system time;
Picture Output Mode: Select VGA or a TV system according to the display or monitor of the
output device;
VGA Mode: adjusts the parameters of the VGA output;
Auto System Logout: sets auto logout and logout time;
Monitor Mode: choose Free Mode or Page Mode. If choose Page Mode, the Layout max 16,
the other live video will be in the next page, you can turn a page choose other surveillance
pictures, the interface as following figure,
Figure 9-2 Page Mode
Transparency Setting: adjusts the transparency;
Record Length: Adjust the maximum length of a single video record, the slider from low to
high into 6th gear, they are:
1——64M(about 4min)
2——128M(about 8min)
3——256M(about 17min)
4——512M(about 34min)
5——1024M(about 68min)
6——2048M(about 136min)
The Record Length is advanced parameters, please use the default configuration. If you have
to adjust the values, please contact the project installer or supplier.
Notice: The PAL system is used in China, while NTSC is used in such regions as North
America and East Asia.Be sure to set system time correctly to avoid incorrect record time
and alarm recording time.
46
System Management
9.2
System Information
The system information function is used to check the current status of the current platform,
CPU utilization, network connectivity, harddisk utilization and system version information.
Enter the System ManagementÆ Sys Info interface from the Main Menu, as shown in Figure
9-3.
Figure 9-3 System Information
9.3
Network Test
Take the ping mode to detect the current network situation. Enter the System Management/Net
Test interface from the main menu. Click Net Test. An interface as shown in Figure 9-4
appears.
47
System Management
Figure 9-4 Network Test
Detection Request: Select or enter the detection address or detection count, duration, and so on;
Start Test: Detect the network situation according to the set detection request;
Detection Result: The detection result will be displayed in the list;
Statistics: displays the detection conditions, timeout count and destination reaching count.
9.4
Dual screen
NVR2860 support two display monitors at the same time.
Click dual screen, and set single or dual output.
When video is VGA, two displays both can be enabled as main output and secondary output,
however main output only when HDMI.
9.5
Image cut
NVR2860 support image cut.
Cut your image edge according your display, and the value should be divided by 4, if not, the
system will adjust according your entering.
48
Operating Multiple NVR
10 Operating Multiple NVR
Multiple NVR devices can share the same remote control. A maximum of 8 NVRs can share
the same remote control. You may set NVR number to relate the remote control the NVR. By
default, the NVR number is 8. If the NVR number is the default value, the remote control can
exercise direct control.
10.1 Setting NVR No.
Enter the System /General interface from the main menu, as shown in Figure 10-1. Set the
platform number here. After modification of the NVR No., click Save.
Figure 10-1 Modifying NVR No.
10.2 Remote control over NVR
1) Press and hold
for 3 seconds
2) Enter NVR number (0-7)
49
Operating Multiple NVR
3) Press
4) Start control over the NVR with the related No.
Notice:The NVR No. range is 0-7 when use the remote control over NVR.
50
Question and Answer
11 Question and Answer
1) How to set system time?
Select Main MenuÆ System ÆGeneral. Set the system time in the System
Time field. By default, the time set here will be synchronized with the time
in the synchronous surveillance system.
2) How to set camera id?
When the device is accessed to the network, the NVR system will allocates
an id to the cameras in a unified manner by default. Once the id is
generated, it keeps unchanged, so the user does not need to make any
setting.
3) Can we conduct disk management operation during recording, and how?
During recording, you may check partition error, but cannot format the
partition. Disk partition formatting should be made after the recording is
stopped. If you want to format immediately, please stop recording first and
then format.
4) After press the
key on the remote control to turn off the device, can I
directly turn off the power supply on the rear panel of the NVR?
Correct turn-off: Press the
key on the remote control twice. After the
video output is turned off, press the power switch on the rear panel of the
NVR.
5) Why the NVR Station cannot view videos while the surveillance system is working
normally?
51
Question and Answer
Diversified reasons may be involved. Please make more attempts:
♦
End any NVR operation which may affect browse. Browse
videos again after the following operation is ended:
♦
Multiple NVR stations are browsing videos at the same
time, so the system is busy;
♦
The recording function is enabled for multiple cameras;
The NVR is formatting the disk partition.
♦
Try to log on to the NVR station with remote login mode.
52
Question and Answer
Glossary
Term
NVR
MPEG-4
PU
NAT
Explanations
Network Video Recorder
Moving Pictures Experts Group
Peripheral Unit, refers to IP Camera, encoder or decoder
Network Address Translation
DHCP
Dynamic Host Configuration Protocol
SNTP
Simple Network Time Protocol
DDNS
Dynamic Domain Name Server
RTP
RTCP
CIF
PPPoE
PAL
Real-time Transport Protocol
Real-time Control Protocol
Common Intermediate Format, resolution: 352×288
Point to Point Protocol over Ethernet
Phase Alternating Line, a TV system. China uses the PAL system.
NTSC
A television system promulgated by the National Television Systems Committee,
which is adopted in the USA and some European countries
VGA
Video Graphics Array, normally VGA is used for computer monitors
PTZ
Pan/Tilt/Zoom,
omni-directional
movement
of
(up/down/left/right), lens magnification, and focus control
the
pan/tilt/zoom
53