1
MAXI_operators booklet.qxd:Layout 1
12/9/13
17:34
Page 6
Operation of MAXI Mk2
WARNING: Before connecting the machine to the mains power, make
sure the machine is switched ‘OFF’ to avoid unintended starting!
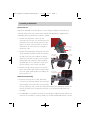
1. Clean the chain before sharpening. Inspect the chain for the most worn-out cutter
tooth and start sharpening with this tooth. The most worn-out tooth is important in
order to sharpen all other teeth to the same depth!
2. Lift up the chain stop, position the chain and secure the chain between the clamping
piece of the chain guide assembly. Fold down the chain stop and pull back the first
cutter tooth against the chain stop. Make sure the chain is between both guide boards
so that the chain can not tilt to the side.
3. Check the necessary filing angle according to the specifications for the chain. Adjust
the filing angle on the chain guide assembly to 25° - 35° or to the required angle and
tighten the locking screw.
4. Lower the motor housing so that the grinding wheel skims the chain tooth. Hold it in
this position while you tighten the screw so that the grinding wheel will only go
down to that point, fix this position with the locking screw.
5. Switch ‘ON’ the MAXI Mk2 by pressing firmly. Use the handle to bring the grinding
wheel down towards the chain tooth. As you bring down the motor housing the
tension cable will automatically clamp the chain between the metal chain
boards.
6. After sharpening one tooth, turn off the machine. Lift the motor housing, to release
the clamp boards, and move the chain so that the next link is positioned against the
chain stop. Mark the first cutter tooth with chalk, then sharpen every second tooth in
one direction. Repeat this process until you have sharpened all of the links set up for
this angle.
7. Change the cutting angle to 30° or to the required angle of the opposite direction of
the remaining chain cutter teeth.