1
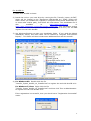
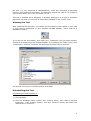
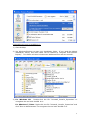
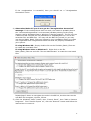
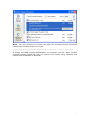
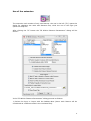
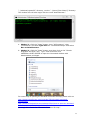
Conefor Inputs “Conefor Inputs” is a custom-made GIS extension for ArcView 3.x, ArcGIS 9.x and ArcGIS 10 developed by Jeff Jenness Enterprises (www.jennessent.com) specifically for the Conefor Sensinode software (CS). The instructions for installation and use of the extension provided below have also been included as part of the CS user’s manual. CS software and manual can be freely downloaded from http://www.conefor.org. “Conefor Inputs” allows easily obtaining from a theme in ArcGIS (e.g. shapefile) both the node file and the connection file (as a distance file) directly in the format required by CS. The distances in the connection file calculated by this extension are edge-to-edge Euclidean (straight-line) between all the features (e.g. patches) of a theme, with the option to analyse either all features or only those within a specified distance (see below). The node and distance files provided by this extension are directly usable (with no change) in CS. Installation For ArcView 3.x 1) Begin by placing the "conefor_inputs.avx" file into the ArcView extensions directory (../../Av_gis30/Arcview/ext32/). This file is available for download at http://www.conefor.org or http://www.jennessent.com/arcgis/conefor_inputs.htm. 2) After starting ArcView, load the extension by clicking on File --> Extensions… , scrolling down through the list of available extensions, and then clicking on the checkbox next to the extension called "Conefor Inputs". 3) The Conefor Inputs tool will appear in your View button bar as a button with a “D” on it: For ArcGIS 9.x 1) Make sure ArcGIS is closed. 2) Install the Conefor Inputs extension by double-clicking on the file “Conefor_inputs.exe”, which will be located in the “Extensions GIS\ArcGIS 9.x” folder (within the folder where you installed CS, typically C:\Program files\Conefor Sensinode 22, or some other similar path), and follow the instructions. This installation file is also available at http://www.conefor.org or http://www.jennessent.com/arcgis/conefor_inputs.htm. The installation routine will register the Conefor_inputs.dll with all the required ArcMap components. 3) Start ArcMap. 1 For ArcGIS 10 1) Make sure ArcGIS is closed. 2) Install the tool on your hard drive by running the file “Conefor_inputs_10.EXE”, which will be located in the “Extensions GIS\ArcGIS 9.x” folder (within the folder where you installed CS, typically C:\Program files\Conefor Sensinode 22, or some other similar path), and follow the instructions. This installation file is also available at http://www.conefor.org or http://www.jennessent.com/arcgis/conefor_inputs.htm. This installation routine will install the DLL and several ancillary files on your hard drive, but will not register the tool with ArcGIS. 3) Use Windows Explorer to open your installation folder. If you used the default installation values, then this folder will be located at “Program Files\Conefor Inputs\”. This folder will also include some additional files and this manual. 4) For Windows XP: Double-click the file “Conefor_Inputs_ArcGIS_10_Installer.bat” to register the tool with ArcGIS 10.0. For Windows 7/Vista: Right-click the file “Conefor_Inputs_ArcGIS_10_Installer.bat” and then click “Run as Administrator to register the tool with ArcGIS 10.0. If the registration is successful, then you should see a “Registration Succeeded” notice. 2 Note: For the concerned or curious, the batch file Conefor_Inputs_ArcGIS_10_ Installer.bat contains the following single line of text: "%CommonProgramFiles%\ArcGIS\bin\ESRIRegAsm.exe" /p:Desktop "Conefor_inputs.dll" /f:"Conefor.reg" It directs the ESRI installer ESRIRegAsm to register the extension DLL Conefor_inputs.dll within ArcGIS, using GUID and Class ID values from the registry file Conefor.reg (also located in your installation directory). Both Conefor_inputs_ArcGIS_10_Installer.bat and Conefor.reg may be opened and viewed using standard text editors such as Notepad or WordPad. 5) Alternative Method if you do not get the “Registration Succeeded” message: If the method above does not work, the reason is probably due to the “%CommonProgramFiles” environmental variable pointing to the wrong location, and/or Windows Vista or Windows 7 Security settings. The fix is to use a batch file that includes the full pathnames to “ESRIRegAsm.exe” and to the extension DLL and REG files. You may edit the BAT file yourself, or you may use the tool Make_Batch_Files.exe (located in your installation folder) to create new registration and unregistration batch files that are properly formatted to your system. If using Windows XP: Simply double-click on the file Make_Batch_Files.exe to create the new batch files. If using Windows Vista or Windows 7: Right-click on the file Make_Batch_Files.exe and click “Run as Administrator” to create the new batch files. Repeat Step 4 above to register the tool in ArcGIS 10, but this time use the new BAT file Register_Conefor_ID.bat. 6) Start ArcMap The default install location for the extension is a folder named “Conefor Inputs” inside the folder “Program Files”, which will also include some additional files required by the extension and this manual. This folder should better be editable to 3 the user (i.e. not restricted to administrators), since this extension occasionally writes to a file located in this folder. The extension should not crash if it is unable to write to this folder, but it will run better if it can. This tool is installed as an Extension in ArcMap, although it is a type of extension that does not show up in the list of extensions available in the “Tools” menu. Viewing the Tool After installing the extension, you should see the following new toolbar in your map (it may also be embedded in your standard ArcMap toolbars, rather than as a standalone object): If you do not see this toolbar, then open your “Customize” tool (by either doubleclicking on a blank part of the ArcMap toolbar, or by clicking the “Tools” menu, then “Customize”), click the “Toolbars” tab and check the box next to “Conefor”. You should now see your Conefor toolbox in ArcMap. Uninstalling the Tool Uninstalling the tool ArcGIS 9.x: 1) Close ArcMap 2) Click the Windows “Start” button, then “Control Panel”, then “Add or Remove Programs”. Find “Conefor Inputs”, click the “Remove” button and follow the instructions to remove it. 4 Uninstalling the tool in ArcGIS 10.0: 1) Close ArcMap 2) Use Windows Explorer to open your installation folder. If you used the default installation values, then this folder will be located at “Program Files\Conefor Inputs\”. This folder will also include some additional files and this manual. 3) For Windows XP: Double-click the file “Uninstall_Conefor_Inputs.bat” to unregister the tool with ArcGIS 10.0. For Windows 7/Vista: Right-click the file “Uninstall_Conefor_Inputs.bat” and click “Run as Administrator” to unregister the tool with ArcGIS 10.0. 5 If the unregistration is successful, then you should see a “Unregistration Succeeded” notice. 4) Alternative Method if you do not get the "Unregistration Succeeded" message: If the method above does not work, the reason is probably due to the "%CommonProgramFiles" environmental variable pointing to the wrong location, and/or Windows Vista or Windows 7 Security settings. The fix is to use a batch file that includes the full pathnames to "ESRIRegAsm.exe" and to the extension DLL and REG files. You may edit the BAT file yourself, or you may use the tool Make_Batch_Files.exe (located in your installation folder) to create new registration and unregistration batch files that are properly formatted to your system. If using Windows XP: Simply double-click on the file Make_Batch_Files.exe to create the new batch files. If using Windows Vista or Windows 7: Right-click on the file Make_Batch_Files.exe and click "Run as Administrator" to create the new batch files. Repeat Step 3 above to unregister the tools in ArcGIS 10, but this time use the new BAT file Unregister_Conefor_ID.bat. 5) Click the Windows “Start” button, then “Control Panel”, then “Add or Remove Programs”. Find “Conefor Inputs 10”, click the “Remove” button and follow the instructions to remove it. 6 Note: For the concerned or curious, the batch file Uninstall_Conefor_Inputs.bat contains the following single line of text: "%CommonProgramFiles%\ArcGIS\bin\ESRIRegAsm.exe" /p:Desktop /u "Conefor_inputs.dll" It directs the ESRI installer ESRIRegAsm to unregister the DLL within ArcGIS. Uninstall_Conefor_Inputs.bat may be opened and viewed using standard text editors such as Notepad or WordPad. 7 Use of the extension The extension tool consists of only two buttons: the one in the left (“D”) opens the dialog for obtaining the node and distance files, while the one in the right just opens this help file. After clicking the “D” button the “ID Within Distance Parameters” dialog will be shown: In the “ID Within Distance Parameters” dialog proceed as follows: 1) Select the layer or layers with the habitat data (where each feature will be considered as a different node in the resultant files). 8 The layers should be already open (added) in ArcMap/ArcGIS. Note that this tool will always analyze all the features in each selected layer. It will not restrict analysis to only the selected features. Note that all the layers should have the same ID and attribute fields (name and format), as described in the next two steps. 2) Select the field in the layer containing a unique ID for each node (feature in the layer). This ID field should be already prepared in your layer before opening the dialog. In case your layer does not contain this ID field, you can easily obtain it in ArcGIS 9.x by creating a new field (Add field… in the layer Attributes table), typically of Short Integer type, and by calculating the ID values in that field for each feature as 1 + the FID field in your layer. The FID field contains a unique ID for each feature in your layer, starting from 0 up to the number of features-1, and should typically be the first and leftmost field in your attribute table. FID is an ‘internal’ field that will not show up in the list of fields to be selected in the dialog, but the field you create from that FID as described above will appear in the dialog. 3) Select the field in the layer containing the attribute of the nodes (e.g. habitat area, habitat quality, quality-weighted area, etc.). This attribute field should be as well calculated and available in the layer before starting the dialog. 4) Choose whether to calculate distances based on edge-to-edge distances, geometric centroid-to-geometric centroid distances, or spherical centroid-tospherical centroid distances. Spherical centroids are calculated from the shape of the feature as it lies on a sphere approximating the surface of the planet. Spherical centroids more accurately reflect the true centre of gravity of a feature, but they take longer to calculate. Note: This option only applies to the ArcGIS 9.x and 10 versions of Conefor inputs. This option is not available in the ArcView 3.x version. 5) Select if you intend to calculate distances to either all other features in the layer (this will correspond to a full connection file, as described in section 5.3), or only those features that are within a specified distance (this will correspond to a partial connection file, as described in section 5.3 of the Conefor Sensinode 2.2 users’ manual). In this latter case the distance threshold must be entered in the same units of the actual feature class projection (“Include features within xxxxx Map units”). The distance threshold option is particularly useful for reducing the processing time in the distance calculations through the GIS, when a significant proportion of the pairs of patches are too distant from each other to be directly connected. This may be the case for themes covering large geographical regions. If for example the maximum dispersal distance of the analysed species is 5 km, it makes no sense spending time in calculating distances between patches that are separated by dozens of kilometres. In this case, restrict the analysis to features within 5 km, and only the pairs of features within that distance will be included in the output. All the nodes (features) not present in the distance/connection file will be considered completely directly unconnected in CS (e.g. by being further apart than 5 km in the previous example), as described in section 5.3 of the Conefor Sensinode 2.2 users’ manual. Note that if you select multiple layers to analyze, then the ID and Attribute Field listboxes will only show those fields from the first selected layer. This extension will assume that all selected layers will have the ID and Attribute fields that you select. 6) Select the output option “ASCII text file of distances to each feature”, which is the output file that can be directly used in CS. 9 The distance file will be named “Distances_[Layer Name]_X.txt”, where [Layer Name] is the name of the input layer being analyzed, and “X” is a number that guarantees that this is a unique filename. The first such file created in this folder will be named “Distances_[Layer Name].txt”; the second will be named “Distances_[Layer Name]_2.txt”, etc. The file contains three columns of data, representing the ID of node i, the ID of node j, and the Euclidean distance between nodes i and j, as described for the connection file format in section 5.3 of the Conefor Sensinode 2.2 users’ manual. Note that the extension will only calculate the distance between any pair of features one time. If the tool has already calculated the distance from i to j, it will not recalculate the distance from j to i. Furthermore, the distance will only be entered into the distance file once, as required by CS. If the file has an entry for the distance from i to j, the file will not also have an entry for the distance from j to i (as required by CS). The extension will also automatically generate the node file in the format required by CS, containing two columns of data, the first representing the node ID and the second containing the attribute value for that node (see section 4.2). The file will be named “Nodes_[Layer Name]_X.txt”, where “X” is a number that guarantees that this is a unique filename. The first such file created in this folder will be named “Nodes_[Layer Name].txt”; the second will be named “Nodes_[Layer_Name]_2.txt”, etc. 7) Select the folder where the node and distance files will be saved. Note that you just have to select the folder (one click) and not to open the folder (the output file names are fixed as described above). 8) Decide whether you would like to automatically open all new files for viewing. Upon completion, the tool will optionally open all the tables and text files it produced (for you to view them), and it will also summarize the processing in a simple “Analysis report”. 10 Note that the processing slows down with large shapefiles (that is, with increasing number of polygon features). Also, highly complex features can slow down the computation time when calculating distances between them. Polygons with lots of vertices will take longer to analyse than polygons with few vertices. Some previous processing to reduce the total number of vertices describing the polygon boundaries (especially removing redundant vertices if there are some) may benefit the speed of the distance computation through this extension. 11 Troubleshooting If Any of the Tools Crash If a tool crashes, you should see a dialog that tells us what script crashed and where it crashed. I would appreciate it if you could copy the text in that dialog, or simply take screenshots of the dialog and email them to me at [email protected]. Note: Please make sure that the line numbers are visible in the screenshots! The line numbers are located on the far right side of the text. Use the scrollbar at the bottom of the dialog to make the line numbers visible. “Object variable or With block variable not set” Error: If you open ArcMap and immediately see the error dialog appear with one or more error messages stating that “Object variable or With block variable not set”, then 90% of the time it is because ArcGIS was running when you installed the extension. The “Object” variable being referred to is the “Extension” object, and ArcGIS only sets that variable when it is initially turned on. The solution is usually to simply close ArcGIS and restart it. If that does not work, then: 1) Close ArcGIS 2) Reinstall the extension 3) Turn ArcGIS back on. RICHTX32.OCX Error (also comct332.ocx, comdlg32.ocx, mscomct2.ocx, mscomctl.ocx, msstdfmt.dll errors): If you see a line in the error dialog stating: Component 'RICHTX32.OCX' or one of its dependencies not correctly registered: a file is missing or invalid Or if you see a similar error stating that one or more of the files comct332.ocx, comdlg32.ocx, mscomct2.ocx, mscomctl.ocx or msstdfmt.dll are missing or invalid, then simply follow the instructions for RICHTX32.OCX below, but substitute the appropriate file for RICHTX32.OCX. This error is almost always due to the fact that new installations of Windows 7 and Windows Vista do not include a file that the extension expects to find. For example, the file “richtx32.ocx” is actually the “Rich Text Box” control that appears on some of the extension dialogs. The other files refer to other common controls that might appear on the various extension dialogs. The solution is to manually install the missing file (richtx32.ocx) yourself. Here is how to do it: 1) Open Windows Explorer and locate the file richtx32.ocx in your extension installation file. 2) If you are running a 32-bit version of Windows, then copy richtx32.ocx to the directory C:\Windows\System32\ If you are running a 64-bit version of Windows, then copy richtx32.ocx to the directory C:\Windows\SysWOW64\ 3) Open an “Elevated Command Prompt” window. This is the standard Windows Command Prompt window, but with administrative privileges enabled. You need these privileges enabled in order to register the OCX with Windows. Note: The Elevated Command Prompt opens up in the 12 “..\windows\system32” directory, not the “..\Users\[User Name]” directory. The window title will also begin with the word “Administrator:” a. Method 1: Click the “Start” button, then “All Programs”, then “Accessories” and then right-click on “Command Prompt” and select Run as Administrator. b. Method 2: Click the “Start” button, and then click on the “Search Programs and Files” box. Type “cmd” and then click CONTROL+SHIFT+ENTER to open the Command window with Administrator privileges. For more help on opening an Elevated Command Prompt, please refer to: http://www.sevenforums.com/tutorials/783-elevated-commandprompt.html http://www.winhelponline.com/articles/158/1/How-to-open-an-elevatedCommand-Prompt-in-Windows-Vista.html Or simply do a search for “Elevated Command Prompt”. 13 4) Register the file richtx32.ocx using the Windows RegSvr function: a. If using a 32-bit version of Windows, type the line regsvr32.exe c:\windows\system32\richtx32.ocx b. If using a 64-bit version of Windows, type the line regsvr32.exe %windir%\syswow64\richtx32.ocx c. Click [ENTER] and you should see a message that the registration succeeded. -------------------------------------------- 14 Tool updated December 2, 2010 (Ver. 1.0.133) to allow for distance by centroids. Tool updated June 9, 2011 (Ver. 1.0.150) to update error-checking code. Tool updated June 27, 2011 (Ver. 1.0.162) to: Fix an error in which operations done by Spheroid and Spherical Centroid were using the centroids from only one of the features, and the edges to the other feature. Wrote a workaround for an ArcGIS bug that triggers a crash in rare instances, producing an “Automation Error” message at line 456. Modified some functions to increase processing speed. Tool updated November 18, 2012 (Ver. 1.0.217) to add option to save connection lines. Tool updated April 9, 2016 (Ver. 1.0.218) to give information and instructions if it finds the extension is not registered properly. 15