1
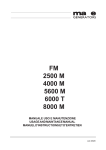
 May 2008 – English Revision v1.1
The DADOS spectrograph project is a collaboration of:
•
Max-Planck Institut für Extraterrestrische Physik
www.mpe.mpg.de
•
CAOS
www.eso.org/projects/caos/
•
Baader Planetarium GmbH
Zur Sternwarte
D - 82291 Mammendorf
Tel.: +49 (0) 8145 - 88 02
Fax: +49 (0) 8145 - 88 05
www.baader-planetarium.de
2 DADOS Spectrograph
User’s Guide
Thank you for purchasing this Baader Planetarium product.
To get the most out of your DADOS Spectrograph, please
read this instruction manual thoroughly before starting to work
with the spectrograph. Keep this User’s Guide available for
future reference and visit the Baader Planetarium website:
http://www.baader-planetarium.de for up to date information
about the product.
3
Unpacking
As you unpack the spectrograph, check the list below and
make sure that all items shown above are included. If anything
is missing contact your original retailer.
Standard accessories:
- DADOS spectrograph
- Allan Wrench 1.5 mm
- Eyepiece 20mm
- Allan Wrench 1.3 mm
- Eyepiece 10mm
- Slit Viewer Assy
- Focusing eyepiece holder (#2458125)
- 1 ¼" Stop ring
- T-2 Quick changing system (#2456313 + #2456320)
4 Part description
1. 2. 3. 4. 5. 6. 2” Nosepiece
Slit illuminator
1 ¼” Slit viewer port
Slit viewer port locking screws
Micrometer
Rotation stage counter spring
(pre-adjusted do not touch)
7. Focuser
8. Focuser locking screw
9. Grating angle locking screw
For a full list of accessories see Appendix D
5
Table of Contents
1. INTRODUCTION
2. QUICK SETUP
2.1 Attaching an eyepiece to the focuser
2.2 Focusing the spectrum
2.3 Changing the spectral range
2.4 Observing some common light sources
8
10
10
11
13
14
3. CONFIGURING DADOS FOR ASTRONOMICAL
OBSERVATION
18
3.1 Coupling a detector to DADOS
3.1.1 Astronomical CCD camera
3.1.2 SLR or D-SLR body
3.2 Fine focusing of the camera objective
3.3 Selecting wavelength range
3.4 Using the slit-viewer
3.4.1 Attaching an eyepiece to the slit-viewer
3.4.2 Attaching a webcam to the slit-viewer
3.4.3 Zoom in/out of the slit view
3.5 Coupling the spectrograph to the telescope
3.6 Operating the spectrograph at the telescope
APPENDIX A: MAINTENANCE
A.1 Battery replacement
A.2 Grating replacement
6 19
19
22
24
25
26
26
28
31
33
34
36
36
37
APPENDIX B: CARE OF THE OPTICAL
COMPONENTS
43
APPENDIX C: SPECIFICATIONS
44
APPENDIX D: OPTIONAL ACCESSORIES
46
APPENDIX E: BIBLIOGRAPHY
48
7
1. Introduction
The DADOS spectrograph is an instrument which permits to
obtain spectra from different light sources.
The name DADOS means “dice” in spanish.
It was designed to be used as spectroscope and as
spectrograph mainly for astronomical and didactical purposes.
The device is very easy to use, robust, and versatile.
Please carefully read trough this manual to achieve the
maximum use from this device.
Description of DADOS main features:
•
Optimized for telescopes up to 14” aperture at f/10.
•
Choice of 3 slits: 25, 35 and 50 µm.
•
A Red LED provides back illumination to the slit for
easy focusing of a guider camera.
•
Default grating of 200 l/mm for low resolution,
optional 900 l/mm grating for higher resolution.
•
Micrometer for fine positioning of the central
wavelength.
•
Camera objective with wide focusing range including
standard T2 adapter thread (M42 x 0.75).
•
Accepts most CCD and DSLR cameras (with
optional adapters). The camera interface is a T2
adapter with a standard M42 x 0.75 thread.
•
Wide focusing range up to 55 mm, suitable for
attaching a DSLR-camera.
8 WARNING
Never aim DADOS straight to the Sun!
Irreversible eye damage may occur!
9
2. Quick setup
2.1 Attaching an eyepiece to the focuser
Remove the T-2 dust cap by
rotating it counterclockwise.
Mount the Baader T-2 quick
changing system (#2456313
+ #2456320).
Lock the Baader T-2 quick
changing system and mount
the focusing Baader eyepiece
holder (#2458125).
10 Insert the DADOS 20mm
eyepiece into the focusing
eyepiece holder.
Lock the eyepiece with any of
the three lock screws.
2.2 Focusing the spectrum
Point the 2” nosepiece (#1) to
a fluorescent light source or a
Neon lamp.
Do not point
directly to the
Sun
Rotate the focuser (#7) in
order to focus onto the
spectrum.
11
Lock the focus with locking
screw once sharp focus is
achieved.
Rotate the focusing eyepiece
holder for fine focus
adjustments.
12 2.3 Changing the spectral range
Slightly loosen the grating
angle locking screw (#9).
Center the spectral lines of
your choice by adjusting the
micrometer.
Tighten the grating angle
locking screw (#9) to secure
the selected setting.
13
2.4 Observing some common light sources
With DADOS you can observe and analyze a large variety of
light sources. For a quick set up of the instrument you can
observe in particular:
•
•
•
•
Neon lamps
(like pilot lamps in multi-socket distributors or
washing machines)
Fluorescent lamps
Continuous spectral sources
(like Tungsten or Halogen lamps)
Bright daylight
Never point directly
towards the Sun.
14 Examples of spectra taken with DADOS and a 200 lines/mm
grating
HeAr calibration lamp
Neon
Continuous 1st and 2nd order
Solar spectrum
Note:
Spectra obtained w. Canon 10D EOS Camera at different
grating angles.
Calibration Lamp only glows in the dark. Shield it from
daylight or connect it to DADOS.
15
Examples of spectra taken with DADOS and a 900 lines/mm
grating
HeAr calibration lamp
Neon
Fluorescent
Continuous
Solar spectrum
Note:
Spectra obtained w. Canon 10D EOS Camera at different
grating angles.
Calibration Lamp only glows in the dark. Shield it from
daylight or connect it to DADOS.
16 17
3. Configuring DADOS for
astronomical observation
The spectrograph should be setup correctly to ensure proper
function.
18 3.1 Coupling a detector to DADOS
3.1.1 Astronomical CCD camera
DADOS optical design is optimized to cover the field of SBIG
ST-8 or ST-1603ME cameras.
Detectors having larger chip size than 13.8 x 9.2 mm may be
used; however the optical image quality will slightly decrease
at the edges and therefore the resolving power as well.
Prepare the detector to be
used in the observation,
prefarably:
SBIG ST-8 XME / ST1603ME / ST-7 XME / ST402ME
Use the Baader T-2 quick
changer system as ideal
device for coupling and
rotating the camera without
loss of focus.
19
Mount the T-2 change ring
onto the SBIG detector.
Mount the quick changer onto
the T-2 male thread of the
DADOS collimator focuser
(#7).
Join the detector and the
change ring combo.
Rotate the camera into the
desired orientation.
20 Clamp the camera by
tightening the locking screw
of the T-2 quick changer.
DADOS with imaging detector
mounted.
21
3.1.2 SLR or D-SLR body
Obtain the appropriate T-Adapter for your type of camera.
Prepare the DSLR camera
body to be attached to the
spectrograph.
Screw the DSLR T-Ring on
the spectrograph focusing
unit.
Attach the camera to the TRing adapter.
22 Open the three set screws of
the Camera T-Ring.
Rotate the camera body into
the desired position.
Lock the three sides set
screws of the camera T-Ring.
DADOS with mounted DSLR
camera.
23
3.2 Fine focusing of the camera objective
Either you have an astronomical CCD camera or a SRL body,
follow the instructions below to achieve the best possible
focus of the instrument.
Loosen the focuser locking
screw (#8) to focus the
detector.
Rotate the focuser (#7) in
order to focus onto the
spectrum.
Lock the focus with locking
screw (#8) when sharp focus
is seen or recorded.
24 3.3 Selecting wavelength range
Slightly loosen the grating
angle locking screw (#9).
Center on certain spectral
lines by rotating the
micrometer (#5).
Prepare spectral
charts of lab
lamps*
Tighten the grating angle
locking screw to secure the
selected setting.
∗
If you want to download the spectral charts
of some laboratory lamps go, for example,
to http://www.eso.org/projects/caos/
25
3.4 Using the slit‐viewer 3.4.1 Attaching an eyepiece to the slit‐viewer Mount the slit viewer
assembly onto the 20mm
DADOS pointing eyepiece.
Slit viewer assembly with
eyepiece.
Slide the 1 ¼” stop ring onto
the eyepiece chrome sleeve
and lock it.
Insert the eyepiece assembly
into the 1 ¼” slit viewer port
(#3).
26 Focus onto the slit by
manually pushing or pulling
the eyepiece.
After having focused the
image of the three slits, lock
the eyepiece by using the
locking screw (#4) of the 1 ¼”
slit viewer port (#3).
Open the set screws of the
stop ring and move the stop
ring down to sit flush on top
of the eyepiece holder.
Tighten the stop ring to
secure proper focus position.
DADOS with mounted slit
viewer assembly.
27
3.4.2 Attaching a webcam to the slit-viewer
Remove the 18mm long
1 ¼” extension tube of the
slit viewer assy.
Mount the remaining body of
the slit viewer onto the 1 ¼”
nosepiece of the webcam.
Example: Celestron
NexImage w. 1 ¼”
nosepiece #825100
Slide the 1 ¼” stop ring onto
the webcam nosepiece.
28 Attach the webcam combo
into the 1 ¼” slit viewer port
(#3).
Focus the Webcam by
manually pushing or pulling
it. Rotate the Webcam body
until it is approximately
aligned with the major axis
of DADOS.
After having focused the
image of the three slits, lock
the webcam combo by using
the locking screws (#4) of
the 1 ¼” slit viewer port (#3).
Open the set screws of the
stop ring and move it to sit
flush on top of the eyepiece
holder / slit viewer port.
29
Tighten the Stop Ring to
secure proper focus position.
Realign the orientation of the
slit by rotating the Webcam.
DADOS with Webcam
mounted on to the slit viewer
port.
30 3.4.3 Zoom in/out of the slit view
The lens inside the slit viewer can be adjusted in order to
magnify the image size of the 3 slits on the detector of the
Webcam.
Remove the second 1 ¼”
extension tube from the slit
viewer body.
Loosen the headless set
screw inside the slit viewer
body by only ½ turn, using
the supplied Allen wrench
(1.3mm).
Slide the lens holder tube
towards the Webcam to
reduce image size.
31
Minimum magnification as
seen by the CCD chip.
Slide the lens holder tube
away from the Webcam in
order to magnify the image.
Maximum magnification as
seen by the CCD chip.
Lock the new position of the
lens holder tube by tightening
the headless set screw.
Remount the slit viewer body
onto the webcam with one
18mm extension tube.
32 3.5 Coupling the spectrograph to the
telescope
Use the provided 2”
nosepiece to attach DADOS
to your telescope.
Alternatively use the female
T-2 thread (M42 x 0.75), by
removing the 2” nosepiece.
Or remove the female T-2
thread adapter to get access
to a female 2” thread in
DADOS body.
33
3.6 Operating the spectrograph at the
telescope
Before attaching DADOS to the telescope, make sure you
have previously focused the spectrum on the camera with the
proper orientation.
Attach DADOS onto the
Telescope with a 2” interface if
using the 2” nosepiece.
Select the alignment between
telescope and instrument. With
equatorial mounts the best
orientation of the instrument is
that the slit is parallel to the right
ascension axis of the telescope.
Ensure the attachment of the
instrument to the telescope by
locking the proper adapter
screws. Then, slew the
telescope to a bright star.
34 Use the focusing screw of the
telescope to focus the star in the
middle of the slit by observing its
image through an eyepiece or
webcam.
Use the slit illuminator (#2) to
illuminate the slits and slowly
slew the telescope to bring the
star inside one of the slits.
Switch off the slit illuminator
before starting an exposure with
the detector.
35
Appendix A: Maintenance
A.1 Battery replacement
Simply turn the back of the
Illuminator counterclockwise
approximately three turns to
open the battery
compartment.
Replace worn-out batteries
with two round “hearing aid”
batteries 1.5V (such as
Camilion AG 3 LR 41
#2454306).
Then turn the back of the
illuminator clockwise till it is
completely closed.
36 A.2 Grating replacement
Attention
Touching the grating will destroy it beyond repair!
Do not attempt to remove dust by breathing or blowing air
onto the grating! Small droplets of moisture and saliva can
permanently damage the grating as well.
Do not use compressed or canned air! This will likewise
transport moisture, grease or flocks of gas propellant onto the
grating.
Any exchange of grating holders should always be performed
in clean surroundings, free of dust and static build up.
Arrange your workplace for ensure a quick and tidy grating
exchange.
37
Have the 900L grating with
holder readily available.
Loosen the grating angle
locking screw (#9) by one
turn only.
Rotate the micrometer
backwards to show an 8mm
setting on the Vernier scale.
Use the 1.5 mm Allen wrench
to remove the four Hex-Head
screws.
38 Take off the side plate with
the complete grating holder
assembly.
Be careful not to
touch the grating.
Release the headless set
screw inside of the pressure
plate by 2 full turns
counterclockwise using the
1.5 mm Allen wrench.
Remove the grating holder
from the pressure plate.
Take the 900L grating holder
out of the storage container
and store the 200L grating in
it.
39
Place the 900L grating holder
into the pressure plate.
Rotate the grating holder to
adjust the proper position in
regard to the markings in the
pressure plate.
Each mark indicates the
position of a specific grating.
Be sure to use the proper one
to achieve the optimal
throughput.
Example of position:
200 lines/mm grating.
40 Example of position:
900 lines/mm grating.
Lock the pressure plate by
tightening the headless set
screw clockwise.
Carefully relocate the side
plate with the new grating.
Relocate the 4 screws that
secure the side plate.
41
Retighten the micrometer into
a Vernier position of 2.5 or
around.
Lock the grating tilt
mechanism by rotating the
grating angle locking screw
clockwise.
DADOS with grating
exchanged.
42 Appendix B: Care of the
Optical components
If you always use dust caps after finishing on working with the
DADOS, no cleaning will be necessary.
Grating and slit can only be cleaned from dust by BaaderPlanetarium. Do not clean gratings or slit, it may void the
warranty.
Lenses cannot be cleaned with common cleaning agents.
Only use Baader Planetarium Optical Wonder fluid
(#2905007) to clean the lenses.
43
Appendix C: Specifications
Mechanical
Weight (without cameras and
eyepieces)
Dimensions (see Figure in Part
Description)
0.85 kg
80 × 150 × 205
mm
Electrical
Red LED Battery
LR 41 or
equivalent
Environmental
Operating temperature
Storage temperature
Humidity (relative)
Storage humidity
-10 to +30oC
-30 to +35oC
0 to 80 %
0 to 60 %
Optical
Collimator aperture
Collimator focal distance
Objective focal distance
Collimator – Camera angle
Dispersion on axis at 550 nm
‐ 200 lines/mm grating
‐ 900 lines/mm grating (optional)
*
f/10 *
80 mm
96 mm
90o
39.7 nm/mm
10.6 nm/mm
Operating at lower f/# degrades the resolving power and
increases the vignetting
44 Performances
Resolving power λ / ∆ λ on camera objective axis and 25 µm slit
Grating of 200 lines/mm
Theoretical
Measured
396
542
606
647
668
723
λ (nm)
@ 416
@ 616
@ 697
Grating of 900 lines/mm
Theoretical
Measured
2038
2000
3910
3000
5376
5000
λ (nm)
@ 371
@ 561
@ 800
Limiting magnitude for a 30 cm Ø telescope with S/N 50 and
20 minutes of exposure time.
For the 200 lines/mm grating :
For the 900 lines/mm grating :
mv = 8
mv = 6
Note:
Measurements performed w. ST-8 XME w. 9 micron pixel
size.
The measured resolving power of the 900L grating was limited
by the pixel matching.
With smaller pixels a higher resolution can be measured.
45
Appendix D: Optional accessories
T2 adapters for many SLR
camera models. Examples:
Nikon
Canon EF
Ref. 240 8300
Ref. 240 8319
Look at Baader Planetarium
Web site for a complete list.
Reflection grating
25 x 25 x 9mm, 900 lines/mm
mounted in quick exchanger.
Ref. 245 8555
Calibration Neon lamp for
DADOS with 220V power
cord and 2" adapter.
Ref. 245 8590
Travel case for DADOS with
flexible compartments for
tools.
Ref. 245 2110
46 47
Appendix E: Bibliography
Stars and their spectra: An
introduction to spectral sequence
Author:
Pub
Pages:
ISBN:
James B. Kaler
1989
300
0521304946
The spectra and structures of
simple free radicals: An
introduction to molecular
spectroscopy
Author:
Pub
Pages:
Gerhard Herzberg
1989
300
Getting the measure of the stars
Author:
Pub
Pages:
ISBN:
48 W.A. Cooper
1989
293
0852748302
Handbook of CCD astronomy
Author:
Pub
Pages:
ISBN:
Steve Bruce Howell
2006
208
0521852153
Astronomical spectroscopy : An
introduction to the atomic and
molecular physics of astronomical
spectra
Author:
Pub
Pages:
Jonathan Tennyson
2005
192
Spectroscopy : The key to the stars:
Reading the lines in stellar spectra
Author:
Pub
Pages:
ISBN:
Keith Robinson
2007
160
9780387367866
49
Foundations of astronomy.
Author:
Pub
Pages:
ISBN:
Michael A. Seeds
2000
656
0534378552
The observation and analysis of
stellar photospheres
Author:
Pub
Pages:
ISBN:
David F. Gray
2005
533
0521851866
Observing variable stars
Author:
Pub
Pages:
ISBN:
50 Gerry A. Good
2003
274
1852334983
Physics of star formation in
galaxies
Author:
Pub
Pages:
ISBN:
Francesco Palla
2002
232
3540431020
The analysis of Starlight. One
hundred and fifty years of
astronomical spectroscopy
Author:
Pub
Pages:
ISBN:
John B. Hearnshaw
1987
531
0521255481
An introduction to the theory of
stellar structure and evolution
Author:
Pub
Pages:
ISBN:
Dina Prialnik
2000
261
9780521659376
51
Optical astronomical spectroscopy
Author:
Pub
Pages:
ISBN:
Christopher R. Kitchin
1995
272
0750303468
Atomic spectra and atomic
structure
Author:
Pub
Pages:
ISBN:
Gerhard Herzberg
2007
527
140675322X
Observers Guide to Stellar
Evolution
Author:
Pub
Pages:
ISBN:
52 Mike Inglis
2007
236
1852334657
Spectrograph Design Fundamentals
Author:
Pub
Pages:
ISBN:
John James
2007
204
10-0521864631
Practical amateur spectroscopy
Author:
Pub
Pages:
ISBN:
Stephen F. Tonkin et al.
2002
210
1852334894
Journey from the center of the sun
Author:
Pub
Pages:
ISBN:
Jack B. Zirker
2002
302
0691057818
53
The behavior of chemical elements
in stars
Author:
Pub
Pages:
ISBN:
Carlos Jaschek
1995
324
052141136X
The classification of stars
Author:
Pub
Pages:
ISBN:
Carlos Jaschek
1990
413
0521267730
Introduction to Stellar Astrophysics.
Vol.3: Stellar structure and
evolution
Author:
Pub
Pages:
ISBN:
54 Erika Boehm-Vitense
1992
285
0521348714
55
WAVELENGTH SETTINGS
Camera
Model:____________________
Micrometer position
Camera
Model:____________________
Micrometer position
Camera
Model:____________________
Micrometer position
56 Grating:___________
_
Central Wavelength
Grating:___________
_
Central Wavelength
Grating:___________
_
Central Wavelength
WAVELENGTH SETTINGS
Camera
Model:____________________
Micrometer position
Camera
Model:____________________
Micrometer position
Camera
Model:____________________
Micrometer position
Grating:___________
_
Central Wavelength
Grating:___________
_
Central Wavelength
Grating:___________
_
Central Wavelength
57
NOTES
58 NOTES
59
No reproduction in any form of this manual in whole
or in part (except for brief quotation in critical
articles or reviews) may be made without written
authorization of Baader Planetarium GmbH.
Baader Planetarium GmbH
Zur Sternwarte
D - 82291 Mammendorf
Tel.: +49 (0) 8145 - 88 02
Fax: +49 (0) 8145 - 88 05
www.baader-planetarium.de
60