1
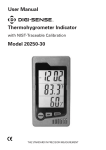
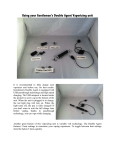
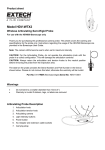
User Manual
Borescope
Model 20250-28
THE STANDARD IN PRECISION MEASUREMENT
Introduction
The Digi-Sense Borescope (Model 20250-28)
is ideal for the inspection of ductwork, wiring locations,
piping, vehicles, and much more. An adjustable LED light
on the camera tip provides necessary light in dimly lit areas
and adjusts down to eliminate washout when viewing
reflective objects.
Unpacking
Check individual parts against the list of items below. If
anything is missing or damaged, please contact your
instrument supplier immediately.
1. Borescope with camera
2. 3.7 V lithium battery (installed)
3. USB cable
4. DC5V charger
5. Video output cable
6. Mirror, hook, and magnet
7. User manual
Key Features
• LCD
• Four LED lights for operation in dark environments
• Menu languages: English, German
• 180° image rotation
• TV OUT jack
• USB charging (Li battery)
2
Meter Description
1. Gooseneck
2. LED light level
3. DECREASE (-) button
4. INCREASE (+) button
5. POWER button
6. MODE button/
CONFIRMED button
7. TV OUT jack
8. USB charge port
9. RESET button
10. L
ithium battery
compartment
11. Camera
12. Camera connectors
12
1
11
3
Setup and Operation
Power
Press the Power ON/OFF button to turn on and press again
to turn off.
Adjusting Brightness
The default light setting is
Brightness indictor
three for the LED light on
camera head. Increase
the light level by pressing
the INCREASE (+) button
until the brightest level
displays on the top
middle of the screen.
Decrease the light level by pressing the DECREASE (-)
button until the light turns off. Note: 5=brightest and
1=darkest; the LED shuts off at 0.
Rotating Images
The image angle can be
rotated from 0° to 180°.
To rotate, press the
MODE button. Each press
rotates the image 90°.
4
Field of view
System Setup
1. To move the cursor, press the DECREASE (-) button to
move it down and the INCREASE (+) button to move the
cursor up.
2. To adjust the LCD settings,
press the Power ON button
(if you have not already). With
the unit on, hold the MODE
button for two seconds. The
Image Setting screen will
appear. Adjust BRIGHTNESS,
CONTRAST, DEFINITION,
COLOR, and LANGUAGE using
this screen.
3. Use the INCREASE (+) and
DECREASE (-) buttons to toggle through the options.
Press the MODE button to select the setting you would
like to adjust. Use the INCREASE (+) and DECREASE (-)
buttons to change the value to your preferred setting.
Press the MODE button to confirm the setting and return
to main menu.
4. Select DEFAULT to return the unit to the best-calibrated
default value.
Changing the Language Setting
1. In the Image Setting screen use the DECREASE (-) button
to toggle to LANGUAGE and press the MODE button.
2. Select preferred language (English or German) using the
INCREASE (+) button.
3. Once selected, press the MODE button to set and return
to the main menu.
4. Toggle to EXIT and press the MODE button to return to
camera mode.
5
Displaying Video on a Television
1. Using the video output cable, insert the earphone plug into
the TV OUT jack in the side panel of the borescope.
2. Insert the yellow video plug into the corresponding jack on
the TV or other video display.
3. Power the borescope ON. The content will still be controlled
by the instrument but will display on the television. Only live
video will be display on the TV or video display. All other
functionality will be limited to the LCD.
Charging the Borescope
1. Connect the USB cable to the DC5V
charger and borescope. The unit will
automatically power on and prompt you
to select the Standby Mode.
2. The default setting is YES. Use the
INCREASE (+) and DECREASE (-) buttons to toggle to your preffered choice.
3. Press the MODE button to choose your desired setting.
4. If YES, the system will shut off all functionality until the
battery is charged. To turn the unit back on, disconnect the
power source and press the Power ON button. If NO, select
the MODE button and the unit will return to normal
functionality.
5. To confirm the system is in working condition, press
the INCREASE (+) button for two seconds. The battery display
will show on the right side of screen. The
indicator will show the amount of charge left in the battery.
Resetting the Borescope
If the system stops operating unexpectedly, press the RESET
button on the left side of the instrument. The instrument can
be operated normally after powering up.
6
Specifications
Sensor size
1⁄4
Sensor pixel
300,000
inch CMOS
Maximum resolution
640 x 480
Maximum frame rate (FPS)
30 FPS/S
Color median
24 Bit
Focusing method
Fixed focus 15-25 cm (5.9-9.8")
Gooseneck length
1 m (39")
Camera diameter
17 mm (0.66")
TFT-LCD
Color TFT-LCD size
3.0 inch
Display resolution
960 (W) x 240 (H)
Active area
60 mm x 45 mm
Light
Light Source
4 LED
Adjustable light intensity level
6 level
Power
Battery
Lithium batteries 3.7V/2000mAh
Working current
MAX 480 mA
Standby current
MAX 5 ma
Temperature
Operating temperature
0 to 50°C (32 to 122°F)
Storage temperature
–20 to 60°C (–4 to 140°F)
Relative humidity
5 to 85%
Product attributes
Size
100 x 95 x 235 mm (315⁄16 " x 33⁄4 " x 91⁄4 ")
Weight
596.2 g (1.3 lb)
7
Maintenance, Recalibration, and Repair
• Take out the battery when the instrument is not in use
for a long period of time.
• Clean the camera before operation.
• Use only a 3.7V Li battery.
• The gooseneck should not be bent to a diameter less
than five inches.
• To avoid instrument damage and injury, the gooseneck
cannot be inserted into rotational gear wheels.
• To avoid electrical shock, the instrument and gooseneck
should not come in contact with high-voltage objects
during operation.
For Product and Ordering Information, Contact:
Toll-Free: 1-800-323-4340
Phone: 1-847-549-7600
Fax: 1-847-247-2929
ColeParmer.com/Digi-Sense
1065DGMAN_20250-28 Rev.1
Toll-Free: 1-800-358-5525
Phone: 1-847-327-2000
Fax: 1-847-327-2700
Davis.com/Digi-Sense
Manual Part No. 00100-59