Download Orealia|DESIGNER 1.5
Transcript
Tutorial Orealia|DESIGNER 1.5 QuickStart 17-308 Beginner Level Débutant Orealia|DESIGNER QuickStart (beginner) 1. Table of contents 1. 2. 3. 6. 4. 5. 6. 7. 8. Table of contents ....................................................................................................................... 2 About the tutorial ...................................................................................................................... 3 Part 1 – Import a 3D model ........................................................................................................ 4 Part 2 – Set up a photo environment ......................................................................................... 5 Part 3 – Create the appearance of 3D objects ............................................................................ 6 1. Select a 3D object .................................................................................................................. 6 2. Create and assign an HDR material to the geometry............................................................... 7 Part 4 – Understanding interactivity .......................................................................................... 9 1. Create slider animation .......................................................................................................... 9 2. Create an interactive scenario ...............................................................................................11 Part 5 – Deploy your work ....................................................................................................... 12 1. Image output ........................................................................................................................12 2. Video output .........................................................................................................................12 3. Autonomous file output ........................................................................................................12 Recommended system configuration ...................................................................................... 13 1. Windows/Linux ..................................................................................................................13 2. Mac ...................................................................................................................................13 Navigation and shortcuts ......................................................................................................... 14 1. Navigating in 3D view ........................................................................................................14 2. Shortcuts in 3D view ..........................................................................................................15 3. User’s interface shortcuts ..................................................................................................15 2 Orealia|DESIGNER QuickStart (beginner) 2. About the tutorial This beginner level tutorial is designed to help you become familiar quickly with some of Orealia|DESIGNER program features by following a simple exercise. For a more detailed description of each tool, we recommend that you read the user’s manual installed with the program. The following icons appear on certain pages to indicate important points or suggestions: This icon indicates some useful supplementary information This icon indicates important information to remember This icon indicates technical information for the initiated reader After installing Orealia|DESIGNER on your computer, the resources for this tutorial are located in the directory: [Orealia|DESIGNER installation path]/Resources/Tutorials/Cell_Phone/ Applications File/OrealiaDesigner/Contents/resources/Tutorials/Cell_Phone/ This project includes the TEXTURES directory where all the images and photos necessary for this tutorial are located. Illustration 1 – The final 3D scene obtained through this tutorial 3 Orealia|DESIGNER QuickStart (beginner) 3. Part 1 – Import a 3D model Orealia|DESIGNER in its standard version imports eight different formats: Autodesk FBX (.fbx), Collada (.dae), Wavefront Object (.obj), 3D Studio Mesh (.3ds), Autodesk AutoCAD (.dxf), Stereo Lithography (.stl), X3D (.x3d) and Virtual Reality Modeling Language (.vrml) In this exercise, the geometry to import is in FBX format: 1. Select the menu File > Import Scene 2. The file selector opens. Click on the file name Cell_Phone.fbx in the directory: [ Orealia|DESIGNER installation path]/Resources/ Tutorials/Cell_Phone/ Applications File/OrealiaDesigner/Contents/resources/ Tutorials/Cell_Phone/ Illustration 2 – 3D geometry import window 3. The import window appears and allows you to choose the options linked to the FBX format (Illustration 2) 4. Leave default options unchanged 5. Click OK to import the file 6. A progress bar indicates the progress of the import. When the procedure is completed, the object appears in the 3D view (Illustration 3). Illustration 3 – The imported file Cell_Phone.fbx is visible in Orealia’s 3D view 4 Orealia|DESIGNER QuickStart (beginner) 6. Part 2 – Set up a photo environment Setting up an environment from a photo allows you to create lights and reflections of the 3D scene from the analysis of this photo’s lighting properties. 1. Select the menu Create > Create Environment (Fig 4) 2. In the Type area, choose none (this option is used when you don’t want the environment to appear in the3D view) 3. Check the option Environment map in order to select the photo that will be the basis for the environment. Click on Browse and choose the photo file named: BlackWhiteENV.hdr in the textures directory (see the paragraph on Resource files) Illustration 4 – Create environment window 4. Leave default parameters unchanged and click on Create 5. When the photo analysis is completed, the element environment1 appears in the TreeView window (Illustration 5), accessed through the menu Window > Tree View. This new element that was added to the scene includes all the information from the previous calculation, such as lights or reflection data that will be used in HDR materials later. Illustration 5 – The environment appears in TreeView 5 Orealia|DESIGNER QuickStart (beginner) 4. Part 3 – Create the appearance of 3D objects Creating a material combined with one or several textures allows you to give a skin to 3D objects in order to give them a photo-realistic look. In Orealia|DESIGNER the result of all these manipulations is instantaneous. 1. Select a 3D object 1. Left-click in the 3D view to select the object representing the cell phone screen. The object thus selected appears with a green mesh representing its geometry structure (Illustration 6). 2. The object just selected is highlighted in the Tree View Illustration 6 – The selection of the 3D object is represented by a green mesh. (Illustration 7). Illustration 7 – Appearance of a selected object in the Tree View 6 Orealia|DESIGNER QuickStart (beginner) 2. Create and assign an HDR material to the geometry 1. Select the menu Create > Create Material (Illustration 8) 2. Among all the different types of materials, click on HDR The HDR material takes into account the information related to lighting and reflection from the environment previously created. 3. In the area Common attributes, click on the open file icon on Diffuse Diffuse is used to simulate the information about the light emitted by the material (here with a texture). 4. Select the file named Screen.jpg 5. Click on the black rectangle located on the right of Ambient Ambient is used to simulate the information about the material’s ambient with a color. 6. Choose a gray color value of 100 for red-green-blue components. Illustration 8 – Create material window (here HDR material) 7. Click on Create and assign to create the material and assign it to the 3D object previously selected. 7 Orealia|DESIGNER QuickStart (beginner) 8. You obtain the result of the image on the right (Illustration 9) 9. Similarly you can create a material and assign it to the following objects: Keyboard with the texture Keyboard_bump.png in Bump with a Blinn material. Here we are not using a HDR material but you can simulate a reflection effect by adding the texture file named BlackWhiteREFX.tga in Reflection map. Bump is used to generate the information about a material’s relief with a texture. Phone body with a HDR material without particular texture (it is not necessary to put a texture for the reflection because the HDR material is linked to the data from the environment). Option panel below the screen with the texture MenuPanel_bump.jpg in Bump of a Blinn material (you can also simulate the reflections as described above) The materials of the buttons on the right side of the phone can be created with the 5 textures LogoXXXX_bump.jpg (XXXX replaces the logo name) in Bump of a Blinn material. Illustration 9 – Look of 3D object after creating an HDR material 8 Orealia|DESIGNER QuickStart (beginner) 5. Part 4 – Understanding interactivity Now that the rendering of the cell phone is finished, let us experiment with interactivity. The user will now be able to open the cell-phone slider. 1. Create slider animation 1. In Tree View, open the group cellphone_midres by clicking on on the left of the name. Select the group Top_Hi located underneath (Illustration 10). Illustration 10 – Selecting a group in Tree View A group is used to group several elements of different nature (geometry, light, animation…) 2. In Edition Control (menu Window > Edition Control), click on the thumbnail Node and from there you can access the coordinates of the selected node in the scene. 3. Position the mouse pointer on Position and right click to access the menu Add to animation > New (Illustration 11). Keep the name suggested and click on Create. The X, Y, and Z cells under Position are displayed in red to indicate that they are animated. Illustration 11 – Creating an animation key on a parameter 9 Orealia|DESIGNER QuickStart (beginner) A first animation key was laid down for the values X=0, Y=0 and Z=0. Now you need to move the group Top_Hi down to place it in a position corresponding to a closed slider. 4. While Top_Hi is still selected, enter: -193 in the cell Y. The top part of the phone slides down to a “closed” position. 5. In Animation Control (menu Window > Animation Control), Illustration 12 – Current animation Time line place the timeline (red vertical bar) to 3.5 seconds (Illustration 12). 6. Position the mouse pointer on Position in the thumbnail Node, and right click to access the option Add key to current animation (Illustration 13). The parameters X, Y, Z are interdependent and cannot be animated independently. The two slider positions "opened/closed" are fixed and separated by 3.5 seconds, allowing Orealia|DESIGNER to interpolate the motion between these two points. Illustration 13 – Option used to add a key to the current animation To trigger this animation interactively in 3D view, we are going to create a scenario containing one or several clips that can be triggered at different times. 10 
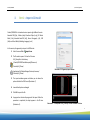
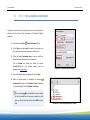
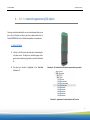
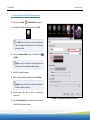
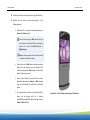
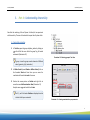
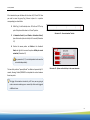
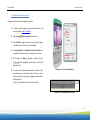
Orealia|DESIGNER QuickStart (beginner) 2. Create an interactive scenario Clicking on the phone screen will trigger the scenario. 1. To do this, select the geometry representing the screen in 3D view (see chapter Select a 3D object). 2. Select Create > Create Scenario (Illustration 14) 3. Select On click to trigger the scenario by clicking on the object selected (here the screen); then click on Create. 4. In Scenario Control (menu Window > Scenario Control) let us now place the slider animation in the scenario just created. 5. The animation (or Clip) clip_Top_Mid is listed on the left . With a drag&drop, you can place it on the right (Illustration 15). 6. The scenario has now been created with an animation. Now, Illustration 14 – Create Scenario window place the cursor over the phone screen in 3D view, and the hand icon will tell you that you can trigger the scenario with a double right click. In this case, this would open or close the phone slider. Illustration 15 – Positioning a clip in a scenario 11 Orealia|DESIGNER QuickStart (beginner) 6. Part 5 – Deploy your work 1. Image output 1. Select View > Take Screenshot 2. Choose the save format (PNG, JPG, BMP) The format of the image saved is that of the screen display resolution. To customize the size, use View > Take Custom Screenshot 2. Video output 1. Select View > Start Recording (Illustration 16) 2. Choose the output format (Flash, MPEG2, AVI, QuickTime or Séquence d’images) then click on Record to start. 3. Autonomous file output 1. Select File > Deploy > File > Deploy > Deploy self executable (Windows) or Deploy self application (Mac) 2. You can save and name the file in the file selector. 3. A file with this icon as well as the extension .exe (Windows) or Illustration 16 – Options to save a video .app (Mac) appear at chosen location: 12 Orealia|DESIGNER QuickStart (beginner) 7. Recommended system configuration The innovative algorithms developed in the Orealia solution use the latest graphics cards technology available on the market. Therefore, in order to ensure the best possible results, we recommend using Orealia|DESIGNER with a recent graphics card. In order to check the compatibility of your equipment with our software, you can download a system configuration checker by clicking on the following link: Orealia|CHECK (Windows) 1. Windows/Linux Operating system Processor RAM Memory Hard disk Sound Graphics card Microsoft Windows XP/VISTA or Linux (*) in 32 bits or 64 bits Intel Pentium IV, AMD Athlon or above 512 Mo or more Minimum available room of 300 Mo Traditional integrated chipset for multimedia use Minimum: NVIDIA GeForce 6 card or ATI Radeon Xxxx with 256 Mo memory Recommended for better performance: NVIDIA Quadro FX or GeForce 7/8 with 512 Mo memory The latest NVIDIA or ATI drivers installed on your computer 2. Mac Operating system Processor RAM Memory Hard disk Sound Graphics card Mac OS X "Leopard" 10.5 or above in 32 bits or 64 bits Intel Processor 512 Mo or more Minimum available room of 300 Mo Traditional integrated chipset for multimedia use Minimum: NVIDIA GeForce 6 card or ATI Radeon Xxxx with 256 Mo memory Recommended for better performance: NVIDIA Quadro FX or GeForce 7/8 with 512 Mo memory The latest NVIDIA or ATI drivers installed on your computer (*) The following Linux distributions have been tested: Kubuntu release 6.x - Suze 10 13 Orealia|DESIGNER QuickStart (beginner) 8. Navigation and shortcuts 1. Navigating in 3D view The mouse allows you to navigate in 3D scenes through the Orbit mode. This is the default mode, adapted to moving around an object. this icon indicate a mouse mouvement LEFT CLICK Windows/Linux/Mac Orientation Camera LEFT Press and hold + RIGHT CLICK Zoom Camera Windows/Linux/Mac MOUSE WHEEL CLICK Pan Camera Windows/Linux/Mac Center Object RIGHT Press and hold + WHEEL Press and hold + MOUSE WHEEL Click Besides navigating in a 3D scene, these shortcuts give you access to many features: Illustration 17 – Mouse click functions in Orbit mode LEFT CLICK Select Object Add object to selection Select rectangle Windows/Linux/Mac LEFT Click CTRL (ou ) + LEFT Click Creating Annotation SHIFT (ou ) + LEFT Click + RIGHT CLICK Start scenario Choose camera menu CTRL (ou ) + LEFT Click + Windows/Linux/Mac Double Right-Click (ou + RIGHT Click) SHIFT (ou ) + RIGHT Click 14 Orealia|DESIGNER QuickStart (beginner) 2. Shortcuts in 3D view The following features have an effect in 3D view and may not necessarily be accessed directly through an option in the interface: ELEMENTS IN THE 3D VIEW Display Performance Increase size of manipulators Decrease size of manipulators Increase size of 3D view icons Decrease size of 3D view icons Windows/Linux D + CTRL + CTRL - Mac D + + - 3. User’s interface shortcuts EDIT MENU Undo Redo Delete selected object Position Orientation Scale Property Pivot Edition Window/Linux Z CTRL + Z SUPPR W E R T Y Mac Z Z BACKSPACE W E R T Y VIEW MENU Center camera on all objects Center camera on selected object Screenshot Full Screen display Window/Linux A Mac A C C CTRL + P F F HELP MENU Help file Window/Linux F1 Mac ? P The following tools can be accessed in the drop-down menus and the toolbars: FILE MENU New scene Open scene Save scene Importer Scène Win/Linux CTRL + X CTRL + O CTRL + S CTRL + I Mac X O S I The icons in the table correspond to shortcuts accessed from the toolbars. 15 Orealia|DESIGNER QuickStart (beginner) Publication date: December 20, 2007 Copyright © 2007 ONESIA, Toulouse, France. Orealia is a trademark of Onesia; all rights reserved. All other trademarks are the property of their respective owners. No part of this book may be stored, shared or reproduced in any form or by any means including but not limited to photocopying, taking pictures or any other recording methods, without prior written permission of Onesia. 16