1
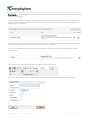
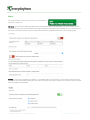
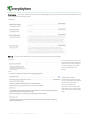
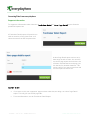
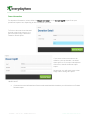
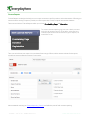
 Everydayhero Training Manual
Building a Campaign in 5 Steps
Building a campaign through everydayhero is easy. Just follow these simple steps. Before you begin, make sure
you have your banners and other images ready. Please see Appendix 1 for design specifications.
Step 1
Click on Create Campaign and then select the modules you would like to use for this event.
Peer to Peer Fundraising –
Allows supporters to create their
own fundraising page
Appeals – Allows donors to make
a donation directly to the campaign
Then, enter your campaign (event) name and your campaign (event) URL.
everydayhero URL
Structure –
www.everydayhero.com.au/eve
nt/eventurl
Please note: Underscores cannot be used in campaign URLs – but you can use hyphens to separate words if
necessary.
Select your campaign (event) date.
Single Day Campaign – Use this
option for events that are on one day
Extended Period Campaign – Use
this option for events that are over
more than one day
If your event is happening in a
specific location, you can enter the address too. Address is optional
Next you can turn Donor Uplift on or off for this particular campaign (event).
Donor Uplift encourages your donors to give a little bit extra, based on the percentage you set in Heroix.
Step 2
Select your layout for your microsite content from a variety of pre-designed templates. You can also select your colour
scheme or create a custom colour scheme to match your brand colours.
To create a custom colour scheme just check the “Custom Colour
Scheme” box.
Primary Colour - The primary colour will be the background colour
of both your campaign and your supporter pages. If you load
background images in, the primary colour will not be seen.
Secondary Colour - The secondary colour will appear on your
navigation bar at both the top and bottom of the campaign. As the
navigation bar text is white, we recommend using a dark colour for
this.
Tertiary Colour - The tertiary colour will be used as the colour for
the funds raised tally and the top supporters leaderboard.
You can also load a background image at this point if you are using one.
Then upload your campaign (event) image to
continue with the setup.
If available, upload your other campaign
design assets, but you can also come back to
those later if needed.
When you are ready, click continue.
It may take a couple of minutes for the next
screen to load, depending on the size of your
images.
Step 3
Go to Edit Micro-Site to adjust the look and feel of your
campaign. There are a number of tabs in this section that you
can use to enhance your microsite.
Site Design – This is where you can
adjust the look and feel of the front page
of your microsite, add event information
into the Primary and Secondary content
areas, and adjust the layout and colour
scheme.
The Primary and Secondary content
areas allow you to put in the
information you want people to know
about your event – what its all about,
when it is, and important information
they may need to know about
participating.
If you have a video on Youtube that
you would like displayed on your
campaign, paste the URL into the box
displayed below the Secondary
Content area
You can also choose whether your charity profile information, social media links and facebook feed appear on your
campaign. Just use the sliders to turn these on or off. The charity information and social media links pull through from
your account.
This is also where you
can adjust the colour
scheme, layout and
background for the
campaign if you need to.
Buttons – Adjust the colour of your buttons or choose to load custom buttons
You have two options when customising your buttons:
1.
2.
You can adjust the colour of the exisiting buttons
You can upload custom button images which can be created by your design team
Links and Pages – Arrange the tabs on the navigation bar and add additional tabs. You can add a link to another site, such
as your charity website and even add additional pages of content
To add a new link to the navigation bar, choose the add custom link button.
Enter the name of the tab and the URL you would like it to direct to.
To add a new page of content, click the add new page button.
Then follow the 3 step process:
1. Choose your layout
2. Enter your content
3. Give your page a title and URL
Images – In this section you can load new banners, sponsor logos and images for the microsite slide show
If you need to change your banners at all after you have created your campaign, just go to the images tab.
If your event has sponsors just load their
logos into the Sponsor logo sections.
Enter their website into the URL box to
hyperlink the logo.
You can also add a slideshow of up to 5 images to your campaign. Just add them in the bottom section of the images
tab.
Downloads – Add downloadable content, such as posters or maps as well as images to insert into areas, such as the primary
content, of your microsite.
If you are adding content for people to download, click “add new asset” then choose your file. Give it a name (this will
appear on your microsite) and tick the list box (this will ensure it is available for your supporters to download). Then
simply update the campaign.
If you have an image you would like to insert, click “add new asset” then choose your file. Name it so you know which
image it is and ensure that the “list” box is unticked. The update the campaign.
Once you have updated the campaign, return to the downloads tab, where you will see your image now has a URL.
Copy this URL.
Then go to the area you would like to insert the image and select the tree icon.
Paste your URL into the pop up box, adjust the size if you need to, then click ‘insert’ and update the campaign
Step 4
Go to the Edit Peer to Peer Features section to customise the
supporter’s experience.
General – Customise the default page goal amount and the default donation dollar handles. You can also choose to allow
supporters to specify their own event date when setting up a page (great for community fundraising events). In this section you
can switch on the offline donations function, which allows supporters to add offline donations to their fundraising tally.
Teams – Choose how supporters can fundraise – as individuals and/or as part of teams. You can also set a team size limit if
you need to. We recommend also taking the time to tick the box at the top, to allow supporters who are part of teams to appear
in the top fundraisers leaderboard.
Customise – This section allows you to enter a custom default page story for your event for both teams and individuals. You
can event adjust the heading if you like.
Emails – Customise the email which is sent out to supporters when they create their page
If you would like to receive new
supporter notifications directly
to your inbox for the campaign
you are setting up, just enter
your email address in this
section.
HANDY HINT: When
customising the email content,
include any phrases that appear
between these symbols: <>.
This ensures that your
supporters receive important
information, such as their page
URL and the expiry date of their
page.
Step 5
If this is an Appeal, such as a Tax Appeal, go to the Edit Appeals
section to customise the donation screen.
Survey Questions – Add additional questions, such as “How did you hear about this Appeal”. You can add as many
additional questions as you like.
You can choose from 4 different
input types: Free Text, Select
(drop down list), Radio Buttons
and Checkboxes (for questions
that allow more than one
response).
Preset Donation Amounts – Customise the preset donation amounts. You can also decorate the dollar handles with text
and images
You can choose to have plain dollar handles
and simply customise the amounts.
Or you can have decorated handles, that include a description
and image to accompany each of your donation amounts.
Other things to consider
If you need to adjust the campaign date, review the Donor
Uplift amount or activate regular giving for your campaign, go
to Edit Campaign Details
If you need to add finance codes to assist with reconciliation
and disbursement of donations, go to Edit Campaign Codes.
You can add up to three finance codes per campaign.
HANDY HINT: You can use the Preview Microsite function throughout the process to see how your campaign is
looking. Once you are happy with the look and feel, you can go live by clicking the button in the top right hand corner.
Accessing Data from everydayhero
Supporter Information
For supporter information select either the F u n d r a i s e r D e t a i l or H e r o P a g e D e t a i l report from the
predefined reports box.
A Fundraiser Detail report will provide you
with an overview of any given event. Just
select the event from the drop down box.
A Hero Page Detail report can be run by
date range as well as event. You can also
run a hero page report that includes a list
of donors who donated to each page, just
tick the box for detailed donations. This
can be useful if you want to save time and
run one report instead of two.
HANDY HINT:
•
If you want to visit your supporters’ pages and see what they are doing, run a Hero Page Detail
report. This will give you the full page URL.
•
For team information, use the Fundraiser Detail Report
Donor Information
For donation information, select either the D o n a t i o n D e t a i l or the D o n o r U p l i f t report from your
predefined reports box, depending on the information you need.
To find out how much was donated
through a particular event or in a
particular date range, choose the
Donation Detail report.
If you want to know more about the
donation, such as whether it included
donor uplift, or if you need a breakdown
of the fees, choose the Donor Uplift
report.
Please note, you will need to set a date
range when running this report.
HANDY HINT:
•
If you need to access information on finance codes associated with donations, you will need to run a Custom
Donation report
Financial Statements
Financial Statements can be located in the Reports section also. To access Remittance Advice and
Transaction Detail reports, select the financial statements option from the Predefined Reports box.
There will be a R e m i t t a n c e A d v i c e and T r a n s a c t i o n D e t a i l report for each fortnightly remittance
period.
The Remittance Advice will provide
top line information, such as the
gross and net amount of the payment
for that period.
The Transaction Detail report will
break down the remittance by
donation, to show how many
donations were included in that
remittance and which events those
donations came from.
Custom Reports
Custom Reports are designed to help you run a report to answer a specific question, reduce the amount of filtering you
need to do after running a report or provide you with a report that is ready to import into another database.
There are two kinds of Custom Reports which you will run: Fundraising Page and Donation.
To access custom reporting log into your charity account
and visit the reports section. From here, select the new
custom report button and choose the type of report you
would like to run.
Then you can build out your report. You can choose from a range of filters, add or remove columns for the report,
reorder and event rename the columns if you need to.
We recommend watching our Custom Reporting Tutorial to familiarise yourself with custom reporting.
Multi-Charity Events
Creating your team
Creating a team in a Multi-Charity Event is easy and can be done in a few simple steps.
1. Visit your e v e r y d a y h e r o charity profile page to choose the event: INSERT PROFILE URL
2. Once you have found your Charity Profile, click on the event icon to visit the fundraising site, then click on
the Start Fundraising button.
3. You will need to enter a few details to get your fundraising account started - enter an email address (yours
or a generic organisation one such as [email protected]), a name (yours or the charity name), a contact
number and a password so you can log back in. Alternatively, if you already have an account from a previous
event, just use the Log In button on the Sign Up screen.
4. Next, you will just need to enter a few more details to complete your team leader page - select the charity
and a page name (do not enter the team name at this point). If this is a new account, you will also need to
enter a date of birth and a postal address. Once all this information is entered, click on “Create Page”
5. You will be directed to your team leader page, where you can then set up the team page. Just click on the
“create a new team link” to the right hand side of your team leader page and enter your team name.
6. Congratulations, you have created your Charity Team Page. Now, just take the time to personalise it by
clicking on the edit this team page button.
HANDY HINTS:
•
•
•
The account sign up process is how e v e r y d a y h e r o gathers the information about your supporters
that we pass back to your charity.
Remember, for Multi Charity Events, creating a team FUNDRAISING page, will not create a
RUNNING team for the event. Contact the event organisers for more information on Running Teams.
Don't forget to remind your supporters to register for the event! Creating a supporter page will not
register them for the event.
Managing your team
Here are some tips to help you manage your team page:
•
•
•
•
Set a goal for your charity team page and don't be afraid to aim high!
Add some information about your charity to the Team Story section. Let people know why you are
aiming to raise a certain amount and tell them about the great work your charity will be able to
continue with that amount.
Add a profile picture - this can be anything you like. If you are looking at getting a logo or image
designed specifically to use on your team page, the dimensions for the image are 230x230px
Share you link far and wide - add it to your newsletters, social media sites and your website. Contact
past supporters and donors and encourage them to join or donate.
If you are the team leader - you can invite other people to join your team using "invite members" button, or
people can join your team from their own Supporter pages, using the "join an existing team" link on their
page.
Once supporters have requested to join your team, you will need to approve them. You will receive an email
notification each time someone requests to join your team. Just log into your team page to approve the
requests.
Appendix 1
Mandatory Assets
Mandatory assets are the minimum assets that need to be added to a campaign in order to activate the
campaign.
•
Campaign Banner - 815px x 226px
•
Campaign Image - 150px wide or high
Optional Assets
Optional assets can be added in to improve the look and feel of a campaign.
•
Custom Buttons - 235px x 59px
•
Campaign Background Image - 2000px x 2000px
•
Footer - 815px x 100px
Supporter Page Design
•
Supporter Page Banner - 940px x 290px
•
Supporter Page Background Image - 2000px x 2000px