1
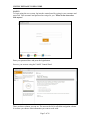
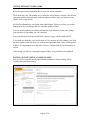
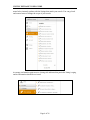
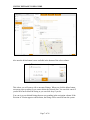
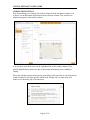
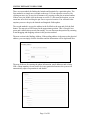
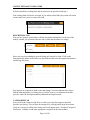
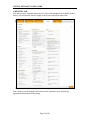
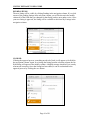
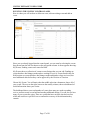
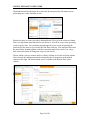
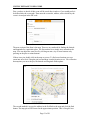
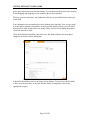
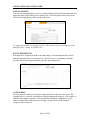
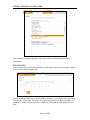
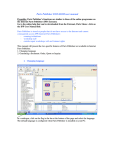
VISITNC
CONTROL PANEL OVERVIEW
USER DOCUMENTATION
REVISED: 5/2010
VISITNC EXTRANET USER GUIDE
BASICS OF THE VISITNC.COM CONTROL PANEL
INITIAL PASSWORD RESET
The first time you use the new control panel, you will have to request a password reset.
You can do this by clicking on the link below the login form.
Simply enter your email address and press the request button. A link to a form where you
can reset your password will be emailed to you. Click the link and fill in the form. You
will need this information to log in.
If the control panel cannot find an account with your email address, you will need to
contact the Extranet Manager at the Division of Tourism.
Page 2 of 26
VISITNC EXTRANET USER GUIDE
LOG IN
To begin using the new system, log into the control panel by typing in your username and
password. Your username and password are unique to you. Please do not share these
with anyone!
Enter your password here and press the login button.
Success, you are now using the VisitNC Control Panel.
There are three columns you can see. The area on the left is called the navigation column.
It is where you choose what information you want to work with.
Page 3 of 26
VISITNC EXTRANET USER GUIDE
Reset your password to something that is easier for you to remember.
Click on the Me icon. The middle area is called the select column. It shows a list of items
associated with the selection made in the navigation column. Since you only have one
profile, click on My Profile.
My Profile information is now listed in the right column. This area is where you will be
making most of your changes and it is called the modify column.
You can quickly update your contact information if you choose or in this case, change
your password to something you will remember.
Type your password in the password field. And now retype it in the confirm field.
If you made any mistakes, you can fix them or if you want to save the changes, you click
the Save button which will always be in the lower right hand corner of the control panel's
window. It is important to save only after you have confirmed all of your information is
correct.
After saving, you will see a message letting you know your profile has been updated.
LISTINGS IN THE VISITNC CONTROL PANEL
Here you will review the control panel columns and how to delete a listing, edit an
existing listing and add a listing.
Page 4 of 26
VISITNC EXTRANET USER GUIDE
Since you are already logged into the control panel, you can start by selecting the listings
drop-down from the left area known as the navigation column. A menu appears showing
My Listings, Pending listings and listings On Hold. My Listings are a collection of your
current listings that you are able to edit. Pending listings are listings that you have made
changes to and are waiting for review by the Division of Tourism. Listings On Hold are
listings that you have made changes to and that have been reviewed by the Division but
need additional edits before they can be approved.
Let’s choose My Listings. You will notice that the middle selection column now shows
all of your listings. The area on the right, known as the modify column, shows a
dashboard of useful information about your listings.
It’s important to note that events are no longer tied to listings. You will discover how to
create events a little later.
The dashboard shows your total number of listings, how many are under a pending
review, and how many are on hold and needing additional editing. You can also see how
many of your listings are aging. These are listings that have not been checked out for a
while and could use a quick review to confirm the accuracy of the information they
contain.
The dashboard also breaks down the listings into the categories they fall under such as
where to dine and what to do.
Now, let’s pretend you have a listing you want to find and delete. First, go to the
selection column. You can either page through all of your listings by pressing the arrows
below the menu or you can use the find filter at the top. You can enter letters and the
Page 5 of 26
VISITNC EXTRANET USER GUIDE
menu below instantly updates with the listings that match your search. You can go back
and reenter letters to change the scope of your search.
An orange exclamation point next to a listing title indicates that particular listing is aging
and its information should be reviewed.
Page 6 of 26
VISITNC EXTRANET USER GUIDE
Also note the delete button is now available in the bottom of the select column.
This is how you will remove old or unwanted listings. When you click the delete button,
a message pops up asking if you want to delete the selected item. You can click cancel if
you do not want to delete the listing or you can click okay if you do.
You can view your deleted listings that are now pending in the navigation column. If the
Division of Tourism approves the deletion, the listing will be removed from the system.
Page 7 of 26
VISITNC EXTRANET USER GUIDE
EDITING LISTINGS
Let's say you just want to edit a listing. To find a specific listing, you can return to the
selection column and use the find filter. Simply click on a listing from the menu and its
information is loaded into the modify column.
You can go in and edit any of the listing information, adjust your descriptions under the
Description tab, add or remove categories within the Categories tab and see what is
assigned. Lastly, look at amenities under the Amenities tab.
Once you are done editing a listing and click the save button located in the bottom right
corner of the modify column, a message appears in the modify column letting you know
that changes will be saved pending review. This listing can now be found by clicking on
Pending in the navigation column. Once your edits are approved, the listing will be
available to edit again from your listings in the navigation column.
Page 8 of 26
VISITNC EXTRANET USER GUIDE
ADDING NEW LISTINGS
How about adding a new listing? Select My Listings from the navigation column. You
will now see an add button at the bottom of the selection column. Click it and a new
blank form appears in the modify column.
You may have noticed the icons on the right-hand side of the modify column. They
provide helpful hints related to the part of the listing information you are adding or
editing.
The icons with the question mark provide general help; the icons that are a book point out
North Carolina Travel Guide specific information. Simply roll over them with your
mouse to see the hints; roll off to hide them.
Page 9 of 26
VISITNC EXTRANET USER GUIDE
LISTING INFO TAB
When adding new listings, the first field you have is the Physical Address.
This should be populated with the actual location of a listing property. Enter the business
name, address and select which city the listing is in. Don’t forget to put in the ZIP code.
GOOGLE MAP
The next section of the form is the map.
Page 10 of 26
VISITNC EXTRANET USER GUIDE
There are two methods for finding the latitude and longitude for a particular place. The
first method is to simply move around on the map. You can adjust the zoom level by
clicking on state, city or street level buttons or by pressing on the plus or minus buttons.
If there is no pin, double click in the map to set one. To fine-tune the location, you can
zoom into street level and drag the pin icon to a precise location. You will notice that
anytime you move the pin, the latitude and longitude fields update.
The second method is to type the address in the field below the map and click the find
button. The map pin will be located at the approximate position. This is Google's best
guess and it almost always needs fine-tuning. You can fine-tune that position by zooming
in and dragging and dropping as done in the previous method.
The next section is the Mailing Address. If the mailing address is the same as the physical
address, you can simply click the checkbox and the information will be duplicated here.
The next fields are for entering the phone information, email addresses and website
URLs. Phone numbers do not need to be in any particular format as the system will
automatically adjust for parenthesis and dashes.
Page 11 of 26
VISITNC EXTRANET USER GUIDE
Websites should be working links and do not need to be preceded with http://.
Non-working links will not be accepted. If you submit a dead link, the system will return
an error until you correct or remove the link.
DESCRIPTION TAB
Now you are going to switch tabs to edit the description information. At the top of the
modify column, you will notice that one tab is white and the others are orange.
Since you have been adding the general listing info, that tab is white. Click on the
Description tab and the form below now has fields related to the description information
and driving directions.
Descriptions are required for both events and listings. Good descriptions help visitors
find the information they’re looking for on VisitNC.com so it is important to include
specifics. Enter the description and any additional driving directions.
CATEGORIES TAB
Next, click on the Categories tab. Here is where you select the categories that best
describe your listing. You can filter the categories by clicking on the drop down menu.
Click on a category to add it to the listing and it will appear in the “Assigned Categories”
field below. Continue to add other appropriate categories in the same manner.
Page 12 of 26
VISITNC EXTRANET USER GUIDE
If you make a mistake and assign an incorrect category, you can simply click it in the
assigned categories field to remove it. A confirmation box will appear when removing
any categories. Click “OK” to continue.
Page 13 of 26
VISITNC EXTRANET USER GUIDE
AMENITIES TAB
Now that you have assigned categories, let’s show what amenities are available for this
listing. You will need to check a couple of these boxes and fill in some fields.
Don’t forget to scroll through to the bottom of the Amenities tab to include any
appropriate information for the listing.
Page 14 of 26
VISITNC EXTRANET USER GUIDE
SAVE CHANGES
Now that the listing changes and additions have been made, you need to save the edits for
approval.
It should be noted that once you save this listing, you will not be able to edit it again
until it has gone through the approval process.
The save button is available in the lower right hand corner of the modify column. Click it
and you will see a message in the modify column.
If you forgot to enter some required information, the message would tell you what was
missing. Click the close button, add the missing information and click the save button
again.
Just like deleting and editing, adding a listing requires the approval process.
Page 15 of 26
VISITNC EXTRANET USER GUIDE
PENDING ITEMS
The new listing will be visible by clicking Pending in the navigation column. If you click
on one of the pending listings in the selection column, you will be shown in the modify
column all of the fields that you changed for that listing, and are now under review. Once
your new listing is approved, the listing will be available to edit from My Listings in the
navigation column.
ON HOLD
If during the approval process, something needs to be fixed, it will appear as On Hold in
the navigation column. Again, by selecting the listing from the selection column, the On
Hold listing will appear in the modify column. A helpful message should tell you exactly
what needs correcting. Once that listing has been edited, it can be resubmitted to the
approval process by clicking the save button.
Page 16 of 26
VISITNC EXTRANET USER GUIDE
EVENTS IN THE VISITNC CONTROL PANEL
Here is where you will see how to delete an event, edit an existing event and add an
event.
Since you are already logged into the control panel, you can start by selecting the events
drop-down from the left area known as the navigation column. A menu appears showing:
My Events, Pending events and events On Hold.
My Events shows a collection of current events listings that you can edit. Pending are
events that have had changes made and are waiting for review. Events listed in the On
Hold section are events that have had changes made and that have been reviewed, but
need additional edits before they can be approved by the Division of Tourism.
Choose My Events. You will notice that the middle selection column now shows all of
your events. The area on the right, known as the modify column, shows a dashboard of
useful information about your events.
The dashboard shows your total number of events, how many are under a pending
review, and how many are on hold and needing additional editing. You can also see how
many of your events are aging. These are events that have not been checked out for a
while and could use a quick review to confirm the accuracy of the information they
contain.
Page 17 of 26
VISITNC EXTRANET USER GUIDE
The dashboard also breaks down the events into the categories they fall under such as
performing arts events or holiday events.
Pretend you have an event you want to find and delete. First, go to the selection column.
There is a drop down menu that will let you choose to view all of your events, upcoming
events or past events. You can either page through all of your events by pressing the
arrows below the menu or you can use the find filter at the top. You can enter letters and
the menu below instantly updates with the events that match your search. You can go
back and reenter letters to change the scope of your search.
Choose which event you want to delete or edit by clicking on it in the selection column.
Once selected, the information related to that particular event appears in the modify
column on the right. The delete button is now available in the bottom of the select
column.
Page 18 of 26
VISITNC EXTRANET USER GUIDE
When you click the delete button, a message pops up asking you if you want to delete the
selected item. You can click cancel if you don't want to delete the event or you can click
okay if you do.
You can view your deleted events from Pending in the navigation column. If the Division
of Tourism approves the deletion, the event will be removed from the system.
Let's say you just want to edit an event. Again you can return to the selection column and
use the find filter. Simply click on an event from the menu and its information is loaded
into the modify column. You can go in and edit any of the event information and adjust
your event details.
When you’re done editing the event, click the save button located at the bottom right of
the modify column. A message now appears letting you know that your changes will be
saved pending review. The event is now under Pending in the navigation column.
Once your edits are approved, the event will be available to edit again from My Events in
the navigation column.
Page 19 of 26
VISITNC EXTRANET USER GUIDE
ADDING NEW EVENTS
Now look at adding a new event. Select My Events from the navigation column. You will
now see an add button at the bottom of the selection column. Click it and a new blank
form appears in the modify column.
You may have noticed the little icons on the right-hand side of the modify column. They
provide helpful hints related to the part of the event information you are adding or
editing. Simply roll over them with your mouse to see the hints; roll off to hide them.
Page 20 of 26
VISITNC EXTRANET USER GUIDE
First, you have to decide if this event will be saved after it ends or if you would prefer it
be deleted after the event ends. Then enter the event title, address, select which city the
event is in and put in the ZIP code.
The next section of the form is the map. There are two methods for finding the latitude
and longitude for a particular place. The first method is to simply move around on the
map. You can adjust the zoom level by clicking on state, city or street buttons or by
pressing on the plus or minus buttons.
If there is no pin, double click in the map to set one. To find exact locations you can
zoom into street level. Drag the pin icon and drop it on the location to set. You will notice
that anytime you move the pin, the latitude and longitude fields update.
The second method is to type the address in the field below the map and click the find
button. The map pin will be located at the approximate position. This is Google's best
Page 21 of 26
VISITNC EXTRANET USER GUIDE
guess and it almost always needs fine-tuning. You can fine-tune that position by zooming
in and dragging and dropping as you learned in the previous method.
The next section is directions. Any landmark references or special directions can be put
in this field.
Your information for each particular event is broken down into tabs. Now you are going
to switch tabs to edit the event details. At the top of the modify column, you will notice
that one tab is white and the others are orange. Since you have been adding the general
event info, that tab is white.
Click on the Details tab and the form below now has fields related to the description
categories and some contact information.
It should be noted that events are no longer tied to listings. You now have the flexibility
to have an event anywhere, at any time and the ability to assign that event to any
appropriate category.
Page 22 of 26
VISITNC EXTRANET USER GUIDE
LINK TO LISTING
You can also optionally link an event to a listing. Simply click the lookup button and start
typing the name of the listing you are looking for. A list will appear below and you can
click on the listing that you want to link to the event.
It’s suggested you link to a listing if possible. This ensures the event will appear on the
linked property’s listing on VisitNC.com.
EVENT DESCRIPTION
Descriptions are required for both events and listings. Good descriptions help visitors
find the information they’re looking for on VisitNC.com so it is important to include
specifics. Enter the description and any specifics about admission.
CATEGORIES
The next section is where you select the categories that best describe your event. The
example below is a festival. Scroll down to find an appropriate category. Click it and it is
added to the assigned categories. You can add other categories if appropriate. If you
make a mistake and assign an incorrect category, simply click it in the assigned
categories file to remove it.
Page 23 of 26
VISITNC EXTRANET USER GUIDE
After you have assigned categories, enter some contact information and website
information.
EVENT DATES
Now you are ready to add your event dates. Again back at the top of the modify column
you can select the Event Dates tab.
Set a start date and time as well as the end date and time. You can also enter notes about
this specific event period. The help icon is quite helpful here as it shows examples of a
schedule of events, a multi-day event, a single day event and an event with just a start
time.
Page 24 of 26
VISITNC EXTRANET USER GUIDE
You should also notice a little x box to the right of the second event date. Click that if
you want to remove an event date.
Once you are done, it’s time to save. It should be noted that once you save this event, you
will not be able to edit it again until it has gone through the approval process.
The save button, as always, is available in the lower right hand corner of the modify
column. Click it and you’ll see a message in the modify column. If you forgot to enter
some required information, the message would tell you what was missing.
Click the close button, add the missing information and click the save button again.
Just like deleting and editing, adding an event requires the approval process. The new
event will be visible by clicking Pending in the navigation column. If you click on one of
the pending events in the selection column, you will be shown in the modify column all
of the fields that you changed for that event, and are now under review. Once your new
event is approved, the event will be available to edit from My Events in the navigation
column. If during the approval process, something needs to be fixed, it will appear from
On Hold in the navigation column. Again, by selecting the event from the selection
column, the On Hold event will appear in the modify column. A helpful message should
tell you exactly what needs correcting. Once that event has been edited, it can be
resubmitted to the approval process by clicking the save button.
Page 25 of 26
VISITNC EXTRANET USER GUIDE
NC Division of Tourism, Film and Sports Development
Guidelines for Inclusion in the VisitNC Database
The VisitNC listings should be used to enhance tourism in your area, and thus benefiting your area.
The Division uses information from this database to help consumers at visitnc.com and its related
websites, 800/VISITNC, welcome centers and in both print and electronic publications. Timely and
accurate updating of your area’s information is to your benefit.
All legally operating, tourism-related businesses can be listed. Membership with the tourism
marketing organization responsible for entering items into the Extranet is not a requirement for
inclusion in this database. Properties listed in the database should be geographically located in
North Carolina. Businesses suitable for listing include the following:
¾
Attractions (If attractions are open with limited hours—please list times of operation)
¾
Accommodations (Should meet state health code, if applicable)
o
Hotels/Motels
o
Resorts
o
B&Bs/Country Inns
o
Vacation realty companies
o
Individual vacation rentals if not listed with a vacation realty company
o
Campgrounds
¾
Restaurants
¾
Outdoor Recreation including public and semi-private golf course, outdoor outfitters, parks
with outdoor activities etc.
¾
Unique shopping venues
¾
Meeting, convention and banquet facilities
¾
Tourism related services
¾
Transportation (Taxi, airports, train service etc.)
¾
Group tour services
¾
Destination Marketing Organizations or other tourism services
This database is not suitable for and should not include businesses such as adult entertainment,
insurance companies, commercial and residential realtors with NO vacation rental business, auto
sales, construction companies, etc. Businesses that are not related to tourism derive no real benefit
from inclusion in this database.
Events also may be listed in the Extranet database. They should:
¾
Be related to tourism and draw attendance from at least 50 miles away. Events such as
chamber of commerce banquets, business after hours, dance recitals, charity auctions or most types
of fundraisers, etc., are not suitable for this website as they tend to be extremely localized in nature
for attendance.
¾
Take place in North Carolina
¾
List specific dates and have contact information included.
¾
Have a brief but informative description.
*The Division reserves the right to exclude, retain or edit any property as it sees fit in order to have
the most current and accurate data possible.
For further information, contact:
Nicolle C. Jones
Database/Web Manager
North Carolina Division of Tourism, Film and Sports Development
4324 Mail Service Center
Raleigh, NC 27699-4324
919-733-7501
[email protected]
Page 26 of 26