1
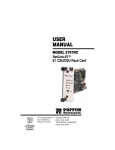
SMARTEYE Single-P
User Manual
VERSION P1.0
Revision 2
www.smarteyecorporation.com
related documents:
SMARTEYE Sender/Receiver Reader User Manual
The material in this manual is for informational purposes and is subject to
change without notice. Smarteye Corporation assumes no responsibility for any
errors which may appear in this manual.
© Smarteye Corporation
SMARTEYE is a registered trademark of Smarteye Corporation.
Printed in U.S.A.
SMARTEYE contact information:
SMARTEYE Corporation
2637 Bond Street
Rochester Hills, MI 48309
Phone: (248) 853-4495 Fax: (248) 853-8539
www.smarteyecorporation.com
Email: [email protected]
SMARTEYE Single-P Users Manual
Page i
Table of Contents
1.0
INTRODUCTION.........................................................................................................................................1
2.0
SINGLE-P DESCRIPTION .........................................................................................................................1
3.0
SINGLE-P INSTALLATION ......................................................................................................................1
4.0
AC POWER/WIRING..................................................................................................................................1
5.0
POWER SUPPLY .........................................................................................................................................2
6.0
AUXILIARY SERIAL PORT RS423 WIRING.........................................................................................2
7.0
READER WIRING .......................................................................................................................................2
7.1
8.0
8.1
8.2
8.3
8.4
9.0
9.1
9.2
9.3
9.4
9.5
SENDER/RECEIVER READER WIRING ...........................................................................................................3
PARALLEL WIRING ..................................................................................................................................3
DATA BITS (D0-D11)..................................................................................................................................3
LABEL/ERROR BIT (L/E) .............................................................................................................................4
PARITY BIT (PAR) ......................................................................................................................................4
DATA READY BITS (RDY0, RDY1)............................................................................................................4
SINGLE-P CPU CIRCUIT CARD..............................................................................................................4
SWITCH AND JUMPER DIAGRAM ..................................................................................................................5
CONFIGURATION LEGEND ...........................................................................................................................6
SINGLE-P OPERATING MODES (SW1) .........................................................................................................6
MEMORY CONFIGURATION (JB2) ................................................................................................................7
READER AND AUXILIARY PORT TERMINATIONS (JB1), (JB3) .....................................................................7
10.0
POWER-UP ...................................................................................................................................................8
11.0
PARALLEL COMMUNICATION PROTOCOL......................................................................................8
11.1
11.2
TRANSACTION STEPS ...................................................................................................................................8
DESIGN CONSIDERATIONS ...........................................................................................................................8
12.0
AUXILIARY PORT OPERATION ............................................................................................................9
13.0
ERROR MESSAGES..................................................................................................................................11
14.0
APPENDIX ‘A’ (DRAWINGS) ...................................................................................................................1
Filename: Single-P R2.doc
AM
… In Control
SMARTEYE Single-P User Manual
1.0
Page 1
Introduction
Smarteye Readers sense an identification number coded into a Smarteye Label. When a label
moves past a reader, signals are sent from the reader, enabling the Single-P to determine the
label identification number.
Smarteye Labels are typically constructed of 12 gauge steel and come in a variety of lengths to
suit specific application requirements. A label contains a pattern of punched slots which can be
detected by a reader as the label moves past it.
The Smarteye Single-P processes label inputs from one Smarteye Reader and converts this data
to parallel digital 24VDC outputs. The digital outputs of the Single-P are directly wired to a
digital input module of a PLC.
The Single-P has 16 outputs: 12 data bits, 1 label or error bit, 1 parity bit, and 2 data ready bits.
The 12 data bits can be configured as either binary or BCD, with a maximum label number of
4095 for binary or 999 for BCD.
2.0
Single-P Description
The Smarteye Single-P contains: Single-P CPU circuit card, power supply, on/off switch, fuse,
aluminum mounting base and interconnecting cables. The unit is completely assembled and
ready for use.
3.0
Single-P Installation
The Smarteye Single-P is designed to function in the environment found in most industrial
facilities. The Single-P will operate properly in the same environment as a programmable
controller. It is rated for operation at temperatures from 0 to 50° C.
Electromagnetic interference on signal lines will not be a problem if the recommended cables are
used for equipment interconnections. The recommended cables will provide adequate shielding.
Mounting dimensions for the Single-P can be found on drawing #SP2001/03-420 in Appendix
'A' of this document.
4.0
AC Power/Wiring
The Smarteye Single-P requires 0.2 amps at 120VAC (25VA). The input voltage may vary from
85-264VAC. Frequency range is 50-60Hz. The Single-P has three terminals for AC power
connections, located on the exterior bottom right of the chassis. These terminals provide
connections for L1, N, and ground. A glass-type 1 AMP fuse is used to protect the hot side of
the line. A two-pole power switch opens both sides of the AC line circuit in the OFF position.
Filename: Single-P R2.doc
AM
… In Control
SMARTEYE Single-P User Manual
Page 2
The Smarteye Single-P has been designed to be as immune to AC power line fluctuations as is
practical. However, like most electronic equipment, it can be susceptible to 'brownouts' and
severe voltage 'spikes'. The Single-P should be powered with an AC line which is fed from the
secondary of a transformer whose primary is electrically as close to the main power source of the
facility as possible. The AC line can supply other, similar electronic equipment such as
programmable controllers, but should not power any heavy industrial equipment that causes
excessive line fluctuations such as motors, motor starters, welders, etc.
All applicable codes and ordinances should be observed for wiring AC power and ground,
particularly the National Electrical Code published by the National Fire Protection Association
of Boston, Massachusetts.
5.0
Power Supply
A single 24 VDC power supply is included in the Smarteye Single-P chassis. This supply
provides power for both the CPU circuit card and the reader connected to the Single-P.
The power supply has a screw for adjusting its output voltage. Using a voltmeter, the output
voltage may be adjusted to approximately 24 VDC.
The power supply includes automatic current limiting circuitry with automatic recovery, which
limits short circuit output current to a safe value. This provides protection against damage due to
accidental shorting. An AC line filter is incorporated into the power supply to reduce noise from
line-to-line and line-to-ground.
6.0
Auxiliary Serial Port RS423 Wiring
The auxiliary port connections require a 9-pin male 'D'-type connector. Belden 8723 or
equivalent (2 shielded pairs, 22 gauge) is recommended for the RS423 connection. Detailed
wiring drawing #SP2001/03-311 can be found in Appendix 'A'.
7.0
Reader Wiring
Pre-wired to each of the three receiver photoeyes in a reader assembly is a six-foot long cable.
These three cables are labeled: A, B, C. Pre-wired to the sender photoeye is a single fifteen foot
long unlabeled cable. All four cables must terminate at a field junction box mounted less than
six cable feet from the receiver. This junction box should provide six screw terminals labeled: +,
-, A, B,C, and SHIELD.
The Single-P circuit card provides a plug-in screw terminal for the Smarteye Reader
connections. Belden 9773 (3 shielded pairs, 18 gauge) is recommended for connecting the
Single-P to the junction box.
Filename: Single-P R2.doc
AM
… In Control
SMARTEYE Single-P User Manual
7.1
Page 3
Sender/Receiver Reader Wiring
The three receiver cables are labeled A, B, or C. The sender photoeye has a single unlabeled
cable.
An optional junction box for the sender is used if extra cable length is required. This junction
box should provide two screw terminals labeled: + , - . Cabling details can be found on drawing
#SP1054/01-411 in Appendix 'A'.
Note:
1.
Readers are delivered with the white signal wires of the receivers prepared for
termination and with black wires tied back with shrink wrap. The black signal wires are
logically inverse to the white wires and are not used.
2.
All references to + and - refer to the 24 VDC supply of the Smarteye Single-P.
3.
The drain wires of the Belden 9773 cable are normally connected to DC ground at the
Single-P. This is accomplished with the jumper block (JB3-1) on the Single-P circuit
card. If the distance between the Single-P and the reader is greater than 1000 feet, or the
environment is electrically noisy, then it may be necessary to connect the drain to DC
ground at the reader's junction box. This is accomplished with a jumper wire installed at
the junction box. Do not connect the drain at both ends of the cable. Remove the jumper
block at the Single-P if a jumper wire is used at the junction box. Never connect the
drain to chassis ground.
8.0
Parallel Wiring
The Single-P circuit card provides a plug-in screw terminal for the 16 parallel output
connections. Discrete 18 gauge wire such as Belden 8501 or equivalent is recommended for
these connections. Parallel wiring details can be found on drawing #SP2001/03-411 in
Appendix 'A'.
Notes:
1.
Data presented by a Single-P on its parallel output lines is binary; i.e., each output
represents a bit in a binary field (off = 0, on =1).
2.
The least significant bit of the data field is D0 and the most significant is D11.
3.
The Single-P is configured for true-high operation; i.e., a binary 1=24VDC and a binary
0=GND.
8.1
Data Bits (D0-D11)
The data bits (D0 - D11) define the value of the label or error number. This field may be binary
or BCD dependent on the position of (SW1.1).
Filename: Single-P R2.doc
AM
… In Control
SMARTEYE Single-P User Manual
8.2
Page 4
Label/Error Bit (L/E)
The label or error (L/E) bit defines the data bits (D0 - D11) as an error number or a label
number. If this bit is a 1, the data is a label number. If the bit is a 0, the data is an error
number.
8.3
Parity Bit (PAR)
The parity bit enables the control device to determine the validity of data received from the
Single- P. Thus, if an input/output point should fail on either the control device or the Single-P
or if a connection between the two should be lost, then the control device can detect the fault and
issue an alarm and/or stop the controlled operation until repairs are made.
The value of the parity bit is always set so that an odd sum results when the number of bits
turned on in the data fields are added. All 16 bits of the parallel output port are used to calculate
the parity, including the parity bit itself.
8.4
Data Ready Bits (RDY0, RDY1)
A change of state in the two data ready bits signals the control device that the Single-P has new
data on its output lines. If the data ready bits are 01 or 10, then the control device should receive
the new data and perform appropriate control action. If data ready is 00 or 11, then the control
device should ignore the data (take no control action). A full description of this protocol appears
in section 11.0 - 'Parallel Communication Protocol'.
9.0
Single-P CPU Circuit Card
The intelligence of Smarteye Readers is contained in the Smarteye Single-P CPU circuit card.
The following features are included in the CPU circuit card hardware:
•
Interface to inputs for one reader
•
16 bit parallel output port (24VDC true high)
•
Interface to a serial RS423 monitor line (auxiliary port)
•
Switches to set operating parameters
•
Jumper blocks to modify shield terminations and memory size
The diagrams on the following pages describe the function of the various jumper blocks and
switches. Prior to shipment, the switches and jumpers are factory configured as shown in the
following diagram.
Filename: Single-P R2.doc
AM
… In Control
SMARTEYE Single-P User Manual
9.1
Page 5
Switch and Jumper Diagram
Filename: Single-P R2.doc
AM
… In Control
SMARTEYE Single-P User Manual
9.2
Page 6
Configuration Legend
switch closed (1)
switch open (0)
jumper block installed
jumper block not installed
X
9.3
jumper installed
Single-P Operating Modes (SW1)
SW1
1 2 3 4 5 6 7 8
OFF
Parallel Output Representation (0-Binary, 1-BCD)
Send Errors to PLC (0-disabled, 1-enabled)
Diagnostic (0-disabled, 1-enabled)
Not Used
Parallel Output Test (0-disabled, 1-enabled)
SW1.1
The data bits (D0-D11) can be configured as binary or BCD, with a maximum
label number of 999 for BCD or 4095 for binary. The switch diagram above is set
for BCD outputs.
SW1.2
Errors generated from the reader are sent to the programmable controller if this
switch is on. When an error occurs, the L/E bit will be 0 and the data bits form
the error number. If this switch is off, then no errors are sent to the
programmable controller. The L/E bit will be 1 except at power-up. The switch
diagram above is set to enable errors.
SW1.3
Reader diagnostic information is sent out the auxiliary serial port if this switch is
on. Diagnostic information is not sent if the switch is off. This switch does not
affect the parallel outputs.
SW1.8
This switch is used for troubleshooting the parallel port. All 16 parallel output
bits are turned on if this switch is on. The outputs will remain on until the switch
is turned off and a new label or error message is sent out the parallel port. Any
label or error messages that occur while this switch is on are not transmitted to the
PLC. Auxiliary port operation is not affected by SW1.8.
Filename: Single-P R2.doc
AM
… In Control
SMARTEYE Single-P User Manual
9.4
Page 7
Memory Configuration (JB2)
The memory configuration is set at the factory and should not be altered; it is shown here for
reference only.
9.5
2
X
X
RAM
8K
32K
4
X
3
X
(JB2)
1 2 3 4
32KEPROM
8K or 16K EPROM
32K RAM
8K RAM
EPROM 1
8K
16K
32K X
Reader and Auxiliary Port Terminations (JB1), (JB3)
(JB1)
(JB3)
1 2
Aux. Port Shield Terminal to Chassis GND
Auxiliary Port Simple Termination
Rdr. Port Shield Terminal to 24VGND
Rdr. Port Shield Terminal to Chassis GND
1 2
The jumper block (JB1) is provided to allow proper termination of the serial communication line.
Jumper (JB1-1) is used to connect the drain wire of the auxiliary port's communication cable to
chassis ground. The auxiliary port's communication cable drain wire is typically terminated at
the Single-P since it normally has a better ground than the user's terminal. Never terminate the
drain wire at both ends of a communication line.
Filename: Single-P R2.doc
AM
… In Control
SMARTEYE Single-P User Manual
Page 8
Jumper (JB1-2) is provided to allow simple termination of the auxiliary port receiver. This
jumper places a 470 ohm resistor across the input of the receiver. The addition of the shunting
termination impedance reduces the reflected signal at the receiver and diminishes ringing and
overshoot. This jumper should be installed if the auxiliary port communication line is greater
than 50 feet.
The jumper block (JB3) is provided to allow proper termination of the reader cable. The drain
wires of the reader cable (Belden 9773) are normally connected to 24V ground at the Single-P.
This is accomplished by installing jumper (JB3-1). Jumper (JB3-2) is provided for
troubleshooting purposes only; normally it is not installed.
10.0
Power-Up
When power is applied, the Smarteye Single-P reads the setup switches and initializes its internal
data. If errors are enabled (SW1.2 on), the Smarteye Single-P generates an error 0 message for
its reader. The RDY 1 bit will be on and all other bits off to represent the error 0. If errors are
disabled, then all parallel outputs remain off until the first label is read.
11.0
Parallel Communication Protocol
The communication protocol between the Single-P and a control device (e.g., programmable
controller) is relatively simple. Nevertheless, it is important that the logic designer for the
control device be thoroughly familiar with the protocol.
11.1
1.
2.
3.
4.
5.
11.2
Transaction Steps
A label passes by the Smarteye reader.
The Single-P reads the digital data from the photoeyes and determines the label number.
The parallel output fields are calculated and sent out.
The data ready bits are set to 01, or 10; if data ready was 01, then 10 is sent or vice versa.
Meanwhile, the control device, which has been monitoring the data ready outputs of the
Single-P, recognizes the change in the data ready bits.
If the data ready bits have changed and are 01 or 10, then the control device receives the
remainder of the data from the parallel outputs and takes appropriate action.
Design Considerations
The Single-P, regardless of the speed of its output buffers, cannot guarantee that all new output
data will transition at the same instant. In other words, there is a short transient interval during
which output data 'settles.' A digital control device samples data presented by a Single-P at
scattered instances in time, including an instant during which the output lines of a Single-P are
settling.
The steps of a data message transaction are designed to prevent a control device from receiving
data that is sampled during a settling period. In order to prevent this, the transaction steps allow
output data to settle before the data ready bits change. Thus, a control device should only
receive data when it recognizes a change in the data ready bits.
Filename: Single-P R2.doc
AM
… In Control
SMARTEYE Single-P User Manual
Page 9
There are four possible patterns of the two data ready bits: 00, 01, 10, and 11. Only 01 and 10
are associated with usable data. Thus, a control device should receive data only when the data
ready bits change and have a value of 01 or 10. This prevents receipt of data during a settling
period of the data ready bits, when 00 and 11 are possible values.
12.0
Auxiliary Port Operation
The auxiliary serial port is designed to aid the user during startup or troubleshooting. The serial
port sends labels, errors, and diagnostic messages to a user display terminal as they occur. An
example of each of the three message types is shown below.
Label Message:
L00371
Label Message with Diagnostic Message: L00371 A+00 B+02 C+01 X+00 Y-04
Error Message:
E94
Diagnostic Error - Check Photoeye C
Notes:
1.
A label message begins with the letter 'L' followed by five numbers that represent the label.
Leading zeros are filled as necessary.
2.
An Error message begins with an 'E' followed by two numbers which identify the error. A
second line is used to describe what the error means.
3.
A diagnostic message will typically follow a label message as shown above. If an error
occurred instead of a good label read, then the diagnostic message will follow the error
code.
4.
Diagnostic messages can be turned off with (SW1.3 off).
5.
A diagnostic message contains five numbers which indicate if the reader needs maintenance.
A perfect diagnostic reading is:
A
B
C
X
Y
+5
+5
+5
0
0
Diagnostic numbers are acceptable if they are within ±5 of the perfect reading shown above.
If an acceptable reading is unobtainable, check the Smarteye Reader User Manual for
alignment information.
6.
Any messages received by the auxiliary port are ignored.
Filename: Single-P R2.doc
AM
… In Control
SMARTEYE Single-P User Manual
7.
Page 10
Messages are transmitted with the following communication parameters: 9600 baud, one
start bit, eight data bits, no parity, and one stop bit.
Filename: Single-P R2.doc
AM
… In Control
SMARTEYE Single-P User Manual
13.0
Page 11
Error Messages
The error messages defined below will appear on the auxiliary serial port as they occur unless
otherwise noted. All error codes will appear on the parallel output port as they occur if (SW1.2)
is on.
Error Code
Description
00
Smarteye Single-P just powered up.
01
Unrecognizable label, too much data obtained.
04
Unrecognizable label, front and back bits = 0.
05
Unrecognizable label, front and back bits = 1.
Note: Errors 01, 04, and 05 can be the result of parts of a carrier breaking the photoeye beams.
06
Unrecognizable label, incorrect parity. Check label for
obstructions.
15
Unrecognizable label, incorrect Hamming code. Check label for
obstructions.
16
Unrecognizable label, more than 5 leading zeros.
19
Overload of input data from reader.
30-39
Unrecognizable label, incorrect number of data bits. LSD (least
significant digit) of error is the LSD of the number of data bits in
the label read.
50
BCD number is too big to send to the PLC. This error occurs
when the Single-P is in BCD mode and a label is read which is
greater than 999.
51
Binary number is too big to send to the PLC. This error occurs
when the Single-P is in binary mode and a label is read which is
greater than 4095.
Errors 91 through 99 are detected during diagnostic check:
91
Photoeye A, insufficient number of transitions in time allowed.
92
Photoeye B, insufficient number of transitions in time allowed.
94
Photoeye C, insufficient number of transitions in time allowed.
Note: Errors 91, 92, and 94 indicate that a photoeye is not transitioning while the other two
photoeyes are. Check reader height, photoeye operation, and reader wiring.
99
to
Diagnostic attempt aborted; acceptable hole pattern not found, probably due
label speed variation. E99 is sent from the auxiliary port if diagnostic mode is
enabled (SW1.3 on) for a reader.
Filename: Single-P R2.doc
AM
… In Control
SMARTEYE Single-P User Manual
14.0
Page A-1
APPENDIX ‘A’ (Drawings)
Single-P Installation Details - SP2001/03-420
Single-P Auxiliary Communication Port Cable Detail - SP2001/03-311
Sender/Receiver Cable Details for Single-P Applications - SP1054/01-411
Single-P Control Unit - Field Wiring Details - SP2001/03-411
Filename: Single-P R2.doc
AM
… In Control