1
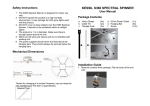
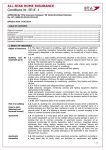
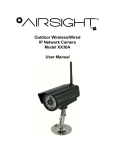
Electronic
Barometer
#4002
Instruction Manual
Instruction manual
Warning . . . . . . . . . . . . . . . . . . . . . . . . . . . . . . . .
P4
Description . . . . . . . . . . . . . . . . . . . . . . . . . . . . . .
P6
SETUP . . . . . . . . . . . . . . . . . . . . . . . . . . . . . . . . . . . .
P9
Use . . . . . . . . . . . . . . . . . . . . . . . . . . . . . . . . . . . . .
P 12
Technical specifications . . . . . . . . . . . . . . . . .
P 19
GUARANTEE . . . . . . . . . . . . . . . . . . . . . . . . . . . . . .
P 19
RECYCLING . . . . . . . . . . . . . . . . . . . . . . . . . . . . . . .
P 20
The Weems & Plath® Story
In May of 1919, eight years before Lindbergh’s famous solo flight, three small planes set out
from Rockaway Naval Airstation, NY headed for Plymouth, England in an attempt to make the
first trans-Atlantic flight. Only one of them made it. Twenty-five hundred feet below on board
a station tracking ship, a young navigator, Lt. Cdr. Philip Van Horn Weems, U.S. Navy, gazed
up and thought there must be a safer and simpler way than using a small armada of ships as
beacons for the flight.
For centuries, man had relied on the heavens, on the circling planets and the constant horizon
to guide him in his travels. An accurate clock, compass, sextant and charts were the necessary
tools for plotting a course, but these required time for computations and a place to spread out
and study the charts. The timeworn system of celestial navigation was ill suited to the cockpit,
but the airplane was here to stay. Lt. Cdr. Weems, a brilliant, inventive and determined young
man knew as he tracked that first flight that navigation was his destiny, and he went on to revolutionize the field with his ideas, writings and inventions.
The challenge he undertook was complex and involved the invention of new methods and new
tools. It required a horizon system independent of the sea horizon that was often not visible
from the cockpit of a plane. Weems worked for years to develop a new kind of sextant and to
find someone to manufacture it. When an accurate timepiece was needed, Weems invented the
Second Setting Watch with its inner rotating dial. He produced the famous Weems Plotter, the
more precise and easier to use plotting tool, which is still one of our most popular plotters.
All his life, Weems continued to improve the instruments and broaden the applications of his
methods until they came to include radio astronomy, polar exploration and even space navigation. He published numerous articles and taught navigation at the Naval Academy in the
1920’s. He went on to establish his own school in Annapolis to teach The Weems System of
Navigation. Charles Lindbergh studied with Weems before attempting his trans-Atlantic flight.
Admiral Byrd, a classmate of Weems at the Naval Academy, came to Weems for instruction
before setting out for the North Pole, as did many others.
A century earlier, Carl Plath’s company in Hamburg, Germany - C. Plath, had been manufacturing the finest commercial sextants and magnetic compasses available. C. Plath developed the
first gyrocompass installed on a commercial vessel in 1913. Weems' school for navigation had
become the purveyor of Weems’ instruments. It was a natural development for Weems’ company to become the North American source for C. Plath’s fine instruments; hence the alliance of
two distinguished names - Weems and Plath. The exceptional workmanship that both Philip Van
Horn Weems and Carl Plath required in developing the manufacturing of precision navigation
tools remains at the heart of all our products.
Weems & Plath is still located in the Chesapeake Bay town of Annapolis where it began so many
years ago. We are committed to supplying the world with the finest nautical products available
while maintaining the high standards of service that have distinguished Weems & Plath from
its inception.
www.weems-plath.com
Thank you for purchasing this device. We hope that it will give you full satisfaction.
The following pages contain important information. Please read fully before using
your Electronic Barometer.
CHECK THE CONTENTS OF THE PACKAGE
• 1 marine barometer – Electronic Barometer 4002
• 1 wall mount
• screws
• 4 batteries LR06 (AA)
• 1 user’s guide
The "warning"
and
��������������
"���������
����������
careful��"
symbols
������������������������������������������������
are used throughout this user’s manual.
Before using your device, please read all of the information preceded by these
symbols.
WARNING
For your safety, please pay attention to the following warnings when using your
ELECTRONIC barometer.
Do not open the device.
This will void the guarantee. Do not insert any blade, rod, screwdriver or other object
in the air vents, doing so could damage the device and void the guarantee.
Handle the batteries carefully.
• The use of LR06
�����������������������������������
(AA)��������������������������
batteries is recommended.
• Please respect the polarity when inserting batteries.
• Do not place the batteries near a flame or a source of heat.
• Batteries have a tendency to leak when they have been completely
discharged. To avoid damaging the device, please remove the batteries when they
are fully discharged.
• When you are not using the batteries, put the battery cover in place. Keep the
batteries in a cool place. Only use new batteries.
Keep this device away from children.
Please pay careful attention that children do not place the batteries or other small
parts of the device in their mouths. The descriptions and characteristics that appear
in this document are furnished as general information and not as a contractual
obligation entered into by the seller. As we are always concerned with the quality of
our products, we reserve the right to carry out, without prior warning, any changes
or improvements.
The manufacturer and their distributors cannot be held responsible for any damage
arising from the use of this device by yourself or a third party. The contents of this
manual cannot be copied or reproduced in any manner without the express consent
of the manufacturer.
PRECAUTIONS
For your safety, please pay attention to the following warnings when using your
Electronic Barometer.
If the Electronic Barometer becomes wet or damp, immediately dry it with a soft
cloth and keep it in a clean and dry place.�
To remove salt, sand, dust and dirt.
Clean the Electronic Barometer with a damp cloth and dry it carefully. Do not use
chemical cleaners or detergents.
Do not touch the LCD screen with your fingers or any other object.
Clean the LCD screen with a soft, slightly dampened cloth. Do not press
on the screen. Do not use chemical cleaners or detergents.
Avoid sudden temperature changes. Use and keep your Electronic Barometer
at normal temperatures (between 14°F and +122°F). Rapid temperature changes
(which can occur when you enter or exit a heated area on a cold day), may result in
the creation of condensation inside the device. To avoid this, place the device in a
bag before exposing it to such temperature changes.
Do not drop the device.
Handle your Electronic Barometer �������������������������������������������
with care and attention. It may be damaged
if it is subjected to impact��.
Keep your device away from strong magnetic fields.�
Do not store your��������������������������������������������������������������
Electronic Barometer near
����������������������������������������
equipment which generates magnetic
fields. The magnetic fields produced by equipment such as radios,
televisions, microwave ovens, computers or cell phones may effect
the display, damage the data stored in the device’s memory, or the circuits inside
the device.
Batteries.
When you turn your device off, check the level of your batteries to see if you should
change them. You should do this when the energy level indicates that this is required.
In cold weather, batteries tend to run down more quickly�.
DESCRIPTION
PRINCIPLE CHARACTERISTICS
Professional quality air pressure detector, linearity +/- 0,2 mb��.
Multiple Functions Including:
• Audible gale warnings
• 2 to 48 hour history display
• Temperature and Humidity display
• Dual time zones
• Regatta timer
• Moon phases
OPERATION
ON/OFF button on the side of the device, on the bottom, turns the Electronic
Barometer on and off.
When the Electronic Barometer is off, it stops working completely even if
the batteries remain in the device. No data will be saved in the device’s memory.�
Furthermore, when the device is turned on again, the setup procedure will have to
be repeated�.
Screen description
> Moon phases
> Alarm
> Date and Time, dual times with a 2nd time zone,
intermittent display
> Temperature indicator IN
> Previous Temperature and Hygrometry
> Strong wind warning
> Air pressure: absolute value or reduced
to sea-level pressure in mb or InHg
> = Min; Max and low battery warning
> Active alarm indicator
> Buzzer mode indicator – sound – deactivated
> Memory input indicator, mini, maxi
and low battery warning
Z
O
O
M
6
H
> Full display zone:
Display of a chart which records air pressure
over the preceding 48 hours with a zoom function
for 24, 12, 6,4, or 2 hours
Or:
> Help zone for the use of the pull down menus
Functions
Adjustable orange backlighting with three intensity levels
Advanced recording function:
• ������������������������������������������������������������������������������������
The cursor system permits the analysis of the pressure curve by displaying the time
and pressure values for each point�.
• ����������������������������������������������������������������������������
With information about the minimum and maximum for greater precision in the
observation of a potential change in pressure that could indicate a change in the
weather�.
Navigation Buttons:
> Mode button
Used for the following settings:
- Time: summer, winter, dual
- Alarm
- Buzzer: volume and stop settings
- Reset
HIST.
+
MEM.
> MEM button
Used for entering data
into the system’s memory
or as a "return" button
ALR.
OK
> HIST + button
Used to display records
or to increase values during setup
ZOOM
MODE
> ZOOM – button
Used to select the zone to ZOOM
or to decrease values during setup
-
> ALR. Button OK
Used to activate the alarm
or as an "OK" button to validate
setup information
INSTALLATION
We strongly recommend that you firmly attach the holder to the wall and not simply place the Electronic Barometer on a flat surface�.
Positioning the Electronic Barometer:
• �������������������������������������������������������������������������
Remove the screws which are used to fasten the device to the wall mount.
• ������������������������������������������������
Gently lift the tabs on the bottom of the mount.
• ������������������������������������������������������������������������
The 2 holes in the center of the mount are used to insert 2 screws into
one of the boat’s walls.
• ������������������������������
Fasten the holder to the wall.
• ������������������������������������
Place the barometer into the holder.
• �������������������������������������������������������������������������������
Replace and tighten the retaining screws on top of unit, avoid over-tightening.
The installation of the batteries should be done before placing the device into the
holder
SETUP
Follow the procedure described below very carefully. The initial setup
is carried out step-by-step in the order that the parameters are displayed.
We suggest that you follow the menu:
The choices are indicated on the LCD screen by means of a small arrow�
located
��������
next to the parameters to be selected������������������������������������������������
. ����������������������������������������������
You must enter all data before leaving the setup mode�.
At each step, you may return to a previous step by pressing the return button. All
validated data is recorded and stored in the device’s memory�.
Manual calibration of air pressure is possible with a maximum of +/- 10 mb�.
The setup must be carried out again each time you change the device’s batteries�����������������������������������������������������
. ���������������������������������������������������
When changing the batteries, system memory is maintained for 30 seconds. This period begins when the batteries have been
removed and ends when new batteries have been inserted.� Should this period be
exceeded, all of the data in the device’s memory will be erased.
Battery Use: Insertion
• ��������������������������������������
Remove the holder from the wall mount.
• ������������������������������
Open the battery compartment .
• ���������������������������������������������������������������������������������
Insert the 4 batteries. Be careful to correctly position them according to their
polarities.
• ����������������������
Close the compartment.
Battery life is approximately 5 months of standard use. Frequent use of the backlighting function can greatly diminish battery life. When on board, we recommend
using a 12 volt source�.
Use of a 12V Electrical Source
• ��������������������������������������������
Insert the plug into the appropriate socket.
• �������������������������������������������������������������������������������
Press the on/off button. The VION logo appears on the screen for a few seconds.
• ��������������������������������
Proceed with the basic settings.
Basic settings
OK
The settings are carried out by means of the buttons + :
+ - Select these settings and either increase or decrease the values displayed�.
Return to the previous step�.
OK Validates the information and takes you to the next step�
.
Language Settings:
This is the initial setting������������������������������������������������������������
. The Electronic
������������������������������������������������������
Barometer can be used in the following languages: French, English, German, Dutch, Italian, Spanish and Swedish�.
Setting the time and the date:
Select the am / pm or 24 hr display and press�� OK .
The default setting for the time is 00 h 00 or 12 h 00 am. Change the value by pressing the� + - ������������������
buttons and press� OK . For the minutes, 00 blinks. Change the value by
pressing the�� + - ������������������
buttons and press� OK .
• ���������������������������������������������������������
The date is in the day/month/year format: dd / mm / yyyy�.
Year: 2008 is the default setting and flashes; change the value by pressing the�
+ - ������������������
buttons and press� OK .
Month: 01 is the default setting and flashes; change the value by pressing the�
+ - ������������������
buttons and press� OK .
Day: 01 is the default setting and flashes; change the value by pressing the� + buttons and press� OK .
Choice of Measurement Units.
The units used for air pressure, altitude and temperature are adjustable.
Pressure
Altitude
Temperature
Mb
Meter
°C
InHg
Feet
°F
blinks
����������������������������������������������������������������������
next to the unit�����������������������������������������������
. To
���������������������������������������������
select the unit of measurement, press the� + - buttons
��������
and press� OK . The
��������������������������������������������������
validation of a value takes you automatically
to the next step.
Altitude Setting:
Altitude: the value "0" is the default setting. You can select an altitude between 0 and 3995m��������������������������������������������������
. ������������������������������������������������
Should you wish to modify the altitude setting,
press the� + - ���������������������������������������������������������
buttons. Each time you press a button, the value changes
by 5 meters then by 50 meters, or by 15 feet then by 150 feet.
10
Choice of Displayed Pressure:
The pressure value can be displayed either in absolute pressure or in pressure at sea
level. If the altitude = 0 there is no difference between the real and the reduced��.
Select the display mode with�
����������
and press�
OK
.
Pressure Setting Adjustment:
You can adjust the pressure value.�
To do this, use the� + - ���������������������������������������������
button. When the desired value is displayed,
press� OK . �������������������������������������������������������������������
Each time you press, the pressure increases or decreases by 0.1 mb
steps to a maximum of +/-10 mb or by 0.01 InHg steps to a maximum
of +/- 0.3 InHg�.
Leaving Setup Mode:
The appears next to OK; press�
mode�.
OK
This confirmation allows you to leave the setup
. ������������������������������������������������
The screen appears as follows:
The chart will be displayed over time�.
11
USE
ALARM FUNCTION ALR.
The Electronic Barometer allows you to set an alarm for air pressure variations – either
increasing or decreasing, which can be preset at 0.5 to 10 mb - for a given time - it
can be set for a period of 1 hour to 6 hours - or for a target air pressure value�.
Setting the Alarm:
P������������������������������������������������������������������������������������
ress the alarm button; the next screen will appear in the dialogue zone�������������
. Choose
�����������
the
type of alarm that you want: decrease, increase or targeted value�.
Use the� + - and�
���� OK buttons
�������������������������������������������
as above to move through the menu��.
The� + - �����������������������������������������������������������
buttons allow you to increase or decrease the value of the
pressure variation from 0.5 to 10 mb by 0.5 mb steps by 0.01 InHg steps from 0.01
InHg to 0.30 and from 1 to 6 hours, hour by hour�.
ALR.
��������������������������������������������������������������������������
is displayed in the lower section of the upper screen of your Electronic
Barometer�.
The alarm for pressure variations is always based on real pressure
changes, even if the pressure displayed is the pressure that has been
reduced to sea level pressure. The alarm is less sensitive at altitude than
at sea level�.
Turning off the Alarm:
Press the� ALR. �������������������������������������������������������������������
button�������������������������������������������������������������
. �����������������������������������������������������������
The data previously recorded appears in the dialogue zone.
The navigational arrow flashes next to STOP?� YES�������������
. S����������
elect yes�.
ALR.
�������������������������������������������
The icon disappears from the upper screen��.
The dialogue zone returns to the chart mode�.
Modifying an Alarm:
To modify an alarm, you must deactivate the alarm and then set a
new one. Use the procedure for stopping the alarm described below,
then the procedure for setting the alarm to enter new data�.
When the alarm goes off, a message will be displayed in the chart
zone showing the alarm settings (programmed air pressure change
or target value).
The buzzer goes off for 3 seconds then stops; the message remains
displayed. Pressing on any button will stop the alarm�.
MEMORY FUNCTION MEM.
This function allows you to memorize and recall air pressure data at any time. For this
function, the time is always displayed.
12
This function allows the rapid visualization of information and is particularly practical
for watch changes.
Initial Memorization of Information:
Press the MEM. button�������������������������������������������������������������
; MEM.
�����������������������������������������������������������
flashes on the upper screen.��������������������������
The ���������������������
Electronic Barometer
asks if you wish to memorize the��������������������������������
������������������������������
flashes in front of YES or NO�.
Use the arrows�� + - ��������������
to select YES�:
• �����������������������������������������������������������������������
If YES: the air pressure value is recorded with the corresponding date
and time�.
• ��������������������������������������������������������������������������
If NO: the dialogue zone becomes a chart zone and MEM disappears from the
upper screen�.
Reminder about Memorized Values:
Press the MEM. button. ���������������������������
Select RAPPEL by using the�
+
-
�������
buttons.
Press� OK ; ����������������������������������������������
the recorded values are displayed as follows:�
• ���������������������������������
A cursor appears on the display.�
• ����������������������������������������������������������������
The cursor corresponds to the moment that the data was recorded
into the device’s memory. The air pressure and time values appear on
the LCD at the top�.
A situation that has been recorded into the device’s memory is automatically
erased after 48 hours��������
. ������
Press� OK ����������������������������������������������
to display the chart with the vertical marker�.
Please note, the ZOOM mode should allow the marker’s display.
New Memorization:
Press the MEM. button. ��������������������������������
Select CANCEL, confirm with the�
for the initial memorization�.
OK
button���������������������
. Use
�������������������
this procedure
MOON PHASE
The Moon icon on upper left corner rotates continuously (showing function), when it
stops (for about 3 seconds) it displays current moon phase.
ZOOM FUNCTION ZOOM
The full chart screen displays the ZOOM corresponding to the air pressure on 2
coordinates using dotted lines.�
The horizontal axis corresponds to time. One dash or one space corresponds
to 1 hour, except in the 48 hr zoom where these symbols correspond
to 2 hours.
13
The vertical axis corresponds to air pressure values in mb. One dash or one space
corresponds to 1 mb.
Zoom
Mb scale
2 hours
8 mb
4 hours
10 mb
6 hours
16 mb
12 hours
20 mb
24 hours
20 mb
48 hours
30 mb
This function allows you to select the ZOOM on the chart screen with
a choice of 2 hours, 4 hours, 6 hours, 12 hours, 24 hours or 48 hours.
• ���������
Press the ZOOM , ������������������������������������������������������������������
button, xh flashes on the screen (x corresponding to the value of
the zoom selected.)
• U�������
se the� + - ���������������������������������
buttons to change the ZOOM value�.
• ���������
Press on� OK �����������
to confirm�.
The display is composed of a series of points�.
Z
O
O
M
Z
O
O
M
Z
O
O
M
2
H
4
H
6
H
Z
O
O
M
Z
O
O
M
Z
O
O
M
12
H
24
H
48
H
When you select the ZOOM, your Electronic Barometer indicates in the selection
screen:
• ����������������������������������������������������������������������������������
The number of horizontal points corresponding to 1 millibar (or InHg). Reminder:
1 millibar = 0,029InHg�.
• ��������������������������������������������������������
The number of horizontal points corresponding to 1 hour�.
14
History Function HIST .
When this function is used, the same ZOOM level is used as that for the chart
display.
• ������������
Press on the HIST . ������������������������������������������������������������������
button. The chart is displayed and a vertical cursor on the curve
allows you to see the curve values.
• ���������
Use the�� + - ����������������������������
buttons to move the cursor��.
+ moves the cursor towards the right�.
- moves the cursor towards the left�.
On the upper screen, the information displayed is replaced by the air pressure and time values that correspond to the position of the cursor on
the curve in the complete chart zone. When the cursor passes over a MIN
value or a MAX value, MIN or MAX is displayed on the bottom section
of the upper screen of your ELECTRONIC BAROMETER.�
In general: if��������������������������������������������������������������
no button is pushed within 10 seconds, the display returns
to the initial display, except during setup and when in SET mode�.
OTHER FUNCTIONS
This button allows you to set up the following functions:
• ������������
Backlighting
• ����
Time
• �����
Alarm
• �����
Timer
• ������
Buzzer
• �����
Setup
MODE
Pressing lightly on the button turns the device on and Sets the backlighting�.
Backlighting:
If the Electronic Barometer is running on battery power, the device will remain lit
for 20 seconds after the last button is pushed. The Electronic Barometer’s default
setting is OFF. Pressing on the� + button
������������������������������������������������������
lets you turn on the backlighting to its first
intensity level. The number 1 appears next to the level. The Electronic Barometer
has 3 levels of intensity: 1, 2 and 3. Pressing a second time on the� + button lets
you increase the intensity of the backlighting in real time. The number 0 turns the
backlighting off.
Please Note: Backlighting requires a great deal of energy and thus greatly reduces battery life�.
Pressing and holding the button will take you to the other setup parameters�.
Time:
This allows you to manually set up the change to DST and back as well as the second
time zone.
+ 1hr : ����������������������������������
adds 1 hour to the displayed time�.
- 1hr : �����������������������������������������
subtracts 1 hour from the displayed time�.
Dual : �������������������������������������������������������������������
is set according to the time difference and allows you to activate
the subsequent display of local time and the time in the second time zone�.
15
The times are displayed alternatively. DUAL appears on the screen when the function
has been activated. To stop the DUAL function, you need only to set the time difference to 0 in the menu.
Alarm:
To activate the alarm, select ALARM on the screen. The current time flashes. To
change the time use the� + - buttons.
����������������������������������������������������
Each time you press, you add or subtract 1
hour. 00 will flash on the screen. To change the minutes, use the � + - �������������
buttons. Use
the� OK ������������������
button to confirm.
Alarm
appears on the screen:
If the alarm is already on, and you wish to change the alarm time:
• �����������������������������������
Select "off" to turn the alarm off.
• ��������������������������������
Select "Alarm" in the mode menu.
• ���������������������������������������������������
Proceed as described below to set a new alarm time.
To turn the alarm off:
• ��������������������
Press on any button.
Regatta timer:
The regatta timer is a countdown stopwatch. The Electronic Barometer offers you 3
choices of timer:
Racing timer: The Electronic Barometer displays the following message:
• Racing timer
• Stopwatch start
Press OK 10 min before the start. The buzzer will go off 10 minutes,
then 6 minutes, 5 minutes, 4 minutes, and 1 minute before the start.
Regatta Timer: The Electronic Barometer displays the following message:
• Regatta timer
• Stopwatch start
Press OK 10 min before the start. The buzzer will go off 5 minutes, 4 minutes, and 1
minute before the start.
Personalized timer: a maximum of three alerts can be set.
Setting the timer:
• Press the
button
• Select Timer in the menu by pressing on
• Select the desired timer: racing - Regatta -Personalized
• Press OK
MODE
16
For the racing timer and the regatta timer:
Enter the starting time.
flashes in front of hours 00 hr: use the + and
the hour.
then flashes in front of minutes 00min: use the
display the minutes.
-
+
buttons to display
and
-
buttons to
The Electronic Barometer displays a confirmation message:
Racing Timer (or regatta)
Start: -- min – sec
For the Personalized Timer:
The Electronic Barometer asks for the number of alerts.
the + and - buttons to display 1, 2 or 3.
flashes in front of 0: use
Then set the alert delay before the start:
Alert 1: -- minutes
Alert 2: -- minutes
Alert 3: -- minutes
The maximum delay is 9 minutes. Enter the start time. Proceed with the racing
or regatta timers.
Changing the Timer:
To change the timer settings, you must cancel the timer and enter the
new information.
• Press the
button
• In the menu select Timer with
The Electronic Barometer displays:
- Racing TIMER (or regatta or personalized, according to your initial selection).
- Start in: -- min – sec
ON
OFF
(OFF allows the timer to be deactivated)
MODE
Timer Operation:
Pressing ON starts the timer. The Electronic Barometer then displays:
- Racing timer (or regatta or personalized, according to your initial selection)
- Start: -- hr – - min – - sec
- Remaining time: -- min – - sec
- The screen shows a countdown of the time remaining before the start.
17
Alerts:
1. For each alert, the buzzer will beep once for each minute remaining
before the start.
2. During the last minutes, the buzzer will emit two short beeps every
10 seconds.
3. During the final 10 seconds, the buzzer will emit a short beep every
second; i.e., 10 short beeps.
4. At the moment of the start, the buzzer will emit a succession of very short beeps
during the first 5 seconds.
Buzzer:
Lets you set the buzzer volume. The default setting is the loudest volume level.
When the buzzer volume has been set to 0, there is no "bip" when
the buttons are pressed.
SET for Setup:
Lets you change the initial settings.
Gale warning icon: this icon appears when a drop in air pressure
of 3.0 mb or greater over a period of 3 hours or less is detected�.
CHANGING BATTERIES
Turn your Electronic Barometer off before changing batteries. For the battery changing procedure, please see page���
9.
TECHNICAL SPECIFICATIONS
Air Pressure
Accuracy: +/- 0.5 mb
Resolution: 0.1 mb
Linearity: +/- 0.2 mb
Temperature
Accuracy: +/- 0.5° to 25°C - Resolution : 0.1°C
Humidity Accuracy: 5% - Resolution: 1%
18
Clock
Time Display
Hour, minutes in 12 or 24 hour mode
Accuracy
+/- 30s per month
Date Display
Month, day, year
Dimensions
165 x 103 x 30
Weight
215 g without batteries
280 g with batteries
Energy source
4 LR06 batteries
GUARANTEE
Your Electronic Barometer is guaranteed for 2 years. You must present the stamped
and dated dealer’s receipt�.
This guarantee is subject to the respect of the conditions for use and
maintenance contained in this manual�.
Any modification of the 4002 will result in the voiding of the warranty.
Disposal of Electronic Devices
Help our environment and the planet. Recycle responsibly.
SOFTWARE for the PC Interface will be available for purchase at a later date.
19
This product is in conformity with the directives.
Place your proof of purchase here.
You will need it in the case
you need to contact us.
Issued 06/16/2008
Declaration made under the manufacturer’s responsibility.
Weems & Plath
214 Eastern Avenue
Annapolis, MD 21403