1
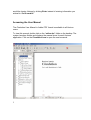
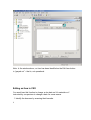
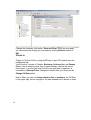
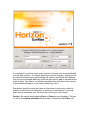
It is important to note that nearly every function in Horizon can be accomplished
in more than one way. You should spend time with the program, getting used to
the various functions and experimenting with various keystrokes and methods
until you are comfortable and have found the way best for you to accomplish the
tasks at hand. Feel free to use different methods than are listed in this manual
to accomplish procedures. If you have a better way, use it.
Remember that all functions are listed on the screen in some way, either by
buttons at the bottom of a dialog box or window; by radio buttons; or by drop
down menus accessible from the menu bar at the top of with screen.
Caution: Be careful about pressing Enter or Return on your keyboard. This key
is “tied” to the bottom left button in the window. If that button said Close, you
1
would be closing Horizon by clicking Enter instead of entering information you
wished to. So be careful!
Accessing the User Manual
The Circulation User Manual in Adobe PDF format is available to all Horizon
users.
To view this manual, double click on the “online doc” folder on the desktop. The
system launches Adobe and displays the manual icons for each Horizon
application. Click on the Circulation icon to open the user’s manual.
2
The left-hand portion of the screen is a navigational window, much the same
as a Table of Contents. Click on the + icon to open a folder and see it’s
contents; click on the – icon to close a folder and hide its contents. The righthand portion of the screen is the actual users manual. You can scroll through
the pages to access the information needed.
To Change User
When you are finished with your work session, or if you need to leave your
workstation unattended, you should change operators.
Click on File on the Menu bar. Click on Change Operator. Horizon will display
the Change operator dialog box.
The hot key for Change Operator is F3.
To Log Off Horizon
Save any changes needed in any open Horizon window. Close all open Horizon
windows. To close a window, click the Close button at the bottom of the
window or the Close button in the upper-right corner of the window.
Close all open Horizon applications, by clicking on the – icons on the
navigation bar.
Click File and Exit, or click on the Close button in the upper-right corner of the
window.
3
Checkout
You should keep both the CKI and CKO windows open all the time in
circulation. You can toggle between the two functions by clicking on the bottom
dialog box and bringing it to the forefront making it active; by turning on the
“toggle workbook” button and clicking on the tabs at the bottom of the window;
or by pressing the F8 key.
To check out an item, first identify the borrower (previously called patron), by
scanning their library card or manually typing in the barcode of their library card.
The system clears the barcode entry box, so that you may scan in an item
barcode. If you manually enter the barcode, you must click enter or press OK to
complete the function.
Various messages could appear when you identify a borrower. If a message
box displays, follow the instructions to resume or cancel CKO procedures.
When the following borrower was identified, a “Current Blocks” dialog box
appeared. In order to continue the process of CKO, you must press the CKO
button. If this were a monetary block or message that said ‘do not check out’ for
some reason, you would press the NO CKO
button.
4
Buttons found on the CKO window:
• Blocks – Press this button to list current blocks for the borrower identified.
• Edit Item – Press this button to edit circulation information for the item
identified in CKO. You can change an item due date here and also see
last patron here (prior circ info).
• All Items Out – Choose this button to list all the items currently checked out
to the borrower identified. Those items with a status of Lost and Claim
Returned will also be listed.
5
Note: In the window above, no item has been identified so the Edit Item button
is “grayed out” – that is, not operational.
Editing an Item in CKO
You would use this function to change a due date on ILL materials or if
instructed by a supervisor to change a date for some reason.
1. Identify the borrower by scanning their barcode.
6
2. Identify the item by scanning the item barcode.
3. Press the All Items Out button to list the items checked out. Identify the item
you wish to edit.
4. Press the Edit Item button to bring up the edit dialog box.
5. Change the due date using this formula, 01-01-2002. Do not change the
time. This is a function used by universities, not public libraries.
6. Choose Save. The CKO window will display the new date in the list box.
If you need to change the dates on more than one item, select all the items
needing to be changed. Click Edit item. A dialog box will appear asking if
you wish to make a batch change. Click OK. Enter the new date. Click Save.
Declaring an Item Claim Returned
You will sometimes need to change the status of an item to Claim Returned.
You should still follow standard circulation policies in handling this situation.
1.
2.
3.
4.
Identify a borrower in CKO.
Click All Items Out to display the list of items charged out to the borrower.
Select the item from the list.
Go to the CKO menu on the menu bar. Select Claim Returned.
The system changes the status on the items out list to reflect the Claim
Returned status.
Declaring an Item Lost
7
Occasionally, you will need to declare a checked out item “Lost.”
1. Identify the borrower in CKO.
2. Click All Items Out to display the list of items currently charged out to this
borrower.
3. Select the item from the list.
4. Go to the CKO menu on the menu bar. Select Lost. The system displays a
dialog box informing you the status is being changed to Lost.
5. Click OK.
6. A second dialog box appears, giving you the cost of the item, plus
processing fee that is being added to this borrower’s record.
7. Click Continue. The Lost item remains on the borrower’s record until either
paid or waived by the library.
If an item declared Lost is later found and checked in, the system will
display a box informing the staff of the occurrence. Click Continue.
8
Renewing Items
DO NOT check in the items and then check out again. This is not a renewal. It
is a new check out. This is a circulation policy that must be followed in order for
our statistics to be accurate.
1.
2.
3.
4.
Identify the borrower.
Click the All Items Out button to display the list of items charged out.
Select the Item(s) to be renewed.
Go to the CKO menu on the menu bar. Click on Renew. If you wish to renew
everything checked out, click Renew All.
5. Choose Yes if items are present; choose No if items are not present.
(It is policy to not renew the items if they are not present.)
Horizon renews the items and displays the new due date in the list box. If
you specified the items were not present, Circ counts the renewal as a
phone renewal. Be sure and follow standard policy here.
If an item is on hold or has been renewed before, it is not available for
renewal. You will be given a display box, should this occur. Press No
Override.
9
Blocks
Blocks are flags that interrupt the normal checkout process. They may tell you
that the borrower has overdues, owes fines, has a lost item, or there might be a
special message to the borrower such as an address change needed.
Some blocks are system-generated and are automatically placed on a
borrower’s record. These are overdues, fines, hold notifications, and lost
charges, among others. There are many blocks not mentioned here. You can
see your system administrator for a complete list of blocks system-generated.
Library-defined blocks are those manually placed by the staff and they include
special messages and fees such as rewind charges or library card
replacement charges.
You can view the Current Blocks window from both CKI and CKO. From this
window you can view detailed information on each block, a history of past
blocks, override the blocks to cko, conduct payment transactions or deny cko.
You can also view the amount owed to the library, number of overdues, and
amount of fines accrued if those items were cki at that time.
10
To view blocks:
• Automatically – When you enter a borrower’s barcode in the CKO window,
the system checks to see if the borrower has any blocks. If blocks exist, an
audible signal is heard and the Current Blocks window is displayed.
• Manually – If you have already identified a borrower who has blocks and
have overridden the Current Blocks window, you can click on Blocks at the
bottom of the CKO or CKI window to redisplay those blocks.
Buttons on the Current Blocks window: (this window shown on previous
page)
• Detail – Allows you to view more details about the current block than is
shown in the summary.
• CKO – Overrides the blocks and allows checkout.
11
•
•
•
•
No CKO – Denies circulation privileges.
Payment – Allows a monetary transaction and records it.
History – Allows you to view past blocks on the borrower’s record.
Change Amount – Allows those staff members with adequate security to
change the amount of a monetary block.
Other information found on the Current Blocks window:
• Borrower Name
• Overdues – displays the current number of overdue items checked out
• Amount Due – displays the total amount of fines currently owed. This is the
amount that can be paid.
• Overdue Accrued Amount – this is the amount of fines that would be owed
if all materials were returned at that time.
• Selection – lets you type the number of the block in this box that you wish to
work with – same as selecting the item.
Block Detail window
A Block Detail gives you more detailed and specific information about a
particular block. Information found here includes:
• Block type
• Date block was placed
• Date item was checked out
• Date item was due
• Date item was actually returned
• Date the block was issued
• Payment amount owed (if any)
• Comments can me added to the block by clicking the Comment button.
• Delete button – actually deletes the block. It will be kept in history
automatically.
Adding a Block
You will sometimes need to add a block to a borrower’s record. This might
be fees for videos returned without being rewound, for payment of a new
library card, for disallowed materials being returned in bookdrop, or for
damaged items, among other things. You may also need to add special
messages such as address change needed.
1.
2.
3.
4.
12
Identify the borrower in CKO.
Go to the Block menu on the menu bar.
Click on Add Fee or Add Note.
Identify the Code for the type fee/note being placed.
(Block types for Fees)
(Block types for Notes)
1. Click OK.
2. A dialog box will appear with spaces for you to fill in. Fill them in, always
adding your initials after the comment.
3. Click OK.
4. The block will automatically appear in the Current Blocks window. You may
Close at this time or take the appropriate action to clear the block.
13
There are three radio button to select the action type. Review is selected by
default. There is no need to change this.
Deleting a Block
Running Day End will delete blocks according to the parameters set up by the
System Administrator. However, there may be blocks that need to be deleted
manually.
1. Identify the borrower in the CKO window.
Because there are unresolved blocks, the Current Blocks window will
display.
1. Select the block to be deleted.
2. Click the Delete button.
You will be asked “are you sure?”
1. Click OK. The system deletes the block and keeps it in history.
14
Fines and Payments
As with many Horizon features, there are 2 ways to take a payment or waive a
charge. All circ workers will be able to take a payment; only supervisors have
the security level required to waive.
1. Identify the borrower in the CKO window. The Current Blocks will appear.
2. Select the fine block you wish to pay or waive.
3. Go to the Blocks menu on the menu bar. Choose either Payment or
Waiver.
4. A dialog box appears. Enter the amount to be paid, a comment if needed,
and the check number if charge is being paid by check. YOU MUST ALSO
CHECK THE PRINT RECEIPT CHECKBOX. This will enable our printers to
print out a receipt of the transaction.
5. Click OK.
6. The Current Blocks window reappears and shows new amounts for any
unresolved charges. The total amount due is updated to reflect the payment
or waiver.
*****Always check the box labeled Print Payment Receipt.
A second way to receive a payment:
1.
2.
3.
4.
15
Identify the borrower in the CKO window. The Current Blocks will appear.
Select the block you wish to pay.
Click the Payment button at the bottom of the window.
The dialog box shown above will appear. Enter the Amount, Comment, and
Check Number. BE SURE TO CHECK THE PRINT PAYMENT RECEIPT BOX in
order to print out a receipt.
5. Click OK.
You cannot Waive from this location, but you can Change Amount by
clicking the appropriate button at the bottom of the window.
Requests and Holds
It is important that you realize there are two terms of importance used in
Horizon. They were used interchangeably in Dynix – not so in Horizon. They
mean very different things now, so forget what you knew about these terms
in the past.
A Request is made by library staff or by borrowers who wish to have an item
reserved for them to pick up when it becomes available. When this item is
available for pickup, it is referred to as a Hold. An item is called a Hold when
it actually has a status of “on hold.”
Placing a Request for a Borrower
1. Identify the borrower in CKO.
2. Search for the requested item. Press F2 to bring up the Search screen.
3. If Horizon displays a Titles List window, highlight the item you want. If a
Bibliographic Detail or Copies window appears, no highlighting is needed.
Go straight to the next step.
4. Go to Request on the menu bar. Choose Make Request or press F5. The
Hold Request window will be displayed.
16
1. The pickup location is defaulted to the location where the request is being
made. If you wish to change this location, click the Codes button to show the
possible pickup points. Choose the correct code. Click OK.
2. You may have need to enter information in the Comment field at this time.
3. Click Save.
4. A Request Made box will appear. Click OK.
Placing a Specific Copy Request
1. Identify the borrower in CKO.
2. Search for the requested item by entering F2.
17
3.
4.
5.
6.
On the Bibliographic Display window, click Show Copies.
Highlight the COPY you wish to request.
Go to the Request menu on the menu bar. Click Make Request.
The Hold Request window will appear. Continue as above.
Editing a Request
Any time before a requested item has actually been checked in a placed on
the hold shelf, it can be changed or edited in several ways. You can change
pickup point, add comments, change hold expiration dates, or suspend the
request. Suspending the request allows the borrower to be kept in the
queue if they are on vacation and it will not be filled until the “suspend until”
is reactivated. Security must be enabled to accomplish these tasks.
1.
2.
3.
4.
5.
6.
Identify the borrower in CKO.
Go to Borrower on the menu bar. Click on Requests.
The Borrower’s Request List window appears.
Click Edit. The Edit Request window appears.
Make needed changes. Click Save.
To close the window, click Cancel or press ESC.
Deleting a Request
1. Identify the borrower in CKO.
2. Go to Borrower on the menu bar. Choose Requests.
The Borrower’s Request List window appears.
1. Highlight the request to delete.
2. Click Delete. You will be asked if you are sure you want to delete this item.
3. Click OK. This will remove the request from the list. DO NOT click Cancel
unless you wish to cancel the operation you are in. Cancel does not get rid
of the request. Only Delete gets rid of the request.
Filling a Request
1. Check in the item in CKI.
Horizon displays a window telling you the item is on hold and for
18
whom it is being held. It may also tell you to send that item to another
location.
1. Check the box labeled Print Hold Slip.
2. Click OK.
The hold slip will be printed and the status will change to Being Held.
1. Follow library procedure in completing the hold process.
Don’t forget to check Print Hold Slip.
What do I have on hold?
This is a question often heard at the circulation desk. To view a borrower’s
request follow this procedure.
1. Identify the borrower in CKO.
2. Go to Borrower on the menu bar. Click Requests.
19
In the above example, the borrower has 2 requests. The first item, Wings, is
on request; the request will expire Feb.8, 2003; she is number 2 in the list
and her pickup point is Ouachita Valley. The second item, Spikes, is
currently being held; the hold will expire Sept. 22, 2002 and the pickup point
is Main.
1. If you wish to delete a request, highlight the request. Click Delete.
2. If you want to see a list of other borrowers who have requested this item,
click Item Queue.
Overriding a Hold
20
There may be occasion too override a hold for one borrower and check out
the item to another. If an item is found on the shelf, the library has made a
mistake in reshelving that item. The patron should not be penalized, so the
item will be checked out to that patron and the requester’s record will be
corrected with item at the top of the queue. You may also have to override
should a wife send a husband to pick up her holds without sending her
card, and the patron uses his own card.
To override a hold
1. Identify the borrower currently checking out in CKO.
2. Scan the item. Horizon will display the name of the borrower who has
requested the item.
3. Click Yes to override the hold and check out the item.
You will be asked do you wish to renew this borrower’s request. If the
item is found on the shelf, click Yes. If the item is being checked out
by someone for the requesting party, click No.
21
Changing status or location
In Dynix, this function was called changing an item variable or updating status
of an item (CIV or USI). In Horizon, this function is carried out through the Item
Group Editor.
• Click Administration in the navigator.
• Click on Group Editor Menu.
• Click on Item Group Editor. A Compound Search box will appear.
For most of our purposes, we will search by barcode. If you are searching
for more than one item, be sure to check the Append List box. It appears
that you aren’t doing anything by scanning barcodes – they are being
entered on the window behind the search window. When you have entered
all the items you wish to change, close the Search window. You will see the
Item Group Editor window.
22
Select the items you wish to change. Click Edit. You will be asked if you
wish to make a batch change. Click OK. The Batch Change window will
appear.
23
Change the necessary information. Save and Close. When you are ready,
you can restore the change you just made by clicking Restore instead of
Edit.
Check In
Toggle to CKI from CKO by using the F8 key or open CKI window from the
navigational bar.
You will notice 3 modes of Checkin: Bookdrop, In House Use, and Exempt
Fines. If this is anything other than a regular checkin, choose the correct
radio button. If an item has been found on the shelf and a supervisor is
unavailable to Exempt Fines, Change the checkin date, by clicking on the
Change CKI Date button.
Notice: When you click on change check in date or bookdrop, the CKI Date
in the upper right corner changes to the date needed and is shown in italics.
24
When you have checked in an item, you can then edit it, by clicking Edit Item.
You can add a check in note or an internal note, if needed.
25
By paging down, you can see the prior circ info, or the previous patron.
26
Last Patron and Current Status
Remember there is a change in terminology. Last Patrons are called Prior
Circ Info and Current Status is called Current Borrower. You can find both
pieces of information by Searching an item, and showing Detail Status. The
second page of this information shows the Current Borrower and the third
page is the Prior Circ Info. Page 1 give bibliographic information and Page 4
gives you purchasing information, including the price of the item.
Bibliographic information (page 1)
27
Current Borrower (page 2)
Prior Circ Info ( page 3)
28
Hot Keys
F2 – New Search
F4 – Allows you to search for a new borrower
F4 + ESC – Clears the CKO window
F5 – Allows you to register a new borrower
F8 – Toggles between CKO and CKI
F12 – Lists codes available at a Code button
ESC – Allows you to close the window you are currently in.
29
INDEX
Blocks………………………………………………………………………..……….5,10
Adding a
block………………………………………………………………….11
Block details……………………………………………………………………10
Buttons………………………………………………………………………….10
Deleting a block………………………………………………………………..12
Viewing a block………………………………………………………………...10
Check In…………………………………………………………………………….21,22
Change check in
date…………………………………………………………21
Editing a check
in………………………………………………………………21
30
Modes……………………………………………………………...……………21
Check Out………………………………………………………………………………..4
All Items Out……………………………………………………………………..5
Blocks…………………………………………………………………………….5
Claims Returned…..……………………………………………………………6
Editing an Item…………………………………………………………………..6
Lost Items………………………………………………………………………..7
Renewing
Items…………………………………………………………………8
CIV………………………………………………………………………………………19
Current
status………………………………………………………………………23,24
Fines and
Payments…………………………………………………………………..13
Holds
See requests
Hot keys………………………………………………………………………………..25
Item Group Editor……………………………………………………………………..19
Last patron…………………………………………………………………………….23
Logging off………………………………………………………………………………3
Navigational window……………………………………………………………………2
Online documentation………………………………………………………………….2
Requests………………………………………………………………………………..1
4
Deleting a
request……………………………………………………………..16
Editing a
request……………………………………………………………….15
Filling a request………………………………………………………………..16
31
Placing a
request………………………………………………………………14
Overriding
holds………………………………………………………………..18
Specific copy
requests………………………………………………………...15
Viewing
requests………………………………………………………………17
Status,
changing……………………………………………………………………….19
User,
changing…………………………………………………………………………..3
User
manual……..………………………………………………………………………2
USI………………………………………………………………………………………19
32