1
Sitka Evergreen Training Manual
Evergreen 2.8
Sitka Evergreen Training Manual: Evergreen 2.8
Copyright © 2015 BC Libraries Cooperative
Last updated November 23, 2015
Table of Contents
I. Introduction .............................................................................................................................................. 1
1. New in Evergreen Version 2.8 .......................................................................................................... 3
1.1. New Features on Video ........................................................................................................ 3
1.2. OPAC/Catalogue ................................................................................................................... 3
1.3. Administration ....................................................................................................................... 3
1.4. Reports ................................................................................................................................ 3
2. Revisions to Version 2.8 and Attributions to Contributors. .................................................................. 4
3. Sitka and Evergreen Resources ....................................................................................................... 5
3.1. Sitka Community Documentation ........................................................................................... 5
4. Sitka Evergreen Support .................................................................................................................. 6
4.1. How to Contact Support ........................................................................................................ 6
4.2. Guidelines for Support Requests ........................................................................................... 6
4.3. RT Self Service .................................................................................................................... 7
5. Getting Started .............................................................................................................................. 12
5.1. Installing the Evergreen Staff Client ..................................................................................... 12
5.2. Registering a Workstation .................................................................................................... 12
5.3. Adding the Profile Manager ................................................................................................. 13
5.4. Logging in to Evergreen ...................................................................................................... 15
5.5. Change Operator ................................................................................................................ 16
5.6. Navigation ........................................................................................................................... 17
5.7. Workstation Administration ................................................................................................... 22
5.7.1. Configure Receipt Templates .................................................................................... 26
II. Circulation ............................................................................................................................................. 34
6. Patron Records .............................................................................................................................. 37
6.1. Searching Patrons ............................................................................................................... 37
6.2. Registering New Patrons ..................................................................................................... 39
6.3. Account Status by Colour Code ........................................................................................... 42
6.4. Updating Patron Records .................................................................................................... 43
6.4.1. Updating Patron Information ...................................................................................... 43
6.4.2. Renewing Library Cards ........................................................................................... 45
6.4.3. Marking Library Cards Lost ....................................................................................... 45
6.4.4. Resetting a Patron's Password .................................................................................. 45
6.4.5. Invalidate Email Address or Phone Number ............................................................... 46
6.4.6. Barring a Patron ....................................................................................................... 47
6.5. Patron Alerts, Notes, Messages and Notifications ................................................................. 47
6.5.1. Alerts ....................................................................................................................... 47
6.5.2. Notes ....................................................................................................................... 49
6.5.3. Messages ................................................................................................................ 50
6.5.4. Notifications ............................................................................................................. 51
6.6. Merging Patron Records ...................................................................................................... 53
6.7. Deleting Patron Records ...................................................................................................... 56
7. Circulation ..................................................................................................................................... 57
7.1. Check Out (F1) ................................................................................................................... 57
7.2. Check In (F2) ..................................................................................................................... 60
7.3. Renewal and Editing the Item's Due Date ............................................................................ 65
7.4. Marking Items Lost, Claimed Returned, and Claimed Never Checked Out ............................... 67
7.5. In-house Use (F6) ............................................................................................................... 70
7.6. Item Status (F5) .................................................................................................................. 72
7.7. Barcode Completion ............................................................................................................ 77
8. Bills and Payments ........................................................................................................................ 80
8.1. Circulation vs. Grocery Bills ................................................................................................. 80
8.2. Making Payments ................................................................................................................ 80
8.3. Patron Credit ...................................................................................................................... 83
Sitka Evergreen Training Manual
iii
8.4. Voiding Bills ........................................................................................................................ 85
8.5. Adding New "Grocery" Bills ................................................................................................. 85
8.6. Bill History .......................................................................................................................... 88
8.7. Refund ............................................................................................................................... 89
9. Holds ............................................................................................................................................ 91
9.1. Placing Holds ...................................................................................................................... 91
9.2. Managing Holds .................................................................................................................. 98
9.3. Holds Pull List ................................................................................................................... 106
9.4. Capturing Holds ................................................................................................................ 110
9.5. Find Another Target for Holds ............................................................................................ 112
9.6. Holds Shelf List and Clearing Shelf-Expired Holds .............................................................. 113
10. Items in Transit .......................................................................................................................... 115
10.1. When will an item go In Transit? ...................................................................................... 115
10.2. How to receive In transit items? ....................................................................................... 116
10.3. Transit Details ................................................................................................................. 116
10.4. Transit List ...................................................................................................................... 117
10.5. Aborting Transits ............................................................................................................. 120
11. Self Check ................................................................................................................................. 122
11.1. Staff Functions in the Evergreen Self Check ..................................................................... 122
11.2. Basic Check Out ............................................................................................................. 123
11.3. View Items Out ............................................................................................................... 125
11.4. View Holds ...................................................................................................................... 126
11.5. View Fines ...................................................................................................................... 127
12. Offline Transactions ................................................................................................................... 128
12.1. Offline Module Setup ....................................................................................................... 129
12.2. Patron Registration .......................................................................................................... 130
12.3. Check Out ...................................................................................................................... 132
12.4. Renew ............................................................................................................................ 135
12.5. In House Use .................................................................................................................. 136
12.6. Check In ......................................................................................................................... 137
12.7. Uploading offline transactions ........................................................................................... 139
III. Cataloguing ........................................................................................................................................ 145
13. Searching the Database for Cataloguing Purposes ....................................................................... 147
13.1. Advanced/Numeric Search ............................................................................................... 147
13.2. MARC Expert Search ...................................................................................................... 150
14. Adding Holdings to Existing Records in the Sitka Database .......................................................... 154
14.1. Adding holdings to title records ........................................................................................ 154
14.2. New Copies and Holds .................................................................................................... 156
14.3. Adding holdings for non-physical resources ...................................................................... 157
15. Editing and Maintaining Holdings ................................................................................................ 158
15.1. Copy Editor ..................................................................................................................... 158
15.2. Editing holdings ............................................................................................................... 162
15.3. Copy Templates .............................................................................................................. 165
15.4. Batch Updating via Item Status screen ............................................................................. 170
15.5. Replacing a barcode ........................................................................................................ 170
15.6. Spine Labels ................................................................................................................... 172
15.7. Transferring holdings ...................................................................................................... 177
15.8. Deleting holdings ............................................................................................................. 180
16. Copy Alerts ................................................................................................................................ 184
17. Copy Buckets ............................................................................................................................ 187
17.1. Adding Copy Records to Copy Buckets ............................................................................ 188
17.2. Working with Copies in a bucket ...................................................................................... 190
17.3. Removing a Copy from a Bucket ...................................................................................... 192
17.4. Retrieving Shared Buckets ............................................................................................... 193
18. Adding Bibliographic Records to the Database ............................................................................. 194
Sitka Evergreen Training Manual
iv
18.1. MARC Records via Z39.50 Interface ................................................................................
18.1.1. Importing Records via Z39.50 Interface ..................................................................
18.1.2. Overlaying Records via Z39.50 Interface ................................................................
18.2. MARC Batch Import ........................................................................................................
18.2.1. Import MARC Records ..........................................................................................
18.2.2. Uploading MARC Record Files ..............................................................................
18.2.3. Importing and Merging Records from Queues .........................................................
18.2.4. Managing Queues ................................................................................................
18.3. Sitka’s Minimum MARC record .........................................................................................
18.4. Creating New MARC Records ..........................................................................................
18.5. Cataloguing non-physical resources .................................................................................
19. Editing and Maintaining MARC records .......................................................................................
19.1. Editing MARC Records ....................................................................................................
19.2. MARC Record Leader and MARC fixed field 008 ..............................................................
19.3. Format Filters and Format Icons ......................................................................................
19.4. Merging Bibliographic Records in Evergreen .....................................................................
19.5. Deleting MARC records (bibliographic or title records) .......................................................
19.6. Exporting MARC Records ................................................................................................
20. Record Buckets ..........................................................................................................................
20.1. Creating Record Buckets .................................................................................................
20.2. Adding Records to Buckets ..............................................................................................
IV. OPAC ................................................................................................................................................
21. Search the catalogue .................................................................................................................
21.1. Basic Search ...................................................................................................................
21.2. Advanced Search ............................................................................................................
21.3. Search Tips ....................................................................................................................
21.4. Search Methodology ........................................................................................................
21.5. Search Results ................................................................................................................
22. My Account ................................................................................................................................
22.1. Logging into Your Account ...............................................................................................
22.2. Resetting Your Password .................................................................................................
22.3. Account Information .........................................................................................................
22.4. My Lists ..........................................................................................................................
23. Integrated Electronic Resources ..................................................................................................
23.1. Check out e-resources .....................................................................................................
23.2. Place hold on e-resources ...............................................................................................
23.3. Checked out and on-hold e-resources in My Account ........................................................
24. Mobile PAC ...............................................................................................................................
24.1. Searching the Mobile PAC ...............................................................................................
24.2. Mobile PAC Account Information ......................................................................................
V. Reports ...............................................................................................................................................
25. Reports overview .......................................................................................................................
26. Folders ......................................................................................................................................
26.1. Creating Folders ..............................................................................................................
26.2. Managing Folders ............................................................................................................
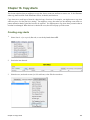
27. Creating Templates ....................................................................................................................
27.1. Choosing Displayed Fields ...............................................................................................
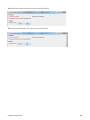
27.2. Applying Filters ................................................................................................................
28. Generating Reports from Templates ............................................................................................
29. Viewing Report Output ...............................................................................................................
30. Running Recurring Reports .........................................................................................................
31. Viewing/Editing/Rescheduling Reports .........................................................................................
32. Shared Templates in SITKA_templates .......................................................................................
32.1. What's in SITKA_templates ..............................................................................................
32.2. Clone a template from SITKA_templates ..........................................................................
Sitka Evergreen Training Manual
194
194
197
200
200
201
203
207
208
210
212
214
214
217
220
222
224
225
228
228
230
232
234
234
235
238
240
241
250
250
251
252
257
260
260
261
262
264
264
265
267
269
271
271
274
276
277
287
292
296
299
301
302
302
305
v
32.3. Modify a template ............................................................................................................
32.4. Examples of using Sitka's templates .................................................................................
33. Commonly used tables and views in Evergreen database .............................................................
34. Template Terminology: Data Types, Transforms, and Operators ...................................................
VI. Serials ................................................................................................................................................
35. Serials .......................................................................................................................................
35.1. Serials Videos .................................................................................................................
35.2. Administration ..................................................................................................................
36. Copy Template ..........................................................................................................................
36.1. Create a Copy Template ..................................................................................................
36.2. Edit a Copy Template ......................................................................................................
36.3. Delete a Copy Template ..................................................................................................
37. Creating Serial Records .............................................................................................................
37.1. Serial Control View ..........................................................................................................
37.2. Managing Serials Records ...............................................................................................
37.2.1. Create a Subscription ...........................................................................................
37.2.2. Create a Distribution .............................................................................................
37.2.3. Create Captions and Patterns ...............................................................................
37.2.4. Edit Captions and Patterns ..................................................................................
37.2.5. Pattern Code Wizard ............................................................................................
37.2.6. Create an Issuance .............................................................................................
37.2.7. Generate Predictions ............................................................................................
38. Receiving Serials .......................................................................................................................
38.1. Receive serials ................................................................................................................
38.2. Batch Receive Serials ......................................................................................................
39. OPAC ........................................................................................................................................
39.1. Searching for Serials in the OPAC ...................................................................................
39.2. OPAC Serials Display ......................................................................................................
40. Reports ......................................................................................................................................
40.1. Serials Report Templates .................................................................................................
41. Special Issues ............................................................................................................................
41.1. Add an Issuance .............................................................................................................
41.2. Edit an Issuance .............................................................................................................
41.3. Delete an Issuance ..........................................................................................................
42. Binding Process .........................................................................................................................
42.1. Binding Template ............................................................................................................
42.2. Binding Units ...................................................................................................................
43. Routing ......................................................................................................................................
43.1. Serials Routing ................................................................................................................
43.2. Serials Batch Receive ......................................................................................................
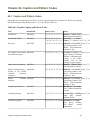
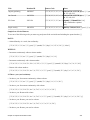
44. Caption and Pattern Codes ........................................................................................................
44.1. Caption and Pattern Codes ..............................................................................................
VII. Booking Module .................................................................................................................................
45. Using the Booking Module ..........................................................................................................
45.1. Evergreen Booking Tutorial ..............................................................................................
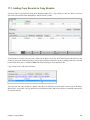
45.2. Creating a Booking Reservation .......................................................................................
45.3. Reservation Pull List ........................................................................................................
45.4. Capturing Items for Reservations .....................................................................................
45.5. Picking Up Reservations ..................................................................................................
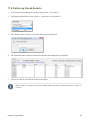
45.6. Returning Reservations ....................................................................................................
45.7. Cancelling a Reservation .................................................................................................
46. Booking Module Administration ...................................................................................................
46.1. Local System Administrator Booking Tutorials ...................................................................
46.2. Creating Bookable Non-Bibliographic Resources ...............................................................
46.3. Editing Non-Bibliographic Resources ................................................................................
Sitka Evergreen Training Manual
308
310
316
320
324
326
326
326
330
330
333
333
335
335
336
336
340
341
342
343
347
349
352
352
356
358
358
358
359
359
360
360
365
366
367
367
368
371
371
373
377
377
384
386
386
386
393
394
395
397
398
401
401
401
408
vi
46.4. Deleting Non-bibliographic Resources ...............................................................................
VIII. Inventory ..........................................................................................................................................
47. Sitka's Inventory Procedure ........................................................................................................
47.1. Checking in all items in the library ....................................................................................
47.2. Generating reports and search list ....................................................................................
IX. Administration .....................................................................................................................................
48. Local Administration Menu ..........................................................................................................
48.1. Overview .........................................................................................................................
48.2. Cash Reports ..................................................................................................................
48.3. Circulation Policies ..........................................................................................................
48.4. Closed Dates Editor ........................................................................................................
48.5. Copy Locations Editor ......................................................................................................
48.6. Copy Location Order .......................................................................................................
48.7. Copy Template Editor ......................................................................................................
48.8. 'Do Not Attempt-Auto-Print' Setting ...................................................................................
48.9. Group Penalty Thresholds ................................................................................................
48.9.1. Penalty threshold inheritance rules ........................................................................
48.9.2. Creating local penalty thresholds ...........................................................................
48.9.3. Deleting or editing local penalty thresholds .............................................................
48.10. Hold-driven Recall .........................................................................................................
48.11. Hold Policies .................................................................................................................
48.12. Item Attribute Editor .......................................................................................................
48.13. Library Settings Editor ....................................................................................................
48.14. Non-Catalogued Type Editor .........................................................................................
48.15. Statistical Categories Editor ...........................................................................................
48.16. Surveys .........................................................................................................................
48.17. Work Log ......................................................................................................................
49. Server Administration .................................................................................................................
49.1. Organizational Units ........................................................................................................
49.1.1. Library Hours of Operation ....................................................................................
49.1.2. Library Addresses .................................................................................................
49.2. Call Number Prefix and Call Number Suffix .......................................................................
49.3. Copy Statuses .................................................................................................................
49.4. Hard Due Date ................................................................................................................
49.5. Floating Group ................................................................................................................
50. Evegreen Self Check Administrative Set-Up ................................................................................
50.1. Initial Set-Up ...................................................................................................................
51. Deleting Inactive Cards and Patron Accounts by Sitka's In-house Patron Deletion Tool ...................
51.1. Deleting Inactive Cards ....................................................................................................
51.2. Deleting Patron Accounts .................................................................................................
52. Courtesy, Overdue, and Hold Notices .........................................................................................
52.1. Library Courtesy Notices ..................................................................................................
52.2. Library Overdue Notices ..................................................................................................
52.3. Final Notices ...................................................................................................................
52.4. Hold Slip and Holds Notifications .....................................................................................
53. Managing Internet OPAC Stations ...............................................................................................
54. Evergreen System Requirements ................................................................................................
55. Staff Accounts ............................................................................................................................
55.1. Creating Staff Accounts ...................................................................................................
55.2. Working Locations ...........................................................................................................
55.3. Editing Staff Accounts ......................................................................................................
55.4. Resetting Your Password .................................................................................................
55.5. Staff Account Permissions ...............................................................................................
55.6. Granting Additional Permissions .......................................................................................
Sitka Evergreen Training Manual
408
409
411
411
414
415
417
417
419
420
423
425
428
428
428
429
430
430
432
432
433
435
437
463
464
469
472
473
473
474
475
477
477
479
479
480
480
481
481
483
486
486
486
487
488
489
490
492
493
493
494
494
495
496
vii
List of Tables
15.1. Identification ....................................................................................................................................
15.2. Location ..........................................................................................................................................
15.3. Circulation .......................................................................................................................................
15.4. Miscellaneous ..................................................................................................................................
19.1. Format Filters ..................................................................................................................................
19.2. Format Icons ...................................................................................................................................
44.1. Popular Caption and Pattern Codes .................................................................................................
48.1. Booking and Cataloguing .................................................................................................................
48.2. Circulation .......................................................................................................................................
48.3. Credit Card Processing ....................................................................................................................
48.4. Finances .........................................................................................................................................
48.5. GUI: Graphic User Interface .............................................................................................................
48.6. Global .............................................................................................................................................
48.7. Holds ..............................................................................................................................................
48.8. Library ............................................................................................................................................
48.9. OPAC .............................................................................................................................................
48.10. Offline and Program ......................................................................................................................
48.11. Receipt Templates and SMS Text Message ....................................................................................
48.12. Security .........................................................................................................................................
48.13. Self Check ....................................................................................................................................
48.14. Other ............................................................................................................................................
54.1. Recommended Internet Connection Speeds .....................................................................................
Sitka Evergreen Training Manual
158
159
160
161
221
221
377
440
442
446
447
448
452
453
455
456
458
459
460
461
461
490
viii
Part I. Introduction
Table of Contents
1. New in Evergreen Version 2.8 .................................................................................................................. 3
1.1. New Features on Video ................................................................................................................ 3
1.2. OPAC/Catalogue ........................................................................................................................... 3
1.3. Administration ............................................................................................................................... 3
1.4. Reports ........................................................................................................................................ 3
2. Revisions to Version 2.8 and Attributions to Contributors. .......................................................................... 4
3. Sitka and Evergreen Resources ............................................................................................................... 5
3.1. Sitka Community Documentation ................................................................................................... 5
4. Sitka Evergreen Support .......................................................................................................................... 6
4.1. How to Contact Support ................................................................................................................ 6
4.2. Guidelines for Support Requests ................................................................................................... 6
4.3. RT Self Service ............................................................................................................................ 7
5. Getting Started ...................................................................................................................................... 12
5.1. Installing the Evergreen Staff Client ............................................................................................. 12
5.2. Registering a Workstation ............................................................................................................ 12
5.3. Adding the Profile Manager ......................................................................................................... 13
5.4. Logging in to Evergreen .............................................................................................................. 15
5.5. Change Operator ........................................................................................................................ 16
5.6. Navigation ................................................................................................................................... 17
5.7. Workstation Administration ........................................................................................................... 22
5.7.1. Configure Receipt Templates ............................................................................................ 26
Part I. Introduction
2
Chapter 1. New in Evergreen Version 2.8
1.1. New Features on Video
Watch the new features of Evergreen 2.8 now!
1.2. OPAC/Catalogue
• New item status: Lost and Paid
• View/edit button in holdings grid in catalogue view
• Option to place another hold on the same title on the staff client
• Permalink on record details screen, which provides a simplified URL for individual records
• Messages in My Account: staff may leave messages for patrons, which are displayed in My Account
• Email notification opt-out setting in My Account in OPAC and patron account in staff client.
1.3. Administration
• A new library setting: Do not change fines/fees on zero-balance LOST transaction to allow libraries to not void
lost charges on returned lost and paid items.
• Two new library settings: Void lost item billing when claims returned and Void lost item processing fee when
claims returned to allow libraries to void lost charges when a lost item is marked claimed returned. You may
consider using these new settings if your library automatically marks long overdue items lost.
1.4. Reports
• New Field Hint field for template filters, which allows notes to be displayed on Report Creation screen. Co-op
support plans to add informational notes to some filters after the upgrade.
• View/edit existing reports, which allows new reports to be created by editing existing reports or recurring reports
to be updated or rescheduled.
Chapter 1. New in Evergreen Version 2.8
3
Chapter 2. Revisions to Version 2.8 and Attributions to
Contributors.
Version 2.8 of this manual was published July 13, 2015. Below are subsequent content changes in reverse
chronological order. Minor changes including spelling corrections, formatting changes, and cosmetic screenshot
updates are excluded.
BC Libraries Cooperative acknowledges the Documentation Interest Group (DIG) Copyright © 2008-2015 GPLS
and others, for their contribution to this manual.
Revision date
Editor(s)
Description
Chapter 2. Revisions to Version 2.8 and Attributions to Contributors.
4
Chapter 3. Sitka and Evergreen Resources
Sitka policy
• The Sitka Evergreen Policy Manual contains policy and best-practice documents supporting Sitka's consortial
installation of the Evergreen ILS. See http://docs.sitka.bclibraries.ca/Policy/current/html/ for html and pdf
versions.
Websites
• The BC Libraries Cooperative website (http://bc.libraries.coop/) provides information about the implementation
of Evergreen in BC and MB, including Evergreen staff client downloads, Sitka documentation, and Sitka policy
and governance documents.
• See the Evergreen site (http://evergreen-ils.org/) for information about Evergreen for all audiences, not specific
to Sitka. Includes links to the Evergreen blog, the software development roadmap, and general documentation.
Listservs
• Join the Sitka Group on the BC Libraries Cooperative website where current member libraries discuss Sitka's
implementation of Evergreen.
Any library specific questions including patron information should be directed to Co-op Support.
• http://evergreen-ils.org/communicate/mailing-lists/: multiple lists for discussions of Evergreen. Messages sent to
the General, Developer, and DIG Evergreen lists are searchable at http://georgialibraries.markmail.org/search/
3.1. Sitka Community Documentation
We encourage Sitka sites to share locally produced Evergreen documentation with the wider Sitka community. If you
have any guides, tutorials, or tip sheets to share please contact Sitka support and we'll link to them in the table below.
Contributing Library
Description
Chapter 3. Sitka and Evergreen Resources
Link
5
Chapter 4. Sitka Evergreen Support
The Co-op Support team strives to respond to new requests within 24 hours, excluding weekends. To manage
requests (also referred to as tickets) the Support team uses ticket tracking software called Request Tracker (RT).
4.1. How to Contact Support
There are four ways to contact Co-op Support for Evergreen support:
1. Request Tracker Interface. Submit and track requests with RT Self Service. After logging in you may use
the form to create new tickets, track the progress of open tickets, or review issues that have been resolved.
2. Email. Send questions to the support email address. Requests submitted by email generate RT tickets and can
also be viewed online by logging in to RT Self Service.
3. Online Contact Form. Send questions to Co-op Support through the contact form on the BC Libraries
Cooperative website. Requests submitted through the contact form generate RT tickets and can also be viewed
online by logging in to RT Self Service.
4. Phone. Telephone support is available 9:00 AM to 4:00 PM Pacific Time, Monday to Friday, with emergency
after hours support 7 days a week. Call our toll free number during regular hours to speak with support staff,
or after hours to leave a message or request emergency server support. To protect our staff we do not accept
anonymous calls so please ensure your caller ID is not blocked.
The Co-op Support toll free number and email address can be found on the Splash page in the Sitka Evergreen
Staff Client. The toll free number can also be found on the Sitka Support page. This information is also given to
libraries during migration.
4.2. Guidelines for Support Requests
Thorough and consistent reporting makes it easier for Co-op Support to respond to your requests.
• Report problems as they occur. Prompt reporting may help us catch a problem before it affects other patrons,
respond quickly to issues that impact multiple libraries, or save you time if there is an easy solution. Please report
issues as soon as is convenient.
• One issue per request. Please submit one issue at a time. Emails generate tickets in RT which are assigned to
support team members. Reporting each question separately helps us assign, classify, and prioritize tickets more
efficiently.
• Contact information. We strive to offer friendly, personalized service. Please include your name and use an
email address where we can reach you directly.
• Descriptive subject.
To make tickets easier to identify in RT please provide as descriptive a subject as possible.
• Example of a descriptive subject line: Circ+Full Cat login unable to edit item record
• Example of a non-descriptive subject line: Editing question
Chapter 4. Sitka Evergreen Support
6
• What, where, when, how? Be specific about what you were doing in Evergreen, what results you obtained
versus what you expected, and the steps required to reproduce the problem. If you cannot reproduce the problem
exactly please describe the circumstances in which it occurred and the symptoms observed, including relevant
patron and item barcodes.
• Include error messages. If the problem caused any OPAC or staff client error messages please copy and
paste error text or attach screenshots when possible. See the section called “Submitting Images to Support” for
guidelines.
• Include example barcods and IDs. A problem in circulation? Make sure you include the patron and/or item
barcodes that were in use when the problem occurred. Cataloguing issues? Make sure you include the item barcode
and/or the record ISBN/ISSN or record ID where the problem occured.
• Trouble-shooting. Spare yourself a boring or obvious email from the Support Team: tell us what steps you
have already taken to try and resolve the problem.
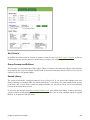
Submitting Images to Support
When submitting images to Co-op Support please follow the guidelines below:
• Save as a .jpg or .png. The best file formats in which to save screenshots are .png and .jpg. These files are
easily accessed by Sitka Support and are unlikely to contain viruses.
• Do not submit .doc or .docx unless absolutely necessary. Files saved as .doc or.docx require additional
software to open them and have a higher potential for carrying viruses.
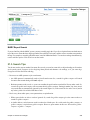
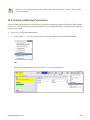
4.3. RT Self Service
Each library has a single account with which to access RT. Under this account staff are able to see all the tickets
associated with their library. Not sure what the username and password are for your library's account? Contact Coop Support to find out.
Access RT Self Service
Create New Tickets
View and Add to Existing Tickets
Review Closed Tickets
Ticket Status
Co-op Support uses RT software to receive, discuss, and respond to questions from libraries in the BC Libraries
Cooperative. Requests are numbered and referred to as tickets, and assigned to team members according to
availability and expertise.
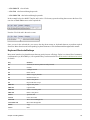
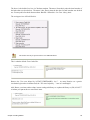
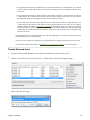
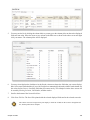
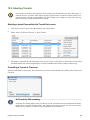
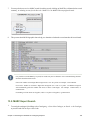
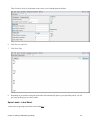
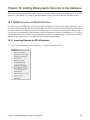
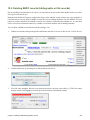
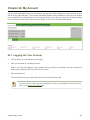
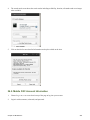
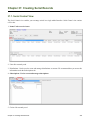
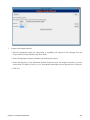
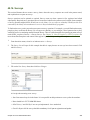
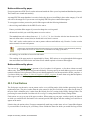
Accessing RT Self Service
Through the RT website https://support. libraries.coop/rt/
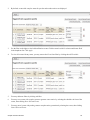
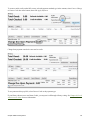
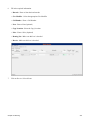
The Self Service home page displays current tickets submitted by email or in RT.
Chapter 4. Sitka Evergreen Support
7
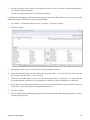
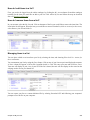
Click the number or subject of any listed ticket to view past correspondence or add new information.
Status usually progresses from new to open to resolved as a ticket is addressed. See also Ticket Status.
Tickets are assigned to individual Co-op Support members depending on availability and expertise. A ticket may
be owned by Nobody while the Support Team gathers more information about the problem.
Access any of your tickets by number with the Goto ticket field. Tickets submitted by other libraries are not visible.
When finished please Logout.
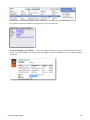
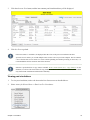
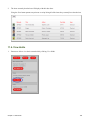
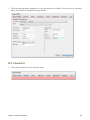
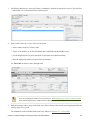
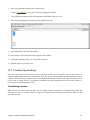
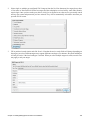
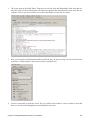
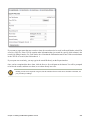
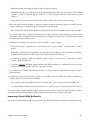
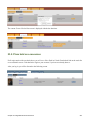
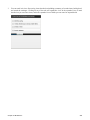
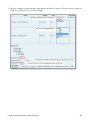
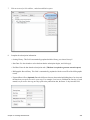
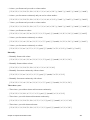
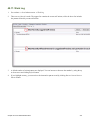
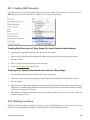
Create New Tickets
1.
Login to RT Self Service as shown above.
2.
Click New ticket.
Chapter 4. Sitka Evergreen Support
8
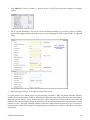
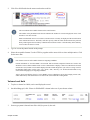
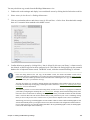
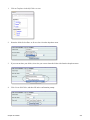
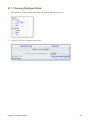
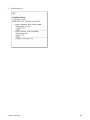
3.
Complete the form and click Create ticket.
By default the Requestors field contains the email address associated with your RT login. Any replies to
this ticket will also be sent to this address.
The Subject should be descriptive to make the ticket easier to identify, assign, and classify. This will also
be the subject line for emailed replies.
Screenshots or other files that help describe the problem may be attached here.
For guidelines on the kind of information that may help the Sitka Team respond to your request please see
Section 4.2, “Guidelines for Support Requests”.
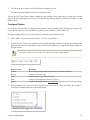
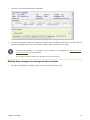
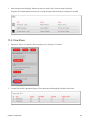
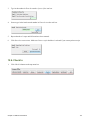
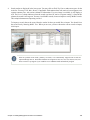
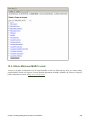
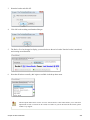
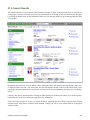
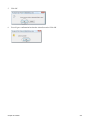
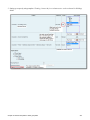
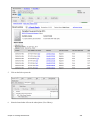
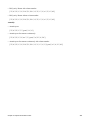
View and Add to Existing Tickets
1.
Login to RT Self Service as shown above.
2.
Click a ticket number or subject to view details or reply.
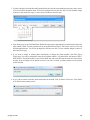
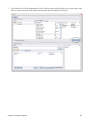
3.
Additional information about the selected ticket appears, including when it was created and last updated. Also
displayed is correspondence between the requestor and Co-op Support, either of whom may add to the ticket
by clicking Reply.
Chapter 4. Sitka Evergreen Support
9
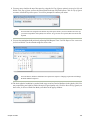
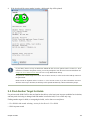
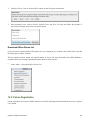
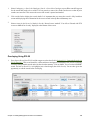
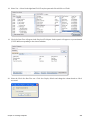
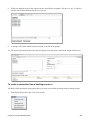
4.
Enter your reply in the form and click Submit.
5.
The new message is added to the correspondence history.
It is not possible to edit past correspondence. To make corrections please add a new reply.
Chapter 4. Sitka Evergreen Support
10
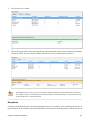
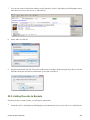
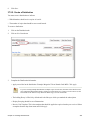
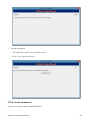
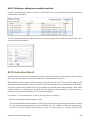
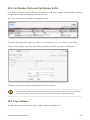
Review Closed Tickets
Resolved tickets do not appear on the RT Self Service welcome page but can be viewed and re-opened if a problem
recurs.
1.
Login to RT Self Service as shown above.
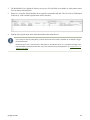
2.
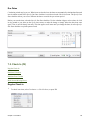
Click Closed tickets.
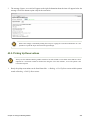
3.
Closed tickets are listed with status resolved. Click on a number or subject link to review a ticket.
To re-open a closed ticket simply add a new reply. This will change the status to open and alert Co-op Support
that more attention is required.
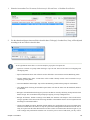
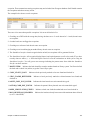
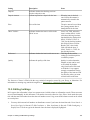
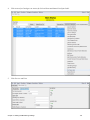
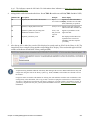
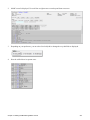
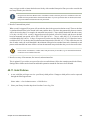
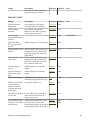
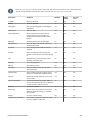
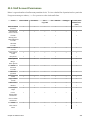
Ticket Status
Ticket status provides general information about a support request and affects display in RT Self Service. Most
status changes are made by Co-op Support but resolved tickets change back to open with any new correspondence.
Status
Description
Displayed with
new
Recent ticket, awaiting reply from Support Team.
Open Tickets
open
Support Team has replied but the issue is not yet resolved.
Open Tickets
resolved
Issue resolved, question answered, or a satisfactory workaround identified.
Closed Tickets
stalled
No immediate solution available but future development,
configuration, or policy changes may provide a fix.
Open Tickets
Chapter 4. Sitka Evergreen Support
11
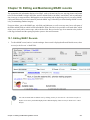
Chapter 5. Getting Started
5.1. Installing the Evergreen Staff Client
To use Evergreen you must first download and install the Evergreen 2.8 staff client. The customized Sitka staff
client is available for download from the BC Libraries Cooperative website here: http://bc.libraries.coop/support/
staff-client-executables/
Due to Sitka specific customizations on our servers the Evergreen Community 2.8 staff client will not work with
the Sitka servers.
For a video tutorial on downloading, installing, and registering the staff client see: Installing the Staff Client - 4:28
5.2. Registering a Workstation
Each Evergreen staff client must have a workstation registered with every server it is used with. The workstation
identifies your physical computer location and may help Co-op Support when troubleshooting.
Registration takes place when a staff client is installed for the very first time, when it connects to a new server, or
if the hostname is changed.
1.
Open the Evergreen staff client
2.
From the Locale drop down menu select en-CA : English (Canada or fr-CA : French (Canada). This sets the
language preferences for the staff client.
3.
Click Apply Locale.
4.
In the Server section, enter the hostname in the Hostname field.
5.
Click Re-Test Server. Status and Version should both display as 200 : OK.
6.
In the Authentication section, enter a Local System Administrator Username and Password into the appropriate
fields.
Only a Local System Administrator account has the required permission to register a workstation.
7.
Click Login.
8.
In the Workstation section, enter a name for your workstation in the WS Name field.
Co-op Support recommends that a unique, meaningful name is used for each workstation, such as checkout
or reference.
Do not use slash ("/") or backslash ("\") in your workstation's name as it may interfere with offline
transaction uploads.
Chapter 5. Getting Started
12
9.
Select the correct organizational unit from the Organization drop down menu.
Multi-branch libraries need to ensure the correct branch is selected.
10. Click Register.
11. A pop-up will appear to indicate successful registration. Click OK.
12. Re-enter the Local System Administrator account password or login using a different staff account.
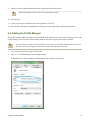
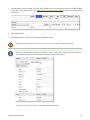
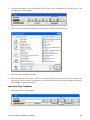
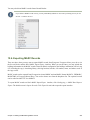
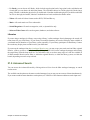
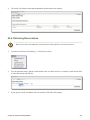
5.3. Adding the Profile Manager
The profile manager makes it possible to create multiple profiles that can be used to login to Evergreen. To use the
profile manager you will need to edit the desktop shortcut once the Evergreen staff client is installed.
The screenshots provided here are for the Windows version of the staff client but should be similar in the Linux
staff client. The profile manager is not currently available for the Macintosh staff client.
1.
Access Properties for the Evergreen staff client.
2.
Add "-P" or "-ProfileManager" to the desktop shortcut
In Windows this is done by adding -profilemanager to the end of the Target field.
Chapter 5. Getting Started
13
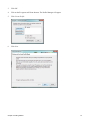
3.
Click OK.
4.
Click on the Evergreen staff client shortcut. The Profile Manager will appear.
5.
Click Create Profile.
6.
Click Next.
Chapter 5. Getting Started
14
7.
Enter the new profile name and click Finish.
The profile manager will not let you use the same name twice.
8.
Select the profile you wish to use and click Start Evergreen.
5.4. Logging in to Evergreen
An account with library staff permissions is required to log in to the Evergreen staff client. Each staff member can
have their own username and password, or generic logins can be used. For more information about staff profiles
and permissions see Chapter 55, Staff Accounts.
Normal Login
1.
Open the Evergreen staff client.
2.
The hostname should display in the Server section. Status and Version should both display as 200 : OK.
Chapter 5. Getting Started
15
If Status displays as There was an error testing this hostname. check that the hostname has been entered
correctly and that your internet connection is working.
If Version displays as 404 : Not Found check that your staff client version matches the version on server
you are attempting to connect to. You can check the staff client version by clicking on Help and selecting
About this client. The version appears as Target Server ID.
3.
In the Authentication section, enter a library staff account Username and Password into the appropriate fields.
4.
Click Login.
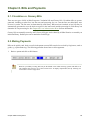
Offline Login
During a network outage staff can login to the Offline Module, also known as the Standalone Interface.
See Offline Transactions for instructions on using the Offline Module.
1.
Open the Evergreen staff client.
2.
Click Standalone Interface.
3.
The Evergreen Standalone Interface, also referred to as the Offline Module, will open.
If your connection to Evergreen is lost during open hours, click Standalone Interface to continue with check
out and patron registration functions until the connection is restored. When there are offline transactions to be
uploaded in a workstation, Offline Transactions Pending will show up on top of Standalone Interface in red.
For regular uploading and processing offline transactions, use Offline Transaction Management on the Admin
menu. Export Transactions and Import Transactions on the login screen are used to copy offline transaction
files out of or into a workstation. They are designed for extreme cases when a workstation will not be able to
connect to the network anymore.
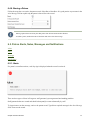
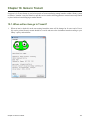
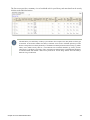
5.5. Change Operator
The login account of a workstation can be changed to another one without logging out first. Go to Admin → Change
Operator:New in Evergreen main window.
In the popup window, type in the new staff username and password. Read the instruction carefully and choose a New
Login Type from the dropdown list. Click Authorization. The menu bar's background colour will be changed to red.
Chapter 5. Getting Started
16
Temporary logins expire in a few minutes of inactivity. Choose it if you need the new account for some specific
task, which can be finished very quickly. Remember to switch back to the old login once you finish it, or else
staff may see the session expired prompt. The old session may NOT be restored if the timeout occurs at some
screens. Log out and re-log in if it happens.
Staff logins are the same as the old login, but you can switch back to the old login at any time.
Permanent logins discard the old login and replace it. You can not switch back.
To switch back to the old account, Go to Admin → Change Operator: NewUsername.
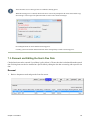
5.6. Navigation
Tabs
Evergreen uses tabs to display functions. Tabs allow all software functionality to be open in one window. You can
have multiple tabs open at once and you can have more than one tab of a single function open at the same time. You
simply move through the tabs to perform your work.
You can operate on Windows and Tabs using the dropdown menu under File . You can also use the plus sign beside
the last tab title and the cross sign at the end of the tab title line to open a new or close the active tab. You can also
use the following keyborard shortcuts/hotkeys, too. Some functions will automatically open records in new tabs.
Keyboard shortcuts/hotkeys for working with tabs:
• Ctrl+T new tab
• Ctrl+W close tab
Chapter 5. Getting Started
17
• Ctrl+Shift+W close all tabs
• Ctrl+Tab tabs forward through open tabs
• Ctrl+Shift+Tab tabs backward through open tabs
In the example below, the MARC Template tab is active. Click on any open tab to bring that screen to the front. You
can also use Ctrl+Tab to move to the required tab
Now the Check Out tab is the active screen.
Once you are in the selected tab, you can use the drop down menus or keyboard shortcuts to perform required
functions. Menu functions and corresponding keyboard shortcuts will be demonstrated throughout this manual.
Keyboard Shortcuts/Hotkeys
Most menu items have keyboard shorcuts that can greatly increase efficiency. Below is a selected list of commonly
used shortcut keys (AKA HotKeys). All or partial hotkeys can be turned off. See Workstation Administration section
for details.
Key
Function
F1
Checkout, or retrieve patron record by barcode
F2
Checkin
F3
Catalogue search
F4
Patron search
F5
Retrieve copy by barcode
F6
Record in house use
F8
Retrieve last patron
F9
Re-print the last receipt
Shift+F1
Register new patron
Shift+F2
Capture holds
Shift+F3
Retrieve record by TCN
Shift+F8
Retrieve last patron
Ctrl+T
Open new tab
Ctrl+W
Close current tab
Ctrl+Tab
Move forward through tabs
Ctrl+Shift+Tab
Move back through tabs
Ctrl+C
Copy
Ctrl+V
Paste
Chapter 5. Getting Started
18
Check-boxes
Most staff client check-boxes are "sticky" -- if you select or deselect them, that status persists. For example, Autoprint, which will print the relevant receipts automatically in certain functions, is sticky. If you select it on one login,
it will persist for future logins until you uncheck the box.
Fast Item Add is another "sticky" check box that makes it possible to add volume and item records from the MARC
editor.
Double Click
Double click a line on patron search result list opens the selected record in a new tab. Double click an item line on
Holdings Maintenance opens the record with Copy Editor in a new tab.
Copy/Paste
There are several methods of copying and pasting text in Evergreen, depending on where you are in the staff client
and the type of information you are copying
1. Underlined blue text. Clicking on any of the blue links in the Evergreen client copies the data to the computer
clipboard (left and right click work the same way for these links). To paste into another location, use Ctrl+V.
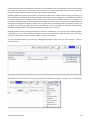
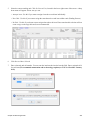
2. Text displayed in tables.
To copy information from a staff client table, first select the desired row then right-
click and choose Copy to Clipboard; alternatively select Actions for Selected Items → Copy to Clipboard.
Chapter 5. Getting Started
19
Next click the desired information in the popup to copy it to the clipboard
3. Text from catalogue search results. There is no right-click menu for copying data from staff client search
results. To copy the ISBN in the example below, highlight it and click Ctrl+C. To paste into another location
use Ctrl+V.
Chapter 5. Getting Started
20
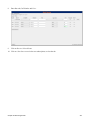
Column Picker
From many screens and lists, you can click on the column picker icon to change which columns are displayed.
When data is displayed in columns, you can click and drag them, add new ones, or remove them. You can also
sort data in a column by clicking on the column header. After customizing the display you may save your changes
for future sessions under that login by right-clicking anywhere in the display area and choosing Save Columns
from the drop-down menu. Some libraries use generic accounts and for those who do, staff need to be aware of the
implications to other staff members of any changes made to the display.
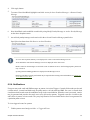
Sorting Columns
You can sort a list by ascending or descending order on any screen with grid display. Clicking the label of a column
sorts display by the column. One more click reverses the order.
You may sort by multiple columns. Click the column label of your first sorting column. Move the cursor to the
second sorting column. Right click your mouse to choose an option from the list.
You may sort by a third column by repeating the above step.
Chapter 5. Getting Started
21
5.7. Workstation Administration
Copy Editor: Copy Location Name First
Font and Sound Settings
Select Hotkeys
Configure Printers
Set Search Preferences
Button Bar/Toolbar
Copy Editor: Copy Location Name First
By default, when editing item records, library code is displayed in front of shelving location in Shelving Location
field. You may reverse the order by going to Admin → Workstation Administration → Copy Editor: Copy Location
Name First. Simply click it to make copy location name displayed first. The setting is saved on the workstation.
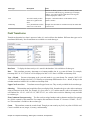
Font and Sound Settings
You may change the size of displayed text or turn staff client sounds on and off. These settings are specific to each
workstation and stored on local hard disk. They do not affect OPAC font sizes.
1.
Select Admin → Workstation Administration → Global Font and Sound Settings.
2.
To turn off the system sounds, like the noise that happens when a patron with a block is retrieved, check the
disable sound box and click Save to Disk.
Chapter 5. Getting Started
22
3.
To change the size of the font, pick the desired option and click Save to Disk.
Select Hotkeys
All or partial hotkeys can be turned on or off. It can be done for all workstations at a particular library (see Library
Settings for details) or for a particular workstation by going to
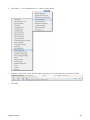
1.
Admin → Workstation Administration → Hotkeys → Current. Select from Default, Minimal, and None.
• Default: inlcuding all hotkeys
• Minimal: including those hotkeys using CTRL key
• None: excluding all hotkeys
Chapter 5. Getting Started
23
2.
Go back to the above menu. Click Set Workstation Default to Current.
To clear the existing default click Clear Workstation Default.
You can use the Toggle Hotkeys button, included in some toolbars, on top right corner, to switch your selected
Hotkeys for the current login session on or off. It has the same effect as when you click Disable Hotkeys on the
Hotkeys menu.
Configure Printers
Use the Printer Settings Editor to configure printer output for each workstation. If left unconfigured Evergreen will
use the default printer set in the workstation's operating system (Windows, OSX, Ubuntu, etc).
Evergreen printing works best if you are using recent, hardware-specific printer drivers.
1.
Select Admin → Workstation Administration → Printer Settings Editor.
2.
Select the Printer Context. At a minimum set the Default and Offline context on each Evergreen workstation.
Repeat the procedure for other contexts if they differ from the default (e.g. if spine labels should output to a
different printer).
If the Offline context is not set receipts will not print when using the Offline Module.
3.
Printer Context
Description
Default
Default settings for staff client print functions (set for each workstation).
Receipt
Settings for printing receipts
Label
Printer settings for spine and pocket labels
Mail
Settings for printing mailed notices (not yet active)
Offline
Applies to all printing from the Offline Interface
After choosing Printer Context click Set Default Printer and Print Test Page and follow the prompts. If
successful, test output will print to your chosen printer.
Chapter 5. Getting Started
24
4.
Optional: to further format or customize printed output click Page Settings and adjust settings. When finished
click OK and print another test page to view changes.
Generally you need to set all the margins to 0 and headers and footers to Blank.
Advanced Settings.
If you followed the steps above and still cannot print there are two alternate print strategies:
• DOS LPTI Print (sends unformatted text directly to the parallel port)
• Custom/External Print (configuration required)
In most cases changing the Advanced Settings is a last resort if the Default print stragety (Mozilla Print) does not
work. Please contact Sitka support if you need help with these settings.
Evergreen cannot print using the Windows Generic/Text Only driver. If this driver is the only one available try
one of the alternate print strategies instead.
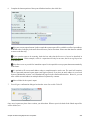
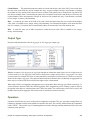
Set Search Preferences
You may set up a default search library and preferred library for a workstation. These settings will override the same
settings in the login account. You may also select a default search method for Advanced Search.
1.
Go to Admin → Workstation Administration → Set Search Preferences.
2.
Read the description carefully. Use the down-pointed arrow to list the options. Click your choice and Save.
Search Library can be easily overridden on search screens by using the dropdown list in Search Library box.
Preferred Library can only be chosen in either Workstation Administration or Account Preference. Settings in
Workstation Administration take precedence.
Chapter 5. Getting Started
25
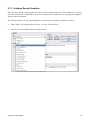
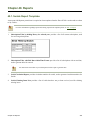
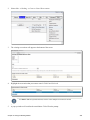
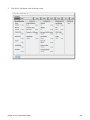
5.7.1. Configure Receipt Templates
There are many default receipt templates included with the Evergreen staff client. These templates are saved on
individual workstations. Customization can be done workstation by workstation or by exporting the templates to
import to other workstations.
The follwing example will walk you through how to customize the receipt that is printed on Checkout.
1.
Select Admin → Workstation Administration → Receipt Template Editor.
2.
Select the checkout template from the dropdown menu.
Chapter 5. Getting Started
26
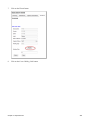
3.
This is what the default checkout template looks like. The template preview is on the left hand side. You can
edit the Header, Line Item or Footer on the right hand side.
Chapter 5. Getting Started
27
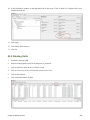
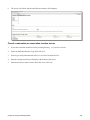
4.
In the upper right hand corner you can see the available macros by clicking on the Macros button. A macro
prints a real value from the database. In this example, the macro %LIBRARY% prints “Prince Rupert Library”.
The macros that are available vary slightly between types of receipt templates (i.e. bills, holds, items).
Receipt templates are marked up with HTML tags. You may use most HTML tags. See http://
www.w3schools.com/html/ for more information on HTML tags.
You may insert a link to an image, e.g. your library's logo, that exists on the web. For example,
to inlcude Sitka's logo, enter tag <img src=http://catalogue.bclibraries.ca//opac/
skin/default/images/sitka.png>. in the receipt template. The URL is where Sitka's logo is
kept on the Web.
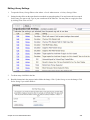
There are several macros that can carry pre-built contents specific to individual libraries. The contents can
be set up in local administration. For details see Library Settings. Though text can be hard-coded in receipt
templates, the pre-built contents will be automatically applied to receipts printed from all workstations
without editing each template.
• %INCLUDE(notice_text)%
• %INCLUDE(alert_text)%
• %INCLUDE(event_text)%
• %INCLUDE(footer_text)%%
• %INCLUDE(header_text)%
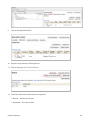
5.
Below are some example edits:
Chapter 5. Getting Started
28
The above is the default Line Item in Checkout template. The macro %barcode% prints the item barcodes of
the books that were checked out. The macro %due_date% prints the due date for each item that was checked
out. You may add a line break between them: Barcode: %barcode% </br> Due: %due_date%
The receipt preview will look like this:
The due date can only be printed in the YYYY-MM-DD format.
This is what the default Footer looks like:
Remove the “You were helped by %STAFF_FIRSTNAME% <br/>”. As many libraries use a generic
circulation login on the circulation desk, the “You were helped by…” note isn’t meaningful.
Add “Renew your items online at http://terrace.catalogue.bclibrary.ca or phone the library at (250) 638-8177”
to inform your patrons how to renew their items.
Chapter 5. Getting Started
29
6.
Once you have the checkout template how you want it, click Save Locally to save the template to your computer.
Exporting templates
As you can only save a template on to the computer you are working on you will need to export the template if
you have more than one computer that prints out receipts (e.g. more than one computers on the circulation desk, or
another computer in the workroom that you use to checkin items or capture holds with).
1.
Click on Export.
2.
Select the location to save the template to, name the template, and click Save.
3.
Click OK to confirm.
Chapter 5. Getting Started
30
Importing Templates
1.
Send the exported templates file to the workstation to which you want to import the templates. You may do
it using memory stick or email, etc.
2.
On Receipt Template Editor, Click Import.
3.
Navigate to and select the template file that you want to import. Click Open.
4.
Click OK to confirm on the prompt.
5.
Click Save Locally.
Chapter 5. Getting Started
31
By default all libraries use shared and hard-coded templates for Hold Slip and Transit Slip. Libraries can switch
to using their own templates by setting up a library setting: Use legacy hardcoded receipts/slips. Details see
Library Settings.
Button Bar/Toolbar
There is an optional toolbar with buttons providing quick access to commonly used staff client functions. When
activated the toolbar appears below the menu bar.
The look of the buttons can be customized. Use Mode, Label Position and Icon Size on the Toolbar menu shown
on the screen below to select your preference.
A group of buttons can be selected or activated by default for all workstations at a particular library (see Library
Settings for details). A different default group can be set up on individual workstations by the following steps.
1.
Go to Admin → Workstation Administration → Toolbars → Current.
2.
Choose a group from the list.
Chapter 5. Getting Started
32
3.
Go back to the above menu. Select Set Workstation Default to Current. The above selected toolbar group is
set as default for this workstation.
To clear an existing setting click Clear Workstation Default.
Circulation and Cataloguing are the default toolbar groups. Local system administrators can create new groups for
individual accounts, workstations or all in a particular library.
1.
Go to Admin → Workstation Administration → Toolbars → Configure Toolbars.
2.
Click New Toolbar
3.
In the prompt window type in a name for the new group, and then click OK.
4.
Choose the function buttons you want to add to the new group. Click -->(A) to add. You may select one in the
Selected pane, and then click <--(R) to remove it.
5.
Check one of the radio buttons: Owning Org Unit, Owning Workstation, or Owning User to specify that the
new group should be available to every workstation in your library, or this workstation, or yourself only.
6.
If you chose Owning Workstation in the above step, click the down-pointed arrow at the end of the Permission
Context box to select your library in the organizational unit tree.
7.
Click Save Toolbar.
8.
The new toolbar group will be displayed together with Circulation and Cataloguing groups when you choose
a toolbar group next time.
Chapter 5. Getting Started
33
Part II. Circulation
Table of Contents
6. Patron Records ...................................................................................................................................... 37
6.1. Searching Patrons ....................................................................................................................... 37
6.2. Registering New Patrons ............................................................................................................. 39
6.3. Account Status by Colour Code ................................................................................................... 42
6.4. Updating Patron Records ............................................................................................................ 43
6.4.1. Updating Patron Information ............................................................................................. 43
6.4.2. Renewing Library Cards ................................................................................................... 45
6.4.3. Marking Library Cards Lost ............................................................................................... 45
6.4.4. Resetting a Patron's Password ......................................................................................... 45
6.4.5. Invalidate Email Address or Phone Number ....................................................................... 46
6.4.6. Barring a Patron ............................................................................................................... 47
6.5. Patron Alerts, Notes, Messages and Notifications ......................................................................... 47
6.5.1. Alerts ............................................................................................................................... 47
6.5.2. Notes ............................................................................................................................... 49
6.5.3. Messages ........................................................................................................................ 50
6.5.4. Notifications ..................................................................................................................... 51
6.6. Merging Patron Records .............................................................................................................. 53
6.7. Deleting Patron Records ............................................................................................................. 56
7. Circulation ............................................................................................................................................. 57
7.1. Check Out (F1) ........................................................................................................................... 57
7.2. Check In (F2) ............................................................................................................................. 60
7.3. Renewal and Editing the Item's Due Date .................................................................................... 65
7.4. Marking Items Lost, Claimed Returned, and Claimed Never Checked Out ....................................... 67
7.5. In-house Use (F6) ....................................................................................................................... 70
7.6. Item Status (F5) .......................................................................................................................... 72
7.7. Barcode Completion .................................................................................................................... 77
8. Bills and Payments ................................................................................................................................ 80
8.1. Circulation vs. Grocery Bills ......................................................................................................... 80
8.2. Making Payments ........................................................................................................................ 80
8.3. Patron Credit .............................................................................................................................. 83
8.4. Voiding Bills ................................................................................................................................ 85
8.5. Adding New "Grocery" Bills ......................................................................................................... 85
8.6. Bill History .................................................................................................................................. 88
8.7. Refund ....................................................................................................................................... 89
9. Holds .................................................................................................................................................... 91
9.1. Placing Holds .............................................................................................................................. 91
9.2. Managing Holds .......................................................................................................................... 98
9.3. Holds Pull List ........................................................................................................................... 106
9.4. Capturing Holds ........................................................................................................................ 110
9.5. Find Another Target for Holds .................................................................................................... 112
9.6. Holds Shelf List and Clearing Shelf-Expired Holds ...................................................................... 113
10. Items in Transit .................................................................................................................................. 115
10.1. When will an item go In Transit? .............................................................................................. 115
10.2. How to receive In transit items? ............................................................................................... 116
10.3. Transit Details ......................................................................................................................... 116
10.4. Transit List .............................................................................................................................. 117
10.5. Aborting Transits ..................................................................................................................... 120
11. Self Check ......................................................................................................................................... 122
11.1. Staff Functions in the Evergreen Self Check ............................................................................. 122
11.2. Basic Check Out ..................................................................................................................... 123
11.3. View Items Out ....................................................................................................................... 125
11.4. View Holds .............................................................................................................................. 126
11.5. View Fines .............................................................................................................................. 127
Part II. Circulation
35
12. Offline
12.1.
12.2.
12.3.
12.4.
12.5.
12.6.
12.7.
Transactions ...........................................................................................................................
Offline Module Setup ...............................................................................................................
Patron Registration ..................................................................................................................
Check Out ..............................................................................................................................
Renew ....................................................................................................................................
In House Use ..........................................................................................................................
Check In .................................................................................................................................
Uploading offline transactions ...................................................................................................
Part II. Circulation
128
129
130
132
135
136
137
139
36
Chapter 6. Patron Records
6.1. Searching Patrons
There are two ways to retrieve patron records in Evergreen:
• Search → Search for Patrons (F4) . Search by patron name, email address, phone number, OPAC login,
identification (primary and parent/guardian), etc. You can also filter by patron permission profile. Searches can
be scoped to your library, federation, or to all of Sitka, but patrons from other Sitka libraries are only listed if they
have used their card at your library and have agreed to share their personal information.
• Search → Search for patron by Barcode (F1) . This is the recommended method if you have the patron's
barcode: it is faster and can retrieve accounts from any Sitka library. Patrons from other Sitka libraries visiting
your library for the first time must consent to sharing their personal information before the account can be used.
The following example demonstrates how to retrieve a patron account if you do not have the barcode.
1.
To find patrons, press F4 in an active tab or on the top menubar select Search → Search for Patrons, or simply
click Patron Search button on the button bar. You must have the Circulation Toolbar activated for the Patron
Search button to be present.
Chapter 6. Patron Records
37
2.
Enter search criteria, such as last name, first name, phone number, etc., and select Filter by Permission Profile
from drop down menu if desired, and click Search or press Enter on your keyboard.
3.
Search results will be listed on the right column of the screen. You can select a record to view record summary
on the left (or top) of the screen. Double click on the selected patron, or click the Retrieve Patron button on
the right top corner to load the patron record.
You can use only one search field or combine as many as all search fields.
You can truncate search terms for more results.
Selecting Include inactive patrons checkbox searches both active and inactive patrons. (Being active/inactive is
controlled by the Active checkbox in the patron record).
Chapter 6. Patron Records
38
Patrons from other Sitka libraries (not a branch of your library system) have to present their Sitka library card
for their first visit. Their records can only be found by Search → Search for patron by barcode F1. They need to
give consent to your library to access their records. You will be prompted to "opt-in" the patron after scanning
such a card. After opting-in, these patron records are searchable on the Patron Search F4 screen.
The default search scope on Search → Search for patron by barcode F1 is the whole Sitka database. On Search
→ Search for patron F4 it is your library's patrons and the patrons who have opted in to your library. The Limit
results to patrons in function takes effect on your library's patrons and opted-in patrons only. Non-opted-in
patrons are not searchable on F4, even by barcode.
6.2. Registering New Patrons
Before registering a new patron, you need to do a thorough search to make sure he/she does not already have a record
in Sitka Evergreen. It is good practice to ask the patron if they have a library card from another library in BC or
MB and scan that card. Patrons may be unaware that they are part of a consortium and their current library card will
work at your library. If modification is required, you should modify the existing patron's record instead of creating
a new one. See Sitka policy about how to manage new and existing patron BC or MB library cards in Evergreen.
Always use Search → Search for patron by Barcode for the thorough search if the patron has a library card.
Using barcode as a search term on the patron search screen F4 is different from using Search → Search for
patron by barcode F1. It does not search those patrons who have not opted-in to your library.
Chapter 6. Patron Records
39
1.
Press Shift+F1 or select Circulation → Register Patron or click Patron Registration button on circulation
toolbar.
2.
Fill in required information. This screen can look different depending on your library's choices regarding
required and suggested fields and whether or not you are displaying all fields, required fields, or suggested
fields.
3.
When complete click Save at the right top corner of the screen.
It is good practice to give patrons a piece of paper providing your OPAC’s URL, the patron's username, which by
default is their barcode number, and the system generated password or the last four-digit of his/her phone number
depending on your library's policy. Patrons can login to their account on the OPAC with their user name and
password. They are encouraged to change their password. The new password must be in a format with more security
features (at least 7-digit long combining numbers and letters). Both username and password are case-sensitive.
Patrons can also change their username to something easier to remember (case-sensitive) in the My Account option
in the OPAC.
Chapter 6. Patron Records
40
Tips for registering patrons:
All fields with a yellow backgroud and exclamation mark are mandatory.
Show Only Required Fields button limits the display to the above mandatory fields and fields with a default value.
If your library policy specifies other required fields, this button will not retain them. You are recommended not
to use this button when registering a patron.
Blank mandatory fields and fields with a value in the wrong format may result in a "Form is invalid" error when
saving the record.
For libraries using phone number as patron's password, once the Day Phone field is filled, the last 4 digits of the
phone number will be automatically copied over to password fields to replace the random number.
Enter the patron’s middle name into the record if you can. This will help distinguish among patrons as the
database grows.
Juvenile flag: Each library can determine an age threshold of juvenile patrons. If the date of birth in a patron's
record falls in the juvenile category, the Juvenile checkbox is automatically selected. If your library does not
record patron's date of birth, you may manually select Juvenile checkbox. It is optional.
Email Address: If required, mulitple email addresses can be put in, separated with comma or semicolon.
OPAC/Staff Client Holds Alias is used to replace the patron's name on the hold slip.
The Receive Overdue and Courtesy Emails checkbox allows patrons to opt-out of receiving courtesy and overdue
email notifications. If this box is un-checked patrons will not be emailed courtesy and overdue notifications.
Patrons are able to set this themselves as well through My Account.
The Hold is behind Circ Desk checkbox is used to identify those patrons who request to pick up holds at
the circulation desk when your library's holds are kept in a public area. It works together with the library
setting: Hold: Behind Desk Pickup , which can be set up by local system administrators. See Chapter 48, Local
Administration Menu.
If a valid postal code is given, the city, province and country information will be automatically retrieved.
Based on your library's policy, patron address may not be mandatory. If you do not want to record the address,
you need to delete the field by clicking the red cross sign beside Address. A Blank Address field will result in
an error when attempting to save the record.
The consortium decides the shared list of profile groups (patron profiles), but individual libraries can choose to
use only a subset of the available options.
There is no link between patron profile group and the Juvenile checkbox. If your library uses the Juvenile
checkbox, you need to deselect it when moving a patron from the juvenile profile group to the adult profile group.
There is a default Account expiration date of 3 years for all profile groups except PL New User which has an
expiration of 3 months. It shows up once a profile group is selected. You can always change it using the calendar
widget or typing a date.
If your library does not control Internet access via patron accounts, you need not change the default value in
Internet Access Level.
Always keep Is Group Lead Account unchecked.
Statistical categories are usually used to further group patrons by categories not in the profile groups. Individual
libraries can create their own patron statistical categories. There are also consortium-wide and federationChapter 6. Patron Records
41
specific categories. See Chapter 48, Local Administration Menu for more information about creating statistical
categories.
Clicking the Save and Clone button will save the patron record and open a new patron record. Phone numbers
from the previous record will be copied into the new record. Depending on your library's setting (See Chapter 48,
Local Administration Menu addresses may be copied over from or linked to the previous record. If your library
chooses to link the addresses, the addresses shown in the new record is greyed out and they can only be edited in
the original record. However, the linked addresses can be replaced by new ones. Using the New Address button
you can create a new address and mark it as both the Mailing and Billing address. Once the record is saved,
the linked addresses will be replaced. The address' owning account can not be deleted or merged when other
accounts are stil using the address. Records created by cloning are automatically grouped together.
Staff accounts can be used as patron accounts, in terms of circulation. Only Local System Administrators can
edit staff accounts.
6.3. Account Status by Colour Code
Patron accounts are displayed with a coloured frame around the patron's name. The frame colour conveys
information about the current status of the patron account. Patrons who have no outstanding fines, overdue items,
or alert messages appear with a green frame:
Here are the possible background colours:
1.
- everything in order (no overdues, no fines, not expired, etc.)
2.
- fines or overdue items, but not exceeding maximum limits
3.
- patron exceeds one or more of maximum fines, check out, or overdue limits defined in Group
Penalty Thresholds
4.
- there is an alert message under Message button. on the account
5.
- there is an alert in body of patron record. on the account
6.
- account is inactive
Chapter 6. Patron Records
42
7.
- account is expired
8.
- patron is barred
In the above list the colours with higher numbers take precedence. For example, a patron with a single overdue
item would be orange, unless they also had an alert message which would make them yellow. A barred patron with
overdue items and an expired account would be red.
6.4. Updating Patron Records
Updating Patron Information
Renewing Library Cards
Marking Library Cards Lost
Resetting a Patron's Password
Barring a Patron
There are some tasks you need to do in your daily operation with the patron records, e.g. updating patron's contact
information, renewing an expired library card, marking a library card lost, resetting patron's password, barring a
patron, inserting a note or alert message, etc.
6.4.1. Updating Patron Information
1.
Retrieve a patron record. Here we use Search → Search for patron by barcode or F1.
2.
Scan the barcode, or type barcode and click Submit.
Chapter 6. Patron Records
43
3.
Once the patron record is loaded, Check Out is the default screen. Your library may choose to display the Bills
screen first if the patron has bills. See Chapter 48, Local Administration Menu. Click Edit to retrieve patron
information.
4.
Edit required fields.
5.
Once editing is done, click the Save button at the right top corner.
Required Survey questions, if any, need to be answered every time when saving the patron record.
Patrons may edit their address on OPAC if your library allows it in the Library Settings Editor. Such addresses
will be displayed on top of the existing address in patron record for staff to approve.
To approve it, click Approve Address. It will replace the existing address.
Chapter 6. Patron Records
44
6.4.2. Renewing Library Cards
Follow the steps above to retrieve the patron record and update the expiration date in the patron’s record. You can
use the calendar widget, which shows up automatically once clicking in the field, or simply click the Update Expire
Date button. Clicking the Update Expire Date button will re-calculate the user's expire date to 3 years from today's
date. Once done, click Save button at the right top corner.
6.4.3. Marking Library Cards Lost
1.
Follow the steps above to retrieve the patron record. Click Replace Barcode beside Barcode.
2.
Scan or type a new barcode in the blank field.
3.
Save the changes by clicking Save button at the top right corner.
If the username is still the original barcode, it should be replaced with the new barcode number.
Once a library card is marked lost, Evergreen marks the card inactive and keeps it in the database.
If the patron has lost a library card before, the See All button shows up beside the Replace Barcode. Click it. All
barcodes that the patron has had are displayed in a pop-up window. Staff can now reactivate an inactive card,
by de-selecting Active for current card, and selecting Active for card they wish to activate. Staff can also assign
the active barcode as the primary card, and these two edits should be done in tandem; the Active card has to
be the Primary Card. Click Apply, and Save.
6.4.4. Resetting a Patron's Password
Follow the steps above to retrieve the patron record. Click Reset Password button or type in a new password in
Password and Verify Password fields. Save the record.
Chapter 6. Patron Records
45
Existing password is not displayed in patron records for security reasons.
If your library uses the last 4 digits of phone number as the default password (Patron: Password from phone #
is set to True on Library Settings Editor), please do not use Reset Password button. Instead type in the phone
number, then save the record. Clicking the Reset Password button will generate a random number.
You can only reset passwords for accounts with less permissions than your account. For example, if your account
is PL Circ + Full Cat you can reset a password for PL Circulator but you cannot reset a password for PL Local
System Administrator.
6.4.5. Invalidate Email Address or Phone Number
Invalidating patron emails ensures that Evergreen does not continue to attempt to send emails to an invalid email
address. Accumulated bounced back emails may result in emails from Evergreen (such as overdue and pre-due
notices) being blocked by some email service providers (GMail, Hotmail, etc). It may affect all Sitka Evergreen
users.
Libraries should regularly check the bounced-back emails and invalidate the email addresses accordingly to
ensure smooth notification services from Evergreen.
1.
Open the patron's record.
2.
Click "Edit".
3.
Beside the patron's email address click the "Invalidate" button. (This button will only appear if the email field
is filled.)
4.
Click "Save".
5.
Click "Refresh".
6.
The patron's email will be cleared from the email field and a message will now appear at the top of the patron's
record saying "Invalid Email - see messages". Clicking on this message will take you to the Messages screen.
7.
Here you can see the invalid email (can compare it with what the patron says their emails should be) and can
delete the the message when it is resolved.
The same procedure can be used to invalidate patron's phone number.
Chapter 6. Patron Records
46
6.4.6. Barring a Patron
Follow the steps above to retrieve the patron record. Select Barred checkbox. It is good practice to put a note in the
Alert Message field to explain why the patron is barred. Save the record.
Barring a patron from one library bars that patron from all consortium member libraries.
To unbar a patron, uncheck the Barred checkbox and remove the alert message.
6.5. Patron Alerts, Notes, Messages and Notifications
Alerts
Notes
Messages
Notifications
6.5.1. Alerts
If a patron’s record has an alert, a red Stop sign is displayed when the record is retrieved.
There are three types of alerts in Evergreen: staff-generated, system-generated and standing penalties.
Staff-generated alerts are created and should subsequently be removed manually by staff.
To insert/remove an alert message, retrieve the patron record. Type/delete required message in the Alert Message
field. Then save the record.
Chapter 6. Patron Records
47
System-generated alerts are automatically inserted on some conditions, such as the patron account is expired, patron
has a ready-for-pickup hold, etc. Once the cause is resolved, e.g. patron's account has been renewed or patron has
checked out the on-hold item, these messages will disappear automatically.
Standing penalties are inserted when a patron's circulation condition meets certain criteria set up by your library, e.g.
the maximum fine threshhold, the maximum number of items allowed to be checked out, or the maximum number
of overdue items allowed. Standing penalties block some of the patron's circulation activities. For example, if a
patron has a standing penalty of exceeding maximum number of overdue items, the patron can not check out more
items before returning/renewing the overdue items. If a patron has an exceeding maximum fines penalty, he/she can
not check out or renew any item before he/she clears the fines or lowers the amount to below the maximum fines
threshold. Standing penalties automatically disappear once the cause is resolved.
Standing penalties can be overriden on an item by item basis. Alternatively, you can remove the standing penalties
temporarily to carry out the circulation actions that need to be overriden. If the conditions persist, once you refresh
or re-access the patron record the penalties will be re-applied immediately.
To remove standing penalties, go to Messages. Highlight the penalties. Click Actions for these penalties → Remove
Penalty/Message.
Besides the alert screen, alerts can be viewed by going to the dropdown menu Other → Display Alerts and Messages
Chapter 6. Patron Records
48
6.5.2. Notes
If there is a note in a patron’s record, a See Notes message appears underneath the patron's name when the record is
retrieved. Notes are strictly communicative and in the Evergreen Staff Client are only visible from within the Notes
field. Notes can be made visible to the patron, via their account on the OPAC.
1.
To insert/remove a note, retrieve patron account and click Other → Notes.
2.
Click Add New Note.
3.
Enter note information and click Add Note. In this example, Patron Visible is selected. Click OK at confirmation
prompt.
Chapter 6. Patron Records
49
4.
To delete a note, go to Other → Notes, use the Delete This Note button under each note.
6.5.3. Messages
Staff can also add Note, Alert and Block on Messages screen.
1.
Retrieve patron record. Click Messages.
2.
Click Apply Standing Penalty/Messages.
3.
In the pop-up window, select Note, Alert or Block. Then type the message in the box below.
Chapter 6. Patron Records
50
4.
Click Apply button.
5.
To remove Note/Alert/Block, highlight it and click Actions for these Penalties/Messages → Remove Penalty/
Message
6.
Note/Alert/Block can be modified or archived by using Modify Penalty/Message or Archive Penalty/Message
on the above dropdown menu.
7.
An archived penalty/message can be retrieved in the Archived Penalties/Messages panel below.
Specify the time frame then click Retrieve Archived Penalties.
See Notes note in patron summary is not displayed for a note created on the Messages screen.
Alerts and blocks created on the Messages screen are displayed on the Alert screen.
Blocks created on the Messages screen blocks some circulation activities. Staff with appropriate permission
may override it.
System-generated standing penalties are displayed on the Messages screen.
Based on your library's setting, staff initials may be required when creating a Note/Alert/Block. See Chapter 48,
Local Administration Menu
6.5.4. Notifications
Evergreen may send email and SMS messages to patrons via Action Triggers. Currently Sitka sends pre-due and
overdue notices via email and hold-ready-for-pickup notices via both email and SMS. An event is created when
circulation or hold records meet the condidtions set up in the event definition. When the event is processed, a notice
may be generated and passed to the email server to be delivered to patrons. Triggered events are viewable on the
staff client via patron or item records. They may help libraries find out whether notices have been generated for
a particular patron or item.
To view triggered events for a patron
1.
Find the patron record and go to Other → Triggered Events
Chapter 6. Patron Records
51
2.
By default, events with complete status for pre-due and overdue notices are displayed.
3.
Use the filter on the right to view hold notification events. Click the arrow beside Circulation and choose Hold
in the dropdown list. Click Apply.
4.
To view all events with any status, you may remove the Event State filter by clicking the red X beside it.
5.
You may add more filters by clicking Add Row.
6.
You may reset events with complete status to generate a new notice by selecting the checkbox in front of the
events, then clicking Reset Selected Events.
7.
You may cancel events with pending status to stop the notice generation by selecting the events, then clicking
Cancel Selected Events.
Chapter 6. Patron Records
52
Action Triggers are used for, but not limited to, pre-due, overdue and hold notification generation. You may see
other triggered events in a patron or item record.
Some triggered events do not generate notices, e.g. most events generated by marking-long-overdue-items-lost
triggers do not generate notices.
Complete status means that the event has been successfully processed. Usually this means the notice has been
generated, unless the notice generation process encunters an error, which is very rare.
Events with status of Invalid or Error encountered problems during the process. No notices were generated for
such events.
Pending and some statuses other than complete, error, or invalid may last for a short period of time while the
event is being processed.
6.6. Merging Patron Records
Patron accounts can only be merged together if both accounts have the same home library. Staff may need to
update the home library in one of the accounts before performing the merge.
1.
Go to the patron search screen by the dropdown menu Search → Search for Patrons.
2.
To load the two records on the same search results screen, search by the terms shared by the two records, such
as names, phone numbers, etc. Hit Enter or click Search.
Chapter 6. Patron Records
53
3.
Select the two records you want to merge by pressing down the CTRL key and clicking each record. Click
Merge Patrons on the top right of the screen.
Chapter 6. Patron Records
54
4.
Select the record you want to keep by checking the radio button Lead Record?# on top of the record. Click
Merge button.
If you want to choose the barcode to keep, you need to choose the record with it as the lead record.
Once two records have been merged, the notes, bills, holds, and outstanding items under the non-lead record are
brought to the lead record. Staff-inserted alert messages are not.
Local System Administration permission is required to merge patron records. Sitka support recommends
discarding the non-lead card and deleting it as described in Section 51.1, “Deleting Inactive Cards” Your library
can also choose to automatically delete inactive card by configuring the Library Setting Patron Merge Barcode
Delete to True
An inactive card will retrieve the active account when used on Check Out screen. The system alerts staff to the
situation with an informative message.
Chapter 6. Patron Records
55
6.7. Deleting Patron Records
Sitka's in-house Patron Deletion Tool is available on the Welcome page. See Patron Deletion Tool. Local System
Administrator's permissions are required to delete a patron record.
Chapter 6. Patron Records
56
Chapter 7. Circulation
Besides the regular items in the catalogue, Sitka Evergreen can circulate pre-catalogued, and non-catalogued items,
too.
• Regular circulation: circulation of regular items in your catalogue with a barcode.
• Pre-catalogued (aka pre-cat ) circulation: circulation of items that have a barcode but have not been catalogued yet.
You may check them out and send for cataloguing after they are returned. Many Sitka sites use this functionality
to circulate interlibrary loan items from other libraries. There is no need to route to cataloguing when using precat for ILL, you can simply ignore the alert.
• Non-catalogued (aka non-cat) circulation: circulation of items that are not in your catalogue and without a barcode.
These items are usually identified by categories, such as magazines, paperbacks, etc.
7.1. Check Out (F1)
Regular Items
1.
To check out an item press F1 or select Circulation → Check Out Items.
2.
Scan or enter patron’s barcode and click Submit if entering barcode manually. If scanning, number is submitted
automatically.
3.
Scan or enter item barcode manually, clicking Submit if manual.
Chapter 7. Circulation
57
4.
Due date is now displayed.
5.
When all items are scanned, click Done at bottom right of screen to generate slip receipt or to exit patron
record if not printing slip receipts.
Pre-catalogued Items
1.
Go to patron's Check Out screen by Circulation → Check Out Items.
2.
Scan the item barcode.
3.
At prompt, click Pre-catalogued.
Chapter 7. Circulation
58
4.
Enter required information and click Checkout.
On check-in, Evergreen will prompt staff to re-route the item to cataloguing.
Non-catalogued Items
You can use this function for items such as paperbacks or magazines that you may not care if the patron doesn't
return. Items are checked out with a due date but when the due date expires, the items disappear from the patron's
record and no fines accrue. Circulation statistics are collected.
Non-cat circulation statistics are kept separately from regular and pre-cat circulation statistics. Use Sitka's noncat circulation reports to generate the numbers.
1.
Go to the patron's Check Out screen by Circulation → Check Out Items.
2.
Click on the drop-down list in Barcode and choose the type of non-catalogued items.
3.
Enter the number of items being circulated and click OK.
Chapter 7. Circulation
59
Due Dates
Circulation periods may be pre-set. When items are checked out, due dates are automatically calculated and inserted
into circulation records if the Specific Due Date checkbox is not selected on the Check Out screen. The Specific Due
Date checkbox allows you to set a different due date to override the pre-set loan period.
Before you scan the item, select the Specific Due Date checkbox. Use the calendar widget to select a date. Or click
in day, month or year, then use the up or down arrows to make the change or simply delete the data, then enter
again. Time is used for hourly loan only. This date applies to all items until you change the date; de-select Specific
Due Date checkbox or quit the patron record.
7.2. Check In (F2)
Regular Check In
Backdated Check In
Backdate Post-Checkin
Mark Item as Missing Pieces
Regular Check In
1.
To check in an item, select Circulation → Check In Items, or press F2.
Chapter 7. Circulation
60
2.
Scan item barcode or enter manually and click Submit.
Backdated Check In
This is useful for clearing a book drop.
1.
To change effective check-in date, select Circulation → Check In Items, or press F2. Use the calendar widget
to choose the effective date.
2.
The top green bar changes to red. The new effective date is now displayed in the header.
3.
Move the cursor to the Barcode field. Scan the items. When finishing backdated check-in, change the Effective
Date back to today's date.
Backdate Post-Checkin
After an item has been checked in, you may use the Backdate Post-Checkin function to backdate the check-in date.
Chapter 7. Circulation
61
1.
Select the item on the Check In screen, click Actions for Selected Items → Backdate Post-Checkin.
2.
Use the calendar widget to select an effective check-in date. Click Apply. Overdue fines, if any, will be adjusted
according to the new effective check-in date.
At the right bottom corner there is a Checkin Modifiers pop-up list. The options are:
• Ignore Pre-cat Items: no prompt when checking in a pre-cat item. Item will be routed to Cataloguing with
Cataloguing status.
• Supress Holds and Transit: item will not be used to fill holds or sent in transit. Item has Reshelving status.
• Amnesty Mode/Forgive Fines: overdue fines will be voided if already created or not be inserted if not yet
created (e.g. hourly loans).
• Auto-Print Hold and Transit Slips: slips will be automatically printed without prompt for confirmation.
• Clear Holds Shelf. Checking in hold-shelf-expired items will clear the items from the hold shelf (holds to
be cancelled).
• Retarget Local Holds. When checking in in process items that are owned by the library, attempt to find a local
hold to retarget. This is intended to help with proper targeting of newly-catalogued items.
• Retarget All Statuses. Similar to Retarget Local Holds, this modifier will attempt to find a local hold to
retarget, regardless of the status of the item being checked in. This modifier must be used in conjunction with
the Retarget Local Holds modifier.
• Capture Local Holds as Transits. With this checkin modifier, any local holds will be given an in transit status
instead of on holds shelf. The intent is to stop the system from sending holds notifications before the item is
ready to be placed on the holds shelf and item will have a status of in-transit until checked in again. If you
wish to simply delay notification and allow time for staff to process item to holds shelf, you may wish to
Chapter 7. Circulation
62
use the Hold Shelf Status Delay setting in Library Settings Editor instead. See Local Administration section
for more information.
• Manual Floating Active. This check in modifier works in conjunction with floating groups, as configured for
your library by Sitka support. See Floating Groups.
These options may be selected simultaneously. The selected option is displayed in the header area.
Mark Item as Missing Pieces
If an item is returned with missing pieces, you may mark the item as missing pieces. You will be prompted to print
a slip, which can be inserted in the item, insert a copy and a patron alert message into the respective records, and
print a letter or note to inform the patron. The item's status is set to Damaged. When the missing pieces are returned,
you need to check in the item, which sets the status to Reshelving. You also need to manually remove the patron
and copy alert messages.
1.
Select the item on the Check In screen, click Actions for Selected Items → Marking Items as Missing Pieces.
Click OK on the prompt.
2.
Choose the printer and click OK to print a slip to be inserted into the item.
3.
The Copy Editor will be opened. Fill in the alert message. Click Apply and then Modify Copies at the bottom
Chapter 7. Circulation
63
4.
The prompt for a patron alert or note shows up. Click Alert, if you wish to add an alert. Type in the content
and your initial. Click Apply.
5.
Notepad will open for you to edit and print a letter/note for the patron.
Windows Command Prompt window will open. It will be closed once Notepad is closed.
Chapter 7. Circulation
64
The item's status is set to Damaged once it is marked as missing pieces.
When the missing piece is returned, check in the item. You will be prompted of the item's status and the copy
alert message. You need go to the patron and item record to remove the alert messages.
Pre-catalogued items can not be marked as missing pieces.
Currently you need to send In Transit items back to the owning library to mark it as missing pieces.
7.3. Renewal and Editing the Item's Due Date
Checked-out items can be renewed if your library's policy allows it. The new due date is calculated from the renewal
date. Existing loans can also be extended to a specific date by editing the due date or renewing with a specific due
date.
Renewal
1.
Retrieve the patron record and go to the Items Out screen.
Chapter 7. Circulation
65
2.
Select the item you want to renew. Click on Actions for Selected Items → Renew. If you want to renew all
items in the account, click Renew All instead.
3.
If you want to specify the due date, click Renew with Specific Due Date, you will be prompted to select a due
date. Once done, click Apply.
Renewal can also be done on the Item Status screen. See Section 7.6, “Item Status (F5)” for more informaiton.
Editing Due Date
1.
Retrieve the patron record and go to the Items Out screen.
Chapter 7. Circulation
66
2.
Select the item you want to renew. Click on Actions for Selected Items → Edit Due Date.
3.
Select a new due date in the pop-up window, then click Apply.
You can select multiple items by pressing down the CTRL key on your keyboard and clicking each item you
want to edit.
Edit Due Date changes the due date in the existing circulation record without reducing the remaining renewal
count or creating a new circulation record. It does not generate new circulation statistics. Outstanding issues on
the circulation, such as overdue fines, may be affected by future actions, such as backdated checkin. Since one
circulation may receive only one pre-due/overdue (for each overdue period) notice, no new notice(s) will be
generated, if aleady sent out. For example, editing the due date on the day when an item is due will not generate
a new pre-due notice near the new due date.
Sitka support team strongly recommends libraries use this function only when staff forgot to set Specific Due
Date on Checkout. Use Renew with Specific Due Date in other circumstances to avoid undesirable result.
7.4. Marking Items Lost, Claimed Returned, and Claimed Never
Checked Out
Lost Items
Claimed Returned Items
Claimed Never Checked Out
Lost Items
1.
To mark items Lost, retrieve patron record and click Items Out.
Chapter 7. Circulation
67
2.
Select the item. Click on Actions for Selected Items → Mark Lost (by Patron).
3.
By default, the lost item now displays in the Other/Special Circulations pane.
Marking an item Lost will automatically bill the patron the replacement cost of the item as recorded in the price
field in the item record or the price limits set up by the library, and a processing fee as determined by your local
policy. If the price field is blank, a default replacement cost as determined by the library is used. Based on the
library's setting, if the price is 0.00, the replacement cost charge may be 0.00 or the default amount. If there is
no default cost, you may manually add the replacement cost portion to the bill. See Section 8.5, “Adding New
"Grocery" Bills” for more information.
If the lost item has overdue charges, based on your library’s setting, the overdue charges may be voided or
retained.
When a lost item is found and returned, your library may choose to:
• Always void lost charges.
• Void lost charges if the item is returned within a specified time period, e.g. within 6 months since the due date.
• Restore existing overdue fines.
• Generate new overdue fines based on the checkin date.
By default, a lost-then-returned item will disappear from the Items Out screen only when all bills linked to
this particular circulation have been resolved. Bills include replacement charges, overdue charges, and manual
charges added to the existing bills.
The following are some common scenarios you may encounter:
Chapter 7. Circulation
68
1. No payment has been made yet. When the item is returned, the lost bills are voided and there is no restored
overdue charge. The bill and circulation record will be closed and the item will disappear from the Items
Out screen.
2. No payment has been made yet. When the item is returned, the lost bills are voided, but there are restored
overdue charges. The overdue bill will be open. The item will be displayed on the Items Out screen due to
the unpaid bill. The item will disappear once the overdue charges are cleared.
3. The lost bills have been paid already. When the item is returned, the lost bills are voided and there is no
overdue charge or the restored overdue charges are less than the replacement cost. There will be a negative
balance in the bill. A refund (see Section 8.7, “Refund” for more details) needs to be made to close the bill
and the circulation record. Or you may add a billing to the bill to make the balance 0.00. Once the outstanding
amount has been refunded, the bill and circulation record will be closed and the item will disappear from
the Items Out screen.
If your library chooses not to automatically void a lost item billing when it is returned, staff need to deal with
the bills manually, as per your local policy.
From version 2.6, libraries have the option to set up whether/where to display Lost items on Items Out screen.
For all the above mentioned settings, See Chapter 48, Local Administration Menu for more information.
Claimed Returned Items
1.
To mark an item Claimed Returned, retrieve patron record and go to the Items Out screen.
2.
Select the item, then Actions for Selected Items → Claimed Returned from the dropdown menu.
3.
Select a date and click Apply.
Chapter 7. Circulation
69
4.
The Claimed Returned item, by default, displays in the Other/Special Circulations pane.
The date entered for a Claimed Returned establishes the fine. If the date given is past, bills will be adjusted
accordingly.
When a Claimed Returned item is returned, if there is an outstanding bill associated with it, by default, the item
will not disappear from the Items Out screen. It will disappear when the outstanding bills are resolved.
If a patron pays the fine, but staff don't find the item and check it in, there is a known bug in Evergreen that
makes the Claimed Return item disappear from patron's account, which is not correct behaviour. Sitka support
recommends the following workaround until bug is resolved programmatically. You may check the item in,
and, if wanting to pursue with original patron, check it back out to that patron and mark it Claimed Returned.
Alternatively, you can change the item's status to Missing, or simply delete the item, based on library policy
and facts of the case. Please contact Sitka support if you encounter this scenario and are uncertain how best
to proceed.
When an item is marked Claimed Returned, the value in Claims-returned Count field in patron record is
automatically increased. But it will not be adjusted when the item is found and checked in. You may manually
edit it according to your local policy.
When an item is marked Claimed Returned, the item's status is automatically set to the Sitka wide default status
of Claimed Returned.
From version 2.6, libraries have the option to set up whether/where to display ClaimedReturned items on Items
Out screen.
Claimed Never Checked Out
1.
To mark an item Claimed Never Checked Out, retrieve patron record and go to the Items Out screen.
2.
Select the item, then Actions for Selected Items → Mark Claimed Never Checked Out from the dropdown menu.
Once an item is marked Claimed Never Checked Out, it disappears from the patron's account. The circulation
record is marked checked in as on the checkout date.
An item marked Claimed Never Checked Out has its status changed to Missing by a Sitka default.
7.5. In-house Use (F6)
You can record in-house use for both catalogued and non-catalogued items.
Chapter 7. Circulation
70
1.
To record in-house use, select Circulation → Record-In House Use or press F6.
2.
To record in-house use for catalogued items, enter number of uses, scan barcode or type barcode and click
Submit.
3.
To record In-house Use of non-catalogued items, choose appropriate item from the dropdown menu in Barcode
box and click Submit.
Chapter 7. Circulation
71
The statistics of in-house use are separated from circulation statistics. The in-house use count of catalogued
items is not included in the items' total use count.
7.6. Item Status (F5)
The Item Status screen is very useful. Many actions can be taken by either circulation staff or cataloguers on
this screen. Here we will cover some circulation-related functions, namely checking item status, viewing past
circulations, inserting item alert messages, marking items missing or damaged, etc.
Checking item status
1.
To check the status of an item, select Search → Search for copies by Barcode or Circulation → Show Item
Status by Barcode , click on the Item Status button on circulation tool bar,or press F5. You can also click on
barcode in copy summary view in catalogue to go directly to Item Status from the catalogue.
2.
Scan the barcode or type it and click Submit. The current status of the item is displayed with selected other
fields. You can use the column picker to select more fields to view.
Chapter 7. Circulation
72
3.
Click the Alternate View button, and the item summary and circulation history will be displayed.
4.
Click List View to go back.
If the item's status is "Available", the displayed due date refers to the previous circulation's due date.
Upload From File allows you to load multiple items saved in a file on your local computer. The file contains
a list of the barcodes in text format. To ensure smooth uploading and further processing on the items, it is
recommended that the list contain no more than 100 items.
Sitka has a pre-defined list of copy statuses available. Please consult Section 49.3, “Copy Statuses” for the
definition, as well as if the status makes the copy holdable or OPAC visible. Additional statuses will be added
only after broader consultation with the Sitka community.
Viewing past circulations
1.
To view past circulations, retrieve the item on the Item Status screen as described above.
2.
Select Actions for Selected Items → Show Last Few Circulations.
Chapter 7. Circulation
73
3.
The item’s recent circulation history is displayed.
4.
To retrieve the patron(s) of the last circulations, click the Retrieve Last Patron or the Retrieve All These Patrons
button at the bottom of the above screen. Patron record(s) will be displayed in new tab(s).
Each libary can determine its own number of past circulations to be displayed. See Chapter 48, Local
Administration Menu for more information.
You can retrieve the past circulations on the patron's Items Out screen, too.
Marking items damaged or missing and other functions
1.
To mark items damaged or missing, retrieve the item on the Item Status screen.
Chapter 7. Circulation
74
2.
Select the item. Click on the Actions for Selected Items dropdown list and Mark Item Damaged or Mark Item
Missing.
Depending on the library's policy, when marking an item damaged, bills (cost and/or processing fee) may be
inserted into the last borrower's account. Overdue fines, if any, may be voided at the same time. See Chapter 48,
Local Administration Menu for more information.
Following the above procedure, you can check in and renew items by using the Check in Items and Renew Items
on the dropdown menu.
Item alerts
The Edit Item Attributes function on the Actions for Selected Items dropdown list allows you to edit item records.
Here we will show you how to insert item alert messages by this function. See Part III, “Cataloguing” for more
information on item editing.
1.
Retrieve record on Item Status screen.
Chapter 7. Circulation
75
2.
Once item is displayed, highlight it and select Actions for Selected Items → Edit Item Attributes.
3.
The item record is displayed in the Copy Editor.
Chapter 7. Circulation
76
4.
Click Alert Message in the Miscellaneous column. The background colour of the box changes. Type in the
message then click Apply.
5.
Click Modify Copies, then confirm the action.
7.7. Barcode Completion
Barcode completion is used to add prefixes, suffixes, and/or padding to a barcode when scanned. This is used when
the physical barcode does not match the barcode saved in Evergreen. For example, all barcodes at a library may
be prefixed in Evergreen with their Library and Archives Canada code MPL12345 but the physical barcode on the
item is 12345. When barcode completion is in use Evergreen will add MPL to ever barcode scanned.
A short video on barcode completion can be found here.
Barcode completion is generally used in Sitka to handle duplicate item or patron barcodes.
Multiple Matches
Patron Barcodes
Item Barcodes
Multiple Matches
When a barcode is entered if multiple matches are found a pop-up will appear listing the possible barcodes.
Chapter 7. Circulation
77
Select the barcode/title or barcode/name combination that matches the item in your hand or the patron.
If the barcode is not a 14 digit codebar barcode you may wish to re-barcode the item or issue the patron a new
library card to prevent future pop-ups caused by that barcode.
Patron Barcodes
The barcode completion pop up will appear when a patron barcode is scanned in the following places:
• the Barcode field in the Retrieve Patron Check Out interface ( Circulation → Check Out Items)
• the Barcode field in the Check Out section of the patron account.
The library setting Load patron from Checkout must be set to True.
• the Place hold for patron by barcode field in the staff client catalogue.
The Barcode Completion pop up will not appear when a patron barcode is scanned into the Barcode field in
the Patron Search interface.
Item Barcodes
The barcode completion pop up will appear when an item barcode is scanned in the following places:
• the Barcode field in the Check Out section of the patron account.
Chapter 7. Circulation
78
• the Enter Barcode field in the Check In interface.
• the Barcode field in the Item Status interface.
Chapter 7. Circulation
79
Chapter 8. Bills and Payments
8.1. Circulation vs. Grocery Bills
There are two types of bills in Sitka Evergreen: Circulation bills and Grocery bills. Circulation bills are systemgenerated, including overdue fines, lost item cost and processing fees, etc. Overdue fines are added daily once
an item is overdue. The fine rates are determined by each library. When an item is marked as lost, bills may be
automatically generated to cover the item's cost (price in the item record) and the processing fee. Each library can
determine its own processing fee. See Chapter 48, Local Administration Menu for more information.
Grocery bills are manually created by staff. Grocery bill types can be shared by all Sitka libraries or created by an
individual library. Default price can be attached to each bill type.
8.2. Making Payments
Bills can be paid by cash, check or credit in the patron account. Bills can also be resolved by forgiveness, work or
goods, e.g. replacement copy. The following procedure shows how to collect payments.
1.
Retrieve patron and click on Bills button.
Based on your library's setting, Bills may be the default screen when retrieving a patron with bills. You
can configure this screen by use of the Column Picker to display required data, and by selecting List
ActionsSave Column Configuration.
Chapter 8. Bills and Payments
80
2.
The bill screen opens.
3.
Select the payment type from the drop down menu.
4.
Enter the amount of payment in the Payment Received field and click Apply Payment.
Chapter 8. Bills and Payments
81
5.
Change, if any, is displayed at the bottom of the screen as Change Due Upon Payment. It can be converted to
patron credit by selecting the Convert to Patron Credit checkbox.
6.
When partial payment is made, the money applied starts at the top of the list of checked bills. Click the See
Distribution button, and the payment distribution will be displayed in the Payment Pending column. To pay
selected bill(s), uncheck the other bills. Note the presence of the Uncheck All and Check All options as shortcuts.
Items marked with red are still checked out. It is possible for a patron to pay a bill while the item is still out
and accruing fines.
You may choose to annotate the payment and fill in the resulting text box as required.
Chapter 8. Bills and Payments
82
Using the Receipt Options button at the right bottom corner, you may request Evergreen to print or not print
receipts. You can also specify the number of copies of receipts.
Void vs. Forgive: Void clears all history of the bill, while forgive retains the history. Use void when the bill
should not be generated, e.g. a bill for a lost book that has been found. Forgive payments are displayed in the
Cash Report.
8.3. Patron Credit
A credit can be kept in a patron account and later used to pay bills.
Chapter 8. Bills and Payments
83
To create or add a credit, on the Bills screen, select the payment method, type in the amount, select Convert Change
to Patron Credit box at the bottom, then click Apply Payment.
Change from payment can also be converted to credit.
To use patron credit to pay bills, select Patron Credit as the payment type.
If your library chooses not to use Patron Credit, you may turn it off through a library setting. See Chapter 48, Local
Administration Menu for more information.
Chapter 8. Bills and Payments
84
8.4. Voiding Bills
All bills under one transaction are grouped under one bill line. You can void the whole amount or partial amount
only. To void the whole amount, select the bill line and click Actions for Selected Transactions → Void All Billings
and click Yes when asked to confirm.
To void a partial amount, select the bill, click Actions for Selected Transactions → Full Details. On bill details
screen, select the bill you want to void, and click Void Selected Billings. Confirm your action.
You cannot partially void one billing line on the bill details screen. A billing line is the minimum bill unit.
Edit Note allows you to edit/create a note. For system-generated bills, we recommend you append your message.
8.5. Adding New "Grocery" Bills
A grocery bill can be added as a new bill or to an existing bill.
To add a grocery bill as a new bill:
1.
Retrieve the patron record and select Bills.
Chapter 8. Bills and Payments
85
2.
Select Bill Patron.
3.
Grocery is the only available transaction type. Choose appropriate billing type from the drop down menu.
Chapter 8. Bills and Payments
86
4.
Enter amount in Amount field and any required note in Note field. Click Submit this Bill, and then confirm it.
Local bill types may have a pre-set amount.
To add a grocery bill to an existing bill line:
1.
Retrieve the patron record and go to the Bills screen.
2.
Select the bill to which you want to add, and click Actions for Selected Transactions → Add Billing. Click Yes
on the confirmation prompt.
3.
Follow steps 3 - 5 in Section 8.5, “Adding New "Grocery" Bills” to select billing type, fill in amount and note,
if required, then submit the bill.
Chapter 8. Bills and Payments
87
8.6. Bill History
1.
To view a patron’s bill history, retrieve the patron record and go to the Bills screen, and then click History.
2.
On Bill History, you can view all bills or bills incurred in a specified time frame. You can use the calendar
widgets to specify the Start Date and End Date, and then click Retrieve Transactions.
3.
For more information about a particular bill, you can select the bill on the list and click Full Details at the
bottom of the above screen and the bill details are displayed in a pop-up window.
4.
You may add a bill entry to an existing bill. Highlight the bill, then click Add Billing button at the bottom of
the above screen.
Chapter 8. Bills and Payments
88
On the Bill History screen, you can also view payments by selecting the Payments tab. You can view all payments
or payments made within a time frame.
To view the details of a particular payment, highlight the line and click the Full Details button at the bottom.
Items can be deleted from the catalogue even if a charge for that item is still attached to the patron's record. The
charge will remain on the patron's account after the deletion.
8.7. Refund
Sometimes paid bills need to be voided, such as when lost and paid items are returned. A negative balance may be
created once such bills are voided. To close such bills, staff may refund the balance amount or add a bill entry.
1.
To refund, select the bill on the Bills screen. Click Actions for Selected Transactions → Refund.
Chapter 8. Bills and Payments
89
2.
Read the instructions and confirm.
3.
Select payment type and click Apply Payment.
4.
Refund can be converted to patron credit by selecting Patron Credit as payment type.
Refunds are reflected in the Cash Report.
Non-cash payment can not be refunded.
Chapter 8. Bills and Payments
90
Chapter 9. Holds
9.1. Placing Holds
Holds can be placed by staff on the Staff Client and by patrons on the OPAC. In this chapter we demonstrate placing
holds on the Staff Client. See Part IV, “OPAC” for placing holds on the OPAC.
Holds Levels
Evergreen has four different levels of holds. Library staff can place holds at all four levels, while patrons can only
place Meta-record,Title-level, and Volume-level holds.
The chart below summarizes the four levels of holds.
Hold level
Abbreviation
When to use
How to use
Meta-record
M
Patron wants first
available copy of
multiple titles of
the same/different
format
Click on place
Patron or staff
hold to the right of
the record. From
holds confirmation
screen, click
Advanced hold
options and select
other applicable
formats.
Holdings attached
to multiple MARC
(title) records
sharing the same
title and author of
selected format(s)
(book, video,
audiobook, etc.)
Title
T
Patron wants first Staff or patron
Patron or staff
available copy of a click on place hold
title
to the right of a
record on search
result list or record
summary screen.
Holdings attached
to a single MARC
(title) record
Volume
V
Patrons want the
first available
copy of a specific
volume (call
number) of a title
Patron or staff
Call number
specific volume
record (local call
number resides in
volume record)
Copy
C
Patron or staff want Staff click details
a specific copy of a to view barcode
title
then place hold
next to that
barcode.
Staff
Item barcode
Chapter 9. Holds
Staff or patron
click Volume in
HOLDABLE?
column on the
holdings grid on
record summary
screen.
Who can use
Hold tied to
91
Title Level Hold
1.
To place a title level hold, retrieve the title record on the catalogue and click the Place Hold button to the right
of the record on the search result list, or record summary screen.
2.
Scan or type patron’s barcode into Place hold for patron by barcode, and then tab or move the cursor out of
the box.
Chapter 9. Holds
92
3.
Edit patron hold notification methods and pickup location, if necessary, and click Submit.
4.
Click Continue, or Cancel if the hold failed, to go back to search result.
In step 2, checking the Place this hold for me radio button will set the login staff as the hold requester. If this is
your personal account, you can use this button to place holds for yourself.
A default hold expiration date will be recorded if the libary has set up a default holds expiration period in
their library settings. See Chapter 48, Local Administration Menu. Uncaptured holds will not be targeted after
expiration date. To view and edit the expiration date, go to Holds under My Account.
Meta-record Level Hold
There are two ways of placing meta-record holds:
Using Advanced Holds Options button
1.
To place a Meta-record level hold, do a regular search for the title. Click Place Hold link on either the result
list or record details screen, shown as step 1 in the section called “Title Level Hold”.
Chapter 9. Holds
93
2.
Click Advanced Holds Options under the title.
Chapter 9. Holds
94
3.
Scan patron's barcode. Select the acceptable format(s) and language(s). Edit patron hold notification methods
and/or pickup location, if required. Click Submit button.
Using Group by Formats and Editions Search
1.
Search for the meta-record on which you want to place a hold. On the Advanced Search screen, select the
Group by Formats and Editions checkbox. Select the search type and type in search terms. Click Search.
Chapter 9. Holds
95
2.
Click Place Hold beside the the meta-record on the result list.
The icons indicate the available formats at the search location.
The number in the parenthsis beside the title indicates the number of records with physical items. Click
the title to view these records.
Meta-record holds do not cover E-resources. But E-resource icons may be displayed if the search location
owns matched E-resources. The link(s) will show up only when the search location and/or the preferred
library of the login account is a library or branch and owns the E-resource. Click the link(s) in the summary
to access these E-resource records.
3.
Type in or scan the patron barcode at the prompt.
4.
Select the acceptable formats. Use the CTRL key together with a mouse click to select multiple entries. Click
Submit once done.
If no format is selected. All available formats are targeting candadites.
Format information is from the MARC record leader and fixed fields. Requested formats are listed in the
Holdable Formats column in hold records. Use the Column Picker to display it. Once a new Web-browser-based
staff client is used, format icons would be displayed in this column. Right now you will see a string. Look for
the language/format codes, such as "eng", "fre", "book", "dvd", "blue-ray", etc. All the selected formats in any
of the selected language(s) are targeting candidates.
After a meta-record hold is placed, if a new MARC record is added and it meets the grouping criteria (title,
author and format), items under this new record will be used to fulfill the existing holds.
Volume Level Hold
1.
To place a volume level hold, retrieve and display the record.
2.
On the holdings grid, click Volume in HOLDABLE? column in the row of your chosen volume.
3.
Scan or type patron’s barcode into Place hold for patron by barcode.
Chapter 9. Holds
96
4.
Edit patron hold notification fields as required and click Submit. Note the hold is identified as a Volume Hold.
Copy Level Hold
1.
Retrieve and display the record.
2.
On the holdings grid, click Copy in HOLDABLE? column in the row of your chosen copy.
3.
Scan or type patron’s barcode into Place hold for patron by barcode.
4.
Edit patron hold notification fields as required and click Submit. Note the hold is identified as a Copy Hold.
Placing Holds in Patron Records
1.
Holds can be placed from patron records too. In the patron record Holds screen, click the Place Hold button
on the left top corner.
2.
The catalogue is displayed in the Holds screen.
3.
Search for the title and place holds using the same procedure as placing holds directly in the catalogue.
Chapter 9. Holds
97
4.
You may continue to search for more titles. Once you are done, click the Holds button on top to go back to the
Holds screen. Click the Refresh button to reflect your newly placed holds.
9.2. Managing Holds
Holds can be cancelled at any time by staff or patrons. Before holds are captured, staff or patrons can suspend them
or set them as inactive for a period of time without losing the hold queue position, activate suspended holds, change
notification method, phone number, pick-up location (for multi-branch libraries only), expiration date, activation
date for inactive holds, etc. Once a hold is captured, staff can change the pickup location and extend the hold shelf
time if required.
Staff can edit holds in either patron's records or the title records. Patrons can edit their holds in their account on
the OPAC.
Managing Holds in Patron Records
1.
Retrieve the patron record and go to the Holds screen.
2.
Highlight the hold record, then select Actions for Selected Holds.
3.
Manage the hold by choosing an action on the list.
Chapter 9. Holds
98
1. If you want to cancel the hold, click Cancel Hold on the above screen. You are prompted to select a reason
and put in a note if required. Once done, click YES.
A captured hold with a status of "On Hold Shelf" or "Ready for Pickup" can be cancelled by either staff
or patrons. But the status of the item will not be changed until staff check it in.
2. If you want to suspend a hold or activate a suspended hold, click the appropriate action on the list. You will
be prompted to confirm your action. Suspended holds have a "No" value in the Active? column.
Suspended holds will not be filled but its hold position will be kept. They will automatically become
active on the activation day if there is an activation date in the record. Without an activation date, the
holds will remain inactive until staff or a patron activate them manually.
Chapter 9. Holds
99
3. You may edit the Activation Date and Expiration Date by using the corresponding action entry on the Action
for Selected Holds dropdown menu. You will be prompted to enter the new date. Use the calendar widget
to choose a date, then click Apply. Use the Remove button to unset the date.
4. Your library may set up a hold shelf time. Hold shelf expire time is automatically recorded in the hold record
when a hold is filled. You may edit this time by using the Edit Shelf Expire Time on the Action for Selected
Holds dropdown menu. You will be prompted to enter the new date. Use the calendar widget to choose a
date, then click Apply.
5. If you want to enable or disable phone notification or change the phone number, click Edit Phone
Notification. You will be prompted to enter the new phone number. You must follow the format of XXXXXX-XXXX. The phone number is used for this hold only and can be different from the one in the patron
account. It has no impact on the patron account. If you leave it blank, no phone number will be printed
on the hold slip.
6. If you want to enable or disable email notification for the hold, click Set Email Notification. Click Email
or No Email on the prompt screen.
Chapter 9. Holds
100
7. Pickup location can be changed by clicking Edit Pickup Library. Click the dropdown list of all libraries and
choose the new pickup location. Click Done.
Staff can change the pickup location for holds with in-transit or ready-for-pickup status. Item will be
sent in transit to the new destination.
Sitka Evergreen allows staff to select any library on the list as a pickup location. Staff should observe
local policy and service agreement with other libraries.
For libraries sharing resources with other libraries in the federation, Sitka support strongly recommends
you not edit pickup location, instead cancel and replace the hold with the new pickup location. This is
due to the fact that the eligible copies that may be used to fill the hold may be different with different
pickup location. Editing the pickup location in the existing hold will not force Evergreen to re-target
the eligible copies. The hold may be filled by a wrong copy.
Chapter 9. Holds
101
8. You may move a hold to the top of the queue by using the Set Top of Queue option in Actions for Selected
Holds. Click Top of Queue to move the selected hold to the top of the hold queue. Click No Top of Queue
to remove it from the top of the queue. You will be prompted to confirm your action.
If an item has been assigned to the hold on top of the queue before you move another one to the top,
you need to suspend the old top hold, Find Another Target for the new top hold, then activate the old
top hold.
9. You can also manipulate hold position by adjusting Hold Request Time. Use Edit Request Time on Actions
for Selected Holds. Use the calendar widget to select a date.
For most libraries, holds are filled based on request time sequence. Changing request time will change
the holds fufillment sequence.
10.The item's physical condition is recorded in the copy record as Good or Mediocre in the Quality field. You
may request that your holds be filled with copies of good quality only. Click Set Desired Copy Quality on
the Actions for Selected Holds list. Make your choice in the pop-up window.
Chapter 9. Holds
102
Cancelled holds can be displayed. Click Show Cancelled Holds button on the Holds screen.
You may un-cancel it.
Based on your library's setting, hold request time can be reset when a hold is un-cancelled.
Cancelled holds displayed on the Cancelled Holds screen can be limited by hold age (amount of time) or count (a
number). Individual libraries can set this up in the Library Settings Editor. See Chapter 48, Local Administration
Menu.
Chapter 9. Holds
103
You can view details of a hold by selecting a hold then clicking the Detail View button on the Holds screen.
You may add a note to a hold in the Detail View.
Notes can be printed on the hold slip if the Print on slip? checkbox is selected. Key in the message then click Add
Note.
Using the Column Picker, you can display Queue Position and Total number of Holds.
Chapter 9. Holds
104
Managing Holds in Title Records
1.
Retrieve and display the title record in the catalogue.
2.
Click Actions for this Record → View Holds.
3.
All holds on this title to be picked up at your library are displayed. Use Filter checkbox and Pickup Library to
view holds to be picked up at other branches of your libary system.
Chapter 9. Holds
105
4.
Highlight the hold you want to edit. Click Actions for Selected Holds and the appropriate action you want to
take as described in step 3 of the section called “Managing Holds in Patron Records”.
You can retrieve the hold requestor's account by selecting Retrieve Patron on the above dropdown menu.
9.3. Holds Pull List
There are five types of status a hold may have: Waiting for Copy, Waiting for Capture, In Transit, Ready for Pickup,
and the optional Reserved/Pending.
If your library chooses to delay hold shelf status (see Chapter 48, Local Administration Menu), then a hold may
have the status of Reserved/Pending.
1. Waiting-for-copy holds: all holdable copies are checked out or not available.
2. Waiting-for-capture holds: an available copy is assigned to the hold. The item shows up on the Holds Pull List
waiting for staff to search the shelf and capture the hold.
3. In Transit holds: holds are captured at a non-pickup branch and on the way to the pick-up location.
4. Ready-for-pick-up holds: holds are captured and items are on the Hold Shelf waiting for patrons to pick up.
5. Reserved/Pending holds: holds are captured and items are in process and to be put on the Hold Shelf. The status
will be automatically changed to Ready-for-pick-up once the delay time period specified in Library Settings
Editor expires.
Besides capturing holds when checking in items, Evergreen matches holds with available items in your library at
regular intervals. Once a matching copy is found, the item's barcode number is assigned to the hold and the item is
put on the Holds Pull List. Staff can print the Holds Pull List and search for the items on shelves.
Chapter 9. Holds
106
1.
To retrieve your Holds Pull List select Circulation → Pull List for Hold Requests.
Chapter 9. Holds
107
2.
The Holds Pull List is displayed. By default the items on the list are grouped first by Copy Location, then by
Call Number. You may re-sort it by clicking the column labels, e.g. Title.
The order of Copy Location can be adjusted on Admin → Local Administration → Copy Location Order
The maximum number of holds initially displayed on the pull list is about 100. Use Fetch More Holds
to retrieve more records.
3.
To print the pull list you may use Print Full Pull List, Print Full Pull List (Alternate Strategy) or go to Simplified
Pull List Interface. The full list prints Title, Author, Shelving Location, Call Number and Item Barcode, while
the alternative stragegy also prints patron barcode. Print button prints title only.
You may export holds pull list to a CSV file, then import it into MS Excel to re-format it for printing. Use
List Actions button on bottom left of screen.
4.
Click Simplified Pull List Interface. The pull list will be displayed in a new tab.
Chapter 9. Holds
108
5.
You may sort the list by clicking the column label or you may go to the column picker to choose the displayed
fields and sort order. Move the cursor to any column in the label row as shown in the above screen and right
click your mouse. The column picker will be displayed.
6.
You may select/deselect the checkboxes in the Display column to choose the fields that you want to display/
hide. Select Auto Width checkbox if you wish Evergreen to automatically adjust the width of each column. Set
the values for Sort Priority for all the fields that you want to sort by. The example list in the above screen will
be sorted by Shelving Location, Call Number, and then Author.
7.
Scroll to the bottom of the list and click Save.
8.
Click Print Full List. The list will be printed with the selected displayed fields and in the selected sort order.
The current version of Evergreen may not display a whole list of holds on the screen in Simplified Pull
List, but the printed list is complete.
Chapter 9. Holds
109
9.
You may perform hold management tasks by using the Actions for Select Holds dropdown list.
The Holds Pull List is updated constantly. Once an item on the list is no longer available or a hold on the list is
captured, the items will disappear from the list. The Holds Pull List should be printed at least once a day.
9.4. Capturing Holds
Holds can be captured when a checked-out item is returned (checked in) or an item on the Holds Pull List is retrieved
and captured. When a hold is captured, the hold slip will be printed and if the patron has chosen to be notified by
email, the email notification will be sent out. The item should be put on the hold shelf.
1.
To capture a hold, Select Circulation → Capture Holds.
2.
Scan or type barcode and click Submit.
Chapter 9. Holds
110
3.
The following hold slip is automatically printed.
Chapter 9. Holds
111
4.
If the item should be sent to another location, a hold transit slip will be printed.
If your library chooses to keep on-hold items behind the desk for some patrons (Hold is behind Circ Desk
checkbox is selected in the patron record), you will be prompted to route the item to Private Hold Shelf. See
Chapter 48, Local Administration Menu for how to set up Behind Desk Pickup.
If a patron has a OPAC/Staff Client Holds Alias in his/her account, it will be used on the hold slip instead of
the patron name.
Holds can also be captured on the Circulation → Check In Items screen. If you have selected the Auto-Print
Hold and Transit Slips checkbox, the hold slip will be printed automatically without confirmation prompt.
9.5. Find Another Target for Holds
For an item on the Holds Pull List but not found on the shelves or the item is not in proper condition for circulation,
staff may mark it missing or damaged and find another item for the hold, if it is not the only copy.
Finding another target for holds, or retargeting the holds, can be done at several places:
• View Holds in title record: selecting Actions for this Record > View Holds
• Holds in patron record
Chapter 9. Holds
112
• Holds Pull List
You need to select the hold and click Actions for Selected Holds → Find Another Target. Evergreen immediately
searches for an available copy for the hold and puts it on the Holds Pull List. If there is no available copy, the hold's
status will be set to "Wait for copy".
Evergreen's holds targeting program, the holds targeter, identifies holdable copies and builds a holdable copy
list once a day at midnight. When an item is checked in, Evergreen will match it with the holdable copy list to
identify pending holds. Items with non-holdable status are not on the list. Items currently not on the holdable
copy list will be not used to match with holds.
The holds targeter matches new holds (requested within 24 hours) with available copies on the holdable copy
list every 15 minutes. For old holds (requested more than 24 hours ago), the holds targeter matches them once
every 24 hours at roughly the hold request time.
Newly created items, or items of which the status was just changed from a non-holdable to a holdable status,
such as from Missing to Reshelving, are not on the holdable copy list until midnight after the next holdable
copy list has been re-generated. Using the checkin modifiers Retarget Local Holds and Retarget All Statuses
will check all the potential holds picked up at the checkin library that may be filled by the copy, instead of
just the holdable copy list. These checkin modifiers are sticky, and Sitka support recommends they be turned
on unless your library belongs to a resource-sharing group, which means the item may be used to fill a hold
picked up at aother library/branch. In such cases, staff may re-target the hold on top of the holds queue on the
Catalogue > View Holds screen.
9.6. Holds Shelf List and Clearing Shelf-Expired Holds
1.
Items with Ready-for-pickup status are on the Holds Shelf List. The Holds Shelf List can help you manage
items on the holds shelf. To see the holds shelf list, select Circulation → Browse Holds Shelf
Chapter 9. Holds
113
2.
The Holds Shelf List is displayed. Note the Actions for Selected Holds are available, as in the patron record.
You can cancel stale holds here.
3.
Select View Clearable Holds checkbox to list expired or cancelled holds only. The Clear These Holds button
is then lit up. Click it and the expired holds will be cancelled.
4.
Print the list, bring the items down from the hold shelf and check them in.
If you cancel a ready-for-pickup hold, you must check in the item to make it available for circulation or trigger
the next hold in line.
Hold shelf expire time is inserted when a hold achieves on-hold-shelf status. It is calculated according to the
individual library's default hold shelf time expire interval in the Library Settings Editor. See Chapter 48, Local
Administration Menu.
Chapter 9. Holds
114
Chapter 10. Items in Transit
Evergreen’s In Transit feature is used to keep track of items transferring among branches within a library system
or libraries. It makes it easy for libraries to provide services such as allowing patrons to return items at any branch
or place holds on items belonging to another branch.
10.1. When will an item go In Transit?
1.
When an item is checked in at the non-owning branch the status will be changed to In transit and a Transit
Slip can be printed. Items in transit should be set aside and sent to the destination branch according to your
library’s policy and workflow.
Chapter 10. Items in Transit
115
2.
When you capture a hold with a pickup branch other than your branch, the item’s status will be changed to In
transit. If you capture the hold on the Check In screen you will be prompted to print the Transit/Hold slip shown
below. If you capture the hold on the Capture Holds screen, a Transit/Hold slip will be printed automatically
if you have a printer attached.
10.2. How to receive In transit items?
At the receiving branch, all items received should be checked in so that items' status will be changed from In transit
to Reshelving. If an item has a hold on it, a Hold Slip will be printed. If the pickup branch for the hold is not your
branch, the item will be sent In transit again to the pickup branch. A Transit/Hold Slip will be printed.
10.3. Transit Details
You may find out the source and destination library of a transit on the Item Status F5 screen.
1.
Retrieve the item by barcode.
Chapter 10. Items in Transit
116
2.
Select the item and go to Alternate View. Select Holds/Transit tab. Transit information is displayed in In Transit
on the lower part of the screen.
10.4. Transit List
The Transit List report can be used as a tool to help manage your incoming and outgoing transits.
Chapter 10. Items in Transit
117
1.
To access the Transit List report, select Admin → Local Administration → Transit List.
2.
Specify Transit to or Transit from library from the dropdown menu to retrieve transits coming to or sending
from your library.
Chapter 10. Items in Transit
118
3.
Pick a date range in Transit Date falls between fields.
4.
Click Retrieve Transits.
5.
Those items, which were sent In Transit within the date range, and with an In Transit status, are listed.
It is good practice to pull Transit Lists when sending or receiving items to and from other branches.
Reconciling the list against the physical items helps ensure your shipments are complete.
Chapter 10. Items in Transit
119
10.5. Aborting Transits
Under certain circumstances aborting transit may be required. But aborting transit may affect data integrity or
affect the accuracy of statistics. Sitka Support strongly suggests libraries be cautious with this function. The
general guideline is that the sending libraries may abort a transit before sending out items, while receiving
libraries never abort a transit but check them in instead.
Aborting a transit from within the Transit List screen.
1.
From the Transit List screen select the transit(s) you wish to cancel
2.
Select Actions for Selected Transits → Abort Transits.
3.
The transit is cancelled. It will still display in the list, but if you re-click Retrieve Transits the screen will be
refreshed and the item will no longer display as a transit, and the item will have a status of Reshelving.
Cancelling a Transit at Checkout
If an item with status of In transit is to be checked out, you can override the block by clicking Abort Transit then
Checkout.
In Transit by Mis-scanning
Sometimes mis-scanning happens when you check in an item. Occasionally the mis-captured barcode number
happens to be a valid item of another library. This sends the item in transit wrongly. To correct these mistakes
libraries need to regularly access their Transit List and abort the invalid transits.
Chapter 10. Items in Transit
120
It is good practice for libraries to inform the owning library if an item with special status, e.g. checked out,
missing, lost etc., is sent in transit by mis-scanning.
Some transits can not be cancelled/aborted, such as items with a previous status of Missing. Such items have
to be checked in at the owning library.
Chapter 10. Items in Transit
121
Chapter 11. Self Check
These instructions are specific to the native Evergreen Self Check. For instructions on using third party self
check outs libraries should refer to the instructions provided by the third party vendors.
For information on how your library can set up and use the native Evergreen Self Check see Chapter 50, Evegreen
Self Check Administrative Set-Up.
11.1. Staff Functions in the Evergreen Self Check
Turning on the Self Check
1.
Open the Evergreen Self Check interface in an internet browser.
2.
Enter your self check login credentials and click Login.
Each library is given a self check specific Local System Administrator account during set up.
Turning off the Self Check
1.
Close the browser.
Chapter 11. Self Check
122
2.
Turn off the computer
Sitka Support recommends turning off all computers running the Evergreen Self Check at closing every night to
avoid any conflicts with overnight processes.
11.2. Basic Check Out
1.
Patron scans their barcode.
2.
Optional Patron enters their account password.
3.
Patron scans the barcodes for their items.
OR
Chapter 11. Self Check
123
Patron places items, one at a time, on the RFID pad.
4.
Items will be listed below with a check out confirmation message.
If a check out fails a message will advise patrons to see staff.
5.
Patron clicks Receipt to print a checkout receipt and logout.
OR
Chapter 11. Self Check
124
Patron clicks Logout to logout with no receipt.
11.3. View Items Out
1.
Patrons are able to view the items they currently have checked out by clicking View Items Out.
Chapter 11. Self Check
125
2.
The items currently checked out will display with their due dates.
Using the Print button patrons can print out a receipt listing all of the items they currently have checked out.
11.4. View Holds
1.
Patrons are able to view their current holds by clicking View Holds.
Chapter 11. Self Check
126
2.
Items currently on hold display. Patrons can also see which, if any, items are ready for pickup.
Using the Print button patrons can print out a receipt listing all of the items they currently have on hold.
11.5. View Fines
1.
Patrons are able to view the fines they currently owe by clicking View Details.
2.
Current fines owed by the patron display. Fines cannot be paid through the self check at this time.
Chapter 11. Self Check
127
Chapter 12. Offline Transactions
Adapted with permission from original material by Georgia PINES
Evergreen's Standalone Interface/Offline Interface is designed to log transactions during network outage, which can
be uploaded and processed once network operations are restored.
The terms “Offline Interface” and “Standalone Interface” mean the same thing - a separate program to handle simple
circulation tasks while the network is down.
To access Offline Interface, go to Staff Client login screen. Click Standalone Interface button.
Chapter 12. Offline Transactions
128
Evergreen Standalone Interface will open.
12.1. Offline Module Setup
Default Offline Printer
A default offline printer must be set on each workstation to be used during offline in order for the Offline Module
to print receipts.
1.
Select Admin → Workstation Administration → Printer Settings Editor.
Chapter 12. Offline Transactions
129
2.
Select the Printer Context. Set the Offline context on each Evergreen workstation.
3.
After choosing Printer Context click Set Default Printer and Print Test Page and follow the prompts. If
successful, test output will print to your chosen printer.
Download Offline Patron List
It is best practice to download the offline patron list every morning on any computers that would in the event that
the library goes to offline checkout.
This list contains blocked, barred, and expired patrons as well as lost cards and enables the Offline Module to
respond with an error message indicating the patron status at check-out time.
•
Select Admin → Download Offline Patron List.
12.2. Patron Registration
Patron registration on Evergreen Offline Interface records the minimum patron information necessary to register
a new patron.
Chapter 12. Offline Transactions
130
All fields, except Line 2 of Billing Address, on Patron Registration screen are required. If your library does not
record information for any field, you need to work out a standard fake value for it, e.g. 1900-01-01 for Date
of Birth.
The account password will be automatically generated. Patrons can access their account with the password after
the offline transactions are uploaded and processed.
1.
Click Register Patron on the top menu bar.
2.
Patron Registration screen is displayed.
Chapter 12. Offline Transactions
131
3.
Fill in the form with patron information. Use the drop down list if available. Click Save patron registration
button. Click OK on the confirmation pop-up window.
12.3. Check Out
1.
Click Check Out button to access check out screen.
Chapter 12. Offline Transactions
132
2.
The Standalone Check Out screen will open.
3.
Make sure the date (on the left end of the menu bar) is correct.
4.
Scan the patron's library card barcode in Enter the patron's barcode box.
Chapter 12. Offline Transactions
133
5.
Check that the due date is correct. You may delete then type in a due date in Enter the item due date box. You
may also click choose one of these dropdown list to select a relative due date based on the loan period.
6.
Scan the items' bacode in Enter the item barcode box. It will appear on the right side of the screen.
7.
For non-catalogued items, you may also click choose a non-barcode option dropdown list to select a noncatalogued category.
Enter the number of items you want to check out, then click OK on the prompt window.
8.
Scan all the items, changing the due date if necessary.
Chapter 12. Offline Transactions
134
9.
If you want to print a receipt, make sure the Print receipt? checkbox is selected.
Receipts will only print if you have previously set a default offline printer in the staff client. See Default
Offline Printer for innstructions on setting the default offline printer.
10. Click Save these transactions.
The default dates are based on your computer settings.
Pre-catalogued item circulation is not available on Offline Interface. If an existing pre-cat barcode happens to
be used, it will be checked out with the previous author and title. If a new pre-cat barcode is attempted, an error
of ASSET NOT FOUND (item not found) will be returned upon processing offline transactions.
The Delete selected transaction function does not currently work. Misscans need to be resolved as exceptions
at this time.
12.4. Renew
To renew, you must know items barcode number. Patron's barcode is optional.
Chapter 12. Offline Transactions
135
1.
To access renew function, click Renew button on the top menu bar.
2.
Renew screen looks very similar to Check Out screen. The differences are patron's barcode is optional on Renew
screen, and non-barcoded option is not available as non-barcoded items can not be renewed.
3.
Follow the same procedure as checking out described above. Skip patron barcode if you do not have it.
12.5. In House Use
1.
To access In House Use, click In House Use button on the top menu bar.
2.
Make sure the date is correct.
Chapter 12. Offline Transactions
136
3.
Type in the number in Enter the number of uses of the item box.
4.
Scan or type in the item barcode number in Enter the item barcode box.
5.
Repeat the above 2 steps until all items have been scanned.
6.
Click Save these transactions. Make sure Print receipt? checkbox is selected if you want to print a receipt.
12.6. Check In
1.
Click Check In button on the top menu bar.
Chapter 12. Offline Transactions
137
2.
Check In screen will open.
3.
Make sure the date is correct.
4.
Scan the items barcode in Enter item barcode box. The number will be displayed on the right side fo the screen.
5.
Scan all items you want to check in.
Chapter 12. Offline Transactions
138
6.
Click Save these transactions. If you need to print a receipt, make sure Print receipt? checkbox is selected
before you save the transactions.
Without access to Evergreen database, items on holds or with special status will not be captured in offline mode.
Sitka Support Team recommends libraries not use check in function on Standalone Interface if possible.
12.7. Uploading offline transactions
Once you are able to connect to the server, you need to upload the offline transactions. It is good practice to do this
as soon as possible, but if the local system administrator isn’t on site for a day or two do not panic.
The terms Offline Interface and Standalone Interface mean the same thing - a separate program to handle simple
circulation tasks while the network is down.
Once you can connect to the server, there are 3 steps to uploading offline transactions:
1. Create a session: to be done by local system administrators at an administration workstation.
2. Upload transactions to a session: to be done by circulation staff at circulation workstations.
3. Process the uploaded transactions: to be done by local system administrators at an administration workstation.
Once the network has come back up, a local system administrator must first create a session before uploading
transactions. Then, staff can upload transactions from each of the workstations used in offline circ to that session.
Once all of the branch workstations have uploaded their transactions to the session, the local system administrator
will process all the transactions in the session at once.
Circulation Staff uploading transactions to the session does not put the transactions into the Evergreen database.
It just copies over the offline transaction file saved in individual local workstations to the Evergreen server. The
transactions will not be sent to the Evergreen database until the local system adminsitrator processes the session.
Create a Session
1.
Log into Evergreen with a local system administrator username and password.
Chapter 12. Offline Transactions
139
2.
From the menu bar, select Admin (-) → Offline Transaction Management.
3.
The Offline Transactions screen will open. Previously created sessions will be listed in the Offline Sessions
section. Otherwise, the Offline Sessions section will be blank.
4.
In the upper Offline Sessions section, click on the Create button to create a new session.
5.
Enter a name for the session, like “Internet Down 2009-12-02”. Click OK.
6.
In the Offline Sessions section, highlight the session you just created. An Uploaded Transactions section will
appear in the bottom of the screen. Initially, this section will be empty.
Chapter 12. Offline Transactions
140
7.
Inform library staff that the session has been created and what the session name is.
Upload Workstation Transactions to a Session
Wait until the local system administrator has created a session and told you that it's ready for your upload. There
may be several sessions shown on the Offline Transaction Management screen, so you will need the name of the
correct session from your local system administrator.
1.
Log into Evergreen with your regular username and password.
2.
From the menu bar, select Admin (-) → Offline Transaction Management.
3.
The Offline Transactions screen will open. You should see at least one session in the Offline Sessions section.
You may see old sessions listed there, as well.
4.
In the upper Offline Sessions section, highlight the correct session, then click Upload.
5.
When the uploading is finished,select the session in Offline Sessions section. Now the value in the Upload
Count column should have been increased by 1. Your workstation should be listed in Uploaded Transactions
section now.
Chapter 12. Offline Transactions
141
6.
Inform your local system administrator that your transaction has been uploaded to the session.
You will need to do this for each workstation you have used for offline circulation. If your library has more
than one workstations that have been used for offline transactions you will see the other workstation sessions
that have already been uploaded.
Process the Transactions
Wait until all the appropriate staff workstations have uploaded their transactions to your session. You should see
the workstations listed in the Uploaded Transactions section. You'll need to be logged into Evergreen as a local
system administrator to do the processing step.
1.
Log into Evergreen with a local system administrator's username and password.
2.
From the menu bar, select Admin (-) → Offline Transaction Management.
3.
Highlight the correct session and, if necessary, Refresh to verify all the appropriate workstations have uploaded
their transactions to your session.
Chapter 12. Offline Transactions
142
4.
Click on the Process button.
5.
The processing may take a while, depending on how many transactions you have done. Click the Refresh button
to check the status. The processing is complete when the Processing? column shows Completed.
The number in the Transactions Processed column is equal to the number of items checked out or checked in.
For example, if there are 5 transactions processed this could be 5 items checked out, or 3 items checked in and
2 items checked out, or 5 items checked in.
Exceptions
Exceptions are problems that were encountered during processing. For example, a mis-scanned patron barcode, an
open circulation, or an item that wasn’t checked in before it was checked out to another patron, would be listed as an
Chapter 12. Offline Transactions
143
exception. Those transactions causing exceptions may not be loaded into Evergreen database. Staff should examine
the exceptions and take necessary action.
The example below shows several exceptions:
These are a few notes about possible exceptions. It is not an all-inclusive list.
1. Checking out a DVD with the wrong date (leaving due date set at +2 weeks instead of +1 week) doesn't cause
an exception.
2. Overdue books are not flagged as exceptions.
3. Checking out a reference book doesn't cause an exception.
4. Checking out an item belonging to another library doesn't cause an exception.
5. The Standalone Interface doesn't recognize books on hold, no exceptions will be generated for that.
6. The Standalone Interface will recognize blocked, barred, and expired patrons as well as lost cards, IF you have
recently done an Admin (-) → Download Offline Patron List on the workstation on which you're using the
Standalone Interface. You will get an error message indicating the patron status from within the Standalone
Interface at check-out time.
7. ROUTE-ITEM. Indicates the book should be routed to another branch or library system. You'll need to find
the book and re-check it in (online) to get the Transit Slip to print.
8. COPY_STATUS_LOST.
Indicates a book previously marked as lost was found and checked in.
9. CIRC_CLAIMS_RETURNED.
checked in.
Indicates a book previously marked as claimed-returned was found and
10.ASSET_COPY_NOT_FOUND.
Indicates the item barcode was mis-scanned/mis-typed.
11.ACTOR_CARD_NOT_FOUND.
12.OPEN_CIRCULATION_EXISTS.
13.MAX_RENEWALS_REACHED.
(or it’s a video/DVD).
Chapter 12. Offline Transactions
Indicates the patron's library barcode was mis-scanned/mis-typed.
Indicates a book was checked out that had never been checked in.
Indicates the item has already been renewed the maximum times allowed
144
Part III. Cataloguing
Table of Contents
13. Searching the Database for Cataloguing Purposes ..............................................................................
13.1. Advanced/Numeric Search .......................................................................................................
13.2. MARC Expert Search ..............................................................................................................
14. Adding Holdings to Existing Records in the Sitka Database ..................................................................
14.1. Adding holdings to title records ................................................................................................
14.2. New Copies and Holds ............................................................................................................
14.3. Adding holdings for non-physical resources ..............................................................................
15. Editing and Maintaining Holdings ........................................................................................................
15.1. Copy Editor .............................................................................................................................
15.2. Editing holdings .......................................................................................................................
15.3. Copy Templates ......................................................................................................................
15.4. Batch Updating via Item Status screen .....................................................................................
15.5. Replacing a barcode ...............................................................................................................
15.6. Spine Labels ...........................................................................................................................
15.7. Transferring holdings ..............................................................................................................
15.8. Deleting holdings .....................................................................................................................
16. Copy Alerts ........................................................................................................................................
17. Copy Buckets ....................................................................................................................................
17.1. Adding Copy Records to Copy Buckets ....................................................................................
17.2. Working with Copies in a bucket ..............................................................................................
17.3. Removing a Copy from a Bucket ..............................................................................................
17.4. Retrieving Shared Buckets .......................................................................................................
18. Adding Bibliographic Records to the Database ....................................................................................
18.1. MARC Records via Z39.50 Interface ........................................................................................
18.1.1. Importing Records via Z39.50 Interface ..........................................................................
18.1.2. Overlaying Records via Z39.50 Interface ........................................................................
18.2. MARC Batch Import ................................................................................................................
18.2.1. Import MARC Records ..................................................................................................
18.2.2. Uploading MARC Record Files ......................................................................................
18.2.3. Importing and Merging Records from Queues ................................................................
18.2.4. Managing Queues ........................................................................................................
18.3. Sitka’s Minimum MARC record .................................................................................................
18.4. Creating New MARC Records ..................................................................................................
18.5. Cataloguing non-physical resources .........................................................................................
19. Editing and Maintaining MARC records ...............................................................................................
19.1. Editing MARC Records ............................................................................................................
19.2. MARC Record Leader and MARC fixed field 008 ......................................................................
19.3. Format Filters and Format Icons ..............................................................................................
19.4. Merging Bibliographic Records in Evergreen .............................................................................
19.5. Deleting MARC records (bibliographic or title records) ...............................................................
19.6. Exporting MARC Records ........................................................................................................
20. Record Buckets ..................................................................................................................................
20.1. Creating Record Buckets .........................................................................................................
20.2. Adding Records to Buckets ......................................................................................................
147
147
150
154
154
156
157
158
158
162
165
170
170
172
177
180
184
187
188
190
192
193
194
194
194
197
200
200
201
203
207
208
210
212
214
214
217
220
222
224
225
228
228
230
Part III. Cataloguing
146
Chapter 13. Searching the Database for Cataloguing
Purposes
It is critical to search the database before adding titles, volumes, or copies. Good practice is to assume the item you
are adding already exists, and to do an exhaustive search for the item before cataloguing it. By doing so, you will
discover whether you need to add your item to an existing title record, or if you need to import or create a new title
record. It is very important that you scope your cataloguing searches to the entire Sitka database, either at the time
of each search or via Workstation or My Account preferences.
You can set workstation search preferences to configure default search location and preferred search library and you
can choose to have Numeric Search or MARC Expert search be the default advanced search view. These workstation
preferences override account login preferences set in My Account. For cataloguing workstations it is recommended
that the Default Search Library be set to Sitka. This will ensure staff using those workstations are always searching
all of Sitka.
13.1. Advanced/Numeric Search
1.
To search the catalogue for holdings select Cataloguing → Search the Catalogue, or Search → the Catalogue,
or press F3.
Chapter 13. Searching the Database for Cataloguing Purposes
147
2.
The advanced search screen is displayed. In this example the search screen defaults to the Numeric Search page
You can customize the look of this screen via Workstation Administration. In this example note the search
library is set to Sitka. A cataloguer must ensure they are searching the entire Sitka database.
3.
Enter your search criteria and click Search.
4.
In this example, the item in hand has 3 copies in Sitka.
Chapter 13. Searching the Database for Cataloguing Purposes
148
5.
To access the record, click on the title link.
6.
Confirm bibliographic data as displayed in the brief record. If satisfied that the record matches the item in
hand, you can proceed to add holdings as described in Chapter 14, Adding Holdings to Existing Records in
the Sitka Database.
Chapter 13. Searching the Database for Cataloguing Purposes
149
7.
You may also choose to view MARC record from this screen by clicking on MARC Record button below record
summary, or selecting Actions for this Record > MARC View or MARC Edit at top right of record.
8.
This presents detailed bibliographic data to help you determine whether the record matches the item in hand.
It is possible to search ISBNs by keyword, but results may not be exhaustive. We recommend using Numeric
Search as described in this lesson.
If an OCLC number is nine digits then Evergreen uses “ocn” as a prefix. For example: ocn123456789.
If an OCLC number is less than 8 digits then Evergreen uses “ocm” as a prefix. In addition Evergreen
will automatically prefix the number with zeros so that it is nine digits. For example: ocm01234567, or
ocm00123456
If searching a LCCN do not use a hyphen, add a “0” in place of a hyphen, e.g. 2001001234
13.2. MARC Expert Search
1.
To search the catalogue for holdings select Cataloguing → Search the Catalogue, or Search → the Catalogue,
or press F3 and click on Expert Search tab.
Chapter 13. Searching the Database for Cataloguing Purposes
150
2.
Enter tag definitions and search criteria and click Search.
3.
You may search multiple tags by clicking Add Search Row.
Chapter 13. Searching the Database for Cataloguing Purposes
151
4.
You may now search multiple tags.
5.
Matching records are retrieved. This example is the MARC view of one result.
Chapter 13. Searching the Database for Cataloguing Purposes
152
You can manipulate the view during a session, and set a default view, by clicking on Actions for this Record on
right of screen. Selecting Set bottom interface as Default, as in this example, sets the current OPAC View as the
default. Next time when you click a title on the resut list, the record will be displayed in this default view.
Chapter 13. Searching the Database for Cataloguing Purposes
153
Chapter 14. Adding Holdings to Existing Records in the
Sitka Database
14.1. Adding holdings to title records
Evergreen has a unified volume/copy creator that allows you to create volumes and copies in a unified screen.
This function consolidates the process of creating volume and copy records. You must configure this, and
whether you want a horizontal or vertical layout, in Library Settings. See Chapter 48, Local Administration
Menu The examples here demonstrate use of the unified volume/copy creator with a vertical layout. There is
also the ability to pre-configure call number prefixes and suffixes, via the Admin menu.
1.
Search the catalogue for a record that matches the item in hand, as described in Chapter 13, Searching the
Database for Cataloguing Purposes. If you do not find a match, refer to the Sitka Cataloguing Policy at http://
sitka.bclibraries.ca/governance/sitka-policy/ for recommendations on required procedures. If you do find a
match, proceed to next step.
2.
When the record details are loaded, select Actions for this Record → Holdings Maintenance.
Chapter 14. Adding Holdings to Existing Records in the Sitka Database
154
3.
On Holdings Maintenance, select your library, or branch(es), from the list and click Actions for Selected Rows
→ Add Volumes or click on Add Volumes link at top left.
4.
In the Volume and Copy Creator section of the screen:
• Enter a number in the # of volumes field.
• Type in a call number, or use the call number that is autofilled from the MARC record.
• Use the drop down lists for prefix and suffix if your library uses that functionality.
• Enter the appropriate number of copies and scan barcode(s).
Use Tab, Enter or mouse to move through fields.
If you are creating place holders for on-order items see What is the best way to enter “on-order” records?
in the Sitka Evergreen Policy and Best Practices Manual
5.
Make all necessary edits to copy record in the Copy Editor section of the screen by moving through fields and
clicking Apply on every edit.
For information on the individual fields in the Copy Editor see Section 15.1, “Copy Editor”
Chapter 14. Adding Holdings to Existing Records in the Sitka Database
155
Co-op support recommends creating and using copy templates with the Copy Editor. For information on
using and creating copy templates see the section called “Creating Copy Templates”
There is a field in the Copy/Item Record called Floating? Leave this field at its default blank, unless
cataloguing special items using this field. If interested in using Floating to manage a rotating or block
collection, contact Co-op support.
6.
Click Create Volumes/Items.
7.
You may need to click Refresh to view new items, and, depending on how you retrieved the volume/copy
editor, you may be in the OPAC view.
By default, a new item has a status of In Process. Item must be checked in to become Available or a cataloguer
can choose to change the status to Available when creating the item record. Your library may choose to alter
this behaviour by contacting Co-op support who can configure a desired default status for you.
14.2. New Copies and Holds
Because of the way Evergreen targets holds, new copies are not guaranteed to fulfill pre-existing holds correctly
until 24 hours after cataloguing. If your cataloguing turn-around time is shorter than 24 hours you can ensure the new
copy is captured correctly at check in by using the checkin modifiers Retarget Local Holds and Retarget All Statuses
or by following the steps below. Co-op support recommends single-branch libraries use the checkin modifiers, as
once selected they are "sticky" and it is a simpler workflow than that described below. We recommend multi-branch
libraries not use check-in modifiers to retarget holds, as the check-in modifier will only re-target the top local hold,
which may not be the top system hold. For multi-branch libraries we recommend using the following procedure.
Chapter 14. Adding Holdings to Existing Records in the Sitka Database
156
1.
After adding the item select Actions for this Record → View Holds
2.
If there are outstanding hold requests, select the hold that is next in line then choose Actions for Selected Holds
→ Find Another Target. This forces Evergreen to re-target the hold and recognize the newly catalogued item.
3.
Check in the new item to capture it for the selected hold.
14.3. Adding holdings for non-physical resources
There are two ways to catalogue non-physical resources in Sitka Evergreen. Recommended process is to use
specially coded MARC records as described in Section 18.5, “Cataloguing non-physical resources”. Alternatively
you may add dummy holdings to a MARC record, using the same steps as adding physical holdings as described
above. Adding dummy holdings will scope your non-physical resources to your catalogue. If you use dummy
holdings it is important to use item barcodes from within your designated barcode range.
Chapter 14. Adding Holdings to Existing Records in the Sitka Database
157
Chapter 15. Editing and Maintaining Holdings
15.1. Copy Editor
The Copy Editor is where you fill in the values for item attributes. You will use it to create or edit items. Below
tables provide detailed description of the fields in an item record.
The Copy Editor will display during the process of cataloguing an item and can be accessed through Holdings
Maintenance or from the Item Status screen by choosing Edit Item Attributes from the appropriate dropdown menu.
Table 15.1. Identification
Setting
Description
Notes
Status
Current status of the item
By default a new copy record
is assigned a status of In
Process. Item must be checked
in to become Available or
cataloguer can choose to
change status to Available
when a creating copy record.
Some statuses, such as
Checked Out and On Holds
Shelf, are not editable. They
Chapter 15. Editing and Maintaining Holdings
158
Setting
Description
Notes
can only be used by circulation
functions.
Barcode
Current barcode of the item
The barcode cannot be updated
in the Copy Editor. See
Section 15.5, “Replacing a
barcode”
Creation Date
Date on which the item was created
This field will be automatically
filled when the record is saved.
Active Date
Date on which the item goes into circulation
This field is empty if an item
is created with status of On
Order or In Process. It is filled
when it is checked in or out, or
its status is edited to others.
Creator
Username of the user who created the item
This field will be automatically
filled when the record is saved.
Last Edit Date
Date on which the item was last edited
This field will be filled/updated
when the record is saved.
Last Editor
Username of the last user to edit the item
This field will be filled/updated
when the record is saved.
Setting
Description
Notes
Location/Collection
Shelving/Copy Location for the item
Shelving locations belonging
to the circulating library/
branch and the organizations
on a higher hierarchal level
(library system, federation,
or Sitka) are displayed in the
dropdown list. Multi-branch
libraries may create system
level shelving locations for all
branches to share.
Circulating Library
Library currently circulating the item.
Owning Lib : Call Number
Owning library of Call Number and Call
Number label
Call Number, aka Volume, is a
separate record. Call Number
cannot be updated in the Copy
Editor. See Section 14.1,
“Adding holdings to title
records”
Copy Number
The copy number of the item
This is an optional field.
Libraries may use it to identify
duplicate copies under one
title.
Table 15.2. Location
Chapter 15. Editing and Maintaining Holdings
159
Table 15.3. Circulation
Setting
Description
Notes
Circulate?
Indicates whether the item can circulate or not
Leave it as "YES", unless
the item is with a circulating
collection (shelving location),
but should not be circulated.
If the shelving location's
Circulate? attribute is "NO",
this field will have no effect.
But the "NO" value in this field
will block circulating when the
shelving location's Circulate?
is "YES".
Holdable?
Indicates whether the item is holdable or not
Leave it as "YES", unless
the item is with a holdable
collection (shelving location),
but holds should not be
allowed on this particular
item. If shelving location's
Holdable? is "NO", this field
will have no effect. But the
"NO" value in this field will
block holds when shelving
location's Holdable? is "YES".
Age-based Hold Protection
Allows libraries to restrict holds to be picked
up at a range of libraries
Sitka provides
two sets of rules:
x_month_within_single_branch
and
x_month_among_multi_branch.
The former allows holds to
be picked up at the item's
circulating library only for
x months, while the latter at
libraries sharing the same
parent with the circulating
library, e.g. all branches
of a library system or all
single-branch libraries within
a federation. In general,
use the former if you are a
single_branch library and want
to restrict holds to your own
library, or if you are a branch
of a multi-branch library
system and want to keep the
holds at your own branch. Use
the latter if you are a multibranch library system and
Chapter 15. Editing and Maintaining Holdings
160
Setting
Description
Notes
allow items to fill holds picked
up at all your branches, but not
to go out of your system.
Floating?
This functionality must be configured by Sitka If Sitka has not configured
floating groups for you, leave
the field blank.
Loan Duration
Indicates whether an item uses the Short,
Normal, or Long loan duration attached to its
circulation modifier or shelving location set up
in the circulation policy.
Each circulation modifier/
shelving location may
have three loan durations,
corresponding to these three
values. Use 'Normal' if only
one loan period is used. Please
contact Co-op support if you
need multiple loan durations
for one circulation modifier/
shelving location.
Fine Level
Indicates whether an item uses the Low,
Normal, or High fine level attached to its
circulation modifier or shelving location set up
in the circulation policy.
Each circulation modifier/
shelving location may have
three fine levels, corresponding
to these three values. Use
'Normal' if only one fine level
is used. Please contact Co-op
support if you need multiple
fine levels for one circulation
modifier/shelving location.
Circulate as Type
Media type
When circulation policy is
controlled by the media type in
MARC records, this field can
be used to override the MARC
media type for individual
items. It can also be used for
statistics purpose.
Circulation Modifier
An identifier used for applying circulation
policies and/or statistical purposes
A shared list of circulation
modifiers displays in the
dropdown list for all libraries.
Each library selects circulation
modifiers to use and for each
selected circulation modifier
the library may define its own
circulation policy.
Setting
Description
Notes
Alert Message
This message will show up when the item is
retrieved or checked in or out
Table 15.4. Miscellaneous
Chapter 15. Editing and Maintaining Holdings
161
Setting
Description
Notes
Deposit?
Indicates whether the checking out item
requires a deposit or not
Deposit Amount
Amount required as a deposit for the item
When the item is checked
out a bill for this amount is
automatically created in the
patron account.
Price
Price of the item
The price entered is used when
the system generates lost or
damaged bills for the item.
OPAC Visible?
Indicates whether the item is visible in the
OPAC or not.
Leave it as 'YES', unless the
item is with an OPAC visible
collection (shelving location),
but should not be displayed on
OPAC. If OPAC Visible? is
"NO" for the shelving location,
this field will have no effect.
But the "NO" value in this
field will hide the item, if
OPAC Visible? is "YES" for
the shelving location.
Reference?
Indicates whether the item is reference or not
This flag can be used for
setting up circulation policies
or statistics purpose.
Quality
Indicates the quality of the item
Quality is used to determine
whether an item can be used
to fill a hold. By default,
only Good items will be used
to fill holds. Co-op support
strongly recommends leaving
the quality of the item as Good
for all items, unless you want
to block holds on the item.
The Statistics Column is filled with the copy statistical categories created by your library or federation. For
information on creating copy statistical categories see Section 48.15, “Statistical Categories Editor”
15.2. Editing holdings
In Evergreen, the call number is kept in a separate record, called volume or call number record. (These two terms
are used interchangably in this document.) Call number can not be edited on Copy Editor. Items under the same
title with the same call number share the same call number record. Copy records and volume records can be edited
at several places.
1.
You may edit items and call numbers on Item Status screen if you know the item's barcode. Go to Search →
Search for Copies by Barcode F5 OR Circulation → Show Item Status by Barcode F5 OR Cataloguing →
Display Item F5. Scan or type in the barcode. Once the item is displayed, highlight it.
Chapter 15. Editing and Maintaining Holdings
162
To edit the copy record, click Actions for Cataloguers → Edit Item Attributes . The item will be loaded into
Copy Editor. Edit the fields that you want to and click Apply after each editing. Click Modifiy Copy when all
editing is done.
To edit the call number, click Actions for Cataloguers → Edit Volumes. The call number is loaded in a popup
window. Edit, then click Modify to save.
Evergreen does not allow two identical call numbers for one title, one library. You will be prompted if an
existing identical call number is detected. You may select Auto-Merge on Volume Collision checkbox to
avoid the prompt. The copies will be put under one call number.
Since copies and call numbers are separate records, their owning/circulating library may be different. Item's
circulating library should match where it is usually located.
2.
You may edit an item and/or its call number after finding it on the catalogue. Simply click Edit beside the
barcode on the record details screen.
Chapter 15. Editing and Maintaining Holdings
163
You may edit call number and barcode on this screen. If you do not wish to edit any item attribute, click Rebarcode/Update Items,otherwise click Edit then Re-barcode to load the item in Copy Editor for further editing.
3.
You may edit copy and call number records on Holdings Maintenance screen. To edit a call number, highlight
the line with call number and click Actions for Selected Rows → Edit Volumes.
To edit the copy record, highlight the line with barcode and click Actions for Selected Rows → Edit Items.
Chapter 15. Editing and Maintaining Holdings
164
You may edit multiple records of the same type displayed on the same screen at one time by highlighting all
of them using Ctrl or Shift key and mouse click.
15.3. Copy Templates
Creating Copy Templates
Using Copy Templates
Exporting Copy Templates
Importing Copy Templates
Copy templates allow you to set up default values for selected item attributes. For example, all adult fiction items
use the same shelving location and circulation modifier. You may set up a copy template for adult fiction with the
appropriate shelving location and circulation modifier values. When you apply this template, the two fields will be
automatically filled with the default values. Use of templates enhances item creation and helps ensure consistency
in records.
Creating Copy Templates
1.
You can create a copy template directly under Admin → Local Administration → Item Attribute Editor OR
you can create a copy template when editing an existing item record.
Chapter 15. Editing and Maintaining Holdings
165
2.
On Copy Editor, select/enter value for each required item attribute sharing the same default value and click
Apply for every edit. Once done, click Save.
3.
Enter a template name at prompt and click OK.
Chapter 15. Editing and Maintaining Holdings
166
4.
Template is saved. Click OK.
5.
Back on Copy Editor, you can now see your new template from the dropdown menu. Click Close to exit the
Copy Editor.
Using Copy Templates
To use a copy template when cataloguing/editing items, on Copy Editor, choose the template from the dropdown
list as shown on the above screen and click Apply beside it. Those fields covered by the template will display with
green coloured background.
Exporting Copy Templates
Templates are saved on Evergreen server, but only viewable by the staff account that created them. To share
templates with other staff, you will need to export them and the other staff to load them into their accounts.
Chapter 15. Editing and Maintaining Holdings
167
1.
To export copy templates, go to Copy Editor. Click on Export in the Template line on top of the screen. This
will export all of your templates.
2.
Select where you will save the template on your computer, name the file and click Save.
3.
Click OK on the confirmation prompt.
4.
You could email the file to others, or save it to a flash drive and pass it to them, so that they can import the
file to their Evergreen accounts. Alternatively, your colleagues may log into Evergreen with their accounts on
your computer to import the templates.
Importing Copy Templates
1.
Load Copy Editor. Click on Import.
Chapter 15. Editing and Maintaining Holdings
168
2.
Navigate to where the template file is located, select it and click Open.
3.
Choose "Yes" on the prompt to import the file.
Chapter 15. Editing and Maintaining Holdings
169
If you choose "No", you will see the following prompt. The templates are not loaded, but may show up on
the template dropdwn list. Re-load the Copy Editor. They will disappear.
4.
Click OK on the confirmation prompt.
When importing copy templates, existing templates will be kept, new ones will be added to them. If a duplicate
template is detected, Evergreen will prompt you to choose whether to replace the existing one.
15.4. Batch Updating via Item Status screen
As discussed in the Circulation chapter, the Item Status (F5) screen is a very useful interface for all library staff.
Cataloguers can perform multiple tasks from this screen. The example below demonstrates updating shelving
location on multiple items. You can batch update any editable field in item records following this procedure. See
Section 7.6, “Item Status (F5)” for more details.
1.
Press F5 on your keyboard or use the dropdown menu to access Item Status screen.
2.
Scan all barcodes into Barcode field or use Upload From File if your barcodes are saved in a file.
3.
Select the barcodes you wish to edit using the Shift or Ctrl on your keyboard.
4.
Select Actions for Cataloguers → Edit Item Attributes.
5.
The Copy Editor window opens. Note all the barcodes, different call numbers and shelving locations are
displayed.
6.
Select required shelving location and click Apply, just as if editing one record.
7.
Click Modify Copies at bottom right of screen. This will modify all the shelving locations on your selected
set of items.
15.5. Replacing a barcode
The simplest way to replace an item's barcode is to use Replace Barcode function on the Circulation or Cataloguing
dropdown menu. You will be prompted to enter the old barcode and then the new barcode. Replace Barcode function
is also available on Holdings Maintenance screen.
Chapter 15. Editing and Maintaining Holdings
170
The Edit function (the link beside item's barcode) on Record Details screen on the catalogue allows you to update
barcode, too.
You may also replace a barcode on the Item Status (F5) screen.
1.
Access the Item Status screen and scan or enter the existing barcode you wish to edit.
2.
Highlight the item row and select Actions for Cataloguers or Actions for Selected Items and choose Replace
Barcode.
3.
Scan or enter new barcode and click OK.
4.
Your item is displayed on Item Status screen with its new barcode, and the old barcode will no longer retrieve
the item.
Chapter 15. Editing and Maintaining Holdings
171
15.6. Spine Labels
Spine Labels - Single Label Roll
Spine Labels - Label Sheet
Spine Labels - Single Label Roll
1.
Open the Item Status interface.
Circulation → Show Item Status By Barcode
2.
Scan the barcode(s) of all the items you would like to print spine labels for.
Ensure the Trim List (20 rows) box is not checked or only 20 items will listed.
3.
Highlight all the line items.
Chapter 15. Editing and Maintaining Holdings
172
4.
Click Actions for Cataloguers or Actions for Selected Items and choose Print Spine Label.
5.
Use the Spine Label settings to adjust the label to match your physical label's dimensions. Click Re-Generate
to see your changes.
Chapter 15. Editing and Maintaining Holdings
173
These fields are sticky by workstation so the values you set should appear by default.
6.
Click Preview and Print.
7.
Click Print Page.
8.
Depending on your printer settings the spine labels will automatically print to your spine label print or you will
get a pop up asking you to select a printer.
Spine Labels - Label Sheet
A short video on printing spine labels can be found here.
Chapter 15. Editing and Maintaining Holdings
174
1.
Open the Item Status interface.
Circulation → Show Item Status By Barcode
2.
Scan the barcode(s) of all the items you would like to print spine labels for.
Ensure the Trim List (20 rows) box is not checked or only 20 items will listed.
3.
Highlight all the line items.
Chapter 15. Editing and Maintaining Holdings
175
4.
Click Actions for Cataloguers or Actions for Selected Items and choose Print Spine Label.
5.
Click Preview and Print.
Chapter 15. Editing and Maintaining Holdings
176
6.
Open your spine label template in a work processor.
Contact Co-op Support if you require assistance setting up a template.
7.
Click inside the document so the cursor appears in the middle of the first "box".
8.
In Evergreen highlight the first label and copy (Ctrl+C) the text.
9.
Paste (Ctrl+P) the label into the template.
10. Repeat steps 8 and 9 until all the labels appear in the template.
11. Adjust the formatting, fonts, etc. of the labels as desired.
12. Print the page on your label stock.
15.7. Transferring holdings
There are times when you need to move copy records from one title record to another, or move copies from one
volume to another under the same or another title record. This lesson will demonstrate the steps required to achieve
a transfer. The critical step is to ensure that you first mark the destination record. In some cases you may also need
to first create a volume record. Co-op support recommends you read through the process first before starting, as
each scenario has different characteristics.
Transferring volumes
When you want to transfer all items under one call number/volume to another title or another branch under the
same title, you may use Transfer Volume. Evergreen will transfer both call number and all copies under it to the
new title or branch.
Chapter 15. Editing and Maintaining Holdings
177
1.
Find the destination or target record and go to Holdings Maintenance. Highlight your library or branch, right
click and select Mark Library as Volume Transfer Destination. Or you may click Actions for Selected Rows
→ Mark Library as Volume Transfer Destination.
2.
Find the volume record you need to transfer on Holdings Maintenance. Highlight it, right click and select
Transfer Volumes to Previously Marked Library.
3.
Confirm the transfer and click Transfer.
4.
Refresh the screen to see the change, if not automatically done.
Chapter 15. Editing and Maintaining Holdings
178
To do the transfer step, you may also find the item(s) on Item Status (F5) screeen. Click Actions for Catalogurs
→ Transfer Volumes to Previously Marked Library. Both call number and copies will be transferred to the
previously marked destination. You may transfer mulitple records at one time by highlighting all of them.
If the destination title/branch has a volume with the same call number label, the copies will be merged into
that volume.
Holds under the title, volume or copy will not be transferred with the holdings. They need to be manually
transferred to the destination record.
Transferring copies
Sometimes you may need to transfer copy records only from one volume to another, e.g. transferring a copy from
reference collection to circulating collection using a different call number, or transferring one copy from one branch
to another that already has a voume and copy.
1.
To transfer a copy record to another volume, find your target record in the catalogue, and go to Holdings
Maintenance screen.
2.
Find your target volume on the record and right-click on it and select Mark Volume as Item Transfer
Destination. Or you may select Actions for Selected Rows → Mark Volume as Item Transfer Destination.
3.
Go to the catalogue and find the record containing the copy you wish to transfer and go to Holdings
Maintenance. Highlight the record you wish to transfer. Select Actions for Selected Rows → Transfer Items to
Previously Marked Volume. Alternatively, you may do this transfer step by scanning the item barcode into Item
Status (F5)screen and making the same choice from Actions for Cataloguers menu. The screenshot below
is from Item Status screen.
4.
Confirm the transfer details and click Transfer.
You may transfer multiple copies to a previously marked volume on the Item Status (F5) screen by scanning
all copies into the screen, selecting all to highlight, then choosing Actions for Cataloguers → Transfer Items
to Previously Marked Volume.
Chapter 15. Editing and Maintaining Holdings
179
Transferring copies to a title without a call number/volume yet
Sometimes you may need to transfer copies only to a title/branch that does not yet have a volume record or you wish
to use a different call number label. For example, you want to transfer one of the two copies from one branch to
another that does not have a copy. In this scenario you will need to first create a zero copy volume record (a volume
record without any copy record under it) on the destination library/branch.
1.
Find the destination record in the catalogue and go to Holdings Maintenance. Highlight the library/branch and
right click to select Add Volumes or select Actions for Selected Rows → Add Volumes
2.
Add your call number without a barcode, then click either Create with Defaults or Create then Edit to create
the volume record.
3.
Back on Holdings Maintenance screen, highlight this volume record and Mark as Item Transfer Destination
as described above.
4.
Find the copy record to be transferred either via Holdings Maintenance or Item Status screen as above described,
and select Transfer Item to Previously Marked Volume.
Depending on your workflow, you can use the transfer function to transfer Pre-Cat records to MARC records.
You may need to first create a volume record on the destination title record, or at minimum mark a volume as Item
Transfer Destination, then go to Item Status (F5) screen to transfer your Pre-Cat item to the destination record.
You may edit the Circulating Library field on Copy Editor to move a copy to another branch. But the call
number's owning library will remain unchanged. On Holdings Maintenance screen, the item will be displayed
under the call number's owning library.
15.8. Deleting holdings
When adding items to the catalogue, you need to have a bibliographic record first, then you create a volume and
copy record. When you delete holdings you need to follow the reverse order. You need to delete copy records first.
By design and Sitka's configuration, Evergreen will also attempt to delete the volume and bibliographic record.
These records will be deleted if they are not used by other copies/volumes. If you delete your library's last copy, the
volume record will be deleted together with the copy. If this is also the last copy for the title (no other libraries have
a copy), the bibliographic record will be deleted, too. So for most cases, you just need to delete the copy records
only. If possible, Evergreen will delete the volume and bibligraphic records automatically. Occasionally you may
want to delete an "orphan" volume (without any copy) or bibliographic (without any volume) record.
Deleting copy records
If you have the item in hand, the quickest way to delete an item is to scan the item into Item Status screen, accessible
a couple of ways.
Chapter 15. Editing and Maintaining Holdings
180
1.
Select Search → Search for copies by Barcode, or select Cataloguing → Display Item (B), as shown here.
Alternatively, press F5 on your keyboard.
2.
Select the item (s) and choose Actions for Cataloguers → Delete Items.
3.
Click OK.
4.
In this example the alert for last copy is configured. Make appropriate choice based on workflow.
5.
Click OK. Item, volume and MARC record are all deleted in this example, because there was only one copy
and volume record attached to this MARC record.
Chapter 15. Editing and Maintaining Holdings
181
You may also delete copy records from the Holdings Maintenance view.
1.
Find the title on the catalogue and display it on record details screen by clicking the title link on the result list.
2.
Select Actions for this Record → Holdings Maintenance
3.
Click on your item barcode row and select Actions for Selected Rows → Delete Items. Note that in this example
there are 11 consortial items attached to this MARC record.
4.
Confirm deletion at prompt by clicking Delete. Item is deleted. In this case your library’s volume record is
also deleted, as Sitka Evergreen has been configured to do. This Sitka wide setting helps keep the consortial
database free of orphaned volume records. The MARC record, with other consortial holdings, is left intact.
If the item being deleted is the sole copy on this MARC record, the volume and MARC record will be
automatically deleted as explained above. If you have Evergreen configured to alert on last copy, Alert on empty
bib records, the alert would be presented. The alert and the effect of deleting the sole copy on a MARC record
are not affected by how you delete the last copy.
You may also delete copy records by utilizing buckets. The advantage to this method is that you can keep a
record of items deleted by not emptying or deleting the bucket. Please see Section 17.2, “Working with Copies
in a bucket” for more information.
It is Sitka best practice to review status and owning library of items to be deleted. Co-op support recommends
you do this by configuring the column picker, see Column picker, to display status field and owning library field.
If an item is not in an ideal state for deleting, for example checked out, you should not delete the item until that
status is resolved. Mis-scans can result in another library's item presented on your screen. Confirming owning
library is correct will prevent errors. Careful review of your screen for duplicate scans is also recommended.
Transferring your last copy on a bibliographic record to another volume record on a different bibliographic record
will also automatically delete your original volume record, due to the Sitka wide configuration mentioned above.
If your volume and copy were the last holdings attached to the original bibliographic record, the bibliographic
record is also deleted upon item transferring.
Chapter 15. Editing and Maintaining Holdings
182
Delete a volume record without copies attached
Occasionally you may want to delete a volume record without copies attached to it. For example, you may have
created a volume record, but did not add a copy to it. To delete it, you need to find the title. Go to Holdings
Maintenance. Highlight the "orphan" volume record, select Actions for Selected Rows → Delete Volumes. If this is
the last volume, the bibliographic record will be deleted, too.
Delete a bibliographic record without volume/copy attached
You may have created/imported a MARC record, but did not use it for your copy. In such a scenario you may
delete the record. Find the title on the catalogue, select Actions for This Record → Delete Record. The record will
be deleted.
If you do not see any copies under the record, but are prompted that the record can not be deleted, very likely there
are "orphan" volume records still under the title. You need to go to Holdings Maintenance to locate and delete the
volume records. The MARC record will be deleted when you delete the last volume.
Deleted MARC records can be retrieved and undeleted if you know the record's database id. Go to the dropdown
menu Cataloguing → Retrieve Title via Database ID. Type in the record id. Once the record is displayed (with
red coloured background), select Actions for This Record → Undelete Record to undelete it.
Co-op support regularly cleans up volume records without copies and bibliographic records without copies or
volumes.
Chapter 15. Editing and Maintaining Holdings
183
Chapter 16. Copy Alerts
This lesson explains when you might use a copy alert, how to create one and how to remove one. It also illustrates
what copy alerts look like in the Item Status screen, at checkin, and checkout.
Copy alerts are a useful type of alert for a physical copy of an item. For example, you might create a copy alert
when one piece of a four-part kit is missing. You might use a copy alert when you are checking out an item to a
patron and notice that the spine label needs to be replaced. You might create a copy alert when you notice that an
item has been damaged. When the item is checked in or out, the alert will pop up on the screen.
Creating copy alerts
1.
Select Search → for copies by Barcode, or use the keyboard shortcut F5.
2.
Scan in the item barcode.
3.
Select the row, and under Actions for Selected Items, select Edit Item Attributes.
Chapter 16. Copy Alerts
184
4.
The item will be loaded into Copy Editor. Add an Alert Message, click Apply and Modify Copies.
Copy alerts must be manually removed. Follow the same process to remove a copy alert.
It is possible to add or remove copy alerts to multiple items by scanning them into the Item Status screen. At
Step 3, instead of selecting one item, you can select all of the items you wish to change by highlighting the
first item in the list, holding down the Shift key and clicking on the last item. To select several, non-sequential
items, hold down the Ctrl key and click on the items you wish to select.
What copy alerts look like
If you scan this item in the Item Status screen, you will see the copy alert.
Chapter 16. Copy Alerts
185
When this item is checked out, the copy alert will look like this:
When this item is checked in, the copy alert will look like this:
Chapter 16. Copy Alerts
186
Chapter 17. Copy Buckets
Buckets is the name for a batch change functionality in Evergreen, or for a function that groups records in one
place. Batch changes allow you to group together many records and enact changes on them all at once, instead of
individually editing them. Buckets can also be used to create pull lists. Buckets allow you to track and work with
your materials in arbitrary ways and more easily collaborate with others.
This chapter will demonstrate a variety of ways in which you can manage your records with Buckets.
Currently there are copy and title record buckets. You may work on copy records with Copy Buckets and MARC
records with Record Buckets.
Some possible uses for buckets are batch editing items, deleting items, and grouping like items temporarily to change
their status or to create bibliographies and pull lists. While you can batch edit records a variety of ways in Evergreen,
using common Windows functions such as select all and edit, buckets are useful for keeping records together over
a period of time. For example, if you scan 20 items into the Item Status screen you can batch edit or delete from
there by selecting all, but you have to enact those changes right then while records are all together on the screen.
By utilizing Evergreen’s bucket functionality, you can create a bucket and add records to that bucket, and they stay
there until you are ready to work with them, whether that be immediately or days later. Adding items to a bucket
is like creating and saving a query. The record being in a bucket does not affect normal library functions such as
circulation, as being in a bucket is not a status.
Buckets can be shared or private, and are associated with a login.
Deleted records are not automatically removed from buckets. It is recommended that you always display
Deleted? field in Bucket View.
When a bucket is retrieved, all information about the records in it is transferred to the workstation. It consumes
the computer's resources. It is recommended that a copy bucket contain no more than a few hundred records.
Chapter 17. Copy Buckets
187
17.1. Adding Copy Records to Copy Buckets
You may create a copy bucket by going to the dropdown menu Edit → Copy Buckets. Click New Bucket. You may
also create a new bucket when attempting to add an item to a bucket.
To add items to a bucket, select or create a bucket in the Bucket View first. Scan item barcodes into the box in the
Pending Copies pane shown on the above screen. Select Add All or Add Select to move pending items to the selected
bucket in the lower pane. Use Ctrl or Shift with mouse clicking to select multiple items.
Copy record is now in the selected bucket.
You may also add copy records to a bucket when they are displayed on some other screens, such as Holdings
Maintenance, Item Status, Check In and Items Out in patron accounts. Add Items to Buckets is included in the actions
list on these screens.
Chapter 17. Copy Buckets
188
To add a copy record to a copy bucket from the Holdings Maintenance screen, highlight the item and choose Actions
for Selected Rows → Add Items to Buckets.
You can either add to an existing bucket, or a new bucket.
To add copy records to a copy bucket on the Item Status (F5) screen. From the Item Status screen select required
record(s) and choose Actions for Cataloguers → Add to Item Bucket, as shown below, or choose Actions for Selected
Items → Add to Item Bucket.
Chapter 17. Copy Buckets
189
You may highlight multiple items and add all of them to a copy bucket at one time.
17.2. Working with Copies in a bucket
Once you have your records in a bucket there are a variety of functions you can do from within that bucket.
One of the most common functions is to batch edit records. This example demonstrates batch editing the shelving
location of a handful of copy records.
1.
Access your Copy Bucket view by choosing Edit → Copy Buckets, or Cataloguing → Manage Copy Buckets.
2.
Select appropriate bucket from drop down menu.
3.
When bucket is displayed, click Edit Item Attributes.
Chapter 17. Copy Buckets
190
4.
The Copy Editor window opens. Note all the barcodes, different call numbers and shelving locations are
displayed.
5.
Select required shelving location and click Apply, just as if editing one record.
6.
Click Modify Copies at bottom right of screen.
Chapter 17. Copy Buckets
191
7.
All your items’ shelving locations have been changed.
This screenshot shows some of the other functions you can do from within a Copy Bucket. If you are deleting
items it is good practice to display Item Status field from the Column picker, and confirm suitable status of
items to be deleted.
17.3. Removing a Copy from a Bucket
To remove a record from a bucket, on Bucket View, select the item and click Remove Selected from Bucket.
You may move some items to the pending area by selecting them and clicking Add Selected beside Remove Selected
from Bucket. You may temporarily remove these items from the bucket to apply changes to the remaining items,
then move these items back to the bucket once the editing is done. Or you may retrieve another copy bucket and
add the items to it.
Chapter 17. Copy Buckets
192
17.4. Retrieving Shared Buckets
1.
Access copy bucket management screen by going to Edit → Copy Bucket.
2.
In drop down menu beside Choose a bucket… select Retrieve shared bucket.
3.
Enter bucket number as told to you by the bucket creator and click OK.
4.
The requested bucket is displayed. Note bucket number and owning library is displayed.
5.
You are now able to work with the records in the bucket.
Bucket numbers are assigned by Evergreen. Bucket number and owner are displayed whenever a bucket is
retrieved.
Chapter 17. Copy Buckets
193
Chapter 18. Adding Bibliographic Records to the Database
When there is no matching MARC record for your item, you may import one from the Z39.50 sources or the files
supplied by your vendors. Or you may create a new MARC record if you can not find one from other sources.
18.1. MARC Records via Z39.50 Interface
It is good practice and Sitka policy to check the Evergreen database for existing records before importing a record.
You may search the catalogue first. Or you can configure the Z39.50 screen to search the Sitka Evergreen database
as well as multiple Z39.50 targets at once. If searching Evergreen via the Z39.50 screen and you find a record, it
is best practice and Sitka policy to then find that record in the catalogue and attach your holdings to it. If you have
confirmed that there is no record in Evergreen that matches the item in your hand, but have found a record in another
database, simply import the new record into Evergreen and then attach holdings.
18.1.1. Importing Records via Z39.50 Interface
1.
To access Z39.50 interface, select Cataloguing → Import Record from Z39.50
Chapter 18. Adding Bibliographic Records to the Database
194
2.
Select single or multiple pre-configured Z39.50 targets from the list. Note that most free targets do not have
a User name or Password field. Some free targets and the subscription services held by some Sitka libraries
require login. Once you have made your choices, click Save as Default to save the services you usually search
and any user names and passwords you have entered. They will be automatically selected the next time you
open the Z39.50 screen.
3.
Fill in preferred search criteria and click Search. Note that the active search fields will change depending on
the targets you select. Different targets may support different search types. For instance, Keyword and Subject
will only be active if the local catalogue is selected. When you select multiple targets to search, an active box
may apply to only one target.
Chapter 18. Adding Bibliographic Records to the Database
195
4.
Search results are displayed in the lower pane. You may click on Hide Top Pane to make more space for the
result list. You may Fetch More Results, if applicable. Information about each retrieved record appears on a
separate summary line, with various columns of information. If a cover image is available, it will display as
well. The Service column indicates where the record was found. If “native-evergreen-catalog” is listed in this
column, the record is in Evergreen. You may view MARC records, choose to import or overlay MARC records.
This example demonstrates importing a record.
To import a record, choose the record from the results list that you would like to import. You should view
the record first by choosing MARC View. When you are sure you have chosen the correct record to import,
click Import.
Sitka has profiled certain fields, primarily 9xx fields, to be automatically stripped when records are
imported through Z39.50. The default fields that are stripped are 906, 923, 925, 936, 948, 955, 959, 963.
Please contact Co-op support if you would like to see additional fields automatically stripped.
Chapter 18. Adding Bibliographic Records to the Database
196
5.
The record opens in the MARC Editor. From here you can edit fixed and bibliographic fields. Note that you
may also select Fast Item Add and input call number and barcode data from this screen. Once your edits are
complete, click Import Record.
6.
Copy Editor will be loaded for you to edit the item record.
7.
Once the item record is saved, the imported MARC record and the newly created item record will be displayed
on Record Details screen.
If you did not utilize Fast Item Add as described above, the Copy Editor will not be loaded. Instead, the newly
imported record will be displayed in a new tab. You may now attach holdings as described in Chapter 14, Adding
Holdings to Existing Records in the Sitka Database.
18.1.2. Overlaying Records via Z39.50 Interface
There are times when it is necessary to overlay an existing MARC record in Evergreen with a better MARC record
from a Z39.50 target. This lesson will demonstrate the steps required to achieve an overlay. Overlaying a MARC
record replaces an existing MARC record and leaves all holdings, and corresponding holds, active circulations, bills,
and fines intact. As overlay affects all libraries sharing a MARC record it is critical that this procedure be done
judiciously and correctly. Please refer to Sitka’s cataloguing policy, Co-op support, or your library’s cataloguing
mentor, if in place, for more information about this process and its effect on the shared database.
Marking a Record for Overlay
You must first identify the MARC record in Evergreen, which you wish to be overlaid. You do this by “marking”
it for overlay. The marked-for-overlay effect is temporary for a login session, and only one record at a time can be
marked. When you mark another record, the previous record is unmarked. Once a record is marked, it stays marked
until it is overlaid, or another record is marked, or you log out of Evergreen. Therefore, you can mark and overlay
one record at a time, following through the entire process to completion before moving on to another record.
Chapter 18. Adding Bibliographic Records to the Database
197
1.
Select Cataloguing → Search the Catalogue, Search → Search the Catalogue or press F3 to search Evergreen
for the record that needs to be overlaid. It is best practice to start with a fresh search screen so that all prior
searches are cancelled. This ensures the correct title record is opened and marked.
2.
Click on title link to display the record details. It is important that you ensure the record is fully loaded on
screen and displaying title information for the correct record in the top Record Summary area.
3.
Select Actions for this Record → Mark for Overlay. Record is now “marked”. You will see "Record with TCN
xxxxxxxx Marked for Overlay" displayed at the bottom of the screen.
Overlaying Using Z39.50
1.
Go to Import Record from Z39.50 to find a target record as described in Section 18.1.1, “Importing Records via
Z39.50 Interface”. This record should be a fuller and better catalogued record than the one you are overlaying.
You may select potential records on the list based on the summary. Click on MARC View to see the full MARC
record. Go back to Result View to highlight your selected target, then click Overlay. You are then given the
opportunity to edit the record before overlaying.
Chapter 18. Adding Bibliographic Records to the Database
198
2.
The record opens in the MARC Editor. From here you can edit fixed and bibliographic fields. Note that you
may also select Fast Item Add and input call number and barcode data from this screen. Once your edits are
complete, click Overlay Record. Below screen shows the MARC record in Flat Text Editor.
3.
Next, you are asked to confirm that the marked record is the one you want to overlay. You can view the record
at this time. Confirm that this is the correct record by clicking Overlay.
4.
You have successfully overlaid the record. The Copy Editor will be loaded if you have chosen to Fast Add
Item, or you will see the bibliographic record displayed in a new tab.
Chapter 18. Adding Bibliographic Records to the Database
199
You may search the Evergreen database by searching Local Catalogue on the Z39.50 interface. On the result
list, you may highlight a record and mark it as the overlay target by using the Mark Local Result as Overlay
Target button. Before you do so, you need to view the full record to make sure this is the correct record to be
overlaid. If you wish to check holdings, you may use the Show in Catalgoue button to display the record in the
catalogue in a new tab.
If the record that you wish to overlay contains local information, e.g. tag 590 or 690, you need to manually add
these tags to the record you intend to import. You may add the tags before overlaying. Or, you may import the
record first, then merge the two records. When merging the records, the two records will be displayed side-byside on screen, which makes it easier to copy over the local tags from the non-lead record.
18.2. MARC Batch Import
18.2.1. Import MARC Records
If the title records you need are not already in the Evergreen database it is possible to upload vendor-supplied MARC
files into Evergreen. Each file may contain one or more MARC records. During the uploading process, Evergreen
matches each record in the file with existing records in Evergreen based on pre-defined match points called Record
Match Sets. Records without matches may be imported directly into the catalogue. Records with matches must be
examined by cataloguers. Due to the nature of Sitka's shared database, the Co-op suppport strongly advises against
allowing Evergreen to select a merge target and cautions you to adhere to instructions for selecting a match as
outlined in this chapter.
During the importing process, all records in the file are first uploaded to the server and kept outside the catalogue
as a queue, which is viewable on the MARC Batch Import/Export → Inspect Queue screen. Cataloguers can view
both the incoming and existing matching records to decide which one to use. You may merge the records with either
the incoming or existing record as the lead while keeping some MARC tags in both records. Overlay/Merge Profile
decides how two records are merged.
Do not load a MARC file of more than 1000 records, as the importing process can time out. If you have more
than 1000 records, please break into multiple files.
Holding records can be created if the incoming MARC records contain holding information in pre-defined format.
Contact Co-op support about the acceptable format if you want to load holding records.
All records in a queue can be exported to a CSV file or printed in non-MARC format (emailing is not available yet).
All records imported from a single queue can be added to a Record Bucket.
There are some settings, namely Record Display Attributes,Record Match Sets, Merge/Overlay Profiles and
Import Item Attributes on this screen that are reserved for Sitka server administration. You should not attempt
to edit them as they affect all bibliographic records.
Record Display Attributes set what fields will display on Inspect Queue screen, once a file of records have been
loaded. Important descriptive MARC tags and control numbers are selected to display.
Record Match Sets are profiles set up by Sitka to allow for different match points to be used when loading
records. The default profile is SitkaMatch. It matches on the 901c (record id), 010a (LC Control Number), 020a
Chapter 18. Adding Bibliographic Records to the Database
200
(ISBN), 022a (ISSN), or 035a (System Control Number). It is used in the majority of record loads. The other
profiles are only used to load special records. Please contact Co-op support for which profile to use if your
records require a set of different match points to load.
Merge/Overlay Profiles control how the incoming and existing MARC records are merged. Two profiles have
been created for all Sitka libraries to use: Merge Using INCOMING Record and Merge Using EXISTING Record.
• Merge Using INCOMING Record: all tags in the INCOMING record will be brought into the final record.
Tags: 092, 590, 690, 852 and 856 in the ORIGINAL record will be preserved in the final record. The rest
will be removed.
• Merge Using EXISTING Record: all tags in the ORIGINAL record will be kept. Tags: 092, 590, 690, 852 and
856 in the INCOMING record will be brought into the final record. The rest will be removed upon merge.
These profiles ensure local data in these five fields in a merged MARC record is never overwritten, and holding
records (in tag 852) can be loaded to either the existing MARC record or with the incoming record.
Import Item Attributes are profiles set up by Sitka to allow importing of item records with vendor supplied
MARC records. The vendor will need to send item level information in a local MARC tag and subfields (eg.
9xx or 852), and this information can be mapped into item records when the bibliographic records are loaded.
Please contact Co-op support if you are interested in loading item records with your bibliographic records.
18.2.2. Uploading MARC Record Files
1.
Select Cataloguing → MARC Batch Import/Export
2.
The MARC File Upload screen opens.
Chapter 18. Adding Bibliographic Records to the Database
201
You may create a new queue for the file you are to upload or append the file's records to an existing queue.
To create a new queue, type in a name for your file in the box beside Create a New Upload Queue. To append
records to an existing queue, choose a queue from the dropdown list beside Add to an Existing Queue.
Do not use "/" or "\" (slash or backslash) in import queue name.
3.
Leave SitkaMatch in Record Match Set box.
The NoMatch profile matches records on tag 901$c only, and should only be used after a false match is
detected using SitkaMatch as described below. Sitka cataloguing policy strives to avoid record duplication
so Sitka policy requires batch imports use SitkaMatch first.
4.
Choose a Holdings Import Profile from the dropdown list if your MARC records include holdings information
and you wish to load it.
Chapter 18. Adding Bibliographic Records to the Database
202
You need to contact Co-op support for holding information format before asking your vendors to include
it in the MARC records.
5.
Select a Record Source from the dropdown. The default is oclc, but choose the one that best matches your file
(eg. ULS, Whitehots etc.) Contact Co-op support if you need to load records for non-physical items, such as
an e-record collection like ebrary.
6.
You do not need to choose a Merge Profile now.
7.
Check Import Non-Matching Records box to automatically import records without matches into the catalogue.
Co-op support strongly advises that you do not select other import options. These options allow Evergreen
to automatically merge records before you inspect them. It is best practice to inspect the potentially merged
records first.
If you want to view your incoming records first without importing any, you may leave Import NonMatching Records box unchecked. You will be able to view all records in the file on Inspect Queue and
import all/selected records with/without matching records there.
8.
You do not need to select any of the checkboxes in Copy Import Actions now.
9.
Click Browse... to choose the source MARC file on your computer, then click Upload. Depending on the size
of the file, it may take a while for the uploading to finish. Once it is finished, records will be displayed in
Inspect Queue view. You may continue to examine and import records in the queue as described below. Or
you may come back later to find the queue to examine and import the records.
Records in a queue are saved on the server, but outside the catalogue. By importing, you bring the records
into the catalogue.
18.2.3. Importing and Merging Records from Queues
If you want to import records from queues uploaded before, go to Cataloguing → MARC Batch Export/Import,
then click Inspect Queue. Click the queue that you wish to examine and import records from. The Queue Summary
screen will open.
If you continue to import records right after uploading the MARC file, the Queue Summary screen is loaded after
you uploaded the file.
Chapter 18. Adding Bibliographic Records to the Database
203
1.
The Queue Summary shows the total number of MARC records in the queue, and items contained in these
records, if any, how many of them have been imported, and how many of them encountered an error when
Evergreen attempted to import them.
Queue Filter allows you to display only the selected type of records in the table below.
A selected number of records (10, 20, 50, 100) are displayed per page. Use the dropdown list beside Records
per Page to select your preferred number. Use Previous and Next to flip over the page.
The records in the queue can be exported in non-MARC format via the method selected from the Export Queue
As dropdown list. (Exporting via email is not currently functional.)
If you imported items via the MARC records, you may view them by View Import Items.
You may add all imported MARC records in the queue to a Record Bucket by using Copy to Bucket.
2.
You can view both incoming and existing match records, if any, to determine which record to use. The links
in View MARC column lead you to the incoming records, while records in the Matches column link to existing
records. A blank in the Matches column means no match record has been found.
3.
Click the blue coloured View MARC link to view the incoming record. You may edit it before importing by
clicking Edit. Once editing is complete, click Save Changes. Click Return to go back to the Record Queue
screen.
Chapter 18. Adding Bibliographic Records to the Database
204
4.
On Record Queue screen click the blue coloured Matches link to view the match record. This takes you to the
following Import Matches screen.
5.
On the Import Matches screen, you will see the match record's ID number and some non-MARC information.
Click View MARC. The existing MARC record is displayed in view mode. You can not edit it. Once done,
click Return to go back to the Import Matches screen.
Match Score is the total score from all matched fields specified in the Record Match Set.
This list shows the matching points and the scores assigned to each point of SitkaMatch. Match scores are
used to indicate how well two records are matched. For example, if two records contain the same value in
tag 901$c, highly likely they are matches. So tag 901$c is assigned a very high score. If the incoming and
existing records match on tag 010$a and 020$a, the match score will be 600.
6.
Upon inspecting both incoming and existing record(s), if the match record is a true match but a brief record,
you may mark the match MARC record as a merge target by selecting the checkbox in front of the record in
the Merge Target column. Click Back to Import Queue once done.
If the match record in Evergreen is a true match but a full record, Sitka policy requires you to use the existing
record instead of importing another. Do not import the record.
However, if the incoming record contains local information in tags 092, 590, 690, 852 or 856 that you want to
bring into the existing record, such as loading holding records to existing MARC records, you need to mark
the match record as a merge target. In this scenario you would use the Merge Using EXISTING Record merge
Chapter 18. Adding Bibliographic Records to the Database
205
profile as described in next step. If you are interested in loading holdings/item information, please contact Coop support to set it up.
7.
If you have marked a merge target, the record is shown as selected once you are back on the Record Queue
screen.
You may inspect other records on the list. Once finished inspecting the list, click Import Selected Records
under Queue Actions.
8.
You are prompted to select import options. Make your choices and click Import.
For Merge Profile, choose one of the following based on which record should be the lead.
Chapter 18. Adding Bibliographic Records to the Database
206
• Merge Using INCOMING Record: uses the incoming record as the lead. Information in existing record in
tags 092, 590, 690, 852 (holdings) and 856 will be kept.
• Merge Using EXISTING Record: uses the existing record in the catalogue as the lead. Information in the
incoming record in tags 092, 590, 690, 852 (holdings) and 856 will be kept. Use this profile when you attach
holdings in your MARC file to existing Evergreen MARC records.
If you have marked a merge target, you do not need to select any further import options. The marked target will
be merged. If you have not already imported non-matching records you can now select Import Non-Matching
Records.
Merge On Exact Match (901c), Merge On Single Match, and Merge On Best Match are designed to allow
Evergreen to programmatically select the best match. Due to the nature of Sitka's shared database, Sitka
support strongly advises against allowing Evergreen to select a merge target and cautions you to adhere
to instructions for selecting a match as outlined above.
Do not use Best/Single Match Minimum Quality Ratio or Insufficient Quality Fall-Through Profile at this time.
If you have On Order brief item records and wish to overlay them with full item records loaded via the MARC
records, you need to select checkbox Auto-overlay On-order Cataloguing Copies. Evergreen will overlay the
items having matching circulating library and On-order status.
If you load items for multiple branches or a branch other than your working location, you need to select
checkbox Use Org Unit Matching in Copy to Determine Best Match, too.
The option Auto-Overlay In-process Acquisitions Copies should only be used if you are working with onorder line items created in the Acquisitions module. For more details please see Auto-Overlay In Process
Acquisitions Copies
9.
Once the records are imported, the display is back on Queue Summary screen. You will see the Import Time
column is filled in for the selected records. The imported record id is displayed in Imported As column.
A record can be imported only once.
Sitka has profiled certain fields, primarily 9xx fields, to be automatically stripped when records are
imported through Batch Import. The default fields that are stripped are 906, 923, 925, 936, 948, 955, 959,
963. Please contact Co-op support if you would like to see additional fields automatically stripped.
18.2.4. Managing Queues
Click Cataloguing → MARC Batch Import/Export. The default screen is Import Records. Click Inspect Queue tab
to manage and view existing queues used in MARC Batch Import.
Under Inspect Queue you can click on an existing queue to view and import records that have already been queued
for importing or simply view records that have already been imported.
To manage the queues, you can batch delete from the Inspect Queue interface by checking the box in front of the
queue name and then choosing Delete Selected.
Chapter 18. Adding Bibliographic Records to the Database
207
18.3. Sitka’s Minimum MARC record
As there is an approved minimum level for original MARC records, the following may assist you when creating
original MARC records in Evergreen. For more detailed information on MARC standards, the Library of Congress
has the authoritative website at http://www.loc.gov/marc/
Chapter 18. Adding Bibliographic Records to the Database
208
Here is an example of a MARC record that meets and exceeds minimum cataloguing standards for a book in a series.
Standard Numbers. 010 Library of Congress Control Number (LCCN) is the control number for MARC records
distributed by the Library of Congress. Can often be found in the Cataloging in Publication (CIP) information on
verso page of a book. Can be useful searching number.
020 International Standard Book Number (ISBN) is a unique number assigned to items by publisher. Can be 10 or 13
digit number. Sitka support and training team recommend searching Evergreen and Z39 targets, by both numbers, if
present on item, before proceeding to original cataloguing. When cataloguing an item, if both numbers are present,
enter both in separate 020 tags.
022 International Standard Serial Number (ISSN) is a unique number assigned to a serial title.
024 Universal Product Code (UPC) is a twelve digit number often assigned to sound recordings and videos.
028 are Publisher Control Numbers, formatted numbers used for sound recordings, printed music, and
videorecordings.
Classification Numbers. Evergreen does not display call numbers from the shared MARC record, but the data
is useful for searching, matching, and assessing quality of a MARC record. Evergreen uses each library’s volume
record for local call number display, and will give you the option to auto-fill your number from the MARC record
if you want to use that call number as yours.
05X are standard classification (call) numbers that are, or can be, present in a MARC record. The most common
are the 050, which is the Library of Congress Classification Number (LCC), assigned by the Library of Congress,
and the 055, which is the Canadian LCC.
082 is the Dewey Decimal Classification number (DDC).
090 and 092 are tags reserved for a library’s local call number. This data is not used by Evergreen for call number
display, but you will often see data there from a different library whose system may use the MARC record for call
number display.
Chapter 18. Adding Bibliographic Records to the Database
209
Title. 245 tag contains all the important title information and General Material Designations (GMD). 245 subfields
a and b are title and sub-title respectively, 245c contains the statement of responsibility, and 245h is for approved
GMDs. Note, for RDA records, the GMD is no longer used; instead the tags of 336, 337 and 338 are used (see below).
Edition Statement. 25X tags contain important descriptive information about the item being described. This
information includes edition statement, imprint and other publication source information.
Publication Information. 260 tag and subfields a, place of publication, b, name of publisher, and c, year of
publication, contain critical publication information and should be as complete as possible. When assessing record
matching the 260 tag should always be considered. Note, for RDA records, the 264 tag (with a second indicator of
1) most often is used instead of the 260.
Physical Description of Item.
300 tag is used to physically describe an item as completely as possible.
Content, Media and Carrier type (RDA only) . 336, 337, 338 tags are used for RDA records only. The fields
of content, media and carrier collectively replace the GMD (245$h). For 336, subfield $a is content term and $2
rdacontent. For subfield 337, $a is media term and $2 is rdamedia. For 338, $a is carrier term and $2 is rdacarrier.
See here for appropriate RDA terms.
Series Information. 440 and 490 are used to describe relevant series. 440 was officially made obsolete in 2008,
but you will still find it used in records that predate 2008, but for correct, current series cataloguing use the 490 tag.
Notes. 5xx tags are useful, keyword searchable notes tags, which assist in description and retrieval of items. Use
the 500 tag for a note that cannot be placed in any other 5xx tag as per MARC standards.
Subjects. 6xx contain subject headings that follow standards for personal, topical, geographical, and genre terms.
Use 690 for local, non-standard subject headings.
Hovering your mouse over a MARC tag in MARC Edit view presents a short description of the tag and its intended
use. You can also hover over a subfield and retrieve textual information about the subfield’s intended use.
18.4. Creating New MARC Records
It is best practice, and Sitka policy, to search Evergreen, Z39.50 sources, or, in some libraries, a vendor file of
MARC records, before using a MARC record template for original cataloguing. You can create new MARC records
Chapter 18. Adding Bibliographic Records to the Database
210
in Evergreen by using MARC templates that exist in Evergreen. Original cataloguing should be done in Evergreen
only if there is no record available in any of these previous sources.
For information about working with MARC records see Chapter 19, Editing and Maintaining MARC records.
1.
To access MARC templates select Cataloguing → Create New Marc Record.
2.
The MARC Template screen opens. Click into drop down menu field to see available templates. Note you can
select a workstation default here. Templates are available for book, music, audio, video and serial and are in
both the AACR2 and RDA standards.
3.
Select appropriate template and click Load.
Chapter 18. Adding Bibliographic Records to the Database
211
4.
A blank MARC record will load. In this example we have chosen a book template so MARC leader coding
is for textual materials.
5.
Complete the MARC record as per Sitka policy. You can add and delete tags and subfields as required. See
Chapter 19, Editing and Maintaining MARC records.
6.
Click Create Record.
7.
The record is created and will open up in your tab in the current default view. If you did not utilize Fast Item
Add, you may now attach holdings as described in Chapter 14, Adding Holdings to Existing Records in the
Sitka Database.
18.5. Cataloguing non-physical resources
Ordinary bibliographic records are only visible in the OPAC when holdings records are attached, but it is also
possible to catalogue non-physical resources such as websites, online journals, or downloadable audiobooks. The
steps below describe how to catalogue a non-physical resource so it appears in OPAC searches.
These instructions are for adding individual records. To upload a batch of records (e.g. from an e-book
subscription) please contact Co-op support. For libraries that subscribe to OverDrive Co-op support creates and
updates bibliographic records automatically.
1.
Locate, import, or create a bibliographic record as described in the preceding chapters.
2.
Open the record in MARC Edit view. Select Actions for this Record → MARC Edit.
3.
Add an 856 tag to the MARC record. Place the cursor in the desired location and press CTRL+Enter to add
an empty row. Enter the tag number (856). You must set the first indicator to 4, and the second indicator to
Chapter 18. Adding Bibliographic Records to the Database
212
0 or 1. The indicators cannot be left blank. For information about indicators see http://www.loc.gov/marc/
bibliographic/bd856.html.
4.
5.
Add applicable subfields from the table below. Press CTRL+D to add a new subfield (CTRL+I on MAC OSX).
Subfield code
Description
Example
OPAC display
$u
Required; the URL or link to the resource
http://
Appears as a link in the OPAC
www.linktoresource.ca
display; the link text is the URI
unless subfield $y is specified
$y
Optional; a display label for the link
Click for access Appears as the text of the link
instead of the URL defined in $u
$z
Optional; a public note providing more
information about the resource
library card
and password
required
Appears in parentheses to the
right of the link
$9
Required; your library code
BBI
Not displayed in the OPAC but
required for the record to be
included in searches scoped to
your library
After the tag 856 is added, the record will be displayed as search result on OPAC for the library in $9. The
image below shows a sample 856 tag and the corresponding OPAC display. This record would appear in OPAC
searches of the Bowen Island Public Library catalogue (BBI).
A separate 856 tag should be added for each library that catalogues the resource. Multi-branch libraries may add
a single 856 using the code for the library system (e.g. SCRL, BCREK) if all branches are allowed to access
the resource.
Evergreen creates an invisible call number for each tag 856 with subfield 9 with the code in subfield 9 as the
owning library. This call number, like a copy record, is used for scoping the seach result to a selected library.
To remove a non-physical record from your library's collection, you need to delete your library's tag 856. If
your library's tag 856 is the only one, you may delete the MARC record. See Deleting MARC records for more
information.
Chapter 18. Adding Bibliographic Records to the Database
213
Chapter 19. Editing and Maintaining MARC records
The appropriate title information displayed on OPAC, such as format icons for text, moving pictures and sound
relies on correct MARC coding in the leader, and 007 and 008 fields, as do OPAC search filters, such as publication
date, item type, or target audience. Bibliographic records matching and de-duplicating also rely on correct MARC
coding and consistency in use and content in particular MARC tags, so the ability to edit and manage MARC records
is key to maintaining database integrity.
Evergreen allows you to edit MARC tags, sub-fields, and indicators, as well as an easy entry box to edit parts of
the leader and 008 fields on a built-in form called MARC Editor. Besides, it also provides a text based editor, which
allows you to easily add or remove tags, and/or edit the fields. But you need to pay close attention to the position
of the tags, indicators and the spacing required to preserve the record structure.
19.1. Editing MARC Records
1.
To edit a MARC record, retrieve it on the catalogue. Once record is displayed on Record Details screen, select
Actions for this Record → MARC Edit.
You can set MARC Edit as default view by clicking Actions for this Record → Set bottom interface as
Default. To revert to your default display from a different display, choose Actions for this Record → Reset
Display.
Chapter 19. Editing and Maintaining MARC records
214
2.
MARC record is displayed. Use scroll bar on right to move record up and down on screen.
3.
Depending on your preference, you can select Stack subfields to change the way subfields are displayed.
4.
Now the subfields are in separate rows.
Chapter 19. Editing and Maintaining MARC records
215
5.
To add or remove rows, or replace tags, click the Help button to find the keyboard shortcuts. Move the cursor
to appropriate positon, then use the keyboard shortcut.
Ctrl + F6 and CTRL + F7 may erase the content in exisiting 006 or 007 tag. It is strongly recommended
you add these tags on the Flat-Text Editor.
6.
To work with the data in a tag simply click or Tab into required field.
7.
To call up the diacritic palette you can use keyboard shortcut: CTRL S.
8.
To edit indicators, click or Tab into required field and right click to view correct indicators and enter appropriate
data.
9.
Once your edits are complete, click Save Record.
To access the Flat-Text Editor, select the checkbox in front of it. To switch back to the form editor, de-select it.
On Flat-Text Editor, each line stands for a tag. The tags, indicators and their values are at fixed positions. If
there is no value at a position, you will see "\" as a spacing taker. For positionally defined tags, such as 007
Chapter 19. Editing and Maintaining MARC records
216
or 008, you will see "\" in the field content area, too. You need to replace it with the content you want to put
in, when necessary.
19.2. MARC Record Leader and MARC fixed field 008
Parts of the leader and the 008 can be edited in the MARC Editor via the fixed field editor box displayed above the
MARC record in default MARC Edit view, and at top of record in Flat-Text Editor view. Information about the
leader and the 008 can be found on the Library of Congress’s MARC Standards page at http://www.loc.gov/marc/
To edit the fixed fields, it is easiest to use default MARC Editor view and click on the name of the field. In FlatText Editor view, you must place the cursor at the correct position in the number to edit. When you click on the
field name , e.g. Date1, what you type will appear in the box. When you click on the field box itself, you have to
backspace your cursor to the very beginning of the box in order to type, because there are space takers in these
positionally defined fields. Right-clicking in certain fields such as Type, BLvl, Form, Audn, and Lang will show
a drop-down menu of possible choices.
Co-op support advises that Evergreen's fixed field editor requires 4 spaces be input into ills box that corresponds
to position 18-21 in the 008. Use your space bar to enter spaces required to meet this convention, or your edit
to the illustrated box will not be saved in the 008. Once the four spaces are filled, the value will automatically
show up in the 008 and will be saved. Contact Sitka support if you have any questions.
The format filter (eg. Books, E-Books, Audiobooks, Videos etc.) and format icons in the OPAC rely on accurate
coding in the Leader, 008 and 007. Please see the format filter and icon specifications in Section 19.3, “Format
Filters and Format Icons”
1.
Retrieve and display record in MARC Edit view as described in Section 19.1, “Editing MARC Records”.
Chapter 19. Editing and Maintaining MARC records
217
2.
Click into any box displayed in the fixed field editor. In this example we are editing the first position, the Type
or Format box, to describe the format of the resource, textual material, by use of an “a”.
3.
Right-clicking in the box will show a list of possible values (eg. BLvl, Type, Form Audn, and Lang). Choose
from this list to populate the box.
Chapter 19. Editing and Maintaining MARC records
218
4.
You can press the Tab key or use the mouse to click through to each field, and can delete and add text as
required by backspacing or highlighting existing text and over typing. Here the publication date is being edited;
OPAC searches filtered by date rely on correct coding in the 008.
5.
Click Save Record.
Chapter 19. Editing and Maintaining MARC records
219
The OPAC icon for textual materials is displayed as in the example below.
A correctly coded moving image record for a video or DVD would look like this in the MARC Edit view, with g
entered in the Type field.
The record would display in the catalogue with the movie icon and searches filtered by Item type, video recordings,
would retrieve this record.
19.3. Format Filters and Format Icons
Format Filter Groups and Format Icons are configured at the Sitka level.
Chapter 19. Editing and Maintaining MARC records
220
• item_type (Type) is Leader position 06
• bib_level (BLvl) is Leader position 07
• item_form (Form) is 008 position 23
• vr_format is 007 position 04
• sr_format is 007 position 03
The format filter is used by the OPAC to allow staff and patrons to limit their search by material format. The
following table shows the fixed fields associated with each format filter value.
Table 19.1. Format Filters
Label
Fixed Fields
All Audiobooks
item_type(i)
All Books
item_type(a,t) AND bib_level(a,c,d,m) but NOT item_form(a,b,c,f)
Audiobooks (electronic)
item_type(i) AND item_form(o,q,s)
Audiobooks (physical)
item_type(i) AND sr_formt(l,f)
Books (electronic)
item_type(a,t) AND bib_level(a,c,d,m) AND item_form (o,q,s)
Books (large print)
item_type(a,t) AND bib_level(a,c,d,m) AND item_form(d)
Books (physical)
item_type(a,t) AND bib_level(a,c,d,m) and NOT item_form (a,b,c,f,o,q,s)
Kits and Mixed Materials item_type(o,p,k)
Maps
item_type(e,f)
Music (CD, cassette)
item_type(j)
Music Scores
item_type(c,d)
Pictures
item_type(k)
Serials and Magazines
bib_level(b,s)
Serials and Magazines
(electronic)
bib_level(s) and item_form(q,o,s)
Software and Video
Games
item_type(m)
Toys, Puzzles and
Equipment
item_type(r)
Videos (DVD, VHS, Blu- item_type(g)
ray)
The format icons show in the search results and record display in the catalogue. The following table shows the fixed
fields associated with each format icon.
Table 19.2. Format Icons
Label
Fixed Fields
Video (shown if format, item_type(g) and NOT vr_format(v,s,b)
eg. vhs, dvd, is unknown)
Chapter 19. Editing and Maintaining MARC records
221
Label
Fixed Fields
E-video
item_type(g) and item_form(o, s, q)
DVD
vr_format(v)
VHS
vr_format(b)
Blu-ray
vr_format(s)
Audiobook (shown if
item_type(i) and NOT item_form(o,q,s) and NOT sr_format(a,b,c,d,e,l,f)
format, eg. cassette, disc,
is unknown)
E-audiobook
item_type(i) and item_form(o,q,s)
CD Audiobook
item_type(i) and sr_format(f)
Cassette audiobook
item_type(i) and sr_format(l)
Phonograph audiobook
item_type(i) and sr_format(a,b,c,d,e)
Book
item_type(a,t) AND bib_level(a,c,d,m) and NOT item_form (a,b,c,d,f,o,q,r,s)
E-Book
item_type(a,t) AND bib_level(a,c,d,m) AND item_form (o,q,s)
Large print book
item_type(a,t) AND bib_level(a,c,d,m) AND item_form(d)
Braille
item_type(a) AND item_form(f)
Kit or mixed material
item_type(o,p)
Map
item_type(e,f)
Music (shown if format,
eg. cassette, disc, is
unknown)
item_type(j) and NOT sr_format(a,b,c,d,e,f,l)
Phonograph music
item_type(j) AND sr_format(a,b,c,d,e)
CD music
item_type(j) AND sr_format(f)
Cassette music
item_type(j) AND sr_format(l)
E-music
item_type(j) AND item_form(o, s, q)
Music score
item_type(c,d)
Picture
item_type(k)
Serial or magazine
bib_level(b,s)
Software or video game
item_type(m)
Toys, puzzles or
equipment
item_type(r)
Picture
item_type(k)
Microform
item_form(a,b,c)
19.4. Merging Bibliographic Records in Evergreen
This lesson will demonstrate merging bibliographic records in the catalogue. A common application for this
functionality is to replace brief records with full records. You will only need to do this if you are unable to locate a
full record in a Z39 target and therefore cannot overlay the brief record on import, or you need to preserve the local
Chapter 19. Editing and Maintaining MARC records
222
information in the record to be overlaid and want to import the record first and copy over the local information on
the merging screen. The full record may have been added to the database by another Sitka cataloguer, or you may
have created a MARC record in the database yourself.
Any volume and copy records or holds associated with the brief record will be transferred to the full record upon
merging.
1.
Create a bucket for the records you wish to merge (see Section 20.1, “Creating Record Buckets” for detailed
instructions). In the examples below the bucket is named Horse Books.
2.
Identify records to be merged and add them to the bucket (see Section 20.2, “Adding Records to Buckets”.
3.
Retrieve the bucket by selecting Edit → Record Buckets or Cataloguing → Manage Record Buckets.
4.
Click Merge All Records.
5.
Select one record as the Lead Record, which would be the better quality full record, and click Merge. In this
example record # 100879689 is the Lead Record. Note that if you wish to edit the lead record, e.g. copying over
local information from the non-lead record, you may select the Edit Bib radio button to do it before clicking
Merge.
The brief record has been subsumed by the full record, and all of the volumes, copies and holds associated with the
brief record are now attached to the full record.
Note some of the options in the record merge screen. You can remove a record from consideration here, view or
edit the bibliographic record, and view attached holdings. If the non-lead record has tags for local information,
such as 590 and 690, you need to add them to the lead record before merging.
Chapter 19. Editing and Maintaining MARC records
223
19.5. Deleting MARC records (bibliographic or title records)
Due to cascading record deletion on sole copies, you may find you do not need to delete MARC records very often,
as Evergreen does this for you.
Remember that Sitka has Evergreen configured to always delete a MARC record when the only copy attached to it
is deleted and you can only delete a MARC record if there are no holdings attached to it in the database. This may
happen if you have imported a new MARC record in error, and have not attached any holdings to it, or some other
error or conversion circumstance that leaves a MARC record in the database with no holdings attached.
You can delete a MARC record directly from the catalogue view.
1.
Find the record in the catalogue and go to Record Details, and click on Actions for this Record → Delete Record.
2.
Confirm the deletion by checking box as indicated then click Delete
3.
Click OK when prompted. Record is now deleted and inactive and only retrievable by a TCN (title control
number) search or bibliographic record id (presented at deletion confirmation prompt).
Chapter 19. Editing and Maintaining MARC records
224
You may also delete MARC records from a Record Bucket.
If you delete a MARC record in error, you may immediately undelete it on screen by selecting Actions for this
Record → Undelete Record.
19.6. Exporting MARC Records
There are times when you may want to export MARC records from Evergreen. Evergreen allows you to do so via
the Record Bucket and the Batch MARC Import/Export interface. When you use the latter, you may include the
holdings information in the MARC records. Based on Sitka's configuration, the holdings information will be in tag
852, including the copy's circulating library, shelving location, barcode, call number, status, and others saved in
the copy record.
MARC records can be exported from Evergreen in selected MARC and non-MARC format: MARC21, UNIMARC,
MARCXML or Evergreen Record Entry. You need to choose one from the dropdown list. The exported records
can be coded in either UTF-8 or MARC8.
To export MARC records on Batch MARC Import/Export interface, click Cataloguing → MARC Batch Import/
Export. The default screen is Import Records. Click Export Records tab to open the export interface.
Chapter 19. Editing and Maintaining MARC records
225
If you want to export more than one record at a time, the records need to be saved in a Record Bucket or their IDs
saved in a CSV file. If the CSV file contains other information than just record ids, specify which column is the
record id by filling it into the Use Field Number box. Note that the field number starts from 0. If the second column
in the CSV file is record id, the field number is 1.
If you export one record only, you may type in the record ID directly on the Export interface.
Once you have completed the above form, click the Retrieve Records button at the bottom. You will be prompted
to browse the records, and then save them, or save them directly into a file.
Holding records can be exported in tag 852, but this includes all item records across the Sitka consortium, not
just your library's holdings.
Chapter 19. Editing and Maintaining MARC records
226
To export MARC records from Record Bucket, go to Edit → Record Bucket. Retrieve the bucket containing the
records that you wish to export. Click Export All Records to select the exported record format. You will be prompted
to save the file.
Chapter 19. Editing and Maintaining MARC records
227
Chapter 20. Record Buckets
This part of the lesson will demonstrate how to create and manage bibliographic record buckets. The steps used
for copy buckets are similar. It is very important when working with buckets to ensure you are working with the
correct type of record for the corresponding bucket. You cannot add copy records to bibliographic record buckets
and vice versa.
20.1. Creating Record Buckets
There are two ways to create a bucket. You can either create a bucket first, without accessing any records, or you can
access a record and choose to create the bucket from that view. We will demonstrate both methods here, beginning
with creating a bucket independent of a record.
1.
Select Edit → Record Buckets or Cataloguing → Manage Record Buckets.
2.
Select New Bucket.
Chapter 20. Record Buckets
228
3.
Name the bucket and click OK.
4.
Click OK on the resulting confirmation dialogue.
5.
The Bucket View has changed to display your new bucket as the active bucket. Note the bucket is numbered,
and creating owner identified.
6.
Note that all buckets created by this login are available in the drop down menu.
The last option under Bucket Actions is Locate Z39.50 Matches. This feature allows you to search for
replacement records via Z39.50 for all records in a bucket. If you are interested in this feature, please
contact Co-op support.
Chapter 20. Record Buckets
229
7.
You can also create a bucket from within a record. Search for, retrieve, and display any bibliographic record,
then choose Actions for this Record → Add to Bucket.
8.
Select Add to New Bucket.
9.
Name the bucket and click OK. The results are the same as creating a bucket using the steps above, with the
difference being the new bucket created on the fly now has a record in it.
20.2. Adding Records to Buckets
Now that you have created a bucket, you can begin to add records.
1.
Search for, retrieve, and display any bibliographic record, then choose Actions for this Record → Add to Bucket.
Chapter 20. Record Buckets
230
2.
Select the appropriate bucket and click Add to Selected Bucket.
3.
If required, go back to the Record Bucket tab to confirm the action. You will see your bucket now contains
the record.
4.
You can continue adding records as required.
You may also add bibliographic records to a bucket via the F5 Item Status screen. Scan item barcodes into
the screen, select all, choose Actions for Cataloguers or Actions for Selected Items and choose Add to Record
Bucket.This will place all the bibliobgraphic records associated with the item records you scanned into a bucket.
Note the column picker allows you to manipulate data display within the bucket.
Clicking on List Actions > Save List CSV to File exports all column headers and displayed data to your computer
in a text file format. This can be useful for creating bibliographies or similar lists.
Clicking on List Actions > Print List CSV prints column headers and displayed data.
Chapter 20. Record Buckets
231
Part IV. OPAC
Table of Contents
21. Search the catalogue .........................................................................................................................
21.1. Basic Search ...........................................................................................................................
21.2. Advanced Search ....................................................................................................................
21.3. Search Tips ............................................................................................................................
21.4. Search Methodology ................................................................................................................
21.5. Search Results ........................................................................................................................
22. My Account ........................................................................................................................................
22.1. Logging into Your Account .......................................................................................................
22.2. Resetting Your Password .........................................................................................................
22.3. Account Information .................................................................................................................
22.4. My Lists ..................................................................................................................................
23. Integrated Electronic Resources ..........................................................................................................
23.1. Check out e-resources .............................................................................................................
23.2. Place hold on e-resources .......................................................................................................
23.3. Checked out and on-hold e-resources in My Account ................................................................
24. Mobile PAC .......................................................................................................................................
24.1. Searching the Mobile PAC .......................................................................................................
24.2. Mobile PAC Account Information ..............................................................................................
234
234
235
238
240
241
250
250
251
252
257
260
260
261
262
264
264
265
Part IV. OPAC
233
Chapter 21. Search the catalogue
The Sitka catalogue can be accessed through the computers at your local library or online from any location via
the Internet.
For online access, visit your library's website and follow the link to their online catalogue, or go to http://
catalogue.libraries.coop for the BC Libraries Cooperative portal to the catalogue.
21.1. Basic Search
The homepage for the Sitka catalogue allows you to search for books and other items at your library or libraries.
The homepage contains a single search box for you to enter a search term.
You can select to search by:
• Keyword—finds the terms you enter anywhere in the entire record for an item, including title, author, subject,
and other information.
• Title—finds the terms you enter in the title of an item.
• Journal Title—finds the terms you enter in the title of a serial bibliographic record.
• Author—finds the terms you enter in the author of an item.
• Subject—finds the terms you enter in the subject of an item. Subjects are categories assigned to items according
to a system such as the Library of Congress Subject Headings.
• Series—finds the terms you enter in the title of a multi-part series.
Formats
You can limit your search by format. Some of the more popular formats in the list are the following:
Chapter 21. Search the catalogue
234
• For Books, you can choose All Books, which includes regular print books, large print books, audiobooks and
e-books OR you can choose the individual format. The individual choices are: Books (physical), Books (large
print), E-Books, Audiobooks (physical) or E-Audiobooks. Note that Audiobooks (physical) are books read aloud
on CDs or other physical media, whereas E-Audiobooks are books read aloud available online.
• Videos will search all videos formats such as DVD, VHS and Blu-ray.
• Music will search music on CD or other media.
• Serials/Magazines will search on magazine, serial, or journal titles only.
• Software/Video Games will search on games, databases, and other software.
Libraries
If you are using a catalogue in a library or accessing a library’s online catalogue from its homepage, the search will
return items for your local library. If your library has multiple branches, the result will display items available at
your branch and all branches of your library system separately. If your library participates in Interlibrary Connect
the results may display items available across your federation.
If you access the catalogue from http://catalogue.libraries.coop, you may scope your search result to Sitka, regional
libraries, a library system or a library branch by clicking into the In box on the catalogue homepage and selecting
the target library from the drop down list. You will then be able to see how many copies of a title are available in
all Sitka member libraries across Sitka, or within the regional libraries, or within the library system, or within the
branch, depending on search scope selected.
21.2. Advanced Search
You can access the Advanced Search by clicking Advanced Search on the Sitka catalogue homepage or search
results screen.
The available search options are the same as on the homepage, but you may use one or more of them simultaneously.
If you want to combine more than three search options, use Add Search Row button to add more search input rows. .
Chapter 21. Search the catalogue
235
Sort Criteria
By default, the search results are in order of greatest to least relevance. See OPAC Order of Results. In the sort
criteria box you may select to order the search results by relevance, title, author, or publication date.
Group Formats and Editions
This checkbox is at the bottom line of Sort Criteria. When it is checked, all formats and editions of the same title
are grouped as one result. For example, the DVD and the first and second print editions of Harry Potter and the
Chamber of Secrets will appear together.
Search Library
The current search library is displayed under the Search Library box. If you accessed the catalogue from your
library's homepage or catalogue URL, the default search library is your library. The search returns results for your
local library only. If your library system has multiple branches, use the Search Library box to select different
branches or the whole library system.
If you access the catalogue from http://catalogue.libraries.coop, your default search library is Sitka or the library
you have selected on the homepage. You may use the Search Library box to select a different library or regional
libraries, or all libraries in Sitka to search.
Chapter 21. Search the catalogue
236
Shelving Location
Select a Search Library to filter by Shelving Location. Shelving Locations that are not OPAC visible will not be
displayed.
Limit to Available
This checkbox is just below the Search Library box. Select Limit to Available to limit by item’s current circulation
status. Titles without available items in the selected search library will not be displayed.
Search Filter
You can filter your search by Format, Language, Audience,Literary Form, Publication Year, and Shelving Location.
Publication year is inclusive. For example, if you set Publication Year Between 2005 and 2007, your result items
will be published in 2005, 2006 and 2007.
Numeric Search
If you have numeric details on the exact item you wish to search for, use the Numeric Search option from search
tabs across the top of the screen. Use the drop-down menu to search by ISBN, ISSN, Call Number, LCCN, TCN, or
Item Barcode. Enter the information and click Search.
Browse the Catalogue
Patrons and staff can browse records in the OPAC. The following fields are browsable: title, author, subject, and
series. The browse is constructed by the term starting with. To browse the catalogue, click Browse the Catalogue,
select a field to browse, and enter a keyword and click Browse. A list of results will appear. Click on the bolded
text to view bibliographic records. You may move backward or forward through your results by clicking on Back
or Next. Note your results are alphabetical, with results prior to your search term, and after, listed.
Chapter 21. Search the catalogue
237
MARC Expert Search
If you are familiar with the MARC system, you may search by tag in the Expert Search option from search tabs across
top of the screen. Enter the three-digit tag number, the subfield (if relevant), and the value or text that corresponds to
the tag. For example, to search by publisher name, enter 260 b Random House. To search several tags simultaneously,
use the Add Row option. Click Search to run the search.
21.3. Search Tips
You do not need to enter an author's last name first, nor do you need an exact title or subject heading as all searches
are keyword search. Evergreen is also forgiving about plurals and alternate verb endings, so if you enter dogs,
Evergreen will also find items with dog.
• Do not use an AND operator to join search terms.
• An AND operator is automatically used to join all search terms. So, a search for golden compass will search
for entries that contain both golden and compass.
• Boolean operators such as and, or, not are not considered special and are searched for like any other word. So,
a search for golden and compass will not return the title golden compass. Putting it another way, there are no
stop words that are automatically ignored by the search engine. So, a title search for the and or not of (and in
any order) yields a list of titles with those words.
• Don’t worry about white space, exact punctuation, or capitalization.
• White spaces before or after a word are ignored. So, search for golden compass gives the same results as a
search for golden compass.
• A double dash or a colon between words is reduced to a blank space. So, a title search for golden:compass or
golden--compass is equivalent to golden compass. However, space matters in this case. No result for golden :
compass or golden -- compass.
Chapter 21. Search the catalogue
238
• Punctuation marks occurring at the front or end of a word are removed.
• Diacritical marks, &, or | located anywhere in the search term but not within a word are removed. Words linked
together by . (dot) are separated into two words. So, a search for |golden.compass& is equivalent to golden
compass.
• Upper and lower case letters are equivalent. So, Golden Compass is the same as golden compass.
• Enter your search words in any order. A search for compass golden gives the same results as a search for golden
compass. Adding more search words gives fewer and more specific results.
• This is also true for author searches. Both David Suzuki and Suzuki, David will return results for the same author.
• Use specific search terms. Evergreen will search for the words you specify, not the meanings, so choose search
terms that are likely to appear in an item description. For example, the search luxury hotels will produce more
relevant results than nice places to stay.
• Search for an exact phrase using double-quotes. For example, “golden compass”.
• The order of words is important for an exact phrase search. “golden compass” is different than “compass
golden”.
• White space, punctuation and capitalization are removed from exact phrases as described above. So a phrase
retains its search terms and its relative order, but not special characters and not case.
• Two phrases are joined by AND, so a search for “golden compass” “dark materials” is equivalent to “golden
compass” and “dark materials”.
• To prevent stemming, use double quotes around a single word or a phrase. So, a search for parenting will also
return results for parental but a search for “parenting” will not.
• Use * (asterisk) as a wildcard to truncate search terms, e.g. comp* golden may return the same results for compass
golden and more.
• Exclude a term from the search, using - (minus) . For example, vacations –britain will search for materials on
vacations that do not make reference to Britain.
• Two excluded words are joined by AND. So, a search for -harry -potter is equivalent to -harry and -potter.
• A + (plus) leading a term has no role and is removed. So, +golden +compass is equivalent to golden compass.
You can form more complex searches using the Advanced Search features. You can also click the Advanced button
under the search box to build complex searches using Boolean operator OR to connect your terms.
Improving a Search With No Results
If no results were returned from your search, you will see Keyword Search Tips for expanding or altering your search.
Chapter 21. Search the catalogue
239
21.4. Search Methodology
Stemming
A search for dogs will also return hits with the word dog and a search for parenting will return results with the
words parent and parental. This is because the search uses stemming to help return the most relevant results. That
is, words are reduced to their stem (or root word) before the search is performed.
The stemming algorithm relies on common English language patterns - like verbs ending in ing - to find the stems.
This is more efficient that looking up each search term in a dictionary and usually produces desirable results.
However, it also means the search will sometimes reduce a word to an incorrect stem and cause unexpected results.
To prevent a word or phrase from stemming, put it in double-quotes.
Understanding how stemming works can help you to create more relevant searches, but it is usually best not to
anticipate how a search term will be stemmed. For example, searching for gold compass does not return for golden
compass because the search does not recognize gold as a stem of golden.
Truncation
Use the wildcard * (asterisk) at the end of the word to truncate search term.
Order of Results
By default, the results in the Sitka catalogue are listed in order of relevance, similar to a search engine like Google.
The relevance is determined using a number of factors, including how often and where the search terms appear in
the item description, and whether the search terms are part of the title, subject, author, or series. The results that best
match your search are returned first rather than results appearing in alphabetical or chronological order.
In the Advanced Search screen, you may select to order the search results by relevance, title, author, or publication
date before you start the search. You can also re-order your search results using the Sort by dropdown list on the
search result screen.
Chapter 21. Search the catalogue
240
21.5. Search Results
The search results are a list of relevant works from the catalogue. If there are many results, they are divided into
several pages. At the top of the list, you can see the total number of results and go back and forth between the pages
by clicking the double arrow on top or bottom of the list or click the page number to go to that page directly. Here
is an example:
Information about the title, such as author, edition, publication date, call number, shelving location, status, etc.,
is displayed under each title. The icons below the title link indicate formats such as books, audio books, video
recordings, and other formats. Hover your mouse over the icon, and a text explanation will show up in a small popup box.
Clicking a title goes to the title details. Clicking an author searches all works by the author. If you want to place a
hold on the title, click Place Hold to the right of the title information.
Above the results list there is a Limit to Available checkbox. Checking this box will filter out those titles with no
available copies in the library or libraries at the moment. Usually you will see your search results are re-displayed
with fewer titles
Chapter 21. Search the catalogue
241
The Sort by dropdown list is beside the Limit to Available button. Clicking an entry on the list will re-sort your
search results accordingly.
Formats and Editions
If you have selected Group Formats and Editions with your search, your search results are grouped by various
formats and editions of the same title. Multiple format icons may be lit up.
Chapter 21. Search the catalogue
242
Refine Your Search
You may refine your search results by Authors, Subjects, and Series. Selecting one of these links on the left side
of search results page narrows down the search results to that subject, author, or series.You may also refine your
search by clicking the hyperlink labelled Refine My Orignal Search at top of search results. Refining a search this
way allows you to add search filters such as Publication Date, Format, Language, etc., to your original search.
Chapter 21. Search the catalogue
243
Availability
The number of available copies and total copies are displayed below the title details. If you are using a catalogue
inside a library or accessing a library’s online catalogue from its homepage, you will see how many copies are
available in that library. If the library belongs to a multi-branch library system you can see how many copies are
available in all branches.
If you access the catalogue from http://catalogue.libraries.coop, depending on your search scope, you may see
multiple rows of Available Copies: the branch, the library, the regional libraries and all Sitka libraries that are
currently using the Sitka Evergreen system in BC and MB.
Chapter 21. Search the catalogue
244
Viewing a record
Click on a title to view a detailed record of the title, including descriptive information, location and availability,
and options for placing holds.
Details
The record shows details such as the cover image, title, author, publication information, and an abstract or summary,
if available.
The Record Details view shows how many copies are at the library or libraries you have selected, and whether they
are available or checked out. It also displays the Call number and Copy Location for locating the item on the shelves.
Chapter 21. Search the catalogue
245
Clicking on Text beside the call number will allow you to send the item's call number by text message, if desired.
Clicking the location library link will reveal information about owning library, such as address and open hours.
Below the local details you can open up various tabs to display more information. You can select Reviews and More
to see the book’s summaries and reviews, if available. You can select Shelf Browser to view items appearing near
the current item on the library shelves. Often this is a good way to browse for similar items. You can select MARC
Record to display the record in MARC format. If your library offers the service, clicking on Awards, Reviews, and
Suggested Reads will reveal that additional information.
Search Additional Items by Author, Subject or Series
You can search for additional items by an author, one of the subjects in the record or other works in the same series.
Clicking the author, subject or series will start a new search in the catalogue. You can do this from the results page,
or from within the record details view, as shown below.
Going back
When you are viewing a specific record, you can always go back to your title list by clicking the link Search Results
on the left of the page.
Chapter 21. Search the catalogue
246
If you have selected Group Formats and Editions with your search, your search results are grouped by various
formats and editions of the same title under My Search Results. You can always go back to this page by selecting
the link to Return to Grouped Search Results.
You can start a new search at any time by entering new search terms in the search box at the top of the page, or
by selecting the Another Search, Basic Search,or Advanced Search link at top of search results, depending on what
screen you are on when wanting to do another search.
Placing Holds
Holds can be placed on either the title results or the title details page. If the item is available, it will be pulled from
the shelf and held for you. If all copies at your local library are checked out, you will be placed on a waiting list
and you will be notified when items become available.
On the title details page, you can select the Place Hold link in the upper right corner of the record to reserve the
item. You will need your library account user name and password. A hold placed on upper right Place Hold button
means any copy attached to the record will fill your hold. This is generally the best method when requesting a book,
as your hold will be filled by any copy of the title record you are viewing. However, if you want a specific issue of
a magazine or a DVD or video in a set, you can select to place a Volume hold in the item details view just below.
In this example the hold is on the April 14 2014 issue of Macleans magazine.
You may choose to be notified by phone, text message, or email. The phone number set up in your account will
automatically show up. Once you select the Yes, by phone or Yes, by text checkbox, you can supply a different
Chapter 21. Search the catalogue
247
phone number for this hold only. The notification method will be selected automatically if you have set it up in
your account preferences. However, you may choose your method on this screen, overriding any default set up in
your account.
You can view and cancel a hold at anytime. Before your hold is captured, which means an item has been held waiting
for you to pick it up, you can edit, suspend or activate it. You need to log into your account to do this.
Chapter 21. Search the catalogue
248
Placing Holds on Multiple Records of the Same Title
If you've selected Group by Formats and Edition when doing a search, you may place a hold on multiple records of
the title but of different formats or editions by clicking Place Hold to the right of the meta record.
You may select acceptable formats on placing hold screen.
Chapter 21. Search the catalogue
249
Chapter 22. My Account
You can access information about your account from any page in the Sitka catalogue by selecting the My Account
link at the top right of the page. Your account information includes contact information, items you have checked
out or on hold, fines, account preferences, note left by the library (if any) and lists, a place for you to keep reading
lists or other lists of items. Each of the sections in the My Account area is described in this chapter.
22.1. Logging into Your Account
1.
Click on the My Account link on any search page.
2.
Enter your username or your library barcode.
If this is your first time logging in, your username will be your library card number. You have the option to
change your username on the Account Preferences screen.
3.
Enter your password.
You should have been given a password when you received your library card.
If you do not have or cannot recall your password please contact your local librarian to have the password
reset or use the Forgot Your Password link.
Chapter 22. My Account
250
4.
Click on the Login button.
22.2. Resetting Your Password
If you have an email address recorded in your library account you can use the Forgot Your Password? link in the
event that you forget your password.
1.
Click on the Forgot Your Password? link.
2.
Enter your username or barcode into the appropriate field. Note you must enter only one value, this is an either
or choice, as some people only use their barcode to access their account, while others only ever use a user name.
3.
Click Submit.
4.
Check your email account for the Library Account Password Reset Request email.
Chapter 22. My Account
251
Reset emails are sent every two minutes.
5.
Open the link provided in the Library Account Password Reset Request email.
6.
Enter your new password in the password reset form in the browser.
You must enter the password twice to ensure that you do not make a mistake. If the passwords match, you will
then be able to log in to your library account with the new password.
Please contact your local library if you do not receive the Library Account Password Reset Request email or if
you continue to be unable to login to your account.
22.3. Account Information
Account Summary
Account Preferences
Items checked-out
Items on Hold
Fines and Payment
Account Summary
The default view when you login to your account is the Account Summary page. This view gives you an overview
of items checked out, items on hold and any fines you may have. You can access any of these screens by clicking
on relevant tab.
Chapter 22. My Account
252
Account Preferences
You can change the username and password that you use to log in to your library account as well as the email address
the library uses to contact you in the Personal Information tab by clicking the Change link next to the item.
Depending on your library's policy, you may request a change to your address by submitting a new address in your
account. Your library staff will verify it and update your account.
If you need to make a change to other information, such as your phone number, please see the library staff.
The Notification Preferences tab is where you set your preferences for holds notification. You can choose to be
contacted by email, phone or text message.
This is also where you can opt-out of receiving courtesy and overdue email notices using the Receive Overdue and
Courtesy Emails setting.
Un-checking this box means your library will not send you any emails for items coming due or overdue. You
are still responsible for returning items on time and paying any applicable fines.
Chapter 22. My Account
253
The Search and History Preferences tab allows you to configure how many search results are displayed per page
on your catalogue searches, your preferred pick up location if a member of a multi branch library, whether you want
to keep a history of your check outs and holds, and who you allow to use your library account on your behalf. The
check out and holds history is not retroactive, it takes effect once you choose to retain your history. You may also
choose to disable a warning about adding items to a temporary list.
Chapter 22. My Account
254
Items Checked Out
Select the Items Checked Out tab at the top of the My Account area to display all of the items you currently have
checked out, their due dates, and the number of times you can renew them. Items are sorted by the due date. You
can simply select the items you wish to renew and then click Go beside Renew Selected Titles.
Items on Hold
The Holds tab shows the materials you currently have holds (reserves) on. The title, author, format, pickup location,
status and expiration date are displayed. The Active column shows whether your hold is currently active.
Clicking the Edit link will bring you to the hold editing screen, where you may suspend the hold, if not already
captured, or change the activation date or cancellation date. If your library has multiple branches you may also
change the pick up location.
Chapter 22. My Account
255
You can use the checkbox beside each hold to select the hold and the Action for selected holds dropdown list to
suspend, activate, set/change an activation date or cancel the selected holds. You may set an activation date when
you suspend your hold or leave the date blank and manually activate it later. A suspended hold will not lose its
hold queue position.
Your position in the hold queue is indicated by the first number in the status column. For example "3 hold on
1 circulating copy" indicates you are third in the hold queue.
Fines and Payments
The Fines and Payments tabs, at bottom of the Account Summary screen, display any fines or fees that you have
accrued and the payments you have made. You can pay your fines at the library.
Chapter 22. My Account
256
22.4. My Lists
The My Lists section allows you to create, edit, share, and remove lists.
Lists are lists of items that can be used for a number of purposes. For example, to keep track of what books you
have read, if you have not chosen to retain your checkout history as described in previous section, books you would
like to read, to maintain a class reading list, to maintain a reading list for a book club, to keep a list of books you
would like for your birthday, etc. There are an unlimited number of uses.
You can see the lists you have created in the My Lists section of the My Account area.
How do I create a list?
Best practice is to create a list after you have logged in to your account. In the My Account area, click on My Lists. In
the Create new list section, enter a name for your list into the text box. You may also enter an optional description.
Decide if you would like to share the contents of the list with other users, and click the Submit button.
You can also create a temporary list from search results, but you then have to create a permanent list and add the
contents of your temporary list to the permanent list. From a search results page click on Add to my list .
Chapter 22. My Account
257
Click on View My List at top of search results page. If you are not already logged in, you will be prompted to do
so. Create a new list as described above. Select the titles in the temporary list, then click on the drop-down menu
labeled Actions for these items and make the appropriate choice.
What does "Share this list" mean?
Lists can either be private, and only viewable by you, or public, and viewable by anyone who knows where the
list resides. By default, all lists are private, and you must explicitly instruct the system to allow others to view the
contents of a list. You can choose to share a list by clicking Share beside the list name. You can un-share a list
by clicking Hide.
You can give the address (URL) of your list to anyone you want to share it with. In the My Lists section there is
a HTML View link for every shared list. Click on that button and bookmark the resulting web page page in your
browser or copy and paste the address (URL) to share your list as required.
Chapter 22. My Account
258
How do I add items to a list?
First, you need to be logged in to the online catalogue by clicking the My Account button. Search the catalogue
normally for the item you would like to add to your list. Click Add to My List and follow the steps as described
above in How do I create a list?
How do I remove items from a list?
In your account, select the My Lists tab. Click on the name of the list you would like to remove the item from. The
items in the list will appear. Select the item you would like to remove from the list, click on Actions for these items,
select Remove from list and click Go.
Managing items in a list
You can place a hold on an item from your list by selecting the item, and choosing Place hold in Actions for
these items menu.
You can annotate your lists by using the Notes feature. Click on one of your lists to open it and display the contents.
A Notes column will appear, with an Edit hyperlink beside it. Click Edit, enter your note and click Save Notes.
Your note will display in your view of your list. If the list is shared, the note will also display in title record on the
webpage used to access your shared list.
You can export your list to a comma delimited file by selecting Download CSV and following your computer's
prompts to save the file on your computer.
Chapter 22. My Account
259
Chapter 23. Integrated Electronic Resources
Electronic resources are usually hosted by separate suppliers outside the library. Most of these resources have records
in the library catalogue. Links leading to the suppliers' website are provided in these records. Some electronic
resources can be integrated into the library catalogue, which allows users not only to view the records, but also
to borrow and place holds on the resources on the library catalogue directly. Currently e-books and e-audio books
from OverDrive are integrated. Users can borrow or place holds on these e-resources, and view their borrowed or
on-hold items in their library account.
When your search result includes an integrated e-book or e-audiobook from OverDrive, you may see the record is
marked as electronic resource with a link going to the supplier's website.You will see two columns for Available
Formats and Status. You may also see Place Hold on E-book/E-audiobook, or Check Out E-book/E-audiobook,
depending on whether there is an available copy, instead of the Place Hold option on the right hand side of the
results list.
If you have already logged into your account when you do a search, you may see Go to E-items on Hold in
a title on which you have placed a hold or Go to E-items Checked Out in a title already checked out to you.
Clicking those links takes you to your account to view those items.
23.1. Check out e-resources
If there is an available copy under a title, you can click on Check Out E-book/E-audiobook on the search result list
or record details screen. You will be prompted to log in with your library account, if you have not already done so.
After logging in, click on the E-Items Checked Out tab in My Account. Click the Check out button.
Choose a format type and click Check out on the prompt. A successful message will be displayed which will be
closed automatically. Click the Download button in Format column to download it.
Chapter 23. Integrated Electronic Resources
260
The current E-items Checked Out screen is displayed with the due date/time.
23.2. Place hold on e-resources
If all copies under a title are checked out, you will see a Place Hold on E-book/E-audiobook link on the result list
or record details screen. Click that link to login to your account, if you have not already done so.
After you log in, you will be directed to the following screen.
Chapter 23. Integrated Electronic Resources
261
Click Place Hold and enter your email address. This address will be kept in the hold record at OverDrive separate
from your library account. If you wish to use another email account to receive notification after holds have been
placed, you need to update it in every pending hold. Click Place Hold again. Once the hold is placed you will
receive a confirmation message and the E-items on hold screen will be displayed.
23.3. Checked out and on-hold e-resources in My Account
You may view e-resources currently checked out to or on hold for you after you log into your account. The summary
is displayed at top right of your screen.
Click the E-items Checked Out tab to view the titles you have checked out and download a copy from there.
Click the E-items on Hold tab to cancel an unwanted hold, check out a ready-for-pickup hold or suspend a pending
hold. Just click the respective buttons and follow the on screen prompts.
When suspending a hold, you have the option to suspend it for a limited period or indefinitely until you activate
it again.
If you wish to update the email address for hold notifications, you need to do it on OverDrive's website. Click onLink
to OverDrive Account to Change Preferences to access those settings.
Chapter 23. Integrated Electronic Resources
262
OverDrive allows users to keep some preference settings, such as preferred loan period. These preferences can
be set up or updated on OverDrive's website only.
Chapter 23. Integrated Electronic Resources
263
Chapter 24. Mobile PAC
The Mobile PAC is designed for users with mobile or smaller screen devices (eg. smart phones, tablets) as well as
for users with dial-up or slower connections. You can search the catalogue using the Mobile PAC as well as log into
Your Account to manage items checked out, items on hold, and fines. You can also place holds using the Mobile
Catalogue. A link called Mobile Catalogue at the bottom of the catalogue provides access to the Mobile PAC.
24.1. Searching the Mobile PAC
1.
Click on the Mobile Catalogue link at the bottom of the OPAC.
2.
The Mobile PAC provides a search box with a drop down to choose the desired index to search: keyword, title,
author, subject or series.
3.
Enter your search term. You can also set your search parameters such as library or branch, availability, format,
and sorting. Click on Search after you have entered your search term(s).
Chapter 24. Mobile PAC
264
4.
The search result screen shows the search results including availability, location, call number and cover images
when available.
5.
Click on the title for more detailed information and to place a hold on the item.
24.2. Mobile PAC Account Information
1.
Choose Log in to see account details at top of the page to log into your account.
2.
Login in with username (or barcode) and password.
Chapter 24. Mobile PAC
265
3.
You can work in 4 views: fines owing, items checked out including a summary of overdue items, holds placed,
and search the catalogue. Clicking on any of the tabs will expand the view. In the expanded view of items
checked out you can renew items, and in the expanded view of holds you can cancel or suspend holds.
Chapter 24. Mobile PAC
266
Part V. Reports
Table of Contents
25. Reports overview ...............................................................................................................................
26. Folders ..............................................................................................................................................
26.1. Creating Folders ......................................................................................................................
26.2. Managing Folders ....................................................................................................................
27. Creating Templates ............................................................................................................................
27.1. Choosing Displayed Fields .......................................................................................................
27.2. Applying Filters ........................................................................................................................
28. Generating Reports from Templates ....................................................................................................
29. Viewing Report Output .......................................................................................................................
30. Running Recurring Reports .................................................................................................................
31. Viewing/Editing/Rescheduling Reports .................................................................................................
32. Shared Templates in SITKA_templates ...............................................................................................
32.1. What's in SITKA_templates ......................................................................................................
32.2. Clone a template from SITKA_templates ..................................................................................
32.3. Modify a template ....................................................................................................................
32.4. Examples of using Sitka's templates .........................................................................................
33. Commonly used tables and views in Evergreen database ....................................................................
34. Template Terminology: Data Types, Transforms, and Operators ...........................................................
269
271
271
274
276
277
287
292
296
299
301
302
302
305
308
310
316
320
Part V. Reports
268
Chapter 25. Reports overview
The Reports interface is accessed from the Admin menu, under Local Administration → Reports.
Only users with reporting permissions (granted by Sitka Support on libraries' request) can access the Reports
interface, but the output can be visible to all staff accounts. Reports are owned by the account used to create them,
though the owner can allow other people to view and copy (template only) them if he/she shares them with other
staff in the library, other libraries in the federation, or the whole Sitka Consortium.
Evergreen has very powerful reporting functionalities. It is possible to report on almost every field in every table in
the database. Connections between tables are pre-made on the Reports interface. Some views are also provided to
group together records meeting certain conditions. For details refer to Commonly used tables and views in Evergreen
Database.
The ultimate goal of reporting is finding the records in the database which meet the requirements. Sometimes the
result records are processed to some extent before they are included in the output, such as counting and displaying
the count of the records found instead of showing the records themselves. The requirements include two parts: the
conditions used to extract the records and the information to be displayed in the result file.
Evergreen is designed to achieve the above goal by creating a template first. The template specifies the fields to
be displayed in the result file (Displayed Fields) and the fields on which conditions can be applied (Filter Fields).
Chapter 25. Reports overview
269
For example, in an overdue template, Due Date in the circulation record should be a filter field so that a date can
be given in order for the reporting program to compare and decide whether a checkout is overdue; while patron's
names may be displayed fields so that staff may know who has the overdue item. In short, a template simply contains
a list of displayed fields and a list of filter fields. The template can be used for multiple times. For example, the
afore-mentioned overdue template can be used to run a report to capture circulation records with Due Date before
2012-01-01. It can also be used to capture circulations with Due Date before 2012-02-15.
Once a template is ready, the next step is assigning values to the filter fields, for example, giving 2012-01-01 to the
Due Date field. This process is commonly known as defining a report, or running a report or setting up a report.
The process also schedules the report's run-time and frequency (one time only or on regularly basis), selects the
result file format(s) and designates output file receivers, if preferred. The information provided during this step is
saved in a file called "Report" on Evergreen. This file contains the template information and the value for each filter.
Unfortunately, most of these contents are neither viewable nor editable after the file is saved.
When a report starts to run, the program goes through the database and gathers the records that meet the conditions
into a file in the selected format(s). This is the Output file that contains the result records.
The three types of files created during the above procedure need to be kept separately in different folders on the
Reports interface. Before anything, you must create at least one Template, Report, and Output folder as described
in Chapter 26, Folders.
This chapter focuses on the movements on the Reports interface while demonstrating how to create reports in
Evergreen. Once you understand how to navigate around the Reports interface, you can create your own reports
from scratch or take advantage of Sitka's pre-packaged report templates. Some background knowledge of Evergreen
database and database terminology are at the end of this chapter.
Chapter 25. Reports overview
270
Chapter 26. Folders
There are three main components used on the Reports inferface: Templates, Reports, and Output. Each of these
components must be stored in a folder. Folders can be private (accessible to your login only) or shared with other
staff at your library, other libraries in your federation, or with the whole Sitka Consortium. It is also possible to
selectively share only certain folders and/or subfolders.
A shared subfolder must be created in a shared folder. The sharing scope of the subfolder should be within the
sharing scope of the parent folder. For example, a subfolder shared with Sitka Consortium should only be in
a parent folder shared with Sitka. It should not be in a folder shared with your library only. Though creating
shared subfolders in unshared folders or a subfolder with the sharing scope exceeding its parent's is not blocked
by Evergreen, serious consequences will be caused by such folders. You must be cautious when creating shared
subfolders.
There are two parts in the folders pane. The My Folders section contains folders created with your Evergreen account.
Folders that other users have shared with you appear in the Shared Folders section under the username of the sharing
account. You can only view the contents or clone the templates in the shared folders, but not make any change in
the shared folders. The cloned template can only be saved into your own folder.
26.1. Creating Folders
Whether you are creating a report from scratch or working from a shared template you must first create at least
one folder.
The steps for creating folders are similar for each reporting function. It is easier to create folders for templates,
reports, and output all at once at the beginning, though it is possible to do it before each step. This example
demonstrates creating a folder for a template.
Chapter 26. Folders
271
1.
Click on Templates in the My Folders section.
2.
Name the folder. Select Share or Do not share from the dropdown menu.
3.
If you want to share your folder, select who you want to share this folder with from the dropdown menu.
4.
Click Create Sub Folder, and then OK on the confirmation prompt.
Chapter 26. Folders
272
5.
Next, create a folder for the report definition to be saved to. Click on Reports.
6.
Repeat steps 2-5 to create a Reports folder also called Circulation.
7.
Finally, you need to create a folder for the report’s output to be saved in. Click on Output.
8.
Repeat steps 2-5 to create an Output folder named Circulation.
Using a parallel naming scheme for folders in Templates, Reports, and Output helps keep your reports organized
and easier to find.
The folders you have just created, will now be visible by clicking the arrows in My Folders. Bracketed after the
folder name, is the name of with whom the folder is shared. For example, Circulation (BNCLF) is shared with the
North Coast Library Federation. If it is not a shared folder, there will be nothing after the folder name. You may
create as many folders and sub-folders as you like.
Chapter 26. Folders
273
26.2. Managing Folders
Once a folder has been created, you can change the name, delete it, create a new subfolder, or change the sharing
settings. This example demonstrates changing a folder name; the other choices follow similar steps.
1.
Click on the folder that you wish to rename.
2.
Click Manage Folder.
3.
Select Change folder name from the dropdown menu and click Go.
4.
Enter the new name and click Submit
Chapter 26. Folders
274
5.
Click OK.
6.
You will get a confirmation box that the Action Succeeded. Click OK.
Chapter 26. Folders
275
Chapter 27. Creating Templates
Once the folders are ready, you can create or clone a template. Templates allow you to run a report more than
once, without building it anew every time by changing definitions (such as values for the filters) to suit current
requirements. For example, a template counting patrons with a registration date within a time frame can be used to
find out the number of patrons registered within the last month or the last ten days. Another example is a shared
template that reports on circulation statistics at a given library. This can be used by other libraries by selecting their
own library as the circulating library when they run the report.
Creating a template is complex. It requires some understanding of the Evergreen database and how Evergreen
handles various records when performing tasks on the staff client. You may refer to the last section of this chapter
for some background knowledge. Bear in mind, that a template includes a list of displayed fields, the information
you will see in the result, and a list of filter fields which enables you to set up the conditions for your target records.
Generally you do not record your conditions in the template. For example, in an overdue template, you do not record
2012-01-01 as the due date. Instead, you just make the Due Date field in the circulation record as a filter field. When
setting up the report with this template, you will be given the chance to put in 2012-01-01 as the due date.
It can be useful to plan out your report on paper before getting started with the reporting tool. The first thing to
decide is the source table. You can choose only one starting source table for each template. If you need information
from other tables, follow the link in the source table to those tables. Grouping together related fields and identifying
the key fields will help you select the correct source.
We will take a report on circulation statistics as an example to show you how to create the template. In circulation
statistic reports, libraries usually want to know how many circulations were done within a selected time period.
When an item is checked out on the staff client, a record is created in the circulation table. You want a count of
the number of circulation records created within the time period. So, the Circulation table is likely the source with
which you want to start.
You may wish to break down the number of circulations by items' shelving locations to see the circulations by
different types of materials (or the patrons' profile groups). In this case, the count of circulation records and
the shelving location (or patron profile) are the potential displayed fields. For the filter fields, you need to limit
the circulations done within a time period, so checkout date should be a filter. You probably want to count the
circulations done at your library only as you are part of a consortium, or for all the branches of your library system.
(In such a case, you may want to see the checkout library in the result, too.) So, the circulating library will be
another filter.
With the above analysis, we will build the template from scratch in the following section to demonstrate the
procedure on the template creating screen.
Chapter 27. Creating Templates
276
27.1. Choosing Displayed Fields
1.
Click on the My Folder template folder where you want the template to be saved.
2.
Click on Create a new Template for this folder.
Chapter 27. Creating Templates
277
3.
You can now see the template creating interface. The upper half of the screen is the Database Source Browser,
where you view the available tables in the database, the fields in each table, and the available transforms for the
selected field. You select fields for your template here. The lower half is the Template Configuration, which
displays your selected Displayed Fields and Base Filters and/or Aggregate Filters in the template.
We will select the displayed fields for our template first. So make sure Displayed Fields is selected.
The top left hand pane contains the database Sources drop-down list. This is the list of tables available as a
starting point for your template. Commonly used sources are Circulation (contains circulation records that
may be used for circulation statistics and overdue reports), ILS User (contains patron records that may be used
for patron reports), and Item (contains copy records that may be used for reports on collection or items with
special status).
The Enable source nullability checkbox below the sources list is for specifying the join type between linked
source tables. In most cases, it should be left unchecked by default. See for how to use Enable source nullability
checkbox. [319]
The relationship between tables can be found by displaying Relationship field (using the Column Picker) in
the low Source Specifier pane.
Chapter 27. Creating Templates
278
4.
Select Circulation in the Sources dropdown menu. Note that the Core Sources for reporting are listed first,
however it is possible to access all available sources at the bottom of this dropdown menu.
One template can have only one starting source table. If you need information from other tables you should
follow the links made by the Reports interface to those tables. The reporting program can not put two
pieces of isolated information together into one record in the result. When you change a starting table all
your existing selected fields will be removed.
Chapter 27. Creating Templates
279
5.
Click on Circulation to retrieve all the fields and links, which will be displayed in the middle pane. The Field
Name column contains the label of each field. The Data Type column shows what type of data is in the field.
For details of data type see Template Terminology. Note that the Source Specifier (above the middle and right
panes) shows the path that you took to get to the specific field.
6.
When you select a field in the middle pane, the available data transforms of the selected field are displayed in
the right pane. Transforms specify how data should be processed before they are displayed/compared. Refer
to Template Terminology for details of Transforms for each data type.
For our example template, select Circ ID in the middle Field Name pane, and Count Distinct from the right
Field Transform pane. You are counting the number of circulation records.
Chapter 27. Creating Templates
280
7.
Click Add Selected Fields underneath the Field Transform pane to add this field to your report output. Note
that Circ ID now shows up in the bottom left hand pane under the Displayed Fields tab.
Chapter 27. Creating Templates
281
8.
Circ ID will be the column header in the report output. You can rename default display names to something
more meaningful. To do so in this example, select the Circ ID row and click Alter Display Header.
Double-clicking on the displayed field name is a shortcut to altering the display header.
9.
Type in the new column header name, for example Circ count and click OK.
10. Add other data to your report by going back to the Sources pane and selecting the desired fields. In this example,
we are going to add Circulating Item → Shelving Location to further refine the circulation report.
Chapter 27. Creating Templates
282
In the top left hand Sources pane, expand Circulation. Depending on your computer you will either click on
the + sign or on an arrow to expand the tree.
11. Click on the + or arrow to expand Circulating Item. Select Shelving Location.
Chapter 27. Creating Templates
283
12. In the Field Name pane select Name.
13. In the upper right Field Transform pane, select Raw Data and click Add Selected Fields. Use Raw Data when
you do not wish to transform field data in any manner.
14. Name will appear in the bottom left pane. Select the Name row and click Alter Display Header.
Chapter 27. Creating Templates
284
15. Enter a new, more descriptive column header, for example, Shelving location. Click OK.
16. Note that the order of rows (top to bottom) will correspond to the order of columns (left to right) on the final
report. The results will be sorted by the columns in this order, too. Select Shelving location and click on Move
Up to move Shelving location before Circ count. The result will be sorted by Shelving Location first.
17. Return to the Sources pane to add more fields to your template. Under Sources click Circulation, then select
Check Out Date/Time from the middle Field Name pane.
Chapter 27. Creating Templates
285
18. Select Year + Month in the right hand Field Transform pane and click Add Selected Fields
19. Check Out Date/Time will appear in the Displayed Fields pane. In the report it will appear as a year and month
(YYYY-MM) corresponding to the selected tranform.
20. Select the Check Out Date/Time row. Click Alter Display Header and change the column header to Check
out month.
Chapter 27. Creating Templates
286
21. Move Check out month to the top of the list using the Move Up button, so that it will be the first column in an
MS Excel spreadsheet. Now, the report output will sort by the checkout month first, then by shelving locations.
Note the Change Transform button in the bottom left hand pane. It has the same function as the upper right Field
Transform pane for fields that have already been added.
27.2. Applying Filters
Without filters, all records in the database will be in the result, which is seldom desired, especially in Sitka's context
where libraries share the same database. So some filters should be applied to keep out the unwanted records.
The following procedure shows how to add filters to the example template:
1.
Select the Base Filters tab in the bottom Template Configuration pane.
Chapter 27. Creating Templates
287
2.
For this circulation statistics example, select Circulation → Check Out Date/Time → Year + Month and click
on Add Selected Fields. You are going to filter on the checkout month.
3.
Select Check Out Date/Time. Click on Change Operator and select In list from the dropdown menu. This
operator allows you to count circulations done within each month for several months by just one report.
Chapter 27. Creating Templates
288
4.
To filter on the location of the circulation select Circulation → Circulating library → Raw Data and click
on Add Selected Fields.
5.
Select Circulating Library and click on Change Operator and select Equals. Note that this is a template, so
the value for Equals will be filled out when you run the report.
For multi-branch libraries, you would select Circulating Library with In list as the operator, so you could
specify multiple branch(es) when you run the report.
Refer to Template Terminology for details of Transforms and Operators, and Aggregate and Non-aggregate
filters.
Chapter 27. Creating Templates
289
6.
You may add a hint to the filter, e.g. explaining the function of the filter, what value is expected when setting
up the report, etc. Select the filter and click Change Field Hint.
In the above example, we added some instruction on how to fill up the filter when setting up the report. The
hint will show up on the report creation screen. Below is how it looks like on the report creation screen.
7.
Once you have configured your template, you must name and save it. Name this template Circulations by
month for one library. You can also add a description. In this example, the title is descriptive enough, so a
description is not necessary. Click Save.
Chapter 27. Creating Templates
290
8.
Click OK.
9.
You will get a confirmation dialogue box that the template was successfully saved. Click OK.
The bottom right hand pane is also a source specifier. By selecting one of these rows you will limit the fields that
are visible to the sources you have specified. This may help to find out the source of the fields, e.g. a circulating
library is from the circulation table or item table. Use Ctrl+Click to select or deselect items.
Once a template is saved, it can not be edited anymore. To make changes you will need to clone it and edit the
clone. This will ensure that the work you have done will not be lost. As mentioned before, creating a template is
complex. The first try seldom gets the perfect result. Your subsequent changes may not always improve the result.
You may need to refer back to your old version. Make changes step-by-step. Check the correctness of the result
on each step. This may help you to find out the exact cause of the issue. After you have the desired template, you
may delete all the interim ones.
The above paragaphs described how to create a template from scratch with a very simple example. You may
choose instead to use one of the generic templates created by the Sitka team to meet common reporting needs (see
Chapter 32, Shared Templates in SITKA_templates). However, knowing how a template is created will help you
understand the report structure and is recommended as an introduction to editing template fields and filters.
Chapter 27. Creating Templates
291
Chapter 28. Generating Reports from Templates
Now you are ready to run a report from the template you have created.
1.
Find the template you just created in the Template folder. In the My Folders section, click the arrow next to
Templates to expand this folder and select circulation.
2.
Select the box beside Circulations by month for one library. Select Create a new report from selected template
from the dropdown menu. Click Submit.
3.
Complete the first part of report settings. Only Report Name
Chapter 28. Generating Reports from Templates
and Choose a folder...
are required fields.
292
Template Name, Template Creator, and Template Description are for informational purposes only. They are
hard coded when the template is created. At the report definition stage it is not possible to change them.
Report Name is required. Reports stored in the same folder must have unique names.
Report Description is optional but may help distinguish among similar reports.
Report Columns lists the columns that will appear in the output. This is derived from the template and cannot
be changed during the report definition.
Pivot Label Column and Pivot Data Column are optional. Pivot tables are a different way to view data. If
you currently use pivot tables in MS Excel it is better to select an Excel output and continue using pivot tables
in Excel. Please note that Pivot tables are suitable to some result data only.
You must choose a report folder to store this report definition. Only report folders under My Folders are
available. Click on the desired folder to select it.
4.
Select values for the Circulation > Check Out Date/Time. Use the calendar widget or manually enter the desired
dates (always in YYYY-MM or YYYY-MM-DD format), then click Add to include the date on the list. You
may add multiple dates with an InList operator by repeating the above step.
The Transform for this field is Year + Month, so even if you choose a specific date (2009-10-20) it will appear
as the corresponding month only (2009-10).
5.
Select a value for the Circulating Library.
Chapter 28. Generating Reports from Templates
293
6.
Complete the bottom portion of the report definition interface, then click Save.
Select one or more output formats. In this example the report output will be available as an Excel spreadsheet,
an HTML table (for display in the staff client or browser), and as a bar chart. Please note that charts are suitable
to some result data only.
If you want the report to be recurring, check the box and select the Recurrence Interval as described in
Recurring Reports. In this example, as this is a report that will only be run once, the Recurring Report box
is not checked.
Select Run as soon as possible for immediate output. It is also possible to set up reports that run automatically
in the future.
It is optional to fill out an email address where a completion notice can be sent. The email will contain a
link to a password-protected report output (staff login required). If you have an email address in your Local
System Administrator account, it will automatically appear in the email notification box. However, you can
enter a different email address or multiple addresses separated by commas.
Select a folder for the report's output.
7.
You will get a confirmation dialogue box that the Action Succeeded. Click OK.
Once saved, reports stay there forever unless you delete them. When a report is deleted all the linked output files
will be deleted, too.
Chapter 28. Generating Reports from Templates
294
With version 2.8, report files are viewable and editable. You may view the contents of a report. You can generate
a new report based on the past report file or re-schedule a recurring report. See Viewing/Editing/Rescheduling
Reports for details.
The required value for filters should be in a format corresponding to the data transform. For example, for a
call number field transformed to First Continuous Non-space string, you need to put in the call number prefix;
for a field transformed to Count you need to give an integer. See Template Terminolgoy section for more on
Data Transforms.
Action corresponds to Operator used for filter fields. It specifies how the given value will be compared with the
field value. See Template Terminolgoy section for more on Operators.
When creating a report, you may disable an unwanted filter in the template by choosing an appropriate value for
it. For example, if a template lists items created within a time frame, specify a time frame between "1900-01-01"
and "today" to cover the whole collection; select all copy statuses on the list to bypass the filter on item status.
If the calendar widget is not provided for a date filter, key in the date in format yyyy-mm-dd.
Chapter 28. Generating Reports from Templates
295
Chapter 29. Viewing Report Output
Once a report is finished, the output is stored in the specified Output folder and will remain there until manually
deleted. Evergreen sends an email with a link to the output if an email address(s) is supplied when the report was
set up.
1.
To view the report output in the staff client, open the reports interface from Admin (-) → Local Administration
→ Reports
2.
Click on Output to expand the folder. Select Circulation (where you just saved the circulation report output).
3.
View report output is the default selection in the dropdown menu. Select Recurring Monthly Circ by Location
by clicking the checkbox and click Submit.
Click on the report name in blue colour, you will see the template name and report description field.
Chapter 29. Viewing Report Output
296
4.
A new tab will open for the report output. Select either Tabular Output or Excel Output. If Bar Charts was
selected during report definition the chart will also appear.
5.
Tabular output looks like this:
Chapter 29. Viewing Report Output
297
6.
If you want to manipulate, filter or graph this data, Excel output would be more useful. Excel output looks
like this in Excel:
Chapter 29. Viewing Report Output
298
Chapter 30. Running Recurring Reports
Recurring reports are a useful way to save time by scheduling reports that you run on a regular basis, such as monthly
circulation and monthly patron registration statistics. When you have set up a report to run on a monthly basis, you
may request an email informing you that the report has successfully run. You can click on the link in the email that
will take you directly to the report output. You can also access the output through the Reports interface as described
in Chapter 29, Viewing Report Output.
To set up a monthly recurring report, follow the procedure in Generating Reports from Templates but make the
changes described below.
1.
Select the Recurring Report check-box and set the recurrence interval to 1 month.
2.
Do not select Run ASAP. Instead schedule the report to run early on the first day of the next month. Enter the
date in YYYY-MM-DD format.
3.
Ensure there is an email address to receive completion emails. You will receive an email completion notice
each month when the output is ready.
4.
Select a folder for the report’s output.
5.
Click Save Report. .
Chapter 30. Running Recurring Reports
299
6.
You will get a confirmation dialogue box that the Action Succeeded. Click OK.
With the above settings, you will get an email on the first day of each month with a link to the report output. By
clicking this link it will open the output in a web browser. It is still possible to login to the staff client and access
the output in Output folder.
Always use 'relative date' for recurring reports. Date is a filter on nearly every template. When setting up a
recurring report, always choose Relative Date, instead of Real Date for any date filter on the report creating screen.
When using relative date the actual date will be calculated when the report runs. Unlike a real date, the actual value
of relative date is adjusted according to the run time. For example, if the report runs at 2012-10-10 23:00, a relative
date transformed to YYYY-MM of "1 month ago" will be Sept, 2012; while a relative date transformed to YYYYMM-DD of '1 day ago" will be 2012-10-09. When it runs at 2012-11-10 23:00 "1 month ago", it will be Oct, 2012,
while "1 day ago" will be 2012-11-09. The date goes by calendar day or month.
How to stop an existing recurring report? To stop a recurring report, you may delete the pending output from
Pending area in Output folder. You may also delete the report from Report folder. But deleting the report will delete
all the output files generated by it, too.
How to make changes to an existing recurring report? Sometimes you may wish to make changes to a recurring
report, e.g. the recurrence interval, generation date, email address to receive completion email, output format/folder
or even filter values (such as the number of days overdue). You may do it by editing the report. See Viewing/
Editing/Rescheduling Reports for details.
Report running interval should correspond to the date filter. For example, if the template filters on a date instead
of month, a recurring report running with a monthly interval may miss a day or capture an extra day's data. So
it works better if the filter can be transformed to month.
Schedule your monthly report to run early next month, but not at the end of the current month.
Once you have been on Evergreen for a year, you can set up your recurring monthly reports to show comparative
data from one year ago. To do this select relative dates of 1 month ago and 13 months ago.
Chapter 30. Running Recurring Reports
300
Chapter 31. Viewing/Editing/Rescheduling Reports
With Evergreen version 2.8, you may view or edit an existing report to change the values for filters, run-time, email
reminder recipient, recurring interval, etc. You may generate a new report by editing an existing non-recurring
report, or keep the recurring report but update the values for filters or use a new schedule. For example, you may
reschedule a recurring report to run at 2am, instead of 10am or change the email reminder recipient. Or you may
update the date fields in last month's report to generate new reports for this month.
To view or edit a report, find the report you wish to view/edit in the Reports folder. Click View or Edit in the Edit
Column. We choose Edit in the below example.
The report is loaded on report creation screen. You may make the changes as when you create a new report. Once
all the necessary changes have been made, click Save Report to update the existing report or Save as New to create
a new report. Note that if using Save as New, you may need to update the report name or choose a different report
folder. Evergreen does not allow two reports in one folder to share the same name.
When choosing Save as New to create a new report, the old report will be kept. If it is a recurring report, you will
continue receiving the outputs from it.
When choosing View a report, the above screen will be displayed in non-editable mode.
In order to get a new report by editing a non-recurring report, you have to give the report a new name or save it
in another folder. Evergreen does not stop you editing a non-recurring report. But without using Save as New,
the new report will not be generated.
Chapter 31. Viewing/Editing/Rescheduling Reports
301
Chapter 32. Shared Templates in SITKA_templates
The Sitka support team has created generic templates for commonly requested reports and shared them under the
SITKA_templates folder. This chapter describes how to make local copies of these templates for routine reports or
as a starting point for customization. When creating a new template it is a good idea to review the shared templates
first: even if the exact template you need does not exist, it is often faster to modify an existing template than to build
a brand new one. A Local System Administrator account is required to clone templates from the Shared Folders
section and save them to My Folders.
32.1. What's in SITKA_templates
The Sitka support team uses a dedicated staff account, SITKA_templates, to share ready-to-use templates. Below
is what a Local System Administrator can see after going to the Reports interface, then follow the path to Shared
Folders, click the arrow (or + sign) in front of Templates, and then SITKA_templates.
From Acquisitions to Typical Week Stats are the subfolders containing various templates. Templates using the same
source table are usually grouped together under one subfolder. These templates are created based on the anticipation
that most libraries may need such reports. The Support Team tends to make these templates generic, which means
they contain more information. Individual libraries may have slightly different requirements. You can remove the
Chapter 32. Shared Templates in SITKA_templates
302
unwanted information when cloning the templates or choose appropriate values for some filters to disable them.
These templates are usually referred to as Sitka standard templates.
The following is a guideline of the templates for various kinds of reports. Please note that the Support Team regularly
maintains the templates. The list below may not be the latest.
Overdue reports. Find overdue reports in Circulation folder. There are templates capturing checkouts with due
date within a selected time frame for all patrons or those without email address (phone list) or the due date is before
a selected date. You may use these templates to set up your overdue reports capturing items which are at a certain
number of days overdue.
Circulation statistics reports. These templates are in Circulation folder. The regular circulation statistics can
be grouped by various criteria: patron's home library, profile and/or stat cat; items' owning library and/or shelving
location. There are two sets of templates: one set limit the circulation period by selected dates; the other selected
month(s). The latter are for monthly recurring reports.
Other circulation statistics related templates are:
• non-catalogued circulation count
• pre-catalogued circulation count
• pre-catalogued circulation count for items with dummy title prefix of "ILL:" (ILL statistics via pre-catalogued
circulation)
• checkin count
• in-house use count for non-catalouged items
• in-house use count for catalogued items
• in-house use count per title
Other circulation related templates are:
• lost and paid item list
• lost with outstanding bills item list
• claimed returned item list
Reports on collection. These templates are in Holdings folder. You will find templates counting items or titles
of your whole collection or catalogued within the selected time period (new title/items statistics). The numbers are
grouped by shelving location and/or circulation modidfier.
Another group of templates in Holdings folder are item/title lists for items meeting various criteria: having selected
shelving location(s) and/or circulation modifier(s), copy stat cat, barcode prefix, call number prefix or within a call
number range; or being catalogued (new title/item list), marked missing, lost or deleted within selected time period.
In this folder, you will also find templates listing pre-catalogued items and items with certain circulation history
(items with fewer circulation count for weeding report or more circulation count for popular title/item report).
Chapter 32. Shared Templates in SITKA_templates
303
Patron reports. All patron reports are in Patrons folder. You may find templates counting patrons by profile
group and/or patron stat cat, registered or expired/expring within a selected time period, or with circulation history
within a selected time period.
Another group of templates list selected information for patrons meeting some conditions such as: email list for all
or those patrons having certain stat cat; names and barcode for patrons without circulation history within selected
time frame; patrons born before a selected date (seniors list); patrons exceeding maximum fine limit.
Besides, there is a template that counts patron's OPAC logins and another that summarizes the answers to patron
survey question(s).
Reports on bibliographic information . It is not easy to generate reports based on bibliographic information due
to the bibliographic record structure. But a simple report that lists the values in a selected MARC tag and subfield
for the whole collection is possible. And the bibliographic records can be limited by a selected value of a MARC
tag and subfield. These templates are in Bibliographic Records folder.
Bills and payments. You can find the templates listing the details of various kinds of payments made in a selected
time period, and a template listing bills with negative balance.
Hold reports. Holds related reports are in this folder, including reports for holds that have been long time
outstanding (requested some time ago but not filled yet), cancelled, or have no eligible copies to be filled. There
are other templates that count the total number of holds placed or fulfilled within a time span, and the hold count
per title for popular titles.
Inventory. The two templates in Inventory folder list items based on whether the item showed up (being scanned
on shelves or returned) in the library while the inventory was taken. The result of the Inventory - un-scanned items
are the potential missing items.
Library setting and policy related reports.
Find them in Library Configuration folder.
Other folders. If your library uses the Acquisitions Module or the Booking Module, you may find related
templates in the relevant folders.
Chapter 32. Shared Templates in SITKA_templates
304
Custom Templates folder. If you open this folder, you will see a subfolder for your library federation with subsubfolders for your library and other libraries within your library federation.
These folders are created when the Support Team creates or customizes templates for individual libraries. The
templates go to these folders when there are similar templates in the standard folders already, or the Support Team
does not anticipate wide use of the templates. The Support Team tries to limit the number of templates in each
standard folder so that staff may find the target template easily.
32.2. Clone a template from SITKA_templates
The steps below assume you have already created at least one Templates folder. If you have not done so, please
see Chapter 26, Folders.
1.
Access the Reports interface from the Admin menu under Local Administration → Reports
Chapter 32. Shared Templates in SITKA_templates
305
2.
Under Shared Folders expand the Templates folder and the SITKA_templates subfolder. To expand the folders
click on the grey arrow or folder icon. Do not click on the blue underlined hyperlink.
3.
Click on the Circulation (SITKA) subfolder.
Chapter 32. Shared Templates in SITKA_templates
306
4.
Select the template you wish to clone. In this example, we are cloning the Monthly Circulation by Shelving
Location template. From the dropdown menu choose Clone selected templates, then click Submit.
By default Evergreen only displays the first 10 items in any folder. To view all content, change the Limit output
setting from 10 to All.
5.
Choose the folder where you want to save the cloned template, then click Select Folder. Only template folders
created with your account will be visible. If there are no folders to choose from please see Chapter 26, Folders.
Chapter 32. Shared Templates in SITKA_templates
307
6.
The cloned template opens in the template editor. From here you may modify the template by adding, removing,
or editing fields and filters as described in Chapter 27, Creating Templates. Template Name and Description
can also be edited. When satisfied with your changes, click Save.
7.
Click OK in the resulting confirmation window.
32.3. Modify a template
Once saved it is not possible to edit a template. To make changes, clone the template and change the clone.
Chapter 32. Shared Templates in SITKA_templates
308
To modify a template, repeat the above steps 1-6. You will see the template open on Template Creating screen.
Click Displayed Fields you will see all the displayed fields. To remove one, highlight it and click Remove Selected
Field. You may move a field up or down the list, which will affect the sorting of the result records. You may also
change the column label or the transform of the field by using respective buttons. See Field Transforms section
for more information.
Removing displayed fields usually does not affect the result set. But sometimes it does, esp. when the report
displays the count of records by each group. Sometimes some fields may contain important information.
Removing them may cause misunderstanding the results. Usually such fields are explained in the template
Description.
cautious
you delete
such
fields. you may use the Source Browser to the right to display
If you are notBeclear
wherewhen
a displayed
field
is from,
fields from the selected table only.
Chapter 32. Shared Templates in SITKA_templates
309
To add a displayed field, go to the Sources to open the source table to find the field or follow the links to the
appropriate table which contains the field you want to display. Click the text in the Sources to display fields in the
table in Field Name pane. Click the arrow in front of the text to display the linked tables in the Sources pane.
Once find the field, select it in Field Name pane and the appropriate transform in Field Transform pane. Click Add
Selected Fields.
The below screenshot shows how to add Precat Dummy Title field. Find Circulating Item table, which is linked
from Circulation. Click it (text) to display its fields in Field Name. Select Precat Dummy Title, and then Raw Data
in Field Transform.
You can not change the starting source table, but have to follow the links to tables in the Sources pane. Changing
the starting table will remove all existing fields, meaning building a new template from scratch.
Select Base Filters or Aggregate Filters to add or remove filters. The steps are the same as adding or removing
displayed fields. Be careful with filters as usually changing filter makes a difference in the result set.
32.4. Examples of using Sitka's templates
Please clone templates in SITKA_templates. and set up your reports from your own copy. This is to avoid
any potential impact that may be resulted from changing the orignal templates. The Support Team regularly
maintains these templates. Deletion may happen. Deleting a template will delete all linked reports and output
files.
Below are a few screenshots showing you how to set up the reports based on some templates in SITKA_templates.
Some explanation is added in the boxes with light coloured background.
Chapter 32. Shared Templates in SITKA_templates
310
1. Setting up a monthly recurring report by using template: Monthly Circulation by Shelving Location (updated to
include item's owning library) in Circulation folder:
Chapter 32. Shared Templates in SITKA_templates
311
2. Setting up a weekly recurring report by using template: Overdues Within Time Span - for Patrons without Email
in Circulation folder:
Chapter 32. Shared Templates in SITKA_templates
312
3. Setting up a one-time report by using template: Circulation Statistics by One Patron Stat Cat within timespan
in Circulation folder:
Chapter 32. Shared Templates in SITKA_templates
313
4. Setting up a report by using template: Items List by Shelving Location in Holdings folder:
Chapter 32. Shared Templates in SITKA_templates
314
5. Setting up a report by using template: Weeding - Items with few circulations since a selected month in Holdings
folder:
Chapter 32. Shared Templates in SITKA_templates
315
Chapter 33. Commonly used tables and views in
Evergreen database
You are creating/updating records when you work on Evergreen. Reporting means you extract some of these records
from the database that meet your requirements. Understanding the Evergreen database and how records are created/
updated when tasks are performed on the staff client, will help you when you create templates and set up reports
on the Reports interface.
There are various kinds of data used by Evergreen, such as patron's names, address, barcode, item's barcode, shelving
location, status, price; checkout date, returned date, fines and bills and so on. This data must be organized in an
efficient and effective way to make sure they can be stored and retrieved easily.
Evergreen uses various tables to keep each type of records. You can visualize a table as an MS Excel Worksheet:
a specified number of columns with unlimited number of rows. Each column is called a field in the database
terminology and each row is a record. There are many tables in Evergreen database. Each contains a certain type
of records. The fields in a record you see on the Staff Client may be from more than one tables. For example, in
a patron record, you can find patron's names, address, phone number, barcode, profile, etc. all in one record. But
in the database, patron's address, barcode, and profile are in separate tables. You do not need to know where these
fields are from when editing a patron record on the Staff Client, but you have to know it when creating a template
on the Reports interface.
Since various information about one patron is saved in separate tables, there must be a mechanism of matching
the information about one patron correctly to make sure all information is about the same patron. This is done via
recording the patron id (a unique number in the main patron record) in every related table. So via recording the id
of a record in another table, two tables are connected. The connections among many tables are pre-made by the
Reports interface. You just need to follow the link to find the data saved in the related table. Below is a simplified
diagram showing the connections among some commonly used tables/views on the Reports interface, which can be
a guide for you to find various fields in different tables. Some explanation of these tables is after the diagram.
Chapter 33. Commonly used tables and views in Evergreen database
316
Commonly used tables and views
ILS User (aka Patron or User): contains patron records. A patron's name, phone number, email address, and
registration date can all be found in this table. Follow the links to the table Current Library Card to find a patron's
current barcode, Circulation to find the circulation history, Home Library, Mailing Address, Physical Address, and
Main Profile Group, etc. to find more information about the patron.
Item (aka Circulating Item): contains copy records. Item's barcode, creation date, active date, last edited date,
last copy status change date and price are in this table. For related information like call number, circulating library,
circ modifier, status, shelving location, etc., you need to follow the links to the respective table to find them. For
title information you need to follow the Call Number table to the Bibliographic Record table to find it. Follow the
link to the Circulation table to find an item's circulation history.
Pre-catalogued item information such as dummy ISBN, title and author are also in this table. When a pre-catalogued
item is checked out, an item record is created. If the barcode is already in the table and the item is not marked
deleted, the item record will be updated with the new title, author, etc.
Bibliographic Record. Contains title information. To find the basic bibliographic information such as title,
author, ISBN, etc., follow the link to Simple Records Extract.
Circulation. Contains circulation records, including pre-catalogued item circulations. When an item is checked
out, a circulation record is created. When an item is renewed, the existing circulation record is closed and another
record is created. Below are some important timestamps in this table.
Checkout Date/Time: the time when an item is checked out
CheckIn Date/Time: the effective date when the item is treated as checked-in
CheckIn Scan Date/Time: the time when the check in action is taken
Due Date/Time: For all daily loans the due time is 23:59:59 of the day in Pacific Time. Hourly loans have specific
time with time zone information.
Fine Stops Date/Time: the date when the Maximum Fine limit has been reached, or the item is returned, marked
lost or claimed returned. After this date, the fine generator will not create new overdue fines for this circulation.
Record Creation Date/Time: the date and time when the circulation record is created. For online checkout it is the
same as Checkout Date/Time. For offline checkout, this date is the offline transaction processing date.
Transaction Finish Date/Time: the date when the bills linked to this checkout have been resolved. For a regular
checkout without bills this field is filled with the checkin time when the item is returned.
The circulating_library field in this table refers to the checkout location. The circulating_library in the Item table
refers to the item's owning library.
Non-catalogued Circulation.
When a non-catalogued checkout is recorded, a record is created in this table.
Non-catalogued item category can be found in the linked Non-Cat Item Type table.
In-house Use.
Contains the catalogued item in-house use records.
Non-catalogued In-house Use. Contains the non-catalogued item in-house use records. Follow the link to Item
Type to find the non-catalogued item category.
Chapter 33. Commonly used tables and views in Evergreen database
317
Copy Transit.
When a copy is sent in transit, regardless of whether it is going back to its circulating library or
going to fill a hold, a copy transit record is created in this table. Follow the link to Transit Copy to find the item
information.
Hold Transit. When a copy is sent in transit to fill a hold, a hold transit record is created in this table and the Copy
Transit table. So this table contains a subset of records of the Copy Transit table. You may find hold information
following the link to Hold Requiring Transit. Follow the link to Transit Copy to find the item information.
Hold Request.
When a hold is placed, a hold record is created in this table. You may find the hold receiver's
information in Hold User. Requesting User is the person who takes the placing hold action. It can be the hold receiver
or a staff member. Generally if the Hold User is different from the Requesting User, this is a staff-placed hold. Hold
Copy Map equals Eligible Copies. Copies that can be used to fill the hold are in this table.
Target Object ID is shown as a link. But there is no linked table in the Source pane. The value in this field could
be a bibilographic record id, a volume record id or a copy record id depending on the hold type.
Timestamps in this table:
Capture Date/Time: The time when the hold achieves hold shelf or hold-in-transit status.
Fulfillment Date/Time: the time when the on-hold item is checked out.
Hold Cancel Date/Time: the time when the hold is cancelled.
Hold Expire Date/Time: This could be the date calculated based on your library's default Hold Expire Interval or
a selected date when placing the hold.
Last Targeting Date/Time: The last time the hold targeting program checked for a target copy for the hold. It usually
has the same time as the Hold Request Time. It is usually not useful for reporting, But it may serve as an indicator
of whether the request time has been edited.
Notify Time: when the email notice is sent out.
Request Date/Time: Usually this is when the hold is placed. But it is editable on the staff client. So sometimes this
may be the request time chosen by the staff.
Shelf Expire Time: the date is calculated based on the Shelf Time and your library's Default Hold Shelf Expire
Interval.
Shelf Time: when the hold achieves On Hold Shelf status.
Thaw Date: the activation date for a suspended hold.
Bills tables and views.
Scroll down to the bottom of the Source list. Hover your mouse over All Available Sources. A new list will pop up
to the right. Move your cursor to the list and scroll down to Billing Line Item. This table contains all the billing line
items such as each day's overdue fines and the grocery bills created manually. The records in this table are viewable
on the Full Details screen on Bills in the staff client.
Billable Transaction with Billing Location: this table contains the summary records of billings and payments. Most
information in these records is displayed on Bills or Bills History screen. The records are updated when either
Chapter 33. Commonly used tables and views in Evergreen database
318
the related billings or payments are updated. Transaction ID is the bill ID. It is also the circulation record ID for
circulation bills. Transaction Start Time is the grocery bill creation time or circulation checkout time. Transaction
Finish Time is when the bill is resolved.
Payments tables and views.
Payments: ALL contains all payment records. When a lump sum of payment is made on the staff client, one or
more payment records are created depending on the number of bills it resolved or partially resolved. One bill may
be resolved by multiple payments.
Payments: Brick-and-mortar contains all payments made at the circulation desk.
Payments: Desk: Cash/Check/Credit Card payment.
Payments: Non-drawer Staff: Forgive/Work/Goods/Patron Credit payments.
A view is a virtual table which contains records meeting defined requirements. The fields in a view can be from
one or more tables. Before you use a view for your report, you need to make sure the view contains the type of
records that you want to report on. For example, Overdue Circulation is a view which contains circulation records
without checkin date and the due date past "today". It does not work for a report on last month's circulation
statistics, but it makes an overdue report easier.
By default, tables are often, but not always, joined by left join. Other join types may be available. Select
the Enable nullability checkbox under the source list on Template Creation screen (before linked tables are
displayed) to list all available join types. You may see None, Child, Parent, Default in Nullable column beside
the table names. None means a inner join; Parent is a right outer join; Child left outer join. Default is unknown,
but likely left outer join.
Chapter 33. Commonly used tables and views in Evergreen database
319
Chapter 34. Template Terminology: Data Types,
Transforms, and Operators
Data Types
The central column of the Database Source Browser lists Field Name and Data Type for the selected database table.
Data Type is associated with each field. It tells what kind of information is stored in the field. The system handles
the information differently based on the data type. Each data type has its own characteristics and uses:
Data Type
Description
Notes
Boolean
Contains either “true” or
“false”.
Examples in Evergreen: “deleted” in item/patron record,
“circulate?” in item record.
ID
Unique number assigned by
the database to identify a
record
IDs look like numbers, but the id data type is treated
specially by the software for determining how tables are
linked. Id is a good candidate field for counting records.
Integer
A number like 1, 2, 3.
Examples in Evergreen: "remaining renewal count" in
circulation record, "claimed returned count" in patron record.
Interval
Time intervals, such as “2
weeks” and “6 months”
Examples in Evergreen: “loan duration” and "grace period"
in circulation record,
Link
It is similar to the id data
Examples in Evergreen: "user id" and "item id" in a
type. It is the id of a record in circulation record. Link outputs a number that is a meaningful
another table.
reference for the database but not of much use to a human
user. You will usually want to drill further down the tree
in the Sources pane and select fields from the linked table.
However, in some instances you might want to use a link
field. For example, to count the number of patrons who
borrowed items you could do a count on the "user id" in the
circulation record.
Money
Monetary amount
Examples in Evergreen: "price" in item record, "billing
amount" in billing record.
Org_unit
Organizational unit. It is a
number. It acts like link data
type.
In Evergreen, libraries are organizational units. In Sitka
context they are organized into a tree structure with
consortium, library federations, libraries/library systems and
Chapter 34. Template Terminology: Data Types, Transforms, and Operators
320
Data Type
Description
Notes
branches for library systems. To filter on a library, make sure
you choose the field having org_unit data type. To display
a library, it is a better option to drill down to the org unit
record to display the "name" of it.
Text
Text field. Usually it takes
whatever is typed into the
field.
Examples: "call number label" in call number record,
"patron’s names".
Timestamp
A very detailed time such as
2007-11-25 17:54:26-07
Example: checkout time in circulation record, last status date
in item record.
Field Transforms
Transforms determine how data is processed when it is retrieved from the database. Different data types can be
transformed differently. Not all transforms are available to a certain data type.
Raw Data.
To display the data exactly as it is stored in the database. It is available to all data types.
Date.
This transform presents a timestamp as a human-readable date in yyyy-mm-dd format. For example,
timestamp 2007-11-25 17:54:26-07 will be displayed as 2007-11-25. Date is available to timestamp field.
Year + Month.
Presents a timestamp as the year and month in yyyy-mm format. For example, 2007-11-25
17:54:26-07 will be displayed as 2007-11. If filtering on a timestamp transformed to Year + Month, all days in the
calendar month are included. It is available to timestamp field.
Upper Case/Lower Case.
Transforms text to all upper/lower case. They are only available for the text data type.
Substring. This transform can be applied to filters, not display fields. It matches the given value with a continuous
string of characters in the field. For example, if a given value is “123’ and the match is with a call number field,
call numbers like ‘123.34’, ‘ANF 123.34’, ‘JNF 233.123’, etc. will be in the result list. Substring is only available
to text data type.
First Continuous Non-space string. The first word (or string of numbers and/or characters until the first spacing)
in a field is returned by this transform. For example, this transform will return “E” from text “E DOR”, “E 123”,
etc. This transform is available to the text data type.
Count. This transform counts the records found. Though you can count by any field, very often id field is used.
Count is available to text, integer, id, money, and timestamp.
Chapter 34. Template Terminology: Data Types, Transforms, and Operators
321
Count Distinct. This transform counts the number of records with unique value in the field. If two records have
the same value in the field, they will be counted once only. A typical example of using Count Distinct is counting
the number of active patrons who borrowed items at a library. Each patron can be counted once only but he/she
may borrow multiple items. Transforming the patron id in circulation record with Count Distinct will result in the
required number. Since each patron has a unique id, she/her will be counted once only. Count Distinct is available
to text, integer, id, money, and timestamp.
Max. It compares the values in the field of all result records and then returns the one record with the highest
value. Max is available to text, integer, money, and timestamp. For timestamp the highest value means the latest
date. For example, if a checkout date is transformed by Max, the returned date is the last checkout date.
Min. It works the same way as Max except that it returns the lowest value. Min is available to text, integer,
money, and timestamp.
Output Type
Note that each transform has either an Aggregate or Non-Aggregate output type.
Whether an output is Non-Aggregate or Aggregate depends on whether the output value relies on a single record or
several records. It is Non-Aggregate if the result is strictly from a single record, while it is Aggregate if it is from
several records. For example, the value of Count transform of circulation id will increase by 1 whenever a record is
found. So the output is Aggregate. The output of Max transform of checkout date is technically not aggregated, but
there may be several records invovled before the highest value is deterrmined.
When used as filters, non-aggregate and aggregate types correspond to Base and Aggregate filters respectively. To
see the difference between a base filter and an aggregate filter, imagine that you are creating a report to find out
the popular items that were circulated more than 3 times last month. This would require a base filter to specify the
month of interest and an aggregate filter on the count of circulation record on each item.
Operators
Operators describe how two pieces of data can be compared to each other. They are used when creating filters in a
template to determine which records should be included in the result. The record is included when the comparation
returns "TRUE". The possible ways of comparing data are related to data type and data transforms. Below are some
commonly used operators.
Chapter 34. Template Terminology: Data Types, Transforms, and Operators
322
Equals.
Compares two operands and returns TRUE if they are exactly the same.
In List. It is similar to Equals, except it allows you specify multiple parameters and returns "TRUE" if the field
is equal to any one of the given values.
Not In List . It is the opposite of In List. Multiple parameters can be specified. TRUE will be returned only when
none of the parameters is matched with the value in the field.
Greater Than.
This operator returns TRUE if a field is greater than your parameter. For text fields, the string
is compared character by character in accordance with the general rule that numerical characters are smaller than
alphabetical characters and upper case alphabeticals are smaller than lower case alphabeticals; for timestamps
“Greater Than” can be thought of as “later than” or "after".
Less Than.
parameter.
This operator returns TRUE if a field is less than, lower than, earlier than or smaller than your
Between. Two parameters are required by this operator. TRUE is returned when the field value is Greater Than
or Equal to the smaller given value and Less Than or Equal to the bigger given value. The smaller parameter should
always comes first when filling in a filter with this operator. For example: between 3 and 5 is correct. Between 5
and 3 will return FALSE on the Reports interface. For timestamp earlier date always comes first.
Is NULL or Blank. Returns TRUE for fields that contain no data or blank string. For most intents and purposes
this operator should be used when there is no visible value in the field.
Contains Matching Substring.
is case-sensitive.
This operator checks if any part of the field matches the given parameter. It
Contains Matching Substring (Ignore Case).
it is not case-sensitive.
This operator is identical to Contains Matching Substring, except
Chapter 34. Template Terminology: Data Types, Transforms, and Operators
323
Part VI. Serials
Table of Contents
35. Serials ...............................................................................................................................................
35.1. Serials Videos .........................................................................................................................
35.2. Administration ..........................................................................................................................
36. Copy Template ..................................................................................................................................
36.1. Create a Copy Template ..........................................................................................................
36.2. Edit a Copy Template ..............................................................................................................
36.3. Delete a Copy Template ..........................................................................................................
37. Creating Serial Records .....................................................................................................................
37.1. Serial Control View ..................................................................................................................
37.2. Managing Serials Records .......................................................................................................
37.2.1. Create a Subscription ...................................................................................................
37.2.2. Create a Distribution .....................................................................................................
37.2.3. Create Captions and Patterns .......................................................................................
37.2.4. Edit Captions and Patterns ..........................................................................................
37.2.5. Pattern Code Wizard ....................................................................................................
37.2.6. Create an Issuance .....................................................................................................
37.2.7. Generate Predictions ....................................................................................................
38. Receiving Serials ...............................................................................................................................
38.1. Receive serials ........................................................................................................................
38.2. Batch Receive Serials .............................................................................................................
39. OPAC ................................................................................................................................................
39.1. Searching for Serials in the OPAC ...........................................................................................
39.2. OPAC Serials Display ..............................................................................................................
40. Reports ..............................................................................................................................................
40.1. Serials Report Templates .........................................................................................................
41. Special Issues ....................................................................................................................................
41.1. Add an Issuance .....................................................................................................................
41.2. Edit an Issuance .....................................................................................................................
41.3. Delete an Issuance .................................................................................................................
42. Binding Process .................................................................................................................................
42.1. Binding Template ....................................................................................................................
42.2. Binding Units ...........................................................................................................................
43. Routing ..............................................................................................................................................
43.1. Serials Routing ........................................................................................................................
43.2. Serials Batch Receive .............................................................................................................
44. Caption and Pattern Codes ................................................................................................................
44.1. Caption and Pattern Codes ......................................................................................................
326
326
326
330
330
333
333
335
335
336
336
340
341
342
343
347
349
352
352
356
358
358
358
359
359
360
360
365
366
367
367
368
371
371
373
377
377
Part VI. Serials
325
Chapter 35. Serials
Adapted with permission from original material by the Evergreen Community
This documentation is intended for users who will be ordering subscriptions, distributing issues, and receiving issues
in Sitka Evergreen. The described processes have been tested by Sitka support in Sitka's shared environment and
are the sole supported workflow for serials in Sitka Evergreen. Sitka support strongly recommends adherence to
this prescribed workflow.
35.1. Serials Videos
1.
Introduction to Serials: This 2 minute video provides a brief overview of the serials module
Click here to view the video
2.
Serials Tutorial in Sitka Evergreen: This 10 minute video outlines the basic procedure for creating a
subscription and receiving Issues.
Click here to view the video
35.2. Administration
The following settings will need to be configured in the Library Settings Editor before you start using the Serials
module.
Chapter 35. Serials
326
1.
Click Admin → Local Administration → Library Settings Editor.
2.
Search or scroll to find Serials: Default display grouping for serials distributions presented in the OPAC.
3.
Click Edit.
Chapter 35. Serials
327
4.
Edit the setting as follows.
• Context: By default your library is selected.
• Value: Enter enum to display issues by enumeration. This value will become your default setting for display
issues in the OPAC.
5.
Click Update Setting.
6.
Search or scroll to find OPAC: Use fully compressed serials holdings..
7.
Click Edit.
8.
Edit the setting as follows.
• Context: By default your library is selected.
• Value: Select True from the dropdown menu to view a compressed holdings statement.
9.
Click Update Setting.
10. Search or scroll to find OPAC: Specify how items are ordered.
11. Click Edit.
Chapter 35. Serials
328
12. Edit the setting as follows.
• Context: By default your library is selected.
• Value: Choose one of the following
• desc: To sort from newest to oldest by active date
• asc: To sort from oldest to newest by active date
• call: To sort by call number
13. Click Update Setting.
Chapter 35. Serials
329
Chapter 36. Copy Template
36.1. Create a Copy Template
You must create at least one template in order to receive serials.
A copy template enables you to specify item attributes that should be applied by default to all copies of serials. You
can create one copy template and apply it to multiple serials or you can create multiple templates. For example, you
may want to create one copy template for Popular Magazines and one template for Juvenile Magazines.
1.
Select Admin → Local Administration → Copy Template Editor.
Chapter 36. Copy Template
330
2.
Click on New Copy Template.
Chapter 36. Copy Template
331
3.
Enter parameters for your new copy template.
Chapter 36. Copy Template
332
4.
Click Save.
36.2. Edit a Copy Template
You can make changes to an existing copy template. Changes that you make to a copy template will apply to any
items that you receive after you edited the template.
1.
Select Admin → Local Administration → Copy Template Editor.
2.
Double-click in the row of the template you want to edit. The copy template will appear, and you can edit
the fields.
3.
After making changes, click Save.
36.3. Delete a Copy Template
You can only delete a copy template that has never been used.
Chapter 36. Copy Template
333
1.
Check the box beside the copy template you would like to delete
2.
Click on Delete Selected.
3.
The copy template is now deleted
Chapter 36. Copy Template
334
Chapter 37. Creating Serial Records
37.1. Serial Control View
The Serial Control view enables you to manage serials in a single tabbed interface. Serial Control view consists
of five tabs.
1. Items: Used to receive issues..
2. Units: Not currently used.
3. Distributions: Can be used to create and manage distributions or streams. We recommend that you access this
information under the Subscriptions tab.
4. Subscriptions: Used to create and manage subscriptions..
5. Claims: Not currently used.
Chapter 37. Creating Serial Records
335
37.2. Managing Serials Records
Create a Subscription
Create a Distribution
Create Captions and Patterns
Pattern Code Wizard
Create an Issuance
Generate Predictions
37.2.1. Create a Subscription
A subscription is designed to hold all information related to a single serial title. Therefore, each library is likely to
have only one subscription per serial title.
A subscription must be added to a catalogue record, so to start you must locate the record in the catalogue. If the
record is not already in the catalogue, you can import it via any of your preferred methods (MARC import, Z39.50
search, etc.)
1.
Search the catalogue. (F3)
Chapter 37. Creating Serial Records
336
2.
Select the bibliographic record for the magazine or periodical.
3.
Click on the title to open the Record Details screen.
4.
Click on Actions for this Record and select Serial Control View.
Chapter 37. Creating Serial Records
337
5.
Click on the Subscriptions tab.
6.
Select the branch that will own the subscription. (Your Library).
Chapter 37. Creating Serial Records
338
7.
Click on Actions for Selected Row , and select Add Subscription.
8.
Complete the subscription information.
• Owning Library: This field is automatically populated with the library you selected in step 5.
• Start Date: Use the calendar to select the date that the subscription begins, and click Apply.
• End Date: Enter the date that the subscription ends. (This date is required to generate renewal reports)
• Bibliographic Record Entry: This field is automatically populated with the record ID of the bibliographic
record.
• Expected Date Offset: (Optional) Enter the difference between the nominal publishing date of an issue and
the date that you expect to receive your copy. For example, if an issue is published the first day of each
month, but you receive the copy two days prior to the publication date, then enter -2 days into this field.
Chapter 37. Creating Serial Records
339
9.
Click Save.
37.2.2. Create a Distribution
You must create a distribution to indicate:
• Which branches should receive copies of a serial.
• The number of copies that should be sent to each branch.
To create a distribution:
1.
Click on the Distribution tab
2.
Click on New Distribution
3.
Complete the Distribution information.
• Apply a new label to the distribution. Example: Magazine Title or Branch Code MPL. Click Apply.
If you are creating multiple distributions (multiple copies of each issue) the name of the label becomes
more important. Multi branch libraries setting up a subscription at a system level will want to use the
branch code as the label to easily determine which copy is sent to each branch.
• The holding library is filled in by default and is the library to which you attached the subscription.
• Display Grouping should be set to Enumeration
• Receive Unit Template: This is the template that should be applied to copies when they are received. Select
a template from the drop down menu and click Apply.
Chapter 37. Creating Serial Records
340
If you have not yet created a serial copy template please refer to 35.1 Create a Copy Template
4.
Click Save.
Instruction on how to setup a Routing List can be found here Serials Routing
37.2.3. Create Captions and Patterns
Caption and Pattern objects define the same material that would be described in an 853, 854, or 855 MARC tag.
Here you define how your issues will be captioned and how often you get them.
1.
Click on the Captions and Patterns tab.
2.
Click the Add New button.
Chapter 37. Creating Serial Records
341
3.
Click Wizard.
Alternatively you can copy and paste a Caption and Pattern string into the empty Pattern Code box. See
Section 44.1, “Caption and Pattern Codes” for a list of pre-defined Caption/Pattern strings to choose from.
Sitka support has created pattern codes for many popular periodicals / magazines. Whenever possible please use
the pattern codes created by Sitka support. If your periodical / magazine is not in the list, contact Sitka support,
or create a pattern using the Pattern Code Wizard.
37.2.4. Edit Captions and Patterns
If the publication pattern changes you will need to delete the current caption/pattern information and enter a new
caption/pattern as well as a new "dummy issuance"
1.
Click the arrow beside the subscription
2.
Click the Captions/Patterns row beneath the subscription.
3.
Click the row with the Caption/Pattern #
4.
Click in the "Pattern Code" box and paste the new pattern code, or click on the button for Pattern Code Wizard
to create a new pattern string.
5.
Click on Modify Caption and Pattern
6.
Add an Issuance as per Section 37.2.6, “Create an Issuance ”
7.
Make predictions as per Section 37.2.7, “Generate Predictions”
Chapter 37. Creating Serial Records
342
37.2.5. Pattern Code Wizard
1.
Click on the Pattern Code Wizard button.
2.
Enumerations:
• To add an enumeration, check the box adjacent to Use enumerations?
• A field for the First level will appear. Enter the enumeration for the first level. A common first level
enumeration is volume,vol., or "v".
• Click Add Enumeration.
• A field for the second level will appear. Enter the enumeration for the second level. A common second level
enumeration is number, or “no.”
• Enter the number of bibliographic units per next higher level.
• Choose the enumeration scheme from the drop down menu.
3.
Calendar:
• To use months, seasons, or dates in your caption, check the box adjacent to Use calendar changes?
• Identify the point in the year at which the highest level enumeration caption changes.
• In the Type drop down menu, select the points during the year at which you want the calendar to restart.
• In the Point drop down menu, select the specific time at which you would like to change the calendar.
• To add another calendar change, click Add Calendar Change. There are no limits on the number of calendar
changes that you can add.
Chapter 37. Creating Serial Records
343
• When you have finished the calendar changes, click Next.
4.
Chronology:
• To add chronological units to the captions, check the box adjacent to Use chronology captions?
• Choose a chronology for the first level. If you want to display the terms such as “year” and “month” next to
the chronology caption in the catalogue, then check the box beneath Display in holding field.
• To include additional levels of chronology, click Add Chronology Caption. Each level that you add must
be smaller than the previous level.
• After you have completed the chronology caption, click Next.
Chapter 37. Creating Serial Records
344
5.
Compress and Expand Captions
• Select the appropriate option for compressing or expanding your captions in the catalogue from the
Compressibility and Expandability drop down menu.
• Choose the appropriate caption evaluation from the drop down menu.
• Choose the frequency of your publication from the drop down menu. For irregular frequencies, you may
wish to select Use number of issues per year:, and enter the total number of issues that you receive each year.
• Click Next.
Chapter 37. Creating Serial Records
345
6.
Regularity Information
• If needed, check box for Use specific regularity information.
• Choose the appropriate information for combined, omitted or published issues.
• If you selected Use number of issues per year: in the previous step, you will need to specify when the issues
are published using the specific regularity information.
• Choose the appropriate frequency and issue. Add additional rows as required.
• Click Finish.
Chapter 37. Creating Serial Records
346
7.
Captions and Patterns
• To complete the wizard, click Create Pattern Code.
• Click Create Caption and Pattern.
37.2.6. Create an Issuance
Issuance is a simple,uncompressed MFHD field 863.
Chapter 37. Creating Serial Records
347
1.
The Issuances function enables you to manually create an issue. Evergreen will use the initial issue that you
manually create to predict future issues. You need to create a “dummy” issuance that will be deleted after you
have done your predictions. This should be created for the issue BEFORE your first issue.
2.
Click on the Issuances tab.
3.
Click on New Issuance.
Chapter 37. Creating Serial Records
348
4.
Complete the Issuance information
• Label: Enter a name for this issuance.
• Date Published: Enter the date for the issue before the first one in your subscription. For example, if your
subscription starts in January 2014, enter a pub. date for the December 2013 issue.
• Click the Wizard button. Enter Holding codes ii. Click on Compile.
• When finished, click Save.
37.2.7. Generate Predictions
1.
Open the Subscriptions tab.
2.
Click on the subscription row.
Chapter 37. Creating Serial Records
349
3.
Click Actions for Selected Row and select Make Predictions.
4.
A pop up box will ask you how many items you want to predict. Enter the number, and click OK.
5.
A confirmation message will appear. Click OK.
Chapter 37. Creating Serial Records
350
6.
Delete first Issuance
• Click on the arrow beside the subscription
• Click on the arrow beside Issuances.
• Right Click on the “dummy” issuance you created and choose Delete Issuance.
Chapter 37. Creating Serial Records
351
Chapter 38. Receiving Serials
38.1. Receive serials
Receiving serials is done through the Serials Control View.
1.
Go to the Items tab.
2.
Click on Refresh
3.
To receive items, click the Receive radio button. Items that have yet to be received are displayed in the top half
of the screen the. Recently received items are displayed in the bottom half of the screen.
4.
Select the issue that you want to receive.
Chapter 38. Receiving Serials
352
5.
Select the current working unit. Click Set Current Unit, located in the lower right corner of the screen. A drop
down menu will appear. Select Auto per item.
• Auto per item - Use this if you want to assign a barcode to each item individually.
• New Unit - Use this if you want to assign the same barcode to each item within a unit. (Binding Process)
• No Unit - Use this if you do not want to assign a barcode to the item. Please note that this selection will not
create a copy on the copy table and is not recommended.
6.
Click Receive/Move Selected.
7.
Enter a barcode and call number. You can scan the item barcode into the barcode field. Enter a rational call #
for each item (We recommend enumeration and/or chronology captions (ex V.22 No.1 Jan 2013 / January
2013)
Chapter 38. Receiving Serials
353
8.
A message confirming receipt of the item appears. Click OK.
• The screen refreshes. In the top half of the screen the item displays a received date. In the bottom half of the
screen the item that you have just received is now at the top of the list of the received items.
Chapter 38. Receiving Serials
354
Serial Alerts at Receive Time - The new "Alerts" button on the Items tab displays the number of alert notes that
are available for the selected items, and clicking this button opens a window which displays all applicable alert
notes, sorted by type . Notes can also be edited or deleted from this window.
Chapter 38. Receiving Serials
355
38.2. Batch Receive Serials
It is also possible to receiving multiple copies of a serial using the Serials Batch Receive interface.
This procedure is for sites receiving multiple copies of the same issue.
1.
Click on Actions for this record
2.
Select Serials Batch Receive
3.
Enter an identifier for a bibliographic record. ISSN or Database ID
4.
Click on Find Record
5.
Choose an Issuance
6.
Click Next
7.
Select Create Units for Receiving Items
Chapter 38. Receiving Serials
356
8.
Enter Barcode,Call Number and Price.
9.
Click on Receive Selected Items.
10. Click on Start Over to receive the next subscription, or close the tab.
Chapter 38. Receiving Serials
357
Chapter 39. OPAC
39.1. Searching for Serials in the OPAC
Searching for serials is the same process as searching for other items in the catalogue. Detailed search instructions
can be found Chapter 27. Search the Catalogue
39.2. OPAC Serials Display
Bibliographic records that contain serials information will have a new section in the OPAC called Issues Held. The
Issues Held tab contains an expandable holdings statement that details each issue in your collection.
There are 3 settings in the Library Settings Editor that must be configured for your serials OPAC to display in
this manner. For more information please refer to Section 35.2, “Administration”
Chapter 39. OPAC
358
Chapter 40. Reports
40.1. Serials Report Templates
An account with Reporter permissions is required to clone templates from the Shared Folders section and save them
to My Folders.
For more information regarding reports and creating reports from templates please see Part V. Reports
1.
Subscription Titles by holding library for selected year: provides a list of all current subscriptions, used
for reviewing subscriptions.
2.
Subscription Titles with End Date within Time Frame: provides a list of subscriptions with an end date,
used to generate titles for renewal
You must enter an end date in your subscriptions for this report to generate titles
3.
Serial Circulation Report: provides circulation statistics for serials, used to generate circulation statistics for
Serials.
4.
Serials Claiming Items List: provides a list of serials that have not yet been received, used for claiming
missing issues.
Chapter 40. Reports
359
Chapter 41. Special Issues
41.1. Add an Issuance
The following instructions are for adding additional Issuances to an existing subscription. This process is used for
unpredicted or special Issues.
1.
From the Serial Record --> Click on the Actions for this record button
2.
Select Alternate Serial Control
Chapter 41. Special Issues
360
3.
Click on the subscription ID
4.
Open on the Issuances tab
5.
Click on the New Issuance button
Chapter 41. Special Issues
361
6.
Enter the Label and Date Published
Chapter 41. Special Issues
362
7.
Click on the Wizard button
8.
Click on the Create Holding Code button
Chapter 41. Special Issues
363
9.
Click on the Save button
10. You must now add an item to the Issuance
11. Click on the Issuance you just created
Chapter 41. Special Issues
364
12. Click on the New Items button
13. Enter Date Expected and click Create
14. The item is now ready to receive. If you complete the Date Received field and change the status to received
then it will receive the issue but it won’t create the associated copy record whereas if you leave it blank and
receive the item through the Serials Control View or Batch Receive function you can create the Copy Record
at that time.
41.2. Edit an Issuance
The following instructions are for entering "Special Issues" or for editing an existing Issuance
1.
From the Serial Control View --> Click on the Subscriptions tab
2.
Click on the arrow beside your library name
3.
Click on the arrow beside Issuances
4.
Click on the Issuance you would like to edit
5.
Edit the label / date published
6.
Click Modify Issuance
Chapter 41. Special Issues
365
41.3. Delete an Issuance
1.
From the Subscriptions tab in Serials Control View
2.
Click on the arrow beside your library name
3.
Click on the arrow beside your subscription #
4.
Click on the arrow beside Issuances
5.
Right Click on the Issue you would like to delete, Select Delete Issuance
Chapter 41. Special Issues
366
Chapter 42. Binding Process
42.1. Binding Template
In order to "Bind" serials you must assign a Bind Unit Template. You can use the same template as your Receive
Unit Template or create a new one. For more information about Copy Templates please see 35.1 Create a Copy
Template
1.
Search the catalogue. (F3)
2.
Select the bibliographic record for the magazine or periodical.
3.
Click on the title to open the Record Details screen.
4.
Click on Actions for this Record and select Serial Control View.
5.
Click on the Subscriptions tab.
6.
Click on the arrow beside your Library
7.
Click on the arrow beside your Subscription
8.
Click on the arrow beside your Distribution
9.
Click on the Distribution Label
Chapter 42. Binding Process
367
10. In the Distribution window on the right hand side of the screen, Click on Bind Unit Template.Select your
template from the list
11. Click Apply
12. Click Modify Distribution(s)
13. Click Ok
42.2. Binding Units
1.
Search the catalogue. (F3)
2.
Select the bibliographic record for the magazine or periodical.
3.
Click on the title to open the Record Details screen.
4.
Click on Actions for this Record and select Serial Control View.
5.
Click on the Itemstab.
6.
Click in the radial button for Bind
Chapter 42. Binding Process
368
7.
Click on Set Current Unit
8.
Select New Unit This is will allow you to use 1 barcode for all items within the unit
If you want the item to be bound into an existing unit, select Recent and select the desired unit from the
menu. To make a change in bound items, receive or bind the items into an already existing unit
9.
Select the items to be bound
10. Click on Receive/Move Selected
11. Scan or Enter the barcode for the item
Chapter 42. Binding Process
369
12. Enter the callnumber for the item
13. Click Ok
Chapter 42. Binding Process
370
Chapter 43. Routing
43.1. Serials Routing
A routing list is made up of “users,” who will receive a copy of a serial before that copy hits its regular shelving
location. .
The following instructions assume that you have already setup a distribution as per 36.2.2 Create a Distribution
Depending on the status you have setup in the copy template editor, we suggest creating a copy template for
"Routed" serials. The status for these items should be set to "In Process" or "Cataloguing". After the item has
been routed around, it will need to be checked in to display a status of "Available"
1.
Search the catalogue. (F3)
2.
Select the bibliographic record for the magazine or periodical.
3.
Click on the title to open the Record Details screen.
4.
Click on Actions for this Record and select Serial Control View.
5.
Click on the Subscriptions tab.
6.
Click on the arrow beside your Library
7.
Click on the row with the Subscription #
8.
Click on the Distribution tab on the right hand side of the screen
Chapter 43. Routing
371
9.
Click on the Hyperlinked Label
10. Select the target stream by checking the box
11. Click on Routing List For Selected Stream
12. Choose the radio button beside barcode or deparment
• Barcode - enter the user barcode
• Department - free form text field
Chapter 43. Routing
372
13. Click on Add
14. Repeat these steps for any additional Barcodes or Deparments
15. You can re-arrange users in the list by dragging and dropping each numbered row.
16. When you've got the list you want, click on Save Changes
43.2. Serials Batch Receive
In order to view and print the Routing Slip, you must receive your serials by Serials Batch Receive
1.
Click on Actions for this Record
2.
Select Serials Batch Receive
Chapter 43. Routing
373
3.
Make sure Create Units for Received Items is checked.
4.
Choose an Issuance from the drop down menu
5.
Click on Next
Chapter 43. Routing
374
6.
Fill in the required information.
• Barcode - Enter or Scan the item barcode
• Circ Modifier - Select the appropriate Circ Modifier
• Call Number - Enter a Call Number
• Note - Enter a Note (Optional)
• Copy Location - Select the Copy Location
• Price - Enter a Price (Optional)
• Routing List - Make sure this box is checked
• Receive- Make sure this box is checked
7.
Click on Receive Selected Items
Chapter 43. Routing
375
8.
Print Routing List
Chapter 43. Routing
376
Chapter 44. Caption and Pattern Codes
44.1. Caption and Pattern Codes
Sitka support has created Caption and Pattern Codes for popular magazines and frequencies. Please copy and paste
the whole string (Including Square brackets "[ ]") in the "Pattern Code" box.
Table 44.1. Popular Caption and Pattern Codes
Title
Database ID
Pattern Code
Notes
BC Business
108282856
[“2”,”0”,”8”,”1”,”a”,”v.”,”b”,”no.”,”u”,”12”,”v”,”r”,"i","(year)","j","
Monthly - 12 Issues/Year With Enumeration captions
BC Home & Garden.
108225216
["2","0","8","1","a","v.
Bi-Monthly - 6 Issues /
","b","no.","u","6","v","r","i","(year)","j","(month)","w","b","x","01"
Year
BC nature.
108527928
["2","0","8","1","a","V.","b","No.","u","4","v","r","i","(year)","j","(s
Seasonal - 4 Issues /
Year Spring, Summer, Fall,
Winter - with enumeration
captions (V. No.)
BC outdoors sport fishing 108419744
and outdoor adventure.
["2","0","8","1","a","v.","b","no.","u","var","v","r","i","(year)","j","(m
9 Issues / Year - 7
Sport Fishing & 2 Hunting
Editions - with enumeration
captions (v. no.) modify
issuance label to add
"hunting or sports fishing"
Better homes and gardens. 108255191
[“2”,”0”,”8”,”1”,”a”,”v.”,”b”,”no.”,”u”,”12”,”v”,”r”,"i","(year)","j","
Monthly - 12 Issues/Year with Enumeration captions
British Columbia history : 108286944
Journal of the British
Columbia
Historical
Federation.
["2","0","8","1","a","V.","b","No.","u","4","v","r","i","(year)","j","(s
Seasonal - 4 Issues /
Year Spring, Summer, Fall,
Winter - with Enumeration
captions (V. No.)
British
magazine.
["2","0","8","1","a","V.","b","No.","u","4","v","r","i","(year)","j","(s
Seasonal - 4 Issues /
Year Spring, Summer, Fall,
Winter - with enumeration
captions (V. No.)
Columbia 108304607
Canada's style at home.
108304570
["2","0","8","1","a","(year)","b","(month)","w","m"]
Monthly - 12 Issues/
Year - without enumeration
captions
Canadian gardening.
108142330
["2","0","8","1","a","v.","b","no.","u","6","v","r","i","(year)","j","(se
6 Issues/Year - January,
April, May, Summer,
Autumn, Winter
Canadian geographic.
108304606
["2","0","8","1","a","(year)","b","(season)","w","q"]
Seasonal - 4 Issues /
Year Spring, Summer,
Fall, Winter - without
enumeration
Chapter 44. Caption and Pattern Codes
377
Title
Database ID
Pattern Code
Notes
Canadian home workshop. 108286953
["2","0","8","1","a","v.","b","no.","u","6","v","r","i","(year)","j","(se
6 Issues/Year - October,
Winter, March, Apr/May,
Summer, September
Canadian house and home. 108286955
["2","0","8","1","a","v.","b","no.","u","12","v","r","i","(year)","j","(m
Monthly - 12 Issues/Year with enumeration captions
(v. no.)
Canadian living.
108289179
["2","0","8","1","a","v.","b","no.","u","12","v","r","i","(year)","j","(m
Monthly - 12 Issues/Year with enumeration captions
(v. no.)
Cooking light.
108304605
["2","0","8","1","a","v.","b","no.","u","12","v","r","i","(year)","j","(m
Monthly - 12 Issues/Year with enumeration captions
(v. no.)
Cook's Illustrated.
108304588
["2","0","8","1","a","no.","i","(year)","j","(month)","w","m","y","cm
Bi-Monthly - 6 Issues /
Year - with enumeration
caption (no.)
Country living.
108303839
["2","0","8","1","a","v.","b","no.","u","10","v","r","i","(year)","j","(m
10 Issues/Year - Dec/Jan,
July/Aug combined - with
enumeration captions (v.
no.)
Crafts 'n things.
108304801
["2","0","8","1","a","V.","b","No.","u","4","v","r","i","(year)","j","(s
Seasonal - 4 Issues /
Year Spring, Summer, Fall,
Winter - with enumeration
captions
Food network magazine.
108304833
["2","0","8","1","a","v.","b","no.","u","10","v","r","i","(year)","j","(m
10 Issues/Year - Jan/Feb,
July/Aug combined - with
enumeration captions (v.
no.)
Gardens west.
108219964
["2","0","8","1","a","v.","b","no.","u","9","v","r","i","(year)","j","(mo
9 Issues/Year - Jan/
Feb, July/Aug, Nov/Dec
combined
Hello! Canada
108221772
["2","0","8","1","a","No.","i","(year)","j","(month)","k","(day)","w","
Weekly - 52 Issues/Year
Ladies' home journal.
108304836
["2","0","8","1","a","v.","b","no.","u","11","v","r","i","(year)","j","(m
11 Issues/Year - Dec/Jan
combined
Maclean's
:
Canada's 108220410
national magazine.
["2","0","8","1","a","v.","b","no.","u","var","v","r","i","(year)","j","(m
Weekly - 52 Issues/Year
Martha Stewart living.
108304837
["2","0","8","1","a","V.","b","No.","u","12","v","r","i","(year)","j","(
Monthly - 12 Issues/Year with enumeration captions
Natural health.
108420801
["2","0","8","1","a","v.","b","no.","u","6","v","r","i","(year)","j","(mo
Bi-Monthly - 6 Issues /
Year - with enumeration
captions (v. no.)
O : the Oprah magazine.
108305645
["2","0","8","1","a","v.","b","no.","u","12","v","r","i","(year)","j","(m
Monthly - 12 Issues/Year with enumeration captions
(v. no.)
Chapter 44. Caption and Pattern Codes
378
Title
Database ID
Pattern Code
Notes
Organic gardening.
108220197
["2","0","8","1","a","v.","b","no.","u","6","v","r","i","(year)","j","(mo
6 Issues/Year - D/J, F/M, A/
M, J/J, A/S, O/N
Our Canada.
108528320
["2","0","8","1","a","v.","b","no.","u","6","v","r","i","(year)","j","(mo
6 Issues/Year - D/J, F/M, A/
M, J/J, A/S, O/N
PC Gamer
30251314
["2","0","8","1","a","no.","i","(year)","j","(month)","w","m"]
Monthly - 12 Issues/Year with enumeration captions
(no.)
People weekly.
108142236
["2","0","8","1","a","v.","b","no.","u","var","v","r","i","(year)","j","(m
Weekly - 52 Issues/Year
Sample Sets of Serial Patterns
To use one of the following codes you must copy and paste all the text inside and including the square brackets [ ].
DAILY:
• Omitted Sunday. 6x a week, but not Sunday:
["2","0","8","1","a","no,","i","(year)","j","(month)","k","(day)","w","d","x","01","y","odsu"]
WEEKLY:
• Increments continuously without volume number:
["2","0","8","1","a","no.","i","(year)","j","(month)","k","(day)","w","w"]
• Increments continuously with volume number:
["2","0","8","1","a","Vol.","b","No.","u","52","v","c","i","(year)","j","(month)","k","(day)","w","w","x","01"]
• Restart with volume number:
["2","0","8","1","a","Vol.","b","no.","u","52","v","r","i","(year)","j","(month)","k","(day)","w","w","x","01"]
26 Times a year (and variations):
• 26 times a year. Increments continuously without volume:
["2","0","8","1","a","no.","i","(year)","j","(month)","k","(day)","w","e","x","01"]
• 26 times a year. Increments continuously with volume:
["2","0","8","1","a","Vol.","b","no.","u","26","v","c","w","e","x","01"]
• 26 times a year. Restart with volume:
["2","0","8","1","a","Vol.","b","no.","u","26","v","r","i","(year)","j","(month)","k","(day)","w","w","x","01","y"]
• 26 times a year. Restart, year used as volume:
["2","0","8","1","a","Vol.","b","no.","u","26","v","r","w","e","x","01"]
• 24 times a year. Restart, year used as volume:
Chapter 44. Caption and Pattern Codes
379
["2","0","8","1","a","Vol.","b","no.","u","24","v","r","w","e","x","01"]
MONTHLY (and variations):
• Names of months without volume:
["2","0","8","1","i","(year)","j","month","w","m"]
• Increments continuously without volume number:
["2","0","8","1","a","No.","i","(year)","j","(month)","w","m","x","01"]
• Increments continuously with volume number:
["2","0","8","1","a","Vol.","b","no.","u","12","v","c","i","(year)","j","(month)","w","m","x","01"]
• Restart without volume number:
["2","0","8","1","a","Vol.","b","No.","u","12","v","r","w","m","x","01"]
• Restart with volume number:
["2","0","8","1","a","vol.","b","no.","u","12","v","r","i","(year)","j","(month)","w","m","x","01"]
• 11 times a year. Increments continuously without volume number:
["2","0","8","1","a","No.","u","11","v","c","i","(year)","j","(month)","w","m","x","01","y","om08"]
• 11 times a year. Increments continuously with volume number:
["2","0","8","1","a","Vol.","b","No.","u","11","v","c","i","(year)","j","(month)","w","m","x","01","y","om08"]
• 11 times a year. Restart without volume number:
["2","0","8","1","a","No.","u","11","v","c","i","(year)","j","(month)","w","m","x","01","y","om08"]
• 11 times a year. Restart with volume number:
["2","0","8","1","a","vol.","b","no.","u","11","v","r","i","(year)","j","(month)","w","m","x","01","y","om08"]
• 10 times a year with volume number. Increments continuously and no issues in August and September:
["2","0","8","1","a","Vol.","b","no.","u","10","v","c","i","(year)","j","(month)","w","m","x","01","y","om08","y","om09"]
• 10 times a year, without volume number. Increments continuously, no issues in August and September:
["2","0","8","1","a","no.","u","10","v","c","i","(year)","j","(month)","w","m","x","01","y","om08","y","om09"]
• 10 times a year. Restart, year used as volume number (no issues in January and August):
["2","0","8","1","a","Vol.","b","No.","u","10","v","r","w","m","x","01","y","om01","y","om08"]
• 9 times a year. Restart and year used as volume number:
["2","0","8","1","a","Vol.","b","No.","u","9","v","r","w","m","x","01","y","om06","y","om07","y","om08"]
Chapter 44. Caption and Pattern Codes
380
• 8 times a year. Restart and year used as volume number:
["2","0","8","1","a","Vol.","b","No.","u","8","v","r","w","m","x","01","y","om01","y","om03","y","om06","y","om08"]
• 8 times a year. Increments continuously and year used as volume number:
["2","0","8","1","a","Vol.","b","No.","u","8","v","c","w","m","x","01","y","om01","y","om03","y","om06","y","om08"]
• 7 times a year. Restart and year used as volume number:
["2","0","8","1","a","Vol.","b","No.","u","7","v","r","w","m","x","01","y","om01","y","om03","y","om06","y","om08","y","
• 5 times a year. Restart on volume:
["2","0","8","1","a","vol.","b","no.","u","5","v","r","i","(year)","j","(month)","w","b","x","01","y","om09","y","om12"]
• 5 times a year. Increments continuously on volume:
["2","0","8","1","a","vol.","b","no.","u","5","v","c","i","(year)","j","(month)","w","b","x","01","y","om09","y","om12"]
• 5 times a year. Increments continuously on volume:
["2","0","8","1","a","no.","u","5","v","c","i","(year)","j","(month)","w","b","x","01","y","om09","y","om12"]
Bimonthly:
• Bimonthly. Restart with volume:
["2","0","8","1","a","vol.","b","no.","u","6","v","r","i","(year)","j","(month)","w","b","x","01"]
• Bimonthly. Restart without volume:
["2","0","8","1","a","Vol.","b","No.","u","6","v","r","w","b","x","01"]
• Bimonthly. Increments continuously without volume:
["2","0","8","1","a","no.","u","6","v","c","i","(year)","j","(month)","w","b","x","01"]
• Bimonthly. Increments continuously with volume:
["2","0","8","1","a","vol.","b","no.","u","6","v","c","i","(year)","j","(month)","w","b","x","01"]
Three times a year:
• Three times a year without volume and increments continuously:
["2","0","8","1","a","No.","u","3","v","c","i","(year)","j","(month)","w","t","x","01"]
• Three times a year with volume and increments continuously:
["2","0","8","1","a","Vol.","b","No.","u","3","v","c","i","(year)","j","(month)","w","t","x","01"]
• Three times a year with volume and restart:
["2","0","8","1","a","Vol.","b","No.","u","3","v","r","i","(year)","j","(month)","w","t","x","01"]
Chapter 44. Caption and Pattern Codes
381
• Three times a year with volume and restart, starting in July:
["2","0","8","1","a","Vol.","b","no.","u","3","v","r","i","(year)","j","(month)","w","t","x","07"]
• Three times a year with volume and restart, starting in August:
["2","0","8","1","a","Vol.","b","no.","u","3","v","r","i","(year)","j","(month)","w","t","x","08"]
• Three times a year without volume with restart:
["2","0","8","1","a","Vol.","b","No.","u","3","v","r","w","t"]
Quarterly:
• Quarterly. Increments continuously and volume:
["2","0","8","1","a","vol.","b","no.","i","(year)","j","(month)","w","q","x","01"]
• Quarterly. Increments continuously and volume, starting in July:
["2","0","8","1","a","vol.","b","no.","i","(year)","j","(month)","w","q","x","06"]
• Quarterly. Increments continuously without volume:
["2","0","8","1","a","no.","i","(year)","j","(month)","w","q","x","01"]
• Quarterly. Restart and volume number:
["2","0","8","1","a","Vol.","b","no.","u","4","v","r","i","(year)","j","(month)","w","q","x","01"]
• Quarterly. Restart and year used as volume number:
["2","0","8","1","a","Vol.","b","No.","u","4","v","r","w","q","x","01"]
• Quarterly. Restart and volume, starting in March:
["2","0","8","1","a","Vol.","b","no.","u","4","v","r","i","(year)","j","(month)","w","q","x","03"]
• Quarterly. Restart and volume, starting in July:
["2","0","8","1","a","Vol.","b","No.","u","4","v","r","i","(year)","j","(month)","w","q","x","07"]
• Quarterly. Restart and volume, starting in October:
["2","0","8","1","a","Vol.","b","No.","u","4","v","r","i","(year)","j","(month)","w","q","x","10"]
Half-yearly:
• Half-yearly. Increments continuously without volume number:
["2","0","8","1","a","no.","i","(year)","j","(month)","w","f","x","01"]
• Half-yearly. Increments continuously with volume number:
["2","0","8","1","a","Vol.","b","no.","i","(year)","j","(month)","w","f","x","01"]
Chapter 44. Caption and Pattern Codes
382
• Half-yearly. Restart with volume number:
["2","0","8","1","a","Vol.","b","No.","u","2","v","r","w","f","x","01"]
• Half-yearly. Restart without volume number:
["2","0","8","1","a","Vol.","b","No.","u","2","v","r","w","f","x","01"]
Annually:
• Annual report:
["2","0","8","1","i","(year)","w","a"]
• Annual report. Increments continuously:
["2","0","8","1","a","no.","i","(year)","w","a","x","01"]
• Annual report. Increments continuously with volume number:
["2","0","8","1","a","Vol.","b","No.","u","1","v","c","i","(year)","w","a","x","01"]
Chapter 44. Caption and Pattern Codes
383
Part VII. Booking Module
Table of Contents
45. Using the Booking Module ..................................................................................................................
45.1. Evergreen Booking Tutorial ......................................................................................................
45.2. Creating a Booking Reservation ...............................................................................................
45.3. Reservation Pull List ................................................................................................................
45.4. Capturing Items for Reservations .............................................................................................
45.5. Picking Up Reservations ..........................................................................................................
45.6. Returning Reservations ............................................................................................................
45.7. Cancelling a Reservation .........................................................................................................
46. Booking Module Administration ...........................................................................................................
46.1. Local System Administrator Booking Tutorials ...........................................................................
46.2. Creating Bookable Non-Bibliographic Resources .......................................................................
46.3. Editing Non-Bibliographic Resources ........................................................................................
46.4. Deleting Non-bibliographic Resources .......................................................................................
386
386
386
393
394
395
397
398
401
401
401
408
408
Part VII. Booking Module
385
Chapter 45. Using the Booking Module
Adapted with permission from original material by the Evergreen Community
With the Evergreen Booking Module you can reserve catalogued (bibliographic) or non-catalogued (nonbibliographic) items for a particular patron for a specified time period. This chapter will help staff create reservations,
generate pull lists for reserved items, capture reserved resources, and pick up and return reservations.
The Booking Module allows you to lend out non-bibliographic items. They are called resources in Evergreen. Almost
anything you lend out can be entered as a resource. Laptops, projectors, cables, ski locks, bike locks, cameras, easels,
meeting rooms, even staplers can be lent using the Booking Module.
The Booking Module can also be used to reserve bibliographic items. For example, do you have a special program
coming up that you need all the books on ducks for? You can reserve them for the specific day of your program to
make sure they will come back and are not checked out when getting near to your program day.
45.1. Evergreen Booking Tutorial
45.2. Creating a Booking Reservation
Only staff members may create reservations. A reservation can be started from a patron record, or a booking
resource. To reserve catalogued items, you may start from searching the catalogue, if you do not know the booking
item's barcode.
To create a reservation from a patron record:
1.
Retrieve the patron’s record.
2.
Select Other → Booking → Create or Cancel Reservations. This takes you to the Reservations Screen.
Chapter 45. Using the Booking Module
386
3.
For non-catalogued items, choose a Bookable Resource Type and click Next. For catalogued items, enter the
barcode in Enter the barcode of a catalogued, bookable resource box, then click Next beside the box.
4.
For non-catalogued resources, the Bookable Resource Type and the items associated with the type will appear.
For catalogued items, the title and the item will display in the box.
Chapter 45. Using the Booking Module
387
5.
Select the date and time for the reservation in I need this resource... area. Click the date field. A calendar widget
will be displayed for you to choose a date. Click the time field to choose time from the dropdown list.
If incorrect date and time is selected, the date/time boxes will appear in red. For example, if the time for
which the reservation is set has already passed, the boxes will appear in red. There must be at least 15
minutes between the creation of the reservation and the start time of the reservation.
6.
For non-catalogued resources, patrons may specify special feature(s), if any, of the resource. With these
attributes: allows you to do so. For example, if a patron is booking a laptop he/she can choose between PC
and Mac and even choose a specific operating system if they need to. Click the drop down arrow to select
your option from the list.
7.
Select the pickup location from the dropdown list.
Chapter 45. Using the Booking Module
388
8.
If there are multiple copies of the resource and any item listed is acceptable, click Reserve Any. To choose a
specific item, select it and then click Reserve Selected.
9.
A message will confirm that the action succeeded. Click OK on the prompt.
10. The screen will refresh and the reservation will appear below the patron’s name at the bottom of the screen.
To create a reservation from a booking resource:
You need to know the barcode of the patron when you create a reservation for him/her from a booking resource.
1.
From the Booking menu, select Create Reservations
Chapter 45. Using the Booking Module
389
2.
Choose a Bookable Resource Type and click Next or enter the barcode of a catalogued resource and click Next.
3.
For non-catalogued resources, a screen showing the Bookable Resource Type and the items associated with
the type will appear.
For catalogued resources, the title and item will appear.
4.
Enter the user’s barcode in the Reserve to patron barcode box. The user’s existing reservations, if any, will
appear at the bottom of the screen.
Chapter 45. Using the Booking Module
390
5.
Select the date and time for the reservation in I need this resource... area. Click the date field. A calendar widget
will be displayed for you to choose a date. Click the time field to choose time from the dropdown list.
If incorrect date and time is selected, the date/time boxes will appear in red. For example, if the time for
which the reservation is set has already passed, the boxes will appear in red. The times must be set correctly
for the reservation to be created. There must be at least 15 minutes between the creation of the reservation
and the start time of the reservation.
6.
For non-catalogued resources, patrons may specify special feature(s), if any, of the resource. The With these
attributes: allows you to do so. For example, if a patron is booking a laptop they can choose between PC and
Mac and even choose a specific operating system if they need to. Click the dropdown arrow to select your
option from the list.
7.
Select the pickup location from the dropdown list.
Chapter 45. Using the Booking Module
391
8.
If there are multiple copies of the resource and any item listed is acceptable, click Reserve Any. To choose a
specific item, select it and then click Reserve Selected.
9.
A message will confirm that the action succeeded. Click OK on the prompt.
10. The screen will refresh and the reservation will appear below the patron’s name at the bottom of the screen.
Search the catalogue to create a reservation
If you would like to reserve a catalogued item but do not know the item barcode, you may start with a catalogue
search.
1.
In the staff client, select Cataloguing → Search the Catalogue or keyboard shortcut F3 to search for the item
you wish to reserve. You may search by any bibliographic information.
2.
Click the title to display the record summary. In the Copy Summary, select Copy Details in Actions column.
3.
The Copy Details will appear in a new row. In the barcode column, click the book now link.
4.
A screen showing the title and barcodes of available copies will appear.
Chapter 45. Using the Booking Module
392
5.
Enter the user’s barcode in the Reserve to patron barcode box. The user’s existing reservations, if any, will
appear at the bottom of the screen.
6.
Select the date and time in I need this resource... section. If the date and time set is incorrect the boxes appear
in red. For example, if the time for which the reservation is set has already passed, the boxes will appear in red.
7.
Select pickup location. If there are multiple copies and any of the listed items is acceptable, click Reserve Any.
To choose a specific item, select it and then click Reserve Selected.
8.
A message will confirm that the action succeeded. Click OK on the prompt.
9.
The screen will refresh, and the reservation will appear below the user’s name.
Reservations on catalogued items can be created on Item Status (F5) screen. Select the item, then Actions for
Selected Items → Book Item Now.
45.3. Reservation Pull List
Reservation pull list can be generated dynamically on the Staff Client.
1.
To create a pull list, select Booking → Pull List.
2.
You can decide how many days in advance you would like to pull reserved items. Enter the number of days in
the box adjacent to Generate list for this many days hence. For example, if you would like to pull items that
are needed today, you can enter 1 in the box, and you will retrieve items that need to be pulled today.
3.
Click Fetch to retrieve the pull list.
Chapter 45. Using the Booking Module
393
4.
The pull list will appear. Click Print to print the pull list.
45.4. Capturing Items for Reservations
Reservations must be captured before they are ready to be picked up by the patron.
Always capture reservations in Booking Module. Check In function in Circulation does not function the same
as Capture Resources.
1.
In the staff client, select Booking → Capture Resources.
2.
Scan the item barcode or type the barcode then click Capture.
Chapter 45. Using the Booking Module
394
3.
The message Capture succeeded will appear to the right. Information about the item will appear below the
message. Click Print button to print a slip for the reservation.
Sitka Team strongly recommends printing the receipt or copying the reservation information. It is not
possible to re-print the slip on the current Evergreen design.
45.5. Picking Up Reservations
Always use the dedicated Booking Module interfaces for tasks related to reservations. Items that have been
captured for a reservation cannot be checked out using the Check Out interface, even if the patron is the
reservation recipient.
1.
Ready-for-pickup reservations can be listed from Other → Booking → Pick Up Reservations within a patron
record or Booking → Pick Up Reservations.
Chapter 45. Using the Booking Module
395
2.
Scan the patron barcode if using Booking → Pick Up Reservations.
3.
The reservation(s) available for pickup will display. Select those you want to pick up and click Pick Up.
Chapter 45. Using the Booking Module
396
4.
The screen will refresh to show that the patron has picked up the reservation(s).
45.6. Returning Reservations
When a reserved item is brought back, staff must use the Booking Module to return the reservation.
1.
To return reservations, select Booking → Return Reservations
2.
You can return the item by patron or item barcode. Here we choose Resource to return by item barcode. Scan
or enter the barcode, and click Go.
3.
A pop up box will tell you that the item was returned. Click OK on the prompt.
Chapter 45. Using the Booking Module
397
4.
If we select Patron on the above screen, after scanning the patron's barcode, reservations currently out to that
patron are displayed. Highlight the reservations you want to return, and click Return.
5.
The screen will refresh to show any resources that remain out and the reservations that have been returned.
Reservations can be returned from within patron records by selecting Other → Booking → Return Reservations
45.7. Cancelling a Reservation
A reservation can be cancelled in a patron’s record or reservation creation screen.
Cancel a reservation from the patron record
1.
Retrieve the patron's record.
Chapter 45. Using the Booking Module
398
2.
Select Other → Booking → Create or Cancel Reservations.
3.
The existing reservations will appear at the bottom of the screen.
4.
Highlight the reservation that you want to cancel. Click Cancel Selected.
Use Shift or Ctrl on keyboard and mouse click to select multiple reservations if needed.
5.
A pop-up window will confirm the cancellation. Click OK on the prompt.
Chapter 45. Using the Booking Module
399
6.
The screen will refresh, and the cancelled reservation(s) will disappear.
Cancel a reservation on reservation creation screen
1.
Access the reservation creation screen by selecting Booking → Create Reservations.
2.
Select any Bookable Resource Type, then click Next.
3.
Scan or type in the patron barcode in Reserve to Patron box then hit Enter.
4.
Patron's existing reservations will display at the bottom of the screen.
5.
Select those that you want to cancel, then click Cancel Selected.
Chapter 45. Using the Booking Module
400
Chapter 46. Booking Module Administration
Adapted with permission from original material by the Evergreen Community
This chapter describes how to create, edit and delete bookable non-bibliographic resources.
Sitka default permissions allow staff members with Circulation privileges to create reservations on all catalogued
items or bookable non-bibliographic resources, and to create bookable non-bibliographic resources.
46.1. Local System Administrator Booking Tutorials
46.2. Creating Bookable Non-Bibliographic Resources
Staff with the required permissions (Circulator and above) can create bookable non-bibliographic resources such
as laptops, projectors, and meeting rooms.
The following pieces make up a non-bibliographic resource:
• Resource Type
• Resource Attribute
• Resource Attribute Values
• Resource
• Resource Attribute Map
You need to create resource types and resource attributes (features of the resource types), and add booking items
(resources) to individual resource type. Each resource attribute may have multiple values. You need to link the
applicable features (resource attributes and values) to individual item (resource) through the Resource Attribute Map.
Before you create resources (booking items) you need to have a resource type and associated resource attributes
and values, if any, for them.
Chapter 46. Booking Module Administration
401
Create New Resource Type
1.
Select Admin → Server Administration → Booking → Resource Types.
2.
A list of current resource types will appear. Use Back and Next buttons to browse the whole list.
You may also see cataloged items in the list. Those items have been marked bookable or booked before.
3.
To create a new resource type, click New Resource Type in the top right corner, .
Chapter 46. Booking Module Administration
402
4.
A box will appear in which you create your new type of resource.
• Resource Type Name - Give your resource a name.
• Fine Interval - How often will fines be charged? This period can be input in several ways:
• second(s), minute(s), hour(s), day(s), week(s), month(s), year(s)
• sec(s), min(s)
• s, m, h
• 00:00:30, 00:01:00, 01:00:00
• Fine Amount - The amount that will be charged at each Fine Interval.
• Owning Library - The home library of the resource.
• Catalog Item - (Function not currently available.)
• Transferable - This allows the item to be transferred between libraries.
• Inter-booking and Inter-circulation Interval - The amount of time required by your library between the return
of a resource and a new reservation for the resource. This interval uses the same input conventions as the
Fine Interval.
• Max Fine Amount - The amount at which fines will stop generating.
5.
Click Save when you have entered the needed information.
Chapter 46. Booking Module Administration
403
6.
The new resource type will appear in the list.
Create New Resource Attribute
1.
Select Server Administration → Booking → Resource Attributes.
2.
Click New Resource Attribute in the top right corner.
3.
A box will appear in which you can add the attributes of the resource. Attributes are categories of descriptive
information that are provided to the staff member when the booking request is made. For example, an attribute
of a projector may be the type of projector. Other attributes might be the number of seats available in a room,
or the computing platform of a laptop.
• Resource Attribute Name - Give your attribute a name.
• Owning Library - The home library of the resource.
• Resource Type - Type in the first letter to list then choose the Resource Type to which the Attribute is
applicable.
• Is Required - (Function not currently available.)
4.
Click Save when the necessary information has been entered.
5.
The added attribute will appear in the list.
One resource type may have multiple attributes. You may repeat the above procedure to add more.
Chapter 46. Booking Module Administration
404
Create New Resource Attribute Value
1.
One resource attribute may have multiple values. To add new attribute value, select Server Administration →
Booking → Resource Attribute Values.
2.
Click New Resource Attribute Value in the top right corner.
3.
A box will appear in which you assign a value to a particular attribute. Values can be numbers, words, or a
combination of them, that describe the particular aspects of the resource that have been defined as Attributes.
As all values appear on the same list for selection, values should be as unique as possible. For example, a laptop
may have a computing platform that is either PC or Mac.
• Owning Library - The home library of the resource.
• Resource Attribute - The attribute you wish to assign the value to.
• Valid Value - Enter the value for your attribute.
4.
Click Save when the required information has been added.
5.
The attribute value will appear in the list. Each attribute should have at least two values attached to it; repeat
this process for all applicable attribute values.
Create New Resource
1.
Add items to a resource type. Click Admin → Server Administration → Booking → Resources.
2.
Click New Resource in the top right corner.
Chapter 46. Booking Module Administration
405
3.
A box will appear. Add information for the resource.
• Owning Library - The home library of the resource.
• Resource Type - Type in the first letter of the resource type's name to list then select the resource type for
your item.
• Barcode - Barcode for the resource.
• Overbook - This allows a single item to be reserved, picked up, and returned by multiple patrons during
overlapping or identical time periods.
• Is Deposit Required - (Function not currently available.)
• Deposit Amount - (Function not currently available.)
• User Fee - (Function not currently available.)
4.
Click Save when the required information has been added.
5.
The resource will appear in the list.
One resource type may have multiple resources attached.
Map Resource Attributes and Values to Resources
1.
Use Resource Attribute Maps to bring together the resources and their attributes and values. Select Admin →
Server Administration → Booking → Resource Attribute Maps.
2.
Click New Resource Attribute Map in the right top corner.
Chapter 46. Booking Module Administration
406
3.
A box will appear in which you will map your attributes and values to your resources.
• Resource - Enter the barcode of your resource.
• Resource Attribute - Select an attribute that belongs to the Resource Type.
• Attribute Value - Select a value that belongs to your chosen attribute and describes your resource. If your
attribute and value do not belong together you will be unable to save.
4.
Click Save once you have entered the required information.
A resource may have multiple attributes and values. Repeat the above steps to map all.
5.
The resource attribute map will appear in the list.
Once all attributes have been mapped your resource will be part of a hierarchy similar to the example below.
Chapter 46. Booking Module Administration
407
46.3. Editing Non-Bibliographic Resources
Staff with the required permissions can edit aspects of existing non-bibliographic resources. For example, resource
type can be edited in the event that the fine amount for a laptop changes from $2.00 to $5.00.
Editing Resource Types
1.
Bring up your list of resource types. Select Admin → Server Administration → Booking → Resource Types.
2.
A list of current resource types will appear.
3.
Double click anywhere on the line of the resource type you would like to edit.
4.
The resource type box will appear. Make your changes and click Save.
Following the same procedure you may edit Resource Attributes, Attributes Values, Resources and Attribute Map
by selecting them on Admin → Server Administration → Booking menu.
46.4. Deleting Non-bibliographic Resources
1.
To delete a booking resource, go to Admin → Server Administration → Booking → Resources.
2.
Select the checkbox in front the resource you want to delete. Click Delete Selected. The resource will disappear
from the list.
Following the same procedure you may delete Resource Attributes Maps.
You may also delete Resource Attribute Values, Resource Attributes and Resource Types. But you have to delete
them in the reverse order when you create them to make sure the entry is not in use when you try to delete it.
This is the deletion order: Resource Attribute Map/Resources -> Resource Attribute Values -> Resource Attributes
-> Resource Types.
Chapter 46. Booking Module Administration
408
Part VIII. Inventory
Table of Contents
47. Sitka's Inventory Procedure ................................................................................................................ 411
47.1. Checking in all items in the library ............................................................................................ 411
47.2. Generating reports and search list ............................................................................................ 414
Part VIII. Inventory
410
Chapter 47. Sitka's Inventory Procedure
Inventory Module is part of Evergreen's long term development plan. At the moment there is no dedicated inventory
function. The following procedure was developed by the Sitka Team based on the current available resources and
the experience of inventory projects done by some Sitka libraries.
Evergreen has a feature that when an item is checked in/out or edited, a timestamp is captured in the Last Edit Date
field in item record. Sitka Team's proposed inventory procedure is based on this feature, together with item status
reports, which can be generated on the Report Interface from Sitka standard templates.
The procedure starts from libraries' checking in (timestamping) every item in the library. Then reports can be
generated to list all items that have "in-library" status but do not have a timestamp within the time range when items
were scanned. This will be the search list.
47.1. Checking in all items in the library
You need to freeze circulation of items in a small area (a shelf, a row of shelves, or one item type, etc.) before
you start checking in the items on shelf. Depending on the devices you use you may choose one of the following
methods to do the check-in:
Method 1: Checking in items on a laptop with Evergreen Staff Client installed and Internet access
•
On Check In (F2) screen scan every item on shelf in the frozen area.
Methhod 2: Checking in items with a portable barcode scanner
1.
Scan every item barcode on shelf in the frozen area.
2.
Export the barcodes to a text file (Sitka team recommends using Notepad.) to a computer with Evergreen
installed. The barcodes should be in one single spaced single column without extra space anywhere.
3.
Use Cut and Paste functions to break the big list of barcodes into smaller lists and save each list as an individual
text file (suggest each list contains about 50 barcodes). Name your files in sequence, e.g. inventory001,
inventory002..., so that it will be easy to follow when you upload the files.
Chapter 47. Sitka's Inventory Procedure
411
4.
On Item Status (F5) screen of Evergreen, click Upload From File.
5.
You are prompted to browse your local computer to find the barcode files. Navigate to and select your first
file and click Open.
6.
Every item on the list is retrieved and displayed. It may take a while if the list is long. Select all items by using
Shift key together with mouse. Click Actions for Selected Items → Check in Items.
Chapter 47. Sitka's Inventory Procedure
412
7.
Repeat steps 4-6 to check in items in all files.
You may see prompt popups for items with special status, such as lost, missing, checked out, in-transit or routing
to the holds shelf. Once you confirm the prompt, the loading will continue. But you need to follow up with items
going on hold shelf and in-transit. .
Method 3: Checking in items on a laptop using a text processing program
1.
Open a text processing program on your laptop (Sitka team recommends using Notepad) and scan about 50
items on shelf. Save your file with .txt extension. The barcodes should be in a single column without any extra
space anywhere.
Chapter 47. Sitka's Inventory Procedure
413
2.
Start a new empty file and continue scanning about 50 items and save the file. Name your files in sequence,
e.g. inventory1, inventory2, .... Repeat this step until all items are scanned in the frozen area.
3.
On Item Status (F5) screen of Evergreen, use the Upload From Files function to check in all items in all text
files. See steps 4-6 in Method 2.
47.2. Generating reports and search list
There are two templates in SITKA_templates > Inventory folder on the Report Interface. Inventory - scanned items
by shelving location counts items that have Last Edited Date after a specified date, which could be the date when you
started taking inventory. The numbers are broken down by shelving locations. This is the report that counts the items
that have been checked in/out or otherwise edited (including marking missing or lost) during the inventory period.
Inventory - un-scanned items lists items having Last Edit Date before a specified date, in specified shelving locations
and having specified status. By using the date when you started taking inventory, the shelving location(s) in which
you took inventory and the "on shelf" status, such as Reshelving, Available, On Hold Shelf, etc. for these specified
values, the output of this report is the search list. Items on this list should be on shelf but they were not checked
in or out during the inventory process.
You may use Sitka's standard Missing and Lost items report to generate these lists.
For accuracy we would suggest staff not edit items without the physical copy at hand during inventory period.
Eding an item will update Last Edited Date field.
Once inventory starts, any items found in inapporiate location should be checked in before they are put back
to the right location.
Chapter 47. Sitka's Inventory Procedure
414
Part IX. Administration
Table of Contents
48. Local Administration Menu ..................................................................................................................
48.1. Overview .................................................................................................................................
48.2. Cash Reports ..........................................................................................................................
48.3. Circulation Policies ..................................................................................................................
48.4. Closed Dates Editor ................................................................................................................
48.5. Copy Locations Editor .............................................................................................................
48.6. Copy Location Order ...............................................................................................................
48.7. Copy Template Editor ..............................................................................................................
48.8. 'Do Not Attempt-Auto-Print' Setting ...........................................................................................
48.9. Group Penalty Thresholds .......................................................................................................
48.9.1. Penalty threshold inheritance rules ................................................................................
48.9.2. Creating local penalty thresholds ...................................................................................
48.9.3. Deleting or editing local penalty thresholds .....................................................................
48.10. Hold-driven Recall .................................................................................................................
48.11. Hold Policies .........................................................................................................................
48.12. Item Attribute Editor ...............................................................................................................
48.13. Library Settings Editor ...........................................................................................................
48.14. Non-Catalogued Type Editor .................................................................................................
48.15. Statistical Categories Editor ...................................................................................................
48.16. Surveys .................................................................................................................................
48.17. Work Log ..............................................................................................................................
49. Server Administration .........................................................................................................................
49.1. Organizational Units ................................................................................................................
49.1.1. Library Hours of Operation ............................................................................................
49.1.2. Library Addresses .........................................................................................................
49.2. Call Number Prefix and Call Number Suffix ..............................................................................
49.3. Copy Statuses .........................................................................................................................
49.4. Hard Due Date ........................................................................................................................
49.5. Floating Group ........................................................................................................................
50. Evegreen Self Check Administrative Set-Up ........................................................................................
50.1. Initial Set-Up ...........................................................................................................................
51. Deleting Inactive Cards and Patron Accounts by Sitka's In-house Patron Deletion Tool ...........................
51.1. Deleting Inactive Cards ............................................................................................................
51.2. Deleting Patron Accounts .........................................................................................................
52. Courtesy, Overdue, and Hold Notices .................................................................................................
52.1. Library Courtesy Notices ..........................................................................................................
52.2. Library Overdue Notices ..........................................................................................................
52.3. Final Notices ...........................................................................................................................
52.4. Hold Slip and Holds Notifications .............................................................................................
53. Managing Internet OPAC Stations .......................................................................................................
54. Evergreen System Requirements ........................................................................................................
55. Staff Accounts ....................................................................................................................................
55.1. Creating Staff Accounts ...........................................................................................................
55.2. Working Locations ...................................................................................................................
55.3. Editing Staff Accounts .............................................................................................................
55.4. Resetting Your Password .........................................................................................................
55.5. Staff Account Permissions .......................................................................................................
55.6. Granting Additional Permissions ...............................................................................................
417
417
419
420
423
425
428
428
428
429
430
430
432
432
433
435
437
463
464
469
472
473
473
474
475
477
477
479
479
480
480
481
481
483
486
486
486
487
488
489
490
492
493
493
494
494
495
496
Part IX. Administration
416
Chapter 48. Local Administration Menu
48.1. Overview
Many Evergreen configuration options are available under the Admin → Local Administration rollover menu.
Items on this menu are visible to anyone logged into the staff client but usually require special permissions to edit.
The following table describes each of the menu options and their required permission levels. Contact the Sitka
support team if you have questions about settings that cannot be edited with a Local System Administrator (LSA)
account.
Menu option
Description
Age Overdue Circs to Lost
To create a queue of ALL overdue items LSA
by selected patron profiles at selected
libraries to be marked lost. It does not
support date parameter. This feature is
mainly for school libraries' end of term
Chapter 48. Local Administration Menu
Permissions
417
Menu option
Description
process. To automatically mark items
lost when they are overdue for x days
contact Sitka support.
Permissions
Cash Reports
View summary report of cash
transactions for selected date range
All staff
Circulation Limit Set
View circulation limit on combination
of circ modifier and patron profile
Viewable to LSA. Contact Sitka Support
for editing
Circulation Policies
View circulation policies
Viewable to LSA. Contact Sitka Support
for editing
Closed Dates Editor
Set library closure dates (affects due
dates and fines)
LSA
Copy Locations Editor
Create and edit copy locations, also
known as shelving locations
LSA
Copy Location Groups
Allows one or more shelving locations
to be grouped together as a search
location.
Sitka Support
Copy Location Order
Change display order of copy locations
on Holds Pull list, also known as
shelving locations
LSA
Copy Template Editor
Admin settings for Serials
LSA/Serials staff
'Do Not Attempt Auto-Print' Setting
Override default settings to block
automatic receipt printing in selected
staff client transactions; not yet
documented
LSA
Field Documentation
Create custom notes describing
Sitka support
individual staff client fields to library
staff; currently applies only to the patron
registration fields
Group Penalty Thresholds
Set library-specific thresholds for
maximum items out, maximum
overdues, and maximum fines
LSA
Hold Policies
View Hold Policies
LSA
Item Attribute Editor
Hide/unhide field(s) on Edit Item
Attributes screen
LSA
Library Settings Editor
Detailed library configuration settings
LSA/Sitka supprt
Non-Catalogued Type Editor
Create and edit optional non-catalogued LSA
item types
Notifications / Action Triggers
Admin settings
Sitka support
Patrons with Negative Balances
Display a list of patron accounts with
negative bill balances, to whom the
library may owe refunds
All staff
Reports
Generate reports on any field in the
Evergreen database
Staff with reporter permission (report
output optionally visible to all staff)
Search Filter Groups
Not in use
Sitka support
Standing Penalties
Admin settings
Sitka support
Chapter 48. Local Administration Menu
418
Menu option
Description
Permissions
Statistical Categories Editor
Create and manage optional categories
for detailed patron/item information
LSA
Surveys
Create patron surveys to be completed at LSA
patron registration
Transit List
View items in transit to or from your
library during selected date range
All staff
Work Log
List the most recent transactions
processed at the selected workstation
All staff
48.2. Cash Reports
1.
Select Admin → Local Administration → Cash Reports.
2.
Select the start date and the end date that you wish to run a cash report for. You can either enter the date in the
YYYY-MM-DD format, or click on the calendar icon to use the calendar widget.
3.
Select your library from the drop down menu. Click Submit.
4.
The output will show cash, check, and credit card payments. It will also show amounts for credits, forgiven
payments, work payments and goods payments (e.g. food for fines initiatives, replacement copy for lost item,
etc.). The output will look something like this:
Chapter 48. Local Administration Menu
419
By clicking on the hyperlinked column headers (i.e. workstation, cash_payment, check_payment, etc.) it is
possible to sort the columns to order the payments from smallest to largest, or largest to smallest, or to group
the workstation names.
Customized payment reports can be created from the reports interface. Several shared templates are available under
SITKA_templates → Payments. For instructions on using shared templates see Chapter 32, Shared Templates in
SITKA_templates
48.3. Circulation Policies
1.
A user with LSA privileges can view your library's circulation policies. Changes to circulation policies can be
requested through the Sitka support team.
Select Admin → Local Administration → Circulation Policies.
2.
By default, your library is selected in the box after Context Org Unit (i.e. Checkout Library). The initial display
will show all circulation rules at your library and the federation level. You can filter the display to show rules
applied to just your library's items.
Click Filter under Context Org Unit.
In the popped up window, select Copy Circ Lib from the first dropdown list; Is from the second list and your
library the third.
Click Apply to limit display to just your library.
Chapter 48. Local Administration Menu
420
3.
The resulting screen provides a summary view of each circulation rule for your library, and more detail can
be seen by clicking on the individual entries.
Circulation policies define the loan duration, renewals, recurring fine rate, maximum fine amount, grace
period and maximum items out rules for different combinations of User Permission Groups and Home
Library, and Circ Modifiers for items belonging to one library or library system. Other item attributes may
be used for more specific rules. Please contact Sitka support.
The current circulation polices allow items to be checked out and renewed at any library in your library
federation.
Chapter 48. Local Administration Menu
421
4.
Select the individual circulation policy for viewing by double-clicking on the desired row.
Chapter 48. Local Administration Menu
422
48.4. Closed Dates Editor
These dates are in addition to your regular weekly closed days (see Section 49.1.1, “Library Hours of Operation”).
Both regular closed days and those entered in the Closed Dates Editor affect due dates, fines, and targeting for
holds:
• Due dates. Due dates that would fall on closed days are automatically pushed forward to the next open day.
Likewise, if an item is checked out at 8pm, for example, and would normally be due on a day when the library
closes before 8pm, Evergreen pushes the due date forward to the next open day.
• Overdue fines. Overdue fines are not charged on days when the library is closed, unless your library chooses
to charge via Library Settings Editor: Charge fines on overdue circulations when closed.
• Hold Targeting. By default items at a closed library are not targeted for holds. This means that available items
that patrons have placed holds on will not appear on the Holds Pull List until the next open day. If you wish items
to be targeted when the library is closed to the public, perhaps staff are still working and would like to pull items
for holds, you can use the library settings Target copies for a hold even if copy's circ lib is closed and Target copies
for a hold even if copy's circ lib is closed IF the circ lib is the hold's pickup lib to override the default behaviour.
Sitka libraries not in the Pacific time zone must off-set their closed dates to ensure correct behaviour. See the
Non-Pacific Time Zone section below for details.
Multi-Day Closing
1.
Select Admin → Local Administration → Closed Dates Editor.
2.
Select Add Multi-Date Closing if your closed dates are entire business days.
Chapter 48. Local Administration Menu
423
3.
Enter applicable dates and a descriptive reason for the closing and click Save. Check the Apply to all of my
libraries box if your library is a multi-branch system and the closing applies to all of your branches.
You can type dates into fields using YYYY-MM-DD format or use calendar widgets to choose dates.
Detailed Closing
If your closed dates include a portion of a business day, select Add Detailed Closing at Step 2, then enter detailed
hours and dates and click Save. Time format must be HH:MM.
Libraries in Non-Pacific Time Zone
Sitka's Evergreen server is in the Pacific time zone. To ensure correct closed date behaviour Sitka libraries not in
the Pacific time zone must off-set their closed date entries by using Add Detailed Closing for all closures.
Chapter 48. Local Administration Menu
424
1.
Select Add Detailed Closing.
2.
Enter start date and select All Day under start time. To compensate for the time zone difference, the end date/
time should be 1am for libaries in the Mountain Time Zone or 2am for libraries in the Central Time Zone the
day after the closure. The example below is for a one day closure on September 6, 2010 for a library in the
Mountain Time Zone. Click Save when finished.
48.5. Copy Locations Editor
1.
Select Admin → Local Administration → Copy Locations Editor.
Chapter 48. Local Administration Menu
425
2.
You can create new copy locations (aka shelving location), or edit existing copy locations. To create a new
shelving location, type in the name, and select Yes or No for the various attributes: OPAC Visible, Holdable,
Circulate, Hold Verify and Checkin Alert. Click Create a new copy location.
Holdable means a patron is able to place a hold on an item in this location.
Hold Verify, if set up, will generate a prompt when an item is captured for a hold.
Checkin Alert will prompt staff to route the item to the location when checking in items with this location.
Label Prefix and Label Suffix, if set up, will be automatically included when printing spine labels
3.
In the bottom part of the Copy Locations Editor you can edit or delete existing copy locations. You cannot
delete a location that contains items. In this example the copy location Adult Videos is being edited.
Click Translate to enter optional translations of copy location titles for OPAC display when patrons select
other languages.
Text in the Label prefix and Label suffix fields will automatically be added to spine labels printed for items
in the selected copy location. It does not affect OPAC or staff client display.
Whether an item can be circulated, holdable or visible on OPAC is controlled by three factors: item status,
shelving location and item attributes (the options in the Copy Editor). Evergreen follows the aforementioned
sequence to check the value of each factor until it encounters a NO. An item can be circulated, holdable or
visible on OPAC when all three factors are set to YES.
Chapter 48. Local Administration Menu
426
After creating or deleting a copy location, log out of the staff client and clear the cache to ensure changes are
reflected in the copy editor. This is not required for edits to existing copy locations.
This is where you see the shelving locations in the Copy Editor:
The order of the shelving location name and library code can be reversed by setting up Admin → Workstation
Adminstration → Copy Editor: Copy Location Name First
This is where the shelving location appears in the OPAC.
Chapter 48. Local Administration Menu
427
48.6. Copy Location Order
This is the place where you specifiy the copy location order on Pull List of Hold Requests. Items are grouped together
by Copy Location first on the list to ease the process of tracing items on shelves. You may adjust the order according
to the layout of your library's shelves.
Drag a Copy Location on the list to the proper position, then click Apply Changes.
48.7. Copy Template Editor
See Section 36.1, “Create a Copy Template” in Serials Adminsitration section.
48.8. 'Do Not Attempt-Auto-Print' Setting
This is the place where you select receipt/slip type(s) to disable auto-print attempt for it. No printing will be attempted
if the receipt/slip type is selected. Auto-print button on individual function screen is automatically disabled for the
selected receipts/slips. The optional receipts/slips are: Checkout, Bill Pay, Transit Slip, Hold Slip and Hold/Transit
Slip.
Select/deselect one or more, then click Update Setting
For multi-branch libraries, you may use the dropdown list of libraries to make your selection effective to the selected
branch or your whole library system.
Chapter 48. Local Administration Menu
428
You may also remove receipt/slip type(s) from Library Settings Editor > Program: Disable Automatic Print
Attempt Type List.
48.9. Group Penalty Thresholds
Group Penalty Thresholds block circulation transactions for users who exceed maximum check out limits, number
of overdue items, or fines. Settings for your library are visible under Admin → Local Administration → Group
Penalty Thresholds. There are four penalties in use now.
Penalty
Effect
PATRON_EXCEEDS_FINES
Blocks new circulations and renewals if patron exceeds X in
fines
PATRON_EXCEEDS_OVERDUE_COUNT
Blocks new circulations if patron exceeds X overdue items
PATRON_EXCEEDS_CHECKOUT_COUNT
Blocks new circulations if patron exceeds X items out
PATRON_EXCEEDS_LOST_COUNT
Blocks new circulations if patron exceeds X lost items
Accounts that meet or exceed penalty thresholds display an alert message when opened and require staff overrides
for blocked transactions.
Chapter 48. Local Administration Menu
429
48.9.1. Penalty threshold inheritance rules
Local penalty thresholds are identified by Org Unit and appear in the same table as the Sitka defaults.
Where there is more than one threshold for the same penalty Evergreen gives precedence to local settings. In this
example BSQ patrons are blocked when owing $5.00 in fines ( ) instead of the Sitka default of $9999.00 ( ).
Thresholds and are both for BSQ but apply to different user profile groups. Threshold
a maximum of 9999 items out, but provides an exception for the PL BC OneCard profile.
limits all patrons to
Multi-branch libraries may create rules for the entire library system or for individual branches. Evergreen will
use the most specific applicable rule.
48.9.2. Creating local penalty thresholds
Local System Administrators can override the Sitka defaults by creating local penalty thresholds for selected patron
groups.
1.
Select Admin → Local Administration → Group Penalty Thresholds.
2.
Click New Penalty Threshold.
Chapter 48. Local Administration Menu
430
3.
The new penalty pop-up appears. Complete all fields and click Save.
Group - the profile group to which the rule applies. Selecting Public Library Patrons includes all profiles
below it in the user hierarchy (PL BC OneCard, PL ILL, etc).
Org Unit - multi-branch libraries may create rules for individual branches or the entire library system.
Penalty - select PATRON_EXCEEDS_CHECKOUT_COUNT, PATRON_EXCEEDS_LOST_COUNT,
PATRON_EXCEEDS_OVERDUE_COUNT, or PATRON_EXCEEDS_FINES ; other options are not used by
Sitka.
4.
After clicking Save the new threshold appears with the Sitka defaults. Evergreen always gives precedence to
local settings (in this example, BSP).
For user groups that have no limits Sitka Support recommends setting thresholds to 9999.
Chapter 48. Local Administration Menu
431
48.9.3. Deleting or editing local penalty thresholds
To delete a local threshold select the row to remove and click Delete Selected. The threshold is removed immediately
without further confirmation.
To edit a local threshold, double-click the desired row to open the pop-up form. Edit the form and click Save. New
settings take effect immediately.
48.10. Hold-driven Recall
Academic libraries usually allow extended loan periods to some patron types on some materials. They will recall
these items when other patrons request them. Hold-driven Recall automates this process.
When libraries recall an item they ususally shorten the loan period and block renewal. They may also change the fine
rate and maximum fine amount. A notice (via email) is sent to the current borrower to inform him/her of the change.
Evergreen uses three library setting entries to trigger hold-driven recall and define change parameters. When a hold
is placed and there is no availabe copy, Evergeen will check whether the Recall settings are set up for the library.
If settings are on and recall condition is met, a recall will be triggered.
Go to Admin → Local Administration → Library Settings Editor to set them up.
1. Recalls: Circulation duration that triggers a recall
This is the threshold that decides whether a recall is triggered. Recalls are triggered only when items are checked
out with a loan period longer than the one specified in this entry. For example, in a library the longest general
loan period is 35 days. Extended loan to faculty is 92 days. You may specify, e.g. 36 days or 90 days in this
Chapter 48. Local Administration Menu
432
entry to trigger recalls on items checked out to faculty with extended loan period. But you need to consider the
next entry to make your decision.
Evergreen uses the loan duration rule in circulation records as the loan period of a circulation. It does not
calculate the loan period from the checkout and due dates. If you set specific due date on checkout, the actual
loan period and the loan duration rule may not match.
2. Recalls: Truncated loan period
When a recall is triggered, Evergreen will reset the due date in the current circulation record. The new due date
is calculated based on the value entered in this entry and the above. The later date generated by these two entries
will be the new due date. For example, the truncated loan period is 7 days and the threshold in the above entry
is 36 days. On 2013-07-01 a recall is triggered on an item checked out on 2013-06-09, and the new due date
based on truncated loan period will be 2013-07-08 (2013-07-01 + 7 days), while 2013-07-15 is based on the
recall threshold (2013-06-09 + 36 days). Evergreen will set the new due date to 2013-07-15. If the above item is
recalled on 2013-07-10, the due date from the truncated loan period will be 2013-07-17. This will be the new due
date. In other words, the recall threshold is the minimum loan period an extended loan can be shortened to, and
patrons with extended loan items will have at least the truncated loan period when they receive the recall notice.
Under extreme circumstance, overdue items' loan periods may be extended, e.g. an extended loan checked
out in last term is recalled in this term.
3. Recalls: An array of fine amount, fine interval, and maximum fine.
This is optional. If you wish to set up new fine rules on recalled items, follow the example quoted in the Library
Settings Editor. Make sure the brackets and double quotation around the fine interval are included.
48.11. Hold Policies
1.
A user with LSA privileges can view your library's hold policies. Changes to hold policies can be requested
through the Sitka support team.
Select Admin → Local Administration → Hold Policies.
2.
Select your library from the drop down list after Context Org Unit.
Chapter 48. Local Administration Menu
433
The first screen provides a summary view of each hold rule for your library, and more detail can be seen by
clicking on the individual entries.
The Hold Policy for each library or library system defines who can place how many holds on what types
of materials. It also defines whether the library's materials can be used to fill holds picked up at other
libraries. Hold policies are usually defined by a combination of the Requestor Permission Group (eg. Public
Library Users, Public Library Staff etc.), item attributes like circulation modifier (eg. books, juvenilecollection etc.), and library (user home, items' owning and circulating library) with additional parameters
of maximum holds and whether a hold can be placed at all. Transit Range defines where the library's
materials can go to fill holds.
Chapter 48. Local Administration Menu
434
3.
Select the individual hold policy for viewing by double-clicking on the desired row.
In the below example, Public Library Users are able to place holds on BELK library’s items of any circulation
modifier and pick up these items at BELK library. They can have up to a maximum of 20 holds.
48.12. Item Attribute Editor
This is where you can choose to hide some unused fields on Edit Item Attibute, (aka Copy Editor) screen, such as
Deposit Amount.
1.
Select Admin → Local Administration → Edit Item Attribute The Copy Editor opens.
Chapter 48. Local Administration Menu
435
2.
Click Hide Fields button at the left bottom corner.
Chapter 48. Local Administration Menu
436
3.
By default your library is displayed on top of the list. If you wish to hide fields for all branches of your library
system, change it to your library system.
Check the field(s) that you want to hide and click OK button. Those selected fields will disappear from the
Copy Editor. Close the tab.
4.
If you wish to unhide a field, repeat the above step 1 and 2. Deselect the field and click OK.
48.13. Library Settings Editor
With the Library Settings Editor local system administrators (LSA) can optionally customize Evergreen's behaviour
for a particular library or library system. For descriptions of available settings see the Settings Overview table below.
Most settings can be changed in the staff client but some Sitka-wide defaults are maintained by the support team.
All staff accounts can view library settings but an LSA login is required to make changes.
New Sitka libraries should set up local settings as soon as possible after migration.
Chapter 48. Local Administration Menu
437
Editing Library Settings
1.
To open the Library Settings Editor select Admin → Local Administration → Library Settings Editor.
2.
Settings having effects on the same function or module are grouped together. You may browse the list or search
for the entry you want to edit. Type in your search term in the filter box. You may clear or re-apply the filter
by clicking Clear Filter or Filter.
3.
To edit an entry click Edit in the line.
4.
Read the instruction in the pop-up window. Make the change. Click Update Setting to save the change. Click
Delete Setting if you wish to delete it.
Chapter 48. Local Administration Menu
438
5.
Click History to view the previous values, if any, of a setting. You can revert back to an old value by clicking
revert.
Please note that different settings may require different data format, which is listed in the Settings Overview
table. Refer to the Data Type table at the bottom of this page to find the data format used for each data type.
Exporting/Importing Library Settings
To export library settings, click Export button on the above Library Setting Editor screen. Click Copy in the popup window. Those settings displayed on the screen are copied to clipboard. Paste the content to a text editor, such
as Notepad. Save the file on your computer.
Chapter 48. Local Administration Menu
439
To import library settings, click Import button on Library Settings Editor screen.
Open your previously saved file and copy the content. Click Paste in the pop-up window. Click Submit.
The exported settings may inlcude entries with context of Sitka. When importing settings with such entries you
may see errors of permission denied. This is considered normal as LSA can not and should not edit entries in
the Sitka context.
Settings Overview
The settings are grouped together in separate tables based on functions and modules, which are affected by the
setting. They are in the same sequence as you see in the staff client. Each table describes the available settings in the
group and shows which can be changed on a per-library basis. At bottom is the table with a list of data types [463]
with details about acceptable settings values.
For settings used by Acquisitions Module, please refer to Acquisition User Manual.
Long Overdue item status is not in use in Sitka, thus none of the long overdue related entries are included in
the table below.
Table 48.1. Booking and Cataloguing
Setting
Description
Data type Edited by Notes
Booking Allow email
notify
Permit email notification when a
reservation is ready for pickup.
True/false
LSA
Default Classification
Scheme
Defines the default classification
scheme for new call numbers: 1 =
Generic; 2 = Dewey; 3 = LC
Number
Sitka
Affects call number
sorting
Selection
list
LSA
Default: In process
Default copy status (fast Default status when a copy is
add)
created using the "Fast Item Add"
interface.
Chapter 48. Local Administration Menu
440
Setting
Description
Data type Edited by Notes
Default copy status
(normal)
Default status when a copy is
created using the normal volume/
copy creator interface.
Selection
list
Defines the control
number identifier used
in 003 and 035 fields
Admin setting
Delete bib if all
copies are deleted via
Acquisitions lineitem
cancellation.
LSA
Default: In Process
Sitka
True/False Sitka
Delete volume with last Automatically delete a volume when True/False Sitka
copy
the last linked copy is deleted.
Maximum Parallel
The maximum number of Z39.50
Z39.50 Batch Searches searches that can be in-flight at any
given time when performing batch
Z39.50 searches.
Number
Sitka
Maximum Z39.50
Batch Search Results
The maximum number of search
Number
results to retrieve and queue for each
record + Z39 source during batch
Z39.50 searches
Sitka
Spine and pocket label
font family
Set the preferred font family for
Text
spine and pocket labels. You can
specify a list of fonts, separated by
commas, in order of preference; the
system will use the first font it finds
with a matching name. For example,
"Arial, Helvetica, serif".
LSA
Spine and pocket label
font size
Set the default font size for spine
and pocket labels
Number
LSA
Spine and pocket label
font weight
Set the preferred font weight for
spine and pocket labels. You can
specify "normal", "bold", "bolder",
or "lighter".
Text
LSA
Spine label left margin
Set the left margin for spine labels in Number
number of characters.
LSA
Spine label line width
Set the default line width for spine Number
labels in number of characters. This
specifies the boundary at which lines
must be wrapped.
LSA
Spine label maximum
lines
Set the default maximum number of Number
lines for spine labels.
LSA
Chapter 48. Local Administration Menu
Default TRUE.
441
Table 48.2. Circulation
Setting
Description
Data type Edited by Notes
Auto-extend grace
periods
When enabled grace periods will
auto-extend. By default this will
be only when they are a full day
or more and end on a closed date,
though other options can alter this.
True/False LSA
Auto-extending grace
periods extend for all
closed dates
It works when the above setting
True/False LSA
"Auto-Extend Grace Periods" is set
to TRUE. If enabled, when the grace
period falls on a closed date(s), it
will be extended past all closed dates
that intersect, but within the hardcoded limits (your library's grace
period).
Auto-extending grace It works when the above setting
True/False LSA
periods include trailing "Auto-Extend Grace Periods" is
closed dates
set to TRUE. If enabled, grace
periods will include closed dates
that directly follow the last day
of the grace period. A backdated
checkin with effective date on the
closed dates will assume the item is
returned after hours on the last day
of the grace period.
Block hold request if
hold recipient privileges
have expired
Useful when libraries'
bookdrop equipped
with AMH.
True/False LSA
Cap max fine at item
price
This prevents the system from
True/False LSA
charging more than the item price in
overdue fines
Charge fines on
overdue circulations
when closed
When set to True, fines will be
charged during scheduled closings
and normal weekly closed days.
Checkout fills related
hold
When a patron checks out an
True/false
item and they have no holds that
directly target the item, the system
will attempt to find a hold for the
patron that could be fulfilled by the
checked out item and fulfills it. On
the Staff Client you may notice that
when a patron checks out an item
under a title on which he/she has
a hold, the hold will be treated as
filled though the item has not been
assigned to the patron's hold.
Chapter 48. Local Administration Menu
True/False LSA
LSA
442
Setting
Description
Data type Edited by Notes
Checkout fills related
When filling related holds on
True/False LSA
hold on valid copy only checkout only match on items that
are valid for opportunistic capture
for the hold. Without this set a Title
or Volume hold could match when
the item is not holdable. With this
set only holdable items will match.
Checkout auto renew
age
When an item has been checked out Duration
for at least this amount of time, an
attempt to check out the item to the
patron that it is already checked out
to will simply renew the circulation.
If the checkout attempt is done
within this time frame, Evergreen
will prompt for choosing Renewing
or Checkin then Checkout the item.
Do not change fines/
fees on zero-balance
LOST transaction
When an item has been marked
True/False LSA
lost and all fines/fees have been
completely paid on the transaction,
do not void or reinstate any fines/
fees EVEN IF Void Lost Item
Billing When Returned, and/or Void
Processing Fee on Lost Item Return,
and/or Restore Overdues on Lost
Item Return are enabled. This setting
has no effect on partially resolved
bills.
Do not include
outstanding Claims
Returned circulations
in lump sum tallies in
Patron Display.
In the Patron Display interface, the True/False LSA
number of total active circulations
for a given patron is presented in the
Summary sidebar and underneath
the Items Out navigation button.
This setting will prevent Claims
Returned circulations from counting
toward these tallies.
Hold shelf status delay
The purpose is to provide an interval Duration
of time after an item goes into
the on-holds-shelf status before it
appears to patrons that it is actually
on the holds shelf. This gives staff
time to process the item before it
shows as ready-for-pickup.
Include Lost
circulations in lump
sum tallies in Patron
Display.
In the Patron Display interface, the True/False LSA
number of total active circulations
for a given patron is presented in the
Summary sidebar and underneath
the Items Out navigation button.
Chapter 48. Local Administration Menu
LSA
2.8. Set it to True if
your library does not
refund lost and paid
items.
LSA
443
Setting
Description
Data type Edited by Notes
This setting will include Lost
circulations as counting toward these
tallies.
Invalid patron address
penalty
When set, if a patron address is set
to invalid, a penalty is applied.
True/False LSA
Item status for missing
pieces
This is the Item Status to use for
items that have been marked or
scanned as having Missing Pieces.
In the absence of this setting, the
Damaged status is used.
Selection
list
Load patron from
Checkout
When scanning barcodes into
True/False LSA
Checkout auto-detect if a new patron
barcode is scanned and auto-load the
new patron.
Lost checkin generates
new overdues
Enabling this setting causes
True/False LSA
retroactive creation of not-yetexisting overdue fines on lost item
checkin, up to the point of checkin
time (or max fines is reached). This
is different than "restore overdue on
lost", because it only creates new
overdue fines. Use both settings
together to get the full complement
of overdue fines for a lost item
Lost items usable on
checkin
Lost items are usable on checkin
instead of going 'home' first
Max patron claims
returned count
When this count is exceeded, a staff Number
override is required to mark the item
as claims returned.
LSA
Maximum visible age If this is unset, staff can view User Duration
of User Trigger Events Trigger Events regardless of age.
in Staff Interfaces
When this is set to an interval, it
represents the age of the oldest
possible User Trigger Event that can
be viewed.
LSA
Minimum transit
checkin interval
In-Transit items checked in this
Duration
close to the transit start time will be
prevented from checking in
LSA
Patron merge address
delete
Delete address(es) of subordinate
user(s) in a patron merge.
True/False LSA
Patron merge barcode
delete
Delete barcode(s) of subordinate
user(s) in a patron merge
True/False LSA
True/false
LSA
Not in use
LSA
Not working
Patron merge deactivate Mark barcode(s) of subordinate
True/False LSA
card
user(s) in a patron merge as inactive.
Chapter 48. Local Administration Menu
444
Setting
Description
Patron Registration:
Cloned patrons get
address copy
If True, in the Patron editor,
True/False LSA
addresses are copied from the cloned
user. If False, addresses are linked
from the cloned user which can
only be edited from the cloned user
record.
Printing: custom
Javascript file
Full URL path to a Javascript File
Text
to be loaded when printing. Should
implement a print_custom function
for DOM manipulation. Can change
the value of the do_print variable to
false to cancel printing.
Require matching email
address for password
reset requests
Data type Edited by Notes
True/False LSA
Restore overdues on
lost item return
If true when a lost item is checked in True/False LSA
overdue fines are charged (up to the
maximum fines amount)
Specify search depth
for the duplicate patron
check in the patron
editor
When using the patron registration Number
page, the duplicate patron check will
use the configured depth to scope
the search for duplicate patrons.
Sitka
Suppress hold transits
group
To create a group of libraris to
supress Hold Transits among them.
All libraries in the group should
use the same unique vaule. Leave
it empty if transits should not be
suppressed.
Text
Sitka
Suppress non-hold
transits group
To create a group of libraris to
Text
supress Non-Hold Transits among
them. All libraries in the group
should use the same unique vaule.
Leave it empty if Non-Hold Transits
should not be suppressed.
Sitka
Not in use
Suppress popup-dialogs When set to True, no pop-up
True/False LSA
during check-in.
window for exceptions on check-in.
But the accompanying sound will be
played.
Target copies for a hold If this setting is true at a given org
even if copy's circ lib is unit or one of its ancestors, the
closed
hold targeter will target copies
from this org unit even if the org
unit is closed (according to the
actor.org_unit.closed_date table).
True/False LSA
Target copies for a hold If this setting is true at a given org
even if copy's circ lib is unit or one of its ancestors, the
True/False LSA
Chapter 48. Local Administration Menu
445
Setting
closed IF the circ lib is
the hold's pickup lib
Description
Data type Edited by Notes
hold targeter will target copies
from this org unit even if the org
unit is closed (according to the
actor.org_unit.closed_date table) IF
AND ONLY IF the copy's circ lib is
the same as the hold's pickup lib.
Truncate fines to max
fine amount
True/False LSA
Sitka default TRUE
Use Lost and Paid copy
status
True/False Sitka
Sitka default TRUE
Warn when patron
account is about to
expire
If set, the staff client displays a
Duration
warning this number of days before
the expiry of a patron account. Value
is in number of days.
LSA
Void lost item billing
when claims returned
If True, when a lost item is claimed
returned, the item replacement bill
(item price) is voided.
Void processing fee
on lost item claims
returned
If True, the processing fee is voided True/false
when a lost item is claimed returned.
LSA
Void lost item billing
when returned
If True,when a lost item is checked True/false
in the item replacement bill (item
price) is voided. If the patron has
already paid the bill a credit is
applied. But libraries may choose
not to adjust bills if already resolved
by: Do not change fines/fees on
zero-balance LOST transaction.
LSA
Void lost max interval
Items that have been overdue this
Duration
long will not result in lost charges
being voided when returned, and the
overdue fines will not be restored,
either. Only applies if Circ: Void
lost item billing or Circ: Void
processing fee on lost item are true.
LSA
True/False LSA
Void processing fee on If True, the processing fee is voided True/false
lost item return
when a lost item is returned
2.8
2.8
LSA
Long Overdue status is not in use on Sitka Evergreen. All settings related to Long Overdue may be ignored.
Table 48.3. Credit Card Processing
Credit card payment is not currently supported.
All settings can be ignored.
Chapter 48. Local Administration Menu
446
Table 48.4. Finances
Setting
Description
Data type Edited by Notes
Allow credit card
payments
If enabled, patrons will be able to
True/False Sitka
pay fines accrued at this location via
credit card.
Charge item price when If true Evergreen bills item price to True/false
marked damaged
the last patron who checked out the
damaged item. Staff receive an alert
with patron information and must
confirm the billing.
LSA
Charge lost on zero
If set to True, default item price will True/false
be charged when an item is marked
lost even though the price in item
record is 0.00 (same as no price). If
False, only processing fee, if used,
will be charged.
LSA
Charge processing fee
for damaged items
Optional processing fee billed to
Number(dollar)
LSA
last patron who checked out the
damaged item. Staff receive an alert
with patron information and must
confirm the billing.
Default item price
Replacement charge for lost items if Number(dollar)
LSA
price is unset in the Copy Editor. .
Does not apply if item price is set to
$0
Disable Patron Credit
Do not allow patrons to accrue credit True/Fasle LSA
or pay fines/fees with accrued credit.
Leave transaction open If True, it leaves the lost copy on the True/False Sitka
when lost balance
patron record when it is paid.
equals zero
Lost materials
processing fee
The amount charged in addition to
item price when an item is marked
lost.
Number
(dollar)
Maximum Item Price
When charging for lost items, limit
the charge to this as a maximum.
Number(dollar)
LSA
Minimum Item Price
When charging for lost items, charge Number(dollar)
LSA
this amount as a minimum.
Void overdue fines
If true overdue fines are voided
when items are marked when an item is marked lost
lost
Chapter 48. Local Administration Menu
True/false
Not in use
Disabled when set to 0
If set to TRUE, Patron
Credit will not be
displayed on Bills
screen.
Sitka default False
LSA
LSA
447
Table 48.5. GUI: Graphic User Interface
Setting
Description
Data type Edited by Notes
Alert on empty bib
records
Alert staff when the last copy for a
record is being deleted.
True/False LSA
Button bar
If TRUE, the staff client button
True/False LSA
bar appears by default on all
workstations registered to your
library; staff can override this setting
at each login.
Cap results in Patron
Search at this number.
The maximum number of resutls
returned per search. If 100 is set
up here, any search will return 100
records at most.
Number
LSA
Default Country for
New Addresses in
Patron Editor
This is the default Country for new
addresses in the patron editor.
Text
LSA
Default hotkeyset
Default Hotkeyset for clients
(filename without the .keyset).
Examples: Default, Minimal, and
None
Text
LSA
Default ident type for
patron registration
This is the default Ident Type for
new users in the patron editor.
Selection
list
LSA
Default showing
suggested patron
registration fields
Instead of All fields, show
just suggested fields in patron
registration by default.
True/False LSA
Disable the ability
to save list column
configurations locally.
GUI: Disable the ability to save list True/False LSA
column configurations locally. If set,
columns may still be manipulated,
however, the changes do not persist.
Also, existing local configurations
are ignored if this setting is true.
Example for
Day_phone field on
patron registration
The example on validation on
the Day_phone field in patron
registration.
Text
LSA
Example for Email field The example on validation on the
on patron registration
Email field in patron registration.
Text
LSA
Example for Eveningphone on patron
registration
The example on validation on the
Evening-phone field in patron
registration.
Text
LSA
Example for Otherphone on patron
registration
The example on validation on
the Other-phone field in patron
registration.
Text
LSA
Example for phone
fields on patron
registration
The example on validation on phone Text
fields in patron registration. Applies
LSA
Chapter 48. Local Administration Menu
Individual workstations'
default overrides this
setting.
448
Setting
Description
Data type Edited by Notes
to all phone fields without their own
setting.
Example for Postal
Code field on patron
registration
The example on validation on
the Postal Code field in patron
registration.
Text
LSA
Format Dates with this
pattern.
Format Dates with this pattern
(examples: "yyyy-MM-dd" for
"2010-04-26", "MMM d, yyyy"
for "Apr 26, 2010"). Formats are
effective in display (not editing)
area.
Text
LSA
Format Times with this Format Times with this pattern
Text
pattern.
(examples: "h:m:s.SSS a z" for
"2:07:20.666 PM Eastern Daylight
Time", "HH:mm" for "14:07").
Formats are effective in display (not
editing) area.
LSA
GUI: Hide these
fields within the Item
Attribute Editor.
Text
LSA
Horizontal layout for
The main entry point for
Volume/Copy Creator/ this interface is in Holdings
Editor.
Maintenance, Actions for Selected
Rows, Edit Item Attributes / Call
Numbers / Replace Barcodes. This
setting changes the top and bottom
panes (if FALSE) for that interface
into left and right panes (if TRUE).
True/False LSA
Idle timeout
If you want staff client windows to Number
be minimized after a certain amount
of system idle time, set this to the
number of seconds of idle time that
you want to allow before minimizing
(requires staff client restart).
LSA
Items Out Claims
Value is a numeric code, describing Number
Returned display setting which list the circulation should
appear while checked out and
whether the circulation should
continue to appear in the bottom list,
when checked in with oustanding
fines. 1 = top list, bottom list. 2 =
bottom list, bottom list. 5 = top list,
do not display. 6 = bottom list, do
not display.
LSA
default=2
Items Out Lost display
setting
LSA
default=2
Value is a numeric code, describing Number
which list the circulation should
Chapter 48. Local Administration Menu
449
Setting
Description
Data type Edited by Notes
appear while checked out and
whether the circulation should
continue to appear in the bottom list,
when checked in with oustanding
fines. 1 = top list, bottom list. 2 =
bottom list, bottom list. 5 = top list,
do not display. 6 = bottom list, do
not display.
Max user activity
Sets the maxinum number of recent
entries to retrieve (staff user activity entries to retrieve for
client)
display in the staff client.
Number
LSA
Maximum previous
checkouts displayed
Number
LSA
The maximum number of previous
circulations the staff client will
display when investigating item
details
Patron circulation
summary is horizontal
True/False LSA
Record in-house use:
# of uses threshold for
Are You Sure? dialog.
In the Record In-House Use
interface, a submission attempt will
warn if the # of uses field exceeds
the value of this setting.
Number
LSA
Record In-House Use:
Maximum # of uses
allowed per entry.
The # of uses entry in the Record In- Number
House Use interface may not exceed
the value of this setting.
LSA
Regex for Day_phone
field on patron
registration
The Regular Expression for
Regular
LSA
validation on the Day_phone field in expression
patron registration. Note: The first
capture group will be used for the
"last 4 digits of phone number" as
patron password feature, if enabled.
Ex: "[2-9]\d{2}-\d{3}-(\d{4})( x\d
+)?" will ignore the extension on a
NANP number.
Regex for Email field
on patron registration
The Regular Expression on
validation on the Email field in
patron registration.
Regular
LSA
expression
Regex for Eveningphone on patron
registration
The Regular Expression on
validation on the Evening-phone
field in patron registration.
Regular
LSA
expression
Regex for Other-phone The Regular Expression on
on patron registration
validation on the Other-phone field
in patron registration.
Regular
LSA
expression
Regex for phone fields
on patron registration
Regular
LSA
expression
The Regular Expression on
validation on phone fields in patron
Chapter 48. Local Administration Menu
450
Setting
Description
registration. Applies to all phone
fields without their own setting.
Data type Edited by Notes
Regext for Postal
Code field on patron
registration
The Regular Expression on
validation on the Postal Code field
in patron registration.
Regular
LSA
expression
Require at least one
address for Patron
Registration
Enforces a requirement for having at True/False LSA
least one address for a patron during
registration. If set to False, you need
to delete the empty address before
saving the record. If set to True,
deletion is not allowed.
Require XXXXX field
on patron registration
The XXXXX field will be required
on the patron registration screen.
True/False LSA
Require staff initials for Appends staff initials and edit date
entry/edit of copy notes into note content.
True/False LSA
Require staff initials
for entry/edit of patron
notes.
Appends staff initials and edit date
into note content.
True/False LSA
Require staff initials
for entry/edit of patron
standing penalties and
messages
Appends staff initials and edit date
into patron standing penalties and
messages.
True/False LSA
Show billing tab first
when bills are present
If true accounts for patrons with bills True/false
will open to the billing tab instead of
check out
Show XXXXX field on The XXXXX field will be shown
patron registration
on the patron registration screen.
Showing a field makes it appear
with required fields even when not
required. If the field is required this
setting is ignored.
LSA
True/False LSA
Suggest XXXXX field
on patron registration
The XXXXX field will be suggested True/False LSA
on the patron registration screen.
Suggesting a field makes it appear
when suggested fields are shown. If
the field is shown or required this
setting is ignored.
Toggle off the patron
summary sidebar after
first view.
When true, the patron summary
sidebar will collapse after a new
patron sub-interface is selected.
Chapter 48. Local Administration Menu
XXXXX can be
Country, Day-phone,
Evening-phone, Otherphone, DOB, Email, or
Prefix.
True/False LSA
451
Setting
Description
URL for remote
The format and naming convention
directory containing list for the files found in this directory
column settings.
match those in the local settings
directory for a given workstation.
An administrator could create the
desired settings locally and then
copy all the tree_columns_for_*
files to the remote directory.
Data type Edited by Notes
Text
Not in use
Uncheck bills by
default in the patron
billing interface
Uncheck bills by default in the
True/False LSA
patron billing interface, and focus on
the Uncheck All button instead of
the Payment Received field.
Unified Volume/Item
Creator/Editor
If True, combines the Volume/Copy True/False LSA
Creator and Item Attribute Editor in
some instances.
Work Log: maximum
actions logged
Maximum entries for "Most Recent
Staff Actions" section of the Work
Log interface.
Number
LSA
Work Log: maximum
patrons logged
Maximum entries for "Most
Number
Recently Affected Patrons..." section
of the Work Log interface.
LSA
Table 48.6. Global
Setting
Description
Allow multiple
username changes
If enabled (and Lock Usernames
True/False Sitka
is not set) patrons will be allowed
to change their username when
it does not look like a barcode.
Otherwise username changing in the
OPAC will only be allowed when
the patron's username looks like a
barcode.
Global default locale
Data type Edited by Notes
Text
Sitka
Default: Canada
True/False Sitka
Default FALSE
Lock Usernames
If enabled username changing via
the OPAC will be disabled.
Password format
Defines acceptable format for OPAC Regular
Sitka
account passwords
expression
Patron barcode format
Defines acceptable format for patron Regular
Sitka
barcodes
expression
Chapter 48. Local Administration Menu
Default TRUE.
Default requires that
passwords "be at least
7 characters in length,
contain at least one
letter (a-z/A-Z), and
contain at least one
number.
452
Setting
Description
Patron username format Regular expression defining the
patron username format, used for
patron registration and self-service
username changing only
Data type Edited by Notes
Regular
Sitka
expression
Table 48.7. Holds
Setting
Description
Data type Edited by Notes
Behind desk pickup
supported
If a branch supports both a public
True/False LSA
holds shelf and behind-the-desk
pickups, set this value to true. This
gives the patron the option to enable
behind-the-desk pickups for their
holds by selecting Hold is behind
Circ Desk flag in patron record.
Best-hold selection sort Defines the sort order of holds when Selection
order
selecting a hold to fill using a given list
copy at capture time
Sitka
Block renewal of items When an item could fulfill a hold, do True/False Sitka
needed for holds
not allow the current patron to renew
Cancelled holds display Show all cancelled holds that were Duration
age
cancelled within this amount of time
LSA
Cancelled holds display How many cancelled holds to show
count
in patron holds interfaces
Number
LSA
Clear shelf copy status
Any copies that have not been put
into reshelving, in-transit, or onholds-shelf (for a new hold) during
the clear shelf process will be put
into this status. This is basically a
purgatory status for copies waiting
to be pulled from the shelf and
processed by hand
Selection
list
Sitka
Default estimated wait
When predicting the amount of time Duration
a patron will be waiting for a hold
to be fulfilled, this is the default
estimated length of time to assume
an item will be checked out.
Sitka
Default hold shelf
expire interval
Hold Shelf Expiry Time is
calculated and inserted into hold
record based on this interval when
capturing a hold.
Duration
LSA
Expire alert interval
Time before a hold expires at which Duration
to send an email notifying the patron
Sitka
Expire interval
Amount of time until an unfulfilled
hold expires
LSA
Chapter 48. Local Administration Menu
Duration
Not applicable in Sitka
OPAC
Not in use
453
Setting
Description
Data type Edited by Notes
Hard boundary
Administrative setting for Sitka use
only
Number
Sitka
Duration
Sitka
Hard stalling interval
Has local copy alert
If there is an available copy at the
requesting library that could fulfill
a hold during hold placement time,
alert the patron.
Has local copy block
If there is an available copy at the
True/False LSA
requesting library that could fulfill a
hold during hold placement time, do
not allow the hold to be placed.
Max foreign-circulation Time a copy can spend circulating
time
away from its circ lib before
returning there to fill a hold
True/False LSA
Duration
Sitka
Maximum library target When this value is set and greater
Number
attempts
than 0, the system will only attempt
to find a copy at each possible
branch the configured number of
times
Sitka
Minimum estimated
wait
When predicting the amount of time Duration
a patron will be waiting for a hold
to be fulfilled, this is the minimum
estimated length of time to assume
an item will be checked out.
Sitka
Org unit target weight
Org Units can be organized into hold Number
target groups based on a weight.
Potential copies from org units
with the same weight are chosen at
random.
Sitka
Reset request time on
un-cancel
When a hold is uncancelled, reset
True/False LSA
the request time to push it to the end
of the queue
Skip for hold targeting
When true, don't target any copies at True/False Sitka
this org unit for holds
Soft boundary
Holds will not be filled by copies
outside this boundary if there are
holdable copies within it.
Number
Sitka
Soft stalling interval
For this amount of time, holds will
not be opportunistically captured at
non-pickup branches.
Duration
Sitka
Use Active Date for age When calculating age protection
protection
rules use the Active date instead of
the Creation Date.
Chapter 48. Local Administration Menu
True/False LSA
Not applicable in Sitka
OPAC
Default TRUE
454
Setting
Description
Data type Edited by Notes
Use weight-based hold
targeting
Use library weight based hold
targeting
True/False Sitka
Setting
Description
Data type Edited by Notes
Change reshelving
status interval
Amount of time to wait before
Duration
changing an item from “Reshelving”
status to “available”
Claim never checked
out: mark copy as
missing
When a circ is marked as claimsTrue/False LSA
never-checked-out, mark the copy as
missing
Claim return copy
status
Claims returned copies are put into Selection
Sitka wide default status of Claimed list
Returned. This is not configurable at
library.
Sitka
Courier code
Courier Code for the library.
Text
Available in transit slip templates as
the %courier_code% macro.
LSA
Juvenile age threshold
Upper cut-off age for patrons to be Duration
considered juvenile, calculated from (years)
date of birth in patron accounts
LSA
Library information
URL
URL for information on this library, Text
such as contact information, hours
of operation, and directions. Use
a complete URL, such as "http://
example.com/hours.html".
LSA
Mark item damaged
voids overdues
When an item is marked damaged,
overdue fines on the most recent
circulation are voided.
Pre-cat item circ lib
Override the default circ lib of
Text
"here" with a pre-configured circ lib
for pre-cat items. The value should
be the "shortname" (aka policy
name) of the org unit
Sitka
Telephony: Arbitrary
line(s) to include in
each notice callfile
This overrides lines from
opensrf.xml. Line(s) must be valid
for your target server and platform
(e.g. Asterisk 1.4).
Sitka
Use external "library
information URL" in
copy table, if available
If set to true, the library name in the True/False LSA
copy details section will link to the
URL associated with the "Library
information URL" library setting
Table 48.8. Library
Chapter 48. Local Administration Menu
LSA
The default is at
midnight each night for
items with "Reshelving"
status for over 24 hours.
Not in use
True/False LSA
Text
Not in use.
455
Setting
Description
rather than the library information
page generated by Evergreen.
Data type Edited by Notes
Setting
Description
Data type Edited by Notes
Allow Patron SelfRegistration
Allow patrons to self-register,
creating pending user accounts
True/False Sitka
Allow pending
addresses
If true patrons can edit their
addresses in the OPAC. Changes
must be approved by staff
True/false
LSA
True/false
Sitka
Table 48.9. OPAC
Auto-Override
Permitted Hold Blocks
(Patrons)
Ignore the Global
luri_as_copy flag for
this OU
Defalt FALSE
Admin setting on e-records scoping True/False Sitka
Jump to details on 1 hit When a search yields only 1 result,
(OPAC)
jump directly to the record details
page. This setting only affects the
public OPAC
True/False LSA
Jump to details on 1 hit When a search yields only 1 result,
(staff client)
jump directly to the record details
page. This setting only affects the
PAC within the staff client
True/False LSA
Limit the depth of
xxxxxx
Admin setting on e-record link
display
Number
Sitka
Limit the number of
URIs on the results
page
Admin setting on e-record link
display
Number
Sitka
OPAC login message
HTML blob to be rendered in an
interstitial page upon OPAC login
Text
Sitka
Number of staff client
saved searches to
display on left side
of results and record
details pages
If unset, the default is 10.
Number
LSA
Open Reviews & More If set to TRUE, Reviews & More
in a new tab
links in the search results to be
opened in a new tab.
True/False LSA
Org unit hiding depth
Admin setting controlled by Sitka
Number
Org Unit is not a hold
pickup library
If set, this org unit will not be
True/False Sitka
offered to the patron as an option for
a hold pickup location. This setting
Chapter 48. Local Administration Menu
Sitka
456
Setting
Description
has no affect on searching or hold
targeting.
Data type Edited by Notes
Paging shortcut links
for OPAC Browse
The characters in this string, in
Regular
Sitka
order, will be used as shortcut links expression
for quick paging in the OPAC
browse interface. Any sequence
surrounded by asterisks will be
taken as a whole label, not split into
individual labels at the character
level, but only the first character will
serve as the basis of the search.
Patron self-reg. display Number of seconds to wait before
Duration
timeout
reloading the patron self-registration
interface to clear sensitive data.
Sitka
Patron self-reg. expire
interval
If set, this is the amount of time
a pending user account will be
allowed to sit in the database.
After this time, the pending user
information will be purged.
Duration
Sitka
Payment history age
limit
The OPAC should not display
payments by patrons that are older
than any interval defined here.
Duration
LSA
Not in use
Specify how items are
ordered
This value specifies how items are Text
ordered in search results and record
views within the org unit. To sort
from newest to oldest by active date
use 'desc'. To sort from oldest to
newest by active date use 'asc'. To
sort by call number use 'call'.
LSA
Default is 'call'.
Tag Circulated Items in When a user is both logged in and
True/False LSA
Results
has opted in to circulation history
tracking, turning on this setting
will cause previous (or currently)
circulated items to be highlighted in
search results.
Use fully compressed
serial holdings
Show fully compressed serial
holdings for all libraries at and
below the current context unit
Warn patrons when
adding to a temporary
book list
Present a warning dialog when a
True/False Sitka
patron adds a book to the temporary
book list.
Chapter 48. Local Administration Menu
Default TRUE
True/False Sitka
457
Table 48.10. Offline and Program
Setting
Description
Data type Edited by Notes
Skip offline checkin
if newer item Status
Changed Time.
Skip offline checkin transaction
True/False LSA
(raise exception when processing) if
item Status Changed Time is newer
than the recorded transaction time.
WARNING: The Reshelving to
Available status rollover will trigger
this.
Skip offline checkout
if newer item Status
Changed Time.
Skip offline checkout transaction
True/False LSA
(raise exception when processing) if
item Status Changed Time is newer
than the recorded transaction time.
WARNING: The Reshelving to
Available status rollover will trigger
this.
Skip offline renewal
if newer item Status
Changed Time.
Skip offline renewal transaction
True/False LSA
(raise exception when processing) if
item Status Changed Time is newer
than the recorded transaction time.
WARNING: The Reshelving to
Available status rollover will trigger
this.
Disable automatic print Disable automatic print attempts
Text
attempt type list
from staff client interfaces for the
receipt types in this list. Possible
values: "Checkout", "Bill Pay",
"Hold Slip", "Transit Slip", and
"Hold/Transit Slip". This is different
from the Auto-Print checkbox in the
pertinent interfaces in that it disables
automatic print attempts altogether,
rather than encouraging silent
printing by suppressing the print
dialog. The Auto-Print checkbox in
these interfaces have no effect on
the behavior for this setting. In the
case of the Hold, Transit, and Hold/
Transit slips, this also suppresses the
alert dialogs that precede the print
dialog (the ones that offer Print and
Do Not Print as options).
LSA
Retain empty bib
records
Retain a bib record even when all
attached copies are deleted
True/False Sitka
Sending email address
for patron notices
This email address is for
automatically generated patron
Text
Chapter 48. Local Administration Menu
Default FALSE based
on Sitka cataloguing
policy.
LSA
458
Setting
Description
Data type Edited by Notes
notices (e.g. email overdues, email
holds notification). It is good
practice to set up a generic account,
like [email protected], so
that one person’s individual email
inbox doesn’t get cluttered with
emails that were not delivered.
Table 48.11. Receipt Templates and SMS Text Message
Setting
Description
Data type Edited by Notes
Content of alert_text
include
Text/HTML/Macros to be inserted
into receipt templates in place of
%INCLUDE(alert_text)%
Text
LSA
Content of event_text
include
Text/HTML/Macros to be inserted
into receipt templates in place of
%INCLUDE(event_text)%
Text
LSA
Content of footer_text
include
Text/HTML/Macros to be inserted
into receipt templates in place of
%INCLUDE(footer_text)%
Text
LSA
Content of header_text
include
Text/HTML/Macros to be inserted
into receipt templates in place of
%INCLUDE(header_text)%
Text
LSA
Content of notice_text
include
Text/HTML/Macros to be inserted
into receipt templates in place of
%INCLUDE(notice_text)%
Text
LSA
Disable auth
Disable authentication requirement True/False LSA
requirement for texting for sending call number information
call numbers.
via SMS from the OPAC.
Enable features
that send SMS text
messages.
Current features that use SMS
True/False LSA
include hold-ready-for-pickup
notifications and a "Send Text"
action for call numbers in the
OPAC. If this setting is not enabled,
the SMS options will not be offered
to the user. Unless you are carefully
silo-ing patrons and their use of
the OPAC, the context org for this
setting should be the top org in the
org hierarchy, otherwise patrons
can trample their user settings when
jumping between orgs.
Chapter 48. Local Administration Menu
459
Table 48.12. Security
Setting
Description
Data type Edited by Notes
Default level of patrons' Enter numbers 1 (Filtered), 2
internet access
(Unfiltered), or 3 (No Acess)
Number
LSA
Maximum concurrently Prevent the creation of new selfactive self-serve
serve password reset requests until
password reset requests the number of active requests drops
back below this number.
Number
Sitka
Not in use
Maximum concurrently
active self-serve
password reset requests
per user
When a user has more than this
number of concurrently active
self-serve password reset requests
for their account, prevent the user
from creating any new self-serve
password reset requests until the
number of active requests for the
user drops back below this number.
Number
Sitka
Not in use
OPAC inactivity
timeout (in seconds)
Number of seconds of inactivity
before OPAC accounts are
automatically logged out. Sitka
default is 420 seconds (7 minutes)
Number
LSA
Obscure the Date of
Birth field
When true, the Date of Birth column True/False LSA
in patron lists will default to Not
Visible, and in the Patron Summary
sidebar the value will display as
unless the field label is clicked.
Offline: Patron
usernames allowed
During offline circulations, allow
patrons to identify themselves with
usernames in addition to barcode.
For this setting to work, a barcode
format must also be defined
True/False
Patron opt-in boundary Admin setting
Sitka
Patron opt-in default
Admin setting
Sitka
Patron: password from
phone #
If true the last 4 digits of the patron's True/false
phone number is the password for
new accounts (password must still
be changed at first OPAC login)
LSA
Persistent login
duration
How long a persistent login lasts,
e.g. '2 weeks'
Duration
Sitka
Self-serve password
reset request time-tolive
Length of time (in seconds) a self- Duration
serve password reset request should
remain active.
Sitka
Staff login inactivity
timeout (in seconds)
Number of seconds of inactivity
Number
before staff client prompts for login
and password. Sitka default is 6000
seconds (2 hours)
LSA
Chapter 48. Local Administration Menu
460
Table 48.13. Self Check
Setting
Description
Data type Edited by Notes
Allow Fine printing
If true, there will be a print option on True/false
the fine list screen.
LSA
Allow Hold printing
If true, there will be a print option on True/false
the hold list screen.
LSA
Allow Items out
printing
If true, there will be a print option on True/false
the items out list screen.
LSA
Audio Alerts
Use audio alerts for selfcheck
events.
LSA
Block copy checkout
status
List of copy status IDs that will
Number
block checkout even if the generic
COPY_NOT_AVAILABLE event is
overridden.
LSA
Patron login timeout (in Number of seconds of inactivity
Duration
seconds)
before the patron is logged out of the
selfcheck interface.
LSA
True/false
Look up copy status ID
from Server Admin.
Pop-up alert for errors
If true, checkout/renewal errors will True/False LSA
cause a pop-up window in addition
to the on-screen message.
Require patron
password
If true, patrons will be required to
enter their password in addition to
their username/barcode to log into
the selfcheck interface.
True/False LSA
Selfcheck override
events list
List of checkout/renewal events
that the selfcheck interface should
automatically override instead
instead of alerting and stopping the
transaction.
Text
Workstation Required
All selfcheck stations must use a
workstation.
True/False LSA
Setting
Description
Data type Edited by Notes
Default display
grouping for serials
distributions presented
in the OPAC.
Default display grouping for serials Text
distributions presented in the OPAC.
This can be "enum" or "chron".
LSA
Table 48.14. Other
Sitka
Previous issuance copy When a serial issuance is received,
location
copies (units) of the previous
issuance will be automatically
moved into the configured shelving
location.
Chapter 48. Local Administration Menu
461
Setting
Description
Data type Edited by Notes
Maximum redirect
lookups
Admin setting.
Number
Sitka
Maximum wait time (in Admin setting
seconds) for a URL to
lookup
Duration
Sitka
Number of URLs to test Admin setting
in parallel
Number
Sitka
Number of seconds to Admin setting
wait between URL test
attempts
Duration
Sitka
Vandelay default
barcode prefix
Apply this prefix to any autogenerated item barcodes
Text
LSA
Vandelay generate
default barcodes
Auto-generate deault item barcodes
when no item barcode is present.
True/False LSA
Vandelay default call
number prefix
Apply this prefix to any autogenerated item call numbers.
Text
Vandelay generate
default call numbers
Auto-generate default item call
numbers when no item call number
is present.
True/False LSA
Vandelay default
circulation modifier
Default circulation modifier value
for imported items.
Selection
list
LSA
Vandelay default copy
location
Default copy location value for
imported items.
Selection
list
LSA
Vandelay default record Admin setting
match set
Selection
list
Sitka
Circ: default precat circ
modifier
Selection
List
LSA
Claim Return: Mark
copy as missing
True/False Sitka
LSA
Disallow circulation
of items when they are
on booking reserve and
that reserve overlaps
with the checkout
period
When true, items on booking reserve True/False LSA
during the proposed checkout
period will not be allowed to
circulate unless overridden with
the COPY_RESERVED.override
permission.
Limit Due Date by
Patron Expiry
If True automatically adjusts item
True/False LSA
due date to match patron card expiry
date if expiry date sooner than due
date. If False item due date applied.
Recalls: An array
of fine amount, fine
interval, and maximum
fine.
An array of fine amount, fine
interval, and maximum fine. For
example, to specify a new fine rule
of $5.00 per day, with a maximum
Chapter 48. Local Administration Menu
Text
LSA
Default FALSE
Brackets are required in
the text.
462
Setting
Description
fine of $50.00, use: [5.00,"1
day",50.00]
Data type Edited by Notes
Recalls: Circulation
duration that triggers a
recall.
A hold placed on an item with a
Duration
circulation duration longer than this
will trigger a recall. For example,
"14 days" or "3 weeks".
LSA
Recalls: Truncated loan When a recall is triggered, this
period.
defines the adjusted loan period for
the item. For example, "4 days" or
"1 week".
Duration
LSA
Use in-database circ
policy
Admin setting
True/False Sitka
Use in-database holds
policy
Admin setting
True/False Sitka
Use legacy hardcoded
receipts/slips
True/False LSA
circ.renew.check_penalty
True/False Sitka
global.credit.allow
True/False Sitka
Not in use
org.opt_out_email_predue
True/False Sitka
Not in use
ui.network.progress_meter
Switch off/on a bar indicating
network in progress
True/False LSA
Acceptable formats for each setting type are listed below. Quotation marks are never required when updating settings
in the staff client.
Data type
Formatting
True/false
Select value from drop-down menu
Number
Enter a numerical value (decimals allowed in price settings)
Duration
Enter a number followed by a space and any of the following units: minutes, hours,
days, months (30 minutes, 2 days, etc)
Selection list
Choose from a drop-down list of options (e.g. copy status, copy location)
Text
Free text
48.14. Non-Catalogued Type Editor
This is where you configure your non-catalogued types that appear in the dropdown menu for non-catalogued
circulations.
1.
Select Admin → Local Administration → Non Catalogued Type Editor.
Chapter 48. Local Administration Menu
463
2.
To set up a new non-catalogued type, type the name in the left hand box, and choose how many days the item
will circulate for. Click Create.
Select the Circulate In-House box for non-catalogued items that will circulate in house. This can be used to
manually track computer use, or meeting room rentals.
This is what the dropdown menu for non-catalogued circulations in the patron checkout screen looks like:
48.15. Statistical Categories Editor
This is where you configure your statistical categories (stat cats). Stat cats are a way to save and report on additional
information that doesn’t fit elsewhere in Evergreen's default records. It is possible to have stat cats for copies or
patrons.
1.
Select Admin → Local Administration → Statistical Categories Editor.
Chapter 48. Local Administration Menu
464
2.
To create a new stat cat, enter the name of the stat cat and select Copy or Patron in the dropdown menu. Check
the respective On or Off radio buttons beside each option. And then click Create new statistical category.
• OPAC Visiblity: If On, the stat cat and its value are displayed in Copy Details on OPAC.
• Required: If On, the stat cat becomes mandatory.
• Archive with Circs: If On, the stat cat and its value are kept in aged circulation records.
Chapter 48. Local Administration Menu
465
3.
To add stat cat values, click Add in the line of the stat cat. Type in the value, then click Create new entry button.
Confirm on the prompt. Repeat these steps if you need add more values.
4.
Clicking Edit on the above screen allows you to change the stat cat name and/or its properties.
5.
Copy stat cats. The image above shows some examples of copy stat cats. You would see these when editing
items in the Copy Editor, also known as the Edit Item Attributes screen. You might use copy stat cats to track
books you have bought from a specific vendor, or donations.
Chapter 48. Local Administration Menu
466
This is what the copy stat cat looks like in the Copy Editor.
Chapter 48. Local Administration Menu
467
Patron stat cats. Below are some examples of patron stat cats. Patron stat cats can be used to keep track of
information like the high school a patron attends, or the home library for a consortium patron, e.g. InterLink. You
would see these in the lower part of registration/edit patron screen.
There are two more options when creating a patron stat cat: Allow Free Text allows staff to type in the values when
on patron registration/edit screen; Show in Summary displays the stat cat, if there is a value, in patron summary.
This is what the patron stat cat looks like in the patron registration screen.
Chapter 48. Local Administration Menu
468
48.16. Surveys
This section illustrates how to create a survey, shows where the survey responses are saved in the patron record,
and explains how to report on surveys.
Surveys questions can be optional or required. Surveys come up when a patron is first registered and edited
subsequently. Required survey questions have to be answered whenever the patron record is edited. Some examples
of survey questions might include: Would you use the library if it were open on a Sunday? Would you like to be
contacted by the library to learn about new services? Do you attend library programs?
To find out the survey result you need to run reports on survey questions. For example, you could find out how many
people say they would use the library if it were open on a Sunday, or you could get a list of patrons who say they
would like to receive marketing material from the library. There is a shared template for reporting on patron surveys
under SITKA_templates+Patrons → Patron Surveys. See Chapter 32, Shared Templates in SITKA_templates for
more about shared templates and contact Sitka support if you need help tweaking this template.
1.
From the Admin menu, select Local Administration → Surveys.
2.
The Survey List will open. In this example the table is empty because no surveys have been created. Click
Add New Survey.
3.
Fill out the New Survey form, then click Save Changes.
A few tips when creating a new survey:
• Start Date must always be in the future. It is not possible to add questions to a survey after the start date.
• Dates should be in YYYY-MM-DD format
• OPAC Survey? and Poll Style? are not yet implemented - leave unchecked
• Check Is Required if the survey should be mandatory for all patron registration and update
Chapter 48. Local Administration Menu
469
• Check Display in User Summary to make survey answers visible in patron records in Other Surveys.
• Surveys can not only start from a future date.
4.
A summary of your new survey will appear. Type the first survey question in the Question field, then click
Save Question & Add Answer. Survey questions are multiple choice.
5.
Enter possible multiple choice answers and click Add Answer. Each question may have as many answers as
you like.
6.
Repeat the steps above to add as many questions and answers as you wish. When finished click Save, then Go
Back to return to the survey list.
Chapter 48. Local Administration Menu
470
7.
Your new survey will appear in the Survey List table. To make further changes click the survey name to open
the detailed view.
This is what the survey looks like in the patron registration/edit screen. Note that in this example this survey question
appears in red and is required as the Is Required box was checked when creating the survey.
To see a patron’s response to a survey, retrieve the patron record. Click Other → Surveys to see the response.
Reporting on Surveys
There is a shared template for reporting on patron surveys in the reporting interface, under SITKA_templates →
Patrons → Patron Surveys. For more information see Chapter 32, Shared Templates in SITKA_templates. If you
need help tweaking this template please contact Sitka support.
Chapter 48. Local Administration Menu
471
48.17. Work Log
1.
Go to Admin → Local Adminstration → Work Log
2.
There are two lists of records. The uppper list contains the recent staff actions, while the lower list includes
the patrons affected by recent staff actions.
3.
A default number of actions/patrons are displayed. You can increase or decrease the number by using the up
or down arrow and clicking Refresh button.
4.
If you highlight an entry, you can retrieve the item and/or patron record by clicking Retrieve Item or Retrieve
Patron button.
Chapter 48. Local Administration Menu
472
Chapter 49. Server Administration
Most options under the Admin → Server Administration menu are global Sitka settings that cannot be changed
locally. The single exception is the Organizational Units submenu, which allows Local System Administrators to
edit library contact information, hours of operation, and addresses.
There is some view-only information that is useful under Server Administration, in particular the list of Copy
Statuses.
49.1. Organizational Units
Anyone with access to the staff client may view these settings but a Local System Administrator login is required
to make changes.
1.
Go to Admin → Server Administration → Organizational Units.
Chapter 49. Server Administration
473
2.
Find your library from the tree on the left side of the page and click it to open settings. Multi-branch library
systems will see an entry for each branch.
3.
The Main Settings tab opens displaying settings for your library. Only Main Email Address and Main Phone
Number should be edited, please leave all other settings at their default values.
4.
Click Save to record changes.
The Organizational Units screen flashes green when saving changes to any tab (see screencast below, only
available in the online version of the manual). If there is no flash or flash in red, please ensure you are using an
LSA login and click Save again. Contact Sitka Support if you still cannot save the changes.
49.1.1. Library Hours of Operation
Local System Administrators can use the Organizational Units interface to set the library's hours of operation. These
are regular weekly hours; holiday and other closures are recorded in the Closed Dates Editor.
Hours of operation and closed dates affect due dates and overdue fines.
• Due dates. Due dates that would fall on closed days are automatically pushed forward to the next open day.
Likewise, if an item is checked out at 8pm, for example, and would normally be due on a day when the library
closes before 8pm, Evergreen pushes the due date forward to the next open day.
• Overdue fines.
Overdue fines are not charged on days when the library is closed.
To review or edit your library's hours of operation:
1.
Open the Organizational Units interface as described in the steps above.
Chapter 49. Server Administration
474
2.
Click the Hours of Operation tab.
3.
Review your library's weekly hours, editing as necessary. To set a closed day click the corresponding Closed
button. Closed days (Monday and Sunday in the example below) have open and close times of 12:00 AM.
4.
Click Save to record any changes
Operation hours do not contain time zone information. Please do not adjust them, even though your library
is outside Pacific Time Zone.
49.1.2. Library Addresses
Addresses set in Admin (-) → Server Administrations → Organizational Units appear in patron email notifications,
hold slips, and transit slips. Local System Adminstrators should ensure that the Mailing, Holds, and Physical
addresses are set correctly.
1.
Open the Organizational Units interface as described in the previous section.
Chapter 49. Server Administration
475
2.
Click the Addresses tab.
3.
There are four address tabs: Mailing, Holds, Physical, and ILL. Sitka Support recommends setting the first
three at a minimum. The Holds Address appears on transit slips when items are sent to fulfill holds at another
branch. The Mailing address is used in notices.
4.
Click Save to record changes for each tab.
The value in State (Province) field in Mailing address is used to generate the URLs to My Account link in email
notices. To ensure correct URLs, please always use BC for BC libraries or MB for Manitoba libraries.
The Valid checkbox is an optional setting that does not affect current Evergreen functions, but the Sitka Support
team recommends checking it for all correct addresses.
Chapter 49. Server Administration
476
49.2. Call Number Prefix and Call Number Suffix
If you library uses prefixes and/or suffixes in call numbers, you can build a standard list, which will be displayed
as dropdown lists when creating/editing call number record.
This is how it looks on the call number creating/editing screen.
To create a call number prefix/suffix, go to Admin → Server Administration → Call Number Prefix (Suffix)
Click New Prefix (Suffix). Type in the label. Choose your library as the Owning Library, and then Save.
To delete a prefix/suffix, check the record, and then click Delete Selected.
Call Number Prefix/Suffix created here are different from Label Prefix/Suffix created on Copy Location Editor.
The former are displayed as part of call number in OPAC, while the latter are on printed labels only.
49.3. Copy Statuses
This table describes the copy statuses in use by Sitka, updated as of January 2012.
Chapter 49. Server Administration
477
If the Sets copy active is set to NO, an item created with this status will not have the Active Date field filled.
The date will be filled later when the item achieves a status with Sets copy active is set to YES.
Item Status
Definition
Holdable
OPAC
Visible
Sets copy
active
Available
Item is on the shelf
Yes
Yes
Yes
Bindery
Sent to be rebound
No
Yes
No
Cataloguing
Item is being catalogued or in cataloguing
department
Yes
Yes
Yes
Checked out
Item is on loan
Yes
Yes
Yes
Claimed Returned
Patron reports item has been returned.
(Libraries develop own procedure for
deciding when to make an item Claimed
Return)
No
Yes
Yes
Damaged
Damaged and may not circulate again
No
Yes
Yes
Discard/Weed
Item is no longer in collection, it has been
weeded or discarded
No
No
Yes
In process
Item is being processed and will soon be
available
Yes
Yes
No
In transit
Item is travelling between libraries and
Yes
remains in the In Transit status until checked
in
Yes
Yes
Lost
Declared lost by patron or library (either
manually or automatically)
No
Yes
Yes
Mending
Item is being repaired
Yes
Yes
Yes
Missing
Item cannot be found
No
Yes
Yes
On display
Item is on display and is not in its usual
shelving location
Yes
Yes
Yes
On holds shelf
Item is awaiting pick-up by patron. Item is
usually on a "holds shelf" within the library
Yes
Yes
Yes
On order
Item has been ordered but not yet received
from a vendor
Yes
Yes
No
On reservation shelf
Used with room/booking module. When an
No
item has been booked/reserved, it is placed in
a unique location, ready for pick-up
Yes
Yes
Reserves
In reserves collection
No
Yes
Yes
Reshelving
Item has been returned but not yet shelved.
Status automatically changes to Available
after 24 hours
Yes
Yes
Yes
Storage
On-site or off-site storage
Yes
Yes
Yes
Temporarily Unavailable
Not available for patrons to borrow but will
become available at a later date
No
No
Yes
Chapter 49. Server Administration
478
49.4. Hard Due Date
One or more hard due date(s) can be set up for a library to force the circulation due on selected date(s). The hard
due date is used in the circulation policy based on patron profile and/or item circulation modifier. It may be used to
extend or shortern the regular loan duration. For example, it may be used to grant faculty members term loan by an
Always Use? TRUE hard due date, or to force all students to return their items by the end of the term by an Always
Use? FALSE hard due date, which takes effect when the regular due date falls after the hard due date. Please contact
Sitka Support if you wish to use hard due date.
49.5. Floating Group
Evergreen 2.6 supports floating collections. Floating items stay at the checkin library, instead of being sent back
to the item's original circulating library. Floating Groups are used to limit the range of libraries that an item can
float within. Please contact Sitka Support if you wish make all or partial of your items float within selected libraries/
branches.
Chapter 49. Server Administration
479
Chapter 50. Evegreen Self Check Administrative Set-Up
The information in this section is specific to the native Evergreen Self Check which is available to all libraries.
For information regarding a third party self check please contact the vendor for that third party self check.
50.1. Initial Set-Up
1.
Library sets up a computer specifically for self check with the following:
• a mouse
• a barcode scanner
• library security system (RFID pad, demagnetizing equipment, etc.)
• a keyboard
• a receipt printer
• Internet Browser
The self check is known to be compatible with Chrome, Firefox and Internet Explorer.
• a method for locking down access so patrons cannot use the computer for other functions
Sitka Support recommends that you consult with your local IT support on the best method to lock down
your computer.
2.
Library contacts Sitka Support to get a self check interface set up with the library's logo and colours.
3.
Sitka Support supplies library with URL for self check and a self check specific Local System Administrator
account.
4.
Library saves URL as a favourite in browser or as a shortcut on the computer's desktop for easy access.
5.
Library sets needed self check library settings. See Table 48.13, “Self Check”.
6.
Library teaches patrons to use self check.
For instructions on using the native Evergreen Self Check see Chapter 11, Self Check.
Chapter 50. Evegreen Self Check Administrative Set-Up
480
Chapter 51. Deleting Inactive Cards and Patron Accounts
by Sitka's In-house Patron Deletion Tool
The patron deletion tool developed by the Sitka Support team allows Local System Administrators to delete inactive
cards and patron accounts. This is done outside patron's records and a small batch of barcodes/records can be deleted
at once. The table below describes a few scenarios where this tool may be used.
Scenario
Action
An active patron lost a card and was issued a new one (using Delete the lost card (optional)
Replace Barcode)
A patron is no longer active and their account should be
removed completely
Delete patron account
An active patron has more than one account
Merge the accounts. Choose the card number that you want
to keep as the lead record. See Section 6.6, “Merging Patron
Records”.
51.1. Deleting Inactive Cards
When a patron's card is marked lost and a new barcode is assigned, the old barcode remains in the Evergreen database
as an inactive card. Deleting lost or inactive cards is optional. Patrons cannot check out items or log into the OPAC
with an inactive card, but the lost cards can be used to retrieve active patron data in the staff client. Whether a library
routinely deletes inactive cards is a matter of local policy.
1.
To delete inactive cards, start a new tab by File → New Tab or CTRL T. Click Delete Patron Account under
Admin.
Chapter 51. Deleting Inactive Cards and Patron Accounts by Sitka's In-house Patron Deletion Tool
481
2.
Login with a Local System Administrator username and password.
3.
Enter one or more inactive cards to delete (one barcode per line). Ensure the Delete cards only box is checked,
then click Submit.
4.
After a few seconds the confirmation screen appears (for multiple cards it may take longer). It is not possible
to delete a patron's primary card. Review patron data, select the card(s) you wish delete, then click Delete
Checked Cards.
Chapter 51. Deleting Inactive Cards and Patron Accounts by Sitka's In-house Patron Deletion Tool
482
5.
The deletion report lists successfully deleted cards.
51.2. Deleting Patron Accounts
Deleted accounts remain in the Evergreen database for reporting purposes but are no longer accessible from the staff
client. The deletion tool checks the following before deleting any account:
• Open circulations.
• Active holds.
• Bills.
Accounts with items checked out cannot be deleted
Accounts with active holds cannot be deleted
Accounts with unpaid bills are flagged but may still be deleted; if deleted the bills are voided
If deleting a duplicate record for an active patron please see Section 6.6, “Merging Patron Records”
1.
To delete patron accounts, start a new tab by File → New Tab or CTRL T. Click Delete Patron Account under
Admin.
Chapter 51. Deleting Inactive Cards and Patron Accounts by Sitka's In-house Patron Deletion Tool
483
2.
Login with a Local System Administrator username and password.
3.
Enter one or more accounts to delete, one per line, then click Submit.
4.
The confirmation screen appears (if deleting multiple accounts this may take longer). Accounts that cannot
be deleted because of active holds or circulations are flagged and the check-boxes greyed out. Accounts with
outstanding bills are un-checked by default but can be selected to void the fines and proceed with deletion.
Click Delete Checked Patrons to continue.
Chapter 51. Deleting Inactive Cards and Patron Accounts by Sitka's In-house Patron Deletion Tool
484
5.
The deletion report lists successfully deleted accounts.
Chapter 51. Deleting Inactive Cards and Patron Accounts by Sitka's In-house Patron Deletion Tool
485
Chapter 52. Courtesy, Overdue, and Hold Notices
Patrons with email addresses in Evergreen receive pre-due email reminders three days before items are due.
Evergreen also generates email and optional print notices for overdues and holds. Customized overdue letters are
also available.
There are three email addresses on the notices besides the recipient’s email: From, Reply-To and Errors-To. The
From address has to be the BC Libraries Cooperative's email address. The Reply-To and Errors-To addresses are
from the Sending email addresses for patron notices setting in the Library Settings Editor. You must specify a
address in this setting. This ensures patron replies are directed to the email of your choice. Bounced emails are also
directed to this email address so staff can alert patrons when there is a problem with their email.
52.1. Library Courtesy Notices
Library courtesy notices, also referred to as pre-due notices, are generated and sent via email to patrons three days
before an item is due. Only patrons with email addresses in Evergreen receive courtesy notices.
These emails are not spam and should not be marked as spam by either patrons or staff.
The courtesy notice template can be customized at the federation or library level. Please contact Sitka Support for
customization.
Libraries can opt out of pre-due notices using the org.opt_out_email_predue setting in the Library Settings Editor.
One checkout will receive only one pre-due notice. If the due date is extended via Edit Due Date after the predue notice is sent out, no new notice will be generated. Staff is encouraged to use Renew or Renew with Specific
Due Date function instead of Edit Due Date to make sure a second notice will be generated in the due course.
52.2. Library Overdue Notices
There are three types of overdue notices according to the delivery method:
• Notices delivered by email
• Notices delivered by paper
• Notices delivered by phone
Notices delivered by email
The server sends overdue emails to patrons once a day, after hours, when the fines generator runs. The emails are
generated when an item is 7 days, and then 14 days overdue (this is a global Sitka setting).
These emails are not spam and should not be marked as spam by either patrons or staff.
The overdue email notice templates can be customized at the federation or library level. Please contact Sitka Support
for customization.
Chapter 52. Courtesy, Overdue, and Hold Notices
486
Notices delivered by paper
Evergreen generates a PDF file of overdue notices and emails the file to you to be printed and distributed to patrons.
These notices are created and sent daily.
An empty PDF file means that there is no notice for the day due to no item filling in the overdue category. You will
still receive the empty file. If you are not receiving daily PDF files please contact Sitka support.
To set up paper overdues you need to provide Sitka support with the following information:
• the receiving email address for the PDF file to be sent to.
Ensure you inform Sitka support if you need to change the receiving email.
• the intervals at which you would like patrons to receive notices.
The standard intervals to choose from are 1, 2, 3, 4, 5, 6, 7, 8, 9 or 10 weeks after the item becomes due. The
intervals define when a second, third, or fourth, and so on, letter is sent out.
The 1 and 2 weeks overdue notices are sent to patrons without email address only. From the 3 weeks overdue
notice onwards it is sent to all patrons.
A final notice which includes billing information can be set to coincide with the system automatically marking
long overdue items to lost. See Final Notices for information on setting up this notice.
• the wording you would like to be used on each notice.
This wording of the paper notices is customizable by library. PDF notices are set up through the Sitka support
team and cannot be modified in the staff client. Please submit required revisions to Sitka support.
Notices delivered by phone
You can set up a recurring report to generate a list of overdues for all patrons, or for those without an email
address only. Then you can phone each person individually. You may specify an email address to receive an email
reminder each time a list is generated. There are two shared templates for overdue reports in the SITKA_templates →
Circulation folder. See Chapter 32, Shared Templates in SITKA_templates for more about using shared templates.
Sitka support staff will be very happy to assist if you need help in this process.
52.3. Final Notices
The final paper overdue notice sent to patrons can be set as a billing notice which includes processing fees and
replacement costs. The price is taken from the price entered in the price field of the copy editor for the item. If
the price field is blank the price is taken from the Default Item Price setting in the Library Settings Editor. The
processing fee comes from the Lost Materials Processing Fee setting found in the Library Settings Editor.
Final notices are set up as part of the paper overdues. When setting up your paper overdues specify the interval
at which you would like the final notice to be sent and provide Sitka support with the wording you would like to
appear on the notice.
Libraries have the option to have Evergreen automatically mark long overdue items as lost. Contact Sitka Support
if you would like to set this up for your library. Please include the interval at which you would like long overdue
Chapter 52. Courtesy, Overdue, and Hold Notices
487
items to be marked as lost. This interval can be set to coincide with your final notice so that patrons receive a bill
for lost items. This does not apply to items that are manually marked lost by staff.
52.4. Hold Slip and Holds Notifications
Hold Slip
A hold slip is generated when a hold reaches ready-for-pickup status. The content of the slip can be from a shared
template saved on the server (legacy slip) or a receipt template saved in individual workstations. Local hold slip
template is used when the library setting called "Use legacy hardcoded receipts/slips" is set to FALSE.
Ready-for-pickup Hold Notice
The ready-for-pickup hold notification templates can be customized at the federation or library level. Please contact
Sitka Support for customization.
When a hold is ready for pickup, the requester can be notified via automatic email and/or SMS Text, and/or manual
phone call by staff depending on the choice made when he/she placed the hold. The selected notfication method(s)
may be indicated on the hold slip. For example, if email notification is selected, the email address will be printed
on the hold slip. A blank email address indicates that email notification was not selected.
1. For automatic email notice and SMS Text, it works the same way as the automatic overdue notices. The
notification email/SMS Text is generated and sent to the patron 5 to 30 minutes after the item achieves on-holdshelf status. In order to receive these notices the patron must have chosen these notification methods when placing
the hold and the email address in his/her account and the given mobile number/carrier must be valid.
2. For phone notification, staff needs to phone patrons individually. Phone numbers are printed on the Hold Slips
when holds are captured, if Phone Notification is chosen.
Holds Cancelled by Staff Notice
This notification is optional for individual libraries. The notification templates can be customized on library level.
Please contact Sitka Support if your library wishes to use this service.
An email is sent to the requester when a hold is cancelled by staff on the Staff Client. The note put in by staff on
cancellation will be included in the email explaining the cancellation reason.
Shelf Expired Holds Cancellation Notice
This notification is optional for individual libraries. The notification templates can be customized on library level.
Please contact Sitka Support if your library wishes to use this service.
The emails are sent to the requesters when staff view and clear hold-shelf expired holds (click Clear These Holds
on Browse Holds Shelf) on the Staff Client.
Chapter 52. Courtesy, Overdue, and Hold Notices
488
Chapter 53. Managing Internet OPAC Stations
This chapter contains some suggestions on how to manage public access to your Internet enabled online catalogue
search stations in your library. They are meant as guidelines only, and their efficacy in your library will depend on
many factors. Some possible factors that will affect how you manage your search stations are: do you want only
Internet browser access to your catalogue, or do you want Internet access limited to a few sites, or do you want
access to other applications such as printing, and so on. How you interpret and use these guidelines will be specific
to your library’s needs. Finally, depending on how your library network is configured you may need assistance from
a system technician or administrator.
Firefox Plugins
There are numerous plugins for Firefox, which could be combined to create a kiosk-like effect. Clever patrons can
still use CTRL-ALT-DEL to cancel the program.
https://addons.mozilla.org/en-US/firefox/addon/1659
If you need to restrict the workstation to specific websites, we recommend looking into plugins that advertise
"parental controls"
https://addons.mozilla.org/en-US/firefox/addon/4351
Internet Explorer
Internet Explore is very prone to security problems, however there are various ways to get a kiosk in IE:
http://support.microsoft.com/kb/154780
http://technet.microsoft.com/en-us/ie/bb219517.aspx
Locking down Windows
This is possible, but it requires extensive editing of the registry. If you want to lock something specific, and you do
not have a system technician available, it's possible to search the Internet for advice and follow the instructions you
find, i.e.: "disable control panel". There are also numerous commercial software packages that do this.
Linux
Implementing Linux on your search stations is also an option. There are various ways that you could do this. If you
use a LiveCD, it still could be possible for the patron to eject the CD and reboot the computer. A better solution
is to install Linux to the hard drive. This solution provides the maximum lock-down, but is the most difficult to
implement. Here are some of the easier ways to get at this solution:
http://webconverger.org/
Chapter 53. Managing Internet OPAC Stations
489
Chapter 54. Evergreen System Requirements
Evergreen runs smoothly on most modern computers with a good internet connection. To ensure your system is
ready for migration here are a few tips and minimum requirements.
Internet Connectivity
The Evergreen staff client requires persistent connectivity to the Evergreen servers to function. Most internet traffic
uses moments of brief connectivity rather than a persistent connection so it is not unusual when experiencing
connectivity issues to notice it in the Evergreen staff client first.
Evergreen will work down to a 3Mbps connection, but the performance will get progressively worse the lower the
connection speed gets. While Evergreen will be functionally usable at 3Mbps it may of limited use at lower speeds.
Table 54.1. Recommended Internet Connection Speeds
Category
Downstream
Upstream
Latency (to
Sitka)
Bare Minimum To Function
3Mbps
786Kbps
less than
200ms
Adequate
6Mbps
1Mbps
less than
125ms
Ideal
12Mbps
2Mbpbs
less than 75ms
Mbps stands for megabit per second and can also be represented as Mbits.
Kbps stands for kilobit per second and can also be represented as Kbits.
ms stands for milliseconds.
Most of the bandwidth usage in a library is not from Evergreen, but from other usage of the Internet by both staff
and patrons. When staff workstations share an ISP connection with public workstations libraries ideally should have
at least 1.5-2x more down/upstream capacity than what is recommended in the table above.
Staff Terminals
Staff terminals connect to the central database using the Evergreen staff client, available for download from
https://bc.libraries.coop/support/staff-client-executables/ . The Evergreen staff client must be installed on each staff
workstation and requires at minimum:
• Windows 10, 8, 7, or Vista operating system. Win 10 users may need to manage Win 10 privacy settings based
on best practice in Windows community or on advice of your IT department or vendor.
• Mac OS X operating system.
• Linux operating system.
Chapter 54. Evergreen System Requirements
490
• a reliable high speed internet connection
• 512Mb of RAM
OPAC Terminals
There is no stand-alone OPAC client for Evergreen. Patrons search the catalogue using a web browser. Each OPAC
terminal will require at minimum:
• a reliable high speed internet connection
• a web browser (e.g. Firefox, Chrome or Internet Explorer)
The OPAC will not work in Internet Explorer on computers running Windows XP. Co-op Support recommends
you update your operating system or use Firefox or Chrome.
To limit your OPAC terminals to catalogue searches local configuration will be required. Please see Chapter 53,
Managing Internet OPAC Stations for more information.
Barcode Scanners
Evergreen will work with virtually any barcode scanner – if it worked with your legacy system it should work on
Evergreen.
Printers
Evergreen can use most desktop printers configured for your terminal to print receipts, check-out slips, holds lists,
etc. The exception is spine label printing, which requires roll printers. Evergreen currently formats spine labels for
output to a label roll printer. If you do not have a roll printer manual formatting may be required.
Evergreen might not print correctly to receipt printers using the Windows XP Generic/Text Only printer driver.
Please use a printer-specific driver instead.
Chapter 54. Evergreen System Requirements
491
Chapter 55. Staff Accounts
Staff accounts are special patron accounts on Evergreen which have been granted more permissions to allow the
owners to log into the Staff Client. Besides extra permissions each staff account has its own working location. The
owner can log into the Staff Client at assigned working locations only.
There are three ways staff accounts can be set up and used in the system.
Staff and Patron Accounts
Accounts are created for staff members and given the appropriate Library Staff permission group and working
location. Staff use the account for borrowing as well as to login into the staff client and perform their work.
Staff Specific Accounts
Accounts are created for staff members and given the appropriate Library Staff permission group and working
location. These accounts often have something like LOGIN or STAFF as part of the name and may use a barcode
such as SITKASTAFF rather than an actual barcode. Staff use the accounts only for logging into the staff client for
work. Staff have a separate patron account for borrowing.
Generic Accounts
Accounts are created for functions, such as circulation, rather than for specific staff members and given the
appropriate Library Staff permission group and working location. These accounts' barcodes and names are often
related to their function. For example, an account for circulation may use circulation1 as the barcode and be named
Dummy, Circulation. These accounts are shared by the appropriate staff. Sitka Staff strongly encourage libraries
to ensure that shared usernames and passwords are kept secure and are changed as needed, especially when staff
leave the library.
Sitka encourages libraries to use the method or methods that work best for them.
Generic accounts will not be granted permissions to create/run reports. Libraries are encouraged to have a
dedicated account(s) for reporting purpose. The account must belong to an individual staff member and is for
office use only. To avoid re-setting up reports, the owner of the account may be updated when the reporting
task is passed on to another staff member.
Chapter 55. Staff Accounts
492
55.1. Creating Staff Accounts
New staff accounts are created in much the same way as patron accounts, using Circulation → Register Patron or
Shift+F1. Select one of the staff profiles from the Profile Group drop-down menu.
Creating Staff Accounts in 5 Easy Steps (For Local System Administrators)
1.
Open the patron registration form and fill in the relevant information.
2.
Choose a Library Staff permission group from the Main (Profile) Permission Group down down menu.
3.
Save the account.
4.
Retrieve the account through a patron or barcode search.
5.
Assign a Working Location to the account.
Creating Local System Administrator Accounts in 5 Easy Steps
1.
Open the patron registration form and fill in the relevant information.
2.
Choose any Library Staff permission group from the Main (Profile) Permission Group down down menu.
3.
Save the account.
4.
Submit a ticket to Sitka Support asking for the account to be granted Local System Administrator permissions.
Make sure you include the name and barcode for the account. If your library is multi-branch include the working
locations to be assigned to the account.
5.
Sitka Support will grant the permission, assign the working locations and respond to your ticket when the
account is ready to be used.
55.2. Working Locations
Each new staff account must be assigned a Working Location which determines its access level in staff client
interfaces. Accounts migrated from legacy systems already have working locations assigned.
Chapter 55. Staff Accounts
493
1.
To assign a working location open the newly created staff account using F1 (retrieve patron) or F4 (patron
search).
2.
Select Other → User Permission Editor
3.
Place a check in the box next to the desired working location, then scroll to the bottom of the display and
click Save.
In multi-branch libraries it is possible to assign more than one working location
55.3. Editing Staff Accounts
All staff are able to edit their own account when logged in with their account. Staff can also edit an account in a
lower permission group. For example, a Local System Administrator can edit a Cataloguer account, but cannot edit
another Local Administrator Account.
55.4. Resetting Your Password
Staff passwords can be reset in four ways:
1. Edit your account in the staff client while signed in as yourself.
2. Use the Forgot Your Password? link in the OPAC.
You must have an email recorded in your account for this to method to work.
3. Have a staff member with Local System Administrator permissions assign a temporary password and then use
method 1 or 2 to reset it to a secure password.
This method only works if your account is not a Local System Administrator account.
4. Send in a request to Co-op Support to have a temporary password assigned and then use method 1 or 2 to reset
it to a secure password.
Chapter 55. Staff Accounts
494
55.5. Staff Account Permissions
Below is a general outline of staff account permission levels. To view a detailed list of permissions for a particular
Evergreen account go to Admin (-) → User permission editor in the staff client.
Action
General Staff
Circulators
Circ +
Copy Edit
Circ + Full Cat
Catalogers
Local System
Administrator
(LSA)
Basic circulation
functions
*
*
*
*
*
*
CheckIn bad
status overrides
*
*
*
*
*
*
*
*
*
*
*
CheckIn
Missing/Lost/
ClaimedReturned
overrides
CheckOut
overrides
MaxRenewalReached
override
*
*
*
*
*
*
*
Basic patron
record
*
*
*
*
Bar patrons
*
*
*
*
*
*
*
*
*
Unbar patrons
Merge/
delete patrons
*
Patron
restriction
overrides
*
*
*
*
*
Bills and
payments
*
*
*
*
Holds
*
*
*
*
*
*
*
*
*
*
*
*
*
Copy/volume
records
Bib records
Buckets
*
*
*
*
*
*
View report
output
*
*
*
*
*
*
Create/
upload offline
transactions
*
*
*
*
*
*
Process offline
transactions
Transit
*
*
Abort remote
transit
Chapter 55. Staff Accounts
*
*
*
*
*
*
*
*
*
495
Permissions of creating/running reports are granted to individual staff members on library's request. Please
contact Sitka Support.
55.6. Granting Additional Permissions
A Local System Administrator (LSA) may selectively grant LSA permissions to other staff accounts. In the example
below a Circ +Full Cat account is granted permission to process offline transactions, a function which otherwise
requires an LSA login.
1.
Log in as a Local System Administrator.
2.
•
Select Admin (-) → User Permission Editor and enter the staff account barcode when prompted
OR
•
Retrieve the staff account first, then select Other → User Permission Editor
Chapter 55. Staff Accounts
496
3.
The User Permission Editor will load (this may take a few seconds). Greyed-out permissions cannot be edited
because they are either a) already granted to the account, or b) not available to any staff account, including
LSAs.
List of permission names. For help correlating permissions to specific Evergreen functions please contact
Sitka support.
If checked the permission is granted to this account.
Depth limits application to the staff member's library and should be left at the default. Evergreen blocks
attempts to set Federation- or Sitka-wide privileges.
If checked this staff account will be able to grant the new privilege to other accounts (not recommended).
Chapter 55. Staff Accounts
497
4.
To allow processing of offline transactions check the Applied column next to OFFLINE_EXECUTE.
5.
Scroll down and click Save to apply the changes.
Chapter 55. Staff Accounts
498