1
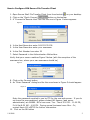
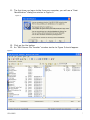
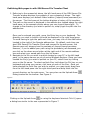
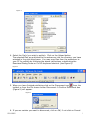
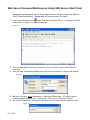
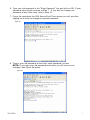
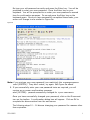
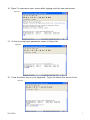
SSH Secure Shell for Windows
How to Obtain, Install, Configure and Use SSH Secure Shell
How to obtain the SSH Secure Shell
There are several ways of obtaining SSH Secure Shell for Workstations software.
Beginning in the fall 2003, all faculty and staff Windows computers have SSH Secure
Shell software installed as part of the standard disk image. If your office computer does
not have SSH Secure Shell installed, please contact the ITS Help Desk at x5-54346 for
assistance.
If you are a Mac user, please refer to the information here:
http://www.easternct.edu/ecsu/makepages/getting_started.htm
For use on your home computer, you may download SSH Secure Shell, (free, noncommercial version), from the SSH.com website at: ftp://ftp.ssh.com/pub/ssh/ (filename:
SSHSecureShellClient-3.2.9.exe)
SSH Secure Shell for Workstations works with all Microsoft Windows versions. Please see
page 10 of this document for complete minimum system requirements.
The “SSH Secure Shell for Workstations User Manual” is available from the Help menu
within the program. It is also available in Adobe Acrobat format at:
http://www.ssh.com/products/ssh/winhelp32/ssh2winclient.pdf
How to install SSH Secure Shell
• After successfully downloading the application to your computer, browse to saved
location. If you should not remember the downloaded file’s location, do a search for
the filename SSHSecureShellClient-3.2.9.exe
• Double-click SSHSecureShellClient-3.2.9.exe
• Accept the default settings during the installation. The installation is simple and
requires only that you accept the End User License Agreement and click on the Next
buttons to accept the defaults (recommended). Click on Finish to complete the
installation. No reboot is required.
There should now be 2 new “shortcut” icons on your desktop.
is the shortcut to: SSH Secure File Transfer Client.
Shell Client.
is the shortcut to: SSH Secure
The SSH Secure File Transfer Client is the application which you will use to transfer
(publish) files to the new web server. If you have previously used a graphical FTP client
such as CuteFTP or WS_FTP, SSH Secure File Transfer Client looks and works in a very
similar way.
02/05/2006
How to Configure SSH Secure File Transfer Client
1. Open Secure Shell File Transfer Client from the shortcut
on your desktop.
2. Click on the “Quick Connect”
button on the toolbar.
3. A “Connect to Remote Host” box like the one in Figure 1 below appears.
Figure 1
4. In the Host Name box enter 149.152.33.156
5. In the User Name box enter your username
6. In the Port Number box enter 22
7. Select Password in the Authentication Method box
Verify that your screen matches Figure 2 below (with the exception of the
username box, where your own username should be)
Figure 2
8. Click on the Connect button
9. An “Enter Password” dialog box like the one shown in Figure 3 should appear.
Figure 3
Enter the password supplied to you by ITS for the new web server. If you do
not know the new password, please contact Bill Kenney (web server
administrator) at x54688. Bill’s hours are: Tue - Thurs 3:00 PM - 11:00 PM,
Fri & Sat 8:30 AM - 4:30 PM. During normal business hours Mon – Fri,
contact Kevin Gill x55793 for further information.
10. Click on the OK button
1/16/2006
2
11. The first time you logon to the from any computer, you will see a “Host
Identification” dialog box similar to Figure 4.
Figure 4
12. Click on the Yes button.
13. An “SSH Secure File Transfer” window similar to Figure 5 should appear.
Figure 5
12/16/2003
3
Publishing Web pages to with SSH Secure File Transfer Client
1. Referring to the screenshot above, the left-hand pane of the SSH Secure File
Transfer window displays the contents of your computer’s drives. The right hand pane displays your default folder location (/export/home/username) on
the server. The third pane at the bottom displays a history of file transfers.
2. The path on the server is displayed in the address box located above the right
hand pane; in the example picture above you see /export/home/gillk. To
change to the directory you wish to publish to, simply type the path into the
address box.
Once you’ve entered your path, press the Enter key on your keyboard. The
directory you wish to publish in should be displayed in the right -hand pane.
To avoid having to type the path each time, you may click on the Add button
located to the right of the Remote address box. By default, each time you
start SSH Secure File Transfer Client and connect to the web server, the
Remote pane will always show the contents of /export/home/username.
However, if you’ve added your path using the procedure just discussed, you
can click on the down-arrow button at the right end of the remote address
box and select your saved path from the list shown.
3. Navigate to the file you wish to publish located on your PC in the left-hand
pane, in the same manner as you do using Windows Explorer. Once you have
located the file(s) you wish to publish on your PC, select them by clicking
once on the file name. To select multiple files, hold down the Ctrl key on your
keyboard and using your mouse, click once on each of the files. Once you
have selected the local files you wish to publish, you may simply drag them
from the left-hand pane into the right-hand pane and drop them into the
correct directory on the web server. You may also use the Upload Arrow
Dialog located on the toolbar. See Figure 6.
Figure 6
Clicking on the Upload Arrow
(or using the keyboard shortcut Ctrl+U) opens
a dialog box similar to the one represented in Figure 7.
12/16/2003
4
Figure 7
4. Select the file(s) you wish to publish. Click on the Upload button
The selected files are published to the webserver into the directory you have
selected in the right hand pane. You may copy files from the webserver to
your PC for editing by following the above instructions, substituting the
Download Dialog Arrow or Ctrl+D keyboard shortcut (see Figure 8).
Figure 8
5. When you have finished publishing click on the Disconnect icon
from the
toolbar or from the File menu choose Disconnect. A Confirm Disconnect box
(Figure 9) will appear.
Figure 9
6. If you are certain you want to disconnect, click on OK, if not click on Cancel.
12/16/2003
5
Web Server Password Maintenance Using SSH Secure Shell Client
Password maintenance on the new web server is done through the Secure
Shell Client application. Passwords will expire every 90 days.
1. From your desktop icon
start the Secure Shell Client. A window like the
one shown in Figure 1a should appear.
Figure 1a
2. Click on the Quick Connect button (or from the File menu, select Quick
Connect.
3. You will see a Password dialog box like the one shown in Figure 2a below.
Figure 2a
4. Be sure to enter your username in the User Name box. All other boxes
should appear exactly as in Figure 2a. Click on the Connect button.
5. An “Enter Password” dialog box like the one in Figure 3a will appear next.
Figure 3a
12/16/2003
6
6. Type your old password in the “Enter Password” box and click on OK. If your
password has expired continue to Step 7. If you wish to change your
password at any other time, skip to Step 10.
7. Figure 4a represents the SSH Secure Shell Client screen you will see after
logging on in order to change an expired password.
Figure 4a
8. Type in your old password at the Enter login password: prompt
NOTE: If you type your old password incorrectly you will see an error
message. See Figure 5a below.
Figure 5a
12/16/2003
7
Re-type your old password correctly and press the Enter key. You will be
prompted to enter your new password. Press the Enter key on your
keyboard. You will be prompted to re-enter your new password a second
time for confirmation purposes. Do so and press the Enter key on the
keyboard again. Once you have successfully completed these tasks, your
screen will change to one similar to Figure 6a.
Figure 6a
Note: if you mistype your new password (non-matching) this message appears:
sshd (SYSTEM): They don’t match; try again. See Figure 5a above.
9. If you successfully enter your new password twice as required, you will
receive an on-screen confirmation message:
sshd (SYSTEM): passwd successfully changed for <your username>
Once you have successfully changed your password, click on the Disconnect
icon on the toolbar. A confirmation dialog box will appear. Click on OK to
complete the disconnection from the web server.
The following steps 10 – 14 discuss changing your password for reasons other
than expiration.
12/16/2003
8
10. Figure 7a represents your screen after logging onto the new web server.
Figure 7a
11. At the $ prompt type passwd as shown in Figure 8a.
Figure 8a
12. Press the Enter key on your keyboard. Figure 9a shows the result of this.
Figure 9a
12/16/2003
9
13. At the Enter login password: prompt type in your old password and press
the Enter key on your keyboard. You will be prompted to enter your new
password. Do so and press Enter again. You will next be prompted to re-enter
your new password. Do so and press Enter again.
If you correctly typed your new password, you will see the on-screen
confirmation message:
sshd (SYSTEM): passwd successfully changed for <your username>
Note: if you mistype your new password the second time you will see the message:
sshd (SYSTEM): They don’t match; try again. See Figure 5a above.
IMPORTANT: Be sure to disconnect before closing the application.
Click on the Disconnect icon
from the File menu.
on the tool bar or choose Disconnect
Minimum System Requirements:
•
•
•
•
•
Pentium processor
Windows 95 or higher
32 MB RAM
15 MB disk space
Adobe Acrobat Reader
*********************************************************
NOTES
12/16/2003
10
FAQ
Q. I have always used Netscape Composer to create, update and publish my web
pages. Can I continue to use Composer?
A. The answer to this is both Yes and No. Yes, you can continue to use Composer
to create and update your web pages. No, you cannot continue to use Composer to
publish them. Since Netscape Composer’s publishing utility does not support the
SSH protocol, it will no longer work. You must use the SSH File Transfer Client to
publish the pages you edit in Composer.
Q. What about Dreamweaver? Can I still publish using Dreamweaver’s file transfer
utility?
A. Again, the answer is both Yes and No. Dreamweaver 4 or MX's built-in file trans fer
utility will no longer work as configured. Dreamweaver 4 and MX users must use the SSH
Secure Shell File Transfer Client to upload your files. However, Dreamweaver MX 2004
now supports SSH and can publish directly to the web server. Macromedia's Contribute2
also supports SSH and can publish directly to the web server as well.
Q. I always saved my password in Netscape Composer. I don’t see any option to
do that in the SSH Secure Shell File Transfer Client. Is n’t that option available?
A. There is no “save password” option in Secure Shell. Each time you connect to
the new web server with Secure Shell, you must enter your password. To change
your password, you must use the SSH Secure Shell Client. The procedure to change
your password using SSH Secure Shell Client is contained within this document in
the Password Maintenance section.
IMPORTANT NOTE: Passwords must contain both an alpha character and a
numeric character within the first 6 characters.
Q. I use a Mac to develop, edit and publish my web pages. What SSH client do I
use?
A. If you are using Mac OS X a Secure Shell client is included with the operating
system. You can obtain a licensed copy of MacSFTP Secure File Transfer program
from the Software Distribution Center located in LIB 420 (CIT). Call x55793 for details.
A. I use Linux. What secure shell client is available to me?
Q. SSH Secure Shell software is available from http://www.ssh.com however
support for SSH on this platform is not currently available from ITS.
Q. Why was FTP and Telnet support removed from the new web server?
A. FTP and Telnet transmit passwords in clear text. In order to protect user
accounts and server integrity, SSH was implemented. More information on the SSH
protocol is available at: http://www.ssh.com/products/ssh/SSH_Secure_Shell.pdf
12/16/2003
11


![Page 1 of 9 Section A – Multiple Choice Questions [20 marks] NOTE](http://vs1.manualzilla.com/store/data/005683805_1-bbf54c1c016690de236e51ec0151b7b8-150x150.png)