1
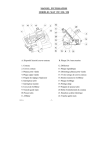
IPLAB-8-RLY User Manual V1.0-12/2011 © LabotroniK SUMMARY SUMMARY ....................................................................................................................................2 1. Overview .................................................................................................................................3 1.1. Board Overview ....................................................................................................................4 2. Signal mapping ........................................................................................................................ 5 2.1. Discrete mapping ..................................................................................................................5 2.2. Analog input wiring ..............................................................................................................6 2.3. Power output ......................................................................................................................... 7 3. First Start .................................................................................................................................7 4. Software configuration ............................................................................................................9 4.1. Discrete Parameters ............................................................................................................10 4.2. Analog Input ....................................................................................................................... 12 4.3. Timer Menu ........................................................................................................................ 13 4.4. Dynamic DNS .................................................................................................................... 14 4.5. File upload .......................................................................................................................... 15 4.6. Network Configuration Menu ............................................................................................ 16 4.7. Drive the card by UDP protocol ......................................................................................... 17 5. Firmware update .................................................................................................................... 18 6. Create you own web page ......................................................................................................20 7. Technical support ..................................................................................................................22 8. Document revision History....................................................................................................23 2 | 23 1. Overview IPLab-8-RLYincluded 8 relays SPDT driven by Ethernet, 8 dry discrete and 2 analog input Relays can drive signal up to 230VAC and 10A Discrete input are designed to read dry contact from switch Analog input are designed to monitor input up to 3.3VDC WARNING To prevent electrical shock it is not recommended to drive signals above 50 VAC or 110 VDC when you are using the board without enclosure. During external connection to terminal bloc, you must use isolated screwdriver and power-off driven equipment master power supply IP-Lab board is intended to be use by professional people who are aware of electrical danger and understanding the potential hazard of inserting an external element in an electrical circuit 3 | 23 1.1. Board Overview P1 : Analog and Digital input connector P2 : terminal blocks for relays K1 to K8 : Relays T1 : On board thermal sensor BP1 : Jumper to recover factory configuration WIFI module and J1extension connector : optional 4 | 23 2. Signal mapping 2.1. Discrete mapping Digital input signal are connected to SW1 to SW8. Only dry switch shall be routed to discrete input terminal block. Never apply voltage in these connectors Wiring example: In the following example, one switch is wired to input SW1 5 | 23 2.2. Analog input wiring The board can read 2 analog signals : AN1 and AN2 Analog input voltage range is from 0 to +3.3V. Ground and 3.3V are available beside signals AN1 and AN2 to facilitate configuration in voltage divider. Potentiometer connected to AN1 : 10k Note: Unconnected analog input is a floating input. It is recommended to insert a pull-up or pull-down resistor to fix this indeterminate situation. You can, for example insert 10k ohms resistor between unconnected analog input and GND if you want to maintain value to 0. 6 | 23 2.3. Power output Available signals for relays K1 to K8 are: Common point, Normally Open (NO) and Normally Close (NC) Each number in front of terminal block P7 represents the common pin for the corresponding relay. Example of lamp connection to relay 1, normally open relay : Neutral Phase WARING : when you connect or disconnect wire to the board, shutdown master electrical power supply 3. First Start IPLab operates as a web server. So you don’t have to install any driver to communicate with. Card’s functionalities are available via the web server and UDP protocol. The java application TCPIP Discover.jar, available on the website www.labotronik.com, helps you to find the board over Ethernet. 7 | 23 When you first power on the board, or if you press the software button “discover device” the card will send his IP and MAC address over the local network. Then you know the board is correctly configured and present. After that, you can reach the board by his IP address on your browser or by entering his default name: http://IPLab Your browser is now connected to the board and the following home page will appear: 8 | 23 4. Software configuration In the master frame, left column shows the relay state and the right column the input state Upper right frame is for analog input (from 0 to 1024, corresponding to 0V and 3.3V) and T1 temperature Lower frame is for debug purpose. To toggle relay state, just click on the corresponded relay name or light state. Input LED is active if corresponding switch close Configuration pages are password protected. By default enter Login : admin Password : admin You can modify them in the network configuration menu 9 | 23 4.1. Discrete Parameters This page allows you to configure relay, depending on discrete input status. Within this page you can link relay to discrete input state. With the “toggle out” option set, corresponding relay state will change at each falling edge. This is typically use if you have connected a push button. For example, this option could be set if you want to drive a lamp in a house with a push button. The “Invert In” option will invert the logic. Relay will be set to active if corresponding input is open. 10 | 23 Note : when a relay is linked to digital input, his label color changed in the webserver home page and become purple. Then, you can’t manually toggle relay to active state because of the link 11 | 23 4.2. Analog Input This menu allows you to link analog input value to a relay. If corresponding analog input value is within the desire range, relay will be set to active. Threshold values are without unit. It corresponds to the value read by the Analog to Digital Converter (ADC). Maximum value is 1024 (10 bit DAC), and minimum is 0 12 | 23 4.3. Timer Menu Each relay can be configuring with a timer delay. The number in the field represent this time, in seconds If a relay is set to active state and the timer value is greater than 0, then relay will be active during this value period and will be automaticaly set to off after that. In the example above, a 60seconds timer is set to relay 1. So relay 1 will be deactivate after 60 seconds without manual action or active input link Timer delay unit is seconds 13 | 23 4.4. Dynamic DNS This page allow you to configure the board with a Dynamic DNS client (like www.noipo.com for example) to reach the board from internet if you don’t have a static IP at home. 14 | 23 4.5. File upload You can download a new version of the webserver with this page. It accepts .bin file compiled with application MPFS2.exe available on the web site labotroniK.com 15 | 23 4.6. Network Configuration Menu To configure low level network parameters such as MAC address or IP address Warning, if you enter invalid parameter card could be unreachable 16 | 23 4.7. Drive the card by UDP protocol You can drive the card by sending commands to the UDP Port N° 30302 Command list, with x and y as function parameters : Command Function Description SRx CRx GRx GIx GAx Set Relay x Clear Relay x Get Relay x Get Input x Get Analog x activate relay x Desactivate relay x Get relay x state Get Input x state Get Analog x value SLIxRy Set Link Input x to Relay y X= 1 to 8 Y= 1 to 8 SLAxRy Set Link Analog x Relay y SAxTHyyyy Set Analog x Threshold High yyyy Set Analog x Threshold LowHigh yyyy Get Analog x Threshold High Set connection between digital input and relay Set connection between analog input and relay Set analog thresolh high value for relay x SAxTLyyyy GAxTH GAxTL Get Analog Threshold Low CLRx Clear Link Relay x ? Board information x Paremeter value X = 1 to 8 X = 1 to 8 X = 1 to 8 X = 1 to 8 X = 1 or 2 Board response OK OK 1 or 0 1 or 0 0 to 1024(0 for 0V and 1024 for 3.3V, AD converter accuracy is 10 bits) OK X= 1 to 8 Y= 1 to 8 OK X=1 to 8 Y=0000 to 1024 waring: parameter y must be on 4 digits Set analog thresolh low value for relay x X=1 to 8 Y=0000 to 1024 waring: parameter y must be on 4 digits Get Analog x Threshold High value Get Analog xThreshold Low value to reset all existing link for relay x (analog and discrete) X=1 to 8 0 to 1024 X=1 to 8 0 to 1024 X=1 to 8 OK Firmware version About the threshold values for analog inputs : To avoid undesired relay state on transition threshold, analog input does work with hysteresis value. 17 | 23 Thus, Analog input linked to a relay will set it to active state if Analog threshold High value is reach. And relay will be disable when analog value reach the Threshold low value Example of UDP sequence run within python script (available on the website) 5. Firmware update To update the firmware : Download the latest version from the website www.labotronik.com Unzip if needed Enter the following command : Tftp IP_ADDRESSe put FIRMWARE_LOCATION 18 | 23 Example if the board is at the address 192.168.1.2 : Information : To enter this command, click on « start » then enter « cmd » Under windows 7 to activate tft function, go into start->control panel-> programs>turn windows features on or off-> check « tftp client» 19 | 23 6. Create you own web page Download source page on the website Download web page compiler: http://www.labotronik.com/Documentation/IPLab/software/MPFS2.zip Do your own modification in the source code, configure MPFS2 software and click on “generate and upload”. It will compile files, to give the .bin file, and download it to the board 20 | 23 . Note : User name : admin password : admin 21 | 23 7. Technical support You can reach the technical support by register into the forum of LabotroniK or you can send an email to [email protected] 22 | 23 8. Document revision History V1.0 – IPLab-8-rly board user manual Initial version 23 | 23