1
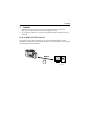
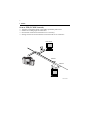
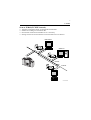
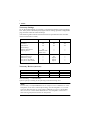
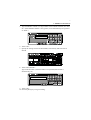
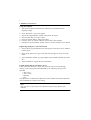
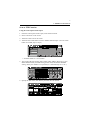
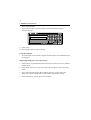
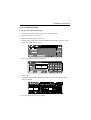
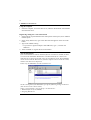
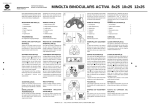
User Manual
Scanner Mode
for Pi8500Pro
i
Foreword
Foreword
Trademark Acknowledgments
Minolta is a registered trademark of MINOLTA CO., LTD.
Lotus Notes is a registered trademark of Lotus Development Corporation.
Novell, GroupWare and GroupWise are either registered trademarks or trademarks
of Novell, Inc.
EFI, Fiery and the Fiery logo are registered trademarks of Electronics For Imaging,
Inc. in the U.S. Patent and Trademark Office and/or certain other foreign
jurisdictions.
The Electronics For Imaging logo, Fiery Scan, Fiery WebScan and Fiery WebTools
are trademarks of Electronics For Imaging, Inc.
All other products or brand names are trademarks or registered trademarks of their
respective companies or organizations.
ii
Contents
Contents
1. Outline .......................................................................... 1
Scan to HDD (TCP/IP Network) .................................................
Scan to FTP (TCP/IP Network) ...................................................
Scan to E-Mail (TCP/IP Network)...............................................
Necessary Settings .......................................................................
Necessary Devices (servers): .......................................................
1
2
3
4
4
2. Pi8500Pro Scan Functions.......................................... 5
Scan to HDD Function................................................................. 6
Scan to FTP Function................................................................... 9
Scan to E-mail Function............................................................. 11
Changing and deleting settings for a one-touch button.............. 13
1
1. Outline
1. Outline
• There are three scan modes you can use with this machine: Use the one
appropriate to the network environment and purpose of use.
• To use this scan function, a network environment using the TCP/IP protocol is
required.
Scan to HDD (TCP/IP Network)
This function saves data scanned by the copier onto the hard disk drive of the
Pi8500Pro. The data is then taken using the Web browser (WebTools) on the PC and
the Fiery Remote Scan (TWAIN).
C4027O404CA
2
1. Outline
Scan to FTP (TCP/IP Network)
•
•
•
•
Transmits scanned document to the folder specified by FTP server.
Suitable for sending high-resolution data.
Environment of Network with FTP server is necessary.
Settings such as the account must be set for the FTP server in advance.
FTP Server
Intranet
Internet
FTP Server
C4027O402CA
3
1. Outline
Scan to E-Mail (TCP/IP Network)
•
•
•
•
Transmits scanned document as attached file with E-Mail.
Suitable for sending low-resolution data.
Environment of Network with Mail server is necessary.
Settings such as the account must be set for the Mail server in advance.
Mail Server
Client PC
Intranet
Internet
Client PC
C4027O401CA
4
1. Outline
Necessary Settings
To use the Scanner Mode, it is necessary to perform the following network settings
first. After you have finished specifying the various settings, print the Configuration
page, and then check the selected settings.
(The following table indicates which items must be specified from the controller
when a scan function is used.)
Controller Set Item
Scan to E-Mail
Scan to FTP
Scan to HDD
Yes
Yes
Yes
Yes
Yes
Yes
Yes
IP address of the
SMTP server
-----
-----
---------
Yes
Option
Option
Option
---------
Scan to E-Mail
Scan to FTP
Scan to HDD
SMTP Mail Server
Yes
---
---
FTP Server
---
Yes
---
(Protocol Setup)
IP Address
Subnet Mask
(E-mail Setup)
Enable E-mail Service
Outgoing Server
(FTP Setup)
Enable FTP Services
Enable Proxy Setup
Proxy Server IP Address
Proxy Server Port Number
Necessary Devices (servers):
Yes: Necessary, ---: Not necessary,
Option: Specify according to the operating environment being used.
NOTE
It is necessary to confirm SMTP Service is ready in receiver’s Mail Server when
GroupWare (Lotus Notes, Microsoft Exchange, Novell GroupWise, etc.) is used.
Scan to E-Mail function can send e-mail to SMTP Server, however GroupWare
does not receive e-mail without SMTP Service. So, GroupWare send/receive email with original format not Internet mail format.
5
2. Pi8500Pro Scan Functions
2. Pi8500Pro Scan Functions
The Pi8500Pro supports the following Scan functions.
• Scan to HDD (Mailbox) function
• Scan to FTP function
• Scan to E-mail function
The following document scanning settings can be specified.
• Simplex/Duplex
• Manuscript Quality (Auto/Text/Increase contrast/Photo)
• Density (Auto/1-11 (Increment: 1))
• Scan Resolution 600 dpi/400 dpi/300 dpi/200 dpi
• File Format (PDF/TIFF)
* Specify the various settings according to the settings specified from the
control panel of the copier.
When scanning a document, the following scanning conditions cannot be specified.
Single-sided → Double-sided, Double-sided → Single-sided, “AUTO” zoom
setting, Paper size setting (The “Full size” automatic paper size setting is
automatically selected.), Number of copies setting, Automatic image rotation
function, Output setting other than “Non-sort”, Special paper size, Sheet/cover
insertion, Chapter, Combination, Booklet, Transparency interleave, Image insert, Nup, Program Job, Non-image area erase, Reverse image, Repeat, Image shift,
Binding, Stamp/Overlay
6
2. Pi8500Pro Scan Functions
Scan to HDD Function
This function saves data scanned by the copier onto the hard disk drive of the
Pi8500Pro. The data is then taken using the Web browser (WebTools) on the PC and
the Fiery Remote Scan (TWAIN).
C4027O404CA
Using the control panel of the copier
1. From the control panel of the copier, select the Scan mode.
2. Select “Network” on the screen.
3. Touch the “HDD” tab on the screen.
4. Touch the one-touch button or select “Address manual input”. (If a one-touch
button is touched, skip to step 7.)
One-touch
buttons
C4027P401CA
* “E-MAIL NOTIFY” is not available.
7
2. Pi8500Pro Scan Functions
5. Type the Mailbox number (a 4-digit number between 0000 and 9999) into “Box
No.” (If the Mailbox number is not typed in, it will automatically be registered
as “0000”.)
C4027P402CA
6. Touch “OK”.
7. Specify the settings such as the Scan Mode, Scan Density and Scan Size as
desired.
C4027P403CA
8. Touch “FILE NAME”.
Type in the file name. (If the file name is not specified, date format is
automatically set.)
C4027P414CA
9. Touch “OK”.
10. Press the [Start] key to begin scanning.
8
2. Pi8500Pro Scan Functions
Using the computer
1. Start up the computer’s Web browser, and then start up WebTools from
PageScope Light.
2.
3.
4.
5.
6.
7.
Click “Web Scan”. The screen appears.
Type in the 4-digit Mailbox number entered from the copier.
Select the data that you wish to import.
Select the format (PDF or TIFF) for the data.
Click the “Save As” button, and then save the data to the computer.
If the data is selected and the “Delete” button is clicked, the data can be deleted.
Registering settings for a one-touch button
1. If the scanning is performed from the control panel of the copier, select “Address
manual input”.
2. In the “Entry Name” box, type in the name that will appears on the one-touch
button.
3. Type the Mailbox number (a 4-digit number between 0000 and 9999) into “Box
No.”
4. Touch “ENTRY” to register the one-touch button.
Length of time that the scan data is saved
From “Clear Each Scan Job” on the “Server Setup” menu (accessed through
“Setup” on the control panel of the Pi8500Pro), the following settings can be
specified.
• After 1 day
• After 1 week
• Manually
• Now
Scan data that is not deleted with Web Scan will be deleted from the hard disk drive
of the Pi8500Pro according to this setting.
Note:
Data can also be acquired from the Mail Box using the Fiery Remote Scan
(TWAIN).
9
2. Pi8500Pro Scan Functions
Scan to FTP Function
Using the control panel of the copier
1. From the control panel of the copier, select the Scan mode.
2. Select “Network” on the screen.
3. Touch the “FTP” tab on the screen.
4. Touch the one-touch button or select “Address manual input”. (If a one-touch
button is touched, skip to step 6.)
C4027P406CA
* “E-MAIL NOTIFY” is not available.
5. Type in the FTP Site settings (Entry Name, Host Address, Directory, Login
Name and Password), Firewall setting (ON or OFF) and the Port Number
setting. (If the port number is not specified, it is automatically set to “21”.)
C4027P407CA
6. Specify the File Form, Scan Density and Scan Size as desired.
C4027P409CA
10
2. Pi8500Pro Scan Functions
7. Touch “FILE NAME”.
Type in the file name. (If the file name is not specified, date format is
automatically set.)
C4027P408CA
8. Touch “OK”.
9. Press the [Start] key to begin scanning.
Using the computer
1. Access the FTP server from the computer, and then import the scanned data onto
the computer.
Registering settings for a one-touch button
1. If the scanning is performed from the control panel of the copier, select “Address
manual input”.
2. In the “Entry Name” box, type in the name that will appears on the one-touch
button.
3. Type in the FTP Site settings (Host Address, Directory, Login Name and
Password), Firewall setting (ON or OFF) and the Port Number setting.
4. Touch “ENTRY” to register the one-touch button.
11
2. Pi8500Pro Scan Functions
Scan to E-mail Function
Using the control panel of the copier
1. From the control panel of the copier, select the Scan mode.
2. Select “Network” on the screen.
3. Touch the “E-Mail” tab on the screen.
4. Touch the one-touch button or select “Address manual input”. (If a one-touch
button is touched, skip to step 7.)
C4027P410CA
5. Type in the Address setting and Subject.
C4027P411CA
6. Touch “OK”.
7. Specify the Scan Mode, Scan Density, Scan Size, File Name and File Form
setting as desired.
C4027P412CA
8. Press the [Start] key to begin scanning.
12
2. Pi8500Pro Scan Functions
Using the computer
1. From the computer, access the mail server, and then download the scanned data
from the mail server.
Registering settings for a one-touch button
1. If the scanning is performed from the control panel of the copier, select “Address
manual input”.
2. In the “Entry Name” box, type in the name that will appears on the one-touch
button.
3. Type in the Address setting.
• If you want to register multiple e-mail addresses, type “,” between the
addresses.
4. Touch “ENTRY” to register the one-touch button.
Note (E-mail Notify):
If the scanned data exceeds the maximum file size with Scan to E-Mail, the data
is saved on the Pi8500Pro. Without the scan data attached, an e-mail is sent
informing the recipient of the URL where the scan data is saved. The Pi8500Pro
can be accessed via the Web browser from the computer that received the e-mail,
and the scan data can be imported.
In this way, the Pi8500Pro is used as a Web server.
C4027P413CA
On the control panel of the Pi8500Pro, specify the following settings in advance.
(The menu levels are shown below.)
Setup > Network Setup > Service Setup > E-mail Service
• Maximum file size (0-15,000 KB)
• Outgoing Mail Server
13
2. Pi8500Pro Scan Functions
Changing and deleting settings for a one-touch button
Press the [Help] key from the control panel of the copier, and then touch “Key
Operator Mode”.
Type in the 4-digit Key Operator password to make changes to the key.
Changing the scan data recipient
Procedure
1. Touch “19 Scan transmission setting” on the Key Operator mode menu screen.
The Scan transmission setting screen appears.
2. Select the type of address that you want to register or delete.
Touch “E-Mail”, “HDD” or “FTP”.
3. Select the key for the name to be registered.
To change the name, touch the appropriate key, and then touch “Change”.
Continue with step 4.
To delete the name, touch the appropriate key, and then touch “Delete”.
Continue with step 5.
Touch the down arrow key to display the next screen of registered keys. Touch
the up arrow key to return to the previous screen.
4. Type in the recipient information into each input screen.
Touch the key on the left to select the information, and then touch the character
keys on the right to type in the information.
5. Touch “OK”. The Scan transmission setting screen appears again.
6. Touch “PREVIOUS SCREEN” on the Scan transmission setting screen to return
to the Key Operator mode menu screen.
Copyright
2002 MINOLTA CO., LTD.
The information contained in this manual
is subject to change without notice to
incorporate improvements made on the
product or products the manual covers.
2002. 7
MINOLTA CO., LTD.
3-13, 2-chome, Azuchi-Machi, Chuo-ku, Osaka. 541-8556, Japan