1
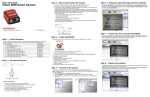
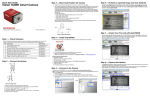
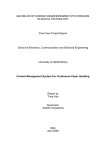
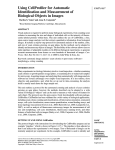
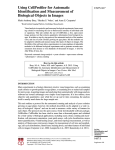
VisionMate Flat
Bed Scanner 2D
Tube Barcode
Reader
User’s Manual
Page 1
This is a controlled document. Except for red stamped "CONTROLLED", printed copies shall be considered uncontrolled 24 hours after printing.
This copy printed 8/19/20088:09 AM
Catalog #3111
MAN-21256 Rev G
Contact Information
North America: Tel: 800.345.0206 | email: [email protected]
Europe: Tel: +44 (0) 161 486 2110 | email: [email protected]
Asia: email: [email protected]
web: www.thermo.com/matrix
Unpacking
Your VisionMate Flat Bed Scanner order should contain the following items:
•
One VisionMate Flat Bed Scanner (including USB connect cable and power
supply)
•
One VisionMate Flat Bed Scanner Installation CD
•
One Security Key (Dongle)
•
Manufacturer’s Installation CD/Instructions
Page 2
This is a controlled document. Except for red stamped "CONTROLLED", printed copies shall be considered uncontrolled 24 hours after printing.
This copy printed 8/19/20088:09 AM
Hardware Setup
•
The VisionMate hardware and software is intended to be installed onto a host
computer. If desired, a laptop computer may be ordered through Thermo
Scientific. Please contact the Customer Service Department at Thermo Scientific
for further information.
1)
If using a host computer ensure that it meets the following system requirements:
• Operating System: MS Windows 2000; MS Windows XP. Not compatible with
MS Windows 95, NT, 98, Me, Vista
• RAM: Recommended 64MB or greater.
• Graphics Adapter/Display: A graphics adapter and monitor that is capable of
displaying a resolution of at least 1024 x 768 in at least 16-bit color (~64,000
colors).
• Hard Disk: Recommended minimum of 200MB of free space.
• Ports: At least one available USB (Universal Serial Bus) port.
• CD-ROM: A CD-ROM drive must be installed for software installation.
2)
On the enclosed CD-ROM, go to the Alladin Install website and download the
driver for the Security Key necessary for your operating system.
3)
Plug Security Key into an available USB port of the host computer.
4)
Attach power supply and USB cable as shown. Attach opposite end of power
supply to AC source. Attach opposite end of USB cable to host computer USB
port.
Power Supply Connect
Computer Connect
Page 3
This is a controlled document. Except for red stamped "CONTROLLED", printed copies shall be considered uncontrolled 24 hours after printing.
This copy printed 8/19/20088:09 AM
Software Setup
Installation
1)
Power up scanner. Unlock and turn power button to ‘On’.
2)
Power up computer.
3)
Insert scanner manufacturer’s CD and install scanner drivers according to the
provided manufacturer’s instructions.
4)
Insert VisionMate Installation CD.
5)
If auto-run is enabled on your computer then the install menu should automatically
appear. If not then run D:\Setup.html (replace D: with your CD-ROM letter
designation if different).
6)
Select to install “VisionScape Studio”.
7)
When prompted, select to “Run this program from its current location”. Continue
with the installation accepting all defaults. When asked to restart the computer at
the completion, agree to do so.
8)
Upon restarting recall the file D:\setup.html. Select “Run” from the “Start Menu” at
the lower left-hand corner of the screen. Type in “D:\setup.html” and press enter.
9)
Select to install “VisionMate 96”.
10) When prompted, select to “Run this program from its current location”. Continue
with the installation accepting all defaults.
11) The installation is now complete. Exit from the HTML window.
Page 4
This is a controlled document. Except for red stamped "CONTROLLED", printed copies shall be considered uncontrolled 24 hours after printing.
This copy printed 8/19/20088:09 AM
Operation
1)
To start the application, click the “VisionMate96” icon.
a. If you get this error message “ scanner is locked”, close VisionMate, turn
off the scanner, unlock scanner and turn it back on then reopen
VisionMate program.
2)
The application main screen and functions are described in the referenced list
below. (Refer to referenced pictures at the end of this manual for letter locations).
A
Enter password to access additional functions. Default password is “password” (case
sensitive).
B
When using a hand held scanner, in addition to the VisionMate flat bed reader, this function will
trigger the reading of the single large scale datamatrix block which contains every individual
code in the entire rack.
C
Displays decoded barcodes in a matrix array corresponding to the tube positions in the rack.
D
Enable this option if you wish to save the results of every scan, automatically.
E
Creates an ASCII comma delimited file of the results.
F
Creates a single column text file of the results.
G
Allows a base name to be added to the names of result files. See “Modify Data File Format”
function for more information. Rack numbers will match rack positions as marked on scanner
template.
H
For use in conjunction with a barcode labeler. This will trigger a large scale datamatrix printout
of every code in the rack every time a scan is made.
I
For use in conjunction with a barcode labeler. This will trigger a large scale datamatrix printout
of every code in the rack.
J
If enabled, a warning will be displayed if the number of successfully decoded barcodes is less
than the value of ‘Number Expected’ codes to be found. If disabled, no warning is given.
K
If “J” is enabled, the program will issue a warning if the number of decoded tubes is less than
this number. This number is adjustable in increments of the number of racks being scanned.
L
If enabled, a beep will sound when the read is completed.
M
Saves the captured image of the rack to the specified directory.
N
Triggers the reader to read a rack if so desired.
O
Clears the displayed data on Total Inspections, Pass Inspections, and Fail Inspections.
P
Quits the program.
Q
Process Time: The amount of time it takes the software to decode every tube
the scan is complete.
scanned after
Acquisition Time: The amount of time it takes the scanner to physically scan all racks.
Total Time: The sum of the Process and Acquisition times.
R
The running count of Total, Failed, and Passed scans.
Page 5
This is a controlled document. Except for red stamped "CONTROLLED", printed copies shall be considered uncontrolled 24 hours after printing.
This copy printed 8/19/20088:09 AM
S
Use this setting to scan the specific number of racks to be read for the scan- 1, 2, or 3.
T
Use this function to view the scanned result of each specific rack location.
U
Modify AVP File: Allows for changes to the AVP file. This file includes many parameters of
operation. The Thermo Scientific factory default AVP file is default.avp. This file should NOT
be overwritten. Do not attempt to make any changes to the AVP settings, unless instructed to
by a factory representative. Doing so may degrade or terminate system performance.
Select Another AVP File: Changes the AVP file in use by the system. Multiple AVP files may
be stored, but only one will be active at any present time.
Reset AVP File: This function may be used to reset the imager to the default AVP file settings.
The newly created AVP should be renamed with a new name. Do not overwrite default.avp!
Modify Data File Format: Allows the data files to be labeled as desired. The standard “Use
Default Data Filename Format” will yield data file names in the following format: “JULIAN
DATE_1COL_FILEBASENAME”. The “1COL” and “FILEBASENAME” are only applicable if the
file is a one column text file and if a file base name is entered. If “Include File Base In
Filename” is selected, then the format will change to include only the file base name as the file
name. If this selection is chosen, you must enter a file base name.
Modify Image File Format: Allows the same file naming control as “Modify Data File Format”,
but with respect to image files.
Change Data File Folder: Changes the directory of where data files are stored.
Change Image File Folder: Changes the directory of where image files are stored.
V
Allows configuration of COM setting parameters when attaching a hand held scanner.
W Allows the user to alter the failure message when the number of tubes read is lower than that
expected. The default message is “No TrakMate”.
X
Allows configuration of printer setting parameters when attaching a barcode printer.
Y
Allows the user to select which scanner is to be used with the VisionMate software if more than
one scanner is installed on the system.
Z
This setting tells the VisionMate software if the scanner is one of two types:
Top Down: The scanner light bar resides at the rear of the scanner when at rest. When
scanning, the light bar moves in a direction towards the front of the scanner. This is the
DEFAULT setting.
Bottom Up: The scanner light bar resides at the front of the scanner when at rest. When
scanning, the light bar moves in a direction away from the front of the scanner.
Page 6
This is a controlled document. Except for red stamped "CONTROLLED", printed copies shall be considered uncontrolled 24 hours after printing.
This copy printed 8/19/20088:09 AM
3)
Place racks into slots in Scanner Template as shown
• If using one rack, place in slot #1.
• If using two racks, place in slot #1 and 2.
• If using three racks, place racks in all slots.
IMPORTANT! - Always ensure that racks are placed with the Thermo Scientific Logo
facing the front. If installed in the opposite orientation, the tube locations will be
backwards!
Thermo Scientific Logo on racks MUST face forward!
5)
Set the number of racks to scan.
6)
Click on “Run Once” to initiate the scan.
7)
After the scan, the resulting data may be processed by using any of the methods
outlined in the command explanation chart.
Page 7
This is a controlled document. Except for red stamped "CONTROLLED", printed copies shall be considered uncontrolled 24 hours after printing.
This copy printed 8/19/20088:09 AM
ADDENDUM- VisionMate96 Version 3.0.2 ActiveX API
Properties
•
•
•
•
•
•
•
•
•
•
•
•
•
•
•
bBeepOnReadStatus() As Boolean - Boolean value that
specifies whether the PC speaker sounds at the
completion of a read cycle
bPassFailCheckStatus() As Boolean - Boolean value
that specifies whether the cycle passes or fails based on
the count of the matrices read
Enabled() As Boolean - Boolean value that specifies
whether the UI allows user interaction
FailureMessage() As String - String value used when
the data matrix is not decoded
lAcquisitionTime() as Long – Long value of one cycle
acquisition time
lProcessTime() As Long - Long value of one cycle
process time
lTotalTime() as Long – Long value of one cycle total
time
nNumberExpected() As Integer - Integer value of the
number of matrices expected for a successful read
nNumberFound() As Integer - Value of the number of
data matrices decoded
nNumberFoundPerRack() as Integer – Three element
array of integer values of the number of data matrices
decoded per rack
nRacksToBeRead() as Integer – Value set for the
number of racks to be processed in the next cycle
nRackToDisplay() as Integer – Value of the rack currently shown on the UI
OneDimensionalRackData() As Variant - Variant array (96, 192, or 288 zero based
depending upon the number of racks run that cycle) of the rack string data contents
RackData() As Variant - Variant array (3, 8,12 zero based) of the rack string data contents
Visible() As Boolean - Boolean value of whether the UI is visible
Methods
•
•
•
•
•
Disconnect() – Supports multiple threaded connection to the out of process EXE to be
disconnected
LoadUI() - Method to start the UI process
Read() - Method to perform a single read cycle on the EXE process
SaveImages() - Method to save the images from the last cycle to a file
Shutdown() - Start a timer that will shutdown the UI process in half a second
Events
•
•
•
•
DuplicateFound(ByVal nCount As Integer, strDuplicates As String) - Event raised when
duplicate data matrices are decoded from the same rack
ReadComplete() - Event fired when a read cycle is complete
UIClosing() - Event fired when the UI is closing
UILoaded() - Event fired when UI load is complete
Page 8
This is a controlled document. Except for red stamped "CONTROLLED", printed copies shall be considered uncontrolled 24 hours after printing.
This copy printed 8/19/20088:09 AM
D
A
F
C
B
E
G
H
I
J
K
T
S
Q
M
L
N
O
Page 9
R
P
This is a controlled document. Except for red stamped "CONTROLLED", printed copies shall be considered uncontrolled 24 hours after printing.
This copy printed 8/19/20088:09 AM
U
Page 10
This is a controlled document. Except for red stamped "CONTROLLED", printed copies shall be considered uncontrolled 24 hours after printing.
This copy printed 8/19/20088:09 AM
V
X
W
Y
Z
Page 11
This is a controlled document. Except for red stamped "CONTROLLED", printed copies shall be considered uncontrolled 24 hours after printing.
This copy printed 8/19/20088:09 AM