1
MemberExport PRO
User manual
MemberExport PRO User manual
Version 2.0.0
MemberExport PRO User manual ................................................................................................... 1
1
INTRODUCTION .................................................................................................................... 3
2
INSTALLATION ...................................................................................................................... 4
3
EXPORT MEMBERS ............................................................................................................... 5
4
EXTEND MEMBEREXPORT ..................................................................................................... 6
4.1
Value parsers........................................................................................................................... 6
4.2
Export provider ........................................................................................................................ 7
4.2.1
CSVProviderUI ................................................................................................................ 7
4.2.2
CsvProvider ..................................................................................................................... 9
5
MANUAL INSTALLATION/CONFIGURATION ......................................................................... 11
5.1
5.2
6
Manual installation of files ..................................................................................................... 11
Manual configuration of Database ......................................................................................... 11
TROUBLESHOOTING ........................................................................................................... 12
6.1
6.2
6.3
6.4
I don’t see the MemberExport package in my members section .......................................... 12
My CSV file is messed up when opening in Excel. ............................................................... 12
I get an Invalid License exception. ........................................................................................ 12
I get an Invalid Membership provider message. .................................................................... 12
© 2011 Soeteman Software
page 2 / 12
MemberExport PRO User manual
Version 2.0.0
1 Introduction
MemberExport Pro helps you export members from your Umbraco installation to an Excel or Csv file.
It’s also possible to save the export options steps for later use .
MemberExport PRO can export thousands of members in a few seconds.
MemberExport uses the database directly and will only work with the default Umbraco
Membership provider!
© 2011 Soeteman Software
page 3 / 12
MemberExport PRO User manual
Version 2.0.0
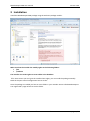
2 Installation
Install the MemberExport PRO package using the Umbraco package installer.
Make sure that the installer has modify rights on the following folders:
/bin
/umbraco
The installer also needs rights to create tables in the database.
If for some reason you can’t give the installer these rights, you can install the package manually.
Read the chapter manual configuration how to do this.
Once the package is installed you have an extra folder in your member section called MemberExport.
You might need a page refresh to see this folder.
© 2011 Soeteman Software
page 4 / 12
MemberExport PRO User manual
Version 2.0.0
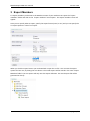
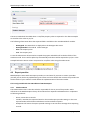
3 Export Members
To export members you browse to the Member section of your Umbraco site. Open the “Export
members” folder and click on the “Export members” menu option. The export member screen will
appear.
Here you can specify what to export, specify the export format (Excel, or csv) and you can specify the
csv export options in case of csv export.
When you click the export button you can download or open the csv file. You can save the export
options for later use, by hitting the save button. The saved exports will be stored in the same “Export
Members folder” The save option will only save the export definition. The actual export file will be
generated on the fly .
© 2011 Soeteman Software
page 5 / 12
MemberExport PRO User manual
Version 2.0.0
4 Extend MemberExport
MemberExport is an out of the box product, still in some cases you might want to modify the
package to your needs. MemberExport can be extended by writing your own value parsers and
export providers.
4.1
Value parsers
By default MemberExport exports the stored value from the database. When this value is an Id value
you might want to export the text value instead. This can be achieved using a value parser. By default
MemberExport comes with value parsers for the following datatypes :
Checkbox
Dropdownlist
MNTP
MuiltipleDropdownlist
Radiobox
Ultimatepicker
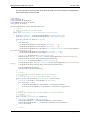
In the example below we will write a value parser for the True/false datatype. By default values will
be exported as 1/0. We want the values to be exported as yes/no for this example.
First we need to add a reference to the MemberExport.Library dll. Then we can create a class that
implements the IValueParser interface
public class TrueFalseParser : IValueParser
{
/// <summary>
/// Returns the Datatype GUID of the true/false Render Control.
/// </summary>
public Guid DataTypeId
{
get { return new Guid("38b352c1-e9f8-4fd8-9324-9a2eab06d97a"); }
}
/// <summary>
/// Converts the 0/1 to a normal yes/no string.
/// </summary>
/// <param name="memberfieldInfo">The memberfield info.</param>
/// <param name="value">The value.</param>
/// <returns>The yes/no string</returns>
public object Parse(Library.Types.MemberField memberfieldInfo, object value)
{
return string.Format("{0}", value) == "1" ? "yes" : "no";
}
}
The DataTypeId property needs to return the GUID which is displayed on the datatype edit screen.
© 2011 Soeteman Software
page 6 / 12
MemberExport PRO User manual
Version 2.0.0
The Parse method will be called when a true/false property value is exported. In the above example
we transform the value to yes/no.
The following information about the exported field is available in the memberFieldInfo variable:
-
DataTypeId. The GUID which is displayed on the datatype edit screen
DatatypeNodeId. The node id of the Datatype.
Alias. The Property alias.
Text. The Property text.
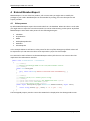
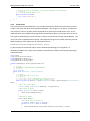
To use the Value Parser all we need to compile the project and add the dll to the bin folder of the
Umbraco install. Then it will be picked up automatically and values will be exported as yes/no. In the
example below the Active column is exported as true/false value using the Value Parser.
4.2
Export provider
MemberExport comes with two Export providers, Csv and Excel. If you want to create a provider
yourself you can do this by implementing two classes and store the dll that contains the provider into
the bin folder of your Umbraco install. Below the implementation of the CSV Provider
This is only possible with the PRO edition of MemberExport
4.2.1
CSVProviderUI
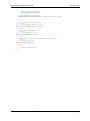
The CSVProviderUI class is the class which is responsible for the UI part of the provider. Add a
reference to the MemberExport.Library dll and derive from ExportProviderUIBase class. Implement
to following methods:
-
OnInit, create the UI controls
Initialize, initialize the UI options based on the stored export provider settings. In this case
exportProvider will hold the text delimiter and text indicator options.
GetOptions will return the export provider settings so we use those settings when exporting
records
© 2011 Soeteman Software
page 7 / 12
MemberExport PRO User manual
-
using
using
using
using
using
Version 2.0.0
The name property will return the name of the provider stored in the Export as dropdownlist
when selecting an export provider.
System;
System.Web.UI;
System.Web.UI.WebControls;
MemberExport.Resources.Helpers;
umbraco.uicontrols;
namespace MemberExport.Library.ExportProviders.CSV
{
/// <summary>
/// Renders the Layout for the CSV Provider
/// </summary>
public class CSVProviderUI : ExportProviderUIBase, INamingContainer
{
protected DropDownList _csvTextIndicatorDropDownList = new DropDownList();
protected DropDownList _csvSVSeperatorDropDownList = new DropDownList();
protected override void OnInit(EventArgs e)
{
base.OnInit(e);
_csvSVSeperatorDropDownList.Items.Add(new ListItem(";", ";"));
_csvSVSeperatorDropDownList.Items.Add(new ListItem(",", ","));
_csvTextIndicatorDropDownList.Items.Add(new ListItem(ResourceHelper.Current.GetStringResour
ce("CSVNoTextIndicator"), ""));
_csvTextIndicatorDropDownList.Items.Add(new ListItem("\"", "\""));
_csvTextIndicatorDropDownList.Items.Add(new ListItem("\'", "\'"));
PropertyPanel delimiterPropery = new PropertyPanel();
delimiterPropery.Text = ResourceHelper.Current.GetStringResource("CSVSeperatorProperty");
delimiterPropery.Controls.Add(_csvSVSeperatorDropDownList);
PropertyPanel stringIndicatorPropery = new PropertyPanel();
stringIndicatorPropery.Text = ResourceHelper.Current.GetStringResource("CSVTextIndicatorPro
perty");
stringIndicatorPropery.Controls.Add(_csvTextIndicatorDropDownList);
Controls.Add(delimiterPropery);
Controls.Add(stringIndicatorPropery);
}
/// <summary>
/// Sets the export options (delimiter and string indicator).
/// </summary>
/// <param name="exportProvider">The export provider.</param>
public override void Initialize(ExportProviderBase exportProvider)
{
CSVProvider csvProvider = exportProvider as CSVProvider;
if (csvProvider != null)
{
_csvSVSeperatorDropDownList.SelectedValue = csvProvider.Delimiter;
_csvTextIndicatorDropDownList.SelectedValue = csvProvider.StringIndicator;
}
}
/// <summary>
/// Returns the selected export options (delimiter and string indicator).
/// </summary>
/// <returns></returns>
public override ExportProviderBase GetOptions()
{
CSVProvider csvProvider = new CSVProvider();
csvProvider.Delimiter = _csvSVSeperatorDropDownList.SelectedValue;
csvProvider.StringIndicator = _csvTextIndicatorDropDownList.SelectedValue;
return csvProvider;
}
/// <summary>
© 2011 Soeteman Software
page 8 / 12
MemberExport PRO User manual
Version 2.0.0
/// Return the name of the provider. this will be displayed in the selectbox
/// </summary>
/// <value>The selected name.</value>
public override string Name
{
get { return "CSV file"; }
}
}
}
4.2.2
CsvProvider
The second part we need implement is the provider itself which handles the actual export process.
Create a new class and derive from ExportProviderBase. This will give you an Export method and
Icon property. The Icon property will be displayed when opening the saved exports tree. In this
implementation we’ve added the StringIndicator and Delimiter options, which gets set from the UI.
The export method will give a list of columns to export and all records using an IRecordReader. The
rest of the code is implementation specific. Two important things to know when exporting records.
When assigning a value always use the ValueParser factory
ValueParser.Parse(reader.GetObject(column.Alias), column));
To write the file to the browser either use the WriteResponseString (for stringvalues ) or
WriteResponseBytes (for a byte array) methods. Both methods need the Contenttype (Mimetype)
and fileExtension.
using
using
using
using
using
System;
System.Collections.Generic;
MemberExport.Library.Csv;
MemberExport.Library.Members;
MemberExport.Library.Types;
namespace MemberExport.Library.ExportProviders.CSV
{
/// <summary>
/// CSV (Default) implementation of MemberExport
/// </summary>
[Serializable()]
public class CSVProvider : ExportProviderBase
{
/// <summary>
/// Exports the data to a csv file
/// </summary>
/// <param name="columns">Collection of column info</param>
/// <param name="reader">The actual data to export</param>
public override void Export(List<Types.MemberField> columns, umbraco.DataLayer.IRecordsReader r
eader)
{
//Use a csv writer object
CsvWriter writer = new CsvWriter(Delimiter, StringIndicator);
//Add columns to export
foreach (MemberField field in columns)
{
writer.Columns.Add(field.Text);
}
//Add data to export
while (reader.Read())
{
//Get values for the current row
List<object> values = new List<object>();
foreach (MemberField column in columns)
{
values.Add(ValueParser.Parse(reader.GetObject(column.Alias), column));
}
© 2011 Soeteman Software
page 9 / 12
MemberExport PRO User manual
Version 2.0.0
//write values to csvwriter;
writer.Add(values.ToArray());
}
//Write response to the browser
WriteResponseString(writer.Parse(), "application/excel", "csv");
}
/// <summary>
/// Gets or sets the string indicator.
/// </summary>
/// <value>The string indicator.</value>
public string StringIndicator { get; set; }
/// <summary>
/// Gets or sets the delimiter.
/// </summary>
/// <value>The delimiter.</value>
public string Delimiter { get; set; }
/// <summary>
/// Returns the icon that will be displayed in the saved tree
/// </summary>
/// <value>The icon.</value>
public override string Icon
{
get
{
return "csvexport.gif";
}
}
}
}
© 2011 Soeteman Software
page 10 / 12
MemberExport PRO User manual
Version 2.0.0
5 Manual Installation/Configuration
If you renamed the Umbraco folder or for some reason can’t give the installer sufficient rights to
create tables in the database , or the sufficient rights to modify the following folders /bin, /umbraco
you need to install MemberExport PRO Manually.
5.1
Manual installation of files
-
-
Open de folder in the zip file.
Copy all .dll files to the /umbraco/bin/ folder.
Copy csvexport.gif to the /umbraco/images/Umbraco folder
Create the following folders
o /umbraco/plugins/MemberExport
o /umbraco/plugins/MemberExport/Config
o /umbraco/plugins/MemberExport/UserControls
Copy all *.aspx files to the /umbraco/plugins/MemberExport folder
Copy MemberExport.ascx to the /umbraco/plugins/MemberExport/Usercontrols folder
If you purchases a license (.Lic) file. Put that in the Bin folder of your Umbraco install!
5.2
Manual configuration of Database
Run the following script to install the database tables
CREATE TABLE [dbo].[MemberExportState](
[Id] [int] IDENTITY(1,1) NOT NULL,
[UniqueIdentifier] [uniqueidentifier] NOT NULL,
[Name] [nvarchar](250) NOT NULL,
[ExportState] [ntext] NOT NULL,
[Icon] [nvarchar](50) NULL,
PRIMARY KEY CLUSTERED
(
[Id] ASC
)WITH (PAD_INDEX = OFF, STATISTICS_NORECOMPUTE = OFF, IGNORE_DUP_KEY = OFF, ALLOW_ROW_LOCKS
= ON, ALLOW_PAGE_LOCKS = ON) ON [PRIMARY]
) ON [PRIMARY] TEXTIMAGE_ON [PRIMARY]
INSERT INTO
[umbracoAppTree]([treeSilent],[treeInitialize],[treeSortOrder],[appAlias],[treeAlias],[treeTit
le],[treeIconClosed],[treeIconOpen],[treeHandlerAssembly],[treeHandlerType],[action]) VALUES
(0,1,100,'member','memberexport','Export
Members','folder.gif','folder_o.gif','MemberExport.Library','Tree.MemberExportTree',null)
INSERT INTO
[umbracoAppTree]([treeSilent],[treeInitialize],[treeSortOrder],[appAlias],[treeAlias],[treeTit
le],[treeIconClosed],[treeIconOpen],[treeHandlerAssembly],[treeHandlerType],[action]) VALUES
(0,0,110,'member','MemberExportSavedExportsTree','Saved
exports','folder.gif','folder_o.gif','MemberExportPro.Library','Tree.SavedExports',null)
© 2011 Soeteman Software
page 11 / 12
MemberExport PRO User manual
Version 2.0.0
6 Troubleshooting
6.1
I don’t see the MemberExport package in my members section
Make sure you have sufficient rights to install the package. See chapter 2, otherwise perform a
manual installation see chapter 4.
6.2
My CSV file is messed up when opening in Excel.
Make sure that you set the correct options to display the CSV file. For Excel, choose ; as the delimiter
and “ as a string indicator.
6.3
I get an Invalid License exception.
Make sure you’ve bought the correct license for the (sub)domain , or an enterprise license and
added the license file to the bin folder. Contact [email protected] for help.
6.4
I get an Invalid Membership provider message.
MemberExport uses the Database directly and will therefore only work with the default Membership
provider. Contact [email protected] for help.
© 2011 Soeteman Software
page 12 / 12