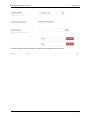
1
CMSImport PRO
User manual
Version 3.0
CMSImport PRO User manual
Version 3.0
1
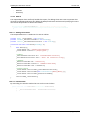
INTRODUCTION .................................................................................................................... 4
2
INSTALLATION ...................................................................................................................... 5
3
IMPORT ............................................................................................................................... 6
3.1
3.2
3.3
3.4
3.5
3.6
3.7
3.8
3.9
3.10
4
STRUCTURED CONTENT IMPORT ......................................................................................... 19
4.2
5
Rich text editor ....................................................................................................................... 22
Media picker/ Multimedia picker ............................................................................................ 23
Upload field ............................................................................................................................ 24
LOOKUPS ........................................................................................................................... 26
6.1
6.2
7
End result............................................................................................................................... 20
RELATED MEDIA IMPORT .................................................................................................... 21
5.1
5.2
5.3
6
Select import type .................................................................................................................... 6
Select Datasource Type .......................................................................................................... 6
Select datasource .................................................................................................................... 7
Set options for Content import ............................................................................................... 10
Set options for member import .............................................................................................. 12
Select dictionary options ........................................................................................................ 13
Create mapping ..................................................................................................................... 14
Confirm .................................................................................................................................. 16
Import..................................................................................................................................... 17
Save Import steps .................................................................................................................. 17
Configuration ......................................................................................................................... 26
Mapping ................................................................................................................................. 26
SCHEDULE IMPORTS ........................................................................................................... 28
7.1
Scheduled task log ................................................................................................................ 29
8
IMPORT DASHBOARD ......................................................................................................... 30
9
SETTINGS ........................................................................................................................... 31
9.1
9.2
9.3
9.4
10
Login credential settings ........................................................................................................ 31
Scheduler result settings ....................................................................................................... 31
Media settings........................................................................................................................ 31
Configure Import Dashboard ................................................................................................. 33
EXTEND CMSIMPORT.......................................................................................................... 35
10.1
10.2
10.3
10.4
10.5
10.6
Setting up Visual Studio ........................................................................................................ 35
What’s in CMSImport.extensions .......................................................................................... 35
Samples ................................................................................................................................. 37
Create a DataProvider for Product Categories ...................................................................... 38
Create a DataProvider for Products. ..................................................................................... 41
Using a Fieldprovider to map text values against a Dropdownlist DataType ........................ 42
© 2015 Soeteman Software
page 2 / 47
CMSImport PRO User manual
11
MANUAL INSTALLATION/CONFIGURATION ......................................................................... 44
11.1
11.2
11.3
11.4
11.5
12
Version 3.0
Manual installation of files ..................................................................................................... 44
Manual configuration of Database ......................................................................................... 44
Manual configuration of the language files ............................................................................ 46
Manual configuration of the scheduled task handler ............................................................. 46
Manual configuration of the node actions .............................................................................. 46
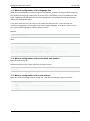
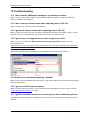
TROUBLESHOOTING ........................................................................................................... 47
12.1
12.2
12.3
12.4
12.5
12.6
12.7
I don’t see the CMSImport package in my developer section ............................................... 47
I don’t see my column names when importing from a CSV file. ............................................ 47
I get weird column names when importing from a CSV file. .................................................. 47
I get an error not supported error when using access files ................................................... 47
Email is not send when importing a member ........................................................................ 47
I get an Invalid License exception. ........................................................................................ 47
I get the scheduler module is not running error when scheduling an item ............................ 47
© 2015 Soeteman Software
page 3 / 47
CMSImport PRO User manual
Version 3.0
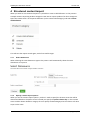
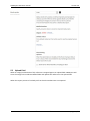
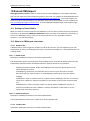
1 Introduction
CMSImport PRO helps you import content, members or dictionary items from any datasource into
Umbraco. The following data sources are supported by default:
Access Database1
BlogML
CSV
Excel File
RSS Feed
SQL Server
WordPress
Umbraco
XML
CMSImport PRO allows you to save wizard steps so you can run the import later or even schedule it
for a certain date and time. When you re-run an import already existing records will be updated and
only new records will be added. When media is imported references in content or member data will
be updated automatically.
And best of all with CMSImport Pro it’s possible to import complete content structures also! This
allows you to import a complete product catalog (Categories and Products), blogposts + comments,
or any structure you want to import.
CMSImport PRO is optimized for uBlogsy, Blog4Umbraco, TeaCommerce and Uwebshop.
This document describes PRO features only. The free edition is limited in functionality.
IMPORTANT:
CMSImport is compatible with Umbraco version 6 and up to 7.x. CMSImport is compatible with SQL
Server (Express).
CMSImport uses HTML Agility pack which is licensed under MS-PL License.
http://htmlagilitypack.codeplex.com/license
CMSImport uses Lumenworks Framework IO which is licensed under MIT license
http://www.codeproject.com/Articles/9258/A-Fast-CSV-Reader
1
Access Datasource requires you to install an extra driver from Microsoft
© 2015 Soeteman Software
page 4 / 47
CMSImport PRO User manual
Version 3.0
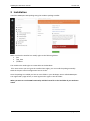
2 Installation
Install the CMSImport PRO package using the Umbraco package installer.
Make sure that the installer has modify rights on the following folders:
/bin
/app_data
/umbraco
The installer also needs rights to create tables in the database.
If for some reason you can’t give the installer these rights, you can install the package manually.
Read the chapter manual configuration how to do this.
Once the package is installed you have an extra folder in your developer section called CMSImport.
You might need a page refresh, or even logout and in again to see this folder.
When you want to use the PRO functionality add the license file to the bin folder of your Umbraco
install.
© 2015 Soeteman Software
page 5 / 47
CMSImport PRO User manual
Version 3.0
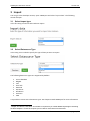
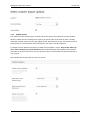
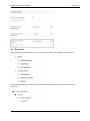
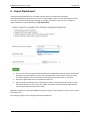
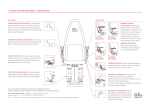
3 Import
You can go to the developer section, open CMSImport and select “import data”. The following
wizard will open.
3.1
Select import type
In the first step you need to select what to import.
3.2
Select Datasource Type
In this step you are asked to specify the type of data you want to import.
The following datasource types are supported by default2:
Access database
BlogML
CSV
Excel File
RSS Feed
SQL Server
WordPress
Umbraco
XML
It is possible to create extra datasource types. See chapter extend CMSImport for more information.
2
BlogML,WordPress, RSS feed and Umbraco require that you install additional packages containing
the Data adapters. Access file requires you to install an extra driver from Microsoft.
© 2015 Soeteman Software
page 6 / 47
CMSImport PRO User manual
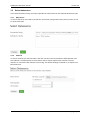
3.3
Version 3.0
Select datasource
In the select datasource step you need to provide the information for the selected datasource Type.
3.3.1
SQL Server
In case of SQL server you need to provide the Connection string and the query that you want to use
to retrieve the data.
3.3.2
CSV File
In case of a CSV file you need to select a CSV File. You also need to provide the field separator and
text indicator. A field separator is the character that is used to separate the columns. The text
indicator is a character that indicates a text string. The default settings are based on an export from
Microsoft Excel.
© 2015 Soeteman Software
page 7 / 47
CMSImport PRO User manual
3.3.3
Version 3.0
XML File
In case of an XML file you need to select the xml file. Optional you can specify an xpath expression.
When using xml you can only use elements, attributes are not supported at the moment. All
elements that you want to map later must be under the first child node of the xml document.
3.3.4
Access database
In case of an access database you can upload a mdb file, or point to a location and you can specify
the query to execute
3.3.5
Excel
In case of an Excel sheet you can upload a xls(x) file, or point to a location. When you click next you
can select the worksheet from the pull-down menu
© 2015 Soeteman Software
page 8 / 47
CMSImport PRO User manual
3.3.6
Version 3.0
Umbraco content, members or dictionary items
Install the additional CMSImport.UmbracoDataProvider.zip package to import data from an old
Umbraco environment into your current Umbraco installation. Only old environments using SQL
server and using at least Umbraco version V4 are supported.
Specify the connection string and additional options and CMSImport will get the information from
the database
3.3.6.1
Media import
Make sure you create a separate mediaimport folder in the root of your Umbraco installation where
you store the media folder of the old Umbraco installation and update the media settings (see
chapter settings) so it looks into that folder for Media items.
3.3.6.2
Password settings for member import
If password in the source system were hashed normally it will be hashed again during import. On the
password field open the advanced settings and set Store passwords as clear text to avoid this.
© 2015 Soeteman Software
page 9 / 47
CMSImport PRO User manual
3.3.7
Version 3.0
RSS Feed
In case of an rss file you can point to a location, or upload an rss file. RSS feed requires install of the.
CMSImport.DataProviders RSS package file. Most content properties are HTML Encoded, when
mapped against a Rich Text Editor you must set the advance field option “Force HTML Decode”
otherwise data will be stored encoded.
3.3.8
BlogML
In case of BlogML you can upload a BlogML file, or point to a location. The BlogML Data adapters
allow you to import authors, categories, tags, posts and comments. When you have uBlogsy,
Blog4Umbraco or the Blog starterkit installed you can specify that you want to optimize for either
uBlogsy /Blog4Umbraco/Blog starter kit. When you enable that option CMSImport will automatically
create the correct mapping also.
BlogML requires install of the CMSImport.DataProviders.BlogML package file.
3.3.9
WordPress
In case of Wordpress you can upload a Wordpress file, or point to a location. The Wordpress data
adapters allow you to import authors, categories, tags, posts, pages and comments. When you have
uBlogsy , Blog4Umbraco or the Blog starterkit installed you can specify that you want to optimize for
either uBlogsy /Blog4Umbraco/Blog starter kit. When you enable that option CMSImport will
automatically create the correct mapping also.
Don’t select this option when you just want to import the blogposts and blogcomments based on an
Umbraco document type .
Wordpress requires install of the CMSImport.DataProviders.Wordpress package file.
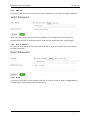
3.4
Set options for Content import
Specify all options specific for content imports
3.4.1
Default options
Specify the location where you want to store the imported documents. You can also specify the
document type and you select the auto publish checkbox, when checked items are published
automatically.
© 2015 Soeteman Software
page 10 / 47
CMSImport PRO User manual
3.4.2
Version 3.0
Update options
The “When the item already exists” and the primary key option are needed for content updates.
With the “When the item already exists” option you specify what to do when an item is already
imported. Possible options are skip and update record. With the primary key you specify the key in
the datasource. This field will be used to determine if an item is already imported.
To disable content updates uncheck the “Enable content updates” option. Only do this when you
don’t have a primary key in your datasource. No relation between imported data and Umbraco
document is stored so even when you run the import for the second time data will be imported as
new records.
Select Delete old records when you want to remove
© 2015 Soeteman Software
page 11 / 47
CMSImport PRO User manual
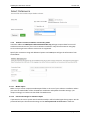
3.4.3
Version 3.0
Recursive options
CMSImport can maintain the structure for you when you import content. This is normally be done
using parent/child import definitions but sometimes you import content with a recursive foreign key
to itself, for example when you import Product categories as in the example below. Some categories
have a relation to a parent category. By selecting the recursive import option you can specify the key
to its parent, in this case ParentProductcategoryID.
Some of the options might be disabled, or you might have a few extra options when run this step
as a child import. See section structured import for more information
3.4.4
Delete old records
When selected CMSImport will delete all records that are no longer in the current data source. This
will be checked during import and allows you to remove old records automatically. The check will be
based on Data source type, primary key name and primary key value. Make sure this is unique when
you have multiple definitions otherwise records from a different data source might be deleted.
3.5
Set options for member import
For member import you can select the member type and assign one or more roles. With the “When
the item already exists” option you specify what to do when an item is already imported. Possible
options are skip and update record.
When the “Automatic generate password” option is checked a password is automatically generated
for the imported member. When the “Send credentials via mail” is checked an email with login
credentials is send to the imported member. You can edit the email template , check chapter settings
on how to do this.
When delete old records is selected CMSImport will delete all records that are no longer in the
current data source. This will be checked during import and allows you to remove old records
automatically. The check will be based on Data source type, primary key name and primary key
value. Make sure this is unique when you have multiple definitions otherwise records from a
different data source might be deleted.
© 2015 Soeteman Software
page 12 / 47
CMSImport PRO User manual
3.6
Version 3.0
Select dictionary options
In this step you can select what to do when a record already exists, update or skip.
When delete old records is selected CMSImport will delete all records that are no longer in the
current data source. This will be checked during import and allows you to remove old records
automatically. The check will be based on Data source type, primary key name and primary key
value. Make sure this is unique when you have multiple definitions otherwise records from a
different data source might be deleted.
© 2015 Soeteman Software
page 13 / 47
CMSImport PRO User manual
3.7
Version 3.0
Create mapping
In this step you can specify the mapping between the fields from the data source and the properties
of the Umbraco document type.
Quick tip:
When your fieldnames from the datasource are the same as the alias of the document property
CMSImport will automatically map this field.
When you click on the green plus sign you can set advanced settings for that particular datatype. It
should be at least possible to specify a default value for each datatype. Below you see the advanced
settings for a datetime datatype.
© 2015 Soeteman Software
page 14 / 47
CMSImport PRO User manual
Version 3.0
Every datatype has its own options. Using CMSImport PRO it’s also possible to import media related
to content the only requirement is that media is stored in the root of the website. Whenever you
map against a media picker or rich text editor screen it’s possible for you to specify a media location
and it’s even possible to specify a default value;
See chapter “Related media import” for more information.
© 2015 Soeteman Software
page 15 / 47
CMSImport PRO User manual
3.8
Version 3.0
Confirm
In this step you can validate the selected options one more time. When you click next the import will
start.
© 2015 Soeteman Software
page 16 / 47
CMSImport PRO User manual
3.9
Version 3.0
Import
When you click next in this step the import starts. When the import is finished it will report what it
did. If there were any errors it will also report the errors.
Quick tip:
In case of test imports it might be useful to install the free (or pro)version of the Bulkmanager
package also to bulk publish/unpublish and delete content nodes.
You can download the package via:
http://soetemansoftware.nl/bulkmanager
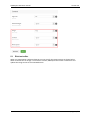
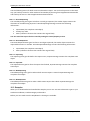
3.10 Save Import steps
When you click save, you can specify a name and when hitting the save button again the import steps
are saved for later use. Create copy will create a copy of the current item.
© 2015 Soeteman Software
page 17 / 47
CMSImport PRO User manual
Version 3.0
Saved imports are stored as Import definitions and can be found in the Import definitions tree.
A saved content definition can have the following icons
© 2015 Soeteman Software
page 18 / 47
CMSImport PRO User manual
Version 3.0
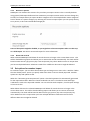
4 Structured content import
When you want to use structured imports it’s possible to create a child definition. In the previous
example we were importing Product categories. Now we can import products for those categories.
Open the context menu on the parent definition (in this case ProductCategory) and select Create
child definition
This will start the import wizard again, with a few small changes.
4.1.1
Select datasource
When selecting the same datasource type as the parent it will automatically select the same
datasource as its parent.
4.1.2
Specify content import options
When you set the content import options you don’t need to specify the location since that will be
determined based on the parent record. Instead you specify the parent relation key. In this case we
want to add a relation based on category id so we specify ProductCategoryId as the relation. All other
steps are the same.
© 2015 Soeteman Software
page 19 / 47
CMSImport PRO User manual
4.2
Version 3.0
End result
When importing these two definitions the content tree is filled with categories and products.
The import definition tree contains two items ProductCategory and Products as the child import
definition
© 2015 Soeteman Software
page 20 / 47
CMSImport PRO User manual
Version 3.0
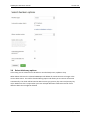
5 Related media import
CMSImport can import media also. This isn’t a separate import process but integrated in content or
media import. When CMSImport finds a reference to a relative path it will try to get the item and
convert it to a media item, or store it in the media folder in case of an upload field.
The only required thing is that the original media folder is copied to the root, or configured media
directory of your Umbraco folder.
When the relative path in the datasource is a folder CMSImport will import the complete folder and
assign the folder id to the mediapicker when assigning a folder is possible with the datatype.
In the example below the img folder of the original site containing two images is stored in the
Umbraco root.
In the Import wizard you can specify that you want to import media items also. Check the option
“Import content related media” on the advanced setting of the property
© 2015 Soeteman Software
page 21 / 47
CMSImport PRO User manual
5.1
Version 3.0
Rich text editor
When you map against a Richtext datatype you can specify the import options as shown below.
When a reference to an image is found in the content, CMSImport will create a media Item and
update the image source to the new Media item.
© 2015 Soeteman Software
page 22 / 47
CMSImport PRO User manual
5.2
Version 3.0
Media picker/ Multimedia picker
When you map against a mediapicker datatype you can specify the import options as shown below
and CMSImport will create a media item and store the Id of the media item . When you specify a
default value. That value will be used when the item is null. When you set “Show error when file is
missing on disk” an error will be displayed when the file is referenced in the data source but not on
disk.
© 2015 Soeteman Software
page 23 / 47
CMSImport PRO User manual
5.3
Version 3.0
Upload field
When an image (could also be a file) reference is mapped against an upload field. CMSImport will
store the image in the Umbraco Media folder and update the reference in the Upload field
When the import process is finished you’ll see that the media items are imported
© 2015 Soeteman Software
page 24 / 47
CMSImport PRO User manual
Version 3.0
And when you open an imported item in the content section you’ll see that all the references are
updated to the imported media items
Currently this import process will work for the following datatypes:
- Upload field
- (multiple) Media Pickers
- Multi Node Tree Picker (Media only)
- DAMP Version 2.0 (Umbraco V6)
© 2015 Soeteman Software
page 25 / 47
CMSImport PRO User manual
Version 3.0
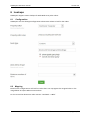
6 Lookups
CMSImport support content lookups for Multi Node Tree picker values.
6.1
Configuration
CMSImport uses the datatype configuration to determine where to look for the nodes.
6.2
Mapping
Based on the configuration it will look for nodes that it can map against the assigned value. In the
image below we import Bike accessories data.
For this record the datasource value contains “Hitch Rack - 4-Bike”
© 2015 Soeteman Software
page 26 / 47
CMSImport PRO User manual
Version 3.0
CMSImport will try to map the values based on Id, or NodeName. In case the value cannot be found
the value will be ignored.
When an item is pointing to a page that is not yet imported the relation will not be inserted the
first time. An extra import to update the relations is required in that case.
© 2015 Soeteman Software
page 27 / 47
CMSImport PRO User manual
Version 3.0
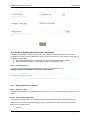
7 Schedule Imports
With CMSImport it’s possible to run imports for on a certain day/time. When you right click on a
saved import item (content/member) and click schedule the following screen will show up.
You can schedule imports to run every week on certain days/time, every day on a certain time or
every hour.
You can specify an email address to receive a notification when the import is finished and you can
specify a user that will be assigned as creator for imported items. When you click save the item will
run on the selected day/time.
© 2015 Soeteman Software
page 28 / 47
CMSImport PRO User manual
Version 3.0
When the import is finished you will receive a notification email on the specified email address.
7.1
Scheduled task log
When you right click on a scheduled task you can view when the task did execute. As you already can
see in the image below the scheduled time can be a little different from the real executed time. This
can be caused by the website not being up at the given time. The scheduler will always execute the
task when the site is back up and did not run the task. This dialog gives some insight when that
happened.
© 2015 Soeteman Software
page 29 / 47
CMSImport PRO User manual
Version 3.0
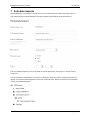
8 Import Dashboard
Using the Import Dashboard you can allow content editors to upload data and media
items(optional)without giving the user access to the Developer section. This is ideal when you want
your users to upload a new product catalog, or member information. The user can’t modify the
import definition using this Dashboard, only upload data.
1. The user can select an import definition(saved in the CMSImport tree) to import. Only Import
definitions that are enabled to import from the Dashboard can be selected. If there is only
one import definition that can be selected this option will not be shown on the form
2. Using this upload field Users can upload their data file.
3. When the import definition allows the import of media, a separate upload field for a media
file will be shown. The user can zip their folder with media that needs to be imported and
use this upload field to import their media
When the datasource is uploaded CMSImport will first inspect if the datasource is still correct. Then it
will import data.
See settings chapter how to configure the Import dashboard
© 2015 Soeteman Software
page 30 / 47
CMSImport PRO User manual
Version 3.0
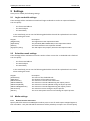
9 Settings
Here you can modify the following settings
9.1
Login credential settings
These settings will be used when an email with login credentials is send to an imported member.
You can specify:
-
The from email address
The email subject
The email body
In the email body you can use the following placeholders that will be replaced with real values
when sending the email:
Snippet
[#loginname]
[#password]
[#email]
[#{property alias}]
9.2
Description
The loginname of the imported member
The password (NOT ENCRYPTED) of the imported member
The Email address of the imported member
This will replace the property alias with the imported value
Scheduler result settings
These settings will be used when an email is send to inform a user that a scheduled task is finished.
You can specify:
-
The from email address
The email subject
The email body
In the email body you can use the following placeholders that will be replaced with real values
when sending the email:
Snippet
[#Taskname]
[#Duration]
[#RecordCount]
[#RecordsAdded]
[#RecordsUpdated]
[#RecorsdSkippedCount]
[#ErrorCount]
[#Errors]
9.3
9.3.1
Description
The name of the scheduled task
The duration of the import process
The amount of records in the datasource
The amount of records added during the import process
The amount of records updated during the import process
The amount of records skipped during the import process
The amount of errors during the import process
The error descriptions that occurred during the import process
Media settings
Domain and file extensions
Specify which file extensions CMSImport needs to parse in case of media import mapped against a
Rich Text editor. Only the selected file extensions will be picked up to import. You can also specify
© 2015 Soeteman Software
page 31 / 47
CMSImport PRO User manual
Version 3.0
some domains url’s that needs to be picked up. Url’s starting with that domain will also be picked
up. You still need to make sure files are located in the root of your Umbraco install.
9.3.2
Media path settings
By default all media is expected in the root of your Umbraco installation. If for some reason you want
to store it in a subfolder you can specify this in the Import path. By default CMSImport respects the
folder structure if you want to import all into a single folder just uncheck the Keep folder structure
checkbox.
9.3.3
Media type settings
By default CMSImport is using the standard media types for Images, files and folders. You can change
it here.
© 2015 Soeteman Software
page 32 / 47
CMSImport PRO User manual
9.4
Version 3.0
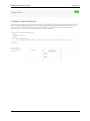
Configure Import Dashboard
In this section you can configure the Import Dashboard. You can specify which import definitions you
want to allow to be used on the Dashboard. Only datasource that supports uploading a datasource
file(such as Excel, Xml, Csv etc) are supported.
Since it’s a dashboard and you can put this dashboard anywhere you like, only a sample xml snippet
will be shown that you can copy and paste into the Dashboard.config file.
To only allow selected usergroups access to the Dashboard use the Access element
More information how to use the Dashboard.config file can be found at
http://our.umbraco.org/wiki/reference/files-and-folders/dashboardconfig
© 2015 Soeteman Software
page 33 / 47
CMSImport PRO User manual
Version 3.0
© 2015 Soeteman Software
page 34 / 47
CMSImport PRO User manual
Version 3.0
10 Extend CMSImport
Although you don’t need to, there are several ways to extend CMSImport. This chapter describes
how you can make use of these extension points in your code. All samples can be downloaded from
http://www.soetemansoftware.nl/downloads/CMSImportV3samples.zip . To use the samples you
need to install the AdventureWorks Lite database which can be downloaded from the CodePlex site
http://msftdbprodsamples.codeplex.com/ and use CMSImport PRO(although some samples might
work in the free version)
10.1 Setting up Visual Studio
When you want to create an extension for CMSImport you can create a new Class Library and add a
reference to the Assembly CMSImport.Extensions. When you need to use Umbraco functionality, or
want to use CMSImport events also you can create references to the assemblies Umbraco,
interfaces, cms and businesslogic.
10.2 What’s in CMSImport.extensions
10.2.1 DataProvider
A DataProvider is used as a generic interface to talk to data sources. You can implement your own
DataProvider by using. The following base classes. Checkout the samples for a full implementation of
a DataProvider.
10.2.1.1 DataProvider
Namespace: CMSImport.Extensions.Providers.DataProviders
The dataprovider will be used to get data from the data source. Decorate the Dataprovider with the
Dataprovider attribute and the Serializable attribute. Optional interfaces to implement:
-
-
-
ISupportsDataSourceUpload. When used CMSImport will show the upload option on the
import Dashboard control
IAutoMapping. Used when you know both the structure of your data source and the
document type you need to map to. In the GetMapping method you return the default
mapping
ILinkResolver. Used to transform links in a specific format. CMSImport uses this to transform
id links from a different Umbraco installation to the id links for the system we import data
into.
IMediaResolver. Used to transform media in a specific format. CMSImport uses this to
transform id media links from a different Umbraco installation to filenames so we can
import it like normal media items.
10.2.1.2 DataProviderForm
Namespace: CMSImport.Extensions.Providers.DataProviders
The DataproviderForm allows you to build the UI for the dataprovider.
10.2.2 FieldProvider
namespace CMSImport.Extensions.Providers.FieldProviders
© 2015 Soeteman Software
page 35 / 47
CMSImport PRO User manual
Version 3.0
A FieldProvider could be used to convert original data in a datasource to a datatype specific format
during import. CMSImport uses this already to make sure values like “true/false” will be converted
to a Boolean value which could be mapped against a true/false datatype without causing an error
and it uses FieldProviders to import media.
A FieldProvider is basically an implementation of the IFieldProvider interface that contains a parse
method , decorated with a FieldProvider attribute which contains the DataProviderId property and
the Parse method. The DataProviderID must match with the DataProviderControl . This will ensure
that the parse method gets called when data is imported for the property.
using CMSImport.Extensions.FieldProvider;
using umbraco.cms.businesslogic.property;
namespace CMSImportLibrary.Providers.FieldProviders.DefaultFieldAdapters
{
/// <summary>
/// Field provider to make sure the boolean values gets imported correctly
/// </summary>
[FieldProvider(PropertyEditorAlias = "38b352c1-e9f8-4fd8-93249a2eab06d97a", Priority = FieldProviderPrio.Medium)]
[FieldProvider(PropertyEditorAlias = "Umbraco.TrueFalse", Priority = FieldProviderPrio.Med
ium)]
public class BooleanFieldProvider : IFieldProvider
{
/// <summary>
/// Parse the data to the correct format
/// </summary>
/// <param name="value">The value to parse</param>
/// <param name="property">The property</param>
/// <param name="fieldProviderOptions">The options</param>
/// <returns></returns>
public object Parse(object value, Property property, FieldProviderOptions fieldProvide
rOptions)
{
if (!(value.Equals("0") || value.Equals("1")))
{
bool boolValue = false;
if (bool.TryParse(value.ToString(), out boolValue))
{
return boolValue ? 1 : 0;
}
}
return value;
}
}
}
This Parse method accepts the following parameters:
-
Value.
The original value which we can manipulate
Property.
Gives us information about the document type
FieldProviderOptions Options you can use for importing data.
o UserId, the current user
o PropertyId the id of the property to import
o MediaResolver. The optional mediaresolver of a data provider to get media in a
specific format
10.2.3 Events
namespace CMSImport.Extensions.Providers.ImportProviders
© 2015 Soeteman Software
page 36 / 47
CMSImport PRO User manual
Version 3.0
Use the following events for both content and member import. You can hook up events in the same
way you hook up events for other Umbraco functionality by deriving from IApplicationEventHandler
and hook up the event in the OnApplicationInitialized method.
10.2.3.1 RecordImporting
The recordImporting event gets hit before a record got imported, the sender object contains the
document or member being imported. RecordImportingEventArgs contains the following
information:
ImportState (the complete state object)
Primary key value
Items (collection of items that contains the original data)
You can cancel the import for this record by setting the cancel property to true.
10.2.3.2 RecordImported
The RecordImported event gets hit after a record got imported, the sender object contains the
imported document or member. RecordImportedEventArgs contains the following information:
ImportState (the complete state object)
Items (collection of items that contains the original data)
10.2.3.3 Importing
The Importing event gets hit before the import starts, ImportEventArgs contains the complete state
object.
10.2.3.4 Imported
The Imported event gets hit after the import has finished, ImportEventArgs contains the complete
state object.
10.2.3.5 BulkImporting
The BulkImporting event gets hit when a bulk content import is started. ImportEventArgs the
complete state object.
10.2.3.6 BulkImported
The BulkImported event gets hit when a bulk content import has ended. ImportEventArgs the
complete state object.
10.3 Samples
When you’ve downloaded and installed the samples you can use two extra document types in your
Umbraco installation, ProductCategory and Product.
Before you start make sure the Dropdown list datatype is available.
© 2015 Soeteman Software
page 37 / 47
CMSImport PRO User manual
Version 3.0
10.4 Create a DataProvider for Product Categories
A DataProvider could be used to communicate with a DataSource. Basically it lets you set some
properties and returns data to CMSImport which can then be imported. In the Sample project we are
using two DataProviders
1. AdventureWorksCategories, responsible for importing all product category data
2. AdventureWorksProducts, responsible for importing all product data.
10.4.1 Create the class
To create a custom DataProvider you need to create a class that derives from
CMSImport.Extensions.Providers.DataProviders. DataProvider
[DataProvider(Alias = "AdventureWorks ProductCategories",
ExcludeForImportProviders = "Member,Dictionary")]
[Serializable]
public class AdventureWorksProductCategoriesProvider : DataProvider
{
}
10.4.2 Add the Dataprovider attribute
10.4.2.1 Specify an alias
The alias will be shown in the pulldownlist where the user can pick a DataProvider. This alias must be
unique.
10.4.2.2 Exclude Import providers
In ExcludeForImportProviders you can exclude the dataprovider for certain import types. Since it
makes no sense to have an productcategory import for members or dictionary items we exclude
them here. Possible options
-
Content
© 2015 Soeteman Software
page 38 / 47
CMSImport PRO User manual
-
Version 3.0
Member
Dictionary
10.4.3 Add UI
The ImportAdapter class itself only handles the import, for adding the UI we create a separate class
deriving from DataProviderForm. By adding the DataproviderForm attribute and specifying the same
alias as the dataprovider we define the relation.
[DataProviderForm(DataProviderAlias = "AdventureWorks ProductCategories")]
public class AdventureWorksProductCategoriesProviderForm : DataProviderForm
{
10.4.3.1 Adding UI elements
The DataproviderForm is a webcontrol so we can add UI.
private Panel _contentPanel = new Panel();
private TextBox _datasourceTextBox = new TextBox();
private Literal _selectDataSourceLiteral = new Literal();
protected override void OnInit(EventArgs e)
{
base.OnInit(e);
_contentPanel.ID = "CategorycontentPanel";
_contentPanel.CssClass = "propertypane";
//Labels
_selectDataSourceLiteral.ID = "SelectDataSourceLiteral";
_selectDataSourceLiteral.Text = "Enter the connection string";
//TextBox
_datasourceTextBox.ID = "datasource";
_datasourceTextBox.CssClass = "umbEditorTextField";
_datasourceTextBox.Text = DataSource;
//Create Layout
_contentPanel.Controls.Add(_selectDataSourceLiteral);
_contentPanel.Controls.Add(new LiteralControl(" "));
_contentPanel.Controls.Add(_datasourceTextBox);
Controls.Add(_contentPanel);
}
10.4.3.2 Initialize data
By overriding the initialize method we can set the control values
public override void Initialize(DataProvider dataProvider)
{
_datasourceTextBox.Text = dataProvider.DataSource;
}
© 2015 Soeteman Software
page 39 / 47
CMSImport PRO User manual
Version 3.0
10.4.3.3 GetProviderOptions
GetProviderOptions returns the Dataprovider object that gets persisted in state or that we use in our
validate method.
public override DataProvider GetProviderOptions()
{
return new AdventureWorksProductCategoriesProvider
{
DataSource = _datasourceTextBox.Text,
};
}
10.4.3.4 Validate
Validate checks if all the UI values are correct and sets an errormessage when it isn’t
public override bool Validate()
{
var result = true;
try
{
var provider = GetProviderOptions();
using (var reader = provider.GetData())
{
//Read
reader.Read();
}
}
catch (Exception ex)
{
//Cannot validate against the Datasource;
result = false;
ValidationErrorMessage = string.Format("Error validating the Data source: {0}"
, ex.Message);
}
return result;
}
10.4.4 Update DataProvider values
When the user clicks next you need to update the DataProvider properties, in this case DataSource
and DataCommand.
public override void UpdateAdapter()
{
//Uses the SqlConnection from the TextBox as the Datasource
DataSource = _datasourceTextBox.Text;
//We are creating a custom DataProvider for a productCategories, don't bother
//the user with sql
DataCommand = "Select * from SalesLT.ProductCategory order by
ParentProductCategoryID, Name";
}
10.4.5 GetData
The GetData method gets called by CMSImport during the import process and it will return the data
from DataSource as an IDataReader. In the example below you’ll see the GetData Method that we
are using in the AdventureWorks ProductCategory DataProvider
public override IDataReader GetData()
{
var sqlConnection = new SqlConnection(DataSource);
sqlConnection.Open();
© 2015 Soeteman Software
page 40 / 47
CMSImport PRO User manual
Version 3.0
var sqlCommand = new SqlCommand("Select * from SalesLT.ProductCategory order by Pa
rentProductCategoryID, Name", sqlConnection);
return sqlCommand.ExecuteReader();
}
CMSImport will dispose the Reader once it’s finished with the import.
If you need to convert XML to IDataReader you can use the helper method XmlToDataReader which
takes an xml file/url and xpath Expression. Currently this only works on elements attributes will be
ignored.
10.4.6 GetConfirmOptions
This method returns a list of provider options that gets displayed on the confirm screen.
/// <summary>
/// returns a list of datasource options to display in the confirmation screen.
/// </summary>
/// <returns></returns>
public override List<ProviderConfirmOption> GetConfirmOptions()
{
return new List<ProviderConfirmOption>
{
new ProviderConfirmOption("Data source",DataSource)
};
}
10.4.7 End result
When we will build the dll and drop it into the bin folder of the Umbraco install we will see the
“AdventureWorks ProductCategory” in the pulldown list of possible datasources and when we select
the AdventureWorks ProductCategory DataProvider we will see the following screen:
We can provide a Connection string and click next to continue the import process the normal way.
10.5 Create a DataProvider for Products.
Since we will be importing both Categories and Products we want to have a Custom DataProvider for
products also. Do this by copying the ProductCategories DataProvider and name it
AdventureWorksProducts, rename the alias to “AdventureWorks Products” and replace the query in
the UpdateAdapter method to “SELECT * FROM SalesLT.Product order by Name”
© 2015 Soeteman Software
page 41 / 47
CMSImport PRO User manual
Version 3.0
10.6 Using a Fieldprovider to map text values against a Dropdownlist DataType
As you might have seen our Product DocumentType contains a property ProductColor which is based
on the ProductColor Dropdownlist. We want to store the values in lowercase. When we map the
color column form the AdventureWorks Products table directly against the ProductColor document
property the import will fail because it just takes the normal values.
This can be solved using a Field provider
Below you find the FieldProvider. We tell the import module to use our FieldProvider using the
FieldProvider attribute and by setting the PropertyEditorAlias to the DataTypeId (Guid or alias in
Umbraco V7) of the Dropdown Datatype. The parse method first checks if the datatype is the
ProductColor datatype and when it is the ProductColor datatype it will get (or create) the integer id
of the prevalue. And we set the priority to high so we know our FieldProvider will be hit before any
other Field providers for this Data type
[FieldProvider(Priority = FieldProviderPrio.High, PropertyEditorAlias = "Umbraco.DropDown")]
public class ColorToLowerFieldProvider : IFieldProvider
{
public object Parse(object value, PropertyInfo property, FieldProviderOptions fieldPro
viderOptions)
{
if (property.PropertyAlias == "productColor")
{
value = value.AsString().ToLower();
}
return value;
}
}
Once the import has finished using this FieldProvider you’ll see that all options are added to the
ProductColor datatype.
© 2015 Soeteman Software
page 42 / 47
CMSImport PRO User manual
Version 3.0
And you’ll see that these Prevalues are mapped correctly against the document
© 2015 Soeteman Software
page 43 / 47
CMSImport PRO User manual
Version 3.0
11 Manual Installation/Configuration
If you renamed the Umbraco folder or for some reason can’t give the installer sufficient rights to
create tables in the database , or the sufficient rights to modify the following folders /bin, /config,
/umbraco you need to install CMSImport PRO Manually.
11.1 Manual installation of files
-
-
-
Open de folder in the zip file.
Copy all *.dll files to the /bin folder of your Umbraco installation.
Copy your license file (when you have one)to the /bin folder of your Umbraco installation.
Open the /umbraco/plugins/ folder.
Create the folder CMSImport.
Create the following folders in the /umbraco/plugins/CMSImport folder.
o Config
o Handlers
o Pages
o Usercontrols
In the /umbraco/plugins/CMSImport /Usercontrols folder create the folder ImportSteps
In the /umbraco/plugins/CMSImport /Usercontrols/ImportSteps folder create the folder
ContentImport
In the /umbraco/plugins/CMSImport /Usercontrols/ImportSteps folder create the folder
MemberImport
Copy all .config files from the zip file to the folder /umbraco/plugins/CMSImport/Config/
Copy all .aspx files from the zip file to the folder /umbraco/plugins/CMSImport/Pages/
Copy the files CMSImport.ascx, StateError.ascx and CMSImportInstaller.ascx from the zip
file to the folder /umbraco/plugins/CMSImport/Usercontrols/
Copy the files ConfirmSelectedOptions.ascx, Importing.ascx, Intro.ascx,
MapProperties.ascx, SelectDataSource.ascx, SelectDataSourceType.ascx and
SelectImportProviderOptions.ascx from the zip file to the folder
/umbraco/plugins/CMSImport/Usercontrols/ImportSteps/
Copy all the png and svg files from the zip file to the folder /umbraco/Images/
11.2 Manual configuration of Database
Run the following script to install the database tables
CREATE TABLE [dbo].[CMSImportState](
[Id] [int] IDENTITY(1,1) NOT NULL,
[UniqueIdentifier] [uniqueidentifier] NOT NULL,
[Name] [nvarchar](250) NOT NULL,
[ImportState] [nvarchar](max) NOT NULL,
[Parent] [uniqueidentifier] NULL,
[ImportProvider] [nvarchar](250) NULL,
CONSTRAINT [PK_CMSImportState] PRIMARY KEY CLUSTERED
(
[Id] ASC
)WITH (PAD_INDEX = OFF, STATISTICS_NORECOMPUTE = OFF, IGNORE_DUP_KEY = OFF, ALLOW_ROW_LOCKS
= ON, ALLOW_PAGE_LOCKS = ON) ON [PRIMARY]
) ON [PRIMARY] TEXTIMAGE_ON [PRIMARY]
GO
/****** Object: Table [dbo].[CMSImportScheduledTask]
Script Date: 01/15/2015 13:10:38
******/
SET ANSI_NULLS ON
GO
SET QUOTED_IDENTIFIER ON
GO
CREATE TABLE [dbo].[CMSImportScheduledTask](
[ScheduleId] [int] IDENTITY(1,1) NOT NULL,
[ScheduleGUID] [uniqueidentifier] NOT NULL,
© 2015 Soeteman Software
page 44 / 47
CMSImport PRO User manual
Version 3.0
[ImportStateGUID] [uniqueidentifier] NOT NULL,
[ScheduledTaskName] [nvarchar](50) NOT NULL,
[NotifyEmailAddress] [nvarchar](250) NOT NULL,
[ExecuteEvery] [nvarchar](50) NOT NULL,
[ExecuteDays] [nvarchar](50) NOT NULL,
[ExecuteHour] [int] NOT NULL,
[ExecuteMinute] [int] NOT NULL,
[ImportAsUser] [int] NULL,
CONSTRAINT [PK_CMSImportScheduledTask] PRIMARY KEY CLUSTERED
(
[ScheduleId] ASC
)WITH (PAD_INDEX = OFF, STATISTICS_NORECOMPUTE = OFF, IGNORE_DUP_KEY = OFF, ALLOW_ROW_LOCKS
= ON, ALLOW_PAGE_LOCKS = ON) ON [PRIMARY]
) ON [PRIMARY]
GO
/****** Object: Table [dbo].[CMSImportScheduledItems]
Script Date: 01/15/2015 13:10:38
******/
SET ANSI_NULLS ON
GO
SET QUOTED_IDENTIFIER ON
GO
CREATE TABLE [dbo].[CMSImportScheduledItems](
[ScheduledItemId] [int] IDENTITY(1,1) NOT NULL,
[ScheduleldTaskId] [int] NOT NULL,
[ScheduledOn] [smalldatetime] NOT NULL,
[ExecutedOn] [smalldatetime] NULL,
[InProgress] [bit] NULL,
CONSTRAINT [PK_CMSImportScheduledItems] PRIMARY KEY CLUSTERED
(
[ScheduledItemId] ASC
)WITH (PAD_INDEX = OFF, STATISTICS_NORECOMPUTE = OFF, IGNORE_DUP_KEY = OFF, ALLOW_ROW_LOCKS
= ON, ALLOW_PAGE_LOCKS = ON) ON [PRIMARY]
) ON [PRIMARY]
GO
/****** Object: Table [dbo].[CMSImportRelation]
Script Date: 01/15/2015 13:10:38 ******/
SET ANSI_NULLS ON
GO
SET QUOTED_IDENTIFIER ON
GO
CREATE TABLE [dbo].[CMSImportRelation](
[Id] [int] IDENTITY(1,1) NOT NULL,
[UmbracoID] [int] NOT NULL,
[DataSourceKey] [nvarchar](250) NOT NULL,
[ImportProvider] [nvarchar](250) NULL,
[Updated] [smalldatetime] NULL,
CONSTRAINT [PK_CMSImportRelation] PRIMARY KEY CLUSTERED
(
[Id] ASC
)WITH (PAD_INDEX = OFF, STATISTICS_NORECOMPUTE = OFF, IGNORE_DUP_KEY = OFF, ALLOW_ROW_LOCKS
= ON, ALLOW_PAGE_LOCKS = ON) ON [PRIMARY]
) ON [PRIMARY]
GO
/****** Object: Table [dbo].[CMSImportMediaRelation]
Script Date: 01/15/2015 13:10:38
******/
SET ANSI_NULLS ON
GO
SET QUOTED_IDENTIFIER ON
GO
CREATE TABLE [dbo].[CMSImportMediaRelation](
[Id] [int] IDENTITY(1,1) NOT NULL,
[UmbracoMediaId] [int] NOT NULL,
[SourceUrl] [nvarchar](500) NOT NULL,
[ByteSize] [int] NULL,
CONSTRAINT [PK_CMSImportMediaRelation] PRIMARY KEY CLUSTERED
(
[Id] ASC
)WITH (PAD_INDEX = OFF, STATISTICS_NORECOMPUTE = OFF, IGNORE_DUP_KEY = OFF, ALLOW_ROW_LOCKS
= ON, ALLOW_PAGE_LOCKS = ON) ON [PRIMARY]
) ON [PRIMARY]
GO
© 2015 Soeteman Software
page 45 / 47
CMSImport PRO User manual
Version 3.0
11.3 Manual configuration of the language files
When the install failed due insufficient rights of the installer. It’s better to assign sufficient rights to
the /umbraco/config/lang/ folder (and all the xml files in that folder). Then start CMSImport PRO
again. CMSImport Pro will determine that the language file is not updated and will automatically
update the language files again.
If for some reason this isn’t the case you can modify the files manually. To do this open the
necessary language files. For example if you use the English language in Umbraco open en.xml, if
you use the Dutch language in Umbraco open nl.xml etc.
Replace
<area alias="actions">
With
<area alias="actions">
<key
<key
<key
<key
<key
<key
alias="DeleteCMSImportAction">Delete</key>
alias="ExecuteCMSImportWizardAction">Execute</key>
alias="ScheduleCMSImportWizardAction">Schedule</key>
alias="StartCMSImportWizardAction">Import Data</key>
alias="StartCMSImportChildDefinitionAction">Create child definition</key>
alias="LastRunInfoAction">Scheduled task log</key>
11.4 Manual configuration of the scheduled task handler
Open the web.config file.
Add the following to the system.webserver/modules section
<add name="CMSImportSchedulerModule" type="CMSImport.HTTPModules.CMSImportSchedulerModule,
CMSImport" />
11.5 Manual configuration of the node actions
Open the /umbraco/config/create/ui.config file. And add the following snippet to that file
<nodeType alias="cmsimport-savedItem">
<header>CMSImport</header>
<tasks>
<delete assembly="CMSImportLibrary" type="Umbraco.Tasks.DeleteTask" />
</tasks>
</nodeType>
© 2015 Soeteman Software
page 46 / 47
CMSImport PRO User manual
Version 3.0
12 Troubleshooting
12.1 I don’t see the CMSImport package in my developer section
Make sure you have sufficient rights to install the package. See chapter 2, otherwise perform a
manual installation see chapter9.
12.2 I don’t see my column names when importing from a CSV file.
Make sure that your csv file contains column names
12.3 I get weird column names when importing from a CSV file.
Make sure that you set the correct csv options to display the CSV file. For example, choose ; as the
delimiter and “ as a string indicator. Also make sure csv files are saved as UTF-8
12.4 I get an error not supported error when using access files
Make sure you’ve installed the Microsoft Data Connectivity Components installed. You can
download them via
http://www.microsoft.com/downloads/en/confirmation.aspx?familyId=7554f536-8c28-4598-9b72ef94e038c891&displayLang=en%22
Make sure to enable 32 bits applications on the application pool running the website .
12.5 Email is not send when importing a member
Make sure you have configured your smtp server in your web.config file. Also check the UmbracoLog
table for SMTP errors.
12.6 I get an Invalid License exception.
Make sure your license file exists in the bin folder and you’ve bought the correct license. Contact
[email protected] for help.
12.7 I get the scheduler module is not running error when scheduling an item
This means the HTTP Module for scheduled tasks is not running. Check manual configuration how to
add this.
© 2015 Soeteman Software
page 47 / 47