1
User manual
- Edition 1 (Last updated: 03/12/2015)
mail2cms user manual
© 2015 myHeimarbeit.de
Prolog
mail2cms is the email import solution for umbraco 7.1+. With this package you can import emails
into cms umbraco. This emails can be saved as content nodes and the attachments as media nodes.
You can import automatically all new emails in a mailbox with a scheduler or you can select single
emails per right click context menu and save this mails under the chosen content or media node.
mail2cms is easy to configure, supports a dynamic mapping and most of the default umbraco
datatypes. mail2cms use the best MIME parser on the market. It support IMAP, POP3, SSL and is fully
compatible with Office 365, Gmail and others.
This package will create entirely new possibilities in umbraco!
For example in addition to the basic functionality, mail2cms can be used to realize the following
things:
-
gives marketing agencies and other external service providers the opportunity to integrate
images and text directly in Umbraco per mail.
send an e-mail to Umbraco to create and publish a new post in your blog.
implement a mail reply interface.
and much more…
mail2cms user manual
© 2015 myHeimarbeit.de
Contents
1. System requirements .......................................................................................................................... 1
2. Install ................................................................................................................................................... 2
3. Quick start ........................................................................................................................................... 4
4. Create a mailbox.................................................................................................................................. 6
5. Settings ................................................................................................................................................ 8
5.1 IMAP settings................................................................................................................................. 8
5.1.1 Import settings ....................................................................................................................... 8
5.1.2 Actions after import ............................................................................................................... 8
5.1.3 Backup .................................................................................................................................... 8
5.2 POP3-Settings
5.2.1 Actions after import ................................................................................................................ 9
5.2.2 Backup .................................................................................................................................. 10
5.3 Save settings ................................................................................................................................ 10
6. Mapping............................................................................................................................................. 11
6.1 Static mapping ............................................................................................................................. 11
6.1.1 General – General................................................................................................................. 11
6.1.2 General - Content ................................................................................................................. 11
6.1.3 General - Media .................................................................................................................... 12
6.1.4 Node names.......................................................................................................................... 12
6.1.5 Document types & properties .............................................................................................. 13
6.1.6 Media types & properties..................................................................................................... 14
6.1.7 Advanced - User ................................................................................................................... 16
6.2 Dynamic mapping ........................................................................................................................ 16
6.2.1 General - General ................................................................................................................. 16
6.2.2 General - Dynamic ................................................................................................................ 16
6.2.3 General - Content ................................................................................................................. 17
6.2.4 General - Media .................................................................................................................... 17
6.2.5 Node names.......................................................................................................................... 19
6.2.6 Document types & properties .............................................................................................. 19
6.2.7 Media types & properties..................................................................................................... 19
mail2cms user manual
© 2015 myHeimarbeit.de
6.2.8 Advanced - User ................................................................................................................... 19
7. Blacklist & Whitelist........................................................................................................................... 21
8. Scheduler ........................................................................................................................................... 22
8.1 Interval ........................................................................................................................................ 22
8.2 Week days ................................................................................................................................... 22
8.3 Month days.................................................................................................................................. 23
9. Reports .............................................................................................................................................. 24
10. Notifications & Log .......................................................................................................................... 25
10.1 Notifications & log settings ....................................................................................................... 25
10.2 Email settings ............................................................................................................................ 26
11. Content Editor (Content section): Right-click import ...................................................................... 27
12. Content-Editor (Media section): Right-click import ........................................................................ 28
13. Troubleshooting .............................................................................................................................. 29
13.1 Imported emails are not automatically replied to or forwarded .............................................. 29
13.2 Notifications mail from logging is not send............................................................................... 29
13.3 Scheduler doesn’t run or stopped certain times ....................................................................... 29
13.4 mail2cms can’t connect to gmail mailbox ................................................................................. 29
13.5 The description under the labels in mail2cms is not shown correctly ...................................... 29
13.6 mail2cms section is not shown.................................................................................................. 30
14. EULA ................................................................................................................................................ 31
15. List of figures ................................................................................................................................... 32
mail2cms user manual
© 2015 myHeimarbeit.de
1. System requirements
mail2cms version 1.0.0 was tested with the following umbraco versions using Microsoft SQL Server:
- 7.1.6
- 7.1.7
- 7.1.8
- 7.1.9
- 7.2.0
- 7.2.1
- 7.2.2
mail2cms has not been tested with mySQL now!
YOU USE THE PROGRAM AT YOUR OWN RISK.
mail2cms user manual
Page 1 of 32
© 2015 myHeimarbeit.de
2. Install
1. Go to developer section in umbraco
2. Open „Packages“ tree und click on „Install local package“
3. Choose the file „mail2cms_1.0-beta.zip“ (You can download this file here: #todo)
4. Click on „Load Package“
Figure 1: Load package
5. Select checkbox for accept license
6. Click on „Install package“ and wait.
Figure 2: Install package
7. Now you should see the new mail2cms section in the left bar. If not, go to user section, activate
mail2cms section for your user, save and press F5.
mail2cms user manual
Page 2 of 32
© 2015 myHeimarbeit.de
Figure 3: Clean mail2cms section after install
mail2cms user manual
Page 3 of 32
© 2015 myHeimarbeit.de
3. Quick start
The following are minimum configuration is described to be able to use mail2cms.
1. Go to mail2cms section
2. Open the context menu of MAILBOXES and choose Create
Figure 4: Create mailbox context menu
3. Enter the credentials for your e-mail account and the data of the e-mail server (see chapter
4.2) and click on Save
Figure 5: Enter mailbox credentials
4. Reload MAILBOXES and open Mapping node under your new created mailbox.
5. Go to Section dropdown field and select Content & Media
Figure 6: Mapping –Static –Select Content & Media
mail2cms user manual
Page 4 of 32
© 2015 myHeimarbeit.de
6. Go to Document types & properties tab and choose document type mail2cms_email
7. Assign all properties as shown in the following illustration:
Figure 7: Mapping –Static –Document types & properties
8. Go to Media types & properties tab and choose med type mail2cms_email
9. Assign the media types and properties as shown in the following illustration:
Figure 8: Mapping –Static –Media types & properties
10. Click on Save
Now, mail2cms is configured for the first mailbox and can be used with right-click context menu in
content and media section (see chapter 11 & 12).
mail2cms user manual
Page 5 of 32
© 2015 myHeimarbeit.de
4. Create a mailbox
In mail2cms you can create an unlimited number of mailboxes. You can also create two or more
mailboxes in mail2cms for the same email address, but with different configurations.
1. Open the context menu of „MAILBOXES“ and choose „Create“
Figure 9: Create mailbox context menu
2. Now you can enter the credentials for your e-mail account and the data of the e-mail server:
a. Mailbox name:
Custom name of your mailbox
b. eMail:
Your email dress
c. Password:
Password for your email adress
d. Protocol:
IMAP or POP3
Hint: We recommend to use IMAP, because mail2cms with
IMAP provides more options.
e. Inbox server:
Address of your inbox server (i.e. „imap.gmail.com“)
f. Encrypted connection type:
None or SSL
g. Port:
Port number of inbox server (i.e. 993)
Figure 10: Enter mailbox credentials
mail2cms user manual
Page 6 of 32
© 2015 myHeimarbeit.de
3. Click on „Save“ and wait… mail2cms now tries to connect to the mail server with the entered
credentials.
Figure 11: Auto connection check on save
4. The mailbox is saved when the check was successful. If everything is going wrong you see another
notification and the mailbox aren’t saved.
Hint: If you are sure that you have enter the correct credentials but the connection check failed, please read
the chapter „Troubleshooting“.
5. You must reload the mail2cms tree to see the new mailbox. Open the context menu on
„MAILBOXES“ and choose „Reload nodes“. Now, the new one should be shown.
Figure 12: Newly created mailbox with subnodes
With the Button Receive mails… you can receive & import the emails from your mailbox. This works
only if the mailbox, settings and mapping is configured correctly. Information about the minimum
configuration, you can read in chapter Quick start.
mail2cms user manual
Page 7 of 32
© 2015 myHeimarbeit.de
5. Settings
The available functions depend on the selected protocol (IMAP or POP3) in the mailbox.
5.1 IMAP settings
5.1.1 Import settings
a. Inbox:
Name of mailbox folder
Hint: if empty, mail2cms automatically select the default
inbox folder
b. Status to import emails:
5.1.2 Actions after import
a. New status of mail after import:
- Unseen & Seen (all): all mails in mailbox be imported
- Unseen: only mails with status “unseen” be imported
- Seen: only mails with status “seen” be imported
You can specify whether the status of an e-mail to be
changed automatically after import:
- Unseen: update status of mail to “unseen” after import
- Seen: update status of mail to “seen” after import
- Unchanged: don’t change status of mail after import
b. Action after import:
mail2cms can perform certain actions after importing
the imported mails:
- Move: imported mails are moved to another folder in
your mailbox. In the input field “Move email into
folder” you must enter the name of folder.
- Delete: imported mails are deleted in mailbox.
- Forward: imported mails are forwardet to another
emailadsress. This emailaddress you can enter in the
field “Forward email to”. You can also insert a text for
the forwarding mail in input field “Text of forwarding
email”.
- Reply: you can enter a text for the reply mail in input
field “Text of reply email”. With this action every
sender from an imported mail receives automatically
an reply email on import.
- Forward & reply: Combination of action “Forward” and
“Reply”.
Hint: mail2cms use the smtp settings in web.config for
sending emails.
5.1.3 Backup
a. Backup emails:
mail2cms user manual
Imported emails are saved as .eml file in the following
folder:
\media\mail2cms\backup
Page 8 of 32
© 2015 myHeimarbeit.de
Figure 13: IMAP settings
5.2 POP3-Settings
5.2.1 Actions after import
a. Action after import:
mail2cms can perform certain actions after importing
the imported mails:
- Delete: imported mails are deleted in mailbox.
- Forward: imported mails are forwardet to another
emailadsress. This emailaddress you can enter in the
field “Forward email to”. You can also insert a text for
the forwarding mail in input field “Text of forwarding
email”.
- Reply: you can enter a text for the reply mail in input
field “Text of reply email”. With this action every
sender from an imported mail receives automatically
an reply email on import.
- Forward & reply: Combination of action “Forward” and
“Reply”.
Hint: mail2cms use the smtp settings in web.config for
sending emails.
mail2cms user manual
Page 9 of 32
© 2015 myHeimarbeit.de
5.2.2 Backup
a. Backup emails:
Imported emails are saved as .eml file in the following
folder:
\media\mail2cms\backup
Figure 14: POP3 settings
5.3 Save settings
If you will click on "Save" consider whether the Inbox is reached and saved the settings.
mail2cms user manual
Page 10 of 32
© 2015 myHeimarbeit.de
6. Mapping
You can configure here among other things, the association of e-mail data to content and media and
document and media types.
6.1 Static mapping
This is the simplest way to import emails in umbraco. “Static” means, that emails are saved under a
static defined content node and the attachments, if you activate this option, are saved under a static
defined media node.
6.1.1 General – General
a. Type:
Static or Dynamic: choose “Static” to use static mapping
b. Section:
Section to save the imported emails:
- Content: only meta data and text of email will be
saved. Attachments or embedded images will not be
saved.
- Content & Media: meta data, text of email and
attachments (and embedded images) will be
saved.
- Media: only attachments and embedded images will be
saved.
6.1.2 General - Content
This is hidden if you have choose Media in Section (see 6.1.1 b)).
a. Parent destination node:
Content Picker to choose the parent node in content
section to save emails.
b. Use auto date folders:
If true it will automatically create year, month, and day
folders under the parent node to store the emails.
c. Auto publish
If true the new content nodes for every email will be
published after import.
Figure 15: Mapping – Static – Content
mail2cms user manual
Page 11 of 32
© 2015 myHeimarbeit.de
6.1.3 General - Media
This is hidden if you have chosen Content in Section (see 6.1.1 b)).
a. Parent destination node:
Media Picker to choose the parent node in media
section to save attachments and embedded images of
emails.
b. Use auto date folders:
If true it will automatically create year, month, and day
folders under the parent node to store the attachments
and embedded images of emails.
c. Use unique related contentId folders: If true it will automatically create an unique folder for
every imported email in media section.
Figure 16: Mapping – Static – Media
6.1.4 Node names
You can define how the node name to be composed.
a. eMail:
Node name for content nodes. This field is hidden if you
have chosen Media in Section (see 6.1.1 b)). The
following terms are available:
- Current number: sequential number underneath the
parent node
- Sender: email address of sender (from)
- Receiver: email address of receiver (to)
- Subject: subject of email
- Name of mailbox: name of mailbox (see 4.2.a))
- Email sender date: date and time of sending
- Import date: date and time of importing into umbraco
b. Attachments:
Node name for media nodes. This field is hidden if you
have chosen Content in Section (see 6.1.1 b)). The
following terms are available:
- Filename: Filename of attachment or embedded image
- Related contentId: works only if you have chosen
mail2cms user manual
Page 12 of 32
© 2015 myHeimarbeit.de
Content & Media in Section (see 6.1.1 b)
- Attachment number: sequential number of attachment
in a specific email.
- Sender: email address of sender (from)
- Receiver: email address of receiver (to)
- Subject: subject of email
- Name of mailbox: name of mailbox (see 4.2.a))
- Email sender date: date and time of sending
- Import date: date and time of importing into umbraco
Figure 17: Mapping –Static - Node names
6.1.5 Document types & properties
You can choose which document types to be used to store the emails and in which properties the
data is to be stored. This function is not available if you have chosen Media in Section (see 6.1.1 b)).
a. Document type:
Select any existing document type of your choice.
Hint: mail2cms comes with a default document type
(mail2cms_email). This document type contains properties for
all available data of emails.
b. Properties:
You can assign the most important data of emails to the
properties of the selected document type.
The following data can be assigned:
- subject: subject of email
- text: detect automatically html if available, otherwise
clean text
- sender: email address of sender (from)
- receiver: email address of receiver (to)
- CC: copy field of email
- BCC: blind copy field of email
- attachments: only comma separated list of file names
- datetime: date and time of sending
mail2cms user manual
Page 13 of 32
© 2015 myHeimarbeit.de
Figure 18: Mapping –Static –Document types & properties
6.1.6 Media types & properties
You can choose which media types to be used to store the attachments and embedded images of
emails and in which properties the data is to be stored. This function is not available if you have
chosen Content in Section (see 6.1.1 b)).
The configuration for images and files are the same.
a. Choose Media type/file type:
Select any existing Media type of your choice for images
and for other files.
Hint: If you will use the standard media types of umbraco, then
select for images the media type “Image” and for files the
media type “File”.
b. Mapping upload image/file:
You can assign the image/file to the properties of the
selected document type. This property must be an
upload field or something similar.
Hint: If you will use the standard media types of umbraco, then
select for images and files the property “umbracoFile”
c. Limitations:
mail2cms user manual
- None: all images/files will be imported.
- Whitelist: only images/files with the file extensions in
whitelist will be imported.
- Blacklist: images/files with the file extensions in
blacklist will not be imported.
Page 14 of 32
© 2015 myHeimarbeit.de
d. Whitelist or Blacklist:
It's just the selected list active. You can simple add a file
extension to the active list. You can also remove any file
extension from the list again.
Figure 19: Mapping –Static –Media types & properties – Whitelist/Blacklist
Figure 20: Mapping –Static –Media types & properties
mail2cms user manual
Page 15 of 32
© 2015 myHeimarbeit.de
6.1.7 Advanced - User
You can select which user should be used to create the content and media nodes. Per default the
user is used with id 0.
Figure 21: Mapping –Static –Advanced (User)
6.2 Dynamic mapping
With dynamic mapping you have a powerful tool. You can define own keys to use in subject of emails
to set the parent node dynamically in content and media section of umbraco. You can also set the
node name variable, and set the user to create the nodes in the same way.
For example:
With a corresponding configuration of dynamic mapping this subject of an email causes that the
email is saved underneath the content node with id 4567 and attachments underneath the media
node with id 6789. The create user is user with id 7:
Subject:
Welcome to mail2cms projectId=4567;files=6789;user=7;
6.2.1 General - General
a. Type:
Static or Dynamic: choose “Dynamic” to use dynamic
mapping
b. Section:
Section to save the imported emails:
- Content: only meta data and text of email will be
saved. Attachments or embedded images will not be
saved.
- Content & Media: meta data, text of email and
attachments (and embedded images) will be
saved.
- Media: only attachments and embedded images will be
saved.
6.2.2 General - Dynamic
a. Subject operator:
Allocation sign for key and value. In the example above
this is the char = in the subject line of an email.
b. Subject separator:
Separator after key-value pair. In the example above this
is the char ; in the subject line of an email.
mail2cms user manual
Page 16 of 32
© 2015 myHeimarbeit.de
6.2.3 General - Content
This is hidden if you have choose Media in Section (see 6.2.1 b)).
a. Name of key in subject:
Freely selectable key, which is included in the subject
line of an e-mail. In the example above this is the string
projectId.
b. Key for destination node is related:
You have two options:
- NodeId: This will use the umbraco node id. In the
example above this is the nodeId 4567
- Custom unique property: You can select any existing
property. This property must contain an unique value.
Figure 22: Mapping –Dynamic –General - Custom unique property
c. Use auto date folders:
If true it will automatically create year, month, and day
folders under the parent node to store the emails.
d. Auto publish
If true the new content nodes for every email will be
published after import.
e. Default parent node for parser errors: When using dynamic mapping it is possible that emails
are not parsed correctly, e.g. if a content node id is
specified in the subject line of an email, but which do
not exist in umbraco.
In this case, a node must be selected via a Content
Picker, under which all emails can be stored, which can
not be parsed correctly.
6.2.4 General - Media
This is hidden if you have chosen Content in Section (see 6.2.1 b)).
a. Name of key in subject:
Freely selectable key, which is included in the subject
line of an e-mail. In the example above this is the string
files.
b. Key for destination node is related:
You have two options:
- MediaId: This will use the umbraco node id. In the
example above this is the mediaId 6789
- Custom unique property: You can select any existing
property. This property must contain an unique value.
mail2cms user manual
Page 17 of 32
© 2015 myHeimarbeit.de
c. Use auto date folders:
If true it will automatically create year, month, and day
folders under the parent node to store the attachments
and embedded images of emails.
d. Use unique related contentId folders: If true it will automatically create an unique folder for
every imported email in media section.
e. Default parent node for parser errors: When using dynamic mapping it is possible that emails
are not parsed correctly, e.g. if a media node id is
specified in the subject line of an email, but which do
not exist in umbraco.
In this case, a node must be selected via a Media
Picker, under which all emails can be stored, which can
not be parsed correctly.
Figure 23: Mapping – Dynamic – Content & Media
mail2cms user manual
Page 18 of 32
© 2015 myHeimarbeit.de
6.2.5 Node names
You can define how the node name to be composed. This function is the same as we will be
described in chapter 6.1.4 (Static mapping – Node names).
In addition, there is the following option in dynamic mapping:
eMail & Attachments:
- Subject key: Freely selectable key, which is included in
the subject line of an e-mail. To use this function, click
on “Subject key” and you will see a new input field. In
this field you can enter your new key. Click on “Insert
key” and this is added in the input field above. You can
insert unlimited custom subject keys for node names.
Figure 24: Mapping –Dynamic - Node names
6.2.6 Document types & properties
You can choose which document types to be used to store the emails and in which properties the
data is to be stored. This function is not available if you have chosen Media in Section (see 6.2.1 b)).
This function is the same as we will be described in chapter 6.1.5 (Static mapping – Document types
& properties).
6.2.7 Media types & properties
You can choose which media types to be used to store the attachments and embedded images of
emails and in which properties the data is to be stored. This function is not available if you have
chosen Content in Section (see 6.2.1 b)).
This function is the same as we will be described in chapter 6.1.6 (Static mapping –Media types &
properties).
6.2.8 Advanced - User
You can select which user should be used to create the content and media nodes. Per default the
user is used with id 0.
a. Create by user:
mail2cms user manual
- Static: Select a specific user for all emails.
- Dynamic: Enter your freely selectable key, which is
included in the subject line of an e-mail.
Page 19 of 32
© 2015 myHeimarbeit.de
Figure 25: Mapping –Dynamic –Advanced (User)
mail2cms user manual
Page 20 of 32
© 2015 myHeimarbeit.de
7. Blacklist & Whitelist
You can use a simple blacklist or whitelist to determine whether emails are to be imported from
certain senders or not.
First you need to select a list. Then you can easily add email addresses and they also remove from
the corresponding list.
Only the selected list will include in the import.
Figure 26: Blacklist & Whitelist
mail2cms user manual
Page 21 of 32
© 2015 myHeimarbeit.de
8. Scheduler
The import can be performed automatically at a regular time interval. The scheduler uses the default
scheduler from umbraco. If there is not working, please see chapter “Troubleshooting”.
You can choose between interval, week days and month days. Only the selected type will perform
the automatically import.
8.1 Interval
You can enter a time interval in minutes for receiving emails of this mailbox.
Hint: The interval must be a minimum of 5 minutes.
Figure 27: Scheduler – Constant interval
8.2 Week days
You can create unlimited schedule tasks for specific recurring weekdays and times for receiving
emails of this mailbox.
Every task must have a title, at least one selected day and a specific time. In the task overview list
below you can activate, deactivate and delete the tasks. In this overview you see also the last import
date for each task.
mail2cms user manual
Page 22 of 32
© 2015 myHeimarbeit.de
Figure 28: Scheduler – Week days
8.3 Month days
You can create unlimited schedule tasks for specific recurring month days and times for receiving
emails of this mailbox.
Every task must have a title, a selected month day and a specific time. In the task overview list below
you can activate, deactivate and delete the tasks. In this overview you see also the last import date
for each task.
Figure 29: Scheduler – Month days
mail2cms user manual
Page 23 of 32
© 2015 myHeimarbeit.de
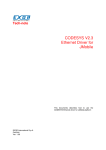
9. Reports
mail2cms comes with a very simple bar chart for visualize the most wanted informations:
- Imported mails
- Imported & failed mails
- Failed imports
- Failed imports (details)
- Scheduled tasks
Hint: This feature is most likely to be replaced in a future release by another chart plugin.
Figure 30: Reports
mail2cms user manual
Page 24 of 32
© 2015 myHeimarbeit.de
10. Notifications & Log
mail2cms have its own notification & log service. You can choose which events are write to an own
log file and which events trigger an email. Per default only parser & general errors are written to the
log file. You can find this log file in \App_Data\Logs\mail2cms.log.txt.
10.1 Notifications & log settings
You can activate log & email triggering for the following mail2cms events:
- General errors
- Parser errors
- eMail blacklisting
- Success: import mailbox
- Success: import mail
- Success: import attachments
- Attachment blacklisting
- Import details (Please use only for debugging, import is very slow)
- Actions after import
- Backup
Hint: Please use this carefull. The number of options you choose has a major influence on the duration of the
imports.
Figure 31: Notifications & log – Notification & log settings
mail2cms user manual
Page 25 of 32
© 2015 myHeimarbeit.de
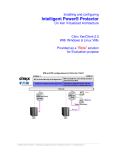
10.2 Email settings
The email notifications only works, if you have enter in this tab the sender and receiver email address
for the notifications.
Figure 32: Notifications & log – eMail settings
Hint: mail2cms use the smtp settings in web.config for sending emails.
mail2cms user manual
Page 26 of 32
© 2015 myHeimarbeit.de
11. Content Editor (Content section): Right-click import
mail2cms comes with an own right-click menu in content section. To use this function, the mailbox
must be configured in mail2cms section and the mapping type must be static.
Per right-click on any node you can choose mail2cms Import directly to save emails under the
selected node.
Figure 33: Right-click Import (Content section) – Context menu
Now you can choose one of your configured mailboxes. In next step the newest 20 mails from this
mailbox are shown. At the end of list you can load the next 20 mails from mailbox.
If you have your mailbox configured for media & content section in mapping, you can choose a
media node to save the attachments.
You can choose the emails for importing and after that you can click on Import. The selected emails
are now imported.
Hint: Any configurations are not supported here, e.g. Blacklist & Whitelist.
Figure 34: Right-click Import (Content section) – Import dialogue
mail2cms user manual
Page 27 of 32
© 2015 myHeimarbeit.de
12. Content-Editor (Media section): Right-click import
mail2cms comes with an own right-click menu in media section. To use this function, the mailbox
must be configured in mail2cms section and the mapping type must be static.
Per right-click on any node you can choose mail2cms Import Files directly to save attachments of
emails under the selected node.
Figure 35: Right-click Import (Media section) – Context menu
Now you can choose one of your configured mailboxes. In next step the newest 20 mails from this
mailbox are shown. Only emails with attachments will be shown! At the end of list you can load the
next 20 mails from mailbox.
You can choose the emails for importing and after that you can click on Import. The attachments of
selected emails are now imported.
Hint: Any configurations are not supported here, e.g. Blacklist & Whitelist.
Figure 36: Right-click Import (Media section) – Import dialogue
mail2cms user manual
Page 28 of 32
© 2015 myHeimarbeit.de
13. Troubleshooting
13.1 Imported emails are not automatically replied to or forwarded
mail2cms use default smtp settings in the web.config file of umbraco. Please check if your smtp
settings are right. Maybe this links can help you:
http://our.umbraco.org/wiki/how-tos/verify-that-your-smtp-settings-are-not-preventing-you-fromsending-e-mail
http://our.umbraco.org/wiki/recommendations/recommended-reading-for-net-developrs/testingsmtp
http://our.umbraco.org/wiki/install-and-setup/how-to-install-umbraco-on-windows-server2008/additional-steps-for-proxy-email-setup
13.2 Notifications mail from logging is not send
(see 13.1 – Imported emails are not automatically replied to or forwarded)
13.3 Scheduler doesn’t run or stopped certain times
mail2cms use default scheduler of umbraco. First, check if there is a line like this in
umbracoSettings.config in <scheduledTasks> section:
<task log="true" alias="mail2cmsScheduler" interval="300" url="http://localhost:60771/umbraco/api/mail2cmsApi/scheduler"/>
Please replace “localhost:60771” with your own domain name.
If the app pool is not running, neither will the scheduler. So for the scheduler to run good you will
need to make sure your site is active. You can use a ping’er for that from another webserver or you
can use the windows task planer.
13.4 mail2cms can’t connect to gmail mailbox
mail2cms doesn’t support 2-step verification. Maybe this will be supported in further versions.
To use mail2cms with gmail you must deactivate the 2-step verification in your gmail account:
https://support.google.com/accounts/answer/1064203?hl=en
13.5 The description under the labels in mail2cms is not shown correctly
There is a bug in umbraco version 7.1. It is fixed in 7.2+. You can fixed it in 7.1 version by yourself.
First, open this file:
/umbraco/js/umbraco.directives.js
and search for the directive “umbControlGroup” and change the code to this:
mail2cms user manual
Page 29 of 32
© 2015 myHeimarbeit.de
angular.module("umbraco.directives.html")
.directive('umbControlGroup', function (localizationService) {
return {
scope: {
label: "@label",
description: "@",
hideLabel: "@",
alias: "@"
},
require: '?^form',
transclude: true,
restrict: 'E',
replace: true,
templateUrl: 'views/directives/html/umb-control-group.html',
link: function (scope, element, attr, formCtrl) {
scope.formValid = function() {
if (formCtrl) {
return formCtrl.$valid;
}
//there is no form.
return true;
};
if (scope.label && scope.label[0] === "@") {
scope.labelstring = localizationService.localize(scope.label.substring(1));
}
else {
scope.labelstring = scope.label;
}
if (scope.description && scope.description[0] === "@") {
scope.descriptionstring = localizationService.localize(scope.description.substring(1));
}
else {
scope.descriptionstring = scope.description;
}
}
};
});
You can also sent the umbraco.directives.js file per email to us ([email protected]) and we will
fix the bug in this files for you.
13.6 mail2cms section is not shown
You can activate this section in the user section for every specific user.
mail2cms user manual
Page 30 of 32
© 2015 myHeimarbeit.de
14. EULA
Licensee acknowledges that this is a nonexclusive license. myHeimarbeit.de is the owner of all titles,
rights, and interests in the software. Licensee may not sell, distribute, or package for sale mail2cms.
Licensee may not decompile, reverse engineer or disassemble mail2cms in whole or in part.
mail2cms includes UI parts of the Umbraco core which is licensed separate under the MIT license.
mail2cms includes mail.dll from limilabs which is licensed separate and is royalty free.
MAIL2CMS IS DISTRIBUTED "AS IS".NO WARRANTY OF ANY KIND IS EXPRESSED OR IMPLIED. YOU
USE THE PROGRAM AT YOUR OWN RISK. MYHEIMARBEIT.DE DOES NOT WARRANT THAT THE
SOFTWARE WILL MEET CUSTOMER'S NEEDS OR BE FREE FROM ERRORS, OR THAT THE OPERATION
OF THE SOFTWARE WILL BE UNINTERRUPTED. MYHEIMARBEIT.DE WILL NOT BE LIABLE FOR DATA
LOSS, DAMAGES, LOSS OF PROFITS OR ANY OTHER KIND OF LOSS WHILE USING OR MISUSING THIS
SOFTWARE.
mail2cms user manual
Page 31 of 32
© 2015 myHeimarbeit.de
15. List of figures
Figure 1: Load package............................................................................................................................ 2
Figure 2: Install package.......................................................................................................................... 2
Figure 3: Clean mail2cms section after install ......................................................................................... 3
Figure 4: Create mailbox context menu .................................................................................................. 4
Figure 5: Enter mailbox credentials ......................................................................................................... 4
Figure 6: Mapping –Static –Select Content & Media .............................................................................. 4
Figure 7: Mapping –Static –Document types & properties ..................................................................... 5
Figure 8: Mapping –Static –Media types & properties............................................................................ 5
Figure 9: Create mailbox context menu .................................................................................................. 6
Figure 10: Enter mailbox credentials ....................................................................................................... 6
Figure 11: Auto connection check on save .............................................................................................. 7
Figure 12: Newly created mailbox with subnodes ................................................................................... 7
Figure 13: IMAP settings ......................................................................................................................... 9
Figure 14: POP3 settings........................................................................................................................ 10
Figure 15: Mapping – Static – Content .................................................................................................. 11
Figure 16: Mapping – Static – Media .................................................................................................... 12
Figure 17: Mapping –Static - Node names ............................................................................................ 13
Figure 18: Mapping –Static –Document types & properties ................................................................. 14
Figure 19: Mapping –Static –Media types & properties – Whitelist/Blacklist ...................................... 15
Figure 20: Mapping –Static –Media types & properties........................................................................ 15
Figure 21: Mapping –Static –Advanced (User) ...................................................................................... 16
Figure 22: Mapping –Dynamic –General - Custom unique property ..................................................... 17
Figure 23: Mapping – Dynamic – Content & Media ............................................................................. 18
Figure 24: Mapping –Dynamic - Node names ....................................................................................... 19
Figure 25: Mapping –Dynamic –Advanced (User) ................................................................................. 20
Figure 26: Blacklist & Whitelist.............................................................................................................. 21
Figure 27: Scheduler – Constant interval ............................................................................................... 22
Figure 28: Scheduler – Week days ......................................................................................................... 23
Figure 29: Scheduler – Month days ....................................................................................................... 23
Figure 30: Reports ................................................................................................................................. 24
Figure 31: Notifications & log – Notification & log settings .................................................................. 25
Figure 32: Notifications & log – eMail settings ..................................................................................... 26
Figure 33: Right-click Import (Content section) – Context menu........................................................... 27
Figure 34: Right-click Import (Content section) – Import dialogue ....................................................... 27
Figure 35: Right-click Import (Media section) – Context menu ............................................................. 28
Figure 36: Right-click Import (Media section) – Import dialogue .......................................................... 28
mail2cms user manual
Page 32 of 32
© 2015 myHeimarbeit.de