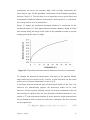
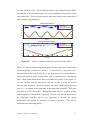
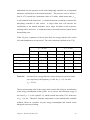
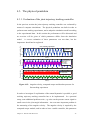
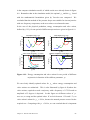
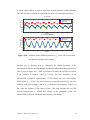
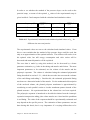
1
Faculteit Ingenieurswetenschappen
Vakgroep Werktuigkunde
Model-based control of a one-dimensional
pendulum actuated with Pleated Pneumatic
Artificial Muscles with adaptable stiffness
Bruno Meira y Duran
Proefschrift ingediend tot het behalen van de academische graad van
Burgerlijk Werktuigkundig-Elektrotechnisch Ingenieur
Academiejaar 2004-2005
Promoter: Prof. dr. ir. Dirk Lefeber
Co-Promotor: Prof. dr. ir. Patrick Kool
Abstract
Model-based control of a one-dimensional pendulum actuated with Pleated
Pneumatic Artificial Muscles with adaptable stiffness
Due to the compressibility of air and the dropping force to contraction
characteristic of the muscle, a joint actuated by two of these muscles set in
antagonistically position, shows a compliant behaviour and can be adapted while
controlling position. This compliance adaptation enhances the possibilities of
exploitation of natural dynamics so that energy consumption and control activity
is decreased.
The main purpose of the project is to investigate the exploitation of natural
dynamics in combination with the joint trajectory control. The joint tracking
controller tracks the desired trajectory while adapting the joint compliance, as
such that the natural regime corresponds as much as possible to the reference
trajectory.
Currently the pendulum is assembled and its hardware components have been
tested. This thesis reports on the design and construction of the pendulum. The
effect on valve control activity and energy consumption by changing the
compliance characteristics are shown by means of a simulation and experiments
on the physical pendulum. A technique to change the stiffness online has been
evaluated.
The next steps in the study are a correct estimation of the system’s parameters
and the extension of the system to a three dimensional pendulum, in that way that
it can be used for implementation on the walking biped “Lucy”, from the Vrije
Universiteit Brussel.
Samenvatting
Studie van een modelgebaseerde controle van een slinger aangedreven door
balgactuatoren met regelbare stijfheid.
Een scharniergewricht, aangedreven door een stel antagonistisch opgestelde
spieren, vertoont een soepel en elastisch gedrag te wijten aan de
samendrukbaarheid van lucht en de dalende kracht - contractie karakteristiek van
de spier. Bovendien kan deze soepelheid ingesteld worden, onafhankelijk van de
positie van het gewricht. De variabele stijfheid, het omgekeerde van de
soepelheid, beïnvloedt de eigenfrequentie van het systeem en biedt dus de
mogelijkheid om de natuurlijke dynamica van de slinger uit te buiten om zo het
energieverbruik en de controleactiviteit te verminderen.
Het hoofddoel van dit project is te komen tot een controle van de slinger waarbij
de uitbuiting van de natuurlijke dynamica van het systeem gecombineerd wordt
met een trajectsturing. De trajectsturing volgt een opgelegd traject, terwijl de
stijfheid van de structuur zodanig wordt ingesteld dat de slingerbeweging
volledig binnen de natuurlijke dynamica van het systeem valt.
De slinger is gebouwd en de bijhorende hardware componenten zijn getest. Deze
thesis geeft een beschrijving van het ontwerp en de bouw van de slinger. De
invloed van de variabele stijfheid op het energieverbruik en de kleppenacties
wordt geïllustreerd aan de hand van simulaties en experimenten op de werkelijke
slinger. Een techniek om de optimale stijfheid langsheen een opgelegd traject te
bepalen en te variëren werd onderzocht.
De volgende stappen binnen dit onderzoeksgebied zijn de correcte bepaling van
de parameters van het systeem en een uitbreiding naar een driedimensionale
slinger, om de opgedane kennis te kunnen gebruiken voor verdere ontwikkeling
van de tweepotige stappende robot ‘Lucy’.
Résumé
Contrôle basé sur un modèle, d’une pendule, actionnée par des muscles
artificiels pneumatiques pliés avec une raideur adaptable.
Grâce à la compressibilité de l’air et de la caractéristique force-contraction
décroissante du muscle, une jointure actionnée par deux muscles antagonistes,
présente un comportement compliant, dont la souplesse peut être controlée
indépendamment de la position. Cette souplesse adaptive permet de bénéficier
du régime naturel du système pour ainsi diminuer la consommation d’énergie et
l’effort de contrôle.
L’objectif de cette thèse est de combiner l’exploitation du mouvement naturel de
la pendule avec un contrôle en position de type suivi de trajectoire.
Une
trajectoire spécifiée est suivie par un contrôle en position pendant que la
souplesse de la jointure est adaptée de telle façon que le régime naturel
correspond le plus possible à la trajectoire de référence.
La pendule est actuellement assemblée et les composant testés. Cette thèse
donne une déscription de la construction de la pendule.
L’influence de la
souplesse de la jointure sur l’effort de contrôle et la consommation d’énergie est
illustrée par des moyens de simulations et d’expérimentations sur la pendule
réelle. Une technique qui permet de déterminer la souplesse optimale tout au
long d’une trajectoire specifiée est étudiée.
La prochaine étape dans le domaine est d’estimer correctement les paramètres du
système et d’étendre ce sytème vers une pendule tridimensionelle. De cette
façon, l’incorporation de la technique pourra se faire sur le robot bipède ‘Lucy’.
Acknowledgements
Na een jaar van pure fun in Barcelona, heeft het mij veel moeite gekost om me
weer in het leven van een ingenieursstudent te storten. Tijdens de periode waar ik
vorig jaar op één van de vele terrasjes aan het genieten was van het mooie weer,
heb ik nu de meeste tijd doorgebracht in het labo, vloekend op de zoveelste klep
die maar niet wilde werken. Na hard werk te hebben geleverd, ben ik dan toch
gekomen tot een (zelf)bevredigend resultaat.Dit afstudeerwerk is uiteraard niet
zonder de hulp en steun van anderen tot stand gekomen en daarom dit
dankwoord.
Ten eerste wil ik mijn promotor Prof. Lefeber en co-promotor Prof. Kool
bedanken om mij de mogelijkheid te geven tot deze eindverhandeling.
Bram Vanderborght en Björn Verrelst zou ik willen bedanken voor de
begeleiding, de goede raad, de hulp bij praktische problemen en vooral voor het
nalezen van de eindverhandeling.
Een groot deel van deze thesis werd verwezenlijkt in samenwerking met mijn
klasgenoot Pieter Beyl. We hebben dan ook vele uren samen doorgebracht in het
labo en zou hem willen bedanken voor de vlotte samenwerking.
Voor de technische hulp kon ik steeds terecht bij Ronald Van Ham, Jean-Paul
Schepens, André Plasschaert, Thierry Lenoir en Gabriël Van den Nest en dank
hen hiervoor.
Joris Naudet en Michael Vandamme wil ik bedanken voor hun hulp bij het
programmeren.
Verder zou ik nog mijn vrienden willen bedanken voor hun aanwezigheid en het
plezier dat we doorheen de jaren aan de VUB hebben beleefd. Thomas, ik ben je
enorm dankbaar voor je hulp bij het maken van de User Interface. Nathalie, jou
wil ik speciaal bedanken, niet alleen voor het nalezen van mijn proefschrift, maar
ook voor je steun en de vele koffiepauzes die mij er steeds weer bovenop
hielpen.
Papi y Mami, os quiero agradecer por vuestro interés, apoyo y amor durante toda
mi carrera universitaria. Sin vosotros, no hubiera sido lo mismo. Os quiero
mucho!
Tenslotte zou ik mijn ouders willen bedanken, voor het vertrouwen, de steun en
de vrijheid die ze me door alle jaren heen gegeven hebben. Aan hen heb ik dan
ook alles te danken.
Brussel
Juni 2005
Bruno
Contents
Introduction............................................................................ 1
1.1
Motivation and goal ...............................................................................1
1.2
Background information ........................................................................4
1.3
Approach ................................................................................................5
1.4
Outline....................................................................................................7
Design .................................................................................... 8
2.1
Introduction ............................................................................................8
2.2
Mechanical Design.................................................................................9
2.2.1.
Pleated Pneumatic Artificial Muscle..............................................9
2.2.2.
The one-dimensional joint set-up.................................................13
2.2.2.1.
Introduction ..........................................................................13
2.2.2.2.
Kinematics of the one-dimensional pendulum.....................13
2.2.2.3.
Adaptable passive behaviour of a revolute joint ..................16
2.2.2.4.
Design of the one-dimensional pendulum............................19
2.2.3.
2.3
Constructing the experimental set-up ..........................................22
2.2.3.1.
The frame .............................................................................22
2.2.3.2.
The valve system..................................................................25
2.2.3.3.
The pneumatic circuit...........................................................26
2.2.3.4.
The exhaust silencer.............................................................27
2.2.3.5.
The support ..........................................................................27
Electronic design..................................................................................29
2.3.1.
Valve system speed-up circuitry ..................................................30
2.3.2.
Pressure Sensor ............................................................................31
2.3.3.
Incremental encoder .....................................................................32
2.3.4.
Data acquisition card....................................................................33
2.3.5.
Safety, supply and transformation board .....................................35
2.4
Software ...............................................................................................36
2.5
Conclusion ...........................................................................................39
Control.................................................................................. 40
3.1.
Introduction ..........................................................................................40
3.2.
Joint tracking controller .......................................................................40
3.3.
Mathematical formulation for compliance adaptation .........................45
3.4.
The simulation model of the pendulum ...............................................48
3.4.1.
Description of the pendulum set-up .............................................48
3.4.2.
The mechanical equations of the model.......................................50
3.4.3.
The thermodynamical equations of the model .............................50
3.4.4.
Complete simulation model .........................................................52
3.5.
Energy considerations ..........................................................................54
3.6.
Conclusion ...........................................................................................55
Results and discussion ......................................................... 57
4.1.
Introduction ..........................................................................................57
4.2.
The simulation model...........................................................................58
4.2.1.
Evaluation of the joint trajectory tracking controller...................58
4.2.1.1.
General considerations .........................................................58
4.2.1.2.
Results and discussion .........................................................59
4.2.2.
Exploitation of the natural dynamics ...........................................62
4.2.2.1.
Experiments..........................................................................62
4.2.2.2.
Results and discussions ........................................................63
Simulation 1: the importance of setting a suitable stiffness.................63
Simulation 2: evaluation of the mathematical formulation..................67
Simulation 3: changing the stiffness online .........................................69
4.3.
The physical pendulum ........................................................................75
4.3.1.
Evaluation of the joint trajectory tracking controller...................75
4.3.2.
Exploitation of the natural dynamics ...........................................80
4.3.2.1.
General considerations .........................................................80
4.3.2.2.
4.4.
Results and discussion .........................................................81
Conclusion ...........................................................................................86
General conclusions and future perspectives....................... 88
Appendices
A Dynamic model of the pendulum.................................... 91
B Safety Board .................................................................... 94
Bibliography......................................................................... 95
1.
Robotics ...................................................................................................95
2.
Programming............................................................................................97
3.
Data acquisition card................................................................................97
List of Figures
Figure 1.1: Industrial robot with heavy electrical drives and the soft actuator
AMASC ............................................................................................1
Figure 1.2: The active walker ‘Asimo’ and the passive walker ‘Denise’ ...........2
Figure 1.3: The bipedal walking robot ‘Lucy’ ....................................................3
Figure 1.4: CAD drawing and photograph of the physical pendulum ................4
Figure 2.1: The Pleated Pneumatic Artificial Muscle .........................................9
Figure 2.2: Theoretical forces at pressure levels 1,2 and 3 bar as a function of
the contraction.................................................................................10
Figure 2.3: Theoretical maximum muscle diameter as function of contraction 11
Figure 2.4: Forces at pressure levels 1,2 and 3 bar and volume resulting from
the polynomial fitting as a function of the contraction ...................12
Figure 2.5: The antagonistic muscle setup and the possibility to adapt both
position and compliance independently..........................................13
Figure 2.6: Basic configuration of the pull rod and leverage system................14
Figure 2.7: Influence on muscle contraction by changing d i and α i ...............20
Figure 2.8: Static and closed muscle torque characteristics ..............................21
Figure 2.9: Static and closed muscle torque characteristics at different pressure
levels, with the design parameters set to the one used in the
experimental set-up.........................................................................22
Figure 2.10: Exploded and assembled view of the basic frame ..........................23
Figure 2.11: View of the connection plate and the position limiter ....................24
Figure 2.12: View of the valve island .................................................................25
Figure 2.13: Schematic overview of the pneumatic circuit.................................26
Figure 2.14: View of the exhaust silencers .........................................................27
Figure 2.15: View of the supporting structure of the pendulum .........................28
Figure 2.16: Schematic overview of the control hardware .................................29
Figure 2.17: View of the speed-up circuitry........................................................30
Figure 2.18: View of the pressure sensor ............................................................31
Figure 2.20: View of the safety, supply and transformation board .....................35
Figure 2.21: The Control tab of the GUI.............................................................37
Figure 2.22: The Model tab of the GUI...............................................................37
Figure 2.23: The Valves Test tab of the GUI ......................................................38
Figure 3.1: Schematic overview of the control structure ..................................41
Figure 3.2: Bang-bang pressure control scheme ...............................................44
Figure 3.3: The pendulum model ......................................................................48
Figure 3.4: Structure of the complete simulation model ...................................52
Figure 4.1: The joint angle θ for perfect and erroneous parameter estimations
of the model ....................................................................................59
Figure 4.2: Torques of the joint for perfect and erroneous parameter estimations
of the model ....................................................................................60
Figure 4.3: Muscle 1 pressure with valve action for perfect model. .................61
Figure 4.4: Actual and desired joint angle with closed muscles for p S = 16 Nm
and p S = 32 Nm .............................................................................63
Figure 4.5: Actual and desired joint angle and angular velocity for p S = 16 Nm
and p S = 32 Nm .............................................................................64
Figure 4.6: Actual and required pressure in muscle 1 and 2 for p S = 16 Nm ..65
Figure 4.7: Actual and required pressure in muscle 1 and 2 for p S = 32 Nm ..65
Figure 4.8: Energy consumption and valve action in function of p S , for
different trajectories ........................................................................68
Figure 4.9: Joint angle, pressure and frequency for a trajectory with linear
varying frequency ...........................................................................69
~
Figure 4.10: Stiffness K and noise due to cotg( ) term for the specific trajectory
........................................................................................................71
Figure 4.11: Actual and required pressure and valve action for a trajectory with
linear varying frequency and p S online changed...........................72
Figure 4.12: Actual and required pressure and valve action for a trajectory with
linear varying frequency and a constant p S . ..................................72
Figure 4.13: p S in function of the frequency of the imposed trajectory. ...........73
Figure 4.14: Effect on the valve actions due to deviation on the online changing
parameter p S ..................................................................................74
Figure 4.15: Angular velocity, computed torque and absolute pressure for first
tracking experiment ........................................................................75
Figure 4.16: Angular velocity, computed torque and absolute pressure for a
tracking experiment by using a filter on the angular velocity. .......76
Figure 4.17: Measured and desired joint angle θ and pressure course for
muscle1 ...........................................................................................79
Figure 4.18: Initial trajectory and imposed trajectory during experiments .........80
Figure 4.19: Energy consumption and valve action for one period of different
trajectories in function of the stiffness parameter p S ....................82
Figure 4.20: Influence of the stiffness parameter p S on the valve action and the
absolute pressure in the muscle.......................................................83
Figure 4.21: The uncontrolled oscillation of the pendulum for three different
stiffness parameters p S after a controlled period of 10 seconds....84
Figure A.1: Schematic overview of the studied model ......................................91
Figure B.1: Electronic scheme of the safety, supply and transformation board 94
List of Tables
Table 2.1: Coefficients of the polynomial force function approximation..........12
Table 2.2: Coefficients of the polynomial volume fitting approximation..........12
Table 3.1: Inertial parameters of the pendulum model.......................................49
Table 4.1: Pressure reaction levels of the bang-bang pressure controller,
used in simulation..............................................................................58
Table 4.2: Air mass flow, exergy and valve action during one period of a sine
wave trajectory with frequency of 2 Hz for p S = 16 Nm and
p S = 32 Nm ......................................................................................66
Table 4.3: Calculated and simulated optimal values of p S for different sine
waves trajectories ..............................................................................67
Table 4.4: Pressure levels of the bang-bang controller for the physical
pendulum...........................................................................................81
Table 4.5: Experimental, calculated and simulated optimal values of p S for
different sine-wave trajectories .........................................................85
Nomenclature
Acronyms
AICH
DACOUT
DIO
PPAM
USB
Analog Input Channel
Analog Channel Ouptut
Digital Input/Output
Pleated Pneumatic Artificial Muscle
Universal Serial Bus controller
Symbols
α
αi
ε
ε ic
ρ0
εi
θ
θc
Δ~
p
τ
a
b
bi
Bi
c
C
C (q, q& )
di
Di
D(q )
e
f
f i (θ )
⎛ l ⎞
f ⎜ε , 0 ⎟
⎝ R⎠
fi
Ft
g
coefficient denoting centre of gravity of the pendulum link
angular design parameters of the joint muscle setup
muscle contraction
contraction of muscle i at chosen central position θ c
air density at standard conditions
contraction of muscle i in a joint setup
angular joint position
chosen central position in the joint setup
control variable of delta-p control unit
actuator torque
reaction level of bang-bang pressure controller
reaction level of bang-bang pressure controller
distance between origin O and points Bi
fixed base points of the joint muscle setup
reaction level of bang-bang pressure controller
pneumatic valve flow constant
centrifugal/coriolis matrix
distance between R and points D
moving points of a joint muscle setup
inertia matrix
reaction level of bang-bang pressure controller
reaction level of bang-bang pressure controller
dimensionless force function of muscle i in the joint setup
°
kg/m³
rad(°)
rad(°)
bar
Nm
bar
bar
m
bar
Std.l/min/bar
m
bar
bar
dimensionless muscle force function
coefficients of a polynomial force fitting
muscle traction force
acceleration of gravity
N
m/s²
Gi
G (q )
Ii
k i (θ )
centre of gravity of part i of the pendulum
gravitational torque/force vector
moment of inertia of part i
joint stiffness function for a joint setup
joint stiffness
kinetic energy
initial muscle length
base suspension bar length of the muscle joint setup
length from pivot to part i
kgm²
Nm/bar
Nm
J
m
m
m
actual length of muscle i in the joint setup
m
m& airi
air mass flow through valves of muscle i
kg/s
mi
mass of part i
number of fibres
polytropic exponent
gauge pressure
stiffness parameter of delta-p control unit
kg
bar
Nm
initial gauge pressure when muscle i was closed
bar
Pi0
initial absolute pressure when muscle i was closed
bar
qi
Qθ
ri (θ )
generalized coordinate
generalized torque associated to qi
K
l0
lb
li
l mi
n
p
pS
pi0
R
t
t i (θ )
T
Ti
U
⎛ l ⎞
v⎜ ε , 0 ⎟
⎝ R⎠
vi
Vi
Vi0
W
leverage arm of muscle i in the joint setup
rotation point of the joint muscle setup
time
torque function of muscle i in a joint setup
joint torque
temperature
torque generated by muscle i in the joint setup
potential energy
s
Nm/bar
Nm
K
Nm
J
dimensionless volume function
coefficients of polynomial muscle volume fitting
enclosed volume of muscle i
m³
initial volume when muscle i was closed
work
m³
J
Subscript
air
atm
d
i
m
of compressed air
atmospheric
derivative
muscle number
isotherm
s
part number
at isothermal conditions
sample
Superscript
a
d
ex
in
supply
~
^
•
analog
digital
of exhaust valve
of inlet valve
of compressed air supply
required value
calculated with estimated parameter values
derivative with respect to time
Chapter 1
Introduction
1.1 Motivation and goal
Nowadays, robots are widely used in all kinds of production and assembly chains
to assist in very hard, repetitive and labour intensive tasks with optimum
performance. Most of the robots built, use heavy electrical drives, making these
machines heavy and power demanding and not safe for humans. Robots in
assembly halls are completely isolated and can not be accessed when working.
As the field of robotic solutions is still expanding and more robots will be used in
the immediate surroundings of people, there is a need for safety against all
possible accidents. Therefore, soft actuators are being developed. Such soft
actuators offer a natural compliance, making them human friendly.
At the
University of Pisa, an electromechanical Variable Stiffness Actuation [10] motor
has been developed, and specifically designed
for machines and robots
physically interacting with humans. Another example of such an actuator is the
AMASC (Actuator with Mechanically Adjustable Series Compliance)[4], which
uses two motors, one for controlling the position and the other for controlling the
stiffness, the inverse of compliance.
Figure 1.1:
Industrial robot with heavy electrical drives and the soft actuator
AMASC
For the last ten years the Robotics and Multibody Mechanics Research Group of
the Vrije Universiteit Brussel is conducting research in the domain of legged
bipedal robots. Bipeds can be divided into 2 main categories: on the one hand the
full actuated robots, which don't use natural or passive dynamics at all, like
Asimo [17] and QRIO [18], on the other hand the "Passive walkers" who don't
require actuation at all to walk down a sloped surface or only use a little
actuation just enough to overcome energy losses, due to friction and impact
effects, when walking over level ground. An example of such a robot is the
Dutch robot Denise.
Figure 1.2: The active walker ‘Asimo’ and the passive walker ‘Denise’
The main advantage of "passive walkers" is that they are highly energy efficient
but unfortunately they are of little practical use. They have difficulties to start,
can't change their speed and cannot stop in the same way a completely actuated
robot can. But on the other hand, a completely actuated robot consumes a lot of
energy. As energy consumption is an important issue for bipeds, it remains
important to exploit the natural dynamics by trying to incorporate the unforced
motion of a system instead of ignoring or avoiding it.
The goal of the Robotics and Multibody Mechanics Research Group is to
develop a robot which combines these two categories. This robot should be able
to adapt the natural dynamics as a function of the imposed walking motion. For
Chapter 1: Introduction
2
this research a joint with controllable compliance is needed in order to influence
the natural dynamics. But the variable stiffness actuators mentioned previously
are too complex and too heavy for an application such as an autonomous bipedal
robot. Therefore, an interesting alternative is the pleated pneumatic artificial
muscle (PPAM), developed at the Robotics and Multibody Mechanics Research
Group.
It is believed that these pneumatic actuators have interesting characteristics,
which can be used in the field of legged robotics. In this context, the
development of a planar walking robot actuated with pleated pneumatic artificial
muscles (PPAM) was started. The robot has been given the name “Lucy” (figure
1.3). It weighs 30 kg and is 150 cm tall. It uses 12 muscles to actuate 6 pin joints,
as such Lucy is only able to walk in the sagittal plane. A sliding mechanism
prevents the robot from falling side-wards. The goal of this project is to create a
lightweight biped, which is able to walk in a dynamical stable way while
exploiting the adaptable passive behaviour of the pleated pneumatic artificial
muscles in order to reduce energy consumption and control efforts. The robot is
currently able to move in a quasi-static way, but stiffness in the joints is still set
constant [11],[14].
Figure 1.3: The bipedal walking robot ‘Lucy’
The main purpose of this master thesis is to investigate the adaptable passive
behavior of the Pleated Pneumatic Artificial Muscle, which allows the stiffness
Chapter 1: Introduction
3
of a joint, actuated by two antagonistically coupled muscles, to be varied online.
Because the research on this topic will be used for further implementation on
‘Lucy’, the investigation is done on one modular part of ‘Lucy’. With such a
modular part a single pendulum set-up, shown in figure 1.4, was created in order
to investigate energy consumption reduction with imposed swinging motion of
the pendulum while the stiffness of the joint is changed. The idea in this work is
to change the natural frequency in combination with pure trajectory control in
such a way that control efforts are minimized. This strategy is tested on both a
physical and mathematical computer simulation model.
Figure 1.4: CAD drawing and photograph of the physical pendulum
1.2 Background information
The first official recordings of passively walking toys goes back till 1888 (e.g.
Fallis patent). Inspired by the observation of human data, in which the muscles
of the swing leg are activated only at the beginning and the end of the swing
phase, Morawski & Wojcieszak were the first to give a mathematical formulation
Chapter 1: Introduction
4
for these toys. They concluded that in human locomotion the motion of the swing
leg is merely a result of gravity acting on an unactuated double pendulum.
Inspired by this calculations, it was McGeer [5] who introduced the concept of
Passive Dynamic Walking. McGeer showed that a simple planar mechanism
with two legs could be made to walk in a stable way down a slight slope with no
other energy input or control. This system acts like two coupled pendula. The
stance leg acts like an inverted pendulum, and the swing leg acts like a free
pendulum attached to the stance leg at the hip. Given sufficient mass at the hip,
the system will have a stable trajectory that repeats itself and will return to this
trajectory even if perturbed slightly. McGeer also constructed a physical
example. His research was continued by the group of Andy Ruina [3]. They
studied the models of McGeer in more detail and extended the two dimensional
model to three dimensions while building several “Passive Walkers”.
Using natural frequencies of the robot is a useful concept for energy efficient
walking. However, the natural frequency of a system is defined by inherent
system properties like: dimensions, mass distribution, collision behavior and
joint compliance. As a result, the eigenfrequency of these models is set during
construction, which limits the different passive walking patterns and walking
speeds. In order to change the natural frequency of the system, passive elements
with variable compliance were implemented. In this context the group of
Takanishi developed the two-legged walker WL-14, where a complex non-linear
spring mechanism makes changes in stiffness possible. A more elegant way to
implement variable compliance is to use pneumatic artificial muscles. Stiffness
can easily be changed by changing the applied pressures. Research on this topic
was done by van der Linde [12] and Wisse [15] through implementation of
McKibben’s type of pneumatic artificial muscles.
1.3 Approach
Pneumatic artificial muscles have the possibility to adapt the stiffness while
controlling position. Exploitation of the natural dynamics of a walking robot by
varying the compliance characteristics can be approached in two ways: a more
biological inspired approach and an analytical approach. The first option is to
Chapter 1: Introduction
5
design the robot, taking into account all the inertial and compliance parameters,
in such a way that the system performs a motion close to walking without
actuation, by making the system oscillate at its natural frequency. By controlling
the joint compliance, the motion characteristics are then adapted and as such
adapt the walking pattern. Concerning dynamic robot stability, this is however a
complex task and will probably result in a small range of feasible motion
patterns. A second approach is to design joint trajectories for a specific robot
configuration, so that dynamic stability is ensured if these trajectories are tracked
by a trajectory tracking controller. In order to reduce valve control activity, the
joint trajectory tracking unit then adapts the compliance of the different joints, so
that the natural motion “best” fits the given trajectories. As a result the global
stability is ensured due to the calculated trajectories, while energy consumption
is lowered by adapting the joint compliances. But of course, setting the ranges in
which the natural motion corresponds to the calculated trajectories required for
dynamic stability, asks for a proper design of all inertial and joint design
parameters. So that in the end, a combination of these two different approaches
will give interesting results.
In this context, two master theses were proposed by the Robotics and Multibody
Mechanics Research Group of the Vrije Universiteit Brussel. In this report the
model based approach will be discussed. My colleague, Pieter Beyl, will carry
out a more biological approach, by using Fuzzy Logic controllers, artificial
neural networks (ANN), central pattern generators (CPG), Look Up Tables or
combinations of all strategies mentioned above.
As we both needed an experimental set-up to check our simulation results, the
first part of our thesis consisted of designing and constructing the pendulum.
Therefore, the following steps were executed:
•
Determination of the dimensions of the leverage mechanism and
consequently the joint torque characteristics.
•
Building, testing and debugging the electronic components.
•
Building a program library, used to send and receive data by use of a data
acquisition board.
Chapter 1: Introduction
6
•
Assembling the pendulum
•
Implementation of the joint trajectory controller
•
Writing a user interface to communicate with the pendulum and extract
the data information.
•
Implementation of a controller for setting the joint stiffness in order to
incorporate natural dynamics.
•
Measuring and analyzing the results.
The first five tasks were done together with my colleague Pieter Beyl. The
remaining tasks were carried out by myself, since a completely different
approach was chosen.
1.4 Outline
This thesis proceeds as follow:
Chapter 2 (Design) gives an extensive description of the mechanical design, with
the joint torque characteristics as an important discussion. The electronic design,
needed to control the valves which set the pressures in the muscles is also given.
Those pressures define the joint stiffness and position. A manual guide of the
user interface is given, in order that further research on this topic can be done by
other people.
Chapter 3 (Control) reports on the controller used for tracking a desired
trajectory in combination with exploitation of the natural dynamics. The tracking
control strategy consists of a multilevel construction of several essential blocks,
trying to cope with the nonlinear structure by using model-based feedforward
techniques. The method used to take into account the natural dynamics will be
formulated. In order to evaluate this control architecture a computer simulation
model was built. A description of the modelling of the robot dynamics and the
thermodynamics of the muscle/valve system is given, followed by an overview
of the complete simulator. Some energy consideration will be given, so that the
method proposed for incorporating the natural dynamics can be evaluated.
Chapter 1: Introduction
7
Results and discussions on both the simulation model and the physical pendulum
are given in chapter 4. For both cases, the performances of the joint trajectory
tracking controller will be discussed. In the context of the exploitation of the
natural dynamics, simulation and experimental results will be given. Finally, a
comparison between simulation and experiments on the real pendulum will be
discussed, in order to conclude whether or not an online changing stiffness can
be used for further implementation on ‘Lucy’.
General conclusions are drawn in chapter 7, followed by the planning of future
research in the domain of exploitation of natural dynamics.
Chapter 1: Introduction
8
Chapter 2
Design
2.1 Introduction
The main goal of the pendulum is to investigate whether the PPAM can be an
interesting actuator for exploitation of natural dynamics in combination with
trajectory tracking. The pendulum set-up has been designed for that purpose and
should be suitable for experiment on the following main items:
•
Evaluation of a trajectory tracking control strategy with the specific
pneumatic system.
•
Evaluation of the adaptable passive behaviour of the PPAM and the
influence on the natural dynamics of the system.
This chapter starts with a description of the mechanical design of the pendulum.
The PPAM and its characteristics will be discussed. The kinematics of a onedimensional joint setup controlled by two antagonistically positioned muscles,
are reported. Special attention is devoted to the design of the actuator connection.
The electronics needed to control the pressures in the muscles will be explained
in the second paragraph, electronic design.
In the third paragraph, software, a user manual of the guided user interface will
be given, so that the experimental set-up can be easily used by other persons.
Constructing the pendulum by just one person would have taken too much time
in the context of a master thesis. Therefore, my colleague Pieter Beyl and I
worked as a team. As a consequence, all the work, except from the GUI, referred
to in this chapter has been carried out together.
2.2 Mechanical Design
2.2.1. Pleated Pneumatic Artificial Muscle
The PPAM consist of a membrane
made of an aromatic polyamide such as
Kevlar to which a thin liner of
polypropylene is attached in order to
make the membrane airtight. The
membrane of this muscle is arranged
into radially laid out folds that can
unfurl free of radial stress when
inflated.
Reinforcing high tensile
Kevlar fibers are positioned in each
crease. The high tensile longitudinal
fibres
of
the
membrane
transfer
tension, while the folded structure
allows the muscle to expand radially,
which
avoid
energy
losses
and
hysteresis. The folded membrane is
positioned into two end fittings, which
close the muscle and provide tubing to
inflate
and
deflate
the
enclosed
volume. An epoxy resin fixes the
membrane and the Kevlar fibres to the
end fittings.
Figure 2.1: The Pleated Pneumatic
Artificial Muscle
Daerden [2] extensively discusses several characteristics concerning the PPAM,
for inelastic as well as elastic membranes. In this work mainly two characteristics
are important: generated traction and enclosed volume for each contraction. The
first is used for joint torque dimensioning and control purposes, while the latter is
used to predict joint compliance with closed muscles. Furthermore, the maximum
Chapter 2: Design
9
diameter when the muscle is fully bulged should be taken into account when
designing the different joints of the robot in order to provide enough space for
the muscle to bulge.
When inflated with pressurised air, the muscle generates a unidirectional pulling
force along the longitudinal axis. Generally, if the number of fibres is large
enough, the generated muscle force depends on the applied gauge pressure ( p ),
the contraction ( ε ) and the two parameters, initial muscle length ( l 0 ) and
slenderness (
l0
) [14]
R
The traction characteristic is given by :
Ft = pl 02 f (ε ,
with f (ε ,
l0
)
R
(2.1)
l0
) the dimensionless force function as defined by Daerden [2].
R
Figure 2.2: Theoretical forces at pressure levels 1,2 and 3 bar as a function
of the contraction
Using l 0 = 110 mm, R = 11.5 mm and n = 40, results in the theoretical force
characteristics depicted in figure 2.2, [14]. The traction as a function of
contraction is drawn for different applied gauge pressures: 1, 2 and 3 bar. The
graph shows the non-linear character of the generated muscle force. For small
Chapter 2: Design
10
contractions, the forces are extremely high, while for large contractions, the
forces drop to zero. For the pendulum, contractions will be bounded somewhere
between 5 and 35 %. The first limit is set to bound the stresses on the fibres and
consequently extends the lifetime of the muscle. And beyond 35 % contraction,
forces drop too low to be of practical use.
Figure 2.3 depicts the theoretical maximum diameter to contraction for the
considered muscle [2]. This approximated maximum diameter should be taken
into account during the design of the joints of the pendulum in order to provide
enough space for the muscle to bulge.
Figure 2.3: Theoretical maximum muscle diameter as function of contraction
To compare the theoretical characteristics with those of the physical PPAM,
static load tests were carried out by Verrelst. A brief discussion on the results
will be given. For more information we refer to [14].
A deviation between measured data and theoretical model of the force was
observed. For dimensioning purpose, the theoretical model can be used.
However, for the trajectory tracking control, an accurate estimation of the real
force function is required. Since the force functions of different muscles are very
similar, a 4th order polynomial function fit on the pressure scaled measured data
was performed in order to achieve a better force estimation. The force function
can be expressed as:
Ft = pl 02 f (ε ) = pl 02 ( f 4 ε 3 + f 3ε 2 + f 2ε + f 1 + f 0 ε −1 )
Chapter 2: Design
(2.2)
11
Finally, for reason of programming convenience, a polynomial fitting was
performed on the theoretical data for the enclosed muscle volume:
V (ε ) = l 03 v(ε ) = l 03 (v5ε 5 + v 4 ε 4 + v3ε 3 + v 2ε 2 + v1ε + v 0 )
(2.3)
Those equations are much easier to handle than the numerical solution derived
from the mathematical model as derived by Daerden and Verrelst. In table 2.1
and table 2.2, the coefficients of respectively the force and volume fitting are
given. The values are valid when the generated force Ft is expressed in N, the
initial muscle length l 0 in m, the pressure expressed in bar, the volume given in
ml and the contraction ε expressed in %. Both polynomial fittings are shown in
Figure 2.4
f0
f1
f2
f3
f4
146099 128611.6 − 7178.93 171.623 − 2.0413
Table 2.1: Coefficients of the polynomial force function approximation
v0
v1
v2
v3
v4
v5
30080
− 2386.3
113.82
− 2.6296 0.02254
71728
Table 2.2: Coefficients of the polynomial volume fitting approximation
Force (N)
10000
1 bar
2 bar
3 bar
5000
0
0
5
10
5
10
Volume (ml)
500
15
20
25
30
35
40
15
20
25
30
35
40
Contraction (%)
400
300
200
100
0
Contraction (%)
Figure 2.4: Forces at pressure levels 1,2 and 3 bar and volume resulting from
the polynomial fitting as a function of the contraction
Chapter 2: Design
12
2.2.2. The one-dimensional joint set-up
2.2.2.1. Introduction
Pneumatic artificial muscles can only exert a pulling force. In order to have a bidirectional working revolute joint, two muscles are coupled antagonistically. The
antagonistic coupling of the two muscles is achieved with a pull rod and leverage
mechanism, as is depicted in figure 2.5. The lever arm can be varied in such a
way that the highly non-linear force-length characteristic of the PPAM is
transformed to a more flattened torque-angle relation. While one muscle
contracts and rotates the joint in its direction, the other muscle will elongate.
Joint
position
Δp
p1↑
τ↑
p2↓
θ↑
Joint
Stiffnes
Σp
p1↑
p2↑
K↑
Figure 2.5: The antagonistic muscle setup and the possibility to adapt both
position and compliance independently.
The gauge pressure difference between the two muscles determines the generated
torque ( T ), and consequently also angular position ( θ ). Furthermore, both
pressures can be increased (decreased) in such a way that joint stiffness ( K )
raises (lowers) without affecting angular position. Thus both position and
compliance can be controlled independently.
2.2.2.2. Kinematics of the one-dimensional pendulum
The kinematics of the pendulum have the same structure as one modular part of
‘Lucy’. For the sake of convenience, the same discussion will be given as in [14]
Chapter 2: Design
13
The basic configuration of the pull rod and leverage mechanism is depicted in
figure 2.6
Y
θ
C
α1
α2
D1
d1
d2
r1
R
lm1
D2
r2
lb
lm2
B2
B1
O
b1
X
b2
Figure 2.6: Basic configuration of the pull rod and leverage system
The two muscles are connected at one side of the system to a fixed base in the
points B1 and B2 respectively. The other ends of the muscles are attached to a
Chapter 2: Design
14
pivoting part at the points D1 and D2, of which the rotation axis passes through a
point R. The rods are assumed to be rigid.
An orthogonal X , Y - coordinate system is defined. The X -axis is aligned with
the base points B1 and B2 , while the vertical Y -axis intersects the physical
pivoting point R and lies along the base suspension bar of the pull rod
mechanism.
The essential parameters to be determined during the design process of the joint
are the following:
•
bi is the distance between the origin O and the point Bi .
•
d i is the distance between the pivoting point R and the point Di .
•
α i is the angle between the vector RDi and RCi point on the rotating
part. ( α i is not oriented and always positive)
•
l mi is the actual length of muscle i
•
l b is the length of the base suspension bar, measured between the origin
O and the pivot point R .
•
θ represents the rotation angle, measured between RC and the Y -axis.
( θ is oriented, counter-clockwise is positive)
The generated torque can be found by combining the traction force generated by
the muscles and the orthogonal leverage arms r1 and r2 :
T (θ ) = T1 (θ ) − T2 (θ ) = Ft1 (θ )r1 (θ ) − Ft 2 (θ )r2 (θ )
= p1l 021 f 1 (θ )r1 (θ ) − p 2 l 022 f 2 (θ )r2 (θ )
(2.4)
= p1t1 (θ ) − p 2 t 2 (θ )
(2.5)
with t1 (θ ) and t 2 (θ ) the torque functions depending on the angular position of
the joint. To calculate the force functions, we will use the polynomial function
fitted on the measured force data as described in the first paragraph.
Chapter 2: Design
15
The vectors Bi Di and RDi are being calculated with following equations:
B1 D1 = [b1 − d1 sin(α 1 − θ ), l b + d1 cos(α 1 − θ )]
B2 D2 = [d 2 sin(α 2 + θ ) − b2 , l b + d 2 cos(α 2 + θ )]
RD1 = [− d1 sin(α 1 − θ ), d1 cos(α 1 − θ )]
(2.6)
(2.7)
(2.8)
RD2 = [d 2 sin(α 2 + θ ), d 2 cos(α 2 + θ )]
(2.9)
The expression for ri (θ ) can then be found as:
ri (θ ) =
Bi Di × RDi
(2.10)
Bi Di
The muscle contraction ε i as function of the rotation angle θ is given by:
c
Bi Di + Bi Di
l
lc − l
ε i (θ ) = 1 − mi = ε ic + mi mi = ε ic +
l0i
l 0i
l 0i
(2.11)
The contraction ε i (θ ) is defined with respect to ε ic , which is the contraction of
muscle i at a chosen central position θ c . In our case θ c = 0 . The parameters are
fixed during the joint design process.
2.2.2.3. Adaptable passive behaviour of a revolute joint
A PPAM has two sources of compliance, being gas compressibility, and the
dropping force to contraction characteristic [2]. The latter effect is typical for
pneumatic artificial muscles while the first is similar to standard pneumatic
cylinders. Joint stiffness, the inverse of compliance, for the considered revolute
joint, can be obtained by the angular derivative of the torque characteristic:
Chapter 2: Design
16
dT dT1 − dT2
=
dθ
dθ
dp
dt
dp
dt
= 1 t1 + p1 1 − 2 t 2 − p 2 2
dθ
dθ dθ
dθ
K=
The terms
(2.12)
dp i
represent the share in stiffness of changing pressure with
dθ
contraction, which is determined by the action of the valves controlling the joint
and by the thermodynamic processes taking place. If the valves are closed and if
we assume polytropic compression/expansion, the pressure changes inside a
muscle are a function of volume changes [9]:
PiVi n = PioVion
(2.13)
Pi = Patm + pi
(2.14)
dpi
V n dV
= − n( Patm + pio ) nio+1 i
dθ
dθ
Vi
(2.15)
with:
leading to:
With Pi , Vi the absolute pressure and volume of muscle i , Pio the absolute initial
pressure, Vio the initial volume when the valves of muscle i were closed, pi and
pio the gauge pressure and initial gauge pressure respectively, Patm the
atmospheric pressure and n a polytropic exponent. The polytropic exponent is
introduced to describe deviations from the isentropic expansion/compression. An
isentropic process assumes reversible adiabatic thermodynamic conditions and
the exponent becomes in this case n = γ = c p cv = 1.4 for dry air [9].
During the joint design process, it is ensured that the torque to angle and the
volume to angle characteristics of a joint are monotonous functions. Meaning
that the derivatives dt i dθ and dVi dθ keep the same sign within the range of
Chapter 2: Design
17
motion for which the joint was designed. Thus, referring to figure 2.6, increasing
the joint angle θ will increase the torque function t1 (θ ) , while the volume of the
respective muscle will decrease. Indeed the larger θ, the lesser muscle 1 is
contracted. Consequently, the generated force is bigger. On the contrary, less
contraction means that the muscle gets thinner and that volume decreases. Thus
dt1 dθ > 0 and dV1 dθ < 0 . For the other muscle 2 in the antagonistic setup,
the actions are opposite: dt 2 dθ < 0 and dV2 dθ > 0 . Combining (2.12), (2.13)
and (2.15) with this information gives:
K = k1 (θ ) p1o + k 2 (θ ) p 2o + k atm (θ ) Patm
(2.16)
with
V1no dV1 V1no dt1
+
>0
V1n +1 dθ V1n dθ
k1 (θ )
= t1 (θ )n
k 2 (θ )
V2no dV2 V2no dt 2
= t 2 (θ )n n +1
+ n
>0
dθ
V2
V 2 dθ
k atm (θ ) = k1 (θ ) + k 2 (θ ) −
dt1 dt 2
−
dθ
dθ
The coefficients k1 (θ ) , k 2 (θ ) , k atm (θ ) are determined by the geometry of the
joint and its muscles.
From equation (2.16), we can conclude that when muscles in an antagonistic
joint setup are closed, a passive spring element with an adaptable stiffness is
created. The stiffness is controlled by a weighted sum of both initial gauge
pressures. Since stiffness depends on a sum of gauge pressures while position is
determined by differences in gauge pressure, the angular position can be
controlled while setting stiffness. How to use this interesting property and how
to incorporate it into the control of the pendulum in order to reduce energy
consumption and valve control, will be discussed in detail in the next chapter.
Chapter 2: Design
18
2.2.2.4. Design of the one-dimensional pendulum
All the equations described above, in combination with the muscle force
function, are used to design the characteristics. A description on how the design
parameters of the former paragraph are chosen is now given.
As mentioned before, the pendulum consists of one modular part of the biped
‘Lucy’. Therefore, some of the parameters are already fixed, namely:
bi = 40 mm
l mi = 110 mm
l b = 350 mm
The central position of the pendulum was set to θ c = 0°
For designing the remaining parameters, some requirements should be met:
•
We want an angle range between -20° and 20°, or larger.
•
Within the angle range, the contraction has to be limited between 5% and
35%. A smaller contraction leads to stresses that are too high for the
muscle fibres. At higher contraction, the forces drop too low for practical
use.
•
Enough torque should be provided by the antagonistic setup to hold a
mass of 10 kg at the maximum of the angle range. Therefore static torque
characteristics of the joint should be compared with the torque needed to
hold a mass of 10 kg.
•
Stability has to be insured. The torque characteristic of the joint with
closed muscles is important here. As the stiffness of the joint is given by
K=
dT
dT
, this characteristic has to be increasing ( K =
> 0 ). In that
dθ
dθ
case, the joint stiffness is positive. If that is not the case, the swing
motion will be amplified and instability will occur. Besides this, within
the angle range, we want this torque characteristic to be as linear as
possible. The joint stiffness will then be almost constant within our
working domain.
Chapter 2: Design
19
•
The diameter of the muscles should be taken into account during the
design, in order to provide enough space for the muscle to bulge.
The joint range is determined via the minimum and maximum angles at the
minimum and maximum contraction of the muscles. Angle range and torque
characteristics are determined as a function of the joint application. The design of
all these functionalities is complex and is linked to the specific motion of the
pendulum.
A small Matlab program has been written to investigate the influence on the joint
characteristics by changing the design parameters. The characteristics are shown
in Figure 2.7 and 2.8. Figure 2.7 shows the contraction of one muscle in function
of the joint angle. Maximum and minimum limits of the contraction are also
plotted. In the left plot d i is changed. In the right plot, the contractions for
different values of α i are given.
α =60° en ε =19%
i
40
35
0
40
di =30 mm en ε 0 =19%
Contraction ε 1 (% )
Contraction ε 1 (% )
Minimal contraction (% )
Maximal contraction (% )
Minimal contraction (% )
Maximal contraction (% )
35
30
30
25
25
20
20
15
15
←
10
di=20mm 10
← α i =45°
di=25mm
← di =30mm
← di =35mm 5
←
5
0
-40
-20
0
Θ (degrees)
20
40
0
-40
← α i =60°
← α i =70°
← α i =90°
-20
0
20
40
Θ (degrees)
Figure 2.7: Influence on muscle contraction by changing d i and α i
Figure 2.8 shows two different torque characteristics. On the left side, the static
torque of the joint is plotted for a maximum pressure of 3 bar in both muscle 1
and 2. The influence on the static torque characteristic by changing d i is also
Chapter 2: Design
20
shown. On the right side, the torque characteristic of the joint with closed
muscles is plotted to analyze the joint stiffness when muscles are closed. This
characteristic is found by setting 3 bar into the muscle and closing the muscle at
zero degrees. By moving the pendulum out of is equilibrium, a repelling torque
is generated. This torque characteristic is plotted on the right.
α =60°, ε =19% and p ,p =3 bar
150
i
0
1
α =60°, ε =19% and p ,p =3 bar
2
150
Static Torque (τ 1 - τ 2) (Nm)
i
0
10
20
Closed muscles torque (Nm)
← di=35mm
Minimal torque needed (Nm)
100
100
← di=35mm
← di=30mm
← di=30mm
50
← di=25mm
50
← di=25mm
← di=20mm
← di=20mm
0
0
-50
-50
-100
-100
-150
-40
-20
0
20
40
-150
-40
Θ (degrees)
-20
0
20
40
Θ (degrees)
Figure 2.8: Static and closed muscle torque characteristics
Based on these plots the design parameters were set to the following values:
d i = 30 mm
α i = 60°
ε 0 = 19 %
As we can see on figure 2.7, for these values the contraction stays between the
limits of 5% and 35% for an angle range between -35 degrees and 35 degrees.
In figure 2.9, the static torque characteristics and torque characteristics with
closed muscle were redrawn with the chosen design parameter values. This was
done for different pressure levels
Chapter 2: Design
21
Within the angle range, Figure 2.9 shows that enough torque can be provided to
lift the mass. If we now look at the torque characteristics of the pendulum with
closed muscles, we see that there is an almost linear evolution of the torque
between -20 degrees and 20 degrees. The angle range is now fixed and all
requirements are met.
α =60°, d =30mm, ε =19
Static torque (τ1 - τ2) (Nm)
100
i
i
α =60°, d =30mm, ε =19
0
150
1 bar
2 bar
3 bar
4 bar
Minimal Torque Needed (Nm)
100
Closed muscles torque (Nm)
150
50
0
-50
-100
-150
-40
i
i
0
1 bar
2 bar
3 bar
4 bar
50
0
-50
-100
-20
0
20
40
Θ (degrees)
-150
-40
-20
0
20
40
Θ (degrees)
Figure 2.9: Static and closed muscle torque characteristics at different
pressure levels, with the design parameters set to the one used in
the experimental set-up.
2.2.3. Constructing the experimental set-up
2.2.3.1. The frame
As was argued previously, a pull rod and leverage mechanism was selected to
position two muscles in an antagonistic setup. The basic frame in which this
system is incorporated, is depicted in figure 2.10. The modular unit is made of
two slats at the side, which are connected parallel to each other by two linking
bars. A joint rotary part, provided with roller bearings, is foreseen for the
Chapter 2: Design
22
connection with an other modular unit. The fixed base for the pull rods
mechanism includes two rotary axes at which the muscles are attached. The
small rotations of these axes are guided by sliding bearings positioned in the
frame. All the parts of the basic frame are made of a high-grade aluminium alloy,
AlSiMg1, apart from the bolts and nuts, required to assemble the frame.
Sliding
bearings
Roller
bearing
Rotary
axes
Joint rotation
points
Fixed base of
muscle pull rod
mechanism
Figure 2.10: Exploded and assembled view of the basic frame
Two more linking bars are connected to the joint rotary part of the basic frame.
This is the swinging part of the pendulum. The mass is attached to the screw
thread connecting the two linking bars. The mass consists of simple discs,
recuperated from dumbbells. In order to attach the discs and because the
diameters of the discs’ centre holes are different to the diameter of the screw
thread, centering rings were fabricated. The discs are colour marked, so that the
mass of each disc is known. They can be easily changed to alter the load.
The muscles are positioned crosswise to allow complete bulging. At one side
they are attached to the frame via the fixed rotary base and at the other side the
interface to the next modular unit is provided via the leverage mechanism. Two
connection plates showed in figure 2.11, are fixed to the next modular unit and
incorporate the leverage mechanism. Again sliding bearings are used to guide the
rotations of both rotary axes. The position of the rotation points determines the
dimensions of the leverage mechanism and consequently joint torque
characteristics. The mathematical formulation of the torque as a function of force
relation was given in section 2.2.2.2. The connection plates incorporate the
parameters α 1 , α 2 , d1 and d 2 of the leverage mechanism for both muscles. Since
Chapter 2: Design
23
these parameters have a large influence, the connection plate system is the one
which can be changed easily, besides muscle dimensions, to alter joint torque
characteristics. Therefore the two plates have to be replaced with only different
positioned holes for the sliding bearings.
Position
limiter
Connection
plate
Figure 2.11: View of the connection plate and the position limiter
At the joint rotation side, an angular position limiter is provided. This device is
equipped with two screws, which can be regulated separately in order to set the
joint rotation range. The limiter is used for the two following reasons:
•
Avoid singular joint configurations in the pull rod and leverage
mechanism. This happens when the axis of the muscle is aligned with the
joint rotation point and the muscle attachment point in the leverage
mechanism. In this situation the muscle can seriously damage the
leverage mechanism when increasing pressures would by required by the
controller.
•
Limit the contraction between 5 and 35 %.
Chapter 2: Design
24
2.2.3.2. The valve system
The force developed by the muscles is proportional to the pressure into the
muscle. Therefore, a rapid and accurate pressure control is needed to set stiffness
and position. Fast switching on/off valves are used. The pneumatic solenoid
valve 821 2/2 NC made by Matrix, weighs only 25 g. They have a reported
switching time of about 1 ms and flow rate of 180 Std.l/ min. The permitted
pressure difference over the valve ranges, for each type, between 0 . . . 6 bar and
2 . . . 8 bar respectively.
To pressurise and depressurise the muscle, which has a varying volume up to 400
ml, it is best to place a number of these small on/off valves in parallel. Obviously
the more valves used, the higher the electric power consumption, price and
weight will be. Simulations of the pressure control on a constant volume were
done by Van Ham et al. in the context of the development of ‘Lucy’ and this led
to the compromise of 2 inlet and 4 outlet valves. The different number between
inlet and outlet comes from the asymmetric pressure conditions between inlet
and outlet and the aim to create equal muscle’s inflation and deflation flows. For
detailed information on the simulations is referred to [13].
Figure 2.12: View of the valve island
Chapter 2: Design
25
The 6 valves are brought together in a valve island with special designed inlet
and outlet collectors after removing parts of the original housing material. A
photograph of the valve island is given in figure 2.12. The total weight of this
device is less than 150 g. [14]
Particles of epoxy present in the muscles and other dirtiness can affect the good
working of the valves. To protect the valves, a filter gauze is placed at the supply
connection of the valve island and between the muscle and the valve island.
Leaks were detected there where the electric wiring is passing through the valve
island. To prevent the air to escape through these holes, a supplementary rubber
joint is placed between valve and valve island.
2.2.3.3. The pneumatic circuit
Figure 2.13 gives an overview of the
pneumatic circuit, which is used to
regulate the supply pressure of the
Supply pressure regulating unit
Depressurize
2 valve
different muscles of the pendulum.
The pneumatic scheme shows the 2
identical pneumatic circuits of which
each drives one antagonistic muscle.
actuated”
valve
symbols. These two symbols represent
the 2 reaction levels of the valve
system. The number of actual valves,
1
are
included
in
each
Inlet valves
1
1
12
2
#1
1
12
12
2
#1
Pressure
sensor
#1
#1
Pressure
sensor
Muscle 1
Exhaust valves
1
Exhaust valves
1
1
12
#1
12
2
Muscle 2
2
which
12
2
Inlet valves
each of them is represented by two
electrically
High pressure
valve
1
Pendulum
2
“2/2
3
1
The valve island is depicted with
separately inlet and exhaust, which
High pressure regulator
Air supply
1
12
2
#3
12
2
#1
12
2
#3
Silencer
configuration are depicted as well.
Silencer
The
Figure 2.13: Schematic overview of the
right
and
left
muscle
are
connected to the supply pressure
pneumatic circuit
regulating unit by separate tubes. The
Chapter 2: Design
26
pressure regulating unit consists of a mechanical unit that determines the
pressure in the circuit. The circuit is interrupted with an electrically actuated 3/2
valve. The exhaust of this valve is connected to an electrically actuated 2/2
depressurizing valve in order to deflate the complete pendulum.
2.2.3.4. The exhaust silencer
Additionally, a silencer is added at the
exhaust of each valve island. Without a
silencer,
the
immediate
expansion
Exhaust silencers
to
atmospheric conditions of the compressed
air at the exhaust creates a lot of noise. A
silencer consists of a closed permeable tube
which makes the pressurised air leave the
volume slowly, resulting in a strongly
reduced noise generation. But generally, a
silencer
also
obstructs
the
dynamic
performance of muscle deflation, since a
pressure rise in the silencer lowers the
exhaust airflow. It is therefore important to
use large silencers with good permeable Figure 2.14: View of the exhaust
silencers
material [14]. As the basic frame of the
pendulum is not moving and the valves very
large exhaust silencers. For implementation on ‘Lucy’ it should be taken into
account, that the valves island are connected to the moving robot, so smaller
exhaust silencers are used.
2.2.3.5. The support
As pneumatic muscles can easily exert forces up to 5000 N and the pendulum is
swinging at frequencies where dynamic forces are being important, a strong
supporting structure has to be provided to hang up the pendulum. Besides this,
Chapter 2: Design
27
the supporting structure has to be as such that the pendulum can be easily
dismounted and inverted. Several configurations can be used for this purpose.
Figure 2.15 shows a picture of the used supporting structure. It has been decided
to use a rectangular pole that is clamped to the wall. One side of the slats of the
basic frame is pressed against the pole with screw thread and rectangular tubes
used as washers. Holes were made into the pole in order to fix both inverted and
non- inverted pendulum. To avoid oscillations of the basic frame due to
dynamical forces generated by the swing motion, the other slat is attached to a
rectangular frame. The pendulum is now resting in a kind of symmetrical cage,
and can easily be disassembled and inverted. In the future a second rectangular
frame should be used, because oscillations were still observed at higher
frequencies of the swing motion.
Pole
Washer
Plate
Rectangular
frame
Figure 2.15: View of the supporting structure of the pendulum
Each valve island, together with its electronic circuit, is mounted on a plate.
Each plate is clamped at one side of to the pole. It can be easily positioned
where desired.
Chapter 2: Design
28
2.3 Electronic design
In figure 2.16 an overview of the control hardware used to control joint position
and stiffness, is given. A multifunction I/O data acquisition card from NI-DAQ is
used to exchange data with a central PC, used to control the whole pendulum.
User Interface
Central PC
ISA
databus
AT-MIO-16E-10
Data acquisition
card
Pressure
supply unit
Emergency
Stop
Speed-up
circuitry
Valve
island
Speed-up
circuitry
Safety/Supply
Transformation
Board
Pressure
extensor
muscle
Valve
island
Pressure
flexor
muscle
Joint Angle
Joint Stiffness
Alarm
signal
Figure 2.16: Schematic overview of the control hardware
Pressures are measured with absolute pressure sensors and the angular position is
captured with an incremental encoder. The valves of the two islands are
Chapter 2: Design
29
controlled by digital micro-controller signals after being transformed by the
speed-up circuitry in order to enhance switching speed of the valves. In the next
sections detailed information is given about the different elements of the control
hardware.
2.3.1. Valve system speed-up circuitry
To have a rapid and accurate pressure control, switching time of the valves
should be as little as possible. In order to enhance the opening time of the Matrix
valves, the manufacturer proposes a speed-up in tension circuitry, shown in
photograph 2.17. Several practical tests, for which is referred to [13], have
resulted in an opening and closing times of about 1 ms. An opening voltage of 32
V is being applied during 1 ms.
Figure 2.17: View of the speed-up circuitry
The data acquisition card commands the valves via discrete 5 V on/off signals.
Two circuits control separately the two inlet valves and another two control the
Chapter 2: Design
30
exhaust valves. Hereby three valves are controlled simultaneously by one circuit.
For the electronic scheme of the speed-up circuitry we refer to [14, D.2]
2.3.2. Pressure Sensor
To have a good dynamic pressure measurement, the pressure sensor, shown in
figure 2.18, is positioned inside the muscle.
The pressure sensor and its
electronics are the same as used for ‘Lucy’, except from the AD-converter.
Since this sensor is inside the muscle volume, an absolute pressure sensor is
provided. In order to pass through the entrance of a muscle, the size of the
sensor and its electronics has to be small (12 mm). An absolute pressure sensor,
CPC100AFC, from Honeywell has been selected for this purpose. The sensor
measures absolute pressure values up to 100 psi (6.9 bar) and has an accuracy of
about 20 mbar. The output of the pressure sensor is amplified by a differential
amplifier. As the pressure sensor outputs an analogue signal, special attention
should be given to possible noise interferences. High precision and accuracy is
required, so a cable consisting of three-wire signal leads is used. The third signal
lead, or shield, is necessary and is grounded at the signal source to reduce
common-mode noise. In section 2.2.4., more information on how this noise was
reduced, is given.
AD-Converter
(not used)
Differential
Amplifier
Pressure
Sensor
Figure 2.18: View of the pressure sensor
Because the electronics of the pressure sensors are handmade, they differ from
each other. That’s why a calibration has to be done. By doing this, offset and
sensitivity of each pressure sensor are determined, so that at the same pressure
Chapter 2: Design
31
level, the same voltage is output for both sensors. For several pressure levels, the
output voltage of the left and right pressure sensors has been acquired. This
output voltage is proportional to the applied pressure in the muscle, so by means
of simple linear fitting of the measured data, voltage offset and sensitivity can be
found.
2.3.3. Incremental encoder
The angular position is measured with an incremental encoder (HEDM6540,
Agilent). Such a device converts rotary displacements into digital pulse signals.
This type is an optical encoder, which consist of a rotating disk, a light source
and a photodetector (light sensor). The disk, which is mounted on the rotating
shaft, has pattern of opaque and transparent sectors coded into the disk. As the
disk rotates, these patterns interrupt the light emitted onto the photodetector,
generating a digital or pulse signal output. The encoder is incremental, which
means that the encoder does not output absolute position. To determine direction
and reference position, 3 channels are used. Using two code tracks (A and B)
with sectors positioned 90°, if A leads B, for example, the disk is rotating in a
clockwise direction. If B leads A, then the disk is rotating in a counter-clockwise
direction. The third output channel is used as a zero or reference signal, which
supplies a single pulse per revolution. In our case, only channel A and B are
used.
We assume that the position where no
muscle is inflated, corresponds with zero degrees
and is therefore taken as reference position.
When using a quadrature encoder with the data
acquisition card, there are two options. For simple
applications, you can connect the encoder directly
to the counter/timer of the data acquisition card,
without any extra logic or signal conditioning. In
this configuration, the counter will increment on
state transitions on channel A. Depending on the
state of B at those transitions, the counter will
count up or down.
Chapter 2: Design
Figure 2.19: View of the
incremental encoder
While this method is very
32
simple to implement, it has a couple of potentially serious drawbacks. If the
encoder disk is not rotating, but is vibrating enough back and forth to cause
active transitions on channel A, without changing the state of channel B, then
each movement will be incorrectly counted. Another problem results when
encoder outputs include noise or jitter that is large enough to be erroneously
counted as a valid state transition. Therefore a clock converter device (LS7084,
LSI Computer systems) is used. This device converts the A and B signals into a
clock and up/down signal that can be connected directly to the data acquisition
card. The UP/DN output indicates the direction of rotation. When in X4 mode,
resolution is increased four times as the CLK output will now pulse once on
every transition of either the A or B signals. The LS7084 includes low-pass
filters to prevent miscounts due to noise and jitter. In addition, the LS7804 uses
dual one-shots to prevent the miscounting produced by vibration, or dither, as
described previously.
2.3.4. Data acquisition card
The AT-MIO-16E-10 data acquisition card has 16 single-ended or 8 differential
analog inputs with a sampling rate of 100 kSamples/s, 2 analog output channels
and 8 digital I/O channels built in.
A Data Acquisition System Timing
Controller (DAQ-STC) is available. The DAQ-STC includes 10 counter/timer
devices, eight of which are designed to control the timing of analog input and
analog output operations. The remaining two counter/timers are 24-bit up/down
counter/timers available for a wide variety of timing and counting applications
and will be used for retrieving information on the joint angle and also used as an
internal clock. Each of the two 24-bit counter/timers of the DAQ-STC includes
three input signals (SOURCE, GATE, and UP_DOWN) and two output signals
(OUT and INTERRUPT). The DAQ card is installed in a Pentium 500 Mhz
computer.
When programming the DAQ hardware, any application development
environment (ADE) can be used but in either case a NI-DAQ driver must be
installed. This driver has an extensive library of functions that can be called
Chapter 2: Design
33
from the ADE. Those functions can be found in [20]. The driver also carries out
many of the complex interactions, such as programming interrupts, between
DAQ and computer. In the beginning Matlab was used to program the DAQ
card, but complicated programming and low sampling rate made us change our
mind and we finally decided to use Visual C++. The minimum control period
during which all control calculations are done is 2 ms. Therefore a controller
sampling time of 2 ms is used.
A cable connector is used to connect the data acquisition card with the sensors
and valves islands. The pressure sensor outputs a non-referenced single-ended
(NRSE) analog signal. The left muscle pressure sensor is connected to analog
input 6 (PIN 15), the right muscle pressure sensor to analog input 7 (PIN 17). As
we mentioned before, analog signals can be disturbed by noise. A proper wiring
system and correct grounding of the signal circuit can strongly reduce this
problem.
To measure a grounded signal source with a single-ended
configuration, the DAQ card was configured in the NRSE input configuration.
The signal is then connected to the desired analog input (ACH6 for left pressure
sensor and ACH7 for right pressure sensor) of the DAQ card, and the signal local
ground reference is connected to AIGND. The ground point of the signal should
now be connected to the AISENSE pin. Any potential difference between the
DAQ card ground and the signal ground appears as a common-mode signal at
both the analog input (ACH6/ACH7) and AIGND and this difference is rejected
by the internal electronics of the DAQ card. If this method is not used, a
difference in ground potentials would appear as an error in the measured voltage.
As mentioned before, the incremental encoder has 3 output channels, but only 2
will be used. The clock converter transforms these two signals into CLK and
UP/DOWN. The pulse signal, CLK, is connected to Programmable Function
Input (PFI) GPCTR0_SOURCE and the direction signal, UP/DOWN, is
connected to the UP_DOWN (DIO6) input. The DAQ-card is configured for a
simple event count with hardware up/down control. In this configuration, the
DAQ card will control the counter, in such a way that it will count up/down on
every transition of either A or B.
Each valve island has 6 valves to be controlled, so 8 digital signals are needed.
Because one of the digital channels is already occupied by one of the signals of
Chapter 2: Design
34
the encoder, an analog signal is used.
DIO1…DIO8, except from DIO6.
The valves are connected through
The remaining valve is connected to
DAC0OUT
DAC1OUT is used to determine the control time of the whole set-up, by means
of a scope.
The remaining 24-bit counter/timer is configured in such a way that an internal
base clock of 100 kHz is used as timer.
The time, the encoder counter and sensors values are read at the beginning of
every control loop and valve states are changed if necessary.
2.3.5. Safety, supply and transformation board
Clock
converter
Pressure
sensors
connection
Emergency stop
connection
5 V Speed-Up
circuitry supply
2/2 valve
supply
3/2 valve
supply
Encoder
connection
24 V Speed-Up
circuitry supply
5 V board
supply
UP/DWN
CLK
AISense,p1,p2
Alarm
Signal
12 V pressure
sensors supply
Figure 2.20: View of the safety, supply and transformation board
Chapter 2: Design
35
The maximum absolute pressure in the muscles, without damaging them, is about
4,5 bar. The supply pressure, however, is 7 bar. If working properly, the
pressure is limited to 4 bar by the controller. If a problem occurs with the
controller, the pressure can exceed this limit, and the muscles will be damaged.
To avoid such a situation and to protect the muscles against high pressure, we
implemented a safety circuit, which handles all the alarm signals, originating
from the pressure sensor inside the muscle and an emergency stop. Whenever an
alarm signal is activated, the 3/2 supply valve of the two pressure regulating
pneumatic circuits is closed, while the depressurising valve is opened in order to
deflate all the muscles.
The safety, supply and transformation board showed in figure 2.20, consists of
the safety circuit, the connection to all voltage supply sources and to the signals
from the pressure sensors and encoder. On this board, the encoder signals are
also transformed by the clock converter.
2.4 Software
As mentioned before, Visual C++ is used to program the DAQ card. To make
experiments and testing more user friendly, a graphical user interface (GUI) was
developed. A brief explanation on how to use the GUI will now be given.
The GUI consists of different tabs. Each tab has some parameters, to be filled in
by the user.
The first tab to appear is the Control tab and is shown in figure 2.21 . In this tab,
parameters like sampling rate, acquisition time and PID gains used by trajectory
tracking controller are set.
These values can be varied online.
A special
attention is given to the compliance calculation. More information on the
definition of p S is given in chapter 3
In the second tab shown in figure 2.22 , the Model parameters are set. As
explained in the mechanical design, we can alter the load of the pendulum by
removing or adding discs. By clicking on the check boxes, the user can enter the
discs used during the experiments. Other masses, free oscillation period and
Chapter 2: Design
36
atmospheric pressure are also to be filled in, so that the pendulum can be
modelated.
Figure 2.21: The Control tab of the GUI
Figure 2.22: The Model tab of the GUI
Chapter 2: Design
37
The Trajectory tab, is used to specify the initial angle, the offset and the
frequency of the desired trajectory we want to be tracked by the tracking
controller.
In the Plotting tab, the user can specify the file where data has to be written to.
Because plotting data in Visual C++ is too complicated, we rather use Matlab.
Therefore, data acquired in Visual C++ has to be sent to Matlab. The Matlab
engine is loaded in C++ to access Matlab’s prebuilt graphics functions. By using
this engine, we are able to send the data to the Matlab workspace and plot them
directly from Visual C++. After each experiment the data is automatically sent
to Matlab and plotted. The option to plot different type of data during the
experiment or test, can also be enabled. Plotting the data during the experiment
takes a lot of time, so it should only be done when no control action is needed.
Once the data is plotted, Matlab workspace will open, so that the data can be
manipulated if necessary.
To calculate the energy consumption during the
experiment, a Matlab M-file is made. Typing “CalcEnergy” into the workspace
will give the valve action and energy consumption. More information on how
energy is being calculated will be given in the next chapter.
Figure 2.23: The Valves Test tab of the GUI
Chapter 2: Design
38
As we experienced a lot of problems making the valves island to work properly,
a last tab is used to test the valves. Input and output valves can be tested, by
choosing the desired valve and to start the test. An overview of the valves test
tab is given in figure 2.23.
2.5 Conclusion
In this chapter, the hard- and software needed to construct the pendulum was
described.
By analyzing the joint characteristics, the muscles and actuators
connection parameters were determined. To acquire the pressures in the muscles
and the joint angle, and to control the valves, a data acquisition card is used. The
control of the pendulum is done by a PC. To make the experimental setup user
friendly a GUI was implemented.
Chapter 2: Design
39
Chapter 3
Control
3.1. Introduction
The main purpose of this work is to incorporate the exploitation of the natural
dynamics by adapting joint stiffness in combination with trajectory tracking.
In section 3.2, the main focus is on the development of a tracking controller,
which incorporates the actuator characteristics and dynamic model of the robot.
The control strategy consists of a multilevel construction of several essential
blocks, trying to cope with the non-linear structure using model-based
feedforward techniques. This tracking controller will be incorporated in a
simulation model and in the physical set-up.
Section 3.3 gives a mathematical formulation for compliance adaptation, in order
to reduce energy consumption and control activity during the joint trajectory
tracking.
A simulation model of a one-dimensional pendulum with one antagonistic
muscle pair actuating the joint, is presented in section 3.4. This model is used to
show the importance of appropriate stiffness selection in order to reduce control
activity. A joint tracking controller is incorporated in a simulation model.
Finally, some energy considerations concerning the proposed control strategy are
given in section 3.5
3.2. Joint tracking controller
The joint tracking controller has to command the valves of the two muscles in
order to track an imposed desired trajectory. The complete system incorporates
several nonlinearities such as the non-linear behaviour of the pendulum
configuration and the nonlinearities introduced by the antagonistic muscle set-up.
The tracking controller is designed in a modular way, which means that the
controller can be easily adapted for an application with another mechanical
configuration, but with an analogue antagonistic muscle actuator set-up.
Therefore, the controller is multistage, of which each stage deals with the
different nonlinearities separately. A schematic overview of the proposed control
structure is given in figure 3.1. The controller consists of three parts: a feedback
linearization module, a delta-p unit and a bang-bang pressure controller. The
feedback linearization or computed torque module is a standard nonlinear control
technique, which deals with the nonlinear behaviour of the mechanical pendulum
configuration [1]. The delta-p unit translates calculated torques into desired
muscle pressure levels, coping with the nonlinearities introduced by the muscle
actuation system. Finally, the bang-bang pressure controller commands the
valves in order to set the required pressures in the muscles.
This control structure will be implemented in a computer simulation of the
pendulum, as well as in the control of the physical set-up.
As is said before, the pendulum consists of one modular part of ‘Lucy’, which
means that the used tracking controller will have the same structure as described
in [14]. For the sake of convenience, the same discussion on the control strategy
will be given. Some of the modules were slightly changed: an integrator is added
to the computed torque method, and of course the model dynamics and
parameters are not the same. Special attention is also given to the estimation of
these parameters.
~ ~& &~& &~&&
θ ,θ ,θ , θ
Stiffness (
pS )
Control
Computed Torque
Desired
Trajectory
&~&
θ
~&
τ~
D̂
KD
θ
Cˆ , Gˆ
KI
KP
Delta_P
Control
~
p1
~
p
Valves 1
Bang-Bang Actions
Pressure
2
Control Valves 2
Actions
θ
θ&
p1 , p 2
Model
θ ,θ&
∫
~
θ
θ
Figure 3.1: Schematic overview of the control structure
Chapter 3: Control
41
In the first module, the computed torque τ~ is calculated. The computed torque
method consists in decomposing the controller into two parts. One part is modelbased in that it makes use of the modelled dynamics of the particular system
under control. The second part of the control is error-driven in that it forms error
signals by differencing desired and actual variables and multiplies this by gains.
It’s also called the servo portion[1].
To find the model-based part, the rigid body dynamics can be written down:
τ = Dˆ (θ )θ&& + Cˆ (θ ,θ&)θ& + Gˆ (θ )
(3.1)
where Dˆ (θ ) is the inertia matrix, Cˆ (θ , θ&) is the centrifugal and coriolis term,
Gˆ (θ ) is the gravity term and θ the joints positions of the real system. In our
case, the system is one-dimensional. Consequently, those matrices will consist
of only one term. The symbol ^ denotes that the respective expressions are
calculated with estimated parameter values. The main problem is to find an
optimal model of the pendulum.
We can linearize this equation by choosing
τ = α τ ′ + β , with α = Dˆ (θ ) and β = Cˆ (θ ,θ&)θ& + Gˆ (θ )
(3.2)
Filling this into the rigid body mechanics (3.1) gives:
τ ′ = θ&&
(3.3)
As we see, the resulting equation is that of unit-mass system. The design of the
servo position is now very simple: gains are chosen as if we were controlling
systems composed of single unit masses.
~
&&
~&
~
~
τ ′ = θ + K D (θ − θ&) + K P (θ − θ ) + K I ∫ (θ − θ )dt
Chapter 3: Control
(3.4)
42
The symbol ∼ represents required values. The gains K I , K P and K D are
manually tuned in order to influence controller performance. The following
expression for the computed torque is thus obtained:
&~&
~&
~
~
τ~ = Cˆ (θ ,θ&)θ& + Gˆ (θ ) + Dˆ (θ ) ⎡⎢θ + K D (θ − θ&) + K P (θ − θ ) + K I ∫ (θ − θ )dt ⎤⎥
⎣
⎦
(3.5)
The required pressures values to be set in the muscles are then calculated by the
delta-p control unit. These two gauge pressures of both muscles are generated as
follows:
p
~
p1 = S + Δ~
p
tˆ1 (θ )
(3.6a)
p
~
p 2 = S − Δ~
p
tˆ2 (θ )
(3.6b)
with p S a parameter that is used to influence the sum of pressures and
consequently the joint stiffness, Δ~
p influences the difference in pressure of the
two muscles and consequently the generated torque. The functions tˆ1 (θ ) and
tˆ2 (θ ) are calculated with estimated values of the muscle force functions and
geometrical parameters of the pull rod and leverage mechanism of the actuation
system. Expression (2.5) allows linking the required torque to the required
pressure values in the muscles:
τ~ = ~p1tˆ1 (θ ) − ~p 2 tˆ2 (θ ) = (tˆ1 (θ ) + tˆ2 (θ ))Δ~p
(3.7)
If the calculated pressure values ~
p1 and ~
p 2 of equations (3.6) are set in the
p and is independent of the
muscles, the generated torque depends only on Δ~
joint stiffness parameter p S , in case the modelling would be perfect. This means
that joint stiffness is changed without affecting the joint angular position.
Chapter 3: Control
43
Feeding back the knee angle θ and introducing the torque τ~ , expression (3.7)
can be used to determine the required Δ~
p:
τ~
Δ~
p=
(3.8)
tˆ1 (θ ) + tˆ2 (θ )
The delta-p unit is actually a feedforward calculation from torque level to
pressure level, using the cinematic model of the muscle actuation system. The
p affects the torque required to track the desired trajectory, while
calculated Δ~
p S is introduced to determine the sum of the pressures, which influences the
stiffness of the joint as was discussed in section 2.2.2.3. Increasing p S lowers
the compliance of the joint.
In the last control block the desired gauge pressures calculated by the delta-p unit
are compared with the measured gauge pressure values after which appropriate
valve actions are taken by a bang-bang pressure controller. We define the
=~
p − p) , with ~
p the desired pressure calculated by the
pressure error as ( p
error
delta-p unit and p the pressure measured in the muscle. The bang-bang pressure
control scheme is given in figure 3.2.
Action
a
b
c
d
e
f
perror
Figure 3.2: Bang-bang pressure control scheme
If the pressure difference stays between c and d , no valve action takes place
(dead zone) and the muscle stays closed. In this situation the muscle is acting as a
compliant passive element. If the pressure error is increasing and reaches level
e , one inlet valve is opened in order to make the pressure rise to the desired
Chapter 3: Control
44
level. If one opened inlet valve is not enough and perror is still increasing and
becomes larger than f , a second inlet valve is opened. The inlet valves are
closed again when the difference drops below level d . The same approach is
used for negative values of perror , but now exhaust valves will be opened. If
perror is beyond level a , 4 exhaust valves will be opened instead of 2.
3.3. Mathematical formulation for compliance
adaptation
In section 2.2.2.3 a formulation of the compliance was given for closed muscles.
As shown, a weighted sum of both pressures in the antagonistic muscle set-up
determines the joint compliance, while pressure differences determine the
generated torque and consequently also the joint position. This means that
compliance can be set while controlling the position. This is interesting, because
by setting the appropriate joint stiffness control activity can be reduced while
tracking a desired trajectory.
In the previous paragraph, the parameter p S , used to influence the sum of
pressures and consequently the joint stiffness, was introduced. The question is
now: what should be the value of p S ? In other words, what should be the joint
stiffness, so that the natural motion “best” fits the desired trajectories? In this
section a mathematical formulation developed by Verrelst [14], is given for
estimating an appropriate value of p S .
The starting-point for the estimation procedure is to fit the natural pressure slopes
with the required ones. The desired pressures depend on the desired trajectory.
The delta-p unit in combination with the computed torque module determinates
the required pressures as explained in the previous section. Pressure changes
with closed muscles are influenced by p S .
Chapter 3: Control
45
The required pressure slopes are calculated by deriving equations (3.6) with
~
respect to the trajectory θ :
pS
d~
p1
~ =− 2
t1
dθ
~
pS
dp 2
~ =− 2
t2
dθ
dt1 dΔ~
p
~+ ~
dθ
dθ
dt 2 dΔ~
p
~− ~
dθ
dθ
(3.9a)
(3.9b)
Taking into account equation (3.8), the derivatives can be expanded by:
⎡
dΔ~
p
1
(t + t 2 )K~ − ⎛⎜ dt~1 + dt~2 ⎞⎟τ~ ⎤⎥
=
2 ⎢ 1
dθ
(t1 + t 2 ) ⎣
⎝ dθ dθ ⎠ ⎦
(3.10)
~
with K (equation (2.12)) representing the stiffness associated with the desired
trajectory and τ~ the torque calculated by the computed torque module.
On the other hand, combining equation (2.15), valid for closed muscles, with
equations (3.6) yields:
⎛ n V10n dV1 ⎞
⎛ V10n dV1 ⎞
d~
p1
~
⎜
⎟
~ = − pS ⎜
~ ⎟ − (Patm + Δp )⎜⎜ n n +1 ~ ⎟⎟
n +1
t
V
dθ
d
θ
⎝ 1 1
⎠
⎝ V1 dθ ⎠
⎛ n V2n0 dV2 ⎞
⎛ V2n0 dV2 ⎞
d~
p2
~
~ = − p S ⎜⎜
~ ⎟⎟ − (Patm − Δp )⎜⎜ n n +1 ~ ⎟⎟
n +1
t
V
dθ
d
θ
2
2
⎝
⎠
⎝ V2 dθ ⎠
(3.11a)
(3.11b)
The idea is to match for each muscle the required pressure slope with the slope
associated with the natural dynamics, by selecting an appropriate p S value. Once
the desired trajectory is known, expressions (3.9) and (3.11) can be evaluated in
every point θ i . Subsequently a p S value is searched in order to match as much
as possible both pressure slopes. For each θ i , equations (3.9a) and (3.11a) and
equations (3.9b) and (3.11b) are thus respectively combined and each solved for
a value p Si j .
Chapter 3: Control
46
p
i
S1
−1
⎡⎛ 1 dt
⎛ n dV1 ⎞ dΔ~
p ⎞⎟⎤
1 n dV1 ⎞ ⎛⎜
1
~
⎟
⎟
⎜
(
)
P
p
+
+
Δ
= ⎢⎜⎜ 2 ~ −
~⎟
atm
⎜ V dθ~ ⎟ dθ~ ⎟⎥
⎢⎣⎝ t1 dθ t1 V1 dθ ⎠ ⎜⎝
⎠
⎝ 1
⎠⎥⎦ θ i
(3.12a)
p
i
S
⎡⎛ 1 dt
1 n dV2
= ⎢⎜⎜ 2 ~2 −
~
⎢⎣⎝ t 2 dθ t 2 V2 dθ
(3.12b)
2
⎞
⎟⎟
⎠
−1
⎛
⎛ n dV2 ⎞ dΔ~
p ⎞⎟⎤
⎜ (Patm − Δ~
⎟
⎜⎜
)
p
−
~⎟
~ ⎟⎥
⎜
⎝ V2 dθ ⎠ dθ ⎠⎥⎦ θ
⎝
i
Note that the initial volume V j0 , when closing a muscle is set equal to the actual
volume V j .
From here on, there are two options. We can use a constant p S , as explained by
Verrelst. The p Si j are calculated in each point θ i , separated by equal time
intervals along the desired trajectory, and a mean is then taken to select one p S :
pS =
[
1 z i
∑ p S + p Si 2
2 z i =1 1
]
(3.13)
with z the number of points chosen to evaluate equations (3.12)
This means that a constant p S is used along the whole trajectory. Probably, a
constant p S will only be suitable for some simple trajectories. As we want a
method for any trajectory, a variable p S is needed. One solution is to use the
same idea of comparing the pressure slopes for the complete trajectory at once,
but for the calculation a differential formulation on p S has to be solved. To
avoid complicated calculations, it was chosen for evaluating the equations (3.12)
at every sample time during the control of the pendulum. At every control sample
time, the angle θ i is acquired and both pSi 1 and pSi 2 are calculated. The mean
for both muscles is then calculated with pSi =
pSi 1 + pSi 2
2
, so that at every sample
time a different p S is set.
As we see in the equations (3.12a) and (3.12b) a correct estimation of the volume
is needed. So the volumes of the end fittings and tubing’s should be added. If
this is not done, the equations (3.12a) and (3.12b) will not give the most suitable
Chapter 3: Control
47
p S and an erroneous stiffness will be set. The influence of the end fittings and
tubing volumes will be explained in more detail in the next chapter.
As mentioned in the previous chapter, special attention was given to the
compliance calculation during the design of the GUI. On the Control tab the user
can choose between three different options: he can set a constant p S by giving it
a certain value, or by calculating it with the method described above, or use a
variable p S , also calculated by the latter method.
3.4. The simulation model of the pendulum
3.4.1. Description of the pendulum set-up
X
O
τ
Y
G2 , m2 , I 2 , l 2
G1 , m1 , l1
θ
Figure 3.3: The pendulum model
The pendulum model consists of 2 parts: the link, and the mass. The mass is
modelled as a point mass and is positioned at a distance l1 of the rotation point.
The length of the link is l 2 , its mass m2 and the moment of inertia about its
centre of mass G2 is I 1 . The location of the centre of mass G2 of the link is
given by OG2 = α l 2 , with α = 0.769 . The parameter values are given in table 3.
Chapter 3: Control
48
i
l i (m)
mi (kg )
I i (kgm 2 )
1
0.4
5.327
0.852
2
0.45
1.483
0.0362
Table 3.1: Inertial parameters of the pendulum model
An accurate estimation of those parameters is crucial, as well for the computer
simulation as for the joint tracking controller. In general the model of the
pendulum will not be perfect. Think for example of the friction model, this is not
taken into account in our model. To illustrate the influence of the parameter
errors on the joint tracking controller we can first look at the real pendulum
dynamics:
τ = D(θ )θ&& + C (θ ,θ&)θ& + G (θ )
(3.14)
Although, for our control law, we use equation (3.2) :
τ = α τ ′ + β , with α = Dˆ (θ ) and β = Cˆ (θ ,θ&)θ& + Gˆ (θ )
where in this case Dˆ (θ ), Gˆ (θ ) and Cˆ (θ , θ&) are the estimated inertia, gravity and
coriolis/centrifugal term.
Decoupling and linearizing will not therefore be perfectly accomplished when
parameters are not known exactly. Starting from equation (3.5), the closed-loop
equations for the system are given by:
[(
) (
) (
E&& + K D E& + K P E + K I ∫ E dt = Dˆ −1 D − Dˆ θ&& + C − Cˆ θ& + G − Gˆ
)]
(3.15)
We clearly see that if the parameters are exactly estimated, the right hand
disappears and no control error will be made. As mentioned before, this will not
be the case in our physical setup. Therefore, some deviations on these model
parameters were incorporated in the simulation.
Chapter 3: Control
49
3.4.2. The mechanical equations of the model
The equation of motion is given by (3.14):
τ = D(θ )θ&& + C (θ ,θ&)θ& + G (θ )
Assuming the model as being frictionless, we can now calculate the elements of
the inertia, coriolis and gravity terms (Appendix A):
D(θ ) = m1l12 + m2α 2 l 22 + I 2
C (θ ,θ&) = 0
(3.16a)
(3.16b)
G (θ ) = − g (m1l1 + m2α l 2 )sin (θ )
(3.16c)
3.4.3. The thermodynamical equations of the model
The equations describing the thermodynamic processes in the pneumatic system
were already discussed by [14]. As we need these equations to understand how
the computer simulation, explained in the next section, works, those equations
will be repeated here.
The thermodynamic processes in the two muscles/valve systems are described by
four first order differential equations. Two equations determine the pressure
changes in both muscles of the pendulum and the remaining two describe
conservation of mass in the respective muscle volume. In assumption that the
pressurised air behaves like a perfect gas, the perfect gas law completes the set of
equations required to run the simulation.
The first law of thermodynamics, while neglecting the fluid’s kinetic and
potential energy and assuming a polytropic process, can be written for each
muscle as [14, Appendix B]:
p& i =
Chapter 3: Control
(
n
in
ex
rTairsup m& air
− rTairi m& air
− (Patm + pi )V&i
i
i
Vi
)
(3.17)
50
with r the dry air gas constant. Tairsup is the temperature of the supply air and Tairi
the temperature in muscle i . The total orifice flow through the opened inlet
in
ex
valves and exhaust valves of muscle i are given by m& air
and m& air
respectively.
i
i
The latter two can be calculated with the following equations, which represents a
normalized approximation of a valve orifice flow defined by the International
Standard ISO6358
[1989]:
m& air = CP u ρ 0
293
⎛ P P −b⎞
1− ⎜ d u
⎟
u
Tair
⎝ 1− b ⎠
m& air = CP u ρ 0
293
Tairu
2
if
Pd
≥b
Pu
(3.18a)
if
Pd
≤b
Pu
(3.18b)
with ρ 0 the air density at standard conditions. C and b are two flow constants
characterising the valve system. The constant C is associated with the amount of
air flowing through the valve orifice, while b represents the critical pressure
ratio at which orifice air flows become maximal. Pu and Pd are the upstream and
downstream absolute pressures, while Tairu air is the upstream temperature. When
choking occurs, equation (3.18b) is valid, otherwise equation (3.18a) is used. The
muscles are controlled by a number of fast switching on/off valves. Once the
actions (opening or closing) of the valves are known, all the air flows can be
calculated in order to be substituted in (3.17). The temperature in the muscle is
calculated with the perfect gas law:
Tairi =
PiVi
mairi r
(3.19)
with Pi = ( pi + Patm ) the absolute pressure in muscle i . The total air mass mairi is
given by integration of the net mass flow entering muscle i :
in
ex
m& airi = m& air
− m& air
i
i
Chapter 3: Control
(3.20)
51
3.4.4. Complete simulation model
The structure of the complete simulation model is given in figure 3.4 and is
based on the simulation model of ‘Lucy’. The kernel of these simulations is
based on three equation blocks, which integrates first order differential equations
only. The differential equations are numerically integrated using a 4th order
Runge-Kutta method with integration time step of 50 μs.
Runge-Kutta numerical
integration
Integration timestep 50 μs
Psup ply
Tsup ply
Equations of motion
θ ,ω
τ
Valve
system
model
Valve
action
in
ex
m& air
/ m& air
i
i
pi
Tairi
Thermodynamic differential
equations
pi
Antagonistic
muscle
model
Thermodynamic state
equations
θ , ω , pi , t
t
Delay
observer
Vi V&i
Control unit
Valve
control
Joint trajectory tracking
Exploiting Natural Dynamics
Desired trajectory
Sampling time 500 μs
Figure 3.4: Structure of the complete simulation model
The first block contains the equations of motion given by (3.14). Since the
equations of motion are second order, these equations have to be transformed
into a set of first order equations. In order to do this, the angular velocity ω is
introduced:
ω = θ&
Chapter 3: Control
(3.21)
52
In our case, the equation of motion can now be rewritten as two first order
equations:
⎧⎪ω& = D(θ )−1 [τ − C (θ , ω ) − G (θ )]
⎨&
⎪⎩θ = ω
(3.22)
The thermodynamics of the joint is characterized by four first order differential
equations on pressure (3.17) and air mass (3.20) (2 first order equations for each
muscle). Finally the two thermodynamic state equations (3.19) complete the set.
The link between the equations of motion and the thermodynamic differential
equations is given by the antagonistic muscle model. In this model the generated
torque τ (3.7) of the joint is calculated with the pressure information of the
thermodynamic block. To calculate this torque the polynomial forces (2.2) must
be known. These are functions of the contraction (2.11), which can be calculated
by knowing the angle information from the equations of motion. Additionally, to
determine the pressure changes in the thermodynamic differential equation block,
muscle volume and volume changes are needed. They are calculated with the
polynomial volume functions (2.3). Consequently, angle and angular velocity
are required from the equations of motion.
Starting from the desired trajectory and by taking the natural dynamics into
account, the control unit determines the appropriate valve actions and sends
valve control signals to the delay observer. The valves have an observed opening
and closing time delay of about 1ms [13] This is incorporated in the delay
observer. In the simulation a delay time of opening or closing the valve of 1 ms
is used. The valve system model will then calculate the air mass flow rates for
each muscle. Therefore, temperature and pressure in the muscles are required
from the thermodynamic differential equations block.
Additionally, deviations can be introduced on the mass, centre of gravity and
inertia parameters and on the force functions, in order to check the robustness of
the controller, as was explained in the previous section.
Chapter 3: Control
53
3.5. Energy considerations
The main purpose of this thesis is to investigate the exploitation of the natural
dynamics of the system in order to reduce energy consumption and control
action.
Therefore, it will be interesting to have an idea of the energy
consumption and control action that takes place during the simulation or
experiment.
As the valves are controlled by the control unit, the valve actions will give us an
idea of the control action. The control signals to action the valves have two
possible values: 1 for an open valve and 0 for a closed valve. To have an idea of
the amount of control action, the control signals for the input as well as for the
output valves are accumulated during the experiment or simulation. The time per
period , during which the input/output valves are open is then calculated with:
Valve Action (ms / period ) =
sum(Valve Signals )
* Sample Time *1000
f Sine−Wave Tacquisition
(3.23)
With Sample Time , the sample time at which data is acquired and not the
controller sample time. In the case of the physical pendulum, the sample time at
which data is acquired and the controller sample time are the same.
The thermodynamic conditions of the pressurized air also determine energy
consumption. So apart from valve actions, it is interesting to consider actual air
mass entering and leaving the total system.
The energy consumption depends not only on the air mass flows but is related to
the thermodynamic conditions of the compressed air supply source. It is not
straightforward to calculate the actual energy needed to power the pendulum,
since this depends on how the pressurized air of the pneumatic supply source has
been created. One way to give an idea of energy consumption is to calculate the
exergy associated with the particular pneumatic air mass flow. Exergy is in fact
the maxi-mum amount of energy, with respect to the surrounding environment,
which can be transformed into useful work. For a compressor, the minimal work
Chapter 3: Control
54
needed to compress air from pressure level p1 to p 2 is done at isothermal
conditions and can be calculated as follows [9]:
p
W& isotherm = m& 1 rT2 ln 1
p2
(3.24)
hereby assuming the air to behave as a perfect gas. The symbol m& 1 represents the
total air mass flowing through the compressor at pressure level p1 , r is the dry
air gas constant and T2 is the temperature the air at pressure level p 2 expressed
in Kelvin.
Using this equation we can calculate the exergy of the supply source as well as
the exergy of the air leaving the muscles. The exergy of the supply source for
muscle i is given by:
p supply
⎛ in
in
⎜&
Wisotherm
,i = ∫ ⎜ m airi rTatm ln
p atm
⎝
⎞
⎟⎟dt
⎠
(3.25a)
⎞
⎟⎟dt
⎠
(3.25b)
, while the output exergy can be calculated with:
⎛ out
pi
out
⎜&
Wisotherm
,i = ∫ ⎜ m airi rTairi ln
p atm
⎝
During the simulation, the absolute supply level is set at 7 bar, the atmospheric
absolute pressure at 1 bar and the atmospheric temperature is 293 K.
3.6. Conclusion
In this chapter a control architecture structure for the pendulum was discussed.
The structure covers the exploitation of the natural dynamics in combination with
joint trajectory tracking. The joint trajectory tracking controller uses a computed
torque method to cope with the nonlinear behavior of the pendulum
Chapter 3: Control
55
configuration. The calculated torques are then transformed into desired muscle
pressure levels by a delta-p unit, coping with the nonlinearities introduced by the
muscle actuation system. Finally, a bang-bang pressure controller commands the
valves in order to set the required pressures in the muscles. The exploitation of
the natural dynamics is important, as it will decrease energy consumption and
control action. In this context, two slightly different mathematical formulations
were given to predict an adequate stiffness setting. First, a suitable constant
stiffness was discussed. In the second formulation, the stiffness is changed
online, which makes it more suitable for complicated trajectories.
A simulation model, which incorporates this control architecture as well as the
modelling of the pendulum dynamics and the thermodynamic processes, which
take place in the muscles, were described. This simulation model will be used to
investigate exploitation of the natural dynamics and particularly to test the
mathematical formulation described for that purpose.
Finally, some energy
considerations were made, in order to have an idea about the amount of energy
consumption and valves action during the simulation or experiment.
Chapter 3: Control
56
Chapter 4
Results and discussion
4.1. Introduction
In the previous chapters, the experimental setup and simulation model as well as
a control architecture, which combines the exploitation of the natural dynamics
with a trajectory tracking controller, were described. To evaluate whether the
proposed controller can meet tracking requirements and deal with the natural
dynamics of the system, it was incorporated into the computer simulation and the
physical pendulum.
This chapter will give results on this theme for both
simulation and practical set-up.
Results on the simulation model will be given in section 4.2. First of all the
trajectory tracking control will be evaluated. The influence of erroneous model
parameter estimations will be shown.
Secondly, the influence of the joint
compliance on the energy consumption and valve actions will be discussed. In
this context, special attention is given to the evaluation of the mathematical
formulations given in the previous chapter for estimating the appropriate joint
stiffness.
In section 4.3, tracking experiments on the physical set-up will be discussed.
Successively, the possibility to decrease control activity and energy consumption
by setting a suitable stiffness, will be shown on the physical pendulum.
4.2. The simulation model
4.2.1. Evaluation of the joint trajectory tracking controller
4.2.1.1. General considerations
As mentioned in chapter 3, the control architecture consists of 3 main blocks: a
feedback linearization module, a delta-p unit and a bang-bang pressure
controller. The computed torque incorporates a model-based module and a servo
control.
The model-based part requires a good estimation of the model
parameters, as was explained before. In order to investigate the influence of a
wrong estimation of the model parameters, deviations on the mass, inertia, centre
of gravities and force function were introduced into the simulation. A simulation
with 0 % deviation, which means that the parameter estimations are exact, will
be compared with a simulation with 10 % deviation on the inertia, 7.5 % on the
centre of gravity and 5% on the mass and the force function. The servo portion
of the computer torque module requires a correct tuning of the gains. This was
done intuitively, but in such a way that stability is still ensured and control
actions are minimized without affecting the tracking accuracy.
perror (mbar)
Valve action
a
-120
Open all exhaust valves
b
-60
Open one exhaust valve
c
-50
Close all exhaust valves
d
50
Close all inlet valves
e
60
Open one inlet valve
f
120
Open all inlet valves
Table 4.1: Pressure reaction levels of the bang-bang pressure controller,
used in simulation
Chapter 4: Results and discussion
58
The bang-bang controller compares the required pressure to be set into the
muscle with the measured gauge pressures and takes the appropriate valve
actions depending on the various reaction levels.
These levels were also
manually tuned in order to minimize energy consumption by taking into account
the trajectory tracking accuracy. The values of the pressure reaction levels are
given in table 4.1
The controller sampling time is set to 2 ms and a valve delay time of 1 ms is
introduced. The valve delay time corresponds with the real data, recorded by
Verrelst. As was mentioned in chapter 2, a controller sampling time of 2 ms is
used for the control of the physical pendulum.
Next, the trajectory tracking control shall be evaluated by imposing a desired
sine-wave trajectory with a frequency of 2 Hz and an amplitude of 5°. The
stiffness parameter p S is set to 20 Nm. This is chosen as an example to validate
the trajectory tracking, without taking into account the natural dynamics of the
system
4.2.1.2. Results and discussion
6
Perfect model ( Mean error on Θ =0.094018°, Maximum error on Θ =0.46594° )
q1 (degrees)
q1Des (degrees)
4
2
0
-2
-4
-6
0.5
1
1.5
2
2.5
Time (s)
6
Erroneous model ( Mean error on Θ =0.1175°, Maximum error on Θ =0.35948° )
q1 (degrees)
q1Des (degrees)
4
2
0
-2
-4
-6
0.5
1
1.5
2
2.5
Time (s)
Figure 4.1: The joint angle θ for perfect and erroneous parameter estimations of
the model
Chapter 4: Results and discussion
59
Perfect model
20
Torque (Nm)
Desired torque (Nm)
friction
CT(model part) (Nm)
P action (Nm)
I action (Nm)
D action (Nm)
10
0
-10
-20
0.5
1
1.5
2
2.5
Time (s)
Erroneous model
20
Torque (Nm)
Desired torque (Nm)
friction
CT(model part) (Nm)
P action (Nm)
I action (Nm)
D action (Nm)
10
0
-10
-20
0.5
1
1.5
2
2.5
Time (s)
Figure 4.2: Torques of the joint for perfect and erroneous parameter
estimations of the model
Figure 4.1 depicts the graphs of the angle θ for the perfect and erroneous model.
The first period was omitted because some settling time is needed and is not
interesting for the purpose of this section. As we see, the tracking controller unit
can still cope with the introduced errors. In fact the tracking errors are very
small.
The difference between both simulations, and thus the influence of
erroneous parameter estimation, is better seen on figure 4.2., were the required
torques, calculated by the inverse dynamic control block, and the actual applied
torques are depicted. The model-based part and the servo portions are also
plotted.
In the perfect model, a little difference is observed between required and applied
torque, due to a minimum pressure error required for the bang-bang controller to
activate. The desired torque is almost equal to the model part of the computed
torque. This is what we expected, because the model part was calculated with
exact parameters. The servo portion deals with the difference in required and
measured angle position and velocity. The erroneous model shows the influence
of the erroneous estimation of the model parameters. First of all, there is a bigger
difference between the applied and required torque because of the influence of
Chapter 4: Results and discussion
60
the force function errors. The model-based part of the computed torque differs
substantially of the calculated torque, due to the introduction of deviations on the
mass and inertia. The servo portion has to take more action, as the model-based
part is using wrong parameters.
Perfect model (muscle 1)
2.2
valve action
pressure (bar)
required pressure (bar)
2
1.8
1.6
1.4
1.2
1
0.5
1
1.5
2
2.5
Time (s)
Detail perfect model (muscle 1)
2.2
valve action
pressure (bar)
required pressure (bar)
2
1.8
1.6
1.4
1.2
1
0.5
0.55
0.6
0.65
0.7
0.75
0.8
0.85
0.9
0.95
1
Time (s)
Figure 4.3:
Muscle 1 pressure with valve action for perfect model.
Figure 4.3. depicts required and actual gauge pressures and valve actions taken
by the bang-bang controller for muscle 1. A closed valve is represented by a
horizontal line at the 2 bar pressure level. An open inlet valve is represented by a
small peak upwards, while an open outlet valve is represented by a downwards
peak. Larger peaks means that 2 inlets or 4 outlets are opened. From figure 4.3.
we can conclude that the bang-bang controller is able to track the desired
pressure quite accurately. No action taken by the valves, means that the pressure
error perror is situated in the dead zone of the bang-bang controller. This is the
case between 0.708 s and 0.826 s. During this period muscle 1 is closed, and the
natural dynamics of the system is exploited. It’s now clear that the dead zone of
the bang-bang controller will be very important to decrease the energy
consumption and should be exploited as much as possible.
This will be
discussed in the following section.
Chapter 4: Results and discussion
61
4.2.2. Exploitation of the natural dynamics
4.2.2.1. Experiments
If we set some pressure values in both muscles of the antagonistic setup, close
them and then release the pendulum from a position different of the equilibrium,
the pendulum starts oscillating with a certain frequency.
If this frequency
corresponds with the desired trajectory, no valve action needs to be taken. This
means that if stiffness is set in such a way that the natural dynamics of the system
suits the desired trajectory, energy consumption will be minimized during
tracking. The first simulations were done in this context. A constant p S , the
parameter to influence the sum of the pressures and consequently the joint
stiffness, was set. This will be done for two different values of p S , in order to
show the importance of setting a correct stiffness for minimizing the energy
consumption. The desired trajectory again is a sine-wave with a frequency of
2 Hz and an amplitude of 5 °.
In a second series of simulations, the mathematical formulation proposed by
Verrelst and described in chapter 3 will be evaluated for different sinusoidal
trajectories. Still, a constant p S will be used.
Finally, the possibility to track a random trajectory with exploitation of the
natural dynamics, will be investigated in the third series of simulations. The
stiffness is changed online in order to set the most suitable stiffness at every
control sample time.
No parameter deviations are introduced in the simulations.
The controller
sampling time and the valve delay time are still 2 ms, respectively 1 ms.
Chapter 4: Results and discussion
62
4.2.2.2. Results and discussions
Simulation 1: the importance of setting a suitable stiffness
We can illustrate the influence of the stiffness by considering the unactuated
oscillation with closed muscles of the pendulum as was explained in the previous
section and compare it with the desired trajectory. In figure 4.4, one period of
the unactuated oscillation is shown for 2 different values of p S , as well as the
2 Hz sine wave that has to be tracked.
ps = 16 Nm
6
q1 (degrees)
q1Des (degrees)
Joint angle (°)
4
2
0
-2
-4
-6
0
0.05
0.1
0.15
0.2
0.25
0.3
0.35
0.4
0.45
0.5
Time (s)
ps = 32 Nm
6
q1 (degrees)
q1Des (degrees)
Joint angle (°)
4
2
0
-2
-4
-6
0
0.05
0.1
0.15
0.2
0.25
0.3
0.35
0.4
0.45
0.5
Time (s)
Figure 4.4: Actual and desired joint angle with closed muscles for
p S = 16 Nm and p S = 32 Nm
For both stiffness’, the oscillation does not fit the desired trajectory, but for
p S = 32 Nm , we can see that the base frequency is near to 2 Hz. We can expect
that for p S = 32 Nm , the valve actions and energy consumption will be less than
in the case of p S = 16 Nm , as the natural dynamics fits best the imposed
trajectory. To investigate this assumption, a simulation of an actuated oscillation
was done for p S = 16 Nm and p S = 32 Nm . Figure 4.5. depicts the joint position
Chapter 4: Results and discussion
63
and angle velocity of the two simulations for one period. There is no significant
difference between the two simulations concerning the joint angle and angle
velocity. The tracking is slightly better for the case where p S = 32 Nm .
ps = 16 Nm
75
angle
desired angle
Joint angle (°)
3.6
45
1.2
15
-1.2
-15
-3.6
-6
0.5
angle velocity
desired ang vel
0.6
0.7
0.8
-45
Angular velocity (°/s)
6
-75
1
0.9
Time (s)
ps = 32 Nm
75
angle
desired angle
Joint angle (°)
3.6
45
1.2
15
-1.2
-15
-3.6
-6
0.5
angle velocity
desired ang vel
0.6
0.7
0.8
0.9
-45
Angular velocity (°/s)
6
-75
1
Time (s)
Figure 4.5: Actual and desired joint angle and angular velocity for
p S = 16 Nm and p S = 32 Nm
In figure 4.6 and 4.7 the gauge pressures and the valve actions are depicted. To
get a clearer view on the valve actions, 2 periods are shown on the right of each
figure. For the same reason as before, the first period is not shown. In figure 4.7
the mean pressure is twice as high as in figure 4.6, this because of the difference
in value of p S . A very clear difference can be observed between the two
simulations. Looking at the valve action, we can immediately conclude that the
case where p S = 32 Nm , is the most appropriate one to track a sine wave with a
frequency of 2 Hz. That is what we already suggested before. For example,
between 4.29 and 4.91 seconds no action
Chapter 4: Results and discussion
64
ps=16Nm
1
valve action
pressure
required pressure
0.5
1
2
3
ps=16Nm
1.5
Pressure muscle 1 (bar)
Pressure muscle 1 (bar)
1.5
4
1
valve action
pressure
required pressure
0.5
5
4
4.2
Time (s)
4.8
5
1.5
Pressure muscle 2 (bar)
Pressure muscle 2 (bar)
4.6
Time (s)
1.5
1
valve action
pressure
required pressure
0.5
4.4
1
2
3
4
1
valve action
pressure
required pressure
0.5
5
4
4.2
Time (s)
4.4
4.6
4.8
5
Time (s)
Figure 4.6: Actual and required pressure in muscle 1 and 2 for p S = 16 Nm
ps=32Nm
2
valve action
pressure (bar)
required pressure (bar)
1.5
1
2
3
ps=32Nm
2.5
Pressure muscle 1 (bar)
Pressure muscle 1 (bar)
2.5
4
2
valve action
pressure (bar)
required pressure (bar)
1.5
5
4
4.2
Time (s)
4.8
5
2.5
Pressure muscle 2 (bar)
Pressure muscle 2 (bar)
4.6
Time (s)
2.5
2
valve action
pressure (bar)
required pressure (bar)
1.5
4.4
1
2
3
Time (s)
4
5
2
valve action
pressure (bar)
required pressure (bar)
1.5
4
4.2
4.4
4.6
4.8
5
Time (s)
Figure 4.7: Actual and required pressure in muscle 1 and 2 for p S = 32 Nm
is taken by the valves of muscle 1 (or between 2.45 and 3.51s). The reason for
this is that the pressure slope induced by the natural dynamics of the system, fits
the pressure slope required to track the desired trajectory.
Chapter 4: Results and discussion
We can also
65
understand why the pressure levels of the bang-bang controller are so important
during the exploitation of the natural dynamics. The pressure error of muscle 1
near to 4.75 seconds has a maximum value of 59 mbar, which means that perror
is still situated in the dead zone. A smaller dead zone would have required the
bang-bang controller to take action.
A larger dead zone will increase the
exploitation of the natural dynamics, but a larger deviation on the trajectory
tracking will be observed. A compromise has to be made between control action
and tracking error.
Table 4.2 gives a summary of the air mass flow, the exergy and the valve action
for both simulations over one period. The valve actions are defined as in (3.23)
p S = 16 Nm
p S = 32 Nm
Muscle 1
Muscle 2
Total
Muscle 1
Muscle 2
Total
Airflow input
120.1 mg
107.9 mg
228.0 mg
21.7 mg
13.9 mg
35.6 mg
Airflow output
111.4 mg
116.6 mg
228.0 mg
14.1 mg
22.1 mg
36.2 mg
Exergy inlet
19.7J
17.7 J
37.4 J
3.6 J
2.3 J
5.9 J
Exergy outlet
6.8 J
7.0 J
13.8 J
1.4 J
2.1 J
3.5 J
Inlet valve action
39.8 ms
36.0 ms
75.8 ms
7.7 ms
4.9 ms
12.6 ms
Outlet valve action
134.4 ms
141.8 ms
276.2 ms
10.5 ms
16.7 ms
27.2 ms
Table 4.2:
Air mass flow, exergy and valve action during one period of a sine
wave trajectory with frequency of 2 Hz for p S = 16 Nm and
p S = 32 Nm
The most interesting value is the exergy inlet, because this will give an indication
of the energy consumption of the system. As we can see the total input exergy in
the case of p S = 32 Nm equals 5.9 J, which is much lower than 37.4 J in the case
of p S = 16 Nm . Therefore, from this experiment we can conclude that a suitable
stiffness affects in a positive way the energy consumption and control action
during the trajectory tracking.
Chapter 4: Results and discussion
66
Simulation 2: evaluation of the mathematical formulation
The main goal is to see whether the mathematical formulation given by Verrelst
is usable. Therefore, in this simulation, joint sine wave trajectories with different
frequencies are imposed.
Table 4.3 gives an overview of the different sine wave trajectories for which the
mathematical formulation was evaluated. In the second column the calculated
values of p S , are given. The values in the third column give the optimal p S , for
the corresponding trajectory. For each trajectory, the latter values were obtained
by varying p S and evaluate where the energy consumption and valve actions are
minimized.
Sine wave frequency (Hz)
p SCalculated ( Nm)
p Ssimulation ( Nm)
1.5
12.6
12.5
1.75
21.4
21
2
31.7
31
2.25
43.2
42.5
Table 4.3: Calculated and simulated optimal values of p S for different sine
waves trajectories
Figure 4.8 depicts the energy consumption and valve actions per period for the
different sine waves in function of p S . For each trajectory, there is a p S where
energy consumption and valve action is minimum. This is the most optimal p S .
By comparing the calculated and the optimal p S , we can conclude that the
mathematical formulation is indeed suitable for setting the stiffness. The optimal
p S is increasing as the frequency is increasing. This was expected because p S
is influencing the stiffness and a higher oscillation frequency requires a higher
stiffness.
Chapter 4: Results and discussion
67
40
15
30
10
20
5
10
7
9.4
11.8
14.2
ps (Nm)
0
19
Frequency = 2 Hz
25
Exergy
Total inlet exergy (J)
16.6
50
Valve action
20
40
15
30
10
20
5
10
0
25
28.2
31.4
34.6
ps (Nm)
37.8
20
40
15
30
10
20
5
10
0
13
25
0
41
15.8
18.6
21.4
ps (Nm)
24.2
Frequency = 2.25 Hz
Exergy
Total inlet exergy (J)
0
50
Valve action
0
27
50
Valve action
20
40
15
30
10
20
5
10
0
37
39.4
41.8
44.2
ps (Nm)
46.6
Inlet valves action (ms)
20
Frequency = 1.75 Hz
Exergy
Total inlet exergy (J)
Valve action
25
Inlet valves action (ms)
Total inlet exergy (J)
Exergy
50
Inlet valves action (ms)
Frequency = 1.5 Hz
Inlet valves action (ms)
25
0
49
Figure 4.8: Energy consumption and valve action in function of p S , for
different trajectories
In the previous discussion only sine wave trajectories were imposed. For these
trajectories the passive behaviour fits the imposed trajectory if p S is set right. In
this case a constant p S value is justified.
We have to remember that the goal of this thesis is to investigate the possibility
to exploit natural dynamics for implementing it later into the biped ‘Lucy’. In
general, the trajectories for such a biped are not just sine waves with only one
frequency component. For such a situation, a constant p S will not be suitable as
shown in figure 4.9.
In this figure, a sine wave with a linear increasing
frequency from 1.5 Hz to 2 Hz is imposed. Only the pressure course for one
muscle is shown here. The trajectory can still be tracked but we can clearly see
that the natural dynamics are only exploited in the time interval [2,2s – 3s ] , or
in other words, for a certain frequency range of the imposed trajectory. At a
frequency higher than 1.92 Hz even 4 exhaust valves are opened, in order to
increase the flow rate and consequently track the required pressure course. Note
also that the mean pressure inside the muscle remains constant during the whole
simulation, due to a constant p S = 21Nm .
Chapter 4: Results and discussion
68
Frequency
Joint angle (°)
6
1.55
1.6
1.65
1.7
1.75
1.8
1.85
1.9
1.95
2
4
2
0
-2
-4
q1 (degrees)
q1Des (degrees)
-6
1
2
3
4
5
6
7
8
9
10
1.8
1.85
1.9
1.95
2
Time (s)
Pressure muscle 1 (bar)
2.5
Frequency
1.55
1.6
1.65
1.7
1.75
2
1.5
valve action
pressure
required pressure
1
1
2
3
4
5
6
7
8
9
10
Time (s)
Figure 4.9: Joint angle, pressure and frequency for a trajectory with linear
varying frequency
The conclusion of this simulation is that a varying p S will be more suitable for
trajectories different from a pure sine wave. This will be the discussion of the
next simulation.
Simulation 3: changing the stiffness online
The purpose of this simulation is to evaluate the method of using a varying p S ,
or stiffness, as described in chapter 3. This was done by imposing the same
trajectory as in figure 4.9.
First, some comments have to be given on the equations that were used during
this simulation.
In chapter 3 a complete description of the mathematical
formulation was given. Using these equations led to unsatisfying results: the
~
stiffness K associated with the desired trajectory, became infinitive in some
points.
Chapter 4: Results and discussion
69
The explanation for this phenomenon can be found by starting from the
dynamically required stiffness, derived from the equation of motion:
~
~
~ ⎞
d ⎛
d 2θ
~ dT
K = ~ = ~ ⎜⎜ d11 2 + g 11 sin(θ ) ⎟⎟
dt
dθ dθ ⎝
⎠
~
3~
⎛ d 3θ
~
d θ dt
⎜
= d11 3 ~ + g 11 cos(θ ) = d11 ⎜ 3
dt dθ
⎝ dt
~
~
dθ ⎞
⎟ + g 11 cos(θ )
⎟
dt ⎠
(4.1)
with:
⎧
⎪θ~ = A cos(ω′t)
⎪⎪
⎨ω′ = ω0 + ωt
⎪
ω − ω min
⎪ω = max
t simulation − 1
⎩⎪
(4.2a)
(4.2b)
(4.2c)
~
The derivatives of the desired trajectory θ are given by:
~
dθ
= − A sin ω0 .t + ω.t 2 (ω0 + 2ω.t )
dt
~
d 2θ
= − A cos ω0 .t + ω.t 2 (ω0 + 2ω.t ) 2 − 2ωA sin ω0 .t + ω.t 2
2
dt
~
d 3θ
3
= A sin ω0 .t + ω.t 2 (ω0 + 2ω.t ) − 4ωA cos ω0 .t + ω.t 2 (ω0 + 2ω.t )
3
dt
−2ωAcos ω0 .t + ω.t 2 (ω0 + 2ω.t )
(
)
(
)
(
(
)
(
)
(
)
)
(4.3a)
(4.3b)
(4.3c)
~
Thus we have for K :
(
(
))
~
~
2
K = d 11 (ω 0 + 2ω.t ) − 6ω cotg ω0 .t + ω.t 2 + g 11 cos(θ )
(4.4)
~
We see that a cotg() functions arises for this specific trajectory. The course of K
is depicted in the first plot in figure 4.10. In the second plot, the cotg( ) term is
~
given. The latter explains why K is being infinitive. The cotg( ) term can be
Chapter 4: Results and discussion
70
K(Nm/rad) with noise
~
seen as a noise signal disturbing K and is therefore neglected. The resulting
~
course of K is given in the third plot.
250
200
150
100
50
0
0
1
2
3
4
5
6
7
8
9
10
6
7
8
9
10
6
7
8
9
10
Time (s)
Noise (Nm)
100
50
0
-50
K(Nm/rad) without noise
-100
0
1
2
3
4
5
Time (s)
250
200
150
100
50
0
1
2
3
4
5
Time (s)
~
Figure 4.10: Stiffness K and noise due to cotg( ) term for the specific trajectory
~
K is now given by:
~
~
2
K = d 11 (ω 0 + 2ω.t ) + g 11 cos(θ )
(4.5)
In the graph at the bottom of figure 4.10, we can observe that the required
stiffness is increasing as the frequency increases. This is what we expected,
because if the frequency of the imposed trajectory increases, a higher stiffness of
the antagonistic setup with closed muscles will be needed in order to exploit
natural dynamics.
Using this equation, running the simulation for an imposed trajectory with
frequency varying between 1.5 Hz and 2 Hz and using a varying p S , gives us the
pressure course as depicted in figure 4.11. To compare this to the situation
where a constant p S was used, the pressure course from figure 4.9 was redrawn
in figure 4.12. Comparing figure 4.11 and 4.12, we can conclude that valve
Chapter 4: Results and discussion
71
action is extremely decreased. The natural dynamics are now being exploited
during the whole simulation, this by making p S variable.
4
Frequency
1.55
1.6
Variable p
1.65
1.7
1.75
1.8
1.85
1.9
1.95
2
s
3.5
Pressure muscle 1 (bar)
3
2.5
2
1.5
1
valve action
pressure
required pressure
0.5
1
2
3
4
5
6
7
8
9
10
Time (s)
Figure 4.11: Actual and required pressure and valve action for a trajectory
with linear varying frequency and p S online changed.
4
Frequency
1.55
1.6
1.65
1.7
3
4
Constant p = 21 Nm
1.75
1.8
1.85
1.9
1.95
2
5
6
7
8
9
10
s
3.5
Pressure muscle 1 (bar)
3
2.5
2
1.5
1
valve action
pressure
required pressure
0.5
1
2
Time (s)
Figure 4.12:
Actual and required pressure and valve action for a trajectory
with linear varying frequency and a constant p S .
Chapter 4: Results and discussion
72
Because the required oscillation frequency is increasing, energy has to be
injected into the system. This explains why in figure 4.11 more inlet valve
actions are taken during the whole trajectory. Once, the frequency remains
constant, the inlet valve actions will decrease, since no additional energy has to
be injected.
Note that the pressure is increasing as the frequency of the imposed trajectory
increases. As mentioned before, the required stiffness raises as the frequency
raises, which means that the sum of pressures in the muscles has to increase.
This also means that p S increases, as it represents a parameter to influence the
sum of the pressures. The evolution of p S along the trajectory is shown in figure
4.13.
90
80
70
ps calculated(Nm)
ps1 (Nm)
ps2 (Nm)
ps calculated + 50% deviation(Nm)
ps calculated - 50% deviation(Nm)
ps (Nm)
60
50
40
30
20
10
0
1.5
1.55
1.6
1.65
1.7
1.75
1.8
1.85
1.9
1.95
2
Frequency (Hz)
Figure 4.13: p S in function of the frequency of the imposed trajectory.
Deviations on p S were introduced to investigate the effect on the valve control
when the online calculation of p S is not giving the correct value. This can be
interesting to know, since we can already expect that the online calculation of the
optimal p S for the simulation will not necessarily give the optimal p S for the
physical pendulum. The influence on the valve actions is given in figure 4.14.
On the left we can see the valve actions during the whole simulation and on the
Chapter 4: Results and discussion
73
right a detailed view is given. We can draw the same conclusion as before: a
wrong variable value of p S will increase the valve actions. Therefore, it will be
important to have a good model of the pendulum setup, such that the method
with variable stiffness can be used during experiments.
1.8
1.9
2
2.5
2
4
6
8
10
1.6
1.7
1.8
1.9
2
2
1.5
2.5
2
1.6
4
6
1.7
1.8
8
1.9
10
2
2
1.5
2
4
6
8
10
Time (s)
Valve actions
1.7
2
1.5
Valve actions(ps -50%) Valve actions(ps +50%)
Frequency
1.6
Valve actions(ps -50%) Valve actions(ps +50%)
Valve actions
2.5
2.5
1.725
Frequency
1.73
1.735
1.74
1.745
1.75
1.5
4.5
4.6
4.7
4.8
4.9
5
3.5
1.725
1.73
1.735
1.74
1.745
1.75
2.5
4.5
4.6
4.7
4.8
4.9
5
1.5
1.725
1.73
1.735
1.74
1.745
1.75
4.6
4.7
4.8
4.9
5
2
3
1
0.5
4.5
Time (s)
Figure 4.14: Effect on the valve actions due to deviation on the online
changing parameter p S
With this simulation, the importance of using a variable p S for tracking
trajectories with not only one frequency component, has been showed. Using a
variable p S , will result in a variable mean of the pressure in each muscle
separately. Therefore, the antagonistic setup should be designed in such a way
that p S stays between a certain range, in order to limit the gauge pressure in the
muscles between 0 bar and 3.5 bar. Or, in the case of the biped ‘Lucy’, the
generated trajectories should take into account those limits if natural dynamics
should be exploited.
Chapter 4: Results and discussion
74
4.3. The physical pendulum
4.3.1. Evaluation of the joint trajectory tracking controller
In the previous section the joint trajectory tracking controller was evaluated by
means of computer simulations. The physical pendulum was built in order to
perform some tracking experiments, and to adapt the simulation model according
to the experimental data. In this section the performance will be discussed and
an overview will be given of which parameters differs from the simulation
model.
A correct estimation of these parameters was not done, but the
Angular velocity (°/s)
importance should not be neglected.
First tracking experiment
Measured
Desired
50
0
-50
0
1
2
3
4
5
6
7
8
9
10
Torque(Nm)
time (s)
Total torque
CT(model part)
P action
I action
D action
10
0
-10
0
1
2
3
4
Pressure 1 (bar)
5
6
7
8
9
10
time (s)
3.5
Pressure muscle 1
Desired pressure
Valve action
3
2.5
2
1.5
0
1
2
3
4
5
6
7
8
9
10
time (s)
Figure 4.15: Angular velocity, computed torque and absolute pressure for
first tracking experiment
In order to investigate if exploitation of the natural dynamics is possible, a good
working trajectory tracking controller has to be implemented. In a practical
setup, some additional problems arise, e.g. noise on the pressure sensor signal or
small errors in the joint angle information. An even more important problem is
the measuring of the angular velocity. The angular velocity is required by the
computed torque module, and in order to have a stable controller, this parameter
Chapter 4: Results and discussion
75
has to be well known and as much as possible free of noise. As we cannot
directly measure the angular velocity, it should be calculated numerically,
starting from the joint angle acquired with the incremental encoder. Therefore, a
first order numerical method was used. Figure 4.15 shows the angular velocity,
the computed torque performance and the absolute pressure in muscle 1 for the
first tracking experiment. A sine wave with a frequency of 1.75 Hz was imposed
and a constant p S = 14 Nm was used. As we can see, a lot of noise appears on
the angular velocity signal. This will have an impact on the tracking controller
as the servo portion will have to cope with this noise. We clearly see that the Daction is trying to eliminate this noise. The delta-p unit transforms the noisy
computed torque to pressure levels, which means that a lot of valve action will be
taken by the bang-bang controller as shown at the bottom of figure 4.15. The
valves are switching a lot, and most of the time the 4 outlet or 2 inlet valves are
opened in order to track the pressure course.
With regard to energy
Angular velocity (°/s)
consumption, this is unacceptable.
First tracking experiment
Measured
Desired
50
0
-50
0
1
2
3
4
5
6
7
8
9
10
Torque(Nm)
time (s)
Total torque
CT(model part)
P action
I action
D action
10
0
-10
0
1
2
3
4
Pressure 1 (bar)
5
6
7
8
9
10
time (s)
3.5
Pressure muscle 1
Desired pressure
Valve action
3
2.5
2
1.5
0
1
2
3
4
5
6
7
8
9
10
time (s)
Figure 4.16: Angular velocity, computed torque and absolute pressure for a
tracking experiment by using a filter on the angular velocity.
To avoid such problems, a first order digital filter was used on the angular
velocity. A bilinear transformation was done in order to convert an analog to a
Chapter 4: Results and discussion
76
digital filter.
The bilinear transformation is a mathematical mapping of
variables. In digital filtering, it is a standard method of mapping the s or analog
plane into the z or digital plane. It transforms analog filters, designed using
classical filter design techniques, into their discrete equivalents [19]. The first
order analog filter used on the physical pendulum is given by:
H a (s) =
1
s
ωa
(4.6)
+1
Pre-warping the filter design gives:
⎛ ω dcut −off TS
2
ω a = tan⎜⎜
2
TS
⎝
⎞
⎟⎟
⎠
(4.7)
with Ts , the sample time and ω dcut −off the cut-off pulsation of the desired digital
filter, given by:
⎧ω dcut −off = 2 π f cut −off
⎪
⎨ f cut − off = 10 Hz
⎪
⎩TS = 2ms
(4.7a)
(4.7b)
(4.7c)
The bilinear transformation is given by:
⎛ 2 ⎛ z −1⎞⎞
H d ( z ) = H a ⎜⎜ ⎜
⎟ ⎟⎟
⎝ TS ⎝ z + 1 ⎠ ⎠
(4.8)
which results in the digital filter:
H d (z ) =
Chapter 4: Results and discussion
b1 z + b0
a1 z + a 0
(4.9)
77
With
⎧
⎛
2 ⎞ ⎛
2
⎟⎟ ⎜⎜1 +
⎪a 0 = ⎜⎜1 −
⎝ TS ω a ⎠ ⎝ TS ω a
⎪
⎪
⎨
⎪
⎪b = b = 1 ⎛⎜1 + 2 ⎞⎟
1
⎜ Tω ⎟
⎪⎩ 0
S a ⎠
⎝
⎞
⎟⎟ , a1 = 1
⎠
(4.9a)
(4.9b)
The introduction of a filter greatly improved the performance of the joint
trajectory controller. Figure 4.16 shows the angular velocity, computed torque
and the absolute pressure when a filter is used. Very remarkable is the effect of
the filter on the valve actions and is a first step in the correct direction
concerning energy consumption. The gains used by the servo portion of the
computed torque, were manually tuned in such a way that stability is still ensured
and control actions are minimized without affecting the tracking accuracy. As
was explained, in chapter 3 it is important to have a good estimation of the model
parameters, in order to reduce the servo portion to a minimum. No friction
model was used during the experiment. Also the existing of small air leaks in the
muscles and tube connections were not taken into account. In the future, a finetuning of the model should be made.
The joint angle is given in figure 4.17. We can see that the control unit is
suitable to track this trajectory.
During the first period, tracking is not so
accurate. An explanation can be found in the pressure course also depicted in
figure 4.15. In the beginning, the pendulum is at rest at an angle of 5 °. The
muscles are inflated and a certain pressure is set into the muscle. Once the
experiment starts, a pressure much lower than the actual pressure is needed. All
the outlet valves are opened in order to track the pressure course, but this is not
enough. The pressure gradient over the valves is insufficient, so that the time
constant of deflation is too large in comparison to the requirements associated
with the imposed pressure course. This can cause the pendulum to become
unstable. A reason for this unwanted phenomena, is the use of an exhaust
silencer, as it obstructs the dynamic performance of the muscle deflation. The
Chapter 4: Results and discussion
78
pressure rise in the silencer lowers the exhaust airflow. During the construction,
this silencer was made as large as possible to avoid such situations.
6
Measured
Required
Joint angle (°)
4
2
0
-2
-4
-6
0
1
2
3
4
5
6
7
8
9
10
time (s)
Pressure 1 (bar)
3.5
Pressure muscle 1
Desired pressure
Valve action
3
2.5
2
1.5
0
1
2
3
4
5
6
7
8
9
10
time (s)
Figure 4.17: Measured and desired joint angle θ and pressure course for
muscle 1
Other solutions for this problem are increasing the outlet valves, or setting the
initial muscle pressure at a lower level. The first option is important if high
oscillation frequencies are needed, since high pressure gradients over the valves
will then be required.
The reason why the initial pressure is set at such a high level requires an
explanation. In the beginning, the idea was to start at an initial angle of zero
degrees and to use a sine function for the imposed trajectory. Because of a
discontinuity in the angular velocity ( θ&(t = 0− ) = 0 , θ&(t = 0+ ) = Aω ), instability
occurred. Therefore, we opted to start at an initial angle equal to the amplitude
of the imposed trajectory. The trajectory used to bring the pendulum in its initial
position as depicted in figure 4.18. By using this trajectory, the discontinuity of
the angular velocity is eliminated. When the initial angle is reached, a certain
settling time is needed for the pendulum to stay at rest. The settling time can
seriously be decreased by increasing the stiffness of the joint. This means that
Chapter 4: Results and discussion
79
p S has to be increased during the tracking of the initial trajectory, and as a
consequence the initial pressure will be at a higher level.
6
Initial trajectory
Required trajecory experiment
Joint angle (°)
4
2
0
-2
-4
-6
-5
-4
-3
-2
-1
0
1
2
3
4
5
time (s)
Figure 4.18: Initial trajectory and imposed trajectory during experiments
During the experiments an increasing deviation on the joint angle was observed
as the time increased due to some miscounts of the encoder signal. This was not
a problem in the context of this thesis, because the acquisition time during the
experiments was relatively short.
But in the future, the third signal of the
incremental encoder should also be incorporated, in order to reset the encoder
counter when the pendulum passes trough his reference angle.
Based on this section, we can conclude that the proposed control architecture is
able to track sine wave trajectories. In order to reduce energy consumption, the
exploitation of the natural dynamics is required. This is shown in the next
section.
4.3.2. Exploitation of the natural dynamics
4.3.2.1. General considerations
We want to investigate the exploitation of the natural dynamics of the system in
order to reduce energy consumption.
A method to estimate the energy
consumption was given in chapter 3. Of course, this will not give us the correct
value, but it is interesting to have an idea of the energy consumption and control
action taking place during the experiment. If a correct estimation is needed,
Chapter 4: Results and discussion
80
measurement of the airflow, air temperature and muscle volume will be needed.
In our case, we only want to investigate whether the PPAM can be used to
exploit the natural dynamics of the system and therefore the formulation from
chapter 3 will do. The calculation of the energy is only started after two seconds
of acquisition, when the pendulum is in regime.
As mentioned before, the dead zone of the bang-bang controller has an important
influence on energy consumption. Changing the pressure levels of the bang-bang
controller will increase or decrease valve actions. In order to investigate only the
influence of the stiffness on the energy consumption and valve actions, these
pressure levels were set to constant values given by table 4.4. These values were
manually tuned, so that control effort is minimized by taking into account the
trajectory tracking accuracy
P < 2.5 bar
P ≥ 2.5 bar
perror (mbar)
perror (mbar)
a
-120
-120
Open all exhaust valves
b
-60
-30
Open one exhaust valve
c
-40
-25
Close all exhaust valves
d
40
25
Close all inlet valves
e
60
30
Open one inlet valve
f
120
120
Open all inlet valves
Valve action
Table 4.4: Pressure levels of the bang-bang controller for the physical pendulum
4.3.2.2. Results and discussion
In the context of the exploitation of the natural dynamics, one experiment was
done on the physical pendulum.
The main goal is to find out if energy
consumption and control action can be minimized by setting the appropriate
stiffness and to determine the value of the optimal stiffness. Therefore, the
stiffness parameter p S was varied, and for different trajectories, energy
consumption and valve action were calculated. The same experiment was done
Chapter 4: Results and discussion
81
in the computer simulation model, of which results were already shown in figure
4.8. Remember that in the simulation model, the optimal p S and the p S found
with the mathematical formulation given by Verrelst were compared.
We
concluded that the method of the pressure slopes was suitable for sine trajectories
with one frequency component, as the two values were almost the same.
In the case of the physical pendulum, energy consumption and valve action,
defined by (3.23), for one period of different trajectories are given in figure 4.19.
Total input exergy vs ps
25
1.5 Hz
1.75 Hz
2 Hz
15
10
5
0
0
10
20
30
6
4
0
40
In valves muscle 1
In valves muscle 2
Out valves muscle 1
Out valves muscle 2
20
50
30
40
25
5 degrees
10 degrees
20
100
0
10
Influence amplitude on total input exergy
Exergy (J)
150
0
ps (Nm)
Valve actions (frequency = 1.75 Hz)
200
Valve actions (ms)
8
2
ps (Nm)
0
1.5 Hz
1.75 Hz
2 Hz
10
Exergy (J)
Exergy (J)
20
Total output exergy vs ps
12
15
10
5
10
20
ps (Nm)
30
40
0
0
10
20
30
40
ps (Nm)
Figure 4.19: Energy consumption and valve action for one period of different
trajectories in function of the stiffness parameter p S
We can clearly identify optimal values for p S , where energy consumption and
valve actions are minimized. This is also illustrated by figure 4.20,where the
valve actions, required to track a trajectory with a frequency of 1.75 Hz and an
amplitude of 5 degrees is depicted. In this figure two different values of p S
were set, a wrong and the optimal value. If we look between 1.32s and 1.7s, no
valve action is taken for p S = 19Nm , because the natural pressure course fits the
required one. Comparing with p S = 30 Nm , we can conclude that it is important
Chapter 4: Results and discussion
82
to set the right stiffness in order to exploit the natural dynamics of the pendulum.
This was already concluded in simulation, but now it is confirmed in practice.
ps = 30 Nm
Pressure muscle 1
Desired pressure
Valve action
Pressure 1 (bar)
3.2
3.1
3
2.9
2.8
2.7
0
0.5
1
1.5
2
2.5
3
3.5
4
4.5
5
time (s)
ps = 19 Nm (Optimal)
2.6
Pressure muscle 1
Desired pressure
Valve action
Pressure 1 (bar)
2.5
2.4
2.3
2.2
2.1
2
0
0.5
1
1.5
2
2.5
3
3.5
4
4.5
5
time (s)
Figure 4.20: Influence of the stiffness parameter p S on the valve action and
the absolute pressure in the muscle
Another way to illustrate how p S influences the natural dynamics, is the
unactuated oscillation of the pendulum for the two different stiffness parameters.
This is given in figure 4.21. After 10 seconds of control, the muscles are closed.
If the stiffness is suitable, when p S = 19 Nm , the base frequency of the
uncontrolled oscillation approximates 1.75 Hz during the two first periods.
While when p S = 30 Nm , the base frequency is situated around 2 Hz, since the
stiffness of the joint is higher. When p S = 10 Nm the base frequency is about 1.4
Hz, since the stiffness of the joint is lower. We only consider the two first
periods, because due to friction and leakage of the pneumatic system, the
uncontrolled oscillation will damp and frequency will change.
Chapter 4: Results and discussion
83
Joint angle (°)
5
Measured Angle (ps = 30Nm)
Desired angle
0
-5
5
6
7
8
9
10
11
12
13
14
15
11
12
13
14
15
11
12
13
14
15
Joint angle (°)
time (s)
5
Measured Angle (ps = popt = 19Nm)
Desired angle
0
-5
5
6
7
8
9
10
Joint angle (°)
time (s)
5
Measured Angle (ps = 10Nm)
Desired angle
0
-5
5
6
7
8
9
10
time (s)
Figure 4.21: The uncontrolled oscillation of the pendulum for three different
stiffness parameters p S after a controlled period of 10 seconds
As was mentioned before and shown in figure 4.20, setting a different stiffness
changes the mean pressure. This means that the stiffness is bounded between
two values, since the absolute pressure in the muscle is limited between 1 and 4.5
bar. Varying the stiffness till those limits were reached, showed that the range of
p S for this pendulum is bounded between 6 and 40 Nm
In figure 4.19, the influence of the amplitude on the input exergy is shown. The
amplitude has little influence on the optimal stiffness, like was expected, but
energy consumption seems to be higher. Due to the nonlinear torque to angle
relation, the shape of the passive trajectory deviates from a pure sine-wave. The
deviation from the sine-wave increases for larger amplitudes. Consequently,
more valve switching is needed for larger movements. This clearly shows the
importance of designing a joint with a linear torque characteristic when muscles
are closed, when sine-wave trajectories with one frequency component are
imposed.
Chapter 4: Results and discussion
84
In order to see whether the method of the pressure slopes can be used on the
practical setup, a resume of the optimal p S values of the experimental setup is
given in table 4.5 and compared with the calculated and simulation values.
Sine wave frequency (Hz)
al
( Nm)
p SExperiment
,optimal
p SCalculated (Nm)
p Ssimulation
,optimal ( Nm)
1.5
12
12.6
12.5
1.75
19
21.4
21
2
29-30
31.7
31
Table 4.5: Experimental, calculated and simulated optimal values of p S for
different sine-wave trajectories
The experimental values are near to the calculated and simulated values. From
this we can conclude that the method of the pressure slope could be used, but
only as an approximation of the optimal stiffness. The stiffness will not be set at
his optimal value, but still energy consumption and valve action will be
decreased and natural dynamics will be exploited.
The error that is made by using this method, can be decreased by a better
parameter estimation, e.g. leaks in the tubing and muscle and friction. The most
important parameters to be estimated, are the volume of the muscle and the
polytropic exponent. The volume is calculated using the estimated polynomial
fitting described in section 2.2.1., which does not take into account the volumes
of the end fittings and tubing’s. Besides this, the estimated polynomial fitting
was done on a theoretical model of the muscle. For the mathematical description
of the enclosed volume, the pleated polyester membrane is approximated by
considering at each parallel section a circular membrane pattern instead of the
pleated structure. No experimental data on the volume has ever been acquired.
The polytropic exponent is introduced to describe deviations from the isentropic
expansion/compression taking place when muscles are closed and the pendulum
is oscillating. The value of the exponent should be experimentally estimated and
may depend on the specific process. The estimation of these parameters was not
done during this thesis, but is very importance if a varying stiffness has to be
Chapter 4: Results and discussion
85
used in combination with trajectory tracking. But still, promising results were
produced.
4.4. Conclusion
In this chapter the trajectory tracking control structure as described in chapter 3
was evaluated on a computer simulation model and a physical pendulum. The
simulation model showed that the proposed control architecture copes with the
nonlinearities introduced by the actuator characteristics and dynamic model of
the pendulum. The importance of a correct estimation of the model parameters
was demonstrated by introducing deviations on the inertia, the mass, the centre of
gravity and on the force function. The implementation of the control unit into
the physical pendulum required the introduction of a filter to reduce the noise on
the calculated angular velocity. A tracking experiment illustrates that the control
unit is able to follow a sine-wave. The main differences with the simulation
model were also discussed.
In the context of the exploitation of the natural dynamics, 3 experiments were
performed on the computer simulation model and one on the physical pendulum.
In the first experiment, the simulation results showed the importance of setting
the right joint stiffness in order to reduce control effort and energy consumption.
In the second experiment, the mathematical formulation, described in section 3.3,
was evaluated. Therefore, the constant stiffness obtained by this method was
compared with the optimal stiffness found by tuning the stiffness manually. We
concluded that the mathematical formulation can indeed be used to estimate the
optimal stiffness, when a sine-wave with one frequency component is imposed.
In order to exploit the natural dynamics for trajectories with more than one
frequency component, the stiffness was changed online in experiment 3. A sinewave trajectory with linear varying frequency was imposed.
By using the
method of varying stiffness, the control unit was able to track the desired
trajectory in combination with the exploitation of the natural dynamics.
The experiment on the physical pendulum was performed to find out if energy
consumption and control action can practically be minimized by setting the
appropriate stiffness and to determine the value of the optimal stiffness. For
Chapter 4: Results and discussion
86
different trajectories, the optimal stiffness was found.
By comparing the
experimental values of the stiffness parameter with those found in the simulation,
we were able to conclude that the method of the pressure slopes can be used to
approximate the optimal stiffness.
A better parameter estimation of the
pendulum’s model and the bang-bang controller’s pressure level will decrease
the error made on the estimation of the stiffness.
Once these parameters are correctly estimated, we should be able to vary the
stiffness along the trajectory. Therefore, adapting the pendulum model to all
experimental data and tuning the bang-bang controller is the next step to take in
order to completely exploit the natural dynamics.
Chapter 4: Results and discussion
87
Chapter 5
General conclusions and future
perspectives
This thesis reports on the design, construction and control of a one-dimensional
pendulum actuated by a pair of pleated pneumatic artificial muscles (PPAM).
Pneumatic artificial muscles have very interesting characteristics towards
exploitation of natural dynamics of the system. Due to the compressibility of air
and the dropping force to contraction characteristic, a joint actuated by two
antagonistically positioned muscles has a compliant behaviour, which can be
adapted while controlling position. The main purpose is to use this adaptable
joint compliance to combine exploitation of natural dynamics combined with
joint trajectory control, in order to reduce control effort and energy consumption
significantly. The joint trajectory controller tracks the imposed trajectory, while
changing the joint stiffness, as such that the natural trajectory corresponds as
much as possible to the reference trajectories. The investigation on this theme is
done on both a computer simulation model and a physical pendulum. The latter,
together with its soft- and hardware, had to be designed and constructed. A lot of
time was spent on testing and debugging the different components.
Chapter 2 discusses both mechanical and electronic design required for a well
working physical setup.
The mechanical design focuses on the actuator
connection, as it defines the joint characteristics of the antagonistic muscle setup
and consequently the compliance. Therefore a formal description of the joint
kinematics is given and it is shown that the joint position is influenced by
differences in both muscle pressures; while the compliance of the joint, with
closed muscles, is set by a weighted sum of pressures.
The basic frame,
supporting structure and pneumatic circuit are assembled to form one modular
part of ‘Lucy’. In order to control the pressure in a muscle, fast switching on/off
valves are used. The electronics required to action these valves together with the
pressure sensors and the incremental encoder are tested and described. A data
acquisition card serves as a data transfer agent between the experimental setup
and a computer, on which the complete control of the pendulum is implemented.
The control architecture used to combine joint trajectory tracking with
exploitation of the natural dynamics, is explained in chapter 3.
The joint
trajectory tracking controller consists of a multilevel construction of several
essential blocks, which try to cope with the system’s nonlinearities at separate
levels. A model-based feedforward controller calculates the required torques to
track the desired joint trajectories. These calculated torques are then transformed
into desired muscle pressure levels by a delta-p unit, coping with the
nonlinearities introduced by the muscle actuation system. Finally, a bang-bang
pressure controller with dead-zone commands the valves in order to set the
required pressures in the muscles. A mathematical formulation is given in order
to incorporate the natural dynamics in the control unit. The starting point for
finding an appropriate constant stiffness, is to fit the natural pressure slopes, this
is when both muscles are closed, with the required ones. The better these two fit,
the less action will be taken by the bang-bang controller. Consequently, energy
consumption and control effort are decreased. Based on this formulation, an
additional method is given to change the stiffness online. In order to evaluate the
tracking controller and the pressure slope method, a simulator, based on the one
used for ‘Lucy’, is developed.
Chapter 4 gives an overview of the results that are obtained with the computer
simulation model and the practical setup. For both, tracking experiments are
performed in order to evaluate the robustness of the trajectory tracking controller.
From these experiments, the conclusion can be drawn that the proposed control
structure is indeed suitable to track imposed trajectories. Great importance is
attached to the incorporation of the natural dynamics of the system. First of all,
the simulation model is used to show the influence of setting a constant suitable
stiffness on the energy consumption and control effort when a sine-wave with
only one frequency component is imposed. The optimal stiffness values are
found for different frequencies of the imposed sine-wave. These values are then
compared to the constant values obtained with the method of pressure slopes.
Based on these results, we can consider that the method can be used for setting
the suitable stiffness. We can draw the same conclusion for the method of
changing the stiffness online. This is interesting for further research on ‘Lucy’,
Chapter 5: General conclusions and future perspectives
89
since the required trajectories are not pure sine-waves and thus an online varying
stiffness will be needed in order to exploit natural dynamics of the complete
robot. Experiments on the physical pendulum are performed, in order to find the
optimal stiffness for imposed sine-wave trajectories with one frequency
component. These optimal values are compared with the simulation values. The
results are very promising, as both values are situated near to each other. This
means that a method is found to control the stiffness of the physical pendulum in
order to exploit the natural dynamics in combination with trajectory tracking.
Two main steps should be taken to improve the performance the stiffness control:
•
A correct estimation of the pendulum’s parameters. The muscle volumes,
the polytropic exponent and the friction are the most important
parameters to be estimated.
•
Fine tuning of the pressure levels of the bang-bang controller. The dead
zone should be exploited as much as possible, without losing tracking
accuracy.
Before using this technique on ‘Lucy’, a study should be done on a double
pendulum, in order to investigate the coupling effects, which can lead to chaotic
behaviour of the system. Finally, the same investigation should be done on an
inverted pendulum.
To conclude, in this master thesis the first steps in the direction of exploitation of
natural dynamics by using PPAM’s were made.
Chapter 5: General conclusions and future perspectives
90
Appendix A
Dynamic model of the pendulum
X
O
τ
Y
G2 , m2 , I 2 , l 2
G1 , m1 , l1
θ
Figure A.1: Schematic overview of the studied model
In this section the equation of motion for the model depicted in figure A.1 is
derived. A Newton-Lagrange formulation of the equation of motion is used for
this purpose. The model has only one DOF θ :
d ⎧ ∂K ⎫ ∂K ∂U
+
= Qθ
⎨ ⎬−
dt ⎩ ∂θ& ⎭ ∂θ ∂θ
(A.1)
K is the total kinetic energy and U the potential energy. Qθ is the generalized
force associated with the pendulum.
The kinematic expressions for the positions and velocities of the centers of mass
for the different links are given by:
OG 1 = l1 (sin θ , cos θ )
(A.2)
T
OG 2 = α l 2 (sin θ , cos θ )
T
v G1 = l (cos θ ,− sin θ ) θ&
(A.3)
T
v G2 = α l 2 (cos θ ,− sin θ ) θ&
(A.5)
T
1
(A.4)
The total potential energy of the pendulum is equal to:
U = m1 gYG1 + m2 gYG2
(A.6)
U = g (m1l1 + α m2 l 2 ) cos θ
(A.7)
Which results in:
The partial derivative becomes:
∂U
= − g (m1l1 + α m2 l 2 ) sin θ
∂θ
(A.8)
The kinetic energy K i of part i is given by:
Ki =
1
1
mi vG2 i + I i ω i2
2
2
(A.9)
with ω i the angular velocity for part i . For the two parts this becomes:
1
2
m1l1 θ& 2
2
1
2
K 2 = m2α 2 l 2 + I 2 θ& 2
2
K1 =
(
(A.10)
)
The total kinetic energy is the sum of these two terms:
K=
(
)
1
2
2
m1l1 + m2α 2 l 2 + I 2 θ& 2
2
(A.11)
Now the different derivatives of the kinetic energy can be calculated:
(
)
d ⎧ ∂K ⎫
2
2 2
⎨ & ⎬ = m1l1 + m2α l 2 + I 2 θ&&
dt ⎩ ∂θ ⎭
∂K
=0
∂θ
Chapter A: Dynamic model of the pendulum
(A.12)
(A.13)
92
The torque τ applied in the pivot point represents the generalized force. So the
equation of motion for this model can be summarized as followed:
τ = D(θ )θ&& + C (θ ,θ&)θ& + G (θ )
(A.14)
With:
D(θ ) = m1l12 + m2α 2 l 22 + I 2
C (θ ,θ&) = 0
(A.15)
G (θ ) = − g (m1l1 + m2α l 2 )sin (θ )
Chapter A: Dynamic model of the pendulum
93
Appendix B
Safety Board
Figure B.1: Electronic scheme of the safety, supply and transformation board
Chapter B: Safety board
94
Bibliography
1. Robotics
[1]
Craig, J. J. [1986]. Introduction to Robotics: Mechanics & Control,
Addison-Wesley Publishing Company
[2]
Daerden, F. [1999]. Conception and Realization of Pleated Pneumatic
Artificial Muscles and their Use as Compliant Actuation Elements, PhD
thesis, Vrije Universiteit Brussel.
[3]
Garcia, M., Chatterjee, A., Ruina, A. and Coleman, M. [1998]. The
simplest walking model: Stability, complexity, and scaling, ASME Journal
of Biomechanical Engineering 120: 281-288.
[4]
Hurst, W., Chestnutt, J., E. and Rizzi, A., A. [2004]. An actuator with
Mechanically Adjustable Series Compliance, technical report CMU-RITR-04-24, Robotics Institute, Carnegie Mellon University.
[5]
McGeer, T. [1990]. Passive dynamic walking, International Journal of
Robotics Research (Special Issue on Legged Locomotion) 9(2): 62-82.
[6]
Pratt, J. E. and Pratt,G. [1998]. Exploiting natural dynamics in the control
of a planar bipedal walking robot, Proceedings of the 36th Annual Allerton
Conference on Communication, Control, and Computing, Monticello,
Illinois.
[7]
Pratt, J. E. [2000]. Exploiting Inherent Robustness and Natural Dynamics
in the Control of Bipedal Walking Robots, PhD Thesis, Massachusetts
Institute of Technology (MIT), Massachusetts, USA.
[8]
Pratt, G., Williamson, M., Dillworth, P., Pratt, J. andWright, A. [1995].
Stiffness isn't everything, Proceedings of the Fourth International
Symposium on Experimental Robotics, Stanford, California, USA, pp. 253262.
[9]
Rogers, G. and Mayhew,Y. [1992]. Engineering Thermodynamics, Work
and Heat Transfer, John Wiley & Sons, New York, USA
[10] Tonietti G., Schiavi R. and Bicchi A. [2004]. Design and Control of a
Variable Stiffness Actuator for Safe and Fast Physical Human/Robot
Interaction, Proceedings of the 2004 International Conference on Robotics
and Automation, Interdepartmental Research Center “E. Piaggio” Faculty
of Engineering, University of Pisa, Italy
[11] Vanderborght, B. [2003] Quasi-statische controle van een stappende robot
aangedreven door actuatoren met regelbare stijheid, Master Thesis, Vrije
Universiteit Brussel (VUB).
[12] van der Linde, R. [2001]. Bipedal Walking with Active Springs, Gait
Synthesis and Prototype Design, PhD thesis, Technische Universiteit Delft.
[13] Van Ham, R., Daerden, F., Verrelst, B., Lefeber, D. and Vandenhoudt, J.
[2002]. Control of pneumatic artificial muscles with enhanced speed up
circuitry., Proceedings of the 5th International Conference on Climbing
and Walking Robots and the Support Technologies for Mobile Machines,
Paris, France, pp. 195-202.
[14] Verrelst, B. [2005]. A Dynamic Walking Biped Actuated By Pleated
Pneumatic Artificial Muscles: Basic concepts and control issues, Phd
Thesis, Vrije Universiteit Brussel (VUB).
[15] Wisse, M. [2004]. Essentials of Dynamic Walking : Analysis and Design of
Two-Legged Robots, PhD thesis, Technische Universiteit Delft.
Bibliography
96
[16] http://mms.tudelft.nl/dbl
[17] http://world.honda.com/ASIMO/
[18] http://www.sony.net/SonyInfo/QRIO/
2. Programming
http://www.codeguru.com
Visual studio 6.0 MSDN
[19] http://www.mathworks.com
3. Data acquisition card.
AT E Series User Manual, Multifunction I/O Devices for the PC AT, National
Instruments, 2002.
[20] NI-DAQ Function Reference Manual for PC Compatibles Version 6.6,
National Instruments, 1999.
http://www.ni.com
Bibliography
97