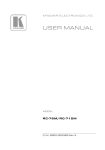
1
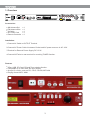
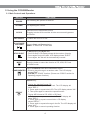
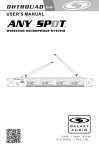
USER’S MANUAL
19"
(482mm)
Contents
Introduction.........................................................................................1
Safety Instructions...............................................................................2
1. Overview...........................................................................................3
2. Using the CD/USB/Reader...........................................................4 - 6
2.1 Main Controls and Operations......................................................4 - 5
2.2 Radio Operation...............................................................................6
2.3 RDS Function...................................................................................6
3. Using the Remote Control...........................................................7 - 9
3.1 Main Controls and Operations......................................................7 - 8
3.2 Radio Operation...............................................................................9
3.3 RDS Function...................................................................................9
4. Specifications.................................................................................10
Introduction
Thank you for choosing the Galaxy Audio CD Player/Recorder. You have joined
hundreds of thousands of other satisfied Galaxy customers. Since 1977 Galaxy Audio’s
professional experience in design and manufacturing ensure our products’ quality,
performance and reliability.
For the most up to date manual and information
visit www.galaxyaudio.com.
1
Safety Instructions
This symbol indicates that there are important
Operating and maintenance instructions in the
Literature Accompanying This Unit
This symbol indicates that dangerous voltage
Constituting a risk of electric shock is present
within this unit.
! IMPORTANT SAFETY INSTRUCTIONS !
1.
2.
3.
4.
5.
6.
7.
READ these instructions.
KEEP these instructions.
HEED all warnings.
FOLLOW all instructions.
DO NOT use this apparatus near water.
CLEAN ONLY with dry cloth.
DO NOT block any ventilation openings. Install in accordance with the manufacturer's instructions.
8. DO NOT install near any heat sources such as radiators, heat registers, stoves,
or other apparatus (including amplifiers) that produce heat.
9. DO NOT defeat the safety purpose of the polarized or grounding-type plug. A
polarized plug has two blades with one wider than the other. A grounding type
plug has two blades and a third grounding prong. The wider blade or the third
prong are provided for your safety. If the provided plug does not fit into your
outlet, consult an electrician for replacement of the obsolete outlet.
10. PROTECT the power cord from being walked on or pinched, particularly at plugs,
convenience receptacles, and the point where they exit from the apparatus.
11. ONLY USE attachments/accessories specified by the manufacturer.
12.
USE only with a cart, stand, tripod, bracket, or table
Specified by the manufacturer, or sold with the
Apparatus. When a cart is used, use caution when
moving the cart/apparatus combination to avoid
injury from tip-over.
13. UNPLUG this apparatus during lightning storms or when unused for long periods of
time.
14. REFER all servicing to qualified service personnel. Servicing is required when the
apparatus has been damaged in any way, such as power-supply cord or plug is damAged, liquid has been spilled or objects have fallen into the apparatus, the apparatus
has been exposed to rain or moisture, does not operate normally, or has been
dropped.
15. DO NOT expose the apparatus to dripping and splashing. DO NOT put objects filled
with liquids, such as vases, on the apparatus.
16. Remove the batteries from the receiver if the system will not be used for a long
period of time. This will avoid any damage resulting from a defective, leaking
battery.
17. DO NOT throw used batteries into a fire. Be sure to dispose of or recycle used
batteries in accordance with local waste disposal laws.
2
1. Overview
Accessories:
l
l
l
l
l
AM Antenna Set
FM Antenna Wire
AV Cable
AC Power Cord
Remote Controller
x1
x1
x1
x1
x1
Installation:
1.Connect AV Cable to OUTPUT Terminal.
2.Connect AC Power Cable in between Socket and AC power resource in AC 110V.
3.Terminal for External Power Supply DC 13.2V.
4.Connect ANT wire to rear terminal for receiving TUNER function.
Features
l
l
l
l
Offers USB, SD Card, CD and Tuner playing function.
Compatible up to 16G USB, SD card / SDHC
Accept 12 cm disc, such as CD, CD-R, CD-RW, MP3 disk
Playing format: MP3, WMA
3
2. Using the CD/USB/Reader
2.1 Main Controls and Operations
BUTTON
FUNCTIONS
POWER
For switching the system On and Off.
VOLUME
For adjusting the volume.
AUX IN
LED ON/OFF
PLAY/PAUSE
and BAND
/
STOP/EJECT
MODE
M
RANDOM/ENTER
Connect iPod or other audio source.
Plugging into the AUX overrides all other sources and bypasses
all controls.
To switch the LED On or Off.
Press to Start and Pause playing.
BAND: To switch FM 1/ FM2 / AM.
To Stop playing and Eject disk.
- Press to stop; LCD display shows all the number of tracks.
- Press again to eject the disk; LCD display shows “EJECT”
- Press again, the disk will be automatically inserted.
Press the button to select the function of CD, USB, SD Card,
or RADIO mode.
Play in a Random order and confirmation button.
- Press to play all songs in a random order. The LCD display
shows “RAN”
- [ENTER] for “PROG” function. (Please see “PROG” section for
operating program function.)
Repeat Play:
REPEAT
- To play the standard format CD:
1. Press once to repeat current track. The LCD display will
show “REP 1”.
2. Press again to repeat whole CD. The LCD display shows “ALL”.
3. Then press again to cancel the repeat function.
- To play MP3 format of CD, USB, or SD Card:
1. Press once to repeat current track. The LCD display will
show “REP1”.
2. Press again to repeat current folder. LCD display
shows “REP1 F”.
3. Press again to repeat all songs in the file. The LCD display will
show “ALL”.
4. Press again to cancel repeating function.
4
BUTTON
FOLDER
FOLDER
FUNCTIONS
Forward to next Folder.
Backward to last Folder.
PREV
- Press to go Backwards to the previous track.
- Press for 2 seconds for a faster rewind.
NEXT
- Press to Fast Forward to the next track.
- Press for 2 seconds for a faster forwarding.
MUTE
For temporarily Muting the sound.
[PROG]: To memorize the songs that are selected.
Up to 10 songs can be stored.
PROG
- Select desired song. Press [PROG] button, LCD shows “PROG”.
Then press [ENTER] button store 1st song. LCD display shows
“00 01” for the 1st song. Start over the above process for storing
up to 10 songs.
- Press
to start playing programmed songs. The LCD
will show “MEMO”. Press
or
button to select
programmed songs.
- Press [PROG] again to cancel program function.
5
2.2 Radio Operation
Press [MODE] button to select Radio mode.
BAND: For switching between FM1, FM2, and AM. Stations in FM1 and FM2 are exactly the same.
Provisions are made for storing up to 10 memory presets.
TUN ▲ / TUN ▼: Press ▲ or ▼ to search stations. Press for over 3 seconds to enter into automatic
scan searching. Scanning stops when unit begins receiving the station.
[MEM. / M ▲] Buttons: Memorizing radio stations: Up to 10 stations can be stored.
l
l
Press [TUN ▲ / TUN ▼] buttons to search the stations. Press [MEM] button then press [M ▲] to
choose store CH. The LCD will show “CH1”. Start over the above process to store 2~10 CH.
To play the stored station, directly press [M ▲] button under RADIO mode.
2.3 RDS Function
AF (Alternative Frequency): Assuming an alternative frequency is available for the station, if the current
signal is weak, press AF. The RDS will search a different frequency with a stronger signal with the
same station.
DISP (Display): The name of the station that is currently tuned in (known as the Program Service or PS).
For example, if Classic FM were tuned in, then when pressing DISP, the display will switch from the
frequency to “Classic”. Otherwise, it will show “NO PS”.
PTY (Program Type): Radio stations can assign different program types to their shows. These can be
picked up by an RDS radio. Press PTY and the LCD will show the radio program type such as news,
sports or drama. If the radio station does not assign the program type for the program, the LCD will
show “NO PTY”.
TA (Traffic Announcement): Press TA and the RDS will automatically search for the traffic or travel
stations and will stop at the travel or traffic station.
Note: Please do not insert an 8 cm disc or computer CD.
When inserting the disk into the CD player or taking out the disk, it is required to let the CD automatically
operate. Do not push, or take out the disk by hand before the disk is completely in/out from device,
otherwise it will damage the unit.
6
3. Using the Remote Control
3.1 Main Controls and Operations
EJECT
M3
M1
M2
1
2
3
M4
M5
M6
4
5
6
M7
M8
M9
7
PROG
RAN
8
9
M10
STOP
PLAY/
REV.
F.WD
FOLDER
0
F.B
F.F
REPEAT
ENTER
MODE
TA
A
B
AF
PTY
DISP
TUNING
BAND
MEMORY
AUTO SCAN
BUTTON
FUNCTIONS
Press to Eject or Insert the disk.
MODE
Press to select CD, USB, SD Card, or RADIO Mode.
PLAY / PAUSE. Press to Play or Pause.
Stop to play
Press to Fast Forward. Press again to cancel. Then Press
back to normal play.
,
Press once to activate Fast Backward. Press again to cancel fast
backward. Then Press
, back to normal play.
Move Forward to next track.
Move Backward to the previous track.
7
BUTTON
FUNCTIONS
Repeat Play:
- To play the standard format CD:
1. Press once to repeat current track. The LCD display will
show “REP 1”.
2. Press again to repeat whole CD. The LCD display shows “ALL”.
3. Then press again to cancel the repeat function.
REPEAT
RAN
FOLDER
- To play MP3 format of CD, USB, or SD Card:
1. Press once to repeat current track. The LCD display will
show “REP1”.
2. Press again to repeat current folder. LCD display
shows “REP1 F”.
3. Press again to repeat all songs in the file. The LCD display will
show “ALL”.
4. Press again to cancel repeating function.
- Press to play all songs in a Random order. The LCD display
will show “RAN”.
Press to forward to next Folder; LCD display shows folder number.
ON / OFF Mute. For temporarily muting the sound.
ENTER : Press to confirm the execution of [PROG] function.
[PROG]: To memorize the songs that are selected.
Up to 10 songs can be stored.
PROG
- Select desired song. Press [PROG] button, LCD shows “PROG”.
Then press [ENTER] button store 1st song. LCD display shows
“00 01” for the 1st song. Start over the above process for storing
up to 10 songs.
- Press
to start playing programmed songs. The LCD
will show “MEMO”. Press
or
button to select
programmed songs.
- Press [PROG] again to cancel program function.
8
3.2 Radio Operation
Press the [MODE] button to select Radio mode.
BAND: Switching between FM1, FM2, and AM.
TUN ▲ / TUN ▼: Press ▲ or ▼ for searching stations.
AUTO SCAN - +: Automatic Scan Searching. Scanning stops when unit receives the station.
MEMORY: Memorizing radio stations: Up to 10 stations can be stored.
l Press [TUN ▲ / TUN ▼] button to search the stations. Press M1 ~ M10 buttons to store up to10
stations.
M1 ~ M10: Press to play memorized channels directly.
3.3 RDS Function
AF (Alternative Frequency): Assuming an alternative frequency is available for the station, if the current
signal is weak, press AF. The RDS will search a different frequency with a stronger signal with the
same station.
DISP (Display): The name of the station that is currently tuned in (known as the Program Service or PS).
For example, if Classic FM were tuned in, then when pressing DISP, the display will switch from the
frequency to “Classic”. Otherwise, it will show “NO PS”.
PTY (Program Type): Radio stations can assign different program types to their shows. These can be
picked up by an RDS radio. Press PTY and the LCD will show the radio program type such as news,
sports or drama. If the radio station does not assign the program type for the program, the LCD will
show “NO PTY”.
TA (Traffic Announcement): Press TA and the RDS will automatically search for the traffic or travel
stations and will stop at the travel or traffic station.
Note:
- Remote controller should be aimed at the IR window on the faceplate. The optimal receiving distance is
3 meters. The usable distance is 5 meters.
- Battery installation of the remote controller:
1.To open up the battery cover (on the back side of the remote controller), Press down on the cap and
slide it from the left to the right, then to pull it out.
2.Place in a new battery (battery type: CR2025 3V, with its positive upward).
3.Reverse the actions stated in the statement 1 to close it.
9
4. Specifications
Connections:
FM Ant: 75 Ohm
AM Ant: Push Terminals
Outputs:
Unbalanced: 2 x RCA
Inputs:
Line In: 1/8" Stereo
13.2VDC Input: Screw Terminal
110-120 VAC Input: IEC C14
USB Type: A
Accessories: AM and FM Antenna
Power Cord
Remote Control
Dual RCA Cable
Dimensions: 19" x 1.75" x 9.5" (483 x 44.5 x 241 mm)
Weight: 7.54lbs (3.42 kg)
10
THREE YEAR LIMITED WARRANTY
WARRANTY Information can be viewed online at
http://www.galaxyaudio.com/warranty.php
Specifications in this manual are subject to change without notice.
For the most up to date manual and information
visit www.galaxyaudio.com.
1-800-369-7768
www.galaxyaudio.com
© Copyright Galaxy Audio 2014
Printed in Taiwan
V20141107