1
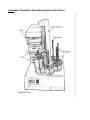
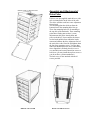
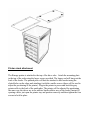
Mediatechnics Systems Inc.
Mass Storage Duplication
Impact CD-R Loader
________________________________________________________________________________
User Manual
WWW.MEDIATECHNICS.COM
AUTOLOADER ORIENTATION (STANDALONE SYSTEM (WITH PRINTER))
3
AUTOLOADER ORIENTATION (TOWER CONTROLLED)
PRINTER STAND ATTACHMENT
THIS IS THE TOWER STAND FOR THE MEDIATECHNICS SYSTEMS IMPACT
AUTOLOADER.
IP-6800 SERIES CD-R AUTOLOADER
USER MANUAL ADDENDUM
DUPLICATION OPTIONS - ADDITIONS
THE MAIN ADJUSTMENTS ARE:
Spindle Location alignment
PRINTING WITH THE THERMAL PRINTER AND THE IMPACT AUTOLOADER
9
10
Autoloader Orientation (Standalone system (with Printer))
Autoloader Orientation (Tower controlled)
1
DRIVE CUBE w/ Mounting Plate
Assembly and Attachment of
Drive Cube
If drives were not supplied, attach drives to side
rails via slotted holes on the sides of the rails.
The drives will then each have some adjustment
front to back.
The mounting plate then slides on from the
bottom front so the mounting holes line up.
These four mounting holes are for attaching to
the top deck of the autoloader. These mounting
points have floating nuts so there is some
adjustment at this point. Attach cables and
power to the drives. Now would be the time to
use the loader utilities from within the loader
menus and calibrate the drive alignment. Swivel
the entire drive cube if need be and tighten down
the four large mounting screws. You may then
make fine adjustments to the drives individually.
Once alignment is finished place drive cover
over assembly and secure bottom four screws to
hold it on. (you may install the top four screws if
you do not have a printer attachment.)
The back cover is now attached with the 10
screws provided.
DRIVES with COVER
BACK COVER IN PLACE
Printer stand attachment
The Rimage printer is attached to the top of the drive cube. Attach the mounting plate
to the top of the cube using the larger screws provided. The longer end will hang out the
back of the loader. The painted piece will then be attached to this bracket using the
slotted holes on the edges and attaching it with the smaller screws (these will be used to
adjust the positioning of the printer). Plug in the printer to power and hook the gray
printer cable to the back of the autoloader. The printer will be adjusted for positioning
the same way the drives are in the utilities/loader utilities area of the loader. Instead of
opening a drive just open the printer tray and position correctly and then tighten the four
screws to hold in place.
This is the tower stand for the Mediatechnics Systems IMPACT autoloader.
This unit attaches to the back-left side of the autoloader, there are four screws at the top
deck of the unit attached through some access holes, and on the bottom with two screws.
(See picture) Remove the rubber feet from the tower and place in the stand as far
forward as possible. Attach power and serial cables to tower.
The tower then can be positioned using the two knobs on the front of the stand.
Adjustment is needed to get the discs to place in the drives correctly, using the
autoloader utilities in the tower menu to move the discs and align the drives.
The knob on top, or closest to the tower, is used to swing the tower front left or right.
The lower knob is used to move the tower from front to back, you will probably have to
manually assist the movement of the tower because of the towers weight.
Once the placement is correct the knobs on the outside rails can be tightened to hold
everything in place.
IP-6800 Series CD-R Autoloader
User Manual Addendum
This is additional information not found in the manual.
To print on CD's while they are being copied you will need to import a print image
into the system to append to the CD image you are copying. On Image functions
you will have a new entry for import print images. To do this you must create the
print image on a PC using the supplied CDID software program or similar program
and then print to a file, (Make sure 'detect media change' is turn OFF in the
Rimage print driver)(should have a .prn extension,Choose print to a file in the
printer driver options instead of the normal LPT1 and it will automatically bring
up the name file screen when you print) this file or files will then be burned to a
cd for transferring onto the loader hard drive. It is best to try and get a lot of the
print images together at the same time and do them together to save time. You then
go to the 'Image Functions' area of the loader and use the Import (load) print
images option. The images are imported similar to how a master is loaded in,
except it will bring up a directory menu and allow you to choose the image to be
imported. To attach or APPEND to a master cd image file you would choose this
option from the menu and pick the appropriate files. You are given the option
when you go to copy if you want to print or not. There is also a print only option
from the main menu.
Duplication Options - Additions
This menu has new items that may not pertain to your system.
Erase CDRW -does not apply if you do not have CDRW drives.
Async copying - Yes or No
Turns asyncronous copying on or off, this is if the drive will immediately start
copying or start when all drives are loaded.
Enable Printer -Yes or No
Tells machine to look for printer or not.
Cyclic Output -Yes or No
This will tell the loader to use the cyclic mode for input and output of the blank
and finished discs. Cyclic mode will allow you to fill all spindles except the
number one spindle with blank media. The loader will begin loading from the #2
spindle and move the copied CDs to #1, #3 to #2, #4 to #3, #5 to #4. The rejected
media will be dropped in front of the drives on the deck. The best way to tell if this
mode is On is if the loader gos to the #2 spindle at start up.
The standard 2 input-2 output mode is the recommended setting for most
duplication (Less confusing for the operator) unless you are doing large quantities.
The main adjustments are:
Column in a vertical position. This is done at the factory but may need to be done
if shipping or handling was particularly harsh. The best way to tell is if the disks
can't be placed up and down consistently in the drives without a 'fade' in or out, or
if there is a noticeable fade one direction while going up and down the spindles.
The column shroud is removed and a small level is placed on the side of the
column (while it is turned to the different locations) the 4 larger nuts on the studs
at the very base of the column inside at the bottom the machine, are loosened then
retightened so the column is in the best vertical position it can be.
DO THIS ONLY AS THE LAST ADJUSTMENT OF THESE THREE!
Drive or tower positioning for optimum loading and unloading of the drives. (this
would also include placement of a printer.) The slotted holes that the individual
drives are mounted in can be used, as well as the slight movement available at the
four main mounting screws of the drive cube.
The towers can be adjusted with the tower extension stand and the two placement
knobs being moved for optimum placement. Make sure the rubber feet are
removed from the bottom of the tower and that once the tower is in position the
four screws on the sides of the stand are tightened so it will stay.
Spindle Location alignment
The symptom for this is that when the pick-arm stops above spindles it
seems to be off in all the same direction by the same amount (clockwise or
counter-clockwise). And that you can't get the drives in a good position for
loading. Make sure the CD spindles are securely place on their locator pins (give
them a spin to be sure they are seated flat)). The spindle locators (white plastic)
can be moved around just a little by pushing the spindle and sliding the locator
around for best position (The little spindle locator pegs are on spring loaded oversize holes).
If needed you can change where the pick-arm stops (Spindle locations) by
adjusting the sensor at the base of the column. Loosen the two screws through the
access holes and move the black plastic sensor in the middle to the left or right to
get the correct positioning. Try not to let the sensor go back away from the column,
only left and right. The best way to find the correct spindle positions is to go to
UTILITIES MENU/LOADER UTILITIES/EXTENDED DIAGS and then move
the pick arm down with the 'pick to spindle' command then the 'rotate next' and
'rotate previous' keys. The #1 spindle is the "index" spindle and doesn't move as
much as the rest of the spindles and should be used as the main one or index for
adjusting for this location, then move the other spindles for best position. (If you
cannot get the positions to line up correctly then you must see - column vertical
alignment area)
NOTE: If the load positions were working fine and the machine wasn't moved or
bumped then it may be just that the sensor at the base of the column is slightly
blocked - blow out this sensor with air and try the positions again.
Printing with the Thermal Printer and the Impact Autoloader
First you must make sure you have the Printer enabled in the duplication options
area of the setup menu. Scroll down through the duplication options and make sure
the printer enabled option is set to YES. After this is done then in the Image
functions area you will have two image menus one for CD (master) images and
one for print images. Each area has its own sub menus with import, rename, etc.
To print on CD's while they are being copied you will need to import a print image
into the system to append this print image to the CD image you are copying. If you
are doing Print Only then the print image does not need to be appended to
anything.
To import images you must first create the print image on a PC using the Rimage
supplied CD Designer software program or any other program that you want to
create your label or print image in. Then when you go to print -choose the correct
printer (Rimage Perfect Image Printer PF) and then print to a file:
THIS IS HARD FOR A LOT OF PEOPLE TO UNDERSTAND- THE FILE
YOU CREATED IS NOT SAVED IT IS PRINTED AND THEN THE
PRINTER DRIVER WILL ASK FOR YOU TO GIVE IT A FILE NAME (********.PRN ) this file or files will then be saved and burned to a CDR for
transferring onto the loader hard drive.
RIMAGE PRINTER DRIVER SETTINGS:
Under START, SETTINGS, PRINTERS - right click Rimage PerfectImage Printer
PF and choose Properties:
In the DETAILS tab make sure:
In the Print to the following port are is set to: FILE: (Creates file on disk)
In the DEVICE OPTIONS tab:
Double Print may or may not be checked depending on you media etc.
RLE compression should be checked
Make sure Detect media change is NOT checked
Make sure Using RimageAuto printer is NOT checked
It is best to try and get a lot of the print images together at the same time and create
them, and then burn them to a CDR together to save time. You then go to the
'Image Functions' area of the loader and use the load print images option. The
images are imported similar to how a master is loaded in, except it will bring up a
menu and allow you to choose the image to be imported.
To attach or APPEND to a master cd image file you would choose this option from
the images/print images/append menu and pick the appropriate files.You are given
the option when you go to copy if you want to print or not. There is also a print
only option from the main menu.
(If you try to do a duplication job only and the system hangs for a long time at the
calibration area it is because it is looking for the printer that should be turned on
and hooked up, if it is not then you should simply turn the printer option OFF in
the setup menu/duplication options area so it will not look for the printer during
straight duplication only.)
(If the Printer is mis-loading because of alignment - see the alignment/adjustment
area of this manual)