1
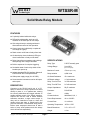
Weeder Technologies WTSSR-M eeder WTSSR-M Technologies 90-A Beal Pkwy NW, Fort Walton Beach, FL 32548 www.weedtech.com Voice/Fax 850-863-5723 Solid State Relay Module FEATURES 5 optically isolated solid state relays. DIP switch addressable; stack up to 32 modules on the same port for 160 relays. Wire relays directly to existing switches to allow software control of their operation. Control each relay individually or update all five relays as a group. Read current on/off state of relays from host. On-board relay closure indicator LEDs give visual confirmation of relay on/off states. Delay timer allows momentary relay closings and openings with a single command. SPECIFICATIONS Relay Type Built-in sequencer for complex triggering. Voltage Range Set default state of each relay which will be loaded upon power-up. 5 SPST normally open 0 to ±250V (DC or AC peak) Maximum Current 170 mA (AC or DC) Industry standard RS-232 interface. Meets all EIA/TIA-232E and V.28 specifications. Relay Isolation 4,000 VRMS Wide power supply range (8 to 20 VDC). On-State Resistance 15 Ω maximum Screw-terminal connectors used on all inputs and outputs. Off-State Leakage 1.0 µA maximum Relay Turn-On Time 3.0 mS maximum DESCRIPTION Relay Turn-Off Time 0.5 mS maximum Connects to the RS-232 serial port of a PC, laptop, or other host. Relay outputs can be wired directly in place of, or in parallel with, existing low current pushbuttons and toggle switches to enable software control of the switch operation. Outputs can also be used to switch external solenoids, actuators, or high current relays. A relay can be instructed to open or close and remain at that new state, or switch back to the previous state after a user-defined delay period. Built-in event sequencer allows user to load a series of relay on/off patterns and time delays which will execute sequentially. Output Capacitance 50 pF maximum Processor PIC16F628 Clock 4 MHz Communications 9600 Baud, N, 8, 1 Power Requirements +8 to +20 VDC Current Draw 11 to 40 mA Operating Temperature -20°C to +70°C Board Dimensions 3.1" x 2.0" x 0.7" Weight 1.8 oz Copyright 2001-2010 by Weeder Technologies Page 1 Rev. H Weeder Technologies WTSSR-M STACKABLE DATA MODULES TABLE 1: ADDRESS SETTING HEADER CHARACTER DIP SWITCH SETTING ASCII (HEX) 1=on, 0=off All modules in this series incorporate two EIA/TIA-232E serial ports which communicate at 9600 baud, no parity, 8 data bits and 1 stop bit. DB9 connectors are jumpered to satisfy hardware handshaking. The port labeled ‘‘HOST’’ is configured as a DCE device and should be connected to a PC’s serial port. The port labeled ‘‘SLAVE’’ is a DTE device and can be left open, or connected to another module’s host port. Up to 32 modules can be chained together in this fashion to form a network. Either plugged together end to end, or separated by a cable. Because a module contains two individual bi-directional ports which pass data through, it also acts as a repeater, extending the total allowable length of the RS-232 communications line. 1 2 3 4 5 A (41) 00000 B (42) 00001 C (43) 00010 D (44) 00011 E (45) 00100 F (46) 00101 G (47) 00110 H (48) 00111 I (49) 01000 J (4A) 01001 K (4B) 01010 L (4C) 01011 M (4D) 01100 N (4E) 01101 O (4F) 01110 P (50) 01111 a (61) 10000 b (62) 10001 c (63) 10010 d (64) 10011 e (65) 10100 f (66) 10101 COLLISION CONTENTION g (67) 10110 h (68) 10111 i (69) 11000 j (6A) 11001 k (6B) 11010 l (6C) 11011 m (6D) 11100 n (6E) 11101 o (6F) 11110 p (70) 11111 The utilization of the communications line can be thought of more as a single, bi-directional, data bus, operated in a multi-drop mode rather then a standard RS-232 data link. A transmission from a data module travels in both directions, upstream to the host, and downstream to signal other modules that it has seized the line. Before transmitting, a module will listen to the communications line and wait for quiescence. After a silent period equal to the length of one byte, the waiting module will send its data packet using a Carrier Sense Multiple Access with Collision Detection communications protocol. See the application note (AN100) at the back of this manual for more details. Copyright 2001-2010 by Weeder Technologies A modem can serve as the host for remote operation, but since a modem uses a DCE port, a ‘‘null modem’’ adapter must be placed between the modem and the data module’s host port. A gender changer may also be required. In addition, any hardware/software flow control must be disabled in the terminal program. Each module in a network should be set to a different address using the on-board 32-position DIP switch. A module will only respond to data packets that begin with its’ own unique header character, which is determined by this DIP switch setting. See Table 1. Data packets transmitted by a module will also begin with this header character. The host PC can use the header character to address each individual module in a network, and to identify a module which is talking. Page 2 Rev. H Weeder Technologies WTSSR-M OPEN - Opens the specified solid-state relay. The relay can be instructed to remain open until a further command, or close back up after a user defined time-out period in the range of 1 to 65535 mS. Note, the timer will operate in the background allowing the other relays to be manipulated during this period. The timer can also be re-loaded before it times out. COMMAND SET The host PC communicates with the Solid-State Relay Module using a command set comprised of standard ASCII character strings as depicted in Table 2. Some commands evoke immediate action on one or more relay channels of the data module, while other commands initiate timing related events or sequences which will then execute independent of the host. A detailed description of each command follows. READ - Reads the current state (open or closed) of a specified relay channel, or reads the current state of all relay channels simultaneously as a 5-bit port in binary notation. If used as the latter, a five character ASCII string will be returned whose digits represent the open/close state of each relay channel. CLOSE - Closes the specified solid-state relay. The relay can be instructed to remain closed until a further command, or open back up after a user defined time-out period in the range of 1 to 65535 mS. Note, the timer will operate in the background allowing the other relays to be manipulated during this period. The timer can also be re-loaded before it times out. WRITE - Writes data to all relay channels simultaneously as a 5-bit port in binary notation. Data consists of a five character ASCII string whose digits represent the open/close state of each relay channel. TABLE 2: COMMAND SET TITLE COMMAND DESCRIPTION CLOSE C relay time Close relay for a period equal to time. relay = A-E, time = 1 to 65535 listed in milliseconds. If time omitted, relay remains closed. (Note 3) OPEN O relay time Open relay for a period equal to time. relay = A-E, time = 1 to 65535 listed in milliseconds. If time omitted, relay remains open. (Note 3) READ R relay Read current state of relay. Returns "relay C" or "relay O". relay = A-E C = closed, O = open. If relay omitted, read relays A-E as a 5-bit port in binary notation. 1 = closed, 0 = open. Relay A = MSB. WRITE W data Write data to relays A-E as a 5-bit port in binary notation. data = 00000 to 11111, 1 = closed, 0 = open. Relay A = MSB. PAUSE P time Loads an internal timer which will signal the host when expired. time = 1 to 65535 and is listed in milliseconds. When this function is complete, the "P" character will be returned to the host. SEQUENCE S string Loads a string of WRITE and PAUSE statements which will begin executing sequentially. string may contain up to 110 characters. When this function is complete, the "S" character will be returned to the host. DEFAULT D relay state ECHO X value Turns on or off the reception confirmation echo. Value = 0 or 1. 0 = off, 1 = on, default = 1. If value omitted, reads the current setting. ERROR ? This character will be returned after an invalid command or variable. RESET ! This character will be returned after a power-on reset, or brownout. (Note 3) Sets the default state of a specific relay which will be loaded upon power-up or brown-out. relay = A-E, state = C or O. C = closed, O = open. If state omitted, reads the current setting. (Note 3) Note 1: All command strings sent to the data module should be preceded with the header character (see Table 1), and terminated with a carriage return. All responses from the data module will also appear in this format. Note 2: Any spaces shown above in the listing of the command strings are for clarity only. They should not be included in the actual transmission from the host, nor expected in a response from the data module. Note 3: If ECHO is on, after successful execution this command will be echoed back to the host in the same format as received. Copyright 2001-2010 by Weeder Technologies Page 3 Rev. H Weeder Technologies WTSSR-M TABLE 3: TERMINAL / CONNECTOR DESCRIPTION NAME TYPE ELECTRICAL SPECS COMMENTS: HOST DB9 EIA/TIA-232E Standard RS-232 serial port configured as DCE. Connects to host PC. Hardware handshake jumpered. EIA/TIA-232E Standard RS-232 serial port configured as DTE. Can be connected to another data module's HOST port for networking. SLAVE (female) DB9 (male) Power Source Jumper N/A Power source selection jumper. Selects either external, or port powered. (Note 1) + Screw Term +8 to +20 VDC External unregulated power supply input. - Screw Term GND External power supply ground. A-E Screw Term V max = ±250V (DC or AC peak) I max = 170 mA (AC or DC) Solid-state relay contact pairs. Note 1: Selecting "port powered" will draw from the power supply source of an upstream data module. Caution, the COM port of a PC or laptop does not supply enough current to serve as the power supply source. PAUSE - Loads an internal timer which will signal the host when the time interval has expired. Selectable range is from 1 to 65535 mS. This function is useful when time-derived operations or events must be executed without having to rely on timekeeping from the host. Note, the communications port will be disabled until this function has completed. ECHO – Turns on or off the confirmation echo which is used to verify reception of a command. If reception confirmation is not needed, turning ECHO off will increase the repetitive rate at which the host can manipulate the relays. ERROR - Any data string sent from the host containing the correct header character but an invalid command or variable will be responded to with this error indicator. SEQUENCE - Loads a string of WRITE and PAUSE statements which will begin executing sequentially. The event will commence immediately following the reception of the carriage return which terminates the command packet. The syntax for each WRITE and PAUSE statements should be the same as if using these commands separately, and should be placed end to end with no separators between them. Listed below is a typical sequence command string that will perform the following: RESET - Upon power-up or any other reset condition, this indicator is transmitted to the host. Note, all user configuration data is stored in non-volatile memory. Therefore, a reset or loss of power will not corrupt these settings. OPERATION To hook the data module to a host PC, use a standard RS-232 cable with male and female DB9 connectors on opposite ends. This cable should be wired straight through (pin to pin) with no crossover of the data lines. In other words, not a null modem cable. Connect a suitable DC power source to the + and - terminals of the data module. It is highly recommended to use an ungrounded AC adapter such as that which is available from Weeder Technologies. This will provide isolation and prevent ground loops which are commonly created if the power supply and computer are grounded at different points. SW10000P60000W01000P5000W00100 Close relay A, pause for 60 seconds, open relay A and close relay B, pause for 5 seconds, open relay B and close relay C. Note, if any syntax error exists within the sequence command string, the error symbol will be transmitted to the host and the sequence will not execute. DEFAULT - Sets the default state (open or closed) of a specified relay channel which will then be loaded upon power-up or brown-out. Copyright 2001-2010 by Weeder Technologies Page 4 Rev. H Weeder Technologies WTSSR-M When the data module is first powered up, the red LED will flash briefly. This indicates that the on-board microcontroller has booted up, successfully completed its internal diagnostic test, and has transmitted the reset character to the host to signal that it is up and running. The red LED will also flash anytime the module receives or transmits any data packet, thus making it a valuable diagnostic tool when troubleshooting communications problems. FIGURE 1: MODCOM APPLICATION An easy-to-use Windows™ software package called "ModCom" is available and can be downloaded from Weeder Technologies' web site. This program will allow the user to quickly set up custom buttons which transmit commands, custom windows that poll for data, and a variety of other screen objects such as slider controls, event counters & timers, bar-graph level indicators, button selection arrays, and more. In addition, conditional statements can be set up to take action when specific events or conditions are met, sequences can be written and then called by other screen objects during run-time, and data can be logged to a file automatically at user-defined intervals. on which button in the array is active. In the "Run Sequence" section, each Push Button executes a sequence which is identical in overall operation, however, one is loaded into the WTSSR using its SEQUENCE command, the other is written into and run from ModCom's own Sequence section. To get a better understanding of how this application works, first halt the run-loop by clicking on the red toolbar button at the top of the screen, then right-click on any screen object to view its properties. Sequences and Conditionals can be accessed by going to the <Run-Loop> menu item at the top of the screen. Refer to the help files for more information. Once ModCom is installed and running, go to the <Communicate> menu item at the top of the screen and click on <Send/Receive>. A dialog box will pop up which you can use to type in the commands from Table 2, transmit them directly to the data module, and see the response coming back. Use this dialog box to familiarize yourself with the command set and to experiment with the various features supported by the module. The experience gained here is significant since these are the same command strings you will use when setting up the other objects in ModCom. RELAY CLOSURE INDICATORS Each of the five solid-state relays has its own relay closure indicator LED which is located near the relay's screw terminal pairs. This LED will light when the associated relay is closed, and distinguish when it is opened. This provides a visual indication of the current state of each relay channel, and is especially useful during the setup and testing of complex sequence and timing events. To control the Solid State Relay Module, start with the sample application "WTSSR.mod" which can be found in the ModCom subfolder called "Samples". After this file is opened, it will appear as shown in Figure 1. To start the main run-loop, click on the green toolbar button at the top of the screen. At this point, you will see the relay default settings load into the windows at the bottom right section of the screen. CONTROLLING A SWITCH The outputs of the WTSSR can be wired directly in parallel with an existing low current pushbutton, toggle switch, key pad contacts, etc. Polarity doesn't matter. This enables a program running on a host PC to activate those switches as if they were being operated manually, thus allowing control of virtually any piece of electronic equipment or device which uses To control relays A, B, and C, click on the buttons in the "Manual Operation" section of the screen. In the "Self-Timed Operation" section, a Push Button activates the Button Array below it which transmits a CLOSE command to the WTSSR using a different time setting depending Copyright 2001-2010 by Weeder Technologies Page 5 Rev. H Weeder Technologies WTSSR-M switches or buttons for user input. Furthermore, the original switch can remain in the circuit without any ill effect, allowing either manual or software control of those contacts. MULTI-BOARD SYNCHRONIZING When using more then one Solid State Relay Modules in a network, it may sometimes be desirable to synchronize the events between them so that the relay actions of one module will line up with that of another. The SEQUENCE function is ideal for this task because the user can pad the start of each event with a delay period which will compensate for the lead/lag times inherent with communicating with multiple devices over a shared data line. The included time field in a CLOSE or OPEN command string is very useful when it comes to controlling external momentary pushbutton switches. This feature allows the host to address that particular action with a single command instead of two separate commands with a delay in-between. Furthermore, the time field for each relay can be re-loaded at any time before it expires, allowing it to function as a form of Watchdog Timer. If it is not re-loaded at regular intervals, the relay will change states. In order to run a sequence on two different modules concurrently, the host PC must address each module with a separate data packet, one right after the other. This introduces a timing offset between the exact moment that each of the two sequences begins its execution. A sequence launches immediately following the reception of the carriage return at the end of the associated data packet, therefore, the offset is equal to and can be measured from the carriage return of the first transmitted packet, to the carriage return of the second packet. SWITCHING HIGH CURRENTS Each channel of the Solid-State Relay Module can switch currents up to 170 mA. If larger currents need to be switched, an external relay can be used as long as the current needed to saturate the coil of the relay is within the range of the WTSSR. To control the external relay, simply connect an output pair of the WTSSR in series with the voltage source which supplies current to the coil of the relay. To align the two sequences, the first sequence must start with a PAUSE statement loaded with a time value equal to this offset. At 9600 baud, it will take approximately 1 mS to transmit each character in a packet. To calculate the amount of delay needed to cause the first sequence to wait and begin at the same time as the second, simply add up the number of characters in the second sequence command string including the header character, command title, carriage return, and space between packets. Then use this value in the PAUSE statement at the beginning of the first sequence command string. CONSTRUCTING SEQUENCES A sequence is very useful when there is a need for precise timing related executions of multiple relay closures and openings. Especially when the timing requirements are too complex for a typical PC or other host to handle in real time. The SEQUENCE command function allows a user to build a series of events and time delays which will execute independent of the host. Note, when addressing multiple data modules in a network, there must be at least a 1 mS gap between data packets transmitted from the host. See the application note (AN200) at the back of this manual for more details on this subject. The structural composition of a sequence consists of two basic commands, WRITE and PAUSE, which can be placed in any order and any frequency as long as the total string of commands does not exceed 110 characters. A WRITE command updates the state of all relays at the exact same time, a PAUSE command defines the amount of delay before moving on to the next WRITE command. All timing is kept with an autonomous clock which is unaffected by the individual events that make up a sequence. In other words, there is no accumulative timing error as the sequence progresses from event to event regardless of the number of events in the sequence. This is even true if multiple PAUSE commands are placed consecutively in the sequence to allow for longer delay periods. Copyright 2001-2010 by Weeder Technologies When synchronizing three or more modules, a similar approach is used. However, the offset delay for each sequence will be a unique value since it is relative to the position the command packet lies in reference to the last command packet being transmitted by the host. To calculate the wait time for each sequence, count the total number of characters and spacings that will follow the carriage return of that particular data packet, and include that value in its associated PAUSE statement at the start of the sequence. Page 6 Rev. H Weeder Technologies WTSSR-M Trans/Rec Indicator LED Flashes whenever there is communications between host PC and Data Module. Address Setting This DIP switch sets the address of the Data Module and determines the header character of its data packets. RS-232 Host Port Connects to the serial port of the host PC. HOST SLAVE RS-232 Slave Port Connects to the Host port of another Data Module. -A- -B- -C- -D- -E- Relay Indicator LEDs Turns on when the relay is closed, turns off when the relay is opened. Power Supply Inputs Will accept any voltage between 8 and 20 VDC. Power Source Jumper Draw power from external input terminals, or from an upstream Data Module via the host port. Relay Outputs Optically isolated solid state relays can switch up to 170 mA each. 0.5" Holes will accept size 4-40 screws 1.0" 2.0" 0.5" 0.375" 0.375" 2.35" 3.1" Copyright 2001-2010 by Weeder Technologies Page 7 Rev. H Weeder Technologies Copyright 2001-2010 by Weeder Technologies WTSSR-M Page 8 Rev. H