1
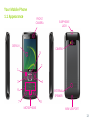
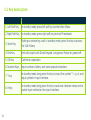
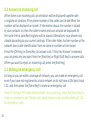
JT Journey
User manual
www.jtglobal.com
EKT934 APR12
2
Contents
Page
Contents
Safety and Maintenance
4
3.4 Making an Int. long-distance call 21
Page
Your mobile phone
13
3.5 Talk options
21
1.1 Appearance
13
3.6 Text edit
23
1.2 Key description
14
3.7 Basic english & no. input mode
23
1.3 Icons
15
3.8 Quit from the menu
23
1.4 Screen background light
16
Menu function list
24
Instructions before use
16
Menu functions
26
2.1 Install and charge the phone
16
4.1 Phonebook
26
2.2 Power on/off
16
4.2 Call center
28
2.3 Security password
17
4.3 Services
31
Basic Functions
18
4.4 Messaging
32
3.1 Direct dial
18
4.5 Video call
35
3.2 Answer an incoming call
20
4.6 Organizer
36
3.3 Making an emergency call
20
4.7 Settings
38
Contents
Page
4.8 Multimedia
41
4.9 Email
44
4.10 File Manager
45
4.11 Extra
45
4.12 eBuddy
46
4.13 Camera
46
FAQ’s
47
3
Safety and Maintenance
Before use, please read this instruction manual carefully.
• Do not switch on the mobile phone when use of a mobile phone is prohibited or
when it may cause interference or danger.
• Obey all local laws. Always keep your hands free to operate the vehicle while
driving. Your first consideration while driving should be road safety.
• Please keep your mobile phone turned off when you are on a plane. If functions
that will automatically power on your mobile phone, such as alarm clock or
calendar are setup, please check and cancel the configuration before boarding
the plane.
• While using the mobile phone, please keep it away from heat sources and high
voltage appliances. Please use the mobile phone under normal temperatures.
Using it at temperatures above 550C (1310F) or below -100C (140F) may
damage the phone. Your device is not water-resistant. Keep it dry.
• Standard battery, charger and accessories provided with your mobile phone
should be used. The mobile phone user is responsible for any consequence
caused by the use of third party accessories.
4
• Mobile phones may cause interference to nearby electronic devices, such as TVs,
radios, pacemakers, hearing aids etc. Do not place the mobile phone near a credit
card or magnetic field. Switch off your mobile phone when regulations posted
instruct you to do so, for example, in hospitals.
• Do not drop, knock, or shake the device. Rough handling can break internal circuit
boards and mechanics.
• Do not disassemble the mobile phone. Only allow qualified personnel to service
your device. Allowing non-qualified personnel to service your device may result in
damage to your device and will void your manufacturer’s warranty.
• Do not use benzene, thinner or alcohol to clean the cover of your mobile phone.
Keep your mobile phone away from corrosive chemicals such as detergent. Use
a clean and soft cloth instead and wipe gently.
• Keep the mobile phone and battery dry. Precipitation, humidity, and all types of
liquids or moisture can contain minerals that corrode electronic circuits. If your
mobile phone gets wet, remove the battery, and allow the device to dry.
• Do not use or store the mobile phone in dusty or dirty areas. Moving parts and
electronic components can be damaged.
5
• Always switch the device off and disconnect the charger before removing the
battery. When you unplug a charger or an accessory, hold and pull the plug,
not the cord.
• Reduce the risk of repetitive motion injuries. While using your device, hold the
device with a relaxed grip, press the keys lightly, use special features that reduce
the number of keys you have to press (such as templates and predictive text),
and take frequent breaks.
• Do not use the device if the screen is cracked or broken. Broken glass or acrylic
could cause injury to your hand and face. Take the device to an authorized
service center to replace the screen. Damage caused by careless handling will
void your manufacturer’s warranty.
While using the battery, please observe the following points:
• Please charge the battery in a cool and well-ventilated room. High temperatures
may lead to overheating, smoking, burning, distortion or even explosion of
the battery.
• Do not dismantle, cut, open, crush, bend, puncture, or shred cells or batteries.
If a battery leaks, do not let battery liquid touch skin or eyes. If this happens,
immediately flush the affected areas with water and seek medical help.
6
• Do not short-circuit. Accidental short-circuiting can occur when a metallic
object such as a coin, clip, or pen causes direct connection of the positive (+)
and negative (-) terminals of the battery. (These look like metal strips on the
battery.) This might happen, for example, when you carry a spare battery in your
pocket or purse. Short-circuiting the terminals may damage the battery or the
connecting object.
• Please keep the metal contact points and battery clean.
• Never use any charger or battery that is damaged.
• The battery can be charged and discharged hundreds of times, but it will
eventually wear out. When the talk and standby times are noticeably shorter
than normal, replace the battery. Only replace with an approved battery.
• Prevent the battery from exposure to the sun or places with excessive smoke
or dust.
• Avoid extreme temperatures. Extreme temperatures (above 550C, 1310F or
below -100C, 140F) may reduce the capacity and lifetime of the battery. A device
with a hot or cold battery may not work temporarily.
• Do not expose the battery to fire as it may explode.
• Do not expose the battery to water as this may damage it and cause the battery
to explode.
7
• Dispose of batteries according to local regulations. Please recycle when possible.
Do not dispose as household waste.
• A special charger should be used for this battery. You should not charge the
battery for longer than 12 hours at a time.
• Keep the battery out of reach of children.
While using the battery charger, please observe the following points:
• Do not disassemble or modify the charger or use it when the power cable is
damaged as there could be a risk of electric shock or fire.
• Do not touch the charger with wet hands. If the charger contacts water or other
liquid, immediately cut off the power supply.
• Do not short circuit the charger. Keep it away from mechanical vibrations or
shaking. Do not expose the charger to direct sunlight. Do not use it in a damp
environment, such as a bathroom. The battery charger is not waterproof; so keep
it away from rain and moisture.
• Do not use the charger near electric appliances such as a TV set or radio.
• Keep the charger out of reach of children.
8
Handle SIM cards and memory cards with care
• Do not remove a card while the device is transferring or accessing information,
as this could result in loss of data and/or damage to the card or device.
• Protect cards from strong shocks, static electricity, and electrical noise from
other devices.
• Do not touch gold-colored contacts or terminals with your fingers or metal
objects. If dirty, wipe the card with a soft cloth.
FCC Statement
This equipment has been tested and found to comply with the limits for a Class
B digital device, pursuant to part 15 of the FCC Rules. These limits are designed
to provide reasonable protection against harmful interference in a residential
installation. This equipment generates, uses and can radiate radio frequency
energy and, if not installed and used in accordance with the instructions, may
cause harmful interference to radio communications. However, there is no
guarantee that interference will not occur in a particular installation. If this
equipment does cause harmful interference to radio or television reception, which
can be determined by turning the equipment off and on, the user is encouraged to
try to correct the interference by one or more of the following measures:
• Reorient or relocate the receiving antenna.
9
• Increase the separation between the equipment and receiver.
• Connect the equipment into an outlet on a circuit different from that to which the
receiver is connected.
• Consult the dealer or an experienced radio/TV technician for help.
Properly shielded and grounded cables and connectors must be used to meet
FCC emission limits. Ekit is not responsible for any radio or television interference
caused by using other than recommended cables or connectors.
Changes or modifications not expressly approved by the party responsible for
compliance could void the user’s authority to operate the equipment.
These devices comply with part 15 of the FCC Rules. Operation is subject to the
following two conditions: (1) These devices may not cause harmful interference,
and (2) these devices must accept any interference received, including
interference that may cause undesired operation.
10
Specific Absorption Rate (SAR) certification information
Your device conforms to international standards that limit human exposure
to radio frequency (RF) energy emitted by radio and telecommunications
equipment. These standards prevent the sale of mobile devices that exceed
a maximum exposure level (known as the Specific Absorption Rate, or SAR)
of 1.6 W/kg.
During testing, the maximum SAR recorded for this model was 0.652 W/kg. In
normal use, the actual SAR is likely to be much lower, as the device has been
designed to emit only the RF energy necessary to transmit a signal to the nearest
base station. By automatically emitting lower levels when possible, your device
reduces your overall exposure to RF energy.
Correct disposal of this product
(Waste Electrical & Electronic Equipment) This marking on the product,
accessories or literature indicates that the product and its electronic accessories,
such as batteries, chargers, headsets, or USB cables should not be disposed of
with other household wastes at the end of their working life.
To prevent possible harm to the environment or human health from uncontrolled
waste disposal, please separate these items from other types of waste and
11
recycle them responsibly to promote the sustainable reuse of material resources.
Household users should contact either the retailer where they purchased this
product or their local government office, for details of where and how they can
take these items for environmentally safe recycling. Business users should contact
their supplier and check the terms and conditions of the purchase contract. This
product and its electronic accessories should not be mixed with other commercial
wastes for disposal.
Disclaimer
Some content and services accessible through this device belong to third parties
and are protected by copyright, patent, trademark and/or other intellectual
property laws. Such content and services are provided solely for your personal,
non-commercial use. You may not use any content or services in a manner that
has not been authorized by the content owner or service provider. Without limiting
the foregoing, unless expressly authorized by the applicable content owner or
service provider, you may not modify, copy, republish, upload, post, transmit,
translate, sell, create derivative works, exploit, or distribute in any manner or
medium any content or services displayed on this device.
12
Your Mobile Phone
1.1 Appearance
FRONT
CAMERA
DISPLAY
EARPHONE
JACK
CAMERA
5
2
1
3
4
6
EXTERNAL
SPEAKER
8
7
MICROPHONE
MINI USB PORT
13
1.2 Key description
Key
Description
1. Left Soft Key
In standby mode, press left soft key to enter Main Menu.
2. Right Soft Key In standby mode, press right soft key to enter Phonebook.
14
3. Send Key
Making or answering a call. In standby mode, press this key to access
the Call History.
4. End Key
End calls, reject calls & lock keypad. Long press: Power on, power off.
5. OK Key
Confirm an operation.
6. Number Keys
Input numbers, letters, and some special characters.
7. * Key
In standby mode, long press this key to input the symbol ‘*, +, p, w’; and
input symbol in input interface.
8. # Key
In standby mode, long press this key to activate vibration mode, and to
switch input method on the input interface.
1.3 Icons <Icons on the screen: >
Icon
Description
Indicates SIM Card signal strength.
Indicates use of a 3G network.
New short message(s) received.
New multimedia message(s) received.
New email(s) received.
Missed call.
Alarm clock has been activated.
Bluetooth on.
Indicates a headset is connected to the phone.
Indicates silent mode has been activated.
Keypad has been locked.
Indicates battery power level.
Indicates phone is roaming.
15
1.4 Screen background light
The backlight illuminates the screen. When you switch your mobile phone on, the
backlight will turn on for a short period. If no key is pressed within the period, the
backlight will turn off automatically to save battery life. The backlight brightness
can be set up in [Settings] >[Phone Settings] > [Misc. Settings] > [LCD Backlight].
Instructions before use
2.1 Install and charge the phone
1. Remove the back cover of the phone.
2. Slide the SIM card into the SIM card holder. Make sure the contact area
is facing down. Please note, 3G services can only be supported on the SIM in
SIM slot 1.
3. Insert the battery and then replace the back cover.
4. Plug the travel charger in a wall socket.
5. Plug the mini USB cable (provided) into the travel charger and then plug the
cable into the phone.
2.2 Power on/off
Press and hold the power key to switch the device on and off. Press the power key
briefly to end a call or close an application.
16
2.3 Security password
You can set a security password to avoid your SIM card being used by others.
2.3.1 PIN code
If your SIM card has PIN code protection enabled, there will be a prompt to enter
the PIN code. If the wrong PIN code is entered three times, your SIM card will be
automatically locked. If you enter the PIN code incorrectly 3 times you will have to
enter your PUK code to unlock it which can be provided by your network service
provider.
2.3.2 PUK code
PUK code, referring to personal unlock code, is used to unlock a SIM card that
is locked due to the PIN code being input incorrectly three times. If the PUK
code is entered incorrectly ten times, your SIM card be permanently blocked.
PUK code is provided by your network service operator.
17
2.4 Insert a memory card (optional)
To store additional multimedia files, you must insert a memory card. Your device
accepts micro SD memory cards (16GB maximum). To insert a memory card:
1. Remove the battery cover and battery.
2. Slide and lift the memory card door.
3. Insert a memory card with the gold-colored contacts facing down.
4. Close and slide the memory card door to lock it into place.
5. Replace the battery and battery cover.
Basic Functions
3.1 Direct dial
In standby state, use the number keys to enter the telephone number you would
like to dial. If you input the wrong number, press the [Right Soft Key] (located at
the top right of the keypad) to delete the number before the cursor. Once the
phone number to dial has been input, press the [Send Key]. If the phone number
being dialed out is saved in your contact list, the name and icon of the contact will
be displayed on the dialing screen. Press [End Key] to end a call.
18
3.1.1 Quick dial from contacts list
Press the [Right Soft Key] to enter the contacts list.
Slide the cursor up/down to select the phone number you want to dial.
Press the [Send Key] to dial the number.
3.1.2 Quick dial from dialed phone number list
Press the [Send Key] to enter the dialed phone number record page.
Slide the cursor up/down to select the person you want to call or the number you
want to dial.
Press the [Send Key] to dial out the number.
19
3.2 Answer an incoming call
When there is an incoming call, an animation will be displayed together with
a ringtone or vibration. If the phone number of the caller can be identified, the
number will be displayed on screen. If information about the number is stored
in your contacts list, then the caller’s name and icon will also be displayed. At
the same time a specified ringtone will be played. Alternatively your phone may
vibrate according to your current settings. If the caller hides his/her number or the
network bans caller identification then no name or number will be shown.
Press the [OK Key] or [Send Key] to answer calls. If ‘Any Key Answer’ is selected,
you can press any key apart from the [End Key] or [Right Soft Key] to answer calls.
When you want to reject an incoming call, press the [End Key].
3.3 Making an emergency call
As long as you are within coverage of network, you can make an emergency call
even if you have not registered to a local network or do not have a SIM card. Input
112, and then press the [Send Key] to make an emergency call.
Note: In the Input PIN code prompt screen during start-up, press the [Send Key] to
make an emergency call. Please note, some networks do not allow dialing of 112
for emergency calls.
20
3.4 Making an international long-distance call
Press the [*] key twice to enter a “+” sign, which tells the network you are making
an international call. You may now input the country code, area code (without 0)
and phone number and then press the [Send Key].
3.5 Talk options
This mobile phone provides some control functions during calls. Press the
[Options] soft key to access the talk control functions during a call.
3.5.1 Hold function
If your network supports it, you can hold the current call. Press the [Options]
soft key and select the ‘Hold’ option in the menu. To take the call off hold, press
[Options] soft key and select the ‘Retrieve’ option in the menu.
3.5.2 Dial a second number
When you are making a call, you can dial another number.
Enter the second number or press the [Main Menu] option in [Options] soft key to
select a number from your contacts list and then press the [Send Key]. When the
second number is put through, the first call will be held automatically.
3.5.3 Answer a second incoming call
If you have a second incoming call whilst on another call, the screen will display
that a second call is waiting. The call wait function is only available if you’ve
21
enabled it in the call wait menu and only if your network supports it. Press the
[Answer Soft Key] or [Send Key] to answer the second call. When the second call
is put through, the first call will be switched to hold state. Press the [End Key] to
terminate the second call.
3.5.4 Select current phone number
Information about the other call is indicated by a small icon in the title area of
the screen. Select the number and press the [Options] soft key to display the
following options:
Swap: Current call enters hold state, while the held call is activated.
Conference: Add held call to conference call.
End Single Call: End one call.
End All Calls: End all current calls.
New Call: Dial a new number.
Main Menu: Enter the main menu.
22
3.6 Text edit
When you use your mobile phone, you may need to enter text. For example, to
save a name in your phonebook, write a short message, or to create a task. You
can enter letters, symbols and numbers using the keyboard of your mobile phone.
In edit state, press the [#] key to select a text input mode.
The default input mode after power-on is smart ABC. Symbols can be entered by
pressing the [*] key.
3.7 Basic English and number input mode
In Basic English input mode, you may press a key on the keyboard to enter a letter.
In number input mode, press a number key on the keyboard to enter that number.
3.8 Quit from the menu
You can press the [Right Soft Key] or [End] key to quit from the menu.
23
Menu Function List
4.1Phonebook
4.2 Call Center
4.2.1 Call History
4.2.2 Call Settings
4.3 Services
4.3.1 Internet Services
4.3.2 SIM Services
4.4 Messaging
4.5 Video call
4.6 Organizer
4.6.1 File Manager
4.6.2 Calendar
4.6.3 Tasks
4.6.4 Alarm
4.6.5 World Clock
24
4.6.6 Notes
4.6.7 PHB Backup Entries
4.7 Settings
4.7.1 Dual SIM Switch
4.7.2 Dual SIM Settings
4.7.3 User Profiles
4.7.4 Phone Settings
4.7.5 Network Settings
4.7.6 Security Settings
4.7.7 Connectivity
4.7.8 Restore Factory Settings
4.7.9 Sound Effects
4.8 Multimedia
4.8.1 Media Player
4.8.2 FM radio
4.8.3 Image Viewer
4.8.4 Photo Editor
4.8.5 Sound Recorder
4.8.6 Schedule FM Record
4.8.7 Melody Composer
4.8.8 Slide Show
4.9 Email
4.10 File Manager
4.11 Extra
4.11.1 Calculator
4.11.2 Currency Converter
4.11.3 Stopwatch
4.11.4 Ebook Reader
4.12eBuddy
4.13. Camera
25
Menu Functions
You can press the [Left Soft Key] in standby state to enter the main menu.
Once you have entered the main menu, you can select an option by using the
direction keys to move the cursor. When the cursor moves to an option, it will
highlight the option with a blue box. To select an option press the [OK] key.
Press the [Right Soft Key] or [End Key] to return to standby mode.
4.1 Phonebook
You can select the ‘Add New Contact’ option to add a new contact or caller group
in the phonebook interface.
You can select ‘Phonebook Settings’ to do the following:
1. Preferred Storage: Select a priority storage location for new contacts.
2. Speed Dial: Set a speed dial from your phonebook and you can dial the contact
by pressing and holding the associated number key whilst in standby mode.
3. My Number: Save or send your mobile number.
4. Extra Numbers: Use this menu to view the other numbers stored in your SIM
card or phone memory.
5. Memory Status: View memory status of your phone and SIM card.
6. Copy Contacts: Use this option to copy all records between the SIM card and
the phone.
26
7. Move Contacts: Use this option to move all records between the SIM card
and the phone.
8. Delete All Contacts: Use this option to delete records from the SIM card
or phone.
Note: This phone can store up to 1000 phone numbers.
27
4.2 Call Center
4.2.1 Call History
Use the direction keys to view all calls, dialed, received or missed. In the missed,
dialed, received calls menu, press the [OK Key] to view the details: type, time and
number. Press [Options] to access the following functions: Send Message, Call,
Delete, Add to Blacklist, Edit, Delete and Advanced. The advanced function allows
you to view call times and call costs. You can also view or reset the sent and
received message counter as well as the GPRS byte counter.
4.2.2 Call Settings
SIM Call Settings
Enter this menu to change the following functions:
Caller ID
If you choose [Hide ID], your phone number won’t be displayed when you make
telephone calls.
28
Call Waiting
Please note: This function is dependent on network support.
Activate: Activate the Call waiting function.
Deactivate: Deactivate the Call waiting function.
Query Status: Query the status of the function.
Call Divert: Divert incoming calls to another phone number.
Call Barring: Use the menu to set the call barring. It contains options for Outgoing
calls, Incoming calls, Cancel all and Change barring password.
Line Switching: Switch between line 1 and 2.
Advance Settings
1. Auto Redial: Turn the function on or off.
2. Background Sound: Turn the function on or off. You can also set the volume, play
mode and effect.
29
4. Call Time Display: Turn the function on to display call times.
5. Call Time Reminder: Turn the function on to get a reminder with a warning tone
during calls.
6. Auto Quick End: Automatically ends the call at a specified time.
7. Text Phone: Turn the function on or off.
End All Calls: End all current calls.
New Call: Dial a new number.
Main Menu: Enter the main menu.
30
4.3 Services
4.3.1 Internet Services
Homepage: Connect to homepage.
Bookmarks: Bookmark pages.
Input Address: Input a web page.
Last Web Address: Go to the last web page.
Recent Pages: Shows history.
Stored Pages: View stored pages.
Service Inbox: Get the service message.
Settings: Access the settings menu to include profiles, browser options, references,
security settings, service message settings and restore browser settings.
4.3.2 SIM Services
Use this function to access your SIM card’s menu
31
4.4 Messaging
1. Write Message: In the edit mode, you can edit a message or MMS. You can also
press [options] to change the following:
Send to: Send the message by SIM1 or SIM2.
Writing Language: Select an input language.
Add Picture: Add a picture to an MMS from the phone or memory card. You can
also take a picture for the MMS.
Add Sound: Add a sound from the phone or memory card. You can also record a
sound for the MMS.
Add Video: Add a video from the phone or memory card. You can also record a
video and send using MMS.
Add Subject: Add a subject for the MMS.
Slide Options: Add a new slide behind or before the MMS.
Switch to MMS: Switch SMS mode to MMS mode.
Advanced: You can insert a text template, attachment, contact number, contact
name or bookmark in the MMS or SMS using this function.
Save: Save SMS or MMS to drafts.
Details: View details of the SMS or MMS.
32
2. Inbox: SMS and MMS you receive are all stored in your inbox. Open an SMS or
MMS and press the [Options] key to access further options.
3. Drafts: Save any unsent SMS and MMS to the drafts folder.
4. Outbox: Saves any SMS and MMS that failed to send.
5. Sent Messages: Saves a copy of your sent SMS and MMS.
6. Archive: You can move SMS and MMS to the archive from your inbox
and outbox.
7. SIM Messages: View messages that are saved to your SIM card.
8. Delete Messages: Delete the messages from your inbox, drafts, outbox, sent
messages or from the archive. You can also delete all messages.
9. Email: To send or receive emails, please set up your accounts.
1. Start to create an account by inputting your email address details.
2. Select the protocol, either POP3 or IMAP4.
3. Select a data account from the list of GPRS accounts.
4. Input the incoming mail server.
5. Input the outgoing mail server.
6. Input your user name.
33
7. Input your password.
8. Activate the account you set.
9. Account options→Edit→Advanced Settings→Outgoing Server→
Authentication→On
Please note: In Email Accounts Menu, select Email Accounts→Option→Edit→
Advanced Settings, you can set outgoing/incoming server, signature and account
settings.
10. Broadcast Message: Use this menu to set the broadcast message.
11. Templates: Access the template messages.
12. Message Settings: This menu contains various settings for SMS & MMS.
34
4.5 Video call
In standby mode, you can input a number then press the [Left Key] to select
video call.
You can also make a video call and access various settings via the ‘Video call’
option on the main menu.
Make Video Call: Make a new video call.
Stop Camera: Close camera during the video call.
Use Rear Camera: Select rear camera during the video call.
Turn On Night Mode: Turn on night mode during the video call.
Switch Picture: Switch between large and small picture.
Hide Small Picture: Close small picture.
Video Call Settings: Contains four options: answer mode, dial mode, image in video
call and audio options.
Advanced: Set video quality.
Please note: To make a video call, you will need a 3G-capable SIM Card, connected
to a 3G network and inserted in SIM slot 1 of the phone.
35
4.6 Organizer
4.6.1 File manager
Manage the files that are saved in your phone and memory card.
You can play, edit, send, delete, and use the files.
4.6.2 Calendar
Enter the menu and press [Options] to set the following:
View: View events for the selected date.
Add Event: Add a new event.
Delete Event: Delete an event.
Jump to Date: Jump to the date you selected.
Go to Today: Jump to current date.
Go to Weekly View: View calendar by week.
4.6.3 Tasks
Enter the menu to view the task list.
Press [Options] to set the following:
View: You can view the task.
Add: Add a new task.
36
Edit: Edit the task you selected.
Search: Search the task by time or by subject.
Delete: Delete a selected task.
Delete Overdue: Delete an overdue task.
Delete All: Delete all the tasks in the phone.
Jump to Date: Jump to the specified date.
View Uncompleted: View uncompleted tasks.
Send Calendar: Provides four options: send by SMS, send by MMS,
send by Bluetooth.
Save As File: Save to file.
4.6.4 Alarm
In edit mode, press [Edit] to set the following: Time, Repeat, Audio options,
Snooze(mins), Alert type.
4.6.5 World Clock
View the time in other cities and time zones.
4.6.6 Notes
Use this menu to add a new note.
37
4.6.7 PHB backup entries
Use this menu to create a backup of your phonebook.
Allows you to import/export all entries to a CSV file.
4.7 Settings
4.7.1 Dual SIM Switch
There are two options: select with SIM status or use the default mode.
4.7.2 Dual SIM Setting
There are four options: dual SIM open, only SIM1 open, only SIM2 open
and flight mode.
4.7.3 User Profiles
There are six profiles to choose from: General, Meeting, Outdoor, Indoor, Headset,
Bluetooth.
Press [Options] to set the following:
Activate: Activate the profile.
Customise: Contains six options: Tone Setup, Volume, Alert Type, Ring Type, Extra
Tone, Answer Mode.
38
4.7.4 Phone Settings
1. Time and Date: Use the menu to set the time and date. It contains three options:
Set Home City, Set Time/Date, Set Format.
2. Schedule Power On/Off: Use the menu to schedule a time to power on/off.
3. Language: Use the menu to set the language.
4. Writing Language: Use the menu to set default input language.
5. Encoding: Use the menu to select encoding mode.
6. Display: Use the menu to set display characteristics. It contains six options:
Wallpaper, Screen Saver, Power On Display, Power Off Display, Show Date and
Time, Screen Switch Effect.
7. Themes: You can select a different theme.
8. Dedicated Key: View or set the functions of the four-way navigation key.
9. Auto Update of Date and Time: Turn on or off the auto update of date and time.
10. UART Setting: Select SIM1 or SIM2 for UART setting.
11. Misc. Settings: You can change the brightness and time of the LCD backlight
using the left and the right direction key.
39
4.7.5 Network setup
1. Network Selection: You can search manually for a network or set it to automatic.
2. Preferences: Press the left soft key to access the following options: Add from the
List, New, Change Priority, Delete.
3. Service Selection: Select service for your SIM card, the function provides three
choices: GSM/GPRS, WCDMA, automatic.
4. Network Information: View the network information of the current SIM card.
4.7.6 Security Settings
1. SIM1/SIM2 Security Setup: Use the menu to turn the SIM1/SIM2 lock on and
off, or change the password of the SIM PIN.
2. Pin request: Enable/disable the SIM’s PIN requirement when turning the phone on.
3. Auto Keypad Lock: Use the menu to choose the waiting time.
4. Change Password: Change the phone password.
5. SIM profile control: Do not use unless instructed by your SIM provider.
40
4.7.7 Connectivity
1. Bluetooth: Enter the menu to set the following: Power, Visibility, My Device,
Search Audio Device, My Name, Advanced.
2. Conn. Management: View the current data transmission set up.
3. Data Account: GSM Data: Add or edit the GSM account. GPRS: Add or edit the
GPRS account.
4.7.8 Restore Factory Setting
The default password is 1122.
4.7.9 Sound effect
You can select a different sound effect.
4.8 Multimedia
4.8.1 Media player
First, you must create a new playlist, go to: My Playlists > Options> New to create
and name a new playlist. Then re-open the playlist and go to Options > Add to add
music from your phone or memory card.
In the player interface, move the four-way navigation keys to select different
operations: start or stop the current music, play the previous or next song, and
press number key two or eight to adjust the volume.
41
[Right Soft Key]: Quit audio player.
[Left Soft Key]: View current playlist and settings. The settings contain player
settings, audio settings, video settings and network settings.
4.8.2 FM radio
Use the menu to listen to the radio. Press the down navigation key to turn the FM
radio on/off, press the up navigation key to open the automatic search function,
press the left/right navigation key to select the last channel or next channel, press
the [OK] key to record, and adjust the sound using the symbolic keys * or #. Press
[Options] to set the following:
Channel List: List the channel of the FM radio.
Manual Input: Input the channel of the FM radio.
Auto Search: Preset Auto search.
Settings: To set Background play and Loud speaker.
Record: Records the current channel.
Append: Add to an existing recording file.
File List: To view the list of recordings.
42
4.8.3 Image viewer
Enter the menu and press [Options] to set the following: View, Slide show, Edit,
Image information, Print, Browse Style, Use As, Send, Rename, Delete, Delete All
Files, Sort By, Storage.
4.8.4 Photo editor
Photo editor allows you to edit photos stored on your phone or memory card.
4.8.5 Sound recorder
Use the menu to record a sound.
You can then choose the saved recording file to operate the following:
New Record: Record the new file.
Play: Play the recorded file.
Append: Append the new record to another file.
Rename: Rename the file.
Delete: Delete the file.
List: View the list of files.
Delete All Files: Delete all the files in the phone.
Settings: Contains two options: Storage and File Format.
Use As: It can be used for user profiles.
Send: You can send the file via MMS, Email and Bluetooth.
43
4.8.6 Schedule FM record
Use the menu to schedule the FM file of one channel, press [Edit] to set the
following: Time, Repeat, Channel Settings and Record Settings.
4.8.7 Melody composer
This can be used to create a new melody.
4.8.8 Slide show
Choose images from the phone or memory card to play as a slide show.
4.9 Email
Please refer to 4.4 Messaging for instructions on how to operate the Email
function.
44
4.10 File manager
Allows you to access and manage files on your phone memory and memory card
if installed).
4.11 Extra
4.11.1 Calculator
Use the menu to do basic calculations, such as addition, subtraction, multiplication
and division.
Key operations:
Left navigation key: Multiplication.
Right navigation key: Division.
Up navigation key: Addition.
Down navigation key: Subtraction.
OK: Equal. Press the key to display the calculation result.
Press [Clear] to clear the contents you input.
4.11.2 Currency converter
Input the currency rate, and then press OK to input local currency.
4.11.3 Stopwatch
Enter the menu to use the stopwatch. It provides two options: Typical Stopwatch
and nWay Stopwatch.
45
4.11.4 Ebook reader
Enter the menu, choose the book you saved, press [options] to operate the
following: Open E-Book, Clean Up Bookshelf, Global Settings, Book Info, Delete,
Delete All Files, Sort By, Apply Global Settings, Help.
4.12 eBuddy
Use the menu to enter eBuddy (data connection required).
4.13 Camera
Enter the menu and press the [Left Soft Key] to choose camera. In the camera
interface press the [OK Key] to capture photos, and press the [Left Soft Key] to set
the following: switch to front camera, Capture Mode, Image Size, Highlight, SelfTimer, White Balance, Effects, Storage, Image Quality, Time Stamp, Shutter Sound
and Restore Default.
46
FAQ’s
If any problems are encountered while using your mobile phone, please refer
to the following tips. If the problems continues, please contact your dealer or
service provider.
• “Enter PIN code” appears on the screen: Enter valid PIN code of your SIM card.
Please contact network service operator immediately if you do not know the code.
• “Enter PUK code” appears on the screen: Your SIM card will be locked if you enter
the wrong PIN code three times. To unlock your SIM card, you have to enter your
PUK code. Please contact your network service operator immediately. Please
note your PIN code and PUK code may be printed on the SIM card.
• “Insert SIM card” appears on the screen: Make sure your SIM card is correctly
installed. It may have defects or faults. If so, please take it to your network service
operator.
• ‘Not in service area. Network failure.’ is displayed. Check signal intensity indicator.
If there is no signal, you may be in an area where network signal isn’t available.
Please move to other locations to receive a signal.
• Poor sound quality, echo or noise makes communication difficult: Hang-up your
phone and dial again. Your network service operator may connect you to a line
with better communication quality.
47
• Standby time declines: If you are in an area where there is little to no signal your
phone will continually be searching for a network, which will reduce battery life.
If your battery is fairly old it may be approaching it’s life span, in this case please
replace it.
• Mobile phone fails to boot: First try to charge the battery/power on while
charging. If your mobile phone has been off for a long time, the battery is likely
to discharge excessively. You cannot power it on in this case, and the phone
will give no response for some time. The phone cannot be powered on until the
battery is charged.
• Can’t send a short message: Please contact your network service operator to
check if your service center number option is correct.
• Mobile phone won’t charge: There are three possibilities: 1. Charger of your
mobile phone doesn’t work properly. You can contact your nearest service
provider or dealer; 2. Ambient temperature is not appropriate. Please change
charging environment; 3. Poor contact. Please check plug of your charger.
• Can’t add entries into phonebook: Phonebook is full. Please delete some entries.
• Can’t select some functions: The service is not available or your network service
operator does not support this service. Please contact your service provider or
dealer.
48