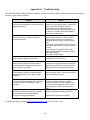
1
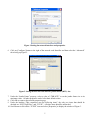
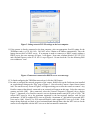
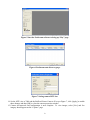
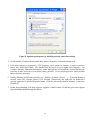
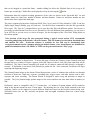
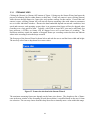
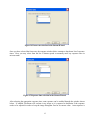
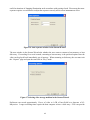
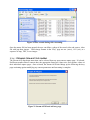
User’s Manual 8215 Madison Boulevard, Suite 150 Madison, AL 35758 Phone: (256) 461-7143 Fax: (256) 461-7145 Email: [email protected] Website: www.southernvisionsystems.com September 30, 2008 End-User License Agreement and Limited Product Warranty Southern Vision Systems Software Product(s) IMPORTANT—READ CAREFULLY: This Southern Vision Systems End-User License Agreement (“EULA”) is a legal agreement between you (either an individual or a single legal entity) and Southern Vision Systems, Inc. (“SVSi”). By installing, copying, downloading, accessing or otherwise using the SOFTWARE PRODUCT, you agree to be bound by the terms of this EULA. You agree that this EULA is enforceable like any written, negotiated contract signed by you. If you do not agree to the terms of this EULA, do not download, install or use the SOFTWARE PRODUCT; you may, however, return it to the place where you obtained it. 1. Limited License Grant. Southern Vision Systems, Inc. grants to you (“Licensee”) a non-exclusive, limited license to use this Software. Licensee may make one archival copy of the Software. Licensee may not re-distribute the Software in whole or in part, either separately or included with a product. 2. Restrictions. Software is confidential copyrighted information of SVSi and title to all copies is retained by SVSi and/or its licensors. Licensee shall not modify, decompile, disassemble, decrypt, extract, or otherwise reverse engineer Software. Software may not be leased, or sublicensed, in whole or in part. Licensee may transfer all rights under this License on a permanent basis provided that Licensee transfers the license, the Software and all associated printed materials, retains no copies and the recipient agrees to the terms of this License. 3. Trademarks and Logos. This License does not authorize Licensee to use any SVSi name, trademark or logo. Licensee acknowledges that SVSi owns the ProStream, StreamView, MemView, iCi, and GigaView trademarks and all related trademarks, and logos and agrees to: (i) not do anything harmful to or inconsistent with SVSi’s rights; and (ii) assist SVSi in protecting those rights, including assigning to SVSi any rights acquired by Licensee. 4. Disclaimer of Warranty. Software is provided “AS IS,” without a warranty of any kind. ALL EXPRESS OR IMPLIED REPRESENTATIONS AND WARRANTIES, INCLUDING ANY IMPLIED WARRANTY OF MERCHANTABILITY, FITNESS FOR A PARTICULAR PURPOSE OR NONINFRINGEMENT, ARE HEREBY EXCLUDED. 5. Limitation of Liability. SVSi AND ITS LICENSORS SHALL NOT BE LIABLE FOR ANY DAMAGES SUFFERED BY LICENSEE OR ANY THIRD PARTY AS A RESULT OF USING OR DISTRIBUTING SOFTWARE. IN NO EVENT WILL SVSi OR ITS LICENSORS BE LIABLE FOR ANY LOST REVENUE, PROFIT OR DATA, OR FOR DIRECT, INDIRECT, SPECIAL, CONSEQUENTIAL, INCIDENTAL OR PUNITIVE DAMAGES, HOWEVER CAUSED AND REGARDLESS OF THE THEORY OF LIABILITY, ARISING OUT OF THE USE OF OR INABILITY TO USE SOFTWARE, EVEN IF SVSi HAS BEEN ADVISED OF THE POSSIBILITY OF SUCH DAMAGES. 6. Termination. Licensee may terminate this License at any time by destroying all copies of Software. This License will terminate immediately without notice from SVSi if Licensee fails to comply with any provision of this License. Upon such termination, Licensee must destroy all copies of Software. 7. Export Regulations. Software, including technical data, is subject to U.S. export control laws, including the U.S. Export Administration Act and its associated regulations, and may be subject to export or import ii regulations in other countries. Licensee agrees to comply strictly with all such regulations and acknowledges that it has the responsibility to obtain licenses to export, re-export, or import Software. Software may not be downloaded, or otherwise exported or re-exported (i) into, or to a national or resident of Cuba, Iran, North Korea, Libya, Sudan, Syria or any country, organization or person to which the U.S. has embargoed the export of goods; or (ii) to anyone on the U.S. Treasury Department’s list of Specially Designated Nations or the U.S. Commerce Department’s Table of Denial Orders. 8. Restricted Rights. Use, duplication or disclosure by the United States government is subject to the restrictions as set forth in the Rights in Technical Data and Computer Software Clauses in DFARS 252.227-7013© (1) (ii) and FAR 52.227-19(c) (2) as applicable. 9. Governing Law. Any action related to this License will be governed by Alabama state law and controlling U.S. federal law. No choice of law rules of any jurisdiction will apply. 10. Severability. If any of the above provisions are held to be in violation of applicable law, void, or unenforceable in any jurisdiction, then such provisions are herewith waived to the extent necessary for the License to be otherwise enforceable in such jurisdiction. However, if in SVSi’s opinion deletion of any provisions of the License by operation of this paragraph unreasonably compromises the rights or increase the liabilities of SVSi or its licensors, SVSi reserves the right to terminate the License and refund the fee paid by Licensee, if any, as Licensee's sole and exclusive remedy. 11. Notice. The GigaView, MemView, ProStream and StreamView trademarks are owned by SVSi. iii IMPORTANT SAFETY INSTRUCTIONS DO NOT DISCARD, READ BEFORE OPERATING Please read the safety precautions carefully before using this product. Ensure that you use the product correctly according to the procedures described in these instructions. The following safety precautions are intended to instruct you in the safe and correct operation of the product and its accessories to prevent injuries or damage to yourself, other persons, and property. Please read and ensure that you understand them before you proceed to the other sections of these instructions. WARNING Do not play the supplied CD-ROM in any CD-ROM Player that does not support data CD-ROMs. The extremely loud sound that may result from playing the CD-ROM in an audio CD player (music player) could damage the speakers. It is also possible to suffer hearing losses from listening with headphones to the loud sounds of a data CD-ROM played on a music CD player. Disclaimer • While every effort has been made to ensure that the information contained in these instructions is accurate and complete, no liability can be accepted for any errors or omissions. SVSi reserves the right to change the specifications of the software described herein at any time without prior notice. • SVSi makes no warranties for damages resulting from corrupted or lost data due to mistaken operation or malfunction of the ProStream software. iv TABLE OF CONTENTS 1.0 SYSTEM REQUIREMENTS ........................................................................................................................................6 2.0 QUICK-START GUIDE ................................................................................................................................................6 2.1 PERFORMANCE.........................................................................................................................................................10 3.0 PROSTREAM OPERATING MODES ......................................................................................................................12 3.1 INITIALIZATION ...............................................................................................................................................................12 3.2 PLAY MODE .....................................................................................................................................................................12 3.3 CAPTURE MODE ...............................................................................................................................................................13 3.3.1 3.3.2 3.3.3 3.3.4 3.3.5 Streaming video ................................................................................................................................................16 Streaming video to memory ..............................................................................................................................19 Streaming video to disk array...........................................................................................................................20 Streaming from multiple cameras.....................................................................................................................21 Triggering options ............................................................................................................................................22 APPENDIX A Troubleshooting..........................................................................................................................23 TABLE OF FIGURES Figure 1 Setting the network interface card properties........................................................................................... 7 Figure 2 Setting the host network interface jumbo frame (MTU) size................................................................... 7 Figure 3 Setting network TCP/IP settings on the host computer............................................................................ 8 Figure 4 Camera not connected to DHCP server error message. ........................................................................... 8 Figure 5 Start the ProStream software to bring up “Play” page. ............................................................................ 9 Figure 6 ProStream auto-discovery page................................................................................................................ 9 Figure 7 Setting camera MTU size. ........................................................................................................................ 9 Figure 8 Optimize performance by disabling network connection settings. ....................................................... 11 Figure 9 ProStream 'Play" window...................................................................................................................... 12 Figure 10 ProStream Capture window................................................................................................................. 14 Figure 11 Changing the display refresh rate. ........................................................................................................ 15 Figure 12 Gain settings. ........................................................................................................................................ 15 Figure 13 Frame size selection in the Stream Wizard. ........................................................................................ 16 Figure 14 Frame rate selection in the Stream Wizard........................................................................................... 17 Figure 15 Exposure time selection in the Stream Wizard..................................................................................... 17 Figure 16 Auto-exposure window in the Stream Wizard. .................................................................................... 18 Figure 17 Selecting video storage medium in the Stream Wizard........................................................................ 18 Figure 18 Selecting record time for streamed video............................................................................................. 19 Figure 19 Selecting destination and recording time for streaming to disk array. ................................................. 20 Figure 20 Files created during video streaming.................................................................................................... 21 Figure 21 Stream-All Wizard advisory page. ....................................................................................................... 21 Figure 22 Frame-sync trigger settings. ................................................................................................................. 22 v 1.0 SYSTEM REQUIREMENTS Operating System RAM Processor Interface Hard Disk Space Display 2.0 Windows XP/Vista (recommended) Minimum 512 MB required 1-GB (recommended for streaming to memory) Pentium class or equivalent (1.6-GHz or higher) Gigabit Ethernet with 9k jumbo frame support 30 MB minimum + required video storage space (not recommended streaming to the OS drive) 1024 x 768, Color (32-bit) minimum QUICK-START GUIDE Your ProStream software is designed to stream digital video from one or more Prosilica GigE-Vision gigabit Ethernet cameras, record common video formats to hard disk, and play back video is super-slow-motion. A host computer with one or more Ethernet network ports is required for camera set-up and for storing recorded video. ProStream is designed to record high speed video direct to either host memory for several seconds or to host disk array for several hours. Using ProStream for the first time: 1. Install software from installation CD after reading Software User License Agreement. 2. Power-up the camera and connect to host computer through a network cable. 3. Connect the camera directly to the host or to a network. A cross-over cable is not required when connecting directly to the computer. The camera(s) can be connected through 10/100 or 1000-baseT connections but performance will be significantly better over gigabit Ethernet. 4. Any Prosilica GigE-Vision camera will be set at the factory with a fixed IP address or DHCP. If the camera is connected to the host computer through a network, DHCP will work fine. However, if directly connected to a network interface on the host, the IP address must be fixed at a value that will not conflict with another network deivce. In order to eliminate any possible network conflict, disable all other network connections (either wired or wireless) on the host computer. 5. ProStream will run on either a laptop or desktop computer with good performance. When streaming to laptop, video is typically captured direct to memory then saved to disk. However, some newer laptops with 7,200-rpm drives and dual-processors can stream direct to disk very efficiently. For example, 640x480 video at 150-fps can be streamed to a Dell Latitude ATG D620 laptop with no dropped frames. A TRENDnet CardBus network interface card was used for these tests although any network interface card should give similar performance. It is critical to install and configure this interface card properly for best performance. To configure the network card interface, from the Windows Control Panel, select [Network Connections] and then right-click on the network interface to select [Properties]. In the window of Figure 1, the TRENDnet card is shown as an example. A PCI or PCIe card will have similar options in the [Properties] menu. (Note: the SVSi GigE Filter option must be selected under connection items and all other options turned off except TCP/IP.) 6 Figure 1 Setting the network interface card properties. 6. Click on [Configure] button to the right of the network card identifier and then select the “Advanced” tab to bring up Figure 2. Figure 2 Setting the host network interface jumbo frame (MTU) size. 7. Under the “Jumbo Frame” property, select a value of “7KB MTU” to set the jumbo frame size to its maximum value. All other properties can be left at their default values. 8. Click OK to return to the network properties page. 9. Under the heading “This connection uses the following items”, the only two items that should be checked are “SVSi GigE Filter” and “TCP/IP”. All other items should be unchecked. 10. Scroll down to click on the “TCP/IP” item and select [Properties] to display the window of Figure 3. 7 Figure 3 Setting network TCP/IP settings on the host computer. 11. If the camera is directly connected to the host computer, select an appropriate fixed IP setting for the TRENDnet card (e.g.-192.168.1.69). DO NOT select “Obtain an IP address automatically” since the laptop does not have a DHCP server. If an attempt is made to connect to a DHCP camera without a DHCP server, the error message of Figure 3 will appear. Next enter a Subnet Mask of 255.255.255.0 and a Default Gateway value of 192.168.1.1 as per Figure 4. Do not check the “Use the following DNS server addresses” item. Figure 4 Camera not connected to DHCP server error message. 12. To finish configuring the TRENDnet network card, click the [OK] button. 13. In order to configure the network properties of the camera, double-click on the ProStream icon installed on your desktop to bring up the “Play” page of Figure 5. Next select the [Camera->Open Camera] menu item. The auto-discovery screen of Figure 6 will appear asking you to select the camera to connect. Any Prosilica camera either directly connected or on a network will appear on this page. Select the camera to connect and click [OK]. Once connected, select the [Camera->Properties->Network] tab to display Figure 7. Important: every Prosilica camera is set to a maximum transfer unit (MTU) size of 1500. The camera MTU must be set to the maximum supported by the host network interface card for best performance. PCMCIA cardbus MTU sizes are typically a maximum of 7,000 while Expresscard MTU sizes can be 9,000. Most PCI or PCIe network interface cards support MTU sizes up to 9,000. If the images being displayed are black or have horizontal bands through them, then the MTU size set for the camera is not compatible with the MTU size set on the host network connection. 8 Figure 5 Start the ProStream software to bring up “Play” page. Figure 6 ProStream auto-discovery page. Figure 7 Setting camera MTU size. 14. Set the MTU size to 7000 and the Buffered Frame Count to 20 as per Figure 7, click [Apply] to enable these changes and then [OK] to close the camera properties window. 15. Camera and network card configuration is now complete. To view images, select [Live] and live imagery should appear on the “Capture” page. 9 2.1 PERFORMANCE ProStream is capable of recording video data-rates of 62-Mbytes/sec to one host network interface for hours on end with <1% dropped frames when both the camera and host computer are properly configured. The minimum system requirements are given in Section 1.0 and instructions on setting the MTU size are given in steps 7 and 13 of the Quickstart Guide. SVSi can deliver a fully tested multi-camera turnkey system. Please contact the factory for pricing and delivery. SVSi has tested several gigabit Ethernet PCMCIA network cards for laptops as well as PCI and PCIe cards for desktops. These are listed below along with the maximum MTU size supported. Some newer laptops use the ExpressCard slot instead of PCMCIA. Performance (as measured by a decrease in the number of dropped frames) increases for larger MTU size. Table 1 Recommended PCMCIA cards for laptops. Manufacturer Model Max MTU Size Interface Netgear GA511 7,000 PCMCIA US Robotics USR7903 7,000 PCMCIA Trendnet TEG-PCBUSR 7,000 PCMCIA Bytecc BT-ECL1G 9,000 ExpressCard Table 2 Recommended network cards for desktops. Manufacturer Model Max MTU Size Intel Pro/1000 GT (PCI) 16,000 D-Link DGE-560T (PCIe) 16,000 Linksys EG-1032 (PCI) 9,000 A customer-supplied computer will demonstrate very good performance when optimized according to the following steps: 1. Make sure the SVSi gigabit Ethernet filter driver is installed and enabled under the [View Network Connections->Properties->General] settings for the network interface. 2. Cancel out of any other applications that may be running during the video recording sequence. 3. Disable all other network settings (e.g.-Quality of Service, Client for Microsoft Networks, File and Printer Sharing, …) as in Figure 8 below. Only the SVSi filter driver and TCP/IP options should be selected. 10 Figure 8 Optimize performance by disabling network connection settings. 4. Set the number of buffered frames under the [Camera->Properties->Network] settings to 20. 5. If the host computer or laptop has a CPU frequency select option (for instance, in order to preserve battery life) disable this feature. This should force the host to run at a higher clock frequency. For example, selecting “Maximum Performance” under Dell Quickset will disable this feature and force the processor at max clock speed even while battery powered. Do not adjust processor speed in BIOS unless absolutely necessary. 6. Disable Windows and all other firewalls (e.g.- McAfee, Symantec, Norton, …). To disable Windows firewall, select [My Network Places->View Network Connections] and right-click on ProStream’s network connection to get the [Properties] menu. Click the [Advanced] tab then [Settings…] and select firewall off. 7. Enable hyper-threading if the host processor supports it (most Pentium IV and later processors support hyper-threading enabled through the BIOS). 11 3.0 PROSTREAM OPERATING MODES The ProStream software is designed to record and playback imagery in a user-friendly manner. Implementation, specifications, data logging and display, and limitations on use for all modes are described below. 3.1 INITIALIZATION When the ProStream application is started, the default “Play” window appears as shown in Figure 2. Video files can be opened and played in this mode whether a camera is attached or not. AVI files must be 8-bit (monochrome) or 24-bit (color) and are limited to a 2-GB file size. The codec for the AVI file being played must be available on your computer. The sections below describe how to set up each mode for optimal data acquisition and display. 3.2 PLAY MODE The “Play” window is shown below playing a video sample. Figure 9 ProStream 'Play" window. Common video controls (Forward/Reverse/FF/Stop) are available on the main “Play” page and on each individual window. Multiple windows can be opened at once. The current frame is indicated below a sliding bar 12 that can be dragged to a particular frame. Another sliding bar allows the Playback Rate to be set up to 40 button. frames-per-second (fps). Media files can be played in a loop by selecting the Information about the original recording parameters of the video are shown in the “Recorded Info” are and include: frame size, frame rate, number of frames, and time duration. Frame size and frame number are also shown in the lower right of the main page. The player supports playing native ProStream RAW files (*.mvw) and AVI files (limited to 2-GB). It can also display single images (bitmap, jpeg, tiff, and raw). Use the File Open command to select the file type and the file to open. The “Save As” command allows you to save the video files with different options. You can save a previously recorded StreamView file as a new StreamView file with different frame parameters; you can save it as an AVI file; or you can save it as a series of images. See the description of the “Save Data” dialog below on the various options. Note: because of the large file sizes generated during a typical record session, SVSi recommends recording and playing in the default *.mvw file format. This file format gives the fastest download times and smallest file sizes. ProStream software is available for free and can be downloaded from www.prostreamsoft.com for customers playing the default format. Once actual frames are identified for public dissemination, then AVIs, BMPs, or TIFFs can be generated from the “Play” page. 3.3 CAPTURE MODE The “Capture” window is shown below. To access this page, click on the [Camera-->Open Camera] menu and the auto-discovery window of Figure 6 appears. Select the camera of choice, click [OK], and connection will be established. The Open Camera command will search for all cameras connected either directly or through a network. If ProStream is not found, click [Refresh] to update the list. Once connected, ProStream will begin acquiring and displaying images. The [Stream] button brings up the Stream Wizard that presents a series of windows that walk the user through selection of frame-size, frame-rate, exposure, recording time, trigger source, and other options such as autoexposure and sector recording. The Stream Wizard is designed to make set-up and operation as simple as possible. The [Live] button simply updates images to the screen and does not store them either in memory or disk. ProStream’s sensor is compatible with 1/3” C-mount lens. A C-mount to F-mount adapter will be needed to adapt to the bayonet mount on most 35-mm lenses. By adjusting the size of the frame streamed to the host computer, frames can be captured at several different frame-rates based on the Prosilica camera being used. Selectable frame sizes are full, one-half, one-quarter, and one-eighth resolutions (based on a linear image dimension). 13 Figure 10 ProStream Capture window. Information about frame size, frame rate, and exposure are shown on the left side of the window. Information about the current frame-rate, number of frames dropped during the recording session, total number of frames stored, current record time, and current frame number are shown in the status bar along the bottom. With 9,000 MTU size and a sufficiently fast processor, no frames should be dropped at data-rates as high as 65-Mbytes/sec to one network interface card. User-adjustments are allowed to frame size, frame rate, exposure, and gain on this page only when stopped. Once these parameters are entered manually, the others will be modified as needed and clicking [Live] will display images with these changes. [Live] does not store imagery and is intended for alignment and setup purposes. Once lighting, focus, and exposure are adjusted, clicking [Stream] will bring up the Stream Wizard with a number of consecutive pop-up windows that walk the user through the process of recording video. The Stream Wizard can be bypassed by typing [Ctrl-S] or by selecting the [Camera->Stream] drop-down menu item. The display update rate will vary between “Live”, “Stream”, and play-back modes and can be set independently for each mode from the [View->Refresh Rate] drop-down menu of Figure 11. In “Live” mode, no images are 14 stored and the display is updated at a faster rate. In “Stream” mode, images are updated to the display once a second. The status bar along the bottom is also updated at 1-Hz during streaming. Figure 11 Changing the display refresh rate. ProStream has the option of adjusting the imager gain setting independent of exposure. Gain settings are accessed under the drop-down [Camera->Set Gain] menu item and are limited to +20dβ, +17dβ, +10dβ, and 0dβ. For low-light levels, the “+” dβ levels increase imager gain but at the expense of higher noise. Figure 12 below shows how to access these gain settings. Figure 12 Gain settings. 15 3.3.1 STREAMING VIDEO Clicking the [Stream] or [Stream All] buttons of Figure 11 brings up the Stream Wizard and starts the process of streaming video to either memory or disk array. If only one camera is open, clicking [Stream] walks the user through frame-size, frame-rate, and exposure settings for that camera. If more than one camera is open, selecting [Stream All] will start all cameras streaming video with whatever parameters are set in their individual windows. Because the data bandwidth depends on network connection, host speed and resources, and operating system, there is no guarantee that frames will not be dropped when recording over a long period of time. Typically, with 9,000 or larger MTU sizes and a sufficiently fast host processor (>2-GHz), no frames will be dropped even over several hours of recording. The ProStream software reports the number of dropped frames per recording session but does not indicate where in the recording session the drops occurred. The first page of the Stream Wizard is shown below and asks the user to end the frame width and height. The user may select from a drop-down list or enter values. Figure 13 Frame size selection in the Stream Wizard. The maximum streaming frame-rate depends on the frame size chosen. The drop-down list of framerates in the next window of the Streaming Wizard (shown below) is modified based on the user’s frame size selection. The user may choose from this drop-down list or manually enter a value within this range. 16 Figure 14 Frame rate selection in the Stream Wizard. Once you have selected the frame rate, the exposure window below contains a drop-down list of exposure times. Here you may select from the list of shutter speeds or manually enter any exposure time in microseconds. Figure 15 Exposure time selection in the Stream Wizard. After selecting the appropriate exposure time, auto-exposure can be enabled through the window shown below. If enabled, ProStream will evaluate every image as it is captured to determine if the exposure needs to be adjusted in order to keep the image histogram fixed at its current value. Auto-exposure is 17 useful in situations of changing illumination such as outdoors with passing clouds. Please note that autoexposure requires several frames to adjust the exposure correctly and is not an instantaneous effect. Figure 16 Auto-exposure window in the Stream Wizard. The next window in the Stream Wizard asks whether the user wants to stream to host memory or host disk array. If recording for several seconds, streaming to host memory is the preferred option since the video can be played back immediately out of memory. When streaming to disk array, the user must exit the “Capture” page and open the stored file in “Play” mode. Figure 17 Selecting video storage medium in the Stream Wizard. ProStream can record approximately 12-secs of video to 1-GB of host RAM at a data-rate of 65Mbytes/sec. Longer recording times require the host computer to have a disk array. SVSi can provide 18 disk arrays for up to 10-hours of high-resolution high-speed video. Please contact the factory for any custom storage requirements. 3.3.2 STREAMING VIDEO TO MEMORY Once the option to stream to host memory is selected, the following Stream Wizard window will show asking for the quantity of available memory to allocate for recording video. The software queries the host operating system to determine available RAM memory and provides the user the slider bar below for determining the recording time. ProStream reserves 256-MB of host RAM for the operating system and other programs. SVSi suggest when possible that all other programs be terminated during a video recording session to ensure that the host operating system is not trying to allocate memory dynamically. Figure 18 Selecting record time for streamed video. After selecting the recording time using the slider bar, clicking [Stream] will cause ProStream to begin recording video to host RAM. To stop the recording process, click on the [Stop] button. Video is now preserved in host memory but has not been written to disk yet. ProStream treats the available memory as a rolling buffer so that, even though only 6.5-secs of recording time was selected, you may record for several minutes until [Stop] is hit after which only the last 6.5-secs of video are stored in memory. Once recording has been stopped, clicking the [Play] button will playback recorded video at whatever frame-rate the host processor can support (typically 15-25-fps). The event-of-interest can be framed by entering the appropriate [Start] and [Stop] frame numbers and clicking [Play]. These start/stop values are remembered when storing video from host memory to host disk so that storing the full video sequence requires re-entry of the desired start/stop frame numbers. Please note that, if the ProStream “Capture” page is closed before storing video and re-opened, the video will NOT be preserved in memory. To store video to host disk, select [File->Save] and the video stored in host memory defined by the start/stop frame numbers will be written to disk. After storing video, the “Capture” page can be closed and recorded video played back in the “Play” page. 19 3.3.3 STREAMING VIDEO TO DISK ARRAY If recording times in excess of a few seconds are required, the following Stream Wizard window allows the user to define the destination and recording time for streamed video. Figure 19 Selecting destination and recording time for streaming to disk array. Note: Although the destination disk does not have to be a RAID array, SVSi recommends this configuration as the only one that can achieve the sustained write rate required 65-mBytes/sec. We also recommend against installing the operating system on the disk array intended for video recording. The ProStream software evaluates the destination drive to determine how much storage space is available and calculates a record time based on this value. Video can be streamed continuously for the required recording time after which recording stops or it can be streamed continuously until the host computer is told to stop with only the required record time stored to disk. Once stopped, the video cannot be replayed in the “Capture” page. Close the “Capture” page and open the “Play” page for playback. Important: if the hard disk array becomes fragmented, streaming performance will degrade leading to an increase in the number of dropped frames. This can happen if the raid array is used for the OS or storing other files than those generated by ProStream or if previous video files are not erased and video files are written to the edge of the disk. When possible, delete the previously recorded files from the raid array and from the Windows Recycle Bin before starting a recording session. If necessary, perform a Quick Format on the raid array by selecting it under Explorer, right-clicking, and selecting “Quick Format” with no compression. In the “Play” page, select [File->Open] and then browse to the destination drive. A window similar to Figure 19 below will appear. ProStream creates multiple files during a recording session to disk so that, if recording is interrupted (e.g. – loss of power), all the video is not lost. The master file (named <Streaming.mvw> here) regulates opening and closing of the individual files and is the file that should be opened in the “Play” page. 20 Figure 20 Files created during video streaming. Once the master file has been opened, the user can define a subset of the stored video and create a video file with just those images. Valid storage formats in the “Play” page are raw (.mvw), AVI (.avi), or a sequence of bmp, TIFF, or raw images. 3.3.4 STREAMING FROM MULTIPLE CAMERAS The [Stream All] drop-down menu item can be selected from any open camera capture page. If selected, ProStream assumes that all cameras have the appropriate frame-rate, frame-size, and exposure values on their individual capture pages. Once selected, the Stream-All Wizard brings up the following advisory page cautioning against modifying any camera parameters until streaming is complete. Figure 21 Stream-All Wizard advisory page. 21 Stream-All Wizard is similar to the Stream Wizard except that memory or disk space allocations are for only one of the open cameras. For example, if the user selects a stream time of 5-secs to memory, all cameras will stream for 5-secs independent of their frame-rates. A 30-Hz camera will record 150frames and a 200-Hz camera will record 1,000-frames within 5-secs. Memory is allocated among the open cameras based on frame-size and frame-rate to insure a common recording time. All streaming cameras can be stopped by selecting [Stop All] from the [Camera] drop-down menu. Each individual camera can be stopped by clicking [Stop] on its [Capture] page. When streaming to disk array, it may take several seconds to close all files and stop the streaming process. 3.3.5 TRIGGERING OPTIONS Cameras may be triggered by one of three methods – software, external, or frame-sync. Software - hitting [Stop] after the starting video streaming halts the recording session and displays recorded video prior to the trigger. External – by inputting a TTL pulse to the “In” connector on the back panel of the Prosilica camera, video will be recorded pre-trigger for the specified time. Frame-sync – whenever a TTL pulse in input to the “In” back panel connector, a single frame is captured. In order to record for the specified time, a sequence of TTL pulses is required. If ProStream detects that the pulse train is interrupted for longer than half of a second during recording to host memory, the video in memory is automatically stored to disk. Frame-sync settings can be entered in the [Frame Sync Trigger Settings] window of Figure 22 below. Recording is triggered off the rising or falling edges and a user-defined delay allows ProStream to synchronize to external events. Figure 22 Frame-sync trigger settings. ProStream is designed to be intuitive and easy to operate. Please contact Southern Vision Systems, Inc. at [email protected] or (256) 461-7143 for technical support or for custom image processing applications. 22 Appendix A: Troubleshooting The following table describes problem conditions you may encounter with the ProStream camera and suggested actions to resolve these problems. Problem Action Camera does not appear on the auto-discovery page upon start-up. -Check to see that power cable is connected to camera and that the ethernet cable is connected to the camera and computer. -If still not initializing, unplug power connector to camera, re-connect, and re-start software. -If this fails, contact factory. [Live] or [Stream] on “Capture” page only shows black frames. -Check that the exposure is high enough to detect the ambient light level and that the adjustable aperture is open enough to admit light. -If still dark, ensure that MTU size on camera is less than or equal that for network connection on host. -If still dark, turn off gige filter driver under [Network Connections->Properties->TCP/IP] and restart software. -If this fails, contact factory. Host computer appears to slow down Set Buffered Frame Count to 2. Capture page indicates that every frame is being dropped and display is either black or does not appear to update. Confirm that all connection items except SVSi GigE Filter and TCP/IP are turned off on the [Network Connection->Properties] window. Error message “Insufficient hard disk space” appears during save of AVI, raw, or image sequence. Not enough disk space. Delete unused files on the host computer and retry. ”Could not change IP address” error message shows after “Edit IP Configuration” page changes. Camera is directly connected to a host computer that does not have a DHCP server. Fix the camera IP address at a known value (different from the host computer’s) and try again. Network Connection status shows “Limited or No Connection” even though camera is recognized during Auto-discovery. -Confirm IP settings on network interface. -Reboot host computer and try again. For technical support, contact [email protected] or call (256) 461-7143. 23