1
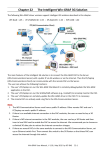
Chapter 5
Modbus Master: connecting to Modbus Slave Devices
This chapter lists the way to enable the Win-GRAF PAC as a Modbus Master to connect Modbus
RTU/ASCII Slave or Modbus TCP/UDP Slave devices. If you want to use one XV board in the WP-5xx8,
refer the Section 5.1.6 to Section 5.1.11.
5.1 Enabling the Win-GRAF PAC as a Modbus RTU/ASCII Master
Application Diagram:
(Refer the P1-1 to view all PAC models)
Follow these steps:
1. Mouse click the “Open Fieldbus Configuration” tool button to open “IO Drivers” window.
Win-GRAF User Manual, V 1.02, Mar. 2015 by ICP DAS
5-1
2. Click the “Insert Configuration” button on the left of the “IO Drivers” window, then click the
“MOSBUS Master” and “OK” to enable the Modbus Master setting.
3. Click the “Insert Master/Port” button on the left side to open the setting window. Then, select the
“Serial MODBUS-RTU”, set COM Port (e.g., “COM2:9600,N,8,1”) and Delay time (recommended
value: 10 ms, it can be 0 to 10000), and then click “OK”.
If wish to set it as a Modbus ASCII
Master, change the setting to
“ASCII:COM2:9600,N,8,1”
After receiving the respond, waiting for
10 ms to send the next command
Select “Disabled” if you do not want
to use this COM Port setting.
4. Click the “Insert Slave/Data Block” button on the left side to create a data block.
Win-GRAF User Manual, V 1.02, Mar. 2015 by ICP DAS
5-2
This table lists five data blocks, and each data block stands for one Modbus Master Request.
Item
Function Code
1
2
Read Input-bits
Read DI data
2
5
Write single coil-bit
Write DO data
3
4
Read Input Registers
Read AI data
4
6
Write single holding register
Write one AO data (16-bit)
5
16
Write Holding Registers
Write multiple AO data (16/32 bits)
5.1.1
Modbus Request
Description
Read DI data
1. Completing all the following settings in the “MODBUS Master Request” window, and then click “OK".
a
b
c
d
e
a. Slave/Unit:
Enter the Net-ID of the Slave device.
(In this case, the Net-ID is “1”).
b. MODBUS Request:
Select “<2> Read Input Bits” option.
c. Base address:
Start from “1” by default.
Nb items:
The number of DI signals to read.
(In this case, the number is “16”).
Note:
If you want to change the “Base address”,
right-click the “MODBUS Master” and
then select the “MODBUS Master
Addresses” to modify the value.
This option can not apply
to the "Read" request.
d. Activation: The way to send the Modbus request.
Periodic: Sending the request periodically.
(In this case, to send once every two seconds.)
“on error” means the next sending time when
an exception occurred (e.g., 15 seconds).
On call:
The request is activated when a program call
to send it
On change: In case of a write request, means that the request is activated each time any variable
changed.
e. Timeout: Set a timeout value. (When time-out occurred, it will show the defined error code.)
(The recommended value for the Modbus RTU/ASCII device is 200 to 1000 ms.
In this case, the value is 250 ms)
Win-GRAF User Manual, V 1.02, Mar. 2015 by ICP DAS
5-3
2. Next, open the “Variables” window and then declare variables that are available for the program.
Tips:
Press “F1” key to view the details
on the MODBUS Master settings.
Double click it to open the window.
Declaring 16 variables to read data (Name: “Boo_01 to Boo_16”; Type: BOOL) and one array variable to
record the state of data access (Name: “Status"; Dim.: 5; Type: DINT). Refer the Sectin 2.3.1 for the
way to declare variables, and the figure below shows defined variables.
3. In the "IO Drivers" window like the figure below, drag all required variables in the Variables Area (i.e.,
“Bool_01” to “Bool_16” and “Status”) and drop them to the “Symbol” area in the first data block.
Note: The “Status” is an array variable, so, the Status[0] to Status[4] will show on the “Symbol” area.
Click the “Del” key to delete the Status[1] to Status[4].
4. Next, select “Offset” field from “Boo_01” to “Boo_16” and then click the “Iterate Property” button
on the left side to set the “Offset” value (From: “0”;By: “1”, refer the Section 3.1 – Step8).
Win-GRAF User Manual, V 1.02, Mar. 2015 by ICP DAS
5-4
5. In the “Operation” field, set the “Status*0+” as “Error report” which means the return value is an
“Error Code” if a read error occurred and the value will be reset to “0” if read successfully.
3
4
The “Offset” must be “0” when
selecting the“Error report”.
5
You can also press “F1” in this “IO Drivers” window to see details on Modbus Master Configuration.
Error Code
Description
Error Code
Description
0
The communication is OK.
8
Data Parity Error.
1
MODBUS function not supported.
10
Invalid gateway path.
2
Invalid MODBUS address.
11
Gateway target failed.
3
Invalid MODBUS value.
128
Communication timeout.
4
MODBUS Server failure.
129
Bad CRC16.
6
Server is busy.
130
RS-232 communication error.
Win-GRAF User Manual, V 1.02, Mar. 2015 by ICP DAS
5-5
5.1.2
Write DO Data
1. Using the same way in the Section 5.1 - Step 4 to create the second data block and completing all the
following settings in the “MODBUS Master Request” window, and then click “OK".
a
b
c
d
e
In this example
a. Slave/Unit:
Enter the Net-ID of the Slave device.
(e.g., the Net-ID is “2”).
b. MODBUS Request:
Select “<5> Write single coil bit”.
c. Base address:
Start from “1” by default.
(Refer the Section 5.1.1 to change it.)
d. On call:
The request is activated when a
program call to send it
(Refer the Section 5.1.1 for details)
e. Timeout: Set a timeout value.
When time-out occurred, it will show
the defined error code. (The
recommended value for the Modbus
RTU/ASCII device is 200 to 1000 ms.
In this case the value is 250 ms.)
2. Next, open the “Variables” window and then declare variables that are available for the program.
Tips:
Press “F1” key to view the details
on the MODBUS Master settings.
Double click it to open the window.
Add two boolean variables in the "Variables" window (refer the Section 2.3.1 for declaring variables).
Variable name
Data type
Description
DO_0
BOOL
Used to Write digital output data.
Act_0
BOOL
In this case, choose the “On call” way to write data that means
using a variable to call it.
Win-GRAF User Manual, V 1.02, Mar. 2015 by ICP DAS
5-6
After completing the settings, the defined variables show as below:
3. In the “IO Drivers” window, drag variables - “DO_0”, “Act_0” and “Status” (that created in the
Section 5.1.1) from the Variables Area to the Symbol Area in the second data block.
Note: The “Status” is an array variable. When you drag “Status” into the Symbol Area, it will show
“Status*0+” to “Status*4+", simply press “Del” key to delete “Status[0]” and “Status[2] to [4]".
4. Set the “Operation” field of the “Status*1+” as “Error report” (that means this variable will be set to
an error code when a read error occurs, or reset it to “0” when a read request is successful).
Press the “F1” key to see the description of the Modbus Master Configuration and move to the title
“Status and command variables” to know related commands and error codes.
5. Set the “Operation” field of “Act_0” as “Command (one shot)” (that means the request will be sent
only once when “Act_0” is set to “TRUE”. Then, this “Act_0” will auto reset to “FALSE”).
The "Command (Enable)” means the request is sent continuously as long as the “Act_0” is “TRUE”.
So, users can set the “Act_0” to “FALSE” to stop sending command.
Win-GRAF User Manual, V 1.02, Mar. 2015 by ICP DAS
5-7
5.1.3
Read AI Data
1. Using the same way in the Section 5.1 - Step 4 to create the third data block and completing all the
following settings in the “MODBUS Master Request” window, and then click “OK".
In this example
a. Slave/Unit:
Enter the Net-ID of the Slave device.
(e.g., the Net-ID is “3”).
a
b. MODBUS Request:
Select “<4> Read Input Registers”.
b
c
d
e
c.
d. Base address:
Start from “1” by default.
(Refer the Section 5.1.1 to change it.)
Nb items:
The number of AI signals to write.
(In this case, the number is “10”).
e.
This option can not apply
to the "Read" request.
d. Periodic: (Refer the Section 5.1.1)
Sending the request periodically.
(In this case, to send once per second.)
“on error” means the next sending
time when an exception occurred
(e.g., 15 seconds).
e. Timeout: Set a timeout value.
When time-out occurred, it will show the defined error code. (The recommended value for the
Modbus RTU/ASCII device is 200 to 1000 ms. In this case the value is 250 ms.)
2. Next, open the “Variables” window and then declare variables that are available for the program.
Tips:
Press “F1” key to view the details
on the MODBUS Master settings.
Double-click it to open this window.
Follow the table below to add six Word (16-bit), one Double integer (32-bit) and one Real (32-bit)
variables. (Refer the Section 2.3.1 for declaring variables).
Win-GRAF User Manual, V 1.02, Mar. 2015 by ICP DAS
5-8
Variable name
Data type
Description
Word_1 to Word_6
WORD
Used to Read AI data (16-bit).
Long_1
DINT
Used to Read AI data (32-bit).
Real_1
REAL
Used to Read AI data (32-bit).
Refer the Appendix A for details on data type and ranges. After completing the settings, the defined
variables show as below:
3. In the “IO Drivers” window, drag variables - “Word_1 to Word_6”, “Long_1”, “Real_1” and “Status”
(that created in the Section 5.1.1) from the Variables Area to the Symbol Area in the third data block.
Note: The “Status” is an array variable. When you drag “Status” into the Symbol Area, it will show
“Status*0+” to “Status[4]", simply press “Del” key to delete “Status[0] to [1]” and “Status[3] to [4]".
4. Set the “Operation” field of the “Status*2+” as “Error report” (that means this variable will be set to
an error code when a read error occurs, or reset it to “0” when a read request is successful).
Press the “F1” key to see the description of the Modbus Master Configuration and move to the title
“Status and command variables” to know related commands and error codes.
5. Both the “Long_1” and “Real_1” are 32-bit variables and require two Modbus addresses. So, set
their “Storage” column as “DWORD (Low – High)”.
3
4
5
Win-GRAF User Manual, V 1.02, Mar. 2015 by ICP DAS
5-9
6. As the figure below, select the "Word_1” to “Word_6” and then click “Iterate property” to set their
Offset value (From: 0;By: 1).
7. Next, double click the Offset field of “Long_1” and “Real_1” items and set their values as “6” and “8”,
then press “Enter” key to complete the settings.
Note: One 32-bit data requires two Modbus addresses. For instance, the Offset value of “Long_1”
is “6” and the next Offset value must be set to “8” (i.e., “Real_1”).
press “Enter”
Win-GRAF User Manual, V 1.02, Mar. 2015 by ICP DAS
5-10
5.1.4
Write AO Data (16-bit)
1. Using the same way in the Section 5.1 - Step 4 to create the 4th data block and completing all the
following settings in the “MODBUS Master Request” window, and then click “OK".
a
b
c
d
e
In this example
a. Slave/Unit:
Enter the Net-ID of the Slave device.
(e.g., the Net-ID is “3”).
b. MODBUS Request: Select
“<6> Write single holding register”.
c. Base address:
Start from “1” by default.
(Refer the Section 5.1.1 to change it.)
d. On change: In case of a write request,
means that the request is activated
each time any variable changed.
(Refer the Section 5.1.1 for derails.)
e. Timeout: Set a timeout value.
When time-out occurred, it will show
the defined error code. (The
recommended value for the Modbus
RTU/ASCII device is 200 to 1000 ms. In
this case the value is 250 ms.)
2. Next, open the “Variables” window and then declare variables that are available for the program.
Tips:
Press “F1” key to view the details
on the MODBUS Master settings.
Double-click it to open this window.
Declaring a "WORD" variable.
(Refer the Appendix A for details on data type and ranges ; refer the Section 2.3.1 for operations).
Variable name
Data type
Word_Write_1
WORD
Description
Used to write AO data (16-bit).
Win-GRAF User Manual, V 1.02, Mar. 2015 by ICP DAS
5-11
After completing the settings, the defined variables show as below:
3. In the “IO Drivers” window, drag variables - “Word_Write_1” and “Status” (that created in the
Section 5.1.1) from the Variables Area to the Symbol Area in the 4th data block.
Note: The “Status” is an array variable. When you drag “Status” into the Symbol Area, it will show
“Status*0+” to “Status[4]", simply press “Del” key to delete “Status[0] to [2]” and “Status[4]".
4. Set the “Operation” field of the “Status*3+” as “Error report” (that means this variable will be set to
an error code when a read error occurs, or reset it to “0” when a read request is successful).
Press the “F1” key to see the description of the Modbus Master Configuration and move to the title
“Status and command variables” to know related commands and error codes.
Win-GRAF User Manual, V 1.02, Mar. 2015 by ICP DAS
5-12
5.1.5
Write AO Data (32-bit)
1. Using the same way in the Section 5.1 - Step 4 to create the 5th data block and completing all the
following settings in the “MODBUS Master Request” window, and then click “OK".
In this example
a. Slave/Unit:
Enter the Net-ID of the Slave device.
(e.g., the Net-ID is “4”).
a
b
b. MODBUS Request:
Select “<16> Write Holding Registers”.
c. Base address:
Start from “1” by default.
(Refer the Section 5.1.1 to change it.)
Nb items:
The number of AO signals to write.
(In this case, the number is “2”
because the REAL type requires two
Modbus address).
c
d
d. On change: In case of a write request,
means that the request is activated
each time any variable changed.
(Refer the Section 5.1.1 for details)
e
e. Timeout: Set a timeout value.
When time-out occurred, it will show the defined error code. (The recommended value for the
Modbus RTU/ASCII device is 200 to 1000 ms. In this case the value is 250 ms.)
2. Next, open the “Variables” window and then declare variables that are available for the program.
Tips:
Press “F1” key to view the details
on the MODBUS Master settings.
Double-click it to
open this window.
Win-GRAF User Manual, V 1.02, Mar. 2015 by ICP DAS
5-13
Declaring a "Real" variable.
(Refer the Appendix A for details on data type and ranges ; refer the Section 2.3.1 for operations).
Variable name
Data type
Real_Write_1
REAL
Description
Used to write AO data (32-bit).
After completing the setting, the defined variable shows as below:
3. In the “IO Drivers” window, drag variables - “Real_Write_1” and “Status” (that created in the
Section 5.1.1) from the Variables Area to the Symbol Area in the 5th data block.
Note: The “Status” is an array variable. When you drag “Status” into the Symbol Area, it will show
“Status*0+” to “Status[4]", simply press “Del” key to delete “Status[0] to [3]”.
4. Set the “Operation” field of the “Status*4+” as “Error report” (that means this variable will be set to
an error code when a read error occurs, or reset it to “0” when a read request is successful).
Press the “F1” key to see the description of the Modbus Master Configuration and move to the title
“Status and command variables” to know related commands and error codes.
5. The “Real_Write_1” is a 32-bit data and required two Modbus addresses. So, set its “Storage” field
as “DWORD (Low – High)”.
Win-GRAF User Manual, V 1.02, Mar. 2015 by ICP DAS
5-14
5.1.6
How to use the XV Board?
The XV board belongs to the Modbus Slave I/O board. Before using the I/O board, users must plug it into
the WP-5xx8, and then enable the WP-5xx8 as a Modbus Master (refer the Section 5.1). Please visit the
XV board Selection Guide page to get more details:
www.icpdas.com/root/product/solutions/hmi_touch_monitor/touchpad/xv-board_selection.html
All the Win-GRAF demo projects listed in the following table can be found on the CD-ROM. Refer the
Chapter 12, click the Win-GARF menu bar "File" > "Add Existing Project" > "From Zip" to restore the
demo project and to view the details. (CD-ROM:\Napdos\Win-GRAF\demo-project\)
Demo
File Name
Description
XV107, XV107A
demo_XV107.zip
Read 8 DI, Write 8 DO
XV110
demo_XV110.zip
Read 16 DI
XV111, XV111A
demo_XV111.zip
Read 16 DO, Read 1 DO
XV116
demo_XV116.zip
Read 5 DI, Write 6 D0
XV308_1
XV308_2
XV308_3
demo_XV308_1.zip
demo_XV308_2.zip
demo_XV308_3.zip
1. Read 8 AI, Read 8 DI
2. Read 8 AI, Write 8 DO
3. Read 8 AI, Write 4 DO, Read 4 DI
XV310
demo_XV310.zip
Read 4 AI, Write 4 DO, Read 4 DI, Write 4 AO
Common setting:
1. Mouse click the “Open Fieldbus Configuration” tool button to open the “I/O Drivers” window.
If using it as the Modbus
ASCII Master, modify it to
“ASCII:COM0:115200,N,8,1”
2. Double click on “RTU: COM:115200,N,8,1” to
open the “MODBUS Master Port” window.
Note:
All the demo projects listed in above table
enable the WP-5xx8 as a Modbus RTU
Master device and set the "Com. Port" as
"COM0:115200,N,8,1”.
Win-GRAF User Manual, V 1.02, Mar. 2015 by ICP DAS
5-15
Configure the AI/AO channel
If you want to use the AI/AO channel of the XV Board (e.g., XV308, XV310) in the WP-5xx8. First, stop
the Win-GRAF driver in the PAC and then configure each AI/AO channel by using
"DCON_Utility_Pro_CE_200.exe".
Using the WP-5238 as an example:
1. Click the "Win_GRAF_WP_5238" (or the small icon on the taskbar) to open the Win-GRAF driver
window, and then click the "End Driver" button.
Stop the Win-GRAF driver
2. Click "My Device" on the desktop and then get into the path "\System_Disk\Tools\dcon_utility_pro"
to run the "DCON_Utility_Pro_CE_200.exe".
3. Click the COM Port button to set the "COM Port" as "COM0", set the "Baud Rate" as "115200" and
set the "Format" as "N,8,1", and then click "OK".
Win-GRAF User Manual, V 1.02, Mar. 2015 by ICP DAS
5-16
4. After clicking the Search button, the XV Board (e.g., XV308) will show in the window. Then, double
click this item to get into the setting window.
Double-click
5. In the "Configuration" tab, set the "Data Format" as "Engineering Format" (recommended setting),
set the "Fast Mode" as "Fast Mode" and uncheck the "Reverse DI State (INIT*)".
Win-GRAF User Manual, V 1.02, Mar. 2015 by ICP DAS
5-17
6. In the "AI/AI Alarm" tab, to configure the proper ranges and values for each AI channel, and
remenmber to select any AI channel (e.g.,"CH:00") you want to use, then click the "Set Alarm"
button.
XV308:
Type Code
Range
05
+/-2.5 V
06
+/-20 mA
07
+4 mA ~ +20 mA
08
+/-10 V
09
+/-5 V
0A
+/-1 V
0D
+/-20 mA
1A
0 mA ~ +20 mA
Data Format
Minimum
Maximum
Engineering
Hexadecimal
Engineering
Hexadecimal
Engineering
Hexadecimal
Engineering
Hexadecimal
Engineering
Hexadecimal
Engineering
Hexadecimal
Engineering
Hexadecimal
Engineering
Hexadecimal
-25000
8000h
-20000
8000h
+4000
0000h
-10000
8000h
-5000
8000h
-10000
8000h
-20000
8000h
0
0000h
+25000
7FFFh
+20000
7FFFh
+20000
FFFFh
+10000
7FFFh
+5000
7FFFh
+10000
7FFFh
+20000
7FFFh
+20000
FFFFh
Note:
1. For easy to use, recommended to use the data format - "Engineering”. (E.g., "+/-2.5 V" will show
as "-25000 to +25000" and "+4 mA to +20 mA" will show as "+4000 to +20000“)
2. When using these "Type Code” - 06, 07, 0D, 1A, please check if the position of eight hardware
jumpers on the XW board are correct.
www.icpdas.com/root/product/solutions/datasheet/hmi_touch_monitor/XV308.pdf
Win-GRAF User Manual, V 1.02, Mar. 2015 by ICP DAS
5-18
Note: When using the XV308, you need to click the "Set Power On" and "Set Safe Value" button
(do not choose any DO Status) in the "DO/Alarm" tab.
Do not choose any DO Status.
Then, click the "Set Power On"
and "Set Safe Value" button.
7. Finally, back to the "Configuration" tab and click the "Set Module Configuration" button (Step5) to
finish the AI/AO configuration, and then close the "DCON_Utility_Pro_CE_200.exe". In addition, click
the "Win_GRAF_WP_5238" on the desktop to run the Win-GRAF driver (like Step 1).
Follow the similar way like the steps above to configure the AI/AO of the XV310.
XV310 - Analog Input:
Type Code
Range
05
+/-2.5 V
06
+/-20 mA
07
+4 mA ~ +20 mA
08
+/-10 V
09
+/-5 V
0A
+/-1 V
0D
+/-20 mA
1A
0 mA ~ +20 mA
Data Format
Minimum
Maximum
Engineering
Hexadecimal
Engineering
Hexadecimal
Engineering
Hexadecimal
Engineering
Hexadecimal
Engineering
Hexadecimal
Engineering
Hexadecimal
Engineering
Hexadecimal
Engineering
Hexadecimal
-25000
8000h
-20000
8000h
+4000
0000h
-10000
8000h
-5000
8000h
-10000
8000h
-20000
8000h
0
0000h
+25000
7FFFh
+20000
7FFFh
+20000
FFFFh
+10000
7FFFh
+5000
7FFFh
+10000
7FFFh
+20000
7FFFh
+20000
FFFFh
Win-GRAF User Manual, V 1.02, Mar. 2015 by ICP DAS
5-19
Note:
1. For easy to use, recommended to use the data format - "Engineering”. (E.g., "+/-2.5 V" will show
as "-25000 to +25000" and "+4 mA to +20 mA" will show as "+4000 to +20000“)
2. When using these "Type Code” - 0, 1, 06, 07, 0D, 1A, please check if the position of eight
hardware jumpers on the XW board are correct.
www.icpdas.com/root/product/solutions/datasheet/hmi_touch_monitor/XV310.pdf
XV310 - Analog Output:
Type Code
Range
0
0 mA ~ +20 mA
1
+4 mA ~+20 mA
2
0V ~ +10 V
3
+/-10 V
4
0 V ~ +5 V
5
+/-5 V
Data Format
Minimum
Maximum
Engineering
Hexadecimal
Engineering
Hexadecimal
Engineering
Hexadecimal
Engineering
Hexadecimal
Engineering
Hexadecimal
Engineering
Hexadecimal
0
0000h
+4000
0000h
0
0000h
-10000
8000h
0
0000h
-5000
8000h
+20000
FFFFh
+20000
FFFFh
+10000
FFFFh
+10000
7FFFh
+5000
FFFFh
+5000
7FFFh
Win-GRAF User Manual, V 1.02, Mar. 2015 by ICP DAS
5-20
5.1.7
Connecting the XV107/ XV107A (8 DI, 8 DO)
The XV107/XV107A is an 8-channel digital input and 8-channel digital output board. This section
provides a Win-GRAF demo project - "demo_XV107.zip". First, go to Section 5.1.6 for the information of
the XV Board before using it.
Demo description:
This demo added two data blocks. One is used to read 8 DI data and the other is used to write 8 DO
data.
1. Mouse double click the 1st data block (i.e., <2> Read Input Bits) to open the setting window.
Note: The “Offset” value is starting from “0” and the Modbus address for variables is equal to the
“Offset” value plus 1 (Base address). Moreover, if you set the “Operation” as "Error report”, the
“Offset” value for the mapping variable (Date Type: DINT) must set to “0”.
The Net-ID ( fixed to “1” ) of the
Slave device (i.e., XV board).
Read DI data.
Start from addr. 1 and
read eight data.
Read every 50 ms.
An exception occurrs if no
respond for 100 ms.
Win-GRAF User Manual, V 1.02, Mar. 2015 by ICP DAS
5-21
2. Mouse double click the 2nd data block (i.e., <15> Write Coil Bits) to open the setting window.
The Net-ID ( fixed to “1” ) of the
Slave device (i.e., XV board).
Write DO data.
Start from addr. 1 and
write eight data.
Write only when data changed.
An exception occurrs if no
respond for 100 ms.
Win-GRAF User Manual, V 1.02, Mar. 2015 by ICP DAS
5-22
5.1.8
Connecting the XV110 (16 DI)
The XV110 is a 16-channel digital input board. This section provides a Win-GRAF demo project "demo_XV110.zip". First, go to Section 5.1.6 for the information of the XV Board before using it.
Demo description:
This demo added one data block that used to write 16 DI data.
1. Mouse double click "<2> Read Input Bits" to open the setting window.
Note: The “Offset” value is starting from “0” and the Modbus address for variables is equal to the
“Offset” value plus 1 (Base address). Moreover, if you set the “Operation” as "Error report”, the
“Offset” value for the mapping variable (Date Type: DINT) must set to “0”.
The Net-ID ( fixed to “1” ) of the
Slave device (i.e., XV board).
Read DI data.
Start from addr. 1 and
read 16 data.
Read every 50 ms.
An exception occurrs if no
respond for 100 ms.
Win-GRAF User Manual, V 1.02, Mar. 2015 by ICP DAS
5-23
5.1.9
Connecting the XV111, XV111A (16 DO)
The XV111/ XV111A is a 16-channel digital output board. This section provides a Win-GRAF demo
project - "demo_XV111.zip". First, go to Section 5.1.6 for the information of the XV Board before using
it.
Demo description:
This demo added two data blocks. One is used to write 16 DO data and the other is used to read the DO
status.
1. Mouse double click the 1st data block (i.e., <15> Write Coil Bits) to open the setting window.
Note: The “Offset”value is starting
from “0” and the Modbus address
of a variable is equal to this value
plus 1 (Base address = 1).
The Net-ID ( fixed to “1” ) of the
Slave device (i.e., XV board).
Write DO data.
Start from addr. 1 and
write 16 data.
Write only when data changed.
An exception occurrs if no
respond for 100 ms.
Win-GRAF User Manual, V 1.02, Mar. 2015 by ICP DAS
5-24
2. Mouse double click the 2nd data block (i.e., <1> Read Coil Bits) to open the setting window.
Note: The “Offset” value is starting from “0” and the Modbus address for variables is equal to the
“Offset” value plus 1 (Base address).
The Net-ID ( fixed to “1” ) of the
Slave device (i.e., XV board).
Read DO data.
Start from addr. 1 and
read one data.
Read every 50 ms.
An exception occurrs if no
respond for 100 ms.
Win-GRAF User Manual, V 1.02, Mar. 2015 by ICP DAS
5-25
5.1.10 Connecting the XV116 (5 DI, 6 Relay)
The XV116 is a 5-channel digital input and 6-channel relay output board. This section provides a
Win-GRAF demo project - "demo_XV116.zip". First, go to Section 5.1.6 for the information of the XV
Board before using it.
Demo description:
This demo added two data blocks. One is used to read 5 DI data and the other is used to write 6 DO
data.
1. Mouse double click the 1st data block (i.e., <2> Read Input Bits) to open the setting window.
Note: The “Offset” value is starting from “0” and the Modbus address for variables is equal to the
“Offset” value plus 1 (Base address). Moreover, if you set the “Operation” as "Error report”, the
“Offset” value for the mapping variable (Date Type: DINT) must set to “0”.
The Net-ID ( fixed to “1” ) of the
Slave device (i.e., XV board).
Read DI data.
Start from addr. 1 and
read five data.
Read every 50 ms.
An exception occurrs if no
respond for 100 ms.
Win-GRAF User Manual, V 1.02, Mar. 2015 by ICP DAS
5-26
2. Mouse double click the 2nd data block (i.e., <15> Write Coil Bits) to open the setting window.
The Net-ID ( fixed to “1” ) of the
Slave device (i.e., XV board).
Write DO data.
Start from addr. 1 and
write six data.
Write only when data changed.
An exception occurrs if no
respond for 100 ms.
Win-GRAF User Manual, V 1.02, Mar. 2015 by ICP DAS
5-27
5.1.11 Connecting the XV308 (8 AI, 8 DIO)
The XV308 is a 8-channel analog input and 8-channel digital input/output board. This section provides
three Win-GRAF demo projects - "demo_XV308_1.zip", "demo_XV308_2.zip" and "demo_XV308_3.zip".
First, go to Section 5.1.6 to view the XV Board instructions and then configure each AI channel by using
"DCON_Utility_Pro_CE_200.exe".
Demo description: (demo_XV308_1)
This demo added two data blocks, one is used to read 8 AI data and the other is used to write 8 DI data.
1. Mouse double click the 1st data block (i.e., <4> Read Input Registers) to open the setting window.
Note: The “Offset” value is starting from “0” and the Modbus address for variables is equal to the
“Offset” value plus 1 (Base address). Moreover, if you set the “Operation” as "Error report”, the
“Offset” value for the mapping variable (Date Type: DINT) must set to “0”.
The Net-ID ( fixed to “1” ) of the
Slave device (i.e., XV board).
Read DI data.
Start from addr. 1 and
read eight data.
Read every 50 ms.
An exception occurrs if no
respond for 100 ms.
Win-GRAF User Manual, V 1.02, Mar. 2015 by ICP DAS
5-28
2. Mouse double click the 2nd data block (i.e., <2> Read Input Bits) to open the setting window.
Notw: When using the XV308 to read DI data, the address must start from "33".
The Net-ID ( fixed to “1” ) of the
Slave device (i.e., XV board).
Read DI data.
Start from addr. 33 and
read eight data.
Read every 50 ms.
An exception occurrs if no
respond for 100 ms.
Win-GRAF User Manual, V 1.02, Mar. 2015 by ICP DAS
5-29
Demo description: (demo_XV308_2)
This demo added two data blocks, one is used to read 8 AI data and the other is used to write 8 DO data.
1. Mouse double click the 1st data block (i.e., <4> Read Input Registers) to open the setting window.
Note: The “Offset” value is starting from “0” and the Modbus address for variables is equal to the
“Offset” value plus 1 (Base address). Moreover, if you set the “Operation” as "Error report”, the
“Offset” value for the mapping variable (Date Type: DINT) must set to “0”.
The Net-ID ( fixed to “1” ) of the
Slave device (i.e., XV board).
Read AI data.
Start from addr. 1 and
read eight data.
Read every 50 ms.
An exception occurrs if no
respond for 100 ms.
Win-GRAF User Manual, V 1.02, Mar. 2015 by ICP DAS
5-30
2. Mouse double click the 2nd data block (i.e., <15> Write Coil Bits) to open the setting window.
The Net-ID ( fixed to “1” ) of the
Slave device (i.e., XV board).
Write DO data.
Start from addr. 1 and
write eight data.
Write only when data changed.
An exception occurrs if no
respond for 100 ms.
Win-GRAF User Manual, V 1.02, Mar. 2015 by ICP DAS
5-31
Demo description: (demo_XV308_3)
This demo added three data blocks, the 1st one is used to read 8 AI data, the 2nd one is used to write 4
DO data and the 3rd one is used to read only 4 DI data.
1. Mouse double click the 1st data block (i.e., <4> Read Input Registers) to open the setting window.
1
Note: The “Offset” value is starting from “0” and the Modbus address for variables is equal to the
“Offset” value plus 1 (Base address).
The Net-ID ( fixed to “1” ) of the
Slave device (i.e., XV board).
Read AI data.
Start from addr. 1 and
read eight data.
Read every 50 ms.
An exception occurrs if no
respond for 100 ms.
2. As the figure below, mouse double click the 2nd data block (i.e., <15> Write Coil Bits) to view the
setting window.
3. As the figure below, mouse double click the 3rd data block (i.e., <2> Read Input Bits) to view the
setting window.
Win-GRAF User Manual, V 1.02, Mar. 2015 by ICP DAS
5-32
2
3
2. <15> Write Coil Bits:
Write 4 DO data.
Write DO data.
The Net-ID ( fixed to “1” ) of the
Slave device (i.e., XV board).
Start from addr. 1 and
write four data.
Write only when data
changed.
An exception occurrs if no
respond for 100 ms.
Read DI data.
Start from addr. 33 and read
only four data in this example.
Read every 50 ms.
3. <2> Read Input Bits, read 4 DI data.
Note:
When using the XV308 to read DI data,
the address must start from "33".
Win-GRAF User Manual, V 1.02, Mar. 2015 by ICP DAS
5-33
5.1.12 Connecting the XV310 (4 AI, 2 AO, 4 DI, 4 DO)
The XV310 is a 4-ch analog input, 2-ch analog output, 4-ch digital input and 4-ch digital ouput board.
This section provides a Win-GRAF demo projects - "demo_XV310.zip".
First, go to Section 5.1.6 to view the XV Board instructions and then configure each AI channel by using
"DCON_Utility_Pro_CE_200.exe".
Demo Description
This demo added four data blocks. The 1st one is used to read 4 AI data, the 2nd is used to write 4 DO
data, the 3rd is used to read 4 DI data and the 4th is used to write 2 AO data.
1. Mouse double click the 1st data block (i.e., <4> Read Input Registers) to open the setting window.
1
Note: The “Offset” value is starting from “0” and the Modbus address for variables is equal to the
“Offset” value plus 1 (Base address). Moreover, if you set the “Operation” as "Error report”, the
“Offset” value for the mapping variable (Date Type: DINT) must be set to “0”.
The Net-ID ( fixed to “1” ) of the
Slave device (i.e., XV board).
Read AI data.
Start from addr. 1 and
read four data.
Read every 50 ms.
An exception occurrs if no
respond for 100 ms.
Win-GRAF User Manual, V 1.02, Mar. 2015 by ICP DAS
5-34
2. Mouse double click the 2nd data block (i.e., <15> Write Coil Bits) to view the setting window.
2
The Net-ID of the Slave
device (i.e., XV board).
Write DO data.
Start from addr. 1 and
write four data.
Write only when data changed.
An exception occurrs if no
respond for 100 ms.
3. Mouse double click the 3rd data block (i.e., <2> Read Input Bits) to view the setting window.
3
Win-GRAF User Manual, V 1.02, Mar. 2015 by ICP DAS
5-35
The Net-ID ( fixed to “1” ) of the
Slave device (i.e., XV board).
Read DI data.
Note: When using the XV310
to read DI data, the base
address must be set to “33”.
Start from addr. 33 and
read four data.
Read every 50 ms.
An exception occurrs if no
respond for 100 ms.
4. Mouse double click the 4th data block (i.e., <16> Write Holding Registers)
4
The Net-ID ( fixed to “1” ) of the
Slave device (i.e., XV board).
Write AO data.
Note: When using the XV310
to write AO data, the base
address must be set to “33”.
Start from addr. 33 and
write two data.
Write only when data changed.
An exception occurrs if no
respond for 100 ms.
Win-GRAF User Manual, V 1.02, Mar. 2015 by ICP DAS
5-36
5.2 Enabling the Win-GRAF PAC as a Modbus TCP/UDP Master
Application Diagram:
(Refer P1-1 to see the PAC model numbers.)
The Setting Steps:
1. Click the tool icon “Open Fieldbus Configuration” to open the “I/O Drivers” window.
2. Click “Insert Configuration” icon in the left side of the “I/O Drivers” window, and then click “MOSBUS
Master”, then click “OK” to enable a Modbus Master.
Note: One “Modbus Master” can set up multiple Ports (see the next step), can set as a Modbus
Master RTU/ASCII Port (Refer Section 5.1) or a Modbus Master TCP/UDP Port or can set up
not to enable the setting.
Win-GRAF User Manual, V 1.02, Mar. 2015 by ICP DAS
5-37
3. Click the tool icon “Insert Master/Port” in the left side, open the setting window and select the
“MODBUS on Ethernet”.
Set up the following items, and then click “OK”.
Address: Fill in the IP Address of the Modbus Slave device (e.g., “192.168.1.100”).
Port:
TCP port Number of the Slave device.
Protocol: If as a Modbus TCP Master, select the “TCP – Open MODBUS”.
If as a Modbus UDP Master, choose the “UDP – Open MODBUS”.
Delay:
Fill in the delay time (e.g., 10 ms, can be 0 ~ 10000).
After received an answer,
wait for 10 ms, and then
send the next request.
If not need the TCP/UDP Port
setting, check “Disabled”.
Win-GRAF User Manual, V 1.02, Mar. 2015 by ICP DAS
5-38
4. Click the icon “Insert Slave/Data Block” in the left side to create a “Data Block”.
Read AI Data
5. In the “MODBUS Master Request” setting window, set up the following items, and then click “OK".
a
b
c
d
It‘s not suitable for “Read” commend.
In this example
a. Slave/Unit:
Fill in the Net-ID of the Slave device
(Usually is “1”).
b. MODBUS Request:
Select “<4> Read Input Registers”.
c. Base address:
Default to start from 1.
Nb items:
The AI numbers to read (here is 4).
Note:
If want to change the “Base address”,
please use mouse to right-click the
“MODBUS Master”, and then select
“MODBUS Master Addresses” to
change the value.
e
d. Activation: the sending way of Modbus Request.
Periodic:
Send request periodically. In this case, it
sends request every 1 Sec. “on error”
means that when an error occurs, the next
sending time (in this case, 15 seconds).
On call:
It will send the request once when a
program calls it.
On change: It will send the request once when data is changed.
e. Timeout:
Set up the max. time to wait for the response. If exceeds it, that means an error.
(For Modbus TCP/UDP, recommended: 1000 ~ 3000 ms; this example is 1000 ms)
Win-GRAF User Manual, V 1.02, Mar. 2015 by ICP DAS
5-39
6. Open the “Variables” window, set up the variables want to use.
Tips:
press “F1” key to see the setting
method for MODBUS Master.
Double click to open.
Please follow the table to set up 4 WORD (16 bit) variables (refer Section 2.3.1).
Variable Name
Word_1 ~ Word_4
Status
Data Type
WORD
DINT
Dim.
--5
Description
Used to read the AI data (16 bit)
Used to record the read/write status
Refer the Appendix A to see the data types and range of the variables. After setting up, it is as the
picture below.
7. In the “I/O Drivers” window, drag the variables (“Word_1 ~ Word_4” and “Status”) from the
Variables area to the “Symbol” area of the Data Block. Notice: This example shows “Status” is an
Array variable. When drag it to the “Symbol” area, it will become “Status*0+ ~ Status*4+", please
press “Delete” key to delete “Status*1+ ~ *4+".
Win-GRAF User Manual, V 1.02, Mar. 2015 by ICP DAS
5-40
8. Set the “Operation” of the “Status*0+” to “Error report” (If reading data fails, its value is an “Error
Code”; when reading data OK, it will reset to “0”.). Press “F1” key to view the setting descriptions for
the Modbus Master. In the title of “Status and command variables”, you can find the details about
this commend and “Error Code”.
9. Select "Word_1 ~ Word_4” and click “Iterate property” to set up the “Offset” value (From: 0; By: 1).
8
9
The setting steps of “Modbus Master Request” for both “Modbus Master RTU/ASCII Port (Section 5.1)”
and “Modbus Master TCP/UDP Port” are the same. Now, we have finished the setting to read AI data.
Please click the item number (link to the Section 5.1.1~5.1.5) in the table below for the setting steps to
read/write other data.
Items Function Code
Modbus Request
Description
1
2
Read Input Bits
Read DI data
2
5
Write single coil bit
Write DO data
3
4
Read Input Registers
Read AI data
4
6
Write single holding register
Write one AO data (16-bit)
5
16
Write Holding Registers
Write multiple AO data (16/32 bits)
Win-GRAF User Manual, V 1.02, Mar. 2015 by ICP DAS
5-41
5.2.1
Connecting ET-7000 Series I/O Module
ICP DAS ET-7000 is a series of I/O module supporting Modbus TCP Slave protocol. The Win-GRAF PAC
can enable the Modbus TCP Master to connect the ET-7000 modules. The maximum recommend
amount of the connecting ET-7000 modules depends on the PAC model, such as the XP-8xx8-CE6,
WP-5238 and WP-5248, recommends a maximum of 200; the WP-8xx8, VP-25W8 and VP-4138 is
recommended that no more than 32.
For more information about the ET-7000 series products, please visit the website:
http://www.icpdas.com/root/product/solutions/remote_io/ethernet_io/ethernet_io_selection.html
Use Internet Browser to Set the ET-7000 Modules
Before the first time using the ET-7000, you must set up the ET-7000 by using the Internet Browser.
When the ET-7000 shipping from the factory, the settings are: IP address = 192.168.255.1; Mask =
255.255.0.0. Please set the IP of your PC in the same network (e.g., set the IP to 192.168.255.100, Mask
= 255.255.0.0), then open the browser (such as IE), and enter the IP of the ET-7000 to connect it.
Notice: The Dip Switch on the rear of the ET-7000 must stay in the “Normal” position.
Username: Admin
Password: Admin
(Case sensitive)
Win-GRAF User Manual, V 1.02, Mar. 2015 by ICP DAS
5-42
Click “Configuration” > “Module I/O Settings” to set up the range of channels as below, and then click
“Submit”.
Set as “ON" to
enable it.
Set “AI Data Format”
to “ON” (Engineer),
means:
± 2.5: -25000 ~ +25000
± 1 : -1000 ~ +1000
258 : 25.8 (℃)
Users can set the ET-7018Z‘s "AI Data Format" to "ON" (Engineering) for more convenient usage.
For example:
Type Code
Range
04
-1 ~ +1 V
05
-2.5 ~ +2.5 V
18
Type M
Thermocouple
-200 ~ 100°C
Data Format
Minimum
Maximum
Engineering
2’s comp HEX
Engineering
2’s comp HEX
Engineering
-10000
8000h
-25000
8000h
-20000
+10000
7FFFh
+25000
7FFFh
+10000
2’s comp HEX
8000h
4000h
Restore/Open the Demo Project:
The Win-GRAF demo projects in the following sections can be found on the shipping CD, please refer
Chapter 12. Click the menu bar "File" > "Add Existing Project" > "From Zip" can restore/open/check the
demo projects. (CD-ROM:\Napdos\Win-GRAF\demo-project\)
Demo Project
ET-7060
ET-7018Z
File Name
demo_ET7060.zip
demo_ET7018z.zip
Description
Read 6 DIs, write 6 DOs
Read 10 AIs
Win-GRAF User Manual, V 1.02, Mar. 2015 by ICP DAS
5-43
1. Click the tool icon “Open Fieldbus Configuration” to open the “I/O Drivers” window.
2. Double click “Open Modbus: IP:502” to open the “MODBUS Master Port” window.
Notice:
All demo projects in this chapter can enable the Win-GRAF PAC as a Modbus TCP Master. Please fill
in the current IP address of your ET-7000, and set "Port" to "502” and "Protocol" to "TCP - Open
Modbus".
Enter the current IP address
of your ET-7000.
Win-GRAF User Manual, V 1.02, Mar. 2015 by ICP DAS
5-44
5.2.2
Connecting the ET-7060 (6 DI, 6 Relay)
The ET-7060 is a 6 DI and 6 Relay channels Ethernet I/O module. The Win-GRAF demo project for this
section is "demo_ET7060.zip". Please refer Section 5.2.1 to set up the module channels using the
Internet Browser, and restore/open the demo project.
Demo Description:
This demo creates two Data Blocks, one is used to read 6 DI data, the other is used to write 6 DO data.
1. Double click the first Data Block (<2> Read Input Bits) to open the setting.
Notice: The value of the “Offset” starts from “0”, but the Modbus address of the variable is the “Offset”
value plus 1 (Base address). If set the “Operation” to "Error report”, the “Offset” value of the
variable (Data Type: DINT) must set to “0”.
The Net-ID of the Slave Unit
(ET-7000) is fixed to "1".
Read DI data
Start from the address 1
to read 6 items.
Read once every 50 ms.
If error occurs, wait 5 s to
send the next commend.
If no responds in 500 ms, means error.
Win-GRAF User Manual, V 1.02, Mar. 2015 by ICP DAS
5-45
2. Double click the second Data Block (<15> Write Coil Bits) to open the setting window.
The Net-ID of the Slave Unit
(ET-7000) is fixed to "1".
Write DO data.
Start from the address 1
to write 6 items.
Write data, if data is changed.
If no responds in 500 ms, means error.
Win-GRAF User Manual, V 1.02, Mar. 2015 by ICP DAS
5-46
5.2.3
Connecting the ET-7018Z (10 AI)
The ET-7018Z is an 10 AI channels Ethernet I/O module. The Win-GRAF demo project for this section is
"demo_ ET7018z.zip". Please refer Section 5.2.1 to set up the module channels using the Internet
Browser, and restore/open the demo project.
Demo Description:
This demo creates one Data Block to read 10 AI data.
1. Double click the first Data Block (<4> Read Input Registers) to open the setting window.
Notice: 1. The value of the “Offset” starts from “0”, but the Modbus address of the variable is the
“Offset” value plus 1 (Base address).
2. If set the “Operation” to "Error report”, the “Offset” value of the variable (Data Type: DINT)
must set to “0”.
3. If AI range is -32768 ~ 32767, please declare the data type as "INT" for the variable.
The Net-ID of the Slave Unit
(ET-7000) is fixed to "1".
Read DI data
Start from the address 1
to read 10 items.
Read once every 50 ms.
If error occurs, wait 5 s to
send the next commend.
If no responds in 500 ms, means error.
Win-GRAF User Manual, V 1.02, Mar. 2015 by ICP DAS
5-47
5.3 Connecting the Modbus TCP Slave device has two IP addresses
The previous section lists the way to enable the Win-GRAF PAC as a Modbus TCP Master device, and lists
the way to read/write Modbus TCP Slave device. This section will list the way to create the redundant
"Modbus Master Request", when one IP of the Modbus TCP Slave devices is disconnected, the other IP
can still normally to be read/written data.
Application Diagram:
Modbus TCP Slave
Modbus TCP Master
Follow The Steps:
1. Click the “Open MODBUS:”, and then click the menu bar “Tools” > “Export”.
2. In the “Export Assistant” window, click “Export some project items (XNL)” and “Next”.
2
1
Each Modbus TCP Master can only set to
connect one Slave IP address, so here we
will show the way to copy and generate
the second Modbus Master to connect
the second Slave IP address.
3
Win-GRAF User Manual, V 1.02, Mar. 2015 by ICP DAS
5-48
3. Check the “Configurations” and uncheck all other items, and then click “Next”.
4. Browse a suitable path (default in C:\Win-GRAF\Projects) and named for the file (e.g., Master_2.xml),
and then click "Save" button. Finally, click "Finish" to export the settings.
Win-GRAF User Manual, V 1.02, Mar. 2015 by ICP DAS
5-49
5. Using the Notepad software to open the file “.xml” that exported in the step 4, and then copy the
content between the <modbus> and </modbus>.
Copy
6. Paste the copied content above the </modbus>, and change the address to the second IP address of
the Modbus Slave device (e.g., “192.168.1.101”), then save and close the file.
Win-GRAF User Manual, V 1.02, Mar. 2015 by ICP DAS
5-50
7. Click the Win-GRAF menu bar “Tools” > “Import”.
8. In the “Import Assistant” window, click “Import project items (XNL)” and “Next”.
9. Select the file you want to import (e.g., “Master_2.xml”) and click “Open” button.
8
9
Win-GRAF User Manual, V 1.02, Mar. 2015 by ICP DAS
5-51
10. Click “Finish” to finish the import action.
11. In the “IO Drivers” window, there has added a new “Open MODBUS” setting item that includes two
“Modbus Master Request” for using to read the DI and AI. One “Error report” is used to check the IP
connecting status, so please add two “DINT” variables in the Variable area (e.g.,
“ERROR_STATUS11”, “ERROR_STATUS21”) and double click the “Error report” to assign variables.
Win-GRAF User Manual, V 1.02, Mar. 2015 by ICP DAS
5-52