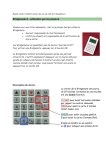
1
Technical operations at The Bidding Box (with the Bridgemate manual appended) David Babcock The Bidding Box Pinecrest, Florida August 6, 2015 Contents 1 System configuration 1.1 Second and third monitor support . . . . . . . . . . . . . . 1.1.1 Monitor 1 . . . . . . . . . . . . . . . . . . . . . . 1.1.2 Monitor 3 . . . . . . . . . . . . . . . . . . . . . . 1.1.3 Monitor 4 . . . . . . . . . . . . . . . . . . . . . . 1.2 Virtual disk drives . . . . . . . . . . . . . . . . . . . . . . 1.3 Post-session game-file access and running games remotely . . . . . . 1 2 3 4 4 4 5 2 System startup 2.1 a possible hardware issue . . . . . . . . . . . . . . . . . . . . . . . . . . . 2.2 “What’s new?” . . . . . . . . . . . . . . . . . . . . . . . . . . . . . . . . 2.3 Google . . . . . . . . . . . . . . . . . . . . . . . . . . . . . . . . . . . . . 5 5 6 6 3 Dealing: for computer-dealt hands only: Deal creation or import 3.1 creation of deals locally . . . . . . . . . . . . . . . . . . . . . 3.2 import of deals from: . . . . . . . . . . . . . . . . . . . . . . 3.2.1 an ACBL source . . . . . . . . . . . . . . . . . . . . 3.2.2 The Common Game . . . . . . . . . . . . . . . . . . 3.2.3 some other external source . . . . . . . . . . . . . . . 3.3 initial processing of imported file . . . . . . . . . . . . . . . . 3.4 export to .PBN and .DUP . . . . . . . . . . . . . . . . . . . . 3.5 print reference (or all) hand records . . . . . . . . . . . . . . 3.6 the actual dealing . . . . . . . . . . . . . . . . . . . . . . . . . . . . . . . . . . . . . . . . . . . . . . . . . . . . . . . . . . . . . . . . . . . . . . . . . . . . . . . . . . . . . . . . . . . . . . . . . . . . . . . . . . . . . . . . . . . . . . . . . . . . . . . . . . . . . . . 6 7 9 9 9 9 10 11 13 14 4 5 Before and during the game 4.1 using a browser during the game . . . . . . . . . . . . . . . . . . . . 4.2 if you have a 299er section . . . . . . . . . . . . . . . . . . . . . . . 4.3 the clock . . . . . . . . . . . . . . . . . . . . . . . . . . . . . . . . . 4.4 movements . . . . . . . . . . . . . . . . . . . . . . . . . . . . . . . 4.5 second board set . . . . . . . . . . . . . . . . . . . . . . . . . . . . . 4.6 if time allows: remove records of unplayed hands . . . . . . . . . . . 4.7 printing the pruned hand records . . . . . . . . . . . . . . . . . . . . 4.7.1 if time allows: adding a QR code pointing to the posted game 4.7.2 printing . . . . . . . . . . . . . . . . . . . . . . . . . . . . . 4.8 uploading hand records to the Bridgemates . . . . . . . . . . . . . . . 4.9 player number entry . . . . . . . . . . . . . . . . . . . . . . . . . . . 4.10 Using Bridgemate’s Real-time Publication (a/k/a Live Ranking) . . . . 4.10.1 from a cold start . . . . . . . . . . . . . . . . . . . . . . . . 4.10.2 phantom pairs . . . . . . . . . . . . . . . . . . . . . . . . . . 4.10.3 rover pairs . . . . . . . . . . . . . . . . . . . . . . . . . . . 4.10.4 shutting down . . . . . . . . . . . . . . . . . . . . . . . . . . 4.11 Movement changes in the EDMOV/Bridgemate world . . . . . . . . . . At the conclusion of the game 5.1 working in ACBLscore. . . . . . . . . . . 5.2 . . .and then working in ScorePost . . . . . . . 5.2.1 verifying in a browser . . . . . . . . 5.3 . . .and then uploading to The Common Game 5.4 . . .and then to the cloud . . . . . . . . . . . . . . . . . . . . . . . . . . . . . . . . . . . . . . . . . . . . . . . . . . . . . . . . . . . . . . . . . . . . . . . . . . . . . . . . . . . . . . . . . . . . . . . . . . . . . . . . . . . . . . . . . . . . . . . . . . . . . . . . . . . . . . . . . . 14 14 14 14 15 15 16 18 18 18 19 20 21 21 23 24 26 26 . . . . . 28 28 29 33 34 35 6 Backing up 36 7 Storing the Bridgemates 37 8 Links to ACBLscore and Dealer4 documentation 37 9 Bridgemate documentation 37 Introduction This document explains the club’s technical operations, including but not limited to how club Web site1 and to The to create hands and how to upload the results of a game to the ✿✿✿✿✿✿✿✿✿✿✿✿✿✿✿✿✿ Common Game. The principal tools for these tasks are the programs BridgeComposer for deal creation and ScorePost for game result upload. Both of these have been installed and configured on the club’s main computer and on the Temple’s library computer and run from icons on the computer Desktop or (better) the Quick Launch bar.2 Versions as of this writing are 5.52.2 and 3.8.3 respectively, and not all operations described here will work in earlier versions (and of course anything can change in later ones). Anyone with a need can install ScorePost on another computer (subject to license restrictions) and configure it; how to do the configuration is beyond the scope of this document. File names and extensions appear here in a monospaced font (in this font ’O’ is the letter after ’N’ while ’0’ is the number zero). Text that you will see on the screen appears in a sans-serif✄ font; slashes within that text indicate successive operations. Key tops are shown in a ✂rounded box ✁ ; keytops shown together are to be pressed simultaneously. When you are told to “select” something, this means to click or double-click on the item, type it, or type a keyboard shortcut in accordance with common Windows procedure. Links on the Internet are shown with a wavy underline like this. ✿✿✿✿✿✿✿✿ Mention is sometimes made of a Quick Launch icon. If an icon is shown, that is actually the icon that is on the Desktop, which has a caption that the Quick Launch icon does not. Either can be used, but the Quick Launch icon will be quicker to find. 1 System configuration Our club PC is a tower4 running Windows XP (SP3). Our computer is configured differently from the typical PC that is used to run an ACBLscore-plus-Bridgemate duplicate bridge game. The differences are to serve two purposes beyond what most would consider to be the basic ones: 1. Support a second and a third monitor [ § 1.1, p. 2 ], one to display a bridge clock and the other to display auto-updated results; 1 www.miamibridge.net 2 BridgeComposer Web site3 , To get these programs, download and install BridgeComposer from the ✿✿✿✿✿✿✿✿✿✿✿✿✿✿✿✿✿✿✿✿✿✿✿✿ register it (the fee is currently $19.95), and then download ScorePost from the same site and install it. 3 www.bridgecomposer.com 4 A laptop has some appeal, but running a game up to modern customer service standards really requires more USB ports than any laptop comes with, and experience has taught us that external USB extenders are not always robust enough to handle the load. 1 2. Enable access to the game files remotely, after game time [ § 1.3, p. 5 ], for the purpose of post-game corrections performed on other computers that are configured to run an ACBLscore game (typically a club laptop for runout games, or the club’s game directors’ personal laptops) and that have had some further enhancements made that will be described later. 1.1 Second and third monitor support The basis for this is Windows’ support for multiple monitors, as implemented by means of standard. 5 third-party devices that (to minimize complications) adhere to the DisplayLink ✿✿✿✿✿✿✿✿✿✿✿✿✿✿✿✿✿✿✿✿✿ Multiple-monitor support in this context means virtual space for each additional screen that is positioned—virtually—above or below or to one side of the original monitor’s (virtual) space. We arrange our monitors with the second (Monitor 3: see following) to the right of the first and the third (Monitor 4: see following) above the first. Windows perceives these monitors as follows: Note that the numbers assigned by Windows are not related to how we think of the monitors; Windows’ numbering is based on when it “sees” each monitor in the start-up process6 . The video devices we use show this icon in the Notification Area: 5 We employ the IOGEAR GUC-2015V device (two of them). ✿✿✿✿✿✿✿✿✿✿ 6 and sometimes, as in this case, on other real or imaginary concerns, such as the designation here of a monitor as 2, which actually is an artifact of previous and long-discarded work done on this system, persisting for reasons known only to Microsoft 2 The monitor numbering discussed above is used by the devices’ software, as seen here in the Notification Area from which a device can be selected and its settings accessed like this: 1.1.1 Monitor 1 Monitor 1 is the main monitor, served from the tower’s VGA port. We run it at a resolution of 1400x1050, the maximum supported by the tower’s video system. This allows maximum “windowing”; for example, at this resolution, ACBLscore’s Update/find (players) functionality can coexist with the Bridgemate Control Software’s players maintenance screens without one obscuring the other. There are some minor hassles in multiple-monitor mode with ACBLscore (an application whose history long precedes Windows’ support for multiple monitors): ◮ Some operations in ACBlscore may cause a window to open in a different position from the one expected—possibly impairing useability—or entirely off the bottom of the screen (assume the latter if you see no window at all when you expected one). If there is a dialog box✄that requires attention and is still on-screen (as is the case if, for example, you tried ✂F10 ✁ to correct some board scores or you chose EDMOV for any purpose): tell the dialog box what it needs to know, then doing the same for any successor, and then click on the title bar of the mis-positioned screen and drag it into view. If, instead, nothing you want to work with✄ is visible, but ✞ ☎ you know ✄ where the 7 window is , you can move it up into view with ✂Alt ✁✝ space ✆and then ✂M ✁, followed by repeating whichever arrow key(s) seem(s) appropriate until the screen appears; ✄ then ✂Enter ✁ exits the window-move process. . 7 for example, you clicked on the program’s icon on the taskbar to minimize it and then ckicked again and could see in what direction the “shadows” moved 3 ◮ Any change in the monitor configuration while ACBLscore is running may cause the next operation in ACBLscore to produce a memory access violation notice like: Closing ACBLscore and restarting it will resolve the situation. The applications for a typical game session, plus the Mozilla Firefox browser, are available on the Quick Launch bar as well as on the desktop: The identity of any of the apps on the Quick Launch bar can be ascertained with a mouseover: 1.1.2 Monitor 3 This monitor is used for the game clock [ § 4.3, p. 14 ]. It runs at a resolution of 1024x768. 1.1.3 Monitor 4 Monitor 4, together with Internet Explorer, the system default browser8 , support Bridgemate’s Live Ranking [ § 4.10, p. 21 ] functionality. It runs in “portrait” orientation at a resolution of 1024x1280. 1.2 Virtual disk drives The startup process includes the aliasing of two folders to drive letters by means of a batch file with the following contents (possibly with additional lines): subst V: "C:\Documents and Settings\Administrator\My Documents\Google Drive" subst X: "C:\Documents and Settings\Administrator\My Documents\Dropbox\183137\CommonGameCurrent" subst Y: "C:\Documents and Settings\Administrator\My Documents\Dropbox\183137\CGNiteGameCurrent" The V: drive allows reference to the Google Drive, whose function will be detailed shortly, by a drive letter rather than by a lengthy path. 8 Internet Explorer is the default browser because it is the only one of the three established Windows browsers that will scroll Live Ranking’s screen in the multiple-monitor setup that we have (that is, a partly-software emulation) when the information overflows the screen, and Live Ranking is hard-coded to use the system default browser. 4 The X: and Y: drives allow The Common Game’s Dropbox deliveries to be accessed by a drive letter rather than by a lengthy path. The convenience of this will be clear later [ § 4.8, p. 19 ]. Mnemonics are: Drive ; Dropbox . an extension of x:’s. ) ( y: simply follows on x: , as its functionality is 1.3 Post-session game-file access and running games remotely A major objective in configuring our system was to allow directors to run games off-site or with a backup laptop, or to update later from some remote location (such as home) a game that had been posted on the club Web site, using the club laptop or their own laptops—which can be any suitably configured Windows-XP-or-later computer. The key to this is the maintenance of configuration files and copies of game files “in the cloud”—that is, on the Google Drive, which, as noted above, is accessible from the club computer as drive V: . Any other computer with access to the same Google Drive can also access those files. An essential component of this mechanism is the copying of each session’s game files to the Google Drive. This is done by clicking on the “copy game files to cloud” icon on the Quick Launch bar. This must be done whether the game director will have a suitably configured system available later or not, because corrections may be able to be done from another director’s system as long as the game files were copied to the cloud where that other director can get at them. A computer to be used as discussed here requires “suitable configuration” as mentioned. The club’s laptop and the principal director’s personal laptop have been configured in this way. The principal director will configure any other computer similarly on request of the club manager or any director, as long as the computer is already capable of running a game with ACBLscore and the Bridgemate system. The configuration does not affect any other operations on that computer9 . 2 System startup 2.1 a possible hardware issue Our system, when configured for multiple monitors, hangs on start-up. The video device(s) must not be physically connected until the first progress bar shown by Windows in its boot process has been completed. We have not located the exact locus of the problem (and it may be rooted beyond removal anyway), but the given workaround is manageable enough. 9 except in the event that drive letter V: is already in use; this can be worked around 5 2.2 “What’s new?” Before doing anything towards the game to be played: ◮ Check the Temple’s on-line event schedule (the “Virtual EMS10 ”), bookmarked in Firefox, to see if the available time has changed and/or if there is a change in the post-game breakdown (yes to no or vice versa); ◮ Check the club’s email, also bookmarked in Firefox, for any relevant communica- tions: most important, though mercifully rare, is a notice from the hand supplier du jour that the hands have been compromised and need to be discarded and replaced. 2.3 Google We use three of Google’s services, all under [email protected] : ◮ Google Mail (for club email: Google has apps for access from Android and iOS devices also); ◮ Google Drive (for offsite backups and for post-game access); ◮ Google Calendar (for the Web site calendar). 3 Dealing: for computer-dealt hands only: Deal creation or import Regardless of the source of the deals, the end result here will be a .PBN (Portable Bridge Notation) file (needed for informational printouts and for the Web site) and, if time allows, a .DUP file. The Dealer4 dealing machine can read either format. If time is pressing, the .PBN file is the one to be sure to make, as it is needed for the eventual Web post, whereas omitting the .DUP file loses only the ability to upload the hand records to the Bridgemates [ § 4.8, p. 19 ], a feature that is useful but not essential. A set of computer-generated deals can come about in one of two ways, depending on whether the hands are being generated locally (as for a typical club game) or are being provided externally (as for example for a STaC game). In either case, the program BridgeComposer is employed. The two possible paths are discussed immediately below and on page 9 respectively. 10 Event Management System 6 3.1 creation of deals locally If you want to modify deals already created and in .PBN format, the most likely changes, such as the event name or the date, are done by means of Format / Hand Record Titles. . . ; how to do the changes is clear on the screen that appears. When you have finished, go to page 11. generating new deals A key concept from the outset is that BridgeComposer has six ways of displaying a set of deals, and they call these ways “page layouts”. We employ two of these: “One board per page” and “Hand record”. You can see which page layout is in effect at any time by View. If the hand record view is in effect, you will see this: while if it is not, you will see this: At various times you may be called on to switch from one page layout to the other. This may be done by clicking on the one of the two above menu lines that you are seeing; that line will be replaced by the other✄ and the ✄ page layout will change—but ✄ ✄ there ✄ is a keyboard shortcut that saves time: press ✂Shift ✁✂F5 ✁ (which may mean ✂Shift ✁✂Fn ✁✂F5 ✁ on some laptops) to change from the current of the two modes to the other. Start BridgeComposer. Under Tools select Generate Random Boards... , as here: 7 Choose 30 boards, starting at #1. Check the box “Calculate makeable contracts for all generated boards”. Be sure you are in “one board per page” layout mode. Set the date to the desired date by use of the Calendar control: Click on Generate to create the deals. When this task has finished, go to page 11. 8 3.2 import of deals from: 3.2.1 an ACBL source In the case of ACBL fund events or STaC games, ACBL offers .DLM and .DUP files; choose the .DUP file because it will be useful later [ § 4.8, p. 19 ]. 3.2.2 The Common Game The Common Game delivers its game files to a drop box. Access the drop box via the icon on the Quick Launch bar or in the Notification Area, navigate to the folder 183137\CommonGameCurrent (for an afternoon game) or 183137\CGNiteGameCurrent (for an evening game) and then to the folder representing the day of the week, and choose the .DUP file which has the desired date in YYMMDD format. In the same folder there will be a .PDF file which can serve as the definitive (because original) hand record (not the .PDF file with “2up” in its name: the other one). The above folders are also accessible as drive X: for an afternoon game or Y: for an evening game. 3.2.3 some other external source BridgeComposer can accept files in one of the following formats: .DLM, .DUP, .LIN, or [ § 4.8, p. 19 ] .PBN. .DUP is simplest because this would remove the need to export to .DUP later . The program seems to be more rigorous than some in adhering to the published .PBN file format for incoming files, and it will flag errors. An example of this that we have experienced is a mis-formatted date in .PBN files produced by the software supplied with the Dealer4 dealing machine that we use. This situation is not fatal, but the user must reformat the date correctly or it will be lost. A further issue is that some .PBN files will come with formatting that is not consistent with our style and that therefore must be edited—or, worse, that BridgeComposer will refuse to edit11 . All these issues are avoided by simply not choosing .PBN when there is a workable alternative. 11 for example, pre-existing double-dummy contract data in The Common Game’s .PBN files, which stops BridgeComposer from doing its opening-lead analysis 9 3.3 initial processing of imported file In BridgeComposer, under File, select Open, find the file in the usual Windows manner and open it (see figure below). Under Tools, choose “Double dummy all boards”, as shown below. 10 3.4 export to .PBN and .DUP Click on Format in the main menu and then on Hand Record Titles. . . in the submenu, to see something like: The first field will not often change, but the rest need to be taken care of, and can have their idiosyncrasies. The “Event” must always have ‘\n’ appended (as shown) to force correct formatting. The “Logo image” does not default to the given file name if there is one; you must click on and select the image file, even if you did the same thing yesterday. Make sure the Center check box beneath each of Title box and last page is checked. Click on Title box and then, if there is no text in the Enter text screen, click on Recent text to see something like: 11 and click OK. Click on Last page and then, if there is no text in the Enter text screen, click on Recent text as before and then click OK. Under File, select Save As...: accept the default type of “Portable Bridge Notation (.pbn)”, navigate to C:\ACBLSCOR\GAMEFILE , name the file in accordance with ACBLscore’s file-naming convention for reports12 , and click Save: 12 This file-naming convention is: YYMMDD (referring to the date of the game) with a suffix of “M”, “A”, “E”, or “L” for morning, afternoon, evening, or late respectively, with an extension determined by the task. For example, 111020A.TXT would be a text file representing to the afternoon game of October 20, 2011. 12 The hands should be saved also in the .DUP format, as discussed earlier. This is done from the main menu: We do not have an established save path for this, as it is likely to be a one-off occurrence. 3.5 print reference (or all) hand records Switch to the “Hand record” layout. Print two hand records via Ctrl-P, or by clicking on the printer icon, or by the File / Print . . . mechanism; print more if you will not be removing unplayed hands or may not have time later. Click through any message about a page being clipped. If the game is to be uploaded to The Common Game but the hands were not provided by them, click on Save to PDF. . . in the menu, and save to the already-determined file name in the folder C:\ACBLSCOR\GAMEFILE . Switch back to the “One board per page” layout. 13 3.6 the actual dealing We employ the Dealer4 dealing machine, which is an excellently documented product. We offer two brief notes on possible surprises: ◮ The machine’s USB interface often will not start up correctly, and the machine will squawk about the connection or about a possible (but usually non-existent) loss of power. As USB is a mature technology, problems like this should not occur, but they do. They can be overcome by unplugging the USB cable from the L-fitting at the machine and leaving it unplugged for 20 seconds and then plugging it back in. One try usually does it; if not, and a second try also fails, a restart of the program will almost always succeed. ◮ Some new decks—of plastic cards especially—have finishes that generate static elec- tricity. Such cards can be seen from above, through the machine’s transparent top, to slide from one pocket of the board part-way or even all the way to another pocket. A few cycles through the machine for that deck will see this problem disappear 4 Before and during the game 4.1 using a browser during the game If you attempt to run a browser by means of an icon that references a location on the Internet (if—but not only if—the icon is the icon of the browser itself, this is what you are trying to do), the system default browser [ § 1.1.3, p. 4 ] will handle the operation, putting the resulting screen uselessly, and destructively, on Monitor 4, which is intended for the use of Live Ranking only. Any access of the Internet outside of what has been prepared for Live Ranking setup must be done via the Firefox browser, whose icon is on the Quick Launch bar. 4.2 if you have a 299er section The 299er section must be set up in ACBLscore as a “New Event”, and its name must contain the text 299 13 , by itself or within a string. Typically we use something like Thursday Aft 299er Pairs . 4.3 the clock Our choice of clock is Lorne Anderson’s Bridge Timer because of its support for multiple ✿✿✿✿✿✿✿✿✿✿✿✿✿ screens; the clock’s runtime control console continues to appear on the main screen even when the clock face is switched to another screen. 13 The Common Game looks for this to identify the separate section. 14 Use of the clock is straightforward, but, one tip: if the announcements are used, the speakers should be muted after the move for the last round is called, as the announcements will no longer make sense after that point. 4.4 movements To ACBLscore’s “external” movements in C:\ACBLSCOR\MOV we have added movements we have written or have taken or adapted from other sources. Our movement files are all named per the format #XTTRRzz, where # is for the purpose of having the files so named be easily distinguished from ACBLscore-supplied files and appear at the front of the listing, X is M for a two-winner movement or H for a one-winner movement, TT is the number of tables, and RR is the number of rounds—so far, this follows ACBLscore’s naming style, after the prepended ’#’—but zz is an optional two-character continuation with no upper-case letters. Documentation of the locally supplied movements appears in the file #!ReadMe.txt in the same folder. 4.5 second board set Some movements require relayed boards. There is little reason except director laziness for a club with a dealing machine physically to relay boards, as wherever boards would traditionally be relayed, giving one of the relaying tables boards from a duplicated set is effectively the same thing, and is simpler and less capable of being screwed up14 . The director should always be prepared to deploy a second board set. For this purpose, we have a dedicated second board set, the green one, that is configured to handle not only second-board-set duties but some of the commonest third-set situations, with its boards 29–32 relabeled as 13–16 and 33–36 relabeled as 1–4. This set, if completely made up including the relabeled boards, will handle odd-table Web movements through 19 tables15 and even-table Web movements through 26 tables. Making up all the boards except the relabeled ones loses only the 17- and 19-table Webs, but those can be gotten underway by a last-minute make of two or four boards respectively (the group of boards starting with board 13 isn’t needed immediately). 14 Back in about 2 BCE (Before Computer Era), our club had the usual three-board relay between tables 1 and 8 in an 8-table Mitchell. Table 1 played Board 1 and Table 8 played Board 2. They exchanged boards (walking right past Board 3 that was on a chair between the tables) and played the new boards. Both tables then needed Board 3 at the same time. The masterpoint total of the eight players at the two tables was over 20,000, a fact which will surprise no experienced bridge director. 15 The board relabelings allow the two upper sections to both work from the augmented second set without relays. 15 If Web movements are not in the club repertoire, making only seven boards—Boards 1–4 and 25–27—will be enough to get through Round 1 of any of the following movements, with any remaining boards being made in a timely manner once the game is underway: ◮ 6-table relay/bye-stand Mitchell, as long as Board 1 is relayed in Round 1; ◮ 8-table relay/bye-stand Mitchell, as long as Board 1 is relayed in Round 1; ◮ 1 12 -table Appendix Mitchell for 10 12 tables; ◮ 2-table Appendix Mitchell (sometimes imprecisely called “Bowman”) for 11 tables; ◮ 12-table relay/bye-stand Mitchell, as long as Board 1 is relayed in Round 1; ◮ 1 21 -table Appendix Mitchell for 14 12 tables; ◮ 2-table Appendix Mitchell (sometimes imprecisely called “Bowman”) for 15 tables; ◮ any Howell in which Board 1 is relayed in Round 1; ◮ any Hesitation Mitchell in which Board 1 is relayed in Round 1. 4.6 if time allows: remove records of unplayed hands While there is nothing terribly wrong with posting or distributing hand record sheets with 30+ boards even when some boards were played by no one, it is cleaner to remove records of unplayed hands. This way, the sheet will not be cluttered with hands that don’t matter, and the statistical summary will not include hands that were never used, since these statistics are calculated from the hands in the .PBN file at the time of posting to the Internet. But if you do not wish to do this and also don’t want to print the QR code discussed below, or there isn’t time, skip to the arrow on page 28. To proceed with board removal, open the file in C:\ACBLSCOR\GAMEFILE . Show the drop-down board selection list by clicking on the down-arrow to the right of the window just above the main display area that shows the first board number. This will look like: 16 Click on the board number in the drop-down list of the highest-number board you will be retaining (you may have to scroll down to see it). Click on Tools on the main menu and then, in the submenu that opens, click Delete All Boards Following. Save the file. This is the second page of a hand-record post/printout of a 27-board game prepared as we have just discussed: 17 4.7 printing the pruned hand records 4.7.1 if time allows: adding a QR code pointing to the posted game The Quick Launch bar includes a reduced-size copy of this icon: whose function is print a page with a QR code for the URL of the soon-to-be Web posting of the game results. This process will ask for a “ScorePost game identifier” (our term, not theirs). This is most easily explained by example. The game of April 28, 2015 looks like this on the Web site: Look at the address bar. The “ScorePost game identifier” is the file name less the path and the extension: in this case, 20150428ana . The identifier is of the form—allowing only for the games we are likely to run—YYYYMMDDTna, with T being afternoon or evening. The process will produce a PDF page that looks something like this toward its bottom right (possibly off the page in the PDF reader’s initial display, in which case scroll down); this is to be printed, “actual size” or the equivalent wording, and re-inserted in the printer input tray so as to receive the second page of the hand record printout from which the copies for the players will be made in the copy room. The URL that appears beneath the QR code is the one that is encoded. 4.7.2 printing Change to the Hand Record layout. Print one copy and have it duplicated (preferably two-sided) in the copy room, unless you don’t care about the QR code nor the removal of unplayed hands or just don’t have the time for those activities, in which case print as many copies of the hand records as required on the club printer. Do not save this change. 18 4.8 uploading hand records to the Bridgemates This requires that a .DUP file of the hands be accessible. In the BCS, go to File / Import / from .DUP : and click on the three dots, to get a file browsing menu. If your hands are from The Common Game, navigate up until you can go to drive X: (for an afternoon game) or Y: (for an evening game); do that, then choose the folder corresponding to the day of the week; then choose the subfolder named according to the \WWW\YYMMDD format discussed earlier for the game date; then select the only file that appears. You will see a result in the file name box that will be similar to this result for Friday, January 2, 2015: (If your hands are not from The Common Game, navigate to wherever the .DUP file is.) Click on Import file(s). Then, back at the main BCS menu, click on Session / Upload hand records, and the process should run to completion. 19 4.9 player number entry We configure the Bridgemate system for player entry of their player numbers at the table at the start of the first round. The names of the players to play each round will be displayed on each table’s remote, providing a check that the moving players have progressed correctly and allowing a host pair to greet arriving players even if they are strangers. Player number entry also supports Bridgemate’s “Real-time Publication” discussed in the next section. ACBLscore allows “placeholder” numbers for non-ACBL-members, and our involvement with The Common Game creates a pitfall here: The Common Game requires a player number of at least six digits, and a shorter number will fail for them unless enough zeroes are prepended. Here is the ACBLscore record of a player whose number has been so handled: The pitfall is that the number looks the same in the Bridgemate player display—no prepended zeroes—whether the player entered the number with or without the zeroes. A seemingly correct number without an accompanying name suggests that the director’s first try at a fix should be to re-enter the number with the zeroes. We have chosen to allow missing or impossible entries simply to expedite getting the game underway. The director will want to check the entries as soon as possible after all tables have reported their first board; with the appropriate menu operations in BCS, he will see something like: though possibly with errors, as implied by missing names. Clicking on a number or name (or its space) will ✄ allow editing. After the names are all correct, they can be brought into ACBLscore via ✂F11 ✁ / BMN . This must be done for each section before the last board of the game is reported, as the names will no longer be available after that has happened. 20 4.10 Using Bridgemate’s Real-time Publication (a/k/a Live Ranking) 4.10.1 from a cold start If the Task Bar is hidden on the main screen, un-hide it. The Live Ranking functionality option is normally enabled; if it should be found to be inoperative for some reason, the following shows what to do: Shortly after the game is started, an Internet Explorer screen will appear on the main monitor showing something like: with an icon on the Task Bar labeled “Current Ranking”: In the Information Bar, click on Click here for options... to see: 21 Click on Allow blocked content... to see: Click on Yes . You should see the Live Ranking screen with no information bar. The task now is to move the Live Ranking screen to Monitor 4 and to maximize it there. Right-click on the Current Ranking icon on the Task Bar to get this: Now: Left-click on Move; ✄ ◮ Press and hold ✂↑ ✁ until the Live Ranking✄ screen just disappears off the top of the screen✄ (and onto Monitor 4), then release ✂↑ ✁; ◮ Press ✂Enter ✁; ✄ ◮ Press ✂F11 ✁. ◮ The Live Ranking should now be full-screen on Monitor 4. The text size may be ✄ screen ✄ ✄ ✄ increased with ✂Ctrl ✁✂+ ✁ or decreased with ✂Ctrl ✁✂– ✁; this should be done to get the most readable text width, as the text will scroll vertically automatically later. The director may wish to minimize the Live Ranking screen until late in the session; this is done as follows: Right-click on the Current Ranking icon on the Task Bar; ◮ Click on Minimize. ◮ and restore it as desired later with: Right-click on the Current Ranking icon on the Task Bar; ◮ Click on Restore. ◮ The Live Ranking functionality should require no other attention for the rest of the game. After the game, a bit of extra work [ § 4.10.4, p. 26 ] will be required if the system is to be shut down. 22 4.10.2 phantom pairs The release of Bridgemate Control Software v. 3.1.2 in July 2015 addressed a long-standing problem with phantom pairs and Real-time Publication in which the pair with the first-round sitout would appear in Live Ranking as “UnKnown - UnKnown” unless special steps were taken. However, the solution appears to have been not quite complete. The test in a particular case is to see whether ACBLscore’s EDMOV and the Bridgemate Control Software are showing the same information about the phantom pair. The figure below shows a situation in which the information from ACBLscore about the phantom pair has been recorded correctly by the Bridgemate Control Software. The EDMOV printout closely resembles the Bridgemate movement editor display, differing in content only in the movement editor showing the phantom as pair 0 vs. EDMOV retaining the actual pair number)16 . (red framing is added in the figure) If the two depictions of the movement agree, as they do above, there is no problem and you can skip the rest of this material. If they do not agree, then to get completely correct 16 the “extra” pair 0 still seen in Round 2 and thereafter in the Bridgemate display is of no import. 23 Real-time Publication displays when you have a phantom pair, set up the game as follows: 1. Remove the Bridgemate remote from the round 1 sitout table and take it with you to your work area. 2. Set up the game for the actual table count, telling ACBLscore that there is a phantom and which pair it is. 3. In EDMOV, print out the movement ( 2 [click OK] 11 [click OK] ) as a check on the work you are about to do in the Bridgemate movement editor. 4. Follow the instructions on the facing page to bring the movement in the Bridgemate Control Software movement editor into agreement with that in EDMOV. Retain the EDMOV printout in case a movement change should come to be required later. 5. Activate the above-referenced remote for the round 1 sitout table, entering the player numbers for the pair at the table (looking them up in the ACBLscore player database). Unless the table will be inactive for the whole game, return the remote to the round 1 sitout table. 4.10.3 rover pairs A rover movement in which the rover pair has a (non-existent) first-round table in the movement file is handled as a Phantom movement. This is true of, for example, the Web movements published by Tim Hill. Where there is no such “table” (as with ACBLscore’s internally-generated rover movements), there is no point in time at which the rover pair might enter their numberi. The convoluted workaround offered by Bridgemate seems still to be necessary, and is to be avoided if at all possible. We will not discuss it here. If such a movement is especially beloved, we suggest re-writing the movement file in EDMOV in conformance with the previous paragraph. 24 (the above is courtesy of Bridgemate) 25 4.10.4 shutting down If the computer system is going to remain on until the next game with no other work expected in the interim, Live Ranking may be left running; it will “pick up” just fine when the next game is started. But if the system will be powered down, it would behoove the director to move the Live Ranking screen back to the main monitor before shutting down; if he does not do this, subsequent operations with the system default browser will appear on Monitor 4, which may be surprising and/or inconvenient. ◮ Move the cursor just above the top edge of the main screen and Left-click; ✄ ◮ Press ✂F11 ✁; ◮ Right-click on the Current Ranking icon on the Task Bar; ◮ Left-click on Move; ✄ ◮ Press and hold ✂↓ ✁ until ✄ the Live Ranking screen completely re-appears on the main monitor, then release ✂↓ ✁; ✄ ◮ Press ✂Enter ✁. 4.11 Movement changes in the EDMOV/Bridgemate world Changing a movement with EDMOV in order to retro-match the seating of pairs who have played one or more boards in the wrong direction is documented in ACBLscore, and we will not repeat those instructions here; but an additional step is advisable if the game’s results will be displayed on the Internet via BridgeComposer/ScorePost. The EDMOV work will get the score right, but there will be a hole where the contract information should be because the score no longer matches the result recorded at the time of play in the BCS. The following EDMOV screen shows a movement in which the pairs played in the wrong direction at Table 6 in Round 7, and the documented correction has been made (red framing added): The following screen shows the BCS Result Matrix for that board per the played result (red framing added): 26 The data items associating the pairs with a direction (that is, those framed in red above) need to be changed as follows (red framing added): Note that the directional information now squares with that in EDMOV after the movement change done there. This work needs to be done for each board involved. If Real-time Publication is in use and there is a half-table, if it becomes necessary to change the movement via EDMOV after the start of the game—for example, if a table plays a round with the pairs seated in the wrong direction—try not to make this change during the game17 , because the change will wipe out the work done in the step just discussed18 and “UnKnown - UnKnown” will reappear. Instead, if possible, wait until the game is over. 17 Of course sometimes this is not possible, as, for example, when the ending round has to be changed 18 It is not clear whether this work could be successfully repeated; Bridgemate tech support could not give a confident answer. 27 5 At the conclusion of the game 5.1 working in ACBLscore. . . =⇒At the conclusion of the game, for each section in the game in alphabetical order, do the following: ✄ Press ✂F8 ✁, then select 1 Screen, then select 2 By rank to get a display with something like the following first two lines: Tuesday Afternoon Pairs Tuesday Aft Session January 27, 2015 Scores after 9 rounds Average: 108.0 Section A North-South The bit of interest is the number of rounds. This provides a quick check that you have actually brought in all the boards—it’s easy to go wrong on this in the typical end-of-game scramble. ✄ Press ✂F11 ✁ , then select LRECA , then select 3 Text file . You will see a screen like this: Accept the suggested file name19 by pressing Save . If this is not the first time you have done this for this game, you will get a window titled Select option (file already exists) : select 2 Overwrite (original file destroyed) . Now do the following (being careful not to Overwrite a file in progress): ◮ Select 5 List + Recap . ◮ Accept the suggested Report Width by clicking on OK . 19 This file name follows the ACBLscore file-naming convention discussed earlier (footnote 12 on page 12). The Bridgemate system uses the same convention, producing a .BWS file corresponding to the .TXT file produced by ACBLscore: the management of that file in the upload process is done behind the scenes by ScorePost. 28 ◮ If you see Include Recap for ALL Pair/BAM/Individual Sections?, click on No. ◮ Select 2 By rank . Click on OK . In a two-winner game, include both recaps. ✄ ✄ ◮ Press ✂F11 ✁, then type TS and ✂Enter ✁. ◮ Change the suggested file name (BOARDS) to match the one just used in LRECA (the implied .TXT extension carries over). ◮ Choose Append. ◮ Choose All Boards Played. Repeat the above for each section in alphabetical order, When you have finished, exit ACBLscore; then in the Bridgemate Control Program, do File / Close and exit that program. Those tasks in the Bridgemate Control Program ensure that the Bridgemate system will go into its ready-to-start state, and the director of the next game will appreciate that. 5.2 . . .and then working in ScorePost On the Quick Launch bar, find this icon: for the ScorePost program (the image of the spade with the green up-arrow is what matters — the background and/or✄ caption may be different) and double-click on it. Click on a ✄previously posted game, in Post Games (F4) or press ✂F4 ✁ (unless you are reposting ✄ which case click on File / Repost. . . Shift+F4 or press ✂Shift ✁✂F4 ✁) . You will see a screen like this: which shows all the games that have not yet been posted. If the only unposted game is the one you are working on, just that one game should be shown, as in the figure above. Unfortunately, the program will also show any other files that have a .TXT extension that have materialized in the C:\ACBLSCOR\GAMEFILE folder for whatever reason (and there 29 are occasional mysteries in this regard). Uncheck any files shown whose names make no sense as game files20 , and uncheck all but one game file — the one you want to post. Only one file should remain checked. Your action now depends on whether you have hand records. ◮ If you do not have hand records, click on OK and continue at the arrow on page 31. ◮ If you do have hand records, click on [Click here] under Hand Records in the above screen, whereupon you will see this screen: You see in the above screen that the default file extension is .PBN, which is correct for our purposes. Select the correct file. (This has been done in the above screen.)21 20 making a mental note to delete these files as soon as it is convenient 21 In this example, we see that the hand record files had been named in accordance with the earlier-discussed ACBL file-naming system, but there was no requirement to have named the files in this way. 30 This will give the following confirmation screen: Click on OK . =⇒ If it has been more than four hours since the game ended, and/or the game has been uploaded before, you will get a screen asking you to confirm the operation. Click Yes . At this point, you may see a window telling you that ScorePost cannot determine everything it needs to know about the game. Its most common fret is about the master point level: tell it “N”. If you have a hand-record file but for some reason omitted to have the double-dummy analysis done before now, ScorePost will calculate double-dummy contract information at this point. UPDATE: ScorePost has lately acquired the habit of doing the double-dummy analysis even if it has already been done. This takes a minute or two but is otherwise harmless. 31 The upload process will now (usually) run to completion, giving a screen like the following: The key here is the message “Indexing succeeded” as seen in the screen shot. If you do not see this happy result, then one of three things has almost certainly happened: The system seems to have stopped: This will happen if the hands plus post-hands text cannot all fit on the intended two pages. Minimize the active window to expose the error notification about “clipping”, and tell the system to continue. You see a message about an incorrect password: Notify the Webmaster. The Webmaster can resolve this situation in a minute or two when he has access to the club computer; otherwise, it may or may not be quickly resolvable: the Webmaster will know. You see a message about something missing from a “template” file: The problem is not what the message indicates; it’s much simpler. Scorepost lost its connection to the Web host for some reason, usually a traffic overload, and didn’t know how to recover. The remedy is to try again, going back to page 29. 32 If the game we just uploaded was a new game, it would appear at the top of the list, but in this case we have uploaded an old game, so we scroll down to find it: Notice the [PDF] and [PBN] links on the line for the game we just uploaded (in this case August 20, 2010). These links will appear when and only when we upload hand records. In other words, for the games on the same screen without these links, we know that hand records were not uploaded. If the screen looks like this, then everything should be OK. Exit ScorePost. 5.2.1 verifying in a browser The success of the upload operation can be verified by looking at the game result just as a player would do from home. It is easy to do this on the club’s computer using Firefox (its icon is on the Quick Launch bar), as Firefox has been configured with our Web site as its home page, so one does not need even to navigate to the site. 33 5.3 . . .and then uploading to The Common Game Click on the Quick Launch icon TCG MERGE: and you will see a screen like this: For a game in which you have used the Common-Game-supplied hands, just follow the instructions. All requested files will be in the folder C:\ACBLSCOR\GAMEFILE . If you have used other hands, or do not want the game to be incorporated into the Common Game 34 consolidated results for whatever reason, click on Exclusions in the above screen to get to this screen: and follow the instructions. 5.4 . . .and then to the cloud Click on the Quick Launch icon for “copy game to cloud”: and you will see a screen like this: Check to be sure that what is shown makes sense, then “press any key to continue” (in this case, meaning to exit). 35 6 Backing up The ACBLscore database and game files should be backed up regularly. This is done from the ACBLscore Utilities menu’s Backup/Restore submenu: choosing the first and then the second items on the submenu: in each case asking for a path: this should be V:\ACBLSCORE : which is an alias for the club’s offsite Google Drive. The multiple-monitor setup must be disabled for this, as otherwise the screen above will not be visible (ACBLscore is not multiple-monitor-aware). Exit ACBLscore in the normal manner (so that the game file has a sensible timestamp). 36 7 Storing the Bridgemates It is essential that the Bridgemates be tested to be showing their opening screen, similar to this: at the time they are stored away. If the Bridgemate is not showing this screen, ✄access the ✄ TD menu and press ✂0 ✁, and then to the question Reset Bridgemate? press ✂OK ✁. If it ✄ says Failed to send, retry? or Logoff failed , press ✂CANCEL ✁. 8 Links to ACBLscore and Dealer4 documentation ◮ ACBLscore ✿✿✿✿✿✿✿✿✿✿✿ ◮ BridgeMate ✿✿✿✿✿✿✿✿✿✿✿ ◮ Dealer4 ✿✿✿✿✿✿✿✿ 9 Bridgemate documentation The Bridgemate II manual is appended hereto. It has its own page numbering. ♠♥♦♣ ♠♥♦♣ ♠♥♦♣ ♠♥♦♣ ♠♥♦♣ ♠♥♦♣ ♠♥♦♣ ♠♥♦♣ ♠♥♦♣ ♠♥♦♣ 37 This page intentionally left blank. 38 Bridgemate II Scoring system Manual Chapter 8: Using Bridgemates with ACBLscore Bridgemate • Bridgemate normally operated by North • When “Verification by East or West” appears, East or West must verify. • Traveler should be viewed by all silently. © 2004-2015 Bridge Systems BV Adapted for North American use Bridgemate.US, LLC – 2015 All information contained in this document is subject to change without prior warning. Unless stated otherwise, all persons and details mentioned in this document are fictitious. No part of this publication may be reproduced and/or published, by print, photoprint, microfilm or otherwise, or stored in a retrieval system, without prior written permission from Bridge Systems BV. © Copyright 2004-2015 Bridge Systems BV. All rights reserved. Bridgemate, Bridgemate Pro, Bridgemate II and the Bridgemate logo are trademarks and/or registered trademarks of Bridge Systems BV in the Netherlands and other countries. Microsoft and Microsoft Windows are trademarks and/or registered trademarks of the Microsoft Corporation in the United States and other countries. Every user should read and take notice of the Safety Instructions printed on page 3 of this manual. Customers who have concerns with the Bridgemate Control Software End User License Agreement (displayed when Bridgemate Control Software is installed) and/or the Bridgemate Scoring System Limited Warranty (pages 1 and 2 of this manual) may return unused products at the customer’s expense to Bridgemate.US, LLC, for a full refund of the purchase price – excluding shipping charges. Bridgemate.US, LLC 350 Sawmill Creek Dr. Nellysford, VA 22958 434-361-1397 FAX: 434-361-0220 [email protected] www.bridgemate.us Table of Contents LIMITED WARRANTY 1 SAFETY INSTRUCTIONS 3 INTRODUCTION 4 CHAPTER 1: DESCRIPTION BRIDGEMATE II SCORING SYSTEM DESCRIPTION OF COMPONENTS PROCEDURE 5 5 6 CHAPTER 2: HARDWARE CONFIGURATION SYSTEM REQUIREMENTS INSTALLING BRIDGEMATE CONTROL SOFTWARE (BCS) INSTALLING THE SERVER INSTALL DRIVER AND CONNECT USB SERVER POWER SUPPLY THROUGH USB PORT AND BATTERIES SETTING THE REGION SETTING THE CHANNEL CONFIGURING THE BRIDGEMATES OPERATING INSTRUCTIONS 8 8 8 8 8 8 9 9 9 9 CHAPTER 3: BRIDGEMATE CONTROL SOFTWARE LAUNCHING BRIDGEMATE CONTROL SOFTWARE LOGGING IN AND LOGGING OFF BRIDGEMATES LOGGING IN BRIDGEMATE LOGGING OFF BRIDGEMATE BOARD RESULTS READING FROM THE SERVER VIEWING AND FILTERING OR SORTING SCORES CREATING REPORTS CHANGING AND DELETING SCORES PROCESSING SCORES IN THE SCORING PROGRAM OPENING, SAVING AND CLOSING RESULT FILES USING MULTIPLE CLIENTS ADDING A CLIENT TO THE RESULT FILE MANAGING TABLES – TOURNAMENT (NETWORK) MODE SERVER CONTROL ACTIVATING THE SERVER ADDING TABLES REMOVING TABLES SYNCHRONIZING THE SERVER AND CLIENT RECOVERING THE SERVER UPDATING MOVEMENT IN THE SERVER CLOSING ROUNDS PROGRAM SETTINGS (OPTIONS) 10 10 11 11 11 11 11 12 12 13 13 13 14 14 14 15 15 15 15 15 16 16 16 17 CHAPTER 4: SERVER FUNCTIONS OVERVIEW OF TABLES OVERVIEW OF ENTERED SCORES RESTARTING BRIDGEMATE NETWORK RESETTING THE SERVER SETTING THE REGION SETTING THE CHANNEL SYSTEM FUNCTIONS USB SERVER LIGHTS PROGRAM SHUTDOWN – POWER OUTAGES – CHANGE PC 18 18 18 18 18 19 19 19 19 19 CHAPTER 5: USE OF THE BRIDGEMATE® II SCORING DEVICES EXPLORING THE BRIDGEMATE ACTIVATING THE BRIDGEMATE CONFIGURING THE BRIDGEMATE STARTING THE SESSION ENTER RESULTS WITH THE BRIDGEMATES RANKING AND GAME SUMMARY REVIEWING SCORES AND RECTIFYING SCORES POSTING BRIDGEMATE II SCORES TD MENU 20 20 21 21 22 23 25 25 25 26 CHAPTER 6: ADDITIONAL BRIDGEMATE FUNCTIONS BRIDGEMATE SETTINGS SHOWING PLAYER NAMES HAND RECORDS ANALYSIS OF MAKEABLE CONTRACTS (DOUBLE-DUMMY ANALYSIS) PRINTING AND EXPORTING HAND RECORDS UPDATE SETTINGS DURING PLAY UPDATING BRIDGEMATE FIRMWARE REAL-TIME PUBLICATION 28 28 29 30 30 30 30 31 31 CHAPTER 7: TIPS FOR USE BRIDGEMATE LOGGED ON AS THE WRONG TABLE REPLACING BRIDGEMATE RECOVERING THE SERVER PROCEDURE IN THE EVENT OF DATA LOSS RESENDING RESULTS MULTIPLE BRIDGE CLUBS PLAYING SIMULTANEOUSLY LARGE TOURNAMENTS USING ACBLSCORE AND BRIDGEMATES ON A NETWORK 32 32 32 32 32 33 34 34 34 CHAPTER 8: USING BRIDGEMATES II WITH ACBLSCORE INSTALLATION SOFTWARE REQUIRED INSTALL SOFTWARE CONNECT THE BRIDGEMATE SERVER TO THE COMPUTER. BCS SETUP ACBLSCORE SETUP READ DATA FROM THE BRIDGEMATE SCORING SYSTEM INTO ACBLSCORE. PLAYER NUMBERS BOARD RESULTS QUICK SETUP TIPS CHANGE MOVEMENT AFTER GAME HAS STARTED CHANGE BEFORE ANY BRIDGEMATES HAVE BEEN USED CHANGE AFTER PEOPLE HAVE STARTED MEMBER NUMBER AND/OR SCORE ENTRY REPLACING BRIDGEMATE DURING PLAY – BRIDGEMATE LOGGED ON AS THE WRONG TABLE SWISS TEAMS AND KNOCKOUTS PROCEDURES WHEN USING PLAYER ENTRY OF SECTION/TABLE SWISS TEAMS AND KNOCKOUTS NAMES DISPLAY FOR 1ST ROUND SIT-OUT PAIR[S] SPECIAL REPORTS EXPANDED DETAIL AVAILABLE ON WEBSITES. USING BRIDGEMATES II AND BRIDGEMATES PRO TOGETHER 35 35 35 35 35 35 36 37 37 38 38 39 39 39 39 39 39 39 39 40 41 41 DECLARATION OF CONFORMITY 42 Limited warranty 1 Limited warranty IMPORTANT—PLEASE READ THIS LIMITED WARRANTY CAREFULLY TO UNDERSTAND YOUR RIGHTS AND OBLIGATIONS! The term “Hardware Device” means the Bridge Systems hardware product. The term “You” means either an individual or a single legal entity who will be referred to in this Limited Warranty as “You” and “Your”. A. WARRANTIES. 1. Express Warranty. Subject to the terms and conditions of this Limited Warranty and in lieu of any other (if any) express warranties, Bridge Systems warrants that under normal use and service, on the date of acquisition as shown on Your receipt or similar proof of payment and for the period of time stated below for the applicable Hardware Device (hereafter each defined as the “Warranty Period”), that the Hardware Device will substantially conform with the accompanying Bridge Systems packaging and documentation. As to any defects discovered after the Warranty Period, there is no warranty or condition of any kind. Warranty Period: For all hardware parts of the Bridgemate Scoring System: one (1) year. This Limited Warranty does not cover, and no warranty of any kind is provided with respect to any subjective or aesthetic aspects of the Hardware Device. The express warranty stated above is the only express warranty made to You and is provided in lieu of all other express or implied warranties and conditions (except for any nondisclaimable implied warranties that exist), including any created by any other documentation or packaging. No information or suggestions (oral or in a record) given by Bridge Systems, its distributors, agents, affiliates or suppliers or its or their employees or agents, shall create a warranty or condition or expand the scope of this Limited Warranty. 2. Limitation on Duration of Implied Warranties. If you are a consumer, You may also have an implied warranty and/or condition under the laws of some jurisdictions, which is hereby limited to the duration of the Warranty Period. Some jurisdictions do not allow limitations on how long an implied warranty or condition lasts, so the foregoing limitation may not apply to You. B. EXCLUSIVE REMEDY. Subject to applicable law and the following, and provided that You return the Hardware Device to Your place of acquisition (or, if that place will not accept the return, to Bridge Systems) with a copy of Your receipt or other bona fide proof of payment during the Warranty Period, Bridge Systems will, at its option and as Your exclusive remedy for breach of this Limited Warranty and any implied warranties: repair or replace the defective Hardware Device; or make payment to You for the allowable damages that You incurred in reasonable reliance, but only up to the amount You paid (if any) for the Hardware Device less reasonable depreciation based on actual use. The above remedy is subject to the following: Any repaired or replaced Hardware Device will be new or refurbished or serviceably used, comparable in function and performance to the original Hardware Device, and may include third party items; Any Hardware Device repaired or replaced under this Limited Warranty will be warranted for the remainder of the original Warranty Period or 30 days from the date of shipment of the item back to You, whichever is longer. Except as otherwise required by legislation in Your jurisdiction, costs associated with transport (including packaging) for warranty service shall be at Your expense; and Bridge Systems, its distributors, agents, affiliates and suppliers do not provide any warranties regarding any other services provided under this Limited Warranty and disclaim all duties (if any) of workmanlike effort or of lack of negligence regarding such services. C. NO OTHER WARRANTIES. The express warranty stated above is the only express warranty made to You and is provided in lieu of all other express or implied warranties and conditions (if any) including any created by any other documentation or packaging. No other warranties or conditions are made with respect to the Hardware Device or the warranty services by any person, including but not limited to Bridge Systems, its distributors, agents, affiliates and suppliers. No information (oral or written) or suggestions given by Bridge Systems, its distributors, agents or suppliers or its or their employees, shall create a warranty or condition or expand the scope of this Limited Warranty. Also, there is no warranty or condition of title, quiet enjoyment, or noninfringement in the Hardware Device. You may have greater rights existing under legislation in your jurisdiction. 2 Limited Warranty D. EXCLUSION OF OTHER DAMAGES. TO THE FULL EXTENT ALLOWED BY LAW, BRIDGE SYSTEMS AND ITS DISTRIBUTORS, AGENTS, AFFILIATES AND SUPPLIERS ARE NOT LIABLE FOR ANY: (i) CONSEQUENTIAL OR INCIDENTAL DAMAGES; (ii) DAMAGES OR LOSS OF ANY NATURE WHATSOEVER RELATING TO LOST PROFITS, BUSINESS INTERRUPTION, LOSS OF DATA OR PRIVACY OR CONFIDENTIALITY, ANY INABILITY TO USE ALL OR PART OF THE HARDWARE DEVICE, PERSONAL INJURY, OR ANY FAILURE TO MEET ANY DUTY (INCLUDING BUT NOT LIMITED TO ANY DUTY OF NEGLIGENCE, GOOD FAITH OR OF WORKMANLIKE EFFORT); OR (iii) INDIRECT, SPECIAL, OR PUNITIVE DAMAGES ARISING OUT OF OR RELATING IN ANY WAY TO THE HARDWARE DEVICE. THE FOREGOING APPLIES EVEN IF BRIDGE SYSTEMS OR ANY DISTRIBUTOR, AGENT, AFFILIATE OR SUPPLIER HAS BEEN ADVISED OF THE POSSIBILITY OF SUCH LOSSES OR DAMAGES; AND EVEN IN THE EVENT OF FAULT, TORT (INCLUDING NEGLIGENCE), STRICT OR PRODUCT LIABILITY, MISREPRESENTATION OR OTHER REASON. Some jurisdictions do not allow the exclusion or limitation of incidental or consequential damages, so the above limitation or exclusions may not apply to You. E. EXCLUSIONS FROM COVERAGE. This Limited Warranty shall not apply and Bridge Systems, its distributors, agents, affiliates and suppliers have no liability under this Limited Warranty if the Hardware Device: - is used for commercial purposes (including rental or lease); - is modified or tampered with; - is damaged by Acts of God, power surge, misuse, abuse, negligence, accident, wear and tear, mishandling, misapplication, or other causes unrelated to defects in the Hardware Device; - is damaged by programs, data, viruses, or files, or during shipments; - is not used in accordance with the accompanying documentation and use instructions; or - is repaired, modified or altered by other than a Bridge Systems authorized repair center and the unauthorized center causes or contributes to any defect or damage. F. REGISTRATION. You need not register Your acquisition of the Hardware Device for the Limited Warranty to be effective. G. BENEFICIARY. To the extent allowed by applicable law, the Limited Warranty is only made to You, the first purchaser of the Hardware Device, and there are no third party beneficiaries of the Limited Warranty. It is not intended for and does not apply to anyone else (except as required by law), including anyone to whom You make any transfer of the Hardware Device. H. FURTHER INFORMATION. Bridge Systems is the warrantor under this Limited Warranty. To receive instructions for obtaining performance of this Limited Warranty You must either contact the local Bridgemate distributor serving your country, or write to: Bridge Systems BV, Postal Box 21570, Rotterdam, 3001 AN, The Netherlands, or visit Bridge Systems on the World Wide Web at www.bridgemate.com. You must also: 1. Submit proof of payment in the form of a bona fide, dated receipt, or invoice (or a copy) evidencing that You are the beneficiary of this Limited Warranty and that Your request for a remedy is made within the Warranty Period; 2. Follow Bridge Systems’ shipping and other instructions if it determines that all or part of your Hardware Device requires return. To obtain the Limited Warranty performance, you must take or deliver the item in either its original packaging or packaging that provides an equal degree of protection to the location specified by Bridge Systems. Except as otherwise required by legislation in your jurisdiction, costs associated with transport (including packaging) for warranty service shall be at Your expense. Failure to follow the above instructions may result in delays, cause you to incur additional charges, or may void your warranty. This Limited Warranty gives You specific legal rights and You may also have other rights which vary from jurisdiction to jurisdiction. Where any term of this Limited Warranty is prohibited by such laws, it shall be null and void, but the remainder of the Limited Warranty shall remain in full force and effect if its allocation of risks is not materially disturbed. Safety instructions 3 Safety instructions Important safety warning Failure to properly set up, use, and care for the Bridgemate system can increase the risk of serious injury or death, or damage to the system. Read this manual and the manuals of any peripherals for important safety and health information. Keep all manuals for future reference. For replacement manuals, go to www.bridgemate.us/media/downloads/bm-ii-manual.pdf or contact Bridgemate.US. Select a safe location for the Bridgemate server and scoring devices If the Bridgemate server or Bridgemate II scoring devices falls and hits someone, it could cause serious injury. To reduce the risk of such injuries and damage to parts of the system, set them up according to these instructions and place them on a surface that: • Is flat and level. • Is stable and not likely to tip over. • Allows all four feet of both the server and scoring device to be in contact with the surface. • Is not likely to allow the server and scoring device to slip or slide off. • Is clean and free of dust and debris. If the surface or feet of server or scoring devices become dirty or dusty, clean them with a dry cloth. Arrange all cables and cords so that people and pets are not likely to trip over or accidentally pull on them as they move around or walk through the area. When the Bridgemate server is not in use, you may need to disconnect all cables and cords from the server to keep them out of the reach of children and pets. Do not allow children to play with cables and cords. Do not place any part of the Bridgemate system on a bed, sofa, or other soft surface. Do not place any part near heat sources, such as radiators, heat registers, stoves, or amplifiers. Avoid smoke and dust: Do not use the Bridgemate Scoring system in smoky or dusty locations. Smoke and dust may damage the Bridgemate server and scoring devices. Insert batteries into the Bridgemate II scoring devices and server WARNING • • • • • • Improper use of batteries may result in battery fluid leakage, overheating, or explosion. Released battery fluid is corrosive and may be toxic. It can cause skin and eye burns, and is harmful if swallowed. To reduce the risk of injury: Keep batteries out of reach of children. Do not heat, open, puncture, mutilate, or dispose of batteries in fire. Do not mix new and old batteries or batteries of different types (e.g., carbon-zinc and alkaline batteries) Remove the batteries if they are worn out or before storing your Bridgemate system for an extended period of time. When removing batteries from the Bridgemate or server do not use your fingers or finger nails to remove the batteries; use a blunt object like a screwdriver or pen to safely remove the batteries. If a battery leaks, remove all batteries, taking care to keep the leaked fluid from touching your skin or clothes. If fluid from the battery comes into contact with skin or clothes, flush skin with water immediately. Before inserting new batteries, thoroughly clean the battery compartment with a damp paper towel, or follow the battery manufacturer's recommendations for cleanup. Dispose of batteries in accordance with Local and National Disposal Regulations, including those governing the recovery and recycling of waste electrical and electronic equipment (WEEE). Remove batteries aboard aircraft Before boarding any aircraft or packing Bridgemate scoring devices or server in luggage that will be checked, remove all batteries. The Bridgemate server and terminals can transmit radio frequency (RF) energy, much like a cellular telephone, whenever batteries are installed. Do Not Attempt Repairs Do not attempt to take apart, service, or modify the Bridgemate server, Bridgemate scoring devices, power supply, or its peripherals in any way. Doing so could present the risk of serious injury or death from electric shock or fire, and it will void your warranty. Any evidence of any attempt to open and/or modify the Bridgemate system, including any peeling, puncturing, or removal of any of the labels, will void the Limited Warranty and render the Bridgemate system ineligible for authorized repair. Disposal of Waste Electrical and Electronic Equipment in the European Union and other countries/regions with separate collections systems This symbol on the product or its packaging means that this product must not be disposed of with household waste. Instead, it is your responsibility to hand this over to an applicable collection point for the recycling of electrical and electronic equipment. This separate collection and recycling will help to conserve natural resources and prevent potential negative consequences for human health and the environment, which inappropriate disposal could cause due to the possible presence of hazardous substances in electrical and electronic equipment. For more information about where to drop off electrical and electronic waste, contact your local city/municipality office, your household waste disposal service, or the shop where you purchased this product. 4 Introduction Introduction Thank you for purchasing your Bridgemate® II scoring system. Bridgemate II is an advanced electronic scoring system for bridge clubs and tournaments, designed to enhance the enjoyment of bridge. Bridgemate II automatically registers board results. The scores are verified and fed to the central PC. Tournament directors will value the userfriendly features of Bridgemate II, as it enables them to focus fully on their core tasks. This manual describes the operation of the Bridgemate Scoring system, including the central software program, the server and the Bridgemate scoring devices. This manual serves as an addition to the manual supplied with your scoring program. As the Bridgemate Scoring system operates independently from the scoring program, this manual includes instructions for operating ACBLscore – but not other scoring programs. This manual consists of the following chapters: • The components of the Bridgemate Scoring system are explained in Chapter 1. A brief and concise explanation is given of the individual components and how they relate to each other. Chapter 2 explains how to configure and install the Bridgemate II software and hardware and how to configure the Bridgemates per section and table. This chapter also explains how to set the radio channels to enable wireless data exchange. Chapter 3 explores the use of the Bridgemate Control Software in more detail. Chapter 4 explains the different Bridgemate Control Software options offered by the Bridgemate II server. Use of the Bridgemate II scoring devices is explained in Chapter 5. Chapter 6 highlights the additional functions for the Bridgemate. Chapter 7 contains tips on how to operate the Bridgemate II scoring system when multiple bridge clubs are playing simultaneously in one room. Practical advice is also offered on how to deploy Bridgemate II in big tournaments, involving different rooms and/or multiple servers. Chapter 8 describes using the Bridgemate system with ACBLscore. • • • • • • • Version numbers This manual covers the following versions of the Bridgemate II components: Bridgemate Control Software Bridgemate USB server Bridgemate II scoring devices 3.1.2 2.1.3d 2.1.2 (firmware version) (firmware version) Download Software and Firmware Bridgemate software and firmware as well as installation instructions may be downloaded from www.bridgemate.us Notes: Bridgemate Control Software (BCS) 3.1.2 is compatible with Windows 10. Windows .NET framework 4.0 (or later) is required to install v3.1.2. If Windows .NET framework software is required on your computer, BCS will display a warning message. Download the software from one of these sites. • • Windows XP: https://www.microsoft.com/en-us/download/details.aspx?id=17851 Windows Vista SP2, Windows 7 SP1, Windows 8/8.1: https://www.microsoft.com/en-us/download/details.aspx?id=42642 Chapter 1: Description Bridgemate II scoring system 5 Chapter 1: Description Bridgemate II scoring system This chapter describes the components of the Bridgemate II scoring system and how they relate to each other. It also explains how to use the Bridgemate II: from creating a session in your scoring program to registering the scores in the scoring program. Please read this chapter carefully. Once you understand the function of the individual components and how they relate to each other, you will quickly get to grips with the Bridgemate II scoring system. Description of components The Bridgemate II scoring system consists of the following hardware and software: • • • • Bridgemate II scoring devices Bridgemate II server + USB cable Data cable for connection between Bridgemate terminals and the server Bridgemate Control Software Bridgemate II Scoring Device Bridgemate II Server + USB Cable Data cable Bridgemate II scoring devices The Bridgemate II scoring devices are placed on the bridge table and are used to enter the results. For the purpose of simplicity, we shall refer to these input devices as ”Bridgemates”. Wireless communication between the Bridgemates and the server is established and maintained using radio frequency waves. Only one Bridgemate is required per table. The use of the Bridgemates is explained in more detail in Chapter 5. Bridgemate II server The Bridgemate II server, “server” for short, is a small device connected to the PC. It acts as a bridge between the PC and the Bridgemates. As the PC cannot communicate directly with the Bridgemates, the server is a vital component. The server is equipped with a transmitter and a receiver, establishing and maintaining wireless data communication with the Bridgemates. The server sends all movement data to the Bridgemates, including board numbers and pair numbers, and receives the board results in return. The server can control up to 256 Bridgemates simultaneously. The server connects to the computer using a USB cable. Data cable Both the USB server and Bridgemates II are equipped with a small round connector – to accommodate the cable. This cable may be used in the future for diagnostic purposes. At this time, however, it is not being used except for a special European “Mind Games” tournament setup. Bridgemate Control Software A specific program is required to control the server from the PC: Bridgemate Control Software (BCS). This program runs on Windows 2000 SP3 or higher and is controlled in part by your scoring program. BCS fully controls the server and data exchange between the server and the PC. BCS first saves all the relevant session data used by the server to control the Bridgemates. BCS then retrieves all entered board results from the server and stores these in the result file. All other server controls are also executed from BCS. Chapter 1: Description Bridgemate II Scoring System 6 In addition, the following three components are important. Although they are not supplied together with your Bridgemate II scoring system, they are of crucial importance to the correct operation of the system. • • • Client (=Personal computer with Bridgemate Control Software) Result file Scoring program Client Bridgemate Control Software runs on a so-called “client” (Windows-based) personal computer (PC). The scoring program and BCS usually run on one client PC, to which the server is also connected. During big tournaments, multiple servers may be required to support the high number of Bridgemates and/or to establish and maintain the wireless communication between the server and the Bridgemates. In this case, the servers are connected to a network PC, and the network consists of multiple clients. Note: The term “client” suggests that the Bridgemate II scoring system also consists of a PC network server. This is not the case. All (network) PCs running the Bridgemate II scoring system are known as clients. Result file The result file is created by the scoring program. It contains all the session data, including sections, tables, movements, etc. This data is generated by the session configured in the scoring program. BCS reads this session data and feeds the correct data to the server. During the session, BCS reads all the board results entered in the server and saves these in the result file. All Bridgemate II result files have the file extension .bws. Scoring program The scoring program creates the session and calculates the scores. After you have created a session, the scoring program will create the abovementioned result file. This file contains all the relevant session data. The scoring program will read all board results saved in the result file and process these during the session. These procedures are explained in more detail in the user manuals or help files of your scoring program. Procedure Having examined the individual components of the Bridgemate II scoring system, the next step involves assessing the entire process and how the different components relate to each other. The process is outlined in the below diagram: Activity Explanation Step 1: Session created in the scoring program This is the starting point in the process. In the session, users can set the number of sections to be played, the number of pairs per section, boards and movements. Step 2: Result file created in the scoring program Using the session data, the scoring program creates a result file, containing all data relating to the sections, corresponding movements, boards and pairs. Step 3: Bridgemate Control Software reads the result file The scoring program starts BCS. The result file is then read by BCS, generating the data for all tables used in each session. Chapter 1: Description Bridgemate II scoring system Step 4: Bridgemate Control Software transfers data to the server BCS initializes the server using the data contained in the result file. All session tables are stored in the server. Movements from each table are included, so that the server knows (per round) which pairs and boards correspond with which table. Step 5: The server has been activated and the Bridgemates can be activated Now that all the relevant data has been stored in the server, the Bridgemates can be activated. The players activate the Bridgemates, which log in to the server. The scores can now be entered. Step 6: Scores are entered in the Bridgemate and sent to the server During this process, the board number and pair number/direction of play are verified for accuracy. Verification is executed via direct communication between the Bridgemate and the server. The Bridgemate itself does not contain any movement data. Entered board results are sent directly to the server. This data is stored in the server memory. Step 7: Bridgemate Control Software retrieves the scores from the server. The scores are saved in the result file BCS reads all newly entered scores from the server and saves them in the result file. Step 8: The scoring program reads the scores saved in the result file and adds these to the session The scoring program reads the scores saved in the result file and stores these in its session file. The scores are processed and incorporated in the session data to calculate the final score. Automatic launch from your scoring program If your scoring program fully supports Bridgemate, BCS can execute steps 2 to 4 and read the scores (step 7) automatically via one simple command from the scoring program. For further information on how to enable automatic launch of the Bridgemate II scoring system, please contact the supplier of your scoring program. 7 8 Chapter 2: Hardware Configuration Chapter 2: Hardware configuration System requirements Operating system The Bridgemate Scoring System needs Windows XP SP3 or higher. Hardware Recommended configuration: Processor Memory Pentium III 600MHz or higher 256MB or higher Installing Bridgemate Control Software (BCS) To install the Bridgemate Scoring System, run the current “BCSsetup.exe” file. This software is on the Flash Drive/Memory Stick from Bridgemate.US; also, it may be downloaded from Bridgemate.US’s website www….BCSsetup3-1-2.exe. The requirements for installing BCS software may differ, depending on your scoring program. For more information about where to install the software on your PC, please consult the information supplied with your scoring program. To install BCS on a separate client, we recommend the default folder [C:\Program Files\Bridgemate Pro or C:\Program Files (x86)\Bridgemate Pro]. Special Note for Vista, Windows 7 or 8 PC’s: Since Windows 7, 8 and Vista security precautions inhibit writing to the BCS Log file to the C:\Program Files folder or the “root” C:\,, previous instructions were to configure BCS to save the Bridgemate Log File elsewhere, e.g., C:\ACBLSCOR. Starting with version 3.1.2 – the default location for the Log file is the “User Appdata folder\,” therefore, new 3.1.2 installations need not change the Log files defaul location. See Log file settings on Page 17 for specific details. The BCS installation program will ask if it may also install the driver needed for the USB Server; answer “yes” to this. Installing the server Install driver and connect USB server Before connecting the Bridgemate II USB server to your computer, the driver must be installed! The server connects to your computer’s USB port using a USB cable. First: If the USB server driver was not installed by the BCS installation program, run the BM2serverDriverInstallation.exe program on the Bridgemate Flash Drive or download it www….BM2serverDriverInstall.exe. Second: Connect the server to your computer. Windows will install the driver – or it may display the New Hardware Found Wizard.; in this case tell the system to search (browse) and automatically install the driver. Power supply through USB port and batteries The server will receive its power supply from your computer through the USB cable. If a USB hub is used, make sure the hub is powered through an external power supply; otherwise the server may not receive enough or any power to operate properly. Batteries Batteries are used in the event of power failure, for example when the computer is switched off. The Server battery compartment holds four AA 1.5 volt batteries. Install the four batteries as indicated. The server obtains its power from the PC through the USB connection. The batteries will only be activated if the USB port is not supplying power (i.e., when the computer is switched off). If PC power is lost, the server immediately transfers to the batteries and no data will be lost. We recommend installing batteries as a back-up while the server is in operation. This will ensure no data is lost during the session. The batteries will operate approximately 50 hours. Warning • Always install the batteries as indicated. Incorrectly installed batteries could damage the server and the batteries. The batteries may start leaking, potentially damaging the server and voiding the warranty. • When removing batteries from the Bridgemate scoring device or server, do not use your fingers or finger nails to remove the batteries. Instead use a blunt object like a screwdriver or pen to safely remove the batteries. Chapter 2: Hardware configuration 9 Switching on / off The server will automatically switch on once the server is connected to the USB port of your computer and the computer is switched on. To switch off the server, the server must be disconnected from USB power (switch off computer – or disconnect the server from the computer – and, if batteries are installed, press and hold the small push button next to “Battery OFF” for a few seconds – until all LEDs are no longer lit. Status indicators There should always be TWO green LEDs on the top of the server. The server is equipped with a black switch and 2 LED status indicators labeled “USB / battery power” and “Battery status.” Center: Green confirms the server is running on USB power from the PC Red confirms the server is operating on battery power No light. There is no USB power or data in the server memory. After a game has been completed and the server disconnected from the PC press – and hold – the switch to reset the server which erases all the data and turns off the battery power. Lower light: After connecting the server to a USB port: Green = sufficient power left. Orange = batteries are half full. Red = batteries have less than 25% power left. Blinking red = immediate battery replacement needed. No light. No batteries or they are completely drained. Automatic power-off The server is equipped with an automatic power-off function. When the server runs on battery power, and there has been no activity for a certain period of time, the server will automatically switch off. The default auto power-off time is 1 hour. This can be changed in Bridgemate Control Software in menu Tools Settings General. Setting the region When BCS is started with a new server attached to the PC, you will be asked to select the correct region. Select North America. To enable the server to transmit data to the Bridgemates over the correct radio frequency,you must select the appropriate region. The region setting in the Bridgemates is controlled by the Bridgemate firmware. The Bridgemate firmware must be for the same region as selected for the server. In other words, the server will be unable to transmit data to the Bridgemates if the server's region differs from the Bridgemates' region firmware. Setting the channel The radio frequency channel over which the server communicates is set to 0 by default. For more information on how to modify this channel, please see Chapter 4. Configuring the Bridgemates See chapter 5 on how to configure the Bridgemates and to put them in use. Operating instructions The Bridgemate II server is very easy to use. Only a few instructions need to be followed. The following rules must be observed: • • • • • Install the batteries as indicated. Incorrectly installed batteries could damage the server. During use, make sure the server is placed horizontally on a level surface. Do not place any objects on the server and make sure there is as much distance between the server and other objects as possible. The fewer objects there are between the Bridgemates and the server, the better the data exchange will be. Where possible, make sure the Bridgemates and the server are not separated by a wall. The server should preferably be placed in a central location between the Bridgemates. If this is not possible, place the server as closely as possible to the Bridgemates along the edge of the playing room. When removing batteries from the server (or Bridgemates) do not use your fingers or finger nails to remove the batteries; use a blunt object such as a screwdriver or pen to safely remove the batteries. The edge of the battery door often works very well; but take care not to damage it. 10 Chapter 3: Bridgemate Control software Chapter 3: Bridgemate Control Software The Bridgemate Control Software program is the bridge between your scoring program and the Bridgemate system. BCS reads the session data from the scoring program though the result file and loads it into the server so that the server can control the Bridgemates. Then, BCS retrieves the entered board results from the server and stores these in the result file for posting by the scoring program. BCS has been designed for simplicity and ease of use and is very user friendly. This chapter contains information on the basic and advanced functions of BCS. For general program use, it is not necessary to know all the information contained in this chapter. When first starting the system,be sure to read the paragraphs “Launching Bridgemate Control”, “Logging in and logging off Bridgemates” and “Board results” first. Launching Bridgemate Control Software Bridgemate Control Software is launched from your scoring program. Depending on your scoring program, there are several ways to launch BCS. The majority of scoring programs have a launching function, enabling fully automatic activation of the Bridgemate server using the existing and active result file. For more information, please consult the manual of your scoring program. This BCS screen shows a 3 Section, mid-game condition where all Bridgemates are active (except C1, C2, C3 & C5) and game results have been entered for a number of boards. The active result file name is displayed in the title bar. If no result file is open, “No session active” will be displayed. Server information The pane in the top left-hand corner of the screen displays information relating to the server. If a server has been found, the text “connected” and the version number will be displayed. If the power adapter is used, the text “AC mains adapter” will be displayed; if batteries are being used, the power meter will display the number of operating hours remaining as a percentage. If you are using batteries, we would recommend replacing them in time rather than overusing them. BCS will indicate when to replace the batteries. Lastly, BCS will display the region and the channel being used. Tables The bottom left-hand corner of the screen lists the tables in the data (.bws) file as created by the scoring program. A red or green dot indicates the status of the table. Red means that table’s Bridgemate hasn’t been activated yet, or has finished the session. Green means the Bridgemate has been activated is currently in use. Received board results All board results read from the server are displayed in the right-hand side of the screen. For each hand/board played, the table[s], pair numbers, declarer, contract, tricks made or set and the exact time the board result was saved in the result file are displayed. BCS logs the time/date when the server was read and the board result was saved in the result file. The system does not log the time/date when the hand was actually registered in the server. Board monitor and round monitor To provide the director with up-to-date information on the progress of the session, a round and a board monitor are available. The round monitor shows how many scores have been recorded for each table in each round. The board monitor shows how many scores have been recorded at each board for each table. Both monitors are updated in realtime when new results come in. Result matrix The result matrix shows the results conveniently arranged. A quick glance tells you which scores are recorded per board or table. The matrix has different viewing orientations which can be controlled from the Options menu. Chapter 3: Bridgemate Control software 11 Players This tab shows the member numbers as they are entered on the Bridgemates, and the names of the players – as found in the local database (loaded from ACBLscore initially) or tournament database (pre loaded in BCS options). Filtering and sorting board results The multi-criteria filtering and sorting functions are in the bottom right-hand of the screen. This enables fast searches for specific boards or to compare results using Section, Table, Round, Board, Pair NS and Pair EW filter/sort options. Logging in and logging off Bridgemates Logging in Bridgemate After the corresponding tables have been added to the server, the Bridgemates can be activated. Once the Bridgemate has been switched on, it will display the main screen with the Bridgemate II logo. Press OK to go to the section and table number screen. Depending on the setting of section and table number entry (see chapter 5), you may be asked to select your section and table number first. Press OK again to log the Bridgemate in to the server. The flashing symbol in the top right-hand corner of the Bridgemate screen indicates that radio communication is taking place. Once the Bridgemate has logged in, all first round data will be displayed. In the BCS screen, the red symbol in the “Status” column of the table list will turn to green. This column also gives a clear overview of all inactive Bridgemates: if the status column is still red, the table has not activated its Bridgemate. In the following cases, the Bridgemate will not be logged in to the server, but instead the message “SYSTEM NOT ACTIVATED YET” will be displayed and the Bridgemate is returned to the main screen: • The Bridgemate Scoring system has not been started yet by the scoring program. • The corresponding table has not been added to the server. • The server and the Bridgemate are not communicating over the same channel. • The region setting in BCS does not match the region setting of the Bridgemates. • The server is outside the range of the Bridgemate and cannot communicate with the Bridgemate. Two other messages may be shown as an indication that the Bridgemate cannot start the session: • “TABLE STARTED BY ANOTHER BRIDGEMATE” Another Bridgemate with the same section/table number setting has already logged in to the server. It is not possible for two Bridgemates to log in with the same section/table number. • “END OF SESSION” The session of this table has finished, all scores have been registered for this table. Logging off Bridgemate The “End of session” message is displayed on Bridgemates that have completed all rounds and sent all the results. These Bridgemates are returned to the “Bridgemate II” main screen and are automatically logged off from the server. The status column of this table will turn red again, indicating that the session has been completed on this table. A clear overview is given of all the active tables. All Bridgemates with the green status display are still in use. As well as logging off automatically at the end of the session, users are given three alternative options for logging off: • Using the reset function on the Bridgemate. The Bridgemate is returned to the start-up screen and is logged off from the server. See chapter 5 for more information on how to reset the Bridgemates from the TD menu. • In BCS: via menu Server Show tables, Reset table[s]. See chapter 4 “Overview of tables.” In BCS: via menu Server Show tables, Log off table[s]. See chapter 4 “Overview of tables.” The latter function can be used if you need to use another Bridgemate for a specific reason but cannot log off via the normal procedure. A Bridgemate needs to be logged off before it can be replaced. See also chapter 7. • Board results Reading from the server Once the Bridgemates have logged in, they will feed data to the server during the session. These results are first saved in the server. As long as the server is connected, BCS retrieves data every second from the server and automatically stores it in the result file. This is an automatic process and indicated by the following message in the status bar: “Status: retrieving data from server”. 12 Chapter 3: Bridgemate Control software If the server is disconnected for a while, all results not yet sent to BCS will be retrieved from the server, read and saved in the result file as soon as the server is reconnected. Delayed reading and processing of scores is therefore possible. It is advised, however, that the server is connected at all times during the session and BCS is running. Viewing and filtering or sorting scores Viewing scores Results that have been read and saved in the result file are displayed in the right-hand table of BCS. Per result, an overview is given of the corresponding table, the round, the team, the player declaring the game and the contract. The registration time and date is also displayed in the result file. Remarks are also displayed (“Not played” = the Bridgemate indicates that the game has not been played, 40%/60% = arbitral score entered in the Bridgemate). Go to the menu Tools Show/hide columns to select the columns you would like to show or hide. Applying filter or sort order As more board results are added and displayed, the more time-consuming and difficult it becomes to find or compare specific scores. Although you will generally use your scoring program for this purpose, it is conceivable that you may wish to view the registered data in BCS. To display a specific section of board results, you can apply a filter to the entire list. This filter can be configured at the bottom of the screen. Enter specific criteria per section, table, round and board number and NS/EW pair number. It is possible to enter multiple criteria, for example section A, table 1, round 3. Per criterion, enter your filtering preference - equal to, not equal, equal or less, equal or greater, between - and enter the relevant values. Select Apply filter to apply the filter. To remove the filter and display all board results, press Reset filter. The sort function can be used to sort the (filtered) results according to various criteria. Select the criteria and choose Ascending or Descending for each criteria. Select Apply sort to start sorting the scores. Round and Board Monitor Use Round monitor to view the number of boards that have been reported from each table in play. This enables Directors to identify slow players and visit the table, if necessary. The color of each cell helps visualize the number of boards played in each round; red = 2 or more boards to be played; yellow = one board remaining; green = all boards have been played in the round. Board monitor shows which boards have been played at each table. Result matrix Another way of viewing the scores is the result matrix. The matrix shows the scores as a grid where the scores are outlined for each table and board. This provides a quick way to locate/view a specific score. The grid can be shown in four different formats: • Boards horizontally, tables vertically • Tables horizontally, boards vertically • Boards horizontally, declarer vertically • Declarer horizontally, boards vertically Use for Mitchell movements – Typically 7+ tables Use for Mitchell movements – Best for small games Use for Howell or Mitchell where every pair # is unique Use for Howell or Mitchell where every pair # is unique Go to Tools Options General (tab) to select the desired method. Creating Reports Hand-record data from the right-hand display may be copied to an external file. For example, this can be used to create a report that compares the results achieved by the various teams that played each board. • • • • Go to the menu Tools Show/hide columns to select the columns to be in the report. Select the records by highlighting the first entry for the report – hold the Shift key down and press End or use the ↑ or ↓ key to select the desired records. Right click on the highlighted records and select “Copy scores to clipboard.” The comma-delimited data may then be “pasted” into an external program (such as Word and Excel). Note: If the result file (i.e., 070904E.bws) is opened by a different client computer, the results will not be immediately displayed in the right-hand panel. Follow the procedure shown under Managing tables, Taking over tables from another client, on page 14. Chapter 3: Bridgemate Control software 13 Result (.bws) file tables may be imported direct into Excel 2007/2010. Data Get External Data / From Access change lookup to “All files” change file extension from .bws to .mdb Open select desired table Open. Changing and deleting scores Changing scores Right-click on the record you would like to change and select Edit score. A detail screen will appear displaying all the score data. You can now edit the result: Declarer is pair that played the hand; NS/EW is the “declarer” player; contract is ♣ = C, ♦ = D, ♥ = H, ♠ = S, No Trump = NT, double = x, redouble =xx, pass = PASS. Enter a space between the value of the contract, the contract type and double/redouble. With “American Style” enter the numbers of tricks taken – or number of tricks down. If the score has not yet been read by the scoring program, the change can be performed in BCS and then it will be read into the scoring program correctly. However, if the board result has already been posted into ACBLscore, that score will have to be “corrected” in ACBLscore. The score may also be changed in BCS in order to have correct traveller and percentage information shown on the Bridgemates – and correct results for website displays. Note that any changes made to the results in the result file will be fed back to the server. Bridgemates will therefore show the edited result in the overview of previous results. If you wish to change a score from the result matrix, double click on the score to display the edit-score window. Deleting results To delete a board result, right-click on the entry you would like to delete and select Delete score. To delete multiple records simultaneously, highlight the first record - hold the Shift key down and use the ↑ or ↓ key to select the records you would like to delete; alternatively, hold the left mouse key down and select records. The result will also be deleted from the server. A new score can be entered in the Bridgemate. Note: Deleted records will not be removed from ACBLscore if the result[s] were already posted into ACBLscore. Scores cannot be deleted through the result matrix. Processing scores in the scoring program For information on how to read and process data from the Bridgemate result file, please consult Chapter 8: Using Bridgemates with ACBLscore or the manual supplied with your scoring program. Opening, Saving and Closing result files If no result files are open in BCS, options are limited. The Session menu is inactive and no server data can be processed. During normal use of the Bridgemate Scoring System, the scoring program creates and automatically reads the result file into BCS. You do not need to open the result file or read the relevant session data. This is processed automatically. To read other result files in BCS, use the Open and Close functions in the File menu. Opening existing result file Use the File Open menu to open an existing result file. If this result file has not been opened previously on this client, BCS will ask whether the client wants to log in to this result file. This step is necessary to add tables to the client and interact with the result file. Saving existing result file. Select File Save as to create a copy of the result file at a location of your choice, e.g., a USB flash drive. Closing the result file Select File Close to close the active result file. You can now open another result file. 14 Chapter 3: Bridgemate Control software Using multiple clients In ordinary club sessions all scoring is done of one computer. In large tournaments, however, it may be necessary to split the session over multiple computers each serving a selection of the tables, while having the scores collected all in one Bridgemate result file. BCS supports multiple clients simultaneously logging in to a single result file and storing scores during the session from multiple Bridgemate servers. In order to change the program to multiple client mode, go to menu Tools Options tab General, and set the mode to “Tournament”. The list of tables will now show two tabs: “All tables” and “Client tables”. The All tables tab contains all the tables stored in the result file. These are generally all the tables used in the session. The Client tables tab displays the tables assigned to the client PC you are currently using. The name of this client is displayed in the bottom left-hand corner of the screen. The tables must be assigned to a client. If you are using one PC for your sessions, all tables will be assigned to the same client. In this case, the All tables and Client tables tabs contain the same tables. If you are using multiple clients, the All tables tab contains all tables in the session; the tables may be assigned to different clients. The Client tables tab only displays (on both PCs) those tables assigned to that specific client. The scoring program will create the result file for you. By default it is assumed that only one client is used. The program will automatically assign all tables to the PC you are currently using. You do not need to perform any manual changes. Manual changes are only required during big tournaments involving the use of multiple clients and servers. Adding a client to the result file The result file keeps track of which clients are using the result file. Your scoring program will automatically add your client to the result file. If the result file has not previously been opened by the client PC (it was created on another PC), this client has not yet logged in to and cannot use the result file. To add a new client to the result file, open the result file on the relevant client. Confirm that the client is to be logged in to the result file. The result file may now be used. Managing tables – Tournament (network) mode Assigning tables to a client Once a result file has been opened, all tables of the result file will be displayed. In Tournament (network) mode the All tables “Client” column will display the currently-assigned Client, or “not assigned” if the table is not assigned to any client. To assign a table to the client you are currently using, right-click on the table and select Add to client. To add multiple tables simultaneously, select the table by clicking and holding the left mouse button and the Shift key, or use the Select all function to select all the tables. Once the table has been added to the client, the client name will be stored in the table. You can only assign tables to the client (PC) you are currently using. If you are using multiple clients in a network, the result file will need to be opened manually per client and the tables added to that client. Taking over tables from another client To transfer a table that has already been assigned to another client to your own client, repeat the above procedure. Right-click on the table and select Add to client. BCS will ask you to confirm whether you would like to take over the table from another client. Overview of tables assigned to a client The client to which the tables have been assigned is displayed in the “Client” column of the All tables tab. The Client tables tab only displays those tables assigned to the current client. Removing tables from the client Click on the Client tables tab for an overview of all the tables added to this client. Right-click on the table you would like to remove and select Remove from client. The table will now be removed from the client. Chapter 3: Bridgemate Control software 15 Server control Activating the server To activate the server, connect it to the client PC and connect the power adapter or fit batteries. Once the server has been found, specific data will be displayed in the top left-hand corner of the BCS screen and the Server menu will be activated. You are advised to connect the server before launching BCS. Resetting the server The server contains no data when initially connected to a power source. New tables can be added instantly. If the server contains data which you would like to delete, you will need to empty the server. This is done using the reset function. Go to Server Reset. You will be asked to enter a verification number which is displayed on the screen. This verification number ensures that the server cannot accidentally be reset. Once the correct verification number has been entered, the server is emptied and all data removed. Adding tables The server is activated by adding tables. As soon as a table has been added, the server feeds this data to the corresponding Bridgemate, which in turn is activated. The Bridgemate cannot operate if the corresponding table has not been added to the server. Tables can only be added once to the server. If you attempt to add a table that has already been added to the server, an error message will be displayed. To add a table to the server, go to the Client tables tab, select the relevant tables, right-click on one of the tables and select Add to server. The tables will now be added one by one to the server, and the corresponding movement loaded per table. An overview of the added tables will be displayed. Removing tables It is also possible to remove tables from the server using the Client tables tab. Select the tables you would like to remove, right-click on these tables and select Remove from server. The tables will now be removed. You will not be able to use any Bridgemates that are configured to these tables. Synchronizing the server and client All data relating to the tables is saved separately in both the result file and the server. In the event of a temporary disconnect between the server and the PC, there can be discrepancies between the server and the result file. These discrepancies can be rectified using the Session Synchronize / recover menu function. Check the relevant options to indicate your synchronization preferences. You must determine whether to synchronize the server to the result file, or whether to update the result file using the data stored in the server. Tables in server which are not in client Use this option to determine what to do with tables stored in the server but not assigned to the client. To delete these tables from the server, select “Delete from server”. To add them to the client, select “Add to client”. Tables that have already been assigned to another client can only be assigned to the current client if the “Take over from other client” option has been checked. If this box has not been checked, the tables cannot be added to the client. Tables in client which are not in server Conversely, some tables may have been assigned to the client but not to the server. To add these tables to the server, select the option “Add to server”. To delete these tables from the client, select the option “Delete from client”. This option also allows you to delete all the tables from the result file by checking the “Delete from session” option. Delete tables from server which are not in session The synchronization function will also verify whether the server contains tables not contained in the result file. These are so-called “obsolete tables”. Check the “Delete tables from server which are not in session” option to delete these tables from the server. If this option is unchecked, these tables will not be removed. 16 Chapter 3: Bridgemate Control software Synchronizing client to server and vice versa As outlined above, the main function of the synchronization process is to synchronize the client to the server and vice versa. The default settings of this function are configured to synchronize the client to the server: tables that have been assigned to the server but not to the client are added to the client, and tables that have been assigned to the client but not to the server are removed from the client. These settings will need to be adjusted when synchronizing the server to the client. In this case, delete all tables from the server that have been assigned to the server but not to the client (select “Delete from server”). Conversely, add to the server all tables that have been assigned to the client but not to the server (select “Add to server”). In all these cases, make sure the “Delete tables from server which are not in session” option is checked to delete all tables that have been assigned to the server but not the result file (and therefore not to the session). Should it transpire that these tables were correctly stored in the server and not in the result file, a new result file will need to be created, or the current file updated. Recovering the server The Synchronize menu function also offers users the opportunity to fully synchronize the result file and the server. To do this, go to the “Recovery” tab and press the “Recover server” button. All existing data will be deleted from the server and overwritten with the tables and the data contained in the result file. The server is synchronized with the current position of the result file. This function is ideal if the server loses its data and you wish to reconfigure the server with data that has been recorded in the result file. Updating movement in the server Movement data is assigned to all tables added to the server during the synchronization process. The synchronization function does not update the movement data of tables already stored in the server and which have not been updated. If the movement data of the result file has been synchronized from the scoring program, and the scoring program does not order BCS to update this data, use the Session Update movement function to update the server with the correct movement for these tables. All sections are checked by default. Uncheck all sections that you do not wish to update. By default, data is updated from round 1. To update from a later round, select another round number using the selection option. Press Update now to update the sections with the correct movement. Any table data belonging to sections that you wish to update will now be deleted from the selected round onwards. A report will be displayed of the executed operations. When updating from a later round option to “Erase results from prior rounds…” will appear. If this is checked, all Bridgemates will start from the selected round. However, this will erase all movement info of the previous rounds and delete all scores from the server for those rounds. Be very cautious with this functionality. If you only want to move the Bridgemates to the next round, use the “Close rounds” function. Note: The scoring program normally updates all movements in BCS automatically. It is, therefore, not necessary to invoke this function manually. Closing rounds If a Bridgemate hasn’t received all the scores of a round and it needs to be moved on the next round, for example due to late play or when players didn’t enter their score in the Bridgemate, you can simply close the round in BCS and force all Bridgemates to move on to the next round. Go to menu Session Close rounds. Select the sections of which you want the Bridgemates to move on, and select the number of round you wish to close. For example, if you want all Bridgemates of section B to move th on the 4 round, then select only section B by deselecting the other sections, set close rounds 1 till 3 (not 4!), and press “Close rounds”. All missing scores up to round 3 for all tables of section B will be filled up with Not played, and this will also appear in the result list and result matrix. Bridgemates of section B which are still in round 3 will automatically move on to round 4. Chapter 3: Bridgemate Control software 17 Program Settings (Options) Change program functions using menu Tools Options General. To disable the automatic server detection while the program is running, check Disable server detection. You may wish to do this when BCS is running without a server connected. During sessions, however, you are always advised to leave this function unchecked. To close BCS automatically at the end of a session, check “Close program at end of session.” This requires that all tables – at least one time during the session – have been logged in (with their status indicators green) and, at end of the session, all tables have finished and are logged off. The Erase original records of deleted stores is required when using ACBLscore. To view the Bridgemate settings before the Bridgemate system is actually started, check “Show Bridgemate options when starting new session.” This allows the TD to verify if all settings are correct and make changes where needed – before the movement is actually loaded into the server. Tab View When ACBLscore updates the movement, the result is shown on the BCS screen through a report window. You may manually close this report, or it will close automatically after 60 seconds. “American Style” should be displayed for North American operation. Result matrix display options are discussed in Chapter 8. File locations The default “Log files” location is the “User Appdata folder.” Note, this is normally a Windows® hidden folder. Should you wish to use a “non-hidden” folder, the “Other folder” should be checked – then use to specify a non-“Program Files” folder such as C:\ACBLSCOR. Double click on C:\ACBLSCOR to use as the logfile location. Special Note: When BCS is being used by more-than-one Windows® User, a single log file may be desired. If so, configure each User’s BCS options to use the same “Other folder.” Similarly the special BMPlayerDB.mdb player-name lookup file for the National Tournament (or large local) database will be located in the hidden “User Appdata folder.” When there are multiple Windows® Users expecting to use the special BMPlayerDB.mdb lookup file, special arrangements are required. Scoring Program and Player Database ACBL affiliated Clubs/Units should select ACBLscore as the scoring program in use; also, check the “Load player database after BMS command.” This works well when your “local” (Club mode) database is not too large; i.e., perhaps no more than 10 to 15,000 names. Should your ACBLscore program (and player database) be located in a drive other than the C:\ “root directory,” click on “Change location” so that BCS can find the database file when it is started from ACBLscore. To use ACBL’s very large “Tournament” (or a large “local”) database, click on “Load tournament database” to load/update the special BMPlayerDB.mdb file. This action will take several minutes. For more information on using the “names” feature and options settings, visit: www.bridgemate.us/how-to-guides/names-display/#names 18 Chapter 4: Server Functions Chapter 4: Server functions Once the server is connected to the PC, the BCS Server menu is active. This menu contains several useful server functions. It is not necessary to open a result file to use these functions. Overview of tables Use the Server Show tables menu to create an overview of the tables stored in the server. Per table, the green or red status light indicates whether this table has logged in to the server, logged off, or has not yet logged in. To delete a table from the server, select the relevant table[s] and choose “Delete table[s]”. The tables will be deleted from the server, as will all the recorded results of these tables. To log off a table manually, select the relevant table[s] and click “Log off table[s]”. Click the “Show scores” button to create an overview of the scores entered by the Bridgemate. Select the table[s] of which you would like to see the board results and select this function. Click the “Retrieve scores” button to move all entered scores for the selected tables to the result file. When the Bridgemate settings have been modified, they are updated in the Bridgemates by selecting the tables and pressing “Update settings”. To force a Bridgemate to reset itself, select the table and log it off from the server. Then, select the table – again – and click “Reset table[s]”. Upon its next communication with the server, the Bridgemate will reset itself. Overview of entered scores The Server Show all scores menu function displays an overview of all board results entered in the server. Depending on the number of tables stored in the server, there may be a delay in reading and displaying the data. Restarting Bridgemate network The wireless network can be restarted from the server using the function Server Restart network. Use this function to solve wireless communication problems between multiple Bridgemates and the server. This may be done at any time; it does not interrupt anything. Resetting the server The Server Reset menu function resets the entire server and deletes all data in its memory. To avoid accidental resets, you will be asked to enter a verification number which is displayed on the screen. Note: Using “Reset” serves the same function as disconnecting the server and pressing the “battery off” switch for 3 or 4 seconds. Thus, for servers that are left connected to the PC between games, this may be used to erase the current game info from the server’s memory – and still save battery power, should be PC lose power (for any period of time) between games. Chapter 4: Server functions Setting the region The Bridgemate Scoring System communicates over a predetermined frequency spectrum. The permitted frequencies differ per continent. Three continents are currently supported: Europe, North America and Australia / New Zealand. When first launching BCS with a new server attached, you will be asked to select your region. The server will select the corresponding frequency spectrum to communicate with the Bridgemates. Typically you should select “North America” and press “Set.” If you want to change the regional settings of the server, go to Server Region selection. Setting the channel The server and the Bridgemates must be set to the same channel to communicate with each other. To set the channel on the server, use the Server Channel selection menu. The “Current channel” function displays the current channel. Select the new channel and press “Set”. The new channel has now been set. System functions Update firmware. The server’s firmware may be updated in the future. If there is an update, download the new firmware from www.bridgemate.us and follow the instructions carefully. USB Server Lights "USB / battery power" LED: • Green confirms the server is running on USB power from the PC. • Red confirms the server is operating on battery power with game data in its memory. • No light. There is no USB power and no data in the server memory. "Battery status" LED: When server is connected to an active USB port - or there is game data in its memory: • Green = sufficient power available. • Orange = batteries are half full. • Red = batteries have less than 25% power left. • Blinking red = immediate battery replacement needed. • No light. There are no batteries in the server, or they are completely drained. Program Shutdown – Power Outages – Change PC The following website page describes actions that may be taken to recover from these special conditions.: www.bridgemate.us/how-to-guides/during-a-game-program-shutdown-power-outage-change-pc/ 19 20 Chapter 5: Use of Bridgemate II Scoring Devices Chapter 5: Use of the Bridgemate® II scoring devices The Bridgemate is a small device designed to enhance the enjoyment of bridge for tournament directors and bridge players alike. The system enables you to enter scores faster than before, and is guaranteed to prevent operator errors. As well as allowing players to enter board results, the Bridgemate also feeds information to the players, such as the achieved percentage on the board played, and the traveler overview. We are convinced that tournament directors and bridge players will appreciate the convenience of the Bridgemate! Preparing the Bridgemate for use The Bridgemates are individually packed in compact sturdy cardboard boxes. Each Bridgemate comes complete with two AA batteries, which must be inserted into the bottom of the Bridgemate unit. The + and – signs in the casing indicate the insertion direction of the batteries. Insert the batteries in the direction indicated, close the lid and press the OK button. Check whether the “Bridgemate II” logo appears. The Bridgemate is now ready for use. Exploring the Bridgemate Large LCD screen for easy entry of scores, viewing results and other information. Four function keys offering all kind of additional functionality. Keypad with 25 large keys for easy input of scores and controlling the Bridgemate. The keyboard The Bridgemate keyboard contains 29 keys. Some of the keys have a dual function. Keys Explanation 1 to 9, 10 ♣, ♦, ♥, ♠, NT These keys are used to enter numbers in the Bridgemate, for example board numbers, pair numbers, contract and result. The 10 button is used to enter 0 (when entering member numbers, board numbers etc) and to indicate 10 as the lead card. These keys enable you to indicate the contract & lead card. +, - Indicates overtricks or downtricks of the result. = Indicates that the contract has been exactly made. J, Q, K, A Use these keys to specify Jack/Queen/King/Ace as the lead card. X, XX Double or redouble. N/S, E/W Declarer’s direction of play. PASS Indicates a pass-out. CANCEL Correct an entry and cancel commands. OK Confirm an entry. Function keys 4 functions keys in the top row provide access to all kind of additional functionality which is not covered by the 25 keys. Chapter 5: Use of the Bridgemate® II scoring devices 21 Switching on/off The Bridgemate does not have a separate on/off button. To switch on the Bridgemate, press the OK button. It is not possible to switch off the Bridgemate manually. The Bridgemate will automatically switch off after it has been idle for a while, i.e. no buttons have been pressed. No data will be lost when the Bridgemate switches off. Simply press the OK button to continue as before. In other words, you can continue entering scores as soon as the Bridgemate has been activated again. The default autopower-off time is set to 20 seconds. This value can be changed to between 5 and 60 seconds. See chapter 6 for more information. Activating the Bridgemate When switching on the Bridgemate II for the first time, the main screen displays: (version number and language may differ) Battery indicator In the upper left corner there is a small battery indicator. Full batteries are indicated with a full indicator. If the battery power is extremely low, the battery indicator will show an empty battery and the indicator starts blinking. Although it is safe to continue using the Bridgemate for several more sessions, it is recommended that you replace the batteries as soon as possible. The average battery life is approximately 400~500 sessions. However, this depends largely on the length of each session, the time frame over which these sessions are played, and how the Bridgemates are stored. Make sure no keys are pressed during storage. Configuring the Bridgemate Before the Bridgemate is put into use the first time, it needs to be configured with the correct settings. Press the SETUP function key to access its internal settings menu. If the menu is protected with a PIN code, enter one of the following fixed 3-digit PIN codes: 749 or 769. SETUP v2.1.1 – PAGE 1/2. SECTION: TABLE: REGION: CHANNEL: LANGUAGE: BACK ▲ SCAN SELECT N-AMERICA 0 ENGLISH ▼ INFO SETUP v2.1.1 – PAGE 2/2. SETUP COD: CONTRAST: BACK ▲ ON -/+ ▼ INFO You can scroll through the menu using the up and down function keys. Use the + or – key to change a setting. Press the BACK function key to exit the setup menu. Any changes in the settings will then be saved. Configuring the section and table Before the Bridgemate can be used in the session, it needs to be configured with a section, table number. There are three ways to set this information: • • • Fixed setting which the players cannot change Flexible setting which can be changed before the session starts. (SELECT / SELECT mode) Flexible setting with selection of available sections only (SCAN / SELECT mode) Fixed section and table setting A fixed section and table setting allows you to configure the Bridgemate for a specific table, while not having the risk that this setting is changed by anyone. Once the setting is made, the Bridgemate must be placed on the correct table that matches the setting. To do so, scroll the focus up or down to “Section”, and use the + and - key to adjust the section. Sections range from A to Z, AA to ZZ and AAA to ZZZ. Once the section has been set, scroll one line down to table; press CANCEL to delete the current number and use the number keys to set the table number. Table numbers range from 1 to 511. The Bridgemate will retain these settings until you next change the section and table number. In other words, these settings will be retained even after the session has been completed. It is, therefore, not necessary to change the settings for the next session. All you need to do now is move the Bridgemate to the correct table. Flexible setting of section and table (SELECT / SELECT mode) A flexible setting allows you to freely distribute the Bridgemates over the tables, and upon start of the session, the Bridgemate will ask the players to confirm the section and table number of the table which they are sitting at. This method allows you to assign numbers and sections to tables at the very last minute while the Bridgemates are 22 Chapter 5: Use of Bridgemate II Scoring Devices already placed on the table. In order to set the flexible setting, scroll the focus up or down to “Section” and press the + or - key until you see “Select” behind “Section”. “Select” will also be placed behind “Table”. Press BACK function key to accept the settings and return to the main screen. The Bridgemate is now configured for flexible entry of section and table number at the start of the session. The Bridgemate can be freely placed on any table in the session. Flexible setting with selection of available sections only (SCAN / SELECT mode) This setting is very similar to flexible setting of section of table, but it limits the selection of section to the sections which have been uploaded to the server. Instead of allowing the player to choose any section ranging from A to ZZZ, only the sections which are actually being used in the session can be selected. In Setup, scroll to “Section”, and press the - or + key until “Scan” appears behind “Section” and Select behind Table. Press the BACK function key to exit the settings menu. The Bridgemate can be placed on any table in the session. Setting Bridgemate Region and Channel Use the up and down function keys to move to the “Region” row. Use the + and – keys to select your region. The Bridgemate II scoring system can communicate over different radio channels. This enables users to install multiple systems next to each other without causing interference (see also Chapter 6, “Multiple clubs”). To enable a Bridgemate to communicate with the server, both must be set to the same region and channel. The default setting for the Bridgemate and server channel is channel 0. To modify the channel, move to the “Channel” row. Erase any exisiting channel number with the Cancel key and input the new channel number. Language Select the language by pressing the + and - keys. SETUP security code To protect the setup menu from unauthorized access by players, set the “SETUP COD” to ON using the + or - key. The preset codes are 749 and 769. Once the Setup code is set to On, the Bridgemate will ask for “Setup PIN”. Starting the session Switching on/off To switch on the Bridgemate, press the OK button. The Bridgemate will automatically switch off after it has been idle for a while, i.e., no buttons have been pressed. No data will be lost. Press the OK button again to continue. Occasionally another table will log on as the wrong table and players will see this screen. If this happens, press OK to start the procedure to log on correctly with this Bridgemate – replacing the unit that logged on incorrectly. The ERASE “take-over” feature may also be used – at the beginning of a game – if one-or-more player names have not been Press ERASE to erase entered or are incorrect. This screen will appear. Enter the TD Pin code. When this is encountered at the beginning of a game, press “Erase” to delete everything entered by the errant table and enable the correct table to enter their player numbers and results. all previous data. Press CONTIN. To continue and retain previous data ERASE CONTIN Activating the Bridgemate and confirming Section and Table setting At the start of the session, the Bridgemate will by default display the “Bridgemate II” main screen. Press OK to view the table and section settings of the Bridgemate. See Configuring the Bridgemate on page 21. Players choose their section by pressing the number that corresponds with the section they will play in. Entering member numbers (optional) If BCS or the scoring program is set to enter member numbers, the Bridgemate will ask for the four player numbers. Use the number keys to enter the number, and press OK to confirm. If a player does not know his number or does not have one, press OK without entering a number. No number will be registered for this player. Review player names When the numbers have been entered, the next screen will display the names that BCS finds for the entered numbers. If there is a correction to be made, press CANCEL to return to the previous screen in order to correct any incorrect entries. ENTER PLAYERS N: 8674722 S: 7435370 E: 789163 W: N: S: E: W: Joseph Steele Henny Dorsman Name N/A Name N/A PRESS OK TO ACCEPT OR CANCEL TO CORRECT Chapter 5: Use of the Bridgemate® II scoring devices 23 Enter results with the Bridgemates Information before the start of the round At the start of each new round, the Bridgemate will display the new round, direction of play and the expected pairs. The board numbers will also be displayed. For example, you can verify at the start of the round whether you are seated in the correct direction and have the correct boards on the table. This information is displayed as follows: Press OK to confirm this screen and continue with the board input. Entering board results The following screen will be displayed when entering the board results: The information at the top of the screen shows the current round, the pair numbers and the boards to be played. The flashing line indicates the input position. Entry and verification of board number Before starting to play the board, enter the board number and press OK to confirm. The Bridgemate will verify the number. In case the board number is incorrect, or the board has already been played in that round, the Bridgemate will notify so. It will also mention the boards that are yet to be played. To assist the players entering the correct board number, two additional features are available which can be enabled or disabled through the Bridgemate settings (see chapter 6): • Automatic entry of board number. When enabled, the Bridgemate will automatically fill in the next board number. Assuming boards are played in order, this reduces the chance of entering a wrong board number. • Board order verification. When enabled, the Bridgemate will verify if the board number corresponds to the logical order. If the Bridgemate expects a different board number to be entered, it will ask to confirm that the boards are played out of sequence. If you do wish to play an out-of-sequence board, press OK. The Bridgemate will assume that you have chosen to deviate from the logical order. If the board number was entered wrongly, press Cancel to return to the previous screen and enter a new board number. Once the board number has been entered and confirmed, the cursor will jump to the second line. You can now begin the bidding. As soon as the contract has been determined, enter the contract and direction of the declarer. Entry of contract and declarer To enter the contract, use numbers 1 to 7 and the ♣, ♦, ♥, ♠ and NT keys. If required, you can also use the X and XX keys to indicate double or redouble. To specify the declarer, use the N/S and E/W keys. If the declarer is North, press N/S once. If the declarer is South, press this key twice. Alternatively, if the declarer is East or West, press E/W once or twice. The screen is displayed as follows: Entering lead card (optional) If you have specified in Bridgemate settings that lead cards must be entered, the Bridgemate will ask you to enter the lead card. If not, this line will not be visible and the input position will jump to result instead. Select the lead card using keys 2 to 9, 10, J, Q, K or A and the card type using ♣, ♦, ♥ or ♠. The card suit and card denomination may be entered in any order. Entering the result Once you have finished playing the board, you can enter the result. Using “American Style,” when the contract has been made enter the number of tricks taken. If the contract was not made, use the – key followed by the number of tricks “down.” The = key may also be used when the contract has been exactly made. Depending on the settings in BCS, the result can also be entered as the total number of tricks won (i.e., 0 to 13) or Up/down tricks. When using Up/down, enter = key when contract has been exactly made, the + key followed by the number of “overtricks,” or the – key followed by the number of tricks “down.” Verification by East or West and confirmation of board result After entering the contract, lead card (if requested) and result, press OK. “Verification by East or West” will display. Pass the Bridgemate to East or West to verify the result and score points calculated by the ROUND 1 NS:3 EW:3 5-6 Bridgemate. Depending on the Bridgemate option, the score points will be displayed as BRD 5, 2D N -1 assigned to the North/South pair or to the Declarer. EW:100 Press ACCEPT to In a short while, the screen will automatically change and repeat all the information previously confirm entered by North. The verification screen will for example be displayed as: ACCEPT 24 Chapter 5: Use of Bridgemate II Scoring Devices East (or West) verifies the data displayed on the verification screen. If this data is incorrect, E/W will press CANCEL to edit the data. If the result is correct, E/W will press the ACCEPT function key to confirm the result. The message “Entry completed” will now be displayed. The data is saved and sent to the server. Overview of percentage achieved and previous results (optional) After E/W has confirmed the board result, players have feedback options for viewing their achieved result and board results achieved by other pairs. Depending on the Bridgemate settings, the following information can be displayed: • Overview of scores of other pairs on the entered board • Achieved percentage for the entered board result The server calculates the percentage by reviewing other scores registered for the board. The percentage will have little significance at the start of a session. As the session progresses, percentages will approximate the final result. Press OK to exit this screen. When the overview of scores of other pairs on the board is enabled, these scores are now shown. Scores are shown as a frequency list, indicating the number of times the same result has been recorded, i.e., 3x = 3 times. The first score is the highest N/S achieved score so far in the session on this board. Depending on the setting in BCS, the scores can be shown in three different formats: 4 scores per screen. Own score bold. 6 scores per screen. Own score 6 scores per screen. Own score Use the up and/or down function keys to move to the next or previous set of results. End of round At the end of the round, the Bridgemate will display the message “End of round”. You do not need to do anything. The Bridgemate will automatically switch off after a few seconds. Press OK again to begin entering the scores in the next round. SCORE RECAP – BOARDS 21-24 Show Score Recap Automatically If the Tools Options Bridgemate Bridgemate II “Show score recap automatically” is checked, the results of the boards played at this table during this round will be displayed. 21:4H W 6 680 22:3NTxW 3 550 23:2C S -1 50 24:6Sx N 6 1210 Show seatings for the next round At the end of the round, Bridgemate can guide the pairs to their next table[s]. This is shown together with the end of round message. Seatings for next round information can be enabled from the Bridgemate settings (see chapter 6). End of session At the end of the last round, the Bridgemate will display the message “End of session” and return to the Bridgemate II main screen after a few seconds. The Bridgemate has completed its tasks and can now be safely stored away. Special entries: Pass-out and board not played If the players have passed four times without making any bid, enter ‘Pass’ at CONTR and confirm with OK. You will not be asked for the lead card and the result; the Bridgemate will switch immediately to the verification screen. If a board has not been played in a particular round, e.g., due to time constraints, the Bridgemate must be informed. If this step is skipped, the Bridgemate will remain in the uncompleted round, and other pairs will be prevented from entering their results. To enter an unplayed board, press the 10 key in the CONTR row. The screen will now display the text ”NO PLAY”. Confirm by pressing OK. The Bridgemate will now display the verification screen. The Bridgemate will not display an overview for unplayed boards. As it is possible to play the board in a later round, players must be prevented from seeing the results of previous boards. The board can be played afterwards without the Bridgemate; in that case, the relevant score is entered manually into the scoring program. When rules in your club say that players are not allowed to skip a board without notifying the director, the Bridgemate Settings (see chapter 6) should enable the option “No Play requires TD confirmation.” The Bridgemate will show the following screen: The director enters the PIN code to confirm the no play. This prevents players from entering a no play when they are not authorized to do so. Chapter 5: Use of the Bridgemate® II scoring devices 25 View hand record If a hand record has been preloaded for this board, or entered by players in a previous round, the hand record can be viewed by the players to verify if the correct board was played and/or the cards in each hand are correct. Press the HANDS button in the overview of previous results to show the hand. General comments: • The Bridgemate monitors the active rounds. In case of a sit-out, the Bridgemate will skip this round. • Before starting a new round, verify whether you and your opponents are seated in the correct direction to avoid playing in the wrong direction. At the start of the round, press OK to display the directions. Ranking and Game Summary The Ranking feature (Chapter 6: Additional Bridgemate functions) must be checked in order for the end-of-session results (shown as percent for each board – or – match points won) to be available. Note, with the ranking feature, information may be displayed after each round, or only at the end of the game. VIEW RANKING At the end of a game, press “Rank” to display the Enter pair number Provisional Ranking; then click “Game Summary” to and direction to view ranking 10 NS: 1. 70% display each board’s Match Points or Percentage. 9 EW: 6. 47% PAIR: 5 NS - After the game, log on as any table; press BACK RANK SCORES BACK BACK GAME SUMMARY the “Rank” key and enter your pair number. Note: When viewing game results at your last table, press the E/W or N/S button to view E/W or N/S results. END OF SESSION _RANKING AFTER ROUND 9 . PROVISIONAL RANKING: Reviewing scores and rectifying scores SCORE RECAP – BOARDS 21-24 Reviewing scores entered 21:4H W 6 680 After a board result has been entered and confirmed, players 22:3NTxW 3 550 may want to review what has been entered. The Bridgemate 23:2C S -1 50 allows the players to review their own scores at any time 24:6Sx N 6 1210 during the round and at end of round. To facilitate this function, enable the option “Score recap” in Bridgemate settings (Chapter 6). Press SCORES to show the recap. The entered board results – Including the score points – are shown in board-number order. If more than four boards are played in the round, up and down function keys are visible for navigating through the results. To exit the score recap screen press the BACK function key. Rectifying an input error If you have made an input error while the board result has not been confirmed yet by E/W, press CANCEL to rectify the error. In principle, it is possible to return to the board number input row by repeatedly pressing this button. It is also possible for E/W to reject the entered data by pressing CANCEL. The Bridgemate will now return to the input screen, and the entered data can be deleted by pressing CANCEL again. Once E/W has confirmed the score and the message “Entry completed” has been displayed, the score can only be edited in the following two ways: • 1. By the director through the special tournament director’s menu (TD-menu). See the section “TD-menu” below. • 2. By the players themselves through the score recap screen. When “Allow players to erase scores” is enabled by the Bridgemate Settings (see Chapter 6), the score recap screen will show the CORREC function key. Press this function key, and – when asked for the board number to correct – enter the board number followed by OK. The result is now erased and can be entered again by the players. Posting Bridgemate II scores Results to Bridgemate Control Software Information entered on the Bridgemates is first saved on the server. The BCS program continuously reads the data from the server and stores these in the result file. 26 Chapter 5: Use of Bridgemate II Scoring Devices Posting scores in the scoring program Once the scores have been saved in the result file, your scoring program can post the scores. For more information, please consult the manual of your scoring program. TD menu Tournament directors have far-reaching powers to verify and edit entered scores and to award adjusted scores. A special TD menu is available for this purpose. This menu is accessed with a 4 digit PIN code set in BCS’s Bridgemate settings. The default PIN code is 0000. It is advised that the PIN code be modified before the Bridgemates are brought into use. Activating the menu To access the TD menu, press the TDMENU function key whenever it is visible. The Bridgemate will ask for the TD PIN code. Enter the 4 digit PIN code. The TD-menu will now appear. TD-MENU 1. 2. 3. 4. 5. v2.1.1 . Adjusted score View results Erase result Status Missing boards BACK ▼ RESEND TD-MENU 6. 7. 0. -+ v2.1.1 . Score recap Hand records Reset Adjust contrast BACK ▲ RESEND The TD-menu consists of two pages. Use the up and down function key to navigate between the two pages. To exit the menu, press the BACK function key. To retransmit all results to the server, press the RESEND key. Menu options The TD-Menu has nine options: 1. Adjusted score To enter an arbitral (adjusted) score, press ‘1’. Note: the cursor must be on Contr: 2. View results For an overview of the entered scores, press ‘2’. 3. Erase result To delete an entry, press ‘3’. 4. Status If you would like to view the current table, section, round and pairs, press ‘4’ 5. Missing boards To retrieve an overview of the board numbers not yet entered, press ‘5’. 6. Score recap Display results already recorded in the Bridgemate. Useful when the “Scores” option is not enabled for players to see the scores themselves. 7. Hand records Use to View, Enter or Erase hand record(s). 0. Reset To reset the Bridgemate, press ‘0’. -+ Adjust contrast To set the contrast of the screen, press + or -. All options are available from both pages by pressing the corresponding key. There is no need to move to the page which lists the options in order to use them. Entering an arbitral score It is possible to specify in the Bridgemate that an adjusted score must be entered for a certain board. With the cursor is positioned at CONTR, access the TD-menu by pressing the TDMENU function key, enter the PIN code, and once in the TDmenu, press ‘1’. The following screen appears: Enter the arbitral score for both pairs. You can choose between 40% (average-minus), 50% (average) and 60% (average-plus). Press 4 or – key to enter 40%, 5 or = key to enter 50%, 6 or + key to enter 60%. It is not possible to enter a value other than these percentages. Press OK after entering both percentages. The Bridgemate will now return to the result entry screen with the assigned arbitral score displayed at CONTR. Press OK to confirm this, and confirm the verification screen. The Bridgemate system has now saved an arbitral score for this board. Retrieving overview To obtain a overview of the results that have been entered on a specifc board on this table, use the view results function of the TD menu - ‘2.’. You will be asked to enter the board number. The overview displays the pair number, direction of play, contract and result. The number of score points is not displayed. If the screen returns to the TD menu after the board number has been entered, no results have been registered for this board at this table. Note that results that have been entered on the same board but in other Bridgemates, will not be shown in this overview. Chapter 5: Use of the Bridgemate® II scoring devices 27 Erasing entry Directors always have the option of erasing entries. This can either be a board result from the current round or any previous round. To erase a board input, press ‘3’ in the TD-menu. The screen will display “BOARD:” – awaiting input of the board to be erased. Enter the board number and confirm with OK. • If the board to be erased has only been played once before at this table, it will be erased immediately – regardless of which round it was originally played in. • If the board was played more than once (e.g., some Howell movements), There will be a propmt asking for the round number. If the particular board can be erased, the message “Board erased” will be displayed to indicate that the entered result has been erased. If the board has not yet been played at this table, the Bridgemate will return a message saying that no results could be found for that board number. Once a board result has been erased, the correct information may be entered. Note when using the ACBLscore: Board results may be erased at the Bridgemate; however, the correction will not be transferred to ACBLscore if the result has already been posted into ACBLscore. Once a board has been posted into ACBLscore, the correction must also be made in ACBLscore. Retrieving current status If you no longer know to which table and section the Bridgemate relates, you can retrieve this information in the status part of the TD menu. Press ‘4’ to retrieve the status. The expected table and section of the Bridgemate will be displayed first, followed by the current round, corresponding pairs at the table and the boards to be played in this round. Overview of missing scores From the TD menu, it is easy to establish which boards of the round have not yet been entered. Press ‘5’. The Bridgemate will now display the numbers of the boards not yet entered in this round at this table. Resetting the Bridgemate The Bridgemate can be reset from the TD menu. Press ‘10’ and OK when prompted to confirm ‘Reset Bridgemate?’. It will now return to the main screen. Score recap The scores recorded in the Bridgemate for the current round may be viewed. This may be helpful to verify results entered when the ability for players to see the scores themselves has been turned off in the Options settings. Hand records View, enter or erase hand records from any Bridgemate. Setting contrast TD-MENU – HAND RECORDS . 1. View hand record 2. Enter hand record 3. Erase hand record BACK ENTER HAND RECORDS When entering a board, this confirms the boards still to be entered. . BOARD: VALID BOARD NUMBERS: 3-4,6-10,12-27 BACK Screen contrast may be adjusted from the TD menu. Press + (plus) to make the screen darker or – (minus) to make the screen lighter. Press the button several times to adjust the contrast. It is also possible to adjust the contrast by going to the Setup menu (from the Bridgemate II main screen), see Chapter 5, Configuring the Bridgemate. Retransmitting all scores Each score entered is stored in the Bridgemate’s internal memory. When one or more scores have been entered, the TD-Menu will show the RESEND function key (above the NT button). This allows the TD to retransmit all scores to the server. For more information about its usage, see Chapter 7, “Resending Results.” 28 Chapter 6: Additional Bridgemate Functions Chapter 6: Additional Bridgemate functions Bridgemate Control Software has a number of functions specifically designed for the Bridgemate II scoring devices. Bridgemate settings For Bridgemate settings use menu Tools Options Bridgemate Settings specified by BCS or scoring program Bridgemate settings can be specified either by the scoring program or BCS. For the scoring program to control Bridgemate settings, choose “Scoring program.” Check your program’s settings for Bridgemate options. Select “Bridgemate Control” when you want to use BCS to control the Bridgemate settings disregarding the information provided by the scoring program. Settings Displaying previous results overview and percentage To enable the Bridgemate to display an overview of previous board results, check the “Show previous results” option. To display your own score in this overview, check the “Show own result” option. Your own score is indicated by a (when showing six scores per screen) or by bold characters (when showing four scores per screen). Limit the number of scores to be displayed by entering a maximum number. “Unlimited” removes the limitation. Boards may also be displayed as “Traveller” – one line for each result To display the board result percentage achieved so far, check the “Show percentage of own result” box. When multiple sections are calculated as one, check the option “Group sections for results.” The percentage will be calculated across the field, and the results on all boards with the same number are shown in the previous results overview. Especially in this case, it is recommended to set a maximum number of scores you want the Bridgemate to show. Without doing so, the players will use up a greater amount of time reviewing the results at large sessions. Results overview Results can be shown 6 different ways: See examples on Page 24. Ranking = best to worst. Perspective of score points Score points – on the East/West Verification screen – can be displayed from the perspective of the declarer or from the N/S direction of play. In the latter case, E/W score points are shown as an opposite score (4H making 5 by E/W is displayed as -450 or -650). This applies to the score points displayed in the verification screen for E/W and the score recap. The overview of previous board results always shows the scores as 1 or 2 columns – N/S best to worst. Entering results Results can be entered in three ways: as overtricks / downtricks, as the total number of tricks won, or American style (tricks made/down). This should be “American Style” in North America with ACBLscore. Displaying the pair number If you do not wish to display the pair numbers in the round-information screen, disable the “Show pair numbers at round info” function. This option can be used for team-of-four events. Transmitting contracts The Bridgemate offers users the option of feeding information to the server immediately after the contract and/or lead card have been entered. This could for example be displayed on vugraph presentations while the game is still being played. If you wish to feed this information to the server, check the “Intermediate transmission of contract” box. Check if you would like the Bridgemate to verify that the boards are played in the Board order verification logical order. An error message will appear on the Bridgemate if the entered board number is not in logical order. Lead card If you would like to enter the lead card on the Bridgemate, check this setting. Member numbers If you would like to enter the member numbers on the Bridgemate, check this setting. By default, players have the option of leaving the entry blank when entering the member number. If entry of member numbers is compulsory, check the “Blank entry not allowed” box. Validate member number View contract When checked, you may specify ACBL member numbers are to be validated. Use this function to specify whether card symbols or letters to display the contract. Auto power-off periods The Bridgemate will automatically go into auto power-off mode if it remains idle for a while. The default setting is 20 seconds. To change this setting, enter a value between 5 and 60 seconds in “Autopower-off period.” In “Verification message,” enter the length of time you would like the message “Verification by East or West” to be displayed. Chapter 6: Additional Bridgemate functions 29 More Bridgemate settings (on Bridgemate II tab) TD PIN code Set the 4-digit PIN code to access the TD-menu. TD confirmation for No Play Check the “No Play requires TD confirmation” box if players must call the TD for “No play” approval. Show remaining boards to be played Enable this option to show the number of remaining boards in the current round after E/W verification. Show seatings for next round With the “Next seatings at end of round” option, the Bridgemate shows which table pairs should go to and the direction to sit; to stay in their current position; or that they will have a bye. Show score recap and allow score corrections To allow the players to retrieve a score recap of their own scores entered in the current round without the TD’s assistance, check the “Score recap” box. However, normally players are expected to call a Director when a score needs to be corrected; thus, do not check the box “Allow players to erase scores.” Show score recap automatically When this option is checked, the Bridgemate will automatically display the scores for all boards played in the round just completed at this table. It does not show the results of these boards at any other table. Automatic entry of board number If you want the Bridgemate to automatically fill in the board number and players only to confirm the number with OK, enable this option. If board sharing takes place frequently and the order of boards played deviates from the logical order, it is advised to disable this function. Alternatively, you may wish to check “Enter first board in round manually.” Enter first board in round manually When boards are shared between tables and for team games where boards are shared, this option will expect the players to enter the first board they are playing; thereafter, the next board will automatically be entered. Enable RESET function key Pressing the TDMENU key will display RESET on Bridgemates II for player access. At times, it can be helpful to instruct players to reset their Bridgemate[s]. This does not cause any problem since the Bridgemate will automatically return to the same screen when it is restarted. Recording of bidding and play Bridgemate has a built-in capability to record and bidding and play. This feature is generally only used at large, international tournaments where live coverage of the game or full recording for statistical or review purposes is done. Refer to the Bridgemate Developer’s Guide for more information on this topic. Pair number entry as part of declarer The declarer on a board is normally indicated by direction only. As an additional verification of a possible pair arrow switch (not uncommon in Howell games where pairs switch direction), the pair number may be entered as part of the declarer. Players will be warned when the combination of pair number and direction input is not valid. Showing player names In order to promote correct seating of players, Bridgemates can show the player names at the start of the round. By reviewing the names, players understand if they have taken their correct positions. Configure name settings Check “Show names at each round” or “Show names at first round only.” Next click “Settings” to configure which source BCS should use to find the player st names. Clubs/Units with a local player database will check the 1 option; when nd using a Tournament database, check the 2 option. TD’s that direct Club/Unit th games as well as tournaments may check the 4 option; thus player names will automatically be found in either the th “local” or the ”national” database. The 5 option is for databases that have player numbers with leading zero’s. 30 Chapter 6: Additional Bridgemate Functions Showing names using member numbers Member number entry at the start of a session is mandatory in order to identify the players. Make sure that member number entry is enabled (in the scoring program or Bridgemate options). BCS uses the member number to find the player name. This requires that the correct source for the player names has been selected, either Bridgemate score th file, BMPlayerDB.mdb lookup database file, or “both” (4 option above) and that the source contains the names. If the wrong source is selected, or the source doesn’t contain any names, BCS will not be able to find the player name. Once BCS has found the player number, it will show the name and number in the “Players” tab, and show the name on the Bridgemate. Special procedures are required in order to display the names of the pair with the first “sit out.” See Chapter 8, Phantom-table sit-out pairs, for more information. Changing names In addition to the ability to make corrections on the Bridgemate (see “Review player names” on page 22), corrections and additions can be made in BCS from the Players tab. Double-click in the “Name” column at a table/direction and enter or modify a name; the new name will automatically display on the Bridgemates II. Alternatively, double-click on the member number and provide a new or correct number. BCS will display the name for the new/corrected number. Hand Records ENTER HAND RECORD ENTER HAND RECORD Board: ENTER HAND RECORD–BOARD 7 NORTH 13 CARDS Boards that have been shuffled and dealt at the table may S: AK65 ENTER VALID BOARD NUMBERS H; 10943 7-8 HAND RECORD? be recorded by the players. Hand records are entered on D: QJ82 C: 9 BACK the Bridgemate – after each board is played or at the end of a round. It is not compulsory, so slow playing tables can move on to the next round; subsequent table(s) can then enter the hands. Also, the Director can enter hand records using the TD Menu. North, East and South cards are entered; the remaining cards will automatically display for West. If the “View hand records” option is checked, players may view a hand on their Bridgemate after playing the board. The Director may use the TD MENU (from any Bridgemate) to display any hand record – regardless of the “View” option setting. Also, hand records may be viewed in BCS. Hand records entered on the Bridgemates (or imported from a .dup, .pbn or Big Deal .csv file) are stored in the result (.bws) file. There is a more detailed description “Hand Records and Makeable Contracts” on the Bridgemate flash drive and on our website www.bridgemate.us/how-to-guides/hand-records/ Use File Import from .DUP, .PBN or .CSV to enable displaying hand records at the table. Director’s will be able to review the hand records using TDMENU. Also, when enabled, players will be able to view hands. Analysis of Makeable Contracts (Double-dummy Analysis) BCS has integrated makeable contract analysis based on Bo Haglund’s Double Dummy Solver. Makeable contract information is stored in the result file and can be printed or exported together with the hand-record information. To control the analysis feature go through Session Report session. Then, click on the “Hand record analysis” tab. Hand records can be analyzed automatically (when each board record is entered). Alternately, all avaiable hands (including those imported from a .dup file) can be “manually” analyzed. Printing and Exporting Hand Records Use File Print – to print hand records (with or without analysis) direct to a printer – or – export and save in one of several formats. Use File Export to export hand records a .pbn or .dup file. If there has been a BCS analysis of the hand records, the .pbn file will include makeable contracts. Update settings during play Option settings are sent to the Bridgemates when a new session is started and Bridgemates log in to the server. It is also possible to modify the Bridgemate II settings during play and have the Bridgemates use these new settings. To update the Bridgemate II settings after the Bridgemates have already started the session, do the following: 1. Update the Bridgemate settings either through the Bridgemate and Bridgemate II settings tabs in BCS (Tools Options) or in ACBLscore. Chapter 6: Additional Bridgemate functions 31 2. Go to menu Server Show Tables. 3. Select the tables for which you wish to update the settings. Note, CTRL + A will select all the tables at once. 4. Press the “Update settings” button. The selected Bridgemates II will now receive the modified settings. Updating Bridgemate firmware The Bridgemate is controlled by a piece of software in its internal memory. This software can be changed from BCS. In concrete terms; this means that the Bridgemate can be updated and functions changed/added. Preparing the Bridgemates: • Collect all the Bridgemates you want to update. • Make sure they are set to the same region and channel as the server. • Make sure they show the main screen with the Bridgemate logo. • Bridgemates should have enough battery power; the battery indicator should not blink. Preparing the computer: • Connect the server to your computer and the mains power. • Start BCS without an active session. BCS can be started from the Windows Start All Programs menu. • Make sure the Region and Channel settings of the server match those of the Bridgemates. Starting the firmware broadcast: • In BCS, go to menu Tools Bridgemate Bridgemate II update firmware. • Click “Select firmware file” browse to the desired .bm2 firmware file (e.g., BM2_2-1-1.BM2) click “Open.” • Click “Select firmware version” click the desired “language” version. • Click “Upload firmware” to upload the firmware to the server. This may take a while to complete. • Make sure “Continuous transmit” is checked and press “Transmit firmware”. Press OK to confirm. • The firmware is now continuously being broadcast by the server. A progress bar shows the ongoing status of the server’s broadcast – starting again after reaching 100%. This will continue until the “Stop transmission” button is pressed, or after the firmware has been broadcast twenty times. Receiving the firmware by the Bridgemates: • Press OK on the Bridgemate to awaken the device. • Press SETUP to enter the setup screen; if needed, enter pin code 749 (or 769). • Press INFO press UPDATE press OK to start the receive mode. • Provided that the firmware broadcast has been started in BCS, the Bridgemates will start receiving the firmware. A progress bar on the Bridgemate indicates how much of the firmware has been received. When the firmware is received completely, the Bridgemate will return to the main screen. • Bridgemates may be updated concurrently. Any number of Bridgemate may be updating at the same time. After all Bridgemates have updated, press “Stop transmission” to stop broadcasting; close the update window. Remarks: • Do not abort the transmission before all Bridgemates that are receiving the firmware update have finished. • If firmware transmission is interrupted, Bridgemates remain in firmware update mode until the firmware is again broadcasted and received fully by the Bridgemate. • The transmission progress bars in BCS and on the Bridgemate do not necessarily progress equally. • When the progress bar on a Bridgemate reaches 100%, it will take a few more seconds to complete. Real-time Publication During a game the rankings may be continuously displayed. The display will start after a few seconds (it opens your browser – Internet Explorer, Firefox, etc.). As each new score is received, the display will automatically update to show the latest rankings. 32 Chapter 7: Tips for Use Chapter 7: Tips for use Bridgemate logged on as the wrong table TABLE STARTED BY ANOTHER BRIDGEMATE PROCEED AS A1? When a Bridgemate logs on under a wrong section or table number, this will have its effect on the Bridgemate of the other table whose section and table number has now been occupied. CALL TD TO START AS TABLE A1 TD PIN: _ Press ERASE to erase all previous data. Press CONTIN. To To rectify this situation, the Bridgemate II has a simple “take over table” procedure. Just let continue and retain the Bridgemate of the correct section/table start the session. It will show that the table was previous data already started by another Bridgemate and asks to proceed or to cancel. Press OK to ERASE CONTIN proceed, and call the TD to confirm the take-over using the TD PIN code. The TD should press the “Erase” button to remove the player numbers and any scores entered by the errant table. The correct table may now enter their player numbers and start playing. After confirmation, the table will start the session. The wrongly-logged-on table will now see a message that another table has taken over. They may now log on as their correct table, enter their player numbers and any results. ANOTHER BRIDGEMATE HAS TAKEN OVER Replacing Bridgemate If for whatever reason you need to replace a Bridgemate during a session, and you are unable to log off the Bridgemate using its reset function, proceed as follows: • Remove the Bridgemate to be replaced. • Take another Bridgemate and set it to the Section/table where you wish to place it in service. • It will inform you that the table has been started by another Bridgemate: Press OK to proceed, enter the TD PIN code, press CONTIN. This Bridgemate has now replaced the unit that was “taken out of service.” Alternatively: • In BCS, go to menu Server Show tables. • Select the relevant table and press “Log off table[s]”. The Bridgemate will now be logged off from the server. • Take another Bridgemate and set this Bridgemate to the correct section and table number. Also make sure to set the correct channel. • Activate this Bridgemate. The Bridgemate will take over the position of the old Bridgemate. Recovering the server If the server is accidentally disconnected from the PC – and there is no battery power – all data will be lost and the Bridgemates will stop functioning. Bridgemates will typically display “FAILED TO SEND, RETRY?” BCS,however, is able to recover the old situation. Proceed as follows: - Make sure the server is reconnected the PC and that BCS shows the server is “Connected.” - In BCS, go to menu Session Synchronize / recover. - Go to the “Recovery” tab and press “Recover server” and follow the screen prompts – including entering the 3digit number (when prompted). All information from the result file will now be moved into the server. When recovering the server, it is important that all data had already been read from the server into the result file. If this is not the case, information that had not been recorded so far will not be recovered back . TD-MENU v2.1.1 . 1. Adjusted score into the server. HARDWARE: 1.0 2. View results FIRMWARE: 2.1.1 3. Erase result It should also be noted that results may be resent to the server. 4. Status PROD.DATE: 2012-3 During a game: After a game has finished 5. Missing boards BACK ▼ RESEND On the TD-MENU page and before the next game is started, go BACK UPDATE RESEND to SETUP INFO press the RESEND key. press the RESEND key Procedure in the event of data loss The security of the board results entered in the Bridgemate II scoring system is given top priority. The best defense against data loss is that results are stored in multiple locations, namely: • The Bridgemate memory All results entered in the Bridgemate are sent to the server. At the same time, each result is also stored in the Bridgemate’s internal memory. These results are stored until the Bridgemate is logged on for a new session and the first result (of the new session) is “accepted.” Then the memory (of the prior session) will be erased. The data remains stored in the Bridgemate, even if no batteries are installed. See “Resending results” – on the next page – on retrieving results from the Bridgemate’s memory – direct – to the results (.bws) file. Chapter 7: Tips for Use • • • 33 The server memory Results entered in the Bridgemate are sent to the server, and stored in the server’s internal memory. It is essential that the server has batteries installed – so it can switch to battery power if the PC power is lost. If there is no power source all data will be lost. It should be noted that the server will stay active on battery power alone for an hour after its last action, e.g., the last result is sent from a Bridgemate. BCS result file and log file BCS continuously reads the new results from the server and processes these into the result file. This data is immediately written to the hard disk of your PC, ensuring the data is safe – even in the event of power failure. All results shown on the BCS screen have been written into the result file. BCS also has a log file, containing all the relevant events. All received results are written to this log file. To view the log file, go to the Tools Show log file menu. The actual file – BMProLog.log – is located in the folder specified under the Tools Options General File locations Tab. Special Note for Vista, Windows 7 and Windows 8 Users: See Log file settings, Chapter 3, for details. Session file in your scoring program Lastly, the scoring program retrieves the results from the result file and stores the results in its own files. The results are therefore stored in five locations in total. In the event of data loss in one of the five locations, it is possible to check whether the results are still stored at the next level up, and to reprocess the results from there. Scoring program data loss In the event of data loss in the scoring program, check whether the results are still stored in the BCS result file. The recommended method is to launch BCS from the Windows Start All Programs Bridgemate Pro BCS. Once BCS is started, go to the File Open menu and select the result file for the session. If the results appear on the screen, they have been stored in the result file. The results can now be reprocessed from the scoring program. BCS data loss If the result file contains no results (see the above-mentioned step), it is possible to retrieve them from the server and to read them in the result file. The first step is to check whether the results are still stored on the server. Use the Server Show all scores menu for this purpose. All the results stored in the server will now be shown. If the correct results are shown, it is possible to read them manually using the Server Show tables menu. Select all tables (CtlA is a shortcut to select all the tables) and press “Retrieve scores”. The results of the selected tables are retrieved from the server and processed in the result file. The results can now be read by the scoring program. Server data loss If neither the server, nor the result file, nor the scoring program contains any data, your last resort is to retrieve the results from the Bridgemates. All results entered in the Bridgemate are stored in the internal memory of the Bridgemateand can be resent to the server. See the section above entitled “Recovering the Server.” Warning The board results are stored in the internal memory of the Bridgemate. Once the Bridgemate has been started up again for a new session, the memory is erased and all the data removed. This procedure is executed after you have pressed OK in the SECTION/TABLE screen and the Bridgemate has logged into the server. Ensure that no players are operating the Bridgemates to avoid the Bridgemate logging into the server. Retrieving results from the log file Results can also be retrieved from the log file. All results entered in BCS are stored in the log file. To view the log file, go to the Tools Show log file menu. The selected rows can be copied and saved to an empty text file and printed. Automatic processing is not possible; the results must be entered manually in the scoring program. The actual file, BMProLog.log, is located in the BCS folder, normally C:\Program files\Bridgemate Pro. Special Note for Vista, Windows 7 & 8 Users: Because of Windows’ “security precautions,” use the BCS option to specify a non-Program Files folder where the Log File should be saved. See Log file settings, Chapter 3, for details. Resending results The Bridgemate retains the board results in its internal memory – until a new game is started and a new board is entered. With a simple command, these results can be resent to the results (.bws) file. This is useful when results have been lost from both the computer and server inadvertently and your last resort is the Bridgemate device itself. Results can be resent from both the TD-menu and the setup menu. Proceed as follows: 1. Make sure the server is connected and loaded with the session data (tables, movements). If the server data was lost as well, restart BCS from ACBLscore (F11 BMS); this loads the session data into the server. 2. a) Bridgemates, which are still in result-entry mode, can resend the results from the TD-menu. Access the TD-menu with the TDMENU function key and PIN code, and press the RESEND function key. 34 Chapter 7: Tips for Use b) Bridgemates, which show the main screen, can resend the results from the setup menu. Press SETUP and the 749 or 769 Setup code; on the Setup menu; press the INFO key, followed by RESEND function key. 3. The Section/table and number of results in the Bridgemate’s memory displays. Press OK to start the retransmission. Retransmission will only succeed when the server is activate and contains the session data. After retransmission, the board results can be posted into the scoring program using normal procedures. Multiple bridge clubs playing simultaneously There may be times when 2 or more bridge clubs are playing at the same time in one building – each with their own client PC. As the Bridgemate server can accommodate only one specific client computer at a time, it is not possible for two clubs to make use of one server simultaneously. Both bridge clubs will, therefore, require their own server. It is, of course, vitally important that they do not interfere with each other. This problem can be rectified by: • each club using different Section letters. In this case the clubs can use the same channel. • the systems communicating over different channels. The first club sets its system (server and Bridgemates) to channel 0, while the other uses channel 1. A third and fourth club can then use channel 2, 3, etc. This method enables multiple clubs to use the Bridgemate scoring system in the same area simultaneously with the same Section letters without causing any interference. Large tournaments During large tournaments, more than one server will be required to control over 256 tables. The layout of the tables is important in this respect. If the tables are outside the range of the server, an extra server will be needed to increase the range. The Bridgemate Scoring System supports multiple servers over a network. In principle, this network can support an unlimited number of tables. The following guidelines must be observed: - You will need a fully operational network in which all used PCs are interconnected, enabling them to access and process files. - Only one result (.bws) file is used, containing all session data and board results of all tables. - The scoring program is running on one of the computers in the network. It is not necessary for the scoring program to be running and/or the result file to be stored on one of the client computers that is running BCS. From an organizational point of view, it may be easier to use a separate PC containing the scoring program and .bws file. Client PCs access the .bws file over the network. - Each Bridgemate server is connected to its own PC (=client) where BCS is running. Do not connect two servers to one client PC; although technically feasible, it may cause unnecessary confusion, as both servers are using the same client name. Worse still, it may even be counter-productive if both servers are operating over the same channel. - Use different channels for each server, especially if the servers are within range of each other. Only use the same channel if you are sure that the servers are not interfering with each other (e.g., in different buildings). Using ACBLscore and Bridgemates on a Network ACBLscore and the Bridgemate Scoring System can be used on a network where the ACBLscore program and Bridgemate Control Software (BCS) software both operate on one computer. Each separate client computer will run its own BCS program and open the single result file, e.g., 070904E.bws, on the ACBLscore computer. ACBLscore Computer - Configure the C:\ACBLSCOR\GAMEFILE folder for Network sharing and “change my files” by a remote computer. - In BCS, Server Show Tables, highlight tables controlled on the remote computer[s] and click Delete Table[s]. - The BCS option (Tools Options General) “Mode = Club [single computer]” should be checked. Remote Computer[s] - Open BCS program and check the BCS option “Mode = Club [single computer]” (Tools Options General). - Use File Open to manually open the *.bws file on the ACBLscore computer. - BCS lower left: Highlight tables to add to this client right click and click Add to client Note: The tables not “added” above, will not be in this “remote” server. If the Bridgemates working into the Remote Computer[s]’ server[s] are configured for different channels, the BCS changes need only be made at the Remote Computer[s]. Contact Bridgemate.US for more detail. Chapter 8: Using Bridgemates II with ACBLscore 35 Chapter 8: Using Bridgemates II with ACBLscore ACBLscore (Windows), starting with version 7.45, supports the Bridgemate Scoring System. This chapter describes how to use ACBLscore to activate Bridgemate Control Software (BCS) and retrieve information from the result file. Installation Software Required • ACBLscore (Windows version) v7.93 or later – download from www.acbl.org • Bridgemate Control Software install program – on website www.bridgemate.us or Flash Drive. Install software The BCS program controls communication with the Bridgemate II hardware and exchanging data with ACBLscore through the result file. The default installation folder is C:\Program Files\Bridgemate Pro. If BCS is installed in another folder, you will need to identify the “different” installation folder to ACBLscore. • • Note: BCSsetup.exe installs BCS and the USB driver. It is recommended you accept the default installation folder. Special Note for Vista, Windows 7 and Windows 8 Users: Because of Windows’ “security precautions,” use the BCS option to specify a non-Program Files folder where the Log File should be saved. See Log file settings on Page 17, Chapter 3, for specific details Install ACBLscore Version 7.93 or later. Normally, BCS and ACBLscore will be installed on the same “client” PC. Connect the Bridgemate Server to the Computer. The server uses a standard USB cable. Windows should recognize the new device and provide screens to install the driver. The Server receives power from your computer’s USB port. The 4 AA batteries should always be installed to provide “backup” power if there is any PC power problem. This will preclude inadvertent loss of scoring data. BCS Setup Verify BCS/server connectivity Once the server has been activated, start BCS to see if it finds the server. Normally, BCS is started by ACBLscore; but to verify server connectivity, it is recommended BCS be started directly from the Windows start menu at this time. [Go to Start - All programs Bridgemate Pro Bridgemate Control.] A small text bar will display while it searches for the server. The BCS screen should show “Connected” in the upper left “Server Information” section. Verify that the region is set to North America. Set BCS options Go to menu Tools Options General “Club (single computer)” “Disable server detection” (unchecked) “Erase original records of deleted scores” MUST be checked when using ACBLscore Optional See Chapter 3, Program Settings (Options), page 17 for option settings on the General, View, Log file and Scoring program tabs. Go to Tools Options Bridgemate Options should be set as appropriate. See the laminated Quick Setup Guide and Chapter 6, Bridgemate settings, page 28. Configure Bridgemates 1. Use SETUP to configure each Bridgemate. 2. Each Bridgemate may be: - assigned to its own Section and Table: A1, A2, A3 ....., B1, B2 ...., etc. - configured for manual entry of the Section/Table by players at the table when a new session is started, 36 Chapter 8: Using Bridgemates II with ACBLscore - set to scan for available Sections. For example: A=1 D=2 (Enter 1 for Section A or 2 for Section D) See Chapter 5, page 21 – Activating the Bridgemate. 3. The default RF (radio frequency) channel is 0. If you experience transmission troubles with this channel, change to another channel. The channel selected in BCS for the Server must always be the same as the one set in all the Bridgemates. The frequency range for North America is 902 ~ 927 mHz. Note: Bridgemates automatically shut off power when not in use. Batteries need not be removed when not in use. In the upper left corner of the Bridgemate II screen there is a small battery indicator. Full batteries are indicated with a full indicator. If the battery power is extremely low, the battery indicator will show an empty battery and the indicator starts blinking. Although it is safe to continue using the Bridgemate for several more sessions, it is recommended that the batteries be replaced as soon as possible. The average battery life is approximately 400~500 sessions. However, this depends largely on the length of each session, the time frame over which these sessions are played, and how the Bridgemates are stored. Make sure no keys are pressed during storage. The Bridgemate Scoring System is now ready to be used with ACBLscore. ACBLscore Setup When the background screen is green, the program is in Club Mode and Game Options will be visible. If the screen is pink and/or Game Options is not visible, switch to Club Mode (from Tournament mode). Enable Bridgemate functionality Go to: Setup Game Options It is recommended that all 3 options be selected. Set Bridgemate Options in ACBLscore It is recommended that Bridgemate options be configured in BCS for control by the scoring program – ACBLscore. Once the Bridgemate options have been set, they will be used for all future games – until changed. When a game is first “opened,” press F11 to display the “Select Command” screen. Left click on “BMO Remote Options” or highlight the line and press ENTER. Typical club game options are shown here Set up a Game 1. With the BCS program already installed, create the game file and set up sections in the normal manner. Special considerations are: Pick-ups should be: “Sequence by table number” Click “Yes” or use cursor key to highlight “Yes” and press ENTER to ”Use Remote Server for score entry” 2. ACBLscore automatically interrupts “posting” as of the penultimate (next-to-last) round to accommodate preparing a one-round-to-go report. After all results for the next-to-the-last round have been posted, one or more additional ACBLscore “post” commands will be needed to complete a game. Chapter 8: Using Bridgemates II with ACBLscore 37 3. To set up a new game (especially with multiple sections) in ACBLscore more quickly, you may bypass event rating. See Quick Setup Tips on page 38. 4. When all Sections are set up, start BCS software. The Bridgemate commands are at the “end/bottom” of the F11 commands; scroll down, or press the End key. 5. The BMO command is used to set Bridgemate options, when BCS software is configured to use options settings specified by the “Scoring Program.” 6. The BMS command is only used to start a new game/session. This will RESET the BCS software, server and Bridgemates – erasing any existing settings. 7. The BMR command is used to “restart” BCS without losing data already entered. This may happen when the PC has been stopped, e.g., due to a power failure, PC reboot, or any other reason for BCS being shut down during a session. There is no loss of data when BMR is used to restart the Bridgemate software. 8. Special note: If Bridgemate use was not enabled as shown in item 1 above, there will be a BME command visible. This should be used to “enable” the Bridgemate Scoring System for each section in the game. Read data from the Bridgemate Scoring System into ACBLscore. The ACBLscore screen is normally visible on the PC, and the BCS screen is minimized. When you first key F11 (or F9) the keyboard may appear to be inactive. Use the mouse (or touch pad) to move the cursor within the ACBLscore screen and left click. This will normally enable/activate the keyboard. Player Numbers • • • • • • If Player Numbers are to be entered at each table, this will be done as each table starts to use a Bridgemate. After play has started, names are read from the result file into ACBLscore – using the BMN command. Key F11 B M N -or- F11 End & highlight the BMN command line; Press ENTER Special Note: In multi-section games the BMN command must be issued separately for each section. ACBL Life Members enter their alpha character as a number. J=1, K=2, L=3, M=4, N-5, O=6, P=7, Q=8 & R=9. A “Life Master ACBL Alpha = Number” file is on the Bridgemate Flash D rive. There is a Life Master ACBL Alpha=Number label on the bottom of each Bridgemate. Non ACBL member “pseudo” numbers: When there are regular players who are not ACBL members, each non-member may be assigned a pseudo number that may be used. Pseudo numbers are in the ACBLscore database preceded by the “#” character. For example: Player number 19 will be “#19” in the database. For each number found in the “Club” or “Tournament” database, the player’s name will be entered into the Player Names (F3) file. If a number (ACBL member or pseudo) is not found – or no number has been entered – there will be no entry made in the file for that player. The BMN command will be available whenever ACBLscore’s Bridgemate Options is configured to “Allow entry of player numbers at remote.” ACBL member numbers as well as non-member “pseudo” numbers are read into ACBLscore and entered in the Names (F3) file. The BMN command must be executed separately for each Section in a session. If the ‘Auto Strat when posting names from remote’ option is checked, a strata will be assigned to each pair based on the players masterpoints in your ACBLscore database; otherwise all names (read in from Bridgemate) are entered in the Names file as strata “A” until the STRAT command is run. The F11 STRAT command is used to assign the correct strata to each pair. Note: Use the F3 command to manually enter the names of new players and those without a number. Use the up-arrow key to move into the player name field when there is only one player in a pair. Before or after the “auto stratify,” manually enter the names of players not shown in the Player Names file. With “Allow Auto Strat” – see page 36 – you will be prompted to confirm the strata for each pair. Note: When using a Mitchell-Rover movement, the will be no opportunity for the “bump” team (that moves to different tables) to enter their player numbers. Use F3 to enter the names of the “bump team” players. View player numbers and names: When ACBLscore is shown as the scoring program and the “Load player database after BMS command” is checked (See Chapter 3, Scoring Programs, page 18), numbers entered by the players and the corresponding names from the ACBLscore database will be shown on the BCS screen – “Players” tab. 38 Chapter 8: Using Bridgemates II with ACBLscore Board Results • • Once boards have been played and the results recorded on Bridgemates, the information may be “posted” into ACBLscore. Typically, this is done periodically throughout the game. This will also enable the scorer (usually the director) to spot any anomalies that might occur. The BMP command (F11 followed by B-M-P – or “End”) is to read board results from Bridgemate and post them into ACBLscore. Posting will automatically stop at the end of the penultimate round – to accommodate the preparation of a next-to-last round report. After the penultimate round has been posted, one or more additional “post” commands are needed to read all of the final results. Ctrl-P is a shortcut for this command. When posting results in a multi-section session you will see: 1 Post all sections configured for remote entry 2 Post only Section x If you wish to post only scores for the “active” session, - click on “2 Post only Section C” and click OK, - press “2” and press Enter, or - use the arrow keys to highlight the line and press ENTER. • • • • • Otherwise just press ENTER to post scores for all sections. The ACBLscore screen displays the number of rounds whose scores have all been posted. After all of the rounds being played are shown as “entered,” the section/game is over. Results and reports can be displayed and printed using F4, F5 and/or F8 as desired. Before a score has been accepted, the TD MENU can be used to separately assign an arbitral score [AVG – (40%), AVG = (50%) or AVG + (60%)] for E/W and for N/S. Note: The cursor must first be on the Contr line. Scores already accepted/recorded in a Bridgemate – but not yet posted into ACBLscore – can be corrected using the TD Menu. See Erasing entry, chapter 5, page 27. Activate the TD Menu, press ‘3 Erase result,” enter the board number and press OK. If the board has been played more than once at this table, you will be prompted to enter the round number. The erroneous result is erased and players may enter the correct one. Scores already posted into ACBLscore must be corrected there. To erase a score in ACBLscore – type “x” See page 24 for Special entries: Pass-out and board not played. Quick Setup Tips Early game/session setup: Single or multi-section games/sessions may be set up early in ACBLscore. Extraneous information such as expected movement, Event rating (stratification criteria), Event Information (Tournament data), etc., may be entered before the stress of actual play being started. It is suggested ACBLscore be “preset” with fewer tables than are actually expected in a single or multi-session game/session. Do not start BCS at this time. Then, when play is ready to start: a) Use F95 Change movement parameters and change to the actual movement/tables/etc. b) In a multi-section session, repeat the F95 Change movement parameters for each section. c) After the all the movement[s] have been finalized, use F11BMS to start BCS – and the session. To setup a session (with one or more sections) more quickly, bypass the masterpoint portion of normal setup. Just select “13 No masterpoints.” Later, after play has started, use “F910 Set masterpoint rating to create stratification for the game/sections. Chapter 8: Using Bridgemates II with ACBLscore 39 Change Movement after Game has started To the extent possible, each session/game should be as fully configured as possible in ACBLscore before starting BCS. Movement changes can be made in ACBLscore after the BCS program has been started – to accommodate the arrival of new player[s] or one-or-more “no show” players. The ACBLscore manual more fully describes how to make changes. Use F95 Change movement parameters. After the new parameters have been entered and accepted, ACBLscore will automatically invoke a command to update the result file and effect the changes in BCS. Always post all scores before making any movement changes in ACBLscore. Especially if adding pairs or making special changes using EDMOV; post all scores using ‘F11BMP’ or Ctrl-P – before making any changes. Note: When BCS is updated, there will normally be a “Report” screen displayed. This screen may “closed” or BCS will automatically close it after 1 minute. When ACBLscore updates BCS, “deleted” table[s] or section[s] sometimes are not actually be removed. Thus, it is recommended that any “deleted” table[s] and/or Section[s] be manually deleted/logged off in BCS to preclude possible confusion if someone inadvertently activates a deleted-table or deleted-section Bridgemate. Change before any Bridgemates have been used When the changes can be made before players have started entering their member numbers and/or results, instruct players to delay any entries until the changes are made. After the ACBLscore changes have been made and BCS has been updated, players may begin normal Bridgemate use. Change after people have started member number and/or score entry Ask players to hold up any further Bridgemate entries until the movement change has been completed. If the movement change will move pairs around, player numbers will need to be entered manually, later. However, if pairs remain at the same tables (even though they may now have different team numbers, e.g., when change from a 5 table Howell to a 6 table Howell, or a 6 table Howell to a 7 table Mitchell, ACBLscore BMN (Post Names from Bridgemate) will correctly assign pairs to the correct tables – when the “member-number” option is being used. Make the movement changes as noted above. ACBLscore automatically updates BCS with the new info. Note: When BCS is updated, there will normally be an “update” screen displayed. Replacing Bridgemate during play – Bridgemate logged on as the wrong table See page 32 Replacing Bridgemate or See page 32 Bridgemate logged on as the wrong table Procedures when using Player entry of Section/Table Check each Bridgemate as it is placed on a table. Press the OK key; if the "Bridgemate II" screen appears, the unit is ready for Section/Table input. If the display is anything other than "Bridgemate II," reset the Bridgemate. Swiss Teams and Knockouts ACBLscore does not support using the Bridgemate wireless scoring system for team events. There is a third-party software that may be used for team games. The final results are then entered manually into ACBLscore. Detailed information is available on the Bridgemate.US website: Team Games using Bridgemates 40 Chapter 8: Using Bridgemates II with ACBLscore Names Display for 1st Round Sit-out Pair[s] When there is a sit-out pair (at a phantom-pair table), a special game set up is required in order to display the sit-out pair’s names on the Bridgemates. For more information, see Chapter 6 Showing player names. • • • • • Set up the game with every section as full tables, i.e., without any phantom pair[s]. Use BMS to start Bridgemate Control Software, in the normal manner. Have the “sit-out pair[s]” (at the phantom-pair table[s]) enter their numbers as soon as possible. After the sit-out pair’s player numbers have been entered at the phantom-pair table[s], go to ACBLscore and change the movement (F9 5 Change movement) to reflect the phantom pair in each applicable Section. Names for the “sit-out pair[s]” will now display on the Bridgemates at the start of each round. Special Reports Play data may be copied from BCS and used to prepare special reports – such as a summary of the results of each board played. • • • • • See Creating Reports, Chapter 3, page 14 on how to copy play data from the BCS screen. EXCEL spreadsheet: o Paste the copied data into an Excel Spreadsheet. o With the new data highlighted, select Data Text to Columns Select “Comma” as the delimiter. WORD document: o Paste the copied data into a Word document. o Highlight the new data, select Table Convert Text to Table Complete the “Convert Text to Table” screen as noted for “Commas,” “AutoFit to contents” and number of columns in your data (7 is shown here). o The table that is created will be highlighted. Select Table Convert Table to Text. This creates text which may be pasted into an email message or uploaded to a website. OpenOffice.org: A simpler procedure is to use the spreadsheet program of OpenOffice.org which is “free to download, use, and distribute” at http://download.openoffice.org/ o Paste the copied data into the OpenOffice.org calc spreadsheet. On the “Text Import” screen that will display, check under “Separator options” and click OK. o Adjust column widths – if desired. o Highlight and copy the data for your report. EXCEL spreadsheet – alternate procedure (advanced Excel user): There is an alternate procedure whereby data can be “imported” into Microsoft® Excel from the game’s .bws data file. o Change the file suffix on the game data file from .bws to .mdb (e.g, 130615A.bws > 130615A.mdb). This file is normally in the C:\ACBLSCOR\GAMEFILE folder. o In Excel: Data Get External Data From Access find & select the renamed .mdb file o A “Select table” window will appear. Highlight the “Received Data” table and click OK. o On the “Import Data” window select “Table” and “Existing worksheet” Click OK o The “Result” column will be in the European “Up/down tricks” format. To create an “American style” Results column use an Excel formula – such as this: =IF(K2="=",LEFT(J2,1)+0,IF(LEFT(K2,1)="-",(K2+0),LEFT(J2,1)+K2)) o Highlight and copy this new “result” column; then paste it as “values” into the “Result” column. o Delete un-needed columns. Chapter 8: Using Bridgemates II with ACBLscore 41 It is suggested the BCS column heading “NS/EW” be changed to Declarer. Below is a sample report. Note: This example includes the “Lead” card which may be captured when options are controlled by BCS. Section A A A A A A Board 1 1 1 1 1 1 NS 2 3 4 5 6 7 EW 3 5 7 9 2 4 Declarer N N S N S N Contract 4 H 4 H 3 NT 3 H 3 NT 4 H Result -2 -2 -1 -1 -3 -1 Lead H4 H4 SJ H4 DA C2 Expanded detail available on Websites. With the Bridgemate Scoring System more detail is available about each board than the limited information from ACBLscore. The Declarer, Contract and actual result – when coupled with ACBLscore info – provides players with more information than ever before. The detail is even more significant with pre-dealt hands using a dealing machine – or the analysis of player-entered boards when using BCS version 2.8.29 (or later). Bridgemate.US has been working with three bridge-specific websites that are easily set up and controlled by a nonprogrammer. Our test sites are: www.waynesboro.bridge-club.org, www.bridgewebs.com/waynesboro/ and http://site.pianola.net/wintergreen-bridge/. Visit www.bridge-club.org or www.bridgewebs.com or www.pianola.net to review their offerings and pricing. All three offer a trial period. Several clubs/units have developed their own website-display software. Also, ACBL offers a “Clubs Results” service to ACBL sanctioned clubs. When a game is finished, it is very easy to upload 2 files (3 – with hand records) and the result is immediate. More information is on our website www.bridgemate.us/product/website-displays/ Using Bridgemates II and Bridgemates Pro together If you have both a Bridgemate Pro and a Bridgemate II system, it is possible to use both systems together to score a single event. As Bridgemates II only communicate with a Bridgemate II USB server and Bridgemates Pro only with a Bridgemate Pro ‘serial’ server, it is a requirement that both servers are connected to the computer. To use both Bridgemate Pro and Bridgemate II in one event: 1. Connect both a Bridgemate II USB server and a Bridgemate Pro serial server to your computer. The Bridgemate Pro server can be connected through the USB-to-serial “dongle.” Please refer to the Bridgemate Pro manual for operating instructions of the Bridgemate Pro server. 2. Start the Bridgemate system from your scoring program. This will start the Bridgemate II system first. 3. After BCS has been loaded and Bridgemates II have been activated, click on Session Run Bridgemate Pro concurrently. This will load a second copy of BCS and this copy will start the Bridgemate Pro server. Both systems may now be used together. 4. When the session is finished, manually close both instances of BCS. Please keep in mind the following when working with both systems together: • All tables will be loaded into the Bridgemate II server and the Bridgemate Pro server. You decide which tables will use Bridgemates Pro, and which will use Bridgemates II. As a consequence, the Bridgemate “II BCS” and the “Pro BCS” will show that certain tables are not activated yet in the II or Pro server, since these units are logged into the other server. • You may wish to use Bridgemate Pro’s and II’s in separate sections, e.g., Section A uses Bridgemates II, and Section B uses Bridgemates Pro. However, the units may even be “mixed” within a Section. • Scores are exchanged between the two systems. Scores entered in Bridgemate Pro will also appear on the Bridgemate II scoring devices, and vice versa. • A scoring-program movement update will first be carried out by Bridgemate II, and a few seconds later by Bridgemate Pro. This is done automatically. • If the second instance of BCS is accidently closed, it can be started again by using the same BCS menu: Session Run Bridgemate Pro concurrently. It will remember that it has already been started before and will not start from round 1 but instead continue from where it was when the program was closed. • Since Bridgemate II has more settings than Bridgemate Pro, Bridgemate Pro will only use those settings that are for Bridgemate Pro. For example, names may appear on Bridgemates II but will not on Bridgemates Pro. 42 Declaration of Conformity Declaration of Conformity Federal Communication Commission Declaration of Conformity (DoC) Statement Responsible party: Address: Bridge Systems BV Postbus 21570, 3001 AN, Rotterdam, The Netherlands Hereby declares that the product: Product Name: Bridgemate® II Wireless Scoring System . Table Terminal: II Model No: BM2-1 FCC ID: UVIBM21 Server: USB – II Model No: BMS2-1 FCC ID: UVIBMS21 Conforms to the following regulations: FCC part 15, subpart B, section 15.47 This equipment has been tested and found to comply with the limits for a Class B digital device, pursuant to Part 15 of the FCC rules. These limits are designed to provide reasonable protection against harmful interference in a residential installation. This equipment generates, uses, and can radiate radio frequency energy and, if not installed and used in accordance with the instructions, may cause harmful interference to radio communications. However, there is no guarantee that interference will not occur in a particular installation. If this equipment does cause harmful interference to radio or television reception, which can be determined by turning the equipment off and on, the user is encouraged to try to correct the interference by one or more of the following measures: • • • • Reorient or relocate the receiving antenna. Increase the separation between the equipment and receiver. Connect the equipment into an outlet on a circuit different from that to which the receiver is connected. Consult the dealer or an experienced radio/TV technician for help. This device complies with Part 15 of the FCC Rules. Operation is subject to the following two conditions: (1) This device may not cause harmful interference, and (2) This device must accept any interference received, including interference that may cause undesired operation. Caution: Any changes or modifications not expressly approved by Bridge Systems BV could void the user's authority to operate the equipment. Canada Regulatory Compliance Statement This device complies with Industry Canada Standard RSS-210. Operation is subject to the following two conditions: (1) this device may not cause harmful interference, and (2) this device must accept any interference, including interference that may cause undesired operation of the device. Ce dispositif est conforme avec la norme CNR-210 d’Industrie Canada. Le fonctionnement du dispositif est sujet aux deux conditions suivantes: (1) le dispositif ne doit pas causer de brouillage, et (2) le dispositif doit accepter tous brouillages, incluant tous brouillages. Table Terminal: Server: II IC: 6946A-BM21 USB – II IC: 6946A-BMS21 July 2015