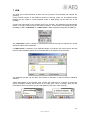
1
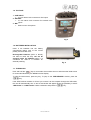
AEQ PAW 120 Professional Digital Portable Recorder USER’S MANUAL ED 02/07 Software version 3.14 CONTENTS Page 1. GENERAL INFORMATION........................................................................................... 1.1. Features........................................................................................................... 1.2. Front panel keys functions............................................................................... 1.3. Left side keys functons.................................................................................... 1.4. Rigth side......................................................................................................... 1.5. Top face........................................................................................................... 1.6. Batteries installation......................................................................................... 1.7. Turning on........................................................................................................ 1.8. Play/Record window description...................................................................... 2. USING THE PAW120.................................................................................................... 2.1. Audio recording................................................................................................ 2.2. Voice operated recording................................................................................. 2.3. Playback.......................................................................................................... 2.4. Playback levels adjustment............................................................................. 2.5. Settings storage in a template......................................................................... 2.6. Fast deleting an audio recording..................................................................... 3. PRESET MENU............................................................................................................. 4. SETUP MENU............................................................................................................... 5. FILE / FOLDER MANAGER.......................................................................................... 6. EDITION........................................................................................................................ 6.1. Edition display.................................................................................................. 6.2. Audio edition.................................................................................................... 7. USB............................................................................................................................... 8. SOFTWARE UPDATE................................................................................................... 9. SPECIFICATIONS......................................................................................................... 10. FAQ............................................................................................................................... . AEQ PAW120 2 3 4 5 5 6 6 6 7 9 9 10 11 11 11 11 12 14 17 19 19 19 21 23 24 28 1 1. GENERAL INFORMATION. What is PAW120? AEQ PAW120 is a professional hand-held digital audio recorder. It is smart, easy to use and has extensive features. The PAW120 allows user to record, playback and edit, it supports the MP2, MP3, BWF and WAV formats. The recorder also can connect with a PC via USB interface for audio files uploading or downloading. ◙ RECORD. The PAW120 allows user to pre-define some templates to make a faster selection of technical parameters when a recording is made. Select a template such as “MUSIC” or “SPEECH”. ◙ PLAYBACK. Press “ ” key to start playing. The user can monitor the audio with either earphones or built-in speaker. ◙ FILE MANAGEMENT. In the file management module it is possible to copy, move and delete files. ◙ EDIT. Cut the unnecessary sections of an audio file and get an storage space release in addition. ◙ OLED Display. The PAW120 recorder has a large bright OLED display. Files can be clearly seen in both bright (sunlight) and darkness conditions. . AEQ PAW120 2 1.1. FEATURES. • High quality internal microphone capsule. • Supports any dynamic, capacitor and electrets external microphone, with Phantom power supply. • Built-in speaker. • Built-in waveform audio editor. • Real-time MPEG and Linear PCM editing. • OLED dual colour display. • USB transfer FAT file format compatible with Windows™ and Mac™ OS. • Automatic Gain Control (AGC) recording. • Metal case. • Support BWF (Broadcast Wave File) format, for easy integration into existing automation system. • Two modes of operation for VOR (Voice Operated Record) system: Pause REC or Split Track. • Variable voice control trigger level. • Customized mute time delay. • Automatic level control. • Standard Windows FAT16 file system. • Optional external stereo microphone with direct-contact feature and self-lock system. • Document management. . AEQ PAW120 3 1.2. FRONT PANEL KEYS FUNCTIONS. 1- key: • Pause function during playback and recording. • Executes functions in menu mode. • Selects PRE-RECORD mode from STOP. 2 - C key: • Cancels (escape) a menu operation or exits a display mode. • Play/Record mode and MANAGER and SETUP menus access. 3 - REC led: • Red blinking during recording. 1 3 6 6 5 5- • • • • 3 • • • • 6- • • • 7- 8- 9- 10 - 3 Fig. 2 in Menu key: Display the sub-menu for fast selection of input device, template, etc., in play/record mode. Enters markers during recording. In edition mode it allows to jump to an exact playback position, return to a previous situation or modify resolution. Right key: Fast forward key during playback. Increases the recording level (0.5 dB steps) in prerecord/record mode. Move right in the menu mode. In edition mode moves the marker forwards. • • • • Down key: Decreases the input gain in prerecord/record mode. Skip forward to next file in play/stop mode. Moves to next available option in menu mode. Moves the A or B marker forwards in edition mode. • • • • • • 10 7 • • • • • 11 - Left key: Rewind key during playback. Decreases the recording level (0.5dB steps) prerecord/record mode. Move left in the menu mode. In edition mode moves the marker backwards. 11 9 Up key: Increases the input gain in prerecord/record mode. Skip back to previous file in play/stop mode. Moves to the previous available option in menu mode. Moves the A or B marker backwards in edition mode. 3 7 8 3 4- 2 4 3 Edit key: Fast access to edition mode from MANAGER menu. Removes the selected portion between 2 marks during editing. Removes the selected files in STOP mode. Play / Stop / Power key: Main Power ON/OFF key (press for 5 secs.). When USB cable is connected, the machine cannot be switched off. Toggles between play and stop. A-B key: Selects the position of marker A or B in the edition mode. In all other modes, put the display into high brightness for 5 sec. . AEQ PAW120 4 1.3. LEFT SIDE KEYS FUNCTIONS. Fig. 2 1 2 3 1 - RECORD switch: • When you slide up the switch the PAW120 starts recording. 2 - AGC (Automatic Gain Control) switch: • When you slide up the switch Automatic Gain Control is activated. 3 - HOLD switch: • When you slide up the switch up the keyboard controls are locked. 1.4. RIGHT SIDE. Fig. 3 1 2 3 4 1 - USB port: • Used for connecting to a PC/MAC for file download. • Allows for external DC powering of the unit. 2 - Output VOLUME adjustment: • Volume adjustment of headphones & built-in speaker. • In the sub-menus, allows selection of a character or a number (for names changing). 3 - LINE OUTPUT: • Stereo line output 3.5 mm Jack connector. 4 - Headphone output: • Stereo headphone output 3.5 mm Jack connector. . AEQ PAW120 5 1.5. TOP FACE. 1 2 3 1 - LINE INPUT: • 3,5 mm stereo Jack connector for line inputs. 2 - EXT MIC: • 3,5 mm stereo Jack connector for external micro inputs. 3 - MIC: • Built-in mono microphone. Fig. 4 1.6. BATTERIES INSTALLATION. Insert 2 AA batteries into the battery compartment taking care of the correct polarity and close the cover. Rechargeable batteries (NiCd or Ni-mH) can also be used, but they can not be charged inside the PAW120 when it is connected via USB to a PC/MAC for external powering. Fig. 5 1.7. TURNING ON. Push and hold the “ ” key for 5 seconds: the machine turns on and shows the initial screen for 2 seconds followed by the “STOP” window display. To skip the initial screen, press any key. To jump to the ”PRE-RECORD” window, press the “ ” key. If the AEQ PAW120 recorder is off and you connect it to the computer through the USB cable, the unit will automatically turn on and a sub-window will appear giving the possibility to select “USB Power” or “USB Transfer”. Make a selection and press the ” ” key. . AEQ PAW120 6 1.8. PLAY / RECORD WINDOW DESCRIPTION. 6 - Keylock status 5 - USB status 1 - Function Name 7 - Battery status 2 - Input Level 8 - Boost level 3 - Recording Level 9 - AGC status 10 - Output volume 4 - VOR status 15 - Play / Record file name 11 - VUmeter 16 - Audio parameters 12 – Current status 17 - Play / Record time 13 - Files Counters 18 - Play progress bar 14 - Total file time / Free record time 1 - Function Name: Area that indicates the function´s name of the current display (“STOP”, “PLAY”, “PRE REC” or “RECORD”). 2 - Input Level: Indicates the input device (internal/external microphone, line input or a new created device) and the associated input gain. 3 - REC Level: The recording level can be adjusted when record or prerecord function is active using the left and right keys in steps of 0.5 dB. The adjustment range depends on the selected input type: from +84 to +144 dB for “EXT MIC”, from -60 to 0 dB for “LINE”, from -12 to +20 dB for “LINE HI” and from -35 to -3 dB for “LINE LO”. Please note that when internal microphone (“INT MIC”) is selected, the “AGC” must be turned on as recording level can not be adjusted. 4 - VOR status: Indicates if VOR (Voice Operated Record) mode is turned ON or OFF. 5 - USB status: This icon appears when the machine is connected via USB to a PC/MAC for external powering. 6 - Keylock status: The key icon appears when the keys are locked by means of the “HOLD” slide button on the left side. 7 - Battery status: Five stripes inside the battery icon indicates full capacity. 8 - Input Boost level: Only when using an external mic, indicates additional gain, that can be turned off or set to +19dB or +34dB. 9 - AGC status: Indicates if Automatic Gain Control is turned ON or OFF. 10 - Output volume: The output volume level for headphones or internal speaker (play mode) can be adjusted from -40.0 dB to + 1.0 dB in 0.5 dB steps. 11 - VU meter: Full scale from -40 dB to 0 dB with peak hold indicator for left and right channels. 12 - Current status: ■ Stop, Ο Monitoring/pre-record (EE) mode, ● Record, ► Play, Forward, Rewind and ▐ ▌Pause. 13 - File counters: The upper counter indicates the total number of recorded files. The lower counter indicates the number of the file ready to be played. . AEQ PAW120 7 14 - Total file time / Free record time: In playback the counter shows the duration of the current file and in recording it shows the remaining capacity left in the memory. 15 - Play/Record file name: The name of the current file during recording or playback. 16 - Audio parameters: This area shows (left to right), the current file type, the sampling frequency, the bit rate and the Mono/Stereo mode. 17 - Play/Record time: Display in minutes & seconds the time since the playback or recording start. 18 - Play progress & free disk space bar (3 colour): During playback the entire bar corresponds to the selected file. The “filled-in” part indicates the playback progression. In stop or record mode, it indicates the remaining record space available in the memory. . AEQ PAW120 8 2. USING THE PAW120. Introduction and general information. The AEQ PAW120 is a hand-held recorder designed for a wide range of applications and functions, which are described in this manual. The operating concept is designed around a system of preset templates where all the required operating settings are stored. The user can choose different parameters of the machine and these personalised settings are stored in a template for future quick access. There are two sets of templates: one for the compression mode to be used and the other one to store different input devices. The topics covered into this User’s Manual are: • • • • • • Field audio recording. Playing a previous recording. Storing settings in a template. Editing a recording. File / Folder management. Downloading to a computer. 2.1. AUDIO RECORDING. Before making a recording the input source, compression mode, file name and working directory need to be defined. The PAW120 makes recordings according to the pre-selected settings stored in the templates. If nothing is set prior to the first recording then the default settings will be adopted. If specific settings are required, then they must be selected first defining a customized template: • • • Input device (internal/external microphone or line input). Compression format (Linear PCM, MP2, MP3, a-Law, µ-Law, G729a). Working directory (where the recorded files will be stored). When you select the input device, input gain, additional boost, use (or not) of input filter and power (this two parameters just for external micro) are automatically set according to the devices template. Select input device and compression template using the “MENU” key according to the pre-saved templates. When ready, press the “OK” key and the PAW120 will go to the “PRE REC” mode where the audio input can be heard on the headphones and the levels are shown on the vumeter. In this mode the prerecord buffer (3 seconds) is also active. In this mode, the recording level can be adjusted in 0.5 dB steps using the “ ” or ” ” keys: the value is shown in the window that appears. Initially, the value corresponds to the preset value stored along in the input device template. When internal microphone (“INT MIC”) is selected, the recording level can not be adjusted. . AEQ PAW120 9 To begin recording, slide the “RECORD” switch upwards. The red LED and the display recording symbol will start blinking. The levels are shown and can be adjusted during recording if necessary. To pause recording press the “ markers during recording, press the “ ” key. To continue recording, press it again. To enter ” key. To stop recording, simply press and hold the “ ” key for 3 seconds. If the recording is started directly from the “STOP” mode, the Pre-record buffer will be off. If during the recording the “RECORD” switch is slided upwards again, a new file will be recorded. Each new recording will be given a file name of up to 8 digits. This file will be stored in the working directory. See “Renaming a directory” (chapter 5) for details. Recording using the AGC. If the AGC switch is in the “ON” position then the Automatic Gain Control circuit is active and the manual level controls will no longer operate. The level is controlled automatically to prevent overloads. 2.2. VOICE OPERATED RECORDING. The VOR allows the system to start a recording depending on the input level. Two parameters must be entered: - the trigger level to start a recording. - the recording duration once the input signal falls 25 dB below the trigger level. IMPORTANT: To start a VOR recording, first start the record manually by shifting up the “RECORD” button. Once a recording is started using the VOR mode it will stop automatically when one of the following applies: • • • The input signal drops 25 dB below the threshold setting for more than x seconds (user defined). The internal memory of the machine is full. The batteries of the machine are flat. There are two modes of operation for the VOR system: • • Split Track: each VOR operation will create a new TAKE Pause Rec: each VOR operation will be added to the previous, thus creating a continuous TAKE. . AEQ PAW120 10 2.3. PLAYBACK. The AEQ PAW120 can play back files irrespective of the current compression mode selected. - To playback the last recorded file, press ” ” and the machine starts playback immediately. To stop the playback, press the “ ” key again. To pause the playback, use the ” “ key. If recording was made with markers, during the playback press shortly the “ the next marker position. ” key to jump to To playback another file from the same working directory, use the “ ” or “ ” keys to scroll through the recorded files available. Once “ ” is pressed, the selected file will be played immediately. During a playback of a file, the full play progress bar corresponds to the total length of the file. When a new file has been selected for playback the “TOTAL TIME” counter will indicate its full length and the “PLAY TIME” counter starts increasing once the playback begins. To REWIND during playback, press and hold the “ the “ ” key. ” key, to go FORWARD press and hold 2.4. PLAYBACK LEVELS ADJUSTMENT. The output volume level for the headphones and line output can be adjusted by the right side Buttons “+ VOL –“ in steps of 0.5 dB from -40 dB up to +1 dB. This value is also shown on the display and stored in the memory. 2.5. SETTINGS STORAGE IN A TEMPLATE. Templates are used to store the custom settings for the AEQ PAW120. These templates contain settings of: input device, levels, filter selection, microphone powering, type of compression, mono or stereo mode, etc. - Input devices: 10 templates are available and each can store the name and characteristics of different input devices such as microphone capsules or line inputs. The gain setting and powering filters can be selected for each device. Compression templates: 10 templates are available and each can be given a dedicated name and can store the desired compression mode, sampling frequency, bit rate and file extension. Templates configuration is explained on “SETUP MENU” chapter in this manual. Once completed, the desired template can be selected by pressing the “MENU” key. Choose the corresponding template by its name in the “Set compress template” or “Set input device”. 2.6. FAST DELETING AN AUDIO RECORDING. Any audio file can be selected from the “STOP” mode by pressing the “ the corresponding file is shown on the display, press the “ file. . AEQ PAW120 ” or “ ” keys. Once ” key and confirm to delete the 11 3. PRESET MENU. All the settings and parameters of the AEQ PAW120 are made through a selection of MENUs. There are two sets of menus: one is used for the selection of the pre-set choices and the other is used for storing the different settings of the machine. Press the “MENU” key and the menu that allows you to configure the PAW120 will appear. The “ “ or “ ” keys will highlight the different options and the “OK” key confirms the selection. • Set input device: Pressing the “OK” key allows selection between line input, internal or external microphone or any other predefined template. Each input device can be personalized in the “SETUP” menu. MENU Set input device OK / > DYN IECM-1 COND INT LINEH LINEL To change the input device, highlight the desired option and press “OK”. Set compress template OK / > HI QUALITY MUSIC SPEECH STENO Press “C” twice to return to the main window. Set VOR mode OK / > VOR off - 10dB • Set compress template: Allows the selection of different operating templates, containing all the recording compression settings. - 20dB - 30dB - 40dB Cancel Select by pressing the “ ” or “ ” keys a preset template. Once selected, press the “OK” key. Each template stores the following parameters: • Template name. • Compression type. • Sampling frequency. • Bit rate & Mono/Stereo mode. • File extension name. • Set VOR mode: Access to the adjustment of the Voice Operated Recording mode trigger level. This sub-menu permits to set the minimum input level for start recording or to turn off the VOR mode. • Set VOR stop mode: If “Pause REC” is selected, the recording will be paused (once the stop delay has passed) if the level drops 25 dB below the trigger level. If the input level rises again above the trigger level, the record on the same file will continue. Set VOR stop mode OK / > Set VOR stop delay OK / > Pause REC Split track 5 sec 10 sec 15 sec 20 sec Set AGC target level OK / > - 5 dB - 8 dB -11,5 dB -14dB Set pre-rec buff OK / > 500 ms 1000 ms 1,5 sec 2 sec 3 sec Set work directory OK / > RECORD USER006.DIR USER001.DIR USER defined data If “Split track” is selected, the recording will be stopped (once the stop delay has passed) if the level drops 25 dB below the trigger level. If the input level rises again above the trigger level, a new record will start. • Set VOR stop delay: It permits to select the maximum recording lengt before it stops if the input level dropped 25 dB below the trigger level. . AEQ PAW120 12 • Set AGC target level: This sub-menu permits to select the mean maximum target recording level. 4 levels are available. • Set pre-rec buffer: Permits to select the size of the pre-record (in seconds or milliseconds). • Set Loop mode: Permits to active a playback loop. There are 4 available options: “No loop”, “Current” (actives the loop just for the selected audio file), “Order” (active a loop with all the audio files, playing them back in increasing order) and “Random” (same as “Order” but with a random order). • Set search speed: Permits to increase the search speed. • Set work directory: Select the preferred sub-directory into which, files are to be stored (record or play) and press “OK”. Work directories can only be created in the “MANAGER” menu. The other directories, like “USER0001.DIR”, are the ones that include graphical information as well as editing information and should not be used to store other audio files. . AEQ PAW120 13 4. SETUP MENU. The “SETUP” menu gives access to several submenus. The most important are the compress templates creation and the input devices manager. To access to “SETUP” menu from the main display, press “C”. The microphone and folder icons appear. Press and hold the “ ” key until the screwdriver icon appears. By using the “ ” or “ ” keys, select the screwdriver icon and press “OK”. By surfing through the different menu windows, be aware that in some cases not only the “OK” key can be used to advance one step but also the “ “ and “ ” keys. Select display language OK / > Set auto power down OK / > English 15 sec 30 sec 45 sec 1 min 2 min Disable Set screen save OK / > 15 sec 30 sec 45 sec 1 min 2 min Disable Manager compress template To go back one step or to escape from a particular screen press “C”. When it appears, select the microphone icon and press “OK” to return to the main display. OK / > HI QUALITY OK / > Template manage MUSIC NAME: SPEECH CORE : WAV- PCM-16 HI QUA STENO SR : 48000Hz empty BR : 1536kBps empty EXT : WAV empty • Select display language: Actually 3 languages are available: English, Spanish and Chinese. USER defined data • Set auto power down: This menu allows 5 possible settings to power down the machine when no keys are pressed for a centain period (except in record, edit or play mode). To turn the auto power down off, select “Disable”. • Set screen save: To save battery power, the screen can be turned off automatically with 5 different settings. To turn the screen save off, select “Disable”. If this mode is active, when no keys are pressed during the selected period, the display will turn off. Push any key to turn on again the display. • Manager compress template: Before the templates can be selected from the “PRESET MENU”, they must be created and stored first. Maximum 10 templates can be entered. They are used to store different configurations and provide a quick access to them. To create a new template or edit a previously created one, select the desired one from the list that appears (“Empty” is you want to create a new one) y press “OK”. The “Template manager” window will appear, where you can define the following parameters: • NAME: The selected character can be changed by using the “+”and “-“ ouput volume buttons. Press the “ “ key to jump to the next character. Maximum 6 characters can be entered. To validate the new name press the “ ” key to go to the next step. . AEQ PAW120 14 • CORE (Recording file compression type setting): Select one of the possibilities using the “ “ or “ “ key and press the “ “key to go to the next step. • S.R. (Sampling frequency setting): Several options are available, depending on the file compression type selected. Select one of the possibilities using the “ “ or “ “ keys and press the “ “ to go to the next step. • B.R. (Bitrate and mono/stereo mode setting): Several options are available (see the table at the end of the manual). Select oneof the possibilities using the “ “ or “ “ keys and press the “ “ to go to the next step. • EXT (File extension setting): By using the “+” or “- “ output volume keys, the selected character can be changed. Press the “ “ key to proceed to the next character position. To confirm the new extension name, press “OK”. Maximum 3 characters can be entered. • Manager input device: This allows to define a new input device or edit a previously created one. Select the desired one from the list that appears (“Empty” is you want to create a new one) y press “OK”. The “InDev manager” window will appear, where you can define the following parameters: • • NAME: The selected character can be changed by using the “+”and “-“ ouput volume buttons. Press the “ “ key to jump to the next character. To validate the new name press the “ “ key to go to the next step. TYPE: This sub-menu gives the selection of the input that will be used for recording. By using the “ “or “ “ keys, select the corresponding input type and press “ “ to go to the next step. Manager input device OK / > DYN OK / > InDev manage IECM-1 NAME: DYN COND TYPE : EXT - MIC INT GAIN : + 0dB LINEH BST : + 19dB LINEL PWR : ON empty FLT : 100 - 20kHz empty empty Set speaker mode OK / > off Auto Clear record counter OK / > Clear to zero Lock input device gain OK / > Manual Set record prefix OK / > USE R Set date and time OK / > Lock Date setting YEAR MONTH DAY 2005 05 01 HOUR MIN 00 55 Restore factory settings OK / > Entry Format disk OK / > Format Check disk space OK / > USED : 0 MB FREE : 527MB Check software version OK / > Infomedia OK / > Resume factory setting Please confirm? Confirm OK / > Cancel Data will be lost Please confirm? Confirm Cancel PAW120 ver 2.6 BUILD: 1209 The available options MACHINE ID Check machine ID OK / > in this sub-menu are: 720 C - 003C 4158 - 89AC “INT-MIC” (built-in 13 microphone), “EXTDatos definidos por el USUARIO MIC” (external microphone), “LINE” (line signal), “LINE HI” (high level line signal: +0 dB fixed gain) and “LINE LO” (low level line signal: +24 dB fixed gain). . AEQ PAW120 15 • • • • GAIN: The input device gain can be pre-adjusted. To modify the value, if it’s possible, use the “ “ or “ “ keys. Once the corresponding value is set, press “ “ to go to the next step. BST: Only for “EXT-MIC” an additional boost can be added to the previous gain setting. By pressing the “ “ or “ “ keys, the boost can be set to +19dB or +34 dB. Once the corresponding setting is made, press “ “ to go to the next step. PWR: Power can only be turned on for “EXT- MIC”. The power available for the Mic is 3V dc. By pressing the “ “ or “ “ keys, power can be turned ON or OFF. FLT: A filter can be selected for “EXT-MIC”. By pressing the “ “ or “ “ keys, you can select one of the two available options. Press “OK” to validate. • Set speaker mode: The AEQ PAW120 has a built-in speaker for audio monitoring. The speaker can be turned “Off” or set to “Auto”. In the “Auto” mode the speaker is active during playback or editing only. During record or monitoring (EE) mode, the speaker is turned off. • Lock input device gain: Permits to lock or unlock the input gain adjustment from the record or pre-record display. Normally the input gain is stored in the input templates. • Set record name prefix: This sub-menu allows 4 characters to be entered. Once being in the “Input record prefix” menu use the “+” or “-“ output volume keys to select the corresponding character. Press the “ “ key for the next character position. Once all the characters are entered, press “OK”. • Set date and time: It permits to set the correct time start and date for each recording. Use the “ “or “ “ keys to set or “ “ keys to go to the next step. Once the settings made, press “OK”. • Clear record counter: Every recording has an index number incrementing automatically. Resetting the counter, by pressing “OK” when “Clear to zero” is shown, resets it to 1. The next recording will have the full name XXXX0001. If there are still files in memory and the USER name has not been changed, the next recording with the same name prefix and index will overwrite the old one. • Restore factory settings: This sub-menu permits to restore the factory settings, including the template settings names, input devices etc. • Format disk: If you need to erase all information on the internal memory, the fastest way is to format it. Once formatted, “No File” will be shown on the display. The three XXX.DAT files in the “SYSINI” folder will not be deleted. • Check disk space: Indicates in Mbytes, the remaining space left in the memory and the used space up to now. • Check software version: This sub-menu shows the type of the machine and the software version installed. • Check machine ID: This sub-menu shows the serie number of the machine. . AEQ PAW120 16 5. FILE / FOLDER MANAGER. The “MANAGER” acts like the explorer on a PC. It offers the possibility to create, erase, move, copy and rename directories or files. To access to “MANAGER” from the main display, press “C” and use the “ ” or “ ” key to select the folder icon and then press “OK”. • Return to root: To return to ROOT level, press “OK”, then select “Return” and press “OK” again. • Entering a directory: Highlight the directory name and press “OK”. Then select “Entry” and press “OK”. The files in this directory will then be shown. • Erasing a directory: To erase a directory, highlight the directory name and press “OK”. Then select “Erase” followed by “OK”. A confirmation window appears to confirm the erasure of the directory and all included files. If “DELE” is selected the directory and all included files will be deleted. OK/ > Return USER0001.DIR USER0002.DIR NEWDIR USER0001.WAV USER0002.WAV OK/ > Return Make Dir OK/ > Return OK/ > Entry USER0001.DIR Play USER0002.DIR Erase NEWDIR Make Dir USER0001.WAV USER0002.WAV Rename OK/ > Return OK/ > USER0001.DIR USER0002.DIR NEWDIR USER0001.WAV USER0002.WAV OK/ > Return OK/ > Return Make Dir OK/ > NewName NEWDI R Play OK/ > Vuelve a ventana principal Erase OK/ > USER0001.WAV confirmfile delete ? DELE / Cancel Edit Wipe • Making a directory: Press “OK” and select “Make dir”. Press “OK” once and the folder “NEWDIR” will be shown on the display. OK/ > RECORD SYS.INI OK/ > Vuelve a ventana de edición OK/ > Limpia el archivo de audio original Copy to OK/ > RECORD USER006.DIR USER001.DIR NEWDIR Move to OK/ > RECORD USER006.DIR USER001.DIR NEWDIR Make dir OK/ > Directorio nuevo Rename OK/ > NewName US E R0 0 0 1 Datos definidos por el USUARIO • Renaming a directory: To rename a directory, highlight the directory name and press “OK”. Then select “Rename” and press “OK”. The selected character can now be changed by using the “+” or “-“ output volume keys. Press the “ ” key to move to the next character. Press “OK” when completed. A maximum of 8 characters can be entered. . AEQ PAW120 17 • Erasing a file: To erase a file, highlight the file name and press “OK”. Then select “Erase” followed by “OK”. A confirmation window will appear. Select “DELE” and confirm by pressing “OK”. • Editing a file: Highlight the file name and press “OK”. Then select “Edit”, press “OK” and the selected audio file will be shown in the edit display. Editing is only possible on audio files recorded with the AEQ PAW120. All imported audio files via USB can not be edited. If the selected audio file is shown with the icon it can be edited; if it is shown with the icon it can not be edited. All MPEG files recorded on the PAW120 using 44.1 KHz sampling can also not be edited on the machine. After editing, the original audio file is not at all modified. The editing information is stored in separated data files. When this audio file is copied to the PC or MAC it still has his original file length, but when this file is played back on the machine, it will only playback the parts decided by the editing. • Wiping a file: Highlight the file name and press “OK”; then select “Wipe” and press “OK”. This function creates a new file that is a copy of the original audio file where the edition cuts have been applied (therefore it will have less lenght than the original). This new file name is the same but with a number 1 at the end (if you apply this function to USER0005.WAV file, for instante, the USER0005-1.WAV file will be created). If you edit several time the original file and, after each edition, you apply this function, new files will be created ended on 1, 2, 3... • Copying a file: To copy a file from the ROOT or from one directory to another, highlight the file to be copied and press “OK”. Select “Copy to” and press “OK”. Select the new directory (by pressing the “ “, “ “, “ “ and “ “ keys) and press “OK”. • Moving a file: To move a file from the ROOT or from one directory to another, highlight the file to be moved and press “OK”. Select “Move to” and press “OK”. Select the new directory (by pressing the “ “, “ “, “ “ and “ “ keys) and press “OK”. . AEQ PAW120 18 6. EDITION. The AEQ PAW120 is fitted with a simple audio editor. It only allows to remove sections of unwanted audio. This is done by setting 2 edition markers (A and B) and then deleting the portion between these 2 points. To start editing a recorded file, first go to the “MANAGER” menu and select the file that needs to be edited. Press the “ editing. ” key or press “OK”, select “Edit” and press “OK” again to start 6.1. EDITION DISPLAY. Run status Marker B Marker A Playback counter Original file lenght Actual file lenght Marker A position Marker B position Modulemeter 6.2. AUDIO EDITION. The audio file appears graphically. The virtual playback head is in the middle of the screen. The full length of the screen corresponds approximately to 10 seconds of sound (without zooming). Press the “ ” key four times to modify resolution and the available options will appear: 1, 3, 6 or 10 frames/pixel. To start or to stop the playback, press the “ ” key. You can move though the file by pressing the “ “ and “ “ keys or by pressing the “ “ and “ “ keys to do it at bigger intervals. If you need to place the playback head in an exact position, press the “ ” key once. A sub-window appears permitting to enter in minutes and seconds the requested position by pressing the “ “, “ “, “ “ and “ “ keys. Once all numbers are entered, press “OK”. If recording was made with markers, press the “ where you can select one to jump to its position. ” key twice and a list of them will appear . AEQ PAW120 19 ” key once to set the first edition marker (A) during play or record; press the Press the “ “ ” key a second time to set the second marker (B). Press as well the “ ” key, to move from one marker to the other one. Press and hold the “ ” to cancel selection. If you want to save the selected section in a new file, press the “OK” key (this new file name is the same but with a number 1 at the end; if you make several selections new files will be created ended on 1, 2, 3...). ” key, it will start the playback of the 3 Once the 2 markers are set, if you press the “ seconds before the marker A, then it will jump over the marked area and will play the 3 seconds after the marker B. This allows you to verify the playback before cutting. If the AGC switch is ” key the section between the 2 marker will moved to “ON” position, when you press the “ be played back. If after verifying, the edition markers are in the right place, press the “ area will be removed. ” key and the marked If after verifying, one of the markers is not in the right place, it must be moved. In the stop mode, ” key . By pressing the “ “ and “ “ first select the misplaced marker by pressing the “ keys, the marker will move step-by-step to left and right respectively. If the key is pressed and held, the marker will move at bigger intervals. If the same action is repeated during play, the corresponding marker will automatically jump to the play head position. If you edit several times a file, you can return to any of the previous situations by pressing the “ ” key three times and selecting one of the files of the list that appears. Once the file is edited, edition can be saved by pressing the “C” key . A sub-window appears giving the possibility to return to the edit window by selecting “Cancel”, to abort the edition by selecting ”Don´t” or to save the changes by selecting “Save”. After editing, the original audio file is not at all modified. The editing information is stored in separated data files. When this audio file is copied to the PC or MAC it still has his original file length, but when this file is played back on the machine, it will only playback the parts decided by the editing. If you need a file where these changes are applied, go to the “MANAGER” menu to select the edited file, press “OK”, then “Wipe” and press “OK” again. This function creates a new file that is a copy of the original audio file where the edition cuts have been applied. . AEQ PAW120 20 7. USB. The USB port of AEQ PAW120 recorder has two purposes: file download and external DC powering. As the internal memory of the PAW120 cannot be removed, audio can be extracted either through the line output in normal playback mode or alternatively via the USB port to the PC/MAC. Connect the USB cable to the computer and to the recorder. The PAW120 will automatically switch on, being powered through the USB connection. A sub-window will appear giving the possibility to select “USB Power” or “USB Transfer”. Make a selection and press the “OK” key. The “USB Power” option is simply for powering the PAW120 through the USB port for normal operation without internal batteries. If “USB Transfer” is selected, in the PAW120 display a connection icon will be shown and the machine will immediately appear as a removable disk in the explorer of the PC/MAC: The PAW120 recorder can do direct files transfer to Windows or Mac-OS without additional software. Taking WindowsXP as an example, after connect the PAW120 to a computer, a found new device information window will be shown on the right down corner of screen. Wait until the notification that the new device can be used appears (it may take a few seconds). . AEQ PAW120 21 To remove the connection, double click the hot swap at the right down corner of the screen, safely remove device window will show up, double click “VFS disk Infomedia EDS USB device” device, and remove the device. If the system is Windows98 or Windows2000, must stop/remove safely first, then the USB connection between the PAW120 and computer can be stopped, otherwise it can cause data mission. Note: Make sure the machine is full battery while communication. . AEQ PAW120 22 8. SOFTWARE UPDATE. The software of the PAW120 can be updated via USB connection. The file used for updating is named “APP.COE”. 1. 2. 3. 4. 5. Turn off the recorder. Press and hold the UP key; at this time, press POWER key until the red LED lights. Stop pressing the keys: the system update menu will show up in the PAW120 display. Connect the machine to a computer via USB cable. Open the new removable disk that computer will find and copy the new “APP.COE”, replacing the original file. If this file doesn’t appear when you open the removable disk, uncheck the “Hide protected operating system files (recommended)” option in My Computer → Tools → Folder Options → View. 6. Remove safely the disk, remove USB cable and the recorder will power off automatically. 7. Turn on the recorder and check the software version. Note: Must safely remove the disk first for the Windows98 or Windows2000 user, it can cause damage and upgrade failure. Make sure the battery is sufficient when updating the software. If you have any questions, e-mail our technical department at [email protected], or contact [email protected] in the USA and Canada. . AEQ PAW120 23 9. SPECIFICATIONS. General • • • • Data Storage: On board 512MB or 1GB flash memory. Recording Method: Digital or Digital compression. Compression Type: MPEG 1 Layer 2/3, Linear PCM, G729a and CCITT a/µ-Law. Maximum recording time (for 512MB): Bit rate Maximum time • • • • • • 8 kbps 142 hours 32 kbps 35 hours 128 kbps 8 hours 384 kbps 2.9 hours Frequency response...................................................10Hz to 20kHz: - 0.5dB Wow & flutter..................................... ........................Below measurable limits Signal to noise ratio (playback) ..................................>89dB (bandwidth 22Hz to 22kHz) Dynamic range (line input) .........................................>96dB Microphone IN ...........................................................>122dB A-weighted THD&N @ 1kHz ref 0dBFS.......................................<0.02% (bandwidth 22Hz to 22kHz) Input and Output • • • • • • • • • • • • External MIC filter selection.........................................20 Hz - 20 kHz / 100 Hz - 20 kHz External MIC maximum gain........................................82dB External MIC minimum gain.........................................19dB Earphone max power................................................. 18mW(L) + 18m(W) (16Ohm) Line maximum input level...........................................+17dBu Line maximum output level.........................................+1.5dBu Inside mono MIC External stereo MIC 3.5mm stereo plug Unbalanced line-in 3.5mm stereo plug Unbalanced line-out 3.5mm stereo plug Stereo earphone output,3.5mm stereo plug USB1.1 interface Physical • • • Dimensions.....................................................................121.4 x 51.5 x 23.0 mm Operating temperature....................................................0~70ºC Operating humidity..........................................................20%-80% Power Supply • • Internal Batteries............................................................ 2 x AA batteries Consumption.................................................................. 3V, maximum 100mA . AEQ PAW120 24 Input Device Parameters Type INT MIC Analog gain 0~10dB Boost ――― Power supply ―――― EXT MIC 0~24dB 19/34dB ON/OFF LINE LINE HI LINE LO 0~24dB 0dB 24dB ――― ――― ――― ―――― ―――― ―――― Filter ―――― 20-20kHz 100-20kHz ―――― ―――― ―――― Input Device Default Settings Name Type DYN IECM-1 COND INT LINEH LINEL EXT MIC EXT MIC EXT MIC INT MIC LINE HI LINE LO Analog gain +6dB +9dB +9dB 0dB 0dB 24dB Boost 34dB 19dB 19dB ――― ――― . AEQ PAW120 Power supply OFF ON OFF ――― ――― ――― Filter 20-20kHz 100-20kHz 100-20KHz ――― ――― ――― 25 Compress Algorithm Parameters Algorithm Linear PCM 16 bits MPEG1 LayerII Sampling Frequency 48 kHz 44.1 kHz 32 kHz 24 kHz 22.05 kHz 16 kHz 48 kHz 44.1 kHz 32 kHz MPEG1 LayerIII 48 kHz 44.1 kHz 32 kHz CCITT a Law 48 kHz 44.1 kHz 32 kHz 24 kHz 22.05 kHz 16 kHz 12 kHz 11.025 kHz 8 kHz Same as CCITT a Law 8 kHz CCITT µ Law G.729.a Bit Rate 768kbps mono, 1536kbps stereo, 705kbps mono, 1411kbps stereo, 512kbps mono, 1024kbps stereo, 384kbps mono, 768kbps stereo, 352kbps mono, 705kbps stereo, 256kbps mono, 512kbps stereo, 32kbps mono, 48kbps mono, 56kbps mono, 64kbps mono, 64kbps stereo, 80kbps mono, 96kbps mono, 96kbps stereo, 112kbps mono, 112kbps stereo, 128kbps mono, 128kbps stereo, 160kbps mono, 160bps,stereo, 192kbps mono, 192kbps stereo, 224kbps stereo, 256kbps stereo, 320kbps stereo, 384kbps,stereo 32kbps mono, 40kbps mono, 48kbps mono, 56kbps mono, 64kbps mono, 64kbps stereo, 80kbps mono, 96kbps mono, 96kbps stereo, 112kbps mono, 112kbps stereo, 128kbps mono, 128kbps stereo, 160kbps mono, 160bps,stereo, 192kbps mono, 192kbps stereo, 224kbps stereo, 256kbps stereo, 320kbps stereo 384kbps mono, 768kbps stereo 352kbps mono, 705kbps stereo 256kbps mono, 512kbps stereo 192kbps mono, 384kbps stereo 176kbps mono, 352kbps stereo 128kbps mono, 256kbps stereo, 96kbps mono, 192kbps stereo, 88kbps mono, 176kbps stereo 64kbps mono, 128kbps stereo Same as CCITT a Law 8kbps mono . AEQ PAW120 26 Compress Template Default Settings Name HI QUA MUSIC SPEECH STENO File format algorithm WAV format 16bitPCM BWF format MP1L2 BWF format MP1L2 WAV format G.729.a Sampling frequency 48000Hz 48000Hz 48000Hz 8000Hz Bit rate Extensión 1536kbps stereo 256kbps stereo 64kbps mono 8kbps mono WAV WAV WAV WAV Attack and Decay Time Sampling frequency 48kbps 32kbps 8kbps ATTACK TIME 10ms 15ms 61ms . AEQ PAW120 DECAY TIME 92ms 137ms 551ms 27 10. FAQ. Problem Possible Reason Solution The machine switched off when playback Low batteries Change batteries or power via USB Cannot switch on the machine Big noise from earphones while recording 1.Empty battery 2.Keyboard is locked 1.Too high volume of earphones 2.Too high input gain 1.Change new batteries or powerc via USB 2.Check keyboard lock 1.Turn down the volume 2.Adjust the input gain SETUP menu does not show up Has not held the RIGHT key long enough Hold the RIGHT key when the menu selection dialog box pops up Keyboard is not working 1.Keyboard is locked 2.Hardware damage 1.Slide HOLD switch 2.Return to the shop No signal or weak signal from RightInternal speaker connected to LeftChannel output when use internal Channel only speaker to playback No sound comes out when use internal speaker to playback The machine cannot automatically switched off Use earphone or an external speaker to playback 1.Inserted earphones 1.Remove earphones 2.Change the setting to 2.Speaker is disabled in system setting “Auto” 1.When USB cable is connected, the 1.Remove USB cable machine cannot be switched off 2.“Set auto power down” is disabled in 2.Select a time for auto system setting power down When use internal MIC for recording, same signal from both Right/Left Channel Internal MIC is single channel. Even When use single channel though the compress template is stereo, for recording, more disk the result is still single channel space can be saved Weak output signal Low volume setting . AEQ PAW120 When the volume is on maximum, the highest signal output is +1dBu 28