1
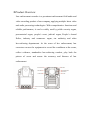
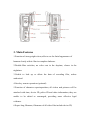
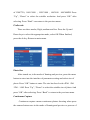
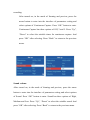
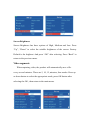
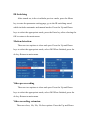
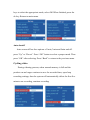
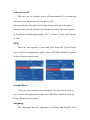
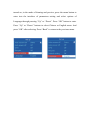
Law Enforcement Audio&Video Recorder
User manual
1.Introduction
We sincerely thank you for using our company’s new product---police
camera.This manual is the introduction of this product which briefly
introduces its functions、 features、performance 、external structure、
operation and caution items as a reference for users’ convenience. Please
read it carefully before use.
If the equipment fails or you have any confusions on the contents of this
manual please contact us, suggestions and criticism are also welcome.
Warning:
1. Far away from fire.
2.Avoiding put LCD screen and video’s camera directly under
the sun.
Cautions:
1. Specific frequencies of electromagnetic waves may affect image
quality.
2.Before you use the product to work, please do a test in order to master
the use of video.
2.Product Overview
Law enforcement recorder is a prominent enforcement field audio and
video recording product of our company, applying multiple latest video
and audio processing technologies. With comprehensive functions and
reliable performance, it can be widely used by public security organ,
procuratorial organ, people’s court, judicial organ, People’s Armed
Police, industry and commerce organ, tax authority and other
law-enforcing departments. At the scene of law enforcement, law
executors can use the equipment to record the conditions at the scene,
collect evidence, standardize law-enforcing conduct, play back the
picture of scene and assure the accuracy and fairness of law
enforcement.
3. Main Features
1.Function of strong night vision, able to see the facial appearance of
humans clearly within 10m in complete darkness.
2.Double-filter switcher, no color cast in the daytime, clearer in the
nighttime.
3.Unable to look up or delete the data of recording files, unless
authorized.
4.One-key remote operation (optional).
5.Function of character superimposition, all videos and pictures will be
attached with time, device ID, police ID and other information, they are
unable to be edited or rearranged, providing more effective legal
evidence.
6.Super-long filename, filenames of all video files include device ID,
time, police ID and other information, convenient for data archiving and
retrieving.
7.Can be fitted with external camera (AVIN function). Cameras of
various models are available, such as Bluetooth camera, button camera,
and camera equipped on the brim of hat, etc.
8.Full HD 1080P video recording.
9.Pre-recording the video, extended recording function, do not miss any
law enforcement picture.
10.Four main functions, namely video recording, photo-shooting 、sound
recording and GPS.
11.Play audio, video and photo on scene
12.Video data will be partitioned and saved automatically, avoiding the
data loss caused by faulty operation.
13.Three kinds of operation prompts, namely vibration, LED light and sound.
Performance Indicators
Frame Rate: 30 f/s
Video bit rate: 2.5 M bit/S
Resolution ratio: 1920*1080 1280*720
848*480
Wide angle: 130°
Illumination requirement: day and night (auxiliary IR)
Battery capacity: 1950mAh x2
Memory capacity: 16G(32G)
Contour dimension: 85*62*31mm
Weight: 150g
Operating temperature: 15-40°C
Working relative humidity:40%-80%
Storage temperature: -20-50℃
Storage relative humidity: 93% (40℃)
Reference Data:
Standby time: 24 hours
Continuous recording time: 5 hours (one battery full charged, IR closed,
resolution ratio 848*480)
Night control distance:more than 10 meters
4.Operation Introduction
Power On/ Off:
Press the power switch button of law-enforcement recorder for 2
seconds, the equipment will be turned on and enter the standby mode.
Under any circumstance, press the power switch button for 2 seconds, the
equipment will be powered off.
Video-recording:
After turned on, the equipment will directly enter the camera preview
mode, directly press the recording button to record, the equipment will
give two short vibrations, the red indicating light on its top will blink,
under the video-recording state, press the recording button again, the
equipment will give two short vibrations together with beep prompt, the
indicating light will stop blinking, the equipment will stop and save the
video.
Under the power-off state, press the recording button for 2 seconds,
the equipment will be turned on automatically and start the
video-recording function, at this time, if needing to end and save the
video, methods are same as above.
In case of shooting at dark night, press the IR button, then the IR light
will be turned on and enter the night shooting mode, pictures shot at night
are black and white.
Photo-shooting:
After turned on, the equipment will directly enter the camera preview
mode, press directly the photo button to shoot photos, in case of shooting
at dark night, turn on the IR light or filling light of the equipment to
shoot.
Under the video-recording state, press the photo button to capture the
picture recorded at that time.
Sound recording:
After turned on, the equipment will directly enter the camera preview
mode, press directly the sound-recording button to record sound, at this
time, the equipment is accompanying with prompts of beep, vibration,
and blink of yellow indicating light, the prompt that there is a picture
under the sound-recording state will be displayed on the screen, under the
sound-recording state, press the sound-recording button again to end and
save audio file.
IR Video Function:
Shortly press the manual light button, you can manually turn on / off
infrared light, usually in ambient low outside light situations, you can
filter poke shot from above and open infrared light, at that time the
product goes to the infrared camera mode image and color reproduction
Will be reduced, it might change the black and white video, which is
normal now.
Intercom functions:
Choose optional USB connector to link interphone achieving
intercom functions (intercom connection cable is optional).
Playback:
The law-enforcement recorder is designed with one-touch playback button
and quick playback button. Under the standby state, press the one-touch
playback button, the equipment will play back the content shot at last
automatically; if needing to play back selectively, press the playback button and
then enter the playback menu to carry out operations.
Picture playback:
Under the video-browsing state, press the playback button to enter
the playback menu button, select to enter the picture playback mode,
press the Up button or the Down button to select the picture you want to
view, press the OK button to select the picture you want to view. When
choosing the slideshow mode to play pictures, pictures will be played in
cycle under the slideshow mode.
Video playback
Under the video preview state, press the playback button to enter the
playback menu, select the video playback options. After entering the
video playback menu, press the Up button or the Down button to select
the video you want to play, press the OK button to play the video file you
select at present.
Audio playback
Under the video preview state, press the playback button to enter the
playback menu, select to enter the audio playback menu, press the Up
button or Down button to select the audio file you want to play, press the
OK button to play back the audio file you select at present.
5.Parameters Setting
Resolution:
After turned on, in the mode of framing and preview, press the menu
button to enter into the interface of parameters setting and select options
of resolution. Press “OK” button to enter. The resolution has four levels
of 1280*720、1440*1080 、1920*1080 、848*480 848*480PH. Press
“Up”, “Down” to select the suitable resolution. And press “OK” after
selecting. Press “Back” can return to the previous menu.
Code rate
There are three modes, High, medium and low. Press the Up and
Down keys to select the appropriate mode, select OK When finished,
press the ok key. Return to main menu.
Photo Size
After turned on, in the mode of framing and preview, press the menu
button to enter into the interface of parameters setting and select size of
photo. Press “OK” button to enter. The size has four levels of5M、8M、
12M、16M. Press “Up”, “Down” to select the suitable size of photo. And
press “OK” after selecting. Press “Back” to return to the previous menu.
Continuous Capture
Continuous capture means continuous photos shooting when press
the camera button once in the mode of framing and preview or process of
recording.
After turned on, in the mode of framing and preview, press the
menu button to enter into the interface of parameters setting and
select options of Continuous Capture. Press “OK” button to enter.
Continuous Capture has three options of Off, 3 and 5. Press “Up”,
“Down” to select the suitable times for continuous capture. And
press “OK” after selecting. Press “Back” to return to the previous
menu.
Sound volume
After turned on, in the mode of framing and preview, press the menu
button to enter into the interface of parameters setting and select options
of Sound. Press “OK” button to enter. Sound has three options of High,
Medium and Low. Press “Up”, “Down” to select the suitable sound. And
press “OK” after selecting. Press “Back” to return to the previous menu.
Screen Brightness
Screen Brightness has three options of High, Medium and Low. Press
“Up”, “Down” to select the suitable brightness of the screen. Factory
Default is the brightest. And press “OK” after selecting. Press “Back” to
return to the previous menu.
Video segments
When capturing video, the product will automatically save a file
every several minutes. There are 5, 10, 15, minutes, four modes. Press up
or down button to select the appropriate mode, press OK button after
selecting the OK , then return to the main menu.
IR Switching
After turned on, in the viewfinder preview mode, press the Menu
key to enter the parameter setting page, go to the IR switching mood
which includes automatic and manual modes. Press the Up and Down
keys to select the appropriate mode, press the Enter key after selecting the
OK to return to the main menu.
Motion detection:
There are two options to close and open. Press the Up and Down
keys to select the appropriate mode, select OK When finished, press the
ok key. Return to main menu.
Video pre-recording
There are two options to close and open. Press the Up and Down
keys to select the appropriate mode, select OK When finished, press the
ok key. Return to main menu.
Video recording extension
There are close, 10s, 20s, 30s four options. Press the Up and Down
keys to select the appropriate mode, select OK When finished, press the
ok key. Return to main menu.
Auto shutoff
Auto screen-off has four options of 1min, 3min and 5min and off.
press “Up” or “Down”. Press “OK” button to select a proper mood. Then
press “OK” after selecting. Press “Back” to return to the previous menu.
Cycling video
During videoing process, when warned memory is full and the
product can no longer continue to save the recorded time, open loop
recording settings, then the system will automatically delete the first five
minutes are recording, continue recording
Auto-power off
The user can set whether power off automatically if no operations
after turned on and the time of auto power-off;
After turned on, in the mode of framing and preview, press the menu
button to enter into the interface of parameters setting and select options
of Auto Power-off through pressing “Up” or “Down”. Press “OK” button
to enter
GPS:
There are two options to close and open. Press the Up and Down
keys to select the appropriate mode, select OK When finished, press the
ok key. Return to main menu.
System Reset:
There are two options to close and open. Press the Up and Down
keys to select the appropriate mode, select OK When finished, press the
ok key. Return to main menu
Language
The equipment has two languages of Chinese and English. After
turned on, in the mode of framing and preview, press the menu button to
enter into the interface of parameters setting and select options of
Language through pressing “Up” or “Down”. Press “OK” button to enter.
Press “Up” or “Down” buttons to select Chinese or English menu. And
press “OK” after selecting. Press “Back” to return to the previous menu.