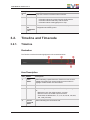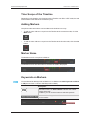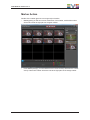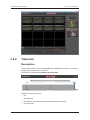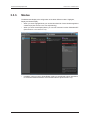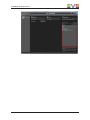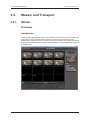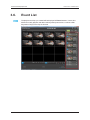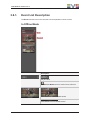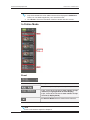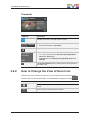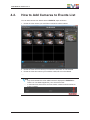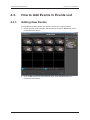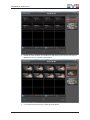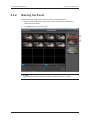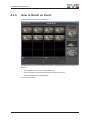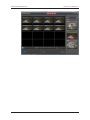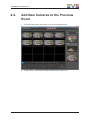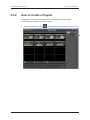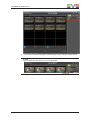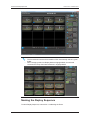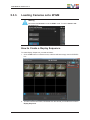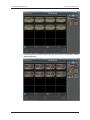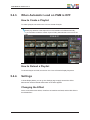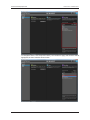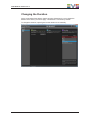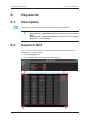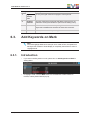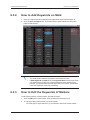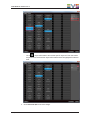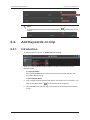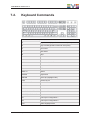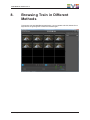
1
USER MANUAL
Version 1.2 - October 2014
USER MANUAL MultiReview 1.2
Copyright
EVS Broadcast Equipment SA– Copyright © 2003-2014. All rights reserved.
Disclaimer
The information in this manual is furnished for informational use only and subject to
change without notice. While every effort has been made to ensure that the information
contained in this user manual is accurate, up-to-date and reliable, EVS Broadcast
Equipment cannot be held responsible for inaccuracies or errors that may appear in this
publication.
Improvement Requests
Your comments will help us improve the quality of the user documentation. Do not
hesitate to send improvement requests, or report any error or inaccuracy on this user
manual by e-mail to [email protected].
Regional Contacts
The address and phone number of the EVS headquarters are usually mentioned in the
Help > About menu in the user interface.
You will find the full list of addresses and phone numbers of local offices either at the end
of this user manual (for manuals on hardware products) or at the following page on the
EVS website: http://www.evs.com/contacts.
User Manuals on EVS Website
The latest version of the user manual, if any, and other user manuals on EVS products
can be found on the EVS download center, on the following webpage:
http://www.evs.com/downloadcenter.
I
USER MANUAL MultiReview 1.2
Table of Contents
TABLE OF CONTENTS
III
WHAT'S NEW?
V
1.
1
PRODUCT OVERVIEW
1.1. Description
1
1.2. Minimal Requirements
1
1.3. General Setup
2
1.3.1. Typical Workflow
2
1.3.2. Config XT
3
STARTUP
4
2.1. Workflow Overview
4
2.2. Loading the Last Session
5
2.3. Starting a New Session
6
2.
3.
USER INTERFACE
3.1. Overview
10
3.2. Timeline and Timecode
11
3.2.1. Timeline
11
3.2.2. Timecode
14
3.3. Settings Menu
18
3.3.1. Opening the Settings Window
18
3.3.2. General
18
3.3.3. Modes
20
3.4. Mosaic and Transport
22
3.4.1. Mosaic
22
3.4.2. Transport
26
3.5. Layout Menu
4.
28
3.5.1. Overview
28
3.5.2. Server List
30
3.5.3. How to Customize Layout
30
3.5.4. How to Assign Channels
31
3.6. Event List
32
3.6.1. Event List Description
33
3.6.2. How to Change the View of Event List
35
OFFLINE MODE AND STANDALONE MODE
4.1. Description
Table of Contents
10
36
36
III
EVS Broadcast Equipment SA
Issue 1.00.A - October 2014
4.2. How to Add Cameras to Events List
37
4.3. How to Add Events in Events List
38
4.3.1. Adding New Events
38
4.3.2. Naming the Event
40
4.3.3. How to Recall an Event
41
4.4. Add New Cameras to the Previous Event
5.
ONLINE MODE/LSM CONNECTED MODE
45
5.1. Description
45
5.2. Highlights Mode
45
5.2.1. Description
45
5.2.2. How to Create a Playlist
46
5.2.3. How to Fill the Playlist
48
5.2.4. Auto Clip Naming
53
5.2.5. Naming the Playlist
53
5.2.6. Modifying the Playlist
54
5.2.7. PGM
63
5.3. Repaly Mode
63
5.3.1. Description
63
5.3.2. Loading Cameras onto Preview Channel
64
5.3.3. Loading Cameras onto 2PGM
69
5.4. Smart Replay Mode
74
5.4.1. Description
74
5.4.2. When Automatic Load on PGM is ON
76
5.4.3. When Automatic Load on PGM is OFF
79
5.4.4. Settings
79
KEYWORDS
82
6.
6.1. Description
82
6.2. Keyword Grid
82
6.3. Add Keywords on Mark
83
6.3.1. Introduction
83
6.3.2. How to Add Keywords on Mark
84
6.3.3. How to Edit the Keywords of Markers
84
6.4. Add Keywords on Clip
7.
86
6.4.1. Introduction
86
6.4.2. How to Add Keywords on Clip
87
6.4.3. How to Edit Keywords of Clips
89
SHUTTLE PRO AND KEYBOARD COMMANDS
90
7.1. Shuttle Pro Commands
90
7.2. Keyboard Commands
91
8.
IV
43
BROWSING TRAIN IN DIFFERENT METHODS
93
Table of Contents
USER MANUAL MultiReview 1.2
What's New?
In the User Manual the icon
has been added on the left margin to highlight
information on new and updated features.
The changes linked to new features in version 1.2 are listed below.
New functionality
•
Keywords on Markers,see"Keywords on Markers" in Chapter 3.2 on page 12.
•
Specification about how to add or edit "Keywords" on Mark or clip is in Chapter 6 on
page 82.
•
In this version you are allowed to go to "Full Screen Mode" mode in all the modes. See
Chapter 3.4 on page 23.
•
In Highlight Mode,now when you are creating clips,"Clip Duration" is displayed in
Timecode Bar.See Chapter 5.2.3 on page 52.
•
You can decide what kind of name you would like to apply to clips in Highlight
Mode,see "Auto Clip Naming" Chapter 5.2.4 on page 53.
•
In Highlight Mode,presently you can "Inserting Clips" before the certain clip.See
Chapter 5.2.6 on page 54.
Changed functionality
•
What's New?
The view of "Event List" has been changed, please see Chapter 3.6 on page 32.
V
USER MANUAL MultiReview 1.2
1.
Product Overview
1.1.
Description
The MultiReview application is a new tool for users who work in OB VA/Mobile Production
Truck to monitor and control the live production in the sports field. MultiReview can view
and browse all the record channels of a production with minimum bandwidth consumption.
This new perspective combined with new features will help the Live sports crews to do
their jobs more efficiently
MultiReview works with XT3 servers and Multicam 12, the Low-Res of the servers.
MultiReview can be controlled by Shuttle Pro.
MultiReview can be used in Offline/Standalone or in Online mode.
In Offline Mode, you can browse all cameras of the network without attaching to an XT3
server and coordinate a replay sequence without directly controlling it over an XT3 server
channel.
In Online Mode, you have to attach to one of the XT3 LSM servers present in the network
to browse all network cameras, to create playlists or to load a camera to the preview
channel. This mode is required to work in conjunction with a XT server of the network.
1.2.
Minimal Requirements
The minimal hardware and software requirements are the following:
•
•
1. Product Overview
LSM:
◦
XT3
◦
MU12.02 RELEASE and MU12.05 RELEASE
MultiReview:
◦
EVS PC 1U
◦
OS: Windows 7 Pro 64 bits
◦
Microsoft.Net Framework 4.5
1
EVS Broadcast Equipment SA
1.3.
General Setup
1.3.1.
Typical Workflow
Issue 1.00.A - October 2014
The diagram below displays a typical MultiReview workflow.
Note
All server have to be set with the same local time, otherwise the mosaic will not
work properly.
2
1. Product Overview
USER MANUAL MultiReview 1.2
1.3.2.
Config XT
Multicam Version: MU12.02 RELEASE and MU12.05 RELEASE
Licences Codes:
•
LoRes
•
Multicam LSM
Note
The bitrates can be set to 3 Mbps or 5 Mbps.
Note
MultiReview will use the keyword file distributed on the SDTI network, on the
Multicam side, and the keyword file parameter has to be set to 'SERVER'.
1. Product Overview
3
EVS Broadcast Equipment SA
2.
Startup
2.1.
Workflow Overview
Issue 1.00.A - October 2014
To start the MultiReview application, the following workflow has to be followed:
4
2. Startup
USER MANUAL MultiReview 1.2
2.2.
Loading the Last Session
Introduction
Load Last Session allows you to reload the last saved session. It reloads the entire
configuration including events, markers, server/remote configuration and layout. The date
and time reminds you when this configuration has been saved.
How to Load the Last Session:
To load the last session, proceed as follows:
1. Double click MultiReview application icon
.
2. Click the Load Last Session button, and then click the Start button.
Note
If the server that was attached the last time has not been attached yet, you cannot
load the last session.You have to start a new session.
2. Startup
5
EVS Broadcast Equipment SA
2.3.
Issue 1.00.A - October 2014
Starting a New Session
Introduction
Start a New Session allows you to do new operations via different modes supplied.
How to Start a New Session:
To start a new session, proceed as follows:
1. Double click MultiReview application icon
.
2. Click the Start a new session button, and then click the Next button.
3. Do one of the following:
•
6
To browse all cameras in the network and create a play sequence without attaching to
a server, select Offline (=Standalone Mode) and click the Start button.
2. Startup
USER MANUAL MultiReview 1.2
•
To attach to a server and remote, select Online and click the Next button. Continue to
Step 5.
4. In the Server and Remotes list, click the XT server and corresponding remote you
want to attach to.
2. Startup
7
EVS Broadcast Equipment SA
Issue 1.00.A - October 2014
Note
If the servers are not connected to GBE, they are highlighted in red in the Servers
and Remotes list.
5. In the Clip Destination list, select a bank.
6. In the Playlist Destination list, select a bank and click the Next button to continue.
8
2. Startup
USER MANUAL MultiReview 1.2
7. Review the settings of the three modes: Highlights, Replay and Smart Replay.
8. Click the Start button to proceed to the default application page.
2. Startup
9
EVS Broadcast Equipment SA
Issue 1.00.A - October 2014
3.
User Interface
3.1.
Overview
Illustration:
The MultiReview user interface contains the areas highlighted on the screenshot below.
Area Description
The table below describes the various areas of the MultiReview user interface.
10
Part Name
Description
1.
Mosaic area
This area contains the mosaic of maximum 16 record channels
per view.
2.
Event List
This area contains thumbnails of events. An event list is a list of
camera selections related to a same action.
3.
Interactivity
This area contains the interactivity between MultiReview and
servers described by three modes:Highlights mode, Replay
mode and Smart Replay mode.
4.
Transport
This area contains different commands. The functions of them
are sent simultaneously to all channels.
3. User Interface
USER MANUAL MultiReview 1.2
Part Name
Description
5.
Timeline
This area contains a timeline marker controller.
6.
Status Bar
This area contains:
• Information about the connection with the Shuttle Pro
• Information about interactivity with the server • Information about creating playlists or clips
7.
Title Bar
This area contains Application name, time box, Layout
and
configuration and Setting menu.
Configuratio
n bar
3.2.
Timeline and Timecode
3.2.1.
Timeline
Illustration
The Timeline contains the areas highlighted on the screenshot below:
Area Description
3. User Interface
Part
Marker
Description
1.
Event
Marker
Marker indicating a particular event. Each time a new event is
created with at least one camera inside, an event marker in
Highlight mode there are no event markers.
2.
Cue Point
Cue added via Mark or Live.
3.
Zoom Area Used to change the time scope of the Timeline by zooming in and
out.
• Maximum zoom: the visible scope is 1 minute.
• Minimum zoom: the visible scope is 24 hours.
• Zoom rates are divided into 1, 2, 5, 10, 20, 45, 90, 180, 360,
720, 1440 ( minutes).
4.
Current
Timecode
Marker
Marker indicating the current timecode.
11
EVS Broadcast Equipment SA
Issue 1.00.A - October 2014
Time Scope of the Timeline
Depending on the situation, the timescope of the Timeline can differ. In E/E mode, the end
of the timeline is the head of the record train (live).
Adding Markers
Cue points and event markers can be added to the timeline in two way:
•
To add an event marker or cue point to the Timeline at the current timecode, click the
Mark button.
•
To add an event marker or cue point to the Timeline at the live timecode, click the Live
button.
Marker Name
The default name of a cue points is 'Marker'.
The default name of an event marker is the name as used in the playlist.
Keywords on Markers
You are allowed to add keywords on Marks or Live Marks when Add Keywords on Mark
is ON(see section 8.3.2 How to Add Keywords on Mark).
Description
The button which is on Green Marker indicates this marker
contains keywords.
In addition, you can click the button to edit the keywords.
It shows the list of keywords of this marker when mouse is
over the marker.
12
3. User Interface
USER MANUAL MultiReview 1.2
Marker Action
Double click a marker (green one or orange one) on timeline,
3. User Interface
•
Marker(green):you will set sources at the frame of this marker, and the blue marker
will be set to be at the right place of the green marker.
•
Event Marker(orange): you will load the event in the event list (it becomes the current
event), and the blue marker will be set to be at the right place of the orange marker.
13
EVS Broadcast Equipment SA
3.2.2.
Issue 1.00.A - October 2014
Timecode
Description
The screenshot below shows the Timecode area of MultiReview interface. Timecode is
displayed by the blue marker on Timeline.
The format of Timecode is Hour:Minute:Second:Frame.
There are 4 modes on Timeline:
14
•
EE
•
Browsing train
•
Browsing the clips defined by mark In and mark Out in the playlist
•
Go to timecode
3. User Interface
USER MANUAL MultiReview 1.2
Timecode Mode
EE Mode
The timeline slides from right to left.
Blue Marker = Live Timecode.
The blue marker remains at the same place. Clip Browsing Mode
The timeline scope is adjusted to fit the clip duration (+margin).
The timeline does not slide unless the browse is between the mark in and the mark out of
the selected clip.
Blue marker = position of the current timecode during the browse.
3. User Interface
15
EVS Broadcast Equipment SA
Issue 1.00.A - October 2014
Go to Timecode
There are two ways to go to Timecode,proceed as follows:
16
3. User Interface
USER MANUAL MultiReview 1.2
3. User Interface
•
Manually enters a time to reach the timecode (You don't need to select a camera).
•
Click the Previous Cue button or the Next Cue button to reach timecode.
17
EVS Broadcast Equipment SA
Issue 1.00.A - October 2014
Edit Timecode
To edit Timecode, proceed as follows:
1. Double-Click the specific part of Timecode you want edit,hour,minute, second or
frame.
2. Enter the specific time, then click the ENTER button of keyboard to go to timecode.
Note
The time you enter should exist on server, or you cannot go to timecode.
3.3.
Settings Menu
3.3.1.
Opening the Settings Window
To open the Settings window, click the Settings button in the toolbar.
The Settings window contains the following categories:
3.3.2.
•
General
•
Modes
•
About
General
The General area contains the following settings:
The interface of General setting is the default interface of setting menu, as the screenshot
below shows.
18
3. User Interface
USER MANUAL MultiReview 1.2
3. User Interface
Setting
Description
Delete all
timeline
markers
Allows you to clear all the timeline markers.
Delete all
events
Allows you to delete all the events in playlists and replay sequences.
Keyword grid
Allows you to check keyword file found in the SDTI network.
This option is only visible in the Online mode.
Add keywords
on clips
When this setting is enabled, the keyword grid pops up each time a
marker is added allowing the user to assign up to 5 keywords to
these clips.
This option is only visible in Online mode.
Add keywords
on mark
When this setting is enabled, the keyword grid pops up each time a
marker is added allowing the user to assign up to 5 keywords to each
marker to each marker.
This option is only visible in the Online mode.
Resync playlist
Allows you to resync the playlists created by MultiReview on the
server.
19
EVS Broadcast Equipment SA
3.3.3.
Issue 1.00.A - October 2014
Modes
The Modes area displays the configuration of the three different modes: Highlights,
Replay and Smart Replay.
20
•
When you are in Highlight Mode,you can decide what kind of name shall be applied to
created clips (See section 5.2.4 Auto Clip Naming).
•
When you are in Smart Replay Mode, you can turn Automatic Load on PGM ON/OFF
(See section 5.4.2 or section 5.4.3).
•
In addition, when you are in Smart Replay mode,you are allowed to apply transitions
to cameras and edit the duration of the transition effects (See section 5.4.4).
3. User Interface
USER MANUAL MultiReview 1.2
3. User Interface
21
EVS Broadcast Equipment SA
3.4.
Mosaic and Transport
3.4.1.
Mosaic
Issue 1.00.A - October 2014
Overview
Introduction
Mosaic player is dedicated to preview the cameras or channels which are presented in the
network for users to edit more easily or arrange sequences in the event list to view.
Mosaic area contains the mosaic of maximum 16 record channels in one page. If there are
more than 16 channels, there's another mosaic available. 4*4 is the default start up layout
by MultiReview.
22
3. User Interface
USER MANUAL MultiReview 1.2
Full Screen Mode
Full Screen Mode Off
When you start MultiReview application, it will start with full screen mode off by default.
The user interface is with all the components in.
Full Screen Mode On
The version 1.2 allows you to go to full screen mode when you are operating with
MultiReview.
How to Go to Full Screen Mode
•
Click
to go to full screen mode.
When you are in full screen mode, only mosaic area is been seen by default.
3. User Interface
23
EVS Broadcast Equipment SA
•
Click
Issue 1.00.A - October 2014
to exit full screen mode.
How to Go to Full Screen Mode with Event List
Click
24
to view Event List in full screen mode.
3. User Interface
USER MANUAL MultiReview 1.2
Mosaic Cell Description
Each cell of mosaic contains zoom out icon and OSD information which includes server
name, camera name and the sequence of the thumbnail in the event list.
Part
Description
1.
The OSD is :
SERVER NAME (NET NAME) – CAMERA NAME
OSD Server info
2.
the sequence of the thumbnail in the event list
Sequence
A cell only can be enlarged four times as big as the
original size.
3.
Zoom Out
Re-size the enlarged cell to its original size.
Zoom In
Description
Normal Low Resolution
4X
3. User Interface
25
EVS Broadcast Equipment SA
3.4.2.
Issue 1.00.A - October 2014
Transport
The screenshot below shows the transport area.These transport functions are sent
simultaneously to all channels except the Go To In button and the Go To Out button,
which can only be used in Highlights mode, and the Return button only works in online
mode.
Command
Description
•
Back to live
•
•
In Highlight Mode, go back to the Live train without clearing IN or
OUT point, but it's invalid in clip mode.
In Replay Mode, go back to the Live train without clearing any
operations you've done before and without creating a new event.
In Smart Replay Mode, go back to the live train without creating a
new event and exit clip mode.
Go back to the Live train.
Back to live
Go back to the point which was defined by Mark In previously.
Go to in
Go to the point which was defined by Mark Out previously.
Go to out
Go to the last cue defined by Mark.
Previous cue
Go to the next cue defined by Mark.
Next cue
Fast rewind
Fast forward
There are 4 speeds for the Fast rewind.To click once is 1X, twice is
2X....
The maximum speed is four times the original speed.
There are 4 speeds for the Fast forward.To click once is 1X, twice is
2X....
The minimum speed is minus four times the original speed.
Go to Previous Frame from the browsing train or clips
Previous
frame
26
3. User Interface
USER MANUAL MultiReview 1.2
Command
Description
Go to Next Frame from the browsing train or clips
Next frame
Play command on the browsing train or clips
Play
Pause command on the browsing train or clips
Pause
Add a marker on timeline at the current timecode.
Mark
Add a marker on timeline at the LIVE timecode.
Live
3. User Interface
27
EVS Broadcast Equipment SA
3.5.
Layout Menu
3.5.1.
Overview
Issue 1.00.A - October 2014
Introduction
You can change the layout of mosaic area and assign channels to the mosaic cells from
the server in the layout configuration page.
By default, the mosaic is a grid of 4*4.
•
•
28
If there are more than 16 cameras (record channels), a second page of mosaic cells
are assigned in the same way.
◦
Between 17 and 25 cameras, the second layout will be a grid of 3 * 3.
◦
Between 26 and 28 cameras, the second layout will be a grid of 3 * 4.
◦
Between 29 and 32 cameras, the second layout will be a grid of 4 * 4.
If there are more mosaic cells than record channels, they will stay empty.
3. User Interface
USER MANUAL MultiReview 1.2
Command Description
Command
Description
Mosaic page number, the number with blue
highlight indicates the current page number for the
mosaic page.
Click the Auto button,
• the layout will restore default layout;
• MultiReview will detect all servers in the
network and assign each record channel
connected with GBE to each part of the
mosaic automatically.
All record channels assigned previously will be
canceled and the layout configuration will be set
to 4*4 for Layout 1 and 2.
Every time the changed layout configuration need
to be saved by clicking Save button.
Six forms of layout configuration,representing the
girds of 3*3, 3*4,4*4,1+2(based on 4*3), 2+8
(based on 4*4) and 1+8(based on 4*3)
respectively. The one you choose is to be
highlighted.
Quadruplicate the mosaic cell.
Re-size mosaic cell to its original size.
3. User Interface
29
EVS Broadcast Equipment SA
3.5.2.
Issue 1.00.A - October 2014
Server List
Server list is available on the right side of the layout configuration.
All record channels in the network will be detected and listed in the drop-down list of
Server List.
Note
In this version, when the recorder is in super slow motion mode, the recorder icon
will be with a tag ,2x/3x/4x/5x/6x/10x.
3.5.3.
How to Customize Layout
There are two methods to customize layout, proceed as follows:
•
You can customize a standard layout by clicking one form of mosaic configurations,
.
•
30
You are also allowed to customize layout through enlarging or re-sizing the cells.
◦
Click the Zoom Out button to enlarge the cell to four times as large as its original
size.
◦
Click the Zoom In button to re-size the enlarged cell to its original size.
3. User Interface
USER MANUAL MultiReview 1.2
Note
The customization as follows,
• A 3*3 can be transformed into 1 large + 5 normal cells.
• A 3*4 can be transformed into 2 large + 4 normal cells.
• A 4*4 can be transformed into a 2*2.
3.5.4.
How to Assign Channels
MultiReview can automatically assign all the record channels (up to 32 channels) of the
servers to each mosaic cell in the same network .
You are also allowed to assign channels manually,proceed as follows,
•
Click the Layout button,
.
•
Click the Reset button, to cancel the current layout setting.
•
Drag and drop the record channels in the Server List tree into the mosaic cells one by
one.(Assigned record channels will be in bold in the Server List.)
•
Click the Save button, to preserve the change of layout.
Or Click the Layout/Settings button to leave layout interface, then there will be a popup window to ask if you want to save the changes. Click Yes to save it.
Note
The server is in gray indicates the certain server is disconnected to GBE.
3. User Interface
31
EVS Broadcast Equipment SA
3.6.
Issue 1.00.A - October 2014
Event List
The playlists and clips you created will be displayed in Event List area. You are also
allowed to modify playlists and add or edit keywords (see section 8.4.3 How to Edit
Keywords of clips) of the clips in this area.
32
3. User Interface
USER MANUAL MultiReview 1.2
3.6.1.
Event List Description
The Event List view is a list of events that can be expanded to see the content.
In Offline Mode
Description
Playlist Name
It is Remove Button which is used to remove Events.
the thumbnail of the first added camera
the In Point of the first added camera
3. User Interface
33
EVS Broadcast Equipment SA
Issue 1.00.A - October 2014
Note
1. Only the thumbnail of the first added camera will be displayed in EVENTS list.
There's no view detail supplied for you to check the event.
2. Click Event to check the thumbnail of the first camera and click it to exit.
In Online Mode
Event
Description
Playlist Name(default)-Playlist Name(editable)
4 clips - 00:00:06;24 indicates the total number of clips
- Duration (in Highlight Mode & Smart Replay)
4 clips - 00:00:06;24 indicates the total number of clips
- In Point (in Replay Mode)
It is Remove Button which is used to remove Events.
Note
Click on the event to expand or collapse it.
34
3. User Interface
USER MANUAL MultiReview 1.2
Thumbnail
OSD Info
Description
the index of the item / the total number of items
•
•
119340- keyword indicates Sever Name - Recorder Name
keyword indicates the Clip Name
It is Remove Button which is used to remove the certain clip.
•
•
•
17: 53: 54; 28 indicates the In Point
17: 53: 56; 19 indicates the Out Point (In Replay Mode
there's no Out Point.)
048B indicates the LSM ID (In Replay Mode there's no
LSM ID)
It is Keyword Button which is used to add or edit keywords of
the specific clip.
3.6.2.
How to Change the View of Event List
There are two types of Event List view for you to set.One is the view with thumbnails,
another is the view without thumbnails. You are allowed to change it by clicking
.
Description
Click it to set the view with thumbnails,and it is the view by
default.
Click it to set the view without thumbnails.
3. User Interface
35
EVS Broadcast Equipment SA
Issue 1.00.A - October 2014
4.
Offline Mode and Standalone
Mode
4.1.
Description
In the Offline mode(or called Standalone mode), you can monitor and browse all the record
channels and cameras in the network and select camera angels to coordinate a replay
sequence.
36
4. Offline Mode and Standalone Mode
USER MANUAL MultiReview 1.2
4.2.
How to Add Cameras to Events List
You can add cameras from Mosaic area to EVENTS, steps as follows:
1. Double click the camera you would like to add,which will be indexed.
2. Double click the second camera you would like to add,which is to be indexed.
3. Double click the third camera you would like to add,which is to be indexed.
......
Note
• Only the thumbnail of the first added camera is displayed in EVENTS list.
There's no view detail supplied for you to check the event.
• In the mean time,there will be an event marker created on timeline when an
event is created.
4. Offline Mode and Standalone Mode
37
EVS Broadcast Equipment SA
Issue 1.00.A - October 2014
4.3.
How to Add Events in Events List
4.3.1.
Adding New Events
You are allowed to add more than one events in Events List, steps as follows:
1. Double click the certain cameras, and there will be an event in Event List, as the
screenshot shows below.
2. Click the E/E button,then there will be an empty event in Event List, as the
screenshot shows below.
38
4. Offline Mode and Standalone Mode
USER MANUAL MultiReview 1.2
3. Double click the cameras you would like to add,and they will be in the new event in
Event List, as the screenshot shows below.
4. If you want to add more events, follow the steps above.
4. Offline Mode and Standalone Mode
39
EVS Broadcast Equipment SA
4.3.2.
Issue 1.00.A - October 2014
Naming the Event
You are allowed to name Event in Event List area, proceed as follows,
1. Right-click the certain event, then input the name you want into the bar as the
screenshot shows below.
2. Click Apply button to save the name.
Note
You are not allowed to name the empty event which was newly created.
40
4. Offline Mode and Standalone Mode
USER MANUAL MultiReview 1.2
4.3.3.
How to Recall an Event
The screenshot below is of the latest event.
Double click the certain event marker to recall the corresponding event you would like to
browse.
•
The timecode will reflect the corresponding time;
•
The blue marker located at the right position of the event marker;
•
That event presented in orange bolder.
as screenshots below:
4. Offline Mode and Standalone Mode
41
EVS Broadcast Equipment SA
42
Issue 1.00.A - October 2014
4. Offline Mode and Standalone Mode
USER MANUAL MultiReview 1.2
4.4.
Add New Cameras to the Previous
Event
1. To recall a certain event, see section 4.3.3 How to Recall an Event.
2. To add cameras, see section 4.2 How to Add Cameras to Event List.
4. Offline Mode and Standalone Mode
43
EVS Broadcast Equipment SA
44
Issue 1.00.A - October 2014
4. Offline Mode and Standalone Mode
USER MANUAL MultiReview 1.2
5.
Online Mode/LSM Connected
Mode
5.1.
Description
Online Mode is also called LSM Connected Mode, in which you can browse all cameras of
the network, and create playlist or load cameras to preview channel. This mode requires
to work in conjunction with an XT server of the network.
Highlights mode, Replay mode and Smart Replay are included in it.
Note
Before going to choose the three modes,you must attach to a server and choose
the destination of clip and playlist listed respectively. They will be highlighted
after selecting, as the screenshot shows below.
5.2.
Highlights Mode
5.2.1.
Description
Highlights Mode allows you to create one or more than one highlights. You can monitor all
cameras,and select interesting camera angles and In/Out points, afterwards there are to
be events and clips on the server selected.
Note
Please make sure that the mode is activated. Click the specific icon which will be
highlighted.
5. Online Mode/LSM Connected Mode
45
EVS Broadcast Equipment SA
5.2.2.
Issue 1.00.A - October 2014
How to Create a Playlist
In Highlights mode, you are allowed to select camera angles to create playlist.
Create a playlist in playlists, proceed as follows,
1. Add a new playlist by clicking
46
, and there will be a blank playlist in the event list.
5. Online Mode/LSM Connected Mode
USER MANUAL MultiReview 1.2
2. If you want to create more playlists, after filling the Playlist, follow the steps above.
Note
The current selected playlist is in an orange border.
5. Online Mode/LSM Connected Mode
47
EVS Broadcast Equipment SA
5.2.3.
Issue 1.00.A - October 2014
How to Fill the Playlist
Steps
1. Create a playlist.
2. Click a camera or more than one camera in the mosaic area .
Or Click
48
to select all the cameras in the mosaic area.
5. Online Mode/LSM Connected Mode
USER MANUAL MultiReview 1.2
Note
If you would like to cancel the selected cameras, proceed as follows:
• Click the selected camera, then it will be canceled and will be without orange
bolder.
• If you selected all the cameras and you want to cancel all of them, click
to cancel all.
3. Click the Mark In button, to define the clip IN point.
5. Online Mode/LSM Connected Mode
49
EVS Broadcast Equipment SA
Issue 1.00.A - October 2014
4. Click the Mark Out button, to define the clip OUT point.
50
5. Online Mode/LSM Connected Mode
USER MANUAL MultiReview 1.2
Note
You are not forced to click Mark In before Mark Out, proceed as follows:
1. Click the Pause button.
2. Click the Out button, to define the clip OUT point.
3. Click the Previous Frame button, to return back to a specific previous frame
and define it as the IN point with clicking the In button.
4. Click the Save button,to create a clip or clips in the playlist. Then, thumbnail(s) will be
displayed in the Playlist.
Note
There's no event marker on timeline.
5. Online Mode/LSM Connected Mode
51
EVS Broadcast Equipment SA
Issue 1.00.A - October 2014
Clip Duration
When you are creating a clip, as soon as IN (or OUT) is defined, it shall be displayed in
Status Bar.
•
When you defined IN(or OUT) point, it will be displayed in Status Bar.
•
When you defined the IN point, the exact duration will be displayed in Status Bar.
And when define the OUT point firstly, presently the DURATION will be displayed like
52
5. Online Mode/LSM Connected Mode
USER MANUAL MultiReview 1.2
5.2.4.
Auto Clip Naming
In Highlight Mode, you are allowed to decide what form of name shall be applied to clips
you will create, proceed as follows,
1. Go into Settings Page. (You can also do it in Configuration Page when the
application starts up.)
2. Select one form to name the clip in the drop-down list.
Options Description
5.2.5.
Option
Description
None
If you select None, the clips created by MultiReview will not have
any name.
Recorder
Name
The recorder name from where the clip has been created will be used
to name the clip.
MRClip
Edit the name you would like to give to all clips created by
MultiReview.
Naming the Playlist
To name Playlist, see section 4.3.2 Naming the Event.
5. Online Mode/LSM Connected Mode
53
EVS Broadcast Equipment SA
5.2.6.
Issue 1.00.A - October 2014
Modifying the Playlist
Changing Order
After finishing creating clips, you are allowed to change the sequence of the clips in the
playlist.
Change the sequence of the clips,proceed as follows,
1. Double-click the playlist, you can see the clips are indexed.
2. Drag the specific clip which you would like to change the sequence to the specific
place you want.
Inserting Clips
If you select a clip in the playlist, next clips created will be inserted BEFORE this clip
position.
•
54
Expand a certain playlist, and select a specific clip (119340 - ASD1259 - ASD1259;
LSM ID: 073C).
5. Online Mode/LSM Connected Mode
USER MANUAL MultiReview 1.2
•
To add a clip into this playlist, see section 5.2.3 How to Fill the Playlist.
•
The new clip will be inserted before the selected clip in the playlist(The second clip
now is the third one).
5. Online Mode/LSM Connected Mode
55
EVS Broadcast Equipment SA
Issue 1.00.A - October 2014
Note
If you don't want to insert clips, just re-click the selected clip in the palylist to cancel
insert. Then the cameras will be added at the end of the playlist.
Removing Clips
To remove playlists or clips, click
56
in the thumbnail.
5. Online Mode/LSM Connected Mode
USER MANUAL MultiReview 1.2
Loading a Clip on the Timeline
After creating playlists, you can browse or trim them ,proceed as follows:
1. Recall a specific playlist you would like to browse or trim, then the playlist will be
expanded.
2. Double click the a certain clip in playlist, then that clip will be loaded on the timeline.
When the clip is loaded on timeline, you can see there's an IN point and an OUT point
on timeline.In addition, the blue marker will locate at the IN point, as the screenshot
shows below.
5. Online Mode/LSM Connected Mode
57
EVS Broadcast Equipment SA
58
Issue 1.00.A - October 2014
5. Online Mode/LSM Connected Mode
USER MANUAL MultiReview 1.2
Trimming a Clip
Trim a clip, follow the steps below:
1. Load an specific clip on timeline.
2. Click the Previous Frame button or the Next Frame button to get to the specific
frame.
3. Click the In button to define the clip IN point.
5. Online Mode/LSM Connected Mode
59
EVS Broadcast Equipment SA
Issue 1.00.A - October 2014
4. Click the Previous Frame button or the Next Frame button to get to the specific
frame.
5. Click the Out button to define the clip OUT point.
60
5. Online Mode/LSM Connected Mode
USER MANUAL MultiReview 1.2
Note
You can also click the Fast Rewind button or Fast Forward button to trim a clip,
following the steps above.
If you fast rewind or fast forward out of the In Point or Out Point, there will be a sign
to show you where is the In Point or Out Point,
/
.
6. Click the Save button to save the trim.
5. Online Mode/LSM Connected Mode
61
EVS Broadcast Equipment SA
62
Issue 1.00.A - October 2014
5. Online Mode/LSM Connected Mode
USER MANUAL MultiReview 1.2
5.2.7.
PGM
Click the PGM button,
, then you are allowed to check the XT server and LSM
remote you have selected, which is highlighted in the list.
In addition, you can check and change the destination of clip and playlist.
5.3.
Repaly Mode
5.3.1.
Description
This mode allows you to load any cameras from network on Preview Channel or
Program Channel according to the remote configuration:
•
In PGM/PRV mode, your selection will be loaded to the Preview channel of the
attached server.
•
In 2 PGM mode, your selection will be loaded to the PGM 1 or 2 of the attached server.
Note
Please make sure that the mode is activated. Click the specific icon which will be
highlighted.
5. Online Mode/LSM Connected Mode
63
EVS Broadcast Equipment SA
5.3.2.
Issue 1.00.A - October 2014
Loading Cameras onto Preview Channel
Warning
Remember the Remote must be in PGM + PRV(Preview Channel) mode. Set
it in Servers and Remotes page.
64
5. Online Mode/LSM Connected Mode
USER MANUAL MultiReview 1.2
How to Create a Replay Sequence
If you would like to load cameras onto Preview Channel, you can create Replay
Sequences, proceed as follows:
1. Click the E/E button to create an event, and there will be an empty event in EVENTS
List.
2. Double click the camera you would like to create in Replay Sequence.
5. Online Mode/LSM Connected Mode
65
EVS Broadcast Equipment SA
Issue 1.00.A - October 2014
Note
• The first selected camera will be loaded on PRV automatically and be in green
bolder.
• When changing mode from Replay Mode to Highlight Mode, the selected
cameras will be kept their selected status in Highlight Mode.
Naming the Replay Sequence
To name Replay Sequence, see section 4.3.2 Naming the Event.
66
5. Online Mode/LSM Connected Mode
USER MANUAL MultiReview 1.2
How To Take the Cameras onto PGM
1. Please make sure you are in a specific event in the Replay Sequence.
2. Click
, the Take button on Remote, to take the first camera which is already
on PRV automatically onto PGM.
•
The camera loaded onto PRV will be in green bolder.
•
The camera taken onto PGM will be in red bolder.
•
After taking a camera onto PGM,the next camera will be loaded onto PRV in
sequence automatically.
3. Click
5. Online Mode/LSM Connected Mode
again, you will take the camera on PRV onto PGM.
67
EVS Broadcast Equipment SA
Issue 1.00.A - October 2014
Forcing the Load
To force the load, double click the certain cameras.
For instance:
1. The first one is already on PRV automatically, then double click the last one to force it
to load on PRV.
2. Click
to take it on PGM.
How to Recall a Replay Sequence
To recall the Replay Sequence created before, there are two methods:
68
•
Double click the specific event marker on timeline.
•
Double click the event you would like to browse in EVENT list.
5. Online Mode/LSM Connected Mode
USER MANUAL MultiReview 1.2
5.3.3.
Loading Cameras onto 2PGM
Warning
Remember the Remote must be in 2PGM mode. To set it in Servers and
Remotes page.
How to Create a Replay Sequence
To create Replay Sequences, proceed as follows:
1. Click the E/E button to create an event, and there will be an empty event in EVENTS
List.
2. To load a camera onto PGM1, left double-click the camera you would like to create in
Replay Sequence.
5. Online Mode/LSM Connected Mode
69
EVS Broadcast Equipment SA
Issue 1.00.A - October 2014
3. To load a camera onto PGM2, right double-click the camera you would like to create in
Replay Sequence.
70
5. Online Mode/LSM Connected Mode
USER MANUAL MultiReview 1.2
Note
The camera selected by left double-click will be loaded on PGM1 automatically and
be in RED bolder.In addition, the camera selected by right double-click will be
loaded on PGM2 automatically and be in GREEN bolder.
5. Online Mode/LSM Connected Mode
71
EVS Broadcast Equipment SA
Issue 1.00.A - October 2014
Forcing the Load
You are allowed to load the specific cameras onto PGM1 or PGM2. To force the load, left
double-click to load them onto PGM1 or right double-click to load them onto PGM2.
For instance:
The forth one is already on PGM2 , you are allowed to left double-click it to force it to load
on PGM1. Then the forth one is in red border, shows as the screenshots below.
72
5. Online Mode/LSM Connected Mode
USER MANUAL MultiReview 1.2
5. Online Mode/LSM Connected Mode
73
EVS Broadcast Equipment SA
5.4.
Smart Replay Mode
5.4.1.
Description
Issue 1.00.A - October 2014
Introduction
This mode allows you to quickly create a playlist by selecting camera angles and time,
click in the mosaic to select best angles and define IN/OUT points according to the
scenario.
Illustration of In/Out point
•
Select CAM1 as a start,you will make an IN point which is T1.
•
Continue to select a new camera (CAM2), and the IN point is T2.
•
This action defines the OUT point of the previous camera(CAM1),and creates the first
clip in the playlist. This clip is automatically added on a playlist of your server, and this
playlist is loaded to the PGM (ready to start playing).
•
Continue to selects a new camera (CAM3),and the IN point is T3.
•
This action defines the OUT points of CAM2, and creates the second clip in the
playlist. This clip is appended to the ON AIR playlist.
This picture shows the processes talked above.
Note
Please make sure that the mode is activated. Click the specific icon which will
highlighted.
74
5. Online Mode/LSM Connected Mode
USER MANUAL MultiReview 1.2
Set the Form of Loading Playlist Before Starting
Before starting, please make sure if you want to load playlists on PGM automatically.
To set the form of loading, turn Automatic Load on PGM ON/OFF on Configuration page
or in Setting Menu.
5. Online Mode/LSM Connected Mode
75
EVS Broadcast Equipment SA
5.4.2.
Issue 1.00.A - October 2014
When Automatic Load on PGM is ON
How to Create a Playlist
You can create playlists when Automatic Load on PGM is ON, proceed as follows:
1. Click the E/E button to create an event, and there will be an empty event in EVENTS
List.
2. In Smart Replay, there are two ways to add new elements into the paylist.
•
76
Select cameras from the mosaic by double clicking to create a chained sequence,
then the IN/OUTpoint will be adjusted automatically with the following rule: TC IN of
the new selected camera = TC OUT of the previous selected camera.
5. Online Mode/LSM Connected Mode
USER MANUAL MultiReview 1.2
Note
• The first camera in playlist will be loaded on PGM automatically, which is in red
bolder.
• The last selected camera is in gray, because it does not have an OUT point.
• If you leave the sequence (click the E/E button, switch to another mode, or exit
the application), an out point will be automatically added.
• If the playlist created in Smart Replay mode is modified from the LSM Remote,
this playlist will be synchronized with the MultiReview.
•
Select a camera by double clicking to defines the IN point, and double click the same
camera again to define the OUT point.Then the selected camera in mosaic area and
the thumbnail in playlist are in blue border.
5. Online Mode/LSM Connected Mode
77
EVS Broadcast Equipment SA
Issue 1.00.A - October 2014
Naming the Playlist
To name playlist in Event List area, see section 4.3.2 Naming the Event.
How to reload a Playlist
To recall a playlist, see section 5.3.2 How to recall a Replay Sequence.
78
5. Online Mode/LSM Connected Mode
USER MANUAL MultiReview 1.2
5.4.3.
When Automatic Load on PGM is OFF
How to Create a Playlist
To create a playlist, see section 5.4.2 How to Create a Playlist.
Note
Please pay attention to that clips will not to be loaded onto PGM automatically.
If you would like to load the certain clip onto PGM, please double-click to force the
load.
How to Reload a Playlist
To reload a Playlist on PGM, see section 5.3.2 How to Recall a Replay Sequence.
5.4.4.
Settings
In Smart Replay Mode, you can go into Settings page to apply an transition effect
between the cameras and edit the duration of the effect applied.
Changing the Effect
As the screenshot shows below, the effects of transition are listed, and the Mix effect is
the default effect.
5. Online Mode/LSM Connected Mode
79
EVS Broadcast Equipment SA
Issue 1.00.A - October 2014
To change the effect, click the specific effect you would like to apply,and the effect will be
highlighted, as the screenshot shows below.
80
5. Online Mode/LSM Connected Mode
USER MANUAL MultiReview 1.2
Changing the Duration
As the screenshot shows below, there's an option of duration for you to change the
duration of the effect you want to apply. The duration is 10 frames by default.
To change the duration, input a figure into the duration circle manually.
5. Online Mode/LSM Connected Mode
81
EVS Broadcast Equipment SA
6.
Keywords
6.1.
Description
Issue 1.00.A - October 2014
The version 1.2 offers the possibility to log the content with some keywords.
Note
• Add Keywords on Mark/Add Keywords on Clip doesn't work in Offline
Mode.
• Add Keywords on Mark/Add Keywords on Clip doesn't work in Replay
Mode which is in Online Mode.
6.2.
Keyword Grid
You can check all the keywords on servers,and you can also refresh the keywords in
Setting Menu, proceed as follows:
1. Click the Settings button.
2. Click the View button, and the Keywords Grid will pop up.
82
6. Keywords
USER MANUAL MultiReview 1.2
6.3.
Part
Area/Button Description
1.
Page
Selector
Area
The keyword grid contains two pages of 100 keywords.
2.
Keyword
List Area
This list contains the keywords selected by users,(but it's not
relevant if the keyword window is open from the setting menu).
3.
Refresh
Click Refresh to refresh the keyword grid to make sure the
keywords in MultiReview are same as those in the network.
4.
Quit
Click Quit to close the keywords grid.
Add Keywords on Mark
Note
We make Highlight Mode as an example. As a matter of fact, the operation to
add keywords on Mark in Smart Replay is completely the same as it works in
Highlight Mode.
6.3.1.
6. Keywords
Introduction
•
If you want to add keywords on mark, please turn on Add keywords on Mark in
Setting Menu.
•
In Highlight mode, click the Mark button or the Live button to add a marker on
timeline, and Keywords Grid will pop up.
83
EVS Broadcast Equipment SA
6.3.2.
Issue 1.00.A - October 2014
How to Add Keywords on Mark
1. Click the certain keywords supplied on tow pages when Keywords Grid pops up.
2. Click the Save and Quit button. Then there will be a green marker with a keyword
button on the timeline.
Note
• You are allowed to add five keywords to each marker at most.
• If Add Keywords on Mark is Off, the Keywords Grid will not pop up when
you add a marker or make live.The keyword button on the marker is gray,
however, you are also allowed to edit keywords of the marker. (see section
6.3.3 How to Edit the Keywords of Markers)
6.3.3.
How to Edit the Keywords of Markers
To edit the keywords of a certain marker, proceed as follows:
1. Click the KW button on the marker. Then the Keywords Grid will pop up.
2. To change or add more keywords of a certain marker.
◦
84
Click the specific keywords which you would like to add on the certain marker.
6. Keywords
USER MANUAL MultiReview 1.2
◦
Click
in keyword list area to remove the specific keyword. Then the certain
keyword will be removed from keyword list area and not be highlighted in selector
area.
3. Click Save and Quit to save the change.
6. Keywords
85
EVS Broadcast Equipment SA
Issue 1.00.A - October 2014
Note
If you delete all the keywords of the certain marker,
marker.
6.4.
Add Keywords on Clip
6.4.1.
Introduction
will be in gray on the
•
To add keywords on clip, turn on Add Keywords on Clip.
•
When you create a playlist and fill the playlist, the Keywords Grid will pop up in
different Modes.
◦
In Highlight Mode:
After clicking theSave button (see section 5.2.3 How to Fill the Palylist), the
Keywords Grid will pop up.
◦
In Smart Replay Mode
a. After creating a playlist and filling the playlist, (see section 5.4.2 or section 5.4.3),
there is a keyword button,
, in each thumbnail in the playlist.
b. Click the KW button which is grey in the thumbnail, then the Keywords Grid will
pop up.
86
6. Keywords
USER MANUAL MultiReview 1.2
Note
No matter when Automatic Load on PGM is ON or OFF,the way to add
keywords on clip are the same. Therefore, we only make that Automatic Load
on PGM is ON as an example in this manual.
6.4.2.
How to Add Keywords on Clip
In Highlight Mode
Steps
After the Keywords Grid popping up, to add keywords on clip, proceed as follows:
1. To add keywords on clip in Keywords Grid, see section 6.3.2 How to Add Keywords
on Mark.
2. Then click the Save and Quit button, and there will be thumbnails with keywords
presented in playlist.
6. Keywords
87
EVS Broadcast Equipment SA
Issue 1.00.A - October 2014
Note
The keywords of all the created clips are the same.However, you can edit them
respectively.(See section 6.3.3 How to Edit the Keywords of Markers)
When a clip you are to create contains marker(s)
When a clip created contains marker(s), then you are allowed to choose to load the
keywords of the marker(s) on your clip. To add keywords on clip, follow the steps below.
1. To create a clip which contains markers, see section 5.2.3 How to Fill the Playlist.
2. After clicking the Save button, then there's a window popping up with the Keywords
Grid to ask if you would like to load the keywords of the markers on your clip.
The components of this window:
Part
Area/Button
Description
1.
Timecode of You can select the specific timecode of the marker here.
Marker Area
2.
Keyword
List Area
The current keywords of the marker you selected.
3.
Load
Click Load to load the keywords of the certain marker on clip.
4.
Cancel
Click Cancel to quit loading any keywords of the makers
contained by the clip.
3. There are two choices for you:
88
◦
Click the Load button, then the Keywords Grid with the highlighted keywords will
pop up.
◦
Click the Cancel button to add keywords on clip by yourself.
6. Keywords
USER MANUAL MultiReview 1.2
In Smart Replay Mode
To add keywords on clip, follow the steps in Highlight mode.
6.4.3.
How to Edit Keywords of Clips
To edit keywords of clips, proceed as follows:
1. Click the KW button in thumbnail, then the Keywords Grid will pop up.
2. Follow the steps in section 6.3.3 to edit keywords of the certain clip.
6. Keywords
89
EVS Broadcast Equipment SA
Issue 1.00.A - October 2014
7.
Shuttle Pro and Keyboard
Commands
7.1.
Shuttle Pro Commands
Note
When the wheel is released the MR has to be in Pause (K).
90
7. Shuttle Pro and Keyboard Commands
USER MANUAL MultiReview 1.2
7.2.
Keyboard Commands
Button
Function
J
Play Backward (Speed increases at each press)
L
Play Forward (Speed increases at each press)
<
Prev frame
>
Next frame
K
Stop
I
Mark In
O
Mark Out
Shift + I / O
Go to Mark IN / OUT
+
Create new SB
E
E/E
Shift + E
Return
SPACE
Play/Pause
ENTER
Save clip (Highlight mode)
TAB
Switch Layout
ARROWS L&R
Prev/Next event
HOME
Mark
END
Mark Live
PAGE UP / PAGE DOWN Next Cue / Prev Cue
DELETE,CLEAR CUE
clear the current cue
F1
Load Layout configuration 1
F2
Load Layout configuration 2
F10
Select Highlight mode
7. Shuttle Pro and Keyboard Commands
91
EVS Broadcast Equipment SA
92
Issue 1.00.A - October 2014
Button
Function
F11
Select Replay Mode
F12
Select Sync Replay Mode
7. Shuttle Pro and Keyboard Commands
USER MANUAL MultiReview 1.2
8.
Browsing Train in Different
Methods
To browse a train with MultiReview application, you can operate with GUI,Shuttle Pro or
keyboard on the growing train to mark the interest angels.
8. Browsing Train in Different Methods
93
EVS Broadcast Equipment SA
Issue 1.00.A - October 2014
Action
Description
JOG
When the user jogs, the mosaic shows the jog position and the
timeline is in browsing mode.
• GUI:
•
Fast Rewind/Preview Frame
Shuttle Pro:
•
Keyboard:
Fast Rewind/Fast Forward
Previous Frame/Next Frame
E/E
Play/Pause
CUE
94
When going back to Live timecode during browsing or in E/E, all
cameras are at the same TC value.
• GUI:
•
Shuttle Pro:
•
Keyboard:
When the user makes a pause, all cameras are paused at the same
TC.
• GUI:
•
Shuttle Pro:
•
Keyboard:
When the user adds CUE in E/E or during browsing, the green
marker will be added to the timeline for each CUE.
• GUI:
•
Mark/Mark Live
Shuttle Pro:
•
Keyboard:
8. Browsing Train in Different Methods
USER MANUAL MultiReview 1.2
Action
Description
Previous Cue
•
GUI:
•
Shuttle Pro:
•
Keyboard:
•
GUI:
•
Shuttle Pro:
•
Keyboard:
Next Cue
8. Browsing Train in Different Methods
95