1
Oxygen XML Editor 17.1
Notice
Copyright
Oxygen XML Editor User Manual
Syncro Soft SRL.
Copyright © 2002-2015 Syncro Soft SRL. All Rights Reserved.
All rights reserved. No parts of this work may be reproduced in any form or
by any means - graphic, electronic, or mechanical, including photocopying,
recording, taping, or information storage and retrieval systems - without the
written permission of the publisher. Products that are referred to in this document
may be either trademarks and/or registered trademarks of the respective owners.
The publisher and the author make no claim to these trademarks.
Trademarks. Many of the designations used by manufacturers and sellers to
distinguish their products are claimed as trademarks. Where those designations
appear in this document, and Syncro Soft SRL was aware of a trademark claim,
the designations have been rendered in caps or initial caps.
Notice. While every precaution has been taken in the preparation of this
document, the publisher and the author assume no responsibility for errors or
omissions, or for damages resulting from the use of information contained in
this document or from the use of programs and source code that may accompany
it. In no event shall the publisher and the author be liable for any loss of profit
or any other commercial damage caused or alleged to have been caused directly
or indirectly by this document.
Link disclaimer. Syncro Soft SRL is not responsible for the contents or
reliability of any linked Web sites referenced elsewhere within this
documentation, and Syncro Soft SRL does not necessarily endorse the products,
services, or information described or offered within them. We cannot guarantee
that these links will work all the time and we have no control over the availability
of the linked pages.
Warranty. Syncro Soft SRL provides a limited warranty on this product. Refer
to your sales agreement to establish the terms of the limited warranty. In addition,
Oxygen XML Editor End User License Agreement, as well as information
regarding support for this product, while under warranty, is available through
the Oxygen XML Editor website.
Third-party components. Certain software programs or portions thereof
included in the Product may contain software distributed under third party
agreements ("Third Party Components"), which may contain terms that expand
or limit rights to use certain portions of the Product ("Third Party Terms").
Information identifying Third Party Components and the Third Party Terms that
apply to them is available on the Oxygen XML Editor website.
Downloading documents. For the most current versions of documentation, see
the Oxygen XML Editor website.
Contact Syncro Soft SRL. Syncro Soft SRL provides telephone numbers and
e-mail addresses for you to report problems or to ask questions about your
product, see the Oxygen XML Editor website.
Oxygen XML Editor | Contents | 5
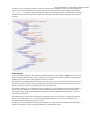
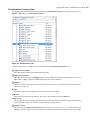
Contents
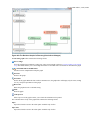
Chapter 1: Introduction..........................................................................................19
Chapter 2: Getting Started.....................................................................................21
What is Oxygen XML Editor..............................................................................................................................22
Getting Familiar with the Layout........................................................................................................................22
Resources to Help You Get Started Using Oxygen XML Editor .......................................................................23
Your First Document or Project...........................................................................................................................24
Your First XML Document.....................................................................................................................24
Your First DITA Topic.............................................................................................................................28
Creating a New Project............................................................................................................................33
Getting Help........................................................................................................................................................34
Help Menu...............................................................................................................................................34
Chapter 3: Installation............................................................................................37
Installation Options.............................................................................................................................................38
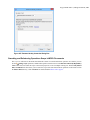
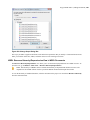
Windows Installation...........................................................................................................................................38
Mac OS X Installation.........................................................................................................................................40
Linux Installation................................................................................................................................................41
Windows Terminal Server Installation................................................................................................................43
Linux Server Installation.....................................................................................................................................45
Java Web Start (JWS) Installation.......................................................................................................................46
Site-wide deployment..........................................................................................................................................48
Licensing.............................................................................................................................................................48
Setting up a License Server.................................................................................................................................52
Setting up a Floating License Server Running as a Standalone Process Using a Platform-independent
Distribution........................................................................................................................................57
Transferring or Releasing a License....................................................................................................................58
Upgrading............................................................................................................................................................58
Installing and Updating Add-ons.........................................................................................................................59
Uninstalling.........................................................................................................................................................60
Installer Command Line Reference.....................................................................................................................61
Chapter 4: Perspectives..........................................................................................63
Editor Perspective................................................................................................................................................64
Supported Document Types....................................................................................................................65
XSLT Debugger Perspective...............................................................................................................................65
XQuery Debugger Perspective ...........................................................................................................................66
Oxygen XML Editor | Contents | 6
Database Perspective ..........................................................................................................................................67
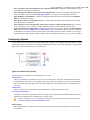
Chapter 5: Editing Modes......................................................................................69
Text Editing Mode...............................................................................................................................................70
Text Mode Editor.....................................................................................................................................70
Text Mode Views.....................................................................................................................................71
Syntax Highlight Depending on Namespace Prefix................................................................................89
Presenting Validation Errors in Text Mode.............................................................................................89
Bidirectional Text Support in Text Mode................................................................................................90
Grid Editing Mode...............................................................................................................................................90
Grid Mode Editor....................................................................................................................................90
Layouts: Grid and Tree............................................................................................................................91
Grid Mode Navigation.............................................................................................................................92
Bidirectional Text Support in Grid Mode................................................................................................92
Author Editing Mode...........................................................................................................................................93
Author Mode Editor................................................................................................................................93
Author Mode Views...............................................................................................................................101
Bidirectional Text Support in Author Mode..........................................................................................122
Design Editing Mode.........................................................................................................................................124
XML Schema Diagram Editor (Design Mode).....................................................................................124
Navigation in the Schema Diagram.......................................................................................................125
XML Schema Outline View..................................................................................................................126
The Attributes View...............................................................................................................................128
The Facets View....................................................................................................................................130
The Palette View....................................................................................................................................131
Chapter 6: Editing Documents............................................................................133
Working with Unicode......................................................................................................................................134
Opening and Saving Unicode Documents.............................................................................................134
Inserting Symbols..................................................................................................................................135
Unicode Fallback Font Support.............................................................................................................136
Creating and Working with Documents............................................................................................................137
Creating New Documents.....................................................................................................................137
Opening Documents..............................................................................................................................140
Saving Documents.................................................................................................................................142
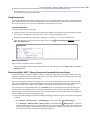
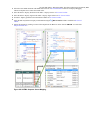
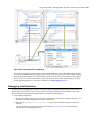
Opening and Saving Remote Documents via FTP/SFTP/WebDAV/SharePoint ..................................143
Switching Between Opened Tabs..........................................................................................................148
Searching Documents............................................................................................................................148
Closing Documents...............................................................................................................................155
The Contextual Menu of the Current Editor Tab...................................................................................155
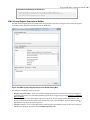
Viewing File Properties.........................................................................................................................155
Using Projects to Group Documents.................................................................................................................156
Creating a New Project..........................................................................................................................156
Oxygen XML Editor | Contents | 7
The Project View...................................................................................................................................157
Sharing a Project - Team Collaboration................................................................................................164
Defining Master Files at Project Level..................................................................................................166
Editing XML Documents..................................................................................................................................169
Editing XML Documents in Text Mode................................................................................................169
Editing XML Documents in Grid Mode...............................................................................................183
Editing XML Documents in Author Mode............................................................................................186
Associate a Schema to a Document......................................................................................................231
Content Completion Assistant...............................................................................................................235
Validating XML Documents.................................................................................................................244
Document Navigation............................................................................................................................255
The Undo/Redo Actions........................................................................................................................258
Dragging and Dropping the Selected Text............................................................................................259
Copying and Pasting Text......................................................................................................................259
Printing a File........................................................................................................................................259
Finding and Replacing Text in the Current File....................................................................................260
Finding and Replacing Text in Multiple Files.......................................................................................264
Editing Large XML Documents............................................................................................................267
Working with XML Catalogs................................................................................................................269
XML Resource Hierarchy/Dependencies View.....................................................................................271
Converting Between Schema Languages..............................................................................................274
Editing XML Tree Nodes......................................................................................................................275
Editing Modular XML Files in the Master Files Context.....................................................................275
Search and Refactor Actions for IDs and IDREFS...............................................................................276
Search and Refactor Operations Scope.................................................................................................277
Viewing Status Information...................................................................................................................278
Image Preview.......................................................................................................................................278
Making a Persistent Copy of Results....................................................................................................278
Locking and Unlocking XML Markup.................................................................................................279
Adjusting the Transparency of XML Markup.......................................................................................279
Editor Highlights...................................................................................................................................279
XML Quick Fixes..................................................................................................................................280
Refactoring XML Documents...............................................................................................................282
Editing XSLT Stylesheets..................................................................................................................................297
Validating XSLT Stylesheets.................................................................................................................297
Editing XSLT Stylesheets in the Master Files Context.........................................................................299
Syntax Highlight...................................................................................................................................299
Content Completion in XSLT Stylesheets.............................................................................................299
The XSLT/XQuery Input View..............................................................................................................304
The XSLT Outline View........................................................................................................................306
XSLT Stylesheet Documentation Support.............................................................................................309
Generating Documentation for an XSLT Stylesheet.............................................................................310
Finding XSLT References and Declarations.........................................................................................316
Highlight Component Occurrences.......................................................................................................317
XSLT Refactoring Actions....................................................................................................................317
Oxygen XML Editor | Contents | 8
XSLT Resource Hierarchy/Dependencies View....................................................................................319
XSLT Component Dependencies View.................................................................................................322
XSLT Quick Assist Support..................................................................................................................323
XSLT Quick Fix Support ......................................................................................................................324
Linking Between Development and Authoring.....................................................................................326
XSLT Unit Test (XSpec).......................................................................................................................326
Editing Ant Build Files......................................................................................................................................328
Validate Ant Build Files........................................................................................................................328
Editing Ant Build Files in the Context of Master Files.........................................................................328
Syntax Highlight...................................................................................................................................329
Content Completion in Ant Build Files.................................................................................................329
Ant Outline View...................................................................................................................................329
Find References and Declarations of Ant Components.........................................................................332
Highlight Component Occurrences.......................................................................................................332
Ant Refactoring Actions........................................................................................................................333
Ant Resource Hierarchy/Dependencies View.......................................................................................333
Ant Component Dependencies View.....................................................................................................334
Ant Quick Assist Support......................................................................................................................335
Ant Quick Fix Support..........................................................................................................................335
Editing XML Schemas......................................................................................................................................336
Editing XML Schema in Design Editing Mode....................................................................................336
Editing XML Schema in Text Editing Mode........................................................................................361
Editing XML Schema in the Master Files Context...............................................................................363
Searching and Refactoring Actions in XML Schemas..........................................................................363
XML Schema Outline View..................................................................................................................364
Component Dependencies View for XML Schema...............................................................................366
XML Schema Quick Assist Support.....................................................................................................368
XML Schema Resource Hierarchy / Dependencies View.....................................................................368
Generate Sample XML Files.................................................................................................................371
Generating Documentation for an XML Schema..................................................................................375
Convert Database Structure to XML Schema.......................................................................................383
Flatten an XML Schema........................................................................................................................384
XML Schema Regular Expressions Builder.........................................................................................386
XML Schema 1.1..................................................................................................................................387
Setting the XML Schema Version.........................................................................................................388
Linking Between Development and Authoring.....................................................................................389
Editing XQuery Documents..............................................................................................................................389
XQuery Outline View............................................................................................................................389
Folding in XQuery Documents.............................................................................................................391
Formatting and Indenting XQuery Documents.....................................................................................391
Generating HTML Documentation for an XQuery Document.............................................................392
Editing WSDL Documents................................................................................................................................392
WSDL Outline View.............................................................................................................................393
Content Completion in WSDL Documents...........................................................................................397
Editing WSDL Documents in the Master Files Context.......................................................................397
Oxygen XML Editor | Contents | 9
Searching and Refactoring Operations in WSDL Documents..............................................................398
Searching and Refactoring Operations Scope in WSDL Documents...................................................399
WSDL Resource Hierarchy/Dependencies View in WSDL Documents...............................................400
Component Dependencies View in WSDL Documents........................................................................403
Highlight Component Occurrences in WSDL Documents...................................................................404
Quick Assist Support in WSDL Documents.........................................................................................404
Generating Documentation for WSDL Documents..............................................................................405
WSDL SOAP Analyzer.........................................................................................................................409
Editing CSS Stylesheets....................................................................................................................................412
Validating CSS Stylesheets...................................................................................................................412
Content Completion in CSS Stylesheets...............................................................................................413
CSS Outline View..................................................................................................................................413
Folding in CSS Stylesheets...................................................................................................................414
Formatting and Indenting CSS Stylesheets (Pretty Print).....................................................................414
Minifying CSS Stylesheets....................................................................................................................414
Editing LESS CSS Stylesheets..........................................................................................................................415
Validating LESS Stylesheets.................................................................................................................415
Content Completion in LESS Stylesheets.............................................................................................415
Compiling LESS Stylesheets to CSS....................................................................................................416
Editing Relax NG Schemas...............................................................................................................................416
Editing Relax NG Schema in the Master Files Context........................................................................416
Relax NG Schema Diagram..................................................................................................................417
Searching and Refactoring Actions in RNG Schemas..........................................................................422
RNG Resource Hierarchy/Dependencies View.....................................................................................423
Component Dependencies View for RelaxNG Schemas.......................................................................426
RNG Quick Assist Support...................................................................................................................427
Configuring a Custom Datatype Library for a RELAX NG Schema....................................................427
Linking Between Development and Authoring.....................................................................................428
Editing NVDL Schemas....................................................................................................................................428
NVDL Schema Diagram.......................................................................................................................428
Searching and Refactoring Actions in NVDL Schemas........................................................................430
Component Dependencies View for NVDL Schemas...........................................................................431
Linking Between Development and Authoring.....................................................................................432
Editing JSON Documents.................................................................................................................................432
Editing JSON Documents in Text Mode...............................................................................................432
Editing JSON Documents in Grid Mode...............................................................................................434
JSON Outline View...............................................................................................................................435
Validating JSON Documents.................................................................................................................435
Convert XML to JSON..........................................................................................................................435
Editing StratML Documents.............................................................................................................................436
Editing XLIFF Documents................................................................................................................................437
Editing JavaScript Documents..........................................................................................................................437
JavaScript Editor Text Mode.................................................................................................................437
Content Completion in JavaScript Files................................................................................................439
JavaScript Outline View........................................................................................................................440
Oxygen XML Editor | Contents | 10
Validating JavaScript Files....................................................................................................................441
Editing XProc Scripts........................................................................................................................................441
Editing Schematron Schemas............................................................................................................................442
Validate an XML Document Against Schematron................................................................................443
Validating Schematron Documents.......................................................................................................443
Content Completion in Schematron Documents...................................................................................444
RELAX NG/XML Schema with Embedded Schematron Rules...........................................................444
Editing Schematron Schema in the Master Files Context.....................................................................445
Schematron Outline View......................................................................................................................445
Schematron Resource Hierarchy/Dependencies View..........................................................................447
Highlight Component Occurrences in Schematron Documents............................................................449
Searching and Refactoring Operations in Schematron Documents......................................................449
Searching and Refactoring Operations Scope in Schematron Documents............................................450
Quick Assist Support in Schematron Documents..................................................................................451
Editing Schematron Quick Fixes.......................................................................................................................452
Customizing Schematron Quick Fixes..................................................................................................452
Validating Schematron Quick Fixes......................................................................................................456
Content Completion in SQF..................................................................................................................456
Highlight Quick Fix Occurrences in SQF.............................................................................................457
Searching and Refactoring Operations in SQF.....................................................................................457
Embed Schematron Quick Fixes in Relax NG or XML Schema..........................................................458
Editing SVG Documents...................................................................................................................................458
The Standalone SVG Viewer.................................................................................................................459
Integrated SVG Viewer in the Results Panel.........................................................................................460
Editing XHTML Documents.............................................................................................................................460
Spell Checking..................................................................................................................................................461
Spell Checking Dictionaries..................................................................................................................462
Learned Words.......................................................................................................................................463
Ignored Words (Elements).....................................................................................................................463
Automatic Spell Check..........................................................................................................................463
Spell Checking in Multiple Files...........................................................................................................463
AutoCorrect Misspelled Words.........................................................................................................................465
Add Dictionaries for the AutoCorrect Feature......................................................................................466
Loading Large Documents................................................................................................................................466
File Sizes Smaller than 300 MB............................................................................................................466
File Sizes Greater than 300 MB............................................................................................................467
Scratch Buffer....................................................................................................................................................467
Handling Read-Only Files.................................................................................................................................468
Editing Documents with Long Lines.................................................................................................................468
Associating a File Extension with Oxygen XML Editor..................................................................................468
Chapter 7: DITA Authoring.................................................................................469
Working with DITA Maps.................................................................................................................................470
DITA Maps Manager.............................................................................................................................470
Oxygen XML Editor | Contents | 11
Creating a Map......................................................................................................................................478
Managing DITA Maps...........................................................................................................................479
Chunking DITA Topics.........................................................................................................................494
DITA Map Validation and Completeness Check...................................................................................495
Working with DITA Topics...............................................................................................................................497
Creating a New DITA Topic..................................................................................................................498
Editing DITA Topics.............................................................................................................................500
Reusing DITA Content..........................................................................................................................501
Linking in DITA....................................................................................................................................515
Adding Images to a DITA Topic...........................................................................................................522
Adding Tables to a DITA Topic.............................................................................................................524
Adding MathML Equations in DITA....................................................................................................525
Working with Keys............................................................................................................................................525
Publishing DITA Output....................................................................................................................................526
Generating Output from DITA Content................................................................................................527
Transforming DITA Content.................................................................................................................527
DITA Profiling / Conditional Text.....................................................................................................................540
Profiling DITA Content.........................................................................................................................542
Profiling / Conditional Text Markers.....................................................................................................542
Profiling with a Subject Scheme Map...................................................................................................543
Publishing Profiled Text........................................................................................................................544
DITA Open Toolkit Support..............................................................................................................................545
Creating a DITA OT Customization Plugin..........................................................................................545
Installing a Plugin in the DITA Open Toolkit.......................................................................................547
Use an External DITA Open Toolkit in Oxygen XML Editor...............................................................547
DITA Specialization Support............................................................................................................................548
Integration of a DITA Specialization.....................................................................................................548
Editing DITA Map Specializations.......................................................................................................548
Editing DITA Topic Specializations......................................................................................................549
Metadata............................................................................................................................................................549
Creating an Index in DITA................................................................................................................................549
DITA 1.3 Experimental Support........................................................................................................................550
Chapter 8: Document Types (Frameworks).......................................................553
Predefined Document Types (Frameworks)......................................................................................................554
The DocBook 4 Document Type...........................................................................................................555
The DocBook 5 Document Type...........................................................................................................567
The DITA Topics Document Type.........................................................................................................580
The DITA Map Document Type............................................................................................................589
The XHTML Document Type...............................................................................................................597
The TEI ODD Document Type.............................................................................................................601
The TEI P4 Document Type..................................................................................................................605
The TEI P5 Document Type..................................................................................................................609
The JATS Document Type.....................................................................................................................614
Oxygen XML Editor | Contents | 12
The EPUB Document Type...................................................................................................................616
The DocBook Targetset Document Type..............................................................................................617
Chapter 9: Author Mode Customization............................................................619
Author Mode Customization Guide..................................................................................................................620
Simple Customization Tutorial..............................................................................................................620
Advanced Customization Tutorial - Document Type Associations.......................................................626
Listing of the Example Files - The Simple Documentation Framework Files......................................701
CSS Support in Author Mode............................................................................................................................706
Handling CSS Imports..........................................................................................................................706
Selecting and Combining Multiple CSS Styles.....................................................................................707
The oxygen Media Type ....................................................................................................................710
Standard W3C CSS Supported Features...............................................................................................711
Oxygen XML Editor CSS Extensions...................................................................................................724
Debugging CSS Stylesheets..................................................................................................................760
Creating and Running Automated Tests............................................................................................................760
API Frequently Asked Questions (API FAQ)....................................................................................................762
Difference Between a Document Type (Framework) and a Plugin Extension......................................762
Dynamically Modify the Content Inserted by the Author.....................................................................762
Split Paragraph on Enter (Instead of Showing Content Completion List)............................................763
Impose Custom Options for Authors.....................................................................................................764
Highlight Content..................................................................................................................................764
How Do I Add My Custom Actions to the Contextual Menu?..............................................................765
Adding Custom Callouts.......................................................................................................................765
Change the DOCTYPE of an Opened XML Document.......................................................................768
Customize the Default Application Icons for Toolbars/Menus.............................................................769
Disable Context-Sensitive Menu Items for Custom Author Actions.....................................................769
Dynamic Open File in Oxygen XML Editor Distributed via JavaWebStart.........................................770
Change the Default Track Changes (Review) Author Name.................................................................771
Multiple Rendering Modes for the Same Document in Author Mode..................................................771
Obtain a DOM Element from an AuthorNode or AuthorElement..............................................771
Print Document Within the Author Component....................................................................................772
Running XSLT or XQuery Transformations.........................................................................................772
Use Different Rendering Styles for Entity References, Comments, or Processing Instructions...........772
Insert an Element with all the Required Content..................................................................................774
Obtain the Current Selected Element Using the Author API................................................................775
Debugging a Plugin Using the Eclipse Workbench...............................................................................775
Debugging an Oxygen SDK Extension Using the Eclipse Workbench................................................776
Extending the Java Functionality of an Existing Framework (Document Type)..................................777
Controlling XML Serialization in the Author Component...................................................................777
How can I add a custom Outline view for editing XML documents in the Text mode?.......................778
Dynamically Adding Form Controls Using a StylesFilter...............................................................781
Modifying the XML Content on Open..................................................................................................782
Modifying the XML Content on Save...................................................................................................783
Oxygen XML Editor | Contents | 13
Save a New Document with a Predefined File Name Pattern...............................................................783
Auto-Generate an ID When a Document is Opened or Created...........................................................784
Chapter 10: Transforming Documents................................................................787
Transformation Scenarios..................................................................................................................................788
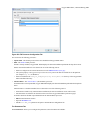
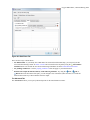
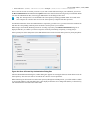
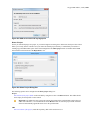
Defining a New Transformation Scenario.............................................................................................788
Configure Transformation Scenario(s) Dialog Box..............................................................................815
Duplicating a Transformation Scenario.................................................................................................817
Editing a Transformation Scenario........................................................................................................817
Apply Batch Transformations...............................................................................................................817
Built-in Transformation Scenarios........................................................................................................818
Sharing the Transformation Scenarios..................................................................................................818
Transformation Scenarios View.........................................................................................................819
Debugging PDF Transformations..........................................................................................................821
XSLT Processors...................................................................................................................................821
XSL-FO Processors...............................................................................................................................824
Output Formats..................................................................................................................................................828
WebHelp System Output.......................................................................................................................828
Chapter 11: Querying Documents.......................................................................859
Running XPath Expressions..............................................................................................................................860
What is XPath........................................................................................................................................860
Oxygen XML Editor XPath Toolbar.....................................................................................................860
The XPath/XQuery Builder View..........................................................................................................861
XPath Expression Results.....................................................................................................................863
Catalogs.................................................................................................................................................864
XPath Prefix Mapping...........................................................................................................................865
Working with XQuery.......................................................................................................................................865
What is XQuery.....................................................................................................................................865
Syntax Highlight and Content Completion...........................................................................................865
XQuery Outline View............................................................................................................................866
The XQuery Input View........................................................................................................................867
XQuery Validation.................................................................................................................................869
Transforming XML Documents Using XQuery....................................................................................869
Chapter 12: Debugging XSLT Stylesheets and XQuery Documents................875
XSLT/XQuery Debugging Overview................................................................................................................876
Layout................................................................................................................................................................876
Control Toolbar.....................................................................................................................................877
Debugging Information Views..............................................................................................................880
Multiple Output Documents in XSLT 2.0 and XSLT 3.0......................................................................889
Working with the XSLT / XQuery Debugger....................................................................................................889
Steps in a Typical Debug Process..........................................................................................................889
Oxygen XML Editor | Contents | 14
Using Breakpoints.................................................................................................................................890
Determining What XSLT / XQuery Expression Generated Particular Output......................................890
Debugging Java Extensions...............................................................................................................................892
Supported Processors for XSLT / XQuery Debugging.....................................................................................893
Chapter 13: Performance Profiling of XSLT Stylesheets and XQuery
Documents..........................................................................................................895
XSLT/XQuery Performance Profiling Overview..............................................................................................896
Viewing Profiling Information..........................................................................................................................896
Invocation Tree View.............................................................................................................................896
Hotspots View........................................................................................................................................897
Working with XSLT/XQuery Profiler...............................................................................................................897
Chapter 14: Working with Archives....................................................................899
Browsing and Modifying Archives....................................................................................................................900
Working with EPUB..........................................................................................................................................902
Create an EPUB.....................................................................................................................................903
Publish to EPUB....................................................................................................................................903
Editing Files From Archives..............................................................................................................................903
Chapter 15: Working with Databases.................................................................905
Relational Database Support.............................................................................................................................906
Configuring Relational Database Data Sources....................................................................................906
Configuring Database Connections.......................................................................................................906
How to Configure Support For Relational Databases...........................................................................906
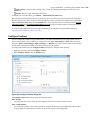
Resource Management..........................................................................................................................917
SQL Execution Support.........................................................................................................................923
Native XML Database (NXD) Support.............................................................................................................925
Configuring Native XML Database Data Sources................................................................................925
Configuring Database Connections.......................................................................................................926
How to Configure Support for Native XML Databases........................................................................926
Data Source Explorer View...................................................................................................................930
XQuery and Databases......................................................................................................................................944
Build Queries with Drag and Drop from the Data Source Explorer View............................................944
XQuery Transformation........................................................................................................................945
XQuery Database Debugging................................................................................................................946
WebDAV Connection........................................................................................................................................948
How to Configure a WebDAV Connection............................................................................................948
WebDAV Connection Actions...............................................................................................................948
BaseX Support...................................................................................................................................................950
Resource Management..........................................................................................................................950
XQuery Execution.................................................................................................................................950
Oxygen XML Editor | Contents | 15
Chapter 16: Importing Data................................................................................953
Import from Text Files.......................................................................................................................................954
Import from MS Excel Files..............................................................................................................................955
Import Data from MS Excel 2007 or Newer.........................................................................................957
Import Database Data as an XML Document...................................................................................................957
Import from HTML Files..................................................................................................................................960
Import Content Dynamically.............................................................................................................................960
Chapter 17: Content Management System (CMS) Integration........................963
Integration with Documentum (CMS) (deprecated).........................................................................................964
Configure Connection to Documentum Server.....................................................................................964
Documentum (CMS) Actions in the Data Source Explorer View.........................................................965
Transformations on DITA Content from Documentum (CMS)............................................................969
Integration with Microsoft SharePoint..............................................................................................................969
How to Configure a SharePoint Connection.........................................................................................969
The SharePoint Browser View...............................................................................................................970
SharePoint Connection Actions.............................................................................................................972
Chapter 18: Extending Oxygen XML Editor Using the SDK...........................975
Extending Oxygen XML Editor with Plugins...................................................................................................976
Introduction to Plugins..........................................................................................................................976
General Configuration of an Oxygen XML Editor Plugin....................................................................976
Installation.............................................................................................................................................977
Types of plugin extensions....................................................................................................................977
How to...................................................................................................................................................986
Example - A Selection Plugin...............................................................................................................990
Creating and Running Automated Tests................................................................................................991
Debugging a Plugin Using the Eclipse Workbench...............................................................................992
Disabling a Plugin.................................................................................................................................993
Author Component............................................................................................................................................993
Licensing...............................................................................................................................................994
Installation Requirements......................................................................................................................994
Customization........................................................................................................................................995
Deployment...........................................................................................................................................996
Sample SharePoint Integration of the Author Component..................................................................1001
Frequently Asked Questions ...............................................................................................................1006
Comparison Between the Author Component and WebApp Component...........................................1009
WebApp Component.......................................................................................................................................1010
WebApp Component Customization Overview..................................................................................1010
WebApp Component How To ............................................................................................................1016
Deploying WebApp Component.........................................................................................................1019
Comparison Between the Author Component and WebApp Component...........................................1024
Oxygen XML Editor | Contents | 16
Chapter 19: Tools................................................................................................1027
SVN Client......................................................................................................................................................1028
Main Window......................................................................................................................................1028
Getting Started.....................................................................................................................................1038
Syncro SVN Client Views...................................................................................................................1090
The Revision Graph of a SVN Resource.............................................................................................1117
Oxygen XML Editor SVN Preferences...............................................................................................1120
Entering Local Paths and URLs..........................................................................................................1120
Technical Issues...................................................................................................................................1121
Tree Editor.......................................................................................................................................................1124
Comparing and Merging Documents..............................................................................................................1124
Directories Comparison.......................................................................................................................1125
Files Comparison.................................................................................................................................1128
XML Digital Signatures..................................................................................................................................1135
Digital Signatures Overview...............................................................................................................1136
Canonicalizing Files............................................................................................................................1137
Certificates...........................................................................................................................................1138
Signing Files........................................................................................................................................1138
Verifying the Signature........................................................................................................................1140
Example of How to Digitally Sign XML Files or Content.................................................................1140
Large File Viewer............................................................................................................................................1141
Hex Viewer......................................................................................................................................................1142
The Standalone SVG Viewer...........................................................................................................................1143
Integrating External Tools...............................................................................................................................1144
Chapter 20: Configuring Oxygen XML Editor................................................1147
Preferences......................................................................................................................................................1148
Global Preferences..............................................................................................................................1148
Appearance Preferences......................................................................................................................1150
Application Layout Preferences..........................................................................................................1152
Add-ons Preferences............................................................................................................................1153
Document Type Association Preferences............................................................................................1153
Encoding Preferences..........................................................................................................................1163
Editor Preferences...............................................................................................................................1164
CSS Validator Preferences...................................................................................................................1196
XML Preferences................................................................................................................................1196
DITA Preferences................................................................................................................................1215
Data Sources Preferences....................................................................................................................1216
SVN Preferences.................................................................................................................................1220
Diff Preferences...................................................................................................................................1223
Archive Preferences.............................................................................................................................1226
Plugins Preferences.............................................................................................................................1226
Oxygen XML Editor | Contents | 17
External Tools Preferences..................................................................................................................1227
Menu Shortcut Keys Preferences........................................................................................................1228
File Types Preferences.........................................................................................................................1229
The Open/Find Resources Preferences Page.......................................................................................1230
Custom Editor Variables Preferences..................................................................................................1231
Network Connection Settings Preferences..........................................................................................1231
XML Structure Outline Preferences....................................................................................................1234
Views Preferences...............................................................................................................................1234
Messages Preferences..........................................................................................................................1234
Configuring Options........................................................................................................................................1235
Customizing Default Options..............................................................................................................1236
Sharing and Storing Preferences.........................................................................................................1236
Importing / Exporting Global Options............................................................................................................1237
Reset Global Options.......................................................................................................................................1237
Configuring the Layout of the Views and Editors...........................................................................................1238
Configure Toolbars..........................................................................................................................................1240
Scenarios Management....................................................................................................................................1241
Editor Variables...............................................................................................................................................1242
Custom Editor Variables......................................................................................................................1246
Custom System Properties..............................................................................................................................1246
Localizing the User Interface..........................................................................................................................1248
Setting a Java Virtual Machine Parameter in the Launcher Configuration File / Start-up Script....................1249
Setting Parameters for the Application Launchers..............................................................................1249
Setting Parameters in the Command Line Scripts...............................................................................1250
Creating Custom Startup Parameters File...........................................................................................1251
Chapter 21: Common Problems........................................................................1253
Performance Problems....................................................................................................................................1254
Performance Issues with Large Documents........................................................................................1254
External Processes...............................................................................................................................1254
Display Problems on Linux or Solaris................................................................................................1254
Common Problems and Solutions...................................................................................................................1254
Details to Submit in a Request for Technical Support Using the Online Form..................................1254
XML Document Takes a Long Time to Open.....................................................................................1255
Oxygen XML Editor Takes Several Minutes to Start on Mac.............................................................1255
Out Of Memory Error When Opening Large Documents...................................................................1255
Special Characters are Replaced with a Square in Editor...................................................................1256
XSLT Debugger Is Very Slow.............................................................................................................1256
The Scroll Function of my Notebook Trackpad is Not Working........................................................1256
Crash at Startup on Windows with an Error Message About a File nvoglv32.dll......................1256
Oxygen XML Editor Crashed on My Mac OS X Computer...............................................................1256
Wrong Highlights of Matched Words in a Search in User Manual.....................................................1257
Keyboard Shortcuts Do Not Work.......................................................................................................1257
After Installing Oxygen XML Editor I Cannot Open XML Files in Internet Explorer Anymore......1257
Oxygen XML Editor | Contents | 18
I Cannot Associate Oxygen XML Editor With a File Type on My Windows Computer....................1257
Gray Window on Linux With the Compiz / Beryl Window Manager.................................................1258
Drag and Drop Without Initial Selection Does Not Work...................................................................1258
Set Specific JVM Version on Mac OS X.............................................................................................1258
Segmentation Fault Error on Mac OS X.............................................................................................1258
Damaged File Associations on OS X..................................................................................................1258
I Cannot Connect to SVN Repository from Repositories View.........................................................1259
Signature Verification Failed Error on Open or Edit a Resource from Documentum.........................1259
Compatibility Issue Between Java and Certain Graphics Card Drivers..............................................1260
An Image Appears Stretched Out in the PDF Output.........................................................................1260
The DITA PDF Transformation Fails..................................................................................................1261
The DITA to CHM Transformation Fails.............................................................................................1261
DITA Map Ant Transformation Because it Cannot Connect to External Location.............................1262
Topic References Outside the Main DITA Map Folder......................................................................1262
The PDF Processing Fails to Use the DITA OT and Apache FOP......................................................1262
The TocJS Transformation Does not Generate All Files for a Tree-Like TOC...................................1263
Navigation to the web page was canceled when viewing CHM on a Network Drive.........................1263
Alignment Issues of the Main Menu on Linux Systems Based on Gnome 3.x...................................1263
JPEG CMYK Color Space Issues.......................................................................................................1264
SVG Rendering Issues.........................................................................................................................1264
MSXML 4.0 Transformation Issues....................................................................................................1264
Increasing the Memory for the Ant Process........................................................................................1264
Chapter 22: Glossary..........................................................................................1265
Chapter
1
Introduction
Welcome to the User Manual of Oxygen XML Editor 17.1.
Oxygen XML Editor is a cross-platform application designed to accommodate
all of your XML editing, authoring, developing, and publishing needs. It is the
best XML editor available for document development using structured mark-up
languages such as XML, XSD, Relax NG, XSL, DTD. It is a comprehensive
solution for authors who want to edit XML documents visually, with or without
extensive knowledge about XML and XML-related technologies. The
WYSIWYG-like editor is driven by CSS stylesheets associated with the XML
documents and offers many innovative, user-friendly authoring features that
make XML authoring easy and powerful.
It offers developers and authors a powerful Integrated Development Environment
and the intuitive Graphical User Interface of Oxygen XML Editor is easy to
use and provides robust functionality for content editing, project management,
and validation of structured mark-up sources. Coupled with XSLT and FOP
transformation technologies, Oxygen XML Editor offers support for generating
output to multiple target formats, including: PDF, PS, TXT, HTML, JavaHelp,
WebHelp, and XML.
This user guide is focused on describing features, functionality, the application
interface, and to help you quickly get started. It also includes a vast amount of
advanced technical information and instructional topics that are designed to
teach you how to use Oxygen XML Editor to accomplish your tasks. It is
assumed that you are familiar with the use of your operating system and the
concepts related to XML technologies and structured mark-up.
Chapter
2
Getting Started
Topics:
•
•
•
•
•
What is Oxygen XML Editor
Getting Familiar with the Layout
Resources to Help You Get
Started Using Oxygen XML Editor
Your First Document or Project
Getting Help
This chapter is designed to help you get started using Oxygen XML Editor as
quickly as possible and to provide you with a variety of resources to help you
get the most out of the application. Typically, the first step of getting started
with Oxygen XML Editor would be to install the software. For detailed
information about that process, see the Installation on page 37 chapter.
After installation, when you launch Oxygen XML Editor for the first time, you
are greeted with a Welcome dialog box. It presents upcoming events, useful
video demonstrations, helpful resources, the tip of the day, and also gives you
easy access to recently used files and projects and to create new ones.
Figure 1: The Welcome Dialog Box
If you do not want it to be displayed every time you launch Oxygen XML Editor,
disable the Show at startup option. To display it any time, go to Help >
Welcome.
Oxygen XML Editor | Getting Started | 22
What is Oxygen XML Editor
Oxygen XML Editor is the best XML editor available and is a complete XML development and authoring solution. It
is designed to accommodate a large number of users, ranging from beginners to XML experts. It is the only XML tool
that supports all of the XML schema languages and provides a large variety of powerful tools for editing and publishing
XML documents.
You can use Oxygen XML Editor to work with most XML-based standards and technologies. It is a cross-platform
application available on all the major operating systems (Windows, Mac OS X, Linux, Solaris) and can be used either
as a standalone application or as an Eclipse plugin.
For a list of many of the features and technologies that are included in Oxygen XML Editor, see the oXygen Website.
Getting Familiar with the Layout
Oxygen XML Editor includes several perspectives and editing modes to help you accomplish a wide range of tasks.
Each perspective and editing mode also includes a large variety of helper view, menu actions, toolbars, and contextual
menu functions.
Regardless of the perspective or editing mode that you are working with, the default layout is comprised of the following
areas:
Menus
Menu driven access to all the features and functions available in Oxygen XML Editor. Most of the menus are
common for all types of documents, but Oxygen XML Editor also includes some context-sensitive and
framework-specific menus and actions that are only available for a specific context or type of document.
Toolbars
Easy access to common and frequently used functions. Each icon is a button that acts as a shortcut to a related
function. Some of the toolbars are common for all perspectives, editing modes, and types of documents, while others
are specific to the particular perspective or mode. Some toolbars are also framework-specific, depending on the
type of document that is being edited. All the toolbars can be configured to suit your specific needs.
Helper Views
Oxygen XML Editor includes a large variety of views to assist you with editing, viewing, searching, validating,
transforming, and organizing your documents. Many of the views also contain useful contextual menu actions,
toolbar buttons, or menus. The most commonly used views for each perspective and editing mode are displayed by
default and you can choose to display others to suite your specific needs. The layout of the views can also be
configured according to your preferences.
Editor Pane
The main editing area in the center of the application. Each editing mode provides a main editor pane where you
spend most of your time reading, editing, applying markup, and validating your documents. The editor pane in each
editing mode also includes a variety of contextual menu actions and other features to help streamline your editing
tasks.
Perspectives
Oxygen XML Editor includes several different perspectives that you can use to work with your documents. The
Editor perspective is the most commonly used perspective used for displaying and editing the content of your XML
documents, and it is the default perspective when you start Oxygen XML Editor for the first time. Oxygen XML
Editor also includes a Database perspective that allows you to manage databases and their connections and a few
debugging perspectives that allow you to detect problems in XSLT or XQuery transformations.
Status Bar
The status bar at the bottom of the application contains some useful information when your working with documents.
It includes the following information, in the order it is displayed from left to right:
•
•
The path of the current document.
The Unicode value for the character directly to the right of the current cursor position.
•
•
•
•
•
Oxygen XML Editor | Getting Started | 23
The status of the current document. The status of Modified is displayed for documents that have not yet been
saved. Otherwise, this section is left blank.
In Text editing mode, the current line and character position is displayed.
If the Check for notifications option is enabled, this section will show you when new messages have been
received. The types of messages include the addition of new videos on the Oxygen XML Editor website, the
announcement of upcoming webinars and conferences where the Oxygen XML Editor team will participate,
and more.
The memory consumption, including the memory used by the application and the maximum amount that is
allocated to the application.
If the Show memory status option is enabled, a
Free unused memory icon is displayed in the bottom-right
corner and you can use this icon to free up unused memory.
Resources to Help You Get Started Using Oxygen XML Editor
Configuring Oxygen XML Editor
There are numerous ways that you can configure Oxygen XML Editor to accommodate your specific needs.
•
See the Configuring Oxygen XML Editor on page 1147 section for details on the various ways that you can configure
the application and its features.
Video Tutorials
The Oxygen XML Editor website includes numerous video demonstrations and webinars that present many of the
features that are available in Oxygen XML Editor and show you how to complete specific tasks or how to use the various
features.
•
Go to the Oxygen XML Editor Videos Page to see the list of video tutorials and webinars.
Oxygen XML Editor Documentation
The Oxygen XML Editor documentation includes a plethora of sections and topics to provide you with a variety of
information, ranging from basic authoring tasks to advanced developer techniques. You can, of course, search through
the documentation using standard search mechanisms, but you can also place the cursor in any particular position in the
interface and use the F1 key to open a dialog box that presents a section in the documentation that is appropriate for the
context of the current cursor position. Aside from the other topics in this Getting Started section, the following are links
to other sections of the documentation that might be helpful for your specific needs:
•
•
•
•
•
•
Text Editing Mode on page 70 Section - Provides information about the Text editor.
Author Editing Mode on page 93 Section - Provides information about the visual WYSIWYG-like Author editing
mode.
Editing Documents on page 133 Section - Includes information about editing a large variety of different types of
documents.
DITA Authoring on page 469 Section - Provides information about using DITA to edit and structure your content.
WebHelp System Output on page 828 Section - Provides information about the WebHelp system that can be used
for publishing content.
Importing Data on page 953 Section - Provides information about importing data from text files, MS Excel files,
database data, and HTML files.
Sample Documents
Your installation of Oxygen XML Editor includes a large variety of sample documents and projects that you can use as
templates to get started and to experiment with the various features and technologies. They are located in the samples
folder that is located in the installation directory of Oxygen XML Editor. You will find files and folders for a variety of
different types of documents, including the following:
•
sample.xpr file - A sample project file that will allow you to experiment with how projects can be structured and
used. When you open this project file, you will be able to see all the sample files and folders in the Project view.
•
•
Oxygen XML Editor | Getting Started | 24
personal files - A collection of interrelated sample files that will allow you to experiment with the structure and
relationship between XML files, stylesheets, and schemas.
Various document type folders - The various folders contain sample files for numerous different types, such as
CSS, DITA, DocBook, ePub, TEI, xhtml, and many others.
Other Resources
The following list includes links to various other resources that will help you get started using the features of Oxygen
XML Editor:
•
•
•
•
•
•
•
•
•
See the Oxygen XML Editor Blog Site for a large variety of current and archived blogs in regards to numerous features,
requests, and instructional topics.
Take advantage of the Oxygen XML Editor Forum to see various announcements and learn more about specific issues
that other users have experienced.
If you are using DITA, see the incredibly helpful DITA Style Guide Best Practices for Authors.
To learn about the WebHelp features in Oxygen XML Editor, see the Publishing DITA and DocBook to WebHelp
section of the website.
For more information about various additional tools that are integrated into Oxygen XML Editor, see the Tools
section.
See the External Resource Page for links to various other helpful resources, such as discussion lists, external tutorials,
and more.
See the oXygen SDK section for details about the SDK that allows you to extend and develop Oxygen XML Editor
frameworks and plugins, and to integrate Eclipse plugins.
For a list of new features that were implemented in the latest version of Oxygen XML Editor, see the What's New
Section of the Website
You can select the Tip of the Day action in the Help menu to display a dialog box that includes a variety of tips for
using Oxygen XML Editor.
Your First Document or Project
This section includes several topics that will help you get started with your first document or project.
Your First XML Document
To create your first XML document, select File >
Document Wizard is displayed:
New or click the
New button on the toolbar. The New
Oxygen XML Editor | Getting Started | 25
Figure 2: New Document Wizard
You can either create a new XML document from scratch by choosing one of the available types in the wizard. You can
also create one from a template by choosing a template from the Global templates or Framework templates folders.
If you are looking for a common document type, such as DITA or DocBook, you can find templates for these document
types in the Framework templates folder. If your company has created its own templates, you can also find them there.
After you use this dialog box to create a few documents, those document types will appear in the Recently used folder,
which allows you to easily create other new documents of those types.
For some document types, you may find a number of different templates. For example, there are numerous templates
for DocBook documents, and DITA topic types and maps. Choose the template that best meets your needs.
Writing Your First Document
Depending on the type of document you choose, the Oxygen XML Editor interface changes to support editing that
document type. This may include new menus, toolbar buttons, and items in the contextual menus.
Also, depending on the type of document you choose, Oxygen XML Editor may open your document in Text or Author
mode. Text mode shows the raw XML source file, while Author mode shows a graphical view of the document.
Whether there is an Author mode view available for your document type depends on the type you choose and if there
is a CSS stylesheet available to create the Author view. Oxygen XML Editor includes default Author mode views for
most of the document types it supports. If your company has created its own document types, Author mode stylesheets
may have also been created for that type. However, if you create a plain XML file, or one based on a schema that is not
included in the Oxygen XML Editor built-in support, you need to edit it in Text mode or create your own Author mode
style sheet for it.
You can switch back and forth between Author mode and Text mode at any time by clicking the buttons at the bottom
left of the editor window. You do not lose any formatting when switching from Author to Text mode. Text and Author
modes are just different views for the same XML document. There is also a Grid mode available, which is useful for
Oxygen XML Editor | Getting Started | 26
certain kinds of documents, particularly those that are structured like databases. You can also use it to sort things such
as list items and table rows.
If you use Author mode, you might find that it is similar to word processors that you are used to. Likewise, the Text
mode is similar to many typical text editors. If you are new to XML, the biggest difference is that XML documents have
a particular structure that you have to follow. Oxygen XML Editor assists you with a continuous validation of the XML
markup.
Structuring Your First Document
Each XML document type has a particular structure that you have to follow as you write and edit the document. Some
document types give you a lot of choices, while others give you very few. In either case, you need to make sure that
your document follows the particular structure for the document type you are creating. This means:
•
•
At any given location in the document, there are only certain XML elements allowed. Oxygen XML Editor helps
you determine which elements are allowed. In Author mode, when you press Enter, Oxygen XML Editor assumes
that you want to enter a new element and shows you a list of elements that can be created in this location. Keep
typing until the element you want is highlighted and press Enter to insert the element. If you want to view the overall
structure of a document and see what is allowed (and where), you can use the Model view (Window > Show View >
Model).
When you create certain elements, you may find that your text gets a jagged red underline and you get a warning
that your content is invalid. This is usually because the element you have just created requires certain other elements
inside of it. Your document will be invalid until you create those elements. Oxygen XML Editor does its best to help
you with this. If there is only one possible element that can go inside the element you just created, Oxygen XML
Editor creates it for you. However, if there is more than one possibility you have to create the appropriate elements
yourself. In many cases, Oxygen XML Editor presents XML Quick Fixes that help you resolve errors by offering
proposals to quickly fix problems such as missing required attributes or invalid elements.
Editing Your First Document
Once you have completed the first draft of your document, you may need to edit it. As with any editor, Oxygen XML
Editor provides the normal cut, copy, and paste options as well as drag and drop editing. However, when you are editing
an XML document, you have to make sure that your edits respect the structure of the XML document type. In fact, you
are often editing the structure as well as the content of your document.
Oxygen XML Editor provides many tools to help you edit your structure and to keep your structure valid while editing
text.
The Document Breadcrumbs
Across the top of the editor window, there is a set of breadcrumbs that shows you exactly were the insertion point
is in the structure of the document. You can click any element in the breadcrumbs to select that entire element in
the document.
Showing Tags
To see exactly where you are in the structure of the document, you can show the tags graphically in the Author
view. There are several levels of tag visibility that you can choose using the
Display tags mode drop-down
menu on the toolbar (the button may look a little different as it changes to reflect the level of tags currently displayed).
Outline View
The Outline view shows you the structure of your document in outline format. You can use it to select elements,
or to move elements around in the document.
Oxygen XML Editor | Getting Started | 27
You can configure the Outline view to determine what is shown, such as element names, attributes, and comments.
Certain choices may work better for particular document types. You can also filter the Outline view to show only
elements with a certain name.
Cut and Paste, Drag and Drop
You can cut and paste or drag and drop text, just as you would in any other editor. However, when you do this in
Author view, it is important to remember that you are actually moving blocks of XML. When you cut and paste or
drag and drop a block of XML, the result has to be valid both where the content is inserted, and where it is removed
from.
A big part of doing this correctly is to make sure that you pick up the right block of text in the first place. Using the
breadcrumbs or Outline view, or showing tags and using them to select content, can help ensure that you are selecting
the right chunk of XML.
If you do try to paste or drop a chunk of XML somewhere that is not valid, Oxygen XML Editor warns you and
tries to suggest actions that make it valid (such as by removing surrounding elements from the chunk you are moving,
by creating a new element at the destination, or by inserting it in a nearby location).
If you are using Author mode, you can also switch to Text mode to see exactly which bits of XML you are selecting
and moving.
Refactoring actions
You can perform many common structure edits, such as renaming an element or wrapping text in an element, using
the actions in the Refactoring menu of the contextual menu (or the Document > Markup menu). More advanced
refactoring operations are also available using the XML Refactoring tool that is available in the Tools menu.
Oxygen XML Editor | Getting Started | 28
Validating Your First Document
Validation is the process of making sure that an XML document abides by the rules of its schema. If Oxygen XML
Editor knows how to find the schema, it validates the document for you as you type. Oxygen XML Editor finds the
schema automatically for most of the document types created from templates. However, in some cases you may have
to tell it how to find the schema.
When Oxygen XML Editor validates as you type, there is a small bar at the right edge of the editor that shows you if
the document is invalid and where errors are found. If the indicator at the top of that bar is green, your document is
valid. If the document is invalid, the indicator turns red and a red flag shows you where the errors are found. Click that
flag to jump to the error. Remember that sometimes your document is invalid simply because the structure you are
creating is not yet complete.
In addition to problems with the validity of the XML document itself, Oxygen XML Editor also reports warnings for a
number of conditions, such as if your document contains a cross reference that cannot be resolved, or if Oxygen XML
Editor cannot find the schema specified by the document. The location of these warnings is marked in yellow on the
validation bar. If the document contains warnings, but no errors, the validity indicator turns yellow.
You can also validate your document at any time by selecting the
Validate action from the
Validation toolbar
drop-down menu or the Document > Validate menu.. When you validate in this manner, if errors are found, the validation
result opens in a new pane at the bottom of the editor that shows each validation error on a separate line. Clicking the
error takes you to the location in your document where the error was detected.
Note: Be aware that the problem is sometimes in a different location from where the validator detects the error.
To get more information about a validation error, right-click a validation error message, and select Show Message.
Proofing Your First Document
Oxygen XML Editor includes an automatic (as-you-type) spell checking feature, as well as a manual spell checking
action. To check the spelling of your document manually, use the
Edit menu.
Check Spelling action on the toolbar or from the
Transforming Your First Document
An XML document must be transformed in order to be published. Transformations are specific to the particular type of
document you have created. For example, a DITA transformation cannot be used on a DocBook file, or vice versa. A
single document type may have many different transformations that produce different kinds of outputs. For some
document types, such a DITA, many different content files may be combined together by a transformation. You need
to locate and launch a transformation that is appropriate for your document type and the kind of output you want to
generate.
Oxygen XML Editor uses transformation scenarios to control the transformation process. Depending on the document
type you have created, there may be several transformation scenarios already configured for your use. This may include
the default transformation scenarios supplied by Oxygen XML Editor or ones created by your organization.
To see the list of transformations available for your document, select the
Apply Transformation Scenario(s) action
from the toolbar or the Document > Transformation menu. A list of available transformation scenarios are displayed.
Choose one or more scenarios to apply, and click Apply associated. Exactly how your transformed content appears
depends on how the transformation scenario is configured.
Your First DITA Topic
To create your first DITA topic, select File >
Wizard is displayed:
New or click the
New button on the toolbar. The New Document
Oxygen XML Editor | Getting Started | 29
Figure 3: New Document Wizard
Go to Framework templates > DITA > topic and select the type of topic that you want to create.
Note: If your organization has created DITA customizations, the appropriate template files may be in another
location, and various different types of topics may be provided for your use. Check with the person who manages
your DITA system to see if you should be using templates from a different directory.
Your DITA topic is an XML document, thus all the editing features that Oxygen XML Editor provides for editing XML
documents also apply to DITA topics. Oxygen XML Editor also provides extensive additional support for editing DITA
topics, their associated DITA maps, and for creating DITA output.
Understanding DITA Topics
It is important to understand the role that a DITA topic plays in a DITA project. A DITA topic is not associated with a
single published document. It is a separate entity that can potentially be included in many different books, help systems,
or websites. Therefore, when you write a DITA topic you are not writing a book, a help system, or a website. You are
writing an individual piece of content. This affects how you approach the writing task and how Oxygen XML Editor
works to support you as you write.
Most of your topics are actually related to other topics, and those relationships can affect how you write and handle
things such as links and content reuse. Oxygen XML Editor helps you manage those relationships. Depending on how
your topics are related, you can use the tools provided in Oxygen XML Editor, along with the features of DITA, in a
variety of different ways.
The Role of Maps
The basic method that DITA uses to express the relationship between topics is through a DITA map. Other relationships
between topics, such as cross references, generally need to be made between topics in the same map. DITA uses maps
to determine which topics are part of any output that you create. While customized DITA solutions can use other
Oxygen XML Editor | Getting Started | 30
mechanisms, generally DITA is not used as a way to publish individual topics. Output is created from a map and includes
all the topics referenced by the map.
A publication is not always represented by a single map. For instance, if you are writing a book, you might use a map
to create each chapter and then organize the chapters in another map to create the book. If you are writing help topics,
you might use a map to combine several DITA topics to create a single help topic and then create another map to organize
your help topics in a help system. This allows you to reuse the content of a map in multiple projects.
Creating a Map
To add topics to a map, you must first create the map. A map is an XML document, similar to a topic. To create a map,
select File >
New or click the
New button on the toolbar, go to Framework templates > DITA Map > map
and select the type of map you want to create. Oxygen XML Editor asks if you want to open your map in the editor or
in the DITA Maps Manager. Usually, opening it in the DITA Maps Manager is the best choice, but you can also open
the map in the editor from the DITA Maps Manager. The DITA Maps Manager presents a view of the DITA map
that is similar to a table of contents.
Adding Topics to a Map
To add a topic to a map, add a topic reference to the map using a topicref element. The easiest way to do this is to
open the topic in the editor, then right-click the DITA map in the DITA Maps Manager view and choose Reference
to the currently edited file from the Append child or Insert After submenus. This opens the Insert Reference dialog
box with all of the required fields already filled in for you. You can fill in additional information in the various tabs in
this dialog box or add it to the map later. When you select Insert and close, a reference to your topic is added to the
map.
Oxygen XML Editor | Getting Started | 31
Figure 4: Insert Reference Dialog Box
If you want to see what the resulting map looks like in XML, save your map and then double-click the DITA map in
the DITA Maps Manager view. The XML version of the map opens in the editor.
As you add topics to your map, you may want to make a topic the child or sibling of another topic. This is usually done
at the map level. To create a child topic reference, right-click the parent topic in the DITA Maps Manager view and
choose Append child. To create a sibling topic reference, right-click a topic in the DITA Maps Manager view and
choose Insert After. From either of these submenus you can then choose one of the following options:
•
•
•
New - Opens the New file wizard for creating a new topic.
Reference - Opens the Insert Reference dialog box that allows you to create a reference to an existing topic.
Reference to the currently edited file - Opens the Insert Reference dialog box that helps you to easily create a
reference to the file that is currently opened in the editor.
You can also change the order and nesting of topics in the DITA Maps Manager view by doing either of the following:
•
•
Select the topic to move while holding down the Alt key and use the arrow keys to move it around.
Use the mouse to drag and drop the topic to the desired location.
The way your parent and child topics are organized in any particular output depends on both the configuration of those
topics in the map and the rules of the output transformation that is applied to them. Do not assume that your topics must
have the same organization for all output types. The map defines the organization of the topics, not the topics themselves.
It is possible to create a variety of different maps, each with different organization and configuration options to produce
a variety of different outputs.
Child Maps
If you have a large set of information, such as a long book or extensive help system, a single map can become long and
difficult to manage. To make it easier to manage, you can break up the content into smaller sub-maps. A sub-map might
represent a chapter of a book, a section of a user manual, or a page on a website.
To build a publication out of these smaller maps, you must add them to a map that represents the overall publication.
To add a child map to the current map, right-click the parent DITA map and choose Append child > Map reference.
Oxygen XML Editor | Getting Started | 32
Validating a Map
Just as it is with your individual topics, it is important to validate your maps. Oxygen XML Editor provides a validation
function for DITA maps that does more than simply validating that the XML is well formed. It also does the following:
•
•
•
Validates all of the relationships defined in the maps.
Validates all of the files that are included in the map.
Validates all of the links that are expressed in the files.
Validating the map that describes your entire publication validates all the files that make up the publication and all of
the relationships between them. To validate a map, click the
DITA Maps Manager view.
Validate and Check for Completeness button in the
Publishing Your Topics
As noted previously, in DITA standards you usually do not publish output from an individual topic. Instead, you create
published output by running a DITA transformation on a map. This collects all the topics that are referenced in the map,
organizes them, and produces output in a particular format. By default, Oxygen XML Editor uses the transformations
provided by the DITA Open Toolkit for publishing to a variety of different output formats (such as PDF, WebHelp or
EPUB). Your organization may have created various custom transformations or modified the built-in DITA Open
Toolkit transformations. In either case, Oxygen XML Editor manages them by using transformation scenarios.
To publish output for a map, select the transformation scenario you want to run and set any of the parameters it requires.
To select a transformation, click the
Configure Transformation Scenario(s) button in the DITA Maps Manager
view. This opens the Configure Transformation Scenario(s) dialog box.
Oxygen XML Editor | Getting Started | 33
Choose the transformation scenarios you want to apply and click Apply associated. Depending on the configuration of
the transformation scenario, when the transformation is finished, your output may automatically be opened in the
appropriate application. To change or view the configuration or storage options for a transformation scenario, select the
transformation and click Edit.
Creating a New Project
Oxygen XML Editor allows you to organize your XML-related files into projects. This helps you manage and organize
your files and also allows you to perform batch operations (such as validation and transformation) over multiple files.
You can also share your project settings and transformation/validation scenarios with other users. Use the Project view
to manage projects, and the files and folders contained within.
Creating a New Project
To create a new project, select
New Project from the Project menu, the New menu in the contextual menu, or the
drop-down menu at the top-left of the Project view. This opens a dialog box that allows you to assign a name to the
new project and adds it to the structure of the project in the Project view.
Adding Items to the Project
To add items to the project, select any of the following actions that are available when invoking the contextual menu in
the Project view:
New >
File
Opens a New file dialog box that helps you create a new file and adds it to the project structure.
New >
Folder
Opens a New Folder dialog box that allows you to specify a name for a new folder and adds it to the structure of
the project.
The project itself is considered a logical folder. You can add a logical folder, or content to a logical folder, by using one
of the following actions that are available in the contextual menu, when invoked from the project root:
New >
Logical Folder
Creates a logical folder in the tree structure (the icon is a magenta folder on Mac OS X - ).
New > Logical Folders from Web
Replicates the structure of a remote folder accessible over FTP/SFTP/WebDAV, as a structure of logical folders.
The newly created logical folders contain the file structure of the folder it points to.
Add Folder
Adds a link to a physical folder, whose name and content mirror a real folder that exists in the local file system (the
icon of this action is different on Mac OS X
).
Add Files
Adds links to files on the local file system.
Add Edited File
Adds a link to the currently edited file in the project.
Using Linked Folders (Shortcuts)
Another easy way to organize your XML working files is to place them in a directory and then to create a corresponding
linked folder in you project. If you add new files to that folder, you can simply use the
Refresh (F5) action from
the toolbar or contextual menu and the Project view will display the existing files and subdirectories. If your files are
scattered amongst several folders, but represent the same class of files, you might find it useful to combine them in a
logical folder.
You can create linked folders (shortcuts) by dragging and dropping folders from the Windows Explorer (Mac OS X
Finder) to the project tree, or by selecting
Add Folder in the contextual menu from the project root. Linked folders
Oxygen XML Editor | Getting Started | 34
are displayed in the Project view with bold text. To create a file inside a linked folder, select the New >
from the contextual menu. The linked files presented in the Project view are marked with a special icon.
File action
Note: Files may have multiple instances within the folder system, but cannot appear twice within the same
folder.
For much more information on managing projects and their content, see the The Project View on page 71 section.
For more details about how you can share projects with other users, see the Sharing a Project - Team Collaboration on
page 164 section.
Getting Help
If you run into specific problems while using Oxygen XML Editor you can take advantage of a variety of support related
resources. Those resources include the following:
•
•
•
•
•
The Oxygen XML Editor Support Section of the Website
The Oxygen XML Editor Forum
The Oxygen XML Editor Video Tutorials
The Common Problems and Solutions Section of the User Manual
The Online Technical Support Form
The application also includes various specific help-related resources in the Help menu.
Help Menu
The Oxygen XML Editor Help menu provides various resources to assist you with your tasks.
These resources include the following actions or options:
The Help (F1) Action
Use this action (or the F1 key) to open a dialog box that presents a section in the User Manual that is appropriate
for the context of the current cursor position. If the Use online help option is enabled, this action will open the User
Manual in an online mode.
Dynamic Help
Use the Show Dynamic Help view action to open a dynamic view that automatically loads the relevant help section
of the User Manual for the focused editor, view, or dialog box.
Add-ons
If you want to extend the functionality of Oxygen XML Editor with add-ons, the Help menu includes several options
for installing, updating, or managing add-ons.
Licensing
If you encounter problems with your Oxygen XML Editor license, you can use the Register option to open a dialog
box that provides options for obtaining or using a license key.
Reporting a Problem
You can use the Report problem option to open a dialog box that allows you to write the description of a problem
that was encountered while using the application. You are able to change the URL where the reported problem is
sent by using the com.oxygenxml.report.problems.url system property. The report is sent in XML format through
the report parameter of the POST HTTP method.You can also use the Support Center option to open the Oxygen
XML Editor Support Section of the Website.
The About Dialog Box
Clicking About opens a dialog box that contains information about Oxygen XML Editor and the installed version.
This dialog box includes the following tabs:
•
•
•
•
Oxygen XML Editor | Getting Started | 35
Copyright - This tab contains general information about the product and the version of the product you are
using, along with contact details and the SGN number. Details regarding the memory usage are also presented
at the bottom of the dialog box.
Libraries - This tab presents the list of third party libraries that Oxygen XML Editor uses. To view the End
User Licence Agreement of each library, double-click it.
Frameworks - This tab contains a list with the frameworks that are bundled with Oxygen XML Editor.
System Properties - This tab contains a list with system properties and their values. The contextual menu allows
you to select and copy the properties.
Chapter
3
Installation
Topics:
•
•
•
•
•
•
•
•
•
•
•
•
•
•
•
Installation Options for Oxygen
XML Editor
Install Oxygen XML Editor on
Windows
Install Oxygen XML Editor on Mac
OS X
Install Oxygen XML Editor on
Linux
Installing Oxygen XML Editor on
Windows Server
Installing Oxygen XML Editor on
a Linux / UNIX Server
Installing Oxygen XML Editor
using the Java Web Start (JWS)
Installer
Site-wide Deployment
Obtaining and Registering a
License Key for Oxygen XML
Editor
Setting Up a Floating License
Server for Oxygen XML Editor
Transferring or Releasing a
License Key
Upgrading Oxygen XML Editor
Installing and Updating Add-ons
in Oxygen XML Editor
Uninstalling Oxygen XML Editor
Oxygen XML Editor Installer
Command Line Reference
The platform requirements and installation instructions are presented in this
chapter.
Oxygen XML Editor | Installation | 38
Installation Options for Oxygen XML Editor
Choosing how Oxygen XML Editor runs
You can install Oxygen XML Editor to run in a number of ways:
•
As a desktop application (running standalone or as an Eclipse plugin) on Windows, Linux, or Mac.
•
As a desktop application (running standalone or as an Eclipse plugin) on a Unix or Linux server or on Windows
Terminal Server.
From within a browser though the Java Web Start technology.
•
Choosing an installer
You have a choice of installers;
•
The native installer for your platform. On Windows and Linux, the native installer can run also in unattended mode.
•
The All-platforms installer, which can be used on any supported platform.
The installation packages were checked before publication with an antivirus program to make sure they are not infected
with viruses, trojan horses, or other malicious software.
Choosing a license option
You must obtain and register a license key to run Oxygen XML Editor.
You can choose from two kinds of license:
•
•
A named-person license, which can be used by a single person on multiple computers.
A floating license, which can be used by different people at different times. Only one person can use a floating license
at a time.
Upgrading, transferring, and uninstalling.
You can also upgrade Oxygen XML Editor, transfer a license, or uninstall Oxygen XML Editor.
Getting help with installation
If you need help at any point during these procedures, please send us an email at [email protected].
Install Oxygen XML Editor on Windows
Choosing an Installer
You can install Oxygen XML Editor on Windows using one of the following methods:
•
•
•
Install using the Windows installer.
Install using the Windows installer in unattended mode.
Install using the All Platforms installer. Choose the all platforms installer if you have trouble installing using the
Windows installer.
System Requirements
System requirements for a Windows install:
Operating systems
Windows Vista, Windows 7, Windows 8, Windows 10, Windows Server 2008, Windows Server 2012
Oxygen XML Editor | Installation | 39
CPU
•
•
Minimum - Intel Pentium III™/AMD Athlon™ class processor, 1 GHz
Recommended - Dual Core class processor
Memory
•
•
Minimum - 2 GB of RAM
Recommended - 4 GB of RAM
Storage
•
•
Minimum - 400 MB free disk space
Recommended - 1 GB free disk space
Java
Oxygen XML Editor requires Java. If you use the native Windows installer, Oxygen XML Editor will be installed
with its own copy of Java. If you use the all platforms installer, your system must have a compatible Java virtual
machine installed.
Oxygen XML Editor supports only official and stable Java Virtual Machines with the version number 1.6.0 or later
(the recommended version is 1.7) from Oracle available at
http://www.oracle.com/technetwork/java/javase/downloads/index.html. Oxygen XML Editor may work with JVM
implementations from other vendors, but there is no guarantee that those implementations will work with future
Oxygen XML Editor updates and releases.
Oxygen XML Editor uses the following rules to determine which installed version of Java to use:
1. If you install using the native Windows installer, which installs a version of Java as part of the Oxygen XML
Editor installation, the version in the jre subdirectory of the installation directory is used.
2. Otherwise, if the Windows environment variable JAVA_HOME is set, Oxygen XML Editor uses the Java version
pointed to by this variable.
3. Otherwise the version of Java pointed to by your PATH environment variable is used.
If you run Oxygen XML Editor using the batch file, oxygen.bat, you can edit the batch file to specify a particular
version to use.
Install Using the Windows Installer
To install Oxygen XML Editor using the Windows installer, follow these steps:
1.
2.
3.
4.
5.
Make sure that your system meets the system requirements.
Download the Windows installer.
Validate the integrity of the downloaded file by checking it against the MD5 sum published on the download page.
Run the installer and follow the instructions in the installation program.
Start Oxygen XML Editor using one of the following methods:
•
•
Using one of the shortcuts created by the installer.
By running oxygen.bat, which is located in the install folder.
6. To license your copy of Oxygen XML Editor go to Help > Register and enter your license information.
Unattended Installation
You can run the installation in unattended mode by running the installer from the command line with the -q parameter.
By default, running the installer in unattended mode installs Oxygen XML Editor with the default options and does not
overwrite existing files. You can change many options for the unattended installer using the installer command line
parameters.
Oxygen XML Editor | Installation | 40
Install Using the All Platforms Installer
To install using the all platforms installer, follow these steps:
1. Download the all platforms installation package (oxygen.tar.gz ) to a folder of your choice.
2. Extract the archive in that folder.
Oxygen XML Editor is now installed in a new sub-folder called oxygen.
3. Optionally, you can move the directory where you installed Oxygen XML Editor to your applications directory. You
can also rename it to contain the product version information. For example, you can rename it as oxygen17.1.
4. Start Oxygen XML Editor by running oxygen.bat, which is located in the install directory.
5. To license your copy of Oxygen XML Editor go to Help > Register and enter your license information.
Install Oxygen XML Editor on Mac OS X
Choosing an Installer
You can install Oxygen XML Editor on Mac OS X using one of the following methods:
•
•
Install using the Mac OS X installation package, oxygen.zip.
Install using the all platforms installer. Choose the all platforms installer if you have trouble installing using the Mac
OS X archive installation.
System Requirements
System requirements for a Mac OS X install:
Operating system
OS X version 10.6 64-bit or later
CPU
•
•
Minimum - Intel-based Mac, 1 GHz
Recommended - Dual Core class processor
Memory
•
•
Minimum - 2 GB of RAM
Recommended - 4 GB of RAM
Storage
•
•
Minimum - 400 MB free disk space
Recommended - 1 GB free disk space
Java
Oxygen XML Editor requires Java to run. OS X includes Java by default or it will install it on the first attempt to
run a Java application.
Oxygen XML Editor supports only official and stable Java Virtual Machines with the version number 1.6.0 or later
(the recommended version is 1.6.0 from Apple). Oxygen XML Editor may work with JVM implementations from
other vendors, but there is no guarantee that other implementations will work with future Oxygen XML Editor
updates and releases.
Oxygen XML Editor uses the following rules to determine which installed version of Java to use:
1. If you start Oxygen XML Editor with the application launcher (.app) file then:
a. if you use the zip distribution for OS X Oxygen XML Editor uses the Apple Java SE 6 available on your
Mac computer
Oxygen XML Editor | Installation | 41
b. if you use the tar.gz distribution that contains a bundled JRE then Oxygen XML Editor will use that bundled
JRE
2. If you start Oxygen XML Editor using a startup .sh script then:
a. if a bundled JRE is available then it will be used
b. otherwise, if the JAVA_HOME environment variable is set then the Java distribution indicated by it will be
used
c. otherwise the version of Java pointed to by your PATH environment variable will be used
If you run Oxygen XML Editor using the oxygen.sh script, you can change the version of Java used by editing
to script file. Go to the Java command at the end of the script file and specify the full path to the Java executable
of the desired JVM version, for example:
/System/Library/Frameworks/JavaVM.framework/Versions/1.6.0/Home/bin/java "-Xdock:name= ...
OS X Installation
To install Oxygen XML Editor on OS X:
1. Download the OS X installation package (oxygen.zip).
The Safari web browser should recognize and expand the compressed file. If it is not automatically expanded, you
can expand it manually by double-clicking it.
2. Validate the integrity of the downloaded file by checking it against the MD5 sum published on the download page.
3. In Finder, move the expanded folder to your Applications folder.
Oxygen XML Editor is now installed.
4. Start Oxygen XML Editor, using one of the following methods:
•
Double click Oxygen XML Editor.app.
•
Run sh oxygenMac.sh on the command line.
Notice: You can start more than one instance on the same computer by running the following command for
each new instance:
open -n Oxygen.app
5. To license your copy of Oxygen XML Editor, go to Help > Register to enter your license key.
Install Using the All Platforms Installer
To install using the all platforms installer:
1. Download the all platforms installation package (oxygen.tar.gz ) to a folder of your choice.
2. Extract the archive in that folder.
Oxygen XML Editor is now installed in a new sub-folder called oxygen.
3. Optionally, you can move the directory where you installed Oxygen XML Editor to your applications directory. You
can also rename it to contain the product version information. For example, you can rename it as oxygen17.1.
4. Start Oxygen XML Editor by running oxygenMac.sh, which is located in the install folder.
5. To license your copy of Oxygen XML Editor go to Help > Register and enter your license information.
Install Oxygen XML Editor on Linux
Choosing an Installer
You can install Oxygen XML Editor on Linux using any of the following methods:
•
•
•
Oxygen XML Editor | Installation | 42
Install using the Linux installer.
Install using the Linux installer in unattended mode.
Install using the all platforms installer. Choose the all platforms installer if you have trouble installing using the
Linux installer.
System Requirements
System requirements for a Linux install:
Operating system
Any Unix/Linux distribution with an available Java SE Runtime Environment version 1.6.0 or later from Oracle
CPU
•
•
Minimum - Intel Pentium III™/AMD Athlon™ class processor, 1 GHz
Recommended - Dual Core class processor
Memory
•
•
Minimum - 2 GB of RAM
Recommended - 4 GB of RAM
Storage
•
•
Minimum - 400 MB free disk space
Recommended - 1 GB free disk space
Java
Oxygen XML Editor requires Java. Oxygen XML Editor supports only official and stable Java Virtual Machines
with the version number 1.6.0 or later (the recommended version is 1.6.0) from Oracle available at
http://www.oracle.com/technetwork/java/javase/downloads/index.html. Oxygen XML Editor may work with JVM
implementations from other vendors, but there is no guarantee that other implementations will work with future
Oxygen XML Editor updates and releases. Oxygen XML Editor does not work with the GNU libgcj Java Virtual
Machine.
Oxygen XML Editor uses the following rules to determine which installed version of Java to use:
1. If you used the Linux installer, which installs a version of Java as part of the Oxygen XML Editor installation,
the version in the jre subdirectory of the installation directory is used.
2. Otherwise, if the Linux environment variable JAVA_HOME is set, Oxygen XML Editor uses the Java version
pointed to by this variable.
3. Otherwise the version of Java pointed to by your PATH environment variable is used.
You can also change the version of the Java Virtual Machine that runs Oxygen XML Editor by editing the script
file, oxygen.sh. Go to the Java command at the end of the script file and specify the full path to the Java executable
of the desired JVM version, for example:
/usr/bin/jre1.6.0_45/bin/java -Xmx256m ...
Linux Installation
Linux installation procedure.
To install Oxygen XML Editor on Linux, follow these steps:
1. Download the Linux installer.
2. Optionally, you can validate the integrity of the downloaded file by checking it against the MD5 sum published on
the download page.
3. Run the installer that you downloaded.
For example, open a shell, cd to the installation directory, and at the prompt type sh ./oxygen-32bit.sh or
sh ./oxygen-64bit.sh, depending on which installer you downloaded.
Oxygen XML Editor | Installation | 43
4. Start Oxygen XML Editor using one of the following methods:
•
•
Use the oxygen shortcut created by the installer.
From a command line, type sh oxygen.sh. This file is located in the installation folder.
5. To license your copy of Oxygen XML Editor go to Help > Register and enter your license key.
Unattended Installation
You can run the installation in unattended mode by running the installer from the command line with the -q parameter.
By default, running the installer in unattended mode installs Oxygen XML Editor with the default options and does not
overwrite existing files. You can change many options for the unattended installer using the installer command line
parameters.
Install Using the All Platforms Installer
To install using the all platforms installer:
1. Download the all platforms installation package (oxygen.tar.gz ) to a folder of your choice.
2. Extract the archive in that folder.
Oxygen XML Editor is now installed in a new sub-folder called oxygen.
3. Optionally, you can move the directory where you installed Oxygen XML Editor to your applications directory. You
can also rename it to contain the product version information. For example, you can rename it as oxygen17.1.
4. Start Oxygen XML Editor by running oxygen.sh, which is located in the install folder.
5. To license your copy of Oxygen XML Editor go to Help > Register and enter your license information.
Installing Oxygen XML Editor on Windows Server
Choosing an Installer
You can install Oxygen XML Editor on Windows using one of the following methods:
•
•
•
Install using the Windows installer.
Install using the Windows installer in unattended mode.
Install using the All Platforms installer. Choose the all platforms installer if you have trouble installing using the
Windows installer.
System Requirements
System requirements for a Windows Server install:
Operating systems
Windows Server 2008, Windows Server 2008 R2, Windows Server 2012, Windows Server 2012 R2
CPU
•
•
Minimum - Intel Pentium III™/AMD Athlon™ class processor, 1 GHz
Recommended - Dual Core class processor
Memory
•
•
Minimum values per user - 512 MB of RAM
Recommended values per user - 2 GB of RAM
Storage
•
•
Minimum - 400 MB free disk space
Recommended - 1 GB free disk space
Oxygen XML Editor | Installation | 44
Java
Oxygen XML Editor requires Java. If you use the native Windows installer, Oxygen XML Editor will be installed
with its own copy of Java. If you use the all platforms installer, your system must have a compatible Java virtual
machine installed.
Oxygen XML Editor supports only official and stable Java Virtual Machines with the version number 1.6.0 or later
(the recommended version is 1.7) from Oracle available at
http://www.oracle.com/technetwork/java/javase/downloads/index.html. Oxygen XML Editor may work with JVM
implementations from other vendors, but there is no guarantee that those implementations will work with future
Oxygen XML Editor updates and releases.
Oxygen XML Editor uses the following rules to determine which installed version of Java to use:
1. If you install using the native Windows installer, which installs a version of Java as part of the Oxygen XML
Editor installation, the version in the jre subdirectory of the installation directory is used.
2. Otherwise, if the Windows environment variable JAVA_HOME is set, Oxygen XML Editor uses the Java version
pointed to by this variable.
3. Otherwise the version of Java pointed to by your PATH environment variable is used.
If you run Oxygen XML Editor using the batch file, oxygen.bat, you can edit the batch file to specify a particular
version to use.
Install Using the Windows Installer
To install Oxygen XML Editor using the Windows installer, follow these steps:
1.
2.
3.
4.
5.
Make sure that your system meets the system requirements.
Download the Windows installer.
Validate the integrity of the downloaded file by checking it against the MD5 sum published on the download page.
Run the installer and follow the instructions in the installation program.
Start Oxygen XML Editor using one of the following methods:
•
•
Using one of the shortcuts created by the installer.
By running oxygen.bat, which is located in the install folder.
6. To license your copy of Oxygen XML Editor go to Help > Register and enter your license information.
Install Using the All Platforms Installer
To install using the all platforms installer, follow these steps:
1. Download the all platforms installation package (oxygen.tar.gz ) to a folder of your choice.
2. Extract the archive in that folder.
Oxygen XML Editor is now installed in a new sub-folder called oxygen.
3. Optionally, you can move the directory where you installed Oxygen XML Editor to your applications directory. You
can also rename it to contain the product version information. For example, you can rename it as oxygen17.1.
4. Start Oxygen XML Editor by running oxygen.bat, which is located in the install directory.
5. To license your copy of Oxygen XML Editor go to Help > Register and enter your license information.
Configuring Windows Terminal Server
Windows Terminal Server configuration procedure.
1. Install Oxygen XML Editor on the server and make its shortcuts available to all users.
2. If you need to run multiple instances of Oxygen XML Editor, make sure you add the
-Dcom.oxygenxml.MultipleInstances=true parameter in the .bat startup script.
3. Make sure you allocate sufficient memory to Oxygen XML Editor by adding the -Xmx parameter either in the .bat
startup script, or in the .vmoptions configuration file (if you start it from an executable launcher).
Oxygen XML Editor | Installation | 45
Installing Oxygen XML Editor on a Linux / UNIX Server
Choosing an Installer
You can install Oxygen XML Editor on Linux using any of the following methods:
•
•
•
Install using the Linux installer.
Install using the Linux installer in unattended mode.
Install using the all platforms installer. Choose the all platforms installer if you have trouble installing using the
Linux installer.
System Requirements
System requirements for a Linux install:
Operating system
Any Unix/Linux distribution with an available Java SE Runtime Environment version 1.6.0 or later from Oracle
CPU
•
•
Minimum - Intel Pentium III™/AMD Athlon™ class processor, 1 GHz
Recommended - Dual Core class processor
Memory
•
•
Minimum - 2 GB of RAM
Recommended - 4 GB of RAM
Storage
•
•
Minimum - 400 MB free disk space
Recommended - 1 GB free disk space
Java
Oxygen XML Editor requires Java. Oxygen XML Editor supports only official and stable Java Virtual Machines
with the version number 1.6.0 or later (the recommended version is 1.6.0) from Oracle available at
http://www.oracle.com/technetwork/java/javase/downloads/index.html. Oxygen XML Editor may work with JVM
implementations from other vendors, but there is no guarantee that other implementations will work with future
Oxygen XML Editor updates and releases. Oxygen XML Editor does not work with the GNU libgcj Java Virtual
Machine.
Oxygen XML Editor uses the following rules to determine which installed version of Java to use:
1. If you used the Linux installer, which installs a version of Java as part of the Oxygen XML Editor installation,
the version in the jre subdirectory of the installation directory is used.
2. Otherwise, if the Linux environment variable JAVA_HOME is set, Oxygen XML Editor uses the Java version
pointed to by this variable.
3. Otherwise the version of Java pointed to by your PATH environment variable is used.
You can also change the version of the Java Virtual Machine that runs Oxygen XML Editor by editing the script
file, oxygen.sh. Go to the Java command at the end of the script file and specify the full path to the Java executable
of the desired JVM version, for example:
/usr/bin/jre1.6.0_45/bin/java -Xmx256m ...
Linux Installation
Linux installation procedure.
To install Oxygen XML Editor on Linux, follow these steps:
Oxygen XML Editor | Installation | 46
1. Download the Linux installer.
2. Optionally, you can validate the integrity of the downloaded file by checking it against the MD5 sum published on
the download page.
3. Run the installer that you downloaded.
For example, open a shell, cd to the installation directory, and at the prompt type sh ./oxygen-32bit.sh or
sh ./oxygen-64bit.sh, depending on which installer you downloaded.
4. Start Oxygen XML Editor using one of the following methods:
•
•
Use the oxygen shortcut created by the installer.
From a command line, type sh oxygen.sh. This file is located in the installation folder.
5. To license your copy of Oxygen XML Editor go to Help > Register and enter your license key.
Install Using the All Platforms Installer
To install using the all platforms installer:
1. Download the all platforms installation package (oxygen.tar.gz ) to a folder of your choice.
2. Extract the archive in that folder.
Oxygen XML Editor is now installed in a new sub-folder called oxygen.
3. Optionally, you can move the directory where you installed Oxygen XML Editor to your applications directory. You
can also rename it to contain the product version information. For example, you can rename it as oxygen17.1.
4. Start Oxygen XML Editor by running oxygen.sh, which is located in the install folder.
5. To license your copy of Oxygen XML Editor go to Help > Register and enter your license information.
Unix / Linux Server Configuration
To install Oxygen XML Editor on a Unix / Linux server:
1. Install Oxygen XML Editor on the server and make sure the oxygen.sh script is executable and the installation
directory is in the PATH of the users that need to use the application.
2. Make sure you allocate sufficient memory to Oxygen XML Editor by setting an appropriate value for the -Xmx
parameter in the .sh startup script.
The default value of the -Xmx parameter is 512 MB. To avoid Performance Issues with Large Documents on page
1254, you may need to adjust it.
3. Make sure the X server processes located on the workstations allow connections from the server host. For this, use
the xhost command.
4. Start telnet (or ssh) on the server host.
5. Start an xterm process with the display parameter set on the current workstation. For example: xterm -display
workstationip:0.0.
6. Start Oxygen XML Editor by typing sh oxygen.sh from the command line. This file is located in the installation
folder.
Installing Oxygen XML Editor using the Java Web Start (JWS) Installer
Oxygen XML Editor provides the tools to create your own JWS distribution that can be installed on a custom web server.
The advantages of a JWS distribution include:
•
•
•
Oxygen XML Editor is run locally, not inside a web browser, overcoming many of the browser compatibility problems
common to applets.
JWS ensures that the most current version of the application will be deployed, as well as the correct version of JRE.
Applications launched with Java Web Start are cached locally. Thus, an already downloaded application is launched
on par with a traditionally installed application.
•
Oxygen XML Editor | Installation | 47
You can preconfigure Oxygen XML Editor and the rest of your team will use the same preferences and frameworks.
Important: If you want to create your own JWS distribution package, please contact Syncro Soft for permission
through a Value Added Reseller Agreement.
Note: A code signing certificate is needed to sign the JWS distribution. The following procedure assumes that
you already have such a certificate (for example Thawte™, or Verisign™).
The following schematics depicts the Oxygen XML Editor Java Web Start deployment procedure:
Figure 5: Java Web Start Deployment Procedure
To deploy an Oxygen XML Editor installation on a server.
1. Go to http://www.oxygenxml.com/InstData/Editor/All/oxygen.tar.gz and download the All Platforms Installation
package to a local drive.
2. Expand the archive to a temporary location.
The oxygen folder is created.
3. Optionally, you can customize the content of the frameworks folder.
4. Edit the oxygen\tools\jwsPackager\packager.properties configuration file. Adjust the following
properties appropriately for your server:
•
•
•
•
•
•
codebase - Represents the location of the future JWS distribution.
keystore - The keystore location path.
storepass - The password for keystore integrity.
storetype - The type of the certificate file, such as PKCS12 or JKS.
alias - The keystore alias.
optionsDir - Points to the options directory that may be distributed with the JWS installer. If the directory contains
an XML document named options.xml or default.xml containing exported options, these options will
Oxygen XML Editor | Installation | 48
be used. Otherwise, the structure of the options folder has to match the structure of a stand alone application
options folder.
Note: This property is optional. It is provided only if custom options need to be delivered to the end
users.
The values of keystore, storepass, and alias properties are all provided by the code signing certificate. For more
information, please check the documentation for your jarsigner tool.
5. If you want to modify the default settings, edit the JNLP
oxygen\tools\jwsPackager\dist\javawebstart\oxygen\oxygen.jnlp template file. You can
specify the list of files opened at startup by modifying the <argument> list. To pass system properties directly to
Oxygen XML Editor when it is started, add the oxy prefix to them (for example: <property
name="oxyPropertyName" value="testValue"/>). The system property is passed to Oxygen XML
Editor with the prefix stripped.
6. Open a command-line console and run ant in the oxygen\tools\jwsPackager folder.
The ant process creates the oxygen\tools\jwsPackager\dist\InstData\oxygenJWS.zip archive
that contains the actual remote JWS installer.
7. Copy the expanded content of the archive to the folder specified in the codebase property, previously set in the
packager.properties file.
8. Using your favorite web browser, go to the address specified in the codebase property or to its parent folder and
start the remote installer.
Important: When running the Java Web Start distribution on OS X, due to changes in this security release,
clicking the link to the JNLP file does not start the application. The selected JNLP is downloaded locally.
Right click it and choose to open the resource.
Site-wide Deployment
If you are deploying Oxygen XML Editor for a group, there are a number of things you can do to customize Oxygen
XML Editor for your users and to make the deployment more efficient.
Creating custom default options
You can create a custom set of default options for Oxygen XML Editor. These will become the default options for
each of your users, replacing Oxygen XML Editor's normal default settings. Users can still set options to suit
themselves in their own copies of Oxygen XML Editor, but if they choose to reset their options to defaults, the
custom defaults that you set will be used.
Creating default project files
Oxygen XML Editor project files are used to configure a project. You can create and deploy default project files
for your projects so that your users will have a preconfigured project file to begin work with.
Shared project files
Rather than each user having their own project file, you can create and deploy shared project files so that all users
share the same project configuration and settings and automatically inherit all project changes.
Using the unattended installer
You can speed up the installation process by using the unattended installer for Windows or Linux installs.
Using floating licenses
If you have a number of people using Oxygen XML Editor on a part-time basis or in different time zones, you can
use a floating license so that multiple people can share a license.
Obtaining and Registering a License Key for Oxygen XML Editor
Oxygen XML Editor is not free software. To enable and use Oxygen XML Editor, you need a license.
Oxygen XML Editor | Installation | 49
For demonstration and evaluation purposes, a time limited license is available upon request at
http://www.oxygenxml.com/register.html. This license is supplied at no cost for a period of 30 days from the date of
issue. During this period, the software is fully functional, enabling you to test all its functionality. To continue using the
software after the trial period, you must purchase a permanent license. If a trial period greater than 30 days is required,
please contact [email protected].
Choosing a License Type
You can use one of the following license types with Oxygen XML Editor:
1. A named-user license may be used by a single Named User on one or more computers. Named-user licenses are not
transferable to a new Named User. If you order multiple named-user licenses, you will receive a single license key
good for a specified number of named users. It is your responsibility to keep track of the named users that each
license is assigned to.
2. A floating license may be used by any user on any machine. However, the total number of copies of Oxygen XML
Editor in use at one time must not be more than the number of floating licenses available. A user who runs two
different distributions of Oxygen XML Editor (for example Standalone and Eclipse Plugin) at the same time on the
same computer, consumes a single floating license.
3. A special academic license (classroom, department or site license) may be used by students and teachers in academic
institutions. These licenses provide a cost effective way of getting access to Oxygen XML Editor for learning
purposes.
For definitions and legal details of the license types, consult the End User License Agreement available at
http://www.oxygenxml.com/eula.html.
Obtaining a License
You can obtain a license for Oxygen XML Editor in one of the following ways:
•
•
•
•
You can purchase one or more licenses from the Oxygen XML Editor website at http://www.oxygenxml.com/buy.html.
A license key will be sent to you by email.
If your company or organization has purchased licenses please contact your license administrator to obtain a license
key.
If you purchased a subscription and you received a registration code, you can use it to obtain a license key from
http://www.oxygenxml.com/registerCode.html. A license key will be sent to you by email.
If you want to evaluate the product you can obtain a trial license key for 30 days from the Oxygen XML Editor
website at http://www.oxygenxml.com/register.html.
Register a Named-User License
To register a named-user license on a machine owned by the Named User:
1. Save a backup copy of the message containing the new license key.
2. Start Oxygen XML Editor.
If this is a new install of Oxygen XML Editor, the registration dialog box is displayed. If the registration dialog box
is not displayed, go to Help > Register.
Oxygen XML Editor | Installation | 50
Figure 6: License Registration Dialog Box
3. Select Use a license key as licensing method.
4. Paste the license text into the registration dialog box.
5. Press OK.
Registering a Floating License
How you register to use a floating license will depend on how floating licenses are managed in your organization.
•
If all the machines sharing a pool of floating licenses are on the same network segment, you will register your licence
the same way you register a named-user licence.
Note: [For System Administrators] Different running instances of Oxygen XML Editor communicate with
each other, using UDP broadcast on the 59153 port, to the 239.255.255.255 group.
Warning: This mechanism was deprecated starting with version 17.0 and it is scheduled for removal in a
future version. It is recommended to switch to the license server/servlet licensing mechanism.
•
If the machines sharing the pool of floating licenses are on different network segments, someone in your company
will need to set up a license server. Consult that person to determine if they have set up a license server as a standalone
process or as a Java servlet as the registration process is different for each.
Request a Floating License from a License Server Running as a Standalone Process
Use this procedure if your company uses a license server running as a standalone process:
1. Contact your server administrator to get network address and login details for the license server.
2. Start Oxygen XML Editor.
3. Go to Help > Register .
The license registration dialog box is displayed.
Oxygen XML Editor | Installation | 51
4.
5.
6.
7.
8.
Choose Use a license server as licensing method.
Select Standalone server as server type.
In the Host field enter the host name or IP address of the license server.
In the Port field enter the port number used to communicate with the license server.
Click the OK button.
If a floating license is available, it is registered in Oxygen XML Editor. To display the license details, open the About
dialog box from the Help menu. If a floating license is not available, you will get a message listing the users currently
using floating licenses.
Request a Floating License from a License Server Running as a Java Servlet
1. Contact your server administrator to get network address and login details for the license server.
2. Start Oxygen XML Editor.
3. Go to Help > Register.
The license registration dialog box is displayed.
4. Choose Use a license server as licensing method.
5. Select HTTP/HTTPS Server as server type.
6. In the URL field enter the address of the license server.
The URL address has the following format:
http://hostName:port/oXygenLicenseServlet/license-servlet
7. Complete the User and Password fields.
8. Click the OK button.
If a floating license is available, it is registered in Oxygen XML Editor. To display the license details, open the About
dialog box from the Help menu. If a floating license is not available, you will get a message listing the users currently
using floating licenses.
Release a Floating License
The floating license you are using will be released and returned to the pool if any of the following occur:
•
The connection with the license server is lost.
•
You exit the application running on your machine, and no other copies of Oxygen XML Editor running on your
machine are using your floating license.
•
You register a Named User license with your copy of Oxygen XML Editor, and no other copies of Oxygen XML
Editor running on your machine are using your floating license.
Register a Floating License for Multiple Users
If you are an administrator registering floating licenses for multiple users, you can avoid having to open Oxygen XML
Editor on each machine and configuring the registration details by using the following procedure:
1. Reset the registration details:
a. Select Register from the Help menu.
b. Click OK without entering any information in this dialog box.
c. Click Reset and restart the application.
2. Register the license using one of the floating license registration procedures.
3. Copy the license.xml file from the Oxygen XML Editor preferences directory to the installation folder on each
installation to be registered.
Oxygen XML Editor | Installation | 52
Setting Up a Floating License Server for Oxygen XML Editor
Determine if you need to set up a license server
If you are using floating licenses for Oxygen XML Editor, you may need to set up a license server. If the computers that
will be using the floating licenses are on different network segments, you must use an Oxygen XML Editor floating
license server. A floating license server can be installed as one of the following:
•
•
A Java servlet.
A standalone process.
Note: Oxygen XML Editor version 17 or higher requires a license server version 17 or higher. License servers
version 17 or higher can be used with any version of a floating license key.
Activating Floating License Keys
To help you comply with the Oxygen XML Editor EULA (terms of licensing), all floating licenses require activation.
This means that the license key will be locked to a particular license server deployment and no multiple uses of the same
license key are possible.
During the activation process, a code that uniquely identifies your license server deployment is sent to the Oxygen XML
Editor servers, which in turn will sign the license key.
Split or combine license keys to work with your license servers
A license server can only manage one license key (which can cover any number of floating licenses). If you have multiple
license keys for the same Oxygen XML Editor version and you want to have all of them managed by the same server,
or if you have a multiple-user floating license and you want to split it between two or more license servers, please contact
[email protected] and ask for a new license key.
Setting up a Floating License Server Running as a Java Servlet
Setting up the floating license server as a servlet.
Steps for Installing the Floating License Server as a Servlet
1. Make sure that Apache Tomcat 5.5 or higher is running on the machine you have selected to be the license server.
To get it, go to http://tomcat.apache.org.
2. Download the Web ARchive (.war) license servlet from the Oxygen XML Editor website.
3. Configure Tomcat to use a security Realm element. Refer to the Tomcat Documentation for more information.
Oxygen XML Editor | Installation | 53
4. Edit the tomcat-users.xml file from your Tomcat installation and configure one user for each of the following
roles: standard, admin, and manager.
5. Go to the Tomcat Web Application Manager page and log-in with the user you configured with the manager role.
In the WAR file to deploy section, choose the WAR file and click the Deploy button. The oXygen License Servlet
is now up and running, but the license keys are not yet registered.
6. Activate the license key. This process involves binding your license key to your license server deployment. Once
the process is completed you cannot activate the license with another license server. Follow these steps to activate
the license:
a. Access the license servlet by following the link provided by the Tomcat Web Application Manager page. If
prompted for authentication, use the credentials configured for the admin or manager users.
Result: A page is displayed that prompts for a license key.
b. Paste your license key into the form and press Submit. The browser used in the activation process needs to have
Internet access.
Result:You will be redirected to an online form hosted on the Oxygen XML Editor website. This form is pre-filled
with an activation code that uniquely identifies your license server deployment, and your license key.
Note: If, for some reason, your browser does not take you to this activation form, refer to the Manual
Activation Procedure.
c. Press Activate.
If the activation process is successfully completed, your license server is running. Follow the on-screen instructions
to configure the Oxygen XML Editor client applications.
7. By default, the license server logs its activity in the
/usr/local/tomcat/logs/oxygenLicenseServlet.log file. To change the log file location, edit the
log4j.appender.R2.File property from the
/usr/local/tomcat/webapps/oXygenLicenseServlet/WEB-INF/lib/log4j.properties
configuration file.
Manual License Activation Procedure
1. Access the license servlet by following the link provided by the Tomcat Web Application Manager page. You will
be taken to the license registration page.
2. Copy the license server activation code.
3. Go to the activation page at http://www.oxygenxml.com/activation/.
4. Paste the license server activation code and floating license key in the displayed form, then click Activate.
5. The activated license key is displayed on-screen. Copy the activated license key and paste it in the license registration
page of the servlet.
Upgrading Your Floating License Servlet
The goal of the following procedure is to help you minimize the downtime when you upgrade the Oxygen XML Editor
floating license servlet to its latest version.
Follow this procedure:
1. Access the license servlet by following the link provided by the Tomcat Web Application Manager page. If prompted
for authentication, use the admin or manager credentials.
2. Click the View license key link and copy the displayed license key to a file for later use.
3. Go to the Tomcat Web Application Manager page, log in with the user you configured with the manager role, and
Undeploy the floating license servlet.
4. Go to Oxygen XML Editor website and download the license servlet.
5. Deploy the downloaded license servlet.
Oxygen XML Editor | Installation | 54
6. Access the license servlet by following the link provided by the Tomcat Web Application Manager page. If prompted
for authentication, use the credentials configured for the admin or manager users.
7. Paste the license key into the form and register it.
Replacing a Floating License Key in a Floating License Servlet
The following procedure assumes that your Oxygen XML Editor floating license servlet contains a previously activated
license key and provides instructions for replacing it with another one. The goal of the procedure is to minimize the
license servlet downtime during the activation step of the new license key.
This is useful if, for instance, you want to upgrade your existing license to the latest version or if you receive a new
license key that accommodates a different number of users.
To replace a floating license key that is activated on your floating license servlet with a new one, follow these steps:
1. Access the license servlet by following the link provided by the Tomcat Web Application Manager page.
2. Click the Replace license key link. This will open a page that contains details about the license currently in use.
3. Click the Yes button to begin the replacement procedure.
Note: During the replacement procedure, new instances of Oxygen XML Editor cannot be licensed by the
servlet until the process is completed.
4. Paste the new floating license key in the displayed form, then click Submit. The browser used in the process needs
to have Internet access.
You will be redirected to an online form hosted on the Oxygen XML Editor website. This form is pre-filled with an
activation code that uniquely identifies your license server deployment and your license key.
Note: If for some reason your browser does not take you to this activation form, refer to the Manual Activation
Procedure.
5. Press Activate.
If the activation process is completed successfully, your license servlet is now running using the new license key.
You can click View license key to inspect the key currently used by the license servlet.
Important: If the activation procedure fails, go to step 1 and click Cancel to revert to the last successfully
activated license key.
Getting More Information From the Report Page
You can access a license server activity report at
http://hostName:port/oXygenLicenseServlet/license-servlet/report.
It displays the following real time information:
•
•
License load - A graphical indicator that shows how many licenses are available. When the indicator turns red, there
are no more licenses available.
Floating license server status - General information about the license server status, including the following
information:
•
•
•
•
•
•
•
•
server start time
license count
rejected and acknowledged requests
average usage time
license refresh and timeout intervals
location of the license key
server version
License key information - License key data, including the following information:
Oxygen XML Editor | Installation | 55
•
•
•
•
•
•
•
licensed product
registration name
company name
license category
number of floating users
Maintenance Pack validity
Current license usage - Lists all currently acknowledged users, including the following information:
•
•
•
•
user name
date and time when the license was granted
name and IP address of the computer where Oxygen XML Editor runs
MAC address of the computer where Oxygen XML Editor runs
Note: The report is also available in XML format at
http://hostName:port/oXygenLicenseServlet/license-servlet/report-xml.
Setting up a Floating License Server Running as a Standalone Process Using a 32-bit
Windows Installer
Setting up the floating license server as a standalone process for Windows.
Steps for Installing the Floating License Server in Windows as a Standalone Process
1. Download the license server installation kit for Windows from the Oxygen XML Editor website.
2. Run the downloaded installer and follow the on-screen instructions.
By default, the installer installs the license server as a Windows service. Optionally, you have the ability to start the
Windows service automatically at Windows startup or create shortcuts on the Start menu for starting and stopping
the Windows service manually. If you want to manually install, start, stop, or uninstall the server as a Windows
service, run the following scripts from a command line as an Administrator:
•
•
•
•
installWindowsService.bat [serviceName] - Installs the server as a Windows service with the
name serviceName. The parameters for the license key folder and the server port can be set in the
oXygenLicenseServer.vmoptions file.
startWindowsService.bat [serviceName] - Starts the Windows service.
stopWindowsService.bat [serviceName] - Stops the Windows service.
uninstallWindowsService.bat [serviceName] - Uninstalls the Windows service.
Note: If you do not provide the serviceName argument, the default name oXygenLicenseServer is used.
If the license server is installed as a Windows service, the output and error messages are automatically
redirected to the following log files that are created in the install folder:
•
•
outLicenseServer.log - Standard output stream of the server.
errLicenseServer.log - Standard error stream of the server.
Oxygen XML Editor | Installation | 56
3. Manually add the oXygenLicenseServer.exe file in the Windows Firewall list of exceptions. Go to Control Panel >
System and Security > Windows Firewall > Allow a program or feature through Windows Firewall > Allow
another program and browse for oXygenLicenseServer.exe from the Oxygen XML Editor License Server installation
folder.
4. Floating licenses require activation prior to use. More details are available either on-screen (if the license server is
started in a command line interface) or in the outLicenseServer.log log file.
Note: A license server can only manage one license key (which can cover any number of floating licenses).
If you have multiple license keys for the same Oxygen XML Editor version and you want to have all of them
managed by the same server, or if you have a multiple-user floating license and you want to split it between
two or more license servers, please contact [email protected] and ask for a new license key.
Upgrading Your Floating License Server
The goal of the following procedure is to help you minimize the downtime generated when you upgrade the Oxygen
XML Editor floating license server to its newest version.
Follow this procedure:
1. Go to the Oxygen XML Editor website and download the latest floating license server.
2. Run the installation kit.
3. Leave the default Update the existing installation option enabled. This will ensure that some options set in the
previous version (namely the installation folder, port number, and the floating license key in use) of the license server
will be preserved.
4. Follow the on-screen instructions to complete the installation process.
Replacing a Floating License Key in a Floating License Server
The following procedure assumes that your Oxygen XML Editor floating license server contains a previously activated
license key and provides instructions for replacing the activated license key with another one. The goal of the procedure
is to minimize the license servlet downtime during the activation step of the new license key.
This is useful if, for instance, you want to upgrade your existing license to the latest version or if you receive a new
license key that accommodates a different number of users.
To replace a floating license key that is activated on your floating license server with a new one, follow these steps:
1. Stop the service that runs the floating license server.
2. Locate the folder that holds the previous activated license key (by default, it is named license and it is located in
the installation directory of the license server).
3. Remove the license.txt file and try to restart the server. Since the file that stores the license key is missing, the
server will fail to start.
4. Find the license activation procedure in the on-screen instructions (if the license server is started in a command line
interface) or in the outLicenseServer.log log file.
5. After you copy the activated license key in the license.txt file, restart the license server.
Common Problems
This section includes some common problems that may appear when setting up a floating license server running as a
standalone process.
Windows Service Reports "Incorrect Function" When Started
The "Incorrect Function" error message when starting the Windows service usually appears because the Windows service
launcher cannot locate a Java virtual machine on your system.
Make sure that you have installed a 32-bit Java SE from Oracle (or Sun) on the system:
http://www.oracle.com/technetwork/java/javase/downloads/index.html.
Oxygen XML Editor | Installation | 57
When Started, the Windows Service Reports "Error 1067: The Process Terminated Unexpectedly"
This error message appears if the Windows service launcher quits immediately after being started.
This problem usually happens because the license key has not been correctly deployed (license.txt file in the
license folder). For more information, see the Setting up a Floating License Server section.
Setting up a Floating License Server Running as a Standalone Process Using a
Platform-independent Distribution
This installation method can be used for running the license server on any platform where a Java virtual machine can
run (OS X, Linux/Unix, Windows).
Steps for Installing the Floating License Server as a Standalone Process with a Zip Archive
1.
2.
3.
4.
Ensure that a Java runtime version 6 or later is installed on the server machine.
Download the license server installation kit for your platform from the Oxygen XML Editor website.
Unzip the installation kit into a new folder.
Start the server using the startup script from a command line console.
The startup script is called licenseServer.sh for OS X and Unix/Linux or licenseServer.bat for
Windows. The following parameters are accepted:
•
•
licenseDir - The path of the directory where the license files will be placed. The default value is license.
port - The TCP port number used to communicate with Oxygen XML Editor instances. The default value is
12346.
The following is an example of the command line for starting the license server on Unix/Linux and OS X:
sh licenseServer.sh myLicenseDir 54321
5. Floating licenses require activation prior to use. Follow the on-screen instruction to complete the license activation
process.
Upgrading Your Floating License Server
The goal of the following procedure is to help you minimize the downtime generated when you upgrade the Oxygen
XML Editor floating license server to its newest version.
Follow this procedure:
1. Stop the current license server process.
2. Locate and open the floating server startup script. It should look like:
sh licenseServer.sh pathToLicenseDir 54321
3. Make a note of the path to the license directory (in our example is pathToLicenseDir) and the port number (in
our example is 54321).
4. Go to the license directory and copy the license key file (license.txt) for later use.
Oxygen XML Editor | Installation | 58
5. Go to the Oxygen XML Editor website and download the all-platforms floating license server installation kit.
6. Unzip the archive and overwrite the content of your current floating license server installation.
7. Copy the license key file (license.txt) saved in step 4 to license directory of the floating license server
installation.
8. Edit the floating server startup script and configure with the info you made note of in step 3.
9. Start the floating license server process.
Replacing a Floating License Key in a Floating License Server
The following procedure assumes that your Oxygen XML Editor floating license server contains a previously activated
license key and provides instructions for replacing the activated license key with another one. The goal of the procedure
is to minimize the license servlet downtime during the activation step of the new license key.
This is useful if, for instance, you want to upgrade your existing license to the latest version or if you receive a new
license key that accommodates a different number of users.
To replace a floating license key that is activated on your floating license server with a new one, follow these steps:
1. Stop the process that runs the floating license server.
2. Locate the folder that holds the previous activated license key (by default, it is named license and it is located in
the installation directory of the license server).
3. Remove the license.txt file and try to restart the server. Since the file that stores the license key is missing, the
server will fail to start.
4. Find the license activation procedure in the on-screen instructions.
5. After you copy the activated license key in the license.txt file, restart the license server.
Transferring or Releasing a License Key
If you want to transfer your Oxygen XML Editor license key to another computer (for example if you are disposing of
your old computer or transferring it to another person), or release a floating license so that someone else can use it, you
must first unregister your license. You can then register your license on the new computer in the normal way.
1. Go to Help > Register.
The license registration dialog box is displayed.
2. The license key field should be empty (this is normal). If it is not empty, delete any text in the field.
3. Make sure the option Use a license key is selected.
4. Click OK.
A dialog box is displayed asking if your want to reset your license key.
5. Select between falling back to the license key entered previously (for the case of releasing a floating license and
reverting to a Named User license) and removing your license key from your user account on the computer using
the Reset button.
The Reset button erases all the licensing information. To complete the reset operation, close and restart Oxygen
XML Editor.
Upgrading Oxygen XML Editor
From time to time, upgrade and patch versions of Oxygen XML Editor are released to provide enhancements that fix
problems, and add new features.
Checking for New Versions of Oxygen XML Editor
Oxygen XML Editor checks for new versions automatically at start up. To disable this check, open the Preferences
dialog box, go to Global, and uncheck Automatic Version Checking.
To check for new versions manually, go to Help > Check for New Versions.
Oxygen XML Editor | Installation | 59
What is Preserved During an Upgrade?
When you install a new version of Oxygen XML Editor, some data is preserved and some is overwritten. If there is a
previous version of Oxygen XML Editor already installed on your computer, it can coexist with the new one, which
means you do not have to uninstall it.
If you install over a previously installed version:
•
•
•
•
All the files from its install directory will be removed, including any modification in document type (framework)
files, XSLT stylesheets, XML catalogs, and templates.
All global user preferences are preserved in the new version.
All project preferences will be preserved in their project files.
Any custom frameworks that were stored outside the installation directory (as configured in Document type
associations > Locations) will be preserved and will be found by the new installation.
If you install in a new directory.
•
•
•
•
All the files from the old install directory will be preserved, including any modification in document type (framework)
files, XSLT stylesheets, XML catalogs, and templates. However, these modifications will not be automatically
imported into the new installation.
All global user preferences are preserved in the new version.
All project preferences will be preserved in their project files.
Any custom frameworks that were stored outside the installation directory (as configured in Document type
associations > Locations) will be preserved and will be found by the new installation.
Upgrading the Standalone Application
1. Upgrading to a new version might require a new license key. To check if your license key is compatible with the
new version, select Help > Check for New Version. Note that the application needs an Internet connection to check
the license compatibility.
2. Download and install the new version according to the instructions for your platform and the type of installer you
selected.
3. If you installed from an archive (as opposed to an executable installer) you may have to update any shortcuts you
have created or modify the system PATH to point to the new installation folder.
4. Start Oxygen XML Editor.
5. If you require an new license for your upgrade, install it now according to the procedure for your platform and the
type of installer you selected.
Installing and Updating Add-ons in Oxygen XML Editor
Oxygen XML Editor provides an add-on mechanism that can automatically discover and install frameworks and plugins
from a remote location.
Note: Frameworks that you install through the add-ons system are read-only.
Installing Add-ons
To install a new add-on, follow these steps:
•
•
Go to Help > Install new add-ons.
In the displayed dialog box, fill-in the Show add-ons from with the update site that hosts add-ons. The add-ons list
contains the name, status, update version, Oxygen XML Editor version, and the type of the add-on (either framework,
or plugin). A short description of each add-on is presented under the add-ons list.
Note: To see all the add-ons from the remote update site, disable Show only compatible add-ons and Show
only the latest version of the add-ons. Incompatible add-ons are shown only to acknowledge their presence
on the remote update site. You cannot install an incompatible add-on.
•
•
Oxygen XML Editor | Installation | 60
By default, only the latest versions of the add-ons that are compatible with the current version of Oxygen XML
Editor are displayed.
Choose the add-ons you want to install, press the Next button, then follow the on-screen instructions.
Note: Accepting the license agreement of the add-on is a mandatory step in the installation process.
Note: All add-ons are installed in the extensions directory inside the Oxygen XML Editor preferences
directory.
Managing installed add-ons
To manage the installed add-ons, follow these steps:
•
•
•
Go to Help > Manage add-ons
The displayed dialog box presents a list of the available updates (compatible with the current version of Oxygen
XML Editor) and with the already installed updates. Under the updates list, Oxygen XML Editor presents a short
description of each update.
Check for box for a specific add-on, then press Update to update it (or Uninstall to remove it). If there is a newer
version of the add-on available, Oxygen XML Editor will download the package and install it. Follow the on-screen
instructions to complete the installation process.
Note: Accepting the license agreement of the add-on is a mandatory step in the installation process.
Checking for add-on updates
To check if there are available updates for the installed add-ons, go to Help > Check for add-ons updates. This action
only displays updates that are compatible with the current Oxygen XML Editor version.
To watch a video demonstration about the add-ons support in Oxygen XML Editor, go to
http://www.oxygenxml.com/demo/AddonsSupport.html.
Uninstalling Oxygen XML Editor
Uninstalling the Oxygen XML Editor Standalone
Caution: The following procedure will remove Oxygen XML Editor from your system. All data stored in the
installation directory will be removed, including any customizations or any other data you have stored
within that directory. Make a back up of any data you want to keep before uninstalling Oxygen XML
Editor.
1. Backup any data you want to keep from the Oxygen XML Editor installation folder.
2. Remove the application.
•
•
On Windows use the appropriate uninstaller shortcut provided with your OS.
On OS X and Unix manually delete the installation folder and all its contents.
3. If you want to remove the user preferences:
•
•
•
•
On Windows Vista/7/8/10, remove the directory:%APPDATA%\Roaming\com.oxygenxml (usually
%APPDATA% has the value [user-home-dir]\Application Data). Note that this is directory is hidden.
On Windows XP, remove the directory:%APPDATA%\com.oxygenxml (usually %APPDATA% has the value
[user-home-dir]\Application Data).
On Linux, remove the directory: .com.oxygenxml from the user home directory.
On OS X, remove the directory: Library/Preferences/com.oxygenxml of the user home folder .
Oxygen XML Editor | Installation | 61
Unattended Uninstall
The unattended uninstall procedure is available only on Windows and Linux.
Run the uninstaller executable from command line with the -q parameter.
The uninstaller executable is called uninstall.exe on Windows and uninstall on Linux and is located in
the application's install folder.
Oxygen XML Editor Installer Command Line Reference
Command line options of the Oxygen XML Editor installer.
The response.varfile
The Oxygen XML Editor installers for Windows and Linux creates a file called response.varfile, which records
the choices that the user made when running the installer interactively. You can use a response.varfile to set the
options for an unintended install. Here is an example of a response.varfile:
#install4j response file for Oxygen XML Editor 16.0
#Fri Jul 18 21:52:15 EDT 2014
sys.adminRights$Boolean=true
sys.programGroupDisabled$Boolean=false
createDesktopLinkAction$Boolean=true
autoVersionChecking=true
sys.fileAssociation.launchers$StringArray="19","19","19","19","19","19","19","19","19","19","19","19","19","19","19","19","19","19","19","19","19","19","19","19","19","19"
sys.programGroupAllUsers$Boolean=true
reportProblem=true
downloadResources=true
sys.languageId=en
sys.installationDir=C\:\\Program Files (x86)\\Oxygen XML Editor 16
createQuicklaunchIconAction$Boolean=true
sys.programGroupName=Oxygen XML Editor 16.0
executeLauncherAction$Boolean=true
sys.fileAssociation.extensions$StringArray="xml","dita","ditamap","ditaval","xsl","xslt","xspec","xsd","rng","rnc","sch","dtd","mod","ent","nvdl","fo","wsdl","xquery","xq","xqy","xqm","xql","xpl","css","json","xpr"
The following table describes some of the settings that can be used in the response.varfile:
Table 1: response.varfile Options Parameters
Parameter name
Description
autoVersionChecking Automatic version checking.
Values
true / false. Default setting is true.
reportProblem Allows you to report a problem encountered while true / false. Default setting is true.
using Oxygen XML Editor.
downloadResources Allows Oxygen XML Editor to download resources true / false. Default setting is true.
(links to video demonstrations, webinars and
upcoming events) from http://www.oxygenxml.com
to populate the application welcome screen.
The Oxygen XML Editor installation uses the install4j installer. A description of the response.varfile format
can be found on the install4j site.
Command line parameters
The Oxygen XML Editor installer supports the following command line parameters:
Oxygen XML Editor | Installation | 62
Option
Meaning
-q
Run the installer in unattended mode. The installer will not prompt the user for input during the
install. Default settings will be used for all options unless a response.varfile is specified
using the -varfile option or individual settings are specified using
- on Windows:
oxygen.exe -q
- on Linux:
oxygen.sh -q
-overwrite
In unattended mode, the installer does not overwrite files with the same name if a previous version
of the Oxygen XML Editor is installed in the same folder. The -overwrite parameter added after
the -q parameter forces the overwriting of these files.
- on Windows:
oxygen.exe -q -overwrite
- on Linux:
oxygen.sh -q -overwrite
-console
To display a console for the unattended installation, add a -console parameter to the command line.
- on Windows:
start /wait oxygen.exe -q -console
Note: The use of start /wait on Windows is required to make the installer run
in the foreground. It you run it without start /wait, it will run in the background.
- on Linux:
oxygen.sh -q -console
-varfile
Points to the location of a response.varfile to be used during an unattended installation. For
example:
- on Windows:
oxygen.exe -q -varfile response.varfile
- on Linux:
oxygen.sh -q -varfile response.varfile
-V
Is used to define a variable to be used by an unattended installation. For example:
- on Windows:
oxygen.exe -q -VusageDataCollector=false
- on Linux:
oxygen.sh -q -VusageDataCollector=false
The Oxygen XML Editor installation uses the install4j installer. A full list of the command line parameters supported
by the install4j installer can be found on the install4j site.
Chapter
4
Perspectives
Topics:
•
•
•
•
Editor Perspective
XSLT Debugger Perspective
XQuery Debugger Perspective
Database Perspective
The Oxygen XML Editor interface uses standard interface conventions and
components to provide a familiar and intuitive editing environment across all
operating systems. There are several perspectives that you can use to work with
documents in Oxygen XML Editor. You can change the perspective by selecting
the respective icons in the top-right corner of Oxygen XML Editor or by selecting
the perspective from the Window > Open Perspective menu.
Oxygen XML Editor | Perspectives | 64
Editor Perspective
The Editor perspective is the most commonly used perspective and it is the default perspective when you start Oxygen
XML Editor for the first time. It is the perspective that you will use to edit the content of your XML documents.
To switch the focus to this perspective, select the Editor button in the top-right corner of Oxygen XML Editor
(or select Editor from the Window > Open perspective menu)
The layout of this perspective is composed of the following components:
Menus
Provides menu driven access to all the features and functions available in Oxygen XML Editor. Most of the menus
are common for all types of documents. However, Oxygen XML Editor also includes some context-sensitive and
framework-specific menus that are only available for a specific context or type of document.
Toolbars
Provides easy access to common and frequently used functions. Each icon is a button that acts as a shortcut to a
related function. Most of the toolbars are common for all types of documents. However, Author mode also includes
framework-specific toolbars, depending on the type of document that is being edited (for example, if you are editing
a DITA document, a DITA Author Custom Actions toolbar is available that includes operations that are specific to
DITA documents). The toolbars can be configured to suit your specific needs.
Editor Pane
The main editing pane where you spend most of your time reading, editing, applying markup, and validating your
documents.
Views
Oxygen XML Editor includes a large variety of views to assist you with editing, viewing, searching, validating,
transforming, and organizing your documents. The most commonly used views are displayed by default and you
can choose to display others by selecting them from the Window > Show View menu. The layout of the views can
also be configured according to your preferences.
When two or more views are displayed, the application provides divider bars. Divider bars can be dragged to a new
position increasing the space occupied by one panel while decreasing it for the other.
As the majority of the work process centers around the Editor area, other views can be hidden using the controls
located on the top-right corner of the view (
).
Some of the most helpful views in the Editor perspective include the following:
•
•
•
•
•
•
•
•
•
Project view - Enables the definition of projects and logical management of the documents they contain.
DITA Maps Manager view - For DITA frameworks, this view helps you organize, manage, and edit DITA
topics and maps.
Open/Find Resource view - Designed to offer advanced search capabilities in various scopes.
Outline view - It provides an XML tag overview and offers a variety of functions, such as modifications follow-up,
document structure change, document tag selection, and elements filtering.
Results view - Displays the messages generated as a result of user actions such as validations, transformation
scenarios, spell checking in multiple files, search operations, and others. Each message is a link to the location
related to the event that triggered the message.
Attributes view - Presents all possible attributes of the current element and allows you to edit attribute values.
You can also use this view to insert attributes in Text mode. Author mode also includes an in-place attribute
editor.
Model view - Presents the current edited element structure model and additional documentation as defined in
the schema.
Elements view - Presents a list of all defined elements that you can insert at the current cursor position according
to the document's schema. In Author mode this view includes tabs that present additional information relative
to the cursor location.
Entities view - Displays a list with all entities declared in the current document as well as built-in ones.
•
•
•
Oxygen XML Editor | Perspectives | 65
Transformation Scenarios view - Displays a list with all currently configured transformation scenarios.
XPath/XQuery Builder view - Displays the results from running an XPath expression.
WSDL SOAP Analyzer view - Provides a tool that helps you test if the messages defined in a Web Service
Descriptor (WSDL) are accepted by a Web Services server.
Supported Document Types
You can use the main editing pane in the Editor perspective to edit a large variety of types of documents. The supported
document types include:
•
- XML documents
•
- XSLT stylesheets
•
- XML Schema
•
- DTD (Document Type Definition) schemas
•
- RELAX NG full syntax schemas
•
- RELAX NG compact syntax schemas
•
- NVDL (Namespace-based Validation Dispatching Language) schemas
•
- XSL:FO documents
•
- XQuery documents
•
- WSDL documents
•
- Schematron documents
•
- JavaScript documents
•
- Python documents
•
- CSS documents
•
- LESS documents
•
- XProc scripts
•
- SQL documents
•
- JSON documents
•
- Ant build scripts
XSLT Debugger Perspective
The XSLT Debugger perspective allows you to detect problems in an XSLT transformation by executing the process
step by step. To switch the focus to this perspective, select the XSLT Debugger button in the top-right corner of Oxygen
XML Editor
or select XSLT Debugger from the Window > Open perspective menu.
The workspace in this perspective is organized as an editing area assisted by special helper views. The editing area
contains editor panels that you can split horizontally or vertically in a stack of XML editor panels and a stack of XSLT
editor panels. The XML files and XSL files can be edited in Text mode only.
The layout of this perspective is composed of the following components:
Oxygen XML Editor | Perspectives | 66
Menus
Provides menu driven access to all the features and functions available in the XSLT Debugger.
Toolbars
Contains all actions needed in order to configure and control the debugging process. The toolbars can be configured
to suit your specific needs.
XML Source Pane
The editing pane where you can display and edit data or document-oriented XML documents.
XSL Source Pane
The editing pane where you can display and edit XSL stylesheets.
Output View
Displays the transformed output that results from the input of a selected document (XML) and selected stylesheet
(XSL) to the transformer. The result of transformation is dynamically written as the transformation is processed.
There are three types of views for the output: a text view (with XML syntax highlight), an XHTML view, and one
text view for each xsl:result-document element used in the stylesheet (if it is a XSLT 2.0 / 3.0 stylesheet).
Debugging Information Views
Presented in two panes, they display various types of information that can be used to understand the transformation
process. For each information type there is a corresponding tab. While running a transformation, relevant events
are displayed in the various information views. This allows you to obtain a clear view of the transformation progress.
See the Debugging Information Views topic for a list of all the information views (and links to more details on each
view).
Note: You are able to add XPath expression automatically in the XWatch view using the Watch expression
action from the contextual menu. In case you select an expression or a fragment of it and then click Watch
expression in the contextual menu, the entire selection is presented in the XWatch view. Using Watch
expression without selecting an expression displays the value of the attribute from the cursor position in
the XWatch view. Variables detected at the cursor position are also displayed. Expressions displayed in
the XWatch view are normalized (unnecessary white spaces are removed from the expression).
To watch our video demonstration about the XSLT debugging capabilities in Oxygen XML Editor, go to
http://www.oxygenxml.com/demo/XSLT_Debugger.html.
XQuery Debugger Perspective
The XQuery Debugger perspective allows you to detect problems in an XQuery transformation process by executing
the process step by step in a controlled environment and inspecting the information provided in the special views. To
switch the focus to this perspective, select the XQuery Debugger button in the top-right corner of Oxygen XML Editor
or select XQuery Debugger from the Window > Open perspective menu.
The workspace in this perspective is organized as an editing area assisted by special helper views. The editing area
contains editor panels that you can split horizontally or vertically in a stack of XML editor panels and a stack of XQuery
editor panels. The XML files and XQuery files can be edited in Text mode only.
The layout of this perspective is composed of the following components:
Menus
Provides menu driven access to all the features and functions available in the XQuery Debugger.
Toolbars
Contains all actions needed in order to configure and control the debugging process. The toolbars can be configured
to suit your specific needs.
XML Source Pane
The editing pane where you can display and edit data or document-oriented XML documents.
Oxygen XML Editor | Perspectives | 67
XQuery Source Pane
The editing pane where you can display and edit XQuery files.
Output View
Displays the transformed output that results from the input of a selected document (XML) and selected XQuery
document to the XQuery transformer. The result of transformation is dynamically written as the transformation is
processed. There are two types of views for the output: a text view (with XML syntax highlight) and an XHTML
view.
Debugging Information Views
Presented in two panes, they display various types of information that can be used to understand the transformation
process. For each information type there is a corresponding tab. While running a transformation, relevant events
are displayed in the various information views. This allows you to obtain a clear view of the transformation progress.
See the Debugging Information Views topic for a list of all the information views (and links to more details on each
view).
Note: You are able to add XPath expression automatically in the XWatch view using the Watch expression
action from the contextual menu. If you select an expression, or a fragment of it, and then click Watch
expression in the contextual menu, the entire selection is presented in the XWatch view. Expressions
displayed in the XWatch view are normalized (unnecessary white spaces are removed from the expression).
To watch our video demonstration about the XQuery debugging capabilities in Oxygen XML Editor, go to
http://www.oxygenxml.com/demo/XQuery_Debugger.html.
Database Perspective
The Database perspective allows you to manage a database, offering support for browsing multiple connections at the
same time, relational and native XML databases, SQL execution, XQuery execution and data export to XML. To switch
the focus to this perspective, select the Database Debugger button in the top-right corner of Oxygen XML Editor
or select Database from the Window > Open perspective menu.
This perspective offers support for the following databases:
•
•
•
•
•
•
•
•
•
•
•
Oracle Berkeley DB XML Database
eXist XML Database
IBM DB2 (Enterprise edition only)
JDBC-ODBC Bridge
MarkLogic (Enterprise edition only)
Microsoft SQL Server 2005 and Microsoft SQL Server 2008 (Enterprise edition only)
MySQL
Oracle 11g (Enterprise edition only)
PostgreSQL 8.3 (Enterprise edition only)
Documentum xDb (X-Hive/DB) 10 XML Database (Enterprise edition only)
Documentum (CMS) 6.5 (Enterprise edition only)
Note: For the databases marked with "Enterprise edition only", the XML capabilities are only available in the
Enterprise edition of Oxygen XML Editor. The non-XML capabilities of any database listed here are available
in the Enterprise, Academic, and Professional editions of Oxygen XML Editor by registering the database driver
as a Generic JDBC type driver when defining the data source for accessing the database. For more information,
see the Configuring Relational Database Data Sources on page 906 or Configuring Native XML Database Data
Sources on page 925 sections.
The supported non-XML capabilities are as follows:
•
•
Browsing the structure of the database instance.
Opening a database table in the Table Explorer view.
Oxygen XML Editor | Perspectives | 68
•
Handling the values from XML Type columns as String values.
The supported XML capabilities are as follows:
•
•
•
Displaying an XML Schema node in the tree of the database structure (for databases with an XML-specific structure)
with actions for opening, editing, and validating the schemas in an Oxygen XML Editor editor panel.
Handling the values from XML Type columns as XML instance documents that can be opened and edited in an
Oxygen XML Editor editor panel.
Validating an XML instance document added to an XML Type (column of a table, etc.)
For a detailed feature matrix that compares the Academic, Professional, and Enterprise editions of Oxygen XML Editor
go to the Oxygen XML Editor website.
Tip: Connections configured on relational data sources can be used to import data to XML or to generate XML
schemas.
The layout of this perspective is composed of the following components:
Menus
Provides menu driven access to all the features and functions available in the XQuery Debugger.
Toolbars
Contains all actions needed in order to configure and control the debugging process. The toolbars can be configured
to suit your specific needs.
Editor Pane
The main editing pane where you spend most of your time reading, editing, applying markup, and validating your
documents.
Data Source Explorer View
Provides browsing support for the configured connections.
Table Explorer View
Provides table content editing support for inserting new rows, deleting table rows, editing cell values, exporting to
an XML file, and more.
Chapter
5
Editing Modes
Topics:
•
•
•
•
Text Editing Mode
Grid Editing Mode
Author Editing Mode
Design Editing Mode
The main editing area in Oxygen XML Editor includes several editing modes
to suit the type of editing that you want to perform. You can easily switch
between modes by clicking on the desired mode at the bottom of the main editing
pane. Oxygen XML Editor offers the following editing modes:
•
•
•
•
Text - This mode presents the source of an XML document.
Grid - This mode displays an XML document as a structured grid of nested
tables.
Author - This mode enables you to edit in a WYSIWYG like editor.
Design - This mode is found in the schema editor and represents the schema
as a diagram.
Oxygen XML Editor | Editing Modes | 70
Text Editing Mode
The Text mode of Oxygen XML Editor provides the usual functionality of a plain text editor. It also includes a variety
of advanced features that are unique to Oxygen XML Editor.
Text Mode Editor
The Text mode Author editor in Oxygen XML Editor is designed to be a simple, yet powerful, XML editor. It provides
support to help you edit, transform, and debug XML-based documents. It also includes a specialized Content Completion
Assistant, an Outline view, and many other helpful features.
Navigating the Document Content in Text Mode
Using the Keyboard
Oxygen XML Editor allows you to quickly navigate through a document using the Ctrl Close Bracket (Meta Close
Bracket on OS X) key to go to the next XML node and Ctrl Open Bracket (Meta Open Bracket on OS X) to go to
the previous one.
To navigate one word forward or backwards, use Ctrl Right Arrow (Command Right Arrow on OS X), and Ctrl
Left Arrow (Command Left Arrow on OS X), respectively. To position the cursor at the beginning or end of the
document you can use Ctrl Home (Command Home on OS X), and Ctrl End (Command End on OS X), respectively.
Using the Navigation Toolbar
The locations of selected text are stored in an internal list that allows you to navigate between them with the
(Ctrl Alt Open Bracket (Meta Alt Open Bracket on OS X)) and
Close Bracket on OS X)) buttons from the Navigation toolbar. The
X)) button automatically takes you to the latest edited text.
Back
Forward (Ctrl Alt Close Bracket (Meta Alt
Last Modification (Ctrl G (Meta G on OS
Using the Breadcrumb Helpers
A breadcrumb on the top stripe indicates the path from the document root element to the current element. It can also be
used as a helpful tool to navigate to specific elements throughout the structure of the document.
Figure 7: The Breadcrumb in Text Mode
The last element listed in the breadcrumb is the element at the current cursor position. The current element is also
highlighted by a thin light blue bar for easy identification. Clicking an element from the breadcrumb selects the entire
element in the editor area. Also, each element provides a contextual menu with access to the following actions:
Append Child
Allows you to select an element (from a drop-down list) that is allowed by the associated schema and inserts it as
a child of the current element.
Insert Before
Allows you to select an element (from a drop-down list) that is allowed by the associated schema and inserts it
immediately before the current element, as a sibling.
Insert After
Allows you to select an element (from a drop-down list) that is allowed by the associated schema and inserts it
immediately after the current element, as a sibling.
Edit Attributes
Opens an editing window that allows you to edit the attributes of the currently selected element.
Oxygen XML Editor | Editing Modes | 71
Toggle Comment
Encloses the currently selected element in an XML comment, if the element is not already commented. If it is already
commented, this action will remove the comment.
Cut
Removes the selected element and copies it to the clipboard.
Copy
Copies the selected element to the clipboard.
Delete
Deletes the currently selected element.
Quick Document Navigation Using Bookmarks
By using bookmarks, you can mark positions in an edited document so that you can return to it later. This is especially
helpful for navigating through large documents or while editing multiple documents. You can place up to nine distinct
bookmarks in any document. Shortcut keys are available to place the bookmarks or to return to any of the marked
positions. To configure these shortcut keys, go to Options > Menu Shortcut Keys.
Figure 8: Editor Bookmarks
A bookmark can be inserted by one of the following:
•
•
Right-click the vertical strip to the left of the editor.
Select the
Create Bookmark (F9) action from the Edit > Bookmarks menu.
A bookmark can be removed by right-clicking its icon on the vertical strip and select Remove or Remove all (Ctrl+F7)
(you can also find the Remove all (Ctrl+F7) action in the Edit > Bookmarks menu).
You can navigate the bookmarks by using one of the actions available on the Edit > Bookmarks > Go to menu or by
using the shortcut keys.
Text Mode Views
There is a large selection of useful views available in the Window > Show View menu. This section presents some of
the most helpful views for editing in Text mode.
The Project View
The Project view is designed to assist you with organizing and managing related files grouped in the same XML project.
The actions available on the contextual menu and toolbar associated to this panel enable the creation of XML projects
and shortcuts to various operations on the project documents.
Oxygen XML Editor | Editing Modes | 72
Figure 9: The Project View
By default, the Project view is positioned on the left side of the Oxygen XML Editor window, above the Outline view.
A closed view can be quickly reopened at any time with the Project > Show Project View menu action.
The tree structure occupies most of the view area. In the upper left side of the view, there is a drop-down menu that
contains all recently used projects and project management actions:
Open Project (Ctrl F2 (Meta F2 on OS X))
Opens an existing project. Alternatively, you can open a project by dropping an Oxygen XML Editor XPR project
file from the file explorer into the Project panel.
Note: When a project is opened for the first time, a confirmation dialog box will be displayed that asks
you to confirm that the project came from a trusted source. This is meant to help prevent potential security
issues.
New Project
Creates a new, empty project.
The following actions are grouped in the upper right corner:
Collapse All
Collapses all project tree folders. You can also collapse/expand a project tree folder if you select it and press the
Enter key or Left Arrow to collapse and Right Arrow to expand.
Link with Editor
When selected, the project tree highlights the currently edited file, if it is found in the project files.
Note: This button is disabled automatically when you move to the Debugger perspective.
Settings
A sub-menu that contains the following actions:
Filters
Allows you to filter the information displayed in the Project view. Click the toolbar button to set filter patterns
for the files you want to show or hide. Also, you can set filter patterns for the linked directories that are hidden.
Show Full Path
When selected, linked files and folders are presented with a full file path.
Enable Master Files Support
Select this option to enable the Master Files support.
Change Search and Refactor operations scope
Allows you to change the collection of documents that define the context of the search and refactor operations.
•
•
Oxygen XML Editor | Editing Modes | 73
Use only Master Files, if enabled - Restricts Oxygen XML Editor to perform the search and refactor
operations starting from the master files that are defined for the current resource. This option is available
when you select Project in the Select the scope for Search and Refactor operations dialog box and the
Master Files support is enabled.
Working sets - Allow you to specify the set of files on which the search and refactor operations will act on.
The files are usually organized in an XML project as a collection of folders. There are three types of resources displayed
in the Project view:
•
•
•
Logical folders - marked with a blue icon on Windows and Unix/Linux ( ) and a magenta icon on Mac OS X ( ).
They help you group files within the project. This folder type has no correspondent on the physical disk, since they
are used as containers for related items. Creating and deleting them does not affect the file system on disk. They are
created on the project root or inside other logical folders by using the contextual action New > Logical Folder. The
contextual menu action
Remove from Project can be used to remove them from the project.
Physical folders and files - marked with the operating system-specific icon for folders (usually a yellow icon on
Windows and a blue icon on Mac OS X). These folders and files are mirrors of real folders or files that exist in the
local file system. They are created or added to the project by using contextual menu actions (such as New > File,
New > Folder, Add Folder, etc.) Also, the contextual menu action
Remove from Disk (Shift+Delete) can be
used to remove them from the project and local file system.
Shortcut folders and files - the icons for file shortcuts include a shortcut symbol and names of folder shortcuts are
displayed in bold text. All files and folders that appear as direct descendants of a logical folder are considered
shortcuts. They are created and added with the contextual actions Add Files and Add Folder from the project root.
Both contextual menu actions
Remove from Project and
Remove from Disk (Shift+Delete) are available
for shortcuts.
Remove from Project just removes the shortcut from the project, while
Remove from Disk
(Shift+Delete) removes the shortcut and the physical resource from the local file system.
Figure 10: The Project View with Examples of all Three Types of Resources
Creating New Projects
The following action is available in the Project menu, the New menu in the contextual menu, or from the drop-down
menu in the top-left of the Project view:
New Project
Creates a new, empty project.
Oxygen XML Editor | Editing Modes | 74
Creating New Project Items
The following actions are available by selecting New from the contextual menu, when invoked from the Project view:
New >
File
Opens a New file dialog box that helps you create a new file and adds it to the project structure.
New >
Folder
Opens a New Folder dialog box that allows you to specify a name for a new folder and adds it to the structure of
the project.
New >
Logical Folder
Available when invoked from the project root, this action creates a logical folder in the tree structure (the icon is a
magenta folder on Mac OS X - ).
New > Logical Folders from Web
Available when invoked from the project root, this action replicates the structure of a remote folder accessible over
FTP/SFTP/WebDAV, as a structure of logical folders. The newly created logical folders contain the file structure
of the folder it points to.
Add Content to a Logical Folder
The project itself is considered a logical folder. You can add content to a logical folder using one of the actions available
in the contextual menu, when invoked from the project root:
Add Folder
Adds a link to a physical folder, whose name and content mirror a real folder that exists in the local file system (the
icon of this action is different on Mac OS X
).
Add Files
Adds links to files on the local file system.
Add Edited File
Adds a link to the currently edited file in the project.
Managing Project Content
Creating/Adding Files and Folders
You can create linked folders (shortcuts) by dragging and dropping folders from the Windows Explorer / Mac OS X
Finder to the project tree, or by selecting Add Folder in the contextual menu from the project root. To create a file inside
a linked folder, select the New >
File action from the contextual menu.
Note: The linked files presented in the Project view are marked with a special icon. Linked folders are displayed
in bold text.
You can create physical folders by selecting New > Folder from the contextual menu.
When adding files to a project, the default target is the project root. To change a target, select a new folder. Files may
have multiple instances within the folder system, but cannot appear twice within the same folder.
Removing Files and Folders
To remove one or more linked files or folders, select them in the project tree and press the Delete key, or select the
contextual menu action
Remove from Project. To remove a linked file or folder from both project and local file
system, select the contextual menu action
Remove from Disk (Shift+Delete). The
Remove from Disk
(Shift+Delete) action is also used to remove physical files or folders.
Caution: In most cases this action is irreversible, deleting the file permanently. Under particular circumstances
(if you are running a Windows installation of Oxygen XML Editor and the Recycle Bin is active) the file is
moved to Recycle Bin.
Oxygen XML Editor | Editing Modes | 75
Moving Files and Folders
You can move the resources of the project with drag and drop operations on the files and folders of the tree.
You can also use the usual
Cut,
Copy, and
Paste actions to move resources in the Project view.
Renaming Files and Folders
There are three ways you can rename an item in the Project view. Select the item in the Project view and do one of the
following:
•
•
•
Invoke the Rename action from the contextual menu.
Press F2 and type the new name.
Click the selected item and type the new name.
To finish editing the item name, press Enter.
Note: The Rename action is also available on logical files.
Locating and Opening Files
If a project folder contains a lot of documents, a certain document can be located quickly in the project tree by selecting
the folder containing the desired document and typing the first few characters of the document name. The desired
document is automatically selected as soon as the typed characters uniquely identify its name in the folder.
The selected document can be opened by pressing the Enter key, by double-clicking it, or with one of the Open actions
from the contextual menu. The files with known document types are opened in the associated editor, while binary files
are opened with the associated system application. To open a file with a known document type in an editor other than
the default one, use the Open with action. Also, dragging and dropping files from the project tree to the editor area
results in the files being opened.
Saving the Project
The project file is automatically saved every time the content of the Project view is saved or modified by actions such
as adding or removing files and drag and drop.
Validate Files
The currently selected files in the Project view can be checked to be XML well-formed or validated against a schema
(DTD, XML Schema, Relax NG, Schematron or NVDL) with one of the following contextual menu actions found in
the Validate sub-menu:
Validate >
Check Well-Formedness
Checks if the selected file or files are well-formed.
Validate
Validate
Validates the selected file or files against their associated schema. EPUB files make an exception, because this
action triggers a Validate and Check for Completeness operation.
ValidateValidate with Schema
Validates the selected file of files against a specified schema.
Validate
Configure Validation Scenario(s)
Allows you to configure and run a validation scenario.
Applying Transformation Scenarios
The currently selected files in the Project view can be transformed in one step with one of the following actions available
from contextual menu in the Transform sub-menu:
Transform >
Apply Transformation Scenario(s)
Obtains the output with one of the built-in scenarios.
Oxygen XML Editor | Editing Modes | 76
Transform >
Configure Transformation Scenario(s)
Opens a dialog box that allows you to configure pre-defined transformation scenarios.
Transform >
Transform with
Allows you to select a transformation scenario to be applied to the currently selected files.
Along with the logical folder support, this allows you to group your files and transform them very easily.
Refactoring Actions (Available for certain document types (such as XML, XSD, and XSL)
Oxygen XML Editor includes some refactoring operations that help you manage the structure of your documents. The
following actions are available from the contextual menu in the Refactoring sub-menu:
Refactoring > Rename resource
Allows you to change the name of a resource.
Refactoring > Move resource
Allows you to change the location on disk of a resource.
Refactoring >
XML Refactoring
Opens the XML Refactoring tool wizard that presents refactoring operations to assist you with managing the structure
of your XML documents.
Other Contextual Menu Actions
Other actions that are available in the contextual menu from the project tree include:
Open
Opens the selected file in the editor.
Open with submenu
This submenu allows you to open the selected file with the internal editor, a system application, or other internal
tools: DITA Maps Manager, Archive Browser, MathML Editor, Generate/Convert Schema, WSDL/SOAP Analyzer,
Large File Viewer, Hex Viewer, SVG Viewer.
Open All Files (when a folder or multiple resources are selected)
Opens all the selected files with the corresponding editors.
Show in Explorer (or Show in Finder on OS X)
In Windows, the content of the selected folder or file is presented in a specific explorer window. On MAC OS X,
the parent folder is opened and the selected folder is highlighted in a specific finder window.
Copy Location
Copies an application-specific URL for the selected resource to the clipboard.
Refresh
Refreshes the content and the dependencies between the resources in the Master Files directory.
Find/Replace in Files
Allows you to find and replace text in multiple files.
XPath in Files
Opens the XPath/XQuery Builder view that allows you to compose XPath and XQuery expressions and execute
them over the currently edited XML document.
Open/Find Resource
Opens the Open/Find Resource dialog box.
Check Spelling in Files
Allows you to check the spelling of multiple files.
Oxygen XML Editor | Editing Modes | 77
Format and Indent Files
Opens the Format and Indent Files dialog box that allows you to configure the format and indent (pretty print)
action that will be applied on the selected documents.
Open in SVN Client
Syncro SVN Client tool is opened and it highlights the selected resource in its corresponding working copy.
Compare
Opens the Compare Directories or Compare Files tool.
Generate Documentation > XML Schema Documentation
Opens the XML Schema Documentation Dialog Box.
Generate Documentation > XSLT Stylesheet Documentation
Opens the XSLT Stylesheet Documentation Dialog Box.
Generate Documentation > XQuery Documentation
Opens the XQuery Documentation Dialog Box.
Generate Documentation > WSDL Documentation
Opens the WSDL Documentation Dialog Box.
Properties
Displays the properties of the current file in a Properties dialog box.
Menu Level Actions
The following actions are available in the Project menu:
New Project
Creates a new, empty project.
Open Project (Ctrl F2 (Meta F2 on OS X))
Opens an existing project. Alternatively, you can open a project by dropping an Oxygen XML Editor XPR project
file from the file explorer into the Project panel.
Note: When a project is opened for the first time, a confirmation dialog box will be displayed that asks
you to confirm that the project came from a trusted source. This is meant to help prevent potential security
issues.
Save Project As
Allows you to save the current project under a different name.
Validate all project files
Checks if the project files are well-formed and their mark-up conforms with the specified DTD, XML Schema, or
Relax NG schema rules. It returns an error list in the message panel.
Filters
Opens the Project filters dialog box that allows you to decide which files and directories will be shown or hidden.
Enable Master Files Support
Allows you to enable the Master Files Support for each project you are working on.
Change Search and Refactor operations scope
Opens a dialog box that allows you to define the context of search and refactor operations.
Show Project View
Displays the project view.
Reopen Project
Contains a list of links of previously used projects. This list can be emptied by invoking the Clear history action.
Oxygen XML Editor | Editing Modes | 78
The Open/Find Resource View
The Open/Find Resource view is designed to offer advanced search capabilities either by using a simple text search
or by using the Apache Lucene - Query Parser Syntax. To open this view, go to Window > Show View > Open/Find
Resource. The view is presented in the left side of the default Oxygen XML Editor layout, next to the Project and
DITA Maps Manager views.
Figure 11: The Open/Find Resource View
You can use this view to find a file in the current Oxygen XML Editor project or in one of the DITA maps opened in
the DITA Maps Manager view by typing only a few letters of the file name of a document or a fragment of the content
you are searching for. The Open/Find Resource view also supports searching in document edits (comments, insertions,
deletions, and highlighted content).
Note: Full support for searching in document edits is available only in the Enterprise edition of Oxygen XML
Editor. The Professional edition offers support to search through a maximum of 10 edits.
Search results are presented instantly, after you finish typing the content you are searching for. The matching fragments
of text are highlighted in the results list displayed in the view. When you open one of the documents from the results
list, the matching fragments of text are highlighted in the editing area. To remove the highlighting from your document
close the Results view. To display the search history, position the cursor in the search field and press Ctrl Down Arrow
(Command Down Arrow on OS X) or Ctrl Up Arrow (Command Up Arrow on OS X) on your keyboard. Pressing
only the Down Arrow key moves the selection to the list of results.
A contextual menu available on each search result provides actions applicable to the document that contains it. These
actions allow you to:
•
•
•
•
Open the document in one of Oxygen XML Editor internal editors.
Open the document in an external system application.
Identify the document in the system file explorer.
Copy the file's location.
The content of the resources used to search in is parsed from an index. The indexing is performed both automatically
and on request.
Oxygen XML Editor | Editing Modes | 79
Note: Automatic indexing is performed when you modify, add, or remove resources in the currently indexed
project. If the index was never initialized, the index in not updated on project changes.
Note: To improve performance, the indexing process skips the following set of common English words (the
so-called stop words): a, an, and, are, as, at, be, but, by, for, if, in, into, is, it, no, not, of, on, or, such, that, the,
their, then, there, these, they, this, to, was, will, with. This means that if you are searching for any of these words,
Open/Find Resource view will not be able to match any of them. However, you can configure the list of stop
words in the Open/Find Resources Preferences Page.
Note: Searches are case insensitive. For example, if you search for car you get the same results as when you
search for Car.
Note: Suffix searches are supported, both for searching in the content of your resources and in their name. For
this, you can use wildcards. If you search in content for *ing you will find documents that contain the word
presenting. If you search in file paths for */samples/*.gif you will find all the gif images from the samples
directory.
Note: You can drag a resource from the Open/Find Resource view and drop it in a DocBook, DITA, TEI or
XHTML document to create a link to that resource.
The Open/Find Resource view offers the following options:
•
Settings - Displays settings for the view:
•
•
•
•
•
•
•
Clear Index - Clears the index.
Show description - Presents the search results in a more compact form, displaying only the title and the location
of the resources.
Options - Opens the Open/Find Resource preferences page.
In file paths - Select this option to search for resources by their name or by its path (or a fragment of its path).
In content - Select this option to search through the content of your resources.
In reviews - Select this option to search through the comments, insertions, and deletion in your resources.
Reindex - Reindexes your resources.
Outline View
The Outline view in Text mode displays a general tag overview of the currently edited XML Document. It also shows
the correct hierarchical dependencies between elements. This makes it easier for you to be aware of the document
structure and the way element tags are nested. It allows for fast navigation of the document by displaying the start of
the content of the child elements in the node of the parent element, thus allowing you to quickly see the content of an
element without expanding it in the Outline tree. It also allows you to insert or delete nodes using contextual menu
actions.
By default it is displayed on screen, but if you closed it you can reopen it from Window > Show View > Outline.
The upper part of the view contains a filter box that allows you to focus on the relevant components. If you type a text
fragment in the filter box, the components that match it are presented. For advanced usage you can use wildcards (*, ?)
and separate multiple patterns with commas.
The Outline view offers the following functionality:
•
•
•
•
•
•
XML Document Overview on page 80
Modification Follow-up on page 80
Drag and Drop Actions in Outline View on page 80
Outline Filters on page 81
The Contextual Menu of the Outline View on page 81
Document Tag Selection on page 82
Oxygen XML Editor | Editing Modes | 80
Figure 12: The Outline View
XML Document Overview
The Outline view displays a general tag overview of the current edited XML document. It also shows the correct
hierarchical dependencies between the tag elements. This functionality makes it easier for you to be aware of the document
structure and the way tags are nested.
The Outline view allows you to:
•
•
•
Insert or delete nodes using contextual menu actions.
Move elements by dragging them to a new position in the tree structure.
Highlight elements in the Author editor area.
Note: The Outline view is synchronized with the Author editor area. When you make a selection in the
Author editor area, the corresponding elements of the selection are highlighted in the Outline view and vice
versa. This functionality is available both for single and multiple selection. To deselect one of the elements,
use Ctrl Single-Click (Command Single-Click on OS X).
Document errors (such as an element inserted in an invalid position, or a wrong attribute name, or a missing required
attribute value) are highlighted in the Outline tree:
•
•
•
A red exclamation mark decorates the element icon.
A dotted red underline decorates the element name and value.
A tooltip provides more information about the nature of the error, when you hover with the mouse pointer over the
faulted element.
Modification Follow-up
When you edit a document, the Outline view dynamically follows the changes that you make, displaying the node that
you modify in the middle of the view. This functionality gives you great insight on the location of your modifications
in the document that you edit.
Drag and Drop Actions in Outline View
Entire XML elements can be moved or copied in the edited document using only the mouse in the Outline view with
drag-and-drop operations. Several drag and drop actions are possible:
•
•
If you drag an XML element in the Outline view and drop it on another one in the same panel then the dragged
element will be moved after the drop target element.
If you hold the mouse pointer over the drop target for a short time before the drop then the drop target element will
be expanded first and the dragged element will be moved inside the drop target element after its opening tag.
•
•
Oxygen XML Editor | Editing Modes | 81
You can also drop an element before or after another element if you hold the mouse pointer towards the upper or
lower part of the targeted element. A marker will indicate whether the drop will be performed before or after the
target element.
If you hold down the (Ctrl (Command on OS X)) key after dragging, there will be performed a copy operation
instead of a move one.
The drag and drop action in the Outline view can be disabled and enabled from a Preferences page.
Tip: You can select and drag multiple nodes in the Outline view when editing in Author mode.
Outline Filters
The upper part of the Outline view contains a filter box that allows you to focus on the relevant components. Type a
text fragment in the filter box and only the components that match it are presented. For advanced usage you can use
wildcard characters (*, ?) and separate multiple patterns with commas.
The following actions are available in the Settings menu of the Outline view when editing in Text mode:
Filter returns exact matches
The text filter of the Outline view returns only exact matches.
Selection update on cursor move
Controls the synchronization between Outline view and source document. The selection in the Outline view can
be synchronized with the cursor moves or the changes in the editor. Selecting one of the components from the
Outline view also selects the corresponding item in the source document.
Flat presentation mode of the filtered results
When active, the application flattens the filtered result elements to a single level.
Show comments and processing instructions
Show/hide comments and processing instructions in the Outline view.
Show element name
Show/hide element name.
Show text
Show/hide additional text content for the displayed elements.
Show attributes
Show/hide attribute values for the displayed elements. The displayed attribute values can be changed from the
Outline preferences panel.
Configure displayed attributes
Displays the XML Structured Outline preferences page.
The Contextual Menu of the Outline View
The following actions are available from the contextual menu in the Outline view in Text mode:
Append Child
Allows you to select an element (from a drop-down list) that is allowed by the associated schema and inserts it as
a child of the current element.
Insert Before
Allows you to select an element (from a drop-down list) that is allowed by the associated schema and inserts it
immediately before the current element, as a sibling.
Insert After
Allows you to select an element (from a drop-down list) that is allowed by the associated schema and inserts it
immediately after the current element, as a sibling.
Oxygen XML Editor | Editing Modes | 82
Edit Attributes
Opens a dialog box that allows you to edit the attributes of the currently selected component.
Toggle Comment
Encloses the currently selected element in an XML comment, if the element is not already commented. If it is already
commented, this action will remove the comment.
Cut
Cuts the currently selected component.
Copy
Copies the currently selected component.
Delete
Deletes the currently selected component.
Expand More
Expands the structure of a component in the Outline view.
Collapse All
Collapses the structure of all the component in the Outline view.
Document Tag Selection
The Outline view can also be used to search for a specific tag location and contents in the edited document. Intuitively,
by selecting with the left mouse button the desired tag in the Outline view, the document is scrolled to the position of
the selected tag. Moreover, the tag contents are selected in the document, making it easy to notice the part of the document
contained by that specific tag and furthermore to easily copy and paste the tag's contents in other parts of the document
or in other documents.
You can double click the tag in the Outline tree to move the focus in the editor.
You can also use the filter text field search to look for a particular tag name in the Outline tree.
The Attributes View
The Attributes view presents all the attributes of the current element determined by the schema of the document.
You can use the Attributes view to insert attributes, edit their values, or add values to existing attributes.
The attributes are rendered differently depending on their state:
•
The names of the attributes with a specified value are rendered with a bold font, and their value with a plain font.
Note: The names of the attributes with an empty string value are also rendered bold.
•
•
•
Default values are rendered with a plain font, painted gray.
Empty values display the text "[empty]", painted gray.
Invalid attributes and values are painted red.
Double-click a cell in the Value column to edit the value of the corresponding attribute. If the possible values of the
attribute are specified as list in the schema of the edited document, the Value column acts as a combo box that allows
you to insert the values in the document.
You can sort the attributes table by clicking the Attribute column header. The table contents can be sorted as follows:
•
•
•
By attribute name in ascending order.
By attribute name in descending order.
Custom order, where the used attributes are displayed at the beginning of the table sorted in ascending order, followed
by the rest of the allowed elements sorted in ascending order.
Oxygen XML Editor | Editing Modes | 83
Figure 13: The Attributes View
Expand/Collapse Button
There is an
Expand/
Collapse button at the top-right of the view. When expanded, this presents the following
additional combo boxes:
Name Combo Box
Use this combo box to select an attribute. The drop-down list displays the list of possible attributes allowed by the
schema of the document, as in the Attributes view. You can use the
Remove button to delete an attribute and
its value from the selected element.
Value Combo Box
Use this combo box to add, edit, or select the value of an attribute. If the selected attribute has predefined values in
the schema, the drop-down list displays those possible values. You can use the
Browse button to select a URL
for the value of an attribute. After you have entered or selected a value, use the
to add the value to the attribute.
Update button (or press Enter)
Contextual Menu Actions in the Attributes View
The following actions are available in the contextual menu of the Attributes view when editing in Text mode:
Add
Allows you to insert a new attribute. Adding an attribute that is not in the list of all defined attributes is not possible
when the Allow only insertion of valid elements and attributes schema aware option is enabled.
Set empty value
Specifies the current attribute value as empty.
Remove
Removes the attribute (action available only if the attribute is specified). You can invoke this action by pressing the
(Delete) or (Backspace) keys.
Copy
Copies the attrName="attrValue" pair to the clipboard. The attrValue can be:
•
•
•
The value of the attribute.
The value of the default attribute, if the attribute does not appear in the edited document.
Empty, if the attribute does not appear in the edited document and has no default value set.
Paste
Depending on the content of the clipboard, the following cases are possible:
•
If the clipboard contains an attribute and its value, both of them are introduced in the Attributes view. The
attribute is selected and its value is changed if they exist in the Attributes view.
•
•
Oxygen XML Editor | Editing Modes | 84
If the clipboard contains an attribute name with an empty value, the attribute is introduced in the Attributes
view and you can start editing it. The attribute is selected and you can start editing it if it exists in the Attributes
view.
If the clipboard only contains text, the value of the selected attribute is modified.
The Model View
The Model view presents the structure of the currently selected tag, and its documentation, defined as annotation in the
schema of the current document. To open the Model view, select it from the Window > Show View menu.
Figure 14: The Model View
The Model view is comprised of two sections, an element structure panel and an annotations panel.
Element Structure Panel
The element structure panel displays the structure of the currently edited or selected tag in a tree-like format. The
information includes the name, model, and attributes of the current tag. The allowed attributes are shown along with
imposed restrictions, if any.
Oxygen XML Editor | Editing Modes | 85
Figure 15: The Element Structure Panel
Annotation Panel
The Annotation panel displays the annotation information for the currently selected element. This information is collected
from the XML schema.
Figure 16: The Annotation panel
The Elements View
The Elements view presents a list of all defined elements that you can insert at the current cursor position according to
the schema associated to the document. Double-clicking any of the listed elements inserts that element in the edited
document. All elements from a sequence are presented but the invalid proposals (which cannot be inserted in the current
context) are disabled and rendered in gray.
Figure 17: The Elements View
The Entities View
This view displays a list with all entities declared in the current document, as well as built-in ones. Double-clicking one
of the entities will insert it at the current cursor position. You can also sort entities by name and value by clicking the
column headers.
Oxygen XML Editor | Editing Modes | 86
Figure 18: The Entities View
The view features a filtering capability that allows you to search an entity by name, value, or both. Also, you can choose
to display the internal or external entities.
Note: When entering filters, you can use the ? and * wildcards. Also, you can enter multiple filters by separating
them with a comma.
The Results View
The Results View displays the messages generated as a result of user actions such as validations, transformations, search
operations, and others. Each message is a link to the location related to the event that triggered the message.
Double-clicking a message opens the file containing the location and positions the cursor at the location offset. The
actions that can generate result messages include the following:
•
•
•
•
•
•
•
•
Validate action
Transform action
Check Spelling in Files action
Find All action from the Find/Replace dialog box
Find/Replace in Files dialog box
Search References action
XPath expression results
SQL results
Figure 19: Results View
Oxygen XML Editor | Editing Modes | 87
Results View Toolbar Actions
The view includes a toolbar with the following actions:
Grouping options drop-down menu
A set of Group by toggle actions that allow you to group the messages according to a selected criteria so that they
can be presented in a hierarchical layout. The criteria used for grouping can be the severity of the errors (error,
warning, info message, etc.), the resource name, the description of the message, and so on.
This drop-down menu also includes the following additional grouping actions:
Ungroup all
Removes the grouping rules so that the messages are presented in a continuous list.
Show group columns
If any of the Group by options are selected, you can use this option to show or hide grouping columns.
Restore Defaults
Restores the column size for each column and the grouping rules that were saved in the user preferences the last
time when this view was used. If it is the first time this view is used, the action sets an initial default column
size for each column and a grouping rule that is appropriate for the type of messages. For example:
•
•
Group the messages by the path of the validated file if there are error messages from a validation action or
spelling errors reported by the Check Spelling in Files action.
No grouping rule for the results of applying an XPath expression.
Highlight all results in editor
Oxygen XML Editor highlights all matches obtained after executing an XPath expression, or performing one of the
following operations: Find All, Find in Files, Search References, and Search Declarations. Click Highlight all
results in editor again to turn off highlighting.
Note: To customize highlighting behavior, open the Preferences dialog box and go to Editor > Highlights
category. You can do the following customizations:
•
•
Set a specific color of the highlights depending on the type of action you make.
Set a maximum number of highlights that the application displays at any given time.
Remove selected
Removes the current selection from the view. This can be helpful if you want to reduce the number of messages or
remove those that have already been addressed or not relevant to your task.
Remove all
Removes all messages from the view.
Results View Contextual Menu Actions
The following actions are available when the contextual menu is invoked in the table grid:
Show message
Displays a dialog box with the full error message, which is useful for a long message that does not have enough
room to be displayed completely in the view.
Previous message
Navigates to the message above the current selection.
Next message
Navigates to the message below the current selection.
Remove selected
Removes selected messages from the view.
Remove all
Removes all messages from the view.
Oxygen XML Editor | Editing Modes | 88
Copy
Copies the information associated with the selected messages:
•
•
•
•
•
•
The file path of the document that triggered the output message.
The path of the main file (in the case of a validation scenario, it is the path of the file from which the validation
starts and can be different from the validated file).
Error severity (error, warning, info message, etc.)
Name of validating processor.
Name of validation scenario.
The line and column in the file that triggered the message.
Select All
Extends the selection to all the messages from the view.
Print Results
Sends the complete list of messages to a printer. For each message the included details are the same as the ones for
the Copy action.
Save Results
Saves the complete list of messages in a file in text format. For each message the included details are the same as
the ones for the Copy action.
Save Results as XML
Saves the complete list of messages in a file in XML format. For each message the included details are the same as
the ones for the Copy action.
Group by
A set of Group by toggle actions that allow you to group the messages according to a selected criteria so that they
can be presented in a hierarchical layout. The criteria used for grouping can be the severity of the errors (error,
warning, info message, etc.), the resource name, the description of the message, and so on.
Ungroup all
Removes the grouping rules so that the messages are presented in a continuous list.
Show group columns
If any of the Group by options are selected, you can use this option to show or hide grouping columns.
Restore Defaults
Restores the column size for each column and the grouping rules that were saved in the user preferences the last
time when this view was used. If it is the first time this view is used, the action sets an initial default column size
for each column and a grouping rule that is appropriate for the type of messages. For example:
•
•
Group the messages by the path of the validated file if there are error messages from a validation action or
spelling errors reported by the Check Spelling in Files action.
No grouping rule for the results of applying an XPath expression.
Expand All
Expands all the nodes of the tree, which is useful when the messages are presented in a hierarchical mode.
Collapse All
Collapses all the nodes of the tree, which is useful when the messages are presented in a hierarchical mode.
Window > Results Menu
The following actions are also available from the Window > Results menu:
Save Results
Saves the complete list of messages in a file in text format.
Print Results
Sends the complete list of messages to a printer.
Oxygen XML Editor | Editing Modes | 89
Close
Closes the current tab.
Close All Tabs
Closes all opened tabs.
Close Other Tabs
Closes all other opened tabs, other than the current one.
Syntax Highlight Depending on Namespace Prefix
The syntax highlight scheme of an XML file type allows the configuration of a color per each type of token that can
appear in an XML file. Distinguishing between the XML tag tokens based on the namespace prefix brings additional
visual help in editing some XML file types. For example, in XSLT stylesheets, elements from different namespaces
(such as XSLT, XHTML, XSL:FO, or XForms) are inserted in the same document and the editor panel can become
cluttered. Marking tags with different colors based on the namespace prefix allows easier identification of the tags.
Figure 20: Example of Coloring XML Tags by Prefix
Presenting Validation Errors in Text Mode
A line with a validation error or warning will be marked in the editor panel by underlining the error region with a red
color. Also a red sign will mark the position in the document of that line on the right side ruler of the editor panel. The
same will happen for a validation warning, but the color will be yellow instead of red. Hovering over a validation error
presents a tooltip message with more details about the error and possible quick fixes (if available for that error or warning).
The ruler on the right side of the document is designed to display the errors and warnings found during the validation
process and also to help you to locate them more easily. The ruler contains the following areas:
•
Top area that contains a success validation indicator that will turn green if the validation succeeded, or red otherwise.
A more detailed report of the errors is displayed in the tooltip of the validation indicator. If there are multiple errors,
only the first three of them will be presented in the tooltip.
•
Middle area where the error markers are depicted in red (with a darker color tone for the current selected one). To
limit the number of markers shown open the Preferences dialog box and go to Editor > Document checking >
Maximum number of problems reported per document.
Clicking a marker will highlight the corresponding text area in the editor. The error message is displayed both in the
tool tip and in the error area on the bottom of the editor panel.
The Document checking user preferences are easily accessible from the button displayed at the beginning of the
error message on the bottom of the editor panel.
•
Bottom area containing two navigation arrows that will go to the next or to the previous error and a button for clearing
all the error markers from the ruler. The same actions can be triggered from menu Document > Automatic
validation > Next Error Ctrl Period (Meta Period on OS X) and Document > Automatic validation > Previous
Error Ctrl Comma (Meta Comma on OS X).
The validation status area is the line at the bottom of the editor panel that presents the message of the current validation
error selected on the right side ruler. Clicking the
Document checking options button opens the document checking
page in Oxygen XML Editor user preferences.
Oxygen XML Editor | Editing Modes | 90
Status messages from every validation action are logged into the Information view.
If you want to see all the validation error messages grouped in a view you should use the
Validate action from the
Document > Validate menu or from the
Validation toolbar drop-down menu. This action collects all error messages
in the Errors view.
Bidirectional Text Support in Text Mode
Bidirectional documents contain text in both directions, usually involving characters from unique types of alphabets.
If bidirectional text (such as Arabic or Hebrew languages), certain Asian languages (such as Devanagari, Bengali,
Gurmukhi, Gujarati, Oriya, Tamil, Telugu, Kannada, Malayalam, Sinhala, Thai, Khmer), or other special characters
(such as combining characters) are detected in a document, Oxygen XML Editor displays a Special Characters Detected
dialog box that prompts you to Enable or Disable support for these special characters.
You can also configure this support in the Support for Special Characters section of the Open/Save preferences page.
To enable or disable this support, open the Preferences dialog box and go to Editor > Open/Save.
Note: Disabling this support may affect text rendering, cursor positioning and navigation, as well as text selection
and management operations. If you need to open very large documents, the bidirectional editing support can
also be disabled to enhance performance while editing.
Restriction: Bidirectional content in the Text mode cannot be rendered using Bold or Italic.
Grid Editing Mode
The Grid editing mode in Oxygen XML Editor displays XML documents in a structured spreadsheet-like grid. It allows
you to easily edit XML documents consisting of repetitive patterns.
Grid Mode Editor
The Oxygen XML Editor Grid editor displays the XML document as a structured grid of nested tables. To activate this
mode, select Grid at the bottom of the editing area.
If you are a non-technical user, you are able to modify the text content of the edited document without working with
the XML tags directly. You can expand and collapse the tables using the mouse cursor and also display or hide the
elements of the document as nested. The document structure can also be changed easily with drag and drop operations
on the grid components. To zoom in and out, use Ctrl +[plus sign] (Command +[plus sign] on OS X), Ctrl -[minus
sign] (Command - on OS X), Ctrl 0 (Command 0 on OS X) or Ctrl Scroll Forward (Command Scroll Forward
on OS X ) /Ctrl Scroll Backwards (Command Scroll Backwards on OS X).
Figure 21: The Grid Editor
Oxygen XML Editor | Editing Modes | 91
To switch back from the Grid mode to the Text or Author mode, use the Text and Grid buttons from the bottom of
the editor. You are also able to perform this switch from Document > Edit Mode > Grid and Document > Edit
Mode > Text.
If the edited document is associated with a schema (DTD, XML Schema, Relax NG, etc.), the editor offers Content
Completion Assistant for the elements and attributes names and values. If you choose to insert an element that has
required content, the sub-tree of needed elements and attributes are automatically included.
To display the content completion pop-up menu, you have to start editing (for example, double click a cell). Pressing
Ctrl Space (Command Space on OS X) on your keyboard also displays the pop-up menu.
Figure 22: Content Completion in Grid Editor
To watch our video demonstration about some of the features available in the Grid editor, go to
http://oxygenxml.com/demo/Grid_Editor.html.
Layouts: Grid and Tree
The Grid editor offers two layout modes. The default one is the grid layout. This smart layout detects the recurring
elements in the XML document and creates tables having the children (including the attributes) of these elements as
columns. This way, it is possible to have tables nested in other tables, reflecting the structure of your document.
Figure 23: Grid Layout
The other layout mode is tree-like. It does not create any tables and it only presents the structure of the document.
Figure 24: Tree Layout
To switch between the two modes, go to Document > Grid Layout > Grid mode/Tree mode.
Oxygen XML Editor | Editing Modes | 92
Grid Mode Navigation
At first, the content of a document opened in the Grid mode is collapsed. Only the root element and its attributes are
displayed. The grid disposition of the node names and values is similar to a web form or dialog box. The same set of
key shortcuts used to select dialog box components is also available in the Grid mode:
Table 2: Shortcuts in the Grid Mode
Key
Action
Tab
Moves the cursor to the next editable value in a table row.
Shift Tab
Moves the cursor to the previous editable value in a table
row.
Enter
Begins editing and lets you insert a new value. Also
commits the changes after you finish editing.
Up Arrow/Page Up
Navigates toward the beginning of the document.
Down Arrow/Page Down
Navigates toward the end of the document.
Shift
Used in conjunction with the navigation keys to create a
continuous selection area.
Ctrl (Command on OS X) key
Used in conjunction with the mouse cursor to create
discontinuous selection areas.
The following key combinations can be used to scroll the grid:
•
•
•
•
Ctrl Up Arrow (Command Up Arrow on OS X) - scrolls the grid upwards.
Ctrl Down Arrow (Command Down Arrow on OS X) - scrolls the grid downwards.
Ctrl Left Arrow (Command Left Arrow on OS X) scrolls the grid to the left.
Ctrl Right Arrow (Command Right Arrow on OS X) scrolls the grid to the right.
An arrow sign displayed at the left of the node name indicates that this node has child nodes. To display the children,
click this sign. The expand/collapse actions can be invoked either with the NumPad+ and NumPad- keys, or from the
Expand/Collapse submenu of the contextual menu or from Document > Grid Expand/Collapse.
The following actions are available on the Expand/Collapse menu:
Expand All
Expands the selection and all its children.
Collapse All
Collapses the selection and all its children.
Expand Children
Expands all the children of the selection but not the selection.
Collapse Children
Collapses all the children of the selection but not the selection.
Collapse Others
Collapses all the siblings of the current selection but not the selection.
Bidirectional Text Support in Grid Mode
If you are editing documents employing a different text orientation, you can change the way the text is rendered and
edited in the grid cells by using the Change Text Orientation(Ctrl Shift O (Meta Shift O on OS X)) action that is
available from the Edit menu in the Grid editing mode. Use this action to switch from the default left to right text
orientation to the right to left orientation, and vice versa.
Oxygen XML Editor | Editing Modes | 93
Note: This change applies only to the text from the cells, and not to the layout of the grid editor.
Figure 25: Default left to right text orientation
Figure 26: Right to left text orientation
Author Editing Mode
This chapter presents the WYSIWYG-like visual editor, called Author mode, that is targeted to content authors.
Author Mode Editor
The Author editing mode in Oxygen XML Editor allows you to visually edit XML documents in a visual interface that
is similar to a WYSIWYG word processor.
Oxygen XML Editor | Editing Modes | 94
Figure 27: Author Editing Mode
Navigating the Document Content in Author Mode
Using the Keyboard
Oxygen XML Editor allows you to quickly navigate through a document using the Tab key to move the cursor to the
next XML node and Shift Tab to go to the previous one. If you encounter a space preserved element when you navigate
through a document and you do not press another key, pressing the Tab key will continue the navigation. However, if
the cursor is positioned in a space preserved element and you press another key or you position the cursor inside such
an element using the mouse, the Tab key can be used to arrange the text.
To navigate one word forward or backwards, use Ctrl Right Arrow (Command Right Arrow on OS X), and Ctrl
Left Arrow (Command Left Arrow on OS X), respectively. Entities and hidden elements are skipped. To position
the cursor at the beginning or at the end of the document you can use Ctrl Home (Command Home on OS X), and
Ctrl End (Command End on OS X), respectively.
Using the Navigation Toolbar
The locations of selected text are stored in an internal list that allows you to navigate between them with the
(Ctrl Alt Open Bracket (Meta Alt Open Bracket on OS X)) and
Close Bracket on OS X)) buttons from the Navigation toolbar. The
X)) button automatically takes you to the latest edited text.
Back
Forward (Ctrl Alt Close Bracket (Meta Alt
Last Modification (Ctrl G (Meta G on OS
Using the Breadcrumb Helpers
A breadcrumb on the top stripe indicates the path from document root to the current element. It can also be used as a
helpful tool to navigate to specific elements throughout the structure of the document.
Figure 28: The Breadcrumb in Author Mode
Oxygen XML Editor | Editing Modes | 95
The last element is also highlighted by a thin light blue bar for easier identification. Clicking an element from the
breadcrumb selects the entire element in the editor area. Also, each element provides a contextual menu with access to
the following actions:
Edit Attributes
Opens the in-place attributes editor that allows you to easily edit the attributes of an element.
Edit Profiling Attributes
Allows you to select the profiling attributes that apply to a certain element.
Append child
Opens a content completion list that allows you to select an element to be inserted as a child of the selected element.
Insert before
Opens a content completion list that allows you to select an element to be inserted (as a sibling) before the selected
element.
Insert after
Opens a content completion list that allows you to select an element to be inserted (as a sibling) after the selected
element.
Cut
Removes the selected element and copies it to the clipboard, while preserving the styles of the content.
Copy
Copies the selected element to the clipboard, while preserving the styles of the copied content.
Paste
Pastes a well-formed element from the clipboard at currently selected position in the breadcrumb.
Paste before
Insert a well-formed element (from the clipboard) before the currently selected element.
Paste after
Insert a well-formed element (from the clipboard) after the currently selected element.
Paste as XML
Inserts clipboard content that is considered to be well-formed XML content.
Delete
Deletes the currently selected element.
Toggle Comment
Encloses the currently selected element in an XML comment, if the element is not commented, or removes the
comment if it is commented.
Rename Element
Opens the Rename dialog box that allows you to rename the currently selected element and other elements with
the same name.
Tip: The tag names displayed in the breadcrumb can be customized with an Author mode extension class that
implements the AuthorBreadCrumbCustomizer API. See the Oxygen SDK for more details.
Using the Folding Support
When working with a large document, the folding support can be used to collapse some element content leaving only
those that you need to edit in focus. Foldable elements are marked with a small triangle painted in the upper left corner
( ). If you hover over that arrow, the entire content of the element is highlighted by a dotted border for quick
identification of the foldable area. The following actions are available in the Folding sub-menu of the contextual menu
or from the Document > Folding menu:
Oxygen XML Editor | Editing Modes | 96
Toggle Fold (or you can simply click on the
Toggles the state of the current fold.
/
arrow)
Collapse Other Folds (Ctrl NumPad / (Meta NumPad / on OS X))
Folds all the elements except the current element.
Collapse Child Folds (Ctrl NumPad . (Meta NumPad . on OS X))
Folds the child elements that are indented one level inside the current element.
Expand Child Folds
Unfolds all child elements of the currently selected element.
Expand All (Ctrl NumPad * (Meta NumPad * on OS X))
Unfolds all elements in the current document.
Using the Linking Support
When working on multiple documents that reference each other (references, external entities, XInclude, DITA conref,
etc), the linking support is useful for navigating between the documents. In the predefined customizations that are
bundled with Oxygen XML Editor, links are marked with an icon representing a chain link ( ). When hovering over
the icon, the mouse pointer changes its shape to indicate that the link can be accessed and a tooltip presents the destination
location. Click the link to open the referenced resource in the editor or system browser. The same effect can be obtained
by using the Document > File > Open file at cursor (Ctrl Enter (Meta Enter on OS X)) action when the cursor is
inside a link element.
Note: Depending on the referenced file type, the target link will either be opened in the Oxygen XML Editor
or in the default system application. If the target file does not exist, Oxygen XML Editor prompts you to create
it.
Displaying the Markup
In the Author mode, you can control the amount of displayed markup using the following dedicated actions from the
Tags display mode drop-down menu that is available on the toolbar:
Full Tags with Attributes
Displays full tag names with attributes for both block level and in-line level elements.
Full Tags
Displays full tag names without attributes for both block level and in-line level elements.
Block Tags
Displays full tag names for block level elements and simple tags without names for in-line level elements.
Inline Tags
Displays full tag names for inline level elements, while block level elements are not displayed.
Partial Tags
Displays simple tags without names for in-line level elements, while block level elements are not displayed.
No Tags
No tags are displayed. This is the most compact mode and is as close as possible to a word-processor view.
To set a default mode of the tags mode, go to Author preferences page and configure the Tags display mode options.
However, if the document opened in Author mode editor does not have an associated CSS stylesheet, then the Full
Tags mode will be used.
Block-level elements are those elements of the source document that are formatted visually as blocks (for example,
paragraphs), while the inline level elements are distributed in lines (for example, emphasizing pieces of text within a
paragraph, inline images, etc). The graphical format of the elements is controlled from the CSS sources via the display
property.
Oxygen XML Editor | Editing Modes | 97
Bookmarks
A position in a document can be marked with a bookmark. You can then quickly go to the marked position with a
keyboard shortcut or a menu action. This is useful when navigating large documents or working on multiple documents
where the cursor needs to move between several marked positions. The bookmarks are displayed with a small icon on
the vertical strip to the left of the editor.
Figure 29: Editor Bookmarks
A bookmark can be inserted by one of the following:
•
•
Right-click the vertical strip to the left of the editor.
Select the
Create Bookmark (F9) action from the Edit > Bookmarks menu.
A bookmark can be removed by right-clicking its icon on the vertical strip and select Remove or Remove all (Ctrl+F7)
(you can also find the Remove all (Ctrl+F7) action in the Edit > Bookmarks menu).
You can navigate the bookmarks by using one of the actions available on the Edit > Bookmarks > Go to menu or by
using the shortcut keys that are listed in that menu (for example, Ctrl+1, Ctrl+2). You can configure these shortcut
keys from Options > Menu Shortcut Keys.
Visual Hints for the Cursor Position
When the cursor is positioned inside a new context, a tooltip will be shown for a couple of seconds displaying the position
of the cursor relative to the current element context.
Here are the common situations that can be encountered:
•
The cursor is positioned before the first block child of the current node.
Figure 30: Before first block
•
The cursor is positioned between two block elements.
Figure 31: Between two block elements
•
The cursor is positioned after the last block element child of the current node.
Figure 32: After last block
•
The cursor is positioned inside a node.
Oxygen XML Editor | Editing Modes | 98
Figure 33: Inside a node
•
The cursor is positioned inside an element, before an inline child element.
Figure 34: Before an inline element
•
The cursor is positioned between two inline elements.
Figure 35: Between two inline elements
•
The cursor is positioned inside an element, after an inline child element.
Figure 36: After an inline element
The nodes in the previous cases are displayed in the tooltip window using their names.
To deactivate this feature, open the Preferences dialog box and go to Editor / Author > Show cursor position tooltip.
Even if this option is disabled, you can trigger the display of the position tooltip by pressing Shift+F2.
Note: The position information tooltip is not displayed if one of the modes Full Tags with Attributes or Full
Tags is selected.
Location Tooltip
When editing XML documents in a visual environment you might find it difficult to position the cursor between certain
tags that do not have a visual representation. To counterbalance this, Oxygen XML Editor displays a transparent preview
of the Position Information Tooltip, called Location Tooltip:
Figure 37: Location Tooltip
Oxygen XML Editor displays a location tooltip when the following conditions are met:
•
•
You are editing the document in one of the following tags display modes: Inline Tags, Partial Tags, No Tags.
The mouse pointer is moved between block elements.
To activate or deactivate this feature, use the Show location tooltip on mouse move option from the Cursor Navigation
preferences page.
Displaying Referenced Content
The references to entities, XInclude, and DITA conrefs are expanded by default in Author mode and the referenced
content is displayed. You can control this behavior from the Author preferences page. The referenced resources are
Oxygen XML Editor | Editing Modes | 99
loaded and displayed inside the element or entity that refers them, however the displayed content cannot be modified
directly.
Figure 38: XInclude reference
Figure 39: External entity reference
When the referenced resource cannot be resolved, an error will be presented inside the element that refers them instead
of the content.
If you want to make modifications to the referenced content, you must open the referenced resource in an editor. The
referenced resource can be opened quickly by clicking the link (marked with the icon ) which is displayed before the
referenced content or by using the Edit Reference action from the contextual menu (in this case the cursor is placed at
the precise location where the action was invoked in the main file). The referenced resource is resolved through the
XML Catalog set in Preferences.
The referenced content is refreshed:
•
•
Automatically, when it is modified and saved from Oxygen XML Editor.
On demand, by using the Refresh references action. Useful when the referenced content is modified outside the
Oxygen XML Editor scope.
Presenting Validation Errors in Author Mode
Automatic validation and validate on request operations are available while editing documents in the Author mode. A
detailed description of the document validation process and its configuration is described in the Validating Documents
section.
Oxygen XML Editor | Editing Modes | 100
Figure 40: Presenting Validation Errors in Author Mode
A fragment with a validation error is marked by underlining the error in red, and validation warnings are underlined in
yellow.
Also, the ruler on the right side of the editor panel is designed to display the errors found during the validation process
and to help you locate them in the document. The ruler contains the following:
•
•
The top area - A success indicator square will turn green if the validation is successful, red if validation errors are
found, or yellow if validation warnings are found.More details about the errors or warnings are displayed in a tool
tip when you hover over indicator square. If there are numerous errors, only the first three are presented in the tool
tip.
The middle area - Errors are depicted with red markers, and warnings with yellow markers. If you want to limit the
number of markers that are displayed, open the Preferences dialog box and go to Editor > Document checking >
Maximum number of validation highlights.
Clicking a marker will highlight the corresponding text area in the editor. The error or warning message is also
displayed both in a tool tip (when hovering over the marker) and in the message area on the bottom of the editor
panel.
The validation status area at the bottom of the editor panel presents the message of the current validation error.
Clicking the
Document checking options button opens the Document checking user preferences page
Oxygen XML Editor | Editing Modes | 101
•
The bottom area - Two navigation arrows ( ) allow you to skip to the next or previous error. The same actions can
be triggered from Document > Automatic validation > Next error (Ctrl Period (Meta Period on OS X)) and
Document > Automatic validation > Previous error (Ctrl Comma (Meta Comma on OS X)). Also, the
button can be used to clear all the error markers.
Status messages from every validation action are logged in the Information view.
Whitespace Handling in Author Mode
When you edit a document in Author mode, Oxygen XML Editor must serialize the resulting document as XML. Oxygen
XML Editor serializes the document when you save it or switch to another editing mode. When the document is serialized,
Oxygen XML Editor formats and indents the XML document according to the current format and indent settings.
Minimizing whitespace differences between versions
When serializing a document to XML, Author mode will only format and indent those elements of the document that
have been edited. Any element that has not been edited will be serialized exactly as it was loaded from disk. This is
useful when your content is managed in a version control systems, as it avoids introducing insignificant whitespace
differences between version, which in turn makes diff output easier to read.
Entering whitespace in Author mode
Oxygen XML Editor controls the entry of whitespace characters in Author mode according the XML whitespace rules,
which means it will not let you insert insignificant whitespace. This means that it will not let you insert extra line-breaks
or spaces inside a typical paragraph element, for instance. (Any such whitespace would be normalized away when the
document was serialized to XML, so Oxygen XML Editor is saving you from any surprises when this happens.)
Of course, you will legitimately want to enter additional spaces and returns in some cases, such as code samples. Oxygen
XML Editor will allow this in elements that are configured as preserve space elements according to the XML whitespace
rules. For all of its predefined document types, Oxygen XML Editor is correctly configured to recognize preserve space
elements and to allow you to enter additional spaces in them.
If you are using a predefined document type and you are unable to enter additional whitespace, make sure that you are
using an element from that document type that is intended to be a preserve-space element.
If you are using a custom document type, make sure that it is configured correctly so that Oxygen XML Editor recognizes
that the current element is a preserve-space element.
Author Mode Views
The content author is supported by special views that are automatically synchronized with the current editing context
of the editor panel. The views present additional information about this context thus helping the author to see quickly
the current location in the overall document structure and the available editing options.
There is a large selection of useful views available in the Window > Show View menu. This section presents some of
the most helpful views for editing in Author mode.
The Project View
The Project view is designed to assist you with organizing and managing related files grouped in the same XML project.
The actions available on the contextual menu and toolbar associated to this panel enable the creation of XML projects
and shortcuts to various operations on the project documents.
Oxygen XML Editor | Editing Modes | 102
Figure 41: The Project View
By default, the Project view is positioned on the left side of the Oxygen XML Editor window, above the Outline view.
A closed view can be quickly reopened at any time with the Project > Show Project View menu action.
The tree structure occupies most of the view area. In the upper left side of the view, there is a drop-down menu that
contains all recently used projects and project management actions:
Open Project (Ctrl F2 (Meta F2 on OS X))
Opens an existing project. Alternatively, you can open a project by dropping an Oxygen XML Editor XPR project
file from the file explorer into the Project panel.
Note: When a project is opened for the first time, a confirmation dialog box will be displayed that asks
you to confirm that the project came from a trusted source. This is meant to help prevent potential security
issues.
New Project
Creates a new, empty project.
The following actions are grouped in the upper right corner:
Collapse All
Collapses all project tree folders. You can also collapse/expand a project tree folder if you select it and press the
Enter key or Left Arrow to collapse and Right Arrow to expand.
Link with Editor
When selected, the project tree highlights the currently edited file, if it is found in the project files.
Note: This button is disabled automatically when you move to the Debugger perspective.
Settings
A sub-menu that contains the following actions:
Filters
Allows you to filter the information displayed in the Project view. Click the toolbar button to set filter patterns
for the files you want to show or hide. Also, you can set filter patterns for the linked directories that are hidden.
Show Full Path
When selected, linked files and folders are presented with a full file path.
Enable Master Files Support
Select this option to enable the Master Files support.
Change Search and Refactor operations scope
Allows you to change the collection of documents that define the context of the search and refactor operations.
•
•
Oxygen XML Editor | Editing Modes | 103
Use only Master Files, if enabled - Restricts Oxygen XML Editor to perform the search and refactor
operations starting from the master files that are defined for the current resource. This option is available
when you select Project in the Select the scope for Search and Refactor operations dialog box and the
Master Files support is enabled.
Working sets - Allow you to specify the set of files on which the search and refactor operations will act on.
The files are usually organized in an XML project as a collection of folders. There are three types of resources displayed
in the Project view:
•
•
•
Logical folders - marked with a blue icon on Windows and Unix/Linux ( ) and a magenta icon on Mac OS X ( ).
They help you group files within the project. This folder type has no correspondent on the physical disk, since they
are used as containers for related items. Creating and deleting them does not affect the file system on disk. They are
created on the project root or inside other logical folders by using the contextual action New > Logical Folder. The
contextual menu action
Remove from Project can be used to remove them from the project.
Physical folders and files - marked with the operating system-specific icon for folders (usually a yellow icon on
Windows and a blue icon on Mac OS X). These folders and files are mirrors of real folders or files that exist in the
local file system. They are created or added to the project by using contextual menu actions (such as New > File,
New > Folder, Add Folder, etc.) Also, the contextual menu action
Remove from Disk (Shift+Delete) can be
used to remove them from the project and local file system.
Shortcut folders and files - the icons for file shortcuts include a shortcut symbol and names of folder shortcuts are
displayed in bold text. All files and folders that appear as direct descendants of a logical folder are considered
shortcuts. They are created and added with the contextual actions Add Files and Add Folder from the project root.
Both contextual menu actions
Remove from Project and
Remove from Disk (Shift+Delete) are available
for shortcuts.
Remove from Project just removes the shortcut from the project, while
Remove from Disk
(Shift+Delete) removes the shortcut and the physical resource from the local file system.
Figure 42: The Project View with Examples of all Three Types of Resources
Creating New Projects
The following action is available in the Project menu, the New menu in the contextual menu, or from the drop-down
menu in the top-left of the Project view:
New Project
Creates a new, empty project.
Oxygen XML Editor | Editing Modes | 104
Creating New Project Items
The following actions are available by selecting New from the contextual menu, when invoked from the Project view:
New >
File
Opens a New file dialog box that helps you create a new file and adds it to the project structure.
New >
Folder
Opens a New Folder dialog box that allows you to specify a name for a new folder and adds it to the structure of
the project.
New >
Logical Folder
Available when invoked from the project root, this action creates a logical folder in the tree structure (the icon is a
magenta folder on Mac OS X - ).
New > Logical Folders from Web
Available when invoked from the project root, this action replicates the structure of a remote folder accessible over
FTP/SFTP/WebDAV, as a structure of logical folders. The newly created logical folders contain the file structure
of the folder it points to.
Add Content to a Logical Folder
The project itself is considered a logical folder. You can add content to a logical folder using one of the actions available
in the contextual menu, when invoked from the project root:
Add Folder
Adds a link to a physical folder, whose name and content mirror a real folder that exists in the local file system (the
icon of this action is different on Mac OS X
).
Add Files
Adds links to files on the local file system.
Add Edited File
Adds a link to the currently edited file in the project.
Managing Project Content
Creating/Adding Files and Folders
You can create linked folders (shortcuts) by dragging and dropping folders from the Windows Explorer / Mac OS X
Finder to the project tree, or by selecting Add Folder in the contextual menu from the project root. To create a file inside
a linked folder, select the New >
File action from the contextual menu.
Note: The linked files presented in the Project view are marked with a special icon. Linked folders are displayed
in bold text.
You can create physical folders by selecting New > Folder from the contextual menu.
When adding files to a project, the default target is the project root. To change a target, select a new folder. Files may
have multiple instances within the folder system, but cannot appear twice within the same folder.
Removing Files and Folders
To remove one or more linked files or folders, select them in the project tree and press the Delete key, or select the
contextual menu action
Remove from Project. To remove a linked file or folder from both project and local file
system, select the contextual menu action
Remove from Disk (Shift+Delete). The
Remove from Disk
(Shift+Delete) action is also used to remove physical files or folders.
Caution: In most cases this action is irreversible, deleting the file permanently. Under particular circumstances
(if you are running a Windows installation of Oxygen XML Editor and the Recycle Bin is active) the file is
moved to Recycle Bin.
Oxygen XML Editor | Editing Modes | 105
Moving Files and Folders
You can move the resources of the project with drag and drop operations on the files and folders of the tree.
You can also use the usual
Cut,
Copy, and
Paste actions to move resources in the Project view.
Renaming Files and Folders
There are three ways you can rename an item in the Project view. Select the item in the Project view and do one of the
following:
•
•
•
Invoke the Rename action from the contextual menu.
Press F2 and type the new name.
Click the selected item and type the new name.
To finish editing the item name, press Enter.
Note: The Rename action is also available on logical files.
Locating and Opening Files
If a project folder contains a lot of documents, a certain document can be located quickly in the project tree by selecting
the folder containing the desired document and typing the first few characters of the document name. The desired
document is automatically selected as soon as the typed characters uniquely identify its name in the folder.
The selected document can be opened by pressing the Enter key, by double-clicking it, or with one of the Open actions
from the contextual menu. The files with known document types are opened in the associated editor, while binary files
are opened with the associated system application. To open a file with a known document type in an editor other than
the default one, use the Open with action. Also, dragging and dropping files from the project tree to the editor area
results in the files being opened.
Saving the Project
The project file is automatically saved every time the content of the Project view is saved or modified by actions such
as adding or removing files and drag and drop.
Validate Files
The currently selected files in the Project view can be checked to be XML well-formed or validated against a schema
(DTD, XML Schema, Relax NG, Schematron or NVDL) with one of the following contextual menu actions found in
the Validate sub-menu:
Validate >
Check Well-Formedness
Checks if the selected file or files are well-formed.
Validate
Validate
Validates the selected file or files against their associated schema. EPUB files make an exception, because this
action triggers a Validate and Check for Completeness operation.
ValidateValidate with Schema
Validates the selected file of files against a specified schema.
Validate
Configure Validation Scenario(s)
Allows you to configure and run a validation scenario.
Applying Transformation Scenarios
The currently selected files in the Project view can be transformed in one step with one of the following actions available
from contextual menu in the Transform sub-menu:
Transform >
Apply Transformation Scenario(s)
Obtains the output with one of the built-in scenarios.
Oxygen XML Editor | Editing Modes | 106
Transform >
Configure Transformation Scenario(s)
Opens a dialog box that allows you to configure pre-defined transformation scenarios.
Transform >
Transform with
Allows you to select a transformation scenario to be applied to the currently selected files.
Along with the logical folder support, this allows you to group your files and transform them very easily.
Refactoring Actions (Available for certain document types (such as XML, XSD, and XSL)
Oxygen XML Editor includes some refactoring operations that help you manage the structure of your documents. The
following actions are available from the contextual menu in the Refactoring sub-menu:
Refactoring > Rename resource
Allows you to change the name of a resource.
Refactoring > Move resource
Allows you to change the location on disk of a resource.
Refactoring >
XML Refactoring
Opens the XML Refactoring tool wizard that presents refactoring operations to assist you with managing the structure
of your XML documents.
Other Contextual Menu Actions
Other actions that are available in the contextual menu from the project tree include:
Open
Opens the selected file in the editor.
Open with submenu
This submenu allows you to open the selected file with the internal editor, a system application, or other internal
tools: DITA Maps Manager, Archive Browser, MathML Editor, Generate/Convert Schema, WSDL/SOAP Analyzer,
Large File Viewer, Hex Viewer, SVG Viewer.
Open All Files (when a folder or multiple resources are selected)
Opens all the selected files with the corresponding editors.
Show in Explorer (or Show in Finder on OS X)
In Windows, the content of the selected folder or file is presented in a specific explorer window. On MAC OS X,
the parent folder is opened and the selected folder is highlighted in a specific finder window.
Copy Location
Copies an application-specific URL for the selected resource to the clipboard.
Refresh
Refreshes the content and the dependencies between the resources in the Master Files directory.
Find/Replace in Files
Allows you to find and replace text in multiple files.
XPath in Files
Opens the XPath/XQuery Builder view that allows you to compose XPath and XQuery expressions and execute
them over the currently edited XML document.
Open/Find Resource
Opens the Open/Find Resource dialog box.
Check Spelling in Files
Allows you to check the spelling of multiple files.
Oxygen XML Editor | Editing Modes | 107
Format and Indent Files
Opens the Format and Indent Files dialog box that allows you to configure the format and indent (pretty print)
action that will be applied on the selected documents.
Open in SVN Client
Syncro SVN Client tool is opened and it highlights the selected resource in its corresponding working copy.
Compare
Opens the Compare Directories or Compare Files tool.
Generate Documentation > XML Schema Documentation
Opens the XML Schema Documentation Dialog Box.
Generate Documentation > XSLT Stylesheet Documentation
Opens the XSLT Stylesheet Documentation Dialog Box.
Generate Documentation > XQuery Documentation
Opens the XQuery Documentation Dialog Box.
Generate Documentation > WSDL Documentation
Opens the WSDL Documentation Dialog Box.
Properties
Displays the properties of the current file in a Properties dialog box.
Menu Level Actions
The following actions are available in the Project menu:
New Project
Creates a new, empty project.
Open Project (Ctrl F2 (Meta F2 on OS X))
Opens an existing project. Alternatively, you can open a project by dropping an Oxygen XML Editor XPR project
file from the file explorer into the Project panel.
Note: When a project is opened for the first time, a confirmation dialog box will be displayed that asks
you to confirm that the project came from a trusted source. This is meant to help prevent potential security
issues.
Save Project As
Allows you to save the current project under a different name.
Validate all project files
Checks if the project files are well-formed and their mark-up conforms with the specified DTD, XML Schema, or
Relax NG schema rules. It returns an error list in the message panel.
Filters
Opens the Project filters dialog box that allows you to decide which files and directories will be shown or hidden.
Enable Master Files Support
Allows you to enable the Master Files Support for each project you are working on.
Change Search and Refactor operations scope
Opens a dialog box that allows you to define the context of search and refactor operations.
Show Project View
Displays the project view.
Reopen Project
Contains a list of links of previously used projects. This list can be emptied by invoking the Clear history action.
Oxygen XML Editor | Editing Modes | 108
The Open/Find Resource View
The Open/Find Resource view is designed to offer advanced search capabilities either by using a simple text search
or by using the Apache Lucene - Query Parser Syntax. To open this view, go to Window > Show View > Open/Find
Resource. The view is presented in the left side of the default Oxygen XML Editor layout, next to the Project and
DITA Maps Manager views.
Figure 43: The Open/Find Resource View
You can use this view to find a file in the current Oxygen XML Editor project or in one of the DITA maps opened in
the DITA Maps Manager view by typing only a few letters of the file name of a document or a fragment of the content
you are searching for. The Open/Find Resource view also supports searching in document edits (comments, insertions,
deletions, and highlighted content).
Note: Full support for searching in document edits is available only in the Enterprise edition of Oxygen XML
Editor. The Professional edition offers support to search through a maximum of 10 edits.
Search results are presented instantly, after you finish typing the content you are searching for. The matching fragments
of text are highlighted in the results list displayed in the view. When you open one of the documents from the results
list, the matching fragments of text are highlighted in the editing area. To remove the highlighting from your document
close the Results view. To display the search history, position the cursor in the search field and press Ctrl Down Arrow
(Command Down Arrow on OS X) or Ctrl Up Arrow (Command Up Arrow on OS X) on your keyboard. Pressing
only the Down Arrow key moves the selection to the list of results.
A contextual menu available on each search result provides actions applicable to the document that contains it. These
actions allow you to:
•
•
•
•
Open the document in one of Oxygen XML Editor internal editors.
Open the document in an external system application.
Identify the document in the system file explorer.
Copy the file's location.
The content of the resources used to search in is parsed from an index. The indexing is performed both automatically
and on request.
Oxygen XML Editor | Editing Modes | 109
Note: Automatic indexing is performed when you modify, add, or remove resources in the currently indexed
project. If the index was never initialized, the index in not updated on project changes.
Note: To improve performance, the indexing process skips the following set of common English words (the
so-called stop words): a, an, and, are, as, at, be, but, by, for, if, in, into, is, it, no, not, of, on, or, such, that, the,
their, then, there, these, they, this, to, was, will, with. This means that if you are searching for any of these words,
Open/Find Resource view will not be able to match any of them. However, you can configure the list of stop
words in the Open/Find Resources Preferences Page.
Note: Searches are case insensitive. For example, if you search for car you get the same results as when you
search for Car.
Note: Suffix searches are supported, both for searching in the content of your resources and in their name. For
this, you can use wildcards. If you search in content for *ing you will find documents that contain the word
presenting. If you search in file paths for */samples/*.gif you will find all the gif images from the samples
directory.
Note: You can drag a resource from the Open/Find Resource view and drop it in a DocBook, DITA, TEI or
XHTML document to create a link to that resource.
The Open/Find Resource view offers the following options:
•
Settings - Displays settings for the view:
•
•
•
•
•
•
•
Clear Index - Clears the index.
Show description - Presents the search results in a more compact form, displaying only the title and the location
of the resources.
Options - Opens the Open/Find Resource preferences page.
In file paths - Select this option to search for resources by their name or by its path (or a fragment of its path).
In content - Select this option to search through the content of your resources.
In reviews - Select this option to search through the comments, insertions, and deletion in your resources.
Reindex - Reindexes your resources.
Outline View
The Outline view in Author mode displays a general tag overview of the currently edited XML Document. It also
shows the correct hierarchical dependencies between elements. This makes it easier for you to be aware of the document
structure and the way element tags are nested. It allows for fast navigation of the document by displaying the start of
the content of the child elements in the node of the parent element, thus allowing you to quickly see the content of an
element without expanding it in the Outline tree. It also allows you to insert or delete nodes using contextual menu
actions.
By default it is displayed on screen, but if you closed it you can reopen it from Window > Show View > Outline.
The upper part of the view contains a filter box that allows you to focus on the relevant components. If you type a text
fragment in the filter box, the components that match it are presented. For advanced usage you can use wildcards (*, ?)
and separate multiple patterns with commas.
The Outline view offers the following functionality:
•
•
•
•
•
•
XML Document Overview on page 80
Modification Follow-up on page 80
Drag and Drop Actions in Outline View on page 80
Outline Filters on page 111
The Contextual Menu of the Outline Tree on page 111
Document Tag Selection on page 82
Oxygen XML Editor | Editing Modes | 110
Figure 44: The Outline View
XML Document Overview
The Outline view displays a general tag overview of the current edited XML document. It also shows the correct
hierarchical dependencies between the tag elements. This functionality makes it easier for you to be aware of the document
structure and the way tags are nested.
The Outline view allows you to:
•
•
•
Insert or delete nodes using contextual menu actions.
Move elements by dragging them to a new position in the tree structure.
Highlight elements in the Author editor area.
Note: The Outline view is synchronized with the Author editor area. When you make a selection in the
Author editor area, the corresponding elements of the selection are highlighted in the Outline view and vice
versa. This functionality is available both for single and multiple selection. To deselect one of the elements,
use Ctrl Single-Click (Command Single-Click on OS X).
Document errors (such as an element inserted in an invalid position, or a wrong attribute name, or a missing required
attribute value) are highlighted in the Outline tree:
•
•
•
A red exclamation mark decorates the element icon.
A dotted red underline decorates the element name and value.
A tooltip provides more information about the nature of the error, when you hover with the mouse pointer over the
faulted element.
Modification Follow-up
When you edit a document, the Outline view dynamically follows the changes that you make, displaying the node that
you modify in the middle of the view. This functionality gives you great insight on the location of your modifications
in the document that you edit.
Drag and Drop Actions in Outline View
Entire XML elements can be moved or copied in the edited document using only the mouse in the Outline view with
drag-and-drop operations. Several drag and drop actions are possible:
•
•
•
•
Oxygen XML Editor | Editing Modes | 111
If you drag an XML element in the Outline view and drop it on another one in the same panel then the dragged
element will be moved after the drop target element.
If you hold the mouse pointer over the drop target for a short time before the drop then the drop target element will
be expanded first and the dragged element will be moved inside the drop target element after its opening tag.
You can also drop an element before or after another element if you hold the mouse pointer towards the upper or
lower part of the targeted element. A marker will indicate whether the drop will be performed before or after the
target element.
If you hold down the (Ctrl (Command on OS X)) key after dragging, there will be performed a copy operation
instead of a move one.
The drag and drop action in the Outline view can be disabled and enabled from a Preferences page.
Tip: You can select and drag multiple nodes in the Outline view when editing in Author mode.
Outline Filters
The upper part of the Outline view contains a filter box that allows you to focus on the relevant components. Type a
text fragment in the filter box and only the components that match it are presented. For advanced usage you can use
wildcard characters (*, ?) and separate multiple patterns with commas.
The following actions are available in the Settings menu of the Outline view when editing in Author mode:
Filter returns exact matches
The text filter of the Outline view returns only exact matches.
Flat presentation mode of the filtered results
When active, the application flattens the filtered result elements to a single level.
Show comments and processing instructions
Show/hide comments and processing instructions in the Outline view.
Show element name
Show/hide element name.
Show text
Show/hide additional text content for the displayed elements.
Show attributes
Show/hide attribute values for the displayed elements. The displayed attribute values can be changed from the
Outline preferences panel.
Configure displayed attributes
Displays the XML Structured Outline preferences page.
The Contextual Menu of the Outline Tree
The contextual menu of the Outline view in Author mode contains the following actions:
Edit Attributes
Allows you to edit the attributes of a selected node. You can find more details about this action in the Attributes
View in Author Mode on page 112 topic.
Edit Profiling Attributes
Allows you to change the profiling attributes defined on all selected elements.
Append Child
Invokes a content completion list with the names of all the elements that are allowed by the associated schema and
inserts your selection as a child of the current element.
Insert Before
Invokes a content completion list with the names of all the elements that are allowed by the associated schema and
inserts your selection immediately before the current element, as a sibling.
Oxygen XML Editor | Editing Modes | 112
Insert After
Invokes a content completion list with the names of all the elements that are allowed by the associated schema and
inserts your selection immediately after the current element, as a sibling.
Cut,
Copy,
Paste,
Delete
Executes the typical editing actions on the currently selected elements. The Cut and Copy operations preserve the
styles of the copied content. The Paste before, Paste after, and Paste as Child actions allow you to insert a
well-formed element before, after, or as a child of the currently selected element.
Toggle Comment
Encloses the currently selected element in an XML comment, if the element is not already commented. If it is already
commented, this action will remove the comment.
Rename Element
Invokes a Rename dialog box that allows you to rename the currently selected element, siblings with the same
name, or all elements with the same name.
Expand More
Expands the structure tree of the currently selected element.
Collapse All
Collapses all of the structure tree of the currently selected node.
Tip: You can copy, cut or delete multiple nodes in the Outline by using the contextual menu after selecting
multiple nodes in the tree.
Document Tag Selection
The Outline view can also be used to search for a specific tag location and contents in the edited document. Intuitively,
by selecting with the left mouse button the desired tag in the Outline view, the document is scrolled to the position of
the selected tag. Moreover, the tag contents are selected in the document, making it easy to notice the part of the document
contained by that specific tag and furthermore to easily copy and paste the tag's contents in other parts of the document
or in other documents.
You can double click the tag in the Outline tree to move the focus in the editor.
You can also use the filter text field search to look for a particular tag name in the Outline tree.
Attributes View in Author Mode
The Attributes view presents all the attributes of the current element determined by the schema of the document.
You can use this view to edit or add attribute values. The attributes of an element are editable if any one of the following
is true:
•
•
•
The CSS stylesheet associated with the document does not specify a false value for the -oxy-editable property
associated with the element.
The element is entirely included in a deleted Track Changes marker.
The element is part of a content fragment that is referenced in Author mode from another document.
The attributes are rendered differently depending on their state:
•
The names of the attributes with a specified value are rendered with a bold font, and their value with a plain font.
Note: The names of the attributes with an empty string value are also rendered bold.
•
•
•
Default values are rendered with a plain font, painted gray.
Empty values display the text "[empty]", painted gray.
Invalid attributes and values are painted red.
Oxygen XML Editor | Editing Modes | 113
Double-click a cell in the Value column to edit the value of the corresponding attribute. If the possible values of the
attribute are specified as list in the schema of the edited document, the Value column acts as a combo box that allows
you to insert the values in the document.
You can sort the attributes table by clicking the Attribute column header. The table contents can be sorted as follows:
•
•
•
By attribute name in ascending order.
By attribute name in descending order.
Custom order, where the used attributes are displayed at the beginning of the table sorted in ascending order, followed
by the rest of the allowed elements sorted in ascending order.
Figure 45: The Attributes View
A drop-down list located in the upper part of the view allows you to select the current element or its ancestors.
Expand/Collapse Button
There is an
Expand/
Collapse button at the top-right of the view. When expanded, this presents the following
additional combo boxes:
Name Combo Box
Use this combo box to select an attribute. The drop-down list displays the list of possible attributes allowed by the
schema of the document, as in the Attributes view. You can use the
Remove button to delete an attribute and
its value from the selected element.
Value Combo Box
Use this combo box to add, edit, or select the value of an attribute. If the selected attribute has predefined values in
the schema, the drop-down list displays those possible values. You can use the
Browse button to select a URL
for the value of an attribute. After you have entered or selected a value, use the
to add the value to the attribute.
Update button (or press Enter)
Contextual Menu Actions in the Attributes View
The following actions are available in the contextual menu of the Attributes view when editing in Author mode:
Set empty value
Specifies the current attribute value as empty.
Remove
Removes the attribute (action available only if the attribute is specified). You can invoke this action by pressing the
(Delete) or (Backspace) keys.
Oxygen XML Editor | Editing Modes | 114
Copy
Copies the attrName="attrValue" pair to the clipboard. The attrValue can be:
•
•
•
The value of the attribute.
The value of the default attribute, if the attribute does not appear in the edited document.
Empty, if the attribute does not appear in the edited document and has no default value set.
Paste
Depending on the content of the clipboard, the following cases are possible:
•
•
•
If the clipboard contains an attribute and its value, both of them are introduced in the Attributes view. The
attribute is selected and its value is changed if they exist in the Attributes view.
If the clipboard contains an attribute name with an empty value, the attribute is introduced in the Attributes
view and you can start editing it. The attribute is selected and you can start editing it if it exists in the Attributes
view.
If the clipboard only contains text, the value of the selected attribute is modified.
In-place Attributes Editor
Oxygen XML Editor includes an in-place attributes editor in Author mode. To edit the attributes of an XML element
in-place, do one of the following:
•
•
Select an element or place the cursor inside it and then press the Alt Enter keyboard shortcut.
Double-click any named start tag when the document is edited in one of the following display modes.:
with Attributes,
Full Tags,
Block Tags, or
Inline Tags.
Full Tags
This opens an in-place attributes editor that contains the same content as the Attributes view. By default, this editor
presents the Name and Value fields, with the list of all the possible attributes collapsed.
Figure 46: In-place Attributes Editor
Name Combo Box
Use this combo box to select an attribute. The drop-down list displays the list of possible attributes allowed by the
schema of the document, as in the Attributes view.
Value Combo Box
Use this combo box to add, edit, or select the value of an attribute. If the selected attribute has predefined values in
the schema, the drop-down list displays those possible values.
If you click More while in the collapsed version, it is expanded to the full version of the in-place attribute editor.
Oxygen XML Editor | Editing Modes | 115
Figure 47: In-place Attributes Editor (Full Version)
The full version includes a table grid, similar to the Atributes view, that presents all the attributes for the selected
element.
The Model View
The Model view presents the structure of the currently selected tag, and its documentation, defined as annotation in the
schema of the current document. To open the Model view, select it from the Window > Show View menu.
Figure 48: The Model View
The Model view is comprised of two sections, an element structure panel and an annotations panel.
Oxygen XML Editor | Editing Modes | 116
Element Structure Panel
The element structure panel displays the structure of the currently edited or selected tag in a tree-like format. The
information includes the name, model, and attributes of the current tag. The allowed attributes are shown along with
imposed restrictions, if any.
Figure 49: The Element Structure Panel
Annotation Panel
The Annotation panel displays the annotation information for the currently selected element. This information is collected
from the XML schema.
Figure 50: The Annotation panel
Elements View
The Elements view presents a list of all defined elements that you can insert in your document. All elements from a
sequence are presented but the invalid proposals (which cannot be inserted in the current context) are disabled and
rendered in gray. The upper part of the view features a combo box that contains the current element's ordered ancestors.
Selecting a new element in this combo box updates the list of the allowed elements in Before and After tabs.
Oxygen XML Editor | Editing Modes | 117
Figure 51: The Elements View
Three tabs present information relative to the cursor location:
•
•
•
Cursor - Displays a list of all the elements allowed at the current cursor location. Double-clicking any of the listed
elements inserts that element at the cursor position.
Before - Displays a list of all elements that can be inserted before the element selected in the combo box.
Double-clicking any of the listed elements inserts that element before the element at the cursor position.
After - Displays a list of all elements that can be inserted after the element selected in the combo box. Double-clicking
any of the listed elements inserts that element after the element at the cursor position.
Double clicking an element name in the list surrounds the current selection in the editor panel with the start tags and
end tags of the element. If there is no selection, just an empty element is inserted in the editor panel at the cursor position.
The Entities View
This view displays a list with all entities declared in the current document, as well as built-in ones. Double-clicking one
of the entities will insert it at the current cursor position. You can also sort entities by name and value by clicking the
column headers.
Oxygen XML Editor | Editing Modes | 118
Figure 52: The Entities View
The view features a filtering capability that allows you to search an entity by name, value, or both. Also, you can choose
to display the internal or external entities.
Note: When entering filters, you can use the ? and * wildcards. Also, you can enter multiple filters by separating
them with a comma.
The Results View
The Results View displays the messages generated as a result of user actions such as validations, transformations, search
operations, and others. Each message is a link to the location related to the event that triggered the message.
Double-clicking a message opens the file containing the location and positions the cursor at the location offset. The
actions that can generate result messages include the following:
•
•
•
•
•
•
•
•
Validate action
Transform action
Check Spelling in Files action
Find All action from the Find/Replace dialog box
Find/Replace in Files dialog box
Search References action
XPath expression results
SQL results
Figure 53: Results View
Oxygen XML Editor | Editing Modes | 119
Results View Toolbar Actions
The view includes a toolbar with the following actions:
Grouping options drop-down menu
A set of Group by toggle actions that allow you to group the messages according to a selected criteria so that they
can be presented in a hierarchical layout. The criteria used for grouping can be the severity of the errors (error,
warning, info message, etc.), the resource name, the description of the message, and so on.
This drop-down menu also includes the following additional grouping actions:
Ungroup all
Removes the grouping rules so that the messages are presented in a continuous list.
Show group columns
If any of the Group by options are selected, you can use this option to show or hide grouping columns.
Restore Defaults
Restores the column size for each column and the grouping rules that were saved in the user preferences the last
time when this view was used. If it is the first time this view is used, the action sets an initial default column
size for each column and a grouping rule that is appropriate for the type of messages. For example:
•
•
Group the messages by the path of the validated file if there are error messages from a validation action or
spelling errors reported by the Check Spelling in Files action.
No grouping rule for the results of applying an XPath expression.
Highlight all results in editor
Oxygen XML Editor highlights all matches obtained after executing an XPath expression, or performing one of the
following operations: Find All, Find in Files, Search References, and Search Declarations. Click Highlight all
results in editor again to turn off highlighting.
Note: To customize highlighting behavior, open the Preferences dialog box and go to Editor > Highlights
category. You can do the following customizations:
•
•
Set a specific color of the highlights depending on the type of action you make.
Set a maximum number of highlights that the application displays at any given time.
Remove selected
Removes the current selection from the view. This can be helpful if you want to reduce the number of messages or
remove those that have already been addressed or not relevant to your task.
Remove all
Removes all messages from the view.
Results View Contextual Menu Actions
The following actions are available when the contextual menu is invoked in the table grid:
Show message
Displays a dialog box with the full error message, which is useful for a long message that does not have enough
room to be displayed completely in the view.
Previous message
Navigates to the message above the current selection.
Next message
Navigates to the message below the current selection.
Remove selected
Removes selected messages from the view.
Remove all
Removes all messages from the view.
Oxygen XML Editor | Editing Modes | 120
Copy
Copies the information associated with the selected messages:
•
•
•
•
•
•
The file path of the document that triggered the output message.
The path of the main file (in the case of a validation scenario, it is the path of the file from which the validation
starts and can be different from the validated file).
Error severity (error, warning, info message, etc.)
Name of validating processor.
Name of validation scenario.
The line and column in the file that triggered the message.
Select All
Extends the selection to all the messages from the view.
Print Results
Sends the complete list of messages to a printer. For each message the included details are the same as the ones for
the Copy action.
Save Results
Saves the complete list of messages in a file in text format. For each message the included details are the same as
the ones for the Copy action.
Save Results as XML
Saves the complete list of messages in a file in XML format. For each message the included details are the same as
the ones for the Copy action.
Group by
A set of Group by toggle actions that allow you to group the messages according to a selected criteria so that they
can be presented in a hierarchical layout. The criteria used for grouping can be the severity of the errors (error,
warning, info message, etc.), the resource name, the description of the message, and so on.
Ungroup all
Removes the grouping rules so that the messages are presented in a continuous list.
Show group columns
If any of the Group by options are selected, you can use this option to show or hide grouping columns.
Restore Defaults
Restores the column size for each column and the grouping rules that were saved in the user preferences the last
time when this view was used. If it is the first time this view is used, the action sets an initial default column size
for each column and a grouping rule that is appropriate for the type of messages. For example:
•
•
Group the messages by the path of the validated file if there are error messages from a validation action or
spelling errors reported by the Check Spelling in Files action.
No grouping rule for the results of applying an XPath expression.
Expand All
Expands all the nodes of the tree, which is useful when the messages are presented in a hierarchical mode.
Collapse All
Collapses all the nodes of the tree, which is useful when the messages are presented in a hierarchical mode.
Window > Results Menu
The following actions are also available from the Window > Results menu:
Save Results
Saves the complete list of messages in a file in text format.
Print Results
Sends the complete list of messages to a printer.
Oxygen XML Editor | Editing Modes | 121
Close
Closes the current tab.
Close All Tabs
Closes all opened tabs.
Close Other Tabs
Closes all other opened tabs, other than the current one.
CSS Inspector View
The purpose of the CSS Inspector view is to display information about the styles applied to the currently selected
element. You can use this view to examine the structure and layout of the CSS rules that match the element. The matching
rules displayed in this view include a link to the line in the CSS file that defines the styles. With this tool you can see
how the CSS rules were applied and the properties defined, and use the link to open the associated CSS for editing
purposes.
Figure 54: CSS Inspector View
Displaying the CSS Inspector View
You can open this view by selecting the Inspect Styles action from the contextual menu in Author mode, or selecting
the CSS Inspector view in the Window > Show View menu. This action makes the view visible and also initializes it
for the currently selected element.
Displaying Rules
All rules that apply to the current element are displayed in sections, which are listed in order of importance (from most
specific to least specific). Rules that are overridden by other rules are crossed out. If you click the link in the top-right
corner of a rule Oxygen XML Editor opens the associated CSS file at the line number where the properties of the rule
are defined.
Oxygen XML Editor | Editing Modes | 122
The CSS Inspector view contains five tabs:
•
•
•
•
•
Element - displays the CSS rules matching the currently selected element in the Author page (ordered from
most-specific to least-specific)
:before - displays the rules matching the :before pseudo-element
:after - displays the rules matching the :after pseudo-element
Computed - displays all the styling properties that apply to the current element, as a result of all the CSS rules
matching the element
Path - displays the path for the current element, and its attributes, allowing you to quickly see the attributes on all
parent elements, and allows you to copy fragments from this view and paste it into the associated CSS to easily create
new rules
The information displayed in each of the five tabs is updated when you click different elements in the Author editing
view. The first three tabs include the link to the associated CSS source, while the other two tabs simply display the style
properties that match the current element.
Each of the tabbed panes include a contextual menu with the following actions:
•
•
•
Copy - copies the current selection
Select all - selects all information listed in the pane
Show empty rules - forces the view to show all the matching rules, even if they do not declare any CSS properties
(by default, the empty rules are not displayed)
Bidirectional Text Support in Author Mode
Oxygen XML Editor offers support for languages that require right to left scripts. This means that authors editing
documents in the Author mode are able to create and edit XML content in Arabic, Hebrew, Persian and others. To
achieve this, Oxygen XML Editor implements the Unicode Bidirectional Algorithm as specified by the Unicode
consortium. The text arrangement is similar to what you get in a modern HTML browser. The final text layout is rendered
according with the directional CSS properties matching the XML elements and the Unicode directional formatting codes.
If bidirectional text (such as Arabic or Hebrew languages), certain Asian languages (such as Devanagari, Bengali,
Gurmukhi, Gujarati, Oriya, Tamil, Telugu, Kannada, Malayalam, Sinhala, Thai, Khmer), or other special characters
(such as combining characters) are detected in a document, Oxygen XML Editor displays a Special Characters Detected
dialog box that prompts you to Enable or Disable support for these special characters.
You can also configure this support in the Support for Special Characters section of the Open/Save preferences page.
To enable or disable this support, open the Preferences dialog box and go to Editor > Open/Save.
Note: Disabling this support may affect text rendering, cursor positioning and navigation, as well as text selection
and management operations. If you need to open very large documents, the bidirectional editing support can
also be disabled to enhance performance while editing.
To watch our video demonstration about the bidirectional text support in the Author mode, go to
http://oxygenxml.com/demo/BIDI_Support.html.
Controlling the Text Direction Using XML Markup
Oxygen XML Editor Supports the following CSS properties:
Oxygen XML Editor | Editing Modes | 123
Table 3: CSS Properties Controlling Text Direction
direction
Specifies the writing direction of the text. The possible
values are ltr (the text direction is left to right), rtl (the
text direction is right to left, and inherit (specifies
whether the value of the direction property is inherited from
the parent element).
unicodeBidi
Used with the direction property, sets or returns
whether the text is overridden to support multiple languages
in the same document. The possible values of this property
are bidi-override (creates an additional level of
embedding and forces all strong characters to the direction
specified in the direction), embed (creates an
additional level of embedding), normal (does not use an
additional level of embedding), and inherit ( the value
of the unicodeBidi property is inherited from parent
element).
For instance, to declare an element as being Right to Left, you could use a stylesheet like the one below:
XML File:
<article>
<myRTLpara>RIGHT TO LEFT TEXT</myRTLPara>
</article>
Associated CSS File:
myRTLpara{
direction:rtl;
unicode-bidi:embed;
}
Oxygen XML Editor recognizes the dir attribute on any XML document. The supported values are:
ltr
The text from the current element is Left to Right,
embedded.
rtl
The text from the current element is Right to Left,
embedded.
lro
The text from the current element is Left to Right,
embedded.
rlo
The text from the current element is Right to Left,
embedded.
The following XML document types make use of the dir attribute with the above values:
•
•
•
•
DITA
DocBook
TEI
XHTML
Note: When the inline element tags are visible, the text in the line is arranged according to the BIDI algorithm
after replacing the tags symbols with Object Replacement Characters. This makes it possible to get a different
text arrangement when viewing a document in the No Tags mode versus viewing it in the Full Tags mode.
Oxygen XML Editor | Editing Modes | 124
Controlling the Text Direction Using the Unicode Direction Formatting Codes
These Unicode Direction Formatting Codes codes can be embedded in the edited text, specifying a text direction and
embedding. However, it is not recommended to use them in XML as they are zero width characters, making it hard to
debug the text arrangement.
Table 4: Directional Formatting Codes
U+202A (LRE)
LEFT-TO-RIGHT EMBEDDING
Treats the following text as embedded
left-to-right.
U+202B (RLE)
RIGHT-TO-LEFT EMBEDDING
Treats the following text as embedded
right to left.
U+202D (LRO)
LEFT-TO-RIGHT OVERRIDE
Forces the following characters to be
treated as strong left-to-right
characters.
U+202E (RLO)
RIGHT-TO-LEFT OVERRIDE
Forces the following characters to be
treated as strong right-to-left
characters.
U+202C (PDF)
POP DIRECTIONAL FORMATTING Restores the bidirectional state to what
CODE
it was before the last LRE, RLE, RLO,
or LRO.
U+200E (LRM)
LEFT-TO-RIGHT MARK
Left-to-right strong zero-width
character.
U+200F (RLM)
RIGHT-TO-LEFT MARK
Right-to-left strong zero-width
character.
To insert Unicode Direction Formatting Codes, use the Character Map dialog box. To easily find such a code, you can
either enter directly the hexadecimal value, or use the Details tab to enter the codes name.
Oxygen XML Editor offers the support for bi-directional text in all the side views (Outline view, Attributes view and
so on) and text fields.
Design Editing Mode
This section presents the Design mode that allows you to edit XML Schemas in a visual schema diagram editor.
XML Schema Diagram Editor (Design Mode)
XML Schemas enable document designers to specify the allowed structure and content of an XML document and to
check if an XML document is valid.
Oxygen XML Editor provides a simple and expressive XML Schema diagram editor (Design mode) for editing XML
Schemas. The schema diagram helps both the content authors who want to understand a schema and schema designers
who develop complex schemas.
The diagram font can be increased using the usual Oxygen XML Editor shortcuts: (Ctrl (Meta on Mac OS) + "+") ,
(Ctrl (Meta on Mac OS)+"-") , (Ctrl (Meta on Mac OS) + 0) or (Ctrl (Meta on Mac OS) - mouse wheel). The
whole diagram can also be zoomed with one of the predefined factors available in the Schema preferences panel. The
same zoom factor is applied for the print and save actions.
Oxygen XML Editor | Editing Modes | 125
Figure 55: XML Schema Diagram
To watch our video demonstration about the basic aspects of designing an XML Schema using the new Schema Editor,
go to http://oxygenxml.com/demo/XML_Schema_Editing.html.
Navigation in the Schema Diagram
The following editing and navigation features work for all types of schema components:
•
•
•
•
Move/reference components in the diagram using drag-and-drop actions.
Select consecutive components on the diagram (components from the same level) using the Shift key. You can also
make discontinuous selections in the schema diagram using the Ctrl (Meta on Mac OS) key. To deselect one of the
components, use Ctrl Single-Click (Command Single-Click on OS X).
Use the arrow keys to navigate the diagram vertically and horizontally.
Use Home/End keys to jumpt to the first/last component from the same level. Use Ctrl Home (Command Home
on OS X) key combination to go to the diagram root and Ctrl End (Command End on OS X) to go to the last child
of the selected component.
•
•
Oxygen XML Editor | Editing Modes | 126
You can easily go back to a previously visited component while moving from left to right. The path will be preserved
only if you use the left arrow key or right arrow key. For example, if the current selection is on the second attribute
from an attribute group and you press the left arrow key to jump to the attribute group, when you press the right
arrow key, then the selection will be moved to the second attribute.
Go back and forward between components viewed or edited in the diagram by selecting them in the Outline view:
•
•
•
•
•
•
•
Back (go to previous schema component).
Forward (go to next schema component).
Go to Last Modification (go to last modified schema component).
Copy, reference, or move global components, attributes, and identity constraints to a different position and from one
schema to another using the Cut/Copy and Paste/Paste as Reference actions.
Go to the definition of an element or attribute with the Show Definition action.
Search in the diagram using the Find/Replace dialog box or the Quick find toolbar. You can find/replace components
only in the current file scope.
You can expand and see the contents of the imports/includes/redefines in the diagram. In order to edit components
from other schemas the schema for each component will be opened as a separate file in Oxygen XML Editor.
Tip: If an XML Schema referenced by the current opened schema was modified on disk, the change will
be detected and you will be asked to refresh the current schema contents.
•
Recursive references are marked with a recurse symbol:
declaration and its reference.
. Click this symbol to navigate between the element
XML Schema Outline View
The Outline view for XML Schema presents all the global components grouped by their location, namespace, or type.
If hidden, you can open it from Window > Show View > Outline.
Oxygen XML Editor | Editing Modes | 127
Figure 56: The Outline View for XML Schema
The Outline view provides the following options in the
Settings menu on the Outline view toolbar:
Filter returns exact matches
The text filter of the Outline view returns only exact matches;
Selection update on cursor move
Allows a synchronization between Outline view and schema diagram. The selected view from the diagram is also
selected in the Outline view.
Sort
Allows you to sort alphabetically the schema components.
Show all components
Displays all components that were collected starting from the main files. Components that are not referable from
the current file are marked with an orange underline. To reference them, add an import directive with the
componentNS namespace.
Show referable components
Displays all components (collected starting from the main files) that can be referenced from the current file. This
option is set by default.
Show only local components
Displays the components defined in the current file only.
Group by location/namespace/type
These three operations allow you to group the components by location, namespace, or type. When grouping by
namespace, the main schema target namespace is the first presented in the Outline view.
The following contextual menu actions are available in the Outline view:
Oxygen XML Editor | Editing Modes | 128
Remove (Delete)
Removes the selected item from the diagram.
Search References (Ctrl (Meta on Mac OS)+Shift+R)
Searches all references of the item found at current cursor position in the defined scope, if any.
Search References in
Searches all references of the item found at current cursor position in the specified scope.
Component Dependencies (Ctrl (Meta on Mac OS)+Shift+F4)
Allows you to see the dependencies for the current selected component.
Resource Hierarchy (F4)
Allows you to see the hierarchy for the current selected resource.
Resource Dependencies (Shift + F4)
Allows you to see the dependencies for the current selected resource.
Rename Component in
Renames the selected component.
Generate Sample XML Files
Generate XML files using the current opened schema. The selected component is the XML document root.
The upper part of the Outline view contains a filter box that allows you to focus on the relevant components. Type a
text fragment in the filter box and only the components that match it are presented. For advanced usage you can use
wildcard characters (*, ?) and separate multiple patterns with commas.
Tip: The search filter is case insensitive. The following wildcards are accepted:
•
•
•
* - any string
? - any character
, - patterns separator
If no wildcards are specified, the string to search will be searched as a partial match (like *textToFind*).
The content of the Outline view and the editing area are synchronized. When you select a component in the Outline
view, its definition is highlighted in the editing area.
The Attributes View
The Attributes view presents the properties for the selected component in the schema diagram. If hidden, you can open
it from Window > Show View > Attributes .
Oxygen XML Editor | Editing Modes | 129
Figure 57: The Attributes View
The default value of a property is presented in the Attributes view with blue foreground. The properties that can not
be edited are rendered with gray foreground. A non-editable category which contains at least one child is rendered with
bold. Bold properties are properties with values set explicitly to them.
Properties for components which do not belong to the current edited schema are read-only but if you double-click them
you can choose to open the corresponding schema and edit them.
You can edit a property by double-clicking by pressing Enter. For most properties you can choose valid values from a
list or you can specify another value. If a property has an invalid value or a warning, it will be highlighted in the table
with the corresponding foreground color. By default properties with errors are highlighted with red and the properties
with warnings are highlighted with yellow. You can customize these colors from the Document checking user preferences.
For imports, includes and redefines, the properties are not edited directly in the Attributes view. A dialog box will open
that allows you to specify properties for them.
The schema namespace mappings are not presented in Attributes view. You can view/edit these by choosing Edit
Schema Namespaces from the contextual menu on the schema root. See more in the Edit Schema Namespaces section.
The Attributes view has five actions available on the toolbar and also on the contextual menu:
Add
Allows you to add a new member type to an union's member types category.
Remove
Allows you to remove the value of a property.
Move Up
Allows you to move up the current member to an union's member types category.
Move Down
Allows you to move down the current member to an union's member types category.
Copy
Copy the attribute value.
Show DefinitionCtrl (Meta on MAC OS) + Click
Shows the definition for the selected type.
Show Facets
Allows you to edit the facets for a simple type.
Oxygen XML Editor | Editing Modes | 130
The Facets View
The Facets view presents the facets for the selected component, if available. If hidden, you can open it from Window >
Show View > Facets .
Figure 58: The Facets View
The default value of a facet is rendered in the Facets view with a blue color. The facets that can not be edited are rendered
with a gray color. The grouping categories (for example: Enumerations and Patterns) are not editable. If these categories
contain at least one child they are rendered with bold. Bold facets are facets with values set explicitly to them.
Important: Usually inherited facets are presented as default in the Facets view but if patterns are inherited
from a base type and also specified in the current simple type only the current specified patterns will be presented.
You can see the effective pattern value obtained by combining the inherited and the specified patterns as a tooltip
on the Patterns category.
Facets for components which do not belong to the current edited schema are read-only but if you double-click them you
can choose to open the corresponding schema and edit them.
You can edit a facet by double-clicking it or by pressing Enter, when that facet is selected. For some facets you can
choose valid values from a list or you can specify another value. If a facet has an invalid value or a warning, it will be
highlighted in the table with the corresponding foreground color. By default facets with errors are presented with red
and the facets with warnings with yellow. You can customize the error colors from the Document Checking user
preferences.
The Facets view provides the following actions in its toolbar and contextual menu:
Add
Allows you to add a new enumeration or a new pattern.
Remove
Allows you to remove the value of a facet.
Edit Annotations
Allows you to edit an annotation for the selected facet.
Move Up
Allows you to move up the current enumeration/pattern in Enumerations/Patterns category.
Move Down
Allows you to move down the current enumeration/pattern in Enumerations/Patterns category.
Copy
Copy the attribute value.
Oxygen XML Editor | Editing Modes | 131
Open in Regular Expressions Builder
Rather than editing regular expressions manually, this action allows you to open the pattern in the XML Schema
Regular Expressions Builder that guides you through the process of testing and constructing the pattern..
Facets can be fixed to prevent a derivation from modifying its value. To fix a facet value just press the
Pin button.
The Palette View
The Palette view is designed to offer quick access to XML Schema components and to improve the usability of the
XML Schema diagram builder. You can use the Palette to drag and drop components in the Design mode. The components
offered in the Palette view depend on the XML schema version set in the XML Schema preferences page.
Figure 59: Palette View
Components are organized functionally into 4 collapsible categories:
•
•
•
•
Basic components: elements, group, attribute, attribute group, complex type, simple type, type alternative.
Compositors and Wildcards: sequence, choice, all, any, any attribute, open content.
Directives: import, include, redefine, override.
Identity constraints: key, keyref, unique, selector, field, assert.
Note: The type alternative, open content, override, and assert components are available for XML Schema
1.1.
To add a component to the edited schema:
•
•
•
Click and hold a graphic symbol from the Palette view, then drag the component into the Design view.
A line dynamically connects the component with the XML schema structure.
Release the component into a valid position.
Note: You cannot drop a component into an invalid position. When you hover the component into an invalid
position, the mouse cursor changes its shape into
. Also, the connector line changes its color from the
usual dark gray to the color defined in the Validation error highlight color option (default color is red).
To watch our video demonstration about the Schema palette and developing XML Schemas, go to
http://oxygenxml.com/demo/Schema_Palette.html and http://oxygenxml.com/demo/Developing_XML_Schemas.html
respectively.
Chapter
6
Editing Documents
Topics:
•
•
•
•
•
•
•
•
•
•
•
•
•
•
•
•
•
•
•
•
•
•
•
•
•
•
•
•
•
Working with Unicode
Creating and Working with
Documents
Using Projects to Group
Documents
Editing XML Documents
Editing XSLT Stylesheets
Editing Ant Build Files
Editing XML Schemas
Editing XQuery Documents
Editing WSDL Documents
Editing CSS Stylesheets
Editing LESS CSS Stylesheets
Editing Relax NG Schemas
Editing NVDL Schemas
Editing JSON Documents
Editing StratML Documents
Editing XLIFF Documents
Editing JavaScript Documents
Editing XProc Scripts
Editing Schematron Schemas
Editing Schematron Quick Fixes
Editing SVG Documents
Editing XHTML Documents
Spell Checking
AutoCorrect Misspelled Words
Loading Large Documents
Scratch Buffer
Handling Read-Only Files
Editing Documents with Long
Lines
Associating a File Extension with
Oxygen XML Editor
This chapter explains the editor types available in Oxygen XML Editor and how
to work with them for editing different types of documents.
Oxygen XML Editor | Editing Documents | 134
Working with Unicode
Unicode provides a unique number for every character, independent of the platform and language. Unicode is an
internationally recognized standard, adopted by industry leaders. The Unicode is required by modern standards (such
as XML, Java, JavaScript, LDAP, CORBA 3.0, WML, etc.) and is the official way to implement ISO/IEC 10646.
It is supported in many operating systems, all modern browsers, and many other products. The emergence of the Unicode
Standard, and the availability of tools supporting it, are among the most significant recent global software technology
trends. Incorporating Unicode into client-server or multiple tiered applications and websites offers significant cost
savings over the use of legacy character sets.
As a modern XML Editor, Oxygen XML Editor provides support for the Unicode standard enabling your XML application
to be targeted across multiple platforms, languages, and countries without re-engineering. Internally, the Oxygen XML
Editor XML Editor uses 16 bit characters covering the Unicode Character set.
As a Java application, Oxygen XML Editor comes with a default Java input method for typing characters with Unicode
codes. However, the default input method does not cover all the Unicode codes, for example the codes for some accented
characters or characters found in East Asian languages. Such characters can be inserted in the editor panel of Oxygen
XML Editor either with the Character Map dialog box available from menu Edit > Insert from Character Map or
by installing a Java input method that supports the insertion of the needed characters. The installation of a Java input
method depends on the platform on which Oxygen XML Editor runs (Windows, Mac OS X, Linux, etc) and is the same
for any Java application.
Note: Oxygen XML Editor may not be able to display characters that are not supported by the operating system
(either not installed or unavailable).
Tip: On windows, you can enable the support for CJK (Chinese, Japanese, Korean) languages from Control
Panel / Regional and Language Options / Languages / Install files for East Asian languages.
Opening and Saving Unicode Documents
When loading documents, Oxygen XML Editor reads the document prolog to determine the specified encoding type.
This encoding is then used to instruct the Java Encoder to load support for and to save the document using the specified
code chart. When the encoding type cannot be determined, Oxygen XML Editor prompts and display the Available
Java Encodings dialog box that provides a list of all encodings supported by the Java platform.
If the opened document contains an unsupported character, Oxygen XML Editor applies the policy specified for handling
such errors. If the policy is set to REPORT, Oxygen XML Editor displays an error dialog box with a message about the
character not allowed by the encoding. If the policy is set to IGNORE, the character is removed from the document
displayed in the editor panel. If the policy is set to REPLACE, the character is replaced with a standard replacement
character for that encoding.
While in most cases you are using UTF-8, simply changing the encoding name causes the application to save the file
using the new encoding.
When saving a document edited in the Text, Grid, or Design modes, if it contains characters not included in the encoding
declared in the document prolog, Oxygen XML Editor detects the problem and signals it to the user. The user is responsible
to resolve the conflict before saving the document.
When saving a document edited in the Author mode, all characters that fall outside the detected encoding will be
automatically converted to hexadecimal character entities.
To edit documents written in Japanese or Chinese, change the font to one that supports the specific characters (a Unicode
font). For the Windows platform, Arial Unicode MS or MS Gothic is recommended. Do not expect WordPad or Notepad
to handle these encodings. Use Internet Explorer or Word to examine XML documents.
When a document with a UTF-16 encoding is edited and saved in Oxygen XML Editor, the saved document has a byte
order mark (BOM) which specifies the byte order of the document content. The default byte order is platform-dependent.
That means that a UTF-16 document created on a Windows platform (where the default byte order mark is UnicodeLittle)
has a different BOM than a UTF-16 document created on a Mac OS platform (where the byte order mark is UnicodeBig).
Oxygen XML Editor | Editing Documents | 135
The byte order and the BOM of an existing document are preserved when the document is edited and saved. This behavior
can be changed in Oxygen XML Editor from the Encoding preferences panel.
Inserting Symbols
You can insert symbols by using the Character Map dialog box that can be opened with the Edit >
Insert from
Character Map action. If you have enabled the Symbols toolbar, you can also use the
Symbols drop-down menu
to insert some of the most commonly used symbols and selecting More symbols from that menu will also open the
Character Map dialog box.
Figure 60: The Character Map Dialog Box
The Character Map dialog box allows you to visualize all characters that are available in a particular font, pick the
character you need, and insert it in the document you are editing. It includes the following fields and sections:
Font
Use this drop-down list to choose the font for which you want to display characters.
Unicode Block
Use this drop-down list to only see a certain range of characters. This will filter the number of characters displayed,
showing only a contiguous range of characters corresponding to the selected block. Unassigned characters are
displayed as empty squares.
Search
Use this filter to search for a character by one of the following attributes:
•
•
•
hexadecimal
decimal
description
Note: Selecting the description option opens the Details tab. If you enter a character description in
the Search field, the description option is selected automatically.
Oxygen XML Editor | Editing Documents | 136
Character Table Section
The characters that are available to be inserted are listed in two tabs:
•
•
Compact - Matrix-like table that displays a visual representation of the characters.
Details - Displays the available characters in a tabular format, presenting their decimal and hexadecimal value
along with their description.
Recently Used Characters Section
Displays the symbols that you have used recently and you can also select one from there to insert it in the current
document.
Character Mode Section
The next section of the dialog box allows you to select how you want the character to appear in the Text editing
mode. You can choose between the following:
•
•
•
Character
Character entity - decimal
Character entity - hexadecimal
You can see the character or code that will be inserted in Text mode next to the selections in this section and a box
on the right side of the dialog box allows you to see the character that will be inserted in Author mode. You can
also see the name and range name of a character either at the bottom of the dialog box, or in a tooltip when hovering
the cursor over the character.
Press the Insert button to insert the selected character in the current editor at cursor position. You will see the character
in the editor if the editor font is able to render it. The Copy button copies it to the clipboard without inserting it in the
editor.
Note: The Character Map dialog box cannot be used to insert Unicode characters in the Grid editor.
Accordingly, the Insert button of the dialog box will be disabled if the current document is edited in Grid mode.
Unicode Fallback Font Support
Oxygen XML Editor provides fonts for most common Unicode ranges. However, if you use special symbols or characters
that are not included in the default fonts, they will be rendered as small rectangles. A fallback font is a reserve typeface
that contains symbols for as many Unicode characters as possible. When a display system encounters a character that
is not part of the range of any of the available fonts, Oxygen XML Editor will try to find that symbol in a fallback font.
Example of a Scenario Where a Fallback Font is Needed
Suppose that you need to insert the Wheelchair symbol ( - U+267F) into your content in a Windows operating system.
By default, Oxygen XML Editor does not render this symbol correctly since it is not included in any of the default fonts.
It is included in Segoe UI Symbol, but this font is not part of the default fonts that come with Oxygen XML Editor. To
allow Oxygen XML Editor to recognize and render the symbol correctly, you can add Segoe UI Symbol as a fallback
font.
Add a Fallback Font in Windows (7 or Later)
To add a fallback font to the Oxygen XML Editor installation, use the following procedure:
1. Start Windows Explorer and browse to the [OXYGEN_INSTALLATION_DIR]/jre/lib/fonts directory.
2. Create a directory called fallback (if it is not already there).
3. Copy a font file (True Type Font - TTF) that includes the special characters into this directory.
Tip: You could, for example, copy the Segoe UI Symbol Regular font from C:\Windows\Fonts.
4. Restart Oxygen XML Editor for the changes to take full effect.
Result: Whenever Oxygen XML Editor finds a character that cannot be rendered using its standard fonts, it will look
for the glyph in the fonts stored in the fallback folder.
Oxygen XML Editor | Editing Documents | 137
Alternate Solution for Other Platforms
For Mac OS X or other platforms, you could use the following approach:
1.
2.
3.
4.
Use a font editor (such as FontForge) to combine multiple true type fonts into a single custom font.
Install the font file into the dedicated font folder of your operating system.
In Oxygen XML Editor, open the Preferences dialog box and go to Appearance > Fonts.
Click the Choose button in the Editor option and select your custom font from the drop down list in the subsequent
dialog box.
5. Restart Oxygen XML Editor for the font changes to take full effect.
Creating and Working with Documents
Oxygen XML Editor includes various features, actions, and wizards to assist you with creating new files and working
with existing files. This section explains many of these features, including information on creating new documents,
opening, saving, and closing existing files, searching documents, viewing file properties, and more.
Creating New Documents
Oxygen XML Editor includes a handy New Document wizard that allows you to customize and create new files from
a large list of document types and predefined new file templates. You can also create your own templates and share
them with others.
New Document Wizard
Oxygen XML Editor supports a wide range of document types. The New Document wizard presents the default
associations between a file extension and the type of editor that opens the file. To customize these default associations,
open the Preferences dialog box and go to File Types.
1. To create a document in Oxygen XML Editor, either select File > New or click the
New button on the toolbar.
Oxygen XML Editor displays the New Document wizard and groups the supported document types in multiple
categories:
•
•
•
Recently used - Contains the list of the most recently used files.
New Document - Contains the list of all supported document types. This list includes XML, XSL, XML Schema,
Document Type Definition, Relax NG Schema, XQuery, web Services Definition Language, Schematron Schema,
CSS, Text, PHP, JavaScript, Java, C, C++, Batch, Shell, Properties, SQL, XML Catalog, and PERL.
Global templates - Contains the list of predefined templates as well as user-defined custom templates. You can
add custom template files to the templates folder of the Oxygen XML Editor installation directory. You can
also specify an additional directory to use for templates in the Document Templates Preferences page.
Note: You can also use editor variables in the template file content and they will be expanded when the
files are opened.
•
Framework templates - Contains the list of templates defined in the Document Type configuration dialog box,
Templates tab.
2. Select a document type.
3. Click one of the following:
•
•
Customize - action available only for XML, XML Schema, Schematron, and XSL documents. Depending on
the document type, you can set different properties before you create the file.
Create - uses default settings to create a file.
If you select Create, Oxygen XML Editor opens the new file in the editor view.
4. If you select Customize, Oxygen XML Editor opens the following dialog box. You can customize different options
depending on the document type you select.
Oxygen XML Editor | Editing Documents | 138
•
Figure 61: New XML Document Dialog Box
•
•
•
•
•
•
•
•
•
Schema URL - Specifies the path to the schema file. When you select a file, Oxygen XML Editor analyzes
its content and tries to fill the rest of the dialog box.
Schema type - Allows you to select the schema type. The following options are available: XML Schema,
DTD, RelaxNG XML syntax, RelaxNG compact syntax, and NVDL.
Public ID - Specifies the PUBLIC identifier declared in the document prolog.
Namespace - Specifies the document namespace.
Prefix - Specifies the prefix for the namespace of the document root.
Root Element - Populated with elements defined in the specified schema, enables selection of the element
used as document root.
Description - A small description of the selected document root.
Add optional content - If you select this option, the elements, and attributes defined in the XML Schema as
optional, are generated in the skeleton XML document.
Add first Choice particle - If you select this option, Oxygen XML Editor generates the first element of an
xs:choice schema element in the skeleton XML document. Oxygen XML Editor creates this document
in a new editor panel when you click OK.
Oxygen XML Editor | Editing Documents | 139
•
Figure 62: New XSL Document Dialog Box
•
•
Stylesheet version - Allows you to select the Stylesheet version number. You can select from: 1.0, 2.0, and
3.0.
Add documentation annotations - Enable this option to generate the stylesheet documentation.
•
Figure 63: New XML Schema Document Dialog Box
•
•
•
•
Default XML Schema version - Uses the XML Schema version defined in the XML Schema preferences
page.
XML Schema 1.0 - Sets the minVersion attribute to 1.0 and the maxVersion attribute to 1.1.
XML Schema 1.1 - Sets the minVersion attribute to 1.1.
Target namespace - specifies the schema target namespace.
•
Oxygen XML Editor | Editing Documents | 140
Namespace prefix declaration table - contains namespace prefix declarations. Table information can be
managed using the
New and
Delete buttons.
Tip: For further details on how you can set the version of an XML Schema, go to Setting the XML
Schema Version.
•
Figure 64: New Schematron Document Dialog Box
•
Schematron version - Specifies the Schematron version. Possible options: 1.5 and ISO.
Note: Starting with version 16.0 of Oxygen XML Editor, the support for Schematron 1.5 is deprecated.
It is recommended to use ISO Schematron instead.
To easily create a Schematron document the application offers two predefined document templates, ISO Schematron
and Schematron 1.5.
5. Press Create to create the file.
Opening Documents
To open a document in Oxygen XML Editor, do one of the following:
•
Go to File >
Open (Ctrl O (Meta O on OS X)) or click the
Open toolbar button to display the Open dialog
box. The start folder of the Open dialog box can be either the last folder visited by this dialog box or the folder of
the currently edited file. This can be configured in the user preferences.
•
Go to File >
Open URL or click the
Open URL toolbar button to display the Open URL dialog box, which
allows you to access any resource identified through an URL (defined by a protocol, host, resource path, and an
optional port). The following actions are available in the drop-down action list:
•
Browse for local file - Opens a local file browser dialog box allowing you to select a local file.
•
Browse for remote file - Displays the Open using FTP/SFTP dialog box that allows you to open a remotely
stored document.
•
Browse for archived file - Displays the Archive Browser dialog box that allows you to browse the content
of an archive a choose a file to open in Oxygen XML Editor.
•
Browse Data Source Explorer - Opens the Data Source Explorer that allows you to browse the data
sources defined in the Data Sources preferences page.
Tip: You can get to the Data Sources preferences page, using the Configure Database Sources shortcut
from the Open URL dialog box.
Oxygen XML Editor | Editing Documents | 141
•
Search for file - Displays the Open/Find Resources dialog box.
•
Click the
•
Go to File >
Reload to load the last saved file content. All unsaved modifications are lost.
Go to File > Reopen to reopen one of the recently opened document files. The list containing recently opened files
can be emptied by invoking the Clear history action.
Select the Open action from the contextual menu of the Project view. This opens the selected file from the Project
view.
•
•
Open/Find Resource toolbar button to run the same action.
Opening the Current Document in System Application
To open the currently edited document in the associated system application, use the
View in Browser/System
Application action that is available in the File menu and on the File toolbar. If you want to open XML files in a specific
internet browser, instead of the associated system application, you can specify the internet browser to be used. To do
so, open the Preferences dialog box, then go to Global and set it in the Default Internet browser field. This will take
precedence over the default system application settings.
Opening Local Files at Start-up from Command Line
To open a local file at start-up when you open Oxygen XML Editor from the command line, add the paths for one or
more local files as parameters in the command line:
•
•
scriptName [pathToXMLFile1] [pathToXMLFile2] ... where scriptName is the name of the startup script for your
platform (oxygen.bat on Windows, oxygen.sh on Unix/Linux, oxygenMac.sh on Mac OS) and
pathToXMLFileN is the name of a local XML file.
an XML file and a schema file to be associated automatically to the file and used for validation and content completion:
scriptName -instance pathToXMLFile -schema pathToSchemaFile -schemaType
XML_SCHEMA|DTD_SCHEMA|RNG_SCHEMA|RNC_SCHEMA -dtName documentTypeName
where scriptName is the name of the startup script for your platform (oxygen.bat on Windows, oxygen.sh on
Unix/Linux, oxygenMac.sh on Mac OS), pathToXMLFile is the name of a local XML file, pathToSchemaFile is the
name of the schema which you want to associate to the XML file, the four constants (XML_SCHEMA,
DTD_SCHEMA, RNG_SCHEMA, RNC_SCHEMA) are the possible schema types (W3C XML Schema, DTD,
Relax NG schema in full syntax, Relax NG schema in compact syntax). The next parameter, documentTypeName,
specifies the name of the Document Type for which the schema is defined. If the Document Type is already set in
preferences, its schema and type are updated.
The two possibilities of opening files at startup by specifying them in the command line are explained also if the startup
script receives one of the -h or --help parameters.
Opening a File at a Specific Position Using the Command Line Interface
Oxygen XML Editor offers support for opening a file at a specific position using the command line interface, by
transmitting parameters to the Oxygen XML Editor batch script file. The following methods are available, depending
on how you identify the position needed:
1. Specific position values (line and column number , or character offset)
Oxygen XML Editor supports the following position parameters:
•
•
•
line - The line number
column - The column number (has meaning if the line parameter is also defined)
char - The character offset
Examples for Windows:
Oxygen XML Editor | Editing Documents | 142
The following examples show how you can open an XML document in Oxygen XML Editor:
oxygen.bat
oxygen.bat
oxygen.bat
oxygen.bat
file:samples/personal.xml#line=4
file:samples/personal.xml#line=4column=5
file:samples/personal.xml#line=4;column=5
file:samples/personal.xml#char=334
2. Simplified XPath index path
Oxygen XML Editor will open an XML file and select one of its elements identified by a simplified XPath index
path. For example, an index path of the form 1/5/7 identifies the seventh child of the fifth child of the root element.
Examples for Windows:
The following example shows how you can open an XML document in Oxygen XML Editor and select the third
child of the root element:
oxygen.bat
file:samples/personal.xml#element(1/3)
3. Anchors identified by ID attribute values
Oxygen XML Editor will open an XML file and select the element whose id attribute value is an exact match of
the anchor attached to a command line instruction.
Examples for Windows:
The following example shows how you can open an XML document in Oxygen XML Editor and select the element
that has the id element set to titleID:
oxygen.bat
file:samples/personal.xml#titleID
Saving Documents
You can save the document you are editing with one of the following actions:
•
File >
•
Save toolbar button - If the document was not yet saved, it displays the Save As dialog box.
File > Save As - Displays the Save As dialog box, used either to name and save an open document to a file or to
save an existing file with a new name.
File > Save To URL - Displays the Save to URL dialog box that can be used to save a file identified by its URL
(defined by a protocol, host, resource path, and an optional port). Use the drop-down action list to choose one of the
available save actions:
•
•
•
Save.
Browse for local file - Opens a local file browser dialog box allowing you to save the document locally.
•
Browse for remote file - Displays the Save to URL dialog box that allows you to save the document to a
remote location (accessible through FTP, SFTP or WebDAV).
•
Browse for archived file - Displays the Archive Browser dialog box that allows you to save the document
inside an archive.
•
Browse Data Source Explorer - Opens the Data Source Explorer that allows you to browse the data
sources defined in the Data Sources preferences page.
Tip: You can get to the Data Sources preferences page, using the Configure Database Sources shortcut
from the Save to URL dialog box.
•
•
Search for file - Displays the Open/Find Resources dialog box.
File > Save All - Saves all open documents. If any document does not have a file, displays the Save As dialog box.
Oxygen XML Editor | Editing Documents | 143
Opening and Saving Remote Documents via FTP/SFTP/WebDAV/SharePoint
Oxygen XML Editor supports editing remote files, using the FTP, SFTP ,WebDAV, SharePoint, and SharePoint Online
for Office 365 protocols. You can edit remote files in the same way you edit local files.For example, you are able to add
remote files a project, or make them subject of XSL and FO transformations.
You can open one or more remote files in the Open URL dialog box.
A WebDAV resource can be locked when it is opened in Oxygen XML Editor by checking the Lock WebDAV files on
open option to prevent other users to modify it concurrently on the server. If a user tries to edit a locked file, Oxygen
XML Editor displays an error message that contains the lock owner's name. The lock is released automatically when
the editor for that resource is closed in Oxygen XML Editor.
To avoid conflicts with other users when you edit a resource stored on a SharePoint server, you can Check Out the
resource.
To improve the transfer speed, the content exchanged between Oxygen XML Editor and the HTTP / WebDAV server
is compressed using the GZIP algorithm.
The current WebDAV Connection details can be saved using the
Data Source Explorer view.
Database Perspective button and then used in the
The Open URL Dialog Box
To open this dialog box, go to File >
Open URL (or click the
Browse for remote file option from the drop down action list.
Figure 65: Open URL Dialog Box
The displayed dialog box is composed of several parts:
Open URL toolbar button), then choose the
•
Oxygen XML Editor | Editing Documents | 144
The Identification section contains the access credentials. To browse for a file on a server, you have to specify the
user and password. This information is bound to the selected URL displayed in the File URL combo box, and used
further in opening/saving the file. If the check box Save is selected, then the user and password are saved between
editing sessions. The password is kept encrypted in the options file.
Note:
Your password is well protected. In the case the options file is used on other machine by a user with a different
username the password will become unreadable, since the encryption is username dependent. This is also
true if you add URLs having user and password to your project.
•
In the server combo you can specify the protocol (HTTP, HTTPS or FTP) and the host name or IP of the server.
Tip: When specifying a URL, follow these rules:
•
•
To access an FTP server, write the protocol, host, and port (if using a non-standard one), like
ftp://server.com or ftp://server.com:7800/.
To access a WebDAV server, write the path to the directory of the WebDAV repository along with the
protocol and the host name, like
https://www.some-webdav-server.com:443/webdav-repository/.
Important:
Make sure that the repository directory ends in a slash "/", like
https://www.some-webdav-server.com:443/webdav-repository/
By pressing the Connect button the directory listing will be shown in the component below. If the selected URL
points to a SharePoint server, a dedicated SharePoint browsing component is presented. When Autoconnect is
selected, the browse action is performed every time when you open the dialog box.
•
The browser view:
•
If you are browsing a WebDAV or FTP repository, the items are presented in a tree-like fashion. You can browse
the directories, and make multiple selections. Additionally, you may use the Rename, Delete, and New Folder
actions to manage the file repository.
Note: The file names are sorted in a case-insensitive way.
•
When you browse a SharePoint repository, a specialized component renders the SharePoint site content.
Oxygen XML Editor | Editing Documents | 145
Figure 66: Browsing a SharePoint Repository
The left side navigation area presents the SharePoint site structure in a tree-like fashion displaying the following
node types: sites (
), libraries, and folders.
Depending on the type of node, a contextual menu offers customized actions that can be performed on that node.
The contextual menu of a folder allows you to create new folders and documents, import folders and files, and
to rename and delete the folder.
Note: The rename and delete actions are not available for library root folders (folders located at first
level in a SharePoint library).
Each library node display next to its name a drop down box where you can select the current library view. This
functionality is also available on the node's contextual menu, under the Current View submenu.
The content of a folder is displayed in a tabular form, where each row represents the properties of a folder or
document. The list of columns and the way the documents and folders are organized depends on the currently
selected view of the parent library.
You can filter and sort the displayed items. To display the available filters of a column, click the filter widget
located on the column's header. You can apply multiple filters at the same time.
Note: A column can be filtered or sorted only if it was configured this way on the server side.
Oxygen XML Editor | Editing Documents | 146
•
The editable combo box, in which it can be specified directly the URL to be opened or saved.
Tip: You can type a URL, such as http://some.site/test.xml (if the file is accessible through
normal HTTP protocol), or ftp://[email protected]/home/test.xml (if the file is accessible
through anonymous FTP).
This combo box is also displaying the current selection when the user changes selection by browsing the tree of
folders and files on the server.
Changing File Permissions on a Remote FTP Server
Some FTP servers allow the modification of permissions of the files served over the FTP protocol. This protocol feature
is accessible directly in the FTP/WebDAV file browser dialog box by right-clicking a tree node and selecting the Change
permissions menu item.
In this dialog box, the usual Unix file permissions Read, Write, and Execute are granted or denied for the file owner,
owner group, and the rest of the users. The aggregate number of permissions is updated in the Permissions text field
when it is modified with one of the check boxes.
WebDAV over HTTPS
If you want to access a WebDAV repository across an unsecure network, Oxygen XML Editor allows you to load and
save the documents over the HTTPS protocol (if the server understands this protocol) so that any data exchange with
the WebDAV server is encrypted.
When a WebDAV repository is first accessed over HTTPS, the server hosting the repository will present a security
certificate as part of the HTTPS protocol, without any user intervention. Oxygen XML Editor will use this certificate
to decrypt any data stream received from the server. For the authentication to succeed you should make sure the security
certificate of the server hosting the repository can be read by Oxygen XML Editor. This means that Oxygen XML Editor
can find the certificate in the key store of the Java Runtime Environment in which it runs. You know the server certificate
is not in the JRE key store if you get the error No trusted certificate found when trying to access the WebDAV repository.
Troubleshooting HTTPS
When Oxygen XML Editor cannot connect to an HTTPS-capable server, most likely there is no certificate set in the
Java Runtime Environment (JRE) that Oxygen XML Editor runs into. The following procedure describes how to:
•
•
Export a certificate to a local file using any HTTPS-capable Web browser (for example Internet Explorer).
Import the certificate file into the JRE using the keytool tool that comes bundled with Oxygen XML Editor.
1. Export the certificate into a local file
a) Point your HTTPS-aware Web browser to the repository URL.
If this is your first visit to the repository it will be displayed a security alert stating that the security certificate
presented by the server is not trusted.
Oxygen XML Editor | Editing Documents | 147
Figure 67: Security alert - untrusted certificate
b) Go to menu Tools > Internet Options.
Internet Options dialog box is opened.
c) Select Security tab.
d) Select Trusted sites icon.
e) Press Sites button.
This will open Trusted sites dialog box.
f) Add repository URL to Websites list.
g) Close the Trusted sites and Internet Options dialog boxes.
h) Try again to connect to the same repository URL in Internet Explorer.
The same error page as above will be displayed.
i) Select Continue to this website option.
A clickable area with a red icon and text Certificate Error is added to Internet Explorer address bar.
j) Click the Certificate Error area.
A dialog box containing a View certificates link is displayed.
k) Click the View certificates link.
Certificate dialog box is displayed.
l) Select Details tab of Certificate dialog box.
m) Press Copy to File button.
Certificate Export Wizard is started.
n) Follow indications of wizard for DER encoded binary X.509 certificate. Save certificate to local file server.cer.
2. Import the local file into the JRE running Oxygen XML Editor.
a) Open a text-mode console with administrative rights.
b) Go to the lib/security directory of the JRE running Oxygen XML Editor. You find the home directory of
the JRE in the java.home property that is displayed in the About dialog box (System properties tab). On Mac
OS X systems, the lib/security directory is usually located in
/System/Library/Java/JavaVirtualMachines/1.6.0.jdk/Contents/Home directory.
c) Run the following command:
..\..\bin\keytool -import -trustcacerts -file server.cer -keystore cacerts
Oxygen XML Editor | Editing Documents | 148
The server.cer file contains the server certificate, created during the previous step. keytool requires a password
before adding the certificate to the JRE keystore. The default password is changeit. If somebody changed the
default password then he is the only one who can perform the import.
Note: To make Oxygen XML Editor accept a certificate even if it is invalid, open the Preferences dialog
box, go to Connection settings > HTTP(S)/WebDAV, and enable the Automatically accept a security
certificate, even if invalid option.
Tip: If you need to import multiple certificates, you need to specify a different alias for each additional
imported certificate with the -alias command line argument, like in the following example:
..\..\bin\keytool -import -alias myalias1 -trustcacerts -file server1.cer -keystore cacerts
..\..\bin\keytool -import -alias myalias2 -trustcacerts -file server2.cer -keystore cacerts
3. Restart Oxygen XML Editor.
HTTP Authentication Schemes
Oxygen XML Editor supports the following HTTP authentication schemes:
•
•
•
Basic - The basic authentication scheme defined in the RFC2617 specifications.
Digest - The digest authentication scheme defined in the RFC2617 specifications.
NTLM - The NTLM scheme is a proprietary Microsoft Windows Authentication protocol (considered to be the most
secure among currently supported authentication schemes).
Note: For NTLM authentication, the user name must be preceded by the name of the domain it belongs to,
as in the following example:
domain\username
•
Kerberos - An authentication protocol that works on the basis of tickets to allow nodes communicating over a
non-secure network to prove their identity to one another in a secure manner.
Single Sign-on
Oxygen XML Editor implements the Single sign-on property (meaning that you can log on once and gain access to
multiple services without being prompted to log on for each of them), based on the Kerberos protocol and relies on a
ticket-granting ticket (TGT) that Oxygen XML Editor obtains from the operating system.
To turn on the Kerberos-based authentication, you need to add the following system property in the .vmoptions
configuration file or start-up script:
-Djavax.security.auth.useSubjectCredsOnly=false
Switching Between Opened Tabs
There are two actions for cycling through the opened file tabs:
Ctrl Tab (Command Tab on OS X)
Switches between the tabs with opened files in the order most recent ones first.
Ctrl + Shift + Tab (Command + Shift + Tab on OS X)
Switches between the tabs with opened files in the reverse order.
Searching Documents
Oxygen XML Editor includes advanced search capabilities to help you locate documents and resources.
Oxygen XML Editor | Editing Documents | 149
The Open/Find Resource View
The Open/Find Resource view is designed to offer advanced search capabilities either by using a simple text search
or by using the Apache Lucene - Query Parser Syntax. To open this view, go to Window > Show View > Open/Find
Resource. The view is presented in the left side of the default Oxygen XML Editor layout, next to the Project and
DITA Maps Manager views.
Figure 68: The Open/Find Resource View
You can use this view to find a file in the current Oxygen XML Editor project or in one of the DITA maps opened in
the DITA Maps Manager view by typing only a few letters of the file name of a document or a fragment of the content
you are searching for. The Open/Find Resource view also supports searching in document edits (comments, insertions,
deletions, and highlighted content).
Note: Full support for searching in document edits is available only in the Enterprise edition of Oxygen XML
Editor. The Professional edition offers support to search through a maximum of 10 edits.
Search results are presented instantly, after you finish typing the content you are searching for. The matching fragments
of text are highlighted in the results list displayed in the view. When you open one of the documents from the results
list, the matching fragments of text are highlighted in the editing area. To remove the highlighting from your document
close the Results view. To display the search history, position the cursor in the search field and press Ctrl Down Arrow
(Command Down Arrow on OS X) or Ctrl Up Arrow (Command Up Arrow on OS X) on your keyboard. Pressing
only the Down Arrow key moves the selection to the list of results.
A contextual menu available on each search result provides actions applicable to the document that contains it. These
actions allow you to:
•
•
•
•
Open the document in one of Oxygen XML Editor internal editors.
Open the document in an external system application.
Identify the document in the system file explorer.
Copy the file's location.
The content of the resources used to search in is parsed from an index. The indexing is performed both automatically
and on request.
Oxygen XML Editor | Editing Documents | 150
Note: Automatic indexing is performed when you modify, add, or remove resources in the currently indexed
project. If the index was never initialized, the index in not updated on project changes.
Note: To improve performance, the indexing process skips the following set of common English words (the
so-called stop words): a, an, and, are, as, at, be, but, by, for, if, in, into, is, it, no, not, of, on, or, such, that, the,
their, then, there, these, they, this, to, was, will, with. This means that if you are searching for any of these words,
Open/Find Resource view will not be able to match any of them. However, you can configure the list of stop
words in the Open/Find Resources Preferences Page.
Note: Searches are case insensitive. For example, if you search for car you get the same results as when you
search for Car.
Note: Suffix searches are supported, both for searching in the content of your resources and in their name. For
this, you can use wildcards. If you search in content for *ing you will find documents that contain the word
presenting. If you search in file paths for */samples/*.gif you will find all the gif images from the samples
directory.
Note: You can drag a resource from the Open/Find Resource view and drop it in a DocBook, DITA, TEI or
XHTML document to create a link to that resource.
The Open/Find Resource view offers the following options:
•
Settings - Displays settings for the view:
•
•
•
•
•
•
•
Clear Index - Clears the index.
Show description - Presents the search results in a more compact form, displaying only the title and the location
of the resources.
Options - Opens the Open/Find Resource preferences page.
In file paths - Select this option to search for resources by their name or by its path (or a fragment of its path).
In content - Select this option to search through the content of your resources.
In reviews - Select this option to search through the comments, insertions, and deletion in your resources.
Reindex - Reindexes your resources.
The Open/Find Resource Dialog Box
The Open/Find Resource dialog box offers advanced search capabilities. To open the Open/Find Resource dialog
box, go to Find >
Open/Find Resource (Ctrl Shift R (Meta Shift R on OS X)). You can also click the
Open/Find Resource toolbar button or use the
Search for file action, available for some URL input fields.
Oxygen XML Editor | Editing Documents | 151
Figure 69: The Open/Find Resource Dialog Box
You can use this dialog box to find a file in the current Oxygen XML Editor project or in one of the DITA maps opened
in the DITA Maps Manager view by typing a few letters of the file name of a document or a fragment of the content
you are searching for. The Open/Find Resource dialog box also supports searching in document edits (comments,
insertions, deletions, and highlighted content).
Note: Full support for searching in document edits is available only in the Enterprise edition of Oxygen XML
Editor. The Professional edition offers support to search through a maximum of 10 edits.
Search results are presented instantly, after you finish typing the content. The matching fragments of text are highlighted
in the results list displayed in the dialog box. When you open one of the documents from the results list, the matching
fragments of text are highlighted in the editing area. To remove the highlighting from your document close the Results
view. To display the search history, position the cursor in the search field and press Ctrl Down Arrow (Command
Down Arrow on OS X) or Ctrl Up Arrow (Command Up Arrow on OS X) on your keyboard. Pressing only the
Down Arrow key moves the selection to the list of results.
Note: Searches are case insensitive. For example, if you search for car you get the same results as when you
search for Car.
Note: Suffix searches are supported, both for searching in the content of your resources and in their name. For
this, you can use wildcards. If you search in content for *ing you will find documents that contain the word
presenting. If you search in file paths for */samples/*.gif you will find all the gif images from the samples
directory.
The Open/Find Resource dialog box offers the following options:
•
•
•
•
In file paths - Select this option to search for resources by their name or by its path (or a fragment of its path).
In content - Select this option to search through the content of your resources.
In reviews - Select this option to search through the comments, insertions, and deletion in your resources.
Options - Opens the Open/Find Resource preferences page.
Oxygen XML Editor | Editing Documents | 152
•
•
Clear Index - Clears the index.
Reindex - Reindexes your resources.
A contextual menu available on each search result provides actions applicable to the document that contains it. These
actions allow you to:
•
•
•
•
Open the document in one of Oxygen XML Editor internal editors.
Open the document in an external system application.
Identify the document in the system file explorer.
Copy the file's location.
When you perform a search a caching mechanism is used to gather the paths of all files linked in the current project.
When the first search is performed, all project files are indexed and added to the cache. The next search operations use
the information extracted from the cache, thus improving the processing time. The cache is kept for the currently loaded
project only, so when you perform a search in a new project the cache is rewritten. Also, the cache is reset when you
press the Reindex button.
Important: Files larger than 2GB are not indexed.
If there is no file found that matches your file pattern or text search, a possible cause is that the file you are searching
for was added to the Oxygen XML Editor project after the last caching operation. In this case, re-indexing the project
files from the Reindex button enables the file to be found. The date and time of the last index operation are displayed
below the file list.
Once you find the files that you want to open, select them in the list and press the Open button. Each of the selected
files is opened in the editor associated with the type of the file.
To watch our video demonstration about the Open/Find Resource dialog box and search capabilities, go to
http://oxygenxml.com/demo/Open_Find_Resource.html.
Searching in Content
To perform a search through the content of your resources, open the Open/Find Resources dialog box or the Open/Find
Resource view, enable the in content option, and in the search field enter the terms that you want to search for.
The Open/Find Resource feature is powered by Apache Lucene. Apache Lucene is a free open source information
retrieval software library.
You can use the Open/Find Resource dialog box and the Open/Find Resource view either to perform a simple text
search or to perform a more complex search using the Apache Lucene - Query Parser Syntax. Using the Apache Lucene
- Query Parser Syntax means you can perform any of the following searches:
Term Searches
Use the Open/Find Resource view or dialog box to search for plain text:
Garden Preparation
Element Specific Searches
Use the Open/Find Resource view or dialog box to search for content that belongs to a specific
element:
title:"Garden Preparation"
Oxygen XML Editor | Editing Documents | 153
Wildcard Searches
Use wildcards to make your search more permissive:
Garden Prepar?tion
Fuzzy Searches
If you are not sure of the exact form of a term that you are interested in, use the fuzzy search to find
the terms that are similar to what you introduce in the Open/Find Resource view or dialog box. To
perform a fuzzy search, use the ~ symbol after the word that you are not sure of:
Garden Preparing~
Proximity Searches
Use proximity searches to find words that are within a specific distance away. To perform a proximity
search, use the ~ symbol at the end of your search. For example, to search for the word Garden and
the word Preparation within 6 words of each other use:
"Garden Preparation"~6
Range Searches
Use range searches to match documents whose element values are between the lower and upper bound
specified in the range query. For example, to find all documents whose titles are between Iris and
Lilac, use:
title:{Iris TO Lilac}
The curly brackets denote an exclusive query. The results you get when using this query are all the
documents whose titles are between Iris and Lilac, but not including Iris and Lilac. To create an
inclusive query use square brackets:
title:[Iris to Lilac]
Term Prioritising Searches
Use term prioritising searches if the fragment of text that you are searching for contains certain words
that are more important to your search than the rest of them. For example, if you are searching for
Autumn Flowers, a good idea is to prioritise the word Autumn since the word Flowers occurs more
often. To prioritise a word use the ^ symbol:
Autumn^6 Flowers
Searches Using Boolean Operators
You are able to use the AND, +, OR, -, and NOT operators.
To search for documents that contain both the words Garden and Preparation, use:
Garden AND Preparation
Oxygen XML Editor | Editing Documents | 154
To search for documents that must contain the word Garden and may contain the word Preparation,
use:
+Garden Preparation
To search for documents that contain either the word Garden or the word Preparation, use:
Garden OR Preparation
To search for documents that contain Garden Preparation but not Preparation of the Flowers, use:
"Garden Preparation" - "Preparation of the Flowers"
Searches Using Grouping
To search either for the word Garden or Preparation, and the word Flowers, use:
(Garden OR Preparation) AND Flowers
Searches Using Element Grouping
To search for a title that contains both the word Flowers and the phrase Garden Preparation, use:
title:(+Flowers +"Garden Preparation")
Searching in File Paths
To perform a search in the file paths of your resources, open the Open/Find Resources dialog box or the Open/Find
Resource view, enable the In file paths option, and in the search field enter the terms that you want to search for.
The Open/Find Resource view and dialog box allows you to search for a resource either by its name or by its path (or
by a fragment of its path).
You can use wildcards when you perform such searches:
•
•
Use "*" to match any sequence of characters.
Use "?" to match any single character.
For example, if you search for *-preferences-page you will find all the resources that contain the -preferences-page
fragment in their name. If you search for */samples/*.gif, you will find all the .gif images from the samples directory.
Searching in Reviews
To perform a search in the edits of your resources, open the Open/Find Resource dialog box or the Open/Find Resource
view, enable the In reviews option, and in the search field enter the terms that you want to search for.
The following options are available:
•
•
•
Type - Specifies whether you want to search for content in comments, insertions, deletions, or highlighted content.
Author - Displays all the authors of the edits in your resources. The authors are collected when indexing. You can
set a specific author for your search or all of them.
Time- Specifies the time when the edits that you are searching through were created.
Both the view and the dialog box display the edits that contain the search results and their parent topics along with a
short description. To hide this description, go to Settings and disable the Show Description option.
Technical Aspects
When Oxygen XML Editor performs the indexing of your resources, the refereed content from your documents is not
taken into account. For example, when DITA documents are indexed, the content from the conref elements is not
Oxygen XML Editor | Editing Documents | 155
parsed. The files that make up the index are stored on disk in the
[user_home_directory]\AppData\Roaming\com.oxygenxml\lucene folder.
Closing Documents
To close open documents, use one of the following methods:
•
•
•
Click Close(Ctrl W (Meta W on OS X)) in the contextual menu of an open tab (or from the File menu) to close it.
Click Close Other Files in the contextual menu of an open tab (or from the File menu) to close all the open tabs
except the selected one.
Click Close All(Ctrl Shift F4 (Meta Shift F4 on OS X)) in the contextual menu of an open tab (or from the File
menu) to close all open tabs.
The Contextual Menu of the Current Editor Tab
The contextual menu is available when you right-click the current editor tab label. It includes the following actions:
Close
Closes the current editor.
Close Other Files
Closes all opened editor but the one you are currently viewing.
Close All
Closes all opened editors.
Reopen last closed editor
Reopens the last closed editor.
Maximize/Restore Editor Area
Collapses all the side views and spans the editing are to cover the entire width of the main window.
Add to project
Adds the file you are editing to the current project.
Add all to project
Adds all the opened files to the current project.
Copy Location
Copies the disk location of the file.
Show in Explorer (Show in Finder on OS X)
Opens the Explorer to the file path of the file.
Viewing File Properties
The Properties view, you can quickly access information about the currently edited document. The information includes:
•
•
•
•
•
•
•
•
•
•
•
Character encoding.
Full path on the file system.
Schema used for content completion and document validation.
Document type name and path.
Associated transformation scenario.
Read-only state of a file.
Bidirectional text (left to right and right to left) state.
Total number of characters in the document.
Line width.
Indent with tabs state.
Indent size.
The view can be accessed from Window > Show View > Properties.
Oxygen XML Editor | Editing Documents | 156
To copy a value from the Properties view in the clipboard, for example the full file path, use the Copy action available
on the contextual menu of the view.
Using Projects to Group Documents
This section explains how to create and work with Projects.
Creating a New Project
Oxygen XML Editor allows you to organize your XML-related files into projects. This helps you manage and organize
your files and also allows you to perform batch operations (such as validation and transformation) over multiple files.
You can also share your project settings and transformation/validation scenarios with other users. Use the Project view
to manage projects, and the files and folders contained within.
Creating a New Project
To create a new project, select
New Project from the Project menu, the New menu in the contextual menu, or the
drop-down menu at the top-left of the Project view. This opens a dialog box that allows you to assign a name to the
new project and adds it to the structure of the project in the Project view.
Adding Items to the Project
To add items to the project, select any of the following actions that are available when invoking the contextual menu in
the Project view:
New >
File
Opens a New file dialog box that helps you create a new file and adds it to the project structure.
New >
Folder
Opens a New Folder dialog box that allows you to specify a name for a new folder and adds it to the structure of
the project.
The project itself is considered a logical folder. You can add a logical folder, or content to a logical folder, by using one
of the following actions that are available in the contextual menu, when invoked from the project root:
New >
Logical Folder
Creates a logical folder in the tree structure (the icon is a magenta folder on Mac OS X - ).
New > Logical Folders from Web
Replicates the structure of a remote folder accessible over FTP/SFTP/WebDAV, as a structure of logical folders.
The newly created logical folders contain the file structure of the folder it points to.
Add Folder
Adds a link to a physical folder, whose name and content mirror a real folder that exists in the local file system (the
icon of this action is different on Mac OS X
).
Add Files
Adds links to files on the local file system.
Add Edited File
Adds a link to the currently edited file in the project.
Using Linked Folders (Shortcuts)
Another easy way to organize your XML working files is to place them in a directory and then to create a corresponding
linked folder in you project. If you add new files to that folder, you can simply use the
Refresh (F5) action from
the toolbar or contextual menu and the Project view will display the existing files and subdirectories. If your files are
Oxygen XML Editor | Editing Documents | 157
scattered amongst several folders, but represent the same class of files, you might find it useful to combine them in a
logical folder.
You can create linked folders (shortcuts) by dragging and dropping folders from the Windows Explorer (Mac OS X
Finder) to the project tree, or by selecting
Add Folder in the contextual menu from the project root. Linked folders
are displayed in the Project view with bold text. To create a file inside a linked folder, select the New >
from the contextual menu. The linked files presented in the Project view are marked with a special icon.
File action
Note: Files may have multiple instances within the folder system, but cannot appear twice within the same
folder.
For much more information on managing projects and their content, see the The Project View on page 71 section.
For more details about how you can share projects with other users, see the Sharing a Project - Team Collaboration on
page 164 section.
The Project View
The Project view is designed to assist you with organizing and managing related files grouped in the same XML project.
The actions available on the contextual menu and toolbar associated to this panel enable the creation of XML projects
and shortcuts to various operations on the project documents.
Figure 70: The Project View
By default, the Project view is positioned on the left side of the Oxygen XML Editor window, above the Outline view.
A closed view can be quickly reopened at any time with the Project > Show Project View menu action.
The tree structure occupies most of the view area. In the upper left side of the view, there is a drop-down menu that
contains all recently used projects and project management actions:
Open Project (Ctrl F2 (Meta F2 on OS X))
Opens an existing project. Alternatively, you can open a project by dropping an Oxygen XML Editor XPR project
file from the file explorer into the Project panel.
Note: When a project is opened for the first time, a confirmation dialog box will be displayed that asks
you to confirm that the project came from a trusted source. This is meant to help prevent potential security
issues.
New Project
Creates a new, empty project.
The following actions are grouped in the upper right corner:
Oxygen XML Editor | Editing Documents | 158
Collapse All
Collapses all project tree folders. You can also collapse/expand a project tree folder if you select it and press the
Enter key or Left Arrow to collapse and Right Arrow to expand.
Link with Editor
When selected, the project tree highlights the currently edited file, if it is found in the project files.
Note: This button is disabled automatically when you move to the Debugger perspective.
Settings
A sub-menu that contains the following actions:
Filters
Allows you to filter the information displayed in the Project view. Click the toolbar button to set filter patterns
for the files you want to show or hide. Also, you can set filter patterns for the linked directories that are hidden.
Show Full Path
When selected, linked files and folders are presented with a full file path.
Enable Master Files Support
Select this option to enable the Master Files support.
Change Search and Refactor operations scope
Allows you to change the collection of documents that define the context of the search and refactor operations.
•
•
Use only Master Files, if enabled - Restricts Oxygen XML Editor to perform the search and refactor
operations starting from the master files that are defined for the current resource. This option is available
when you select Project in the Select the scope for Search and Refactor operations dialog box and the
Master Files support is enabled.
Working sets - Allow you to specify the set of files on which the search and refactor operations will act on.
The files are usually organized in an XML project as a collection of folders. There are three types of resources displayed
in the Project view:
•
•
•
Logical folders - marked with a blue icon on Windows and Unix/Linux ( ) and a magenta icon on Mac OS X ( ).
They help you group files within the project. This folder type has no correspondent on the physical disk, since they
are used as containers for related items. Creating and deleting them does not affect the file system on disk. They are
created on the project root or inside other logical folders by using the contextual action New > Logical Folder. The
contextual menu action
Remove from Project can be used to remove them from the project.
Physical folders and files - marked with the operating system-specific icon for folders (usually a yellow icon on
Windows and a blue icon on Mac OS X). These folders and files are mirrors of real folders or files that exist in the
local file system. They are created or added to the project by using contextual menu actions (such as New > File,
New > Folder, Add Folder, etc.) Also, the contextual menu action
Remove from Disk (Shift+Delete) can be
used to remove them from the project and local file system.
Shortcut folders and files - the icons for file shortcuts include a shortcut symbol and names of folder shortcuts are
displayed in bold text. All files and folders that appear as direct descendants of a logical folder are considered
shortcuts. They are created and added with the contextual actions Add Files and Add Folder from the project root.
Both contextual menu actions
Remove from Project and
Remove from Disk (Shift+Delete) are available
for shortcuts.
Remove from Project just removes the shortcut from the project, while
Remove from Disk
(Shift+Delete) removes the shortcut and the physical resource from the local file system.
Oxygen XML Editor | Editing Documents | 159
Figure 71: The Project View with Examples of all Three Types of Resources
Creating New Projects
The following action is available in the Project menu, the New menu in the contextual menu, or from the drop-down
menu in the top-left of the Project view:
New Project
Creates a new, empty project.
Creating New Project Items
The following actions are available by selecting New from the contextual menu, when invoked from the Project view:
New >
File
Opens a New file dialog box that helps you create a new file and adds it to the project structure.
New >
Folder
Opens a New Folder dialog box that allows you to specify a name for a new folder and adds it to the structure of
the project.
New >
Logical Folder
Available when invoked from the project root, this action creates a logical folder in the tree structure (the icon is a
magenta folder on Mac OS X - ).
New > Logical Folders from Web
Available when invoked from the project root, this action replicates the structure of a remote folder accessible over
FTP/SFTP/WebDAV, as a structure of logical folders. The newly created logical folders contain the file structure
of the folder it points to.
Add Content to a Logical Folder
The project itself is considered a logical folder. You can add content to a logical folder using one of the actions available
in the contextual menu, when invoked from the project root:
Oxygen XML Editor | Editing Documents | 160
Add Folder
Adds a link to a physical folder, whose name and content mirror a real folder that exists in the local file system (the
icon of this action is different on Mac OS X
).
Add Files
Adds links to files on the local file system.
Add Edited File
Adds a link to the currently edited file in the project.
Managing Project Content
Creating/Adding Files and Folders
You can create linked folders (shortcuts) by dragging and dropping folders from the Windows Explorer / Mac OS X
Finder to the project tree, or by selecting Add Folder in the contextual menu from the project root. To create a file inside
a linked folder, select the New >
File action from the contextual menu.
Note: The linked files presented in the Project view are marked with a special icon. Linked folders are displayed
in bold text.
You can create physical folders by selecting New > Folder from the contextual menu.
When adding files to a project, the default target is the project root. To change a target, select a new folder. Files may
have multiple instances within the folder system, but cannot appear twice within the same folder.
Removing Files and Folders
To remove one or more linked files or folders, select them in the project tree and press the Delete key, or select the
contextual menu action
Remove from Project. To remove a linked file or folder from both project and local file
system, select the contextual menu action
Remove from Disk (Shift+Delete). The
Remove from Disk
(Shift+Delete) action is also used to remove physical files or folders.
Caution: In most cases this action is irreversible, deleting the file permanently. Under particular circumstances
(if you are running a Windows installation of Oxygen XML Editor and the Recycle Bin is active) the file is
moved to Recycle Bin.
Moving Files and Folders
You can move the resources of the project with drag and drop operations on the files and folders of the tree.
You can also use the usual
Cut,
Copy, and
Paste actions to move resources in the Project view.
Renaming Files and Folders
There are three ways you can rename an item in the Project view. Select the item in the Project view and do one of the
following:
•
•
•
Invoke the Rename action from the contextual menu.
Press F2 and type the new name.
Click the selected item and type the new name.
To finish editing the item name, press Enter.
Note: The Rename action is also available on logical files.
Locating and Opening Files
If a project folder contains a lot of documents, a certain document can be located quickly in the project tree by selecting
the folder containing the desired document and typing the first few characters of the document name. The desired
document is automatically selected as soon as the typed characters uniquely identify its name in the folder.
Oxygen XML Editor | Editing Documents | 161
The selected document can be opened by pressing the Enter key, by double-clicking it, or with one of the Open actions
from the contextual menu. The files with known document types are opened in the associated editor, while binary files
are opened with the associated system application. To open a file with a known document type in an editor other than
the default one, use the Open with action. Also, dragging and dropping files from the project tree to the editor area
results in the files being opened.
Saving the Project
The project file is automatically saved every time the content of the Project view is saved or modified by actions such
as adding or removing files and drag and drop.
Validate Files
The currently selected files in the Project view can be checked to be XML well-formed or validated against a schema
(DTD, XML Schema, Relax NG, Schematron or NVDL) with one of the following contextual menu actions found in
the Validate sub-menu:
Validate >
Check Well-Formedness
Checks if the selected file or files are well-formed.
Validate
Validate
Validates the selected file or files against their associated schema. EPUB files make an exception, because this
action triggers a Validate and Check for Completeness operation.
ValidateValidate with Schema
Validates the selected file of files against a specified schema.
Validate
Configure Validation Scenario(s)
Allows you to configure and run a validation scenario.
Applying Transformation Scenarios
The currently selected files in the Project view can be transformed in one step with one of the following actions available
from contextual menu in the Transform sub-menu:
Transform >
Apply Transformation Scenario(s)
Obtains the output with one of the built-in scenarios.
Transform >
Configure Transformation Scenario(s)
Opens a dialog box that allows you to configure pre-defined transformation scenarios.
Transform >
Transform with
Allows you to select a transformation scenario to be applied to the currently selected files.
Along with the logical folder support, this allows you to group your files and transform them very easily.
Refactoring Actions (Available for certain document types (such as XML, XSD, and XSL)
Oxygen XML Editor includes some refactoring operations that help you manage the structure of your documents. The
following actions are available from the contextual menu in the Refactoring sub-menu:
Refactoring > Rename resource
Allows you to change the name of a resource.
Refactoring > Move resource
Allows you to change the location on disk of a resource.
Refactoring >
XML Refactoring
Opens the XML Refactoring tool wizard that presents refactoring operations to assist you with managing the structure
of your XML documents.
Oxygen XML Editor | Editing Documents | 162
Other Contextual Menu Actions
Other actions that are available in the contextual menu from the project tree include:
Open
Opens the selected file in the editor.
Open with submenu
This submenu allows you to open the selected file with the internal editor, a system application, or other internal
tools: DITA Maps Manager, Archive Browser, MathML Editor, Generate/Convert Schema, WSDL/SOAP Analyzer,
Large File Viewer, Hex Viewer, SVG Viewer.
Open All Files (when a folder or multiple resources are selected)
Opens all the selected files with the corresponding editors.
Show in Explorer (or Show in Finder on OS X)
In Windows, the content of the selected folder or file is presented in a specific explorer window. On MAC OS X,
the parent folder is opened and the selected folder is highlighted in a specific finder window.
Copy Location
Copies an application-specific URL for the selected resource to the clipboard.
Refresh
Refreshes the content and the dependencies between the resources in the Master Files directory.
Find/Replace in Files
Allows you to find and replace text in multiple files.
XPath in Files
Opens the XPath/XQuery Builder view that allows you to compose XPath and XQuery expressions and execute
them over the currently edited XML document.
Open/Find Resource
Opens the Open/Find Resource dialog box.
Check Spelling in Files
Allows you to check the spelling of multiple files.
Format and Indent Files
Opens the Format and Indent Files dialog box that allows you to configure the format and indent (pretty print)
action that will be applied on the selected documents.
Open in SVN Client
Syncro SVN Client tool is opened and it highlights the selected resource in its corresponding working copy.
Compare
Opens the Compare Directories or Compare Files tool.
Generate Documentation > XML Schema Documentation
Opens the XML Schema Documentation Dialog Box.
Generate Documentation > XSLT Stylesheet Documentation
Opens the XSLT Stylesheet Documentation Dialog Box.
Generate Documentation > XQuery Documentation
Opens the XQuery Documentation Dialog Box.
Generate Documentation > WSDL Documentation
Opens the WSDL Documentation Dialog Box.
Properties
Displays the properties of the current file in a Properties dialog box.
Oxygen XML Editor | Editing Documents | 163
Menu Level Actions
The following actions are available in the Project menu:
New Project
Creates a new, empty project.
Open Project (Ctrl F2 (Meta F2 on OS X))
Opens an existing project. Alternatively, you can open a project by dropping an Oxygen XML Editor XPR project
file from the file explorer into the Project panel.
Note: When a project is opened for the first time, a confirmation dialog box will be displayed that asks
you to confirm that the project came from a trusted source. This is meant to help prevent potential security
issues.
Save Project As
Allows you to save the current project under a different name.
Validate all project files
Checks if the project files are well-formed and their mark-up conforms with the specified DTD, XML Schema, or
Relax NG schema rules. It returns an error list in the message panel.
Filters
Opens the Project filters dialog box that allows you to decide which files and directories will be shown or hidden.
Enable Master Files Support
Allows you to enable the Master Files Support for each project you are working on.
Change Search and Refactor operations scope
Opens a dialog box that allows you to define the context of search and refactor operations.
Show Project View
Displays the project view.
Reopen Project
Contains a list of links of previously used projects. This list can be emptied by invoking the Clear history action.
Moving/Renaming Resources in the Project View
The Project view allows you to move or rename files in the current project.
Moving Resources
To move a file or directory in the Project view, drag and drop it to the new location in the tree structure or use the
Cut and
Paste actions from the contextual menu or Edit menu (you can also use the
actions from the contextual menu or Edit menu to copy resources to a new location).
Copy and
Paste
You can also move certain types of files (such as XML, XML Schema, Relax NG, WSDL, and XSLT) by using the
Refactoring > Move resource action from the contextual menu. This action opens the Move resource dialog box that
includes the following options:
•
•
•
Destination - Presents the path to the current location of the resource you want to move and gives you the option to
introduce a new location.
New name - Presents the current name of the moved resource and gives you the option to change it.
Update references of the moved resource(s) - Enable this option to update the references to the resource you are
moving, based upon the selected scope. You can select or configure the scope by using the
button.
Oxygen XML Editor | Editing Documents | 164
Renaming Resources
To quickly rename a file or a directory, use the in-place editing either by pressing F2 or by selecting Rename from the
contextual menu.
You can also rename certain types of files (such as XML, XML Schema, Relax NG, WSDL, and XSLT) by using the
Refactoring > Rename resource action from the contextual menu. This action opens the Rename resource dialog
box that includes the following options:
•
•
New name - Presents the current name of the edited resource and allows you to modify it.
Update references of the renamed resource - Enable this option to update the references to the resource you are
renaming. You can select or configure the scope by using the
button.
Problems Updating References of Moved/Renamed Resources
In some case the references of a moved or a renamed resource can not be updated. For example, when a resource is
resolved through an XML catalog or when the path to the moved or renamed resource contains entities. For these cases,
Oxygen XML Editor displays a warning dialog box.
Figure 72: Problems Dialog Box
Sharing a Project - Team Collaboration
You can use XML projects to make team collaboration and synergy efficient and effective. Not only can you share the
project files and folders, but Oxygen XML Editor also allows you to store preferences, transformation scenarios, and
validation scenarios in a project file (.xpr file extension). It can be saved on a version control system (such as SVN,
CVS, or Source Safe) or in a shared folder, so that your team will have access to the same resources stored in the project
file.
Oxygen XML Editor | Editing Documents | 165
Sharing Preferences (Creating a Project-Level Options File)
To share options that are configured in certain preferences pages, you can create a project-level options file by storing
them in a project file (.xpr file extension). To do so, follow these steps:
1.
2.
3.
4.
You many want to use a fresh install for this procedure, to make sure that you do not copy personal or local preferences.
In the Project view, create a project or open an existing one.
Open the Preferences dialog box.
Configure the options in each preferences page that you want to be included in the project file and switch the storage
preference to Project Options in each page.
Note: Some pages do not have the Project Options switch, since the options they host might contain
sensitive data (such as passwords, for example) that is unsuitable for sharing with other users.
5. Click OK and close the Preferences dialog box.
All explicitly set values are now saved in the project file. You can then share the project file so that your team will
have the same option configuration that you stored in the project file.
Note: The project file extension (.xpr) must be preserved when the file is distributed to others.
Note: When a project is opened for the first time, a confirmation dialog box will be displayed that asks you
to confirm that the project came from a trusted source. This is meant to help prevent potential security issues.
Sharing Transformation Scenarios
To share created and edited transformation scenarios, you can store them in a project file (.xpr file extension) by
following these steps:
1. In the Project view, create a project or open an existing one.
2. When you create a new transformation scenario or edit an existing one, there is a Storage option. Switch the storage
preference to Project Options in each transformation scenario you want to be included in the project file.
3. Click OK to store the scenario in the project file.
You can then share the project file so that your team will have access to the same transformation scenarios that you
stored in the project file. When you create a scenario at the project level, the URLs from the scenario become relative
to the project URL.
Note: The project file extension (.xpr) must be preserved when the file is distributed to others.
Note: When a project is opened for the first time, a confirmation dialog box will be displayed that asks you
to confirm that the project came from a trusted source. This is meant to help prevent potential security issues.
Sharing Validation Scenarios
To share created and edited validation scenarios, you can store them in a project file (.xpr file extension) by following
these steps:
1. In the Project view, create a project or open an existing one.
2. When you create a new validation scenario or edit an existing one, there is a Storage option. Switch the storage
preference to Project Options in each validation scenario you want to be included in the project file.
3. Click OK to store the scenario in the project file.
You can then share the project file so that your team will have access to the same validation scenarios that you stored
in the project file. When you create a scenario at the project level, the URLs from the scenario become relative to
the project URL.
Note: The project file extension (.xpr) must be preserved when the file is distributed to others.
Note: When a project is opened for the first time, a confirmation dialog box will be displayed that asks you
to confirm that the project came from a trusted source. This is meant to help prevent potential security issues.
Oxygen XML Editor | Editing Documents | 166
Syncro SVN Client (Apache Subversion™)
To assist you with team collaboration and sharing projects, Oxygen XML Editor includes an embedded SVN (Subversion)
Client. Even if you start developing a new project, or you want to migrate an existing one to Subversion, the Syncro
SVN Client allows you to easily share it with the rest of your team.
It can be accessed from the Tools menu and can be used for synchronizing your working copy with a central repository.
It can also be started by selecting the
Open in SVN Client action from the contextual menu of the Project view.
This action opens the Syncro SVN Client and shows the selected project file in the Working Copy view.
Minimize Differences Between Versions Saved on Different Computers
The number of differences between versions of the same file saved by different content authors on different computers
can be minimized by imposing the same set of formatting options when saving the file, for all the content authors. An
example, the following procedure can be used to minimize the differences:
1. Create an Oxygen XML Editor project file that will be shared by all content authors.
2. Configure your own formatting preferences. To do this, open the Preferences dialog box, go to Editor > Format,
configure the appropriate options in this page, then go to Editor > Format > XML and configure the options there.
3. Save the configured options into your project file by selecting Project Options in both of the preferences pages.
4. Save the project and commit the project file to your versioning system so all the content authors can use it.
5. Make sure the project is opened in the Project view.
6. Open and save your XML files in the Author mode.
7. Commit the saved XML files to your versioning system.
When other content authors change the files, only the changed lines will be displayed in your diff tool instead of one
big change that does not allow you to see the changes between two versions of the file.
Defining Master Files at Project Level
This chapter details the Master Files Support available in Oxygen XML Editor.
The Master Files Support helps you simplify the configuration and development of XML projects. A Master File
typically refers to the root of an import/include tree of modules.
Introduction to Master Files at Project Level
Oxygen XML Editor allows you to define master files at project level. These master files are automatically used by
Oxygen XML Editor to determine the context for operations such as validation, content completion, refactoring, or
search for XML, XSD, XSL, WSDL, and RNG modules. Oxygen XML Editor maintains the hierarchy of the master
files, helping you to determine the editing context.
To watch our video demonstration about the Master Files Support for XML documents, XSL documents, and WSDL
documents, go to Working with Modular XML Files, Master Files Support, and Working with Modular WSDL Files,
respectively.
Master Files Benefits
When you edit a module after defining the master files, you have the following benefits:
•
•
•
•
When the module is validated, Oxygen XML Editor automatically identifies the master files that include the module
and validates all of them.
The Content Completion Assistant presents all the components that are collected, from the master files to the modules
they include.
The Outline view displays all the components that are defined in the master files hierarchy.
The master files that are defined for the current module determines the scope of the search and refactoring actions.
Oxygen XML Editor performs the search and refactoring actions in the context that the master files determine, thus
improving the speed of execution.
Oxygen XML Editor | Editing Documents | 167
Enabling the Master Files Support
Oxygen XML Editor stores the master files in a folder located in the Project view, as the first child of the project root.
The Master Files Support is disabled by default. To enable the Master Files Support, go to the Settings menu of the
Project view and select Enable Master Files Support. You can also select Enable Master Files Support from the
contextual menu of the Master Files directory, or from the contextual menu of the project itself. Oxygen XML
Editor allows you to enable/disable the Master Files Support for each project you are working on.
When the Master Files Support is disabled, Oxygen XML Editor displays a window tip located at the bottom of the
project view. This window contains an Enable button and a read more option. Clicking the read more option takes
you to the user guide. Clicking the Enable button opens the Enable Master Files dialog box. This dialog box contains
general information about the Master Files Support and allows you to enable it. You can also use the Detect and
Enable option to detect the master files from the current project.
Note: Once you close this window tip, Oxygen XML Editor hides it for all projects. To make the window tip
reappear, restore Oxygen XML Editor to its default settings.
Warning: Restoring Oxygen XML Editor to its default settings causes loss of your customized options.
Detecting Master Files
Oxygen XML Editor allows you to detect the master files using the
Detect Master Files option available in the
contextual menu of the project. This action applies to the folders you select in the project. To detect master files over
the entire project, do one of the following:
•
Right-click the root of the project and select
•
Use the
folder.
Detect Master Files.
Detect Master Files from Project option, available in the contextual menu of the Master Files
Both of these options display the Detect Master Files wizard. In the first panel you can select the type of master files
you want Oxygen XML Editor to detect. In the subsequent panel the detected master files are presented in a tree-like
fashion.The resources are grouped into three categories:
•
•
•
Possible master files - the files presented on the first level in this category are not imported/included from other files.
These files are most likely to be set as master files.
Cycles - the files that are presented on the first level have circular dependencies between them. Any of the files
presented on the first level of a cycle is a possible master file.
Standalone - files that do not include/import other files and are also not included/imported themselves. It is not
necessary to set them as master files.
To set them as master files, enable their check-boxes. Oxygen XML Editor marks all the children of a master file as
modules. Modules are rendered in gray and their tool-tip presents a list of their master files. A module can be accessed
from more than one master file.
The master files that are already defined in the project are automatically marked in the tree and cannot be removed. The
only way to disable a master file is to delete it from the Master Files folder.
The next panel displays a list with the selected master files. Click the Finish button to add the master files in the Master
Files folder.
You can use the Select Master Files option to automatically mark all master files. This action sets all the resources
from the Possible Master Files category and the first resource of each Cycle as master files .
Tip: We recommend you to only add top-level files (files that are at the root of the include/import graph) in
the Master Files directory. Keep the file set to a minimum and only add files that import or include other
files.
Attention: If the Master Files Support is disabled, the Master Files directory is rendered only if it contains
master files.
Oxygen XML Editor | Editing Documents | 168
Adding/Removing a Master File
The Master Files directory only contains logical folders and linked files. To add files in the Master Files
directory, use one of the following methods:
•
Right-click a file from your project and select
•
Select
Add Files or
Add Edited File from the contextual menu of the Master Files directory.
Drag and drop files into the Master Files directory.
•
•
From the contextual menu of the
action.
Add to Master Files from the contextual menu.
Resource Hierarchy Dependencies view, use the
Add to Master Files
You can view the master files for the current resource in the Properties dialog of the Project view and the master files
for the current editor in the Properties and Information views.
Project Validation and Transformation
The Master Files Support is also useful for project level validation and transformation. When you hover the cursor
over a file in the Master Files directory, Oxygen XML Editor displays the
Validate and
Transform buttons
at the right of the file. Select one of these buttons to run a transformation, or validation scenario. If the current node is
selected, Oxygen XML Editor executes a batch transformation and validation. If the current node is not selected, Oxygen
XML Editor executes the validation and transformation for the current node only. The behavior of these actions is the
same as the behavior of the transformation actions that are available in the contextual menu.
Note: The tooltip of the
can apply.
Validate and
Transform buttons displays the associated scenarios that you
When you hover the cursor over the Master Files directory itself, apart from the
Validate and
Transform
buttons, Oxygen XML Editor displays a
Help button. To open the Help section regrading the Master Files Support
click this button, or press F1 on your keyboard.
The Contextual Menu of the Master Files
The contextual menu of the Master Files directory contains the following actions:
New
Allows you to create a File, Logical Folder, or Project.
Add Files
Allows you to add master files to the Master Files directory.
Add Edited File
Use this option to add the currently edited file to the Master Files directory.
Open All Files
Opens all the files of the Master Files directory.
Paste
Pastes the files you copy in the Master Files directory.
Rename
Allows you to rename a file in the Master Files directory.
Refresh
Refreshes the content of the Master Files directory.
Find/Replace in Files
Opens the Find/Replace dialog box.
Oxygen XML Editor | Editing Documents | 169
XPath in Files
Opens the XPath/XQuery Builder view that allows you to compose XPath and XQuery expressions and execute
them over the currently edited XML document.
Open/Find Resource
Opens the Open/Find Resource dialog box.
Check Spelling in Files
Opens the Check Spelling in Files dialog box.
Transform
Provides access to one of the following actions:
Apply Transformations Scenario(s)
Applies the transformation scenarios associated with the Master Files directory.
Configure Transformation Scenario(s)
Opens the Configure Transformation Scenario dialog box.
Transform with
Opens the Transform with dialog box that allows you to select the transformation scenario you want to execute.
Validate
Provides access to one of the following actions:
Check Well-Formedness
Allows you to check if a document is Namespace Well-Formed XML.
Validate
Oxygen XML Editor performs the validation of the master files.
Validate with Schema
Opens the Validate with dialog box. Oxygen XML Editor performs the validation of the master files using a
schema.
Configure Validation Scenario(s)
Opens the Configure Validation Scenario dialog box.
Detect Master Files from Project
Enables automatic detection of master files.
Enable Master Files Support
Select this option to enable the Master Files Support.
Editing XML Documents
This section explains the XML editing features of the application. All the user interface components and actions available
to users are described in detail with appropriate procedures for various tasks.
Editing XML Documents in Text Mode
This section includes features and actions for editing XML documents in the Text mode of Oxygen XML Editor.
Contextual Menu Actions in Text Mode
When editing XML documents in Text mode, Oxygen XML Editor provides the following actions in the contextual
menu (many of them also appear in the submenus of the Document menu):
Oxygen XML Editor | Editing Documents | 170
Cut,
Copy,
Paste
Executes the typical editing actions on the currently selected content.
Copy XPath
Copies the XPath expression of the current element or attribute from the current editor to the clipboard.
Toggle Comment (Ctrl Shift Comma (Meta Shift M on OS X))
Comments the current selection of the current editor. If the selection already contains a comment the action removes
the comment from around the selection. If there is no selection in the current editor and the cursor is not positioned
inside a comment the current line is commented. If the cursor is positioned inside a comment then the commented
text is uncommented.
Go to submenu
This submenu includes the following actions:
Go to Matching Tag (Ctrl Shift G)
Moves the cursor to the end tag that matches the start tag, or vice versa.
Go after Next Tag (Ctrl Close Bracket (Meta Close Bracket on OS X))
Moves the cursor to the end of the next tag.
Go after Previous Tag (Ctrl Open Bracket (Meta Open Bracket on OS X))
Moves the cursor to the end of the previous tag.
Select submenu
This submenu allows you to select the following:
Element
Selects the entire element at the current cursor position.
Content
Selects the entire content of the element at the current cursor position, excluding the start and end tag. Performing
this action repeatedly will result in the selection of the content of the ancestor of the currently selected element
content.
Attributes
Selects all the attributes of the element at the current cursor position.
Parent
Selects the parent of the element at the current cursor position.
Source submenu
This submenu includes the following actions:
Shift Right (Tab)
Shifts the currently selected block to the right.
Shift Left (Shift Tab)
Shifts the currently selected block to the left.
Indent selection (Ctrl I (Meta I on OS X))
Corrects the indentation of the selected block of lines if it does not follow the current indenting preferences.
Escape Selection
Escapes a range of characters by replacing them with the corresponding character entities.
Unescape Selection
Replaces the character entities with the corresponding characters.
Format and Indent Element (Ctrl Shift I (Meta Shift I on OS X))
Pretty prints the element that surrounds the current cursor position.
Oxygen XML Editor | Editing Documents | 171
To Upper Case
Converts the content selection to upper case characters.
To Lower Case
Converts the content selection to lower case characters.
Capitalize Lines
It capitalizes the first letter found on every new line that is selected. Only the first letter is affected, the rest of
the line remains the same. If the first character on the new line is not a letter then no changes are made.
Convert Hexadecimal Sequence to Character (Alt X (Meta Shift X on OS X))
Converts a sequence of hexadecimal characters to the corresponding Unicode character. A valid hexadecimal
sequence can be composed of 2 to 4 hexadecimal characters, preceded or not by the 0x or 0X prefix. Examples
of valid sequences: 0x0045, 0X0125, 1253, 265, 43.
To convert a hexadecimal sequence to a character, do one of the following:
•
•
place the cursor at the right side of a valid hexadecimal sequence, then press Alt X (Meta Shift X on OS
X) on your keyboard
select a valid hexadecimal sequence, then press Alt X (Meta Shift X on OS X) on your keyboard
Join and Normalize Lines (Ctrl J (Meta J on OS X))
For the current selection, this action joins the lines by replacing the line separator with a single space character.
It also normalizes the whitespaces by replacing a sequence of such characters with a single space.
Insert new line after (Ctrl Alt Enter (Meta Alt Enter on OS X))
This action has the same result as moving the cursor to the end of the current line and pressing the ENTER key.
Insert XInclude
Displays a dialog box that allows you to browse and select the content to be included and automatically generates
the corresponding XInclude instruction.
Note: In the Author mode, this dialog box presents a preview of the inserted document as an author
page in the preview tab and as a text page in the Source tab. In the Text mode, the Source tab is
presented.
Import entities list
Displays a dialog box that allows you to select a list of files as sources for external DTD entities. The internal
subset of the DOCTYPE declaration of your document will be updated with the chosen entities. For instance,
choosing the files chapter1.xml and chapter2.xml inserts the following section in the DOCTYPE:
<!ENTITY chapter1 SYSTEM "chapter1.xml">
<!ENTITY chapter2 SYSTEM "chapter2.xml">
Lock / Unlock the XML Tags
Disables or enables the ability to edit XML tags.
Canonicalize
Opens the Canonicalize dialog box that allows you to select a canonicalization algorithm to standardize the
format of the document.
Sign
Opens the Sign dialog box that allows you to configure a digital signature for the document.
Verify Signature
Allows you to specify the location of a file to verify its digital signature.
Manage Highlighted Content submenu
This submenu is available from the contextual menu when it is invoked from a highlight after you perform a search
operation or apply an XPath expression that highlights more than one result. The following options are available in
this submenu:
Oxygen XML Editor | Editing Documents | 172
Modify All
Allows you to modify (in-place) all the occurrences of the selected content. A thin rectangle replaces the highlights
and allows you to start editing. If matches with different letter cases are found, a dialog box is displayed that
allows you select whether you want to modify only matches with the same letter case or all matches.
Surround All
Surround the highlighted content with a specific tag. This option opens the Tag dialog box. The Specify the tag
drop-down menu presents all the available elements that you can choose from.
Remove All
Removes all the highlighted content.
Modify All Matches
Use this option to modify (in-place) all the occurrences of the selected content (or the contiguous fragment in which
the cursor is located). When you use this option, a thin rectangle replaces the highlights and allows you to start
editing. If matches with different letter cases are found, a dialog box is displayed that allows you select whether
you want to modify only matches with the same letter case or all matches.
Show Definition (Ctrl Shift Enter)
Moves the cursor to the definition of the current element or attribute in the schema (DTD, XML Schema, Relax NG
schema) associated with the edited XML document. If the current attribute is a “type” belonging to the
“http://www.w3.org/2001/XMLSchema-instance” namespace, the cursor is moved in the XML schema to the definition
of the type referenced in the value of the attribute.
Refactoring submenu
This submenu includes the following actions:
Rename Element
The element from the cursor position, and any elements with the same name, can be renamed according with
the options from the Rename dialog box.
Rename Prefix (Alt Shift P)
The prefix of the element from the cursor position, and any elements with the same prefix, can be renamed
according with the options from the Rename dialog box.
•
If you select the Rename current element prefix option, the application will recursively traverse the current
element and all its children.
Note: For example, to change the xmlns:p1="ns1" association in the current element to
xmlns:p5="ns1", if the xmlns:p1="ns1" association is applied on the parent element, then
Oxygen XML Editor will introduce xmlns:p5="ns1" as a new declaration in the current element
and will change the prefix from p1 to p5. If p5 is already associated with another namespace in
the current element, then the conflict will be displayed in a dialog box. By pressing OK, the prefix
is modified from p1 to p5 without inserting a new declaration.
•
•
If you select the Rename current prefix in all document option, the application will apply the change on
the entire document.
To also apply the action inside attribute values, check the Rename also attribute values that start with
the same prefix checkbox.
Surround with submenu
Presents a drop-down menu that allows you to choose a tag to surround a selected portion of content.
Surround with Tags (Ctrl E (Meta E on OS X) )
Allows you to choose a tag that encloses a selected portion of content. If there is no selection, the start and end
tags are inserted at the cursor position.
•
If the Cursor position between tags option is enabled in the Content Completion Preferences page, the
cursor is placed between the start and end tag.
•
Oxygen XML Editor | Editing Documents | 173
If the Cursor position between tags option is disabled in the Content Completion Preferences page, the
cursor is placed at the end of the start tag, in an insert-attribute position.
Surround with ((Ctrl /))
Surround the selected content with the last tag used.
Delete element tags (Alt Shift X (Meta Alt X on OS X))
Deletes the start and end tag of the current element.
Split element (Alt Shift D (Ctrl Alt D on OS X))
Split the element from the cursor position into two identical elements. The cursor must be inside the element.
Join elements (Alt Shift J (Meta Alt J on OS X))
Joins the left and right elements relative to the current cursor position. The elements must have the same name,
attributes, and attributes values.
Attributes submenu
Contains predefined XML refactoring operations that pertain to attributes. Oxygen XML Editor considers the
editing context to get the names and namespaces of the element or attribute for which the contextual menu was
invoked, and uses this information to preconfigure some of the parameter values for the selected refactoring
operation.
Add/Change attribute
Allows you to change the value of an attribute or insert a new one.
Delete attribute
Allows you to remove one or more attributes.
Rename attribute
Allows you to rename an attribute.
Replace in attribute value
Allows you to search for a text fragment inside an attribute value and change the fragment to a new value.
Elements submenu
Contains predefined XML refactoring operations that pertain to elements. Oxygen XML Editor considers the
editing context to get the names and namespaces of the element or attribute for which the contextual menu was
invoked, and uses this information to preconfigure some of the parameter values for the selected refactoring
operation.
Delete element
Allows you to delete elements.
Delete element content
Allows you to delete the content of elements.
Insert element
Allows you to insert new elements.
Rename element
Allows you to rename elements.
Unwrap element
Allows you to remove the surrounding tags of elements, while keeping the content unchanged.
Wrap element
Allows you to surround elements with element tags.
Wrap element content
Allows you to surround the content of elements with element tags.
Oxygen XML Editor | Editing Documents | 174
Fragments submenu
Contains predefined XML refactoring operations that pertain to XML fragments. Oxygen XML Editor considers
the editing context to get the names and namespaces of the element or attribute for which the contextual menu
was invoked, and uses this information to preconfigure some of the parameter values for the selected refactoring
operation.
Insert XML fragment
Allows you to insert an XML fragment.
Replace element content with XML fragment
Allows you to replace the content of elements with an XML fragment.
Replace element with XML fragment
Allows you to replace elements with an XML fragment.
Manage IDs submenu
This submenu is available for XML documents that have an associated DTD, XML Schema, or Relax NG schema.
It includes the following actions:
Rename in
Renames the ID and all its occurrences. Selecting this action opens the Rename XML ID dialog box. This
dialog box lets you insert the new ID value and choose the scope of the rename operation. For a preview of the
changes you are about to make, click Preview. This opens the Preview dialog box, which presents a list with
the files that contain changes and a preview zone of these changes.
Rename in File
Renames the ID you are editing and all its occurrences from the current file.
Search References
Searches for the references of the ID. By default, the scope of this action is the current project. If you configure
a scope using the Select the scope for the Search and Refactor operations dialog box, this scope will be used
instead.
Search References in
Searches for the references of the ID. Selecting this action opens the Select the scope for the Search and Refactor
operations.
Search Declarations
Searches for the declaration of the ID reference. By default, the scope of this action is the current project. If you
configure a scope using the Select the scope for the Search and Refactor operations dialog box, this scope will
be used instead.
Search Declarations in
Searches for the declaration of the ID reference. Selecting this action opens the Select the scope for the Search
and Refactor operations.
Search Occurrences in file
Searches for the declaration an references of the ID in the current document.
Quick Assist (Alt 1 (Meta Alt 1 on OS X))
Available when the cursor is inside an ID or IDREF, this action opens the Quick Assist window that allows you to
select some search and refactoring actions for the selected ID or IDREF.
Open submenu
The following actions are available in this submenu:
Open File at Cursor
Opens the file at the cursor position in a new panel. If the file path represents a directory path, it will be opened
in system file browser. If the file at the specified location does not exist, an error dialog box is displayed and it
includes a Create new file button that starts the New document wizard. This allows you to choose the type or
Oxygen XML Editor | Editing Documents | 175
the template for the file. If the action succeeds, the file is created with the referenced location and name and is
opened in a new editor panel.
Open File at Cursor in System Application
Opens the file (identified by its link) or web page (identified by a web link) found at cursor position. The target
is opened in the default system application associated with that file type.
Compare
Opens the current file in the Compare Files tool.
Resource Hierarchy
Opens the Resource Hierarchy/Dependencies view that allows you to see the resource hierarchy for an XML
document.
Resource Dependencies
Opens the Resource Hierarchy/Dependencies view that allows you to see the resource dependencies for an XML
document.
Smart Editing
Oxygen XML Editor includes smart editing features to help you edit XML documents in Text mode. The following
smart editing features are included:
•
•
•
•
•
•
Closing tag auto-expansion - This feature helps save some keystrokes by automatically inserting a closing tag when
you insert a complete start tag and the cursor is automatically placed in between the start and end tags. For instance,
after entering a start <tag>, the corresponding closing </tag> is automatically inserted and the cursor is placed
between the two (<tag>|</tag>.
Auto-rename matching tag - When you edit the name of a start tag, Oxygen XML Editor will mirror-edit the name
of the matching end tag. This feature can be controlled from the Content Completion option page.
Auto-breaking the edited line - The Hard line wrap option automatically breaks the edited line when its length
exceeds the maximum line length defined for the format and indent operation.
Indent on Enter - The Indent on Enter option indents the new line inserted when you press Enter.
Smart Enter - The Smart Enter option inserts an empty line between the start and end tags. If you press Enter between
a start and end tag, the action places the cursor in an indented position on the empty line between the lines that contain
the start and end tag.
Double-click - A double-click selects a certain text, depending on the position of the click in the document:
•
•
•
•
If the click position is on a start tag or end tag, then the element name is selected.
If the click position is immediately after the opening quote or immediately before the closing quote of an attribute
value, then the entire attribute value is selected.
Otherwise, a double-click selects contiguous text.
Triple-click - A triple-click selects entire regions of text, depending on the click position:
•
•
•
•
•
•
If the click position is on a start or end tag, then the entire tag is selected, including the start and end tags, and
the content in between.
If the click position is after a start tag or before an end tag, then the entire content of the element without the start
and end tags is selected.
If the click position is before a start tag or after an end tag, then the entire tag is selected, including the start and
end tags, and the content in between.
If the click position is immediately before an attribute, then the entire attribute and its value is selected.
If the click position is in between the opening and closing quotes of an attribute value, then the entire attribute
value is selected.
Otherwise, it selects the entire current line of text.
Using the Go To Dialog Box
To navigate precisely to a part of the document you are editing in the Text mode, use the Go to dialog box. To open
the Go to dialog box, go to Find > Go to (Ctrl+L (Cmd+L on Mac)).
Oxygen XML Editor | Editing Documents | 176
Figure 73: Go to Dialog Box
Complete the dialog box as follows:
•
•
•
Line - Destination line in the current document.
Column - Destination column in the current document.
Offset - Destination offset relative to the beginning of document.
Highlight ID Occurrences in Text Mode
To see the occurrences of an ID in an XML document in the Text mode, place the cursor inside the ID declaration or
reference. The occurrences are marked in the vertical side bar at the right of the editor. Click a marker on the side bar
to jump to the occurrence that it corresponds to. The occurrences are also highlighted in the editing area.
Note: Highlighted ID declarations are rendered with a different color than highlighted ID references. To
customize these colors or disable this feature, open the Preferences dialog box and go to Editor > Mark
Occurrences.
Quick Assist Support for IDs and IDREFS
The Quick Assist support is activated automatically when you place the cursor inside and ID or an IDREF. To access
it, click the yellow bulb help marker placed on the current line, in the line number stripe of the editor. You can also
invoke the quick assist menu from the contextual menu or by pressing Alt 1 (Meta Alt 1 on Mac OS X) on your
keyboard.
The following actions are available:
Rename in
Renames the ID and all its occurrences. Selecting this action opens the Rename XML ID dialog box. This dialog
box lets you insert the new ID value and choose the scope of the rename operation. For a preview of the changes
you are about to make, click Preview. This opens the Preview dialog box, which presents a list with the files that
contain changes and a preview zone of these changes.
Search Declarations
Searches for the declaration of the ID reference. By default, the scope of this action is the current project. If you
configure a scope using the Select the scope for the Search and Refactor operations dialog box, this scope will be
used instead.
Search References
Searches for the references of the ID. By default, the scope of this action is the current project. If you configure a
scope using the Select the scope for the Search and Refactor operations dialog box, this scope will be used instead.
Change scope
Opens the Select the scope for the Search and Refactor operations dialog box.
Rename in File
Renames the ID you are editing and all its occurrences from the current file.
Search Occurrences
Searches for the declaration an references of the ID located at the cursor position in the current document.
Oxygen XML Editor | Editing Documents | 177
Shortcut Actions in Text Mode
The Text editing mode allows you to use the following shortcut actions:
Ctrl Delete (Command Delete on OS X)
Deletes the next word.
Ctrl Backspace (Command Backspace on OS X)
Deletes the previous word.
Ctrl W (Meta W on OS X)
Cuts the previous word.
Ctrl K (Meta K on OS X)
Cuts to end of line.
Ctrl Single-Click (Command Single-Click on OS X)
Use this shortcut to open any of the following:
•
•
•
Any absolute URL (URLs that have a protocol), regardless of their location in the document.
URI attributes such as: schemaLocation, noNamespaceSchemaLocation, href and others.
Processing instructions used for associating resources, xml-models, xml-stylesheets.
Ctrl Shift Y (Meta Shift Y on OS X) (Document > Edit > Toggle Line Wrap)
Enables or disables line wrapping. When enabled, if text exceeds the width of the displayed editor, content is wrapped
so that you do not have to scroll horizontally.
Inserting or Opening a File at Cursor Location
When editing content in Text mode, the following actions (in regards to inserting, opening, or comparing files) are
available in the Document > File menu:
Insert File
Inserts the content of the file with the specified file path into the current document, at the current position of the
cursor.
Open File at Cursor
Opens the file at the cursor position in a new panel. If the file path represents a directory path, it will be opened in
system file browser. If the file at the specified location does not exist, an error dialog box is displayed and it includes
a Create new file button that starts the New document wizard. This allows you to choose the type or the template
for the file. If the action succeeds, the file is created with the referenced location and name and is opened in a new
editor panel.
Open File at Cursor in System Application
Opens the file (identified by its link) or web page (identified by a web link) found at cursor position. The target is
opened in the default system application associated with that file type.
Compare
Opens the current file in the Compare Files tool.
Formatting and Indenting XML Documents
Oxygen XML Editor creates XML documents using several different edit modes. In text mode, you as the author decide
how the XML file is formatted and indented. In the other modes, and when you switch between modes, Oxygen XML
Editor must decide how to format and indent the XML. Oxygen XML Editor will also format and indent your XML for
you in text mode if you use one of the Format and Indent options:
•
Document > Source >
•
Document > Source >
Indent Selection - Indents the current selection (but does not add line breaks). This
action is also available in the Source submenu of the contextual menu.
Format and Indent - Formats and indents the whole document.
Oxygen XML Editor | Editing Documents | 178
•
Document > Source >
Format and Indent Element - Formats and indents the current element (the inmost
nested element which currently contains the cursor) and its child-elements. This action is also available in the Source
submenu of the contextual menu.
A number of settings affect how Oxygen XML Editor formats and indents XML. Many of these settings have to do with
how whitespace is handled.
Significant and insignificant whitespace in XML
XML documents are text files that describe complex documents. Some of the white space (spaces, tabs, line feeds, etc.)
in the XML document belongs to the document it describes (such as the space between words in a paragraph) and some
of it belongs to the XML document (such as a line break between two XML elements). Whitespace belonging to the
XML file is called insignificant whitespace. The meaning of the XML would be the same if the insignificant whitespace
were removed. Whitespace belonging to the document being described is called significant whitespace.
Knowing when whitespace is significant or insignificant is not always easy. For instance, a paragraph in an XML
document might be laid out like this:
<p>
NO Freeman shall be taken or imprisoned, or be disseised of his Freehold, or Liberties, or
free Customs, or be outlawed, or exiled, or any other wise destroyed; nor will We not pass
upon him, nor condemn him, but by lawful judgment of his Peers, or by the <xref
href="http://en.wikipedia.org/wiki/Law_of_the_land" format="html" scope="external">Law of the land</xref>.
We will sell to no man, we will not deny or defer to any man either Justice or Right.
</p>
By default, XML considers a single whitespace between words to be significant, and all other whitespace to be
insignificant. Thus the paragraph above could be written all on one line with no spaces between the start tag and the
first word or between the last word and the end tag and the XML parser would see it as exactly the same paragraph.
Removing the insignificant space in markup like this is called normalizing space.
In some cases, all the spaces inside an element should be treated as significant. For example, in a code sample:
<codeblock>
class HelloWorld
{
public static void main(String args[])
{
System.out.println("Hello World");
}
}
</codeblock>
Here every whitespace character between the codeblock tags should be treated as significant.
How Oxygen XML Editor determines when whitespace is significant
When Oxygen XML Editor formats and indents an XML document, it introduces or removes insignificant whitespace
to produce a layout with reasonable line lengths and elements indented to show their place in the hierarchy of the
document. To correctly format and indent the XML source, Oxygen XML Editor needs to know when to treat whitespace
as significant and when to treat it as insignificant. However it is not always possible to tell this from the XML source
file alone. To determine what whitespace is significant, Oxygen XML Editor assigns each element in the document to
one of four categories:
Ignore space
In the ignore space category, all whitespace is considered insignificant. This generally applies to content that consists
only of elements nested inside other elements, with no text content.
Normalize space
In the normalize space category, a single whitespace character between character strings is considered significant
and all other spaces are considered insignificant. This generally applies to elements that contain text content only.
This content can be normalized by removing insignificant whitespace. Insignificant whitespace may then be added
to format and indent the content.
Oxygen XML Editor | Editing Documents | 179
Mixed content
In the mixed content category, a single whitespace between text characters is considered significant and all other
spaces are considered insignificant. However,
•
Whitespace between two child elements embedded in the text is normalized to a single space (rather than to zero
spaces as would normally be the case for a text node with only whitespace characters, or the space between
elements generally).
•
The lack of whitespace between a child element embedded in the text and either adjacent text or another child
element is considered significant. That is, no whitespace can be introduced here when formatting and indenting
the file.
For example:
<p>The file is located in <i>HOME</i>/<i>USER</i>/hello. This is s <strong>big</strong>
<emphasis>deal</emphasis>.
</p>
In this example, whitespace should not be introduced around the i tags as it would introduce extra significant
whitespace into the document. The space between the end </strong> tag and the beginning <emphasis> tag
should be normalized to a single space, not zero spaces.
Preserve space
In the preserve space category, all whitespace in the element is regarded as significant. No changes are made to the
spaces in elements in this category. Note, however, that child elements may be in a different category, and may be
treated differently.
Attribute values are always in the preserve space category. The spaces between attributes in an element tag are always
in the default space category.
Oxygen XML Editor consults several pieces of information to assign an element to one of these categories. An element
is always assigned to the most restrictive category (from Ignore to Preserve) that it is assigned to by any of the sources
Oxygen XML Editor consults. For instance, if the element is named on the Default elements list (as described below)
but it has an xml:space="preserve" attribute in the source file, it will be assigned to the preserve space category.
If an element has the xml:space="default" attribute in the source, but is listed on the Mixed content elements
list, it will be assigned to the mixed content category.
To assign elements to these categories, Oxygen XML Editor consults information from the following sources:
xml:space
If the XML element contains the xml:space attribute, the element is promoted to the appropriate category based
on the value of the attribute.
CSS whitespace property
If the CSS stylesheet controlling the Author mode editor applies the whitespace: pre setting to an element,
it is promoted to the preserve space category.
CSS display property
If a text node contains only white-spaces:
•
•
•
If the node has a parent element with the CSS display property set to inline then the node is promoted to
the mixed content category.
If the left or right sibling is an element with the CSS display property set to inline then the node is promoted
to the mixed content category.
If one of its ancestors is an element with the CSS display property set to table then the node is assigned
to the ignore space category.
Schema aware formatting
If a schema is available for the XML document, Oxygen XML Editor can use information from the schema to
promote the element to the appropriate category. For example:
•
Oxygen XML Editor | Editing Documents | 180
If the schema declares an element to be of type xs:string, the element will be promoted to the preserve space
category because the string built-in type has the whitespace facet with the value preserve.
•
If the schema declares an element to be mixed content, it will be promoted to the mixed content category.
Schema aware formatting can be turned on and off.
•
To turn it on or off for Author mode, open the Preferences dialog box and go to Editor > Edit modes > Author >
Schema aware > Schema aware normalization, format and indent.
•
To turn it on or off for the Text editing mode ,open the Preferences dialog box and go to Editor > Format >
XML > Schema aware format and indent.
Preserve space elements list
If an element is listed in the Preserve space list in the XML formatting preferences, it is promoted to the preserve
space category.
Default space elements list
If an element is listed in the Default space list in the XML formatting preferences, it is promoted to the default
space category
Mixed content elements list
If an element is listed in the Mixed content list in the XML formatting preferences, it is promoted to the mixed
content category.
Element content
If an element contains mixed content, that is, a mix of text and other elements, it is promoted to the mixed content
category. (Note that, in accordance with these rules, this happens even if the schema declares the element to have
element only content.)
If an element contains text content, it is promoted to the default space category.
Text node content
If a text node contains any non-whitespace characters then the text node is promoted to the normalize space category.
An exception to the rule
In general, a element can only be promoted to a more restrictive category (one that treats more whitespace as significant).
However, there is one exception. In Author mode, if an element is marked as mixed content in the schema, but the
actual element contains no text content, it can be demoted to the space ignore category if all of its child elements are
displayed as blocks by the associated CSS (that is, they have a CSS property of display: block). For example, in
some schemas, a section or a table entry can be defined as having mixed content but in many cases they contain only
block elements. In these cases, any whitespace they contain cannot be significant and they can be treated as space ignore
elements. This exception can be turned on or off using the option Editor / Edit modes / Author / Schema aware.
How Oxygen XML Editor formats and indents XML
You can control how Oxygen XML Editor formats and indents XML documents. This can be particularly important if
you store your XML document in a version control system, as it allows you to limit the number of trivial changes in
spacing between versions of an XML document. The following settings pages control how XML documents are formatted:
•
•
•
Format Preferences on page 1178
XML Formatting Preferences on page 1179
Whitespaces Preferences on page 1181
When Oxygen XML Editor formats and indents XML
Oxygen XML Editor formats and indents a document, or part of it, on the following occasions:
•
•
•
•
•
•
Oxygen XML Editor | Editing Documents | 181
In text mode when you select one of the format and indent options (Document > Source > Format and Indent,
Document > Source > Indent Selection, or Document > Source > Format and Indent Element).
When saving documents in Author mode.
When switching from Author mode to another mode.
When saving documents in Design mode.
When switching from Design mode to another mode.
When saving or switching to Text mode from Grid mode, if the option Editor / Edit modes / Grid / Format and
indent when passing from grid to text or on save is selected.
Setting an Indent Size to Zero
Oxygen XML Editor will automatically format and indent documents at certain times. This includes indenting the content
from the margin to reflect its structure. In some cases you may not want your content indented. To avoid your content
being indented, you can set an indent size of zero.
Note: Changing the indent size does not override the rules that Oxygen XML Editor uses for handling whitespace
when formatting and indenting XML documents. Indents in elements that require whitespace to be maintained
will not have their indent changed by these settings.
There are two cases to consider.
Maintaining zero indent in documents with zero indent
If you have existing documents with zero indent and you want Oxygen XML Editor to maintain a zero indent when
editing or formatting those documents:
1. Open the Preferences dialog box and go to Editor > Format.
2. Select Detect indent on open.
3. Select Use zero-indent if detected.
Oxygen XML Editor will examine the indent of each document as it is opened and if the indent is zero for all lines,
or for nearly all lines, a zero indent will be used when formatting and indenting the document. Otherwise, Oxygen
XML Editor will use the indent closest to what it detects in the document.
Enforcing zero indent for all documents
If you want all documents to be formatted with zero indent, regardless of their current indenting:
1. Open the Preferences dialog box and go to Editor > Format.
2. Deselect Detect indent on open.
3. Set Indent size to 0.
All documents will be formatted and indented with an indent of zero.
Warning: Setting the indent size to zero can change the meaning of some file types, such as Python source
files.
Format and Indent (Pretty Print) Multiple Files
Oxygen XML Editor provides support for formatting and indenting (pretty printing) multiple files at once. This action
is available for any document in XML format, as well as for XQuery, CSS, JavaScript, and JSON documents.
To format and indent multiple files, use the
Format and Indent Files action that is available in the contextual menu
of the Project view or from the Tools menu. This opens the Format and Indent Files dialog box that allows you to
configure options for the action.
Oxygen XML Editor | Editing Documents | 182
Figure 74: The Format and Indent Files Dialog Box
The Scope section allows you choose from the following scopes:
•
•
•
•
•
All opened files - The pretty print is performed in all opened files.
Directory of the current file - All the files in the folder of the current edited file.
Project files - All files from the current project.
Selected project files - The selected files from the current project.
Specified path - Pretty prints the files located at a specified path.
The Options section includes the following options:
•
•
•
•
File filter - Allow you to filter the files from the selected scope.
Recurse subdirectories - When enabled, the pretty print is performed recursively for the specified scope. The one
exception is that this option is ignored if the scope is set to All opened files.
Include hidden files - When enabled, the pretty print is also performed in the hidden files.
Make backup files with extension - When enabled, Oxygen XML Editor makes backup files of the modified files.
The default extension is .bak, but you can change the extension as you prefer.
Managing Highlighted Content
While working with XML documents you often have frequent changes to the structure and content. You are often faced
with a situation where you need to make a slight change in multiple places in the same document. Oxygen XML Editor
includes a feature, Manage Highlighted Content, that is designed to help you achieve this.
When you are in Text mode and you perform a search operation or apply an XPath that highlights more than one result,
you can select the Manage Highlighted Content action from the contextual menu of any highlight in the document,
and the following options are available in its submenu:
•
Modify All - Use this option to modify (in-place) all the occurrences of the selected content. When you use this
option, a thin rectangle replaces the highlights and allows you to start editing. If matches with different letter cases
are found, a dialog box is displayed that allows you select whether you want to modify only matches with the same
letter case or all matches.
Note: If you select a very large number of highlights that you want to modify using this feature, a dialog
box informs you that you may experience performance issues. You have the option to either use the
Find/Replace operation, or continue the operation.
•
Surround All - Use this option to surround the highlighted content with a specific tag. This option opens the Tag
dialog box. The Specify the tag drop-down menu presents all the available elements that you can choose from.
Oxygen XML Editor | Editing Documents | 183
•
Remove All - Removes all the highlighted content.
If you right-click content in another part of the document, other than a highlight, you have the option to select the
following option:
•
Modify All Matches - Use this option to modify (in-place) all the occurrences of the selected content (or the
contiguous fragment in which the cursor is located). When you use this option, a thin rectangle replaces the highlights
and allows you to start editing. If matches with different letter cases are found, a dialog box is displayed that allows
you select whether you want to modify only matches with the same letter case or all matches.
Editing XML Documents in Grid Mode
This section includes features and actions for editing XML documents in the Grid mode of Oxygen XML Editor.
Editing Actions in Grid Mode
In order to access these actions, you can click the column header and choose the Table item from the contextual menu.
The same set of actions is available in the Document menu and on the Grid toolbar which is opened from menu
Window > Show Toolbar > Grid.
Sorting a Table Column
You can sort certain table columns by using the
the Grid toolbar or from the contextual menu.
Sort ascending or
Sort descending actions that are available on
The sorting result depends on the data type of the column content. It can be different in case of number (numerical
sorting) or text information (alphabetical sorting). The editor automatically analyzes the content and decides what type
of sorting to apply. When a mixed set of values is present in the sorted column, a dialog box is displayed that allows
you to choose the desired type of sorting between numerical and alphabetical.
Inserting a Row in a Table
You can add a new row using the Copy/Paste actions, or by selecting
Grid toolbar.
Insert row from the contextual menu or the
For a faster way to insert a new row, move the selection over the row header, and then press Enter. The row header is
the zone in the left of the row that holds the row number. The new row is inserted below the selection.
Inserting a Column in a Table
You can insert a column after the selected column by using the
the Grid toolbar.
Insert column action from the contextual menu or
Clearing the Content of a Column
You can clear all the cells from a column by using the Clear content action from the contextual menu.
Adding Nodes
You can add nodes before, after, or as a child of the currently selected node by using the various actions in the following
submenus of the contextual menu:
•
•
•
Insert before - Offers a list of valid nodes, depending on the context, and inserts your selection before the currently
selected node, as a sibling.
Insert after - Offers a list of valid nodes, depending on the context, and inserts your selection after the currently
selected node, as a sibling.
Append child - Offers a list of valid nodes, depending on the context, and appends your selection as a child of the
currently selected node.
Duplicating Nodes
You can quickly create new nodes by duplicating existing ones. The Duplicate action is available in the contextual
menu and in the Document > Grid Edit menu.
Oxygen XML Editor | Editing Documents | 184
Refresh Layout
When using drag and drop to reorganize the document, the resulting layout can be different from the expected one. For
instance, the layout can contain a set of sibling tables that can be joined together. To force the layout to be recomputed,
you can use the
menu.
Refresh selected action that is available in the contextual menu and in the Document > Grid Edit
Start and Stop Editing a Cell Value
To edit the value of a cell, simply select the grid cell and press (Enter) or you can use the
in the Document > Grid Edit menu.
To stop editing a cell value, press (Enter) again or use the
menu.
Start Editing action found
End Editing action found in the Document > Grid Edit
To cancel the editing without saving the current changes in the document, press the (Esc) key.
Drag and Drop in the Grid Editor
You are able to easily arrange different sections in your XML document in the Grid mode by using drag and drop
actions.
You can do the following with drag and drop:
•
•
•
Copy or move a set of nodes.
Change the order of columns in the tables.
Move the rows from the tables.
These operations are available for both single and multiple selections. To deselect one of the selected fragments, use
Ctrl Single-Click (Command Single-Click on OS X).
While dragging, the editor paints guide-lines showing the locations where you can drop the nodes. You can also drag
nodes outside the Grid editor and text from other applications into the Grid. For more information, see Copy and Paste
in the Grid Editor.
Copy and Paste in the Grid Editor
The selection in the Grid mode is a bit complex compared to the selection in a text component. It consists of a current
selected cell and additional selected cells. These additional cells are either selected with the cursor, or implied by the
currently selected cell. To be more specific, consider that you click the name of the column (this becomes the current
selected cell), but the editor automatically extends the selection so that it contains all the cells from that column. The
current selected cell is painted with a color that is different from the rest of the selection.
You can select discontinuous regions of nodes and place them in the clipboard using the copy action. To deselect one
of the selected fragments, use Ctrl Single-Click (Command Single-Click on OS X). Pasting these nodes relative to
the current selected cell may be done in two ways: just below (after) as a brother, which is the default behavior, or as
the last child of the selected cell.
The Paste as Child action is available in the contextual menu.
The same action can be found in the menu Document > Grid Edit > Paste as Child.
The nodes copied from the Grid editor can also be pasted into the Text editor or other applications. When copying from
the Grid into the Text editor or other text based applications, the inserted string represents the nodes serialization. The
nodes from tables can be copied using HTML or RTF in table format. The resulting cells contain only the concatenated
values of the text nodes.
Oxygen XML Editor | Editing Documents | 185
Figure 75: Copying from Grid to Other Editors
In the Grid editor you can paste well-formed XML content or tab separated values from other editors. If you paste XML
content, the result will be the insertion of the nodes obtained by parsing this content.
Figure 76: Copying XML Data into Grid
If the pasted text contains multiple lines of tab separated values it can be considered as a matrix of values. By pasting
this matrix of values into the Grid editor the result will be a matrix of cells. If the operation is performed inside existing
cells, the existing values will be overwritten and new cells will be created when needed. This is useful, for example,
when trying to transfer data from Excel like editors into the Grid editor.
Oxygen XML Editor | Editing Documents | 186
Figure 77: Copying Tab Separated Values into Grid
Editing XML Documents in Author Mode
This section details how to edit the text content and the markup of XML documents in Author mode. It also explains
how to edit tables, images, MathML notations, and more, in Author mode.
Tagless XML Authoring
Once the structure of an XML document and the required restrictions on its elements and their attributes are defined
with an XML schema, the editing of the document becomes easier in a WYSIWYG-style editor in which the XML
markup is not visible.
This type of tagless editor is available in Oxygen XML Editor as the Author mode. To enter this mode, click the Author
button at the bottom of the editing area. The Author mode renders the content of the XML document visually, based
on a CSS stylesheet associated with the document. Many of the actions and features available in Text mode are also
available in Author mode.
Figure 78: Author Editing Mode
Associating a Stylesheet with an XML Document
The tagless rendering of an XML document in the Author mode is driven by a CSS stylesheet which conforms to the
version 2.1 of the CSS specification from the W3C consortium. Some CSS 3 features, such as namespaces and custom
extensions, of the CSS specification are also supported. Oxygen XML Editor also supports stylesheets coded with the
LESS dynamic stylesheet language.
There are several methods for associating a stylesheet (CSS or LESS) with an XML document:
Oxygen XML Editor | Editing Documents | 187
1. Insert the xml-stylesheet processing instruction with the type attribute at the beginning of the XML document.
If you do not want to alter your XML documents, you should create a new document type (framework).
CSS example:
<?xml-stylesheet type="text/css" href="test.css"?>
LESS example:
<?xml-stylesheet type="text/css" href="test.less"?>
Note: XHTML documents need a link element, with the href and type attributes in the head child
element, as specified in the W3C CSS specification. XHTML example:
<link href="/style/screen.css" rel="stylesheet" type="text/css"/>
Tip: You can also insert the xml-stylesheet processing instruction by using the
Associate
XSLT/CSS Stylesheet action that is available on the toolbar or in the Document > XML Document menu.
2. Configure a Document Type Association by adding a new CSS or LESS file in the settings. To do so, open the
Preferences dialog box and go to Document Type Association. Edit the appropriate framework, open the Author
tab, then the CSS tab. Press the
New button to add a new CSS or LESS file.
Note: The Document Type Associations are read-only, so you need to extend an existing one.
You can read more about associating a CSS to a document in the section about customizing the CSS of a document type.
If a document has no CSS association or the referenced stylesheet files cannot be loaded, a default one is used. A warning
message is also displayed at the beginning of the document, presenting the reason why the CSS cannot be loaded.
Figure 79: Document with no CSS association default rendering
Selecting and Combining Multiple CSS Styles
Oxygen XML Editor provides a Styles drop-down menu on the Author Styles toolbar that allows you to select one
main (non-alternate) CSS style and multiple alternate CSS styles. An option in the preferences can be enabled to allow
the alternate styles to behave like layers and be combined with the main CSS style. This makes it easy to change the
look of the document.
Oxygen XML Editor | Editing Documents | 188
You can select a main CSS stylesheet that styles the whole document and then apply alternate styles, as layers, to specific
parts of the document. In the subsequent figure, a DITA document has the Century style selected for the main CSS and
the alternate styles Full width, Show table column specification, Hints, and Inline actions are combined for additive
styling to specific parts of the document.
Figure 80: Styles Drop-down Menu in a DITA Document
Author Mode User Roles
There are two main types of users of the Author mode: framework developers and content authors. A framework
developer is a technical person with advanced XML knowledge who defines the framework for authoring XML documents
in the tagless editor. Once the framework is created or edited by the developer, it is distributed as a deliverable component
ready to plug into the application for the content authors. A content author does not need to have advanced knowledge
about XML tags, operations such as validation of XML documents, or applying an XPath expression to an XML
document. The content author just uses the framework set-up by the developer in the application and starts editing the
content of XML documents without editing the XML tags directly.
The framework set-up by the developer is also called document type association and defines a type of XML document
by specifying all the details needed for editing the content of XML documents in tagless mode.
The framework details that are created and customized by the developer include:
•
•
The CSS stylesheet that drives the tagless visual rendering of the document.
The rules for associating an XML schema with the document, which is needed for content completion and validation
of the document.
Oxygen XML Editor | Editing Documents | 189
•
•
•
Transformation scenarios for the document.
XML catalogs.
Custom actions available as buttons on the toolbar.
The tagless editor comes with some ready-to-use predefined document types for XML frameworks such as DocBook,
DITA, TEI, and XHTML.
To watch our video demonstration about the basic functionality of the Author mode, go to
http://oxygenxml.com/demo/WYSIWYG_XML_Editing.html.
Contextual Menu Actions in Author Mode
Oxygen XML Editor includes powerful support for editing XML documents through actions included in the contextual
menu. When editing XML documents in Author mode, the contextual menu includes general actions that are available
for all of the recognized document types and document type-specific actions that are configured for each document type.
General Contextual Menu Actions in Author Mode
The general actions that are available in the contextual menu (some of them are also available in the submenus of the
Document menu) for all document types include the following:
Quick Fix (Alt 1 (Meta Alt 1 on OS X))
Available when the contextual menu is invoked on an error where Oxygen XML Editor can provide a quick fix.
Open Image
Available when the contextual menu is invoked on an image. This action allows you to open an image in the Oxygen
XML Editor's Image Viewer or in a default system application associated with the current image type.
Track Changes Actions
Available when the Track Changes feature is enabled and the contextual menu is invoked on a change. The following
options are available:
Accept Change(s)
Accepts the tracked change located at the cursor position. If you select a part of a delete or insert change, only
the selected content is accepted. If you select multiple changes, all of them are accepted. For an insert change,
it means keeping the inserted text and for a delete change, it means removing the content from the document.
Reject Change(s)
Rejects the tracked change located at the cursor position. If you select a part of a delete or insert change, only
the selected content is rejected. If you select multiple changes, all of them are rejected. For an insert change, it
means removing the inserted text and for a delete change, it means preserving the original content from the
document.
Comment Change
Opens a dialog box that allows you to add a comment to an existing tracked change. The comment appears in
a callout box and a tooltip (when hovering over the change).
Author Callout Actions
Available when the contextual menu is invoked on a callout. If enabled in the Callouts preferences page, the callouts
are displayed in Author mode for comments, tracked insertion changes, or tracked deletion changes.
The following actions are available in the contextual menu of an insertion or deletion callout:
Accept Change(s)
Accepts the tracked change located at the cursor position. If you select a part of a delete or insert change, only
the selected content is accepted. If you select multiple changes, all of them are accepted. For an insert change,
it means keeping the inserted text and for a delete change, it means removing the content from the document.
Reject Change(s)
Rejects the tracked change located at the cursor position. If you select a part of a delete or insert change, only
the selected content is rejected. If you select multiple changes, all of them are rejected. For an insert change, it
Oxygen XML Editor | Editing Documents | 190
means removing the inserted text and for a delete change, it means preserving the original content from the
document.
Comment Change
Opens a dialog box that allows you to add a comment to an existing tracked change. The comment appears in
a callout box and a tooltip (when hovering over the change).
Edit Reference
If the fragment that contains a callout is a reference, use this option to go to the reference and edit the callout.
Callouts Options
Select this option to open a preferences page where you can configure the callout options.
The following actions are available in the contextual menu of a comment callout:
Edit comment
Opens the Edit Comment dialog box that allows you to edit the selected comment.
Remove comment
Removes a selected comment.
Callouts Options
Select this option to open a preferences page where you can configure the callout options.
Edit Attributes
Displays an in-place attributes editor that allows you to manage the attributes of an element.
Edit Profiling Attributes
Allows you to change the profiling attributes defined on all selected elements.
Cut
Deletes the currently selected content and copies it to the clipboard.
Copy
Copies the currently selected content to the clipboard.
Paste
Pastes the content of the clipboard at the current cursor location.
Paste special submenu
This submenu includes special paste actions that are specific to each framework, as well as the following general
paste actions:
Paste As XML
Pastes clipboard content that is considered to be XML.
Paste As Text
Pastes clipboard content, ignoring any structure or styling markup.
Insert submenu
This submenu includes insert actions that are specific to each framework, along with the following general action:
Insert Entity
Allows you to insert a predefined entity or character entity. Surrogate character entities (range #x10000 to
#x10FFFF) are also accepted. Character entities can be entered in one of the following forms:
•
•
•
•
#<decimal value> - e. g. #65
&#<decimal value>; - e. g. A
#x<hexadecimal value> - e. g. #x41
&#x<hexadecimal value>; - e. g. A
Oxygen XML Editor | Editing Documents | 191
Select submenu
This submenu allows you to select the following:
Element
Selects the entire element at the current cursor position.
Content
Selects the entire content of the element at the current cursor position, excluding the start and end tag. Performing
this action repeatedly will result in the selection of the content of the ancestor of the currently selected element
content.
Parent
Selects the parent of the element at the current cursor position.
Text submenu
This submenu contains the following actions:
To Lower Case
Converts the selected content to lower case characters.
To Upper Case
Converts the selected content to upper case characters.
Capitalize Sentences
Converts to upper case the first character of every selected sentence.
Capitalize Words
Converts to upper case the first character of every selected word. 0034
Count Words
Counts the number of words and characters (no spaces) in the entire document or in the selection for regular
content and read-only content.
Note: The content marked as deleted with change tracking is ignored when counting words.
Convert Hexadecimal Sequence to Character (Alt X (Meta Shift X on OS X))
Converts a sequence of hexadecimal characters to the corresponding Unicode character. A valid hexadecimal
sequence can be composed of 2 to 4 hexadecimal characters, preceded or not by the 0x or 0X prefix. Examples
of valid sequences: 0x0045, 0X0125, 1253, 265, 43.
To convert a hexadecimal sequence to a character, do one of the following:
•
•
place the cursor at the right side of a valid hexadecimal sequence, then press Alt X (Meta Shift X on OS
X) on your keyboard
select a valid hexadecimal sequence, then press Alt X (Meta Shift X on OS X) on your keyboard
Refactoring submenu
Contains a series of actions designed to alter the XML structure of the document:
Toggle Comment
Encloses the currently selected text in an XML comment, or removes the comment if it is commented.
Move Up
Moves the current node or selected nodes in front of the previous node.
Move Down
Moves the current node or selected nodes after the successive node.
Split Element
Splits the content of the closest element that contains the position of the cursor. Thus, if the cursor is positioned
at the beginning or at the end of the element, the newly created sibling will be empty.
Oxygen XML Editor | Editing Documents | 192
Join Elements
Joins two adjacent elements that have the same name. The action is available only when the cursor position is
between the two adjacent elements. Also, joining two elements can be done by pressing the Delete or Backspace
keys and the cursor is positioned between the boundaries of these two elements.
Surround with Tag
Selected text in the editor is marked with the specified start and end tags.
Rename Element
The element from the cursor position and the elements that have the same name as the current element can be
renamed according with the options from the Rename dialog box.
Delete Element Tags
Deletes the tags of the closest element that contains the position of the cursor. This operation is also executed
if the start or end tags of an element are deleted by pressing the Delete or Backspace keys.
Remove All Markup
Removes all the XML markup inside the selected block of content and keeps only the text content.
Remove Text
Removes the text content of the selected block of content.
Attributes submenu
Contains predefined XML refactoring operations that pertain to attributes. Oxygen XML Editor considers the
editing context to get the names and namespaces of the element or attribute for which the contextual menu was
invoked, and uses this information to preconfigure some of the parameter values for the selected refactoring
operation.
Add/Change attribute
Allows you to change the value of an attribute or insert a new one.
Delete attribute
Allows you to remove one or more attributes.
Rename attribute
Allows you to rename an attribute.
Replace in attribute value
Allows you to search for a text fragment inside an attribute value and change the fragment to a new value.
Elements submenu
Contains predefined XML refactoring operations that pertain to elements. Oxygen XML Editor considers the
editing context to get the names and namespaces of the element or attribute for which the contextual menu was
invoked, and uses this information to preconfigure some of the parameter values for the selected refactoring
operation.
Delete element
Allows you to delete elements.
Delete element content
Allows you to delete the content of elements.
Insert element
Allows you to insert new elements.
Rename element
Allows you to rename elements.
Unwrap element
Allows you to remove the surrounding tags of elements, while keeping the content unchanged.
Oxygen XML Editor | Editing Documents | 193
Wrap element
Allows you to surround elements with element tags.
Wrap element content
Allows you to surround the content of elements with element tags.
Fragments submenu
Contains predefined XML refactoring operations that pertain to XML fragments. Oxygen XML Editor considers
the editing context to get the names and namespaces of the element or attribute for which the contextual menu
was invoked, and uses this information to preconfigure some of the parameter values for the selected refactoring
operation.
Insert XML fragment
Allows you to insert an XML fragment.
Replace element content with XML fragment
Allows you to replace the content of elements with an XML fragment.
Replace element with XML fragment
Allows you to replace elements with an XML fragment.
Review submenu
This submenu includes the following actions:
Track Changes
Enables or disables the track changes support for the current document.
Accept Change(s)
Accepts the tracked change located at the cursor position. If you select a part of a delete or insert change, only
the selected content is accepted. If you select multiple changes, all of them are accepted. For an insert change,
it means keeping the inserted text and for a delete change, it means removing the content from the document.
Reject Change(s)
Rejects the tracked change located at the cursor position. If you select a part of a delete or insert change, only
the selected content is rejected. If you select multiple changes, all of them are rejected. For an insert change, it
means removing the inserted text and for a delete change, it means preserving the original content from the
document.
Comment Change
Opens a dialog box that allows you to add a comment to an existing tracked change. The comment appears in
a callout box and a tooltip (when hovering over the change).
Highlight
Enables the highlighting tool that allows you to mark text in your document.
Colors
Allows you to select the color for highlighting text.
Stop highlighting
Use this action to disable the highlighting tool.
Remove highlight(s)
Use this action to remove highlighting from the document.
Add Comment
Inserts a comment at the cursor position. The comment appears in a callout box and a tooltip (when hovering
over the change).
Remove comment
Removes a selected comment.
Oxygen XML Editor | Editing Documents | 194
Manage Reviews
Opens the Review view.
Manage IDs submenu
This submenu is available for XML documents that have an associated DTD, XML Schema, or Relax NG schema.
It includes the following actions:
Rename in
Renames the ID and all its occurrences. Selecting this action opens the Rename XML ID dialog box. This
dialog box lets you insert the new ID value and choose the scope of the rename operation.
Search References
Searches for the references of the ID. By default, the scope of this action is the current project. If you configure
a scope using the Select the scope for the Search and Refactor operations dialog box, this scope will be used
instead.
Search References in
Searches for the references of the ID. Selecting this action opens the Select the scope for the Search and Refactor
operations.
Search Occurrences in file
Searches for the occurrences of the ID in the current document.
Folding submenu
This submenu includes the following actions:
Toggle Fold
Toggles the state of the current fold.
Collapse Other Folds (Ctrl NumPad / (Meta NumPad / on OS X))
Folds all the elements except the current element.
Collapse Child Folds (Ctrl NumPad . (Meta NumPad . on OS X))
Folds the elements indented with one level inside the current element.
Expand Child Folds
Unfolds all child elements of the currently selected element.
Expand All (Ctrl NumPad * (Meta NumPad * on OS X))
Unfolds all elements in the current document.
Inspect Styles
Opens the CSS Inspector view that allows you to examine the CSS rules that match the currently selected element.
Options
Opens the Author mode options page.
Document Type-Specific Contextual Menu Actions in Author Mode
Other document type-specific actions are available in the contextual menu of Author mode for the following document
types (click the links to see the default actions that are available for each specific document types):
•
•
•
•
•
•
•
•
DocBook4 Author Actions
DocBook5 Author Actions
DITA Author Actions
DITA Map Author Actions
XHTML Author Actions
TEI ODD Author Actions
TEI P4 Author Actions
TEI P5 Author Actions
Oxygen XML Editor | Editing Documents | 195
•
JATS Author Actions
Editing the XML Content
By default, you can type only in elements which accept text content. So if the element is declared as empty or element
only in the associated schema you are not allowed to insert text in it. This is also available if you try to insert CDATA
inside an element. Instead, a warning message is displayed:
Figure 81: Editing in empty element warning
You can disable this behavior by checking the Allow Text in empty or element only content check box in the Author
preferences page.
Entire sections or chunks of data can be moved or copied by using the drag and drop support. The following situations
can be encountered:
•
•
•
When both of the drag and drop sources are from the Author mode editor, a well-formed XML fragment is transferred.
The section is balanced before dropping it by adding matching tags when needed.
When the drag source is from the Author mode editor but the drop target is a text-based editor, only the text inside
the selection is transferred as it is.
The text dropped from another text editor or another application into the Author mode editor is inserted without
changes.
Removing the Text Content of the Current Element
You can remove the text content of the current element and keep only the markup by highlighting the appropriate block
of content and use the
Remove Text action that is available in the Refactoring submenu of the contextual menu
and in the Document > Markup menu. This is useful when the markup of an element must be preserved, for example
a table structure but the text content must be replaced.
Editing the XML Markup
One of the most useful features in Author mode is the content completion support. The fastest way to invoke it is to
press Enter or Ctrl Space (Command Space on OS X) in the editor panel.
The content completion window offers the following types of actions:
•
•
•
•
•
•
Inserting allowed elements for the current context according to the associated schema.
Inserting element values if such values are specified in the schema for the current context.
Inserting new undeclared elements by entering their name in the text field.
Inserting CDATA sections, comments, processing instructions.
Inserting code templates.
If the Show all possible elements in the content completion list option from the Schema aware preferences page
is enabled, the content completion pop-up window will present all the elements defined by the schema. When choosing
an element from this section, the insertion will be performed using the schema aware smart editing features.
Figure 82: Content Completion Window
Oxygen XML Editor | Editing Documents | 196
If you press (Enter) the displayed content completion window will contain as first entries the Split <Element name>
items. Usually you can only split the closest block element to the cursor position but if it is inside a list item, the list
item will also be proposed for split. Selecting Split <Element name> splits the content of the specified element around
the cursor position. Thus, if the cursor is positioned at the beginning or at the end of the element, the newly created
sibling will be empty.
If the cursor is positioned inside a space preserved element the first choice in the content completion window is Enter
which inserts a new line in the content of the element. If there is a selection in the editor and you invoke content
completion, a Surround with operation can be performed. The tag used will be the selected item from the content
completion window.
By default you are not allowed to insert element names which are not defined by the schema. This can be changed by
unchecking the Allow only insertion of valid elements and attributes check box from the Schema aware preferences
page.
Note: The content completion list of proposals contains elements depending on the elements inserted both
before and after the cursor position.
Joining two elements - You can choose to join the content of two sibling elements with the same name by using the
contextual menu > Join elements action.
The same action can be triggered also in the next situations:
•
•
•
•
The cursor is located before the end position of the first element and (Delete) key is pressed.
The cursor is located after the end position of the first element and (Backspace) key is pressed.
The cursor is located before the start position of the second element and (Delete) key is pressed.
The cursor is located after the start position of the second element and (Backspace) key is pressed.
In either of the described cases, if the element has no sibling or the sibling element has a different name, Unwrap
operation will be performed automatically.
Unwrapping the content of an element - You can unwrap the content of an element by deleting its tags using the
Delete element tags action from the editor contextual menu.
The same action can be triggered in the next situations:
•
•
•
•
The cursor is located before the start position of the element and (Delete) key is pressed.
The cursor is located after the start position of the element and (Backspace) key is pressed.
The cursor is located before the end position of the element and (Delete) key is pressed.
The cursor is located after the end position of the element and (Backspace) key is pressed.
Removing all the markup of an element - You can remove the markup of the current element and keep only the text
content by highlighting the appropriate block of content and use the
Remove All Markup action that is available
in the Refactoring submenu of the contextual menu and in the Document > Markup menu.
When you press (Delete) or (Backspace) in the presented cases the element is unwrapped or it is joined with its sibling.
If the current element is empty, the element tags will be deleted.
When you click a marker representing the start or end tag of an element, the entire element is selected and numerous
context specific actions are available in the various menus and the contextual menu.
Code Templates
Code templates are code fragments that can be inserted quickly at the current editing position . Oxygen XML Editor
comes with a set of built-in code templates for CSS, LESS, Schematron, XSL, XQuery, and XML Schema document
types. You can also define you own code templates and share them with others.
To get a complete list of available code templates, press Ctrl Shift Space in Text mode. To enter the code template,
select it from the list or type its code and press Enter. If a shortcut key has been assigned to the code template, you can
also use the shortcut key to enter it. Code templates are displayed with a symbol in the content completion list.
When the Content Completion Assistant is invoked (Ctrl Space (Command Space on OS X) in Text mode or Enter
in Author mode), it also presents a list of code templates specific to the type of the active editor.
Oxygen XML Editor | Editing Documents | 197
To watch our video demonstration about code templates, go to http://oxygenxml.com/demo/Code_Templates.html.
Finding and Replacing Text
You can search for a specific word or string of characters using the following features:
•
•
•
•
Find/Replace dialog box
Find/Replace in Files dialog box
Quick Find toolbar
Find all Elements dialog box
Complex search operations may take some time to complete. If a search operation takes more than 5 seconds, you are
prompted to decide whether you want to continue the operation or stop it.
Smart Paste Support
You can paste content from various sources, such as web pages and Office-type documents, and paste it into DITA,
TEI, DocBook, JATS, and XHTML documents. Oxygen XML Editor keeps the original text styling (such as bold, italics,
etc.) and formatting (such as lists, tables, paragraphs, etc.), and helps you make the resulting document valid.
The following document types include support for Smart Paste:
•
•
•
•
•
•
•
DITA
DocBook 4
DocBook 5
TEI 4
TEI 5
XHTML
JATS
The styles and general layout of the pasted content are transformed to the equivalent XML markup of the target document
type.
You can disable the Smart Paste feature by deselecting Convert external content on paste in the Schema Aware
preferences.
If you paste the content in a location where the resulting XML would not be valid, Oxygen XML Editor will attempt to
place it in a valid location, and may prompt you with one or more choices for where to place it. You can disable this
location selection feature by deselecting Smart paste and drag and drop option, available in the Schema Aware
preferences.
To watch our video demonstration about the Smart Paste support, go to
http://oxygenxml.com/demo/Smart_Paste_Copy_Paste_from_Web_Office_Documents_to_DITA_DocBook_TEI_XHTML_Documents.html.
Reviewing Documents
Tracking Document Changes
Track Changes is a way to keep track of the changes you make to a document. To activate track changes for the current
document, either choose Edit > Review >
Track Changes or click the
Track Changes button on the Review
toolbar. When Track Changes is enabled, your modifications are highlighted using a distinctive color. The name of
the author who is currently making changes and the colors can be customized from the Review preferences page.
Oxygen XML Editor | Editing Documents | 198
Figure 83: Change Tracking in Author Mode
When hovering over a change the tooltip displays information about the author and modification time.
Track Changes highlights textual changes and also changes that you make to the attributes in a document. Here is the
list of tracked changes:
•
•
•
•
•
•
•
•
•
•
Inserting, deleting content (text or elements)
Drag and drop content (text or elements)
Cutting or pasting content (text or elements)
Inserting, deleting, and changing the structure of tables
Inserting and editing lists and their content
Inserting and deleting entities
Inserting and deleting element tags
Editing attributes
Performing a Split operation
Performing a Surround with operation
If the selection in the Author view contains tracked changes and you are copying it, the clipboard contains the selection
with all the accepted changes. This filtering is performed only if the selection is not entirely inside a tracked change.
The changes are stored in the document as processing instructions and they do not interfere with validating and
transforming it. For each change, the author name and the modification time are preserved.
Oxygen XML Editor | Editing Documents | 199
The following processing instruction is an example of how an insert change is stored in a document:
<?oxy_insert_start author="John Doe"
timestamp="20090408T164459+0300"?>all<?oxy_insert_end?>
The following processing instruction is an example of how an delete change is stored in a document:
<?oxy_delete author="John Doe" timestamp="20090508T164459+0300"
content="belong"?>
Note: Tracked changes are also shown in the Outline view. Deleted content is rendered with a strike through.
Adding Document Comments
You can associate a note or a comment to a selected area of content. Comments can highlight virtually any content from
your document, except read-only text. The difference between such comments and change tracking is that a comment
can be associated to an area of text without modifying or deleting the text.
The actions for managing comments are
Add Comment,
Edit Comment,
Remove Comment, and
Manage reviews. They are available on the Review toolbar and in the Review submenu of the contextual menu in
Author mode.
Tip: The comments are stored in the document as processing instructions, containing information about the
author name and the comment time:
<?oxy_comment_start author="John Doe" timestamp="20090508T164459+0300" comment="Do not change this
content"?>
Important content
<?oxy_comment_end?>
Comments are persistent highlights with a colored background. The background color is customizable or can be assigned
automatically by the application. This behavior can be controlled from the Review preferences page.
Note: Oxygen XML Editor presents the tracked changes in DITA conrefs and XInclude fragments.
Managing Changes
You can review the changes that you or other authors have made and then accept or reject them using the Track Changes
toolbar buttons
, or similar actions from the Edit > Review menu:
Track Changes
Enables or disables the track changes support for the current document.
Accept Change(s)
Accepts the tracked change located at the cursor position. If you select a part of a delete or insert change, only the
selected content is accepted. If you select multiple changes, all of them are accepted. For an insert change, it means
keeping the inserted text and for a delete change, it means removing the content from the document.
Reject Change(s)
Rejects the tracked change located at the cursor position. If you select a part of a delete or insert change, only the
selected content is rejected. If you select multiple changes, all of them are rejected. For an insert change, it means
removing the inserted text and for a delete change, it means preserving the original content from the document.
Comment Change
Opens a dialog box that allows you to add a comment to an existing tracked change. The comment appears in a
callout box and a tooltip (when hovering over the change).
Oxygen XML Editor | Editing Documents | 200
Highlight
Enables or disables the Highlight tool. Use the
Highlight drop-down menu to select a new color.
Add Comment
Inserts a comment at the cursor position. The comment appears in a callout box and a tooltip (when hovering over
the change).
Edit comment
Opens the Edit Comment dialog box that allows you to edit the selected comment.
Remove comment
Removes a selected comment.
Manage Reviews
Opens the Review view.
Track Changes Visualization Modes Drop-Down Menu
This drop-down menu includes specialized actions that allow you to switch between the following visualization modes:
•
View All Changes/Comments - This mode is active by default. When you use this mode, all tracked changes
are represented in the Author mode.
•
View only Changes/Comments by - Only the tracked changes made by the author you select are presented.
•
View Final - This mode offers a preview of the document as if all tracked changes (both inserted and deleted)
were accepted.
•
View Original -this mode offers a preview of the document as if all tracked changes (both inserted and deleted)
were rejected. You cannot edit the document in this mode. Attempting to do so switches the view mode to View All
Changes.
All four actions are available only in the drop-down menu in the Review toolbar. If you use
View Final mode and
View Original mode, highlighted comments are not displayed. To display highlighted comments, use
View All
Changes/Comments.
To watch our video demonstration about the Track Changes support, go to
http://oxygenxml.com/demo/Change_Tracking.html.
Track Changes Behavior
This section explains the behavior of the Track Changes feature depending on the context and whether it is activated.
You can use the Track Changes feature to keep track of multiple actions.
Possible change tracking scenarios:
•
•
•
•
•
•
•
Inserted content
Surrounded content
Deleted characters
Deleted content
Copied content
Pasted content
Attribute changes
Keeping Track of Inserted Content
When Track Changes is disabled and you insert content, the following is possible:
•
Making an insertion in a Delete change results in the change being split in two and the content is inserted without
being marked as change.
•
•
Oxygen XML Editor | Editing Documents | 201
Making an insertion in an Insert change results in the change being split in two and the content is inserted without
being marked as change.
Making an insertion in regular content results in a regular insertion.
When Track Changes is enabled and you insert content, the following are possible:
•
•
Making an insertion in a Delete change results in the change being split in two and the current inserted content
appears marked as an INSERT.
Making an insertion in an Insert change results in the following:
•
•
•
If the original insertion was made by another user, the change is split in two and the current inserted content
appears marked as an INSERT by the current author.
If the original Insert change was made by the same user, the change is just expanded to contain the inserted
content. The creation time-stamp of the previous insert is preserved.
If we insert in regular content, the current inserted content appears marked as an Insert change.
Keeping Track of Surrounded Content
When Track Changes is enabled and you surround content in a new XML element, the following is possible:
•
•
Making a surround in a Delete change results in nothing happening.
Making a surround in an Insert change results in the following:
•
•
•
If the original insertion was made by another user, the change is split in two and the surround operation appears
marked as being performed by the current author.
If the original Insert change was made by the same user, the existing change is just expanded to contain the
surrounded content.
Making a surround in regular content results in the operation being marked as a surround change.
Keeping Track of Deleted Characters
When Track Changes is disabled and you delete content character by character, the following is possible:
•
•
•
Deleting content in an existing Delete change results in nothing happening.
Deleting content in an existing Insert change results in the content being deleted without being marked as a deletion
and the INSERT change shrinks accordingly.
Deleting in regular content results in a regular deletion.
When Track Changes is enabled and you delete content character by character, the following is possible:
•
Deleting content in an existing Delete change results in the following:
•
•
•
Deleting content in an existing Insert change results in the following:
•
•
•
If the same author created the Delete change, the previous change is marked as deleted by the current author.
If another author created the Delete change, nothing happens.
If the same author created the Insert change, the content is deleted and the Insert change shrinks accordingly.
If another author created the Insert change, the Insert change is split in two and the deleted content appears
marked as a Delete change by the current author.
Deleting in regular content results in the content being marked as Delete change by the current author.
Keeping Track of Deleted Content
When Track changes is disabled and you delete selected content, the following is possible:
•
•
•
•
If the selection contains an entire Delete change, the change disappears and the content is deleted.
If the selection intersects with a Delete change (starts or ends in one), it results in nothing happening.
If the selection contains an entire Insert change, the change disappears and the content is deleted.
If the selection intersects with an Insert change (starts or ends in one), the Insert change is shrunk and the content
is deleted.
Oxygen XML Editor | Editing Documents | 202
When Track changes is enabled and you delete selected content, the following is possible:
•
•
•
If the selection contains an entire Delete change, the change is considered as rejected and then marked as deleted by
the current author, along with the other selected content.
If the selection intersects a Delete change (starts or ends in one), the change is considered as rejected and marked
as deleted by the current author, along with the other selected content.
If the selection contains an entire Insert change, the following is possible:
•
•
•
If the Insert is made by the same author, the change disappears and the content is deleted.
If the Insert is made by another author, the change is considered as accepted and then marked as deleted by the
current author, along with the other selected content.
If the selection intersects an Insert change (starts or ends in one), the Insert change shrinks and the part of the Insert
change that intersects with the selection is deleted.
Keeping Track of Copied Content
When Track Changes is disabled and you copy content, the following is possible:
•
If the copied area contains Insert or Delete changes, these are also copied to the clipboard.
When Track Changes is enabled and you copy content, the following is possible:
•
If the copied area contains Insert or Delete changes, these are all accepted in the content of the clipboard (the changes
will no longer be in the clipboard).
Keeping Track of Pasted Content
When Track Changes is disabled and you paste content, the following is possible:
•
If the clipboard content contains Insert or Delete changes, they will be preserved on paste.
When Track Changes is enabled and you paste content, the following is possible:
•
If the clipboard content contains Insert or Delete changes, all the changes are accepted and then the paste operation
proceeds according to the insertion rules.
Keeping Track of Attribute Changes
The Track Changes feature is able to keep track of changes you make to attributes in a document. If the Callouts support
is enabled, all the attribute changes are presented as callouts in the document you are editing. The changes are also
presented in the Review view and Attributes view.
When you copy a fragment that contains tracked attribute changes, the following is possible:
•
•
If you perform the copy operation with Track Changes enabled, all the attribute changes in the fragment are accepted.
If you perform the copy operation with Track Changes disabled, the fragment holds the attribute changes inside it.
When you paste a fragment that contains tracked attribute changes, the following is possible:
•
•
If you perform the paste operation with Track Changes enabled, the changes are accepted before the paste operation.
If you perform the paste operation with Track Changes disabled, the changes are pasted in the document.
Track Changes Limitations
Recording changes has limitations and there is no guarantee that rejecting all changes will return the document to exactly
the same state in which it originally was. Recorded changes are not hierarchical, a change cannot contain other changes
inside. For example, if you delete an insertion made by another user, then reject the deletion, the information about the
author who made the previous insertion is not preserved.
Track Changes Markup
Depending on the type of your edits, the following track changes markup appears in a document when you activate the
Track Changes feature:
Oxygen XML Editor | Editing Documents | 203
Edit Type
Processing Instruction Start
Marker
Processing Instruction End
Marker
Attributes
Insertion
<?oxy_insert_start?>
<?oxy_insert_end?>
author, timestamp
Split
<?oxy_insert_start?>
<?oxy_insert_end?>
author, timestamp,
type="split"
Surround
<?oxy_insert_start?>
<?oxy_insert_end?>
author, timestamp,
type="surround"
Deletion
<?oxy_delete?>
_
author, timestamp, content
Comment
<?oxy_comment_start?> <?oxy_comment_end?>
Attribute
Change
<?oxy_attributes?>
_
author, timestamp,
comment, mid
id, type, oldValue, author,
timestamp
If a comment intersects another, the mid attribute is used to correctly identify start and end processing instruction
markers.
Intersecting Comments Markup
<?oxy_comment_start author="Andrew" timestamp="20130111T151520+0200" comment="Do we have a
task about pruning trees?"?>Unpruned
<?oxy_comment_start author="Matthew" timestamp="20130111T151623+0200" comment="What time
of the year do they flower?" mid="3"?>lilacs<?oxy_comment_end?>
flower reliably every year<?oxy_comment_end mid="3"?>
Managing Comments
A comment is marked in the Author mode with a background that is configured for each user name.
Figure 84: Comments in Author Mode
You can manage comments using the following actions that are available on the toolbar, in the Review submenu of the
contextual menu, and the Edit > Review menu:
Add Comment
Allows you to insert a comment at the cursor position or on a specific selection of content.
Edit Comment
Allows you to change an existing content.
Remove Comment(s)
Removes the comment at the cursor position or all comments found in the selected content.
Oxygen XML Editor | Editing Documents | 204
Managing Highlights
Use the
Highlight tool to mark fragments in your document using various colors. This is especially useful when
you want to mark sections that needs additional editing or to draw the attention of others to particular content.
You can find the
Highlight option on the main toolbar, in the Edit > Review menu, or in the contextual menu of
a document, in the Review submenu. You can also choose the highlight Colors or choose to Stop highlighting from
the same menus.
This tool allows you to do the following:
•
•
•
Mark selected text.
Mark fragments of the document you are editing.
Remove highlighting.
Tip: If the
Highlight tool is not available on your toolbar, enable Author Comments in the contextual
menu of the toolbar.
Note: Oxygen XML Editor keeps the highlighting of a document between working sessions.
To watch our video demonstration about using the Highlight tool, go to http://oxygenxml.com/demo/Highlight_Tool.html.
Mark Selected Text
To mark the text you select in a document:
1. Select the text you want to highlight.
Note: To mark more than one part of the document you are editing, press and hold Ctrl (Meta on Mac OS)
and using you cursor select the parts you want to highlight.
2. Click the small arrow next to the
Highlight icon and select the colour that you want to use for highlighting.
The selected text is highlighted.
3. Click the Highlight icon to exit the highlighting mode.
Mark Document Fragments
To mark fragments in a document, follow these steps:
1. Click the
Highlight icon on the toolbar.
The highlighting mode is on. The cursor changes to a dedicated symbol that has the same color with the one set in
the Highlight palette.
2. Select the text you want to highlight with your cursor.
3. To highlight different fragments using multiple colors, click the small arrow next to the
Highlight icon, choose
the colour that you want to use for highlighting, and repeat step 2.
The fragments are highlighted.
4. To exist the highlighting mode, press Esc on your keyboard, click the
document.
Highlight icon, or start editing the
Remove Highlighting from a Document
To remove highlighting from the document you are editing, follow these steps:
1. Either select the text you want to remove highlighting from using your cursor, or press Ctrl A (Meta A on OS X)
if you want to select all of the text.
2. Click the small arrow next to the
Highlight icon and select No color (erase), or right click the highlighted
content and select Remove highlight(s) (or select the action from the Edit > Review menu).
The highlighting is removed.
3. Click the Highlight icon to exit the highlighting mode.
Oxygen XML Editor | Editing Documents | 205
Author Callouts
A callout is a vertical stripe, with a balloon-like look, that Oxygen XML Editor displays in the right side of the editing
area. Callouts are decorated with a colored border and also have a colored background. A horizontal line, which has the
same color as the border, connects text fragments with their corresponding callouts. Oxygen XML Editor assigns an
individual color for the callouts depending on the user who is editing the document. To customize the list of these colors,
open the Preferences dialog box and go to Editor > Edit Modes > Author > Review. You are able to add, edit, or
remove colors in this list. You can choose to use the same color for any user who modifies the content or inserts a
comment. To do this, select the fixed option and choose a color from the color box. Once you set a fixed color for a user
you are able to edit it. Press the color box and select a different color from the Choose color dialog box.
Oxygen XML Editor uses callouts to provide an enhanced view of the changes you, or other authors make to a document.
They hold specific information depending on their type. In addition, Oxygen XML Editor uses callouts to display
comments that you associate with fragments of the document you are editing. For more information about editing
comments, go to Managing Comments. To enable callouts, open the Preferences dialog box and go to Editor > Edit
Modes > Author > Review > Callouts. Enable the following options:
•
Comments - Oxygen XML Editor displays comment callouts when you insert a comment. You can use two types
of comments in Oxygen XML Editor:
•
•
Author Review Comments - Comments that you associate with specific fragments of text.
Callout Comments - Comments that you add in an already existing insertion or deletion callout.
By default, the fragment of text that you comment is highlighted and a horizontal line connects it with the comment
callout. A comment callout contains the name of the author who inserts the callout and the comment itself. To
customize how comments are displayed, open the Preferences dialog box, go to Editor > Edit Modes > Author >
Review > Callouts, and enable Show review time.
Figure 85: Comment Callouts
•
Track Changes deletions - Oxygen XML Editor displays deletion callouts when you delete a fragment of text. By
default, a deletion callout contains the type of callout (Deleted) and the name of the author that makes the deletion.
You are able to customize the content of a deletion callout to display the date and time of the deletion and the deleted
fragment itself. To do this, open the Preferences dialog box, go to Editor > Edit Modes > Author > Review >
Callouts, and enable Show review time and Show deleted content in callout.
Figure 86: Deletion Callouts
•
Track Changes insertions - Oxygen XML Editor displays insertion callouts when you insert a fragment of text. By
default, an insertion callout contains the type of callout (Inserted) and the name of the author that makes the insertion.
You are able to customize the content of an insertion callout to contain the date and time of the insertion and the
inserted fragment itself. Open the Preferences dialog box, go to Editor > Edit Modes > Author > Review >
Callouts, and enable Show review time and Show inserted content in callout.
Figure 87: Insertion Callouts
Oxygen XML Editor | Editing Documents | 206
Figure 88: Multiple Authors Callouts
Note: Oxygen XML Editor displays callouts only if
View All Changes/Comments or
View Only
Changes/Comments by is selected. Oxygen XML Editor does not display callouts in
View Final and
View Original modes.
To select a callout, either click the callout or its source. Selected callouts have a more intense background and a bold
border. The connecting line between the source and the callout is also rendered in bold font. If you select a fragment of
text which is associated with one or more callouts, the callouts are highlighted.
Important: The callouts are displayed in the right side of the editing area. However, in some cases, the text
you are editing can span into the callouts area. For example, this situation can appear for callouts associated
with wide images or space-preserve elements (like codeblock in DITA or programlisting in DocBook) which
contain long fragments. To help you view the text under the covered area, Oxygen XML Editor applies
transparency to these callouts. When the cursor is located under a callout, the transparency is enhanced, allowing
you to both edit the covered content and access the contextual menu of the editing area.
Figure 89: Transparent Callout
Note: Oxygen XML Editor does not display callouts located in folded areas of the edited document.
The following actions are available in the contextual menu of an insertion or deletion callout:
•
Accept Change - Select this option to accept the changes you or other authors make to a document.
•
Reject Change - Select this option to reject the changes you or other authors make to a document.
•
Comment Change - Select this option to comment an existing change in your document. You are also able to
add a comment to a change from the
Comment Change button available on the Review toolbar.
•
•
Oxygen XML Editor | Editing Documents | 207
Edit Reference - If the fragment that contains a callout is a reference, use this option to go to the reference and edit
the callout.
Callouts Options - Select this option to open a preferences page where you can configure the callout options.
The following options are available in the contextual menu of a comment callout:
•
Edit Comment - Select this option to modify the content of a comment callout.
Note: The text area is disabled if you are not the author which inserted the comment.
•
•
•
Remove Comment - Select this option to remove a comment callout.
Edit Reference - If the fragment that contains a callout is a reference, use this option to go to the reference and edit
the callout.
Callouts Options - Select this option to open a preferences page where you can configure the callout options.
When you print a document from Oxygen XML Editor, all callouts you, or other authors added to the document are
printed. For a preview of the document and its callouts, go to File > Print preview.
To watch our video demonstration about the Callouts support, go to http://oxygenxml.com/demo/CalloutsSupport.html.
The Review View
The Review view is a framework-independent panel, available both for built-in, and custom XML document frameworks.
It is designed to offer an enhanced way of monitoring all the changes that you make to a document. This means you are
able to view and control highlighted, commented, inserted, and deleted content, or even changes made to attributes,
using a single view.
The Review view is useful when you are working with documents that contain large quantities of edits. The edits are
presented in a compact form, in the order they appear in the document. Each edit is marked with a type-specific icon.
Oxygen XML Editor | Editing Documents | 208
Figure 90: The Review View
To activate the Review view, do one of the following:
•
•
•
Click the
Manage reviews button on the Review toolbar.
Right-click in a document and from the contextual menu go to Review, Manage reviews.
Go to Window > Show View > Review.
This view and the editing area are synchronized. When you select an edit listed in the Review view, its corresponding
fragment of text is highlighted in the editing area and the reverse is also true. For example, when you place the cursor
inside an area of text marked as inserted, its corresponding edit is selected in the list.
The upper part of the view contains a filtering area which allows you to search for specific edits. Use the small arrow
symbol from the right side of the search field to display the search history. The Settings button allows you to:
•
•
•
•
Show highlights - controls whether the Review view displays the highlighting in your document.
Show comments - controls whether the Review view displays the comments in the document you are editing.
Show track changes - controls whether the Review view displays the inserted and deleted content in your document.
Show review time - displays the time when the edits from the Review view were made.
The following actions are available when you hover the edits in the Review view, using the cursor:
Remove
Action available for highlights and comments presented in the Review view. Use this action to remove these
highlights or comments from your document;
Accept
Action available for inserted and deleted content presented in the Review view. Use this action to accept the changes
in your document;
Oxygen XML Editor | Editing Documents | 209
Reject
Action available for inserted and deleted content presented in the Review view. Use this action to reject the changes
in your document.
Depending on the type of an edit, the following actions are available in its contextual menu in the Review view:
Show comment
This option is available in the contextual menu of changes not made by you and of any comment listed in the Review
view. Use this option to view a comment in the Show comment dialog box.
Edit comment
This option is available in the contextual menu of your comments, listed in the Review view. Use this action to start
editing the comment.
Remove comment
This option is available in the contextual menu of a comment listed in the Review view. Use this action to remove
the selected comment.
Show only reviews by
This option is available in the contextual menu of any edit listed in the Review view. Use this action to keep visible
only the edits of a certain author in the view.
Remove all comments
This option is available in the contextual menu of any comment listed in the Review view. Use this action to remove
all the comments that appear in the edited document.
Change color
Opens a palette that allows you to choose a new color for the highlighted content.
Remove highlight
Removes the selected highlighting.
Remove highlights with the same color
Removes all the highlighting with the same color from the entire document.
Remove all highlights
Clears all the highlighting in your document.
Accept change
Accepts the selected change.
Reject change
Rejects the selected change.
Comment change
This option is available in the contextual menu of an insertion or deletion that you made. Use this option to open
the Edit comment dialog box and comment the change you made.
Accept all changes
Accepts all the changes made to a document.
Reject all changes
Rejects all the changes made to a document.
To watch our video demonstration about the Review view, go to http://oxygenxml.com/demo/Review_Panel.html.
Profiling / Conditional Text
Conditional text is a way to mark blocks of text meant to appear in some renditions of the document, but not in others.
It differs from one variant of the document to another, while unconditional text appear in all document versions.
For instance you can mark a section of a document to be included in the manual designated for the expert users, other
for the novice users manual while unmarked sections are included in any rendition.
You can use conditional text when you develop documentation for:
Oxygen XML Editor | Editing Documents | 210
•
•
•
A series of similar products.
Different releases of a product.
Various audiences.
The benefits of using conditional text include reduced effort for updating and translating your content and an easy way
to customize the output for various audiences.
Oxygen XML Editor comes with a preconfigured set of profiling attribute values for some of the most popular document
types. These attributes can be redefined to match your specific needs. Also, you can define your own profiling attributes
for a custom document type.
Create Profiling Attributes
Note: To ensure the validity of the document, the attribute must already be defined in the document DTD or
schema before referencing it here.
To create custom profiling attributes for a specific document type, follow these steps:
1. Open the Preferences dialog box and go to Editor > Edit modes > Author > Profiling/Conditional Text .
2. In the Profiling Attributes area, press the New button.
The Profiling Attribute dialog box is opened.
3. Fill-in the dialog box as follows:
a) Choose the Document type on which the profiling attribute is applied. * and ? can be used as wildcards, while
,(comma character) can be used to specify more patterns. For example use DITA* to match any document type
name that starts with DITA.
b) Specify the Attribute name.
c) Specify a Display name. This field is optional, being used only as a descriptive rendering in profiling dialog
boxes.
Oxygen XML Editor | Editing Documents | 211
d) Use the New, Edit, Delete buttons to add, edit, and delete possible values of the attribute. You can also specify
and optional description for each attribute value.
e) Choose whether the attribute accepts a Single value or Multiple values separated by a delimiter (space, comma,
semicolon, or a custom one). A custom delimiter must be supported by the specified document type. For example,
the DITA document type only accepts spaces as delimiters for attribute values.
4. Click OK.
5. Click Apply to save the profiling attribute.
Create Profiling Condition Sets
Several profiling attributes can be aggregated into a profiling condition set that allow you to apply more complex filters
on the document content. A Profiling Condition Set is a very powerful and convenient tool used to preview the content
that goes into the published output. For example, an installation manual available both in Windows and Linux variants
can be profiled to highlight only the Linux procedures for more advanced users.
To create a new profiling condition set:
1. Open the Preferences dialog box and go to Editor > Edit modes > Author > Profiling/Conditional Text.
2. In the Profiling Condition Sets area, press the New button.
The Condition Set dialog box is opened:
3. Fill-in the dialog box as follows:
a) Type the condition set Name.
b) Choose the Document type for which you have previously defined profiling attributes.
c) If you want the Profiling Condition Set to reference a DITAVAL file, enable the Use DITAVAL file option and
select the DITAVAL file from your disk.
After choosing a document type, all profiling attributes and their possible values are listed in the central area of
the dialog box.
d) Define the combination of attribute values by selecting the appropriate checkboxes in the Include the content
matching the following conditions section.
If you have defined a lot of profiling attributes, you can use the filter text field to search for specific conditions.
Oxygen XML Editor | Editing Documents | 212
4. Click OK.
5. Click Apply to save the condition set. All saved profiling condition sets are available in the
Profiling /
Conditional Text toolbar drop-down menu.
Apply Profiling Condition Sets
All defined Profiling Condition Sets are available as shortcuts in the Profiling / Conditional Text menu. Select a menu
entry to apply the condition set. The filtered content is grayed-out in the Author mode, Outline view, and DITA Maps
Manager view. An element is filtered-out when one of its attributes is part of the condition set and its value does not
match any of the value covered by the condition set. As an example, let us suppose that you have the following document:
If you apply the following condition set it means that you want to filter-out the content written for non-expert audience
and having the Other attribute value different than prop1.
Oxygen XML Editor | Editing Documents | 213
And this is how the document looks like after you apply the Expert user condition set:
Apply Profiling Attributes
Profiling attributes are applied on element nodes.
Oxygen XML Editor | Editing Documents | 214
You can apply profiling attributes on a text fragment, on a single element, or on multiple elements in the same time. To
profile a fragment from your document, select the fragment in the Author mode and follow these steps.
Note: If there is no selection in your document, the profiling attributes are applied on the element at the cursor
position.
1. Invoke the Edit Profiling Attributes action from the contextual menu.
The displayed dialog box shows all profiling attributes and their values, as defined in the framework (document
type) of the edited content. The checkboxes corresponding with the values already set in the profiled fragment are
enabled.
2. In the Edit Profiling Attributes dialog box, enable the checkboxes corresponding to the attribute values you want
to apply on the document fragment. The profiling attributes having different values set in the elements of the profiled
fragment are marked with a gray background and they are disabled by default. You can change the values of these
attributes by choosing the Change Now option associated with all attributes.
3. Click OK to finish the profiling configuration.
The attributes and attributes values selected in the Edit Profiling Attributes dialog box are set on the elements
contained in the profiled fragment.
If you select only a fragment of an element's content, this fragment is wrapped in phrase-type elements on which
the profiling attributes are set. Oxygen XML Editor comes with predefined support for DITA and DocBook. For
more developer-level customization options, see the Customize Profiling Conditions topic.
If Show Profiling Attributes option (available in the
Profiling / Conditional Text toolbar menu) is set, a light
green border is painted around profiled text, in the Author mode. Also, all profiling attributes set on the current
element are listed at the end of the highlighted block and in its tooltip message. To edit the attributes of a profiled
fragment, click one of the listed attributes. A form control pops up and allows you to add or remove attributes using
their checkboxes.
Profiling / Conditional Text Toolbar Menu
The
Profiling / Conditional Text toolbar menu groups the following actions:
Show Profiling Colors and Styles
Enable this option to turn on conditional styling.
Show Profiling Attributes
Enable this option to turn on conditional text markers. They are displayed at the end of conditional text blocks, as
a list of attribute name and their currently set values.
Show Excluded Content
Controls if the content filtered out by a particular condition set is hidden or greyed-out in the editor area and in the
Outline and DITA Maps Manager views. When this option is enabled, the content filtered by the currently applied
condition set is greyed-out. To show only the content that matches the currently applied condition set, disable this
option.
Note: To remind you that document content is hidden, Oxygen XML Editor displays labels showing the
currently applied condition set. These labels are displayed in the Author mode editing area, the Outline
view and DITA Maps Manager view. Right click any of the labels to quickly access the Show Excluded
Content action.
List of all profiling condition sets that match the current document type
Click a condition set entry to activate it.
Profiling Settings
Opens the profiling options preferences page, where you can manage profiling attributes and profiling conditions
sets. You can also configure the profiling styles and colors options from the colors/styles preferences page and the
attributes rendering preferences page.
Oxygen XML Editor | Editing Documents | 215
All these settings are associated with the current project, being restored the next time you open it. For a new project all
Profiling/Conditional Text menu actions states are reset to their default values.
Apply Profiling Colors and Styles
Applying profiling colors and styles allows you to customize the Author mode editing area to mark profiled content so
you can instantly spot different variants of the output.
Choosing the right style for a specific profiling attribute is a matter of personal taste, but you should keep in mind that:
•
•
•
If the same block of text is profiled with two or more profiling attributes, their associated styles combine. Depending
on the styling, this might result in an excessively styled content that may prove difficult to read or work with.
Profile only differences. There is no need to profile common content, since excessive profiling can visually pollute
the document.
A mnemonic associated with a style will help you spot instantly different types of content.
To set colors and styles to profiling attribute values:
•
Enable the Show Profiling Colors and Styles option from the
menu.
•
Go to Profiling Settings from the
Profiling / Conditional Text toolbar drop-down menu. This is a shortcut to
the Profiling/Conditional Text options page. Select the Colors and Styles options page.
Set a style to a profiling attribute value.
•
Profiling / Conditional Text toolbar drop-down
Note that the styling is now applied in the Author editing mode, the Outline view and DITA Maps Manager view.
Also, to help you identify more easily the profiling you want to apply in the current context, the styling is applied in the
Edit Profiling Attributes dialog box and in the inline form control that allows you to quickly set the profiling attributes.
Table Layout and Operations
Oxygen XML Editor provides support for editing data in a tabular form. The following operations are available:
•
Adjusting column width
You are able to manage table width and column width specifications from the source document. These specifications
are supported both in fixed and proportional dimensions. The predefined frameworks (DITA, DocBook, and XHTML)
also support this feature. The layout of the tables for these document types takes into account the table width and
the column width specifications particular to them. To adjust the width of a column or table, drag the border of the
column. The changes you make to a table are committed into the source document.
Oxygen XML Editor | Editing Documents | 216
Figure 91: Resizing a Column in Oxygen XML Editor Author Editor
•
Column and row selection
To select a row or a column of a table, place the mouse cursor above the column or in front of the row you want to
select, then click. When hovering the mouse cursor in front of rows or above column headers, the cursor changes to
for row selection and to
•
for column selection and that specific row or column is highlighted.
Cell selection
To select a cell in a table, press and hold the Ctrl key and click anywhere inside the cell. You can use this action to
select one or more cells, and also to deselect cells from a selection. Alternatively, you can click one of the left corners
of a cell (right corners if you are editing a RTL document). The cursor changes to
of the cell.
•
when it hovers over the corners
Rectangular selection
To select a rectangular block of cells do one of the following:
•
•
•
Click a cell and drag to expand the selection.
Click a cell, then press the Shift key and use the arrow keys to expand the selection.
Drag and drop
You can use the drag and drop action to edit the content of a table. You are able to select a column and drag it to
another location in the table you are editing. When you drag a column and hover the cursor over a valid drop position,
Oxygen XML Editor decorates the target location with bold rectangles. The same drag and drop action is also available
for rows.
•
Copy-paste and cut for columns and rows
In Oxygen XML Editor, you are able to copy entire rows or columns of the table you are editing. You can paste a
copied column or row both inside the source table and inside other tables. The cut operation is also available for
rows and columns. You can use the cut and the copy-paste actions for tables located in different documents as well.
When you paste a column in a non-table content, Oxygen XML Editor introduces a new table which contains the
fragments of the source column. The fragments are introduced starting with the header of the column. When you
copy a column of a CALS table, Oxygen XML Editor preserves the width information of the column. This information
is then used when you paste the column in another CALS table.
•
Content deletion
To delete a group of cells (can be columns, rows, or rectangular block of cells), select them and do one of the
following:
•
Press either Delete, or Backspace on your keyboard to delete the cells' content. Press again Delete, or Backspace
to remove the selected table structure.
•
If the selection is a column or a row, you can use the
to delete both the content and table structure.
Delete a table row or
Delete a table column actions
Oxygen XML Editor | Editing Documents | 217
DocBook Table Layout
The DocBook table layout supports two models: CALS and HTML.
In the CALS table model, you can specify column widths using the colwidth attribute of the associated colspec
element. The values can be fixed or proportional. By default, when you insert, drag and drop, or copy/paste a column,
the value of the colwidth attribute is 1*.
Also the colsep and rowsep attributes are supported. These control the way separators are painted between the table
cells.
Figure 92: CALS Table in DocBook
Pasted Tables
Tables that are pasted into a DocBook file are automatically converted to the CALS model. If you want to overwrite
this behavior and instruct Oxygen XML Editor to convert them to HTML tables, set the docbook.html.table
parameter to 1. You can find this parameter in the following stylesheet:
•
•
[OXYGEN_DIR]/frameworks/docbook/resources/xhtml2db5Driver.xsl for DocBook 5
[OXYGEN_DIR]/frameworks/docbook/resources/xhtml2db4Driver.xsl for DocBook 4
Editing Table Component Properties in DocBook
To customize the look of a table, place the cursor anywhere in a table and invoke the
Table Properties (Ctrl + T
(Command + T on OS X)) action from the Table submenu of the contextual menu or DocBook menu (or from the
toolbar).
The Table properties dialog box allows you to set specific properties to the table elements.
Note: Depending on the context, some options or values are filtered out.
Note: If you want to remove a property, set its value to <not set>.
Note: Choose the <preserve> setting to:
•
•
Keep the current non-standard value for a particular property.
Keep the values already set. This happens when you select multiple elements having the same property set
to different values.
For a CALS table you can format any of the following:
•
Table - The horizontal alignment, row and column separators, and the frame.
•
•
•
Oxygen XML Editor | Editing Documents | 218
Row - The row type, vertical alignment, and row separator.
Column - The horizontal alignment, and column and row separators.
Cell - The horizontal alignment, vertical alignment, and column and row separators.
For an HTML table you can customize any of the following:
•
•
•
•
Table - The frame attribute.
Row - The row type, horizontal alignment, and vertical alignment.
Column - The horizontal and vertical alignment.
Cell - The horizontal and vertical alignment.
XHTML Table Layout
The HTML table model accepts both table and column widths. Oxygen XML Editor uses the width attribute of the
table element and the col element associated with each column. Oxygen XML Editor displays the values in fixed
units, proportional units, or percentages.
Figure 93: HTML table
DITA Table Layout
Depending on the context, the DITA table layout accepts CALS tables, simple tables, and choice tables.
In the CALS table model, you can specify column widths using the colwidth attribute of the associated colspec
element. The values can be fixed or proportional. By default, when you insert, drag and drop, or copy/paste a column,
the value of the colwidth attribute is 1*.
Figure 94: CALS table in DITA
The simple tables accept only relative column width specifications by using the relcolwidth attribute of the
simpletable element.
Oxygen XML Editor | Editing Documents | 219
Figure 95: DITA simple table
You can insert choice tables in DITA tasks either using the Content Completion Assistant or using the toolbar and
contextual menu actions.
Editing Table Component Properties in DITA
To customize the look of a table, place the cursor anywhere in a table and invoke the
Table Properties (Ctrl + T
(Command + T on OS X)) action from the Table submenu of the contextual menu or DITA menu (or from the toolbar).
The Table properties dialog box allows you to set specific properties to the table elements.
Note: Depending on the context, some options or values are filtered out.
Note: If you want to remove a property, set its value to <not set>.
Note: Choose the <preserve> setting to:
•
•
Keep the current non-standard value for a particular property.
Keep the values already set. This happens when you select multiple elements having the same property set
to different values.
For a CALS table you can format any of the following:
•
•
•
•
Table - The horizontal alignment, row and column separators, and the frame.
Row - The row type, vertical alignment, and row separator.
Column - The horizontal alignment, and column and row separators.
Cell - The horizontal alignment, vertical alignment, and column and row separators.
For a Simple table, you can customize the following:
•
•
Table - The frame attribute.
Row - The row type.
Sorting Content in Tables and List Items
Oxygen XML Editor offers support for sorting the content of tables and list items of ordered and unordered lists.
What do you want to do?
•
•
•
•
Sort an entire table.
Sort a selection of rows in a table.
Sort a table that contains cells merged over multiple rows.
Sort list items.
Sorting a Table
To sort rows in a table, select the entire table (or specific rows) and use the
the contextual menu. This opens the Sort dialog box.
Sort action from the main toolbar or
Oxygen XML Editor | Editing Documents | 220
Figure 96: The "Sort" Dialog Box
This dialog box sets the range that is sorted and the sorting criteria. The range is automatically selected depending on
whether you sort an entire table or only a selection of its rows.
Note: When you invoke the sorting operation over an entire table, the Selected rows option is disabled.
The Criteria section specifies the sorting criteria (a maximum of three sorting criteria are available), defined by the
following:
•
•
A name, which is collected from the column heading.
The type of the information that is sorted. You can choose between the following:
•
•
•
•
Text - Alphanumeric characters.
Numeric - Regular integer or floating point numbers are accepted.
Date - Default date and time formats from the local OS are accepted (such as short, medium, long, full, xs:date,
and xs:dateTime).
The sorting direction (either ascending or descending).
The sort criteria is automatically set to the column where the cursor is located at the time when the sorting operation is
invoked.
After you finish configuring the options in the Sort dialog box, click OK to complete the sorting operation. If you want
to revert to the initial order of your content, press Ctrl Z (Meta Z on OS X) on your keyboard.
Note: The sorting support takes the value of the xml:lang attribute into account and sorts the content in a
natural order.
Sorting a Selection of Rows
To sort a selection of rows in a table, select the rows that you want to sort and either right click the selection and choose
Sort, or click
Sort on the main toolbar. This opens the Sort dialog box.
Oxygen XML Editor | Editing Documents | 221
Figure 97: Sort Selected Rows
This dialog box sets the range that is sorted and the sorting criteria. The range is automatically selected depending on
whether you sort an entire table or only a selection of its rows.
The Sort dialog box also allows you to apply the sorting operation to the entire table, using the All rows option.
The Criteria section specifies the sorting criteria (a maximum of three sorting criteria are available), defined by the
following:
•
•
A name, which is collected from the column heading.
The type of the information that is sorted. You can choose between the following:
•
•
•
•
Text - Alphanumeric characters.
Numeric - Regular integer or floating point numbers are accepted.
Date - Default date and time formats from the local OS are accepted (such as short, medium, long, full, xs:date,
and xs:dateTime).
The sorting direction (either ascending or descending).
The sort criteria is automatically set to the column where the cursor is located at the time when the sorting operation is
invoked.
After you finish configuring the options in the Sort dialog box, click OK to complete the sorting operation. If you want
to revert to the initial order of your content, press Ctrl Z (Meta Z on OS X) on your keyboard.
Note: The sorting support takes the value of the xml:lang attribute into account and sorts the content in a
natural order.
Sort Using Multiple Criteria
You can also sort an entire table or a selection of its rows based on multiple sorting criteria. To do so, enable the rest of
boxes in the Criteria section of the Sort dialog box, configure the applicable items, and click OK to complete the sorting
operation.
Oxygen XML Editor | Editing Documents | 222
Figure 98: Sorting Based on Multiple Criteria
Sorting a Table that Contains Merged Cells
If a table contains cells that span over multiple rows, you can not perform the sorting operation over the entire table.
Still, the sorting mechanism works over a selection of rows that do not contain rowspans.
Note: For this type of table, the Sort dialog box keeps the All rows option disabled even if you perform the
sorting operation over a selection of rows.
Sorting List Items
A sorting operation can be performed on various types of lists and list items. Oxygen XML Editor provides support for
sorting the following types of lists:
•
•
•
•
•
•
•
•
•
Ordered list (ol)
Unordered list (ul)
Parameter list (parml)
Simple list (sl)
Required conditions (reqconds)
Supplies list (supplyli)
Spare parts list (sparesli)
Safety conditions (safety)
Definitions list (dl)
The sorting mechanism works on an entire list or on a selection of list items. To sort items in a list, select the items or
list and use the
Sort action from the main toolbar or the contextual menu. This opens the Sort dialog box.
Figure 99: Sorting List Items
This dialog box sets the range that is sorted and the sorting criteria. The range is automatically selected depending on
whether you sort an entire list or only a selection of its items.
Oxygen XML Editor | Editing Documents | 223
Note: When you invoke the sorting operation over an entire list, the Selected rows option is disabled.
The Criteria section specifies the sorting criteria, defined by the following:
•
•
The name of the type of item being sorted.
The type of the information that is sorted. You can choose between the following:
•
•
•
•
Text - Alphanumeric characters.
Numeric - Regular integer or floating point numbers are accepted.
Date - Default date and time formats from the local OS are accepted (such as short, medium, long, full, xs:date,
and xs:dateTime).
The sorting direction (either ascending or descending).
After you finish configuring the options in the Sort dialog box, click OK to complete the sorting operation. If you want
to revert to the initial order of your content, press Ctrl Z (Meta Z on OS X) on your keyboard.
Note: The sorting support takes the value of the xml:lang attribute into account and sorts the content in a
natural order.
Image Rendering
The Author mode and the output transformation process might render the images referenced in an XML document
differently, since they use different rendering engines.
Table 5: Supported Image Formats
Image Type
Support
Additional Information
GIF
built-in
Animations not yet supported
JPG, JPEG
built-in
JPEG images with CMYK color profiles are properly rendered only if color profile is
inside the image.
PNG
built-in
SVG, SVGZ,
WMF
built-in
BMP
built-in
TIFF
built-in
Rendered using a part of the Java JAI Image library.
EPS
built-in
Renders the preview TIFF image inside the EPS.
AI
built-in
Renders the preview image inside the Adobe Illustrator file.
JPEG 2000,
WBMP
plug-in
Renders by installing the Java Advanced Imaging (JAI) Image I/O Tools plug-in.
CGM
plug-in
Renders by installing an additional library.
PDF
plug-in
Renders by installing the Apache PDF Box library.
Rendered using the open-source Apache Batik library which supports SVG 1.1.
When an image cannot be rendered, Oxygen XML Editor Author mode displays a warning message that contains the
reason why this is happening. Possible causes include the following:
•
•
The image is too large. Enable the Show very large images option.
The image format is not supported by default. It is recommended to install the Java Advanced Imaging(JAI) Image
I/O Tools plug-in.
Scaling Images
Image dimension and scaling attributes are taken into account when an image is rendered. The following rules apply:
•
•
•
•
Oxygen XML Editor | Editing Documents | 224
If you specify only the width attribute of an image, the height of the image is proportionally applied.
If you specify only the height attribute of an image, the width of the image is proportionally applied.
If you specify width and height attributes of an image, both of them control the rendered image.
If you want to scale both the width and height of an image proportionally, use the scale attribute.
Note: As a Java application, Oxygen XML Editor uses the Java Advanced Imaging API that provides a pluggable
support for new image types. If you have an ImageIO library that supports additional image formats, just copy
this library to the [OXYGEN_DIR]/lib directory.
Installing Java Advanced Imaging(JAI) Image I/O Tools Plug-in
Follow this procedure:
1. Start Oxygen XML Editor and open the Help > About dialog box. Go to the System properties tab and look for
the java.runtime.name and java.home properties. Keep their values for later use.
2. Download the JAI Image I/O kit corresponding to your operating system and Java distribution (found in the
java.runtime.name property).
Note that the JAI API is not the same thing as JAI Image I/O. Make sure you have installed the latter.
3. Run the installer. When the installation wizard displays the Choose Destination Location page, fill-in the Destination
Folder field with the value of the java.home property. Continue with the installation procedure and follow the
on-screen instructions.
Customize Oxygen XML Editor to Render CGM Images (Experimental Support)
Oxygen XML Editor provides experimental support for CGM 1.0 images.
Attention: Image hotspots are not supported.
Since this is an experimental support, some graphical elements might be missing from the rendered image.
The CGM rendering support is based on a third party library. In its free of charge variant it renders the images
watermarked with the string Demo, painted across the panel. You can find more information about ordering the
fully functioning version here: http://www.bdaum.de/cgmpanel.htm.
Follow this procedure to enable the rendering of CGM images in Author mode:
1. Download the CGMPANEL.ZIP from http://www.bdaum.de/CGMPANEL.ZIP.
2. Unpack the ZIP archive and copy the cgmpanel.jar into the [OXYGEN_DIR]\lib directory.
3. Restart the application.
Customize Oxygen XML Editor to Render PDF Images (Experimental Support)
Oxygen XML Editor provides experimental support for PDF images using the Apache PDFBox library.
To enable the rendering of PDF images in Author mode, follow this procedure:
1. Go to http://pdfbox.apache.org/downloads.html and download the pre-built PDFBox standalone binary JAR files
pdfbox-1.8.9.jar, fontbox-1.8.9.jar, and jempbox-1.8.9.jar.
2. Copy the downloaded JAR libraries to the [OXYGEN_DIR]\lib directory.
3. Restart the application.
Customize Oxygen XML Editor to Render PSD Images
Oxygen XML Editor provides support for rendering PSD (Adobe Photoshop) images.
To enable the rendering of PSD images in Author mode, follow this procedure:
1. Download the following JAR files:
•
•
•
http://search.maven.org/remotecontent?filepath=com/twelvemonkeys/common/common-lang/3.1.0/common-lang-3.1.0.jar
http://search.maven.org/remotecontent?filepath=com/twelvemonkeys/common/common-io/3.1.0/common-io-3.1.0.jar
http://search.maven.org/remotecontent?filepath=com/twelvemonkeys/common/common-image/3.1.0/common-image-3.1.0.jar
•
•
•
Oxygen XML Editor | Editing Documents | 225
http://search.maven.org/remotecontent?filepath=com/twelvemonkeys/imageio/imageio-core/3.1.0/imageio-core-3.1.0.jar
http://search.maven.org/remotecontent?filepath=com/twelvemonkeys/imageio/imageio-metadata/3.1.0/imageio-metadata-3.1.0.jar
http://search.maven.org/remotecontent?filepath=com/twelvemonkeys/imageio/imageio-psd/3.1.0/imageio-psd-3.1.0.jar
2. Copy the downloaded JAR libraries to the [OXYGEN_DIR]\lib directory.
3. Restart the application.
Customize Oxygen XML Editor to Render EPS and AI Images
Most EPS and AI image files include a preview picture of the content. Oxygen XML Editor tries to render this preview
picture. The following scenarios are possible:
•
•
The EPS or AI image does not include the preview picture. Oxygen XML Editor cannot render the image.
The EPS image includes a TIFF preview picture.
Note: Some newer versions of the TIFF picture preview are rendered in gray-scale.
•
The AI image contains a JPEG preview picture. Oxygen XML Editor renders the image correctly.
Adding an Image
To insert an image in a document while editing in Author mode, use one of the following methods:
•
Click the
Insert Image action from the toolbar and choose the image file you want to insert. Oxygen XML Editor
tries to reference the image with a path that is relative to that of the document you are currently editing. For example,
if you want to add the file:/C:/project/xml/dir/img1.jpg image into the
file:/C:/project/xml/doc1.xml document, Oxygen XML Editor inserts a reference to dir/img1.jpg.
This is useful when multiple users work on a common project and they have it stored in different locations in their
computers.
Note: The
Insert Image action is available for the following document types: DocBook 4, DocBook 5,
DITA, TEI P4, TEI P5, XHTML.
•
Drag an image from other application and drop it in the Author editing mode. If it is an image file, it is inserted as
a reference to the image file. For example, in a DITA topic the path of the image file is inserted as the value of the
href attribute in an image element:
<image href="../images/image_file.png"/>
Note: To replace an image, just drag and drop a new image over the existing one. Oxygen XML Editor will
automatically update the reference to the new image.
•
Copy the image from another application (such as an image editor) and paste it into your document. Oxygen XML
Editor prompts you to first save it. After saving the image, a reference to that file path is inserted at the paste position.
Editing MathML Notations
The Author editor includes a built-in editor for MathML notations. To start the MathML editor, either double-click a
MathML notation, or select the Edit Equation action from its contextual menu. In the MathML editor you are able to
edit the mathematical symbols of a MathML notation. You can open a MathML file of your current project directly in
the MathML editor. To do this, select Open with > MathML editor from the contextual menu in the Project view.
Oxygen XML Editor | Editing Documents | 226
Figure 100: The default MathML editor
The font size and font family that is used for the equations is based upon the context in which the MathML equation
appears. To configure the minimum font size of the equation, open the Preferences dialog box and go to Editor > Edit
modes > Author > MathML.
Configure the MathFlow Editor
The MathFlow Components product (MathFlow SDK) can replace the default MathML editor with a specialized MathML
editor. You have to purchase a MathFlow Component from Design Science and configure it in Oxygen XML Editor
with the following procedure:
Oxygen XML Editor | Editing Documents | 227
Figure 101: The default MathML editor
1. Install MathFlow Components (MathFlow SDK).
2. On Windows make sure there is a copy of the FLEXlm DLL, which is the file
[MathFlow-install-folder]/resources/windows/lmgr10.dll, in a folder that is added to the
PATH environment variable.
3. Set the path to the MathFlow install folder in the Preferences.
4. Set the path to the MathFlow license file in the Preferences.
MathML Equations in HTML Output
Currently, only Firefox can render MathML equations embedded in the HTML code. MathJax is a solution to properly
view MathML equations embedded in HTML content in a variety of browsers.
If you have DocBook or DITA content that has embedded MathML equations and you want to properly view the
equations in published HTML output types (WebHelp, CHM, EPUB, etc.), you need to add a reference to the MathJax
script in the head element of all HTML files that have the equation embedded.
For example:
<script type="text/javascript" src="http://cdn.mathjax.org/mathjax/latest/MathJax.js?config=TeX-AMS-MML_HTMLorMML">
</script>
For DITA documents, you can also edit the DITA Map WebHelp transformation scenario and set the args.hdf
parameter to point to the footer.html resource. Then transform to WebHelp and the equation should be properly
rendered in the browsers such as IE, Chrome, and Firefox.
Refreshing the Content
On occasion you may need to reload the content of the document from the disk or reapply the CSS. This can be performed
by using the
Reload action.
To refresh the content of the referenced resources you can use the
Refresh references action. However, this action
will not refresh the expanded external entities, for which you will need to use the
Reload action.
Oxygen XML Editor | Editing Documents | 228
Editing Attributes in Author Mode In-Place
You can easily edit attributes in Author mode by using the Attributes View and Oxygen XML Editor also allows you
to edit attribute and element values in-place, directly in the Author mode, using an in-place attribute editor.
In-place Attributes Editor
Oxygen XML Editor includes an in-place attributes editor in Author mode. To edit the attributes of an XML element
in-place, do one of the following:
•
•
Select an element or place the cursor inside it and then press the Alt Enter keyboard shortcut.
Double-click any named start tag when the document is edited in one of the following display modes.:
with Attributes,
Full Tags,
Block Tags, or
Inline Tags.
Full Tags
This opens an in-place attributes editor that contains the same content as the Attributes view. By default, this editor
presents the Name and Value fields, with the list of all the possible attributes collapsed.
Figure 102: In-place Attributes Editor
Name Combo Box
Use this combo box to select an attribute. The drop-down list displays the list of possible attributes allowed by the
schema of the document, as in the Attributes view.
Value Combo Box
Use this combo box to add, edit, or select the value of an attribute. If the selected attribute has predefined values in
the schema, the drop-down list displays those possible values.
If you click More while in the collapsed version, it is expanded to the full version of the in-place attribute editor.
Figure 103: In-place Attributes Editor (Full Version)
Oxygen XML Editor | Editing Documents | 229
The full version includes a table grid, similar to the Atributes view, that presents all the attributes for the selected
element.
Generating IDs for Elements in Author Mode
Oxygen XML Editor allows you to manually assign or edit values of id attributes in Author mode by using the Attributes
View or an in-place attribute editor. Oxygen XML Editor also includes mechanisms to generate ID values for elements,
either on-request or automatically, in DITA, DocBook, or TEI documents.
Generate IDs On-Request
You can generate ID values for specific elements on-request. To do so, select the element for which you want to generate
an ID (or place the cursor inside the element) and select the Generate IDs action from the contextual menu or the
framework-specific menu (DITA, DocBook, or TEI). This action generates a unique ID for the current element. If you
invoke the action on a block of selected content, the action will generate IDs for all top-level elements and elements
that are listed in the ID Options dialog box that are found in the current selection.
Note: The Generate IDs action does not overwrite existing ID values. It only affects elements that do not
already have an id attribute.
Automatically Generate IDs
Oxygen XML Editor includes an option to automatically add unique ID values to certain elements when they are created
in Author mode. The Auto generate IDs for elements option can be found in the ID Options dialog box that is displayed
when you select the ID Options action from the framework-specific menu (DITA, DocBook, or TEI). If enabled,
Oxygen XML Editor automatically generates unique ID values for elements that are listed in this dialog box. You can
use this dialog box to customize the format of the ID values and choose which elements will have their ID values
automatically generated (for example, you can customize the list of elements to include those that you most often need
to identify).
ID Options Dialog Box
Figure 104: The ID Options Dialog Box
The ID Options dialog box allows you to configure the following options in regards to generating ID values:
Oxygen XML Editor | Editing Documents | 230
ID Pattern
The pattern for the ID values that will be generated. This text field can be customized using constant strings and
most of the supported Editor Variables on page 663.
Element name or class value to generate ID for
The elements for which ID values will be generated, specified using class attribute values. To customize the list,
use the Add, Edit, or Remove buttons.
Auto generate IDs for elements
If enabled, Oxygen XML Editor will automatically generate unique IDs for the elements listed in this dialog box
when they are created in Author mode.
Remove IDs when copying content in the same document
Allows you to control whether or not pasted elements that are listed in this dialog box should retain their existing
IDs when copying content in the same document. To retain the element IDs, disable this option.
Duplicating Elements with Existing IDs
If you duplicate elements with existing IDs (for example, through copy/paste or drag/drop actions), all IDs are removed
at the resolution of the operation. However, you can use the options in the ID Options dialog box to change this behavior.
The options in this dialog box affect duplicated elements with existing IDs in the following ways:
Note: Only the elements listed in this dialog box are affected by these options. Therefore, if you want to use
these options to preserve IDs or generate new ones, you must first add the elements to be duplicated to the list
in this dialog box.
•
•
•
•
If the Auto generate IDs for elements option is enabled and you duplicate elements with existing IDs, Oxygen
XML Editor assigns new, unique ID values to the duplicates.
If the Auto generate IDs for elements option is disabled and you duplicate elements with existing IDs, the ID values
are removed from the duplicates. However, when elements are duplicated in the same document, this option has no
effect and IDs are preserved if the Remove IDs when copying content in the same document option is disabled.
If the Remove IDs when copying content in the same document option is enabled, the ID values are removed
from elements that are duplicated in the same document. However, enabling this option has no effect if the Auto
generate IDs for elements option is enabled.
If the Remove IDs when copying content in the same document option is disabled, the ID values are preserved
when elements are duplicated in the same document. This option has no affect on elements that are duplicated in
other documents.
Using Form Controls in Author Mode
You can use form controls in Author mode in a variety of ways to make it easier to capture, organize, and edit content.
Oxygen XML Editor includes built-in form controls that can be used by content authors in Author mode. The types of
built-in form controls that you can use include the following:
•
•
•
•
•
•
•
•
•
•
Text Field - A graphical user interface box that allows you to enter a single line of text.
Combo Box - A graphical user interface object that can be a drop-down menu or a combination of a drop-down menu
and a single-line text field.
Check Box - A graphical user interface box that you can click to select or deselect a value.
Pop-up - A contextual menu that provides quick access to various actions.
Button - A graphical user interface object that performs a specific action.
Button Group - A graphical user interface group of buttons (such as radio buttons) that perform specific actions.
Text Area - A box that allows you to enter multiple lines of text.
URL Chooser - A dialog box that allows you to select the location of local or remote resources.
Date Picker - A form control object that allows you to select a date in a specified format.
HTML Content - A graphical user interface box that is used for rendering HTML content.
You can also implement custom form controls for more specific needs.
Oxygen XML Editor | Editing Documents | 231
The following image is an example of how form controls can be used by content authors in Author mode. It includes
several button form controls, a combo box, and a text field. The
icon is a button form control that is assigned a
specific action that changes the layout to an editing mode. The [ + ] and [ - ] icons are also button form controls that are
assigned specific actions to add or delete records from the document. The Direct manager row includes a combo box
form control that is both a drop-down menu and an editable text field, while the Homepage row includes a simple editable
text field form control.
Figure 105: Example of Form Controls in Author Mode
You can use your imagination to envision the multitude of ways that you can use form controls to make the editing
experience for content authors easier and more efficient. As a working example, a bundled samples project (located in
the samples folder inside the Oxygen XML Editor installation directory) contains a file called personal.xml that
contains form controls. You can use this file, along with its corresponding personal.css file (form controls are
defined in the CSS) to experiment with an example of how form controls can be implemented in Author mode.
Associate a Schema to a Document
This section explains the methods of associating a schema to a document for validation and content completion purposes.
Setting a Schema for Content Completion
This section explains the available methods of setting a schema for content completion in an XML document edited in
Oxygen XML Editor.
Supported Schema Types for XML Documents
The supported schema types are:
•
•
•
•
•
•
W3C XML Schema 1.0 and 1.1 (with and without embedded Schematron rules);
DTD;
Relax NG - XML syntax (with and without embedded Schematron rules);
Relax NG - compact syntax;
NVDL;
Schematron (both ISO Schematron and Schematron 1.5).
Setting a Default Schema
When trying to detect a schema, Oxygen XML Editor searches in multiple locations, in the exact following order:
•
•
•
The validation scenario associated with the document.
The validation scenario associated with the document type (if defined).
The document schema declaration.
Note: If a DTD schema is specified in the document, the content completion for Author mode is based on
this schema (even if there is already one detected from the validation scenario).
•
Oxygen XML Editor | Editing Documents | 232
The document type schema definition. Each document type available in Document Type Association preferences
page contains a set of rules for associating a schema with the current document.
Note: The locations are sorted by priority, from high to low.
The schema has one of the following types: XML Schema, XML Schema with embedded Schematron rules, Relax NG
(XML syntax or compact syntax), Relax NG (XML syntax) with embedded Schematron rules, Schematron, DTD, NVDL.
The rules are applied in the order they appear in the table and take into account the local name of the root element, the
default namespace and the file name of the document.
Important:
The editor is creating the content completion lists by analysing the specified schema and the current context
(the position in the editor). If you change the schema, then the list of tags to be inserted is updated.
Figure 106: Content Completion Driven by DocBook DTD
Making the Schema Association Explicit in the XML Instance Document
The schema used by the Content Completion Assistant and document validation engine can be associated with the
document using the
Associate Schema action. For most of the schema types, it uses the xml-model processing
instruction, the exceptions being:
•
•
W3C XML Schema - The xsi:schemaLocation attribute is used.
DTD - The DOCTYPE declaration is used.
The association can specify a relative file path or a URL of the schema. The advantage of relative file path is that you
can configure the schema at file level instead of document type level.
Select the
Associate schema action from the Document > Schema menu or the Document toolbar to select the
schema that will be associated with the XML document. The Associate Schema dialog box is displayed:
Oxygen XML Editor | Editing Documents | 233
Figure 107: The Associate Schema Dialog Box
The available options are:
•
•
•
•
•
•
URL - Contains a predefined set of schemas that are used more often and it also keeps a history of the last used
schemas. The URL must point to the schema file which can be loaded from the local disk or from a remote server
through HTTP(S), FTP(S) or a custom protocol.
Schema type - Selected automatically from the list of possible types in the Schema type combo box (XML Schema,
DTD, Relax NG, Relax NG Compact, Schematron, NVDL) based on the extension of the schema file that was entered
in the URL field.
Public ID - Specify a public ID if you have selected a DTD.
Add additional association for embedded schematron rules - If you have selected XML Schema or Relax NG
schemas with embedded Schematron rules, enable this option.
Use path relative to file location - Enable this option if the XML instance document and the associated schema
contain relative paths. The location of the schema file is inserted in the XML instance document as a relative file
path. This practice allows you, for example, to share these documents with other users, without running into problems
caused by different project locations on physical disk.
Keep existing schema associations - Enable this option to keep the associations of the currently edited document
with a Schema when you associate a new one.
The association with an XML Schema is added as an attribute of the root element. The Associate schema action adds
one of the following:
•
•
xsi:schemaLocation attribute, if the root element of the document sets a default namespace with an xmlns
attribute.
xsi:noNamespaceSchemaLocation attribute, if the root element does not set a default namespace.
The association with a DTD is added as a DOCTYPE declaration. The association with a Relax NG , Schematron or
NVDL schema is added as xml-model processing instruction.
Associating a Schema With the Namespace of the Root Element
The namespace of the root element of an XML document can be associated with an XML Schema using an XML catalog.
If there is no xsi:schemaLocation attribute on the root element and the XML document is not matched with a
document type, the namespace of the root element is searched in the XML catalogs set in Preferences.
If the XML catalog contains an uri or rewriteUri or delegateUri element, its schema will be used by the
application to drive the content completion and document validation.
Oxygen XML Editor | Editing Documents | 234
The xml-model Processing Instruction
The xml-model processing instruction associates a schema with the XML document that contains the processing
instruction. It must be added at the beginning of the document, just after the XML prologue. The following code snippet
contains an xml-model processing instruction declaration:
<?xml-model href="../schema.sch" type="application/xml" schematypens="http://purl.oclc.org/dsdl/schematron"
phase="ALL" title="Main schema"?>
It is available in the Content Completion Assistant, before XML document root element, and includes the following
attributes:
•
•
href (required) - The schema file location.
type - The content type of the schema. This is an optional attribute with the following possible values for each
specified type:
•
•
•
•
•
•
•
schematypens - The namespace for the schema language of the referenced schema with the following possible
values:
•
•
•
•
•
•
•
•
DTD - The recommended value is application/xml-dtd.
W3C XML Schema - The recommended value is application/xml, or can be left unspecified.
RELAX NG XML Syntax - The recommended value is application/xml, or can be left unspecified.
RELAX NG Compact Syntax - The recommended value is application/relax-ng-compact-syntax.
Schematron - The recommended value is application/xml, or can be left unspecified.
NVDL - The recommended value is application/xml, or can be left unspecified.
DTD - Not specified.
W3C XML Schema - The recommended value is http://www.w3.org/2001/XMLSchema.
RELAX NG XML Syntax - The recommended value is http://relaxng.org/ns/structure/1.0.
RELAX NG Compact Syntax - Not specified.
Schematron - The recommended value is http://purl.oclc.org/dsdl/schematron.
NVDL - The recommended value is http://purl.oclc.org/dsdl/nvdl/ns/structure/1.0.
phase - The phase name for the validation function in Schematron schema. This is an optional attribute. To run all
phases from the Schematron, use the special #ALL value. If the phase is not specified, the default phase that is
configured in the Schematron will be applied.
title - The title for the associated schema. This is an optional attribute.
Older versions of Oxygen XML Editor used the oxygen processing instruction with the following attributes:
•
•
•
•
RNGSchema - Specifies the path to the Relax NG schema that is associated with the current document.
type - Specifies the type of Relax NG schema. It is used along with the RNGSchema attribute and can have the
value xml or compact.
NVDLSchema - Specifies the path to the NVDL schema that is associated with the current document.
SCHSchema - Specifies the path to the SCH schema that is associated with the current document.
Note: Documents that use the oxygen processing instruction are compatible with newer versions of Oxygen
XML Editor.
Learning Document Structure
When working with documents that do not specify a schema, or for which the schema is not known or does not exist,
Oxygen XML Editor is able to learn and translate the document structure to a DTD. You can choose to save the learned
structure to a file in order to provide a DTD as an initialization source for content completion and document validation.
This feature is also useful for producing DTD's for documents containing personal or custom element types.
When you open a document that is not associated with a schema, Oxygen XML Editor automatically learns the document
structure and uses it for content completion. To disable this feature you have to uncheck the checkbox Learn on open
document in the user preferences.
Oxygen XML Editor | Editing Documents | 235
Create a DTD from Learned Document Structure
When there is no schema associated with an XML document, Oxygen XML Editor can learn the document structure by
parsing the document internally. This feature is enabled with the option Learn on open document that is available in
the user preferences.
To create a DTD from the learned structure:
1. Open the XML document for which a DTD will be created.
2. Go to Document > XML Document > Learn Structure (Ctrl Shift L (Meta Shift L on OS X)).
The Learn Structure action reads the mark-up structure of the current document. The Learn completed message
is displayed in the application's status bar when the action is finished.
3. Go to Document > XML Document > Save Structure (Ctrl Shift S (Meta Shift S on OS X)) and enter the DTD
file path.
4. Press the Save button.
Content Completion Assistant
The intelligent Content Completion Assistant available in Oxygen XML Editor enables rapid, in-line identification
and insertion of structured language elements, attributes and, in some cases, their parameter options.
Figure 108: Content Completion Assistant
The functioning of the Content Completion Assistant feature is schema-driven (XML Schema, DTD, and RELAX
NG). When Oxygen XML Editor detects a schema, it logs its URL in the Information view.
The Content Completion Assistant is enabled by default. To disable it, open the Preferences dialog box and go to
Editor > Content Completion. It is activated:
•
•
Automatically, after a configurable delay from the last key press of the < character. You can adjust the delay from
the Content Completion preferences page.
On demand, by pressing Ctrl Space (Command Space on OS X) on a partial element or attribute name.
Note: If the Content Completion list contains only one valid proposal, when you press the Ctrl Space
(Command Space on OS X) shortcut key, the proposal is automatically inserted.
Note: You can also start the Content Completion Assistant from Document > Content Completion >
Start Content Completion.
When active, it displays a list of context-sensitive proposals valid at the current cursor position. Elements are selected
in the list using the Up and Down cursor keys on your keyboard. For each selected item in the list, the Content Completion
Assistant displays a documentation window. You can customize the size of the documentation window by dragging its
top, right, and bottom borders.
To insert the selected content, do one of the following:
•
Press Enter or Tab key on your keyboard to insert both the start and end tags. The cursor is positioned inside the
start tag, in a position suitable for inserting attributes.
•
Oxygen XML Editor | Editing Documents | 236
Press Ctrl Enter (Meta Enter on OS X) on your keyboard. Oxygen XML Editor inserts both the start and end tags
and positions the cursor between the tags, so you can start typing content.
Note: When the DTD, XML Schema or RELAX NG schema specifies required child elements for the newly
added element, they are inserted automatically only if the Add Element Content option (found in the Content
Completion preferences page) is enabled. The Content Completion Assistant can also add optional content
and first choice particle, as specified in the DTD or XML Schema or RELAX NG schema. To activate this
feature, open the Preferences dialog box, go to Content Completion, and select the Add optional content and
Add first Choice particle check boxes.
After inserting an element, the cursor is positioned:
•
•
Before the > character of the start tag, if the element allows attributes, in order to enable rapid insertion of any of
the attributes supported by the element. Pressing the space bar displays the Content Completion list once again. This
time it contains the list of allowed attribute names. If the attribute supports a fixed set of parameters, the assistant
list displays the list of valid parameters. If the parameter setting is user-defined and therefore variable, the assistant
is closed to enable manual insertion. The values of the attributes can be learned from the same elements in the current
document
After the > character of the start tag if the element has no attributes.
The Content Completion Assistant is displayed:
•
•
•
Anywhere within a tag name or at the beginning of a tag name in an XML document, XML Schema, DTD,or Relax
NG (full or compact syntax) schema
Anywhere within an attribute name or at the beginning of an attribute name in any XML document with an associated
schema
Within attribute values or at the beginning of attribute values in XML documents where lists of possible values have
been defined for that element in the schema associated with the document.
The items that populate the Content Completion Assistant depend on the element structure specified in the DTD, XML
Schema, Relax NG (full or compact syntax) schema, or NVDL schema associated with the edited document.
Note: The Content Completion Assistant is able to offer elements defined both by XML Schemas version
1.0 and 1.1.
The number and type of elements displayed by the Content Completion Assistant is dependent on the cursor's current
position in the structured document. The child elements displayed within a given element are defined by the structure
of the specified DTD, XML Schema, Relax NG (full or compact syntax) schema, or NVDL schema.
A schema may declare certain attributes as ID or IDREF/IDREFS. When the document is validated, Oxygen XML Editor
checks the uniqueness and correctness of the ID attributes. It also collects the attribute values declared in the document
to prepare the Content Completion Assistant's list of proposals. This is available for documents that use DTD, XML
Schema, and Relax NG schema.
Also, values of all the xml:id attributes are handled as ID attributes. They are collected and displayed by the Content
Completion Assistant as possible values for anyURI attributes defined in the schema of the edited document. This
works only for XML Schema and Relax NG schemas.
For documents that use an XML Schema or Relax NG schema, the content assistant offers proposals for attributes and
elements values that have as type an enumeration of tokens. Also, if a default value or a fixed value is defined in the
XML Schema used in validation for an attribute or element, then that value is offered in the Content Completion
Assistant window.
Set Schema for Content Completion
The DTD, XML Schema, Relax NG, or NVDL schema used to populate the Content Completion Assistant is specified
in the following methods, in order of precedence:
•
•
The schema specified explicitly in the document. In this case Oxygen XML Editor reads the beginning of the document
and resolves the location of the DTD, XML Schema, Relax NG schema, or NVDL schema.
The default schema declared in the Document Type configuration dialog box that matches the edited document.
•
•
Oxygen XML Editor | Editing Documents | 237
For XSLT stylesheets, the schema specified in the Oxygen XML Editor Content Completion options.Oxygen XML
Editor will read the Content Completion settings when the prolog fails to provide or resolve the location of a DTD,
XML Schema, Relax NG or NVDL schema.
For XML Schemas, the schema specified in the Oxygen XML Editor Content Completion options.Oxygen XML
Editor will read the Content Completion settings and the specified schema will enhance the content completion inside
the xs:annotation/xs:appinfo elements of the XML Schema.
Content Completion in Documents with Relax NG Schemas
Inside the documents that use a Relax NG schema, the Content Completion Assistant is able to present element values
if such values are specified in the Relax NG schema. Also in Relax NG documents the Content Completion Assistant
presents additional values of type ID for an anyURI data type. It presents also pattern names defined in the Relax NG
schema as possible values for pattern references. For example if the schema defines an enumValuesElem element
like:
<element name="enumValuesElem">
<choice>
<value>value1</value>
<value>value2</value>
<value>value3</value>
</choice>
</element>
In documents based on this schema, the Content Completion Assistant offers the following list of values:
Figure 109: Content Completion assistant - element values in Relax NG documents
Schema Annotations
A schema annotation is a documentation snippet associated with the definition of an element or attribute in a schema.
If such a schema is associated with an XML document, the annotations are displayed in:
•
•
The Content Completion Assistant.
A small tooltip window shown when the mouse hovers over an element or attribute. The tooltip window can be
invoked at any time using the F2 shortcut.
The schema annotations support is available the schema type is one of the following: XML Schema, Relax NG, NVDL,
or DTD. If you want to turn off this feature, disable the Show annotations in Content Completion Assistant option.
Styling Annotations with HTML
You can use HTML format in the annotations you add in an XML Schema or Relax NG schema. This improves the
visual appearance and readability of the documentation window displayed when editing XML documents validated
against such a schema. An annotation is recognized and displayed as HTML if it contains at least one HTML element,
like: div, body, p, br, table, ul, or ol.
The HTML rendering is controlled by the Show annotations using HTML format, if possible option. When this
options is disabled, the annotations are converted and displayed as plain text. If the annotation contains one or more
HTML tags (p, br, ul, li), they are rendered as an HTML document loaded in a web browser: p begins a new paragraph,
br breaks the current line, ul encloses a list of items, li encloses an item of the list.
Collecting Annotations from XML Schemas
In an XML Schema the annotations are specified in an <xs:annotation> element like this:
<xs:annotation>
<xs:documentation>
Description of the element.
Oxygen XML Editor | Editing Documents | 238
</xs:documentation>
</xs:annotation>
For XML Schema, if an element or attribute does not have a specific annotation, then Oxygen XML Editor looks for an
annotation in the type definition of that element or attribute.
Collecting Annotations from Relax NG Schemas
For Relax NG schema element / attribute annotation are made using the <documentation> element from the
http://relaxng.org/ns/compatibility/annotations/1.0 namespace. However, any element outside
the Relax NG namespace (http://relaxng.org/ns/structure/1.0) is handled as annotation and the text
content is displayed in the annotation window. To activate this behavior, enable the Use all Relax NG annotations as
documentation option.
Collecting Annotation from DTDs
For DTD Oxygen XML Editor defines a custom mechanism for annotation using comments enabled from the option
Use DTD comments as annotations. Following is an example of a DTD annotation:
<!--doc:Description of the element. -->
Content Completion Helper Views
Information about the current element being edited is also available in various views, such as the Model view, Attributes
view, Elements view, and Entities view. By default, they are located on the right-hand side of the main editor window.
These views, along with the powerful Outline view, provide spatial and insight information about the edited document
and the current element.
The Model View
The Model view presents the structure of the currently selected tag, and its documentation, defined as annotation in the
schema of the current document. To open the Model view, select it from the Window > Show View menu.
Figure 110: The Model View
The Model view is comprised of two sections, an element structure panel and an annotations panel.
Oxygen XML Editor | Editing Documents | 239
Element Structure Panel
The element structure panel displays the structure of the currently edited or selected tag in a tree-like format. The
information includes the name, model, and attributes of the current tag. The allowed attributes are shown along with
imposed restrictions, if any.
Figure 111: The Element Structure Panel
Annotation Panel
The Annotation panel displays the annotation information for the currently selected element. This information is collected
from the XML schema.
Figure 112: The Annotation panel
The Attributes View
The Attributes view presents all the attributes of the current element determined by the schema of the document.
You can use the Attributes view to insert attributes, edit their values, or add values to existing attributes.
The attributes are rendered differently depending on their state:
•
The names of the attributes with a specified value are rendered with a bold font, and their value with a plain font.
Note: The names of the attributes with an empty string value are also rendered bold.
•
•
•
Default values are rendered with a plain font, painted gray.
Empty values display the text "[empty]", painted gray.
Invalid attributes and values are painted red.
Double-click a cell in the Value column to edit the value of the corresponding attribute. If the possible values of the
attribute are specified as list in the schema of the edited document, the Value column acts as a combo box that allows
you to insert the values in the document.
You can sort the attributes table by clicking the Attribute column header. The table contents can be sorted as follows:
•
•
By attribute name in ascending order.
By attribute name in descending order.
•
Oxygen XML Editor | Editing Documents | 240
Custom order, where the used attributes are displayed at the beginning of the table sorted in ascending order, followed
by the rest of the allowed elements sorted in ascending order.
Figure 113: The Attributes View
Expand/Collapse Button
There is an
Expand/
Collapse button at the top-right of the view. When expanded, this presents the following
additional combo boxes:
Name Combo Box
Use this combo box to select an attribute. The drop-down list displays the list of possible attributes allowed by the
schema of the document, as in the Attributes view. You can use the
Remove button to delete an attribute and
its value from the selected element.
Value Combo Box
Use this combo box to add, edit, or select the value of an attribute. If the selected attribute has predefined values in
the schema, the drop-down list displays those possible values. You can use the
Browse button to select a URL
for the value of an attribute. After you have entered or selected a value, use the
to add the value to the attribute.
Update button (or press Enter)
Contextual Menu Actions in the Attributes View
The following actions are available in the contextual menu of the Attributes view when editing in Text mode:
Add
Allows you to insert a new attribute. Adding an attribute that is not in the list of all defined attributes is not possible
when the Allow only insertion of valid elements and attributes schema aware option is enabled.
Set empty value
Specifies the current attribute value as empty.
Remove
Removes the attribute (action available only if the attribute is specified). You can invoke this action by pressing the
(Delete) or (Backspace) keys.
Copy
Copies the attrName="attrValue" pair to the clipboard. The attrValue can be:
•
•
•
The value of the attribute.
The value of the default attribute, if the attribute does not appear in the edited document.
Empty, if the attribute does not appear in the edited document and has no default value set.
Paste
Depending on the content of the clipboard, the following cases are possible:
•
•
•
Oxygen XML Editor | Editing Documents | 241
If the clipboard contains an attribute and its value, both of them are introduced in the Attributes view. The
attribute is selected and its value is changed if they exist in the Attributes view.
If the clipboard contains an attribute name with an empty value, the attribute is introduced in the Attributes
view and you can start editing it. The attribute is selected and you can start editing it if it exists in the Attributes
view.
If the clipboard only contains text, the value of the selected attribute is modified.
The Elements View
The Elements view presents a list of all defined elements that you can insert at the current cursor position according to
the schema associated to the document. Double-clicking any of the listed elements inserts that element in the edited
document. All elements from a sequence are presented but the invalid proposals (which cannot be inserted in the current
context) are disabled and rendered in gray.
Figure 114: The Elements View
The Entities View
This view displays a list with all entities declared in the current document, as well as built-in ones. Double-clicking one
of the entities will insert it at the current cursor position. You can also sort entities by name and value by clicking the
column headers.
Figure 115: The Entities View
The view features a filtering capability that allows you to search an entity by name, value, or both. Also, you can choose
to display the internal or external entities.
Note: When entering filters, you can use the ? and * wildcards. Also, you can enter multiple filters by separating
them with a comma.
Oxygen XML Editor | Editing Documents | 242
Code Templates
Code templates are code fragments that can be inserted quickly at the current editing position . Oxygen XML Editor
comes with a set of built-in code templates for CSS, LESS, Schematron, XSL, XQuery, and XML Schema document
types. You can also define you own code templates and share them with others.
To get a complete list of available code templates, press Ctrl Shift Space in Text mode. To enter the code template,
select it from the list or type its code and press Enter. If a shortcut key has been assigned to the code template, you can
also use the shortcut key to enter it. Code templates are displayed with a symbol in the content completion list.
When the Content Completion Assistant is invoked (Ctrl Space (Command Space on OS X) in Text mode or Enter
in Author mode), it also presents a list of code templates specific to the type of the active editor.
To watch our video demonstration about code templates, go to http://oxygenxml.com/demo/Code_Templates.html.
Configuring the Proposals in the Content Completion Assistant
Oxygen XML Editor gathers information from the associated schemas (DTDs, XML Schema, RelaxNG) to determine
the proposals that appear in the Content Completion Assistant. Oxygen XML Editor also includes support that allows
you to configure the possible attribute or element values for the proposals. To do so, a configuration file can be used,
along with the associated schema, to add or replace possible values for attributes or elements that are proposed in the
Content Completion Assistant. An example of a specific use-case is if you want the Content Completion Assistant
to propose several possible values for the language code whenever you use an xml:lang attribute.
To configure content completion proposals, follow these steps:
1. Create a new resources folder (if it does not already exist) in the frameworks directory for the document type.
For instance: OXYGEN_INSTALL_DIR/frameworks/dita/resources.
2. Open the Preferences dialog box and go to Document Type Association. Edit the document type configuration for
your XML vocabulary, and in the Classpath tab add a link to that resources folder.
3. Use the New document wizard to create a configuration file using the Content Completion Configuration file
template.
4. Make the appropriate changes to your custom configuration file. The file template includes details about how each
element and attribute is used in the configuration file.
5. Save the file in the resources folder, using the fixed name: cc_value_config.xml.
6. Re-open the application and open an XML document. In the Content Completion Assistant you should see your
customizations.
The Configuration File
The configuration file is composed of a series of match instructions that will match either an element or an attribute
name. A new value is specified inside one or more item elements, which are grouped inside an items element. The
behavior of the items element is specified with the help of the action attribute, which can have any of the following
values:
•
•
•
append - Adds new values to appear in the proposals list (default value).
addIfEmpty - Adds new values to the proposals list, only if no other values are contributed by the schema.
replace - Replaces the values contributed by the schema with new values to appear in the proposals list.
The values in the configuration file can be specified either directly or by calling an external XSLT file that will extract
data from any external source.
Example - Specifying Values Directly
<!-- Replaces the values for an element with the local name "lg", from the given namespace -->
<match elementName="lg" elementNS="http://www.oxygenxml.com/ns/samples">
<items action="replace">
<item value="stanza"/>
<item value="refrain"/>
</items>
</match>
<!-- Adds two values for an attribute with the local name "type", from any namespace -->
Oxygen XML Editor | Editing Documents | 243
<match attributeName="type">
<items>
<item value="stanza"/>
<item value="refrain"/>
</items>
</match>
Example - Calling an External XSLT Script
<xslt href="../xsl/get_values_from_db.xsl" useCache="false" action="replace"/>
In this example, the get_values_from_db.xsl is executed in order to extract values from a database.
Note: A comprehensive XSLT sample is included in the Content Completion Configuration file template.
Configuring Proposals in the Context for which the Content Completion was Invoked
A more complex scenario for configuring the content completion proposals would be if you want to choose the possible
values to provide, depending on the context of the element in which the content completion was invoked.
Suppose that you want to propose certain possible values for one property (for example, color) and other values for
another property (for example, shape). If the property represents a color, then the values should represent applicable
colors, while if the property represents a shape, then the values should represent applicable shapes. See the following
code snippets:
Your main document:
<sampleArticle>
<!-- The possible values for @value should be "red" and "blue" -->
<property name="color" value=""/>
<!-- The possible values for @value should be "square" and "rectangle" -->
<property name="shape" value=""/>
</sampleArticle>
The content completion configuration file:
<config xmlns="http://www.oxygenxml.com/ns/ccfilter/config">
<match elementName="property" attributeName="value">
<xslt href="get_values.xsl" useCache="false" action="replace"/>
</match>
</config>
The stylesheet that defines the possible values based on the context of the property on which the content completion
was invoked:
<xsl:stylesheet
xmlns:xsl="http://www.w3.org/1999/XSL/Transform"
xmlns:xs="http://www.w3.org/2001/XMLSchema"
xmlns:saxon="http://saxon.sf.net/"
exclude-result-prefixes="xs"
version="2.0">
<xsl:param name="documentSystemID" as="xs:string"></xsl:param>
<xsl:param name="contextElementXPathExpression" as="xs:string"></xsl:param>
<xsl:template name="start">
<xsl:apply-templates select="doc($documentSystemID)"/>
</xsl:template>
<xsl:template match="/">
<xsl:variable name="propertyElement"
select="saxon:eval(saxon:expression($contextElementXPathExpression, ./*))"/>
<items>
<xsl:if test="$propertyElement/@name = 'color'">
<item value='red'/>
<item value='blue'/>
</xsl:if>
<xsl:if test="$propertyElement/@name = 'shape'">
<item value='rectangle'/>
<item value='square'/>
</xsl:if>
</items>
</xsl:template>
</xsl:stylesheet>
Oxygen XML Editor | Editing Documents | 244
The contextElementXPathExpression parameter will be bound to an XPath expression that identifies the
element in the context for which the content completion was invoked.
Validating XML Documents
The W3C XML specification states that a program should not continue to process an XML document if it finds a
validation error. The reason is that XML software should be easy to write and all XML documents should be compatible.
With HTML it is possible to create documents with lots of errors (for example, when you forget an end tag). One of the
main reasons that various HTML browsers have performance and compatibility problems is that they have different
methods of figuring out how to render a document when an HTML error is encountered. Using XML helps to eliminate
such problems.
Even when creating XML documents, errors are very easily introduced. When working with large projects or a large
number of files, the probability that errors will occur is even greater. Preventing and solving errors in your projects can
be time consuming and frustrating. Fortunately, Oxygen XML Editor provides validation functions that enable you to
easily identify errors and their location.
Checking XML Well-formedness
A Well-Formed XML document is a document that conforms to the XML syntax rules. A Namespace Well-Formed XML
document is a document that is XML Well-Formed and is also namespace-wellformed and namespace-valid.
The XML Syntax rules for Well-Formed XML are:
•
•
•
•
•
•
All XML elements must have a closing tag.
XML tags are case-sensitive.
All XML elements must be properly nested.
All XML documents must have a root element.
Attribute values must always be quoted.
With XML, whitespace is preserved.
The namespace-wellformed rules are:
•
•
All element and attribute names contain either zero or one colon.
No entity names, processing instruction targets, or notation names contain any colons.
The namespace-valid rules are:
•
•
•
•
The prefix xml is by definition bound to the namespace name http://www.w3.org/XML/1998/namespace. It MAY,
but need not, be declared, and MUST NOT be undeclared or bound to any other namespace name. Other prefixes
MUST NOT be bound to this namespace name.
The prefix xmlns is used only to declare namespace bindings and is by definition bound to the namespace name
http://www.w3.org/2000/xmlns/. It MUST NOT be declared or undeclared. Other prefixes MUST NOT be bound to
this namespace name.
All other prefixes beginning with the three-letter sequence x, m, l, in any case combination, are reserved. This means
that users SHOULD NOT use them except as defined by later specifications and processors MUST NOT treat them
as fatal errors.
The namespace prefix, unless it is xml or xmlns, MUST have been declared in a namespace declaration attribute in
either the start-tag of the element where the prefix is used or in an ancestor element (for example, an element in
whose content the prefixed markup occurs). Furthermore, the attribute value in the innermost such declaration MUST
NOT be an empty string.
To check if a document is Namespace Well-Formed XML, select the
Check Well-Formedness (Ctrl Shift W (Meta
Shift W on OS X)) action from the Document > Validate menu or from the
Validation toolbar drop-down menu.
If any error is found the result is returned to the message panel. Each error is one record in the result list and is
accompanied by an error message. Clicking the record will open the document containing the error and highlight its
approximate location.
Oxygen XML Editor | Editing Documents | 245
A not Well-Formed XML Document
<root><tag></root>
When Check Well-Formedness is performed the following error is raised:
The element type "tag" must be terminated by the matching end-tag "</tag>"
To resolve the error, click in the result list record which will locate and highlight the errors approximate
position. Identify which start tag is missing an end tag and insert </tag>.
A not namespace-wellformed document
<x::y></x::y>
When Check document form is performed the following error is raised:
Element or attribute do not match QName production:
QName::=(NCName':')?NCName.
A not namespace-valid document
<x:y></x:y>
When Check document form is performed the following error is raised:
The prefix "x" for element "x:y" is not bound.
Also the selected files in the current project can be checked for well-formedness with a single action by selecting the
Check Well-Formedness action from the Validate submenu when invoking the contextual menu in the Project
view.
Validating XML Documents Against a Schema
A Valid XML document is a Well-Formed XML document that also conforms to the rules of a schema that defines the
legal elements of an XML document. The schema type can be: XML Schema, Relax NG (full or compact syntax),
Schematron, Document Type Definition (DTD), or Namespace-based Validation Dispatching Language (NVDL).
The purpose of the schema is to define the legal building blocks of an XML document. It defines the document structure
with a list of legal elements.
The
Validate function ensures that your document is compliant with the rules defined by an associated DTD, XML
Schema, Relax NG, or Schematron schema. XML Schema or Relax NG Schema can embed Schematron rules. For
Schematron validations you can select the validation phase.
Presenting Validation Errors in Text Mode
A line with a validation error or warning will be marked in the editor panel by underlining the error region with a red
color. Also a red sign will mark the position in the document of that line on the right side ruler of the editor panel. The
same will happen for a validation warning, but the color will be yellow instead of red. Hovering over a validation error
presents a tooltip message with more details about the error and possible quick fixes (if available for that error or warning).
The ruler on the right side of the document is designed to display the errors and warnings found during the validation
process and also to help you to locate them more easily. The ruler contains the following areas:
•
Top area that contains a success validation indicator that will turn green if the validation succeeded, or red otherwise.
A more detailed report of the errors is displayed in the tooltip of the validation indicator. If there are multiple errors,
only the first three of them will be presented in the tooltip.
•
Oxygen XML Editor | Editing Documents | 246
Middle area where the error markers are depicted in red (with a darker color tone for the current selected one). To
limit the number of markers shown open the Preferences dialog box and go to Editor > Document checking >
Maximum number of problems reported per document.
Clicking a marker will highlight the corresponding text area in the editor. The error message is displayed both in the
tool tip and in the error area on the bottom of the editor panel.
The Document checking user preferences are easily accessible from the button displayed at the beginning of the
error message on the bottom of the editor panel.
•
Bottom area containing two navigation arrows that will go to the next or to the previous error and a button for clearing
all the error markers from the ruler. The same actions can be triggered from menu Document > Automatic
validation > Next Error Ctrl Period (Meta Period on OS X) and Document > Automatic validation > Previous
Error Ctrl Comma (Meta Comma on OS X).
The validation status area is the line at the bottom of the editor panel that presents the message of the current validation
error selected on the right side ruler. Clicking the
Document checking options button opens the document checking
page in Oxygen XML Editor user preferences.
Status messages from every validation action are logged into the Information view.
If you want to see all the validation error messages grouped in a view you should use the
Validate action from the
Document > Validate menu or from the
Validation toolbar drop-down menu. This action collects all error messages
in the Errors view.
Presenting Validation Errors in Author Mode
Automatic validation and validate on request operations are available while editing documents in the Author mode. A
detailed description of the document validation process and its configuration is described in the Validating Documents
section.
Oxygen XML Editor | Editing Documents | 247
Figure 116: Presenting Validation Errors in Author Mode
A fragment with a validation error is marked by underlining the error in red, and validation warnings are underlined in
yellow.
Also, the ruler on the right side of the editor panel is designed to display the errors found during the validation process
and to help you locate them in the document. The ruler contains the following:
•
•
The top area - A success indicator square will turn green if the validation is successful, red if validation errors are
found, or yellow if validation warnings are found.More details about the errors or warnings are displayed in a tool
tip when you hover over indicator square. If there are numerous errors, only the first three are presented in the tool
tip.
The middle area - Errors are depicted with red markers, and warnings with yellow markers. If you want to limit the
number of markers that are displayed, open the Preferences dialog box and go to Editor > Document checking >
Maximum number of validation highlights.
Clicking a marker will highlight the corresponding text area in the editor. The error or warning message is also
displayed both in a tool tip (when hovering over the marker) and in the message area on the bottom of the editor
panel.
The validation status area at the bottom of the editor panel presents the message of the current validation error.
Clicking the
Document checking options button opens the Document checking user preferences page
Oxygen XML Editor | Editing Documents | 248
•
The bottom area - Two navigation arrows ( ) allow you to skip to the next or previous error. The same actions can
be triggered from Document > Automatic validation > Next error (Ctrl Period (Meta Period on OS X)) and
Document > Automatic validation > Previous error (Ctrl Comma (Meta Comma on OS X)). Also, the
button can be used to clear all the error markers.
Status messages from every validation action are logged in the Information view.
Customizing Assert Error Messages
To customize the error messages that the Xerces or Saxon validation engines display for the assert and assertion
elements, set the message attribute on these elements. For Xerces, the message attribute has to belong to the
http://xerces.apache.org namespace. For Saxon, the message attribute has to belong to the
http://saxon.sourceforge.net/ namespace. The value of the message attribute is the error message
displayed if the assertion fails.
Validation Example - A DocBook Validation Error
In the following DocBook 4 document the content of the listitem element does not match the rules of the DocBook
4 schema, that is docbookx.dtd.
<?xml version="1.0" encoding="UTF-8"?>
<!DOCTYPE article PUBLIC "-//OASIS//DTD DocBook XML V4.4//EN"
"http://www.docbook.org/xml/4.4/docbookx.dtd">
<article>
<title>Article Title</title>
<sect1>
<title>Section1 Title</title>
<itemizedlist>
<listitem>
<link>a link here</link>
</listitem>
</itemizedlist>
</sect1>
</article>
The Validate Document action will return the following error:
Unexpected element "link". The content of the parent element type must match
"(calloutlist|glosslist|bibliolist|itemizedlist|orderedlist|segmentedlist|simplelist
|variablelist|caution|important|note|tip|warning|literallayout|programlisting
|programlistingco|screen|screenco|screenshot|synopsis|cmdsynopsis|funcsynopsis
|classsynopsis|fieldsynopsis|constructorsynopsis|destructorsynopsis|methodsynopsis
|formalpara|para|simpara|address|blockquote|graphic|graphicco|mediaobject|mediaobjectco
|informalequation|informalexample|informalfigure|informaltable|equation|example|figure
|table|msgset|procedure|sidebar|qandaset|task|anchor|bridgehead|remark|highlights
|abstract|authorblurb|epigraph|indexterm|beginpage)+".
This error message is a little more difficult to understand, so understanding of the syntax or processing rules for the
DocBook XML DTD's listitem element is recommended. However, the error message does give us a clue as to the
source of the problem, indicating that “The content of element type must match”.
Luckily most standards based DTDs, XML Schemas, and Relax NG schemas are supplied with reference documentation.
This enables us to lookup the element and read about it. In this case you should learn about the child elements of
listitem and their nesting rules. Once you have correctly inserted the required child element and nested it in accordance
with the XML rules, the document will become valid on the next validation test.
Automatic Validation
Oxygen XML Editor can be configured to mark validation errors in the document as you are editing. If you enable the
Automatic validation option, all validation errors and warnings will be highlighted automatically in the editor panel.
The automatic validation starts parsing the document and marking the errors after a configurable delay from the last
key typed. Errors are highlighted with underline markers in the main editor panel and small rectangles on the right side
ruler of the editor panel, in the same way as for manual validation invoked by the user. Hovering over a validation error
presents a tooltip message with more details about the error.
Oxygen XML Editor | Editing Documents | 249
Figure 117: Automatic Validation on the Edited Document
If the error message is long and it is not displayed completely in the error line at the bottom of the editing area,
double-clicking the error icon at the left of the error line or on the error line displays an information dialog box with the
full error message. The arrow buttons of the dialog box enable the navigation to other errors issued by the Automatic
Validation feature.
Custom Validators
If you need to validate the edited document with a validation engine that is different from the built-in engine, you can
configure external validators in the Oxygen XML Editor preferences. After a custom validation engine is properly
configured, it can be applied on the current document by selecting it from the list of custom validation engines in the
Validation toolbar drop-down menu. The document is validated against the schema declared in the document.
Some validators are configured by default but there are third party processors which do not support the output message
format of Oxygen XML Editor for linked messages:
•
LIBXML - Included in Oxygen XML Editor (Windows edition only). It is associated to XML Editor. It is able to
validate the edited document against XML Schema, Relax NG schema full syntax, internal DTD (included in the
XML document) or a custom schema type. XML catalogs support (the --catalogs parameter) and XInclude processing
(--xinclude) are enabled by default in the preconfigured LIBXML validator. The --postvalid parameter is also set by
default which allows LIBXML to validate correctly the main document even if the XInclude fragments contain
IDREFS to ID's located in other fragments.
For validation against an external DTD specified by URI in the XML document, add the --dtdvalid ${ds} parameter
manually to the DTD validation command line. ${ds} represents the detected DTD declaration in the XML document.
Caution: File paths containing spaces are not handled correctly in the LIBXML processor. For example
the built-in XML catalog files of the predefined document types (DocBook, TEI, DITA, etc) are not handled
by LIBXML if Oxygen XML Editor is installed in the default location on Windows (C:\Program Files)
because the built-in XML catalog files are stored in the frameworks subfolder of the installation folder
which in this case contains at least one space character in the file path.
Attention: On OS X if the full path to the LIBXML executable file is not specified in the Executable path
text field, some errors may occur during validation against a W3C XML Schema, such as:
Unimplemented block at ... xmlschema.c
To avoid these errors, specify the full path to the LIBXML executable file.
•
•
Saxon-EE - Included in Oxygen XML Editor. It is associated to XML Editor and XSD Editor. It is able to validate
XML Schema schemas and XML documents against XML Schema schemas. The validation is done according to
the W3C XML Schema 1.0 or 1.1. This can be configured in Preferences.
MSXML 4.0 - Included in Oxygen XML Editor (Windows edition only). It is associated to XML Editor, XSD Editor
and XSL Editor. It is able to validate the edited document against XML Schema, internal DTD (included in the XML
document), external DTD or a custom schema type.
•
•
•
Oxygen XML Editor | Editing Documents | 250
MSXML.NET - Included in Oxygen XML Editor (Windows edition only). It is associated to XML Editor, XSD
Editor and XSL Editor. It is able to validate the edited document against XML Schema, internal DTD (included in
the XML document), external DTD or a custom schema type.
XSV - Not included in Oxygen XML Editor. Windows and Linux distributions of XSV can be downloaded from
http://www.cogsci.ed.ac.uk/~ht/xsv-status.html. The executable path is already configured in Oxygen XML Editor
for the [OXYGEN_DIR]/xsv installation folder. If it is installed in a different folder the predefined executable
path must be corrected in Preferences. It is associated to XML Editor and XSD Editor. It is able to validate the edited
document against XML Schema or a custom schema type.
SQC (Schema Quality Checker from IBM) - Not included in Oxygen XML Editor. It can be downloaded from
here (it comes as a .zip file, at the time of this writing SQC2.2.1.zip is about 3 megabytes). The executable path and
working directory are already configured for the SQC installation directory [OXYGEN_DIR]/sqc. If it is installed
in a different folder the predefined executable path and working directory must be corrected in the Preferences page.
It is associated to XSD Editor.
A custom validator cannot be applied on files loaded through an Oxygen XML Editor custom protocol plugin developed
independently and added to Oxygen XML Editor after installation.
Linked Output Messages of an External Engine
Validation engines display messages in an output view at the bottom of the Oxygen XML Editor window. If such an
output message (warning, error, fatal error, etc) spans between three to six lines of text and has the following format,
then the message is linked to a location in the validated document. Clicking the message in the output view highlights
the location of the message in an editor panel containing the file referenced in the message. This behavior is similar to
the linked messages generated by the default built-in validator.
Linked messages have the following format:
•
•
•
•
•
•
Type:[F|E|W] (the string Type: followed by a letter for the type of the message: fatal error, error, warning) - this
property is optional in a linked message
SystemID: a system ID of a file (the string SystemID: followed by the system ID of the file that will be opened
for highlighting when the message is clicked in the output message - usually the validated file, the schema file or an
included file)
Line: a line number (the string Line: followed by the number of the line that will be highlighted)
Column: a column number (the string Column: followed by the number of the column where the highlight will start
on the highlighted line) - this property is optional in a linked message
EndLine: a line number (the string EndLine: followed by the number of the line where the highlight ends) - this
property is optional in a linked message
EndColumn: a column number (the string EndColumn: followed by the number of the column where the highlight
ends on the end line) - this property is optional in a linked message
Note: The Line/Column pair works in conjunction with the EndLine/EndColumn pair. Thus, if both pairs
are specified, then the highlight starts at Line/Column and ends at EndLine/EndColumn. If the
EndLine/EndColumn pair is missing, the highlight starts from the beginning of the line identified by the Line
parameter and ends at the column identified by the Column parameter.
•
AdditionalInfoURL: the URL string pointing to a remote location where additional information about the error can
be found - this line is optional in a linked message.
•
Description: message content (the string Description: followed by the content of the message that will be displayed
in the output view).
Example of how a custom validation engine can report an error using the format specified above:
Type: E
SystemID: file:///c:/path/to/validatedFile.xml
Line: 10
Column: 20
EndLine: 10
EndColumn: 35
Oxygen XML Editor | Editing Documents | 251
AdditionalInfoURL: http://www.host.com/path/to/errors.html#errorID
Description: custom validator message
Validation Scenario
A complex XML document is split in smaller interrelated modules. These modules do not make much sense individually
and cannot be validated in isolation due to interdependencies with other modules. Oxygen XML Editor validates the
main module of the document when an imported module is checked for errors.
A typical example is the chunking DocBook XSL stylesheet which has chunk.xsl as the main module and param.xsl,
chunk-common.xsl, and chunk-code.xsl as imported modules. param.xsl only defines XSLT parameters.
The module chunk-common.xsl defines an XSLT template with the name chunk. Chunk-code.xsl calls this
template. The parameters defined in param.xsl are used in the other modules without being redefined.
Validating chunk-code.xsl as an individual XSLT stylesheet, generates misleading errors in regards to parameters
and templates that are used but undefined. These errors are only caused by ignoring the context in which this module is
used in real XSLT transformations and in which it is validated. To validate such a module, define a validation scenario
to set the main module of the stylesheet and the validation engine used to find the errors. Usually this engine applies
the transformation during the validation process to detect the errors that the transformation generates.
You can validate a stylesheet with several engines to make sure that you can use it in different environments and have
the same results. For example an XSLT stylesheet is applied with Saxon 6.5, Xalan, and MSXML 4.0 in different
production systems.
Other examples of documents which can benefit of a validation scenario are:
•
•
A complex XQuery with a main module which imports modules developed independently but validated in the context
of the main module of the query. In an XQuery validation scenario the default validator of Oxygen XML Editor
(Saxon 9) or any connection to a database that supports validation (Berkeley DB XML Database, eXist XML Database,
Documentum xDb (X-Hive/DB) 10 XML Database, MarkLogic version 5 or newer) can be set as a validation engine.
An XML document in which the master file includes smaller fragment files using XML entity references.
Note: When you validate a document for which a master file is defined, Oxygen XML Editor uses the scenarios
defined in the Master Files directory.
To watch our video demonstration about how to use a validation scenario in Oxygen XML Editor, go to
http://oxygenxml.com/demo/Validation_Scenario.html.
How to Create a Validation Scenario
To create a validation scenario, follow these steps:
1. Select the
Configure Validation Scenario(s) from the Document > Validate menu, or the
Validation
toolbar drop-down menu, or from the Validate submenu when invoking the contextual menu on a file in the Project
view .
The Configure Validation Scenario(s) dialog box is displayed. It contains the following types of scenarios:
•
Predefined scenarios are organized in categories depending on the type of file they apply to. You can identify
Predefined scenarios by a yellow key icon that marks them as read-only. If the predefined scenario is the default
scenario of the framework, its name is written in bold font. You can use the options in the
menu to filter which scenarios are shown.
•
Settings drop-down
User defined scenarios are organized under a single category, but you can use the options in the
drop-down menu to filter them.
Settings
Note: If the current file has no associated scenarios, the preview area displays a message to let you know
that you can apply the default validation.
Oxygen XML Editor | Editing Documents | 252
Figure 118: Configure Validation Scenario
2. To edit an existing scenario, select the scenario and press the Edit button. If you try to edit one of the read-only
predefined scenarios, Oxygen XML Editor creates a customizable duplicate (you can also use the Duplicate button).
3. To add a new scenario, press the
New button.
The New scenarios dialog box is displayed. It lists all the validation units for the scenario.
Figure 119: Add / Edit a Validation Unit
The New scenario dialog box includes the following information:
•
•
•
•
•
Name - The name of the current validation scenario.
Storage - You can choose between storing the scenario in the Global Options or Project Options.
URL of the file to validate - The URL of the main module that includes the current module. It is also the entry
module of the validation process when the current one is validated.
File type - The type of the document that is validated in the current validation unit. Oxygen XML Editor
automatically selects the file type depending on the value of the URL of the file to validate field.
Validation engine - One of the engines available in Oxygen XML Editor for validation of the type of document
to which the current module belongs. Default engine means that the default engine is used to run the validation
and is set in the Preferences pages for the current document type (XML, XML Schema, XSLT, XQuery, etc.).
•
•
•
Oxygen XML Editor | Editing Documents | 253
Automatic validation - If this option is checked, the validation operation defined by this row is also applied by
the automatic validation feature. If the Automatic validation feature is disabled in Preferences, then this option
is ignored, as the Preference setting has a higher priority.
Schema - This option becomes active when you set the File type to XML Document.
Settings - Opens the Specify Schema dialog box that allows you to set a schema for validating XML
documents, or a list of extensions for validating XSL or XQuery documents. You can also set a default phase for
validation with a Schematron schema.
4. If you want to add a new validation unit, press the Add button.
5. To edit the URL of the main validation module, double-click its cell in the URL of the file to validate column.
Specify the URL of the main module by doing one of the following:
•
•
Enter the URL in the text field or select it from the drop-down list.
•
Use the
Use the
Browse drop-down button to browse for a local, remote, or archived file.
Insert Editor Variable button to insert an editor variable or a custom editor variable.
Figure 120: Insert an Editor Variable
6. Select the File type of the validated document.
Note that this determines the list of possible validation engines.
7. Select the Validation engine by clicking its cell and selecting it from the drop-down list.
8. Select the Automatic validation option if you want the current unit to be used by the automatic validation feature.
9. Choose the schema to be used during validation (the schema detected after parsing the document or a custom one).
10. Press OK.
The newly created validation scenario is now included in the list of scenarios in the Configure Validation Scenario(s)
dialog box. You can select the scenario in this dialog box to associate it with the current document and press the
Apply associated button to run the validation scenario.
Sharing Validation Scenarios
The validation scenarios and their settings can be shared with other users by saving them at project level or by exporting
them to a specialized scenarios file that can then be imported. When you create a new validation scenario or edit an
existing one, there is a Storage option to control whether the scenarios are stored in Global Options or Project Options.
Selecting Global Options stores the scenario in the global options that are stored in the user home directory.
Selecting Project Options stores the scenario in the project file and can be shared with other users that have access to
the project. If your project is saved on a source versioning/sharing system (CVS, SVN, Source Safe, etc.) then your team
Oxygen XML Editor | Editing Documents | 254
will have access to the scenarios that you define. When you create a scenario at the project level, the URLs from the
scenario become relative to the project URL.
You can also change the storage options on existing validation scenarios by using the Change storage action from the
contextual menu of the list of scenarios.
Validation Actions in the User Interface
To validate the currently edited document, use one of the following methods:
•
Select the
Validate (Ctrl Shift V (Meta Shift V on OS X)) action from the Document > Validate menu, from
the
Validation toolbar drop-down menu, or from the Validate submenu when invoking the contextual menu
in the Project view . An error list is presented in the message panel. Markup of current document is checked to
conform with the specified DTD, XML Schema, or Relax NG schema rules. This action also re-parses the XML
catalogs and resets the schema used for content completion.
•
Select the
Validate (cached) action from the Document > Validate menu or from the
Validation toolbar
drop-down menu. This action caches the schema, allowing it to be reused for the next validation. Markup of the
current document is checked to conform with the specified DTD, XML Schema, or Relax NG schema rules.
Note: Automatic validation also caches the associated schema.
•
Select the Validate with action from the Document > Validate menu, from the
Validation toolbar drop-down
menu, or from the Validate submenu when invoking the contextual menu in the Project view . You can use this
action to validate the current document using a schema of your choice (XML Schema, DTD, Relax NG, NVDL,
Schematron schema), other than the associated one. An error list is presented in the message panel. Markup of current
document is checked to conform with the specified schema rules.
Note: The Validate with action does not work for files loaded through an Oxygen XML Editor custom
protocol plugin developed independently and added to Oxygen XML Editor after installation.
•
Select Validate with Schema from the Validate submenu when invoking contextual menu in the Project view to
choose a schema and validate all selected files with it.
To open the schema used for validating the current document, select the
Document > Schema menu.
Open Associated Schema action from the
The
Validation options button, available in the Document > Validate menu, allows you to quickly access to the
validation options for the built-in validator in the Oxygen XML Editor preferences page.
Tip: If a large number of validation errors are detected and the validation process takes too long, you can limit
the maximum number of reported errors in the Preferences page.
References to XML Schema Specification
If validation is done against XML Schema Oxygen XML Editor indicates a specification reference relevant for each
validation error. The error messages contain an Info field that when clicked will open the browser on the XML Schema
Part 1:Structures specification at exactly the point where the error is described. This allows you to understand the reason
for that error.
Oxygen XML Editor | Editing Documents | 255
Figure 121: Link to Specification for XML Schema Errors
Resolving References to Remote Schemas with an XML Catalog
When a reference to a remote schema must be used in the validated XML document for interoperability purposes, but
a local copy of the schema should be actually used for validation for performance reasons, the reference can be resolved
to the local copy of the schema with an XML catalog. For example, if the XML document contains a reference to a
remote schema docbook.rng like this:
<?xml-model href="http://www.oasis-open.org/docbook/xml/5.0/rng/docbook.rng" type="application/xml"
schematypens="http://relaxng.org/ns/structure/1.0"?>
it can be resolved to a local copy with a catalog entry:
<uri name="http://www.oasis-open.org/docbook/xml/5.0/rng/docbook.rng"
uri="rng/docbook.rng"/>
An XML catalog can be used also to map a W3C XML Schema specified with an URN in the xsi:schemaLocation
attribute of an XML document to a local copy of the schema. For example, if the XML document specifies the schema
with:
<topic xmlns:xsi="http://www.w3.org/2001/XMLSchema-instance"
xsi:noNamespaceSchemaLocation="urn:oasis:names:tc:dita:xsd:topic.xsd:1.1">
the URN can be resolved to a local schema file with a catalog entry like:
<uri name="urn:oasis:names:tc:dita:xsd:topic.xsd:1.1"
uri="topic.xsd"/>
Document Navigation
This section explains various methods for navigating the edited XML document.
Quick Document Navigation Using Bookmarks
By using bookmarks, you can mark positions in an edited document so that you can return to it later. This is especially
helpful for navigating through large documents or while editing multiple documents. You can place up to nine distinct
bookmarks in any document. Shortcut keys are available to place the bookmarks or to return to any of the marked
positions. To configure these shortcut keys, go to Options > Menu Shortcut Keys.
Oxygen XML Editor | Editing Documents | 256
Figure 122: Editor Bookmarks
A bookmark can be inserted by one of the following:
•
•
Right-click the vertical strip to the left of the editor.
Select the
Create Bookmark (F9) action from the Edit > Bookmarks menu.
A bookmark can be removed by right-clicking its icon on the vertical strip and select Remove or Remove all (Ctrl+F7)
(you can also find the Remove all (Ctrl+F7) action in the Edit > Bookmarks menu).
You can navigate the bookmarks by using one of the actions available on the Edit > Bookmarks > Go to menu or by
using the shortcut keys.
Folding of the XML Elements
An XML document is organized as a tree of elements. When working on a large document you can collapse some
elements, leaving only the ones you need to edit in the focus. Expanding and collapsing works on individual elements.
Expanding an element leaves the child elements unchanged.
Figure 123: Folding of the XML Elements
The fact that the folds are persistent is a unique feature of Oxygen XML Editor. The next time you open the document
the folds are restored to its last state.
To toggle the folded state of an element, click the special mark displayed in the left part of the document editor next to
the start tag of that element or use the
Toggle fold action that is available from the Document > Folding menu (in
Author mode it is also available from the Folding submenu of the contextual menu). The element extent is marked with
a gray line displayed in the left part of the edited document. The gray line always cover the lines of text between the
start tag and end tag of the element where the cursor is positioned.
The following other menu actions related to folding of XML elements are available from the Document > Folding
menu or the contextual menu of the folding stripe (in Author mode they are also available from the Folding submenu
of the contextual menu):
Collapse Other Folds (Ctrl NumPad / (Meta NumPad / on OS X))
Folds all the elements except the current element.
Collapse Child Folds (Ctrl NumPad . (Meta NumPad . on OS X))
Folds the elements indented with one level inside the current element.
Oxygen XML Editor | Editing Documents | 257
Expand Child Folds
Unfolds all child elements of the currently selected element.
Expand All (Ctrl NumPad * (Meta NumPad * on OS X))
Unfolds all elements in the current document.
To watch our video demonstration about the folding support in Oxygen XML Editor, go to
http://oxygenxml.com/demo/FoldingSupport.html.
Navigation Using the Outline View
The Outline view displays a general tag overview of the currently edited XML Document. It also shows the correct
hierarchical dependencies between elements. This makes it easier for you to be aware of the document structure and the
way element tags are nested. It allows for fast navigation of the document by displaying the start of the content of the
child elements in the node of the parent element, thus allowing you to quickly see the content of an element without
expanding it in the Outline tree. It also allows you to insert or delete nodes using contextual menu actions.
By default it is displayed on screen, but if you closed it you can reopen it from Window > Show View > Outline.
The upper part of the Outline view contains a filter box that allows you to focus on the relevant components. Type a
text fragment in the filter box and only the components that match it are presented. For advanced usage you can use
wildcard characters (*, ?) and separate multiple patterns with commas.
It also includes a
even further.
Settings menu in the top-right corner that presents a variety of options to help you filter the view
XML Document Overview
The Outline view displays a general tag overview of the current edited XML document. It also shows the correct
hierarchical dependencies between the tag elements. This functionality makes it easier for you to be aware of the document
structure and the way tags are nested.
The Outline view allows you to:
•
•
•
Insert or delete nodes using contextual menu actions.
Move elements by dragging them to a new position in the tree structure.
Highlight elements in the Author editor area.
Note: The Outline view is synchronized with the Author editor area. When you make a selection in the
Author editor area, the corresponding elements of the selection are highlighted in the Outline view and vice
versa. This functionality is available both for single and multiple selection. To deselect one of the elements,
use Ctrl Single-Click (Command Single-Click on OS X).
Document errors (such as an element inserted in an invalid position, or a wrong attribute name, or a missing required
attribute value) are highlighted in the Outline tree:
•
•
•
A red exclamation mark decorates the element icon.
A dotted red underline decorates the element name and value.
A tooltip provides more information about the nature of the error, when you hover with the mouse pointer over the
faulted element.
Modification Follow-up
When you edit a document, the Outline view dynamically follows the changes that you make, displaying the node that
you modify in the middle of the view. This functionality gives you great insight on the location of your modifications
in the document that you edit.
Drag and Drop Actions in Outline View
Entire XML elements can be moved or copied in the edited document using only the mouse in the Outline view with
drag-and-drop operations. Several drag and drop actions are possible:
•
•
•
•
Oxygen XML Editor | Editing Documents | 258
If you drag an XML element in the Outline view and drop it on another one in the same panel then the dragged
element will be moved after the drop target element.
If you hold the mouse pointer over the drop target for a short time before the drop then the drop target element will
be expanded first and the dragged element will be moved inside the drop target element after its opening tag.
You can also drop an element before or after another element if you hold the mouse pointer towards the upper or
lower part of the targeted element. A marker will indicate whether the drop will be performed before or after the
target element.
If you hold down the (Ctrl (Command on OS X)) key after dragging, there will be performed a copy operation
instead of a move one.
The drag and drop action in the Outline view can be disabled and enabled from a Preferences page.
Tip: You can select and drag multiple nodes in the Outline view when editing in Author mode.
Document Tag Selection
The Outline view can also be used to search for a specific tag location and contents in the edited document. Intuitively,
by selecting with the left mouse button the desired tag in the Outline view, the document is scrolled to the position of
the selected tag. Moreover, the tag contents are selected in the document, making it easy to notice the part of the document
contained by that specific tag and furthermore to easily copy and paste the tag's contents in other parts of the document
or in other documents.
You can double click the tag in the Outline tree to move the focus in the editor.
You can also use the filter text field search to look for a particular tag name in the Outline tree.
Navigation Buttons
These buttons are available in the main toolbar and the Find menu:
•
•
•
Last Modification - Moves the cursor to the last modification in any opened document.
Back - Moves the cursor to the previous position.
Forward - Moves the cursor to the next position. Enabled after at least one press of the Back button.
Changing the Font Size
The font size of the editor panel can be changed with the following actions:
•
•
•
Document > Font size > Increase editor font (Ctrl NumPad+[plus sign] (Command NumPad+[plus sign] on
OS X)) - increases the font size with one point for each execution of the action.
Document > Font size > Decrease editor font (Ctrl NumPad-[minus sign] (Command NumPad-[minus sign]
on OS X) ) - decreases the font size with one point for each execution of the action.
Document > Font size > Normal editor font (Ctrl 0 (Command 0 on OS X)) - resets the font size to the value of
the editor font set in Preferences.
The Undo/Redo Actions
The typical undo and redo actions are available in the Edit menu:
Undo Ctrl Z (Meta Z on OS X)
Reverses a maximum of 200 editing actions (configurable in the Editor preferences page) to return to the preceding
state.
Note: Complex operations like Replace All or Indent selection count as single undo events.
Redo Ctrl Y (Meta Shift Z on OS X, Ctrl Shift Z on Linux/Unix)
Recreates a maximum of 100 editing actions that were undone by the Undo function.
Oxygen XML Editor | Editing Documents | 259
Dragging and Dropping the Selected Text
To move a whole region of text to other location in the same edited document just select the text, drag the selection by
holding down the left mouse button and drop it to the target location.
You can also copy content from other applications and paste it into the document. For more information about this
feature, see the Smart Paste Support section.
Copying and Pasting Text
The typical copying and pasting actions are available:
Edit >
Cut Ctrl C (Meta C on OS X)
Removes the current selected node from the document and places it in the clipboard as RTF. All text attributes such
as color, font, or syntax highlight are preserved when pasting into another application.
Edit >
Copy Ctrl C (Meta C on OS X)
Places a copy of the current selection in the clipboard as RTF. All text attributes such as color, font, or syntax
highlight are preserved when pasting into another application.
Edit >
Paste Ctrl V (Meta V on OS X)
Places the current clipboard content into the document at the cursor position.
Edit > Select All Ctrl A (Meta A on OS X)
Selects the entire body of the current document, including whitespace preceding the first and following the last
character.
Printing a File
Printing is supported in Text, Author, and Grid modes. The Print(Ctrl P (Meta P on OS X)) action that is available
from File menu displays the Page Setup dialog box, used for defining the page size and orientation properties for
printing.
A Print Preview action is also available in the File menu. It allows you to manage the format of the printed document.
Note: If you are printing in the Author visual editing mode to change the styling of the document in the printed
output, you can use the CSS print media type.
Oxygen XML Editor | Editing Documents | 260
Figure 124: Print Preview Dialog Box
The main window is split in three sections:
•
•
•
Preview area - Displays the formatted document page as it will appear on printed paper.
Left stripe - The left-side stripe that displays a list of thumbnail pages. Clicking any of them displays the page
content in the main preview area.
Toolbar - The toolbar area at the top that contains controls for printing, page settings, page navigation, print scaling,
and zoom.
Note: If your document is open in Author mode and contains Track Changes, you can print (or print preview)
a copy of the document as if all changes have been accepted by switching the Track Changes Visualization
Modes to View Final.
Finding and Replacing Text in the Current File
This section walks you through the find and replace features available in Oxygen XML Editor.
You can use a number of advanced views depending on what you need to find in the document you are editing or in
your entire project. The Find/Replace dialog box allows you to search through the current project or selected resources
and offers a set of options to improve your search. The Find All Elements/Attributes dialog box allows you to search
through the structure of the current document for elements and attributes.
As an alternative to the dedicated search operations, you can also use the Quick Find toolbar.
Oxygen XML Editor | Editing Documents | 261
The Find/Replace Dialog Box
To open the Find/Replace dialog box, use the
or by pressing Ctrl F (Meta F on OS X).
Find/Replace action that is available in the Find menu, on the toolbar,
You can use the Find/Replace dialog box to perform the following operations:
•
•
Replace occurrences of target defined in the Find area with a new fragment of text defined in Replace with area.
Find all the occurrences of a word or string of characters (that can span over multiple lines) in the document you are
editing. This operation also takes into account all the white spaces contained in the fragment you are searching for.
Note: The Find/Replace dialog box counts the number of occurrences of the text you are searching for and
displays it at the bottom of the dialog box, above the Close button. This number is also displayed in the Results
view.
The find operation works on multiple lines, meaning that a find match can cover characters on more than one line of
text. To input multiple-line text in the Find and Replace with areas, do one of the following:
•
•
Press Ctrl Enter (Meta Enter on OS X) on your keyboard.
Use the Insert newline contextual menu action.
You can use Perl-like regular expressions syntax to define patterns. A content completion assistant window is available
in the Find and Replace with areas to help you edit regular expressions. It is activated every time you type \(backslash
key) or on-demand if you press Ctrl Space (Command Space on OS X) on your keyboard.
The replace operation can bind regular expression capturing groups ($1, $2, etc.) from the find pattern.
To replace the tag-name start tag and its attributes with the new-tag-name tag use as Find the
expression <tag-name(\s+)(.*)> and as Replace with the expression <new-tag-name$1$2>.
The dialog box contains the following options:
•
•
Find - The target character string to search for. You can search for Unicode characters specified in the \uNNNN
format. Also, hexadecimal notation (\xNNNN) and octal notation (\0NNNN) can be used. In this case you have to
select the Regular expression option. For example, to search for a space character you can use the \u0020 code.
Replace with - The character string with which to replace the target. The string for replace can be on a line or on
multiple lines. It can contain Perl notation capturing groups, only if the search expression is a regular expression and
the Regular expression option is selected.
Note: Some regular expressions can block indefinitely the application. If the execution of the regular
expression does not end in about 5 seconds, the application displays a dialog box that allows you to interrupt
the operation.
Note: Special characters like newline and tab can be inserted in the Find and Replace with text boxes using
dedicated actions in the contextual menu (Insert newline and Insert tab).
Unicode characters in the \uNNNN format can also be used in the Replace with area.
•
•
The
History button - Contain lists of the last find and replace expressions. Use the
Clear history action from
the bottom of the lists to remove these expressions.
XPath - The XPath 2.0 expression you input in this combo is used for restricting the search scope.
Note: The Content Completion Assistant helps you input XPath expressions, valid in the current context.
•
•
Direction - Specifies if the search direction is from current position to end of file (Forward) or to start of file
(Backward).
Scope - Specifies whether the Find/Replace operation is executed over the entire content of the edited document
(All option), or over the selected lines of text (Only selected lines option). If the selection spans across multiple
lines, when you open the Find/Replace dialog box, the scope is set to Only selected lines.
•
•
•
•
Oxygen XML Editor | Editing Documents | 262
Case sensitive - When checked, the search operation follows the exact letter case of the text entered in the Find
field.
Whole words only - Only entire occurrences of a word are included in the search operation.
Incremental - The search operation is started every time you type or delete a letter in the Find text box.
Regular expression - When this option is enabled, you can use regular expressions in Perl-like regular expressions
syntax to look for specific pieces of text.
•
•
•
•
Dot matches all - A dot used in a regular expression also matches end of line characters.
Canonical equivalence - If enabled, two characters will be considered a match if, and only if, their full canonical
decompositions match. For example, the ã symbol can be inserted as a single character or as two characters (the
a character, followed by the tilde character). This option is disabled by default.
Wrap around - When the end of the document is reached, the search operation is continued from the start of the
document, until its entire content is covered.
Enable XML search options - This option is only available when editing in Text mode. It provides access to a set
of options that allow you to search specific XML component types:
•
•
•
•
•
•
•
•
•
Element names - Only the element names are included in the search operation which ignores XML-tag notations
('<', '/', '>'), attributes or white-spaces.
Element contents - Search in the text content of XML elements.
Attribute names - Only the attribute names are included in the search operation, without the leading or trailing
white-spaces.
Attribute values - Only the attribute values are included in the search operation, without single quotes(') or
double quotes(").
Comments - Only the content of comments is included in the search operation, excluding the XML comment
delimiters ('<!--', '-->').
PIs (Processing Instructions) - Only the content are searched, skipping '<?', '?>'. e. g.: <?processing instruction?>
CDATA - Searches inside content of CDATA sections.
DOCTYPE - Searches inside content of DOCTYPE sections.
Entities - Only the entity names are searched.
The two buttons Select All and Deselect All allow a simple activation and deactivation of all types of XML
components.
Note: Even if you enable all options of the Enable XML search options section, the search is still
XML-aware. If you want to perform the search over the entire file content, disable Enable XML search
options.
•
•
•
•
•
•
Find All Elements - Available when editing in Author mode, you can use this link to extend the search scope to
XML-specific markup (names and values of both attributes and elements).
Find - Executes a find operation for the next occurrence of the target. It stops after highlighting the find match in
the editor panel.
Replace - Executes a replace operation for the target followed by a find operation for the next occurrence.
Find All - Executes a find operation and displays all results in the Results view. The results are displayed in the
Results view.
Replace All - Executes a replace operation in the entire scope of the document.
Replace to End - Executes a replace operation starting from current target until the end of the document, in the
direction specified by the current selection of the Direction switch (Forward or Backward).
The Find All Elements Dialog Box
To open the Find All Elements dialog box, go to Find > Find All Elements(Ctrl Shift E (Meta Shift E on OS X))
or from the shortcut Find All Elements that is available in the Find / Replace dialog box. It assists you in defining
XML element / attribute search operations in the current document.
Oxygen XML Editor | Editing Documents | 263
Figure 125: Find All Elements Dialog Box
The dialog box can perform the following actions:
•
•
•
•
Find all the elements with a specified name
Find all the elements that contain, or does not contain, a specified string in their text content
Find all the elements that have a specified attribute
Find all the elements that have an attribute with, or without, a specified value
You can combine all of these search criteria to filter your results.
The following fields are available in the dialog box:
•
Element name - The qualified name of the target element to search for. You can use the drop-down menu to find
an element or enter it manually. It is populated with valid element names collected from the associated schema. To
specify any element name, leave the field empty.
Note: Use the qualified name of the element (<namespace prefix>:<element name>) when the
document uses this element notation.
•
•
Element text - The target element text to search for. The drop-down menu beside this field allows you to specify
whether you are looking for an exact or partial match of the element text. For any element text, select contains from
the drop-down menu and leave the field empty. If you leave the field empty but select equals from the drop-down
menu, only elements with no text will be found. Select not contains to find all elements that do not include the
specified text.
Attribute name - The name of the attribute that must be present in the element. You can use the drop-down menu
to select an attribute or enter it manually. It is populated with valid attribute names collected from the associated
schema. For any or no attribute name, leave the field empty.
Note: Use the qualified name of the attribute (<namespace prefix>:<attribute name>) when
the document uses this attribute notation.
•
•
Attribute value - The drop-down menu beside this field allows you to specify that you are looking for an exact or
partial match of the attribute value. For any or no attribute value, select contains from the drop-down menu and
leave the field empty. If you leave the field empty but select equals from the drop-down menu, only elements that
have at least an attribute with an empty value will be found. Select not contains to find all elements that have
attributes without a specified value.
Case sensitive - When this option is checked, operations are case-sensitive
When you press Find All, Oxygen XML Editor tries to find the items that match all the search parameters. The results
of the operation are presented as a list in the message panel.
The Quick Find Toolbar
A reduced version of the Find / Replace dialog box is available as a dockable toolbar. To display it press the Alt Shift
F (Meta Alt F on OS X) key combination or invoke the Find >
Quick Find action. By default, the toolbar is
Oxygen XML Editor | Editing Documents | 264
displayed at the bottom of the Oxygen XML Editor window, above the status bar, but can be changed at any time by
dragging (and docking) it to a different location. To hide the toolbar, use the
Close button or ESC key.
All matches are highlighted in the current editor.
The toolbar offers the following controls:
•
•
•
•
•
•
A search input box where you insert the text you want to search for. The input box keeps a history of the last used
search text. The background color of the input box turns red when no match is found.
Next and Previous buttons. They allow you to advance to the next or previous match.
All button. Highlights in the current document all matches of the search string.
Incremental check box. The search operation is started every time you type or delete a character in the search input
box.
Case sensitive check box. When selected, the search operation follows the exact letter case of the search text.
Shortcuts to the
Find/Replace and
Find/Replace in Files dialog boxes.
Keyboard Shortcuts for Finding the Next and Previous Match
Navigating from one match to the next or previous one is very easy to perform using the F3 and Shift F3 (Meta Shift
G on OS X) keyboard shortcuts. They are useful to quickly repeat the last find action performed in the Find / Replace
dialog box, taking into account the same find options.
Regular Expressions Syntax
Oxygen XML Editor uses the Java regular expression syntax. It is similar to that used in Perl 5, with several exceptions.
Thus, Oxygen XML Editor does not support the following constructs:
•
•
•
•
The conditional constructs (?{X}) and (?(condition)X|Y).
The embedded code constructs (?{code}) and (??{code}).
The embedded comment syntax (?#comment).
The preprocessing operations \l, \u, \L, and \U.
There are some other notable differences that may cause unexpected results, including the following:
•
•
•
•
In Perl, \1 through \9 are always interpreted as back references; a backslash-escaped number greater than 9 is
treated as a back reference if at least that many sub-expressions exist, otherwise it is interpreted, if possible, as an
octal escape. In this class octal escapes must always begin with a zero. In Java, \1 through \9 are always interpreted
as back references, and a larger number is accepted as a back reference if at least that many sub-expressions exist at
that point in the regular expression, otherwise the parser will drop digits until the number is smaller or equal to the
existing number of groups or it is one digit.
Perl uses the g flag to request a match that resumes where the last match left off.
In Perl, embedded flags at the top level of an expression affect the whole expression. In Java, embedded flags always
take effect at the point at which they appear, whether they are at the top level or within a group; in the latter case,
flags are restored at the end of the group just as in Perl.
Perl is forgiving about malformed matching constructs, as in the expression *a, as well as dangling brackets, as in
the expression abc], and treats them as literals. This class also accepts dangling brackets but is strict about dangling
meta-characters like +, ? and *.
Finding and Replacing Text in Multiple Files
To open the Find/Replace in Files dialog box, use the
locations::
•
•
•
•
Find/Replace in Files action that is available in the following
The Find menu.
The main toolbar.
The contextual menu of the DITA Maps Manager view.
The contextual menu of the Project view.
•
Oxygen XML Editor | Editing Documents | 265
The contextual menu of the Data Source Explorer view for Documentum xDb (X-Hive/DB), eXist and WebDAV
connections. This action is available for Documentum (CMS), but lacks the replace feature.
The operation works on both local and remote files from an (S)FTP, WebDAV or CMS server.
It enables you to define Search for or Search for and Replace operations across a number of files. You can use Perl-like
regular expression syntax to match patterns in text content. The replace operation can bind regular expression capturing
groups ($1, $2, etc.) from the find pattern.
To replace the tag-name start tag and its attributes with the new-tag-name tag use as Text to
find the expression <tag-name(\s+)(.*)> and as Replace with the expression <new-tag-name$1$2>.
The encoding used to read and write the files is detected from the XML header or from the BOM. If a file does not have
an XML header or BOM Oxygen XML Editor uses by default the UTF-8 encoding for files of type XML, that is for
files with one of the extensions: .xml, .xsl, .fo, .xsd, .rng, .nvdl, .sch, .wsdl or an extension associated
with the XML editor type. For the other files it uses the encoding configured for non-XML files.
You can cancel a long operation at any time by pressing the Cancel button of the progress dialog box displayed when
the operation is executed.
Since the content of read-only files cannot be modified, the Replace operation is not processing those files. For every
such file, a warning message is displayed in the message panel.
Figure 126: Find / Replace in Files Dialog Box
Oxygen XML Editor | Editing Documents | 266
The dialog box contains the following options:
•
•
•
•
•
Text to find - The target character string to search for. You can search for Unicode characters specified in the
\uNNNN format. Also, hexadecimal notation (\xNNNN) and octal notation (\0NNNN) can be used. In this case you
have to select the Regular expression option. For example, to search for a space character you can use the \u0020
code.
Case sensitive - When checked, the search operation follows the exact letter case of the value entered in the Text
to find field.
Whole words only - Only entire occurrences of a word are included in the search operation.
Ignore extra whitespaces - If enabled, the application normalizes the content (collapses any sequence of whitespace
characters into a single space) and trims its leading and trailing whitespaces when performing the search operation.
Regular expression - When this option is enabled, you can use regular expressions in Perl-like regular expressions
syntax to look for specific pieces of text.
•
•
•
Dot matches all - A dot used in a regular expression also matches end of line characters.
Canonical equivalence - If enabled, two characters will be considered a match if, and only if, their full canonical
decompositions match. For example, the ã symbol can be inserted as a single character or as two characters (the
a character, followed by the tilde character). This option is disabled by default.
XPath - The XPath 2.0 expression you input in this combo is used for restricting the search scope.
Note: The Content Completion Assistant helps you input XPath expressions, valid in the current context.
•
Enable XML search options - This option is only available when editing in Text mode. It provides access to a set
of options that allow you to search specific XML component types:
•
•
•
•
•
•
•
•
•
Element names - Only the element names are included in the search operation which ignores XML-tag notations
('<', '/', '>'), attributes or white-spaces.
Element contents - Search in the text content of XML elements.
Attribute names - Only the attribute names are included in the search operation, without the leading or trailing
white-spaces.
Attribute values - Only the attribute values are included in the search operation, without single quotes(') or
double quotes(").
Comments - Only the content of comments is included in the search operation, excluding the XML comment
delimiters ('<!--', '-->').
PIs (Processing Instructions) - Only the content are searched, skipping '<?', '?>'. e. g.: <?processing instruction?>
CDATA - Searches inside content of CDATA sections.
DOCTYPE - Searches inside content of DOCTYPE sections.
Entities - Only the entity names are searched.
The two buttons Select All and Deselect All allow a simple activation and deactivation of all types of XML
components.
Note: Even if you enable all options of the Enable XML search options section, the search is still
XML-aware. If you want to perform the search over the entire file content, disable Enable XML search
options.
•
•
•
•
Replace with - The character string with which to replace the target. It may contain regular expression group markers
if the search expression is a regular expression and the Regular expression checkbox is checked.
Make backup files with extension - In the replace process Oxygen XML Editor makes backup files of the modified
files. The default extension is .bak, but you can change the extension as you prefer.
Selected project resources - Searches only in the selected files of the currently opened project. This option is not
displayed when this dialog box is opened from the contextual menu of the DITA Maps Manager view and Archive
Browser view.
Project files - Searches in all files from the current project. This option is not displayed when this dialog box is
opened from the contextual menu of the DITA Maps Manager view and Archive Browser view.
•
•
•
•
•
•
•
•
•
•
•
•
Oxygen XML Editor | Editing Documents | 267
All opened files - Searches in all files opened in Oxygen XML Editor (regular files or DITA maps). You are prompted
to save all modified files before any operation is performed. This option is not displayed when this dialog box is
started from the contextual menu of the DITA Maps Manager view and Archive Browser view.
Current file directory - The search is done in the directory of the file opened in the current editor panel. If there is
no opened file, this option is disabled. This option is not displayed when this dialog box is opened from the contextual
menu of the DITA Maps Manager view and Archive Browser view.
Current DITA Map hierarchy - The search is done in all maps and topics referenced by the currently selected
DITA map, opened in the DITA Maps Manager view.
Opened archive - The search is done in an archive opened in the Archive Browser view. Displayed only when this
dialog box is opened from the Archive Browser view.
Specified path - Chooses the search path.
Include files - Narrows the scope of the operation only to the files that match the given filters.
Recurse subdirectories - When enabled, the pretty print is performed recursively for the specified scope. The one
exception is that this option is ignored if the scope is set to All opened files.
Include hidden files - When enabled, the search is also performed in the hidden files.
Include archives - When enabled, the search is also done in all individual file entries from all supported ZIP-type
archives.
Show separate results for each search expression - When enabled, the application opens a new tab to display the
result of each new search expression. When the option is unchecked, the search results are displayed in the Find in
Files tab, replacing any previous search results.
Find All - Executes a find operation and returns the result list to the message panel. The results are displayed in a
view that allows grouping the results as a tree with two levels.
Replace All - Replaces all occurrences of the target contained in the specified files.
When you replace a fragment of text, Oxygen XML Editor provides a preview of the changes you make. The Preview
dialog box is divided in two sections. The first section presents a list of all the documents containing the fragment of
text you want to modify. The second section offers a view of the original file and a view of the final result. It also allows
you to highlight all changes using the vertical bar from the right side of the view. The Next change and Previous change
buttons allow you to navigate through the changes displayed in the Preview dialog box.
Caution: Use this option with caution. Global search and replace across all project files does not open the files
containing the targets, nor does it prompt on a per occurrence basis, to confirm that a replace operation must be
performed. As the operation simply matches the string defined in the find field, this may result in replacement
of matching strings that were not originally intended to be replaced.
Editing Large XML Documents
Consider the case of documenting a large project. It is likely that there will be several people involved. The resulting
document can be few megabytes in size. The question becomes how to deal with this amount of data in such a way that
work parallelism will not be affected.
Fortunately, XML provides two solutions for this: DTD entities and XInclude. A master document can be created, with
references to the other document parts, containing the document sections. The users can edit the documents individually,
then apply an XSLT stylesheet over the master and obtain the output files in various formats (for example, PDF or
HTML).
Including Document Parts with DTD Entities
There are two conditions for including a part using DTD entities:
•
The master document should declare the DTD to be used, while the external entities should declare the XML sections
to be referenced.
•
The document containing the section must not define again the DTD.
Oxygen XML Editor | Editing Documents | 268
A master document looks like this:
<?xml version="1.0" encoding="UTF-8"?>
<!DOCTYPE book SYSTEM "../xml/docbookx.dtd" [
<!ENTITY testing SYSTEM "testing.xml" > ]
>
<book>
<chapter> ...
The referenced document looks like this:
<section> ... here comes the section content ... </section>
Note:
The indicated DTD and the element names (section, chapter) are used here only for illustrating the inclusion
mechanism. You can use any DTD and element names you need.
At a certain point in the master document there can be inserted the section testing.xml entity:
... &testing; ...
When splitting a large document and including the separate parts in the master file using external entities, only the master
file will contain the Document Type Definition (the DTD) or other type of schema. The included sections can not define
the schema again because the main document will not be valid. If you want to validate the parts separately you have to
use XInclude for assembling the parts together with the master file.
Including Document Parts with XInclude
XInclude is a standard for assembling XML instances into another XML document through inclusion. It enables larger
documents to be dynamically created from smaller XML documents without having to physically duplicate the content
of the smaller files in the main file. XInclude is targeted as the replacement for External Entities. The advantage of using
XInclude is that, unlike the entities method, each of the assembled documents is permitted to contain a Document Type
Declaration (DOCTYPE). This means that each file is a valid XML instance and can be independently validated. It also
means that the main document to which smaller instances are included can be validated without having to remove or
comment out the DOCTYPE. as is the case with External Entities. This makes XInclude a more convenient and effective
method for managing XML instances that need to be stand-alone documents and part of a much larger project.
The main application for XInclude is in the document-oriented content frameworks such as manuals and Web pages.
Employing XInclude enables authors and content managers to manage content in a modular fashion that is akin to Object
Oriented methods used in languages such as Java, C++ or C#.
The advantages of modular documentation include: reusable content units, smaller file units that are easier to be edited,
better version control and distributed authoring.
Include a chapter in an article using XInclude
Create a chapter file and an article file in the samples folder of the Oxygen XML Editor install
folder.
Chapter file (introduction.xml) looks like this:
<?xml version="1.0"?>
<!DOCTYPE chapter PUBLIC "-//OASIS//DTD DocBook XML V4.3//EN"
"http://www.oasis-open.org/docbook/xml/4.3/docbookx.dtd">
<chapter>
<title>Getting started</title>
<section>
<title>Section title</title>
<para>Para text</para>
</section>
</chapter>
Oxygen XML Editor | Editing Documents | 269
Main article file looks like this:
<?xml version="1.0"?>
<!DOCTYPE article PUBLIC "-//OASIS//DTD DocBook XML V4.3//EN"
"http://www.docbook.org/xml/4.3/docbookx.dtd"
[ <!ENTITY % xinclude SYSTEM "../frameworks/docbook/dtd/xinclude.mod">
%xinclude;
]>
<article>
<title>Install guide</title>
<para>This is the install guide.</para>
<xi:include xmlns:xi="http://www.w3.org/2001/XInclude"
href="introduction.dita">
<xi:fallback>
<para>
<emphasis>FIXME: MISSING XINCLUDE CONTENT</emphasis>
</para>
</xi:fallback>
</xi:include>
</article>
In this example the following is of note:
•
The DOCTYPE declaration defines an entity that references a file containing the information to add the xi namespace
to certain elements defined by the DocBook DTD.
•
The href attribute of the xi:include element specifies that the introduction.xml file will replace the xi:include
element when the document is parsed.
If the introduction.xml file cannot be found, the parser will use the value of the xi:fallback element - a FIXME
message.
•
If you want to include only a fragment of a file in the master file, the fragment must be contained in a tag having an
xml:id attribute and you must use an XPointer expression pointing to the xml:id value. For example if the master file
is:
<?xml version="1.0" encoding="UTF-8"?>
<?xml-model href="test.rng" type="application/xml" schematypens="http://relaxng.org/ns/structure/1.0"?>
<test>
<xi:include href="a.xml" xpointer="a1"
xmlns:xi="http://www.w3.org/2001/XInclude"/>
</test>
and the a.xml file is:
<?xml version="1.0" encoding="UTF-8"?>
<test>
<a xml:id="a1">test</a>
</test>
after resolving the XPointer reference the document is:
<?xml version="1.0" encoding="UTF-8"?>
<?xml-model href="test.rng" type="application/xml" schematypens="http://relaxng.org/ns/structure/1.0"?>
<test>
<a xml:id="a1" xml:base="a.xml">test</a>
</test>
The XInclude support in Oxygen XML Editor is enabled by default. To configure it, open the Preferences dialog box
and go to XML > XML Parser > Enable XInclude processing. When enabled, Oxygen XML Editor will be able to
validate and transform documents comprised of parts added using XInclude.
Working with XML Catalogs
An XML Catalog maps a system ID or an URI reference pointing to a resource (stored either remotely or locally) to a
local copy of the same resource. If XML processing relies on external resources (like referenced schemas and stylesheets,
for example), the use of an XML Catalog becomes a necessity when Internet access is not available or the Internet
connection is slow.
Oxygen XML Editor supports any XML Catalog file that conforms to one of:
Oxygen XML Editor | Editing Documents | 270
1. OASIS XML Catalogs Committee Specification v1.1
2. OASIS Technical Resolution 9401:1997 including the plain-text flavor described in that resolution
The version 1.1 of the OASIS XML Catalog specification introduces the possibility to map a system ID, a public ID or
a URI to a local copy using only a suffix of the ID or URI used in the actual document. This is done using the catalog
elements systemSuffix and uriSuffix.
Depending on the resource type, Oxygen XML Editor uses different catalog mappings.
Table 6: Catalog Mappings
Document Referenced
Resource
Mappings
XML
system or public
DTD
The Prefer option controls which one of the mappings should be used.
XML Schema
The following strategy is used (if one step fails to provide a resource, the next is applied):
Relax NG
1. resolve the schema using URI catalog mappings.
2. resolve the schema using system catalog mappings.
Schematron
NVDL
This happens only if the Resolve schema locations also through system mappings
option is enabled (it is by default).
3. resolve the root namespace using URI catalog mappings.
XSL
XSL/ANY
URI
CSS
CSS
URI
XML
XML Schema
Schema
Relax
NG
Relax NG
The following strategy is used (if one step fails to provide a resource, the next is applied):
1. resolve schema reference using URI catalog mappings.
2. resolve schema reference using system catalog mappings.
This happens only if the Resolve schema locations also through system mappings
option is enabled (it is by default).
3. resolve schema namespace using uri catalog mappings.
This happens only if the Process namespaces through URI mappings for XML Schema
option is enabled (it is not by default).
An XML Catalog file can be created quickly in Oxygen XML Editor starting from the two XML Catalog document
templates called OASIS XML Catalog 1.0 and OASIS XML Catalog 1.1 and available when creating new document
templates.
<?xml version="1.0" encoding="UTF-8"?>
<!DOCTYPE catalog
PUBLIC "-//OASIS//DTD XML Catalogs V1.1//EN"
"http://www.oasis-open.org/committees/entity/release/1.1/catalog.dtd">
<catalog xmlns="urn:oasis:names:tc:entity:xmlns:xml:catalog">
<!-- Use "system" and "public" mappings when resolving DTDs -->
<system
systemId="http://www.docbook.org/xml/4.4/docbookx.dtd"
uri="frameworks/docbook/4.4/dtd/docbookx.dtd"/>
<!-- The "systemSuffix" matches any system ID ending in a specified string -->
<systemSuffix
systemIdSuffix="docbookx.dtd"
uri="frameworks/docbook/dtd/docbookx.dtd"/>
<!-- Use "uri" for resolving XML Schema and XSLT stylesheets -->
<uri
name="http://www.oasis-open.org/docbook/xml/5.0/rng/docbook.rng"
uri="frameworks/docbook/5.0/rng/docbookxi.rng"/>
Oxygen XML Editor | Editing Documents | 271
<!-- The "uriSuffix" matches any URI ending in a specified string -->
<uriSuffix
uriSuffix="docbook.xsl"
uri="frameworks/docbook/xsl/fo/docbook.xsl"/>
</catalog>
Oxygen XML Editor comes with a built-in catalog set as default, but you can also create your own one. Oxygen XML
Editor looks for a catalog in the following order:
•
•
•
User-defined catalogs set globally in the XML Catalog preferences page.
User-defined catalogs set at document type level, in the Catalog tab from the Document Type configuration dialog
box.
Built-in catalogs.
An XML catalog can be used to map a W3C XML Schema specified with an URN in the
xsi:noNamespaceSchemaLocation attribute of an XML document to a local copy of the
schema.
Considering the following XML document code snippet:
<topic xmlns:xsi="http://www.w3.org/2001/XMLSchema-instance"
xsi:noNamespaceSchemaLocation="urn:oasis:names:tc:dita:xsd:topic.xsd:1.1">
The URN can be resolved to a local schema file with a catalog entry like:
<uri name="urn:oasis:names:tc:dita:xsd:topic.xsd:1.1"
uri="topic.xsd"/>
Resolve Schemas Through XML Catalogs
Oxygen XML Editor resolves the location of a schema in the following order:
•
•
•
•
First, it attempts to resolve the schema location as a URI (uri, uriSuffix, rerwriteURI mappings from the
XML catalog). If this succeeds, the process end here.
If the Resolve schema locations also through system mappings option is selected, it attempts to resolve the schema
location as a systemID (system, systemSuffix, rewriteSuffix, rerwriteSystem from the XML catalog).
If this succeeds, the process ends here.
If the Process namespace through URI mappings for XML Schema option is selected, it attempts to resolve the
location by processing the schema namespace as a URI (uri, uriSuffix, rewriteURI from the XML catalog).
The namespace is taken into account only when the schema specified in the schemaLocation attribute was not resolved
successfully. If this succeeds, the process ends here.
If none of these succeeds, the actual schema location is used.
XML Resource Hierarchy/Dependencies View
The Resource Hierarchy/Dependencies view allows you to easily see the hierarchy / dependencies for an XML
document. The tree structure presented in this view is built based on the XIinclude and External Entity mechanisms. To
define the scope for calculating the dependencies of a resource, click
Resource Hierarchy/Dependencies toolbar.
Configure dependencies search scope on the
To open this view, go to Window > Show View > Resource Hierarchy/Dependencies . As an alternative, right click
the current document and either select Resource Hierarchy or Resource Dependencies.
Oxygen XML Editor | Editing Documents | 272
Figure 127: Resource Hierarchy/Dependencies View - Hierarchy for Syncro phone v1.xml
The build process for the dependencies view is started with the Resource Dependencies action available on the contextual
menu.
Figure 128: Resource Hierarchy/Dependencies View - Dependencies for Insert battery.xml
The following actions are available in the Resource Hierarchy/Dependencies view:
Refresh
Refreshes the Hierarchy/Dependencies structure.
Oxygen XML Editor | Editing Documents | 273
Stop
Stops the hierarchy/dependencies computing.
Show Hierarchy
Allows you to choose a resource to compute the hierarchy structure.
Show Dependencies
Allows you to choose a resource to compute the dependencies structure.
Configure
Allows you to configure a scope to compute the dependencies structure. There is also an option for automatically
using the defined scope for future operations.
History
Provides access to the list of previously computed dependencies. Use the
items from this list.
Clear history button to remove all
The contextual menu contains the following actions:
Open
Opens the resource. You can also double-click a resource in the Hierarchy/Dependencies structure to open it.
Copy location
Copies the location of the resource.
Move resource
Moves the selected resource.
Rename resource
Renames the selected resource.
Show Resource Hierarchy
Shows the hierarchy for the selected resource.
Show Resource Dependencies
Shows the dependencies for the selected resource.
Add to Master Files
Adds the currently selected resource in the Master Files directory.
Expand All
Expands all the children of the selected resource from the Hierarchy/Dependencies structure.
Collapse All
Collapses all children of the selected resource from the Hierarchy/Dependencies structure.
Tip: When a recursive reference is encountered in the Hierarchy view, the reference is marked with a special
icon .
Note: The Move resource or Rename resource actions give you the option to update the references to the
resource. Only the references made through the XInclude and External Entity mechanisms are handled.
Moving/Renaming XML Resources
When you select the Rename action in the contextual menu of the Resource/Hierarchy Dependencies view, the
Rename resource dialog box is displayed. The following fields are available:
•
•
New name - Presents the current name of the edited resource and allows you to modify it.
Update references - Enable this option to update the references to the resource you are renaming.
When you select the Move action from the contextual menu of the Resource/Hierarchy Dependencies view, the Move
resource dialog box is displayed. The following fields are available:
•
•
•
Oxygen XML Editor | Editing Documents | 274
Destination - Presents the path to the current location of the resource you want to move and gives you the option to
introduce a new location.
New name - Presents the current name of the moved resource and gives you the option to change it.
Update references of the moved resource(s) - Enable this option to update the references to the resource you are
moving, in accordance with the new location and name.
If the Update references of the moved resource(s) option is enabled, a Preview option (which opens the Preview
dialog box) is available for both actions. The Preview dialog box presents a list with the resources that are updated.
Converting Between Schema Languages
The Generate/Convert Schema dialog box allows you to convert a DTD or Relax NG (full or compact syntax) schema
or a set of XML files to an equivalent XML Schema, DTD or Relax NG (full or compact syntax) schema. Where perfect
equivalence is not possible due to limitations of the target language, Oxygen XML Editor generates an approximation
of the source schema. Oxygen XML Editor uses Trang multiple format converter to perform the actual schema conversions.
To open the Generate/Convert Schema dialog box, select the
Generate/Convert Schema(Alt Shift C (Meta Alt
C on OS X)) action from the Tools menu or from the Open with submenu when invoking the contextual menu in the
Project view.
Figure 129: Convert a Schema to Other Schema Language
The language of the source schema is specified with one of the four radio buttons in the Input panel. If the conversion
is based on a set of XML files, not just a single XML file, select the XML Documents option. Then use the file selector
to add the XML files involved in the conversion.
The language of the target schema is specified with one of the four options in the Output panel. Here you can also
choose the encoding, the maximum line width and the number of spaces for one level of indentation.
The conversion can be further fine-tuned by specifying more advanced options available from the Advanced options
button. For example if the input is a DTD and the output is an XML Schema the following options are available:
Input panel:
•
•
xmlns - Specifies the default namespace, that is the namespace used for unqualified element names.
xmlns - Each row specifies the prefix used for a namespace in the input schema.
•
•
•
•
•
•
•
•
Oxygen XML Editor | Editing Documents | 275
colon-replacement - Replaces colons in element names with the specified chars when constructing the names of
definitions used to represent the element declarations and attribute list declarations in the DTD.
element-define - Specifies how to construct the name of the definition representing an element declaration from the
name of the element. The specified value must contain exactly one percent character. This percent character is
replaced by the name of element (after colon replacement) and the result is used as the name of the definition.
inline-attlist - Instructs the application not to generate definitions for attribute list declarations, but instead move
attributes declared in attribute list declarations into the definitions generated for element declarations. This is the
default behavior when the output language is XSD.
attlist-define - Specifies how to construct the name of the definition representing an attribute list declaration from
the name of the element. The specified value must contain exactly one percent character. This percent character is
replaced by the name of element (after colon replacement) and the result is used as the name of the definition.
any-name - Specifies the name of the definition generated for the content of elements declared in the DTD as having
a content model of ANY.
strict-any - Preserves the exact semantics of ANY content models by using an explicit choice of references to all
declared elements. By default, the conversion engine uses a wildcard that allows any element
generate-start - Specifies whether the conversion engine should generate a start element. DTD's do not indicate
what elements are allowed as document elements. The conversion engine assumes that all elements that are defined
but never referenced are allowed as document elements.
annotation-prefix - Default values are represented using an annotation attribute prefix:defaultValue where
prefix is the specified value and is bound to
http://relaxng.org/ns/compatibility/annotations/1.0 as defined by the RELAX NG DTD
Compatibility Committee Specification. By default, the conversion engine will use a for prefix unless that conflicts
with a prefix used in the DTD.
Output panel:
•
•
•
disable-abstract-elements - Disables the use of abstract elements and substitution groups in the generated XML
Schema. This can also be controlled using an annotation attribute.
any-process-contents - One of the values: strict, lax, skip. Specifies the value for the processContents attribute
of any elements. The default is skip (corresponding to RELAX NG semantics) unless the input format is DTD, in
which case the default is strict (corresponding to DTD semantics).
any-attribute-process-contents - Specifies the value for the processContents attribute of anyAttribute
elements. The default is skip (corresponding to RELAX NG semantics).
Editing XML Tree Nodes
A Well-Formed XML document can be viewed and edited in Oxygen XML Editor also as a tree of XML elements. This
is possible in the Tree Editor perspective, available from Tools > Tree Editor. The Tree Editor provides specially
designed views, toolbars and an editable tree allowing you to use common tree actions, such as create/delete nodes, edit
node names, and move nodes with drag and drop.
If you want to be able to edit XML documents that are not well-formed and still have a tree view of the document you
should use the Outline view in the Editor perspective.
Editing Modular XML Files in the Master Files Context
Smaller interrelated modules that define a complex XML modular structure cannot be correctly edited or validated
individually, due to their interdependency with other modules. Oxygen XML Editor provides the support for defining
the main module (or modules), allowing you to edit any file from the hierarchy in the context of the master XML files.
You cat set a main XML document either using the master files support from the Project view, or using a validation
scenario.
To set a main file using a validation scenario, add validation units that point to the main modules. Oxygen XML Editor
warns you if the current module is not part of the dependencies graph computed for the main XML document. In this
case, it considers the current module as the main XML document.
The advantages of editing in the context of a master file include:
•
•
•
•
Oxygen XML Editor | Editing Documents | 276
Correct validation of a module in the context of a larger XML structure.
Content Completion Assistant displays all collected entities and IDs starting from the master files.
Oxygen XML Editor uses the schema defined in the master file when you edit a module which is included in the
hierarchy through the External Entity mechanism.
The master files defined for the current module determines the scope of the search and refactoring actions for
ID/IDREFS values and for updating references when renaming/moving a resource. Oxygen XML Editor performs
the search and refactoring actions in the context that the master files determine, improving the speed of execution.
To watch our video demonstration about editing modular XML files in the master files context, go to
http://oxygenxml.com/demo/Working_With_XML_Modules.html.
Search and Refactor Actions for IDs and IDREFS
Oxygen XML Editor allows you to search for ID declarations and references (IDREFS) and to define the scope of the
search and refactor operations. These operations are available for XML documents that have an associated DTD, XML
Schema, or Relax NG schema. These operations are available through the search and refactor actions in the contextual
menu. In Text mode, these actions are also available in the Quick Assist menu.
The search and refactor actions from the contextual menu are grouped in the Manage IDs section:
Rename in
Renames the ID and all its occurrences. Selecting this action opens the Rename XML ID dialog box. This dialog
box lets you insert the new ID value and choose the scope of the rename operation. For a preview of the changes
you are about to make, click Preview. This opens the Preview dialog box, which presents a list with the files that
contain changes and a preview zone of these changes.
Rename in File
Renames the ID you are editing and all its occurrences from the current file.
Note: Available in the Text mode only.
Search References
Searches for the references of the ID. By default, the scope of this action is the current project. If you configure a
scope using the Select the scope for the Search and Refactor operations dialog box, this scope will be used instead.
Search References in
Searches for the references of the ID. Selecting this action opens the Select the scope for the Search and Refactor
operations.
Search Declarations
Searches for the declaration of the ID reference. By default, the scope of this action is the current project. If you
configure a scope using the Select the scope for the Search and Refactor operations dialog box, this scope will be
used instead.
Note: Available in the Text mode only.
Search Declarations in
Searches for the declaration of the ID reference. Selecting this action opens the Select the scope for the Search and
Refactor operations.
Note: Available in the Text mode only.
Search Occurrences in file
Searches for the declaration and references of the ID in the current document.
Tip: A quick way to go to the declaration of an ID in Text mode is to move the cursor over an ID reference
and use the Ctrl Single-Click (Command Single-Click on OS X) navigation.
Oxygen XML Editor | Editing Documents | 277
Selecting an ID for which you use search or refactor operations differs between the Text and Author modes. In the
Text mode, you position the cursor inside the declaration or reference of an ID. In the Author mode, Oxygen XML
Editor collects all the IDs by analyzing each element from the path to the root. If more IDs are available, you are prompted
to choose one of them.
Figure 130: Selecting an ID in the Author Mode
Search and Refactor Operations Scope
The scope is a collection of documents that define the context of a search and refactor operation. To control it you can
use the
Change scope operation, available in the Quick Assist action set or on the Resource Hierarchy/Dependency
View toolbar. You can restrict the scope to the current project or to one or multiple working sets. The Use only Master
Files, if enabled check-box allows you to restrict the scope of the search and refactor operations to the resources from
the Master Files directory. Click read more for details about the Master Files support.
Figure 131: Change Scope Dialog Box
The scope you define is applied to all future search and refactor operations until you modify it. Contextual menu actions
allow you to add or delete files, folders, and other resources to the working set structure.
Oxygen XML Editor | Editing Documents | 278
Viewing Status Information
Status information generated by the Schema Detection, Validation, Automatic validation, and Transformation
threads are fed into the Information view allowing you to monitor how the operation is being executed.
Figure 132: Information view messages
Messages contain a timestamp, the name of the thread that generated it and the actual status information. The number
of displayed messages can be controlled from the Options panel.
In order to make the view visible go to menu Window > Show View > Information.
Image Preview
Images and SVG files from the Project view can be previewed in a separate panel.
To preview an image, either double click the image name or click the Preview action from the Project view's contextual
menu. Supported image types are GIF, JPEG/JPG, PNG, BMP. Once the image is displayed in the Preview panel using
the actions from the contextual menu, you can scale the image to its original size (1:1 action) or scale it down to fit in
the view's available area (Scale to fit action).
To preview an SVG file, click the Preview action from the Project view's contextual menu. Once the SVG is displayed
in the Preview panel, the following actions are available on the contextual menu: Zoom in, Zoom out, Rotate and
Refresh.
Note: You can drag an image from the Image Preview view and drop it in a DITA, DocBook, or TEI document.
Making a Persistent Copy of Results
The Results panel displays the results from the following operations:
•
•
•
•
•
•
document validation
checking the form of documents
XSLT or FO transformation
find all occurrences of a string in a file
find all occurrences of a string in multiple files
applying an XPath expression to the current document
To make a persistent copy of the Results panel, use one of these actions:
Oxygen XML Editor | Editing Documents | 279
File > Save Results
Displays the Save Results dialog box, used to save the result list of the current message tab. The action is also
available on the right click menu of the Results panel.
File > Print Results
Displays the Page Setup dialog box used to define the page size and orientation properties for printing the result
list of the current Results panel. The action is also available on the right click menu of the Results panel.
Save Results as XML from the contextual menu
Saves the content of the Results panel in an XML file with the format:
<Report>
<Incident>
<engine>The engine who provide the error.<engine>
<severity>The severity level<severity>
<Description>Description of output message.</Description>
<SystemID>The location of the file linked to the message.</SystemID>
<Location>
<start>
<line>Start line number in file.<line>
<column>Start column number in file<column>
</start>
<end>
<line>End line number in file.<line>
<column>End column number in file<column>
</start>
</Location>
</Incident>
</Report>
Locking and Unlocking XML Markup
For documents with fixed markup, such as forms in which the XML tags are not allowed to be modified (only their text
content), the possibility to edit the XML tag names can be disabled/enabled with the
action available in Text editing mode from:
•
•
Lock / Unlock the XML tags
The Document > Source menu.
The Source submenu from the contextual menu.
You can set the default lock state for all opened editors using the Lock the XML tags option in the Text preferences
page.
Adjusting the Transparency of XML Markup
Most of the time you want the content of a document displayed on screen with zero transparency. However, if you want
to focus your attention only on editing text content inside XML markup, Oxygen XML Editor offers the option of
reducing the visibility of the markup by increasing their transparency when displayed in Text mode. To change the level
of transparency, use the
[Tags Transparency Selector] drop-down menu that is available from the Source
toolbar. By default, this drop-down menu is not visible. You can add it to the toolbar by using the Configure Toolbars
action. There are several levels of transparency that can be adjusted to make the content more or less visible:
•
•
•
•
Normal contrast - Resets the transparency level back to normal.
Semi-transparent Text - Slightly reduces the visibility of text to place greater emphasis on the visibility of the XML
markup.
Transparent Text - Greatly reduces the visibility of text to place even greater emphasis on the visibility of the XML
markup.
Semi-transparent Markup - Slightly reduces the visibility of the XML markup to place greater emphasis on the
visibility of the text.
Editor Highlights
An editor highlight is a text fragment emphasized by a colored background.
Highlights are generated in both Text and Author mode when the following actions generate results:
Oxygen XML Editor | Editing Documents | 280
•
•
•
•
•
•
•
Find/Replace in Files
Open/Find Resource
Find All
Find All Elements
XPath in Files
Search References
Search Declarations
By default, Oxygen XML Editor uses a different color for each type of highlight (XPath in Files, Find/Replace, Search
References, Search Declarations, etc.) You can customize these colors and the maximum number of highlights displayed
in a document on the Editor preferences page. The default maximum number of highlights is 10000.
You are able to navigate the highlights in the current document by using the following methods:
•
•
Clicking the markers from the range ruler, located at the right side of the document.
Clicking the
Next and Previous buttons from the bottom of the range ruler.
Note: When there are multiple types of highlights in the document, the
navigate through highlights of the same type.
•
Next and Previous buttons
Clicking the messages displayed in the Results view at the bottom of the editor.
To remove the highlights, you can do the following:
•
•
•
Click the Remove all button from bottom of the range ruler.
Close the results tab at the bottom of the editor that contains the output of the action that generated the highlights.
Click the
Remove all button from the results panel at the bottom of the editor.
Note: Use the
Highlight all results in editor button to either display all the highlights or hide them.
XML Quick Fixes
The Oxygen XML Editor Quick Fix support helps you resolve errors that appear in an XML document by offering quick
fixes to problems such as missing required attributes or invalid elements. Quick fixes are available in Text mode and
Author mode
To activate this feature, hover over or place the cursor in the highlighted area of text where a validation error or warning
occurs. If a Quick Fix is available for that particular error or warning, you can access the Quick Fix proposals with any
of the following methods:
•
When hovering over the error or warning, the proposals are presented in a tooltip popup window and the available
quick fixes include a link that can be used to perform the fix.
Figure 133: Quick Fix Presented in a Tooltip in Text Mode
Oxygen XML Editor | Editing Documents | 281
Figure 134: Quick Fix Presented in a Tooltip in Author Mode
•
When hovering over the error or warning in Author mode, a small quick fix drop-down menu is presented. You can
use the drop-down menu to display a list of available quick fixes to select from for the particular error or warning.
Figure 135: Quick Fix Drop-Down Menu in Author Mode
•
If you place the cursor in the highlighted area where a validation error or warning occurs, a quick fix icon ( ) is
displayed in the stripe on the left side of the editor. If you click this icon, Oxygen XML Editor displays the list of
available fixes.
Figure 136: Quick Fix Menu Invoked by Clicking on the
•
Icon
With the cursor placed in the highlighted area of the error or warning, you can also invoke the quick fix menu by
pressing Alt 1 (Meta Alt 1 on OS X) on your keyboard.
Whenever you make a modification in the XML document or you apply a fix, the list of quick fixes is recomputed to
ensure that you always have valid proposals.
Note: A quick fix that adds an element inserts it along with required and optional elements, and required and
fixed attributes, depending on how the Content Completion Assistant options are configured.
Quick Fixes for XSD and Relax NG Errors
Oxygen XML Editor offers quick fixes for common errors that appear in XML documents that are validated against
XSD or Relax NG schemas.
Note: For XML documents validated against XSD schemas, the quick fixes are only available if you use the
default Xerces validation engine.
Quick fixes are available in Text mode and Author mode.
Oxygen XML Editor provides quick fixes for numerous types of problems, including the following:
Oxygen XML Editor | Editing Documents | 282
Problem type
Available quick fixes
A specific element is required in the current context
Insert the required element
An element is invalid in the current context
Remove the invalid element
The content of the element should be empty
Remove the element content
An element is not allowed to have child elements
Remove all child elements
Text is not allowed in the current element
Remove the text content
A required attribute is missing
Insert the required attribute
An attribute is not allowed to be set for the current
element
Remove the attribute
The attribute value is invalid
Propose the correct attribute values
ID value is already defined
Generate a unique ID value
References to an invalid ID
Change the reference to an already defined ID
Schematron Quick Fixes (SQF)
Oxygen XML Editor provides support for Schematron Quick Fixes (SQF). They help you resolve errors that appear in
XML documents that are validated against Schematron schemas by offering you solution proposals. The Schematron
Quick Fixes are an extension of the Schematron language and they allow you to define fixes for Schematron error
messages. Specifically, they are associated with assert or report messages.
A typical use case is using Schematron Quick Fixes to assist technical writers with common editing tasks. For example,
you can use Schematron rules to automatically report certain validation warnings (or errors) when performing regular
editing tasks, such as inserting specific elements or changing IDs to match specific naming conventions. For more details
and examples, please see the following blog:
http://blog.oxygenxml.com/2015/05/schematron-checks-to-help-technical.html.
Displaying the Schematron Quick Fix Proposals
The defined Schematron Quick Fixes are displayed on validation errors in Text mode and Author mode.
Figure 137: Example of a Schematron Quick Fix
Refactoring XML Documents
In the life cycle of XML documents there are instances when the XML structure needs to be changed to accommodate
various needs. For example, when an associated schema is updated, an attribute may have been removed, or a new
element added to the structure.
These types of situations cannot be resolved with a traditional Find/Replace tool, even if the tool accepts regular
expressions. The problem becomes even more complicated if an XML document is computed or referenced from multiple
modules, since multiple resources need to be changed.
To assist you with these types of refactoring tasks, Oxygen XML Editor includes a specialized XML Refactoring tool
that helps you manage the structure of your XML documents.
Oxygen XML Editor | Editing Documents | 283
XML Refactoring Tool
The XML Refactoring tool is presented in the form of an easy to use wizard that is designed to reduce the time and
effort required to perform various structure management tasks. For example, you can insert, delete, or rename an attribute
in all instances of a particular element that is found in all documents within your project.
To access the tool, select the
•
•
•
XML Refactoring action from one of the following locations:
The Tools menu.
The Refactoring submenu from the contextual menu in the Project view.
The Refactoring submenu from the contextual menu in the DITA Maps Manager view.
Note: The predefined refactoring operations are also available from the Refactoring submenu in the contextual
menu of Author or Text mode. This is useful because by selecting the operations from the contextual menu,
Oxygen XML Editor considers the editing context to skip directly to the wizard page of the appropriate operation
and to help you by preconfiguring some of the parameter values.
The tool includes the following wizard pages:
Refactoring operations
The first wizard page displays, and allows you to select, the available operations, which are grouped by category.
To search for an operation, you can use the filter text box at the top of the page.
Configure Operation Parameters
The next wizard page allows you to specify the parameters for the refactoring operation. The parameters are specific
to the type of refactoring operation that is being performed. For example, to delete an attribute you need to specify
the parent element and the qualified name of the attribute to be removed.
Oxygen XML Editor | Editing Documents | 284
Scope and Filters
The last wizard page allows you to select the set of files that represent the input of the operation. You can select
from predefined resource sets (such as the current file, your whole project, the current DITA map hierarchy, etc.)
or you can define your own set of resources by creating a working set.
The Filters section includes the following options:
•
•
•
Include files - Allows you to filter the selected resources by using a file pattern. For example, to restrict the
operation to only analyze build files you could use build*.xml for the file pattern.
Restrict only to known XML file types - When enabled, only resources with a known XML file type will be
affected by the operation.
Look inside archives - When enabled, the resources inside archives will also be affected.
If an operation takes longer than expected you can use the
Stop button in the progress bar to cancel the operation.
Note: It is recommended that you use the Preview button to review all the changes that will be made by the
refactoring operation before applying the changes.
Oxygen XML Editor | Editing Documents | 285
Warning: After clicking the Finish button, the operation will be processed and Oxygen XML Editor provides
no automatic means for reverting the operations. Any Undo action will only revert changes on the current
document.
Predefined Refactoring Operations
The XML Refactoring tool includes a variety of predefined operations that can be used for common refactoring tasks.
They are grouped by category in the Refactoring operations wizard page. You can also access the operations from the
Refactoring submenu in the contextual menu of Author or Text mode. The operations are also grouped by category
in this submenu (Attributes, Elements, and Fragments). When selecting the operations from the contextual menu,
Oxygen XML Editor considers the editing context to get the names and namespaces of the current element or attribute,
and uses this information to preconfigure some of the parameter values for the selected refactoring operation.
The following predefined operations are available:
Refactoring Operations for Attributes
Add/Change attribute
Use this operation to change the value of an attribute or insert a new one. To perform this operation, specify the
following parameters:
•
•
•
The parent Element of the attribute to be changed, in the form of a local name from any namespace, a local
name with a namespace prefix, or an XPath expression.
The Local name, Namespace, and Value of the affected attribute.
One of the following choices for the Operation mode in the Options section:
•
•
•
Add the attribute in the parent elements where it is missing
Change the value in the parent elements where the atrribute already exists
Both
Tip: Use the link provided in the lower part of the wizard to open the XML / XSLT-FO-XQuery / XPath
preferences page where you can configure XPath options and declare namespace prefixes.
Delete attribute
Use this operation to remove one or more attributes. To perform this operation, specify the following parameters:
•
•
The parent Element of the attribute to be deleted, in the form of a local name from any namespace, a local name
with a namespace prefix, or an XPath expression.
The name of the Attribute to be deleted.
Tip: Use the link provided in the lower part of the wizard to open the XML / XSLT-FO-XQuery / XPath
preferences page where you can configure XPath options and declare namespace prefixes.
Rename attribute
Use this operation to rename an attribute. Specify the following parameters in the Rename attribute dialog box:
•
•
•
The parent Element of the attribute to be renamed, in the form of a local name from any namespace, a local
name with a namespace prefix, or an XPath expression.
The name of the Attribute to be renamed.
New local name of the attribute.
Tip: Use the link provided in the lower part of the wizard to open the XML / XSLT-FO-XQuery / XPath
preferences page where you can configure XPath options and declare namespace prefixes.
Replace in attribute value
Use this operation to search for a text fragment inside an attribute value and change the fragment to a new value.
To perform this operation, specify the following parameters:
•
•
•
•
Oxygen XML Editor | Editing Documents | 286
The parent Element of the attribute to be modified, in the form of a local name from any namespace, a local
name with a namespace prefix, or an XPath expression.
The name of the Attribute to be modified.
The text fragments to Find. You can use Perl-like regular expressions when specifying the text to find.
The text fragment to Replace with. This parameter can bind regular expression capturing groups ($1, $2,
etc.) from the find pattern.
Tip: Use the link provided in the lower part of the wizard to open the XML / XSLT-FO-XQuery / XPath
preferences page where you can configure XPath options and declare namespace prefixes.
Refactoring Operations for Elements
Delete element
Use this operation to delete elements. To perform this operation, specify the following parameter:
•
The target Element to be deleted, in the form of a local name from any namespace, a local name with a namespace
prefix, or an XPath expression.
Tip: Use the link provided in the lower part of the wizard to open the XML / XSLT-FO-XQuery / XPath
preferences page where you can configure XPath options and declare namespace prefixes.
Delete element content
Use this operation to delete the content of elements. To perform this operation, specify the following parameter:
•
The target Element in which its content is to be deleted, in the form of a local name from any namespace, a
local name with a namespace prefix, or an XPath expression.
Tip: Use the link provided in the lower part of the wizard to open the XML / XSLT-FO-XQuery / XPath
preferences page where you can configure XPath options and declare namespace prefixes.
Insert element
Use this operation to insert new elements. To perform this operation, specify the following parameters:
•
•
•
•
The Local name of the element to be inserted.
The Namespace of the element to be inserted.
The XPath location of an existing element where the new element will be inserted, in the form of a local name
from any namespace, a local name with a namespace prefix, or other XPath expressions.
The Position, in relation to the specified existing element, where the new element will be inserted. The possible
selections in the drop-down menu are: After, Before, First child, or Last child.
Tip: Use the link provided in the lower part of the wizard to open the XML / XSLT-FO-XQuery / XPath
preferences page where you can configure XPath options and declare namespace prefixes.
Rename element
Use this operation to rename elements. To perform this operation, specify the following parameters:
•
•
The Target elements (XPath) to be renamed, in the form of a local name from any namespace, a local name
with a namespace prefix, or other XPath expressions.
The New local name of the element.
Tip: Use the link provided in the lower part of the wizard to open the XML / XSLT-FO-XQuery / XPath
preferences page where you can configure XPath options and declare namespace prefixes.
Unwrap element
Use this operation to remove the surrounding tags of elements, while keeping the content unchanged. To perform
this operation, specify the following parameters:
•
The Target elements (XPath) for which its surrounding tags will be removed, in the form of a local name from
any namespace, a local name with a namespace prefix, or other XPath expressions.
Oxygen XML Editor | Editing Documents | 287
Tip: Use the link provided in the lower part of the wizard to open the XML / XSLT-FO-XQuery / XPath
preferences page where you can configure XPath options and declare namespace prefixes.
Wrap element
Use this operation to surround elements with element tags. To perform this operation, specify the following
parameters:
•
•
•
The Target elements (XPath) to be surrounded with tags, in the form of a local name from any namespace, a
local name with a namespace prefix, or other XPath expressions.
The Local name of the Wrapper element.
The Namespace of the Wrapper element.
Tip: Use the link provided in the lower part of the wizard to open the XML / XSLT-FO-XQuery / XPath
preferences page where you can configure XPath options and declare namespace prefixes.
Wrap element content
Use this operation to surround the content of elements with element tags. To perform this operation, specify the
following parameters:
•
•
•
The Target elements (XPath) to surround its content with tags, in the form of a local name from any namespace,
a local name with a namespace prefix, or other XPath expressions.
The Local name of the Wrapper element in which its content will be wrapped.
The Namespace of the Wrapper element in which its content will be wrapped.
Tip: Use the link provided in the lower part of the wizard to open the XML / XSLT-FO-XQuery / XPath
preferences page where you can configure XPath options and declare namespace prefixes.
Refactoring Operations for Fragments
Insert XML fragment
Use this operation to insert an XML fragment. To perform this operation, specify the following parameters:
•
•
•
The XML Fragment to be inserted.
The XPath location of an existing element where the fragment will be inserted, in the form of a local name from
any namespace, a local name with a namespace prefix, or other XPath expressions.
The Position, in relation to the specified existing element, where the fragment will be inserted. The possible
selections in the drop-down menu are: After, Before, First child, or Last child.
Tip: Use the link provided in the lower part of the wizard to open the XML / XSLT-FO-XQuery / XPath
preferences page where you can configure XPath options and declare namespace prefixes.
Replace element content with XML fragment
Use this operation to replace the content of elements with an XML fragment. To perform this operation, specify the
following parameters:
•
•
The Target elements (XPath) for which its content will be replaced, in the form of a local name from any
namespace, a local name with a namespace prefix, or other XPath expressions.
The XML Fragment with which to replace the content of the target element.
Tip: Use the link provided in the lower part of the wizard to open the XML / XSLT-FO-XQuery / XPath
preferences page where you can configure XPath options and declare namespace prefixes.
Replace element with XML fragment
Use this operation to replace elements with an XML fragment. To perform this operation, specify the following
parameters:
•
The Target elements (XPath) to be replaced, in the form of a local name from any namespace, a local name
with a namespace prefix, or other XPath expressions.
Oxygen XML Editor | Editing Documents | 288
•
The XML Fragment with which to replace the target element.
Tip: Use the link provided in the lower part of the wizard to open the XML / XSLT-FO-XQuery / XPath
preferences page where you can configure XPath options and declare namespace prefixes.
Additional Notes
Note: There are some operations that allows <ANY> for the local name and namespace parameters. This value
can be used to select an element or attribute regardless of its local name or namespace. Also, the
<NO_NAMESPACE> value can be used to select nodes that do not belong to a namespace.
Note: Some operations have parameters that accept XPath expressions to match elements or attributes. In these
XPath expressions you can only use the prefixes declared in the Options > Preferences > XML >
XSLT-FO-XQUERY > XPath page. This preferences page can be easily opened by clicking the link in the note
(Each prefix used in an XPath expression must be declared in the Default prefix-namespace mappings
section) at the bottom of the Configure Operation Parameters wizard page.
Custom Refactoring Operations
If none of the predefined operations will help you accomplish a particular refactoring task, you can create a custom
operation that is specific to your needs. For example, if you want to convert an attribute to an element and insert the
element as the first child of the parent element, a custom refactoring operation needs to be created.
Note: The custom refactoring operations are only available in the Enterprise edition.
An XML Refactoring operation is defined as a pair of resources:
•
•
An XQuery Update script or XSLT stylesheet that Oxygen XML Editor will run in order to refactor the XML files.
An XML Operation Descriptor file that contains information about the operation, such as the name, description, and
parameters.
Figure 138: Diagram of an XML Refactoring Operation
All the defined custom operations are loaded by the XML Refactoring tool and presented in the Refactoring operations
wizard page, along with the predefined built-in operations.
Oxygen XML Editor | Editing Documents | 289
After the user chooses an operation and specifies its parameters, Oxygen XML Editor processes an XQuery Update or
XSLT transformation over the input file. This transformation is executed in a safe mode, which implies the following:
•
When loading the document:
•
•
•
•
The XInclude mechanism is disabled. This means that the resources included by using XInclude will not be
visible in the transformation.
The DTD entities will be processed without being expanded.
The associated DTD will be not loaded, so the default attributes declared in the DTD will not be visible in the
transformation.
When saving the updated XML document:
•
•
•
•
The DOCTYPE will be preserved.
The DTD entities will be preserved as they are in the original document when the document is saved.
The attribute values will be kept in their original form without being normalized.
The spaces between attributes are preserved. Basically, the spaces are lost by a regular XML serialization since
they are not considered important.
The result of this transformation overrides the initial input file.
Note: To achieve some of the previous goals, the XML Refactoring mechanism adds several attributes that are
interpreted internally. The attributes belong to the
http://oxygenxml.com/app/xml_refactory/additional_attributes namespace. These
attributes should not be taken into account when processing the input XML document, since they are discarded
when the transformed document is serialized.
Restriction: Comments or processing instructions that are in any node before or after the root element cannot
be modified by an XML Refactoring operation. In other words, XML Refactoring operations can only be
performed on comments or processing instructions that are inside the root element.
Creating a Custom Refactoring Operation
To create a custom refactoring operation, follow these steps:
1. Create an XQuery Update script or XSLT file.
2. Create an XML Refactoring Operation Descriptor file.
3. Store both files in one of the locations that Oxygen XML Editor scans when loading the custom operations.
Once you run the XML Refactoring tool again, the custom operation appears in the Refactoring operations wizard
page.
Custom Refactoring Script
The first step in creating a custom refactoring operation is to create an XQuery Update script or XSLT stylesheet that is
needed to process the refactoring operations. The easiest way to create this script file is to use the New document wizard
to create a new XQuery or XSLT file and you can use our examples to help you with the content.
There are cases when it is necessary to add parameters in the XQuery script or XSLT stylesheet. For instance, if you
want to rename an element, you may want to declare an external parameter associated with the name of the element to
be renamed. To allow you to specify the value for these parameters, they need to be declared in the refactoring operation
descriptor file that is associated with this operation.
Note: The XQuery Update processing is disabled by default in Oxygen XML Editor. Thus, if you want to create
or edit an XQuery Update script you have to enable this facility by creating an XQuery transformation scenario
and choose Saxon EE as the transformation engine. Also, you need to make sure the Enable XQuery update
option is enabled in the Saxon processor advanced options.
Oxygen XML Editor | Editing Documents | 290
Note: If you are using an XSLT file, XPath expressions that are passed as parameters will automatically be
rewritten to conform with the mapping of the namespace prefixes declared in the XML /XSLT-FO-XQuery /
XPath preferences page.
The next step in creating a custom refactoring operation is to create a custom operation descriptor file.
Custom Refactoring Operation Descriptor File
The second step in creating a custom refactoring operation is to create an operation descriptor file. The easiest way to
do this is to use the New document wizard and choose the XML Refactoring Operation Descriptor template.
Introduction to the Descriptor File
This file contains information (such as name, description, and id) that is necessarily when loading an XML
Refactoring operation . It also contains the path to the XQuery Update script or XSLT stylesheet that is associated with
the particular operation through the script element.
You can specify a category for your custom operations to logically group certain operations. The category element
is optional and if it is not included in the descriptor file, the default name of the category for the custom operations is
Other operations.
The descriptor file is edited and validated against the following schema:
frameworks/xml_refactoring/operation_descriptor.xsd.
Declaring Parameters in the Descriptor File
If the XQuery Update script or XSLT stylesheet includes parameters, they should be declared in the parameters section
of the descriptor file. All the parameters specified in this section of the descriptor file will be displayed in the XML
Refactoring tool within the Configure Operation Parameters wizard page for that particular operation.
The value of the first description element in the parameters section will be displayed at the top of the Configure
Operation Parameters wizard page.
To declare a parameter, specify the following information:
•
•
•
label - This value is displayed in the user interface for the parameter.
name - The parameter name used in the XQuery Update script or XSLT stylesheet and it should be the same as the
one declared in the script.
type - Defines the type of the parameter and how it will be rendered. There are several types available:
•
•
TEXT - Generic type used to specify a simple text fragment.
XPATH - Type of parameter whose value is an XPATH expression. For this type of parameter, Oxygen XML
Editor will use a text input with corresponding content completion and syntax highlighting.
Note: The value of this parameter is transferred as plain text to the XQuery Update or XSLT
transformation without being evaluated. You should evaluate the XPath expression inside the XQuery
Update script or XSLT stylesheet. For example, you could use the saxon:evaluate Saxon extension
function.
Note: A relative XPath expression is converted to an absolute XPath expression by adding // before it
(//XPathExp). This conversion is done before transferring the XPath expression to the XML refactoring
engine.
Note: When writing XPath expressions, you can only use prefixes declared in the Options > Preferences >
XML > XSLT-FO-XQUERY > XPath options page.
•
•
•
NAMESPACE - Used for editing namespace values.
REG_EXP_FIND - Used when you want to match a certain text by using Perl-like regular expressions.
REG_EXP_REPLACE - Used along with REG_EXP_FIND to specify the replacement string.
•
•
•
•
•
•
Oxygen XML Editor | Editing Documents | 291
XML_FRAGMENT - This type is used when you want to specify an XML fragment. For this type, Oxygen XML
Editor will display a text area specialized for inserting XML documents.
NC_NAME - The parameter for NC_NAME values. It is useful when you want to specify the local part of a QName
for an element or attribute.
BOOLEAN - Used to edit boolean parameters.
TEXT_CHOICE - It is useful for parameters whose value should be from a list of possible values. Oxygen XML
Editor renders each possible value as a radio button option.
description - The description of the parameter. It is used by the application to display a tooltip when you hover
over the parameter.
possibleValues - Contains the list with possible values for the parameter and you can specify the default value,
as in the following example:
<possibleValues onlyPossibleValuesAllowed="true">
<value name="before">Before</value>
<value name="after"default="true">After</value>
<value name="firstChild">First child</value>
<value name="lastChild">Last child</value>
</possibleValues>
Specialized Parameters to Match Elements or Attributes
If you want to match elements or attributes, you can use some specialized parameters, in which case Oxygen XML
Editor will propose all declared elements or attributes based on the schema associated with the currently edited file. The
following specialized parameters are supported:
elementLocation
This parameter is used to match elements. For this type of parameter, the application displays a text field where you
can enter the element name or an XPath expression. The text from the label attribute is displayed in the application
as the label of the text field. The name attribute is used to specify the name of the parameter from the XQuery
Update script or XSLT stylesheet. If the value of the useCurrentContext attribute is set to true, the element
name from the cursor position is used as proposed values for this parameter.
Example of an elementLocation:
<elementLocation name="elem_loc" useCurrentContext="false">
<element label="Element location">
<description>Element location description.</description>
</element>
</ ElementLocation>
attributeLocation
This parameter is used to match attributes. For this type of parameter, the application displays two text fields where
you can enter the parent element name and the attribute name (both text fields accept XPath expressions for a finer
match). The text from the label attributes is displayed in the application as the label of the associated text fields.
The name attribute is used to specify the name of the parameter from the XQuery Update script or XSLT stylesheet.
The value of this parameter is an XPath expression that is computed by using the values of the expression from the
element and attribute text fields. For example, if section is entered for the element and a title is entered
for the attribute, the XPath expression would be computed as //section/@title. If the value of the
useCurrentContext attribute is set to true, the element and attribute name from the cursor position is used
as proposed values for the operation parameters.
Example of an attributeLocation:
<attributeLocation name="attr_xpath" useCurrentContext="true">
<element label="Element path">
<description>Element path description.</description>
</element>
<attribute label="Attribute" >
<description>Attribute path description.</description>
</attribute>
</ AttributeLocation>
Oxygen XML Editor | Editing Documents | 292
elementParameter
This parameter is used to specify elements by local name and namespace. For this type of parameter, the application
displays two combo boxes with elements and namespaces collected from the associated schema of the currently
edited file. The text from the label attribute is displayed in the application as label of the associated combo. The
name attribute is used to specify the name of the parameter from the XQuery Update script or XSLT stylesheet. If
you specify the allowsAny attribute, the application will propose <ANY> as a possible value for the Name and
Namespace combo boxes. You can also use the useCurrentContext attribute and if its value is set to true,
the element name and namespace from the cursor position is used as proposed values for the operation parameters.
Example of an elementParameter:
<elementParameter id="elemID">
<localName label="Name" name="element_localName" allowsAny="true" useCurrentContext="true">
<description>The local name of the attribute's parent element.</description>
</localName>
<namespace label="Namespace" name="element_namespace" allowsAny="true">
<description>The local name of the attribute's parent element</description>
</namespace>
</elementParameter>
attributeParameter
This parameter is used to specify attributes by local name and namespace. For this type of parameter, the application
displays two combo boxes with attributes and their namespaces collected from the associated schema of the currently
edited file. The text from the label attribute is displayed in the application as the label of the associated combo
box. You can also use the useCurrentContext attribute and if its value is set to true, the attribute name and
namespace from the cursor position is used as proposed values for the operation parameters.
Note: An attributeParameter is dependant upon an elementParameter. The list of attributes
and namespaces are computed based on the selection in the elementParameter combo boxes.
Example of an attributeParameter:
<attributeParameter dependsOn="elemID">
<localName label="Name" name="attribute_localName" useCurrentContext="true">
<description>The name of the attribute to be converted.</description>
</localName>
<namespace label="Namespace" name="attribute_namespace" allowsAny="true">
<description>The namespace of the attribute to be converted.</description>
</namespace>
</attributeParameter>
Note: All predefined operations are loaded from the [OXYGEN_DIR]/refactoring folder.
Example of an XML Refactoring Operation
To demonstrate creating a custom operation, consider that we have a task where we need to convert an attribute into an
element and insert it inside another element. A specific example would be if you have a project with a variety of image
elements where a deprecated alt attribute was used for the description and you want to convert all instances of that
attribute into an element with the same name and insert it as the first child of the image element.
Thus, our task is to convert this attribute into an element with the same name and insert it as the first child of the image
element.
Oxygen XML Editor | Editing Documents | 293
A new custom XML refactoring operation requires:
•
•
An XQuery Update script or XSLT stylesheet.
An XML Refactoring operation descriptor file that contains the path to the XQuery Update script or XSLT stylesheet.
Example of an XQuery Update Script for Creating a Custom Operation to Convert an Attribute to an
Element
The XQuery Update script does the following:
•
•
•
Iterates over all elements from the document that have the specified local name and namespace.
Finds the attribute that will be converted to an element.
Computes the QName of the new element to be inserted and inserts it as the first child of the parent element.
(:
XQuery document used to implement 'Convert attribute to element' operation from XML Refactoring tool.
:)
declare namespace output = "http://www.w3.org/2010/xslt-xquery-serialization";
declare option output:method
"xml";
declare option output:indent
"no";
(: Local name of the attribute's parent element. :)
declare variable $element_localName as xs:string external;
(: Namespace of the attribute's parent element. :)
declare variable $element_namespace as xs:string external;
(: The local name of the attribute to be converted :)
declare variable $attribute_localName as xs:string external;
(: The namespace of the attribute to be converted :)
declare variable $attribute_namespace as xs:string external;
(: Local name of the new element. :)
declare variable $new_element_localName as xs:string external;
(: Namespace of the new element. :)
declare variable $new_element_namespace as xs:string external;
(: Convert attribute to element:)
for $node in //*
(: Find the attribute to convert :)
let $attribute :=
$node/@*[local-name() = $attribute_localName and
($attribute_namespace = '<ANY>' or $attribute_namespace = namespace-uri())]
(: Compute the prefix for the new element to insert :)
let $prefix :=
for $p in in-scope-prefixes($node)
where $new_element_namespace = namespace-uri-for-prefix($p, $node)
return $p
Oxygen XML Editor | Editing Documents | 294
(: Compute the qname for the new element to insert :)
let $new_element_qName :=
if (empty($prefix) or $prefix[1] = '') then $new_element_localName
else $prefix[1] || ':' || $new_element_localName
where ('<ANY>' = $element_localName or local-name($node) = $element_localName) and
($element_namespace = '<ANY>' or $element_namespace = namespace-uri($node))
return
if (exists($attribute)) then
(insert node element {QName($new_element_namespace, $new_element_qName)}
{string($attribute)} as first into $node,
delete node $attribute)
else ()
Example of an XSLT Script for Creating a Custom Operation to Convert an Attribute to an Element
The XSLT stylesheet does the following:
•
•
•
Iterates over all elements from the document that have the specified local name and namespace.
Finds the attribute that will be converted to an element.
Adds the new element as the first child of the parent element.
<?xml version="1.0" encoding="UTF-8"?>
<xsl:stylesheet xmlns:xsl="http://www.w3.org/1999/XSL/Transform"
xmlns:xs="http://www.w3.org/2001/XMLSchema"
exclude-result-prefixes="xs"
xmlns:xr="http://www.oxygenxml.com/ns/xmlRefactoring"
version="2.0">
<xsl:import href="http://www.oxygenxml.com/ns/xmlRefactoring/resources/commons.xsl"/>
<xsl:param
<xsl:param
<xsl:param
<xsl:param
<xsl:param
<xsl:param
name="element_localName" as="xs:string" required="yes"/>
name="element_namespace" as="xs:string" required="yes"/>
name="attribute_localName" as="xs:string" required="yes"/>
name="attribute_namespace" as="xs:string" required="yes"/>
name="new_element_localName" as="xs:string" required="yes"/>
name="new_element_namespace" as="xs:string" required="yes"/>
<xsl:template match="node() | @*">
<xsl:copy>
<xsl:apply-templates select="node() | @*"/>
</xsl:copy>
</xsl:template>
<xsl:template match="//*[xr:check-local-name($element_localName, ., true()) and
xr:check-namespace-uri($element_namespace, .)]">
<xsl:variable name="attributeToConvert"
select="@*[xr:check-local-name($attribute_localName, ., true()) and
xr:check-namespace-uri($attribute_namespace, .)]"/>
<xsl:choose>
<xsl:when test="empty($attributeToConvert)">
<xsl:copy>
<xsl:apply-templates select="node() | @*"/>
</xsl:copy>
</xsl:when>
<xsl:otherwise>
<xsl:copy>
<xsl:for-each select="@*[empty(. intersect $attributeToConvert)]">
<xsl:copy-of select="."/>
</xsl:for-each>
<!-- The new element namespace -->
<xsl:variable name="nsURI" as="xs:string">
<xsl:choose>
<xsl:when test="$new_element_namespace eq $xr:NO-NAMESPACE">
<xsl:value-of select="''"/>
</xsl:when>
<xsl:otherwise>
<xsl:value-of select="$new_element_namespace"/>
</xsl:otherwise>
</xsl:choose>
</xsl:variable>
<xsl:element name="{$new_element_localName}" namespace="{$nsURI}">
<xsl:value-of select="$attributeToConvert"/>
</xsl:element>
<xsl:apply-templates select="node()"/>
</xsl:copy>
</xsl:otherwise>
</xsl:choose>
</xsl:template>
</xsl:stylesheet>
Oxygen XML Editor | Editing Documents | 295
Note: The XSLT stylesheet imports a module library that contains utility functions and variables. The location
of this module is resolved via an XML catalog set in the XML Refactoring framework.
Example of an Operation Descriptor File for Creating a Custom Operation to Convert an Attribute to
an Element
After you have developed the XQuery script or XSLT stylesheet, you have to create an XML Refactoring operation
descriptor. This descriptor is used by the application to load the operation details such as name, description, or parameters.
<?xml version="1.0" encoding="UTF-8"?>
<refactoringOperationDescriptor
xmlns:xsi="http://www.w3.org/2001/XMLSchema-instance"
xmlns="http://www.oxygenxml.com/ns/xmlRefactoring"
id="convert-attribute-to-element"
name="Convert attribute to element">
<description>Converts the specified attribute to an element. The new element will be inserted as first child
of the attribute's parent element.</description>
<!-- For the XSLT stylesheet option uncomment the following line and comment the line referring the XQuery
Update script -->
<!-- <script type="XSLT" href="convert-attribute-to-element.xsl"/> -->
<script type="XQUERY_UPDATE" href="convert-attribute-to-element.xq"/>
<parameters>
<description>Specify the attribute to be converted to element.</description>
<section label="Parent element">
<elementParameter id="elemID">
<localName label="Name" name="element_localName" allowsAny="true">
<description>The local name of the attribute's parent element.</description>
</localName>
<namespace label="Namespace" name="element_namespace" allowsAny="true">
<description>The local name of the attribute's parent element</description>
</namespace>
</elementParameter>
</section>
<section label="Attribute">
<attributeParameter dependsOn="elemID">
<localName label="Name" name="attribute_localName">
<description>The name of the attribute to be converted.</description>
</localName>
<namespace label="Namespace" name="attribute_namespace" allowsAny="true">
<description>The namespace of the attribute to be converted.</description>
</namespace>
</attributeParameter>
</section>
<section label="New element">
<elementParameter>
<localName label="Name" name="new_element_localName">
<description>The name of the new element.</description>
</localName>
<namespace label="Namespace" name="new_element_namespace">
<description>The namespace of the new element.</description>
</namespace>
</elementParameter>
</section>
</parameters>
</refactoringOperationDescriptor>
Note: If you are using an XSLT file, the line with the script element would look like this:
<script type="XSLT" href="convert-attribute-to-element.xsl"/>
Results
After you have created these files, copy them into a folder scanned by Oxygen XML Editor when it loads the custom
operation. When the XML Refactoring tool is started again, you will see the created operation.
Since various parameters can be specified, this custom operation can also be used for other similar tasks. The following
image shows the parameters that can be specified in our example of the custom operation to convert an attribute to an
element:
Oxygen XML Editor | Editing Documents | 296
Storing and Sharing Refactoring Operations
Oxygen XML Editor scans the following locations when looking for XML Refactoring operations to provide flexibility:
•
•
A refactoring folder, created inside a directory that is associated to a framework you are customizing.
Any folder. In this case, you need to open the Preferences dialog box, go to XML > XML Refactoring, and specify
the same folder in the Load additional refactoring operations from text box.
Note: If you share a project with your team, you can also share the custom operation by saving them in a
folder that is part of your project. Then switch the XML Refactoring option page at project level (open the
Preferences dialog box, go to XML > XML Refactoring, and select Project Options at the bottom of the
dialog box), and in the Load additional refactoring operations from text box, use the ${pd} editor variable
so that the folder path is declared relative to the project.
•
•
A folder specified by the XML Refactoring Operations Plugin Extension.
The refactoring folder from the Oxygen XML Editor installation directory ([OXYGEN INSTALLATION
DIRECTORY]/refactoring/).
Sharing Custom Refactoring Operations
The purpose of Oxygen XML Editor scanning multiple locations for the XML Refactoring operations is to provide more
flexibility for developers who want to share the refactoring operations with the other team members. Depending on your
particular use case, you can attach the custom refactoring operations to other resources, such as frameworks or projects.
After storing custom operations, you can share them with other users by sharing the resources.
Localizing XML Refactoring Operations
Oxygen XML Editor includes localization support for the XML refactoring operations.
The translation keys for the built-in refactoring operations are located in [OXYGEN INSTALLATION
DIRECTORY]/refactoring/i18n/translation.xml.
The localization support is also available for custom refactoring operations. The following information can be translated:
•
•
•
The operation name, description, and category.
The description of the parameters element.
The label, description, and possibleValues for each parameter.
Translated refactoring information uses the following form:
${i18n(translation_key)}
Oxygen XML Editor | Editing Documents | 297
Oxygen XML Editor scans the following locations to find the translation.xml files that are used to load the
translation keys:
•
•
•
•
•
A refactoring/i18n folder, created inside a directory that is associated to a customized framework.
A i18n folder, created inside a directory that is associated to a customized framework.
An i18n folder inside any specified folder. In this case, you need to open the Preferences dialog box, go to XML >
XML Refactoring, and specify the folder in the Load additional refactoring operations from text box.
An i18n folder located in directories specified through the XML Refactoring Operations Plugin Extension.
The refactoring/i18n folder from the Oxygen XML Editor installation directory ([OXYGEN INSTALLATION
DIRECTORY]/refactoring/i18n).
Example of a Refactoring Operation Descriptor File with i18n Support
<?xml version="1.0" encoding="UTF-8"?>
<refactoringOperationDescriptor xmlns:xsi="http://www.w3.org/2001/XMLSchema-instance"
xsi:schemaLocation="http://oxygenxml.com/app/xml_refactory
http://oxygenxml.com/app/xml_refactory/operation_descriptor.xsd"
xmlns="http://oxygenxml.com/app/xml_refactory" id="remove_text_content"
name="${i18n(Remove_text_content)}">
<description>${i18n(Remove_text_content_description)}</description>
<script type="XQUERY_UPDATE" href="remove_text_content.xq"/>
<parameters>
<description>${i18n(parameters_description)}</description>
<parameter label="${i18n(Element_name)}" name="element_localName" type="NC_NAME">
<description>${i18n(Element_name_descriptor)}</description>
<possibleValues>
<value default="true" name="value1">${i18n(value_1)}</value>
<value name="value2">${i18n(value_2)}</value>
</possibleValues>
</parameter>
</parameters>
</refactoringOperationDescriptor>
Editing XSLT Stylesheets
This section explains the features of the XSLT editor.
To watch our video demonstration about basic XSLT editing and transformation scenarios in Oxygen XML Editor, go
to http://oxygenxml.com/demo/XSL_Editing.html.
Validating XSLT Stylesheets
Oxygen XML Editor performs the validation of XSLT documents with the help of an XSLT processor that you can
configure in the preferences pages according to the XSLT version. For XSLT 1.0, the options are: Xalan, Saxon 6.5.5,
Saxon 9.6.0.7 and a JAXP transformer specified by the main Java class. For XSLT 2.0, the options are: Saxon 9.6.0.7
and a JAXP transformer specified by the main Java class. For XSLT 3.0, the options are Saxon 9.6.0.7 and a JAXP
transformer specified by the main Java class.
To access the XSLT preferences quickly, use the
Validation options action from the Document > Validate menu.
Creating a Validation Scenario for XSLT Stylesheets
You can validate an XSLT document using the engine defined in the transformation scenario, or a custom validation
scenario. If you choose to validate using the engine from transformation scenario, and a transformation scenario is not
associated with the current document or the engine has no validation support, the default engine is used. To set the
default engine, open the Preferences dialog box and go to XML > XSLT/FO/XQuery > XSLT.
You can also create new validation scenarios or edit existing ones, and you can add jars and classes that contain extension
functions. To create or edit a validation scenario for an XSLT stylesheet, follow these steps:
1. With the XSLT file opened in Oxygen XML Editor, select the
Configure Validation Scenario(s) from the
Document > Validate menu, or the
Validation toolbar drop-down menu, or from the Validate submenu when
invoking the contextual menu on the XSLT file in the Project view .
Oxygen XML Editor | Editing Documents | 298
The Configure Validation Scenario(s) dialog box is displayed. It contains the existing scenarios, organized in
categories depending on the type of file they apply to. You can use the options in the
Settings drop-down menu
to filter which scenarios are shown.
2. To edit an existing scenario, select the scenario and press the Edit button. If you try to edit one of the read-only
predefined scenarios, Oxygen XML Editor creates a customizable duplicate (you can also use the Duplicate button).
3. To add a new scenario, press the
New button.
The New scenarios dialog box is displayed. It lists all validation units of the scenario.
Figure 139: Add / Edit a Validation Unit
4. Configure the following information in this dialog box:
a) Name - The name of the validation scenario.
b) Storage - You can choose between storing the scenario in the Global Options or Project Options.
c) URL of the file to validate - In most cases leave this field as the default selection (the URL of the current file).
If you want to specify a different URL, double-click its cell and enter the URL in the text field, select it from the
drop-down list, or use the
Browse drop-down menu or
Insert Editor Variable button.
d) File type - The file type should be XSLT Document.
e) Validation engine - Click the cell to select a validation engine. You must select an engine to be able to add or
edit extensions.
f) Automatic validation - If this option is checked, the validation operation defined by this row is also used by the
automatic validation feature.
5. To add or edit extensions, click the
Edit extensions button. This button is only available if the File type is set
as XSLT Document and a Validation engine is chosen.
The Libraries dialog box is opened. It is used to specify the jars and classes that contain extension functions called
from the XSLT file of the current validation scenario. They will be searched, in the specified extensions, in the order
displayed in this dialog box. To change the order of the items, select the item and press the
Move up or
Move
down buttons.
6. Press OK to close the New scenario dialog box.
The newly created validation scenario is now included in the list of scenarios in the Configure Validation Scenario(s)
dialog box. You can select the scenario in this dialog box to associate it with the current XSLT document and press
the Apply associated button to run the validation scenario.
Validating XSLT Stylesheets with Custom Engines
If you need to validate an XSLT stylesheet with a validation engine that is different from the built-in engine, you can
configure external engines as custom XSLT validation engines in the Oxygen XML Editor preferences. After a custom
validation engine is properly configured, it can be applied on the current document by selecting it from the list of custom
validation engines in the
declared in the document.
Oxygen XML Editor | Editing Documents | 299
Validation toolbar drop-down menu. The document is validated against the schema
By default, there are two validators that are configured for XSLT stylesheets:
•
•
MSXML 4.0 - included in Oxygen XML Editor (Windows edition). It is associated to the XSL Editor type in
Preferences page.
MSXML.NET - included in Oxygen XML Editor (Windows edition). It is associated to the XSL Editor type in
Preferences page.
Editing XSLT Stylesheets in the Master Files Context
Smaller interrelated modules that define a complex stylesheet cannot be correctly edited or validated individually, due
to their interdependency with other modules. For example, a function defined in a main stylesheet is not visible when
you edit an included or imported module. Oxygen XML Editor provides the support for defining the main module (or
modules), allowing you to edit any of the imported/included files in the context of the larger stylesheet structure.
You cat set a main XSLT stylesheet either using the master files support from the Project view, or using a validation
scenario.
To set a main file using a validation scenario, add validation units that point to the main modules. Oxygen XML Editor
warns you if the current module is not part of the dependencies graph computed for the main stylesheet. In this case, it
considers the current module as the main stylesheet.
The advantages of editing in the context of main file include:
•
•
•
Correct validation of a module in the context of a larger stylesheet structure.
Content Completion Assistant displays all components valid in the current context.
The Outline displays the components collected from the entire stylesheet structure.
To watch our video demonstration about editing XSLT stylesheets in the master files context, go to
http://oxygenxml.com/demo/MasterFilesSupport.html.
Syntax Highlight
The XSL editor renders the CSS and JS scripts, and XPath expressions with dedicated coloring schemes. To customize
the coloring schemes, open the Preferences dialog box and go to Editor > Syntax Highlight.
Content Completion in XSLT Stylesheets
The items in the list of proposals offered by the Content Completion Assistant are context-sensitive. The proposed
items are valid at the current cursor position. You can enhance the list of proposals by specifying an additional schema.
This schema is defined by the user in the Content Completion / XSL preferences page and can be: XML Schema, DTD,
RELAX NG schema, or NVDL schema.
Oxygen XML Editor | Editing Documents | 300
Figure 140: XSLT Content Completion Window
The Content Completion Assistant proposes numerous item types (such as templates, variables, parameters, keys, etc.)
that are defined in the current stylesheet, and in the imported and included XSLT stylesheets. The Content Completion
Assistant also includes code templates that can be used to quickly insert code fragments into stylesheets.
Note: For XSL and XSD resources, the Content Completion Assistant collects its components starting from
the master files. The master files can be defined in the project or in the associated validation scenario. For further
details about the Master Files support go to Defining Master Files at Project Level.
The extension functions built in the Saxon 6.5.5 and 9.6.0.7 transformation engines are presented in the content completion
list only if the Saxon namespace (http://saxon.sf.net for XSLT version 2.0 / 3.0 or http://icl.com/saxon for XSLT version
1.0) is declared and one of the following conditions is true:
•
•
•
The edited file has a transformation scenario that uses as transformation engine Saxon 6.5.5 (for XSLT version 1.0),
Saxon 9.6.0.7 PE or Saxon 9.6.0.7 EE (for XSLT version 2.0 / 3.0).
The edited file has a validation scenario that uses as validation engine Saxon 6.5.5 (for version 1.0), Saxon 9.6.0.7
PE or Saxon 9.6.0.7 EE (for version 2.0 / 3.0).
The validation engine specified in Options page is Saxon 6.5.5 (for version 1.0), Saxon 9.6.0.7 PE or Saxon 9.6.0.7
EE (for version 2.0 / 3.0).
Additionally. the Saxon-CE-specific extension functions and instructions are presented in the Content Completion
Assistant's proposals list only if the http://saxonica.com/ns/interactiveXSLT namespace is declared.
Namespace prefixes in the scope of the current context are presented at the top of the content completion window to
speed up the insertion into the document of prefixed elements.
Figure 141: Namespace Prefixes in the Content Completion Window
For the common namespaces like XSL namespace (http://www.w3.org/1999/XSL/Transform), XML Schema
namespace (http://www.w3.org/2001/XMLSchema) or Saxon namespace (http://icl.com/saxon for
version 1.0, http://saxon.sf.net/ for version 2.0 / 3.0), Oxygen XML Editor provides an easy mode to declare
them by proposing a prefix for these namespaces.
Oxygen XML Editor | Editing Documents | 301
Content Completion in XPath Expressions
In XSLT stylesheets, the Content Completion Assistant provides all the features available in the XML editor and also
adds some enhancements. In XPath expressions used in attributes of XSLT stylesheets elements like match, select
and test, the Content Completion Assistant offers the names of XPath and XSLT functions, the XSLT axes, and
user-defined functions (the name of the function and its parameters). If a transformation scenario was defined and
associated to the edited stylesheet, the Content Completion Assistant computes and presents elements and attributes
based on:
•
•
The input XML document selected in the scenario.
The current context in the stylesheet.
The associated document is displayed in the XSLT/XQuery Input view.
Content completion for XPath expressions is started:
•
•
•
On XPath operators detected in one of the match, select and test attributes of XSLT elements: ", ', /, //, (, [,
|, :, ::, $
For attribute value templates of non-XSLT elements, that is the { character when detected as the first character of
the attribute value.
On request, if the combination Ctrl Space (Command Space on OS X) is pressed inside an edited XPath expression.
The items presented in the content completion window are dependent on:
•
•
•
The context of the current XSLT element.
The XML document associated with the edited stylesheet in the stylesheet transformation scenario.
The XSLT version of the stylesheet (1.0, 2.0, or 3.0).
Note: The XSLT 3.0 content completion list of proposals includes specific elements and attributes for the
3.0 version.
For example, if the document associated with the edited stylesheet is:
<personnel>
<person id="Big.Boss">
<name>
<family>Boss</family>
<given>Big</given>
</name>
<email>[email protected]</email>
<link subordinates="one.worker"/>
</person>
<person id="one.worker">
<name>
<family>Worker</family>
<given>One</given>
</name>
<email>[email protected]</email>
<link manager="Big.Boss"/>
</person>
</personnel>
If you enter an xsl:template element using the content completion assistant, the following actions are triggered:
•
•
•
The match attribute is inserted automatically.
The cursor is placed between the quotes.
The XPath Content Completion Assistant automatically displays a popup window with all the XSLT axes, XPath
functions and elements and attributes from the XML input document that can be inserted in the current context.
The set of XPath functions depends on the XSLT version declared in the root element xsl:stylesheet: 1.0, 2.0 or
3.0.
Oxygen XML Editor | Editing Documents | 302
Figure 142: Content Completion in the match Attribute
If the cursor is inside the select attribute of an xsl:for-each, xsl:apply-templates, xsl:value-of or
xsl:copy-of element the content completion proposals depend on the path obtained by concatenating the XPath
expressions of the parent XSLT elements xsl:template and xsl:for-each as shown in the following figure:
Figure 143: Content Completion in the select Attribute
Also XPath expressions typed in the test attribute of an xsl:if or xsl:when element benefit of the assistance of
the content completion.
Figure 144: Content Completion in the test Attribute
XSLT variable references are easier to insert in XPath expressions with the help of the content completion popup triggered
by the $ character which signals the start of such a reference in an XPath expression.
Oxygen XML Editor | Editing Documents | 303
Figure 145: Content Completion in the test Attribute
If the { character is the first one in the value of the attribute, the same Content Completion Assistant is available also
in attribute value templates of non-XSLT elements.
Figure 146: Content Completion in Attribute Value Templates
The time delay configured in Preferences page for all content completion windows is applied also for the XPath
expressions content completion window.
Tooltip Helper for the XPath Functions Arguments
When editing the arguments of an XPath/XSLT function, Oxygen XML Editor tracks the current entered argument by
displaying a tooltip containing the function signature. The currently edited argument is highlighted with a bolder font.
When moving the cursor through the expression, the tooltip is updated to reflect the argument found at the cursor position.
We want to concatenate the absolute values of two variables, named v1 and v2.
<xsl:template match="/">
<xsl:value-of select="concat(abs($v1), abs($v2))"></xsl:value-of>
</xsl:template>
When moving the cursor before the first abs function, Oxygen XML Editor identifies it as the first
argument of the concat function. The tooltip shows in bold font the following information about
the first argument:
•
•
•
Its name is $arg1.
Its type is xdt:anyAtomicType.
It is optional (note the ? sign after the argument type).
The function takes also other arguments, having the same type, and returns a xs:string.
Oxygen XML Editor | Editing Documents | 304
Figure 147: XPath Tooltip Helper - Identify the concat Function's First Argument
Moving the cursor on the first variable $v1, the editor identifies the abs as context function and
shows its signature:
Figure 148: XPath Tooltip Helper - Identify the abs Function's Argument
Further, clicking the second abs function name, the editor detects that it represents the second argument
of the concat function. The tooltip is repainted to display the second argument in bold font.
Figure 149: XPath Tooltip Helper - Identify the concat Function's Second Argument
The tooltip helper is available also in the XPath toolbar and the XPath Builder view.
The XSLT/XQuery Input View
The structure of the XML document associated to the edited XSLT stylesheet, or the structure of the source documents
of the edited XQuery is displayed in a tree form in a view called XSLT/XQuery Input. The tree nodes represent the
elements of the documents.
The XSLT Input View
If you click a node, the corresponding template from the stylesheet is highlighted. A node can be dragged from this view
and dropped in the editor area for quickly inserting xsl:template, xsl:for-each, or other XSLT elements that
have the match/select/test attribute already completed. The value of the attribute is the correct XPath expression
that refers to the dragged tree node. This value is based on the current editing context of the drop spot.
Figure 150: XSLT Input View
Oxygen XML Editor | Editing Documents | 305
For example, for the following XML document:
<personnel>
<person id="Big.Boss">
<name>
<family>Boss</family>
<given>Big</given>
</name>
<email>[email protected]</email>
<link subordinates="one.worker"/>
</person>
<person id="one.worker">
<name>
<family>Worker</family>
<given>One</given>
</name>
<email>[email protected]</email>
<link manager="Big.Boss"/>
</person>
</personnel>
and the following XSLT stylesheet:
<?xml version="1.0" encoding="UTF-8"?>
<xsl:stylesheet xmlns:xsl="http://www.w3.org/1999/XSL/Transform"
version="2.0">
<xsl:template match="personnel">
<xsl:for-each select="*">
</xsl:for-each>
</xsl:template>
</xsl:stylesheet>
if you drag the given element and drop it inside the xsl:for-each element, the following pop-up
menu is displayed:
Figure 151: XSLT Input Drag and Drop Pop-up Menu
Select for example Insert xsl:value-of and the result document is:
Figure 152: XSLT Input Drag and Drop Result
Oxygen XML Editor | Editing Documents | 306
The XSLT Outline View
The XSLT Outline view displays the list of all the components (templates, attribute-sets, character-maps, variables,
functions, keys, outputs) from both the edited stylesheet and its imports or includes. For XSL and XSD resources, the
Outline view collects its components starting from the master files. The master files can be defined in the project or in
the associated validation scenario. For further details about the Master Files support go to Defining Master Files at
Project Level. To enable the Outline view, go to Window > Show View > Outline.
Figure 153: The XSLT Outline View
The following actions are available in the
Settings menu on the Outline view toolbar:
Filter returns exact matches
The text filter of the Outline view returns only exact matches;
Selection update on cursor move
Controls the synchronization between Outline view and source document. The selection in the Outline view can
be synchronized with the cursor moves or the changes in the XSLT editor. Selecting one of the components from
the Outline view also selects the corresponding item in the source document.
When the
Show components option is selected, the following actions are available:
Show XML structure
Displays the XML document structure in a tree-like structure.
Show all components
Displays all components that were collected starting from the main file. This option is set by default.
Show only local components
Displays the components defined in the current file only.
Group by location/type
The stylesheet components can be grouped by location and type.
When the
Show XML structure option is selected, the following actions are available:
Show components
Switches the Outline view to the components display mode.
Oxygen XML Editor | Editing Documents | 307
Flat presentation mode of the filtered results
When active, the application flattens the filtered result elements to a single level.
Show comments and processing instructions
Show/hide comments and processing instructions in the Outline view.
Show element name
Show/hide element name.
Show text
Show/hide additional text content for the displayed elements.
Show attributes
Show/hide attribute values for the displayed elements. The displayed attribute values can be changed from the
Outline preferences panel.
Configure displayed attributes
Displays the XML Structured Outline preferences page.
The following contextual menu actions are also available when the
Show components option is selected in the
Settings menu:
Edit Attributes
Opens a small in-place editor that allow you to edit the attributes of the selected node.
Cut
Cuts the currently selected node.
Copy
Copies the currently selected node.
Delete
Deletes the currently selected node.
Search References Ctrl Shift R (Meta Shift R on OS X)
Searches all references of the item found at current cursor position in the defined scope, if any. See Finding XSLT
References and Declarations for more details.
Search References in
Searches all references of the item found at current cursor position in the specified scope. See Finding XSLT
References and Declarations for more details.
Component Dependencies
Allows you to see the dependencies for the current selected component. See Component Dependencies View for
more details.
Resource Hierarchy
Displays the hierarchy for the currently selected resource.
Resource Dependencies
Displays the dependencies of the currently selected resource.
Rename Component in
Renames the selected component. See XSLT Refactoring Actions for more details.
The following contextual menu actions are available in the Outline view when the
is selected in the
Settings menu:
Show XML structure option
Oxygen XML Editor | Editing Documents | 308
Append Child
Displays a list of elements that you can insert as children of the current element.
Insert Before
Displays a list of elements that you can insert as siblings of the current element, before the current element.
Insert After
Displays a list of elements that you can insert as siblings of the current element, after the current element.
Edit Attributes
Opens a small in-place editor that allow you to edit the attributes of the selected node.
Toggle Comment
Comments/uncomments the currently selected element.
Search references
Searches for the references of the currently selected component.
Search references in
Searches for the references of the currently selected component in the context of a scope that you define.
Component dependencies
Displays the dependencies of the currently selected component.
Rename Component in
Renames the currently selected component in the context of a scope that you define.
Cut
Cuts the currently selected component.
Copy
Copies the currently selected component.
Delete
Deletes the currently selected component.
Expand More
Expands the structure of a component in the Outline view.
Collapse All
Collapses the structure of all the component in the Outline view.
The stylesheet components information is presented on two columns: the first column presents the name and match
attributes, the second column the mode attribute. If you know the component name, match or mode, you can search it
in the Outline view by typing one of these pieces of information in the filter text field from the top of the view or directly
on the tree structure. When you type de component name, match or mode in the text field, you can switch to the tree
structure using:
•
•
•
•
Keyboard arrow keys
Enter key
Tab key
Shift-Tab key combination
To switch from tree structure to the filter text field, you can use Tab and Shift-Tab.
Tip: The search filter is case insensitive. The following wildcards are accepted:
•
•
•
* - any string
? - any character
, - patterns separator
Oxygen XML Editor | Editing Documents | 309
If no wildcards are specified, the string to search is used as a partial match (like *textToFind*).
The content of the Outline view and the editing area are synchronized. When you select a component in the Outline
view, its definition is highlighted in the editing area.
Oxygen XML Editor allows you to sort the components of the tree in the Outline view.
Note: Sorting groups in the Outline view is not supported.
Oxygen XML Editor has a predefined order of the groups in the Outline view:
•
•
For location, the names of the files are sorted alphabetically. The main file is the one you are editing and it is located
at the top of the list.
For type, the order is: parameters, variables, templates, functions, set attributes, character-map.
Note: When no grouping is available and the table is not sorted, Oxygen XML Editor sorts the components
depending on their order in the document. Oxygen XML Editor also takes into account the name of the file
that the components are part of.
XSLT Stylesheet Documentation Support
Oxygen XML Editor offers built-in support for documenting XSLT stylesheets. If the expanded QName of the element
has a non-null namespace URI, the xsl:stylesheet element may contain any element not from the XSLT namespace.
Such elements are referenced as user-defined data elements. Such elements can contain the documentation for the
stylesheet and its elements (top-level elements whose names are in the XSLT namespace). Oxygen XML Editor offers
its own XML schema that defines such documentation elements. The schema is named
stylesheet_documentation.xsd and can be found in
[OXYGEN_DIR]/frameworks/stylesheet_documentation. The user can also specify a custom schema in
XSL Content Completion options.
When content completion is invoked inside an XSLT editor by pressing Ctrl Space (Command Space on OS X), it
offers elements from the XSLT documentation schema (either the built-in one or one specified by user).
In Text mode, to add documentation blocks while editing use the Add component documentation action available in
the contextual menu.
In Author mode, the following stylesheet documentation actions are available in the contextual menu, Component
Documentation submenu:
•
•
•
•
•
•
•
Add component documentation - Adds documentation blocks for the component at cursor position.
Paragraph - Inserts a new documentation paragraph.
Bold - Makes the selected documentation text bold.
Italic - Makes the selected documentation text italic.
List - Inserts a new list.
List Item - Inserts a list item.
Reference - Inserts a documentation reference.
If the cursor is positioned inside the xsl:stylesheet element context, documentation blocks are generated for all
XSLT elements. If the cursor is positioned inside a specific XSLT element (like a template or a function), a documentation
block is generated for that element only.
Example of a documentation block using Oxygen XML Editor built-in schema
<xd:doc>
<xd:desc>
<xd:p>Search inside parameter <xd:i>string</xd:i> for the last occurrence of parameter
<xd:i>searched</xd:i>. The substring starting from the 0 position to the identified last
occurrence will be returned. <xd:ref name="f:substring-after-last" type="function"
xmlns:f="http://www.oxygenxml.com/doc/xsl/functions">See also</xd:ref></xd:p>
</xd:desc>
<xd:param name="string">
Oxygen XML Editor | Editing Documents | 310
<xd:p>String to be analyzed</xd:p>
</xd:param>
<xd:param name="searched">
<xd:p>Marker string. Its last occurrence will be identified</xd:p>
</xd:param>
<xd:return>
<xd:p>A substring starting from the beginning of <xd:i>string</xd:i> to the last
occurrence of <xd:i>searched</xd:i>. If no occurrence is found an empty string will be
returned.</xd:p>
</xd:return>
</xd:doc>
Generating Documentation for an XSLT Stylesheet
You can use Oxygen XML Editor to generate detailed documentation in HTML format for the elements (top-level
elements whose names are in the XSLT namespace) of an XSLT stylesheet. You are able to select what XSLT elements
to include in the generated documentation and also the level of details to present for each of them. The elements are
hyperlinked. To generate documentation in a custom output format, you can edit the XSLT stylesheet used to generate
the documentation, or create your own stylesheet.
To open the XSLT Stylesheet Documentation dialog box, select XSLT Stylesheet Documentation from the Tools >
Generate Documentation menu or from the Generate Documentation submenu in the contextual menu of the Project
view.
Figure 154: The XSLT Stylesheet Documentation Dialog Box
The XSL URL field of the dialog box must contain the full path to the XSL Stylesheet file you want to generate
documentation for. The stylesheet may be a local or a remote file. You can specify the path to the stylesheet by entering
it in the text field, or by using the
Insert Editor Variables button or the options in the
Browse drop-down
menu.
The Output Tab
The following options are available in the Output tab:
•
Format - Allows you to choose between the following formats:
•
•
HTML - The documentation is generated in HTML output format.
Custom - The documentation is generated in a custom output format, allowing you to control the output. Click
the Options button to open a Custom format options dialog box where you can specify a custom stylesheet for
Oxygen XML Editor | Editing Documents | 311
creating the output. There is also an option to Copy additional resources to the output folder and you can
select the path to the additional Resources that you want to copy. You can also choose to keep the intermediate
XML files created during the documentation process by deselecting the Delete intermediate XML file option.
•
•
•
Output file - You can specify the path of the output file by entering it in the text field, or by using the
Insert
Editor Variables button or the options in the
Browse drop-down menu.
Split output into multiple files - Instructs the application to split the output into multiple files. For large XSLT
stylesheets being documented, choosing a different split criterion may generate smaller output files providing a faster
documentation browsing. You can choose to split them by namespace, location, or component name.
Open in Browser/System Application - Opens the result in the system application associated with the output file
type.
Note: To set the browser or system application that will be used, open the Preferences dialog box, then go
to Global and set it in the Default Internet browser field. This will take precedence over the default system
application settings.
The Settings Tab
When you generate documentation for an XSLT stylesheet you can choose what XSLT elements to include in the output
(templates, functions, global parameters, global variables, attribute sets, character maps, keys, decimal formats, output
formats, XSLT elements from referenced stylesheets) and the details to include in the documentation.
Figure 155: The Settings Tab of the XSLT Stylesheet Documentation Dialog Box
The Settings tab allows you to choose whether or not to include the following components: Templates, Functions,
Global parameters, Global variables, Attribute sets, Character maps, Keys, Decimal formats, Output formats,
Referenced stylesheets.
You can choose whether or not to include the following other details:
•
Documentation - Shows the documentation for each XSLT element. For HTML format, the user-defined data
elements that are recognized and transformed in documentation blocks of the XSLT elements they precede, are the
ones from the following schemas:
•
•
Oxygen XML Editor built-in XSLT documentation schema.
A subset of DocBook 5 elements. The recognized elements are: section, sect1 to sect5, emphasis,
title, ulink, programlisting, para, orderedlist, itemizedlist.
•
•
•
•
Oxygen XML Editor | Editing Documents | 312
A subset of DITA elements. The recognized elements are: concept, topic, task, codeblock, p, b, i, ul,
ol, pre, sl, sli, step, steps, li, title, xref.
Full XHTML 1.0 support.
XSLStyle documentation environment. XSLStyle uses DocBook or DITA languages inside its own user-defined
data elements. The supported DocBook and DITA elements are the ones mentioned above.
Doxsl documentation framework. Supported elements are : codefrag, description, para, docContent,
documentation, parameter, function, docSchema, link, list, listitem, module, parameter,
template, attribute-set;
Other XSLT documentation blocks that are not recognized will just be serialized inside an HTML pre element.
You can change this behavior by using a custom format instead of the built-in HTML format and providing your
own XSLT stylesheets.
•
•
•
•
•
•
•
•
•
•
•
•
Use comments - Controls whether or not the comments that precede an XSLT element is treated as documentation
for the element they precede. Comments that precede or succeed the xsl:stylesheet element, are treated as
documentation for the whole stylesheet. Note that comments that precede an import or include directive are not
collected as documentation for the imported/included module. Also, comments from within the body of the XSLT
elements are not collected at all.
Namespace - Shows the namespace for named XSLT elements.
Location - Shows the stylesheet location for each XSLT element.
Parameters - Shows parameters of templates and functions.
References - Shows the named XSLT elements that are referenced from within an element.
Used by - Shows the list of all the XSLT elements that reference the current named element.
Supersedes - Shows the list of all the XSLT elements that are superseded the current element.
Overriding - Shows the list of all the XSLT elements that override the current element.
Return type - Shows the return type of the function.
Source - Shows the text stylesheet source for each XSLT element.
Import precedence - Shows the computed import precedence as declared in the XSL transformation specifications.
Generate index - Creates an index with all the XSLT elements included in the documentation.
Export settings - Save the current settings in a settings file for further use (for example, with the exported settings file
you can generate the same documentation from the command-line interface.)
Load settings - Reloads the settings from the exported file.
Generate - Use this button to generate the XSLT documentation.
Generate XSLT Documentation in HTML Format
The XSLT documentation generated in HTML format is presented in a visual diagram style with various sections,
hyperlinks, and options.
Oxygen XML Editor | Editing Documents | 313
Figure 156: XSLT Stylesheet Documentation Example
The generated documentation includes the following:
•
•
Table of Contents - You can group the contents by namespace, location, or component type. The XSLT elements
from each group are sorted alphabetically (named templates are presented first and the match ones second).
Information about main, imported, and included stylesheets. This information consists of:
•
•
•
XSLT modules included or imported by the current stylesheet.
The XSLT stylesheets where the current stylesheet is imported or included.
The stylesheet location.
Figure 157: Information About an XSLT Stylesheet
Oxygen XML Editor | Editing Documents | 314
If you choose to split the output into multiple files, the table of contents is displayed in the left frame. The contents are
grouped using the same criteria as the split.
After the documentation is generated, you can collapse or expand details for some stylesheet XSLT elements by using
the Showing options or the
Collapse or
Expand buttons.
Figure 158: The Showing Options
For each element included in the documentation, the section presents the element type followed by the element name
(value of the name or match attribute for match templates).
Figure 159: Documentation for an XSLT Element
Oxygen XML Editor | Editing Documents | 315
Generate XSLT Documentation in a Custom Format
XSLT stylesheet documentation can be also generated in a custom format. You can choose the format from the XSLT
Stylesheet Documentation dialog box. Specify your own stylesheet to transform the intermediary XML generated in the
documentation process. You must write your stylesheet based on the schema xslDocSchema.xsd from
[OXYGEN_DIR]/frameworks/stylesheet_documentation. You can create a custom format starting from
one of the stylesheets used in the predefined HTML, PDF, and DocBook formats. These stylesheets are available in
[OXYGEN_DIR]/frameworks/stylesheet_documentation/xsl.
Figure 160: The Custom Format Options Dialog Box
When using a custom format, you can also copy additional resources into the output folder or choose to keep the
intermediate XML files created during the documentation process.
Generating XSLT Documentation From the Command-Line Interface
You can export the settings of the XSLT Stylesheet Documentation dialog box to an XML file by pressing the Export
settings button. With the exported settings file, you can generate the same documentation from the command line by
running the script stylesheetDocumentation.bat (on Windows) / stylesheetDocumentation.sh (on
OS X / Unix / Linux) located in the Oxygen XML Editor installation folder. The script can be integrated in an external
batch process launched from the command-line interface.
The command-line parameter of the script is the relative path to the exported XML settings file. The files that are
specified with relative paths in the exported XML settings are resolved relative to the script directory.
Example of an XML Configuration File
<serialized>
<map>
<entry>
<String xml:space="preserve">xsd.documentation.options</String>
<xsdDocumentationOptions>
<field name="outputFile">
<String xml:space="preserve">${cfn}.html</String>
</field>
<field name="splitMethod">
<Integer xml:space="preserve">1</Integer>
</field>
<field name="openOutputInBrowser">
<Boolean xml:space="preserve">true</Boolean>
</field>
<field name="format">
<Integer xml:space="preserve">1</Integer>
</field>
<field name="customXSL">
<null/>
</field>
<field name="deleteXMLFiles">
<Boolean xml:space="preserve">true</Boolean>
</field>
<field name="includeIndex">
<Boolean xml:space="preserve">true</Boolean>
</field>
<field name="includeGlobalElements">
<Boolean xml:space="preserve">true</Boolean>
</field>
<field name="includeGlobalAttributes">
<Boolean xml:space="preserve">true</Boolean>
</field>
<field name="includeLocalElements">
Oxygen XML Editor | Editing Documents | 316
<Boolean xml:space="preserve">true</Boolean>
</field>
<field name="includeLocalAttributes">
<Boolean xml:space="preserve">true</Boolean>
</field>
<field name="includeSimpleTypes">
<Boolean xml:space="preserve">true</Boolean>
</field>
<field name="includeComplexTypes">
<Boolean xml:space="preserve">true</Boolean>
</field>
<field name="includeGroups">
<Boolean xml:space="preserve">true</Boolean>
</field>
<field name="includeAttributesGroups">
<Boolean xml:space="preserve">true</Boolean>
</field>
<field name="includeRedefines">
<Boolean xml:space="preserve">true</Boolean>
</field>
<field name="includeReferencedSchemas">
<Boolean xml:space="preserve">true</Boolean>
</field>
<field name="detailsDiagram">
<Boolean xml:space="preserve">true</Boolean>
</field>
<field name="detailsNamespace">
<Boolean xml:space="preserve">true</Boolean>
</field>
<field name="detailsLocation">
<Boolean xml:space="preserve">true</Boolean>
</field>
<field name="detailsType">
<Boolean xml:space="preserve">true</Boolean>
</field>
<field name="detailsTypeHierarchy">
<Boolean xml:space="preserve">true</Boolean>
</field>
<field name="detailsModel">
<Boolean xml:space="preserve">true</Boolean>
</field>
<field name="detailsChildren">
<Boolean xml:space="preserve">true</Boolean>
</field>
<field name="detailsInstance">
<Boolean xml:space="preserve">true</Boolean>
</field>
<field name="detailsUsedby">
<Boolean xml:space="preserve">true</Boolean>
</field>
<field name="detailsProperties">
<Boolean xml:space="preserve">true</Boolean>
</field>
<field name="detailsFacets">
<Boolean xml:space="preserve">true</Boolean>
</field>
<field name="detailsAttributes">
<Boolean xml:space="preserve">true</Boolean>
</field>
<field name="detailsIdentityConstr">
<Boolean xml:space="preserve">true</Boolean>
</field>
<field name="detailsEscapeAnn">
<Boolean xml:space="preserve">true</Boolean>
</field>
<field name="detailsSource">
<Boolean xml:space="preserve">true</Boolean>
</field>
<field name="detailsAnnotations">
<Boolean xml:space="preserve">true</Boolean>
</field>
</xsdDocumentationOptions>
</entry>
</map>
</serialized>
Finding XSLT References and Declarations
The following search actions related with XSLT references and declarations are available from the Search submenu of
the contextual menu and from the Document > References menu:
Oxygen XML Editor | Editing Documents | 317
•
Search References - Searches all references of the item found at current cursor position in the defined scope,
if any. If a scope is defined but the currently edited resource is not part of the range of determined resources, a
warning dialog box is displayed that allows you to define another search scope.
•
Search References in - Searches all references of the item found at current cursor position in the file or files that
you specify when a scope is defined.
•
Search Declarations - Searches all declarations of the item found at current cursor position in the defined scope,
if any. If a scope is defined but the current edited resource is not part of the range of resources determined by this
scope, a warning dialog box is displayed that allows you to define another search scope.
Search Declarations in - Searches all declarations of the item found at current cursor position in the file or files
that you specify when a scope is defined.
Search Occurrences in File - Searches all occurrences of the item at the cursor position in the currently edited file.
•
•
The following action is available from the contextual menu and the Document > Schema menu:
•
Show Definition - Moves the cursor to the location of the definition of the current item.
Note: You can also use the Ctrl Single-Click (Command Single-Click on OS X) shortcut on a reference
to display its definition.
Highlight Component Occurrences
When a component (for example variable or named template) is found at current cursor position, Oxygen XML Editor
performs a search over the entire document to find the component declaration and all its references. When found, they
are highlighted both in the document and in the stripe bar, at the right side of the document.
Note: Oxygen XML Editor also supports occurrences highlight for template modes.
Customizable colors are used: one for the component definition and another one for component references. Occurrences
are displayed until another component is selected and a new search is performed. All occurrences are removed when
you start to edit the document.
This feature is enabled by default. To configure it, open the Preferences dialog box and go to Editor > Mark
Occurrences. A search can also be triggered with the Search > Search Occurrences in File (Ctrl Shift U (Meta Shift
U on OS X)) contextual menu action. Matches are displayed in separate tabs of the Results view.
XSLT Refactoring Actions
Oxygen XML Editor offers a set of actions that allow changing the structure of an XSLT stylesheet without changing
the results of running it in an XSLT transformation. Depending on the selected text, the following refactoring actions
are available from Refactoring submenu from the contextual menu of the current editor and the Document > Refactoring
menu:
•
Extract template - Extracts the selected XSLT instructions sequence into a new template. Opens a dialog box
that allows you to specify the name of the new template to be created. The possible changes to perform on the
document can be previewed before altering the document. After pressing OK, the template is created and the selection
is replaced with a <xsl:call-template> instruction referencing the newly created template.
Note: This action is available only when the selection contains well-formed elements.
Note: The newly created template is indented and its name is highlighted in the <xsl:call-template>
element.
•
Move to another stylesheet - Allows you to move one or more XSLT global components (templates, functions,
or parameters) to another stylesheet. Active only when these entire components are selected. Follow these steps:
1. Choose whether you want to move the selected components to a new stylesheet or an existing one.
Oxygen XML Editor | Editing Documents | 318
2. Select the destination stylesheet. Press the Choose button to select the destination stylesheet file. Oxygen XML
Editor will automatically check if the destination stylesheet is already contained by the hierarchy of the current
stylesheet. If it is not contained, choose whether or not the destination stylesheet will be referenced (imported or
included) from the current stylesheet. The following options are available:
•
•
•
Include - The current stylesheet will use an xsl:include instruction to reference the destination stylesheet.
Import - The current stylesheet will use an xsl:import instruction to reference the destination stylesheet.
None - There will be created no relation between the current and destination stylesheets.
3. Press the Move button to move the components to the destination stylesheet. The moved components are
highlighted in the destination stylesheet.
•
Convert attributes to xsl:attributes - Converts the attributes from the selected element and represents each of them
with an <xsl:attribute> instruction. For example, from the following element:
<person id="Big{test}Boss"/>
you obtain:
<person>
<xsl:attribute name="id">
<xsl:text>Big</xsl:text>
<xsl:value-of select="test"/>
<xsl:text>Boss</xsl:text>
</xsl:attribute>
</person>
•
Convert xsl:if into xsl:choose/xsl:when - Converts an xsl:if block to an xsl:when block surrounded by an
xsl:choose element. For example, the following block:
<xsl:if test="a">
<!-- XSLT code -->
</xsl:if>
is converted to:
<xsl:choose>
<xsl:when test="a">
<!-- XSLT code -->
</xsl:when>
<xsl:otherwise>
|
</xsl:otherwise>
</xsl:choose>
where the | character is the current cursor position.
•
Extract local variable - Allows you to create a new local variable by extracting the selected XPath expression. After
creating the new local variable before the current element, Oxygen XML Editor allows you to edit in-place the
variable's name.
Note: The action is active on a selection made inside an attribute that contains an XPath expression.
•
Extract global variable - Allows you to create a new global variable by extracting the selected XPath expression.
After creating the new global variable, Oxygen XML Editor allows you to edit in-place the variable's name.
Note: The action is active on a selection made inside an attribute that contains an XPath expression.
Note: Oxygen XML Editor checks if the selected expression depends on local variables or parameters that
are not available in the global context where the new variable is created.
•
Extract template parameter - Allows you to create a new template parameter by extracting the selected XPath
expression. After creating the new parameter, Oxygen XML Editor allows you to edit in-place its name.
Note: The action is active on a selection made inside an attribute that contains an XPath expression.
•
Oxygen XML Editor | Editing Documents | 319
Extract global parameter - Allows you to create a new global parameter by extracting the selected XPath expression.
After creating the new parameter, Oxygen XML Editor allows you to edit in-place its name.
Note: The action is active on a selection made inside an attribute that contains an XPath expression.
Note: Oxygen XML Editor checks if the selected expression depends on local variables or parameters that
are not available in the global context where the new parameter is created.
•
Rename Component - Allows you to rename the current component in-place. The component and all its references
in the document are highlighted with a thin border and the changes you make to the component at the cursor position
are updated in real time to all occurrences of the component. To exit in-place editing, press the Esc or Enter key on
your keyboard.
•
Rename Component in - Opens the Rename component_type dialog box that allows you to rename the selected
component by specifying the new component name and the files to be affected by the modification. If you click the
Preview button, you can view the files affected by the Rename Component action.
Figure 161: Rename Identity Constraint Dialog Box
Note: These refactoring actions are also proposed by the Quick Assist support.
To watch our video demonstration about XSLT refactoring, go to http://oxygenxml.com/demo/XSL_Refactoring.html.
XSLT Resource Hierarchy/Dependencies View
The Resource Hierarchy/Dependencies view allows you to see the hierarchy/dependencies for a stylesheet. To open
this view, go to Window > Show View > Resource Hierarchy/Dependencies .
If you want to see the hierarchy of a stylesheet, select the desired stylesheet in the project view and choose Resource
Hierarchy from the contextual menu.
Oxygen XML Editor | Editing Documents | 320
Figure 162: Resource Hierarchy/Dependencies View - Hierarchy for docbook.xsl
If you want to see the dependencies of a stylesheet, select the desired stylesheet in the project view and choose Resource
Dependencies from the contextual menu.
Figure 163: Resource Hierarchy/Dependencies View - Dependencies for common.xsl
Oxygen XML Editor | Editing Documents | 321
The following actions are available in the Resource Hierarchy/Dependencies view:
Refresh
Refreshes the Hierarchy/Dependencies structure.
Stop
Stops the hierarchy/dependencies computing.
Show Hierarchy
Allows you to choose a resource to compute the hierarchy structure.
Show Dependencies
Allows you to choose a resource to compute the dependencies structure.
Configure
Allows you to configure a scope to compute the dependencies structure. There is also an option for automatically
using the defined scope for future operations.
History
Provides access to the list of previously computed dependencies. Use the
items from this list.
Clear history button to remove all
The contextual menu contains the following actions:
Open
Opens the resource. You can also double-click a resource in the Hierarchy/Dependencies structure to open it.
Copy location
Copies the location of the resource.
Move resource
Moves the selected resource.
Rename resource
Renames the selected resource.
Show Resource Hierarchy
Shows the hierarchy for the selected resource.
Show Resource Dependencies
Shows the dependencies for the selected resource.
Add to Master Files
Adds the currently selected resource in the Master Files directory.
Expand All
Expands all the children of the selected resource from the Hierarchy/Dependencies structure.
Collapse All
Collapses all children of the selected resource from the Hierarchy/Dependencies structure.
Tip: When a recursive reference is encountered in the Hierarchy view, the reference is marked with a special
icon .
Moving/Renaming XSLT Resources
You are able to move and rename a resource presented in the Resource/Hierarchy Dependencies view, using the
Rename resource and Move resource refactoring actions from the contextual menu.
When you select the Rename action in the contextual menu of the Resource/Hierarchy Dependencies view, the
Rename resource dialog box is displayed. The following fields are available:
•
•
New name - Presents the current name of the edited resource and allows you to modify it.
Update references - Enable this option to update the references to the resource you are renaming.
Oxygen XML Editor | Editing Documents | 322
When you select the Move action from the contextual menu of the Resource/Hierarchy Dependencies view, the Move
resource dialog box is displayed. The following fields are available:
•
•
•
Destination - Presents the path to the current location of the resource you want to move and gives you the option to
introduce a new location.
New name - Presents the current name of the moved resource and gives you the option to change it.
Update references of the moved resource(s) - Enable this option to update the references to the resource you are
moving, in accordance with the new location and name.
If the Update references of the moved resource(s) option is enabled, a Preview option (which opens the Preview
dialog box) is available for both actions. The Preview dialog box presents a list with the resources that are updated.
XSLT Component Dependencies View
The Component Dependencies view allows you to see the dependencies for a selected XSLT component. You can open
the view from Window > Show View > Component Dependencies .
If you want to see the dependencies of an XSLT component, select the desired component in the editor and choose the
Component Dependencies action from the contextual menu. The action is available for all named components (templates,
variables, parameters, attribute sets, keys, functions, outputs).
Figure 164: Component Dependencies View - Hierarchy for table.xsl
In the Component Dependencies view you have several actions in the toolbar:
Refresh
Refreshes the dependencies structure.
Stop
Stops the dependencies computing.
Oxygen XML Editor | Editing Documents | 323
Configure
Allows you to configure a search scope to compute the dependencies structure. You can decide to use automatically
the defined scope for future operations by checking the corresponding checkbox.
History
Allows you to repeat a previous dependencies computation.
The following actions are available on the contextual menu:
Go to First Reference
Selects the first reference of the referenced component from the current selected component in the dependencies
tree.
Go to Component
Shows the definition of the current selected component in the dependencies tree.
Tip: If a component contains multiple references to another, a small table is displayed that contains all references.
When a recursive reference is encountered, it is marked with a special icon .
XSLT Quick Assist Support
The Quick Assist support helps you to rapidly access search and refactoring actions. If one or more actions are available
in the current context, they are accessible via a yellow bulb help marker placed on the cursor line, in the editor line
number stripe. Also, you can invoke the Quick Assist menu if you press Alt + 1 keys (Meta + Alt + 1 on Mac OS X)
on your keyboard.
Two categories of actions are available in the Quick Assist menu:
•
Actions available on a selection made inside an attribute that contains an XPath expression:
•
•
•
•
•
•
Extract template - Extracts the selected XSLT instructions sequence into a new template.
Move to another stylesheet - Allows you to move one or more XSLT global components (templates, functions,
or parameters) to another stylesheet.
Extract local variable - Allows you to create a new local variable by extracting the selected XPath expression.
Extract global variable - Allows you to create a new global variable by extracting the selected XPath expression.
Extract template parameter - Allows you to create a new template parameter by extracting the selected XPath
expression.
Extract global parameter - Allows you to create a new global parameter by extracting the selected XPath
expression.
Figure 165: XSLT Quick Assist Support - Refactoring Actions
•
actions available when the cursor is positioned over the name of a component:
Rename Component in
Renames the component and all its dependencies.
Search Declarations
Searches the declaration of the component in a predefined scope. It is available only when the context represents a
component name reference.
Oxygen XML Editor | Editing Documents | 324
Search References
Searches all references of the component in a predefined scope.
Component Dependencies
Searches the component dependencies in a predefined scope.
Change Scope
Configures the scope that will be used for future search or refactor operations.
Rename Component
Allows you to rename the current component in-place.
Search Occurrences
Searches all occurrences of the component within the current file.
Figure 166: XSLT Quick Assist Support - Component Actions
XSLT Quick Fix Support
The Oxygen XML Editor Quick Fix support helps you resolve various errors that appear in a stylesheet by proposing
quick fixes to problems such as missing templates, misspelled template names, missing functions, or references to an
undeclared variable or parameter.
To activate this feature, hover over or place the cursor in the highlighted area of text where a validation error or warning
occurs. If a Quick Fix is available for that particular error or warning, you can access the Quick Fix proposals with any
of the following methods:
•
•
•
When hovering over the error or warning, the proposals are presented in a tooltip popup window.
If you place the cursor in the highlighted area where a validation error or warning occurs, a quick fix icon ( ) is
displayed in the stripe on the left side of the editor. If you click this icon, Oxygen XML Editor displays the list of
available fixes.
With the cursor placed in the highlighted area of the error or warning, you can also invoke the quick fix menu by
pressing Alt 1 (Meta Alt 1 on OS X) on your keyboard.
Note: The quick fixes are available only when validating an XSLT file with Saxon HE/PE/EE.
Figure 167: Example of an Undefined XSLT Functions Quick Fix
Oxygen XML Editor | Editing Documents | 325
Figure 168: Example of an Undeclared XSLT Variables/Parameters Quick Fix
Oxygen XML Editor provides XSLT quick fixes for the following types of instances:
•
Template does not exist, when the template name referenced in a call-template element does not exist. The
following fixes are available:
•
•
•
Variable/Parameter not declared, when a parameter or variable reference cannot be found. The following fixes
are available:
•
•
•
•
•
•
•
•
•
Create parameter "paramName" in the template "templateName" - creates a new parameter with the
specified name in the referenced template.
Change "paramName" parameter reference to "newParamName" - changes the parameter reference from
the call-template element to a parameter that is declared in the called template.
Remove parameter "paramName" from call-template - removes the parameter with the specified name from
the call-template element.
No value supplied for required parameter, when a required parameter from a template is not referenced in a
call-template element. The following quick-fix is available::
•
•
Create global variable "varName" - creates a global variable with the specified name in the current stylesheet.
The new variable is added at the beginning of the stylesheet after the last global variable or parameter declaration.
Create global parameter "paramName" - creates a global parameter with the specified name in the current
stylesheet. The new parameter is added at the beginning of the stylesheet after the last global parameter or variable
declaration.
Create local variable "varName" - creates a local variable with the specified name before the current element.
Create template parameter "paramName" - creates a new parameter with the specified name in the current
template. This fix is available if the error is located inside a template.
Create function parameter "paramName" - creates a new parameter with the specified name in the current
function. This fix is available if the error is located inside a function.
Change reference to "varName" - changes the name of the referenced variable/parameter to an existing local
or global variable/parameter, that has a similar name with the current one.
Parameter from a called template is not declared, when a parameter referenced from a call-template element
is not declared. The following fixes are available:
•
•
Create template "templateName" - creates a template and generates its corresponding parameters. The template
name and parameter names and types are collected from the call-template element.
Change reference to "newTemplateName" - changes the name of the missing template referenced in the
call-template element. The proposed new names are the existing templates with names similar with the
missing one.
Add parameter "paramName" in call-template - creates a new parameter with the specified name in
call-template element.
Function "prefix:functionName()" has not been defined, when a function declaration is not found. The following
quick fixes are available:
•
•
•
Attribute-set "attrSetName" does not exist, when the referenced attribute set does not exist. The following quick
fixes are available:
•
•
•
Oxygen XML Editor | Editing Documents | 326
Create function "prefix:functionName(param1, param2)" - creates a new function with the specified signature,
after the current top level element from stylesheet.
Change function to "newFunctionName(..)" - changes the referenced function name to an already defined
function. The proposed names are collected from functions with similar names and the same number of parameters.
Create attribute-set "attrSetName" - creates a new attribute set with the specified name, after the current top
level element from stylesheet.
Change reference to "attrSetName" - changes the referenced attribute set to an already defined one.
Character-map "chacterMap" has not been defined, when the referenced character map declaration is not found.
The following quick fixes are available:
•
•
Create character-map "characterMapName" - creates a new character map with the specified name, after the
current top level element from stylesheet.
Change reference to "characterMapName" - changes the referenced character map to an already defined one.
Linking Between Development and Authoring
The Author mode is available for the XSLT editor presenting the stylesheets in a nice visual rendering.
XSLT Unit Test (XSpec)
XSpec is a behavior driven development (BDD) framework for XSLT and XQuery. XSpec consists of a syntax for
describing the behavior of your XSLT or XQuery code, and some code that enables you to test your code against those
descriptions.
To create an XSLT Unit Test, go to File > New > XSLT Unit Test. You can also create an XSLT Unit Test from the
contextual menu of an XSL file in the Project view. Oxygen XML Editor allows you to customize the XSpec document
when you create it. In the customization dialog box, you can enter the path to an XSL document or to a master XSL
document.
To run an XSLT Unit Test, open the XSPEC file in an editor and click
main toolbar.
Apply Transformation Scenario(s) on the
Note: The transformation scenario is defined in the XSPEC document type.
When you create an XSpec document based on an XSL document, Oxygen XML Editor uses information from the
validation and transformation scenarios associated with the XSL file. From the transformation scenario Oxygen XML
Editor uses extensions and properties of Saxon 9.6.0.7, improving the Ant scenario associated with the XSpec document.
Oxygen XML Editor | Editing Documents | 327
Figure 169: The New XSLT Unit Test Wizard
An XSpec file contains one, or more test scenarios. You can test a stylesheet in one of the following ways:
•
Test an entire stylesheet.
Testing is performed in a certain context. You can define a context as follows:
•
Inline context, building the test based on a string.
<x:scenario label="when processing a para element">
<x:context>
<para>...</para>
</x:context>
...
</x:scenario>
•
Based on an external file, or on a part of an external file extracted with an XPath expression.
<x:scenario label="when processing a para element">
<x:context href="source/test.xml" select="/doc/body/p[1]" />
...
</x:scenario>
•
Test a function.
<x:scenario label="when capitalising a string">
<x:call function="eg:capital-case">
<x:param select="'an example string'" />
<x:param select="true()" />
</x:call>
...
</x:scenario>
Oxygen XML Editor | Editing Documents | 328
•
Test a template with a name.
<x:call template="createTable">
<x:param name="nodes">
<value>A</value>
<value>B</value>
</x:param>
<x:param name="cols" select="2" />
</x:call>
You are able to reference test files between each other, which allows you to define a suite of tests. For further details
about test scenarios, go to https://github.com/expath/xspec/wiki/Writing-Scenarios.
Editing Ant Build Files
This section explains the features of the Ant build file editor.
Validate Ant Build Files
Oxygen XML Editor performs the validation of Ant build files with the help of a built-in processor, which is largely
based on the Apache Ant libraries. The path to these libraries can be configured in the Ant Preferences on page 1213 page.
The validation processor accesses the parameters set in the associated Ant transformation scenario and uses them as
Ant properties when validating the current build script.
Oxygen XML Editor automatically validates Ant build files as you type. You can also validate the currently edited file
by selecting the
menu.
Validate action from the
Validation toolbar drop-down menu or the Document > Validate
Tip: To make a custom task available in the Ant validation engine, add a JAR file that contains the task
implementation to the library directory of the built-in Ant distribution that comes bundled with Oxygen XML
Editor (for example, [OXYGEN INSTALLATION DIRECTORY]/tools/ant/lib folder).
Create a Validation Scenario for Ant Build Files
If you want to customize the validation process for Ant build files, you can create a new validation scenario (or configure
an existing one). For example, if you want to validate interrelated modules that define a complex Ant build file, you can
specify the main Ant file by configuring a validation scenario. To create or configure a validation scenario, select
Configure Validation Scenario(s) from the
menu.
Validation toolbar drop-down menu or the Document > Validate
Editing Ant Build Files in the Context of Master Files
Smaller interrelated modules that define a complex Ant build file cannot be correctly edited or validated individually
due to their interdependency with other modules. For example, a target defined in a main build file is not visible when
you edit an included or imported module. Oxygen XML Editor provides support for defining the main module (or
modules), allowing you to edit any of the imported/included files in the context of the larger Ant build structure.
You cat set a main Ant build file either by using the master files support from the Project view, or a validation scenario.
To set a main file using a validation scenario, add validation units that point to the main modules. Oxygen XML Editor
warns you if the current module is not part of the dependencies graph computed for the main build file. In this case, it
considers the current module as the main build file.
The advantages of editing in the context of main file include:
•
•
•
Correct validation of a module in the context of a larger build structure.
Content Completion Assistant displays all components valid in the current context.
The Outline view displays the components collected from the entire build file structure.
Oxygen XML Editor | Editing Documents | 329
Syntax Highlight
To change the syntax highlighting colors for Ant build files, open the Preferences dialog box and go to Editor > Syntax
Highlight.
Content Completion in Ant Build Files
The items in the list of proposals offered by the Content Completion Assistant are context-sensitive.
The Content Completion Assistant proposes various item types that are defined in the current Ant build and in the
imported and included builds. The proposals include:
•
•
•
Element names
Attribute names
Property names
Note: In addition to the user-defined properties, the Content Completion Assistant offers the following
values:
•
•
•
•
The system properties set in the Java Virtual Machine.
The built-in properties that Ant provides.
Target names
Task and type reference IDs
Tip: To make a custom task available in the Content Completion Assistant, add a JAR file that contains
the task implementation to the library directory of the built-in Ant distribution that comes bundled with
Oxygen XML Editor (for example, [OXYGEN INSTALLATION DIRECTORY]/tools/ant/lib
folder).
Note: For Ant resources, the proposals are collected starting from the master files. The master files can be
defined in the project or in the associated validation scenario. For further details about the Master Files support
go to Defining Master Files at Project Level.
Ant Outline View
The Ant Outline view displays the list of all the components (properties, targets, extension points, task/type definitions
and references) from both the edited Ant build file and its imported and included modules. For Ant resources, the Outline
view collects its components starting from the master files. The master files can be defined in the project and the main
build file can be specified in a validation scenario. For more details, see Defining Master Files at Project Level.
To enable the Outline view, go to Window > Show View > Outline.
Oxygen XML Editor | Editing Documents | 330
Figure 170: Ant Outline View
The following actions are available in the
Settings menu on the Outline view toolbar:
Filter returns exact matches
The text filter of the Outline view returns only exact matches. By default, this filter is not selected.
Selection update on cursor move
Controls the synchronization between Outline view and source document. The selection in the Outline view can
be synchronized with the cursor moves or the changes in the Ant editor. Selecting one of the components from the
outline view also selects the corresponding item in the source document.
When the
Show components option is selected, the following actions are available:
Show XML structure
Displays the XML document structure in a tree-like manner.
Sort
Sorts the components in the Outline view alphabetically.
Show all components
Displays all components that were collected starting from the main file. This option is set by default.
Show only local components
Displays the components defined in the current file only.
Group by location/type
The build file components can be grouped by location and type.
When the
Show XML structure option is selected, the following actions are available:
Show components
Switches the Outline view to the components display mode.
Flat presentation mode of the filtered results
When active, the application flattens the filtered result elements to a single level.
Show comments and processing instructions
Show/hide comments and processing instructions in the Outline view.
Show element name
Show/hide element name.
Oxygen XML Editor | Editing Documents | 331
Show text
Show/hide additional text content for the displayed elements.
Show attributes
Show/hide attribute values for the displayed elements. The displayed attribute values can be changed from the
Outline preferences panel.
Configure displayed attributes
Displays the XML Structured Outline preferences page.
The following actions are available in the contextual menu of the Outline view (when the
option is selected in the
Show XML structure
Settings menu:
Append Child
Displays a list of elements that can be inserted as children of the current element.
Insert Before
Displays a list of elements that can be inserted as siblings of the current element, before the current element.
Insert After
Displays a list of elements that can be inserted as siblings of the current element, after the current element.
Edit Attributes
Displays an in-place attribute editing window.
Toggle Comment
Comments/uncomments the currently selected element.
Search References Ctrl Shift R (Meta Shift R on OS X)
Searches all references of the item found at current cursor position in the defined scope. See Find References and
Declarations of Ant Components for more details.
Search References in
Searches all references of the item found at current cursor position in the specified scope. See Find References and
Declarations of Ant Components for more details.
Component Dependencies
Allows you to see the dependencies for the current selected component. See Ant Component Dependencies View
for more details.
Rename Component in
Renames the selected component. See Ant Refactoring Actions for more details.
Cut,
Copy,
Delete
Executes the typical editing actions on the currently selected component.
Expand More
Expands recursively all sub-components of the selected component.
Collapse All
Collapses recursively all sub-components of the selected component.
You can search a component in the Outline view by typing its name in the filter text field at the top of the view or
directly on the tree structure. When you type the component name in the text field, you can switch to the tree structure
using the following:
•
•
•
Down arrow key
Tab key
Shift-Tab key combination
Oxygen XML Editor | Editing Documents | 332
To switch from tree structure to the filter text field, you can use Tab and Shift-Tab.
Tip: The search filter is case insensitive. The following wildcards are accepted:
•
•
•
* - any string
? - any character
, - patterns separator
If no wildcards are specified, the string to search is used as a partial match (such as *textToFind*).
The content of the Outline view and the editing area are synchronized. When you select a component in the Outline
view, its definition is highlighted in the editing area.
Oxygen XML Editor has a predefined order for the groups in the Outline view:
•
•
For location, the names of the files are sorted alphabetically. The main file is the one you are editing and it is located
at the top of the list.
For type, the order is: properties, targets, references.
Note: When no grouping is available Oxygen XML Editor sorts the components depending on their order
in the document. Oxygen XML Editor also takes into account the name of the file that the components are
part of.
Find References and Declarations of Ant Components
The following search actions related to references and declarations of Ant components are available from the Search
submenu of the contextual menu and from the Document > References menu::
•
Search References - Searches all references of the item found at current cursor position in the defined scope.
•
Search References in - Searches all references of the item found at current cursor position in the file or files that
you specify after selecting a scope for the search operation.
•
Search Declarations - Searches all declarations of the item found at current cursor position in the defined scope.
Search Declarations in - Searches all declarations of the item found at current cursor position in the file or files
that you specify when defining a new scope.
Search Occurrences in File - Searches all occurrences of the item at the cursor position in the currently edited file.
•
•
The following action is available from the contextual menu and the Document > Schema menu:
•
Show Definition - Moves the cursor to the location of the definition of the current item.
Note: You can also use the Ctrl Single-Click (Command Single-Click on OS X) shortcut on a reference
to display its definition.
Highlight Component Occurrences
When a component (for example property or target) is found at the current cursor position, they are highlighted in both
the document and in the stripe bar at the right side of the document. Oxygen XML Editor also supports occurrences
highlight for type and task references.
Customizable colors are used (one for the component definition and another one for component references). Occurrences
are displayed until another component is selected and a new search is performed. All highlights are removed when you
start to edit the document.
This feature is enabled by default. To configured it, open the Preferences dialog box and go to Editor > Mark
Occurrences. If the automatic feature is disabled for a particular type of file, you can perform this search by going to
Search > Search Occurrences in File Ctrl Shift U (Meta Shift U on OS X) in the contextual menu. Matches are
displayed in separate tabs of the Results view.
Oxygen XML Editor | Editing Documents | 333
Ant Refactoring Actions
The following refactoring actions can be applied on targets, extension-points, properties, and references and allow you
to consistently rename a component in the entire Ant build file structure. They are available from the Refactoring
submenu in the contextual menu of the current editor or from the Document > Refactoring menu:
•
Rename Component - Allows you to rename the current component in-place. The component and all its references
in the document are highlighted with a thin border and the changes you make to the component at the cursor position
are updated in real time to all occurrences of the component. To exit in-place editing, press the Esc or Enter key on
your keyboard.
•
Rename Component in - Opens the Rename component_type dialog box that allows you to rename the selected
component by specifying the new component name and the files to be affected by the modification. If you click the
Preview button, you can view the files affected by the Rename Component action.
Figure 171: Rename Identity Constraint Dialog Box
Ant Resource Hierarchy/Dependencies View
The Resource Hierarchy/Dependencies view allows you to see the hierarchy/dependencies for an Ant build file by
analyzing imported or included build files. To open this view, go to Window > Show View > Resource
Hierarchy/Dependencies.
If you want to see the hierarchy of a build file, select it in the project view and choose Resource Hierarchy from the
contextual menu.
If you want to see the dependencies of a build file, select it in the project view and choose Resource Dependencies
from the contextual menu.
The following actions are available in the Resource Hierarchy/Dependencies view:
Refresh
Refreshes the Hierarchy/Dependencies structure.
Oxygen XML Editor | Editing Documents | 334
Stop
Stops the hierarchy/dependencies computing.
Show Hierarchy
Allows you to choose a resource to compute the hierarchy structure.
Show Dependencies
Allows you to choose a resource to compute the dependencies structure.
Configure
Allows you to configure a scope to compute the dependencies structure. There is also an option for automatically
using the defined scope for future operations.
History
Provides access to the list of previously computed dependencies. Use the
items from this list.
Clear history button to remove all
The contextual menu contains the following actions:
Open
Opens the resource. You can also double-click a resource in the Hierarchy/Dependencies structure to open it.
Copy location
Copies the location of the resource.
Move resource
Moves the selected resource.
Rename resource
Renames the selected resource.
Show Resource Hierarchy
Shows the hierarchy for the selected resource.
Show Resource Dependencies
Shows the dependencies for the selected resource.
Add to Master Files
Adds the currently selected resource in the Master Files directory.
Expand All
Expands all the children of the selected resource from the Hierarchy/Dependencies structure.
Collapse All
Collapses all children of the selected resource from the Hierarchy/Dependencies structure.
Tip: When a recursive reference is encountered in the Hierarchy view, the reference is marked with a special
icon .
Ant Component Dependencies View
The Component Dependencies view allows you to see the dependencies for a selected Ant component. You can open
the view from Window > Show View > Component Dependencies.
If you want to see the dependencies of an Ant component, select the desired component in the editor or Outline view
and choose the Component Dependencies action from the contextual menu. The action is available for the following
components: properties, targets, extension-points, and references (those that have an id set).
The following toolbar actions are available in the Component Dependencies view:
Refresh
Refreshes the dependencies structure.
Oxygen XML Editor | Editing Documents | 335
Stop
Stops the dependencies computing.
Configure
Allows you to configure a search scope to compute the dependencies structure. You can decide to use automatically
the defined scope for future operations by checking the corresponding checkbox.
History
Allows you to repeat a previous dependencies computation.
The following actions are available from the contextual menu:
Go to First Reference
Selects the first reference of the referenced component from the current selected component in the dependencies
tree.
Go to Component
Shows the definition of the current selected component in the dependencies tree.
Tip: If a component contains multiple references to another, these references are listed in a table displayed at
the bottom of Component Dependencies view. When a recursive reference is encountered, it is marked with a
special icon .
Ant Quick Assist Support
The Quick Assist support helps you to rapidly access search and refactoring actions. If one or more actions are available
in the current context, they are accessible via a yellow bulb help marker placed on the cursor line, in the editor line
number stripe. Also, you can invoke the Quick Assist menu by pressing Alt 1 (Meta Alt 1 on OS X) on your keyboard.
The quick assist support offers direct access to the following actions:
Rename Component in
Renames the component and all its dependencies.
Search Declarations
Searches the declaration of the component in a predefined scope. It is available only when the context represents a
component name reference.
Search References
Searches all references of the component in a predefined scope.
Component Dependencies
Searches the component dependencies in a predefined scope.
Change Scope
Configures the scope that will be used for future search or refactor operations.
Rename Component
Allows you to rename the current component in-place.
Search Occurrences
Searches all occurrences of the component within the current file.
Ant Quick Fix Support
The Oxygen XML Editor Quick Fix support helps you resolve missing target reference errors that may occur when
developing Ant build documents.
Oxygen XML Editor | Editing Documents | 336
To activate this feature, hover over or place the cursor in the highlighted area of text where a validation error or warning
occurs. If a Quick Fix is available for that particular error or warning, you can access the Quick Fix proposals with any
of the following methods:
•
•
•
When hovering over the error or warning, the proposals are presented in a tooltip popup window.
If you place the cursor in the highlighted area where a validation error or warning occurs, a quick fix icon ( ) is
displayed in the stripe on the left side of the editor. If you click this icon, Oxygen XML Editor displays the list of
available fixes.
With the cursor placed in the highlighted area of the error or warning, you can also invoke the quick fix menu by
pressing Alt 1 (Meta Alt 1 on OS X) on your keyboard.
Oxygen XML Editor provides the following types of quick fixes for Ant build files:
•
•
•
Create new target - Creates a new target with the specified name.
Change reference to "targetName" - Corrects the reference to point to an already defined target.
Remove target reference - Removes the erroneous reference.
Editing XML Schemas
An XML Schema describes the structure of an XML document and is used to validate XML document instances against
it, to check that the XML instances conform to the specified requirements. If an XML instance conforms to the schema
then it is said to be valid, otherwise it is invalid.
Two editing modes are provided for working with XML Schema:
•
•
The Text editing mode.
The visual Design editing mode.
Note: Oxygen XML Editor offers support for both XML schema 1.0 and 1.1.
Editing XML Schema in Design Editing Mode
This section explains how to use the graphical diagram editing mode for a W3C XML Schema.
Schema Editing Actions
You can edit an XML schema using drag and drop operations or contextual menu actions.
Drag and drop is the easiest way to move the existing components to other locations in an XML schema. For example,
you can quickly insert an element reference in the diagram with a drag and drop from the Outline view to a compositor
in the diagram. Also, the components order in an xs:sequence can be easily changed using drag and drop.
If this property has not been set, you can easily set the attribute/element type by dragging over it a simple type or complex
type from the diagram. If the type property for a simple type or complex type is not already set, you can set it by dragging
over it a simple or complex type.
Depending on the drop area, different actions are available:
•
•
•
move - Context dependent, the selected component is moved to the destination.
reference - Context dependent, the selected component is referenced from the parent.
copy - If (Ctrl (Meta on Mac OS)) key is pressed, a copy of the selected component is inserted to the destination.
Visual clues about the operation type are indicated by the mouse pointer shape:
•
- When moving a component.
•
- When referencing a component.
Oxygen XML Editor | Editing Documents | 337
•
- When copying a component.
You can edit some schema components directly in the diagram. For these components, you can edit the name and the
additional properties presented in the diagram by double clicking the value you want to edit. If you want to edit the name
of a selected component, you can also press (Enter). The list of properties which can be displayed for each component
can be customized in the Preferences.
When editing references, you can choose from a list of available components. Components from an imported schema
for which the target namespace does not have an associated prefix is displayed in the list as
componentName#targetNamespace. If the reference is from a target namespace which was not yet mapped, you
are prompted to add prefix mappings for the inserted component namespace in the current edited schema.
You can also change the compositor by double-clicking it and choose the compositor you want from the proposals list.
There are some components that cannot be edited directly in the diagram: imports, includes, redefines. The editing action
can be performed if you double-click or press (Enter) on an import/include/redefine component. An edit dialog box is
displayed, allowing you to customize the directives.
Contextual Menu Actions in the Design Mode
The contextual menu of the Design mode includes the following actions:
Show Definition (Ctrl Shift Enter)
Shows the definition for the current selected component. For references, this action is available by clicking the
arrow displayed in its bottom right corner.
Open Schema (Ctrl Shift Enter)
Opens the selected schema. This action is available for xsd:import, xsd:include and xsd:redefine
elements. If the file you try to open does not exist, a warning message is displayed and you have the possibility to
create the file.
Edit Attributes ()
Allows you to edit the attributes of the selected component in a small in-place editor that presents the same attributes
as in the Attributes View and the Facets View. The actions that can be performed on attributes in this dialog box are
the same actions presented in the two views.
Append child
Offers a list of valid components, depending on the context, and appends your selection as a child of the currently
selected component. You can set a name for a named component after it has been added in the diagram.
Insert before
Offers a list of valid components, depending on the context, and inserts your selection before the selected component,
as a sibling. You can set a name for a named component after it has been added in the diagram.
Insert after
Offers a list of valid components, depending on the context, and inserts your selection after the selected component,
as a sibling. You can set a name for a named component after it has been added in the diagram.
New global
Inserts a global component in the schema diagram. This action does not depend on the current context. If you choose
to insert an import you have to specify the URL of the imported file, the target namespace and the import ID. The
same information, excluding the target namespace, is requested for an xsd:include or xsd:redefine element.
Note: If the imported file has declared a target namespace, the field Namespace is completed automatically.
Edit Schema Namespaces
When performed on the schema root, it allows you to edit the schema target namespace and namespace mappings.
You can also invoke the action by double-clicking the target namespace property from Attributes view for the
schema or by double-clicking the schema component.
Oxygen XML Editor | Editing Documents | 338
Edit Annotations
Allows you to edit the annotation for the selected schema component in the Edit Annotations dialog box. You can
perform the following operations in the dialog box:
•
Edit all appinfo/documentation items for a specific annotation - all appinfo/documentation
items for a specific annotation are presented in a table and can be easily edited. Information about an annotation
item includes: type (documentation/appinfo), content, source (optional, specify the source of the
documentation/appinfo element) and xml:lang. The content of a documentation/appinfo item
can be edited in the Content area below the table.
•
Insert/Insert before/Remove documentation/appinfo. The
Add button allows you to insert a new annotation
item (documentation/appinfo). You can add a new item before the item selected in table by pressing the
Insert Before button. Also, you can delete the selected item using the
•
•
•
Remove button.
Move items up/down - to do this use the
Move up and
Move down buttons.
Insert/Insert before/Remove annotation - available for components that allow multiple annotations like
schemas or redefines.
Specify an ID for the component annotation. the ID is optional.
Annotations are rendered by default under the graphical representation of the component. When you have a reference
to a component with annotations, these annotations are presented in the diagram also below the reference component.
The Edit Annotations action invoked from the contextual menu edit the annotations for the reference. If the reference
component does not have annotations, you can edit the annotations of the referenced component by double-clicking
the annotations area. Otherwise you can edit the referenced component annotations only if you go to the definition
of the component.
Note: For imported/included components which do not belong to the currently edited schema, the Edit
Annotations dialog box presents the annotation as read-only. To edit its annotation, open the schema where
the component is defined.
Extract Global Element
Action that is available for local elements. A local element is made global and is replaced with a reference to the
global element. The local element properties that are also valid for the global element declaration are kept.
Figure 172: Extracting a Global Element
If you use the Extract Global Element action on a name element , the result is:
Oxygen XML Editor | Editing Documents | 339
Extract Global Attribute
Action available for local attributes. A local attribute is made global and replaced with a reference to the global
attribute. The properties of local attribute that are also valid in the global attribute declaration are kept.
Figure 173: Extracting a Global Attribute
If you use the Extract Global Attribute action on a note attribute, the result is:
Extract Global Group
Action available for compositors (sequence, choice, all). This action extracts a global group and makes a reference
to it. The action is enabled only if the parent of the compositor is not a group.
Oxygen XML Editor | Editing Documents | 340
If you use the Extract Global Group action on the sequence element, the Extract Global Component dialog
box is displayed and you can choose a name for the group. If you type personGroup, the result is:
Figure 174: Extracting a Global Group
Extract Global Type
Action used to extract an anonymous simple type or an anonymous complex type as global. For anonymous complex
types, the action is available on the parent element.
Figure 175: Extracting a Global Simple Type
If you use the action on the union component and choose numericST for the new global simple type name, the
result is:
Figure 176: Extracting a Global Complex Type
If you use the action on a person element and choose person_type for the new complex type name, the result
is:
Oxygen XML Editor | Editing Documents | 341
Rename Component in
Rename the selected component.
Cut Ctrl X (Meta X on OS X)
Cut the selected component(s).
Copy Ctrl C (Meta C on OS X)
Copy the selected component(s).
Copy XPath
This action copies an XPath expression that identifies the selected element or attribute in an instance XML document
of the edited schema and places it in the clipboard.
Paste Ctrl V (Meta V on OS X)
Paste the component(s) from the clipboard as children of the selected component.
Paste as Reference
Create references to the copied component(s). If not possible a warning message is displayed.
Remove (Delete)
Remove the selected component(s).
Override component
Copies the overridden component in the current XML Schema. This option is available for xs:override components.
Redefine component
The referenced component is added in the current XML Schema. This option is available for xs:redefine components.
Optional
Can be performed on element/attribute/group references, local attributes, elements, compositors, and element
wildcards. The minOccurs property is set to 0 and the use property for attributes is set to optional.
Unbounded
Can be performed on element/attribute/group references, local attributes, elements, compositors, and element
wildcards. The maxOccurs property is set to unbounded and the use property for attributes is set to required.
Search
Can be performed on local elements or attributes. This action makes a reference to a global element or attribute.
Search References
Searches all references of the item found at current cursor position in the defined scope if any.
Oxygen XML Editor | Editing Documents | 342
Search References in
Searches all references of the item found at current cursor position in the specified scope.
Search Occurrences in File
Searches all occurrences of the item found at current cursor position in the current file.
Component Dependencies
Allows you to see the dependencies for the current selected component.
Resource Hierarchy
Allows you to see the hierarchy for the current selected resource.
Flatten Schema
Recursively adds the components of included Schema files to the main one. It also flattens every imported XML
Schema from the hierarchy.
Resource Dependencies
Allows you to see the dependencies for the current selected resource.
Expand All
Recursively expands all sub-components of the selected component.
Collapse All
Recursively collapses all sub-components of the selected component.
Save as Image
Save the diagram as image, in JPEG, BMP, SVG or PNG format.
Generate Sample XML Files
Generate XML files using the current opened schema. The selected component is the XML document root. See
more in the Generate Sample XML Files section.
Options
Show the Schema preferences panel.
XML Schema Components
A schema diagram contains a series of interconnected components. To quickly identify the relation between two connected
components, the connection is represented as:
•
A thick line to identify a connection with a required component (in the following image, family is a required
element).
•
A thin line to identify a connection with an optional component (in the following image, email is an optional
element).
The following topics explain in detail all available components and their symbols as they appear in an XML schema
diagram.
Oxygen XML Editor | Editing Documents | 343
xs:schema
Defines the root element of a schema. A schema document contains representations for a collection of schema components,
such as type definitions and element declarations, that have a common target namespace. See more info at
http://www.w3.org/TR/xmlschema11-1/#element-schema.
By default, it displays the targetNamespace property when rendered.
xs:schema properties
Property Name
Description
Possible Values
Target Namespace
The schema target namespace.
Any URI
Element Form Default
Determining whether local element
declarations will be
namespace-qualified by default.
qualified, unqualified, [Empty]. Default
value is unqualified.
Attribute Form Default
Determining whether local attribute
declarations will be
namespace-qualified by default.
qualified, unqualified, [Empty]. Default
value is unqualified.
Block Default
Default value of the block attribute
of xs:element and
xs:complexType.
#all, extension, restriction, substitution,
restriction extension, restriction
substitution, extension substitution,
restriction extension substitution,
[Empty].
Final Default
Default value of the final attribute
of xs:element and
xs:complexType.
#all, restriction, extension, restriction
extension, [Empty].
Default Attributes
Specifies a set of attributes that apply Any.
to every complex Type in a schema
document.
Xpath Default Namespace
The default namespace used when the ##defaultNamespace,
XPath expression is evaluated.
##targetNamespace, ##local.
Version
Schema version
Any token.
ID
The schema id
Any ID.
Component
The edited component name.
Not editable property.
SystemID
The schema system id
Not editable property.
xs:element
Defines an element. An element declaration is an association of a name with a type definition, either simple or complex,
an (optional) default value and a (possibly empty) set of identity-constraint definitions. See more info at
http://www.w3.org/TR/xmlschema11-1/#element-element.
An element by default displays the following properties when rendered in the diagram: default, fixed, abstract and type.
When referenced or declared locally, the element graphical representation also contains the value for the minOccurs
and maxOccurs properties (for 0..1 and 1..1 occurs the values are implied by the connector style) and the connectors to
the element are drawn using dotted lines if the element is optional.
Oxygen XML Editor | Editing Documents | 344
xs:element properties
Property Name
Description
Possible Values
Mentions
Name
The element name. Always Any NCName for global or If missing, will be displayed
required.
local elements, any QName as '[element]' in diagram.
for element references.
Is Reference
When set, the local element true/false
is a reference to a global
element.
Type
The element type.
Base Type
The extended/restricted base All declared or built-in types For elements with complex
type.
type, with simple or complex
content.
Mixed
Defines if the complex type true/false
content model will be mixed.
For elements with complex
type.
Content
The content of the complex simple/complex
type.
For elements with complex
type which extends/restricts
a base type. It is
automatically detected.
Content Mixed
Defines if the complex
true/false
content model will be mixed.
For elements with complex
type which has a complex
content.
Default
Default value of the element. Any string
A default value is
automatically assigned to the
element when no other value
is specified.
The fixed and default
attributes are mutually
exclusive.
Fixed
A simple content element
Any string
may be fixed to a specific
value using this attribute. A
fixed value is also
automatically assigned to the
element and you cannot
specify another value.
The fixed and default
attributes are mutually
exclusive.
Min Occurs
Minimum number of
A numeric positive value.
occurrences of the element. Default value is 1
Only for references/local
elements
Max Occurs
Maximum number of
A numeric positive value.
occurrences of the element. Default value is 1
Only for references/local
elements
Appears only for local
elements.
All declared or built-in
For all elements. For
types. In addition, the
references, the value is set in
following anonymous types the referenced element.
are available:
[ST-restriction], [ST-union],
[ST-list], [CT-anonymous],
[CT-extension SC],
[CT-restriction SC],
[CT-restriction CC],
[CT-extension CC].
Oxygen XML Editor | Editing Documents | 345
Property Name
Description
Possible Values
Substitution Group
Qualified name of the head All declared elements. For
of the substitution group to XML Schema 1.1 this
which this element belongs. property supports multiple
values.
For global and reference
elements
Abstract
Controls whether the
true/false
element may be used directly
in instance XML documents.
When set to true, the element
may still be used to define
content models, but it must
be substituted through a
substitution group in the
instance document.
For global elements and
element references
Form
Defines if the element is
"qualified" (i.e. belongs to
the target namespace) or
"unqualified" (i.e. doesn't
belong to any namespace).
Only for local elements
Nillable
When this attribute is set to true/false
true, the element can be
declared as nil using an
xsi:nil attribute in the
instance documents.
For global elements and
element references
Target Namespace
Specifies the target
Not editable property.
namespace for local element
and attribute declarations.
The namespace URI may be
different from the schema
target namespace. This
property is available for local
elements only.
For all elements.
Block
Controls whether the
element can be subject to a
type or substitution group
substitution. '#all' blocks any
substitution, 'substitution'
blocks any substitution
through substitution groups
and 'extension'/'restriction'
block any substitution (both
through xsi:type and
substitution groups) by
elements or types, derived
respectively by extension or
restriction from the type of
the element. Its default value
is defined by the
blockDefault attribute
of the parent xs:schema.
For global elements and
element references
unqualified/qualified
#all, restriction,
extension,substitution,
extension restriction,
extension substitution,
restriction substitution,
restriction extension
substitution
Mentions
Oxygen XML Editor | Editing Documents | 346
Property Name
Description
Possible Values
Final
Controls whether the
#all, restriction, extension,
element can be used as the restriction extension,
head of a substitution group [Empty]
for elements whose types are
derived by extension or
restriction from the type of
the element. Its default value
is defined by the
finalDefault attribute
of the parent xs:schema.
For global elements and
element references
ID
The component id.
For all elements.
Component
The edited component name. Not editable property.
For all elements.
Namespace
The component namespace. Not editable property.
For all elements.
System ID
The component system id.
For all elements.
Any id
Not editable property.
Mentions
xs:attribute
Defines an attribute. See more info at http://www.w3.org/TR/xmlschema11-1/#element-attribute.
An attribute by default displays the following properties when rendered in the diagram: default, fixed, use and type.
Connectors to the attribute are drawn using dotted lines if the attribute use is optional. The attribute name is stroked out
if prohibited.
xs:attribute properties
Property Name
Description
Possible Value
Mentions
Name
Attribute name. Always
required.
Any NCName for
global/local attributes, all
declared attributes' QName
for references.
For all local or global
attributes. If missing, will be
displayed as '[attribute]' in
the diagram.
Is Reference
When set, the local attribute true/false
is a reference.
Type
Qualified name of a simple
type.
All global simple types and For all attributes. For
built-in simple types. In
references, the type is set to
addition another 3 proposals the referenced attribute.
are present: [anonymous
restriction], [anonymous
list], [anonymous union] for
creating anonymous simple
types more easily.
Default
Default value. When
specified, an attribute is
added by the schema
processor (if it is missing
from the instance XML
document) and it is given
this value. The default and
Any string
For local attributes.
For all local or global
attributes. For references the
value is from the referenced
attribute.
Oxygen XML Editor | Editing Documents | 347
Property Name
Description
Possible Value
fixed attributes are mutually
exclusive.
Mentions
Fixed
When specified, the value of Any string
the attribute is fixed and
must be equal to this value.
The default and fixed
attributes are mutually
exclusive.
For all local or global
attributes. For references the
value is from the referenced
attribute.
Use
Possible usage of the
attribute. Marking an
attribute "prohibited" is
useful to exclude attributes
during derivations by
restriction.
Form
Specifies if the attribute is unqualified/qualified
qualified (i.e. must have a
namespace prefix in the
instance XML document) or
not. The default value for
this attribute is specified by
the
attributeFormDefault
attribute of the xs:schema
document element.
For local attributes.
Inheritable
Specifies if the attribute is
inheritable. Inheritable
attributes can be used by
<alternative> element on
descendant elements.
true/false
For all local or global
attributes. The default value
is false. This property is
available for XML Schema
1.1.
Target Namespace
Specifies the target
Any URI
namespace for local attribute
declarations. The namespace
URI may be different from
the schema target
namespace.
Setting a target namespace
for local attribute is useful
only when restricts attributes
of a complex type that is
declared in other schema
with different target
namespace. This property is
available for XML Schema
1.1.
ID
The component id.
For all attributes.
Component
The edited component name. Not editable property.
For all attributes.
Namespace
The component namespace. Not editable property.
For all attributes.
System ID
The component system id.
For all attributes.
optional, required, prohibited For local attributes
Any id
Not editable property.
xs:attributeGroup
Defines an attribute group to be used in complex type definitions. See more info at
http://www.w3.org/TR/xmlschema11-1/#element-attributeGroup.
Oxygen XML Editor | Editing Documents | 348
xs:attributeGroup properties
Property Name
Description
Possible Values
Mentions
Name
Attribute group name.
Always required.
Any NCName for global
attribute groups, all declared
attribute groups for
reference.
For all global or referenced
attribute groups. If missing,
will be displayed as
'[attributeGroup]' in diagram.
ID
The component id.
Any id
For all attribute groups.
Component
The edited component name. Not editable property.
For all attribute groups.
Namespace
The component namespace. Not editable property.
For all attribute groups.
System ID
The component system id.
For all attribute groups.
Not editable property.
xs:complexType
Defines a top level complex type. Complex Type Definitions provide for: See more data at
http://www.w3.org/TR/xmlschema11-1/#element-complexType.
•
•
•
•
•
•
Constraining element information items by providing Attribute Declarations governing the appearance and content
of attributes.
Constraining element information item children to be empty, or to conform to a specified element-only or mixed
content model, or else constraining the character information item children to conform to a specified simple type
definition.
Using the mechanisms of Type Definition Hierarchy to derive a complex type from another simple or complex type.
Specifying post-schema-validation infoset contributions for elements.
Limiting the ability to derive additional types from a given complex type.
Controlling the permission to substitute, in an instance, elements of a derived type for elements declared in a content
model to be of a given complex type.
Tip: A complex type which is a base type to another type will be rendered with yellow background.
xs:complexType properties
Property Name
Description
Possible Values
Mentions
Name
The name of the complex
type. Always required.
Any NCName
Only for global complex
types. If missing, will be
displayed as '[complexType]'
in diagram.
Base Type Definition
The name of the
extended/restricted types.
Any from the declared
simple or complex types.
For complex types with
simple or complex content.
Derivation Method
The derivation method.
restriction/ extension
Only when base type is set.
If the base type is a simple
type, the derivation method
is always extension.
Content
The content of the complex simple/ complex
type.
For complex types which
extend/restrict a base type. It
is automatically detected.
Content Mixed
Specifies if the complex
true/false
content model will be mixed.
For complex contents.
Mixed
Specifies if the complex type true/false
content model will be mixed.
For global and anonymous
complex types.
Oxygen XML Editor | Editing Documents | 349
Property Name
Description
Possible Values
Abstract
true/false
When set to true, this
complex type cannot be used
directly in the instance
documents and needs to be
substituted using an
xsi:type attribute.
For global and anonymous
complex types.
Block
Controls whether a
all, extension, restriction,
substitution (either through extension restriction,
a xsi:type or substitution [Empty]
groups) can be performed for
a complex type, which is an
extension or a restriction of
the current complex type.
This attribute can only block
such substitutions (it cannot
"unblock" them), which can
also be blocked in the
element definition. The
default value is defined by
the blockDefault
attribute of xs:schema.
For global complex types.
Final
Controls whether the
all, extension, restriction,
complex type can be further extension restriction,
derived by extension or
[Empty]
restriction to create new
complex types.
For global complex types.
Default Attributes Apply
The schema element can true/false
carry a
defaultAttributes
attribute, which identifies an
attribute group. Each
complexType defined in
the schema document then
automatically includes that
attribute group, unless this is
overridden by the
defaultAttributesApply
attribute on the
complexType element.
This property is available
only for XML Schema 1.1.
ID
The component id.
For all complex types.
Component
The edited component name. Not editable property.
For all complex types.
Namespace
The component namespace. Not editable property.
For all complex types.
System ID
The component system id.
For all complex types.
Any id
Not editable property.
Mentions
xs:simpleType
Defines a simple type. A simple type definition is a set of constraints on strings and information about the values they
encode, applicable to the normalized value of an attribute information item or of an element information item with no
Oxygen XML Editor | Editing Documents | 350
element children. Informally, it applies to the values of attributes and the text-only content of elements. See more info
at http://www.w3.org/TR/xmlschema11-1/#element-simpleType.
Tip: A simple type which is a base type to another type will be rendered with yellow background.
xs:simpleType properties
Name
Description
Possible Values
Scope
Name
Simple type name. Always
required.
Any NCName.
Only for global simple types.
If missing, will be displayed
as '[simpleType]' in diagram.
Derivation
The simple type category:
restriction, list or union.
restriction,list or union
For all simple types.
Base Type
A simple type definition
component. Required if
derivation method is set to
restriction.
All global simple types and
built-in simple types. In
addition another 3 proposals
are present: [anonymous
restriction], [anonymous
list], [anonymous union] for
easily create anonymous
simple types.
For global and anonymous
simple types with the
derivation method set to
restriction.
Item Type
A simple type definition
component. Required if
derivation method is set to
list.
All global simple types and
built-in simple types(from
schema for schema). In
addition another 3 proposals
are present: [anonymous
restriction], [anonymous
list], [anonymous union] for
easily create anonymous
simple types.
For global and anonymous
simple types with the
derivation method set to list.
Derivation by list is the
process of transforming a
simple datatype (named the
item type) into a
whitespace-separated list of
values from this datatype.
The item type can be defined
inline by adding a
simpleType definition as a
child element of the list
element, or by reference,
using the itemType attribute
(it is an error to use both).
Member Types
Category for grouping union Not editable property.
members.
For global and anonymous
simple types with the
derivation method set to
union.
Member
A simple type definition
component. Required if
derivation method is set to
union.
For global and anonymous
simple types with the
derivation method set to
union. Deriving a simple
datatype by union merges the
lexical spaces of several
simple datatypes (called
member types) to create a
new simple datatype. The
member types can be defined
either by reference (through
the memberTypes attribute)
or embedded as simple
All global simple types and
built-in simple types(from
schema for schema). In
addition another 3 proposals
are present: [anonymous
restriction], [anonymous
list], [anonymous union] for
easily create anonymous
simple types.
Oxygen XML Editor | Editing Documents | 351
Name
Description
Possible Values
Scope
datatype local definitions in
the xs:union element. Both
styles can be mixed.
Final
Blocks any further
derivations of this datatype
(by list, union, derivation or
all).
#all, list, restriction, union, Only for global simple types.
list restriction, list union,
restriction union. In addition,
[Empty] proposal is present
for set empty string as value.
ID
The component id.
Any id.
For all simple types
Component
The name of the edited
component.
Not editable property.
Only for global and local
simple types
Namespace
The component namespace. Not editable property.
For global simple types.
System ID
The component system id.
Not present for built-in
simple types..
Not editable property.
xs:alternative
The type alternatives mechanism allows you to specify type substitutions on an element declaration.
Note: xs:alternative is available for XML Schema 1.1.
xs:alternative properties
Name
Description
Possible Values
Type
Specifies type substitutions for an
All declared or built-in types. In
element, depending on the value of the addition, the following anonymous
attributes.
types are available: [ST-restriction],
[ST-union], [ST-list],
[CT-anonymous], [CT-extension SC],
[CT-restriction SC], [CT-restriction
CC], [CT-extension CC].
Test
Specifies an XPath expression. If the An XPath expression.
XPath condition is valid, the specified
type is selected as the element type.
The expressions allowed are limited to
a subset of XPath 2.0. Only the
attributes of the current element and
inheritable attributes from ancestor
elements are accessible in the XPath
expression. When you edit this
property, the content completion list
of proposals offers XPath expressions.
XPath Default Namespace
The default namespace used when the ##defaultNamespace,
XPath expression is evaluated.
##targetNamespace, ##local.
ID
Specifies the component ID.
Any ID.
Component
Specifies the type of XML schema
component.
Not editable property.
Oxygen XML Editor | Editing Documents | 352
Name
Description
Possible Values
System ID
Points to the document location of the Not editable property.
schema.
xs:group
Defines a group of elements to be used in complex type definitions. See more info at
http://www.w3.org/TR/xmlschema11-1/#element-group.
When referenced, the graphical representation also contains the value for the minOccurs and maxOccurs properties (for
0..1 and 1..1 occurs the values are implied by the connector style) and the connectors to the group are drawn using dotted
lines if the group is optional.
xs:group properties
Property Name
Description
Possible Values
Mentions
Name
The group name. Always
required.
Any NCName for global
groups, all declared groups
for reference.
If missing, will be displayed
as '[group]' in diagram.
Min Occurs
Minimum number of
occurrences of the group.
A numeric positive value.
Default value is 1.
Appears only for reference
groups.
Max Occurs
Maximum number of
occurrences of the group.
A numeric positive value.
Default value is 1.
Appears only for reference
groups.
ID
The component id.
Any id
For all groups.
Component
The edited component name. Not editable property.
For all groups.
Namespace
The component namespace. Not editable property
For all groups.
System ID
The component system id.
For all groups.
Not editable property.
xs:include
Adds multiple schemas with the same target namespace to a document. See more info at
http://www.w3.org/TR/xmlschema11-1/#element-include.
xs:include properties
Property Name
Description
Possible Values
Schema Location
Included schema location.
Any URI
ID
Include ID.
Any ID
Component
The component name.
Not editable property.
xs:import
Adds multiple schemas with different target namespace to a document. See more info at
http://www.w3.org/TR/xmlschema11-1/#element-import.
xs:import properties
Oxygen XML Editor | Editing Documents | 353
Property Name
Description
Possible Values
Schema Location
Imported schema location
Any URI
Namespace
Imported schema namespace
Any URI
ID
Import ID
Any ID
Component
The component name
Not editable property.
xs:redefine
Redefines simple and complex types, groups, and attribute groups from an external schema. See more info at
http://www.w3.org/TR/xmlschema11-1/#element-redefine.
xs:redefine properties
Property Name
Description
Possible Values
Schema Location
Redefine schema location.
Any URI
ID
Redefine ID
Any ID
Component
The component name.
Not editable property.
xs:override
The override construct allows replacements of old components with new ones without any constraint. See more info at
http://www.w3.org/TR/xmlschema11-1/#element-override.
xs:override properties
Property Name
Description
Possible Values
Schema Location
Redefine schema location.
Any URI
ID
Redefine ID
Any ID
xs:notation
Describes the format of non-XML data within an XML document. See more info at
http://www.w3.org/TR/xmlschema11-1/#element-notation.
xs:notation properties
Property Name
Description
Possible values
Mentions
Name
The notation name. Always Any NCName.
required.
If missing, will be displayed
as '[notation]' in diagram.
System Identifier
The notation system
identifier.
Any URI
Required if public identifier
is absent, otherwise optional.
Public Identifier
The notation public
identifier.
A Public ID value
Required if system identifier
is absent, otherwise optional.
ID
The component id.
Any ID
For all notations.
Component
The edited component name. Not editable property.
For all notations.
Oxygen XML Editor | Editing Documents | 354
Property Name
Description
Possible values
Namespace
The component namespace. Not editable property.
For all notations.
System ID
The component system id.
For all notations.
Not editable property.
Mentions
xs:sequence, xs:choice, xs:all
Figure 177: An xs:sequence in diagram
xs:sequence specifies that the child elements must appear in a sequence. Each child element can occur from 0 to
any number of times. See more info at http://www.w3.org/TR/xmlschema11-1/#element-sequence.
Figure 178: An xs:choice in diagram
xs:choice allows only one of the elements contained in the declaration to be present within the containing element.
See more info at http://www.w3.org/TR/xmlschema11-1/#element-choice.
Figure 179: An xs:all in diagram
xs:all specifies that the child elements can appear in any order. See more info at
http://www.w3.org/TR/xmlschema11-1/#element-all.
The compositor graphical representation also contains the value for the minOccurs and maxOccurs properties (for
0..1 and 1..1 occurs the values are implied by the connector style) and the connectors to the compositor are drawn using
dotted lines if the compositor is optional.
xs:sequence, xs:choice, xs:all properties
Property Name
Description
Possible Values
Mentions
Compositor
Compositor type.
sequence, choice, all.
'all' is only available as a
child of a group or complex
type.
Min Occurs
Minimum occurrences of
compositor.
A numeric positive value.
Default is 1.
The property is not present
if compositor is 'all' and is
child of a group.
Max Occurs
Maximum occurrences of
compositor.
A numeric positive value.
Default is 1.
The property is not present
if compositor is 'all' and is
child of a group.
ID
The component id.
Any ID
For all compositors.
Component
The edited component name. Not editable property.
For all compositors.
System ID
The component system id.
For all compositors.
Not editable property.
xs:any
Enables the author to extend the XML document with elements not specified by the schema. See more info at
http://www.w3.org/TR/xmlschema11-1/#element-any.
Oxygen XML Editor | Editing Documents | 355
The graphical representation also contains the value for the minOccurs and maxOccurs properties (for 0..1 and 1..1
occurs the values are implied by the connector style) and the connectors to the wildcard are drawn using dotted lines if
the wildcard is optional.
xs:any properties
Property Name
Description
Possible Values
Namespace
The list of allowed namespaces. The ##any, ##other, ##targetNamespace,
namespace attribute expects a list of ##local or anyURI
namespace URIs. In this list, two
values have a specific meaning:
'##targetNamespace' stands for the
target namespace, and '##local' stands
for local attributes (without
namespaces).
notNamespace
Specifies the namespace that extension ##local, ##targetNamespace
elements or attributes cannot come
from.
notQName
Specifies an element or attribute that
is not allowed.
##defined
Process Contents
Type of validation required on the
elements allowed for this wildcard.
skip, lax, strict
Min Occurs
Minimum occurrences of any
A numeric positive value. Default is 1.
Max Occurs
Maximum occurrences of any
A numeric positive value. Default is 1.
ID
The component id.
Any ID.
Component
The name of the edited component.
Not editable property.
System ID
The component system id.
Not editable property.
xs:anyAttribute
Enables the author to extend the XML document with attributes not specified by the schema. See more info at
http://www.w3.org/TR/xmlschema11-1/#element-anyAttribute.
xs:anyAttribute properties
Property Name
Description
Possible Value
Namespace
The list of allowed namespaces. The ##any, ##other, ##targetNamespace,
namespace attribute expects a list of ##local or anyURI
namespace URIs. In this list, two
values have a specific meaning:
'##targetNamespace' stands for the
target namespace, and '##local' stands
for local attributes (without
namespaces).
Process Contents
Type of validation required on the
elements allowed for this wildcard.
skip, lax, strict
ID
The component id.
Any ID.
Oxygen XML Editor | Editing Documents | 356
Property Name
Description
Possible Value
Component
The name of the edited component.
Not editable property.
System ID
The component system id.
Not editable property.
xs:unique
Defines that an element or an attribute value must be unique within the scope. See more info at
http://www.w3.org/TR/xmlschema11-1/#element-unique.
xs:unique properties
Property Name
Description
Possible Values
Name
The unique name. Always required.
Any NCName.
ID
The component id.
Any ID.
Component
The edited component name.
Not editable property.
Namespace
The component namespace.
Not editable property.
System ID
The component system id.
Not editable property.
xs:key
Specifies an attribute or element value as a key (unique, non-nullable and always present) within the containing element
in an instance document. See more info at http://www.w3.org/TR/xmlschema11-1/#element-key.
xs:key properties
Property Name
Description
Possible Value
Name
The key name. Always required.
Any NCName.
ID
The component id.
Any ID.
Component
The edited component name.
Not editable property.
Namespace
The component namespace.
Not editable property.
System ID
The component system id.
Not editable property.
Oxygen XML Editor | Editing Documents | 357
xs:keyRef
Specifies that an attribute or element value corresponds to that of the specified key or unique element. See more info at
http://www.w3.org/TR/xmlschema11-1/#element-keyref.
A keyref by default displays the Referenced Key property when rendered.
xs:keyRef properties
Property Name
Description
Possible Values
Name
The keyref name. Always required.
Any NCName.
Referenced Key
The name of referenced key.
any declared element constraints.
ID
The component id.
Any ID.
Component
The edited component name.
Not editable property.
Namespace
The component namespace.
Not editable property.
System ID
The component system id.
Not editable property.
xs:selector
Specifies an XPath expression that selects a set of elements for an identity constraint. See more info at
http://www.w3.org/TR/xmlschema11-1/#element-selector.
xs:selector properties
Property Name
Description
Possible Values
XPath
Relative XPath expression identifying An XPath expression.
the element on which the constraint
applies.
ID
The component id.
Any ID.
Component
The edited component name.
Not editable property.
System ID
The component system id.
Not editable property.
xs:field
Specifies an XPath expression that specifies the value used to define an identity constraint. See more info at
http://www.w3.org/TR/xmlschema11-1/#element-field.
xs:field properties
Property Name
Description
Possible Values
XPath
Relative XPath expression identifying An XPath expression.
the field(s) composing the key, key
reference, or unique constraint.
Oxygen XML Editor | Editing Documents | 358
Property Name
Description
Possible Values
ID
The component id.
Any ID.
Component
The edited component name.
Not editable property.
System ID
The component system id.
Not editable property.
xs:assert
Assertions provide a flexible way to control the occurrence and values of elements and attributes available in an XML
Schema.
Note: xs:assert is available for XML Schema 1.1.
xs:assert properties
Property Name
Description
Possible Values
Test
Specifies an XPath expression. If the An XPath expression.
XPath condition is valid, the specified
type is selected as the element type.
The expressions allowed are limited to
a subset of XPath 2.0. Only the
attributes of the current element and
inheritable attributes from ancestor
elements are accessible in the XPath
expression. When you edit this
property, the content completion list
of proposals offers XPath expressions.
XPath Default Namespace
The default namespace used when the ##defaultNamespace,
XPath expression is evaluated.
##targetNamespace, ##local.
ID
Specifies the component ID.
Any ID.
Component
The edited component name.
Not editable property.
System ID
The component system id.
Not editable property.
xs:openContent
The openContent element enables instance documents to contain extension elements interleaved among the elements
declared by the schema. You can declare open content for your elements at one place - within the complexType definition,
or at the schema level.
For further details about the openContent component, go to
http://www.w3.org/TR/xmlschema11-1/#element-openContent.
xs:openContent properties
Property Name
Description
Possible Value
Mode
Specifies where the extension elements The value can be: "interleave", "suffix"
can be inserted.
or "none". The default value is
"interleave".
ID
The component id.
Any ID.
Component
The edited component name.
Not editable property.
Oxygen XML Editor | Editing Documents | 359
Property Name
Description
Possible Value
System ID
The component system id.
Not editable property.
Note: This component is available for XML Schema 1.1 only. To change the version of the XML Schema,
open the Preferences dialog box and go to XML > XML Parser > XML Schema.
Constructs Used to Group Schema Components
This section explains the components that can be used for grouping other schema components:
•
•
•
Attributes
Constraints
Substitutions
Attributes
Groups all attributes and attribute groups belonging to a complex type.
Attributes properties
Property Name
Description
Possible Values
Component
The element for which the attributes
are displayed.
Not editable property.
System ID
The component system id.
Not editable property.
Constraints
Groups all constraints (xs:key, xs:keyRef or xs:unique) belonging to an element.
Attributes properties
Property Name
Description
Possible Values
Component
The element for which the constraints Not editable property.
are displayed.
System ID
The component system id.
Not editable property.
Oxygen XML Editor | Editing Documents | 360
Substitutions
Groups all elements which can substitute the current element.
Attributes properties
Property Name
Description
Possible Values
Component
The element for which the substitutions Not editable property.
are displayed.
System ID
The component system id.
Not editable property.
Schema Validation
Validation for the Design mode is seamlessly integrated in the Oxygen XML Editor XML documents validation capability.
Figure 180: XML Schema Validation
A schema validation error is presented by highlighting the invalid component:
•
•
•
•
In the Attributes View.
In the diagram by surrounding the component that has the error with a red border.
A marker on the errors stripe at the right of the diagram view.
A status label with a red icon ( ) below the diagram view.
Invalid facets for a component are highlighted in the Facets View.
Oxygen XML Editor | Editing Documents | 361
Components with invalid properties are rendered with a red border. This is a default color, but you can customize it in
the Document checking user preferences. When hovering an invalid component, the tooltip will present the validation
errors associated with that component.
When editing a value which is supposed to be a qualified or unqualified XML name, the application provides automatic
validation of the entered value. This proves to be very useful in avoiding setting invalid XML names for the given
property.
If you validate the entire schema using the
Validate action from the Document > Validate menu or from the
Validation toolbar drop-down menu, all validation errors will be presented in the Errors tab. To resolve an error,
just click it (or double-click for errors located in other schemas) and the corresponding schema component will be
displayed as the diagram root so that you can easily correct the error.
Important: If the schema imports only the namespace of other schema without specifying the schema location
and a catalog is set-up that maps the namespace to a certain location both the validation and the diagram will
correctly identify the imported schema.
Tip: If the validation action finds that the schema contains unresolved references, the application will suggest
the use of validation scenarios, but only if the current edited schema is a XML Schema module.
Edit Schema Namespaces
You can use the XML Schema Namespaces dialog box to easily set a target namespace and define namespace mappings
for a newly created XML Schema. In the Design mode these namespaces can be modified anytime by choosing Edit
Schema Namespaces from the contextual menu. Also you can do that by double-clicking the schema root in the diagram.
The XML Schema Namespaces dialog box allows you to edit the following information:
•
Target namespace - The target namespace of the schema.
•
Prefixes - The dialog box displays a table with namespaces and the mapped prefixes. You can add a new prefix
mapping or remove an already existing one.
Editing XML Schema in Text Editing Mode
This page is used for editing the XML Schema in a text mode. It offers powerful content completion support, a
synchronized Outline view, and multiple refactoring actions. The Outline view has two display modes: the standard
outline mode and the components mode.
A diagram of the XML Schema can be presented side by side with the text. To activate the diagram presentation, enable
the Show Full Model XML Schema diagram check box from the Diagram preferences page.
Content Completion in XML Schema
The intelligent Content Completion Assistant available in Oxygen XML Editor enables rapid, in-line identification
and insertion of elements, attributes and attribute values valid in the editing context. All available proposals are listed
in a pop-up menu displayed at the current cursor position.
The Content Completion Assistant is enabled by default. To disable it, open the Preferences dialog box and go to
Editor > Content Completion. It is activated:
•
•
Automatically, after a configurable delay from the last key press of the < character. You can adjust the delay from
the Content Completion preferences page.
On demand, by pressing Ctrl Space (Command Space on OS X) on a partial element or attribute name.
Note: If the Content Completion list contains only one valid proposal, when you press the Ctrl Space
(Command Space on OS X) shortcut key, the proposal is automatically inserted.
Note: You can also start the Content Completion Assistant from Document > Content Completion >
Start Content Completion.
Oxygen XML Editor | Editing Documents | 362
When active, it displays a list of context-sensitive proposals valid at the current cursor position. Elements are selected
in the list using the Up and Down cursor keys on your keyboard. For each selected item in the list, the Content Completion
Assistant displays a documentation window. You can customize the size of the documentation window by dragging its
top, right, and bottom borders.
To insert the selected content, do one of the following:
•
•
Press Enter or Tab key on your keyboard to insert both the start and end tags. The cursor is positioned inside the
start tag, in a position suitable for inserting attributes.
Press Ctrl Enter (Meta Enter on OS X) on your keyboard. Oxygen XML Editor inserts both the start and end tags
and positions the cursor between the tags, so you can start typing content.
Depending on the selected schema version, Oxygen XML Editor populates the proposals list with information taken
either from XML Schema 1.0 or 1.1.
Oxygen XML Editor helps you to easily reference a component by providing the list of proposals (complex types, simple
types, elements, attributes, groups, attribute groups, or notations) valid in the current context. The components are
collected from the current file or from the imported/included schemas.
When editing xs:annotation/xs:appinfo elements of an XML Schema, the Content Completion Assistant
proposes elements and attributes from a custom schema (by default ISO Schematron). This feature can be configured
from the XSD Content Completion preferences page.
References to XML Schema Specification
The same as in editing XML documents, the message of an error obtained by validation of an XML Schema document
includes a reference to the W3C specification for XML Schema. An error message contains an Info field that will open
the browser on the "XML Schema Part 1:Structures" specification at exactly the point where the error is described thus
allowing you to understand the reason for that error.
Figure 181: Link to Specification for XML Schema Errors
Validation of an XML Schema containing a type definition with a minOccurs or maxOccurs attribute having a value
larger than 256 limits the value to 256 and issues a warning about this restriction in the Message panel at the bottom of
the Oxygen XML Editor window. Otherwise, for large values of the minOccurs and maxOccurs attributes the
validator fails with an OutOfMemory error which practically makes Oxygen XML Editor unusable without a restart of
the entire application.
Important:
If the schema imports only a namespace without specifying the schema location and a catalog is set-up mapping
the namespace to a certain location both validation and the schema components outline will correctly identify
the imported schema.
Oxygen XML Editor | Editing Documents | 363
Highlight Component Occurrences
When a component (for example types, elements, attributes) is found at current cursor position, Oxygen XML Editor
performs a search over the entire document to find the component declaration and all its references. When found, they
are highlighted both in the document and in the stripe bar, at the right side of the document. Customizable colors are
used: one for the component definition and another one for component references. Occurrences are displayed until
another component is selected and a new search is performed. All occurrences are removed when you start to edit the
document.
This feature is on by default. To configured it, open the Preferences dialog box and go to Editor > Mark Occurrences.
A search can also be triggered with the Search > Search Occurrences in File () contextual menu action. All matches
are displayed in a separate tab of the Results view.
Editing XML Schema in the Master Files Context
Smaller interrelated modules that define a complex XML Schema cannot be correctly edited or validated individually,
due to their interdependency with other modules. For example, an element defined in a main schema document is not
visible when you edit an included module. Oxygen XML Editor provides the support for defining the main module (or
modules), thus allowing you to edit any of the imported/included schema files in the context of the larger schema
structure.
You cat set a main XML document either using the master files support from the Project view, or using a validation
scenario.
To set a main file using a validation scenario, add validation units that point to the main schemas. Oxygen XML Editor
warns you if the current module is not part of the dependencies graph computed for the main schema. In this case, it
considers the current module as the main schema.
The advantages of editing in the context of main file include:
•
•
•
Correct validation of a module in the context of a larger schema structure.
Content Completion Assistant displays all the referable components valid in the current context. This include
components defined in modules other than the currently edited one.
The Outline displays the components collected from the entire schema structure.
Searching and Refactoring Actions in XML Schemas
Search Actions
The following search actions can be applied on attribute, attributeGroup, element, group, key, unique,
keyref, notation, simple, or complex types and are available from the Search submenu in the contextual menu
of the current editor or from the Document > References menu:
•
•
•
•
Search References - Searches all references of the item found at current cursor position in the defined scope,
if any. If a scope is defined, but the current edited resource is not part of the range of resources determined by this,
a warning dialog box is displayed and you have the possibility to define another search scope.
Search References in - Searches all references of the item found at current cursor position in the file or files that
you specify when define a scope in the Search References dialog box.
Search Declarations - Searches all declarations of the item found at current cursor position in the defined scope
if any. If a scope is defined, but the current edited resource is not part of the range of resources determined by this,
a warning dialog box will be displayed and you have the possibility to define another search scope.
Search Declarations in - Searches all declarations of the item found at current cursor position in the file or files
that you specify when you define a scope for the search operation.
•
Search Occurrences in File - Searches all occurrences of the item at the cursor position in the currently edited
file.
The following action is available from the contextual menu and the Document > Schema menu:
•
Show Definition - Moves the cursor to the definition of the referenced XML Schema item.
Oxygen XML Editor | Editing Documents | 364
Note: You can also use the Ctrl Single-Click (Command Single-Click on OS X) shortcut on a reference
to display its definition.
Refactoring Actions
The following refactoring actions can be applied on attribute, attributeGroup, element, group, key,
unique, keyref, notation, simple, or complex types and are available from the Refactoring submenu in the
contextual menu of the current editor or from the Document > Refactoring menu:
•
Rename Component - Allows you to rename the current component in-place. The component and all its references
in the document are highlighted with a thin border and the changes you make to the component at the cursor position
are updated in real time to all occurrences of the component. To exit in-place editing, press the Esc or Enter key on
your keyboard.
•
Rename Component in - Opens the Rename component_type dialog box that allows you to rename the selected
component by specifying the new component name and the files to be affected by the modification. If you click the
Preview button, you can view the files affected by the Rename Component action.
Figure 182: Rename Identity Constraint Dialog Box
XML Schema Outline View
The Outline view for XML Schema presents all the global components grouped by their location, namespace, or type.
If hidden, you can open it from Window > Show View > Outline.
Oxygen XML Editor | Editing Documents | 365
Figure 183: The Outline View for XML Schema
The Outline view provides the following options in the
Settings menu on the Outline view toolbar:
Filter returns exact matches
The text filter of the Outline view returns only exact matches;
Selection update on cursor move
Allows a synchronization between Outline view and schema diagram. The selected view from the diagram is also
selected in the Outline view.
Sort
Allows you to sort alphabetically the schema components.
Show all components
Displays all components that were collected starting from the main files. Components that are not referable from
the current file are marked with an orange underline. To reference them, add an import directive with the
componentNS namespace.
Show referable components
Displays all components (collected starting from the main files) that can be referenced from the current file. This
option is set by default.
Show only local components
Displays the components defined in the current file only.
Group by location/namespace/type
These three operations allow you to group the components by location, namespace, or type. When grouping by
namespace, the main schema target namespace is the first presented in the Outline view.
The following contextual menu actions are available in the Outline view:
Oxygen XML Editor | Editing Documents | 366
Remove (Delete)
Removes the selected item from the diagram.
Search References (Ctrl (Meta on Mac OS)+Shift+R)
Searches all references of the item found at current cursor position in the defined scope, if any.
Search References in
Searches all references of the item found at current cursor position in the specified scope.
Component Dependencies (Ctrl (Meta on Mac OS)+Shift+F4)
Allows you to see the dependencies for the current selected component.
Resource Hierarchy (F4)
Allows you to see the hierarchy for the current selected resource.
Resource Dependencies (Shift + F4)
Allows you to see the dependencies for the current selected resource.
Rename Component in
Renames the selected component.
Generate Sample XML Files
Generate XML files using the current opened schema. The selected component is the XML document root.
The upper part of the Outline view contains a filter box that allows you to focus on the relevant components. Type a
text fragment in the filter box and only the components that match it are presented. For advanced usage you can use
wildcard characters (*, ?) and separate multiple patterns with commas.
Tip: The search filter is case insensitive. The following wildcards are accepted:
•
•
•
* - any string
? - any character
, - patterns separator
If no wildcards are specified, the string to search will be searched as a partial match (like *textToFind*).
The content of the Outline view and the editing area are synchronized. When you select a component in the Outline
view, its definition is highlighted in the editing area.
Component Dependencies View for XML Schema
The Component Dependencies view allows you to spot the dependencies for the selected component of an XML
Schema, a Relax NG schema, a NVDL schema or an XSLT stylesheet. You can open the view from Window > Show
View > Component Dependencies .
If you want to see the dependencies of a schema component:
•
•
Select the desired schema component in the editor.
Choose the Component Dependencies action from the contextual menu.
The action is available for all named components (for example elements or attributes).
Oxygen XML Editor | Editing Documents | 367
Figure 184: Component Dependencies View - Hierarchy for xhtml11.xsd
In the Component Dependencies view the following actions are available in the toolbar:
Refresh
Refreshes the dependencies structure.
Stop
Stop the dependencies computing.
Configure
Allows you to configure a search scope to compute the dependencies structure.
History
Contains a list of previously executed dependencies computations.
The contextual menu contains the following actions:
Go to First Reference
Selects the first reference of the referenced component from the current selected component in the dependencies
tree.
Go to Component
Shows the definition of the currently selected component in the dependencies tree.
Oxygen XML Editor | Editing Documents | 368
Tip: If a component contains multiple references to another components, a small table is displayed that contains
all these references. When a recursive reference is encountered, it is marked with a special icon .
XML Schema Quick Assist Support
The Quick Assist support improves the development work flow, offering fast access to the most commonly used actions
when you edit XML Schema documents.
The Quick Assist feature is activated automatically when the cursor is positioned over the name of a component. It is
accessible via a yellow bulb help marker placed on the cursor line, in the line number stripe on the left side of the editor.
Also, you can invoke the quick assist menu by using the Alt + 1 keys (Meta + Alt + 1 on Mac OS X) keyboard shortcuts.
Figure 185: Quick Assist Support
The quick assist support offers direct access to the following actions:
Rename Component in
Renames the component and all its dependencies.
Search Declarations
Searches the declaration of the component in a predefined scope. It is available only when the context represents a
component name reference.
Search References
Searches all references of the component in a predefined scope.
Component Dependencies
Searches the component dependencies in a predefined scope.
Change Scope
Configures the scope that will be used for future search or refactor operations.
Rename Component
Allows you to rename the current component in-place.
Search Occurrences
Searches all occurrences of the component within the current file.
To watch our video demonstration about improving schema development using the Quick Assist action set, go to
http://oxygenxml.com/demo/Quick_Assist.html.
XML Schema Resource Hierarchy / Dependencies View
The Resource Hierarchy / Dependencies view allows you to easily see the hierarchy / dependencies for an XML
Schema, a Relax NG schema or an XSLT stylesheet. To open this view, go to Window > Show View > Resource
Hierarchy / Dependencies .
Oxygen XML Editor | Editing Documents | 369
The Resource Hierarchy / Dependencies is useful when you want to start from an XML Schema (XSD) file and build
and review the hierarchy of all the other XSD files that are imported, included or redefined in the given XSD file. The
view is also able to build the tree structure, that is the structure of all other XSD files that import, include or redefine
the given XSD file. The scope of the search is configurable (the current project, a set of local folders, etc.)
The build process for the hierarchy view is started with the Resource Hierarchy action available on the contextual
menu of the editor panel.
Figure 186: Resource Hierarchy/Dependencies View - Hierarchy for xhtml11.xsd
The build process for the dependencies view is started with the Resource Dependencies action available on the contextual
menu.
Figure 187: Resource Hierarchy/Dependencies View - Dependencies for xhtml-param-1.xsd
Oxygen XML Editor | Editing Documents | 370
The following actions are available in the Resource Hierarchy/Dependencies view:
Refresh
Refreshes the Hierarchy/Dependencies structure.
Stop
Stops the hierarchy/dependencies computing.
Show Hierarchy
Allows you to choose a resource to compute the hierarchy structure.
Show Dependencies
Allows you to choose a resource to compute the dependencies structure.
Configure
Allows you to configure a scope to compute the dependencies structure. There is also an option for automatically
using the defined scope for future operations.
History
Provides access to the list of previously computed dependencies. Use the
items from this list.
Clear history button to remove all
The contextual menu contains the following actions:
Open
Opens the resource. You can also double-click a resource in the Hierarchy/Dependencies structure to open it.
Copy location
Copies the location of the resource.
Move resource
Moves the selected resource.
Rename resource
Renames the selected resource.
Show Resource Hierarchy
Shows the hierarchy for the selected resource.
Show Resource Dependencies
Shows the dependencies for the selected resource.
Add to Master Files
Adds the currently selected resource in the Master Files directory.
Expand All
Expands all the children of the selected resource from the Hierarchy/Dependencies structure.
Collapse All
Collapses all children of the selected resource from the Hierarchy/Dependencies structure.
Tip: When a recursive reference is encountered in the Hierarchy view, the reference is marked with a special
icon .
Note: The Move resource or Rename resource actions give you the option to update the references to the
resource.
Moving/Renaming XML Schema Resources
You are able to move and rename a resource presented in the Resource/Hierarchy Dependencies view, using the
Rename resource and Move resource refactoring actions from the contextual menu.
When you select the Rename action in the contextual menu of the Resource/Hierarchy Dependencies view, the
Rename resource dialog box is displayed. The following fields are available:
•
•
Oxygen XML Editor | Editing Documents | 371
New name - Presents the current name of the edited resource and allows you to modify it.
Update references - Enable this option to update the references to the resource you are renaming.
When you select the Move action from the contextual menu of the Resource/Hierarchy Dependencies view, the Move
resource dialog box is displayed. The following fields are available:
•
•
•
Destination - Presents the path to the current location of the resource you want to move and gives you the option to
introduce a new location.
New name - Presents the current name of the moved resource and gives you the option to change it.
Update references of the moved resource(s) - Enable this option to update the references to the resource you are
moving, in accordance with the new location and name.
If the Update references of the moved resource(s) option is enabled, a Preview option (which opens the Preview
dialog box) is available for both actions. The Preview dialog box presents a list with the resources that are updated.
Generate Sample XML Files
Oxygen XML Editor offers support to generate sample XML files both from XML schema 1.0 and XML schema 1.1,
depending on the XML schema version set in Preferences.
To generate sample XML files from an XML Schema, use the
Generate Sample XML Files action from the Tools
menu. This action is also available in the contextual menu of the schema Design mode.
The Generate Sample XML Files dialog box contains the following tabs:
•
•
•
Schema
Options
Advanced
To watch our video demonstration about generating sample XML files, go to
http://oxygenxml.com/demo/Generate_Sample_XML_Files.html.
The Schema Tab
Figure 188: The Generate Sample XML Files Dialog Box
Oxygen XML Editor | Editing Documents | 372
Complete the dialog box as follows:
•
•
•
•
•
•
•
•
•
URL - Schema location as an URL. A history of the last used URLs is available in the drop-down box.
Namespace - Displays the namespace of the selected schema.
Document root - After the schema is selected, this drop-down box is populated with all root candidates gathered
from the schema. Choose the root of the output XML documents.
Output folder - Path to the folder where the generated XML instances will be saved.
Filename prefix and Extension - Generated file names have the following format: prefixN.extension, where
N represents an incremental number from 0 up to Number of instances - 1.
Number of instances - The number of XML files to be generated.
Open first instance in editor - When checked, the first generated XML file is opened in editor.
Namespaces - Here you can specify the default namespace as well as the proxies (prefixes) for namespaces.
Load settings / Export settings - The current settings can be saved for further usage with the Export settings button,
and reloaded when necessary with the Load settings button.
The Options Tab
The Options tab allows you to set specific options for different namespaces and elements.
Figure 189: The Generate Sample XML Files Dialog Box
•
Namespace / Element table - Allows you to set a namespace for each element name that appears in an XML
document instance. The following prefix-to-namespace associations are available:
•
•
•
•
All elements from all namespaces (<ANY> - <ANY>). This is the default setting and can be customized from
the XML Instances Generator preferences page.
All elements from a specific namespace.
A specific element from a specific namespace.
Settings
•
Generate optional elements - When checked, all elements are generated, including the optional ones (having
the minOccurs attribute set to 0 in the schema).
•
•
Oxygen XML Editor | Editing Documents | 373
Generate optional attributes - When checked, all attributes are generated, including the optional ones (having
the use attribute set to optional in the schema.)
Values of elements and attributes - Controls the content of generated attribute and element values. Several
choices are available:
•
•
•
None - No content is inserted.
Default - Inserts a default value depending of data type descriptor of the particular element or attribute. The
default value can be either the data type name or an incremental name of the attribute or element (according
to the global option from the XML Instances Generator preferences page). Note that type restrictions are
ignored when this option is enabled. For example, if an element is of a type that restricts an xs:string with
the xs:maxLength facet in order to allow strings with a maximum length of 3, the XML instance generator
tool may generate string element values longer than 3 characters.
Random - Inserts a random value depending of data type descriptor of the particular element or attribute.
Important:
If all of the following are true, the XML Instances Generator outputs invalid values:
•
•
At least one of the restrictions is a regexp.
The value generated after applying the regexp does not match the restrictions imposed by one of
the facets.
This limitation leads to attributes or elements with values set to Invalid.
•
Preferred number of repetitions - Allows you to set the preferred number of repeating elements related with
minOccurs and maxOccurs facets defined in XML Schema.
•
•
•
•
•
Maximum recursion level - If a recursion is found, this option controls the maximum allowed depth of the same
element.
Choice strategy - Option used for xs:choice or substitutionGroup elements. The possible strategies
are:
•
•
•
•
•
•
If the value set here is between minOccurs and maxOccurs, then that value is used.
If the value set here is less than minOccurs, then the minOccurs value is used.
If the value set here is greater than maxOccurs, then maxOccurs is used.
First - The first branch of xs:choice or the head element of substitutionGroup is always used.
Random - A random branch of xs:choice or a substitute element or the head element of a
substitutionGroup is used.
Generate the other options as comments - Option to generate the other possible choices or substitutions (for
xs:choice and substitutionGroup). These alternatives are generated inside comments groups so you
can uncomment and use them later. Use this option with care (for example on a restricted namespace and element)
as it may generate large result files.
Load settings / Export settings - The current settings can be saved for further usage with the Export settings
button, and reloaded when necessary with the Load settings button.
Element values - The Element values tab allows you to add values that are used to generate the elements content.
If there are more than one value, then the values are used in a random order.
Attribute values - The Attribute values tab allows you to add values that are used to generate the attributes content.
If there are more than one value, then the values are used in a random order.
Oxygen XML Editor | Editing Documents | 374
The Advanced Tab
Figure 190: Advanced Tab
This tab allows you to set advanced options that controls the output values of elements and attributes.
•
•
•
Use incremental attribute / element names as default - If checked, the value of an element or attribute starts with
the name of that element or attribute. For example, for an a element the generated values are: a1, a2, a3, and so
on. If not checked, the value is the name of the type of that element / attribute (for example: string, decimal,
etc.)
Maximum length - The maximum length of string values generated for elements and attributes.
Discard optional elements after nested level - The optional elements that exceed the specified nested level are
discarded. This option is useful for limiting deeply nested element definitions that can quickly result in very large
XML documents.
Running the Generate Sample XML Files Action from Command Line
The Generate Sample XML Files tool can be also used from command line by running the script called
xmlGenerator.bat (on Windows) / xmlGenerator.sh (on Mac OS X / Unix / Linux) located in the Oxygen
XML Editor installation folder. The parameters can be set once in the dialog box, exported to an XML file on disk with
the button Export settings and reused from command line. With the exported settings file you can generate the same
XML instances from the command line as from the dialog box:
xmlGenerator.bat path_of_CFG_file
The script can be integrated in an external batch process launched from the command line. The command line parameter
of the script is the relative path to the exported XML settings file. The files specified with relative paths in the exported
XML settings will be made absolute relative to the folder where the script is run.
The following example shows such an XML configuration file:
XML Configuration File
<settings>
<schemaSystemId>http://www.w3.org/2001/XMLSchema.xsd</schemaSystemId>
<documentRoot>schema</documentRoot>
<outputFolder>D:\projects\output</outputFolder>
<filenamePrefix>instance</filenamePrefix>
<filenameExtension>xml</filenameExtension>
<noOfInstances>1</noOfInstances>
<openFirstInstance>true</openFirstInstance>
<defaultNamespace><NO_NAMESPACE></defaultNamespace>
<element namespace="<ANY>" name="<ANY>">
<generateOptionalElements>false</generateOptionalElements>
<generateOptionalAttributes>false</generateOptionalAttributes>
<valuesForContentType>DEFAULT</valuesForContentType>
<preferredNumberOfRepetitions>2</preferredNumberOfRepetitions>
<maximumRecursivityLevel>1</maximumRecursivityLevel>
<choicesAndSubstitutions strategy="RANDOM"
generateOthersAsComments="false"/>
<attribute namespace="<ANY>"
name="<ANY>">
<attributeValue>attrValue1</attributeValue>
<attributeValue>attrValue2</attributeValue>
</attribute>
</element>
<element namespace="<NO_NAMESPACE>"
name="<ANY>">
<generateOptionalElements>true</generateOptionalElements>
<generateOptionalAttributes>true</generateOptionalAttributes>
<valuesForContentType>DEFAULT</valuesForContentType>
Oxygen XML Editor | Editing Documents | 375
<preferredNumberOfRepetitions>2</preferredNumberOfRepetitions>
<maximumRecursivityLevel>1</maximumRecursivityLevel>
<choicesAndSubstitutions strategy="RANDOM"
generateOthersAsComments="true"/>
<elementValue>value1</elementValue>
<elementValue>value2</elementValue>
<attribute namespace="<ANY>"
name="<ANY>">
<attributeValue>attrValue1</attributeValue>
<attributeValue>attrValue2</attributeValue>
</attribute>
</element>
</settings>
Generating Documentation for an XML Schema
Oxygen XML Editor can generate detailed documentation for the components of an XML Schema in HTML, PDF,
DocBook, or other custom formats. You can select the components and the level of detail. The components are hyperlinked
in both HTML and DocBook documents.
Note: You can generate documentation for both XML Schema version 1.0 and 1.1.
To generate documentation for an XML Schema document, select XML Schema Documentation from the Tools >
Generate Documentation menu or from the Generate Documentation submenu in the contextual menu of the Project
view.
Figure 191: The XML Schema Documentation Dialog Box
The Schema URL field of the dialog box must contain the full path to the XML Schema (XSD) file for which you want
to generate documentation. The schema may be a local or a remote file. You can specify the path to the schema by
entering it in the text field, or by using the
Insert Editor Variables button or the options in the
Browse
drop-down menu.
Oxygen XML Editor | Editing Documents | 376
The Output Tab
The following options are available in the Output tab:
•
Format - Allows you to choose between the following formats:
•
•
•
•
•
•
•
HTML - The documentation is generated in HTML output format.
PDF - The documentation is generated in PDF output format.
DocBook - The documentation is generated in DocBook output format.
Custom - The documentation is generated in a custom output format, allowing you to control the output. Click
the Options button to open a Custom format options dialog box where you can specify a custom stylesheet for
creating the output. There is also an option to Copy additional resources to the output folder and you can
select the path to the additional Resources that you want to copy. You can also choose to keep the intermediate
XML files created during the documentation process by deselecting the Delete intermediate XML file option.
Output file - You can specify the path of the output file by entering it in the text field, or by using the
Insert
Editor Variables button or the options in the
Browse drop-down menu.
Split output into multiple files - Instructs the application to split the output into multiple files. You can choose to
split them by namespace, location, or component name.
Open in Browser/System Application - Opens the result in the system application associated with the output file
type.
Note: To set the browser or system application that will be used, open the Preferences dialog box, then go
to Global and set it in the Default Internet browser field. This will take precedence over the default system
application settings.
•
Keep only the annotations with xml:lang set to - The generated output will contain only the annotations with the
xml:lang attribute set to the selected language. If you choose a primary language code (for example, en for
English), this includes all its possible variations (en-us, en-uk, etc.).
The Settings Tab
When you generate documentation for an XML schema you can choose what components to include in the output and
the details to be included in the documentation.
Oxygen XML Editor | Editing Documents | 377
Figure 192: The Settings Tab of the XML Schema Documentation Dialog Box
The Settings tab allows you to choose whether or not to include the following components: Global elements, Global
attributes, Local elements, Local attributes, Simple Types, Complex Types, Groups, Attribute Groups, Redefines,
Referenced schemas, Include notations.
You can choose whether or not to include the following other details:
•
Diagram - Displays the diagram for each component. You can choose the image format (JPEG, PNG, GIF, SVG)
to use for the diagram section. The generated diagrams are dependent on the options from the Schema Design
Properties page.
•
•
•
•
•
•
Namespace - Displays the namespace for each component.
Location - Displays the schema location for each component.
Type - Displays the component type if it is not an anonymous one.
Type hierarchy - Displays the types hierarchy.
Model - Displays the model (sequence, choice, all) presented in BNF form. Different separator characters are used
depending on the information item used:
•
•
•
•
•
•
Diagram annotations - This option controls whether the annotations of the components presented in the diagram
sections are included.
xs:all - its children will be separated by space characters.
xs:sequence - its children will be separated by comma characters.
xs:choice - its children will be separated by | characters.
Children - Displays the list of component's children.
Instance - Displays an XML instance generated based on each schema element.
Used by - Displays the list of all the components that reference the current one. The list is sorted by component type
and name.
•
•
•
•
•
•
•
•
Oxygen XML Editor | Editing Documents | 378
Properties - Displays some of the component's properties.
Facets - Displays the facets for each simple type
Identity constraints - Displays the identity constraints for each element. For each constraint there are presented the
name, type (unique, key, keyref), reference attribute, selector and field(s).
Attributes - Displays the attributes for the component. For each attribute there are presented the name, type, fixed
or default value, usage and annotation.
Asserts - Displays the assert elements defined in a complex type. The test, XPath default namespace, and annotation
are presented for each assert.
Annotations - Displays the annotations for the component. If you choose Escape XML Content, the XML tags are
present in the annotations.
Source - Displays the text schema source for each component.
Generate index - Displays an index with the components included in the documentation.
•
•
Include local elements and attributes - If checked, local elements and attributes are included in the documentation
index.
Include resource hierarchy - Specifies whether the resource hierarchy for an XML Schema documentation is
generated.
Export settings - Save the current settings in a settings file for further use (for example, with the exported settings file
you can generate the same documentation from the command line interface.)
Load settings - Reloads the settings from the exported file.
Generate - Use this button to generate the XML Schema documentation.
Output Formats for Generating XML Schema Documentation
XML Schema documentation can be generated in HTML, PDF, DocBook, or a custom format. You can choose the
format from the Schema Documentation dialog box. For the PDF and DocBook formats, the option to split the output
in multiple files is not available.
HTML Output Format
The XML Schema documentation generated in HTML format contains images corresponding to the same schema
definitions as the ones displayed by the schema diagram editor. These images are divided in clickable areas that are
linked to the definitions of the names of types or elements. The documentation of a definition includes a Used By section
with links to the other definitions that reference it. If the Escape XML Content option is unchecked, the HTML or
XHTML tags used inside the xs:documentation elements of the input XML Schema for formatting the documentation
text (for example <b>, <i>, <u>, <ul>, <li>, etc.) are rendered in the generated HTML documentation.
The generated images format is PNG. The image of an XML Schema component contains the graphical representation
of that component as it is rendered in the Schema Diagram panel of the Oxygen XML Editor XSD editor panel.
Oxygen XML Editor | Editing Documents | 379
Figure 193: XML Schema Documentation Example
The generated documentation includes a table of contents. You can group the contents by namespace, location, or
component type. After the table of contents there is some information about the main, imported, included, and redefined
schemas. This information contains the schema target namespace, schema properties (attribute form default, element
form default, version), and schema location.
Figure 194: Information About a Schema
If you choose to split the output into multiple files, the table of contents is displayed in the left frame. The contents are
grouped in the same mode. If you split the output by location, each file contains a schema description and the components
that you have chosen to include. If you split the output by namespace, each file contains information about schemas
from that namespace and the list with all included components. If you choose to split the output by component, each
file contains information about a schema component.
After the documentation is generated, you can collapse or expand details for some schema components by using the
Showing options or the
Collapse or
Expand buttons.
Oxygen XML Editor | Editing Documents | 380
Figure 195: The Showing Options
For each component included in the documentation, the section presents the component type follow by the component
name. For local elements and attributes, the name of the component is specified as parent name/component name. You
can easily go to the parent documentation by clicking the parent name.
Figure 196: Documentation for a Schema Component
If the schema contains imported or included modules, their dependencies tree is generated in the documentation.
Oxygen XML Editor | Editing Documents | 381
PDF Output Format
For the PDF output format, the documentation is generated in DocBook format and a transformation using the FOP
processor is applied to obtain the PDF file. To configure the FOP processor, see the FO Processors preferences page.
For information about customizing the PDF output, see the Customizing the PDF Output of Generated XML Schema
Documentation on page 381 topic.
DocBook Output Format
If you generate the documentation in DocBook output format, the documentation is generated as a DocBook XML file.
You can then apply a predefined transformation scenario (such as, DocBook PDF or DocBook HTML) on the output
file, or configure your own transformation scenario for it to convert it into whatever format you desire.
Custom Output Format
For the custom format, you can specify a stylesheet to transform the intermediary XML file generated in the documentation
process. You have to edit your stylesheet based on the schema xsdDocSchema.xsd from
[OXYGEN_DIR]/frameworks/schema_documentation. You can create a custom format starting from one
of the stylesheets used in the predefined HTML, PDF, and DocBook formats. These stylesheets are available in
[OXYGEN_DIR]/frameworks/schema_documentation/xsl.
When using a custom format you can also copy additional resources into the output folder and choose to keep the
intermediate XML files created during the documentation process.
Customizing the PDF Output of Generated XML Schema Documentation
To customize the PDF output of the generated XML Schema documentation, use the following procedure:
1. Customize the [OXYGEN_DIR]/frameworks/schema_documentation/xsl/xsdDocDocbook.xsl
stylesheet to include the content that you want to add in the PDF output. Add the content in the XSLT template with
the match="schemaDoc" attribute between the info and xsl:apply-templates elements, as commented
in the following example:
<info>
<pubdate><xsl:value-of select="format-date(current-date(),'[Mn] [D], [Y]', 'en', (), ())"/></pubdate>
</info>
<!-- Add the XSLT template content with the match="schemaDoc" attribute here -->
<xsl:apply-templates select="schemaHierarchy"/>
Note: The content that you insert here has to be wrapped in DocBook markup. For details about working
with DocBook see the following video demonstration:
http://www.oxygenxml.com/demo/DocBook_Editing_in_Author.html.
Oxygen XML Editor | Editing Documents | 382
2. Create an intermediary file that holds the content of your XML Schema documentation.
a. Go to Tools > Generate Documentation > XML Schema Documentation.
b. Select Custom for the output format and click the Options button.
c. In the Custom format options dialog box, do the following:
a. Enter the customized stylesheet in the Custom XSL field
([OXYGEN_DIR]/frameworks/schema_documentation/xsl/xsdDocDocbook.xsl).
b. Enable the Copy additional resources to the output folder option, and leave the default selection in the
Resources field.
c. Click OK.
d. When you return to the XML Schema Documentation dialog box, just press the Generate button to generate
a DocBook XML file with an intermediary form of the Schema documentation.
3. Create the final PDF document.
a. Use the
Configure Transformation Scenario(s) action from the toolbar or the Document > Transformation
menu, click New, and select XML transformation with XSLT.
b. In the New Scenario dialog box, go to the XSL URL field and choose the
[OXYGEN_DIR]/frameworks/docbook/oxygen/xsdDocDocbookCustomizationFO.xsl file.
c. Go to the FO Processor tab and enable the Perform FO Processing and XSLT result as input options.
d. Go to the Output tab and select the directory where you want to store the XML Schema documentation output
and click OK.
e. Click Apply Associated.
Tip: If you want your modifications to be permanent so that you can simply select the PDF output format in
the XML Schema Documentation dialog box, rather than configuring a custom format each time you generate
this documentation, follow this procedure:
1. Create a JAR or ZIP file that includes the modified stylesheet (customized in step 1 above), placed in the
following directory structure:
builtin/documentation/schema_documentation/xsdDocDocbook.xsl.
2. Create a new directory named endorsed inside the [OXYGEN_DIR]/lib directory and place the created
JAR or ZIP file inside it.
3. Restart Oxygen XML Editor and the PDF output format will now use your customized stylesheet.
Generating XML Schema Documentation From the Command-Line Interface
You can export the settings of the XML Schema Documentation dialog box to an XML file by pressing the Export
settings button. With the exported configuration file, you can generate the same documentation from the command-line
interface by running the following script:
•
•
schemaDocumentation.bat on Windows.
schemaDocumentation.sh on OS X / Unix / Linux.
The script is located in the Oxygen XML Editor installation folder. The script can be integrated in an external batch
process launched from the command-line interface. The script accepts a variety command line arguments that allow you
to configure the documentation.
The accepted syntax and arguments are as follows:
schemaDocumentation schemaFile [ [-cfg:configFile] | [ [-out:outputFile]
[-format:<value>] [-xsl:<xslFile>] [-split:<value>] [-openInBrowser:<value>] ] |
--help | -help | --h | -h ]
schemaFile
The XML Schema file.
Oxygen XML Editor | Editing Documents | 383
-cfg:configfile
The exported configuration file. It contains the output file, output format options, split method, and some advanced
options regarding the included components and components details. If an external configuration file is specified,
all other supplied arguments except for the XML Schema file will be ignored.
-out:outputFile
The file where the generated documentation will be saved. By default, it is the name of the schema file with an html
extension.
-format:<value>
The output format type used when generating the documentation. Possible values are as follows:
•
•
•
•
html - To generate documentation in HTML format.
pdf - To generate documentation in PDF format.
docbook - To generate documentation in DocBook format.
custom - To generate documentation in a custom format.
-xsl:<xslFile>
The XSL file to be applied on the intermediate XML format. If there is no XSL file provided, the result will be in
the HTML format.
-split:<value>
The split method used when generating the documentation. Splitting is recommended for large schemas. Possible
values are as follows:
•
•
•
•
none (default value) - To generate one single output file.
namespace - To generate an output file for every namespace in the schema.
component - To generate an output file for every component in the schema.
location - To generate an output file for every schema location.
-openInBrowser:<value>
Opens the result of the transformation in a browser or system application. Possible values are true or false
(default value).
--help | -help | --h | -h
Displays the available options.
Example of the script in a Windows command line:
schemaDocumentation example.xsd -out:schemaDocumentation.html -format:custom -xsl:example.xsl
-split:namespace
Convert Database Structure to XML Schema
Oxygen XML Editor includes a tool that allows you to create an XML Schema from the structure of a database. To
convert a database structure to an XML Schema, use the following procedure:
1. Select the Convert DB Structure to XML Schema action from the Tools menu.
The Convert DB Structure to XML Schema dialog box is opened and your current database connections are
displayed in the Connections section.
2. If the database source is not listed, click the Configure Database Sources button to open the Data Sources preferences
page where you can configure data sources and connections.
3. In the Format for generated schema section, select one of the following formats:
•
•
Flat schema - A flat structure that resembles a tree-like view of the database without references to elements.
Hierarchical schema - Display the table dependencies visually, in a type of tree view where dependent tables
are shown as indented child elements in the content model. Select this option if you want to configure the database
columns of the tables to be converted.
Oxygen XML Editor | Editing Documents | 384
4. Click Connect
The database structure is listed in the Select database tables section according to the format you chose.
5. Select the database tables that you want to be included in the XML Schema.
6. If you selected Hierarchical schema for the format, you can configure the database columns.
a) Select the database column you want to configure.
b) In the Criterion section you can choose to convert the selected database column as an Element, Attribute, or
to be Skipped in the resulting XML Schema.
c) You can also change the name of the selected database column by changing it in the Name text field.
7. Click Generate XML Schema.
The database structure is converted to an XML Schema and it is opened for viewing and editing.
Flatten an XML Schema
You can organize an XML schema on several levels linked by xs:include and xs:import statements. In some
cases, working on such a schema as on a single file is more convenient.
The Flatten Schema operation allows you to flatten an entire hierarchy of XML schemas. Starting with the main XML
schema, Oxygen XML Editor calculates its hierarchy by processing the xs:include and xs:import statements.
This action is available from the contextual menu of the editor or from the Tools menu.
Figure 197: Flatten Schema Dialog Box
For the main schema file and for each imported schema, a new flattened schema is generated in the output folder. These
schemas have the same name as the original ones.
Note: If necessary, the operation renames the resulted schemas to avoid duplicated file names.
Note: You can choose the output folder and the name of each generated schema file.
Oxygen XML Editor | Editing Documents | 385
A flattened XML schema is obtained by recursively adding the components of the included schemas into the main one.
This means Oxygen XML Editor replaces the xs:include, xs:redefine, and xs:override elements with the
ones coming from the included files.
The following options are available in the Flatten Schema dialog box:
•
•
Open the flattened XML Schema file in editor - opens the main flattened schema in the editing area after the
operation completes
Use the XML Catalogs when collecting the referenced XML Schemas - enables resolving the imported and
included schemas through the available XML Catalogs;
Note: Changing this option triggers the recalculation of the dependencies graph for the main schema.
•
•
Process the imported XML Schemas resolved through the XML Catalogs - specifies whether the imported
schemas that were resolved through an XML Catalog are flattened
Flatten the imported XML Schema(s) - specifies whether the imported schemas are flattened.
Note: For the schemas skipped by the flatten operation, no files are created in the output folder and the
corresponding import statements remain unchanged.
To flatten a schema from the command line, use the following command:
•
•
•
flattenSchema.bat on Windows
sh flattenSchemaMac.sh on OS X
sh flattenSchema.sh on Unix/Linux
The command line accepts the following parameters:
•
•
•
•
•
-in:inputSchemaURL - the input schema URL
-outDir:outputDirectory - the directory where the flattened schemas should be saved
-flattenImports:<boolean_value> - controls if the imported XML Schemas should be flattened or not.
The default value true
-useCatalogs:<boolean_value> - controls if the references to other XML Schemas should be resolved
through the available XML Catalogs. The default value false
-flattenCatalogResolvedImports:<boolean_value> - controls if the imported schemas that were
resolved through the XML Catalogs should be flattened or not
Note: This option is used only when -useCatalogs is set to true. The default value is true.
•
•
-verbose - provides information about the current flatten XML Schema operation
--help | -help | --h | -h - prints the available parameters for the operation
Command Line Example for Windows
flattenSchema.bat -in:http://www.w3.org/MarkUp/SCHEMA/xhtml11.xsd
-outDir:mySchemas/flattened/xhtml -flattenImports:true -useCatalogs:true
-flattenCatalogResolvedImports:true -verbose
Command Line Example for OS X
sh flattenSchemaMac.sh -in:http://www.w3.org/MarkUp/SCHEMA/xhtml11.xsd
-outDir:mySchemas/flattened/xhtml -flattenImports:true -useCatalogs:true
-flattenCatalogResolvedImports:true -verbose
Oxygen XML Editor | Editing Documents | 386
Command Line Example for Unix/Linux
sh flattenSchema.sh -in:http://www.w3.org/MarkUp/SCHEMA/xhtml11.xsd
-outDir:mySchemas/flattened/xhtml -flattenImports:true -useCatalogs:true
-flattenCatalogResolvedImports:true -verbose
XML Schema Regular Expressions Builder
The XML Schema regular expressions builder allows testing regular expressions on a fragment of text as they are applied
to an XML instance document. Start the tool from the Tools menu.
Figure 198: XML Schema Regular Expressions Builder Dialog Box
The dialog box contains the following sections:
•
•
•
Regular expressions editor - allows you to edit the regular expression to be tested and used. Content completion
is available and presents a list with all the predefined expressions. It is triggered by pressing Ctrl Space (Command
Space on OS X).
Error display area - if the edited regular expression is incorrect, an error message will be displayed here. The
message contains the description and the exact location of the error. Also, clicking the quick navigation button ( )
highlights the error inside the regular expression.
Category combo box - here you can choose from several categories of predefined expressions. The selected category
influences the displayed expressions in the Available expressions table.
•
•
Oxygen XML Editor | Editing Documents | 387
Available expressions table - holds the available regular expressions and a short description for each of them. The
set of expressions depends on the category selected in the previous combo box. You can add an expression in the
Regular expressions editor by double-clicking the expression row in the table. You will notice that in the case of
Character categories and Block names the expressions are also listed in complementary format. For example:
\p{Lu} - Uppercase letters; \P{Lu} - Complement of: Uppercase letters.
Evaluate expression on radio buttons - there are available two options:
•
•
•
Evaluate expression on each line - the edited expression will be applied on each line in the Test area.
Evaluate expression on all text - the edited expression will be applied on the whole text.
Test area - a text editor which allows you to enter a text sample on which the regular expression will be applied. All
matches of the edited regular expression will be highlighted.
After editing and testing your regular expression you can insert it in the current editor. The Insert button will become
active when an editor is opened in the background and there is an expression in the Regular expressions editor.
The regular expression builder cannot be used to insert regular expressions in the grid version or the schema version of
a document editor. Accordingly, the Insert button of the dialog box will be disabled if the current document is edited
in grid mode.
Note: Some regular expressions may block indefinitely the Java Regular Expressions engine. If the execution
of the regular expression does not end in about five seconds, the application displays a dialog box that allows
you to interrupt the operation.
XML Schema 1.1
Oxygen XML Editor offers full support for XML Schema 1.1, including:
•
•
•
•
•
•
•
•
•
XML Documents Validation and Content Completion Based on XML Schema 1.1.
XML Schema 1.1 Validation and Content Completion.
Editing XML Schema 1.1 files in the Schema Design mode.
The Flatten Schema action.
Resource Hierarchy/Dependencies and Refactoring Actions.
Master Files.
Generating Documentation for XML Schema 1.1.
Support for generating XML instances based on XML Schema.
Support for validating XML documents with an NVDL schema that contains an XML Schema 1.1 validation step.
Note: To enable XML Schema 1.1 validation in NVDL, you need to pass the following option to the
validation engine to specify the schema version:
http://www.thaiopensource.com/validate/xsd-version (the possible values are 1.0 or
1.1.
Note: To enable the full XPath expression in assertions and type alternatives, you need to set the
http://www.thaiopensource.com/validate/full-xpath option.
XML Schema 1.1 is a superset of XML Schema 1.0, that offers lots of new powerful capabilities.
Oxygen XML Editor | Editing Documents | 388
Figure 199: XML Schema 1.1
The significant new features in XSD 1.1 are:
•
•
•
Assertions - support to define assertions against the document content using XPath 2.0 expressions (an idea borrowed
from Schematron).
Conditional type assignment - the ability to select the type against which an element is validated based on the
values of the attribute of the element.
Open content - content models are able to use the openContent element to specify content models with open
content. These content models allow elements not explicitly mentioned in the content model to appear in the document
instance. It is as if wildcards were automatically inserted at appropriate points within the content model. A schema
document wide default may be set, which causes all content models to be open unless specified otherwise.
To see the complete list with changes since version 1.0, go to http://www.w3.org/TR/xmlschema11-1/#ch_specs.
XML Schema 1.1 is intended to be mostly compatible with XML Schema 1.0 and to have approximately the same scope.
It also addresses bug fixes and brings improvements that are consistent with the constraints on scope and compatibility.
Note: An XML document conforming to a 1.0 schema can be validated using a 1.1 validator, but an XML
document conforming to a 1.1 schema may not validate using a 1.0 validator.
If you are constrained to use XML Schema 1.0 (for example if you develop schemas for a server that uses an XML
Schema 1.0 validator which cannot be updated), change the default XML Schema version to 1.0. If you keep the default
XML Schema version set to 1.1, the content completion window presents XML Schema 1.1 elements that you can insert
accidentally in an 1.0 XML Schema. So even if you make a document invalid conforming with XML Schema 1.0, the
validation process does not signal any issues.
To change the default XML Schema version, open the Preferences dialog box and go to XML > XML Parser > XML
Schema.
To watch our video demonstration about the XML Schema 1.1 support, go to
http://oxygenxml.com/demo/XML_Schema_11.html.
Setting the XML Schema Version
Oxygen XML Editor lets you set the version of the XML Schema you are editing either in the XML Schema preferences
page, or through the versioning attributes. If you want to use the versioning attributes, set the minVersion and
maxVersion attributes, from the http://www.w3.org/2007/XMLSchema-versioning namespace, on the schema root
element.
Note: The versioning attributes take priority over the XML Schema version defined in the preferences page.
Oxygen XML Editor | Editing Documents | 389
Table 7: Using the minVersion and maxVersion Attributes to Set the XML Schema Version
Versioning Attributes
XML Schema Version
minVersion = "1.0" maxVerion = "1.1"
1.0
minVersion = "1.1"
1.1
minVersion = "1.0" maxVerion = greater than "1.1" the XML Schema version defined in the XML Schema
preferences page.
Not set in the XML Schema document.
the XML Schema version defined in the XML Schema
preferences page.
To change the XML Schema version of the current document, use the Change XML Schema version action from the
contextual menu. This is available both in the Text mode, and in the Design mode and opens the Change XML Schema
version dialog box. The following options are available:
•
•
•
XML Schema 1.0 - Inserts the minVersion and maxVersion attributes on the schema element and gives them
the values "1.0" and "1.1" respectively. Also, the namespace declaration
(xmlns:vc=http://www.w3.org/2007/XMLSchema-versioning) is inserted automatically if it does not exist.
XML Schema 1.1 - Inserts the minVersion attribute on the schema element and gives it the value "1.1". Also,
removes the maxVersion attribute if it exists and adds the versioning namespace
(xmlns:vc=http://www.w3.org/2007/XMLSchema-versioning) if it is not declared.
Default XML Schema version - Removes the minVersion and maxVersion attributes from the schema
element. The default schema version, defined in the XML Schema preferences page, is used.
Note: The Change XML Schema version action is also available in the informative panel presented at the top
of the edited XML Schema. If you close this panel, it will no longer appear until you restore Oxygen XML
Editor to its default options.
Oxygen XML Editor automatically uses the version set through the versioning attributes, or the default version if the
versioning attributes are not declared, when proposing content completion elements and validating an XML Schema.
Also, the XML instance validation against an XML Schema is aware of the versioning attributes defined in the XML
Schema.
When you generate sample XML files from an XML Schema, Oxygen XML Editor takes into account the minVersion
and maxVersion attributes defined in the XML Schema.
Linking Between Development and Authoring
The Author mode is available on the XML Schema editor allowing you to edit visually the schema annotations. It
presents a polished and compact view of the XML Schema, with support for links on imported/included schemas.
Embedded Schematron is supported only in Relax NG schemas with XML syntax.
Editing XQuery Documents
This section explains the features of the XQuery editor and how to use them.
XQuery Outline View
The XQuery document structure is presented in the XQuery Outline view. The outline tree presents the list of all the
components (namespaces, imports, variables, and functions) from both the edited XQuery file and its imports. It allows
quick access to components and can be opened from Window > Show View > Outline.
Oxygen XML Editor | Editing Documents | 390
Figure 200: XQuery Outline View
The following actions are available in the
Settings menu on the Outline view toolbar:
Selection update on cursor move
Controls the synchronization between Outline view and source document. The selection in the Outline view can
be synchronized with the cursor moves or the changes performed in the XQuery editor. Selecting one of the
components from the Outline view also selects the corresponding item in the source document.
Sort
Allows you to alphabetically sort the XQuery components.
Show all components
Displays all collected components starting from the current file. This option is set by default.
Show only local components
Displays the components defined in the current file only.
Group by location/namespace/type
Allows you to group the components by location, namespace, and type. When grouping by namespace, the main
XQuery module namespace is presented first in the Outline view.
If you know the component name, you can search it in the Outline view by typing its name in the filter text field from
the top of the view or directly on the tree structure. When you type the component name in the filter text field you can
switch to the tree structure using the arrow keys of the keyboard, (Enter), (Tab), (Shift-Tab). To switch from tree
structure to the filter text field, you can use (Tab), (Shift-Tab).
Tip: The search filter is case insensitive. The following wildcards are accepted:
•
•
•
* - any string
? - any character
, - patterns separator
If no wildcards are specified, the string to search is used as a partial match (like *textToFind*).
Oxygen XML Editor | Editing Documents | 391
The upper part of the Outline view contains a filter box that allows you to focus on the relevant components. Type a
text fragment in the filter box and only the components that match it are presented. For advanced usage you can use
wildcard characters (*, ?) and separate multiple patterns with commas.
Folding in XQuery Documents
In a large XQuery document, the instructions enclosed in the '{' and '}' characters can be collapsed so that only the
needed instructions remain in focus. The same folding features available for XML documents are also available in
XQuery documents.
Figure 201: Folding in XQuery Documents
There is available the action Go to Matching Bracket Ctrl Shift G on contextual menu of XQuery editor for going to
matching character when cursor is located at '{' character or '}' character. It helps for finding quickly matching character
of current folding element.
Formatting and Indenting XQuery Documents
Editing XQuery documents may lead to large chunks of content that are not easily readable by human audience. Also,
each developer may have a particular way of writing XQuery code. Oxygen XML Editor assists you in maintaining a
consistent code writing style with the
and also on the toolbar..
The
•
•
Format and Indent action that is available in the Document > Source menu
Format and Indent action achieves this by performing the following steps:
Manages whitespaces, by collapsing or inserting space characters where needed.
Formats complex expressions on multiple, more readable lines by properly indenting each of them. The amount of
whitespaces that form an indent unit is controlled through one of the Indent with tabs and Indent size options from
the Format Preferences page.
Note: These operations can be performed only if your XQuery document conforms with W3C XQuery 1.0,
XQuery Update Facility 1.0, and XQuery 3.0 specifications. If the Format and Indent operation fails, the
document is left unaltered and an error message is presented in the Results view.
Oxygen XML Editor | Editing Documents | 392
Generating HTML Documentation for an XQuery Document
To generate HTML documentation for an XQuery document, use the XQuery Documentation dialog box. It is opened
with the XQuery Documentation action that is available from the Tools > Generate Documentation menu or from
the Generate Documentation submenu in the contextual menu of the Project view.
The dialog box allows you to configure a set of parameters for the process of generating the HTML documentation.
Figure 202: The XQuery Documentation Dialog Box
The following options are available:
•
Input - The full path to the XQuery file must be specified in one of the two fields in this section:
•
•
•
•
•
URLFile - The URL of the file in which you want to generate the documentation.
Folder - The directory that contains the files for which you want to generate the documentation. You can also
specify the XQuery file extensions to be searched for in the specified directory.
Default function namespace - Optional URI for the default namespace for the submitted XQuery.
Predefined function namespaces - Optional, engine-dependent, predefined namespaces that the submitted XQuery
refers to. They allow the conversion to generate annotation information to support the presentation component
hypertext linking (only if the predefined modules have been loaded into the local xqDoc XML repository).
Open in Browser/System Application - Select this option if you want the result to be opened in the system application
associated with that file type.
Note: To set the browser or system application that will be used, open the Preferences dialog box, then go
to Global and set it in the Default Internet browser field. This will take precedence over the default system
application settings.
•
Output - Allows you to specify where the generated documentation is saved on disk.
Editing WSDL Documents
WSDL is an XML format for describing network services as a set of endpoints operating on messages containing either
document-oriented or procedure-oriented information. The operations and messages are described abstractly, and then
Oxygen XML Editor | Editing Documents | 393
bound to a concrete network protocol and message format to define an endpoint. Related concrete endpoints are combined
into abstract endpoints (services).
Oxygen XML Editor provides a special type of editor dedicated to WSDL documents. The WSDL editor offers support
to check whether a WSDL document is valid, a specialized Content Completion Assistant, a component oriented Outline
view, searching and refactoring operations, and support to generate documentation.
Both WSDL version 1.1 and 2.0 are supported and SOAP versions 1.1 and 1.2. That means that in the location where
a SOAP extension can be inserted the Content Completion Assistant offers elements from both SOAP 1.1 and SOAP
1.2. Validation of SOAP requests is executed first against a SOAP 1.1 schema and then against a SOAP 1.2 schema. In
addition to validation against the XSD schemas, Oxygen XML Editor also checks if the WSDL file conforms with the
WSDL specification (available only for WSDL 1.1 and SOAP 1.1).
In the following example you can see how the errors are reported.
Figure 203: Validating a WSDL file
To watch our video demonstration about the WSDL editing support in Oxygen XML Editor, go to
http://www.oxygenxml.com/demo/Create_New_WSDL.html.
WSDL Outline View
The WSDL Outline view displays the list of all the components (services, bindings, port types and so on) of the currently
open WSDL document along with the components of its imports.
If you use the Master Files support, the Outline view collects the components of a WSDL document starting from the
master files of the current document.
To enable the Outline view, go to Window > Show View > Outline.
Oxygen XML Editor | Editing Documents | 394
Figure 204: The WSDL Outline View
The Outline view can display both the components of the current document and its XML structure, organized in a
tree-like fashion. You can switch between the display modes by using the
components actions in the
Show XML structure and
Show
Settings menu on the Outline view toolbar. The following actions are available:
Filter returns exact matches
The text filter of the Outline view returns only exact matches.
Selection update on cursor move
Controls the synchronization between the Outline view and the current document. The selection in the Outline
view can be synchronized with the cursor moves or the changes in the WSDL editor. Selecting one of the components
from the Outline view also selects the corresponding item in the current document.
When the
Show components option is selected, the following actions are available:
Show XML structure
Displays the XML structure of the current document in a tree-like manner.
Sort
Sorts the components in the Outline view alphabetically.
Show all components
Displays all the components that were collected starting from current document or from the main document, if it is
defined.
Show referable components
Displays all the components that you can reference from the current document.
Show only local components
Displays the components defined in the current file only.
Group by location
Groups the WSDL components by their location.
Group by type
Groups the WSDL components by their type.
Oxygen XML Editor | Editing Documents | 395
Group by namespace
Groups the WSDL components by their namespace.
Note: By default all the three grouping criteria are active.
When the
Show XML structure option is selected, the following actions are available:
Show components
Switches the Outline view to the components display mode.
Flat presentation mode of the filtered results
When active, the application flattens the filtered result elements to a single level.
Show comments and processing instructions
Show/hide comments and processing instructions in the Outline view.
Show element name
Show/hide element name.
Show text
Show/hide additional text content for the displayed elements.
Show attributes
Show/hide attribute values for the displayed elements. The displayed attribute values can be changed from the
Outline preferences panel.
Configure displayed attributes
Displays the XML Structured Outline preferences page.
The following contextual menu actions are available in the Outline view when the
Show components option is
selected in the Settings menu:
Edit Attributes
Opens a dialog box that allows you to edit the attributes of the currently selected component.
Cut
Cuts the currently selected component.
Copy
Copies the currently selected component.
Delete
Deletes the currently selected component.
Search references
Searches for the references of the currently selected component.
Search references in
Searches for the references of the currently selected component in the context of a scope that you define.
Component dependencies
Displays the dependencies of the currently selected component.
Resource Hierarchy
Displays the hierarchy for the currently selected resource.
Resource Dependencies
Displays the dependencies of the currently selected resource.
Oxygen XML Editor | Editing Documents | 396
Rename Component in
Renames the currently selected component in the context of a scope that you define.
The following contextual menu actions are available in the Outline view when the
is selected in the
Show XML structure option
Settings menu:
Append Child
Displays a list of elements that you can insert as children of the current element.
Insert Before
Displays a list of elements that you can insert as siblings of the current element, before the current element.
Insert After
Displays a list of elements that you can insert as siblings of the current element, after the current element.
Edit Attributes
Opens a dialog box that allows you to edit the attributes of the currently selected component.
Toggle Comment
Comments/uncomments the currently selected element.
Search references
Searches for the references of the currently selected component.
Search references in
Searches for the references of the currently selected component in the context of a scope that you define.
Component dependencies
Displays the dependencies of the currently selected component.
Rename Component in
Renames the currently selected component in the context of a scope that you define.
Cut
Cuts the currently selected component.
Copy
Copies the currently selected component.
Delete
Deletes the currently selected component.
Expand More
Expands the structure of a component in the Outline view.
Collapse All
Collapses the structure of all the component in the Outline view.
To switch from the tree structure to the text filter, use Tab and Shift-Tab.
Tip: The search filter is case insensitive. The following wildcards are accepted:
•
•
•
* - any string
? - any character
, - patterns separator
If no wildcards are specified, the string to search is used as a partial match (like *textToFind*).
The content of the Outline view and the editing area are synchronized. When you select a component in the Outline
view, its definition is highlighted in the editing area.
Oxygen XML Editor | Editing Documents | 397
Content Completion in WSDL Documents
The Content Completion Assistant is a powerful feature that enhances the editing of WSDL documents. It helps you
define WSDL components by proposing context-sensitive element names. Another important capability of the Content
Completion Assistant is to propose references to the defined components when you edit attribute values. For example,
when you edit the type attribute of a binding element, the Content Completion Assistant proposes all the defined
port types. Each proposal that the Content Completion Assistant offers is accompanied by a documentation hint.
Note: XML schema specific elements and attributes are offered when the current editing context is the internal
XML schema of a WSDL document.
Figure 205: WSDL Content Completion Window
Note: The Content Completion Assistant collects its components starting from the master files. The master
files can be defined in the project or in the associated validation scenario. For further details about the Master
Files support go to Defining Master Files at Project Level.
Namespace prefixes in the scope of the current context are presented at the top of the content completion window to
speed up the insertion into the document of prefixed elements.
Figure 206: Namespace Prefixes in the Content Completion Window
For the common namespaces, like XML Schema namespace (http://www.w3.org/2001/XMLSchema) or SOAP namespace
(http://schemas.xmlsoap.org/wsdl/soap/), Oxygen XML Editor provides an easy mode to declare them by proposing a
prefix for these namespaces.
Editing WSDL Documents in the Master Files Context
Smaller interrelated modules that define a complex WSDL structure cannot be correctly edited or validated individually,
due to their interdependency with other modules. Oxygen XML Editor provides the support for defining the main module
(or modules), allowing you to edit any of the imported/included files in the context of the larger WSDL structure.
You cat set a main WSDL document either using the master files support from the Project view, or using a validation
scenario.
Oxygen XML Editor | Editing Documents | 398
To set a main file using a validation scenario, add validation units that point to the main modules. Oxygen XML Editor
warns you if the current module is not part of the dependencies graph computed for the main WSDL document. In this
case, it considers the current module as the main WSDL document.
The advantages of editing in the context of a master file include:
•
•
•
Correct validation of a module in the context of a larger WSDL structure.
Content Completion Assistant displays all components valid in the current context.
The Outline displays the components collected from the entire WSDL structure.
Note: When you edit an XML schema document that has a WSDL document set as master, the validation
operation is performed over the master WSDL document.
To watch our video demonstration about editing WSDL documents in the master files context, go to
http://oxygenxml.com/demo/WSDL_Working_Modules.html.
Searching and Refactoring Operations in WSDL Documents
Search Actions
The following search actions are available from the Search submenu in the contextual menu of the current editor or
from the Document > References menu:
•
•
•
•
Search References - Searches all references of the item found at current cursor position in the defined scope,
if any. If a scope is defined, but the current edited resource is not part of the range of resources determined by this,
a warning dialog box is displayed and you have the possibility to define another search scope.
Search References in - Searches all references of the item found at current cursor position in the file or files that
you specify when define a scope in the Search References dialog box.
Search Declarations - Searches all declarations of the item found at current cursor position in the defined scope
if any. If a scope is defined, but the current edited resource is not part of the range of resources determined by this,
a warning dialog box will be displayed and you have the possibility to define another search scope.
Search Declarations in - Searches all declarations of the item found at current cursor position in the file or files
that you specify when you define a scope for the search operation.
•
Search Occurrences in File - Searches all occurrences of the item at the cursor position in the currently edited
file.
The following action is available from the Document > Schema menu:
•
Show Definition - Takes you to the location of the definition of the current item.
Note: You can also use the Ctrl Single-Click (Command Single-Click on OS X) shortcut on a reference
to display its definition.
Refactoring Actions
The following refactoring actions are available from the Refactoring submenu from the Document > Refactoring menu
or in the contextual menu of the current editor:
•
Rename Component - Allows you to rename the current component in-place. The component and all its references
in the document are highlighted with a thin border and the changes you make to the component at the cursor position
are updated in real time to all occurrences of the component. To exit in-place editing, press the Esc or Enter key on
your keyboard.
•
Rename Component in - Opens the Rename component_type dialog box that allows you to rename the selected
component by specifying the new component name and the files to be affected by the modification. If you click the
Preview button, you can view the files affected by the Rename Component action.
Oxygen XML Editor | Editing Documents | 399
Figure 207: Rename Identity Constraint Dialog Box
Searching and Refactoring Operations Scope in WSDL Documents
The scope is a collection of documents that define the context of a search and refactor operation. To control it you can
use the
Change scope operation, available in the Quick Assist action set or on the Resource Hierarchy/Dependency
View toolbar. You can restrict the scope to the current project or to one or multiple working sets. The Use only Master
Files, if enabled check-box allows you to restrict the scope of the search and refactor operations to the resources from
the Master Files directory. Click read more for details about the Master Files support.
Oxygen XML Editor | Editing Documents | 400
Figure 208: Change Scope Dialog Box
The scope you define is applied to all future search and refactor operations until you modify it. Contextual menu actions
allow you to add or delete files, folders, and other resources to the working set structure.
WSDL Resource Hierarchy/Dependencies View in WSDL Documents
The Resource Hierarchy/Dependencies view allows you to see the hierarchy/dependencies for a WSDL resource. To
open this view, go to Window > Show View > Resource Hierarchy/Dependencies .
Note: The hierarchy of a WSDL resource includes the hierarchy of imported XML Schema resources. The
dependencies of an XML Schema resource present the WSDL documents that import the schema.
To view the hierarchy of a WSDL document, select the document in the project view and choose Resource Hierarchy
from the contextual menu.
Oxygen XML Editor | Editing Documents | 401
Figure 209: Resource Hierarchy/Dependencies View
If you want to see the dependencies of a WSDL document, select the document in the project view and choose Resource
Dependencies from the contextual menu.
Figure 210: Resource Hierarchy/Dependencies View
The following actions are available in the Resource Hierarchy/Dependencies view:
Oxygen XML Editor | Editing Documents | 402
Refresh
Refreshes the Hierarchy/Dependencies structure.
Stop
Stops the hierarchy/dependencies computing.
Show Hierarchy
Allows you to choose a resource to compute the hierarchy structure.
Show Dependencies
Allows you to choose a resource to compute the dependencies structure.
Configure
Allows you to configure a scope to compute the dependencies structure. There is also an option for automatically
using the defined scope for future operations.
History
Provides access to the list of previously computed dependencies. Use the
items from this list.
Clear history button to remove all
The contextual menu contains the following actions:
Open
Opens the resource. You can also double-click a resource in the Hierarchy/Dependencies structure to open it.
Copy location
Copies the location of the resource.
Move resource
Moves the selected resource.
Rename resource
Renames the selected resource.
Show Resource Hierarchy
Shows the hierarchy for the selected resource.
Show Resource Dependencies
Shows the dependencies for the selected resource.
Add to Master Files
Adds the currently selected resource in the Master Files directory.
Expand All
Expands all the children of the selected resource from the Hierarchy/Dependencies structure.
Collapse All
Collapses all children of the selected resource from the Hierarchy/Dependencies structure.
Tip: When a recursive reference is encountered in the Hierarchy view, the reference is marked with a special
icon .
Note: The Move resource or Rename resource actions give you the option to update the references to the
resource.
Moving/Renaming WSDL Resources
You are able to move and rename a resource presented in the Resource/Hierarchy Dependencies view, using the
Rename resource and Move resource refactoring actions from the contextual menu.
When you select the Rename action in the contextual menu of the Resource/Hierarchy Dependencies view, the
Rename resource dialog box is displayed. The following fields are available:
•
•
Oxygen XML Editor | Editing Documents | 403
New name - Presents the current name of the edited resource and allows you to modify it.
Update references - Enable this option to update the references to the resource you are renaming.
When you select the Move action from the contextual menu of the Resource/Hierarchy Dependencies view, the Move
resource dialog box is displayed. The following fields are available:
•
•
•
Destination - Presents the path to the current location of the resource you want to move and gives you the option to
introduce a new location.
New name - Presents the current name of the moved resource and gives you the option to change it.
Update references of the moved resource(s) - Enable this option to update the references to the resource you are
moving, in accordance with the new location and name.
If the Update references of the moved resource(s) option is enabled, a Preview option (which opens the Preview
dialog box) is available for both actions. The Preview dialog box presents a list with the resources that are updated.
Component Dependencies View in WSDL Documents
The Component Dependencies view allows you to view the dependencies for a selected WSDL component. To open
the Component Dependencies view, go to Window > Show View > Component Dependencies .
To view the dependencies of an WSDL component, select the desired component in the editor and choose the Component
Dependencies action from the contextual menu. This action is available for all WSDL components (messages, port
types, operations, bindings and so on).
Note: If you search for dependencies of XML Schema elements, the Component Dependencies view presents
the references from WSDL documents.
Figure 211: Component Dependencies View
The following action are available in the toolbar of the Component Dependencies view:
Refresh
Refreshes the dependencies structure.
Stop
Stops the dependencies computing.
Configure
Allows you to configure a search scope to compute the dependencies structure. You can decide to use the defined
scope for future operations automatically, by checking the corresponding check box.
History
Allows you to repeat a previous dependencies computation.
Oxygen XML Editor | Editing Documents | 404
The following actions are available in the contextual menu of the Component Dependencies view:
Go to First Reference
Selects the first reference of the referenced component from the current selected component in the dependencies
tree.
Go to Component
Displays the definition of the current selected component in the dependencies tree.
Tip: If a component contains multiple references to another, a small table is displayed that contains all references.
When a recursive reference is encountered, it is marked with a special icon .
Highlight Component Occurrences in WSDL Documents
When you position your mouse cursor over a component in a WSDL document, Oxygen XML Editor searches for the
component declaration and all its references and highlights them automatically.
Customizable colors are used: one for the component definition and another one for component references. Occurrences
are displayed until another component is selected.
To change the default behavior of Highlight Component Occurrences, open the Preferences dialog box and go to
Editor > Mark Occurrences. You can also trigger a search using the Search > Search Occurrences in File () action
from contextual menu. Matches are displayed in separate tabs of the Results view.
Quick Assist Support in WSDL Documents
The Quick Assist feature is activated automatically when the cursor is positioned over the name of a component. It is
accessible via a yellow bulb help marker placed on the cursor line, in the line number stripe on the left side of the editor.
Also, you can invoke the quick assist menu by using the Alt + 1 keys (Meta + Alt + 1 on Mac OS X) keyboard shortcuts.
Figure 212: WSDL Quick Assist Support
The quick assist support offers direct access to the following actions:
Rename Component in
Renames the component and all its dependencies.
Search Declarations
Searches the declaration of the component in a predefined scope. It is available only when the context represents a
component name reference.
Search References
Searches all references of the component in a predefined scope.
Component Dependencies
Searches the component dependencies in a predefined scope.
Oxygen XML Editor | Editing Documents | 405
Change Scope
Configures the scope that will be used for future search or refactor operations.
Rename Component
Allows you to rename the current component in-place.
Search Occurrences
Searches all occurrences of the component within the current file.
Generating Documentation for WSDL Documents
You can use Oxygen XML Editor to generate detailed documentation for the components of a WSDL document in
HTML format. You can select the WSDL components to include in your output and the level of details to present for
each of them. Also, the components are hyperlinked. You can also generate the documentation in a custom output format
by using a custom stylesheet.
Note: The WSDL documentation includes the XML Schema components that belong to the internal or imported
XML schemas.
To generate documentation for a WSDL document, select WSDL Documentation from the Tools > Generate
Documentation menu or from the Generate Documentation submenu in the contextual menu of the Project view.
Figure 213: The WSDL Documentation Dialog Box
The Input URL field of the dialog box must contain the full path to the WSDL document that you want to generate
documentation for. The WSDL document may be a local or a remote file. You can specify the path to the WSDL file
by entering it in the text field, or by using the
Insert Editor Variables button or the options in the
Browse
drop-down menu.
The Output Tab
The following options are available in the Output tab:
•
Format - Allows you to choose between the following formats:
•
HTML - The documentation is generated in HTML output format.
•
•
•
•
Oxygen XML Editor | Editing Documents | 406
Custom - The documentation is generated in a custom output format, allowing you to control the output. Click
the Options button to open a Custom format options dialog box where you can specify a custom stylesheet for
creating the output. There is also an option to Copy additional resources to the output folder and you can
select the path to the additional Resources that you want to copy. You can also choose to keep the intermediate
XML files created during the documentation process by deselecting the Delete intermediate XML file option.
Output file - You can specify the path of the output file by entering it in the text field, or by using the
Insert
Editor Variables button or the options in the
Browse drop-down menu.
Split output into multiple files - Instructs the application to split the output into multiple files. For large WSDL
documents, choosing a different split criterion may generate smaller output files providing a faster documentation
browsing. You can choose to split them by namespace, location, or component name.
Open in Browser/System Application - Opens the result in the system application associated with the output file
type.
Note: To set the browser or system application that will be used, open the Preferences dialog box, then go
to Global and set it in the Default Internet browser field. This will take precedence over the default system
application settings.
•
Keep only the annotations with xml:lang set to - The generated output will contain only the annotations with the
xml:lang attribute set to the selected language. If you choose a primary language code (for example, en for
English), this includes all its possible variations (en-us, en-uk, etc.).
The Setting Tab
When you generate documentation for a WSDL document, you can choose what components to include in the output
and the details to be included in the documentation.
Figure 214: The Settings Tab of the WSDL Documentation Dialog Box
The Settings tab allows you to choose whether or not to include the following:
•
Components
•
•
•
•
Services - Specifies whether the generated documentation includes the WSDL services.
Bindings - Specifies whether the generated documentation includes the WSDL bindings.
Port Types - Specifies whether the generated documentation includes the WSDL port types.
Messages - Specifies whether the generated documentation includes the WSDL messages.
•
Oxygen XML Editor | Editing Documents | 407
XML Schema Components - Specifies whether the generated documentation includes the XML Schema
components.
•
•
Only global elements and types - Specifies whether the generated documentation includes only global
elements and types.
Component Details
•
•
•
•
•
•
Namespace - Presents the namespace information for WSDL or XML Schema components.
Location - Presents the location information for each WSDL or XML Schema component.
Used by - Presents the list of components that reference the current one.
Documentation - Presents the component documentation. If you choose Escape XML Content, the XML tags
are presented in the documentation.
Source - Presents the XML fragment that defines the current component.
Instance - Generates a sample XML instance for the current component.
Note: This option applies to the XML Schema components only.
•
XML Schema Diagram - Displays the diagram for each XML Schema component. You can choose the image
format (JPEG, PNG, GIF, SVG) to use for the diagram section.
•
•
Diagram annotations - Specifies whether the annotations of the components presented in the diagram sections
are included.
Generate index - Displays an index with the components included in the documentation.
•
•
Include local elements and attributes - If checked, local elements and attributes are included in the documentation
index.
Include resource hierarchy - Specifies whether the resource hierarchy for an XML Schema documentation is
generated.
Export settings - Save the current settings in a settings file for further use (for example, with the exported settings file
you can generate the same documentation from the command-line interface.)
Load settings - Reloads the settings from the exported file.
Generate - Use this button to generate the WSDL documentation.
Generating WSDL Documentation in HTML Format
The WSDL documentation generated in HTML format is presented in a visual diagram style with various sections,
hyperlinks, and options.
Oxygen XML Editor | Editing Documents | 408
Figure 215: WSDL Documentation in HTML Format
The documentation of each component is presented in a separate section. The title of the section is composed of the
component type and the component name. The component information (namespace, documentation, etc.) is presented
in a tabular form.
If you choose to split the output into multiple files, the table of contents is displayed in the left frame and is divided in
two tabs: Components and Resource Hierarchy.
The Components tab allows you to group the contents by namespace, location, or component type. The WSDL
components from each group are sorted alphabetically. The Resource Hierarchy tab displays the dependencies between
WSDL and XML Schema modules in a tree like fashion. The root of the tree is the WSDL document that you generate
documentation for.
After the documentation is generated, you can collapse or expand details for some WSDL components by using the
Showing options or the
Collapse or
Expand buttons.
Figure 216: The Showing Options
Generating WSDL Documentation in a Custom Format
To obtain the default HTML documentation output from a WSDL document, Oxygen XML Editor uses an intermediary
XML document to which it applies an XSLT stylesheet. To create a custom output from your WSDL document, edit
the wsdlDocHtml.xsl XSLT stylesheet or create your own.
Oxygen XML Editor | Editing Documents | 409
Note: The wsdlDocHtml.xsl stylesheet that is used to obtain the HTML documentation is located in the
[OXYGEN_DIR]/frameworks/wsdl_documentation/xsl folder.
Note: The intermediary XML document complies with the wsdlDocSchema.xsd XML Schema. This schema
is located in the [OXYGEN_DIR]/frameworks/wsdl_documentation folder.
Figure 217: The Custom Format Options Dialog Box
When using a custom format, you can also copy additional resources into the output folder or choose to keep the
intermediate XML files created during the documentation process.
Generating WSDL Documentation from the Command-Line Interface
To generate documentation for a WSDL document from the command line, open the WSDL Documentation dialog
box and click Export settings. Using the exported settings file you can generate the same documentation from the
command line by running the following scripts:
•
•
•
wsdlDocumentation.bat on Windows.
wsdlDocumentation.sh on Unix / Linux.
wsdlDocumentationMac.sh on Mac OS X.
The scripts are located in the installation folder of Oxygen XML Editor. You can integrate the scripts in an external
batch process launched from the command-line interface.
WSDL SOAP Analyzer
After you edit and validate your Web service descriptor against a mix of the XML Schemas for WSDL and SOAP, it is
easy to check if the defined SOAP messages are accepted by the remote Web Services server using Oxygen XML Editor's
WSDL SOAP Analyzer integrated tool (Available .
Composing a SOAP Request
WSDL SOAP Analyzer is a tool that helps you test if the messages defined in a Web Service Descriptor (WSDL) are
accepted by a Web Services server.
Oxygen XML Editor provides two ways of testing, one for the currently edited WSDL document and another for the
remote WSDL documents that are published on a web server. To open the WSDL SOAP Analyzer tool for the currently
edited WSDL document do one of the following:
•
Click the
•
Use the
•
Go to Open with >
WSDL SOAP Analyzer toolbar button.
WSDL SOAP Analyzer action from the Tools menu.
WSDL SOAP Analyzer in the contextual menu of the Project view.
Oxygen XML Editor | Editing Documents | 410
Figure 218: WSDL SOAP Analyzer Dialog Box
This tool contains a SOAP analyzer and sender for Web Services Description Language file types. The analyzer fields
are as follows:
•
•
•
•
•
•
•
•
Services - The list of services defined by the WSDL file.
Ports - The ports for the selected service.
Operations - The list of available operations for the selected service.
Action URL - The script that serves the operation.
SOAP Action - Identifies the action performed by the script.
Version - Choose between 1.1 and 1.2. The SOAP version is selected automatically depending on the selected port.
Request Editor - It allows you to compose the web service request. When an action is selected, Oxygen XML Editor
tries to generate as much content as possible for the SOAP request. The envelope of the SOAP request has the correct
namespace for the selected SOAP version, that is http://schemas.xmlsoap.org/soap/envelope/ for SOAP 1.1 or
http://www.w3.org/2003/05/soap-envelope for SOAP 1.2. Usually you just have to change few values in order for
the request to be valid. The content completion assistant is available for this editor and is driven by the schema that
defines the type of the current message. While selecting different operations, Oxygen XML Editor remembers the
modified request for each one. You can press the Regenerate button in order to overwrite your modifications for
the current request with the initial generated content.
Attachments List - You can define a list of file URLs to be attached to the request.
•
•
•
Oxygen XML Editor | Editing Documents | 411
Response Area - Initially it displays an auto generated server sample response so you can have an idea about how
the response looks like. After pressing the Send button, it presents the message received from the server in response
to the Web Service request. It may show also error messages. If the response message contains attachments, Oxygen
XML Editor prompts you to save them, then tries to open them with the associated system application.
Errors List - There may be situations in which the WSDL file is respecting the WSDL XML Schema, but it fails
to be valid for example in the case of a message that is defined by means of an element that is not found in the types
section of the WSDL. In such a case, the errors are listed here. This list is presented only when there are errors.
Send Button - Executes the request. A status dialog box is displayed when Oxygen XML Editor is connecting to
the server.
The testing of a WSDL file is straight-forward: click the WSDL analysis button, then select the service, the port, and
the operation. The editor generates the skeleton for the SOAP request. You can edit the request, eventually attach files
to it and send it to the server. Watch the server response in the response area. You can find more details in the Testing
Remote WSDL Files section.
Note: SOAP requests and responses are automatically validated in the WSDL SOAP Analyzer using the XML
Schemas specified in the WSDL file.
Once defined, a request derived from a Web Service descriptor can be saved with the Save button to a Web Service
SOAP Call (WSSC) file for later reuse. In this way, you save time in configuring the URLs and parameters.
You can open the result of a Web Service call in an editor panel using the Open button.
Testing Remote WSDL Files
To open and test a remote WSDL file the steps are the following:
1. Go to Tools >
WSDL SOAP Analyzer .
2. On the WSDL File tab enter the URL of the remote WSDL file.
You enter the URL:
•
•
•
•
by typing
by browsing the local file system
by browsing a remote file system
by browsing a UDDI Registry
3. Press the OK button.
This will open the WSDL SOAP Analyzer tool. In the Saved SOAP Request tab you can open directly a previously
saved Web Service SOAP Call (WSSC) file thus skipping the analysis phase.
The UDDI Registry Browser
Pressing the
button in the WSDL File Opener dialog box (menu Tools > WSDL SOAP Analyzer) opens the
UDDI Registry Browser dialog box.
Oxygen XML Editor | Editing Documents | 412
Figure 219: UDDI Registry Browser Dialog Box
The fields of the dialog box are as follows:
•
•
•
•
•
•
URL - Type the URL of an UDDI registry or choose one from the default list.
Keywords - Enter the string you want to be used when searching the selected UDDI registry for available Web
services.
Rows to fetch - The maximum number of rows to be displayed in the result list.
Search by - You can choose to search either by company or by provided service.
Case sensitive - When checked, the search takes into account the keyword case.
Search - The WSDL files that matched the search criteria are added in the result list.
When you select a WSDL from the list and click the OK button, the UDDI Registry Browser dialog box is closed and
you are returned to the WSDL File Opener dialog box.
Editing CSS Stylesheets
This section explains the features of the editor for CSS stylesheets and how these features should be used.
Validating CSS Stylesheets
Oxygen XML Editor includes a built-in CSS Validator, integrated with general validation support. This makes the usual
validation features for presenting errors also available for CSS stylesheets.
When you edit a CSS document, you can access the CSS validator options by selecting
the Document > Validate menu.
Validation options from
The CSS properties accepted by the validator are those included in the current CSS profile that is selected in the CSS
validation preferences. The CSS 3 with Oxygen extensions profile includes all the CSS 3 standard properties plus the
CSS extensions specific for Oxygen that can be used in Author mode. That means all Oxygen specific extensions are
accepted in a CSS stylesheet by the built-in CSS validator when this profile is selected.
Oxygen XML Editor | Editing Documents | 413
Specify Custom CSS Properties
Lists the steps required for specifying custom CSS properties.
To specify custom CSS properties, follow these steps:
1. Create a file named CustomProperties.xml that has the following structure:
<?xml version="1.0" encoding="UTF-8"?>
<css_keywords
xmlns:xsi="http://www.w3.org/2001/XMLSchema-instance"
xsi:schemaLocation="http://www.oxygenxml.com/ns/css http://www.oxygenxml.com/ns/css/CssProperties.xsd"
xmlns="http://www.oxygenxml.com/ns/css">
<property name="custom">
<summary>Description for custom property.</summary>
<value name="customValue"/>
<value name="anotherCustomValue"/>
</property>
</css_keywords>
2. Go to your desktop and create the builtin/css-validator/ folder structure.
3. Press and hold Shift and right-click anywhere on your desktop. From the contextual menu, select Open Command
Window Here.
4. In the command line, run the jar cvf custom_props.jar builtin/ command.
The custom_props.jar file is created.
5. Go to [OXYGEN_DIR]/lib and create the endorsed folder. Copy the custom_props.jar file to
[OXYGEN_DIR]/lib/endorsed.
Content Completion in CSS Stylesheets
A Content Completion Assistant, similar to the one available for XML documents offers the CSS properties and the
values available for each property. It is activated with the Ctrl Space (Command Space on OS X) shortcut and is
context-sensitive when invoked for the value of a property. The Content Completion Assistant also includes code
templates that can be used to quickly insert code fragments into CSS stylesheets. The code templates that are proposed
include form controls, actions, and Author mode operations.
Figure 220: Content Completion in CSS Stylesheets
The properties and values available are dependent on the CSS Profile selected in the CSS preferences . The CSS 2.1
set of properties and property values is used for most of the profiles. However, with CSS 1 and CSS 3 specific proposal
sets are used.
The profile CSS 3 with Oxygen extensions includes all the CSS 3 standard properties plus the CSS extensions specific
for Oxygen XML Editor that can be used in Author mode.
CSS Outline View
The CSS Outline view presents the import declarations for other CSS stylesheet files and all the selectors defined in
the current CSS document. The selector entries can be presented as follows:
•
•
•
In the order they appear in the document.
Sorted by the element name used in the selector.
Sorted by the entire selector string representation.
Oxygen XML Editor | Editing Documents | 414
You can synchronize the selection in the Outline view with the cursor moves or changes you make in the stylesheet
document. When you select an entry from the Outline view, Oxygen XML Editor highlights the corresponding import
or selector in the CSS editor.
To enable the Outline view, go to Window > Show View > Outline.
Figure 221: CSS Outline View
The selectors presented in this view can be found quickly using the key search field. When you press a sequence of
character keys while the focus is in the view, the first selector that starts with that sequence is selected automatically.
Folding in CSS Stylesheets
In a large CSS stylesheet document, some styles can be collapsed so that only the styles that are needed remain in focus.
The same folding features available for XML documents are also available in CSS stylesheets.
Note: To enhance your editing experience, you can select entire blocks (parts of text delimited by brackets) by
double-clicking somewhere inside the brackets.
Formatting and Indenting CSS Stylesheets (Pretty Print)
If the edited CSS stylesheet becomes unreadable because of the bad alignment of the text lines, the format and indent
operation available for XML documents is also available for CSS stylesheets. It works in the same way as for XML
documents and is available as the same menu and toolbar action.
Minifying CSS Stylesheets
Minification (or compression) of a CSS document is the practice of removing unnecessary code without affecting the
functionality of the stylesheet.
To minify a CSS, invoke the contextual menu anywhere in the edited document and choose the Minify CSS action.
Oxygen XML Editor opens a dialog box that allows you to:
•
•
Set the location of the resulting CSS.
Place each style rule on a new line.
After pressing OK, Oxygen XML Editor performs the following actions:
•
All spaces are normalized (all leading and trailing spaces are removed, while sequences of white spaces are replaced
with single space characters).
Oxygen XML Editor | Editing Documents | 415
•
All comments are removed.
Note: The CSS minifier relies heavily upon the W3C CSS specification. If the content of the CSS file you are
trying to minify does not conform with the specifications, an error dialog box will be displayed, listing all errors
encountered during the processing.
The resulting CSS stylesheet gains a lot in terms of execution performance, but loses in terms of readability. The source
CSS document is left unaffected.
Note: To restore the readability of a minified CSS, invoke the Format and Indent action from the Document >
Source menu, the Source submenu from the contextual menu, or Source toolbar. However, this action will not
recover any of the deleted comments.
Editing LESS CSS Stylesheets
Oxygen XML Editor provides support for stylesheets coded with the LESS dynamic stylesheet language. LESS extends
the CSS language by adding features that allow mechanisms such as variables, nesting, mixins, operators, and functions.
Oxygen XML Editor offers additional LESS features that include:
•
•
•
•
Open LESS files - the LESS extension is recognized and thus can be opened by the editor
Validation - presents errors in LESS files
Content completion - offers properties and the values available for each property
Compile to CSS - options are available to compile LESS files to CSS
Note: Oxygen XML Editor also support syntax highlighting in LESS files, although there may be some
limitations in supporting all the LESS constructs.
For more information about LESS go to http://lesscss.org/.
Validating LESS Stylesheets
Oxygen XML Editor includes a built-in LESS CSS Validator, integrated with general validation support. The usual
validation features for presenting errors also available for LESS stylesheets.
Oxygen XML Editor provides three validation methods:
•
•
Automatic validation as you type - marks validation errors in the document as you are editing.
•
Validation scenarios, by selecting
Configure Validation Scenario(s) from the
Validation toolbar drop-down
menu. Errors are presented in the message panel at the bottom of the editor. This is useful when you need to validate
the current file as part of a larger LESS import hierarchy (for instance, you may change the URL of the file to validate
to the root of the hierarchy).
Validation upon request, by pressing the
Validate button from the
An error list is presented in the message panel at the bottom of the editor.
Validation toolbar drop-down menu.
Content Completion in LESS Stylesheets
A Content Completion Assistant offers the LESS properties and the values available for each property. It is activated
with the Ctrl Space (Command Space on OS X) shortcut and is context-sensitive when invoked for the value of a
property in a LESS file. The Content Completion Assistant also includes code templates that can be used to quickly
insert code fragments into LESS stylesheets. The code templates that are proposed include form controls, actions, and
Author mode operations.
Oxygen XML Editor | Editing Documents | 416
Figure 222: Content Completion in LESS Stylesheets
The properties and values available are dependent on the CSS Profile selected in the CSS preferences .
Compiling LESS Stylesheets to CSS
When editing LESS files, you can compile the files into CSS. Oxygen XML Editor provides both manual and automatic
options to compile LESS stylesheets into CSS.
Important: The LESS processor works well only with files having the UTF-8 encoding. Thus, it is highly
recommended that you always use the utf-8 encoding when working with LESS files or the files they import
(other LESS or CSS files). You can use the following directive at the beginning of your files:
@charset "utf-8";
You have two options for compiling LESS files to CSS:
1. Use the contextual menu in a LESS file and select Compile to CSS (Ctrl Shift C (Meta Shift C on OS X)).
2. Enable the option Automatically compile LESS to CSS when saving in the settings. To do so, open the Preferences
dialog box and go to Editor > Open > Save > Save hooks. If enabled, when you save a LESS file it will automatically
be compiled to CSS (this option is disabled by default).
Important: If this option is enabled, when you save a LESS file, the CSS file that has the same name as
the LESS file is overwritten without warning. Make sure all your changes are made in the LESS file. Do not
edit the CSS file directly, as your changes might be lost.
Editing Relax NG Schemas
Oxygen XML Editor provides a special type of editor for Relax NG schemas. This editor presents the usual text view
of an XML document synchronized in real time with an outline view. The outline view has two display modes: the
standard outline mode and the components mode.
Editing Relax NG Schema in the Master Files Context
Smaller interrelated modules that define a complex Relax NG Schema cannot be correctly edited or validated individually,
due to their interdependency with other modules. For example, an element defined in a main schema document is not
visible when you edit an included module. Oxygen XML Editor provides the support for defining the main module (or
modules), thus allowing you to edit any of the imported/included schema files in the context of the larger schema
structure.
You cat set a main Relax NG document either using the master files support from the Project view, or using a validation
scenario.
To set a main file using a validation scenario, add validation units that point to the main schemas. Oxygen XML Editor
warns you if the current module is not part of the dependencies graph computed for the main schema. In this case, it
considers the current module as the main schema.
The advantages of editing in the context of main file include:
•
•
•
Oxygen XML Editor | Editing Documents | 417
Correct validation of a module in the context of a larger schema structure.
Content Completion Assistant displays all the referable components valid in the current context. This include
components defined in modules other than the currently edited one.
The Outline displays the components collected from the entire schema structure;
Relax NG Schema Diagram
This section explains how to use the graphical diagram of a Relax NG schema.
Introduction to Relax NG Schema Diagram View
Oxygen XML Editor provides a simple, expressive, and easy to read Schema Diagram view for Relax NG schemas.
With this new feature you can easily develop complex schemas, print them on multiple pages or save them as JPEG,
PNG, or BMP images. It helps both schema authors in developing the schema and content authors who are using the
schema to understand it.
Oxygen XML Editor is the only XML editor to provide a side by side source and diagram presentation and have them
real-time synchronized:
•
•
The changes you make in the Editor are immediately visible in the Diagram (no background parsing).
Changing the selected element in the diagram selects the underlying code in the source editor.
Full Model View
When you create a new schema document or open an existing one, the editor panel is divided in two sections: one
containing the schema diagram and the second the source code. The Diagram view has two tabbed panes offering a
Full Model View and a Logical Model View.
Figure 223: Relax NG Schema Editor - Full Model View
Oxygen XML Editor | Editing Documents | 418
The following references can be expanded in place: patterns, includes, and external references. This expansion mechanism,
coupled with the synchronization support, makes the schema navigation easy.
All the element and attribute names are editable: double-click any name to start editing it.
Symbols Used in the Schema Diagram
The Full Model View renders all the Relax NG Schema patterns with intuitive symbols:
•
- define pattern with the name attribute set to the value shown inside the rectangle (in this example
name).
•
- define pattern with the combine attribute set to interleave and the name attribute
set to the value shown inside the rectangle (in this example attlist.person).
•
- define pattern with the combine attribute set to choice and the name attribute set to
the value shown inside the rectangle (in this example attlist.person).
•
- element pattern with the name attribute set to the value shown inside the rectangle (in this example
name).
•
- attribute pattern with the name attribute set to the value shown inside de rectangle (in this case
note).
•
- ref pattern with the name attribute set to the value shown inside the rectangle (in this case family).
•
- oneOrMore pattern.
•
- zeroOrMore pattern.
•
- optional pattern.
•
- choice pattern.
•
- value pattern, used for example inside a choice pattern.
•
- group pattern.
•
- pattern from the Relax NG Annotations namespace (http://relaxng.org/ns/compatibility/annotations/1.0)
which is treated as a documentation element in a Relax NG schema.
•
- text pattern.
•
- empty pattern.
Logical Model View
The Logical Model View presents the compiled schema which is a single pattern. The patterns that form the element
content are defined as top level patterns with generated names. These names are generated depending of the elements
name class.
Oxygen XML Editor | Editing Documents | 419
Figure 224: Logical Model View for a Relax NG Schema
Actions Available in the Schema Diagram View
When editing Relax NG schemas in Full Model View, the contextual menu offers the following actions:
Append child
Appends a child to the selected component.
Insert Before
Inserts a component before the selected component.
Insert After
Inserts a component after the selected component.
Edit attributes
Edits the attributes of the selected component.
Remove
Removes the selected component.
Show only the selected component
Depending on its state (selected/not selected), either the selected component or all the diagram components are
shown.
Show Annotations
Depending on its state (selected/not selected), the documentation nodes are shown or hidden.
Auto expand to references
This option controls how the schema diagram is automatically expanded. If you select it and then edit a top-level
element or you make a refresh, the diagram is expanded until it reaches referenced components. If this option is left
unchecked, only the first level of the diagram is expanded, showing the top-level elements. For large schemas, the
editor disables this option automatically.
Oxygen XML Editor | Editing Documents | 420
Collapse Children
Collapses the children of the selected view.
Expand Children
Expands the children of the selected view.
Print Selection
Prints the selected view.
Save as Image
Saves the current selection as JPEG, BMP, SVG or PNG image.
Refresh
Refreshes the schema diagram according to the changes in your code. They represent changes in your imported
documents or changes that are not reflected automatically in the compiled schema).
If the schema is not valid, you see only an error message in the Logical Model View instead of the diagram.
Relax NG Outline View
The Relax NG Outline view presents a list with the patterns that appear in the diagram in both the Full Model View
and Logical Model View cases. It allows a quick access to a component by name. By default it is displayed on screen,
but if you closed it you can reopen it from Window > Show View > Outline.
Figure 225: Relax NG Outline View
The tree shows the XML structure or the defined pattern (components) collected from the current document. By default,
the Outline view presents the components.
When the
Show components option is selected in the
option is available:
Settings menu on the Outline view toolbar, the following
Show XML structure
Shows the XML structure of the current document in a tree-like manner.
Oxygen XML Editor | Editing Documents | 421
The following actions are available in the
structure option is selected:
Settings menu on the Outline view toolbar when the
Show XML
Filter returns exact matches
The text filter of the Outline view returns only exact matches.
Selection update on cursor move
Allows a synchronization between Outline view and schema diagram. The selected view from the diagram will be
also selected in the Outline view.
Show components
Shows the defined pattern collected from the current document.
Flat presentation mode of the filtered results
When active, the application flattens the filtered result elements to a single level.
Show comments and processing instructions
Show/hide comments and processing instructions in the Outline view.
Show element name
Show/hide element name.
Show text
Show/hide additional text content for the displayed elements.
Show attributes
Show/hide attribute values for the displayed elements. The displayed attribute values can be changed from the
Outline preferences panel.
Configure displayed attributes
Displays the XML Structured Outline preferences page.
The following contextual menu actions are also available in the Outline view when the
option is selected in the
Show XML structure
Settings menu:
Append Child
Displays a list of elements that you can insert as children of the current element.
Insert Before
Displays a list of elements that you can insert as siblings of the current element, before the current element.
Insert After
Displays a list of elements that you can insert as siblings of the current element, after the current element.
Edit Attributes
Opens a dialog box that allows you to edit the attributes of the currently selected component.
Toggle Comment
Comments/uncomments the currently selected element.
Search references
Searches for the references of the currently selected component.
Search references in
Searches for the references of the currently selected component in the context of a scope that you define.
Component dependencies
Displays the dependencies of the currently selected component.
Oxygen XML Editor | Editing Documents | 422
Rename Component in
Renames the currently selected component in the context of a scope that you define.
Cut
Cuts the currently selected component.
Copy
Copies the currently selected component.
Delete
Deletes the currently selected component.
Expand More
Expands the structure of a component in the Outline view.
Collapse All
Collapses the structure of all the component in the Outline view.
The upper part of the Outline view contains a filter box that allows you to focus on the relevant components. Type a
text fragment in the filter box and only the components that match it are presented. For advanced usage you can use
wildcard characters (*, ?) and separate multiple patterns with commas.
Searching and Refactoring Actions in RNG Schemas
Search Actions
The following search actions can be applied on named defines and are available from the Search submenu in the
contextual menu of the current editor or from the Document > References menu:
•
•
•
•
Search References - Searches all references of the item found at current cursor position in the defined scope,
if any. If a scope is defined, but the current edited resource is not part of the range of resources determined by this,
a warning dialog box is displayed and you have the possibility to define another search scope.
Search References in - Searches all references of the item found at current cursor position in the file or files that
you specify when define a scope in the Search References dialog box.
Search Declarations - Searches all declarations of the item found at current cursor position in the defined scope
if any. If a scope is defined, but the current edited resource is not part of the range of resources determined by this,
a warning dialog box will be displayed and you have the possibility to define another search scope.
Search Declarations in - Searches all declarations of the item found at current cursor position in the file or files
that you specify when you define a scope for the search operation.
•
Search Occurrences in File - Searches all occurrences of the item at the cursor position in the currently edited
file.
The following action is available from the contextual menu and the Document > Schema menu:
•
Show Definition - Moves the cursor to the definition of the current element in the Relax NG (full syntax) schema.
Note: You can also use the Ctrl Single-Click (Command Single-Click on OS X) shortcut on a reference
to display its definition.
Refactoring Actions
The following refactoring actions can be applied on named defines and are available from the Refactoring submenu in
the contextual menu of the current editor or from the Document > Refactoring menu:
•
Rename Component - Allows you to rename the current component in-place. The component and all its references
in the document are highlighted with a thin border and the changes you make to the component at the cursor position
Oxygen XML Editor | Editing Documents | 423
are updated in real time to all occurrences of the component. To exit in-place editing, press the Esc or Enter key on
your keyboard.
•
Rename Component in - Opens the Rename component_type dialog box that allows you to rename the selected
component by specifying the new component name and the files to be affected by the modification. If you click the
Preview button, you can view the files affected by the Rename Component action.
Figure 226: Rename Identity Constraint Dialog Box
RNG Resource Hierarchy/Dependencies View
The Resource Hierarchy/Dependencies view allows you to see the hierarchy/dependencies for a schema. To open this
view, go to Window > Show View > Resource Hierarchy/Dependencies .
If you want to see the hierarchy of a schema, select the desired schema in the project view and choose Resource
Hierarchy from the contextual menu.
Oxygen XML Editor | Editing Documents | 424
Figure 227: Resource Hierarchy/Dependencies View - hierarchy for map.rng
If you want to see the dependencies of a schema, select the desired schema in the project view and choose Resource
Dependencies from the contextual menu.
Figure 228: Resource Hierarchy/Dependencies View - Dependencies for tblDecl.mod.rng
The following actions are available in the Resource Hierarchy/Dependencies view:
Refresh
Refreshes the Hierarchy/Dependencies structure.
Oxygen XML Editor | Editing Documents | 425
Stop
Stops the hierarchy/dependencies computing.
Show Hierarchy
Allows you to choose a resource to compute the hierarchy structure.
Show Dependencies
Allows you to choose a resource to compute the dependencies structure.
Configure
Allows you to configure a scope to compute the dependencies structure. There is also an option for automatically
using the defined scope for future operations.
History
Provides access to the list of previously computed dependencies. Use the
items from this list.
Clear history button to remove all
The contextual menu contains the following actions:
Open
Opens the resource. You can also double-click a resource in the Hierarchy/Dependencies structure to open it.
Copy location
Copies the location of the resource.
Move resource
Moves the selected resource.
Rename resource
Renames the selected resource.
Show Resource Hierarchy
Shows the hierarchy for the selected resource.
Show Resource Dependencies
Shows the dependencies for the selected resource.
Add to Master Files
Adds the currently selected resource in the Master Files directory.
Expand All
Expands all the children of the selected resource from the Hierarchy/Dependencies structure.
Collapse All
Collapses all children of the selected resource from the Hierarchy/Dependencies structure.
Tip: When a recursive reference is encountered in the Hierarchy view, the reference is marked with a special
icon .
Note: The Move resource or Rename resource actions give you the option to update the references to the
resource.
Moving/Renaming RNG Resources
You are able to move and rename a resource presented in the Resource/Hierarchy Dependencies view, using the
Rename resource and Move resource refactoring actions from the contextual menu.
When you select the Rename action in the contextual menu of the Resource/Hierarchy Dependencies view, the
Rename resource dialog box is displayed. The following fields are available:
•
•
New name - Presents the current name of the edited resource and allows you to modify it.
Update references - Enable this option to update the references to the resource you are renaming.
Oxygen XML Editor | Editing Documents | 426
When you select the Move action from the contextual menu of the Resource/Hierarchy Dependencies view, the Move
resource dialog box is displayed. The following fields are available:
•
•
•
Destination - Presents the path to the current location of the resource you want to move and gives you the option to
introduce a new location.
New name - Presents the current name of the moved resource and gives you the option to change it.
Update references of the moved resource(s) - Enable this option to update the references to the resource you are
moving, in accordance with the new location and name.
If the Update references of the moved resource(s) option is enabled, a Preview option (which opens the Preview
dialog box) is available for both actions. The Preview dialog box presents a list with the resources that are updated.
Note: Updating the references of a resource that is resolved through a catalog is not supported. Also, the update
references operation is not supported if the path to the renamed or moved resource contains entities.
Component Dependencies View for RelaxNG Schemas
The Component Dependencies view allows you to see the dependencies for a selected Relax NG component. You can
open the view from Window > Show View > Component Dependencies .
If you want to see the dependencies of a RelaxNG component, select the desired component in the editor and choose
the Component Dependencies action from the contextual menu. The action is available for all named defines.
Figure 229: Component Dependencies View - Hierarchy for base.rng
In the Component Dependencies view you have several actions in the toolbar:
Refresh
Refreshes the dependencies structure.
Stop
Stops the dependencies computing.
Configure
Allows you to configure a search scope to compute the dependencies structure. You can decide to use automatically
the defined scope for future operations by checking the corresponding checkbox.
History
Allows you to repeat a previous dependencies computation.
The following actions are available on the contextual menu:
Go to First Reference
Selects the first reference of the referenced component from the current selected component in the dependencies
tree.
Oxygen XML Editor | Editing Documents | 427
Go to Component
Shows the definition of the current selected component in the dependencies tree.
Tip: If a component contains multiple references to another components, a small table is displayed that contains
all references. When a recursive reference is encountered, it is marked with a special icon .
RNG Quick Assist Support
The Quick Assist support improves the development work flow, offering fast access to the most commonly used actions
when you edit XML Schema documents.
The Quick Assist feature is activated automatically when the cursor is positioned over the name of a component. It is
accessible via a yellow bulb help marker placed on the cursor line, in the line number stripe on the left side of the editor.
Also, you can invoke the quick assist menu by using the Alt + 1 keys (Meta + Alt + 1 on Mac OS X) keyboard shortcuts.
Figure 230: RNG Quick Assist Support
The quick assist support offers direct access to the following actions:
Rename Component in
Renames the component and all its dependencies.
Search Declarations
Searches the declaration of the component in a predefined scope. It is available only when the context represents a
component name reference.
Search References
Searches all references of the component in a predefined scope.
Component Dependencies
Searches the component dependencies in a predefined scope.
Change Scope
Configures the scope that will be used for future search or refactor operations.
Rename Component
Allows you to rename the current component in-place.
Search Occurrences
Searches all occurrences of the component within the current file.
Configuring a Custom Datatype Library for a RELAX NG Schema
A RELAX NG schema can declare a custom datatype library for the values of elements found in XML document
instances. The datatype library must be developed in Java and it must implement the interface specified on the
www.thaiopensource.com website.
Oxygen XML Editor | Editing Documents | 428
The jar file containing the custom library and any other dependent jar file must be added to the classpath of the application,
that is the jar files must be added to the folder [OXYGEN_DIR]/lib .
To load the custom library, restart Oxygen XML Editor.
Linking Between Development and Authoring
The Author mode is available on the Relax NG schema presenting the schema similar with the Relax NG compact
syntax. It links to imported schemas and external references. Embedded Schematron is supported only in Relax NG
schemas with XML syntax.
Editing NVDL Schemas
Some complex XML documents are composed by combining elements and attributes from different namespaces. More,
the schemas that define these namespaces are not even developed in the same schema language. In such cases, it is
difficult to specify in the document all the schemas which must be taken into account for validation of the XML document
or for content completion. An NVDL (Namespace Validation Definition Language) schema can be used. This schema
allows the application to combine and interleave multiple schemas of different types (W3C XML Schema, RELAX NG
schema, Schematron schema) in the same XML document.
Oxygen XML Editor provides a special type of editor for NVDL schemas. This editor presents the usual text view of
an XML document synchronized in real time with an outline view. The outline view has two display modes: the standard
outline mode and the components mode.
NVDL Schema Diagram
This section explains how to use the graphical diagram of a NVDL schema.
Introduction to NVDL Schema Diagram View
Oxygen XML Editor provides a simple, expressive, and easy to read Schema Diagram view for NVDL schemas.
With this new feature you can easily develop complex schemas, print them on multiple pages or save them as JPEG,
PNG, and BMP images. It helps both schema authors in developing the schema and content authors that are using the
schema to understand it.
Oxygen XML Editor is the only XML Editor to provide a side by side source and diagram presentation and have them
real-time synchronized:
•
•
The changes you make in the Editor are immediately visible in the Diagram (no background parsing).
Changing the selected element in the diagram, selects the underlying code in the source editor.
Full Model View
When you create a schema document or open an existing one, the editor panel is divided in two sections: one containing
the schema diagram and the second the source code. The diagram view has two tabbed panes offering a Full Model
View and a Logical Model View.
Oxygen XML Editor | Editing Documents | 429
Figure 231: NVDL Schema Editor - Full Model View
The Full Model View renders all the NVDL elements with intuitive icons. This representation coupled with the
synchronization support makes the schema navigation easy.
Double-click any diagram component in order to edit its properties.
Actions Available in the Diagram View
The contextual menu offers the following actions:
Show only the selected component
Depending on its state (selected/not selected), either the selected component or all the diagram components are
shown.
Show Annotations
Depending on its state (selected/not selected), the documentation nodes are shown or hidden.
Auto expand to references
This option controls how the schema diagram is automatically expanded. For instance, if you select it and then edit
a top-level element or you trigger a diagram refresh, the diagram will be expanded until it reaches the referenced
components. If this option is left unchecked, only the first level of the diagram is expanded, showing the top-level
elements. For large schemas, the editor disables this option automatically.
Collapse Children
Collapses the children of the selected view.
Expand Children
Expands the children of the selected view.
Print Selection
Prints the selected view.
Oxygen XML Editor | Editing Documents | 430
Save as Image
Saves the current selection as image, in JPEG, BMP, SVG or PNG format.
Refresh
Refreshes the schema diagram according to the changes in your code (changes in your imported documents or those
that are not reflected automatically in the compiled schema).
If the schema is not valid, you see only an error message in the Logical Model View instead of the diagram.
NVDL Outline View
The NVDL Outline view presents a list with the named or anonymous rules that appear in the diagram. It allows a quick
access to a rule by name. It can be opened from the Window > Show View > Outline menu.
Searching and Refactoring Actions in NVDL Schemas
Search Actions
The following search actions can be applied on name, useMode, and startMode attributes and are available from
the Search submenu in the contextual menu of the current editor or from the Document > References menu:
•
•
•
•
Search References - Searches all references of the item found at current cursor position in the defined scope,
if any. If a scope is defined, but the current edited resource is not part of the range of resources determined by this,
a warning dialog box is displayed and you have the possibility to define another search scope.
Search References in - Searches all references of the item found at current cursor position in the file or files that
you specify when define a scope in the Search References dialog box.
Search Declarations - Searches all declarations of the item found at current cursor position in the defined scope
if any. If a scope is defined, but the current edited resource is not part of the range of resources determined by this,
a warning dialog box will be displayed and you have the possibility to define another search scope.
Search Declarations in - Searches all declarations of the item found at current cursor position in the file or files
that you specify when you define a scope for the search operation.
•
Search Occurrences in File - Searches all occurrences of the item at the cursor position in the currently edited
file.
The following action is available from the contextual menu and the Document > Schema menu:
•
Show Definition - Moves the cursor to its definition in the schema used by NVDL in order to validate it.
Note: You can also use the Ctrl Single-Click (Command Single-Click on OS X) shortcut on a reference
to display its definition.
Refactoring Actions
The following refactoring actions can be applied on name, useMode, and startMode attributes and are available
from the Refactoring submenu in the contextual menu of the current editor or from the Document > Refactoring menu:
•
Rename Component - Allows you to rename the current component in-place. The component and all its references
in the document are highlighted with a thin border and the changes you make to the component at the cursor position
are updated in real time to all occurrences of the component. To exit in-place editing, press the Esc or Enter key on
your keyboard.
•
Rename Component in - Opens the Rename component_type dialog box that allows you to rename the selected
component by specifying the new component name and the files to be affected by the modification. If you click the
Preview button, you can view the files affected by the Rename Component action.
Oxygen XML Editor | Editing Documents | 431
Figure 232: Rename Identity Constraint Dialog Box
Component Dependencies View for NVDL Schemas
The Component Dependencies view allows you to see the dependencies for a selected NVDL named mode. You can
open the view from Window > Show View > Component Dependencies .
If you want to see the dependencies of an NVDL mode, select the desired component in the editor and choose the
Component Dependencies action from the contextual menu. The action is available for all named modes.
Figure 233: Component Dependencies View - Hierarchy for test.nvdl
In the Component Dependencies the following actions are available on the toolbar:
Refresh
Refreshes the dependencies structure.
Stop
Allows you to stop the dependencies computing.
Oxygen XML Editor | Editing Documents | 432
Configure
Allows you to configure a search scope to compute the dependencies structure. If you decide to set the application
to use automatically the defined scope for future operations, select the corresponding checkbox.
History
Repeats a previous dependencies computation.
The following actions are available in the contextual menu:
Go to First Reference
Selects the first reference of the referenced component from the current selected component in the dependencies
tree.
Go to Component
Shows the definition of the current selected component in the dependencies tree.
Tip: If a component contains multiple references to another component, a small table containing all references
is displayed. When a recursive reference is encountered it is marked with a special icon .
Linking Between Development and Authoring
The Author mode is available on the NVDL scripts editor presenting them in a compact and easy to understand
representation.
Editing JSON Documents
This section explains the features of the Oxygen XML Editor JSON Editor and how to use them.
Editing JSON Documents in Text Mode
The Text Mode of the JSON editor provides the usual actions specific for a plain text editor: undo / redo, copy / paste,
find / replace, drag and drop, and other editor actions like validation and formatting and indenting (pretty print) document.
You can use the two Text and Grid buttons available at the bottom of the editor panel if you want to switch between
the editor Text Mode and Grid Mode .
Oxygen XML Editor | Editing Documents | 433
Figure 234: JSON Editor Text Mode
Syntax Highlight in JSON Documents
Oxygen XML Editor supports Syntax Highlight for JavaScript / JSON editors and provides default configurations for
the JSON set of tokens. You can customize the foreground color, background color and the font style for each JSON
token type.
Folding in JSON
In a large JSON document, the data enclosed in the '{' and '}' characters can be collapsed so that only the needed data
remain in focus. The folding features available for XML documents are available in JSON documents.
Oxygen XML Editor | Editing Documents | 434
Editing JSON Documents in Grid Mode
Figure 235: JSON Editor Grid Mode
Oxygen XML Editor allows you to view and edit the JSON documents in the Grid Mode. The JSON is represented in
Grid mode as a compound layout of nested tables in which the JSON data and structure can be easily manipulated with
table-specific operations or drag and drop operations on the grid components. You can also use the following
JSON-specific contextual actions:
Array
Useful when you want to convert a JSON value to array.
Insert value before
Inserts a value before the currently selected one.
Insert value after
Inserts a value after the currently selected one.
Append value as child
Appends a value as a child of the currently selected value.
You can customize the JSON grid appearance according to your needs. For instance you can change the font, the cell
background, foreground, or even the colors from the table header gradients. The default width of the columns can also
be changed.
Oxygen XML Editor | Editing Documents | 435
JSON Outline View
The JSON Outline view displays the list of all the components of the JSON document you are editing. To enable the
JSON Outline view, go to Window > Show view > Outline.
Figure 236: The JSON Outline View
The following actions are available in the contextual menu of the JSON Outline view:
•
Cut
•
Copy
•
Paste
•
Delete
The Settings menu on the JSON Outline view toolbar allows you to enable
Selection update on cursor move.
This option controls the synchronization between the Outline view and source the document. Oxygen XML Editor
synchronizes the selection in the Outline view with the cursor moves or the changes you make in the JSON editor.
Selecting one of the components from the Outline view also selects the corresponding item in the source document.
Validating JSON Documents
Oxygen XML Editor includes a built-in JSON validator (based on the free JAVA source code available on www.json.org),
integrated with the general validation support.
Convert XML to JSON
The steps for converting an XML document to JSON are the following:
1. Select the XML to JSON action from the Tools menu.
The XML to JSON dialog box is displayed:
Oxygen XML Editor | Editing Documents | 436
2.
3.
4.
5.
Choose or enter the Input URL of the XML document.
Choose the Output file that will contain the conversion JSON result.
Check the Open in Editor option to open the JSON result of the conversion in the Oxygen XML Editor JSON Editor
Click the OK button.
The operation result will be a document containing the JSON conversion of the input XML URL.
Editing StratML Documents
Strategy Markup Language (StratML) is an XML vocabulary and schema for strategic plans. Oxygen XML Editor
supports StratML Part 1 (Strategic Plan) and StratML Part 2 (Performance Plans and Reports) and provides templates
for the following documents:
•
•
•
•
Strategic Plan (StratML Part 1)
Performance Plan (StratML Part 2)
Performance Report - (StratML Part 2)
Strategic Plan - (StratML Part 2)
Oxygen XML Editor | Editing Documents | 437
You can view the components of a StratML document in the Outline view. Oxygen XML Editor implements a default
XML with XSLT transformation scenario for this document type, called StratML to HTML.
Editing XLIFF Documents
XLIFF (XML Localisation Interchange File Format) is an XML-based format that was designed to standardize the way
multilingual data is passed between tools during a localization process. Oxygen XML Editor provides the following
support for editing XLIFF documents:
XLIFF Version 1.2 and 2.0 Support:
•
•
•
New file templates for XLIFF documents.
A default CSS file (xliff.css) used for rendering XLIFF content in Author mode is stored in
[OXYGEN_DIR]/frameworks/xliff/css/.
Validation and content completion support using local catalogs. The default catalog (catalog.xml) for version
1.2 is stored in [OXYGEN_DIR]/frameworks/xliff/xsd/1.2, and for version 2.0 in
[OXYGEN_DIR]/frameworks/xliff/xsd/2.0.
XLIFF Version 2.0 Enhanced Support:
•
Support for validating XLIFF 2.0 documents using modules. The default modules are stored in
[OXYGEN_DIR]/frameworks/xliff/xsd/2.0/modules.
Editing JavaScript Documents
This section explains the features of the Oxygen XML Editor JavaScript Editor and how you can use them.
JavaScript Editor Text Mode
Oxygen XML Editor allows you to create and edit JavaScript files and assists you with useful features such as syntax
highlight, content completion, and outline view. To enhance your editing experience, you can select entire blocks (parts
of text delimited by brackets) by double-clicking somewhere inside the brackets.
Oxygen XML Editor | Editing Documents | 438
Figure 237: JavaScript Editor Text Mode
The contextual menu of the JavaScript editor offers the following actions:
Cut
Allows you to cut fragments of text from the editing area.
Copy
Allows you to copy fragments of text from the editing area.
Paste
Allows you to paste fragments of text in the editing area.
Toggle Comment
Allows you to comment a line or a fragment of the JavaScript document you are editing. This option inserts a single
comment for the entire fragment you want to comment.
Toggle Line Comment
Allows you to comment a line or a fragment of the JavaScript document you are editing. This option inserts a
comment for each line of the fragment you want to comment.
Go to Matching Bracket
Use this option to find the closing, or opening bracket, matching the bracket at the cursor position. When you select
this option, Oxygen XML Editor moves the cursor to the matching bracket, highlights its row, and decorates the
initial bracket with a rectangle.
Note: A rectangle decorates the opening, or closing bracket which matches the current one at all times.
Source
Allows you to select one of the following actions:
To Lower Case
Converts the selection content to lower case characters.
Oxygen XML Editor | Editing Documents | 439
To Upper Case
Converts the selection content to upper case characters.
Capitalize Lines
Converts to upper case the first character of every selected line.
Join and Normalize Lines
Joins all the rows you select to one row and normalizes the content.
Insert new line after
Inserts a new line after the line at the cursor position.
Modify all matches
Use this option to modify (in-place) all the occurrences of the selected content. When you use this option, a thin
rectangle replaces the highlights and allows you to start editing. If matches with different letter cases are found, a
dialog box is displayed that allows you select whether you want to modify only matches with the same letter case
or all matches.
Open
Allows you to select one of the following actions:
•
•
Open File at Cursor - select this action to open the source of the file located at the cursor position
Open File at Cursor in System Application - select this action to open the source of the file located at the
cursor position with the application that the system associates with the file
Compare
Select this option to open the Diff Files dialog box and compare the file you are editing with a file you choose in
the dialog box.
Folding
When you invoke the contextual menu from the folding stripe on the left side of the editor, the following actions
are available:
Collapse Other Folds (Ctrl NumPad / (Meta NumPad / on OS X))
Folds all the elements except the current element.
Collapse Child Folds (Ctrl NumPad . (Meta NumPad . on OS X))
Folds the elements indented with one level inside the current element.
Expand Child Folds
Unfolds all child elements of the currently selected element.
Expand All (Ctrl NumPad * (Meta NumPad * on OS X))
Unfolds all elements in the current document.
Content Completion in JavaScript Files
When you edit a JavaScript document, the Content Completion Assistant presents you a list of the elements you can
insert at the cursor position. For an enhanced assistance, JQuery methods are also presented. The following icons decorate
the elements in the content completion list of proposals depending on their type:
•
•
- function
•
- object
- property
- method
•
•
- variable
Note: These icons decorate both the elements from the content completion list of proposals and from the Outline
view.
Oxygen XML Editor | Editing Documents | 440
Figure 238: JavaScript Content Completion Assistant
The Content Completion Assistant collects:
•
•
Method names from the current file and from the library files.
Functions and variables defined in the current file.
If you edit the content of a function, the content completion list of proposals contains all the local variables defined in
the current function, or in the functions that contain the current one.
JavaScript Outline View
Oxygen XML Editor present a list of all the components of the JavaScript document you are editing in the Outline view.
To open the Outline view, go to Window > Show View > Outline.
Oxygen XML Editor | Editing Documents | 441
Figure 239: The JavaScript Outline View
The following icons decorate the elements in the Outline view depending on their type:
•
•
- function
•
- object
- property
- method
•
•
- variable
The contextual menu of the JavaScript Outline view contains the usual
Cut,
Copy,
Paste, and
Delete
actions. From the settings menu, you can enable the Update selection on cursor move option to synchronize the Outline
view with the editing area.
Validating JavaScript Files
You have the possibility to validate the JavaScript document you are editing. Oxygen XML Editor uses the Mozilla
Rhino library for validation. For more information about this library, go to http://www.mozilla.org/rhino/doc.html. The
JavaScript validation process checks for errors in the syntax. Calling a function that is not defined is not treated as an
error by the validation process. The interpreter discovers this error when executing the faulted line. Oxygen XML Editor
can validate a JavaScript document both on-request and automatically.
Editing XProc Scripts
An XProc script is edited as an XML document that is validated against a RELAX NG schema. If the script has an
associated transformation scenario, then the XProc engine from the scenario is invoked as validating engine. The default
engine for XProc scenarios is the Calabash engine which comes bundled with Oxygen XML Editor version 17.1.
The content completion inside the element input/inline from the XProc namespace http://www.w3.org/ns/xproc
offers elements from the following schemas depending both on the port attribute and the parent of the input element.
When invoking the content completion inside the XProc element inline, the Content Completion Assistant's proposals
list is populated as follows:
•
If the value of the port attribute is stylesheet and the xslt element is the parent of the input elements, the
Content Completion Assistant offers XSLT elements.
•
•
•
•
Oxygen XML Editor | Editing Documents | 442
If the value of the port attribute is schema and the validate-with-relax-ng element is the parent of the
input element, the Content Completion Assistant offers RELAX NG schema elements.
If the value of the port attribute is schema and the validate-with-xml-schema element is the parent of
the input element, the Content Completion Assistant offers XML Schema schema elements.
If the value of the port attribute is schema and the validate-with-schematron element is the parent of
the input element , the Content Completion Assistant offers either ISO Schematron elements or Schematron 1.5
schema elements.
If the above cases do not apply, then the Content Completion Assistant offers elements from all the schemas from
the above cases.
The XProc editor assists you in writing XPath expressions by offering a Content Completion Assistant and dedicated
coloring schemes. To customize the coloring schemes, open the Preferences dialog box and go to Editor > Syntax
Highlight.
Figure 240: XProc Content Completion
Editing Schematron Schemas
Schematron is a simple and powerful Structural Schema Language for making assertions about patterns found in XML
documents. It relies almost entirely on XPath query patterns for defining rules and checks. Schematron validation rules
allow you to specify a meaningful error message. This error message is provided to you if an error is encountered during
the validation stage.
The Skeleton XSLT processor is used for validation and conforms with ISO Schematron or Schematron 1.5. It allows
you to validate XML documents against Schematron schemas or against combined RELAX NG / W3C XML Schema
and Schematron.
Oxygen XML Editor assists you in editing Schematron documents with schema-based content completion, syntax
highlight, search and refactor actions, and dedicated icons for the Outline view. You can create a new Schematron
schema using one of the Schematron templates available in the New Document wizard.
You can specify the query language binding to be used in the Schematron schema by doing the following:
•
•
For embedded ISO schematron, open the Preferences dialog box, go to XML > XML Parser > Schematron, and
select it in the Embedded rules query language binding option.
For standalone ISO Schematron, specify the version by setting the query language to be used in a queryBinding
attribute on the schema root element. For more information see the Query Language Binding section of the Schematron
specifications.
•
Oxygen XML Editor | Editing Documents | 443
For Schematron 1.5 (standalone and embedded), open the Preferences dialog box, go to XML > XML Parser >
Schematron, and select the version in the XPath Version option.
The Schematron editor renders the XPath expressions with dedicated coloring schemes . To customize the coloring
schemes, open the Preferences dialog box and go to Editor > Syntax Highlight.
To watch our video demonstration about the Schematron support in Oxygen XML Editor, go to
http://www.oxygenxml.com/demo/Schematron_Validation.html, and to
http://www.oxygenxml.com/demo/Editing_Schematron_Schemas/Editing_Schematron_Schemas.html.
Note: When you create a Schematron document, Oxygen XML Editor provides a built-in transformation
scenario. You are able to use this scenario to obtain the XSLT style-sheet corresponding to the Schematron
schema. You can apply this XSLT stylesheet to XML documents to obtain the Schematron validation results.
Validate an XML Document Against Schematron
To validate an XML document against a Schematron schema, select the
Validate action from the
Validation
toolbar drop-down menu, or the Document > Validate menu, or from the Validate menu when invoking the contextual
menu in the Project view.
If you would like to add a persistence association between your Schematron rules and the current edited XML document,
use the
Associate Schema action from the Document > Schema menu or the Document toolbar. A custom processing
instruction is added into the document and the validation process will take into account the Schematron rules:
PI Added by the Associate Schema Action
<?xml-model href="percent.sch" type="application/xml"
schematypens="http://purl.oclc.org/dsdl/schematron"?>
The possible errors that might occur during the validation process are presented in the Errors panel at the bottom area
of the Oxygen XML Editor window. Each error is flagged with a severity level that can be one of warning, error, fatal
or info.
To set a severity level, Oxygen XML Editor looks for the following information:
•
The role attribute, which can have one of the following values:
•
•
•
•
•
warn or warning, to set the severity level to warning
error, to set the severity level to error
fatal, to set the severity level to fatal
info or information, to set the severity level to info
The start of the message, after trimming leading white-spaces. Oxygen XML Editor looks to match the following
exact string of characters (case sensitive):
•
•
•
•
Warning:, to set the severity level to warning
Error:, to set the severity level to error
Fatal:, to set the severity level to fatal
Info:, to set the severity level to info
Note: Displayed message does not contain the matched prefix.
•
If none of the previous rules match, Oxygen XML Editor sets the severity level to error.
Validating Schematron Documents
By default, a Schematron schema is validated as you type. To change this, open the Preferences dialog box, go to
Editor > Document Checking, and disable the Enable automatic validation option.
Oxygen XML Editor | Editing Documents | 444
To validate your Schematron document manually, select the
Validate action from the
Validation toolbar
drop-down menu or the Document > Validate menu. When Oxygen XML Editor validates a Schematron schema, it
expands all the included modules so the entire schema hierarchy is validated. The validation problems are highlighted
directly in the editor, making it easy to locate and fix any issues.
Oxygen XML Editor offers an error management mechanism capable of pinpointing errors in XPath expressions and
in the included schema modules.
Content Completion in Schematron Documents
Oxygen XML Editor helps you edit a Schematron schema, offering, through the Content Completion Assistant, items
that are valid at the cursor position. When you edit the value of an attribute that refers a component, the proposed
components are collected from the entire schema hierarchy. For example, if the editing context is
phase/active/@pattern, the Content Completion Assistant proposes all the defined patterns.
Note: For Schematron resources, the Content Completion Assistant collects its components starting from the
master files. The master files can be defined in the project or in the associated validation scenario. For further
details about the Master Files support go to Defining Master Files at Project Level.
If the editing context is an attribute value that is an XPath expression (like assert/@test or report/@test), the
Content Completion Assistant offers the names of XPath functions, the XPath axes, and user-defined variables.
The Content Completion Assistant displays XSLT 1.0 functions and optionally XSLT 2.0 / 3.0 functions in the attributes
path, select, context, subject, test depending on the Schematron options that are set in Preferences pages. If the Saxon
6.5.5 namespace (xmlns:saxon="http://icl.com/saxon") or the Saxon 9.6.0.7 namespace is declared in the
Schematron schema (xmlns:saxon="http://saxon.sf.net/") the content completion also displays the XSLT
Saxon extension functions as in the following figure:
Figure 241: XSLT extension functions in Schematron schemas documents
The Content Completion Assistant also includes code templates that can be used to quickly insert code fragments into
Schematron documents.
RELAX NG/XML Schema with Embedded Schematron Rules
Schematron rules can be embedded into an XML Schema through annotations (using the appinfo element), or in any
element on any level of a RELAX NG Schema (taking into account that the RELAX NG validator ignores all elements
that are not in the RELAX NG namespace).
Oxygen XML Editor | Editing Documents | 445
Oxygen XML Editor accepts such documents as Schematron validation schemas and it is able to extract and use the
embedded rules. To validate an XML document with both RELAX NG schema and its embedded Schematron rules,
you need to associate the document with both schemas. For example:
<?xml-model href="percent.rng" type="application/xml"
schematypens="http://relaxng.org/ns/structure/1.0"?>
<?xml-model href="percent.rng" type="application/xml"
schematypens="http://purl.oclc.org/dsdl/schematron"?>
The second association validates your document with Schematron rules extracted from the RELAX NG Schema.
Similarly, you can specify an XML Schema having the embedded Schematron rules.
<?xml-model href="percent.xsd" type="application/xml" schematypens="http://purl.oclc.org/dsdl/schematron"?>
Note: When you work with XML Schema or Relax NG documents that have embedded Schematron rules
Oxygen XML Editor provides two built-in validation scenarios: Validate XML Schema with embedded
Schematron for XML schema , and Validate Relax NG with embedded Schematron for Relax NG. You can
use one of these scenarios to validate the embedded Schematron rules.
Editing Schematron Schema in the Master Files Context
Smaller interrelated modules that define a complex Schematron cannot be correctly edited or validated individually,
due to their interdependency with other modules. For example, a diagnostic defined in a main schema document is not
visible when you edit an included module. Oxygen XML Editor provides the support for defining the main module (or
modules), thus allowing you to edit any of the imported/included schema files in the context of the larger schema
structure.
You cat set a main Schematron document either using the master files support from the Project view, or using a validation
scenario.
To set a main file using a validation scenario, add validation units that point to the main schemas. Oxygen XML Editor
warns you if the current module is not part of the dependencies graph computed for the main schema. In this case, it
considers the current module as the main schema.
The advantages of editing in the context of main file include:
•
•
Correct validation of a module in the context of a larger schema structure.
Content Completion Assistant displays all the referable components valid in the current context. This include
components defined in modules other than the currently edited o