1
Prometheus Student User Guide
2
Prometheus v.5
Table of Contents
Introduction .............................................................................................................. 4
Description
Summary of Courseware Features
Access Instructions
Core Features and Functions. ................................................................................ 7
New for v. 5
Review of v. 4.1 Improvements
Text Boxes
Using the Equation Editor
HTML Editor and HTML Guide
Outside a Course (Course Listings)..................................................................... 18
Course Listings
Preferences
Add a Course
Remove a Course
Syllabus .................................................................................................................. 27
Outline .................................................................................................................... 27
Outline
Sessions
Testing .................................................................................................................... 28
Grade Book ............................................................................................................ 29
Projects................................................................................................................... 29
Lectures.................................................................................................................. 29
Files......................................................................................................................... 30
Files
Post Files
Messages................................................................................................................ 32
Individual E-Mail
Broadcast E-Mail
Group E-Mail
© 2001 The George Washington University
Prometheus Student User Guide
3
Discussions............................................................................................................ 35
Topic Listing
Chat......................................................................................................................... 39
Using the Chat Tool
Rooms
Slides
Logs
Options
Frequently Asked Questions ................................................................................ 48
© 2001 The George Washington University
Prometheus Student User Guide
4
INTRODUCTION
Description
Prometheus is a web-based courseware application (or course management
system) that allows instructors to post course related information for students and
conduct courses online in a secure environment. With the use of web-based
forms, faculty can create an online course in a very short period of time. No
special programming skill or knowledge is required to utilize the functions of
Prometheus.
Summary of Courseware Features
Prometheus is designed to be flexible and easy to use, accommodating different
teaching styles and instructional needs. A variety of features are available, which
can be utilized at the discretion of the course builder. These features include:
Syllabus
Outline
Testing
Grade Book
Projects
Lectures
Files
Messages
Discussions
Chat
The first page of the course, designed to showcase
general information about the course, including study
guide, learning outcomes, and specific policies. Links
to regulations, resources and related courses can be
placed here.
Lists the activities for each week, or Session. Click on
individual sessions to add, edit and view activities,
requirements, assignments and other resources and
materials for that specific Session.
Online assessments and surveys may be created and
posted here.
Collects and manages grades for the entire class and
viewable to students, if desired.
A repository for describing group projects. These can
be linked to sessions.
Students can print lectures out separately for off-line
viewing.
A place to store personal work and view work posted
by others.
The e-mail address book, where all participants’ names
and e-mails are located in one place.
The course bulletin board, where topics are posted to
be discussed online, anytime. Discussions can also be
answered off-line in v. 5.0.
Real-time distance option including a Whiteboard,
audio and text Chat, slide viewing, and additional
functions.
© 2001 The George Washington University
Prometheus Student User Guide
5
The Core Features and Functions area details functions central to Prometheus,
as well as features added in v. 5 and a review of features added in v. 4.1. Turn
to the individual features areas for further information on using the features of
Prometheus.
Access Instructions
Access to Prometheus
Prometheus can be accessed through any computer connected to the Internet,
from any location and at any time.
Prometheus is designed to be accessible from computers running either
Windows or Macintosh operating systems. Prometheus may be viewed by
Netscape's Navigator browsers 4.0 through 4.7, or by Microsoft's Internet
Explorer 4.0 or higher. Prometheus is also viewable through AOL browsers 4.0
and above. We strongly suggest that you DO NOT use Internet Explorer 3.0 or
Netscape 6.
How to Log In
To enter Prometheus, an account must exist in the system. This account is
represented by a personal User Name and Password. The User Name and
Password are entered at the first login screen. To obtain a User Name and
Password:
• Click Create Student Account
• Fill in the fields indicated. Be sure to enter a valid e-mail address.
• Click Submit. The Course Listings screen will appear.
NOTE: If your campus connects Prometheus to the Student
Registration System, courses will already be listed for you when you
log in.
How to Add a Course to Course Listings
You may join and participate in several different courses on Prometheus. To sign
in to a Prometheus course, a Course ID and Password for the course is
needed. With this information:
•
•
Click on Add a Course
Enter the Course ID and Password in the fields provided
© 2001 The George Washington University
Prometheus Student User Guide
•
•
Click Add Course. The page will refresh and the course will now be listed
as a link.
Click on the link to ‘enter’ the course.
How to Remove a Course from Course Listings
In most instances, the instructor will close the course at when it has been
completed. This will remove it from your screen. If the course continues to
appear, you may remove it from your Course Listings page by using the
Remove Course button.
•
•
•
6
Click Remove Course
Choose the course to remove yourself from
Click Delete
© 2001 The George Washington University
Prometheus Student User Guide
7
CORE FEATURES AND FUNCTIONS
New for v. 5
•
The Prometheus interface has been thoroughly reviewed and redesigned
for the 5.0 release, resulting in increased functionality and usability.
•
Chat improvements include two-way audio capability, dynamic anonymous
polling, and improved access control. Faculty can now exercise greater
control over log viewing and permissions for whiteboard use.
•
Prometheus users can now access threaded Discussions off-line,
permitting participants to read and answer Discussion postings without
being connected to the Internet. A simple synchronization function
accessible within the Discussion area leads participants through the
process.
•
Faculty can now delete individual Discussion messages from the
Discussion area.
•
Text boxes can now be reviewed easily using an integral spell-checker.
•
Prometheus courses can now be moved easily between instructors and
installations, allowing faculty to share courses on their own campus or with
Prometheus users at other campuses.
•
Content Modules can now be moved between installations of the
Prometheus software, allowing sharing of re-usable content.
•
The Files Collection (now File Manager) and Files area have undergone
extensive redesign to facilitate file management and clarify how Files are
stored and accessed.
•
Prometheus now meets or exceeds level-one compliance for web
accessibility under the provisions of the Americans with Disabilities Act.
•
Prometheus will be SCORM “run time” compliant, able to import and play
‘scos’, or SCORM-compliant files, with this release. The Sharable Content
Object Reference Model (SCORM) is a set of technical standards defining
a framework for sharability of content between learning management
systems. The SCORM is developed and maintained by the Advanced
Distributed Learning (ADL) initiative (http://www.adlnet.org/index.cfm)
Prometheus supports versions SCORM 1.0 and 1.1 requirements.
If you are creating SCORM compliant material and need more details
© 2001 The George Washington University
Prometheus Student User Guide
8
about Prometheus-specific SCORM requirements, contact the
Prometheus Administrator at your institution.
Review of v. 4.1 Improvements
Testing: The ability to create surveys, item analysis in test items, charts which
graphically represent test results.
File Uploading: Multiple file uploads throughout the course.
Content Modules: Prometheus gives instructors the ability to create subjectspecific groups of learning objects outside the context of a course. Content
Modules can be built from existing or original course material and placed into
courses as needed. Changes made to the module replicate across courses,
enabling centralized content management. Within a course, the instructor
changes the Session(s) with which the module is associated using a simple dragand-drop interface.
Web Content Integration: This tool allows entire websites to be integrated into
Prometheus courses, preserving links, ensuring constant, secure availability and
enabling tracking within the website.
Language Support: The use of the following foreign languages in the text box is
now supported: Western European, Traditional Chinese, Simplified Chinese and
Japanese as well as Unicode and Cyrillic fonts.
HTML Editor: A What You See Is What You Get (WYSISYG) HTML editor is
integrated into Prometheus text boxes for users working on a PC with Internet
Explorer 5.0 or higher. This allows the creation of HTML- rich content without the
need to learn HTML programming. For more information on how these options
work, go to HTML Editor and HTML Guide.
Text Boxes
Prometheus ease-of-use is founded on features that recur throughout it. Web
form templates and title fields provide areas for course creators to enter
information about their courses. A feature that is central to Prometheus is the
editable text box. Here, the bulk of course materials can be placed to be viewed
by students.
As in any text box, information can be entered and saved for use in the course. In
addition to space in which documents can simply be typed or cut-and-pasted,
each text box in Prometheus provides three options: Access to your Personal
Files (
) an Equation Editor (
) and a Site Map (
).
© 2001 The George Washington University
Prometheus Student User Guide
9
The file folder allows the inclusion of a File in any text box clicked in, so that
students will see information where it is most instructionally sound. For example,
you might place a picture to illustrate a point, or instructions for completing an
assignment.
The Equation Editor builds graphic files of equations, for insertion into text boxes,
test areas, etc. Equations can be re-used. In addition, faculty can control whether
students can use the Equation Editor to create their own Equations in answer to
test questions. For more information on how this option works, see Using the
Equation Editor.
The Site Map creates links from one section to another within the course. Links
can be made from a Session to a File, a Discussion question, Test or other area
to provide a path for students to follow easily. For example, you might provide a
link directly to a quiz or discussion area question from an assigned reading. To
use the Site Map effectively, the items to be linked to should be created (i.e., the
test must be built). Then:
•
•
•
•
Click in the text box
Click on the Site Map icon
Choose the link desired
Close the Site Map window
Use of the Site Map function can help students to navigate easily and make a
course easier to manage.
Using the Equation Editor
Use the Web EQ Equation Editor to insert equations into text boxes. Once
created, Equations can be edited and/or deleted, or inserted into any editable
text boxes. To facilitate the speed of the editor, it can be downloaded to your
desktop (Options).
The equations are specific to each Prometheus course. Therefore, you cannot
reference one course’s collection of equations in another Prometheus course.
The Equation Editor can only be used with the following browsers: Netscape
Navigator 4.0 - 4.7 or Microsoft Internet Explorer 4.0 - 5.5. Both Java and
JavaScript need to be enabled in your browser.
To access the Equation Editor, click on the
pop-up Internet browser window will appear.
symbol above any text box. A
The Equation Editor has five functions:
© 2001 The George Washington University
Prometheus Student User Guide
10
Create: Where the title is entered and the Equation built.
Insert: This is the default page of the Equation Editor that lists equation(s)
created. Choose from created equations to place into text box(es).
Edit: Used to make changes to each equation.
Delete: Used to delete individual equations.
Options: To speed use of the Equation Editor, it can be downloaded and
installed onto your desktop.
How to Create an Equation
•
From the Equation Editor browser window, click on the Create button
•
A new screen will appear. Enter the title of the equation in the text field
directly below the Equation Title.
•
Below the Equation Title field a bar of equation symbols is visible. Each
represents templates that are used to create equations into which
numbers, letters or symbols can be inserted.
•
Below the bar of equation symbols is the equation editing board. When an
equation symbol button is chosen, the template will display with empty
layout boxes to be filled.
•
To select a layout box within a template, click on it with the mouse, or use
TAB to cycle between empty boxes. When the cursor is in a slot, the
cursor will be red and the parent template will be faintly outlined in white.
Since many templates can be nested in a single equation, this helps to
keep track of progress.
•
Type in the number or letter.
-
•
To insert a symbol, click on the Greek symbol button (αβχ…). A
pop-up Applet window will open. Choose the desired symbol – it
will automatically insert into the layout box. Close to remove the
pop-up box.
Click on the Submit button. The screen will refresh and return to the
Create Equation page. Choose to create another equation or insert the
equation just built into the course text box.
Understanding Cursor Movement
© 2001 The George Washington University
Prometheus Student User Guide
•
Use the mouse or the arrow keys to move the cursor
•
The left and right arrows move the cursor between characters in a
template slot. When you get to the end of a slot, the cursor will try to
automatically jump to the next reasonable spot.
•
The up and down arrows move the cursor into and out of a template.
11
Note: Templates group characters together. For example, all
the characters in a superscript template are in a group. When
the cursor is on a group, it switches from a vertical bar to an 'L'
shape underlining the whole group.
How to Cut, Copy, Paste and Undo
•
Use the mouse to highlight templates.
•
Use the Cut, Copy and Paste buttons on the tool bar in the normal way.
The Undo is also useful.
Note: In highlighting templates, that selection respects the
nested structure of your templates. In other words, you can't
select part of one template and a part of another.
How to use Shortcut Keys
Shortcut keys are helpful for those who use the Equation Editor often. Most
shortcuts use the control key, with one important exception. The '^' character is a
shortcut for creating a superscript template and putting the last thing you typed in
for the base. Thus 'x^2' entered x with a superscript 2.
The other shortcut keys are:
ctrl-ctrl-+
decrease magnification
increase magnification
ctrl-c
ctrl-x
ctrl-v
ctrl-z
copy
cut
paste
undo
ctrl-/ or ctrl-f fraction template
ctrl-^ or ctrl-p superscript template
ctrl-_ or ctrl-b subscript template
© 2001 The George Washington University
Prometheus Student User Guide
ctrl-Q
ctrl-R
ctrl-P
12
square root template
general root template
parenthesis template
Insert
•
This screen is the default page when the Equation Editor is opened. This
page can also be reached by clicking on the Insert button
•
The Insert Equation screen will appear. The list of created equation(s)
will be visible.
•
Choose the equation to insert in the text box by clicking on the radio
button to the left of the Equation Title.
•
Click on the Submit button at the bottom of the screen. The pop-up
window will disappear and the chosen equation will appear in the text box.
Inserting multiple equations in the same text box
When inserted, Equations are preceded with an Equation code, “{Eqn: Equation
Title}” Equation titles are unique for each equation. Each equation can be used
only once in each text area; however, the same equation can be created and
given a different title if it is necessary to use the same Equation twice in the same
text box.
Edit
•
From the Equation Editor browser window, click on the Edit button
•
The Edit Equation screen will open, showing the list of created
Equation(s).
•
Choose the Equation to be edited clicking on the radio button to the left of
the Equation Title.
•
Click on the Submit button. The screen will refresh to the equation editing
board.
•
Make the desired changes to the equation.
•
Click Submit. The screen will refresh to the Edit Equation screen. The
adjusted equation will be visible.
© 2001 The George Washington University
Prometheus Student User Guide
13
Delete
•
From the Equation Editor browser window, click on the Delete button
•
The Delete Equation screen will appear with a list of existing equations in
this course.
•
Choose the Equation to delete by clicking on the radio button to the left of
the Equation Title.
•
Click on the Submit button.
•
A confirmation message will appear. Click OK to complete deletion.
•
The Delete Equation screen will refresh without the chosen equation.
Only one equation may be deleted at a time.
Options
The Equation Editor may be downloaded to your desktop. It need only be
installed once. After that, simply choose from the links at the top to use the
Equation Editor.
•
From the Equation Editor browser window, click on the Options button.
•
There is a link to Install the Equation Editor.
•
Follow the instructions to install on your desktop.
Note: Macintosh users wishing to install the Equation Editor should
complete the installation manually. Shift-click on 'Install the JAR file'
to save the Math Viewer JAR archive to your local disk.
Mac/Netscape users: move that file to the
'.../Program/Java/Download' directory of your Netscape installation
and restart your browser. Mac/Internet Explorer users: open the
Preferences panel in Internet Explorer (under the Edit menu) and
select 'Java' to bring up the Java preference panel. Add the
WebEQApplet.jar file to your classpath, and restart the browser.
HTML Editor and HTML Guide
To make it easier to format web-based content, there a WYSIWYG (What You
See Is What You Get) HTML editor is incorporated into Prometheus text boxes.
© 2001 The George Washington University
Prometheus Student User Guide
14
(Discussions and Messages) With it, changes can be made to the font, font size,
and font color; hyperlinks can be created, text alignment can be changed, and
bulleted and numbered lists can be created by those with no knowledge of HTML
programming.
To use the HTML Editor, the following must be used:
•
•
•
PC (not Macintosh)
Internet Browser Internet Explorer 4.0 or higher (not Netscape Navigator,
Opera, etc.)
Windows 95 and above.
The HTML Editor is enabled by default. To disable or re-enable the HTML Editor:
•
Go to the Course Listings page.
•
Click on Preferences.
•
Click on Edit User Interface
•
Scroll to Form Related Preferences, choose Yes or No from the dropdown menu next to the HTML Editor.
•
Click Update.
Features of the HTML Editor: Design Mode
When the HTML Editor is enabled, a toolbar will be visible above every editable
text box. This is the editor’s Design Mode. The editor will automatically insert
the HTML tags that correspond to choices. Similar to word-processing software,
the steps to make changes are the same.
•
•
•
Type or copy-and-paste the text into the text box.
Highlight the text to be modified.
Choose the feature desired from the formatting toolbar.
Formatting Text
•
Change the Font Type: Select Arial, Times, Courier from the drop-down
menu.
•
Change the Font Size: Select 1-7 from the drop-down menu.
•
Make text Bold: Click on the B button.
•
Make text Italic: Click on the I button
© 2001 The George Washington University
Prometheus Student User Guide
15
•
Change text alignment: Click on the Right, Middle or Left Text Alignment
Button.
•
Change text color: Click on the colored “font” button. Select color from
pop-up window by color palette, name or hexadecimal code. Close
window to apply to text.
•
Change background color of text: Click on four-colored button. Select
color from pop-up window by color palette, name or hexadecimal code.
Close window to apply to text.
•
Apply bulleted list to text: Click on bulleted list to apply to text.
•
Apply numbered list to text: Click on numbered list to apply to text.
Creating a Hyperlink
A hyperlink to a web page can be created over any text.
•
Type the text that will be linked.
•
Highlight the text.
•
To apply the URL to this text, choose the Link button from the toolbar.
•
A small pop-up window will open. Specify the type of link desired. To
create a link to web site, leave the link type on its default setting, “http:”
•
Type or paste in the desired URL to apply to the highlighted text.
•
Click on OK. The text box with the new hyperlink will appear.
Creating a Horizontal Rule Bar
A horizontal rule bar can be inserted in the text to create a visual division
between text sections.
•
Click on the horizontal rule button.
•
A horizontal rule bar will appear where the cursor was last located in the
text box.
Edit Source Mode
To display the actual HTML tags being created, click on the HTML button to the
far right of the toolbar. The editable text box will change to display the HTML tags
in Edit Source mode.
© 2001 The George Washington University
Prometheus Student User Guide
16
Those familiar with HTML tags, can insert, adjust or delete any tags in this mode.
Note: When/If you toggle back to Design Mode, the editor may reinsert the
HTML tags to make it readable within its program.
Using the File Manager, Equation Editor, and Site Map with the HTML
Editor.
When using the File Manager, Equation Editor and Site Map with the HTML
Editor, be sure that the cursor is blinking inside the desired text box before
inserting a file, equation or link.
•
Open the File Manager, Equation Editor or Site Map associated with the
text box.
•
Click back in the text box on the editing screen.
•
Return to the File Manager, Equation Editor or Site Map and click Submit.
•
Your file, equation, or link should be within the text box.
If the File, Equation or Site Map link appears in an undesirable place in on the
screen, click submit to save and try editing the section again.
Using Basic HTML Tags
HTML consists of tags. To apply their affect on text, these tags are inserted
directly before and after the text.
For example, to bold a certain section of text you can use the bold tag:
<b>This text will be bold after submitting the form.</b>
Following is a list of simple HTML tags that can be used in the text boxes
throughout Prometheus:
Bold:
<b>bold</b>
Italics
<i>italics</i>
Underline:
<u>underline</u>
Font Size
<font size=-1>This text will be one size smaller</font>
<font size=+1>This text will be one size larger</font>
Font Color:
<font color=red>This text will be red</font>
Font Face:
<font face=arial>This text will be in Arial font</font>
© 2001 The George Washington University
Prometheus Student User Guide
Hyperlinks
<a href=full URL goes in here>This text will be a highlighted
link</a>
- i.e. - <a href=http://www.washingtonpost.com>The Post</a>
© 2001 The George Washington University
17
Prometheus Student User Guide
18
OUTSIDE A COURSE (The Course Listings Page)
The Course Listings page allows access to global change areas and provides
views of courses and account information. It can also be accessed by clicking on
Courses in the toolbar.
The Course Listing page has shows several functional areas:
1. Course Listings: The links to course(s).
2. Preferences: Used for modifying User Information and User Interface,
accessing and adding Files to the Files Manager, and accessing
Advanced Course Control options.
3. Add a Course: Used to add courses to the roster.
4. Remove a Course: Used to remove courses from the roster.
1. COURSE LISTINGS
•
The Course Listings box shows courses with which you are associated
(If no courses are listed, you are not enrolled in or have not created any
courses.) The following is shown:
o Course Number: The ID Number of the course.
o Course Title: The title of the course.
o Professor: The person teaching the course.
•
Click on an underlined course number to open that course to view or to
edit it. To go back to the Course Listings page, click on Courses in the
toolbar.
2. PREFERENCES
•
Click on Preferences to access the Choose a Task page. The options
listed beneath the Preferences function are:
o Edit User Information: For editing personal user information, like
e-mail address, etc.
o Edit User Interface: For altering the way Prometheus is viewed.
© 2001 The George Washington University
Prometheus Student User Guide
19
o File Manager: For managing all the Files and folders related to
courses, as well as any personal Files and folders.
How to Edit User Information
•
To edit personal information and password, click on Edit User
Information. An editing screen will be displayed on which the following
information can be changed:
o First Name: Enter first name.
o Last Name: Enter last name.
o E-mail: The e-mail address used to create the account will be
entered here. This is the e-mail used by Prometheus to send emails. It is important that it be correct. Make the necessary
changes.
o User Name: The User Name used to create the account will be
entered here.
o Password : The password generated to create the account will be
entered, but only asterisks will be visible. All account passwords
are encrypted and are not visible to anyone at any time. To change
password, enter the same password on two separate lines to
ensure it is typed correctly.
o CD Drive Location: If a CD-Rom (like those included with many
textbooks) is used to upload or access information, the letter
corresponding to the drive (i.e., d or f) must be chosen here so that
the system will know where to look for the referenced information.
o E-mail Signature: Add a signature, title, quote or other information
here. This will be added to any e-mail sent from Prometheus.
•
Once all information is changed, click on the Update button to save the
changes. The Course Listings page will appear.
How to Edit the User Interface - Graphical
To alter the appearance of the personal Prometheus user interface, click on Edit
User Interface. Note that the default under the User Interface category should
be set to Graphical. The Edit User Interface box will show the following
information:
© 2001 The George Washington University
Prometheus Student User Guide
20
Set to Default Button: This button sets the User Interface to the defaults
listed in the categories below.
General User Interface Preferences:
User Interface: There are two options, Graphical or Textual. Click
on Graphical to utilize a graphics rich version of the Prometheus
interface. Click on Textual to utilize a less graphic-intensive version
of the Prometheus interface. This choice permits slightly faster
downloads on slower dial-up connections.
Toolbar location: The default placement of the Prometheus
toolbar is on the left side of the screen. Options include moving it to
the right, top, or bottom of the screen.
Font Type: Affects the fonts of Prometheus forms and other
material already existing in Prometheus. Font type options are
currently limited to Arial/Helvetica (Arial for PCs and Helvetica for
Macs) or Times Roman (for both PCs and Macs).
Font Size: Font size can be increased by either one or two point
sizes. Increasing font size provides greater visibility for the visually
changed and for projected presentations of Prometheus pages.
Form Related Preferences:
Textarea Rows: Editing the text area rows increase or decrease
the number of viewable lines in editable text boxes.
HTML Editor: Users with Internet Explorer 4.0 and above will also
see the HTML Editor option. The HTML editor can be turned on or
off using the drop-down menu. If set to “yes”, the HTML editor will
appear in text entry areas throughout Prometheus. By default, this
feature is enabled.
Input Font Type: Changes font for text typed directly into text
boxes. Fonts type options are currently limited to Arial, Helvetica or
Times Roman.
Other Preferences:
Number of Discussions to View: Allows the choice between one
and all Discussions viewed in the Discussions area of Prometheus.
•
Make all desired choices.
© 2001 The George Washington University
Prometheus Student User Guide
•
21
When all preference choices have been made, click the Update button.
The Course Listings page will appear, with changes effected.
Prometheus will save these changes. Thereafter, every time you log onto
the system from any computer, the interface will reflect personal settings.
Note: Preferences are associated with User Name, not a specific
computer. If you log on to Prometheus under a different User Name, the
preferences reflected will correspond to those set under that User Name.
How to Edit User Interface – Textual
•
Click on Edit User Interface. Click on the underlined word Textual in the
User Interface field. Clicking on the Textual link changes the Prometheus
to a text-based version of the interface. This option will let the pages of
Prometheus load faster, especially for users with slow Internet
connections.
NOTE: The textual interface editing choices affect colors of text
and button areas for the individual user only.
•
To alter the appearance of the personal Prometheus user textual
interface, click on Preferences and then Edit User Interface. You will see
an Edit User Interface box with the following information:
Set to Default Button: This button sets the User Interface to the
defaults listed in the categories beneath.
General User Interface Preferences: Each choice (listed below) is
followed by a drop-down menu of color names, a color palette and
a question mark. Use the color palette to verify the name of the
color chosen; clicking on the question mark icon will provide an
explanation of the area affected.
User Interface: The colors of the textual user interface that may be
changed are:
Text Color
Windowpane
Gray Bar
Background Color
Button Color
© 2001 The George Washington University
Prometheus Student User Guide
22
Link Color
Toolbar Text Color
The remaining choices for change on the textual interface are the same as
those for the graphical interface, noted above.
The File Manager
Click on File Manager. This will open the Files Collection page, which is used
for managing personal Files and all Files and folders related to courses. Listed
first are Files labeled Personal Files, followed by Files organized in folders by
the classes into which they have been placed.
Understanding the Areas of the File Manager
There are two primary areas on the Files Board: Personal Files and Course
Files (labeled by course titles).
Folders inside the Personal Files area:
My Files: Personal Files that can be shared among multiple
courses. These Files are not accessible to others until placed in a
course. They are made accessible from within any course from the
text box within any edit screen, using the file folder icon. Items to be
stored here include any that may be used multiple times, like
policies, writing guides and general resources.
Folders inside the Course Files area:
Inbox: Contains Files that other members of the course post
directly to the instructor.
Collaborative Files: Shows Files that all members of the course
can view and Files that are viewable only by members of Groups.
Course Content Files: Shows Files that are ‘embedded’ and
those that have been placed into the Session, Projects, Lectures,
and Discussion areas of the course. The embedded Files folder
indicates Files that have been placed into a course from the
personal file area using the those which have been associated. In
other words, embedded Files are those that have been previously
saved in the personal Files area and linked to from within a course
wherever it is appropriate that they appear.
© 2001 The George Washington University
Prometheus Student User Guide
23
About Working with Files and Folders
The Files Collection page shows the folders and Files that are included in the
personal Files and all courses.
A closed folder is indicated by the (
) symbol. It can be expanded to
view its contents by clicking on the addition sign.
A open folder is indicated by the (
) symbol. It indicates an open folder
and its contents are listed below. It can be closed by clicking on the minus
sign.
Each file is indicated by the ( ) symbol. The date and person who posted
the file, as well as any notes about it, will be shown here.
How to Hide, View, Edit, Move, Copy and Delete a File: These features are
available to the right of every file contained in the File Manager.
Make a File Visible or Hidden:
•
Click on the eye icon associated with a file (located to the right of the title
of the file) to hide or show Files. When the eye icon is closed ( ), the file
is not visible to students and the file is tagged (Hidden From Students).
When the eye icon is open ( ), the file will be visible to students.
Edit File Information:
•
Click on the Edit icon ( ) associated with a file to edit Files. An Edit File
Information page will open. Here, the Title of the file, the Notes related to
you file, placement of the file within a session in the course or assignment
to an individual or group can be changed. Graphic Files can also have
dimensions and textual description altered here.
•
Click the Submit button when done. The screen will refresh to the default
Files Section page.
NOTE: Editing does not effect the actual uploaded file, but only
the information about it. Links to the file will remain active, even if the
information about the file (i.e., the title) has been edited. To change the
file, make and save changes locally (on your own the computer), delete
the file already in Prometheus, and re-post the file. See How to Delete
a File, below.
© 2001 The George Washington University
Prometheus Student User Guide
24
Move a File:
•
Click on the Move icon ( ) associated with a file. A Move File page will
open. Choose the folder to be moved from the drop-down menu.
•
Click the Submit button when done. The screen will refresh to the default
and reveal the moved file.
Copy a File:
•
Click on the Copy icon ( ) associated with a file. The Copy File page will
open. Choose the file to copy from the drop-down menu.
•
Click the Submit button when done. The screen will refresh to the default
Files Section page and will copy the file in the appropriate folder.
Delete a File:
•
Click on the Delete icon ( ) associated with a file. A pop-up box will
appear confirming that you want to delete the file. Click OK and the page
will refresh and the chosen file will be deleted. Only one file at a time may
be deleted.
NOTE: Deleting a file will not change the links associated with it. If a file
associated within a class is deleted, any links placed directly into text boxes
using the file folder icon previous to the file change will no longer work. Please
check all links to be certain that they are active.
How to Create, Hide, View and Delete a New Folder
A new folder can be created within any existing folder. This feature can help
faculty organize course Files into instructional categories or student groups.
Documents can then be filed within a category or group that is most appropriate
to it. Faculty can create or delete any folder, or make folders visible or hidden to
students.
Create a New Folder:
•
Click on the New Folder icon ( ) located to the right of an existing folder.
A page labeled Create New Folder will open.
•
Type in the text field the new Folder Name that you want to create.
© 2001 The George Washington University
Prometheus Student User Guide
•
25
Click the Submit button when done. The screen will refresh to the default
Files Section page with the new folder created.
Make a New Folder Visible or Hidden:
•
Click on the eye icon associated with a folder (located to the right of a
folder). When the eye icon is closed ( ), the folder is not visible to
students and the folder is tagged (Hidden From Students). When the eye
icon is open ( ), the folder is visible to students.
Delete a New Folder:
•
Click on the Delete icon ( ) associated with a folder. A pop-up box
requesting confirmation of the choice to delete the folder and all its
contents will appear. Click OK. The page will refresh and the chosen
folder will be deleted. Only one folder may be deleted at a time.
About File Posting
The Post File function appears at the top of the Files Collection page. This used
for uploading single Files, multiple Files and for tagging references on CD-ROM
Files. Any files can be uploaded into Prometheus. This includes word-processed
documents, image Files, text documents, presentation Files, spread sheet files,
ZIP files, and audio and video files.
NOTE: Be aware that people accessing Files will need to have the appropriate
software programs installed on their desktop to view uploaded Files.
How to Post a File:
•
Click on the Post File button. The Post File page will open.
•
Enter the title in the Title field. This is required for the file to be copied and
uploaded to the Prometheus database.
•
Choose a file to upload. Either type the full path to the file on the
computer, or click on the Browse button.
•
Add information related to the file inside the Notes text box.
•
Choose where to Post File To from the drop-down menu choices.
© 2001 The George Washington University
Prometheus Student User Guide
•
26
Click Submit. The screen will refresh to the default Files Section page
and will display the file in the appropriate folder.
NOTE: About Posting an Image File
When an image file with .jpg or .gif after the title is posted in the browse
field, Prometheus will automatically open a dialogue box requesting
information about the image file. The display size (height and width) may
be changed here (optional). Leave the size fields blank unless a specific
size is desired.
3. Add A Course
Click here to add a course to the Course Listings page. To do so, the Course ID
and Password must be known.
Note: You only need to remember the Course ID and Course
Password once to sign up for a particular course. Prometheus will
remember that you are enrolled in the course. After the initial sign-in
use only your personal User Name and Password to access
Prometheus.
4. Remove a Course
Click here to remove a course from the Course Listings page.
© 2001 The George Washington University
Prometheus Student User Guide
27
SYLLABUS
The Syllabus page is the first page seen when logging into a course in
Prometheus. It includes general information about a course, such as the name
of the instructor, a course description, course reading materials, prerequisites,
course objectives, methods of instruction and evaluation, and any other overall
course information required.
On the navigation toolbar will be listed all of the functions the instructor has
chosen to use for this course. Click on any of the function buttons to open the
function’s page.
OUTLINE
The Outline section is used to navigate through course Sessions. Each class
meeting is a different Session with its own page. The Session page lists the
topics, assignments, readings and files your instructor requires for class, as well
as any items the instructor may have put on electronic reserve. Certain items
may be hyperlinked to locations or files. Click on these items to get to the link.
In the Outline are:
Outline: Lists course date(s), Session number(s), and Topic(s)
Assignments: Lists complete Session information in chronological order
and can be printed easily.
Calendar: Displays a monthly calendar graphically covering the duration
of the course. Links session dates to the Session View page for each
Session.
Click on the Session that corresponds to the current date or lesson to view
information and assignments for the lesson. Some of the information may include
links to documents you wish to save, particularly the ones under Files.
To save a file on a PC:
•
•
•
•
•
Right click on the link. A short menu of options should appear. In Internet
Explorer, click on “Save Target As.” In Netscape, click on “Save Link As.”
Select the appropriate ‘Save’ command
Enter the title desired.
Navigate to area in which to save the document
Click Save.
To save a file on a Macintosh computer, click on the file and drag it to your
desktop.
© 2001 The George Washington University
Prometheus Student User Guide
28
TESTING
The Testing section allows the administration of tests and surveys.
Testing is the default page of the Testing section. It is used to view each of the
Tests built within a course.
•
Click on the Test name under Title. This will open the Test to be
completed. A Test must have been created to appear here. Tests can only
be taken once, unless reset by the instructor.
The instructor will provide information about the test and a password to access
the test, if one is required.
• Choose the test you are to take from the list on the Testing page. If a
password is required, Prometheus will open a box into which the
password can be typed. When the password is entered, the test will
appear.
• Answer each question on the test. To add mathematic or scientific
equations to any of the text areas in this section, click on this equation
editor graphic (
) to open the WebEQ Equation Editor. (See Using the
Equation Editor for instructions.) To add Files from the Files Manager to
any of the text areas, click on the file folder graphic (
) and select the
file from the collection.
• When all questions have been answered, click Submit. A confirmation
message will appear.
• Click OK to make the message disappear. The list of tests will appear
again. The test just taken will no longer be linked.
© 2001 The George Washington University
Prometheus Student User Guide
29
GRADE BOOK
A Grade Book option is available for each course created. If the instructor has
chosen to include a Grade Book in the course, this option will appear in the
navigation tool bar for the course.
• Click on Grade Book to view grades and comments.
•
If more than one name appears, the instructor has selected the option to
‘Show All Grades’. Students will see all of the grades entered, but only
their own name. Each time the Grade Book is opened, the grade order will
be rearranged.
PROJECTS
The Projects section allows Files to be posted, or text provided that details major
assignment(s), paper(s) or Project(s) that extend over several Sessions.
Information that can be posted includes files, a title for the Project, a due date
and any instructional notes. Specific full-class or group Projects can be posted,
or simply outline criteria for any required Projects for students to design
themselves. If the instructor has chosen to include Projects in the course,
Projects will be viewable in the navigation tool bar.
•
Click Projects.
•
View the list of Projects for information.
LECTURES
The Lectures section allows the posting of Files, such as PowerPoint files, that
detail specific Lectures or notes associated with a particular Session. The
Lectures page also creates a printer-friendly page for printing all Lecture notes
posted.
•
•
Click Lectures, if available.
View the Lectures. Print all Lectures by choosing the Print function in your
browser screen.
© 2001 The George Washington University
Prometheus Student User Guide
30
FILES
The Files section is used for managing all the files related to courses, as well as
any personal files. The Files section is also a place where files can be shared
between class participants.
Files of virtually any format can be copied from a hard drive, a floppy disk or a
shared network drive into the Prometheus database. In other words, there must
be direct access to a file to post it. Prometheus automatically creates a copy of
the file chosen.
Instructors may also reference information on a CD-ROM. If so, you must have
the same CD-ROM.
The Files section has three functions:
Files: This is the default page of the Files Section, also called the Files
Board, where there are listings of your personal and course-related folders
and files. Use this page to change the visibility, edit the information, copy,
move and delete each file, as well as to create, change the visibility of and
delete folders.
Post Files: Where you input the information about posting a single file,
posting multiple files and/or referencing a file on a CD-ROM.
Log: A listing of the files posted on the Files Board. Files cannot be
viewed or changed from here.
Understanding the Areas on the Files Board
There are two primary areas on the Files Board: Course Files and Non-Course
Files. The Course Files area lists all the Files that exist in that particular course.
The Non-Course Files board lists all the Files held in student or faculty personal
files. If the student or faculty is a participant in another course, the Inbox for
those course(s) will appear under the Non-Course Files area.
Folders inside the Course Files area:
Inbox: Contains files that other members of the course post directly to you.
Collaborative Files: Contains Files shared between members of Groups,
and Files that all course participants can view.
© 2001 The George Washington University
Prometheus Student User Guide
31
Course Content Files: Contains files that are initially attached and/or
uploaded from specific areas of the course (listed below).
Session
Projects
Lectures
Discussion Attachments
Embedded Files: These are files that are uploaded using the
File Manager feature that is located above Prometheus text
boxes.
Folders inside the Non-Course Files area:
Inbox: Contains files from other courses (identified by their department ID,
course number and section number).
My Files: Personal files that are accessible from within any course.
All About Working with Files and Folders
The Files default page shows the folders and Files that are included in personal
files and course files.
A closed folder is indicated by the (
view its contents.
) symbol. It can be expanded to
An open folder is indicated by the (
) symbol. It indicates an open
folder and its contents are listed below the folder.
Each individual File is indicated by the ( ) symbol.
For additional information about the use of Files, see Outside a Course >
File Manager earlier in this Guide.
© 2001 The George Washington University
Prometheus Student User Guide
32
MESSAGES
The Messages section is the e-mail address book for the course. It provides a
number of ways to send messages to the students in the course. An individual email message can be sent to anyone in the class; a broadcast e-mail can be sent
to everyone signed up for the course; group e-mail can be sent to selected class
members. Announcements can be posted to the Course Listings pages for each
class member to view upon log-in.
Note: Students do not have the ability to post Announcements; only an instructor
has that permission
The Messages section has three functions:
Individual E-mail: Allows the sending of e-mail messages and file
attachments to students within the course individually or to individual
groups within the course.
Broadcast E-mail: Allows sending of e-mail messages and file
attachments to all students and faculty related to the course at one time.
Group E-mail: Allows sending of e-mail messages and file attachments to
selected multiple people or pre-formed groups related to the course with
one e-mail.
How to Send Individual E-mail
•
To send an individual e-mail to a person enrolled in the course, click on
the e-mail address next to their name, or select the name of a particular
person in the course. An Individual E-mail Message form will open.
•
Fill out the fields on the form. Note that the Subject field is filled by
default, but can be changed. Note that by default a copy of the message is
‘sent to you’. Uncheck this box, if desired.
•
Enter a file into the File field (optional). Post additional files in the File field
by clicking on the Post Multiple Files button, which will add more file
fields to the form.
•
Type the message in the Message field.
© 2001 The George Washington University
Prometheus Student User Guide
33
•
To have this message appear in the Message Log, make sure a check
mark shows in the Create a log of this message box located next to the
Submit Message button. By default, this is checked. Uncheck this box if
a log of this message is not desired.
•
Click Submit Message. Once the message is submitted, the screen will
display a confirmation message.
How to Send Broadcast E-mail
•
Click on Broadcast E-mail. A Broadcast E-mail Message form will
appear.
•
Fill out the fields on the form. Note that the From and Subject fields have
default information in them. The Subject field can be edited.
•
Enter a file into the File field (optional). Post additional files in the File field
by clicking on the Post Multiple Files button, and entering the necessary
information.
•
Type the message into the Message field.
•
To have this message appear in the Message Log, make sure a check
mark shows in the Create a log of this message box located next to the
Submit Message button.
•
Click Submit Message. The screen will display a confirmation message.
Note: Each person receiving an e-mail through the Broadcast Email feature of Prometheus will only see his or her address in the
"To:" line of the header. All other addresses will be suppressed.
© 2001 The George Washington University
Prometheus Student User Guide
34
How to Send Group E-mail
•
Select Group E-Mail from the Messages page.
•
Choose members of the group to receive the e-mail. Group e-mails may
be sent to established Groups or chosen from the list of individual
students. Click the Group button to view Group members.
•
Click Submit. The Group E-mail Message form will appear.
•
Fill out the fields on the form. Note that the To, From and Subject fields
have default information in them. The Subject field can be changed.
•
Enter a file into the File field, if desired, as noted above.
•
Type the message in the Message field.
•
To have this message appear in the Message Log, make sure a check
mark shows in the Create a log of this message box located next to the
Submit Message button.
•
Click Submit Message. The screen will display a confirmation message.
Note: Each person receiving e-mail through Prometheus will only see his
or her address in the "To:" line of the header. All other addresses will be
suppressed.
About Log Buttons
All the functions within the Messages section have Log buttons, found in the
upper right corner of the specific Messages area. For the Individual, Broadcast
and Group E-mail functions, logs of all e-mails sent can be viewed by clicking on
the Log button. Logs can be deleted by clicking on Clear Log.
The Announcement function Log page allows the viewing and deletion of logs.
Click on the Delete button beside any Announcement to remove it from the
Course Listings page.
© 2001 The George Washington University
Prometheus Student User Guide
35
DISCUSSIONS
The Discussions section allows members of the class to participate in
asynchronous (anytime), threaded discussions. Messages are posted to the
discussion board under a particular topic for anyone enrolled in the course to
read. Class members can respond to each other's messages on the discussion
board whenever they have time.
Topic Listing is the default page of the Discussions section where discussion
topics are posted and viewed.
Near the top of this page is a Legend of symbols that apply to Discussions:
Visible: When this icon is displayed to the right of a topic link, students
are able to view the particular category and messages within that
category.
Hidden: When this icon is displayed to the right of a topic link, students
are not able to view the particular category or the messages within that
category.
Create Topic: Clicking on this icon allows a topic and message to be
posted on the Topic Listings page in categories labeled General
Discussions Area, inside a Group Discussion(s) area, or inside a
Category. A Category is a subject area, for example, ‘Research Paper’.
See How to Create a New Category, below.
Edit: Clicking on this icon allows you to edit a category, topic and/or
message that has been posted on the Topic Listing page.
Delete: Clicking on this icon allows you to delete a category, topic
and/or message(s) that has been posted on the Topic Listing page.
Deleting a category will delete all materials, messages and topics
associated with it.
Below the Legend is the Topic Order area. To view the most recent messages
first, click on the New link. To view the oldest messages first, click on the Old
link.
All topics in the Discussions section can also be viewed by clicking on the All
link, or participants can choose to view only those topics not yet read by clicking
on Unread.
© 2001 The George Washington University
Prometheus Student User Guide
36
Discussions are posted in three areas below the Topic Order section,
progressing in order from general to specific:
The General Discussions Category area is designed to hold messages for
every member of the class to have access to.
Any Category Discussions created follow. For example, Discussions only
pertaining to the Category ‘The Research Paper’ would be posted here.
Any Group Discussions are listed below Category Discussions. Only
members of the Groups have access to these Discussion areas.
How to Create a Topic:
•
Click on the Create Topic icon. A Discussions: Create Topic page
will appear with a Post To title and From title area that are filled and
cannot be edited.
•
Enter a title in the Subject field.
•
Enter the appropriate information in the Message Body text box.
•
Upload a file(s) to the Attach Files field(s) (Optional). Be sure that
Attachments are enabled on Discussions Options page.
•
Click Submit Message. The new topic will be listed within the chosen
category.
How to Edit a Topic or Message:
•
Click on the Edit icon in the topic, category or message, and make the
changes desired.
•
Click on Update Changes
How to Delete a Topic or Message:
•
Click on the item to be deleted. A confirmation prompt will appear,
warning that all materials will be deleted, and providing an option to
cancel the deletion.
•
Choose Delete or Cancel.
© 2001 The George Washington University
Prometheus Student User Guide
37
Reading and Replying to Messages
To view any of the messages displayed on the Topics Listing page, simply click
on any linked message. A screen displaying the icon Legend, the message, and
options with arrows that allow viewing the Previous Topic, Next Topic or Next
Message and a Reply icon will appear. The previous or next topic or message
appears only if there are topics or messages to view.
Note: By default, Discussions are viewed one at a time. All
Discussion messages can also be viewed in the order they are
posted. To view all Discussions, Go to Course Listings >
Preferences > Edit User Preferences page. Select All at
“Discussions to View”.
Reply: Click on this icon to post a reply message within the appropriate
topic. A Reply to screen will appear. Inside this area is a Reply drop-down
with three options:
Reply to Thread: Posts your reply message to all members of the
class who have the ability to see this discussion.
E-mail Author: posts an e-mail reply directly to the author of the
message. No message is viewed by other students.
Both: Combines both of the above options.
•
Below the Reply drop-down menu enter or change information in the
From, Subject, and Message Body fields.
•
Attach any files desired. Place a check in the checkbox if receiving an email a notification to you whenever someone else posts a message
in this same thread is desired.
•
Click Submit Message. The message will be submitted to the database
and the screen will refresh, showing the message.
Certain Options May be Enabled by Faculty, including:
Create New Category: Creates a Category in the General Discussion
area to help focus your discussions into subject areas, i.e.,
‘Requirements’.
© 2001 The George Washington University
Prometheus Student User Guide
38
How to Create a New Category
•
Click on Create New Category. A Category Title page will appear.
•
Enter a Category title.
•
Click Create. The Options page will appear. The Category is now listed on
the Topic Listing page.
NOTE: Any action that takes place on this page results in a message:
‘your action was successful’ displayed near the top of the screen.
Student Message Editing: Allows or prevents students from
changing/editing their messages once posted. This is an either/or choice;
it is not time-dependent. Instructors can always edit their own messages.
Students can edit only messages they created when this option is
selected. Only the person who posted the message may edit it. No one
may edit a message posted by someone else.
File Attachments: Enable or disable File Attachments. Enabling File
Attachments allows students to attach files to their postings.
© 2001 The George Washington University
Prometheus Student User Guide
39
CHAT
Synchronous interaction between course participants takes place in the
Prometheus Chat section. Through textual and audio Chat rooms, as well as
Whiteboard functions, class participants can engage in real-time discussions, as
well as type and draw on slide presentations to illustrate their points of interest.
Instructors can also moderate Chats, log textual Chats and conduct anonymous
polls. Before utilizing these functions, it is suggested that you familiarize yourself
with all the areas of the Chat section.
NOTE: The Chat section functions with the aid of Macromedia Shockwave
and the HearMe plug-ins. Your first time in the Chat area, please answer
Yes to “download Shockwave and HearMe”. These applications are free and
also available directly from the Internet at
http://www.macromedia.com/shockwave/ and http://www.hearme.com.
The Chat section has four functions:
Rooms: Join, create, edit or delete Chat rooms here.
Slides: Graphic files can be uploaded for display in the Whiteboard area.
Logs: Save and obtain access to previously recorded text Chat sessions
here.
Options: Edit permissions for the default Chat room for the course. This is
the same functionality as going to Rooms and hitting “Edit” next to the
Default Chat Room.
Using the Chat Tool
The Chat area is where the textual content of Chats is viewed. Located in the
upper left side of the screen, the Chat area consists of two white text-area
sections, and a Send button. All text Chat is displayed for viewing in the top area;
the bottom text-area section is used to type text into. Place the cursor in the
bottom area and type text. Click Send or press Enter on your keyboard. If the
Question Queue is not activated (see Question Queue, below), text will
immediately appear in the top section of the Chat area.
© 2001 The George Washington University
Prometheus Student User Guide
40
How the Whiteboard Area Works:
When a slide show is selected from the Slide Show drop-down menu, the Chat
room will reload Shockwave and reconnect to the server. The first image of the
slide show will display inside the Whiteboard area of the Chat room. Any other
Chat room participants will see this slide show in their Whiteboard area. Any of
the Whiteboard features listed below can now be used. As these features are
used, all Chat room participants will view the results on the Whiteboard.
Title Bar: Just below the image you’ll see a Bar that displays the Title of
the slide. To the right of the title are the
buttons, which allow
display of the previous or next slide in the slide show.
Type, Draw, And Size:
•
Click on the Pencil tool to draw on the Whiteboard. The point size can be
increased or decreased.
•
Click on the text tool (T) to enter text on the Whiteboard. Choose between
Arial or Times font; choose B to bold type and the I to italicize. Type size
can be made smaller or larger by clicking on the up or down arrows. Size
range is from 12 to 36.
•
Click enter/return on your keyboard to save any text entered on the
Whiteboard. Clicking elsewhere before clicking return will cause the text
to be lost.
Color Palette:
•
Click anywhere inside this palette to apply color choice to the drawing
or text tools.
Erase-Undo:
•
Click on the Erase box to remove all drawings and text entered onto
the Whiteboard area. Click on the Undo arrow to remove the latest
drawing or text entered.
Question Queue: The Question Queue provides the ability to moderate the Chat
session. Located in the bottom left side of your screen, the Question Queue area
consists of two view areas, a Queue All button, a Back to Queue button, a Post
button and a box to the right of the Question Queue title that enables or disables
this area.
© 2001 The George Washington University
Prometheus Student User Guide
41
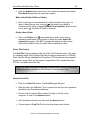
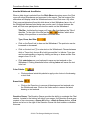
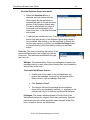
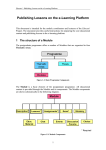
How the Question Queue area works:
•
When the Question All box is
checked, any text entered into the
Chat session by any participant is
automatically sent to the top text-area
section of the Question Queue area.
The text is labeled with the name of
the sender and is displayed in the
order it was sent. It can now be edited
and posted.
•
To edit this text, double click on it. This will send the text to the
bottom text-area section of the Question Queue area, where it
can be edited. After editing, it can be sent Back to Queue (the
top-text area section) by clicking on the Back to Queue button
or posted directly to the Chat area by clicking on the Post
button.
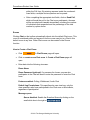
User List: The User List displays the names of the
active participants who have logged into use the
Chat room. Two features are accessible through
the User List.
Whisper: This feature allows Chat room participants to send a live
message directly to each other without having their text viewable by
anyone else in the room.
To activate the Whisper feature:
•
Double-click on the name of the individual who is to
receive the message. A pop-up box will appear with a
field in which to type a message. Enter text.
•
Click Cancel or Send.
•
The receiver will see the message and the sender’s
name will be surrounded by brackets <>, signifying to the
receiver that only he or she can see this particular post.
Privileges: This feature allows activation of Audio Chat or the
Whiteboard features for a specfic Chat room participant. Selected
participants can edit, delete and make other changes in the Chat
room, as well as control the Whiteboard.
© 2001 The George Washington University
Prometheus Student User Guide
42
To activate the Privileges feature:
•
Hold down the Alt key (PC) or the Option key (Mac) and
double-click on the name of the individual who is to be given
privileges. A pop-up box will appear with the a Whiteboard icon
and a Microphone icon.
•
Click on the function(s) to be activated.
•
Click Cancel or Save to activate. Note that the dots located next
to the individual’s name will increase in size corresponding to
the feature(s) activated.
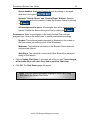
Microphone Button/Audio Chat: Chat room participants can also talk
with each other in live audio inside the Prometheus Chat section. In order
to accomplish live audio Chats, participants must have a microphone and
headphones or speakers. (Headphones are preferred.) The Audio Chat
feature must be enabled through the Options/Features Enabled/Audio
Chat function.
To speak, click on the microphone icon. An alert will appear
to advise that the microphone will be activated. Click Yes to
activate the microphone. Click Cancel to end the possible
activation of the microphone.
•
Begin speaking.
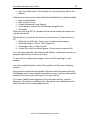
Log: Creates a transcript of any textual Chat. To start, click on
the Log button located beneath the microphone button during any
particular Chat. To stop the log function, click on the Log button again.
Logs are viewable through the Logs function.
Start Poll: Prometheus allows anonymous polling of Chat participants. To
use this polling feature the Whiteboard must be enabled through the
Options/Features Enabled/Whiteboard function.
To activate polling:
•
Click on the Start Poll button. A Poll form will be displayed in
the Whiteboard area.
•
Type a question directly into the text field labeled Question.
There are three types of questions available: true/false, yes/no
and multiple choice. True/false questions or yes/no questions
will automatically populate by clicking on the appropriate buttons
© 2001 The George Washington University
Prometheus Student User Guide
43
within the Poll form. By entering answers inside the numberedlines fields, a multiple-choice question can be posed.
•
After completing the appropriate text fields, click on Send Poll,
which will send the poll to the Chat room participants. Answers
will be recorded and viewable immediately, showing the number
of individuals that responded and the percentage of the total
number by option choice.
Rooms
Clicking Chat on the toolbar automatically directs into the default Chat room. This
room is considered public and anyone from the course can join in a Chat in this
default room at any time. Other Chat rooms can be created in the Rooms
function.
How to Create a Chat Room
•
Click
•
Click on create a new Chat room. A Create a Chat Room page will
open.
•
Enter data into the following six areas:
. A Chat Rooms page will open.
Room Name
Room Password (optional): If a password is chosen, anyone who
participates in the Chat will need to enter the password to enter the Chat
room.
Features enabled: Polling, Whiteboard, Audio Chat
Default Log Permissions: This specifies who can view logs: only the
class members who have participated in the Chat room or all students,
regardless of participation.
Message queue:
Queue disabled: Enable the Question Queue by clicking on the
small white box to the right of
.
© 2001 The George Washington University
Prometheus Student User Guide
44
Separate “Send to Queue” and “Send to Room” Buttons:
Question Queue is present but not enabled. Enable the Question
Queue by clicking on
.
All messages sent to queue: All messages sent will be
automatically be queued. Disable this feature during the Chat by
clicking on
.
Permissions: Roles for participation in the newly created Chat room are
assigned here. Click on the white boxes to enable permissions
accordingly:
Speaker: This individual sends comments to Moderator to be
posted on the Chat screen; has editing control of the Whiteboard.
Moderator: This individual has control of the Question Queue
where all comments are filtered.
Slide Show: This individual controls which Slide Show will be
displayed during a Chat session.
•
Click Create Chat Room. The following message will be displayed: These
changes will not take effect until users leave and re-enter the Chat
room.
•
Click OK. The new Chat room will open. The Shockwave and HearMe
plug-ins will load and a live Chat session will commence.
Note: The Chat room will now be listed inside the Chat Rooms page,
which can be accessed whenever the Rooms button is clicked. A listing of
all available course Chat rooms is viewable on the Chat Rooms page,
which includes a link to the Default Chat Room.
How to Edit a Chat Room
Once a Chat room is created, it will be listed on the Chat Rooms page, where it
can be accessed by clicking on it.
•
Click on the Edit button next to the Chat room to be edited. An Edit a
Chat Room page will appear.
•
Make the appropriate changes.
© 2001 The George Washington University
Prometheus Student User Guide
•
Click on Update Chat Room. A message will notify you that: These
changes will not take effect until users leave and re-enter the Chat
room.
•
Click OK. The Chat Rooms page will appear.
45
How to Delete a Chat Room
Once created, a Chat room will be listed on the Chat Rooms page, where it can
be accessed by clicking on it. It can be deleted, if desired. To delete a Chat
room:
•
Click on the Delete button next to the Chat room to be removed. The
following message will appear: Are you sure you want to delete?
•
Click OK. The Chat Rooms page will reappear and the room will no
longer be listed.
Note: The Default Chat Room cannot be deleted. It can be edited by
clicking on the Edit button next to the Default Chat Room link.
Slides
If enabled by the instructor, this function will appear on the Chat display. The
Slides function allows upload and display of .jpg or .gif image files displayed in
the Whiteboard area. A slide show can be created using as many slides as
desired. Slide shows can be edited by title or description, rearranged, added to or
deleted (individually and in their entirety) and/or annotated with drawings and text
during a live Chat.
How to Create a Slide Show
•
Click
•
Click on the create a new slide show link. This will reveal a form with two
sections: General Show Information and Add a Slide.
•
Enter a Show Name and Description in the appropriate fields within the
General Show Information section.
•
Upload an image(s) – either .jpg or .gif image(s) -- in the fields within the
Add a Slide show section. Three images can be entered on a single
. This will reveal the Slides Show page.
© 2001 The George Washington University
Prometheus Student User Guide
46
screen; if more images are required for the presentation, click on the add
more slides box.
•
Click Submit. If add more slides is checked, a new Create Slide Show
form, listing all the information just entered, and adding three new Add a
Slide fields, will be seen. To the left of each image is a drop-down box with
a number that allows slides to be re-ordered. To the right of each image
are an edit button and a delete button. These allow changes to or deletion
of the image(s) entered.
•
Repeat until the desired slide show is completed.
•
Click Submit; the Slide Shows page showing the new slide show will be
revealed. After a slide show is created, the title will be listed in the dropdown menu labeled Slide Show on the Chat default page.
Logs
Faculty members and Chat room creators can Log the textual Chat portion of
Chat. To start logging, click on the Log button. To stop, also click on the Log
button.
Logs of Chats for this course are viewable by choosing
the Chat screen.
at the top of
Options
The options page allows you to edit settings for the default chat room for the
course.
How to Edit a Chat Room
•
Click Options on the toolbar to access Edit a Chat Room. You can make
changes to any of the following settings:
Room Password (optional): If a password is chosen, anyone who
participates in the Chat will need to enter the password to enter the Chat
room.
Features enabled: Polling, Whiteboard, Audio Chat
Default Log Permissions: This specifies who can view logs: only the class
members who have participated in the Chat room or all students, regardless
of participation.
Message queue:
© 2001 The George Washington University
Prometheus Student User Guide
47
Queue disabled: Enable the Question Queue by clicking on the small
white box to the right of
.
Separate “Send to Queue” and “Send to Room” Buttons: Question
Queue is present but not enabled. Enable the Question Queue by clicking
on
.
All messages sent to queue: All messages sent will be automatically be
queued. Disable this feature during the Chat by clicking on
.
Permissions: Roles for participation in the newly created Chat room are
assigned here. Click on the white boxes to enable permissions accordingly:
Speaker: This individual sends comments to Moderator to be posted on
the Chat screen; has editing control of the Whiteboard.
Moderator: This individual has control of the Question Queue where all
comments are filtered.
Slide Show: This individual controls which Slide Show will be displayed
during a Chat session.
•
Click on Update Chat Room. A message will notify you that: These changes
will not take effect until users leave and re-enter the Chat room.
•
Click OK. The Chat Rooms page will appear.
Note: This is the same functionality as going to Rooms and hitting
“Edit” next to the Default Chat Room.
© 2001 The George Washington University
Prometheus Student User Guide
48
FREQUENTLY ASKED QUESTIONS
Is there a Prometheus Manual that I can download?
The Prometheus User Manual can be accessed in several places in .pdf format.
You will need to have the Adobe Acrobat Reader installed on your computer to
view this file. (A link to the Adobe Acrobat Reader download site is listed in the
‘applications and browsers’ FAQ listed below.)
The User Manual can be searched using the Adobe Acrobat Reader search
function. It can also be printed out or downloaded to a local computer for ready
reference.
To access the Prometheus User Manual through General Help:
• Log on to Prometheus
• Click on the 'General Help' question mark in the upper right hand corner of
the 'Course Listings' page.
• Click on “Prometheus User Manual”
To access the Prometheus User Manual from within a course:
• While in a course, click on More Info at the end of the navigation bar.
Click on “Prometheus User Manual
What is the purpose of the Course ID and Course Password?
Prometheus uses two layers of security to allow access to course materials.
Every time you want to access Prometheus, you must login with your user name
and password. This is the first layer of security. Once you set up an account in
Prometheus, simply logging in will not give you access to any course materials.
To gain access to a course, students must join the course with the Course ID and
Course Password.
Who do I contact for help with my Prometheus course?
Questions about the course content should be directed to your instructor. If you
are having technical difficulty with a Prometheus course, contact the technology
services office on your campus.
Why can't I edit one of the files that I posted?
The edit function in the Files section does not edit the file itself. It allows you to
edit the information about the file, such as its title in Prometheus, notes about the
file, the associated session, and its visibility. To edit the file:
• Open or download the file and make the changes to it on your own
computer (you must have the file to make changes to it);
• Sign on to Prometheus;
© 2001 The George Washington University
Prometheus Student User Guide
•
•
•
49
Delete the outdated file;
Post (upload) the changed file.
Replace any links in the course to the ‘old file’ with links to the ‘new’ file.
How do I know if e-mail that I sent through Prometheus really went through?
Every time you send an e-mail message through Prometheus, you will receive a
confirmation screen that the e-mail was sent. You may wish to check the CC: box
in the e-mail form, to send yourself a copy of the e-mail to assure you that e-mail
is going through. By default, Prometheus logs all e-mails sent. There are other
reasons for failure to deliver e-mail: The e-mail address must be correct and the
e-mail server or any forwarding set by the addressee must be working, as well.
Why can't I get into Chat?
To use the Chat Section, you must have Java and JavaScript enabled on your
Internet Browser. You must also have the plug-ins, Shockwave and HearMe XTra, downloaded to your desktop. They are free on the Internet at
http://www.macromedia.com/shockwave/ and http://www.hearme.com.
How do I change my account information?
•
•
•
•
•
•
Log into Prometheus
Go to the Course Listings Page
Click on Preferences
Click on Edit User Information.
Update the form to change your User Name, Password, e-mail address
and/or the way your name appears.
Click Update to save these changes.
I am uploading a large file over a modem connection. Why do I keep getting an
error message?
Most likely it is because the file is too large to easily transfer through a dial-up
modem connection. The best way to upload large files is to do the transfer over a
LAN or a high-speed connection.
I am trying to view a .pdf document using Internet Explorer 5.0. Why doesn’t it
work?
There are several things that could be wrong. Check your security settings in IE.
• Select the tools menu on the browser;
• Choose Internet Options;
• Click on the security tab;
© 2001 The George Washington University
Prometheus Student User Guide
•
50
Click the Default button. This will reset your security settings back to the
defaults.
If that does not work and you have Adobe Acrobat Reader 4.0 or higher installed,
• Open Acrobat Reader
• Click on the file menu
• Choose Preferences, then General.
• Under Options, uncheck the Web Browser Integration box
• Click apply.
When you click on a PDF file, Acrobat will now launch outside the browser and
you can view the file.
The last option is to save the file directly to your hard drive. To save a file on a
PC:
• Right click on the file link. A short menu of options should appear.
• In Internet Explorer, click on "Save Target As."
• In Netscape, click on "Save Link As."
• A ‘save file’ prompt box should appear. Choose where to save the file.
If you are using a browser other than Internet Explorer or Netscape, consult your
browser's help function on how to save files.
To save a file on a Macintosh computer, click on the file and drag it to your
desktop.
I am using multiple Equations and/or Files together and they aren't displaying
properly.
Each equation created with the Equation Editor and each file created within the
File Manager can be used multiple times within a course. However, each specific
equation or file can only be used only once in each text box.
If you wish to add the same equation or file to the same text box, copy the
equation or file and give it a different title. Alternatively, use a different text box,
which may be a more visually pleasing choice.
© 2001 The George Washington University