1
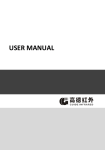
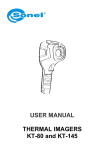
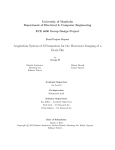
GUIDE® EasIR-0 Thermal Camera
User Manual
Wuhan Guide Infrared Co., Ltd.
No. 26 Shucheng Rd, Hongshan District, Wuhan 430070 P. R. China
Telephone:
+86-27-8767 1991
Facsimile:
+86-27-8767 1927
Email:
[email protected]
Internet:
www.guide-infared.com
© Wuhan Guide Infrared Co., Ltd., 2012
Publication No: GUIDE® EASIR-0UM 012
The Quality Management System of Wuhan Guide Infrared Co., Ltd. is approved to ISO9001:2000 for the design and
manufacturing, stockholding, in-house repair and site servicing of non-contact temperature measuring
instrumentation.
Wuhan Guide Infrared Co., Ltd. reserves the right to make changes and improvements on any of the products
described in this manual without prior notice.
GUIDE® EASIR-0 Thermal Camera complies with current European directives relating to
electromagnetic compatibility and safety. (EMC directive 89/336/EEC; Low voltage directive
73/23/EEC).
Copyright
© Wuhan Guide Infrared Co., Ltd, 2012. All rights reserved worldwide. No parts of the products may be reproduced,
transmitted, transcribed or translated into any language or computer language in any form or by any means, electronic,
magnetic, optical, manual or otherwise, without the prior written permission of Wuhan Guide Infrared Co., Ltd.
This manual must not, in whole or part, be copied, photocopied, reproduced, translated or transmitted to any electronic
medium or machine readable form without prior consent, in writing, from Wuhan Guide Infrared Co., Ltd.
Table of the Contents
Table of the Contents ........................................................................................................... 1
Introduction .......................................................................................................................... 1
Precautions .......................................................................................................................... 1
Maintenance ........................................................................................................................ 1
Calibration and Repair Philosophy ...................................................................................... 2
Technical Support ................................................................................................................ 2
Feedback to Us .................................................................................................................... 2
System Overview ................................................................................................................. 2
System Configuration .......................................................................................................... 2
Technical Specification ........................................................................................................ 3
System Features .................................................................................................................. 4
Parts Described ................................................................................................................... 5
EASIR-0 Charging Instruction ............................................................................................. 7
Buttons Introduction ............................................................................................................. 7
Function operation ............................................................................................................. 10
User Manual
Introduction
This publication provides the necessary information required to safely operate the GUIDE® EASIR-0 Thermal Camera.
It is important to fully check all equipment with which you have been supplied.
The equipment should be used, maintained and serviced by suitably trained personnel, capable of carefully following
the procedures and guidelines given in this User Manual.
All User Manuals and leaflets should be read thoroughly before proceeding with operation of the equipment.
It is also advisable that all User Manuals and Instruction Leaflets supplied are kept readily available, for reference when
the equipment is in general use.
Precautions
The following precautions must be adhered to at all times and must be considered in addition to any advised
precautions issued at the relevant worksite or work area.
•
Keep the GUIDE® EASIR-0 Thermal Camera steady during operation.
•
Do not use the GUIDE® EASIR-0 Thermal Camera in temperature exceeding its working and storage
temperature ranges.
•
Do not direct the GUIDE® EASIR-0 Thermal Camera at very high intensity radiation sources such as the
sun, carbon dioxide lasers or arc welders etc.
•
Do not expose the GUIDE® EASIR-0 Thermal Camera to dust and moisture. When operating the unit near
water, ensure that the unit is adequately guarded against splashes.
•
When the GUIDE® EASIR-0 Thermal Camera is not in use or is to be transported, ensure that the unit and its
accessories are stored in the protective carry case.
•
Do not re-switch on the camera until 15 seconds later after switching it off.
•
Do not throw, knock or vibrate intensely the camera and its components in order to keep them from damage.
•
Do not attempt to open the camera body, as this action will void the warranty.
•
Keep the SD memory card for the exclusive use of the camera.
Maintenance
To ensure that the GUIDE® EASIR-0 Thermal Camera is kept in good working condition and remains fully operational,
the following guidelines should be adhered to at all times.
Non-optical surfaces
The non-optical surfaces of the camera can be cleaned when required, with a soft cloth dampened with water and a
mild detergent.
Optical surfaces
The optical surfaces of the camera lens should only be cleaned when visibly dirty. Care should be taken to avoid
touching the exposed lens surface, as skin acid left behind from fingerprints can be damaging to coatings and lens
substrates. Use only a proprietary lens cleaning tissue.
1
User Manual
Calibration and Repair Philosophy
To ensure the accuracy and reliability of the GUIDE® EASIR-0 Thermal Camera, it is highly recommended that the
instrument be calibrated at 12 monthly intervals.
Calibration or repair for the instrument can be obtained by either contacting the address/ telephone number on the
cover of this User Manual, or by email to the following addresses: [email protected]
Caution
The GUIDE® EASIR-0 Thermal Camera does not incorporate any user serviceable parts. Never attempt to
disassemble or modify the camera. Opening the unit invalidates the warranty.
Technical Support
Technical support for your Wuhan Guide Thermal Imaging System can be obtained by either contacting the address /
telephone
number
on
the
cover
of
this
User
Manual
or
by
email
to
the
following
address:
[email protected]
Feedback to Us
We have tested and verified the information in this manual to the best of our abilities. Yet as we are committed to
continuous development and progress, you might find features of the product have been changed since the time of
printing. You are appreciated to let us know about any error you find, and your suggestions for further editions by
either contacting the address/telephone number on the cover of this User Manual or by email to the following address:
[email protected]
System Overview
GUIDE® EASIR-0 is a new infrared camera of Guide infrared, breaks the IR world with its lowest price and high
performance. Designed for tough work environments and entry-level users, EASIR-0 is far more robust and
shock-resistant for any tough working environment and it is easy to operate and allows for the learners to operate
without being trained and take the inspection work easily with one hand .Featured with latest IR Fusion technology, it
helps you pinpoint the problem exactly with the most efficiency. Power on the EASIR-0, let the 3.6" LCD bring you into
the fresh IR world
System Configuration
Please ensure that the following items have been correctly supplied:
•
IR Camera with visual camera
•
11mm IR lens
•
3.6" TFT LCD with high resolution
•
2GB SD card & card reader
•
AC Adapter & cable
•
USB extension cable
2
User Manual
•
USB driver
•
Guide IrAnalyser® Software
•
User manual
Options
•
Sun Shield
Technical Specification
Imaging Performance
THERMAL
Detector type:
Uncooled FPA microbolometer (160× 120 pixels, 25μm)
Spectral Range:
8-14μm
Thermal Sensitivity:
≤100mk at 30℃
Field of View/ Focus:
20.6° X 15.5°/ 11mm
Focus:
motorized
Image Presentation
External Display:
3.6" TFT LCD with high resolution
Video Output:
PAL/ NTSC
Man-Machine Communication
Buttons:
Respond as per operators’ operation
Menu:
Microsoft® Windows style
Measurement
Temperature Range:
0℃ to 250℃
Accuracy:
±2℃ or ±2% of reading
Emissivity Correction:
Variable from 0.01 to 1.00 (in 0.01 increment)
Measurement Features:
Automatic correction based on distance, relative humidity, atmospheric
transmission and external optics
Optics Transmission Correction:
Auto, based on signals from sensors
Image Storage
Type:
Removable 2GB SD card
File Format:
JPG with analysis records
Power System
Battery Type:
AA rechargeable battery, field-replaceable, AA Alkaline battery also usable
Charging System:
in battery charger
3
User Manual
Battery Operating Time:
Over 2 hours continuous operation
External Power Operation:
AC adapter 110/ 220 VAC, 50/ 60Hz
Environmental Specification
Operating Temperature:
0℃ to 50℃
Storage Temperature:
-10℃ to 60℃
Humidity:
Operating and storing 10% to 95%, non- condensing
Encapsulation:
IP43
Shock:
Operational: 25G, IEC 68-2-29
Vibration:
Operational: 2G, IEC 68-2-6
Interfaces
USB 2.0:
Real-time image and measurement transfer to PC;
Physical Characteristics
Weight:
0.73KG(including battery)
Size:
111mmx124mmx240mm
Colors
Yellow&blue interlaced or red&dark interlaced alternative
System Features
Unique Features
•
Rugged housing and rubber protection offers high effective operation even in harsh environment
•
Big 3.6" LCD plus three-button button system make for a friendly navigation with the push of a thumb
•
Unique ergonomically handle presents the comfortable feeling
•
Auto gate which works as both shutter and intelligent lens cap prevents all disturbing heat radiation caused by
optics and electronics inside, delivers crisp and uniform images and protects the precise lens.
•
Ultra large capacity SD memory card and built-in flash memory offer easy in-field storage.
•
High-speed USB2.0 interface enables real-time data transfer and camera control.
•
Robust on board analysis enhances operators’ efficiency & productivity.
•
Low cost enables the ownership of everyone.
Imaging Performance
•
Motorized focusing of IR lens.
Temperature Measurement
•
Auto calibration ensures high accuracy.
•
Auto hot-spot tracing and center-cursor temperature measurement pinpoint the problem.
Image Storage
4
User Manual
•
Live images can be frozen to be static images
•
Frozen images, comprising radiometric data, infrared image can be saved into 2GB SD card or the built-in flash
memory in standard JPG format.
•
SD card can accommodate 2000 images and the built-in flash memory can store 200 images.
Image Playback
•
Images saved into SD card or the built-in flash memory can be replayed on the camera.
•
Temperature measurement can be done on replayed images.
•
Images saved in SD card and the built-in flash memory can be downloaded to PC for further analysis and report
generation with software Guide IrAnalyser®
Parts Described
5
User Manual
1
LCD Display
2
Charging Indicator
3
Function Softkeys
4
Microphone
5
Battery Cover
6
Speaker (EASIR-4 only)
7
Visual Camera (EASIR-2/4 only)
8
Laser(EASIR-2/4 only)
9
IR Lens
10
Trigger Button
11
USB Interface
12
Video Interface(EASIR-2/4 only)
13
AC Adapter/Charging Input Terminal
14
SD Card Slot
6
User Manual
EASIR-0 Charging Instruction
How to use the batteries
Ÿ
Insert the batteries, the indicator will not flicker at once. Press button
to make the red indicator flicker ,
after 2 seconds , the indicator will alternatively flickers as green and red and stop when entering the self-check
interface.(If the camera is powered on when battery is low, the red indicator will flicker quickly and power off
automatically.
Ÿ
When using the camera, if the batteries consume to the lowest limitation, the red indicator will flicker for a moment
then power off automatically.
Note:
Ÿ
When using the battery,only when powering on and in the low battery condition, the indicator will light on.
How to charge with batteries
- Charge the batteries with battery charger only.
Note:
Ÿ
Please choose qualified rechargeable batteries and battery charger.
Buttons Introduction
There are three functional buttons of GUIDE® EASIR-0(From left to right, they are
,
and
) and
a trigger button “T”.
Power on /off the camera
The input voltage is 9V,keep button
the button
depressed for more than 3 seconds to power on. When powering off, keep
depressed until the switch off bar runs fully. To release the button
at any time before the
switch off bar runs fully to leave the power off state.
Focus
In the non-menu state, press
to enter focus menu, the following info will be displayed on the screen:
Far
According to the attention, press
Near
to focus far, press
Quick function
7
focus near. Press T or
to exit.
User Manual
In the non-function state, long-pressing the
press
to switch between the manual mode and automatic mode, and
shortly to enter spot analysis mode
↑/←
↓/→
- Press
to switch between the up/down or left/right
- Press
or
L/R / U/D
to adjust the value of X or Y’s coordinate..
- Press T to exit the spot analysis and return the real-time IR mode.
Manual calibration
On the non-menu mode, keep pressing "T" button and then press
button to run shutter calibration
Image frozen and save
On the non-menu mode, press T to freeze the image, the following info will be displayed on the screen:
Save
8
User Manual
Press T again to exit frozen mode and return to the real-time IR mode, or
Ÿ
Press
to save the image and return to live thermal image
Main menu operation
On the non-menu mode, press
to bring up Main menu, the following info will be displayed on the screen:
Parameter
File
Setup
Press T in the main menu to return real-time IR mode;
Ÿ
to enter sub-menu of parameter setting:
On the main menu mode, press
Emiss
Tamb
Distance
Palette
RelHum
↑
On the sub-menu mode, press
↓
OK
to confirm selecting the highlighted option and enter the next sub-menu,
press T to exit main menu operation and return to real-time IR mode.
Ÿ
On the main menu mode, press
to enter file operation sub-menu :
Filelist
Del All
Help
About
↑
On this sub-menu mode, press
↓
Ok
to enter next sub-menu, press T to exit main-menu operation and return
real-time IR mode.
Ÿ
On the main menu mode, press
to enter system setting sub-menu:
9
User Manual
Default
Language
Tunit
TimeDate
AlarmTemp
↑
On the sub-menu mode, press
↓
Ok
to confirm selecting the highlighted option and enter the next sub-menu,
press T to exit main-menu operation and return real-time IR mode.
Function operation
Thermal camera focusing
To motorizedly focus:
Ÿ
Aim the lens at the target
Ÿ
Press
Ÿ
Press the softkey labeled “Far” and “Near” until the image on the LCD is as clear as possible
to activate the menu
Image capturing and saving
Ÿ
Aim the lens at the target of interest and adjust the focus motorizedly or automatically above to get a clear image on
the LCD, and then pull the trigger to capture an image. The image will be frozen and bring up the image capture
menu.
Ÿ
Press the softkey labeled “Save”. If the SD card is in the camera, the image data will be acquiescently saved in the
SD card.
Selecting the Palette
Ÿ
Press
Ÿ
Press the softkey labeled Parameter
Ÿ
Press the softkey labeled Palette
Ÿ
Press
or
Ÿ
Press
to confirm.
to display main menu.
to shift among different palettes
Setting Tmin and Tmax
Ÿ
Keep
depressed for 3sec to display the menu.
Auto Span
Manual Span
10
User Manual
Ÿ
Press
to enter Manual mode and to adjust Tmin and Tmax manually.
Ÿ
Press
to increase the Tmax value, press
to decrease the value, press
to switch to Tmin
adjustment mode.
Ÿ
The same operation for Tmin adjustment.
Ÿ
Press
to enter Auto mode and Tmin and Tmax will adjust automatically according to the change of
scenery.
Reviewing and Deleting Stored Images
To view stored images on the SD card:
Ÿ
Press
Ÿ
Press the softkey labeled “File” to reveal the review menu “Filelist”.
Ÿ
Press the softkey labeled “OK” to enter the file list.
Ÿ
Press the softkey labeled “←” and “→” to toggle between different images, and press the softkey labeled “Select” to
to activate the menu.
choose the selected image.
To delete a single image from the SD card
Ÿ
Perform the steps under viewing stored images above to bring the desired image to the display.
Ÿ
Press the softkey labeled “Delete”
Ÿ
Press the softkey labeled “Yes”.
To delete all the images from the SD card
Ÿ
Press
Ÿ
Press the softkey labeled “File”.
Ÿ
Select “Del All” by pressing softkey labeled “↑” and “↓”, and “OK” to confirm.
Ÿ
Press the softkey labeled “Yes”.
to activate the menu.
Listening to Voice Annotation
To play the voice annotation already stored with an image on the UFlash or SD card:
Ÿ
Perform the steps in the “Reviewing and Deleting Stored Images” section to bring the desired image to the
EASIR-0’s display.
Ÿ
Press the softkey labeled “Voice”.
Ÿ
Press the softkey labeled “Play”
The saved voice annotation will be replayed through the imager’s speaker.
11
User Manual
Changing the Temperature Units
The EASIR-0 will display temperature in Fahrenheit or Celsius. To change the temperature units:
Ÿ
Press
Ÿ
Press the softkey labeled Setup
Ÿ
Press the softkey labeled Tunit
Ÿ
Press
to display main menu
for Celsius or
for Fahrenheit.
Doing spot analysis
EASIR-0 supports single spot measurement. The location of center spot can be adjusted in live image:
Ÿ
Press
Ÿ
The default adjustment mode is “Left/Right” mode, press
button and then
button to bring location adjustment mode of center spot.
and “
can move the center spot to left and
right under this mode; press “P” button to switch into “Up/Down” mode, then press
and
can move the
center spot to up and down under this mode. Press “P” button can switch between the above two modes freely.
Ÿ
Press “trigger” button can save and exit the location adjustment mode of center spot.
How to get accurate temperature?
There are a lot of factors affecting temperature accuracy.
Here is a brief introduction to some typical parameters: emissivity, background temperature, distance, humidity and etc.
Note:
To get accurate temperature, you shall hold the camera stably and focus the camera well.
Ÿ
Emissivity: All objects radiate infrared energy. The amount of energy radiated is based on two primary factors: the
surface temperature of the object and the emissivity of object’s surface.
The default emissivity is 0.98, which is applicable to most surfaces.
For some special materials or surfaces, please refer to the emissivity table to find a right emissivity value.
You can change emissivity between 0.01 and 1.00 in menu Para and Emissivity.
Ÿ
Tamb: To display and adjust the real-time comparative scene temperature of target. The default setting of this
parameter is automatic adjusted by the internal temperature sensor. If needed, this setting can be adjusted
manually according to real temperature of some special scenes (like sky or snow) of measured target.
Press
button and
button to bring the submenu of parameter setting, then choose “Tamb” and select
“Set” option to set the value manually by press
button and
button. The new measurement will be
based on the saved tamb value until re-enter the “Tamb” option and exit, which will activate the default automatic
mode.
12
User Manual
Ÿ
Distance: To set the proper distance from target, the distance range is from 0.1 meter to 50 meters.
Ÿ
Relative Humidity: To set relative humidity percentage value between 0 and 100 according to the practical
environment.
Transferring Data from the Camera to PC
•
Before transferring data from the EasIR-0 camera to PC, ensure that the PC offers USB2.0 interface and the USB
driver for the camera has been successfully installed in the PC.
•
If SD card is inserted in EASIR-0, the PC will identify the EASIR-0 as a removable hard disk, you can copy the
saved data to PC or delete them from the card, or even format the SD card and etc. But you cannot operate on it in
the Guide IrAnalyser software.
Install USB driver to PC
When there is no menu in the live thermal image, properly connect the USB interfaces of the camera to a USB2.0 port
of your PC with the USB extension cable.
Microsoft® Windows launches a Found New Device Wizard to guide you to install the driver as follows:
Ÿ
Choose “Install from a list or specific location (advanced)” and include the folder where you save the driver
program. Then Click button next to go further.
13
User Manual
Ÿ
Installation starts. When getting to the step as shown below, choose “Continue anyway” to proceed further.
Ÿ
Installation continues and finishes quickly. Click button Finish.
14
User Manual
Ÿ
Go to Device Manager to check and confirm whether the driver has been successfully installed. If there is “GUIDE
EASIR-0” listed under Universal Serial Bus Controller, it indicates the driver has been properly installed and you
can transfer data from the camera to PC now.
Ÿ
The procedures to go to Device Manager is as follows: Clicking My Computer-> Clicking the right mouse and
choosing Property-> Choosing menu Hardware in the System Property dialog box-> Choosing option Device
Manager under the menu Hardware.
15