1
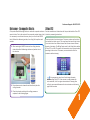
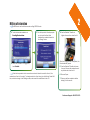
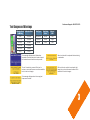
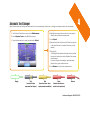
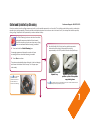
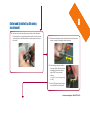
: M I L L I N G
C E N T E R
QUICK REFERENCE GUIDE
Table of Contents
Defoamer - Composit Blocks...................... 1
Zirlux FC2..................................................... 1
Milling a Restoration................................... 2
Tool Gauges and Warnings......................... 3
Automatic Tool Changer.............................. 4
Maintenance Reminders............................ 5
Clean/Refill Milling Fluid Tank.................... 6
Collet and Spindle Cap Cleaning................ 7
Block Orientation
Note: The position of the labels may change from one lot of blocks to
the next.
Vertical Orientation
Notch points to the bottom right
Horizontal Orientation
Notch points to the top right
Customer Support: 800.537.6070
Defoamer - Composite Blocks
A Composite Block Defoaming Solution is used with composite and nanoceramic blocks. Due to the nature of the composite material when milled,
it is necessary to use this solution every time you mill with the MZ100
block. Without the defoaming solution, the milling fluid may foam and
overflow.
1 After inserting the MZ100 block into the milling chamber,
shake the bottle of defoaming solution and position it over
the chamber.
2 Press down once to release the solution directly into the
milling chamber.
3 Close the chamber and begin the milling process as
explained in the following pages.
Zirlux FC2
See the manufacturer’s Instructions for Use provided with the Zirlux FC2
blocks for processing instructions.
Zirconia shrinks in the sintering oven. There are numbers on the side of
the box that the blocks come in. You must keep this box with the blocks.
Do not mix blocks from different boxes. Each box can have a different
amount of shrinkage. The Milling Center asks for the Scale Factor before
a Zirlux FC2 is milled. The system will increase the size of the restoration
according to this number. This means you cannot test the fit of the
restoration before sintering..
It is necessary to clean the mill and change the water
before milling Zirlux FC2. If the zirconia is contaminated with
other materials, it will turn green when sintered. Cleaning after
milling is recommended because the zirconia acts as a thickening
agent with the water.
1
2
Milling a Restoration
Remember to use the defoamer when milling MZ100 blocks.
1 Touch the desired restoration in
Pending Restorations.
3 The mill opens the lid and prompts
you to insert the block that
matches the material selected in
the Design Center.
2 When the restoration is highlighted,
touch Select.
If the block requested on the screen does not match what is inserted in the mill, the
restoration will not mill correctly. To change material or block size, go to the Design Center Mill
tab, make the change in the Settings screen, and resend the restoration to the mill.
4 Use the Mandrel T-Handle to
tighten the cam then close the lid.
After the milling process is complete, the
lid automatically opens.
5 Use the Mandrel T-Handle to loosen
the cam. Remove the restoration and
any debris and close the lid.
6 Remove Sprue.
7 Rinse or sterilize restoration before
testing fit in the mouth.
Customer Support: 800.537.6070
Customer Support: 800.537.6070
Tool Gauges and Warnings
Minutes Used
in Milling
0-39
40-79
80-119
120-139
140-159
160+
Indicator Bars
Tool Type
3 Greens
2 Greens
1 Green
2 Yellows
1 Yellow
1 Red
Ellipsoidal
Tapered
Conical
Tool Strip
Color
Yellow
White
Blue
Side of
Mill
Left
Right
Left
This message displays when Restoration
Inspection is active and a tool breaks. Inspect
the restoration and decide how to proceed.
Worn tools should be replaced before starting
a restoration.
The mill is unable to proceed if the tool is
broken or worn and there are no other available
tools in the tool changer.
Old tools do not need to be replaced right
away, but you should ensure another tool is
available in the tool changer.
This message displays when the wrong tool
shape was inserted.
3
Automatic Tool Changer
When the automatic tool changer has extra tools, the mill can exchange a broken tool or change tool shapes without user intervention.
1 In the Control Panel Home screen, touch Maintenance.
2 Select Replace Tools on the Mill Options menu.
3 Touch the desired tool or empty slot and touch Select.
4
4 Highlight the shape of the new tool or touch empty to
remove the tool without a replacement.
5 Touch Select.
6 Remove the old tool from the collet. Place the new tool
in the collet. Ensure it is pushed all the way in (fully
seated).
7 Close the lid.
The Milling Center seats and clamps the tool, profiles
the new tool, and returns to the Replace Tools screen
when finished.
If you are filling the tool changer, repeat the steps
above until no green outlines remain.
8 Touch Return to return to the restoration list.
Empty
Tool
(colored stripes
represent tool shape)
Old
(based on time - have
replacements available)
Worn
(based on tool wear needs to be replaced)
Broken
Customer Support: 800.537.6070
Maintenance Reminders
Customer Support: 800.537.6070
Daily Maintenance
Weekly Maintenance
The following should be done at the end of each day.
The following should be done once a week.
High volume offices may be required to empty, clean, and refill
the fluid tank. See instructions on page 6.
●● Shutdown the Job Server by pressing and holding the power
button for several seconds. Press it again to restart.
1 In Mill Options, touch Turn Off the Mill and touch Select.
●● Check the status of the yellow sponge in the drawer. If the
sponge is wet, then there is water in your air lines. Call
Customer Support.
2 Touch Yes to turn OFF the mill.
The lid pops open.
The desktop for the operating system appears.
3 Touch Start - Shut Down or press the green button on the Mill to
turn it OFF.
4 Wipe down the inside of the milling chamber and the lid. Leave lid
open to allow the milling chamber to dry out overnight.
●● Clean Spindle Cap holes. Without removing the spindle caps,
insert the Nozzle Cleaning Brush into the nozzle holes. This
will help prevent the nozzles from becoming clogged. The
holes should also be cleaned when the spindle caps are
removed for a full cleaning.
●● Clean the tank floats and strainer. See instructions below.
The fluid tank and the collets must be cleaned more frequently when
e.max blocks are used. Zirlux FC2 requires cleaning before and after use.
Mill Maintenance for Extended Idle Time
To prevent mold growth or build-up of porcelain and grinding fluid, do not leave the fluid tank in the mill for extended periods of
idle time.
When closing for periods longer than just a weekend, open the lid and remove the fluid tank. This allows the mill the opportunity
to air out and dry properly.
5
6
Clean/Refill Milling Fluid Tank
Refill Fluid Tank
The water level icon shows when the
water level is too low to continue milling.
Clean Milling Fluid Tank
The Clean Milling Fluid icon turns red when the tank is scheduled to be
cleaned. Touch the icon at any time to see how many milling hours are
estimated before the next scheduled cleaning.
1 Touch and hold the Clean Fluid Tank icon.
1 In the Control Panel Home screen, touch
Maintenance.
2 A message appears and shows the number of hours remaining before a
scheduled cleaning is needed. Touch Yes to continue.
2 Select Unlock drawer on the Mill Options
menu.
3 Follow the on-screen instructions for opening the drawer and removing the tank.
3 Follow the on-screen instructions for opening
the drawer.
5 Insert the Nozzle Cleaning Brush into the small holes of the spindle cap.
4 Add one quart (or liter) of water. If more than
one quart (or liter) is required, then perform
a tank cleaning and replenish the tank with
fresh coolant and water.
5 Close drawer carefully, with audible click. The
Milling Center automatically locks the drawer.
4 Rinse the tank and the strainer basket to remove any ceramic residue.
6 Add one gallon of water (3.5 liters) and six ounces of fresh milling coolant to the
tank.
7 Remove and clean the strainer when prompted by the on-screen instructions.
The tank, floats, and strainer should be cleaned once a week to prevent mold
growth or build-up of ceramic material and for optimal circulation. High volume
offices need to clean the strainer and fluid tank more frequently.
8 Reinstall the strainer and click Next.
9 Replace the tank in the drawer when prompted by the on-screen instructions.
10 Close drawer carefully, with audible click. The Milling Center automatically locks
the drawer.
Customer Support: 800.537.6070
Collet and Spindle Cap Cleaning
Customer Support: 800.537.6070
Over time, residue from the milling process may build up in the spindle caps and/or on the collet. This inhibits coolant delivery and/or reduces the
spindle’s tool holding capability. Clean the collets and spindle caps when the icon turns red or the tools “walk” (do not stay flush with the spindle)
during milling. Replace the fluid periodically to reduce residue buildup.
The Collet Cleaning icon turns red when the collets
and spindle caps are scheduled to be cleaned.
Touch the icon at any time to see how many milling
hours are estimated before cleaning is needed.
1 Touch and hold the Collet Cleaning icon.
A message appears and shows the number of h
ours
remaining before a scheduled cleaning is needed.
3 Use the Spindle Cap Tool to turn the spindle cap counter
clockwise until the point of the spindle is pointing
approximately to the 1:00 position. Remove the spindle cap.
2 Touch Yes to continue.
The system automatically places the tools in the tool changer
and moves the bellows out of the way. The lid pops open
when ready.
If your Spindle
Caps have screws,
see the User Manual
for instructions on
removal and cleaning.
Spindle Cap
Spindle Cap Tool in locked
position - point of the spindle
cap pointing down
The spindle cap can be removed by hand, but it is often easier with the
tool, especially when the spindle cap is wet.
7
8
Collet and Spindle Cap Cleaning
(continued)
4 Remove the collet using the shorter side of the collet tool.
If the spindle is turning instead of the collet, use the curved
collet wrench to hold the spindle in place while you loosen
the collet.
5 Rinse the collet and use the small wire brush to clean the
inside, running it through a couple of times.
6 Use the large bronze brush in
the collet shaft. Be sure to use
a straight in-and-out motion
and do NOT use a circular
motion.
The air must be blowing during
this step.
7 Use a DRY paper towel to wipe
the inside of the collet shaft.
Customer Support: 800.537.6070
Customer Support: 800.537.6070
8 Insert the Nozzle Cleaning Brush in the small holes on the
spindle cap at an angle. This will push any ceramic buildup
out of the hole.
Note the alignment grooves on the spindle cap and spindle
housing and the pointed extension on the spindle cap. You will
use these for proper alignment.
9 Use a soft bristle brush, like a toothbrush on the spindle cap
to remove any ceramic buildup.
10 Insert the collet into the spindle.
11 Use the collet tool to tighten the collet in the spindle housing.
Use the wrench to hold the spindle housing in place and
use the collet tool to tighten the collet. Be sure to use your
fingertips to turn the tool to avoid using too much torque.
12 Wipe the red O-Rings with a damp paper towel to remove any
residue.
13 To attach the spindle
cap, align the grooves
so that the spindle cap
extension is pointing
upwards. Then turn the
spindle cap clockwise
until the extension
points downward and
the cap groove aligns
with the housing groove.
14 Close lid when finished.
15 Start a milling job or turn OFF the mill to complete the
procedure and ensure the collets do not remain empty.
Note the L or an R on the spindle caps to denote on which side
of the mill it belongs.
The Nozzle Cleaning Brush should be used every time the water is changed. The
brush can be inserted while the spindle caps are in place. The spindle caps should be
removed and thoroughly cleaned bi-weekly.
9
Log on to our website www.e4d.com for these additional resources:
●●Resources tab - log in to ECO Community*
●●Online Training Videos
●●Chairside Chats - practical “how to” presentation updated weekly
●●Online community and forum
●●User Manual
●●Exercise Workbook
●●Quick Reference Guides
*To register for the ECO Community and access to these resources, go to www.e4d.com/eco
●●Education tab
●●Intermediate and advanced course descriptions
●●Course planner and calendar
●●Links to online registration
Online Videos are avaiable in the mill software by clicking
Contact Customer Support
phone: 800.537.6070
fax: 972.479.1106
email: [email protected]
© 2013 E4D Technologies All rights reserved
11518900.A US $25.00