1
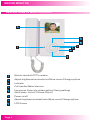
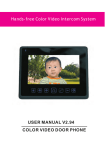
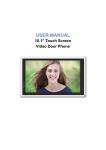
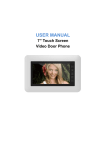
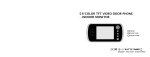
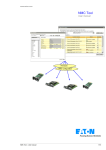
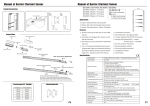
Hands-set Color Video Intercom System
USER MANUAL V1.1
COLOR VIDEO DOOR PHONE
CONTENTS
COVER
CONTENTS
P1
INDOOR MONITOR
P2
FEATURES
P2
SPECIFICATIONS
P2
DESCRIPTIONS OF MONITOR(FRONT)
P3
DESCRIPTIONS OF MONITOR(REAR)
P4
INSTALLATION GUIDE
P5
CAUTION
P6
DIAGRAM(4 MONITOR +1 DOORBELLS + 1 CCTV)
P7
SINGLE MONITOR INSTALLATION
P8
SINGLE DOORBELL INSTALLATION
P8
CABLE SPECIFICATIONS
SPECIFICATION
CABLE
P9
OPERATION GUIDE
P10
HOW TO ANSWER WHEN SOMEONE PRESSES DOORBELL
P11
HOW TO MONITOR DOORBELLS OR CCTV CAMERAS
P11
HOW TO UNLOCK DOOR2 WHEN TALKING WITH DOOR1
P11
HOW TO UNLOCK THE DOOR WHEN MONITORING DOORBELL
P12
HOW TO TRANSFER VISITOR-CALLS AMONG MONITORS
P12
HOW TO MAKE INTERNAL CALL AMONG MONITORS
P12
SYSTEM SETTING
P13
HOW TO SET CHIME TIME
P13
HOW TO ADJUST BRIGHTNESS/COLOR/CONTRAST
P13
SYSTEM SETTING MENU
P14
CARE INSTRUCTION
P14
Page 1
SIN
INDOOR MONITOR
MODEL LIST
FEATURES
3.5" Digital LCD screen
Hand-set
Surface-mounted
Brightness/Color/Contrast adjustment
Simple operation
BASIC FUNCTIONS
Support unlock door from monitor
Support room-to-room internal communication
Support door call transfer to the other indoor monitors
SUPPORT SOLUTIONS
Solution 1: 2 doorbells + 4 monitors
Solution 2: 2 doorbells + 1 CCTV + 1 monitor
Solution 3: 1 doorbell + 2 CCTV + 1 monitor
SPECIFICATIONS:
Display screen
3.5 " color analog LCD
TFT Resolution
Video channels quantity
Additional monitors quantity
Power(Rated Power/standby power)
Key type
Connection/Effective length
Dimension
320*240
1 doorbell+ 2 CCTV
Up to 3
AC110-240(8W/0.4W)
Mechanical key
4 wires/100m
192(W)×195(H)×31(D)mm
Page 2
INDOOR MONITOR
DESCRIPTIONS OF MONITOR(FRONT)
8
67
65
1
34
5
3
2
1
Monitor doorbell/CCTV camera
2
2
3
Adjust brightness/contrast/color/Move cursor/Change options
4
Call transfer/Make intercom
5
Long press: Enter into system setting/ Saving settings
Short press: Unlock/ Choose /Return
6
Power on/off
7
Adjust brightness/contrast/color/Move cursor/Change options
8
LCD Screen
Page 3
Indicator
INDOOR MONITOR
DESCRIPTIONS OF MONITOR(REAR)
11
12
11 Terminals
12 Power cable
AD1 GND PWR1 VD1
AD2 GND PWR2 VD2
AD-1 GND DATA VD-1
Block for
Doorbell1
Block for
Doorbell2 /CCTV
Block for
Connecting other
monitors
AD1: Audio
GND : Ground
PWR1: Power
VD1: Video
AD2: Audio
GND : Ground
PWR2: Power
VD2: Video
AD-1: Audio
GND : Ground
DATA: Data
VD-1: Video
Page 4
Page 4
INSTALLATION
GUIDE
Page 5
SYSTEM DIAGRAM
CAUTION
RISK OF ELECTRIC SHOCK, DO NOT OPEN
THIS MONITOR’S POWER UNIT IS BUILT-IN(110V-220V).
TO REDUCE THE RISK OF ELECTRIC SHOCK, DO NOT REMOVE THE COVER (BACK).
Graphic Symbol Explanation:
The lightning flash with arrowhead symbol, within an equilateral
triangle, is intended to alert the user to the presence of uninsulated
`dangerous voltage` within the product`s enclosure that may be
of sufficient magnitude to constitute a risk of electric shock to
persons.
The exclamation point within an equilateral triangle is intended to
alert the user to the presence of important operating maintenance
(servicing) instructions in the literature accompanying the appliance.
WARNING: TO PREVENT FIRE OR SHOCK HAZARDS, DO NOT EXPOSE
THIS UNIT TO RAIN OR MOISTURE
Page 6
SYSTEM DIAGRAM
DIAGRAM(4 MONITOR +1 DOORBELLS + 1 CCTV)
SOLUTION1
Doorbell 1
AD1
GND
POW1
Doorbell 2
AD1
VD1
AD1 GND PWR1 VD1
GND
POW2
VD2
AD2 GND PWR2 VD2
AD-1 GND DATA VD-1
AD1 GND PWR1 VD1
AD2 GND PWR2 VD2
AD-1 GND DATA VD-1
M2
M1
AD1 GND PWR1 VD1
AD2 GND PWR2 VD2
AD-1 GND DATA VD-1
M3
Doorbell 2
AD1 GND PWR1 VD1
AD2 GND PWR2 VD2
CCTV1
GND VD
CCTV 1
Doorbell 1
GND VD
AD1 GND PWR1 VD1
Page 7
AD2 GND PWR2 VD2
AD-1 GND DATA VD-1
AD-1 GND DATA VD-1
M4
AD1 GND PWR1 VD1
AD1 GND PWR1 VD1
AD2 GND PWR2 VD2
SOLUTION3
SOLUTION2
Doorbell 1
AD1 GND PWR1 VD1
AD2 GND PWR2 VD2
CCTV2
GND VD
AD-1 GND DATA VD-1
INSTALLATION GUIDE
SINGLE MONITOR INSTALLATION
Installation Instructions
Refer to relevant wiring diagram for the system you have chosen and ensure you
have the correct cable.
Determine Monitor positions and heights:
-suggest to install at 1.5~1.6Meters;
-suggest distance between indoor monitor and doorbell is at least 350 mm;
Unplug the connection terminal from the back of the monitor.
Ensure no power supply connection.
Connect cables as per the wiring diagram indicated.
Remove top and bottom facia trim for mounting points.
Fix the monitor onto the bracket.
Connect power when doorbell is installed.
150cm
SINGLE DOORBELL/CAMERA INSTALLATION
Please select the most suitable doorbell position, avoid direct sunshine to camera,
dark surroundings, rain.
Determine doorbell installation height: suggest to be1.5~1.6meters.
Run cable through the doorbell mounting plate.
Connect cable to doorbell as system wiring diagram indicated.
Fasten doorbell onto its mounting plate and secure doorbell with screws.
35cm
50cm
150cm
45
Page 8
INSTALLATION GUIDE
Cable Specification
When signal is from monitor , cable specification is:
•Distance between monitor and door station is less than 30 meters ,shielded
4*0.5mm² cable is available;
PWR1
blue
blue
yellow
white
VD1
yellow
cable
white
Monitor
1AD1
2GND GND
3PWR LOCK4VD1
SHIELD
- 12V +
-
GND
red
+
red
AD1
Electric lock
Doorbell
• Distance exceed 30 meters, please choose SYV-75-3 coaxial cable for video
with another shielded 2*0.5mm² cable or professional cable SYV-75-3 +RVVP
2*0.5(recommend)
yellow
GND
PWR1
VD1
Monitor
Page 9
red
yellow
white
cable
cable
white
1AD1
2GND GND
3PWR LOCK4VD1
SHIELD
Doorbell
- 12V +
-
blue
red
+
blue
AD1
Electric lock
OPERATION
GUIDE
Page 10
OPERATION GUIDE
HOW TO ANSWER WHEN SOMEONE PRESSES DOORBELL
When a visitor presses doorbell, all the indoor monitors in this house will chime
simultaneously, the screen will show PLEASE TAKE UP, you will see the visitor is
in front of the DOORBELL1 or DOORBELL2 . Take up the handset then you have 60
seconds to talk with the visitor. If you want to unlock the door for the visitor,
press
button, then DOOR1 UNLOCKED will show on the screen. The unlock
delay time is 3 seconds, and the screen will be turn off in 5 seconds.
HOW TO MONITOR DOORBELLS OR CCTV CAMERAS
There are 3 channels images for your viewing: DOOR1,DOOR2/CCTV1, CCTV2
The system would automatically detect the connected doorbells and CCTV.
1) Press
button one time, viewing images of DOOR1
2)HOW
PressTO ADJUST
button
second time, viewing images of DOOR2/CCTV1.
BRIGHTNESS/COLOR/CONTRAST
3) Press
button third time , viewing images of CCTV2.
4)Press
button fourth time, the screen will be turn off.
The surveillant time is 8 hours for CCTV cameras and 2 minutes for Doorbells.
HOW TO UNLOCK DOOR2 WHEN TALKING WITH DOOR1
Sometime, when you are talking with DOORBELL1, you will see a sentence on
the screen says, `SOMEONE IS VISITING DOOR2` , that means another person
is pressing DOORBELL2.
If you want to talk with the person at DOOR 2, press
the call from DOOR 1
would be turn off, and now you can talk with the person at DOOR 2. If make sure
it is safe, press
the door for him/her and the word DOOR2 UNLOCKED will
show on the screen, the unlock delay time is 3 seconds. The screen will be
turn off after 5 seconds.
Page 11
OPERATION GUIDE
HOW TO UNLOCK THE DOOR WHEN MONITORING DOORBELL
At monitoring state, if someone presses the doorbell, you may pick up the handset to
talk with the visitor, press
to open the door.
If you have more than one monitor (up to 4 monitors)
in your house, you have rights to make below
operations.
HOW TO TRANSFER THE VISITOR-CALLS AMONG MONITORS
When somebody presses doorbell, all the indoor monitors in this house will
chime simultaneously, the screen will show PLEASE TAKE UP, you may see the
visitor is in front of the DOOR1 or DOOR2 .Then pick up the handset to talk with
the visitor. If the visitor wants to talk with another person, press
button,
(the words TRANSFERRING TO OTHERS will show on the screen), all the other
monitors in other room will chime, and another person can pick up the handset to
talk with the visitor.
HOWTO
TOMAKE
MAKEINTERNAL
INTERNALCALL
CALLAMONG
AMONGMONITORS
MONITORS
HOW
If you want to talk with the other monitor, please pick up the handset , press
then you can talk with him/her.if you have more than 2 monitors (up to 4)
connected together you can choose the monitor no. on the screen that you want
to talk with.
Note: When you are making internal talk, if a call is coming from doorbell, the
visitor-call will be prior to internal-call function. Now please press
,the
visitor`s image appear on the screen, then you can talk with the visitor. If there
is another doorbell rings, long press
can transfer the call from DOORBEEL1
to DOORBELL2.
Page 12
SYSTEM SETTING
At standby state, long press
as following pictures:
, you can enter into system setting
SYSTEM SETTINGS
V1.1
ENGLISH
LANGUAGE
60S
CHIME TIME
CHIME VOLUME
HIGH
DO NOT DISTURB
ENABLE
RING REPEAT
DISABLE
ROOM 1
DEVICE ADDRESS
PORT 2 STATE
DOOR 2
CCTV 2
PORT 3 STATE
ENTER
RESTORE DEFAULT
EXIT
HOWTO
TOMAKE
SET CHIME
TIME CALL AMONG MONITORS
HOW
INTERNAL
At system setting screen, press
short press
the value, press
and move the cursor to CHIME TIME line,
, then the option will turn white ,press
or
to change
again, the option will be normal.
Through similar operation, you can set the other system settings.
HOW
INTERNAL
CALL AMONG MONITORS
HOWTO
TOMAKE
ADJUST
BRIGHTNESS/CONTRAST/COLOR
When talking with doorbell or monitoring doorbell/CCTV camera, press
or
,brightness adjust menu will appear on the screen ,press
to
adjust it . Press
,it will change to contrast adjust menu, press
will change to color adjust menu.
Page 13
or
again ,it
SYSTEM SETTING
SYSTEM SETTING MENU
SYSTEM SETTING MENU
No.
Setting items
1.1
LANGUAGE
1.2
CHIME TIME
Options
Note
ENGLISH
RUSSIAN
10S/15S/20S/25S/3
0S/35S/40S/45S/50
Chime duration time
S/55S/60S
1.3
CHIME VOLUME
1.4
DO NOT DISTURB
HIGH
LOW
DISABLE
ENABLE
CARE INSTRUCTION
1.5
RING REPEAT
DISABLE
ENABLE
1.6
DEVICE ADDRESS
1.7
PORT2 STATE
ROOM1 /2 /3 /4
DOOR 2
CCTV 2
CCTV 1
The monitor will ring just once
the visitor press the doorbell
The monitor ring will be off when
the chime time arrives
The option will be red if two
monitors set the same address
Only valid when the device
address set ''ROOM1''
MONITOR
1.8
1.9
PORT3 STATE
RESTORE DEFAULT
CCTV 2(optional)
ENTER
Only valid when the device
address set ''ROOM1''
The system will restore default
by this operation.
CARE INSTRCTION
1)
Please
you
use the CALL
recommended
cable for the conditions set out
HOW
TO
MAKE
INTERNAL
AMONG MONITORS
HOW
TO ensure
ADJUST
BRIGHTNESS/CONTRAST/COLOR
in this guide.
2) Do not use cleaning agents or solvents on the screens of these products.
Use a moist damp cloth and gently wipe lens surfaces outwards.
3) Image distortion may occur if your equipment is mounted too close to
magnetic field e.g. microwaves, TV, audio equipment or speakers.
4) The Doorbell/Camera should be fitted with an approved weather shield if
the position chosen is in direct sunlight, or in contact with rain, snow or
irrigation sprinkler systems.
Page 14