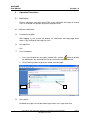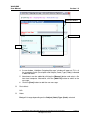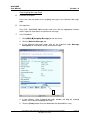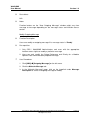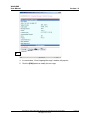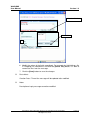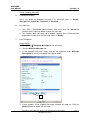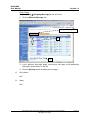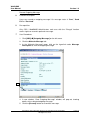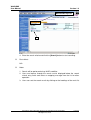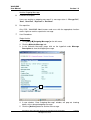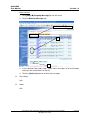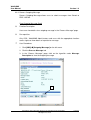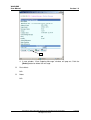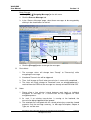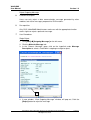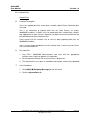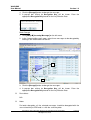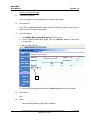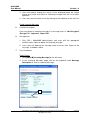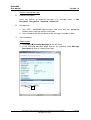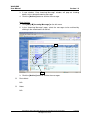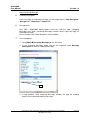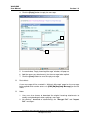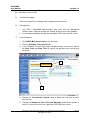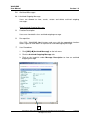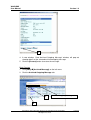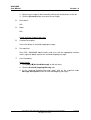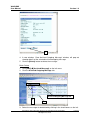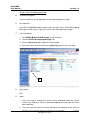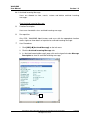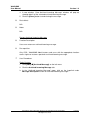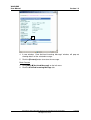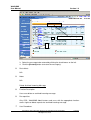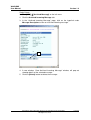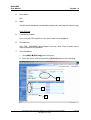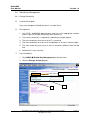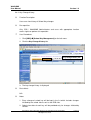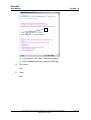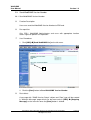
1
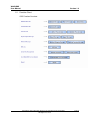
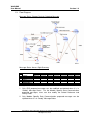
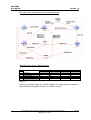
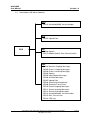
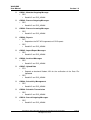
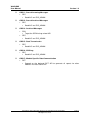
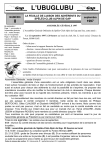
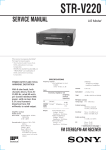
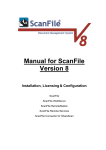
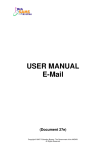
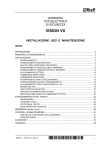
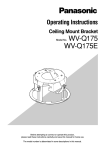
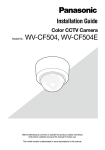
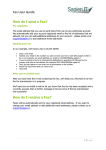
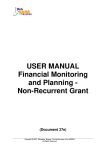
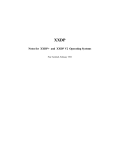
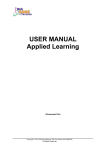
USER MANUAL
CDS
(Document 27e)
Copyright © 2007. Education Bureau. The Government of the HKSAR.
All Rights Reserved.
WebSAMS
User Manual
Version 1.4
Table of Contents
1
MODULE OVERVIEW............................................................................................................... 1
1.1
INTRODUCTION ........................................................................................................................ 1
1.1.1
Objective ......................................................................................................................... 1
1.2
FUNCTION CHART ................................................................................................................... 2
1.3
FLOW DIAGRAM ...................................................................................................................... 3
Message Status Change Cycle for Outgoing Message................................................................ 3
Message Status Access Right Summary ..................................................................................... 3
Message Status Change Cycle for Incoming Message ............................................................... 4
Message Status Access Right Summary ..................................................................................... 4
1.4
INTERACTIONS WITH OTHER MODULES ................................................................................... 5
2
OPERATION PROCEDURES.................................................................................................... 8
2.1
NOTIFICATION ......................................................................................................................... 8
2.1.1
Maintain Notification...................................................................................................... 8
2.2
OUTGOING MESSAGE ............................................................................................................ 10
2.2.1
Maintain Outgoing Message......................................................................................... 10
Add New Outgoing Message .................................................................................................... 10
View Outgoing Message Detail ................................................................................................ 12
Modify Outgoing Message........................................................................................................ 13
Delete Outgoing Message ......................................................................................................... 16
Resend Outgoing Message........................................................................................................ 18
Search Outgoing Message......................................................................................................... 19
Archive Outgoing Message....................................................................................................... 21
2.2.2
Process Outgoing Message........................................................................................... 23
View Outgoing Message Detail ................................................................................................ 23
Modify Outgoing Message........................................................................................................ 24
Delete Outgoing Message ......................................................................................................... 27
Encrypt Outgoing Message....................................................................................................... 29
Reject Outgoing Message ......................................................................................................... 31
2.2.3
Upload Data.................................................................................................................. 33
Upload Data .............................................................................................................................. 33
2.3
INCOMING MESSAGE ............................................................................................................. 35
2.3.1
Process Incoming Message........................................................................................... 35
View Incoming Message........................................................................................................... 35
Decrypt Incoming Message ...................................................................................................... 37
Search Incoming Message ........................................................................................................ 39
Delete Incoming Message......................................................................................................... 40
Archive Incoming Message ...................................................................................................... 42
Reply Incoming Message.......................................................................................................... 44
2.4
TRANSMISSION ...................................................................................................................... 46
2.4.1
Ad hoc Transmission..................................................................................................... 46
2.4.2
Schedule Transmission.................................................................................................. 47
2.5
EXPORT / IMPORT MESSAGES................................................................................................ 49
2.5.1
Export Message............................................................................................................. 49
2.5.2
Import Message............................................................................................................. 51
2.6
ARCHIVED MESSAGES ........................................................................................................... 53
2.6.1
Archived Outgoing Message ......................................................................................... 53
View Archived Outgoing Message ........................................................................................... 53
Restore Archived Outgoing Message ....................................................................................... 54
Delete Archived Outgoing Message ......................................................................................... 56
Copyright © 2007. Education Bureau. The Government of the HKSAR.
All Rights Reserved.
WebSAMS
User Manual
Version 1.4
Search Archived Outgoing Message......................................................................................... 59
2.6.2
Archived Incoming Message ......................................................................................... 60
View Archived Incoming Message........................................................................................... 60
Restore Archived Incoming Message ....................................................................................... 61
Delete Archived Incoming Message ......................................................................................... 63
Search Archived Incoming Message......................................................................................... 66
2.7
CDS LOG ............................................................................................................................... 67
2.7.1
Maintain CDS Log ........................................................................................................ 67
View CDS Log.......................................................................................................................... 67
Delete CDS Log........................................................................................................................ 68
Print CDS Log........................................................................................................................... 69
2.8
SCHOOL KEY MANAGEMENT ................................................................................................ 71
2.8.1
Change School Key ....................................................................................................... 71
2.8.2
Key Change History...................................................................................................... 73
2.8.3
Synchronize CDS Tables............................................................................................... 74
2.9
SEND WEBSAMS VERSION NUMBER ................................................................................... 76
2.9.1
Send WebSAMS Version Number.................................................................................. 76
2.10 REPORT ................................................................................................................................. 78
2.10.1 Generate Report............................................................................................................ 78
2.10.2 Incoming Message Summary ........................................................................................ 81
2.10.3 Outgoing Message Summary ........................................................................................ 82
2.10.4 Outgoing Message Handling List.................................................................................. 83
2.10.5 Daily Incoming Message Received List ........................................................................ 84
2.10.6 Daily Outgoing Message Created List.......................................................................... 85
2.10.7 Uploaded Message Summary........................................................................................ 86
2.10.8 Imported Message Summary......................................................................................... 87
2.10.9 Exported Message Summary......................................................................................... 88
2.10.10
Key Change History List ........................................................................................... 89
Copyright © 2007. Education Bureau. The Government of the HKSAR.
All Rights Reserved.
WebSAMS
User Manual
Version 1.4
1
Module Overview
1.1
Introduction
1.1.1 Objective
Communication and Delivery System Module is designed to provide data
exchange among EDB, Schools and Third Parties. This document provides
knowledge on Communication and Delivery System Module functions and the
corresponding procedural guide.
Copyright © 2007. Education Bureau. The Government of the HKSAR.
All Rights Reserved.
Page 1
WebSAMS
User Manual
1.2
Version 1.4
Function Chart
CDS Function Overview
Copyright © 2007. Education Bureau. The Government of the HKSAR.
All Rights Reserved.
Page 2
WebSAMS
User Manual
1.3
Version 1.4
Flow Diagram
Message Status Change Cycle for Outgoing Message
Message Status Access Right Summary
Message Status
1
2
3
4
5
6
7
READY
PROCESSING
ENCRYPT FAIL
SENT
SEND FAIL
REJECTED
RECEIVED
Function
MODIFY
*Y
ARCHIVE
DELETE
*Y
Y
Y
Y
Y
Y
Y
Y
Y
Y
RESEND
ENCRYPT
Y
Y
Y
EXPORT
REJECT
*Y
Y
Y
Note (*):
1. Only CDS prepared messages can be modified and deleted when it is in
“Ready” Message Status. For the Module Specific Data Communication
prepared messages, users can also modify the School Reference and
Priority fields.
2. Only Module Specific Data Communication prepared messages can be
rejected when it is in “Ready” Message Status
Copyright © 2007. Education Bureau. The Government of the HKSAR.
All Rights Reserved.
Page 3
WebSAMS
User Manual
Version 1.4
Message Status Change Cycle for Incoming Message
Message Status Access Right Summary
Message Status
1
2
3
4
5
Encrypted
Not Encrypted
Decrypted Fail
Imported
Import Fail
Function
Archive
Delete
*Y
Y
Y
Y
*Y
Y
Y
Y
Decrypt
Y
Reply
Y
Y
Y
Y
Note (*):
Please ensure that import of a “Not Encrypted” message into other modules is
done before performing the “Archive” or “Delete” function.
Copyright © 2007. Education Bureau. The Government of the HKSAR.
All Rights Reserved.
Page 4
WebSAMS
User Manual
1.4
Version 1.4
Interactions with other modules
SCH
- CDS13 Send WebSAMS Version Number
STU
- CDS07 Upload Data
CDS
RPT
- CDS04 Reports
- CDS17 Module Specific Data Communication
SEC
- CDS01 Maintain Outgoing Messages
- CDS02 Process Outgoing Messages
- CDS03 Process Incoming Messages
- CDS04 Reports
- CDS05 Import/Export Messages
- CDS06 Archived Messages
- CDS07 Upload Data
- CDS08 School Key Management
- CDS09 Schedule Transmission
- CDS10 Search Outgoing Messages
- CDS11 Search Incoming Messages
- CDS12 Search Archived Messages
- CDS13 Send WebSAMS Version Number
- CDS15 Start Transmission
- CDS16 CDS Log
Copyright © 2007. Education Bureau. The Government of the HKSAR.
All Rights Reserved.
Page 5
WebSAMS
User Manual
Version 1.4
CDS01 - Maintain Outgoing Message
• SEC
• Read ACL on CDS_ADMIN
CDS02 - Process Outgoing Messages
• SEC
• Read ACL on CDS_ADMIN
CDS03 - Process Incoming Messages
• SEC
• Read ACL on CDS_ADMIN
CDS04 - Reports
• RPT
• Depend on the RPT API to generate all CDS reports
• SEC
• Read ACL on CDS_ADMIN
CDS05 - Import/Export Messages
• SEC
• Read ACL on CDS_ADMIN
CDS06 - Archived Messages
• SEC
• Read ACL on CDS_ADMIN
CDS07 - Upload Data
• STU
• Depend on backend Student API for the verification of the Data File
Uploaded
• SEC
• Read ACL on CDS_ADMIN
CDS08 - School Key Management
• SEC
• Read ACL on CDS_ADMIN
CDS09 - Schedule Transmission
•
SEC
• Read ACL on CDS_ADMIN
CDS10 - Search Outgoing Messages
• SEC
• Read ACL on CDS_ADMIN
Copyright © 2007. Education Bureau. The Government of the HKSAR.
All Rights Reserved.
Page 6
WebSAMS
User Manual
Version 1.4
CDS11 - Search Incoming Messages
• SEC
• Read ACL on CDS_ADMIN
CDS12 - Search Archived Messages
• SEC
• Read ACL on CDS_ADMIN
CDS13 - Archived Messages
• SCH
• To get the SCRN using school API
• SEC
• Read ACL on CDS_ADMIN
CDS15 - Start Transmission
• SEC
• Read ACL on CDS_ADMIN
CDS16 - CDS Log
• SEC
• Read ACL on CDS_ADMIN
CDS17 - Module Specific Data Communication
• RPT
• Depend on the backend RPT API to generate all reports for other
modules via Data Comm API.
Copyright © 2007. Education Bureau. The Government of the HKSAR.
All Rights Reserved.
Page 7
WebSAMS
User Manual
Version 1.4
2
Operation Procedures
2.1
Notification
Display notification messages when EDB sends notification messages to remind
users in selected user groups to perform important tasks.
2.1.1 Maintain Notification
Function Description
After logging in, the system will display the notification message page when
there is any notification message for users.
Pre-requisites
N/A
User Procedures
1. Users can disable the messages marked with symbol “
Allow to disable
the Notification” by selecting the "Do not remind me again" check box.
2. Click [Confirm] button to go to the school calendar page.
2
1
Post-effects
Disabled messages will not be shown again when users login next time.
Copyright © 2007. Education Bureau. The Government of the HKSAR.
All Rights Reserved.
Page 8
WebSAMS
User Manual
Version 1.4
Notes
Only messages marked with symbol “
Allow to disable the Notification” can
be disabled.
Copyright © 2007. Education Bureau. The Government of the HKSAR.
All Rights Reserved.
Page 9
WebSAMS
User Manual
2.2
Version 1.4
Outgoing Message
2.2.1 Maintain Outgoing Message
Maintain Outgoing Message allows users to view and perform operations on
outgoing messages.
Add New Outgoing Message
Function Description
Users can add a new outgoing message as well as attach files to it, if necessary.
Pre-requisites
Only CDS / WebSAMS Administrators and users with the appropriate function
access right can add new messages.
User Procedures
1. Click [CDS] [Outgoing Message] on the left menu.
2. Click the Maintain Message tab.
3. In the “Maintain Message” page, click the [Add] button.
Copyright © 2007. Education Bureau. The Government of the HKSAR.
All Rights Reserved.
Page 10
WebSAMS
User Manual
Version 1.4
Must be filled in
Attach file
6
4. A new window, “Add New Outgoing Message” window will pop out. Fill in all
the mandatory fields (Description and Subject (Code) Type (Code)) indicated
in bold red labels.
5. Attachments can be added by clicking the [Browse] button and select a file
from local computer. Afterwards, click the [Add File] button to add it to the
message.
6. Click the [Save] button to add the new message.
Post-effects
N/A
Notes
Party will change depending on the Subject (Code) Type (Code) selected.
Copyright © 2007. Education Bureau. The Government of the HKSAR.
All Rights Reserved.
Page 11
WebSAMS
User Manual
Version 1.4
View Outgoing Message Detail
Function Description
Users can view the details of an outgoing message in the “Maintain Message”
page.
Pre-requisites
Only CDS / WebSAMS Administrators and users with the appropriate function
access right can view details of a particular message
User Procedures
1. Click [CDS] [Outgoing Message] on the left menu.
2. Click the Maintain Message tab.
3. In the “Maintain Message” page, click on the hyperlink under Message
Description to view details of the selected message.
5
4. A new window, “View Outgoing Message” window, will pop out showing
details of the selected outgoing message.
5. Click the [View] button to view or download the attached files if any.
Copyright © 2007. Education Bureau. The Government of the HKSAR.
All Rights Reserved.
Page 12
WebSAMS
User Manual
Version 1.4
Post-effects
N/A
Notes
Function buttons on the “View Outgoing Message” window might vary from
message to message depending on the message status and function access
control.
Modify Outgoing Message
Function Description
Users can modify an outgoing message if its message status is ‘Ready’.
Pre-requisites
1. Only CDS / WebSAMS Administrators and users with the appropriate
function access right can modify a particular message.
2. Users can only modify the School Reference and Priority for a Module
Specific Data Communication prepared message.
User Procedures
1. Click [CDS] [Outgoing Message] on the left menu.
2. Click the Maintain Message tab.
3. In the “Maintain Message” page, click on the hyperlink under Message
Description to select an outgoing message to modify.
Copyright © 2007. Education Bureau. The Government of the HKSAR.
All Rights Reserved.
Page 13
WebSAMS
User Manual
Version 1.4
5
4. A new window, “View Outgoing Message” window, will pop out.
5. Click the [Edit] button to modify the message.
Copyright © 2007. Education Bureau. The Government of the HKSAR.
All Rights Reserved.
Page 14
WebSAMS
User Manual
Version 1.4
Must be filled in
Attach file
7
6. Modify the values of the fields accordingly. For example, by highlighting a file
in ‘Outgoing File Attachment’ and click the [Delete File] button, it is able to
remove the files from the message.
7. Click the [Save] button to save the changes.
Post-effects
Creation Date / Time of the message will be updated after modified.
Notes
Description of reply message cannot be modified.
Copyright © 2007. Education Bureau. The Government of the HKSAR.
All Rights Reserved.
Page 15
WebSAMS
User Manual
Version 1.4
Delete Outgoing Message
Function Description
Users can delete an outgoing message if its message status is ‘Ready’,
‘Encrypt Fail’, ‘Send Fail’, ‘Rejected’ or ‘Received’.
Pre-requisites
1. Only CDS / WebSAMS Administrators and users with the appropriate
function access right can delete a particular message.
2. This function does not apply for a Module Specific Data Communication
prepared message when the message status is ‘Ready’.
User Procedures
Single Delete
1. Click [CDS] [Outgoing Message] on the left menu.
2. Click the Maintain Message tab.
3. In the “Maintain Message” page, click on the hyperlink under Message
Description to select an outgoing message to delete.
4
4. A new window, “View Outgoing Message” window, will pop out. Click the
[Delete] button to delete the message.
Copyright © 2007. Education Bureau. The Government of the HKSAR.
All Rights Reserved.
Page 16
WebSAMS
User Manual
Version 1.4
Batch Delete
1. Click [CDS] [Outgoing Message] on the left menu.
2. Click the Maintain Message tab.
Maintain Message tab
3
4
3. In the “Maintain Message” page, select those messages to be deleted by
clicking the check boxes on the left.
4. Click the [Delete] button to delete the messages.
Post-effects
N/A
Notes
N/A
Copyright © 2007. Education Bureau. The Government of the HKSAR.
All Rights Reserved.
Page 17
WebSAMS
User Manual
Version 1.4
Resend Outgoing Message
Function Description
Users can resend an outgoing message if its message status is ‘Sent’, ‘Send
Fail’ or ‘Received’.
Pre-requisites
Only CDS / WebSAMS Administrators and users with the “Encrypt” function
access right can resend a particular message.
User Procedures
1. Click [CDS] [Outgoing Message] on the left menu.
2. Click the Maintain Message tab.
3. In the “Maintain Message” page, click on the hyperlink under Message
Description to view the outgoing message.
5
4. A new window, “View Outgoing Message” window, will pop out showing
details of the selected outgoing message.
5. Click the [Resend] button to resend the message.
Copyright © 2007. Education Bureau. The Government of the HKSAR.
All Rights Reserved.
Page 18
WebSAMS
User Manual
Version 1.4
Post-effects
A new message will be created in “Maintain Message” page for the message
being resent which can be access via [CDS] [Outgoing Message] on the left
menu.
Notes
N/A
Search Outgoing Message
Function Description
Users can perform search operation on outgoing messages.
Pre-requisites
Only CDS / WebSAMS Administrators and users with the “View” function access
right can perform search operation.
User Procedures
1. Click [CDS] [Outgoing Message] on the left menu.
2. Click the Maintain Message tab.
3. In the “Maintain Message” page, click the [Search] button to go to the search
page.
Copyright © 2007. Education Bureau. The Government of the HKSAR.
All Rights Reserved.
Page 19
WebSAMS
User Manual
Version 1.4
Maintain Message tab
4
4. Enter the search criteria and click the [Search] button to start searching.
Post-effects
N/A
Notes
1. Search will be performed using “AND” condition.
2. Users can browse through the search results displayed below the search
criteria entry fields and select an outgoing message from the list for other
operation.
3. Users can sort the search results by clicking on the headings of the result list.
Copyright © 2007. Education Bureau. The Government of the HKSAR.
All Rights Reserved.
Page 20
WebSAMS
User Manual
Version 1.4
Archive Outgoing Message
Function Description
Users can archive an outgoing message if its message status is ‘Encrypt Fail’,
‘Sent’, ‘Send Fail’, ‘Rejected’ or ‘Received’.
Pre-requisites
Only CDS / WebSAMS Administrators and users with the appropriate function
access right can archive a particular message.
User Procedures
Single Archive
1. Click [CDS] [Outgoing Message] on the left menu.
2. Click the Maintain Message tab.
3. In the “Maintain Message” page, click on the hyperlink under Message
Description to view the outgoing message.
5
4. A new window, “View Outgoing Message” window, will pop out showing
details of the selected outgoing message.
5. Click the [Archive] button to archive the message.
Copyright © 2007. Education Bureau. The Government of the HKSAR.
All Rights Reserved.
Page 21
WebSAMS
User Manual
Version 1.4
Batch Archive
1. Click [CDS] [Outgoing Message] on the left menu.
2. Click the Maintain Message tab.
Maintain Message tab
3
4
3. In the “Maintain Message” page, select those messages to be archived by
clicking in the check boxes on the left.
4. Click the [Archive] button to archive the messages.
Post-effects
N/A
Notes
N/A
Copyright © 2007. Education Bureau. The Government of the HKSAR.
All Rights Reserved.
Page 22
WebSAMS
User Manual
Version 1.4
2.2.2 Process Outgoing Message
Process Outgoing Message allows users to submit messages from School to
EDB / HKEAA.
View Outgoing Message Detail
Function Description
Users can view details of an outgoing message in the “Process Message” page.
Pre-requisites
Only CDS / WebSAMS Administrators and users with the appropriate function
access right can view details of a particular message.
User Procedures
1. Click [CDS] [Outgoing Message] on the left menu.
2. Click the Process Message tab.
3. In the “Process Message” page, click on the hyperlink under Message
Description to view the outgoing message.
5
Copyright © 2007. Education Bureau. The Government of the HKSAR.
All Rights Reserved.
Page 23
WebSAMS
User Manual
Version 1.4
4. A new window, “View Outgoing Message” window, will pop out showing
details of the selected outgoing message.
5. By clicking the [View] button of an attachment, it is able to view / save the
attachment.
Post-effects
N/A
Notes
Function buttons on the “View Outgoing Message” window might vary from
message to message depending on the message status and the function access
right.
Modify Outgoing Message
Function Description
Users can modify an outgoing message if its message status is ‘Ready’.
Pre-requisites
1. Only CDS / WebSAMS Administrators and users with the appropriate
function access right can modify a particular message.
2. Users can only modify the School Reference and Priority for a Module
Specific Data Communication prepared message.
User Procedures
1. Click [CDS] [Outgoing Message] on the left menu.
2. Click the Process Message tab.
3. In the “Process Message” page, click on the hyperlink under Message
Description to view an outgoing message.
Copyright © 2007. Education Bureau. The Government of the HKSAR.
All Rights Reserved.
Page 24
WebSAMS
User Manual
Version 1.4
5
4. A new window, “View Outgoing Message” window, will pop out.
5. Click the [Edit] button to modify the message.
Copyright © 2007. Education Bureau. The Government of the HKSAR.
All Rights Reserved.
Page 25
WebSAMS
User Manual
Version 1.4
Must be filled in
Attach file
7
Copyright © 2007. Education Bureau. The Government of the HKSAR.
All Rights Reserved.
Page 26
WebSAMS
User Manual
Version 1.4
6. Modify the values of the fields accordingly. For example, by highlighting a file
in ‘Outgoing File Attachment’ and click the [Delete File] button, it is able to
remove the file from message.
7. Click the [Save] button to save the changes.
Post-effects
Creation Date / Time of the messages will be updated after modified.
Notes
Description of reply message cannot be modified.
Delete Outgoing Message
Function Description
Users can delete an outgoing message if its message status is ‘Ready’,
‘Encrypt Fail’, ‘Send Fail’, ‘Rejected’ or ‘Received’.
Pre-requisites
1. Only CDS / WebSAMS Administrators and users with the appropriate
function access right can delete a particular message.
2. This function does not apply to a Module Specific Data Communication
prepared message when its message status is ‘Ready’.
User Procedures
1. Click [CDS] [Outgoing Message] on the left menu.
2. Click the Process Message tab.
3. In the “Process Message” page, click on the hyperlink under Message
Description to view an outgoing message.
Copyright © 2007. Education Bureau. The Government of the HKSAR.
All Rights Reserved.
Page 27
WebSAMS
User Manual
Version 1.4
4
4. A new window, “View Outgoing Message” window, will pop out. Click the
[Delete] button to delete the message.
Post-effects
N/A
Notes
N/A
Copyright © 2007. Education Bureau. The Government of the HKSAR.
All Rights Reserved.
Page 28
WebSAMS
User Manual
Version 1.4
Encrypt Outgoing Message
Function Description
Users can encrypt a “Ready” outgoing message with an effective school key.
Pre-requisites
Only CDS / WebSAMS Administrators and users with the appropriate function
access right can encrypt a particular message with an effective school key.
User Procedures
Single Encrypt
1. Click [CDS] [Outgoing Message] on the left menu.
2. Click the Process Message tab.
3. In the “Process Message” page, click on the hyperlink under Message
Description to view the outgoing message.
5
4. A new window, “View Outgoing Message” window, will pop out showing
details of the selected outgoing message.
5. Click the [Encrypt] button to encrypt the message.
Copyright © 2007. Education Bureau. The Government of the HKSAR.
All Rights Reserved.
Page 29
WebSAMS
User Manual
Version 1.4
Batch Encrypt
1. Click [CDS] [Outgoing Message] on the left menu.
2. Click the Process Message tab.
3. In the “Process Message” page, select those messages to be encrypted by
clicking in the check boxes on the left.
Process Message tab
3
4
4. Click the [Encrypt] button to encrypt the messages.
Post-effects
1. The message status will change from "Ready" to "Processing" while
encrypting the message.
2. A backend Transmission will be triggered.
3. Then, it will change to "Sent" when transmission is successfully completed.
4. The status will finally change to "Received" once an acknowledgement is
received from the EDB that the message has already arrived EDB-end CDS.
Notes
1. Please allow a few minutes interval between each batch or individual
encryption of messages as a transmission will be triggered for each
encryption process.
2. As such, if an existing transmission is running at the backend, the
transmission being triggered will be ignored.
3. The attached files encrypted with the school private key cannot be viewed
anymore. Only the message summary, i.e. Message Description, Subject &
Type, etc. can be seen.
Copyright © 2007. Education Bureau. The Government of the HKSAR.
All Rights Reserved.
Page 30
WebSAMS
User Manual
Version 1.4
Reject Outgoing Message
Function Description
Users can only reject a data communication message generated by other
modules, but not for messages prepared via CDS functions.
Pre-requisites
Only CDS / WebSAMS Administrators and users with the appropriate function
access right can reject a particular message.
User Procedures
Single Reject
1. Click [CDS] [Outgoing Message] on the left menu.
2. Click the Maintain Message tab.
3. In the “Process Message” page, click on the hyperlink under Message
Description to select a ‘DataComm’ outgoing message to reject.
4
4. A new window, “View Outgoing Message” window, will pop out. Click the
[Reject] button to reject the message.
Copyright © 2007. Education Bureau. The Government of the HKSAR.
All Rights Reserved.
Page 31
WebSAMS
User Manual
Version 1.4
Batch Reject
1. Click [CDS] [Outgoing Message] on the left menu.
2. Click the Process Message tab.
3. In the “Process Message” page, select those messages to be rejected by
clicking in the check boxes on the left.
Process Message tab
Process Message tab
4
3
4. Click the [Reject] button to reject the messages.
Post-effects
The message status will change from “Ready” to “Rejected”.
Notes
N/A
Copyright © 2007. Education Bureau. The Government of the HKSAR.
All Rights Reserved.
Page 32
WebSAMS
User Manual
Version 1.4
2.2.3 Upload Data
Upload Data
Function Description
Users can upload data files and create a module specific Data Communication
message.
This is an alternative to prepare data files for "Data Comm." of various
WebSAMS modules. It allows users to upload data files created from school's
own application or other sources. However, the data files have to conform to the
pre-defined format of the Interface Files.
Users cannot use this function if he or she has been preparing data files via
WebSAMS modules.
Users are only recommended to use this function only if necessary and if he or
she is an advanced user.
Pre-requisites
1. Only CDS / WebSAMS Administrators and users with the appropriate
function access right can perform this operation.
2. All the required interface files of an event must be present.
3. The interface files must pass all validation rules before successfully uploaded.
User Procedures
1. Click [CDS] [Outgoing Message] on the left menu.
2. Click the Upload Data tab.
Copyright © 2007. Education Bureau. The Government of the HKSAR.
All Rights Reserved.
Page 33
WebSAMS
User Manual
Version 1.4
3
4
5
3. Select the required event in the drop down menu of Description for
uploading of data.
4. Attached the required interface files for the event.
5. Click the [Save] button to complete the upload process.
Post-effects
1. A new message will be created in “Maintain Message” page which can be
access via [CDS] [Outgoing Message] on the left menu.
2. Similar to Data Comm. message of individual modules, such message can
be rejected or encrypted and sent to EDB / HKEAA.
Notes
N/A
Copyright © 2007. Education Bureau. The Government of the HKSAR.
All Rights Reserved.
Page 34
WebSAMS
User Manual
2.3
Version 1.4
Incoming Message
2.3.1 Process Incoming Message
Incoming Message allows users to decrypt, archive, reply, search, view and
delete but not modify incoming messages.
View Incoming Message
Function Description
Users can view details of an incoming message in “Incoming Message” page.
Pre-requisites
1. Only CDS / WebSAMS Administrators and users with the appropriate
function access right can view both lock and unlock messages.
2. Generally, normal CDS users can only view unlock messages.
User Procedures
1. Click [CDS] [Incoming Message] on the left menu.
2. In the “Incoming Message” page, click on the hyperlink under Message
Description to view the incoming message.
4
3. A new window, “View Incoming Message” window, will pop out showing
details of the selected incoming message.
Copyright © 2007. Education Bureau. The Government of the HKSAR.
All Rights Reserved.
Page 35
WebSAMS
User Manual
Version 1.4
4. Click the [View] button to download or view the individual files (only for
“unlock” message).
Post-effects
N/A
Notes
Function buttons might vary from message to message depending on the
message status and function access control.
Copyright © 2007. Education Bureau. The Government of the HKSAR.
All Rights Reserved.
Page 36
WebSAMS
User Manual
Version 1.4
Decrypt Incoming Message
Function Description
Users can only decrypt an incoming message which has an
icon.
encrypted
Pre-requisites
1. Only CDS / WebSAMS Administrators and users with the appropriate
function access right can decrypt a message with ‘Authenticate’ encryption
level using the appropriate School Key.
2. Message with ‘Authenticate’ encryption level must be decrypted first before
any processing or operation can be done on it.
User Procedures
Single Decrypt
1. Click [CDS] [Incoming Message] on the left menu.
2. In the “Incoming Message” page, click on the hyperlink under Message
Description to view an incoming message.
4
3. A new window, “View Incoming Message” window, will pop out showing
details of the selected incoming message.
Copyright © 2007. Education Bureau. The Government of the HKSAR.
All Rights Reserved.
Page 37
WebSAMS
User Manual
Version 1.4
4. Click the [Decrypt] button to decrypt the message.
5. A pop-up box asking for Decryption Key will be shown. Enter the
appropriate Decryption Key based on the Key Effective Date.
Batch Decrypt
1. Click [CDS] [Incoming Message] on the left menu.
2. In the “Incoming Message” page, select those messages to be decrypted by
clicking in the check boxes on the left.
2
3
3. Click the [Decrypt] button to decrypt the messages.
4. A pop-up box asking for Decryption Key will be shown. Enter the
appropriate Decryption Key based on the Key Effective Date.
Post-effects
N/A
Notes
For batch decryption, all the selected messages should be decrypted with the
same school key at EDB end, i.e. with the same key date.
Copyright © 2007. Education Bureau. The Government of the HKSAR.
All Rights Reserved.
Page 38
WebSAMS
User Manual
Version 1.4
Search Incoming Message
Function Description
Users can perform search operation on incoming messages.
Pre-requisites
Only CDS / WebSAMS Administrators and users with the “View” function access
right can search incoming messages.
User Procedures
1. Click [CDS] [Incoming Message] on the left menu.
2. In the “Incoming Message” page, click the [Search] button to go to the
search page.
3
3. Enter the search criteria and click the [Search] button to start searching.
Post-effects
N/A
Notes
1. Search will be perform using “AND” condition.
Copyright © 2007. Education Bureau. The Government of the HKSAR.
All Rights Reserved.
Page 39
WebSAMS
User Manual
Version 1.4
2. Users can browse through the search results displayed below the search
criteria entry fields and select an incoming message from the list for other
operation.
3. Users can sort the search results by clicking on the headings of the result list.
Delete Incoming Message
Function Description
Users can delete an incoming message if its message status is ‘Not Encrypted’,
‘Decrypt Fail’, ‘Imported’, ‘Import Fail’.
Pre-requisites
1. Only CDS / WebSAMS Administrators and users with the appropriate
function access right can delete an incoming message.
2. Users who are deleting the message need to ensure that import of the
message, if needed, is done.
User Procedures
Single Delete
1. Click [CDS] [Incoming Message] on the left menu.
2. In the “Incoming Message” page, click on the hyperlink under Message
Description to view an incoming message.
4
Copyright © 2007. Education Bureau. The Government of the HKSAR.
All Rights Reserved.
Page 40
WebSAMS
User Manual
Version 1.4
3. A new window, “View Incoming Message” window, will pop out showing
details of the selected incoming message.
4. Click the [Delete] button to delete the message.
Batch Delete
1. Click [CDS] [Incoming Message] on the left menu.
2. In the “Incoming Message” page, select the messages to be deleted by
clicking in the check boxes on the left.
2
3
3. Click the [Delete] button to delete the messages.
Post-effects
N/A
Notes
N/A
Copyright © 2007. Education Bureau. The Government of the HKSAR.
All Rights Reserved.
Page 41
WebSAMS
User Manual
Version 1.4
Archive Incoming Message
Function Description
Users can archive an incoming message if its message status is ‘Not
Encrypted’, ‘Decrypt Fail’, ‘Imported’, ‘Import Fail’.
Pre-requisites
1. Only CDS / WebSAMS Administrators and users with the appropriate
function access right can archive a message.
2. Users should ensure that the import of the message, if needed, is done
User Procedures
Single Archive
1. Click [CDS] [Incoming Message] on the left menu.
2. In the “Incoming Message” page, click on the hyperlink under Message
Description to view an incoming message.
4
Copyright © 2007. Education Bureau. The Government of the HKSAR.
All Rights Reserved.
Page 42
WebSAMS
User Manual
Version 1.4
3. A new window, “View Incoming Message” window, will pop out showing
details of the selected incoming message.
4. Click the [Archive] button to archive the message.
Batch Archive
1. Click [CDS] [Incoming Message] on the left menu.
2. In the “Incoming Message” page, select the messages to be archived by
clicking in the check boxes on the left.
2
3
3. Click the [Archive] button to archive the messages.
Post-effects
N/A
Notes
N/A
Copyright © 2007. Education Bureau. The Government of the HKSAR.
All Rights Reserved.
Page 43
WebSAMS
User Manual
Version 1.4
Reply Incoming Message
Function Description
Users can reply an incoming message if its message status is ‘Not Encrypted’,
‘Decrypt Fail’, ‘Imported’ or ‘Import Fail’.
Pre-requisites
Only CDS / WebSAMS Administrators and users with the “Add” (Outgoing
Message) and “View” (Incoming Message) function access right can reply an
incoming message.
Only messages with “Reply Deadline” can be replied.
User Procedures
1. Click [CDS] [Incoming Message] on the left menu.
2. In the “Incoming Message” page, click on the hyperlink under Message
Description to view an incoming message.
4
3. A new window, “View Incoming Message” window, will pop out showing
details of the selected incoming message.
Copyright © 2007. Education Bureau. The Government of the HKSAR.
All Rights Reserved.
Page 44
WebSAMS
User Manual
Version 1.4
4. Click the [Reply] button to reply the message.
6
7
5. A new window, “Reply Incoming Message” window, will pop out.
6. Add the necessary attachment(s) for the message to be replied.
7. Click the [Save] button to save the reply message.
Post-effects
A new message will be created in “Maintain Message” page for the message
being replied which can be access via [CDS] [Outgoing Message] on the left
menu.
Notes
1. Users can also choose to download the original incoming attachments to
modify and upload again when replying a message.
2. No viewing / download of attachment(s) for “Decrypt Fail” and “Import
Fail” messages.
Copyright © 2007. Education Bureau. The Government of the HKSAR.
All Rights Reserved.
Page 45
WebSAMS
User Manual
2.4
Version 1.4
Transmission
2.4.1 Ad hoc Transmission
Function Description
Users can trigger a transmission on an as-need basis.
Pre-requisites
Only CDS / WebSAMS Administrators and users with the appropriate function
access right can trigger an ad hoc transmission.
User Procedures
1. Click [CDS] [Transmission] on the left menu.
2. Click the Ad hoc Transmission tab.
3. Click the [Start] button to start transmission.
2
3
Post-effects
1. If users triggered an ad hoc transmission, the transmission will start
immediately, provided no existing transmission is running at the backend.
2. If an existing transmission is running at the backend, the transmission being
triggered will be ignored.
Notes
N/A
Copyright © 2007. Education Bureau. The Government of the HKSAR.
All Rights Reserved.
Page 46
WebSAMS
User Manual
Version 1.4
2.4.2 Schedule Transmission
Function Description
Users can maintain the settings of the schedule for transmission.
Pre-requisites
1. Only CDS / WebSAMS Administrators and users with the appropriate
function access right can change the settings of the transmission schedule.
2. It is not recommended to change the preloaded CDS Extension URL values.
User Procedures
1. Click [CDS] [Transmission] on the left menu.
2. Click the Schedule Transmission tab.
3. In the ‘Schedule Transmission’ page, change the hours and minutes field of
the Start Time and Stop Time to specify the period of the transmission
schedule.
2
8
4. Change the Transmission Interval value to define the wait time for each
transmission.
5. Change the Number of Time to Resend Message to define the number of
retries if a transmission fails on a particular CDS Extension server.
Copyright © 2007. Education Bureau. The Government of the HKSAR.
All Rights Reserved.
Page 47
WebSAMS
User Manual
Version 1.4
6. Change the URL of the Primary CDS Extension to define the first URL of
the CDS Extension to be used for the transmission.
7. Change the URL of the Secondary CDS Extension to define the second
URL of the CDS Extension to be used if the transmission fails when using
the primary URL.
8. Click the [Save] button to save the settings of the transmission schedule.
Post-effects
A transmission will be triggered at backend based on the schedule being set.
The schedule starts at the next effective time.
Notes
1. The transmission schedule can span across a day when start time is larger
than stop time or by clicking on the [24 hours] button.
2. The maximum number of “Time to resend Message” available depends on
the “Transmission Interval” selected:
Interval
Maximum Resend No.
•
1 hourly
3
•
•
2-3 hourly
4-6 hourly
5
10
3. Users can also click the [Un-schedule] to stop the transmission schedule.
Copyright © 2007. Education Bureau. The Government of the HKSAR.
All Rights Reserved.
Page 48
WebSAMS
User Manual
2.5
Version 1.4
Export / Import Messages
2.5.1 Export Message
Function Description
Users are allowed to export an outgoing message when such message needs to
be sent to EDB by other means. This scenario will occur especially when CDS
Transmission is not working.
Pre-requisites
1. Only CDS / WebSAMS Administrators and users with the appropriate “View”
(Outgoing Message) and “Export” (Outgoing Message) function access right
can export an outgoing message.
2. Only CDS / WebSAMS Administrators can grant the rights to users for
viewing and / or exporting own or others message.
User Procedures
1. Click [CDS] [Import / Export] on the left menu.
2. Click the Export Message tab.
Export Message
3
4
3. In the “Export Message” page, click on the message that you wish to export
from WebSAMS CDS.
4. Click the [Export] button to export the message into a zip file.
Copyright © 2007. Education Bureau. The Government of the HKSAR.
All Rights Reserved.
Page 49
WebSAMS
User Manual
Version 1.4
Post-effects
N/A
Notes
1. The message files are contained in the zip file.
2. Send the zip file to EDB for import.
Copyright © 2007. Education Bureau. The Government of the HKSAR.
All Rights Reserved.
Page 50
WebSAMS
User Manual
Version 1.4
2.5.2 Import Message
Function Description
Users are allowed to import an incoming message when such message is
received from EDB by other means.
Pre-requisites
1. Only CDS / WebSAMS Administrators and users with the appropriate
function access right can import an incoming message.
2. The message to be imported should be compressed in a .zip format file.
User Procedures
1. Click [CDS] [Import/Export] on the left menu.
2. Click the Import Message tab.
Import Message tab
3
4
3. In the “Import Message” page, click the [Browse] button to select the zipped
message you want to import into WebSAMS CDS.
4. Click the [Import] button to import the zip file onto WebSAMS CDS.
Copyright © 2007. Education Bureau. The Government of the HKSAR.
All Rights Reserved.
Page 51
WebSAMS
User Manual
Version 1.4
Post-effects
Imported message will appear in “Incoming Message” page which can be
accessed via [CDS] [Incoming Message] on the left menu.
Notes
N/A
Copyright © 2007. Education Bureau. The Government of the HKSAR.
All Rights Reserved.
Page 52
WebSAMS
User Manual
2.6
Version 1.4
Archived Messages
2.6.1 Archived Outgoing Message
Users are allowed to view, search, restore and delete archived outgoing
messages.
View Archived Outgoing Message
Function Description
Users can view details of an archived outgoing message.
Pre-requisites
Only CDS / WebSAMS Administrators and users with the appropriate function
access right can view details of a particular archived outgoing message.
User Procedures
1. Click [CDS] [Archived Message] on the left menu.
2. Click the Archived Outgoing Message tab.
3. Click on the hyperlink under Message Description to view an archived
outgoing message.
5
Copyright © 2007. Education Bureau. The Government of the HKSAR.
All Rights Reserved.
Page 53
WebSAMS
User Manual
Version 1.4
4. A new window, “View Archived Outgoing Message”, will pop out showing
details of the archived outgoing message.
5. Click the [Close] button to end viewing the message.
Post-effects
N/A
Notes
Users are not allowed to view the attachment(s) of the archived outgoing
message.
Restore Archived Outgoing Message
Function Description
Users can restore an archived outgoing message.
Pre-requisites
Only CDS / WebSAMS Administrators and users with the appropriate function
access right can restore a particular archived outgoing message.
User Procedures
Single Restore
1. Click [CDS] [Archived Message] on the left menu.
2. Click the Archived Outgoing Message tab.
3. In the “Archived Outgoing Message” page, click on the hyperlink under
Message Description to view an archived outgoing message.
Copyright © 2007. Education Bureau. The Government of the HKSAR.
All Rights Reserved.
Page 54
WebSAMS
User Manual
Version 1.4
5
4. A new window, “View Archived Outgoing Message” window, will pop out
showing details of the selected archived outgoing message.
5. Click the [Restore] button to restore the message.
Batch Restore
1. Click [CDS] [Archived Message] on the left menu.
2. Click the Archived Outgoing Message tab.
3
Archived Outgoing Message tab
4
Copyright © 2007. Education Bureau. The Government of the HKSAR.
All Rights Reserved.
Page 55
WebSAMS
User Manual
Version 1.4
3. Select the messages to be restored by clicking the check boxes on the left.
4. Click the [Restore] button to restore the messages.
Post-effects
N/A
Notes
N/A
Delete Archived Outgoing Message
Function Description
Users can delete an archived outgoing message.
Pre-requisites
Only CDS / WebSAMS Administrators and users with the appropriate function
access right can delete a particular archived outgoing message.
User Procedures
Single Delete
1. Click [CDS] [Archived Message] on the left menu.
2. Click the Archived Outgoing Message tab.
3. In the “Archived Outgoing Message” page, click on the hyperlink under
Message Description to view an archived outgoing message.
Copyright © 2007. Education Bureau. The Government of the HKSAR.
All Rights Reserved.
Page 56
WebSAMS
User Manual
Version 1.4
5
4. A new window, “View Archived Outgoing Message” window, will pop out
showing details of the selected archived outgoing message.
5. Click the [Delete] button to delete the message.
Batch Delete
1. Click [CDS] [Archived Message] on the left menu.
2. Click the Archived Outgoing Message tab.
Archived Outgoing Message tab
3
4
3. Select the messages to be deleted by clicking in the check boxes on the left.
Copyright © 2007. Education Bureau. The Government of the HKSAR.
All Rights Reserved.
Page 57
WebSAMS
User Manual
Version 1.4
4. Click the [Delete] button to delete the messages.
Post-effects
N/A
Notes
The corresponding attachments will be deleted.
Copyright © 2007. Education Bureau. The Government of the HKSAR.
All Rights Reserved.
Page 58
WebSAMS
User Manual
Version 1.4
Search Archived Outgoing Message
Function Description
Users can perform search operation on archived outgoing messages.
Pre-requisites
Only CDS / WebSAMS Administrators and users with “View” (Archived Outgoing
Message) function access right can search archived outgoing messages.
User Procedures
1. Click [CDS] [Archived Message] on the left menu.
2. Click the Archived Outgoing Message tab.
3. Click the [Search] button to go to the search page.
4. Enter the search criteria and click the [Search] button to start searching.
3
Post-effects
N/A
Notes
1. Users can browse through the search results displayed below the search
criteria entry fields and select an archived outgoing message from the list for
other operation.
2. Users can sort the search results by clicking on the headings of the result list.
Copyright © 2007. Education Bureau. The Government of the HKSAR.
All Rights Reserved.
Page 59
WebSAMS
User Manual
Version 1.4
2.6.2 Archived Incoming Message
Users are allowed to view, search, restore and delete archived incoming
messages.
View Archived Incoming Message
Function Description
Users can view details of an archived incoming message.
Pre-requisites
Only CDS / WebSAMS Administrators and users with the appropriate function
access right can view details of a particular archived incoming message.
User Procedures
1. Click [CDS] [Archived Message] on the left menu.
2. Click the Archived Incoming Message tab.
3. In “Archived Incoming Message” page, click on the hyperlink under Message
Description to view an archived incoming message.
5
Copyright © 2007. Education Bureau. The Government of the HKSAR.
All Rights Reserved.
Page 60
WebSAMS
User Manual
Version 1.4
4. A new window, “View Archived Incoming Message” window, will pop out
showing details of the selected archived incoming message.
5. Click the [Close] button to end viewing the message.
Post-effects
N/A
Notes
N/A
Restore Archived Incoming Message
Function Description
Users can restore an archived incoming message.
Pre-requisites
Only CDS / WebSAMS Administrators and users with the appropriate function
access right can restore a particular archived incoming message.
User Procedures
Single Restore
1. Click [CDS] [Archived Message] on the left menu.
2. Click the Archived Incoming Message tab.
3. In the “Archived Incoming Message” page, click on the hyperlink under
Message Description to view an archived incoming message.
Copyright © 2007. Education Bureau. The Government of the HKSAR.
All Rights Reserved.
Page 61
WebSAMS
User Manual
Version 1.4
5
4. A new window, “View Archived Incoming Message” window, will pop out
showing details of the selected message.
5. Click the [Restore] button to restore the message.
Batch Restore
1. Click [CDS] [Archived Message] on the left menu.
2. Click the Archived Incoming Message tab.
Copyright © 2007. Education Bureau. The Government of the HKSAR.
All Rights Reserved.
Page 62
WebSAMS
User Manual
Version 1.4
3
Archived Incoming Message tab
4
3. Select the message to be restored by clicking the check boxes on the left.
4. Click the [Restore] button to restore the message(s).
Post-effects
N/A
Notes
N/A
Delete Archived Incoming Message
Function Description
Users can delete an archived incoming message.
Pre-requisites
Only CDS / WebSAMS Administrators and users with the appropriate function
access right can delete a particular archived incoming message.
User Procedures
Copyright © 2007. Education Bureau. The Government of the HKSAR.
All Rights Reserved.
Page 63
WebSAMS
User Manual
Version 1.4
Single Delete
1. Click [CDS] [Archived Message] on the left menu.
2. Click the Archived Incoming Message tab.
3. In the “Archived Incoming Message” page, click on the hyperlink under
Message Description to view an archived incoming message.
5
4. A new window, “View Archived Incoming Message” window, will pop out
showing details of the selected message.
5. Click the [Delete] button to delete the message.
Copyright © 2007. Education Bureau. The Government of the HKSAR.
All Rights Reserved.
Page 64
WebSAMS
User Manual
Version 1.4
Batch Delete
1. Click [CDS] [Archived Message] on the left menu.
2. Click the Archived Incoming Message tab.
3
Archived Incoming Message tab
4
3. Select the message to be deleted by clicking in the check boxes on the left.
4. Click the [Delete] button to delete the message(s).
Post-effects
N/A
Notes
N/A
Copyright © 2007. Education Bureau. The Government of the HKSAR.
All Rights Reserved.
Page 65
WebSAMS
User Manual
Version 1.4
Search Archived Incoming Message
Function Description
Users can perform search operation on archived incoming messages.
Pre-requisites
Only CDS / WebSAMS Administrators and users with the appropriate function
access right can perform search on archived incoming messages.
User Procedures
1. Click [CDS] [Archived Message] on the left menu.
2. Click the Archived Incoming Message tab.
3. Click the [Search] button to go to the search page.
4
4. Enter the search criteria and click the [Search] button to start searching.
Post-effects
N/A
Notes
1. Users can browse through the search results displayed below the search
criteria entry fields and select an archived incoming message from the list for
other operation.
2. Users can sort the search results by clicking on the headings of the result list.
Copyright © 2007. Education Bureau. The Government of the HKSAR.
All Rights Reserved.
Page 66
WebSAMS
User Manual
2.7
Version 1.4
CDS Log
Users can delete, download, search, print and view the CDS log.
2.7.1 Maintain CDS Log
View CDS Log
Function Description
Users can view the CDS log online or download the log file for offline browsing.
Pre-requisites
Only CDS / WebSAMS Administrators and users with the appropriate function
access right can view transmission details of the CDS log.
User Procedures
1. Click [CDS] [CDS Log] on the left menu.
2. Enter the search criteria and click the [Search] button to start searching for
the required CDS log(s).
3
3. Click on the hyperlink under Log file to download the individual CDS log file
for offline browsing or click the [Preview & Print] button to view and print the
log file online.
Copyright © 2007. Education Bureau. The Government of the HKSAR.
All Rights Reserved.
Page 67
WebSAMS
User Manual
Version 1.4
Post-effects
N/A
Notes
N/A
Delete CDS Log
Function Description
Users can housekeep the CDS log file by deleting it.
Pre-requisites
Only CDS / WebSAMS Administrators and users with the appropriate function
access right can delete CDS log file(s) online.
User Procedures
1. Click [CDS] [CDS Log] on the left menu.
2. Enter the search criteria and click the [Search] button to start searching.
3
4
3. Select the log files to be deleted by clicking in the check boxes on the left.
4. Click the [Delete] button to delete the selected log files.
Copyright © 2007. Education Bureau. The Government of the HKSAR.
All Rights Reserved.
Page 68
WebSAMS
User Manual
Version 1.4
Post-effects
N/A
Notes
You are recommended to housekeep the log files by retaining one month of logs.
Print CDS Log
Function Description
Users can print CDS log file on a fax cover to be sent to Helpdesk.
Pre-requisites
Only CDS / WebSAMS Administrators and users with “View” function access
right can perform this operation.
User Procedures
1. Click [CDS] [CDS Log] on the left menu.
2. Enter the search criteria and click the [Search] button to start searching.
3
4
5
Copyright © 2007. Education Bureau. The Government of the HKSAR.
All Rights Reserved.
Page 69
WebSAMS
User Manual
Version 1.4
3. Keyed in values for the following fields which will be printed in the From
section of the fax cover:
- Contact Person
- Fax Number
- Phone Number
4. Select the log files to be printed by clicking in the check boxes on the left.
5. Click the [Print and Preview] button to print the log files.
Post-effects
N/A
Notes
N/A
Copyright © 2007. Education Bureau. The Government of the HKSAR.
All Rights Reserved.
Page 70
WebSAMS
User Manual
2.8
Version 1.4
School Key Management
2.8.1 Change School Key
Function Description
Users can change the School Key on an “as-need” basis.
Pre-requisites
1. Only CDS / WebSAMS Administrators and users with appropriate function
access right can change School Key when necessary.
2. The current school key is required for submitting a change request.
3. The new school key must consist of A-Z, a-z and 0-9.
4. The new school key must consist of all alphabets or at most 2 numeric digits.
5. The new school key must have at least 2 characters different from the old
one.
6. School Key is case-sensitive.
User Procedures
1. Click [CDS] [School Key Management] on the left menu.
2. Click the Change School Key tab.
Change School Key tab
3
4
Copyright © 2007. Education Bureau. The Government of the HKSAR.
All Rights Reserved.
Page 71
WebSAMS
User Manual
Version 1.4
3. Enter the Current and New School Key. Re-type New School Key.
4. Click the [Save] button to save the new school key.
Post-effects
1. The New School Key will take effect according to the effective date.
2. The change process will take one day from the submission date.
3. No another submission is allowed when the successfully submitted key
change is in processing state. i.e. the "Save" button will be dimmed.
4. If WebSAMS cannot receive any acknowledgements from the EDB on the
School Key change request after one day from the submission date, the
encryption function that require the School Key will be locked until the next
submission of School Key change request has been made. While waiting for
an acknowledgement from the EDB, the previous effective school key should
be used.
5. The effective date for school key will be updated in encryption and decryption
functions once a new key comes to effect.
6. A new record will be added to the Key Change History that is initiated by
schools or the EDB.
Notes
1. A message will be prompted when you enter this page if the current school
key has expired.
2. The "Save" button will be dimmed, i.e. you can't change the school key again,
when a new key is in processing state or to be effective..
Copyright © 2007. Education Bureau. The Government of the HKSAR.
All Rights Reserved.
Page 72
WebSAMS
User Manual
Version 1.4
2.8.2 Key Change History
Function Description
Users can view history of School Key changes.
Pre-requisites
Only CDS / WebSAMS Administrators and users with appropriate function
access right can perform this operation.
User Procedures
1. Click [CDS] [School Key Management] on the left menu.
2. Click the Key Change History tab.
Key Change History tab
3. The key change history is displayed.
Post-effects
N/A
Notes
1. Every change of school key will be kept in the list which includes changes
initiated by the school side as well as the EDB side.
2. Submission date of each key will be provided only for changes initiated by
schools.
Copyright © 2007. Education Bureau. The Government of the HKSAR.
All Rights Reserved.
Page 73
WebSAMS
User Manual
Version 1.4
2.8.3 Synchronize CDS Tables
Function Description
Users can perform synchronization of data between WebSAMS CDS end and
EDB end. Such data includes School Key, Common Key etc.
Pre-requisites
1. Only CDS / WebSAMS Administrators and users with “Execute” (Change
School Key) function access right can perform this operation.
2. The “websams” folder found in the CDS Installation Kit must be copied to the
<WEBSAMS_HOME>\cds\<CDS Destination ID>\system\install folder (e.g.
E:\Data\cds\1234567890123\system\install) in the WebSAMS Server.
User Procedures
1. Click [CDS] [School Key Management] on the left menu.
2. Click the Change School Key tab.
3
3. Click on the Synchronize CDS Tables link.
Copyright © 2007. Education Bureau. The Government of the HKSAR.
All Rights Reserved.
Page 74
WebSAMS
User Manual
Version 1.4
5
4. A “Synchronize CDS Tables” Window will pop up.
5. Click the [Start] button to synchronize CDS table.
Post-effects
N/A
Notes
N/A
Copyright © 2007. Education Bureau. The Government of the HKSAR.
All Rights Reserved.
Page 75
WebSAMS
User Manual
2.9
Version 1.4
Send WebSAMS Version Number
2.9.1 Send WebSAMS Version Number
Function Description
Users can send the WebSAMS Version Number to EDB end.
Pre-requisites
Only CDS / WebSAMS Administrators and users with appropriate function
access right can perform this operation.
User Procedures
1. Click [CDS] [Send WebSAMS Ver] on the left menu.
2
2. Click the [Start] button to Send WebSAMS Version Number.
Post-effects
A message with "SAMS Version Setup" subject and "Data" type will be created
in "Maintain Message" page which can be accessed via [CDS] [Outgoing
Message] on the left menu once the [Start] button is clicked.
Copyright © 2007. Education Bureau. The Government of the HKSAR.
All Rights Reserved.
Page 76
WebSAMS
User Manual
Version 1.4
Notes
1. The school could trigger this "Send WebSAMS Version Number" function to
send to EDB the latest WebSAMS Version Number.
2. The created message should be encrypted with the School Key before
sending out.
Copyright © 2007. Education Bureau. The Government of the HKSAR.
All Rights Reserved.
Page 77
WebSAMS
User Manual
Version 1.4
2.10 Report
2.10.1
Generate Report
Function Description
Users can generate reports in different languages. Currently, the languages
available are in English and Chinese.
CDS Reports that can be generated are as follows:
I.
Incoming Message Summary
II.
Outgoing Message Summary
III. Outgoing Message Handling List
IV. Daily Incoming Message Received List
V.
Daily Outgoing Message Created List
VI. Uploaded Message Summary
VII. Imported Message Summary
VIII. Exported Message Summary
IX. Key Change History List
Report formats available are PDF, WORD, RICHTEXT and EXCEL.
The steps to generate each report are similar. As such, this manual will guide in
generate one particular report, i.e. Daily Incoming Message Received List.
Pre-requisites
1. Only CDS / WebSAMS Administrators and users with “View” Report function
access right can view and generate Report.
2. Adobe Acrobat Reader and Microsoft Office 2000 are required to be installed
on the machine to view the reports.
Copyright © 2007. Education Bureau. The Government of the HKSAR.
All Rights Reserved.
Page 78
WebSAMS
User Manual
Version 1.4
User Procedures
1. Click [CDS] [Report] on the left menu.
2
3
2. Click on the Report Name (ID) link and a list of built-in and user-defined
report templates will be displayed.
3. Click on a Report Template link to generate a report.
5
Copyright © 2007. Education Bureau. The Government of the HKSAR.
All Rights Reserved.
4
Page 79
WebSAMS
User Manual
Version 1.4
4. Users will be led to a Report Search Parameter Screen. Key in the Search
Criteria and Select the Report Format for Report Generation.
5. Click the [Preview & Print] button to generate the reports required.
6. A new window will pop out displaying the report of the required format if the
necessary web browser plug-in supporting the file format is installed.
Post-effects
The generated report will be displayed in a pop-up window which allows users to
preview and / or print it out.
Notes
N/A
Copyright © 2007. Education Bureau. The Government of the HKSAR.
All Rights Reserved.
Page 80
WebSAMS
User Manual
Version 1.4
2.10.2
Incoming Message Summary
Function Description
Users can generate Incoming Message Summary Report.
The generated report will display a summary of all incoming messages grouped
by the following fields:
- Subject (Code)
- Type (Code)
- Encryption Level
- Priority
Pre-requisites
1. Only CDS / WebSAMS Administrators and users with “View” Report function
access right can view and generate Reports.
2. Adobe Acrobat Reader and Microsoft Office 2000 are required to be installed
into your machine to view the reports.
User Procedures
Please refer to the User Procedures of Generate Report.
Post-effects
The generated report will be displayed in a pop-up window which allows users to
preview and / or print.
Notes
N/A
Copyright © 2007. Education Bureau. The Government of the HKSAR.
All Rights Reserved.
Page 81
WebSAMS
User Manual
Version 1.4
2.10.3
Outgoing Message Summary
Function Description
Users can generate Outgoing Message Summary Report.
The generated report will display a summary of all outgoing messages grouped
by the following fields:
- Subject (Code)
- Type (Code)
- Owner ID
Pre-requisites
1. Only CDS / WebSAMS Administrators and users with “View” Report function
access right can view and generate Reports.
2. Adobe Acrobat Reader and Microsoft Office 2000 are required to be installed
into your machine to view the reports.
User Procedures
Please refer to the User Procedures of Generate Report.
Post-effects
The generated report will be displayed in a pop-up window which allows users to
preview and / or print.
Notes
N/A
Copyright © 2007. Education Bureau. The Government of the HKSAR.
All Rights Reserved.
Page 82
WebSAMS
User Manual
Version 1.4
2.10.4
Outgoing Message Handling List
Function Description
Users can generate Outgoing Message Handling List Report
The generated report will display a list of all Outgoing Message Subject
Descriptions, Subject Code, Type Descriptions and Type Code available for
creating an outgoing message and the corresponding Party to which the
outgoing message created will be sent.
Pre-requisites
1. Only CDS / WebSAMS Administrators and users with “View” Report function
access right can view and generate Reports.
2. Adobe Acrobat Reader and Microsoft Office 2000 are required to be installed
into your machine to view the reports.
User Procedures
Please refer to the User Procedures of Generate Report.
Post-effects
The generated report will be displayed in a pop-up window which allows users to
preview and / or print.
Notes
N/A
Copyright © 2007. Education Bureau. The Government of the HKSAR.
All Rights Reserved.
Page 83
WebSAMS
User Manual
Version 1.4
2.10.5
Daily Incoming Message Received List
Function Description
Users can generate Daily Incoming Message Received List Report.
The generated report will display a summary of all incoming messages grouped
by the following fields:
- Received Date
- Subject (Code)
- Type (Code)
- Encryption Level
Pre-requisites
1. Only CDS / WebSAMS Administrators and users with “View” Report function
access right can view and generate Reports.
2. Adobe Acrobat Reader and Microsoft Office 2000 are required to be installed
into your machine to view the reports.
User Procedures
Please refer to User Procedures of Generate Report.
Post-effects
The generated report will be displayed in a pop-up window which allows users to
preview and / or print.
Notes
N/A
Copyright © 2007. Education Bureau. The Government of the HKSAR.
All Rights Reserved.
Page 84
WebSAMS
User Manual
Version 1.4
2.10.6
Daily Outgoing Message Created List
Function Description
Users can generate Daily Outgoing Message Created List Report.
The generated report will display a summary of all outgoing messages grouped
by the following fields:
- Creation Date
- Subject (Code)
- Type (Code)
- Owner ID
Pre-requisites
1. Only CDS / WebSAMS Administrators and users with “View” Report function
access right can view and generate Reports.
2. Adobe Acrobat Reader and Microsoft Office 2000 are required to be installed
into your machine to view the reports.
User Procedures
Please refer to User Procedures of Generate Report
Post-effects
The generated report will be displayed in a pop-up window which allows users to
preview and / or print.
Notes
N/A
Copyright © 2007. Education Bureau. The Government of the HKSAR.
All Rights Reserved.
Page 85
WebSAMS
User Manual
Version 1.4
2.10.7
Uploaded Message Summary
Function Description
Users can generate Uploaded Message Summary Report.
The generated report will display a summary of all outgoing messages created
via the CDS "Upload Data" online function grouped by the following fields:
- Subject (Code)
- Type (Code)
- Owner ID
Pre-requisites
1. Only CDS / WebSAMS Administrators and users with “View” Report function
access right can view and generate Reports.
2. Adobe Acrobat Reader and Microsoft Office 2000 are required to be installed
into your machine to view the reports
User Procedures
Please refer to User Procedures of Generate Report.
Post-effects
The generated report will be displayed in a pop-up window which allows users to
preview and / or print.
Notes
N/A
Copyright © 2007. Education Bureau. The Government of the HKSAR.
All Rights Reserved.
Page 86
WebSAMS
User Manual
Version 1.4
2.10.8
Imported Message Summary
Function Description
Users can generate Imported Message Summary Report.
The generated report will display a summary of all incoming messages being
imported into CDS grouped by the following fields:
- Subject (Code)
- Type (Code)
- Encryption Level
Pre-requisites
1. Only CDS / WebSAMS Administrators and users with “View” Report function
access right can view and generate Reports.
2. Adobe Acrobat Reader and Microsoft Office 2000 are required to be installed
into your machine to view the reports
User Procedures
Please refer to User Procedures of Generate Report.
Post-effects
The generated report will be displayed in a pop-up window which allows users to
preview and / or print.
Notes
N/A
Copyright © 2007. Education Bureau. The Government of the HKSAR.
All Rights Reserved.
Page 87
WebSAMS
User Manual
Version 1.4
2.10.9
Exported Message Summary
Function Description
Users can generate Exported Message Summary Report.
The generated report will display a summary of all outgoing messages grouped
by the following fields:
- Subject (Code)
- Type (Code)
- Owner ID
Pre-requisites
1. Only CDS / WebSAMS Administrators and users with “View” Report function
access right can view and generate Reports.
2. Adobe Acrobat Reader and Microsoft Office 2000 are required to be installed
into your machine to view the reports
User Procedures
Please refer to User Procedures of Generate Report.
Post-effects
The generated report will be displayed in a pop-up window which allows users to
preview and / or print.
Notes
N/A
Copyright © 2007. Education Bureau. The Government of the HKSAR.
All Rights Reserved.
Page 88
WebSAMS
User Manual
Version 1.4
2.10.10
Key Change History List
Function Description
Users can generate Key Change History List Report.
The generated report will display history of School Key Changes.
Pre-requisites
1. Only CDS / WebSAMS Administrators and users with “View” Report function
access right can view and generate Reports.
2. Adobe Acrobat Reader and Microsoft Office 2000 are required to be installed
into your machine to view the reports
User Procedures
Please refer to User Procedures of Generate Report.
Post-effects
The generated report will be displayed in a pop-up window which allows users to
preview and / or print.
Notes
N/A
Copyright © 2007. Education Bureau. The Government of the HKSAR.
All Rights Reserved.
Page 89