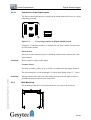
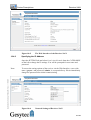
1
Technical Manual User Documentation Gesytec GmbH Pascalstr. 6 52076 Aachen, Germany Tel. +(49) 24 08 / 9 44-0 FAX +(49) 24 08 / 9 44-100 e-mail: [email protected] www.gesytec.com Document: GesySense/UserDoc/GesySense_HW Manual-EN-v1.1.docx Version: 1.1 Date: 08/12/2015 Preliminary Notes 1 Preliminary Notes This manual describes the devices used in the GesySense® wireless sensor system. Part I gives an introduction to the system. Part II provides information on the devices covering the following aspects Position in the system and usage Protective and safety measures Installation and commissioning Technical specifications Maintenance Accessories and spare parts The manual is intended for operators and installation and maintenance staff. GesySense/UserDoc/GesySense_HW Manual-EN-v1.1.docx, v 1.1, 08/12/2015 Complementary Documents [1] “GesySense Modbus Communication” describes the protocol specification related to the communication between the receiver and a superior system, e.g. a Modbus master. [2] “GesySense LogIt User Manual” describes the PC software GesySense LogIt for commissioning the GesySense system. [3] Particular Installation Instructions for individual hardware components of the system are included in the scope of delivery of the devices. [4] “Calibration of PT1000 Modules”, Calibration instruction for wireless modules using PT1000 probes. This documentation can be modified any time without prior notice. Gesytec doesn’t take over any responsibilities related to errors or inaccuracies in this documentation and possible resulting outcome. In no case Gesytec, its representatives and employees are liable for possible failures, indirectly caused damages or damages resulting from use, that occur due to application or non-usability of the software or the accompanying documentation. Technical modification in software and devices are reserved. GesySense is registered trademark of Gesytec GmbH. Other names may be registered trademarks of their respective holders. 2/108 Preliminary Notes 1.1 Intended Use Important Notice The GesySense documentation comprehensively describes the intended use of the GesySense system and its components. Any other use and especially the connection of GesySense components to a PC that is not designated for configuration of the GesySense system accordance with the documentation are prohibited. As a wireless system the GesySense system is only of limited suitability for control tasks in conjunction with other systems, as the quality of radio transmission is underlying system external influences. Therefore it cannot be guaranteed that every message from a wireless module will get to the receiver. Only taking into account this limitation, the detected values can be used for the control of other systems. 1.2 Safety Instructions and Warning Notices GesySense is an autonomously functioning system for recording measured values. For that purpose, wireless modules which are fitted with sensing elements, Repeaters and one Receiver are installed. The system components do not feature direct operator facilities. Some however, are fitted with acoustic or optical signals to indicate operational statuses. GesySense/UserDoc/GesySense_HW Manual-EN-v1.1.docx, v 1.1, 08/12/2015 Manual operation of system components is not intended in normal operation. All settings have to be done using the appropriate software or IT equipment. This is normally done during commissioning. Components may be exchanged by authorized personnel only for maintenance purposes. Trouble-free and safe operation of the devices is dependent on proper handling, transport and storage. Please observe any special instructions. Installation of GesySense equipment should only be performed by qualified and experienced technical personnel. Installation of the devices must be in compliance with the relevant DIN/VDE regulations or the relevant national standards. If not –for assembly or maintenance purposes– expressly specified, GesySense devices may only be opened by authorized personnel. ESD protective measures must be followed. This is indicated by the following sign: Electrostatic sensitive device! 3/108 Preliminary Notes Repair of GesySense equipment must be carried out by Gesytec only or by service companies commissioned by Gesytec. 1.3 Gesytec Support If there should be any damages or errors on the devices to be reported or you have a genera complaint, please use the email address [email protected]. You can address technical questions to [email protected]. GesySense/UserDoc/GesySense_HW Manual-EN-v1.1.docx, v 1.1, 08/12/2015 Upon publishing new versions of the configuration software or firmware of devices, we will inform registered users by email. In addition, all system related documentation is available for download from the Gesytec web site www.gesytec.com. 4/108 Contents Contents 1 1.1 1.2 1.3 Preliminary Notes ................................................................................................... 2 Intended Use ............................................................................................................. 3 Safety Instructions and Warning Notices ................................................................. 3 Gesytec Support ........................................................................................................ 4 Part I System Overview .......................................................................................................... 11 2 2.1 2.2 2.3 The GesySense System .......................................................................................... 12 The Wireless System............................................................................................... 15 In-System Communication ..................................................................................... 15 Components and Modes of Operation .................................................................... 16 3 3.1 3.2 3.3 Setting up the Systems .......................................................................................... 18 Preliminary Considerations ..................................................................................... 18 Tools for Commissioning ....................................................................................... 19 Installation and Initial Operation ............................................................................ 19 3.3.1 Instructions for Installing the Devices ........................................................ 19 3.3.2 Putting Wireless Modules and System into Operation ............................... 20 3.3.3 Access from External Systems.................................................................... 22 3.4 Firmware Update of GesySense Components ........................................................ 22 Part II Device Descriptions .................................................................................................... 23 4 4.1 GesySense/UserDoc/GesySense_HW Manual-EN-v1.1.docx, v 1.1, 08/12/2015 4.2 4.3 4.4 Thermo-Sensor/Logger......................................................................................... 24 Safety Instructions and Warning Notices ............................................................... 24 4.1.1 Identification ............................................................................................... 24 Usage, Requirements for Operation ........................................................................ 24 4.2.1 Requirements to Ambient Conditions ......................................................... 25 4.2.2 Measuring Temperatures with a Chip-Sensor............................................. 25 4.2.3 Display and Control Facilities .................................................................... 25 Mounting ................................................................................................................. 26 4.3.1 Requirements to the Mounting Location .................................................... 26 4.3.2 Operating temperature and humidity stated in section 4.3.6 “Notes on Commissioning ........................................................................................... 26 4.3.3 „Straight" Mounting of Wireless Module ................................................... 26 4.3.4 Installation Using an Assembly Plate ......................................................... 27 4.3.5 Notice for Mounting in Chest Freezers ....................................................... 27 4.3.6 Notes on Commissioning ............................................................................ 28 Technical Specifications ......................................................................................... 28 5/108 Contents 4.5 4.6 5 5.1 Digital-Sensor/Logger ........................................................................................... 33 Safety Instructions and Warning Notices ............................................................... 33 5.1.1 Identification ............................................................................................... 33 5.2 Usage, Requirements for Operation ........................................................................ 34 5.2.1 Requirements to Ambient Conditions......................................................... 35 5.2.2 Display and Control Facilities .................................................................... 35 5.3 5.4 5.5 Mounting ................................................................................................................. 35 5.3.1 Requirements to the Mounting Location .................................................... 35 5.3.2 Wall Mounting ............................................................................................ 36 5.3.3 Notes on Commissioning ............................................................................ 37 Technical Specifications ......................................................................................... 37 Maintenance Instructions ........................................................................................ 39 5.6 5.5.1 General Inspections ..................................................................................... 39 5.5.2 Battery Replacement ................................................................................... 39 5.5.3 Replacing a Wireless Module ..................................................................... 41 5.5.4 Disposal....................................................................................................... 41 Accessories, Spare Parts ......................................................................................... 42 6 6.1 GesySense/UserDoc/GesySense_HW Manual-EN-v1.1.docx, v 1.1, 08/12/2015 Maintenance Instructions ........................................................................................ 30 4.5.1 General Inspections ..................................................................................... 30 4.5.2 Calibration................................................................................................... 30 4.5.3 Battery Replacement ................................................................................... 30 4.5.4 Replacing a Wireless Module ..................................................................... 32 4.5.5 Disposal....................................................................................................... 32 Accessories, Spare Parts ......................................................................................... 32 6.2 6.3 6.4 6.5 PT1000-Sensor/Logger ......................................................................................... 43 Safety Instructions and Warning Notices ............................................................... 43 6.1.1 Identification ............................................................................................... 43 Usage, Requirements for Operation ........................................................................ 44 6.2.1 Requirements to Ambient Conditions ......................................................... 44 6.2.2 Temperature Measurement with PT1000.................................................... 44 6.2.3 Display and Control Facilities .................................................................... 45 Mounting ................................................................................................................. 45 6.3.1 Requirements to the Mounting Location .................................................... 45 6.3.2 Wall Mounting ............................................................................................ 46 6.3.3 Notes on Commissioning ............................................................................ 47 Technical Specifications ......................................................................................... 47 Maintenance Instructions ........................................................................................ 48 6/108 Contents 6.6 7 7.1 7.2 6.5.1 General Inspections ..................................................................................... 48 6.5.2 Calibration of Temperature Measurement .................................................. 49 6.5.3 Battery Replacement ................................................................................... 49 6.5.4 Replacing a Wireless Module ..................................................................... 51 6.5.5 Disposal....................................................................................................... 51 Accessories, Spare Parts ......................................................................................... 52 T-H-Sensor/Logger ............................................................................................... 53 Safety Instructions and Warning Notices ............................................................... 53 7.1.1 Identification ............................................................................................... 53 Usage, Requirements for Operation ........................................................................ 54 7.2.1 7.2.2 7.2.3 7.3 7.4 7.5 GesySense/UserDoc/GesySense_HW Manual-EN-v1.1.docx, v 1.1, 08/12/2015 7.6 8 8.1 8.2 8.3 Requirements to Ambient Conditions......................................................... 54 Measuring Temperatures with a Chip-Sensor............................................. 54 Display and Control Facilities .................................................................... 55 Mounting ................................................................................................................. 55 7.3.1 Requirements to the Mounting Location .................................................... 55 7.3.2 „Straight" Mounting of Wireless Module ................................................... 55 7.3.3 Installation Using an Assembly Plate ......................................................... 56 7.3.4 Notes on Commissioning ............................................................................ 56 Technical Specifications ......................................................................................... 57 Maintenance Instructions ........................................................................................ 58 7.5.1 General Inspections ..................................................................................... 58 7.5.2 Calibration................................................................................................... 58 7.5.3 Battery Replacement ................................................................................... 59 7.5.4 Replacing a Wireless Module ..................................................................... 61 7.5.5 Disposal....................................................................................................... 61 Accessories, Spare Parts ......................................................................................... 61 Sensor-Actuator-Module SAM 2PT-2D-1R ....................................................... 62 Safety Instructions and Warning Notices ............................................................... 62 8.1.1 Identification ............................................................................................... 62 8.1.2 Safety Features ............................................................................................ 63 Usage, Requirements for Operation ........................................................................ 63 8.2.1 Requirements to Ambient Conditions ......................................................... 63 8.2.2 Temperature Measurement with PT1000.................................................... 64 8.2.3 Display and Control Facilities .................................................................... 64 Mounting ................................................................................................................. 64 8.3.1 Requirements to the Mounting Location .................................................... 65 8.3.2 Connections................................................................................................. 65 7/108 Contents 8.4 8.5 8.6 9 9.1 Receiver/Repeater ................................................................................................. 74 Safety Instructions and Warning Notices ............................................................... 74 9.1.1 Identification ............................................................................................... 74 9.2 Usage, Requirements for Operation ........................................................................ 75 9.2.1 Requirements to Ambient Conditions ......................................................... 75 9.2.2 LED Signals ................................................................................................ 75 9.2.3 Connector Pin Assignment ......................................................................... 76 9.2.4 Relocation of the Antenna .......................................................................... 77 Mounting of Receiver and Repeaters ...................................................................... 77 9.3 GesySense/UserDoc/GesySense_HW Manual-EN-v1.1.docx, v 1.1, 08/12/2015 8.3.3 Wall Mounting ............................................................................................ 67 8.3.4 Notes on Commissioning ............................................................................ 67 Technical Specifications ......................................................................................... 67 Maintenance Instructions ........................................................................................ 69 8.5.1 General Inspections ..................................................................................... 69 8.5.2 Calibration of Temperature Measurement .................................................. 70 8.5.3 Battery Replacement ................................................................................... 70 8.5.4 Replacing a Wireless Module ..................................................................... 72 8.5.5 Disposal....................................................................................................... 72 Accessories, Spare Parts ......................................................................................... 72 9.4 9.5 9.3.1 Requirements to the Mounting Location .................................................... 77 9.3.2 Mounting the Device................................................................................... 77 9.3.3 Notes on Commissioning ............................................................................ 79 Technical Specifications ......................................................................................... 80 Maintenance Instructions ........................................................................................ 81 9.5.1 Replacing a Repeater .................................................................................. 81 9.5.2 Replacing the Receivers .............................................................................. 81 9.5.3 Firmware Update ........................................................................................ 82 9.6 Accessories ............................................................................................................. 82 10 10.1 Receiver \LAN ....................................................................................................... 83 Safety Instructions and Warning Notices ............................................................... 83 10.1.1 Identification 83 Usage, Requirements for Operation ........................................................................ 84 10.2.1 Requirements to Ambient Conditions ......................................................... 84 10.2.2 Display and Control Facilities .................................................................... 84 10.2.3 MicroSD Card Receptacle and “Stop SD” Push Button ............................. 86 10.2.4 Factory Reset Push Button .......................................................................... 86 10.2.5 Relocation of the Antenna .......................................................................... 86 10.2 8/108 10.3 10.4 10.5 10.6 10.7 10.8 11 11.1 11.2 GesySense/UserDoc/GesySense_HW Manual-EN-v1.1.docx, v 1.1, 08/12/2015 11.3 11.4 11.5 Mounting ................................................................................................................. 86 10.3.1 Requirements to the Mounting Location .................................................... 86 10.3.2 Mounting the Device................................................................................... 87 10.3.3 EIA-485 Modbus Connection ..................................................................... 88 10.3.4 Connecting the Digital Output .................................................................... 89 Putting the Device into Operation........................................................................... 89 10.4.1 Connecting to the Receiver’s Web Interface .............................................. 89 10.4.2 Specifying the IP Address ........................................................................... 91 10.4.3 Changing the Password, Managing Users .................................................. 92 10.4.4 Adapting the Time Settings ........................................................................ 93 Data Presentation in Web Interface ........................................................................ 94 Technical Specifications ......................................................................................... 95 Maintenance Instructions ........................................................................................ 96 10.7.1 Firmware Update ........................................................................................ 96 Accessories ............................................................................................................. 97 Configurator .......................................................................................................... 98 Safety Instructions and Warning Notices ............................................................... 98 11.1.1 Identification 98 Usage, Requirements for Operation ........................................................................ 98 11.2.1 Requirements to Ambient Conditions ......................................................... 99 11.2.2 Display and Control Facilities .................................................................... 99 Installation and Commissioning ........................................................................... 101 Technical Specifications ....................................................................................... 101 Maintenance Instructions ...................................................................................... 102 11.5.1 Firmware Update ...................................................................................... 102 Appendix ................................................................................................................................ 103 12 12.1 Appendix .............................................................................................................. 104 List of Tables ........................................................................................................ 104 12.2 12.3 12.4 List of Figures ....................................................................................................... 104 Terminology and Symbols .................................................................................... 105 Index ..................................................................................................................... 107 9/108 GesySense/UserDoc/GesySense_HW Manual-EN-v1.1.docx, v 1.1, 08/12/2015 System Overview Part I System Overview 11/108 System Overview 2 The GesySense System The GesySense System GesySense, the wireless sensor system by Gesytec, allows for acquisition of measuring data from distributed measuring points. It is based on sensor modules transmitting their measuring data wireless to the GesySense Receiver. The radio path between wireless modules and Receiver can be extended using Repeaters. For operation, different system concepts can be realized: GesySense/UserDoc/GesySense_HW Manual-EN-v1.1.docx, v 1.1, 08/12/2015 Figure 2-1: Direct transmission to Receiver connected to networked data server A Modbus master can read the values from the Receiver either using Modbus RTU or Modbus TCP. The GesySense system can be connected, e.g. by a data server, to the building management system of a site or the data server may run as a compact data center. The following illustrations show other possible system configurations. 12/108 GesySense/UserDoc/GesySense_HW Manual-EN-v1.1.docx, v 1.1, 08/12/2015 System Overview The GesySense System Figure 2-2: Direct transmission to PC Figure 2-3: Direct transmission to PC and logging in sensor 13/108 GesySense/UserDoc/GesySense_HW Manual-EN-v1.1.docx, v 1.1, 08/12/2015 System Overview The GesySense System Figure 2-4: Direct transmission to system Receiver with storage on SD card Figure 2-5: Direct transmission to networked system Receiver 14/108 System Overview Figure 2-6: 2.1 The GesySense System Direct transmission to networked DELTA data server The Wireless System GesySense/UserDoc/GesySense_HW Manual-EN-v1.1.docx, v 1.1, 08/12/2015 The wireless system used an ISM frequency band to transmit the measurement data. This operating frequency is 433 MHz in Europe1 and 915 MHz on the American2 continents. Radio devices are so called short range devices operating according to the low power device radio permissions for these bands. For details on frequencies and radio properties please refer to the technical specifications of the devices. A near field radio connection is additionally used to put wireless module into operation. This parameterization frequency is using the 13.56 MHz ISM band. For this purpose the GesySense Configurator is used, as wireless adapter which is connected to a PC via USB. 2.2 In-System Communication Communication in the operative system goes from the measuring and transmitting wireless modules, if necessary via repeaters, to the system receiver. This 1 Europe together with Africa, the successor states of the Soviet Union and Mongolia constitute “Region 1” in the regulations for ISM usage. The general authorization may be subject to national laws. For the countries of the EC, Norway and Switzerland there are no restrictions concerning the usage of the GesySense system. 2 North and South America “Region 2” 15/108 System Overview The GesySense System central receiver can be accessed by other systems using Modbus RTU with EIA485 or Modbus TCP. For the parameterization of certain suitable modules, for firmware updates and for time synchronization there is also data traffic using the operation frequency in the opposite direction. Each GesySense wireless device has got a unique, unalterable 10 digit module ID, which is affixed to the device (T.nnn.nnn.nnn). This ID is contained in every message as well as a running sequence number. Further to this, the measured value and other data with information on the system status each message has a checksum to secure transmittance. Messages are sent by the wireless modules on a preset radio channel with an approximately 4 ms long pulse in in a definable time interval (default: 270 s). The exact transmission time results from a random process in order to avoid collisions with messages from other modules. A message is either directly received by the system receiver or by any repeater in the radio path. Transmission to the receiver can run across several repeaters. The maximum number of repeaters in the system is 7. 2.3 Components and Modes of Operation GesySense/UserDoc/GesySense_HW Manual-EN-v1.1.docx, v 1.1, 08/12/2015 The GesySense System comprises the following functional components: Receiver Central radio receiver of the System Repeater Signal amplifier in the radio path to forward the messages sent by sensor and logger modules Sensor module Measurement and radio module (no data is stored in the module, and generally no data can be received on the operating frequency). There are modules for digital and analog values including special modules for temperature or humidity measurement. Logger module Measurement and radio module like the sensor modules but with local data storage. The collected data can be read with the suitable GesySense software. Sensor-Actuator-Module Sensor modules with receiver and integrated switching function, which execute switching operations based on measured values and parameters receiver via radio. Configurator USB adapter connecting a PC to the wireless system; used during installation and putting to operation of a GesySense system 16/108 System Overview The GesySense System GesySense/UserDoc/GesySense_HW Manual-EN-v1.1.docx, v 1.1, 08/12/2015 GesySense LogIt Commissioning software for Windows PC, used for putting into operation wireless modules and for definition of a complete system including configuration of receiver and repeaters. 17/108 System Overview 3 Setting up the Systems Setting up the Systems The GesySense system can be used in versatile combinations, different application areas and system sizes. This manual may therefore only give a basic introduction to the establishment of such systems. 3.1 Preliminary Considerations System size From a 3 sensor system in a small retail shop over 20 sensor systems with several repeaters in a large warehouse to 2 x 70 sensor systems of a Hypermarket, the system size is important in the process of putting the system into operation. Mixing modules Wireless modules measuring different physical values can be treated similarly during commissioning. To be prepared it is recommended to define suitable naming conventions and groups. Measuring spots, places for receiver and repeaters Prior to fixing wireless modules to refrigeration devices make sure to know where they can be screwed on without causing damage. And furthermore consider where to place them in order to get the desired information. There even may be legal requirements to be observed. Receiver and repeaters require uninterrupted mains supply. Planning their positions requirement of radio propagation have to be considered. GesySense/UserDoc/GesySense_HW Manual-EN-v1.1.docx, v 1.1, 08/12/2015 The Receiver has to be placed that the wireless modules are best received and a connection to the superior system is provided. Depending on the device this would be either EIA-485 or Ethernet. Make sure, that the environmental conditions are suitable for the devices. Radio paths The local situation has a substantial effect on radio coverage and quality. An onsite inspection in advance will help to determine number and places for receiver and repeaters. The configuration software will help with additional information in optimizing positons during system commissioning. 18/108 System Overview Setting up the Systems Sequence of installation steps A) Configure – mount – optimize B) Mount – configure – optimize Generally, both are possible procedures. 3.2 3.3 Tools for Commissioning GesySense LogIt, PC software for commissioning and system configuration GesySense Configurator, wireless adapter to PC PC/Laptop with EIA-232 interface to connect to the Receiver, or with Ethernet, to connect to the Receiver \LAN. Maybe an USB to EIA-232 adapter will be required. Installation and Initial Operation GesySense/UserDoc/GesySense_HW Manual-EN-v1.1.docx, v 1.1, 08/12/2015 Initial situation 3.3.1 Wireless modules are OFF on delivery Wireless modules with external connections (PT1000 probe or digital inputs) are delivered without these peripherals connected. Receivers do not contain a configuration on delivery. The system configuration must be defined first and then uploaded into the receiver. Repeaters are not configured, i.e. they have not got a repeater number, which is required for operation. Instructions for Installing the Devices Please note for all installation steps the relevant installation instructions or the information given in this document. Preparing wireless modules If required, connect all external leads to the wireless modules. This can be done in advance before the actual installation of the equipment. Mounting wireless modules Depending on the selected commissioning procedure the wireless modules have to be mounted at the designated position prior to or after activating them. 19/108 System Overview Setting up the Systems Mounting the receiver Mount the receiver at the designated position. Depending on the device type an Ethernet connection or an EIA-485 connection to a Modbus master has to be available. Note: Please be aware, that during commissioning or maintenance a serial EIA-232 connection between the receiver and a PC may be required to upload the system configuration into the receiver and to optimize the system using the GesySense PC software. Mounting repeaters If planned for the system, mount the repeater(s) at the designated position(s). Note: In order to optimize system performance the positions of repeaters may have to be modified. Therefore it is recommended to start with a provisional positioning of the repeaters which can easily be changed. Attention Pay attention to the necessary distance to walls and ceiling which is described in the installation instructions. It is essential for receiving the radio signals. 3.3.2 Putting Wireless Modules and System into Operation Commissioning the wireless modules and the systems is usually done using PC software such as GesySense LogIt. There is a separate manual [2] describing the use of this program. This document will focus on principal procedures in standard commissioning scenarios.3 GesySense/UserDoc/GesySense_HW Manual-EN-v1.1.docx, v 1.1, 08/12/2015 During commissioning the GesySense Configuration links the PC with configuration program to the GesySense system. It communicates on the operating frequency as well as by nearfield communication with the wireless modules using the parameterization frequency. As configuration program GesySense LogIt supports all system configurations illustrated in the chapter “The GesySense System”. Allowing for different commissioning procedures it supports as well different system sizes. 3.3.2.1 Activate Wireless Modules Wireless modules are activated by a nearfield signal from the GesySense Configurator. For this purpose both have to be in close contact (< 10 cm). The relevant area of the Configurator is indicated by a circle on the device. 3 Self-configuring systems are not described here. Information on these is provided in the document „GesySense Modbus Communication“. 20/108 System Overview Setting up the Systems After activation the wireless modules transmit in a 60 s interval for 60 minutes. Afterwards the defined measurement/transmit cycle starts. 3.3.2.2 General Organizational Structure GesySense systems are structured by LogIt in projects with several sites underneath. A wireless module is always assigned to a single site, each site having a single receiver. The modules defined for a site make up the site configuration. This configuration must be loaded into the receiver of that site before the system can start operation. LogIt stores all data4 of a project in a Microsoft Access data base. 3.3.2.3 Examples for Different Commissioning Approaches Systems having a comparable structure for several sites You should start with a general configuration comprising all types of modules which may be used in any site of the project with their maximum number. From this the real site configurations are derived with the module types really installed in the real numbers. In this approach the wireless modules should be given function-related names with a running number. This requires a thorough planning which must include any superior system which will have to work with the data. During the commissioning itself the wireless modules are activated one after the other and their ID is assigned to the site configuration. During this process the unique assignment between module and measuring spot must be observed. To follow a clear line you can either activate the modules after they have been mounted5 or all modules are activated off-site and their ID is noted in a floor plan. Mounting can take place afterwards according to the plan. GesySense/UserDoc/GesySense_HW Manual-EN-v1.1.docx, v 1.1, 08/12/2015 Individual system structures Having defined a new project with a site in LogIt each wireless module can be activated by placing the Configurator on top, entering a name for it in LogIt (for which it is sensible to include e.g. the measuring spot or its function) and then to mount the module. 4 Further to the site configuration these are, if recorded by LogIt, measured values and all operative information transmitted in the system. 5 This will, however, require going from one module to the next with a laptop and the Configurator to activate the modules by selecting them in a table and while holding the Configurator on top of them. 21/108 System Overview 3.3.2.4 Setting up the Systems Turn on Repeaters, Configure the Receiver and Optimize the System After all modules are activated and assigned to a site the site configuration can be loaded into the receiver. Repeaters are put into service by connecting them to mains supply. GesySense LogIt can be used to assign a Repeater number to each repeater installed which has to be unique in for one site. This is necessary for operation ad can be used for optimization. Finally a system check and optimization have to be done. The GesySense System provides ample information for its optimization, e.g. with respect to radio transmittance quality or the radio path of a message until it arrives at the Receiver. The data traffic of the receiver can be shown and logged as well. The LogIt software is making this information available. 3.3.3 Access from External Systems The document “GesySense Modbus Communication” [1] provides essential information for the access to the GesySense system from Modbus devices. It describes in detail how data storage is organized on the receiver. Furthermore, details on representation of measured values are contained. Depending on the receiver type connection is made by serial EIA-485 with Modbus RTU or via Ethernet running Modbus TCP. 3.4 Firmware Update of GesySense Components GesySense/UserDoc/GesySense_HW Manual-EN-v1.1.docx, v 1.1, 08/12/2015 Firmware update files for GesySense Configurator or receivers and repeaters and other devices are made available at need. Installation of an update for the Configurator or the receiver can be done with the configuration program from a PC connected to these devices. Details on the procedure are provided in the manual to the configuration program. The receiver firmware can also be updated from the Modbus data server if that has the necessary functions for file transfer implemented6. If GesySense repeaters are part of the system the update transmitted to the receiver will automatically be propagated to all repeaters. The update distribution to the repeaters can be triggered by a special command to the receiver. The GesySense Modbus specification [1] describes the firmware update possibilities via radio. 6 cf. protocol specification “GesySense Modbus Communication” 22/108 GesySense/UserDoc/GesySense_HW Manual-EN-v1.1.docx, v 1.1, 08/12/2015 Device Descriptions Part II Device Descriptions 23/108 Device Descriptions 4 Thermo-Sensor/Logger Thermo-Sensor/Logger For information on installation and operation of each component read the Installation Instruction and the information provided by this Technical Manual. 4.1 Safety Instructions and Warning Notices Please observe the notes from chapter 1.2 “Safety Instructions and Warning Notices”. 4.1.1 Identification The type label on the device provides information on: Product line and device name: GesySense Thermo-Sensor / Thermo-Logger Order code, hardware code: P.Wnn1nn-n, TTE.XXXn manufacturer. GesySense/UserDoc/GesySense_HW Manual-EN-v1.1.docx, v 1.1, 08/12/2015 In particular the 10 digit module ID (T.nnn.nnn.nnn) is stated here, which uniquely identifies the device in the system. The module ID of the ThermoSensors starts with the type code T = 0, the Thermo-Logger starts with T = 6. Figure 4-1: 4.2 GesySense Thermo-Sensor and Thermo-Logger Usage, Requirements for Operation GesySense is an autonomously functioning system for recording measured values. For that purpose, wireless modules which are fitted with sensing elements, Repeaters and one Receiver are installed. The system components do not feature direct operator facilities. Some however, are fitted with acoustic or optical signals to indicate operational statuses. Manual operation of system components is not intended in normal operation. All settings have to be done using the appropriate software or IT equipment. This is normally done during commissioning. Components may be exchanged by authorized personnel only for maintenance purposes. 24/108 Device Descriptions Thermo-Sensor/Logger The GesySense Thermo-Sensor measures the environmental temperature at the place of installation and radio transmits it directly or via a repeater to the receiver. The Thermo-Logger operates accordingly; however, it provides internal memory into which data is stored in parallel to the transmission. The device is battery powered. As to commissioning (activating, setting parameters), measurements and the transmission of values and parameterization the device operates as described for the system in chapter 2 for wireless sensors and loggers. The following functions are implemented: 4.2.1 In a defined interval the sensor module measures temperatures with an internal chip sensor and transmits them immediately. The time stamped values are received by the receiver of the GesySense wireless sensor system. The logger module additionally internally records the 15 minute values derived from the measurements. Even at a battery failure the values will be preserved. Correct operation of the module is indicated by a LED. Requirements to Ambient Conditions Operating conditions range from -35 °C to + 70 °C. Within this range the radio system adapts itself to the environmental conditions and compensates any temperature dependent drift of the transmitter. GesySense/UserDoc/GesySense_HW Manual-EN-v1.1.docx, v 1.1, 08/12/2015 4.2.2 Measuring Temperatures with a Chip-Sensor Accuracy of the temperature measurement depends on the long-term accuracy of the temperature assessment circuit. GesySense wireless sensors for measuring ambient temperatures are using a Texas Instruments chip for measurement and calculations. According to the manufacturer’s information a recalibration is not required. The chip is either operating correctly or it is defective. The manufacturers states Mean Time Between Failures (MTBF) values to describe the reliability of the chip, i.e. the compliance with the specified accuracy of typically ±0.0625 ºC. For the temperature range of intended usage of GesySense Thermo-Sensors an MTBF of 2.98x10⁸ is stated. In other words, the average time between 2 failures of the chip is about 34,000 years. Failure in this case means an aberration of maximum ±1 ºC. For a 10 year period this corresponds to a failure probability of 0.3‰. 4.2.3 Display and Control Facilities A red flashing LED in the housing cover of the Logger module indicates that the wireless module is running. 25/108 Device Descriptions Thermo-Sensor/Logger The sensor module does not provide any LED. 4.3 Mounting The installation of these wireless modules is generally realized using an installation adapter with bayonet coupling which is secured against unauthorized removal with a small locking bolt. This ensures secure fastening and easy removal of the module. Additionally there is an assembly plate available allowing for a displacement of the actual fixing point, which is e.g. helpful in mounting the module inside refrigeration units. For this, mounting has to be done in two steps. An installation instruction is part of the delivery. 4.3.1 Requirements to the Mounting Location 4.3.2 Operating temperature and humidity stated in section 4.3.6 “Notes on Commissioning Commissioning of the device is done in the system using the appropriate software (cf. section 3, “Setting up the Systems”. Data of the Thermo-Sensors with a type code 0 are registered in the Modbus address structure at addresses from 200 onwards. Thermo-Loggers have the type code 6. Their data can be found form address 3000 onwards, cf. [1]. Technical Specifications” have to be observed. 4.3.3 The bayonet mount is directly bolted to the wall or ceiling. A drill jig is available in order to facilitate the alignment of the bayonet mount. GesySense/UserDoc/GesySense_HW Manual-EN-v1.1.docx, v 1.1, 08/12/2015 Straight mounting using 2 screws „Straight" Mounting of Wireless Module 26/108 Device Descriptions Access to locking bolt 4.3.4 Thermo-Sensor/Logger The wireless module is attached by putting it on the bayonet mount turning it counter-clockwise until it snaps on. It is locked by tightening the locking bolt. Installation Using an Assembly Plate The position of the wireless module relative to the fixing point can be modified by means of the assembly plate. Thus, a Thermo-Sensor in a chest freezer for instance, can be fixed outside the cooling conducts but still in the relevant measuring range. The bayonet mount is fixed by means of two screws on the assembly plate, which itself is fixed by means of two screws. If necessary, the assembly plate can be carefully bent at the punched bars. The wireless module is then attached as described above. GesySense/UserDoc/GesySense_HW Manual-EN-v1.1.docx, v 1.1, 08/12/2015 4.3.5 Notice for Mounting in Chest Freezers Data transmission between the GesySense Configurator and a wireless module is realized via an induction loop whose electromagnetic field can be strongly interfered by the metal of baskets sometimes present in freezers. Hence, if the wireless module shall be activated when it is already at the measuring spot it has to be positioned in a way that only one bar of the grill comes across the module. The module must not be located within a grill cell. The upper picture shows an example of a correct installation while the lower picture shows an inappropriate installation position. 27/108 Device Descriptions Thermo-Sensor/Logger Correct mounting of a temperature sensor in a freezer: The assembly plate is bolted in the plastic bar at the upper edge of the freezer. The metal bar of the freezer basket is located across the middle of the sensor. Wrong mounting: Please be aware that the sensor in this picture is inappropriately positioned as one cell of the freezer basket is located like a frame over the sensor. GesySense/UserDoc/GesySense_HW Manual-EN-v1.1.docx, v 1.1, 08/12/2015 4.3.6 Notes on Commissioning Commissioning of the device is done in the system using the appropriate software (cf. section 3, “Setting up the Systems”. Data of the Thermo-Sensors with a type code 0 are registered in the Modbus address structure at addresses from 200 onwards. Thermo-Loggers have the type code 6. Their data can be found form address 3000 onwards, cf. [1]. 4.4 Technical Specifications Thermo-Sensor (P.W0x101-n) Measuring range -35 – +70 °C, (-31 F to 158 F) Accuracy 0.3 °C Resolution 0.1 °C 28/108 Device Descriptions Thermo-Sensor/Logger Thermo-Logger (P.W0x111-n) Interval settable 1 – 12 000 min, factory setting: 15 min Capacity >1 year at 1 value/15 min Storage non-volatile flash memory Time stamp real time clock Operation indicator 1 LED Radio Data Transmission Emitter low power radio system European ISM band P.W001x1 433-MHz (433.05 – 434.79 MHz), <10 mW American ISM band P.W011x1 915 MHz band (902 – 928 MHz), <1 mW Free field range up to 250 m Emitter identification unique 10 digits ID Measuring-/transmission interval adjustable from 15 to 3600 s, default: 270 s Parameterization Receiver, inductive^ Range GesySense/UserDoc/GesySense_HW Manual-EN-v1.1.docx, v 1.1, 08/12/2015 Power Supply Lithium Battery Battery use ISM 13.56 MHz band <10 cm 3.6 V, 2.4 Ah, size AA 5 years at a measuring interval of 270 s and operating temperature -30 – +25 °C (deviant times and temperatures may result in reduced operating periods) Dimensions & Environmental Conditions Weight 90 g Dimensions 77 x 110 x 18.5 [mm] 154 mm with assembly plate Housing material ABS, 20% glass fiber reinforced color light gray, RAL 7035 Flammability UL94 HB, self-extinguishing Temperature operating -35 – +70 °C storage 0 – +30 °C Humidity DIN 40040 class F, 5-93%, the board has a protective coating Protection class IP 64 according to DIN EN 60 529 29/108 Device Descriptions Certificates EMC Radio Logger Thermo-Sensor/Logger emission EN 55022 immunity EN 61000-6-2 ETSI EN 300 220-1 DIN EN 62479 EC 37/2005 DIN EN 12830: S, C, 1, 4.5 Maintenance Instructions 4.5.1 General Inspections Operational state As the GesySense Thermo-Logger may be used out of range of a GesySense receiver, its operational state has to be checked regularly. The LED in the lid blinking red indicates normal operation. 4.5.2 Calibration A calibration of the temperature measurement of the wireless module is not necessary. For further information cf. chapter 4.2.2, „Measuring Temperatures with a Chip-Sensor“. 4.5.3 Battery Replacement The device is powered by a Lithium battery. The battery status is recorded by the GesySense system. If required, the battery or the entire module is to be replaced. GesySense/UserDoc/GesySense_HW Manual-EN-v1.1.docx, v 1.1, 08/12/2015 If not –for assembly or maintenance purposes– expressly specified, GesySense devices may only be opened by authorized personnel. ESD protective measures must be followed. The device has to be opened for battery replacement. ESD precautions have to be observed! Electrostatic sensitive device! Exchanging the Battery To provide a wireless module with a new battery, first remove the module from the bayonet mount by loosening the locking bolt, turning the sensor clockwise and pulling it from the bayonet mount. Note: Write down the ID number of the module, it is needed for documentation of the replacement. 30/108 Device Descriptions Thermo-Sensor/Logger Open the housing by carefully inserting a screwdriver into the gap between top and bottom part and detach the top from the bottom. Position of board and battery inside the sensor housing Lift board and battery from the housing and flip it over so you can see the battery socket at the back side of the board. Disconnect the plug of the old battery and connect the new battery to the board, making sure the plug is tight. Connection of the battery plug to the board GesySense/UserDoc/GesySense_HW Manual-EN-v1.1.docx, v 1.1, 08/12/2015 Insert board and battery as shown on the following picture, observing the position of the battery cable: Fitting position of the battery and cable run Close the housing by putting both housing parts above each other and pressing them together. Re-install the module at the bayonet mount and tighten the locking bolt. Note: Inform the system administrator about the battery change stating module ID and date; thus he can reset the battery monitoring for the respective module. 31/108 Device Descriptions 4.5.4 Thermo-Sensor/Logger Replacing a Wireless Module To exchange a defective wireless module, commission the module and install it at the respective spot. Inform the system administrator stating the module ID of the old and new wireless module and the date of exchange; thus the required modifications in the receiver and any other connected systems can be made. 4.5.5 Disposal Batteries The wireless module is powered by a battery. Should the device become unsuitable for use, it must be disposed of professionally, such as at recycling centers that accept electronic scrap. Any relevant national laws have to be observed. Batteries exchanged during maintenance have to be treated accordingly. 4.6 Accessories, Spare Parts Batteries Replacement batteries can be purchased from Gesytec under the following order codes: Batteries for wireless modules with flat housing Lithium battery, 3.6 V, 2.4 Ah, size AA GesySense/UserDoc/GesySense_HW Manual-EN-v1.1.docx, v 1.1, 08/12/2015 P.WZ0215 32/108 Device Descriptions 5 Digital-Sensor/Logger Digital-Sensor/Logger For information on installation and operation of each component read the Installation Instruction and the information provided by this Technical Manual. 5.1 Safety Instructions and Warning Notices Please observe the notes from chapter 1.2 “Safety Instructions and Warning Notices If not –for assembly or maintenance purposes– expressly specified, GesySense devices may only be opened by authorized personnel. ESD protective measures must be followed. This module has to be opened to connect the probes and for mounting. Installation of GesySense equipment should only be performed by qualified and experienced technical personnel. Installation of the devices must be in compliance with the relevant DIN/VDE regulations or the relevant national standards. 5.1.1 Identification The type label on the device provides information on: Product line and device name: GesySense Digital-Sensor / Digital-Logger Order code, hardware code: P.W0n1n2-n, TTE.XXXn manufacturer GesySense/UserDoc/GesySense_HW Manual-EN-v1.1.docx, v 1.1, 08/12/2015 In particular the 10 digit module ID (T.nnn.nnn.nnn) is stated here, which uniquely identifies the device in the system. The module ID of the DigitalSensor/-Logger starts with the type code T = 6. Figure 5-1: GesySense Digital-Sensor and Digital-Logger 33/108 Device Descriptions 5.2 Digital-Sensor/Logger Usage, Requirements for Operation GesySense is an autonomously functioning system for recording measured values. For that purpose, wireless modules which are fitted with sensing elements, Repeaters and one Receiver are installed. The system components do not feature direct operator facilities. Some however, are fitted with acoustic or optical signals to indicate operational statuses. Manual operation of system components is not intended in normal operation. All settings have to be done using the appropriate software or IT equipment. This is normally done during commissioning. Components may be exchanged by authorized personnel only for maintenance purposes. The GesySense Digital-Sensor reads the status of its 2 digital inputs and radio transmits these directly or via a repeater to the receiver. The inputs can be used as status monitor or as counters. The Digital-Logger operates accordingly; however, it provides internal memory into which data is stored in parallel to the transmission. The device is battery powered. As to commissioning (activating, setting parameters), measurements and the transmission of values and parameterization the device operates as described for the system in chapter 2 for wireless sensors and loggers. The following functions are implemented: Status Capturing GesySense/UserDoc/GesySense_HW Manual-EN-v1.1.docx, v 1.1, 08/12/2015 The wireless module captures the status of 2 input channels (passive switching contacts) at a fixed interval. To avoid that “oscillating” contacts generate false alarms, there must be a minimum period of time for a status message to be considered as valid. Channel 1 is connected to pins 1 and 2, channel 2 to pins 3 and 4. Internally both are using a common GND. In the data messages the input status is represented by a number as follows: Channel 1 Channel 2 Value OFF / 0 OFF / 0 0 ON / 1 OFF / 0 1 OFF / 0 ON / 1 2 ON / 1 ON / 1 3 34/108 Device Descriptions Digital-Sensor/Logger Counter Sensor The GesySense Counter Sensor meters pulses with a frequency of up to 20 Hz at its two digital inputs and saves them locally. The counter resolution is 32 bit. In the set transmission interval set the counter reading of the elapsed interval is transmitted. Channel 1 is connected to pins 1/2, channel 2 to pins 3/4. Logger module The logger module operates accordingly but additionally internally records the 15 minute values derived from the measurements. Even at a battery failure the values will be preserved. Correct operation of the module is indicated by a LED. 5.2.1 Requirements to Ambient Conditions Measurement and operating conditions are stated in section „Technical Specifications“. 5.2.2 Display and Control Facilities A red flashing LED in the housing cover of the Logger module indicates that the wireless module is running. The sensor module does not provide any LED. 5.3 Mounting Independent of the device operation the input lines have to be connected to the device prior to initial operation. This can be done in advance in a separate step or in conjunction with the wall mounting on site. GesySense/UserDoc/GesySense_HW Manual-EN-v1.1.docx, v 1.1, 08/12/2015 Information on approved accessories is given in section 5.6, “Accessories, Spare Parts”. To fasten the unit and connect the leads the housing cover must be removed. Caution: When working on the open device, make sure that the electronics are not damaged. ESD precautions must be observed! Electrostatic sensitive device! 5.3.1 Requirements to the Mounting Location Operating temperature and humidity stated in section 5.4 “Technical Specifications” have to be observed. 35/108 Device Descriptions 5.3.1.1 Digital-Sensor/Logger Connection of the Digital Inputs The lines to the digital inputs are placed on the board inside the device on a 4-pin connecting terminal. 1 2 3 4 1 2 3 4 Figure 5-2: Connecting terminal on Digital-Module board Channel 1 is connected to pins 1/2, channel 2 to 3/4. Pins 2 and 4 are connected to GND in the module Status-Sensor If used as a status monitor a passive switching contact can be connected to each input channel. Attention: Do not connect voltage to the inputs. Counter-Sensor If used as a counter, pulses of up to 20 Hz are connected to the inputs channels. GesySense/UserDoc/GesySense_HW Manual-EN-v1.1.docx, v 1.1, 08/12/2015 The connecting line is lead in through a 2 x M16 cable fitting (range 2 – 7 mm). Attention: Having connected the lines, the cable fitting must be screwed tight in order to guarantee sealing and strain relief of the lines. 5.3.2 Wall Mounting For mounting of the device and connections the cover has to be removed. 36/108 Device Descriptions Figure 5-3: Digital-Sensor/Logger Housing dimensions Digital-Sensor/Logger Mount the device using suitable screws ( 4.8 mm). Note: Take care of the orientation as the closure head of logger modules only fits with the LED in one position. Lead the connecting cable through the cable fittings and connect it according to the specification given under 5.3.1.1, “Connection of the Digital Inputs”. Tighten the cable fitting to close the opening around the cable. Put the closure head on the housing and fix it. Attention: The light conductor of Logger modules must be exactly above the LED, as it will not be visible otherwise, cf. Figure 5-1. The supply line to the digital inputs should be routed so that it is not exposed to the risk of accidental damage. 5.3.3 Notes on Commissioning Commissioning of the modules is done in the system using the appropriate software (cf. section 3, “Setting up the Systems”. GesySense/UserDoc/GesySense_HW Manual-EN-v1.1.docx, v 1.1, 08/12/2015 5.4 Technical Specifications Status-Module Digital inputs Switching voltage Switching current Max. cable length Connection 2 contacts for passive switching contacts 3:3 V 0:33 mA 1:5 m 4 pin screwing terminal 0.13 – 1.5 mm² Counter Module Digital Inputs 2 pulse counters, 20 Hz max Resolution Switching voltage Switching current Max. cable length Connection 32 Bit 3:3 V 0:33 mA 1:5 m 4 pin screwing terminal 0.13 – 1.5 mm² Logger (P.W0x122) Interval Capacity settable 1 – 12 000 min, factory setting: 15 min >1 year at 1 value/15 min 37/108 Device Descriptions Digital-Sensor/Logger Storage Time stamp Operation indicator non-volatile flash memory real time clock 1 LED Radio Data Transmission Emitter low power radio system European ISM band P.W001x2 433-MHz (433.05 – 434.79 MHz), <10 mW American ISM band P.W011x2 915 MHz band (902 – 928 MHz), <1 mW GesySense/UserDoc/GesySense_HW Manual-EN-v1.1.docx, v 1.1, 08/12/2015 Free field range up to 250 m Emitter identification unique 10 digit ID Measuring-/transmission interval adjustable from 15 to 3600 s, default: 270 s Parameterization Receiver, inductive^ Range ISM 13.56 MHz band <10 cm Power Supply Lithium Battery 3.6 V, 2.4 Ah, size AA Dimensions & Environmental Conditions Weight 230 g Dimensions w/o gland 94 x 94 x 57 [mm] Housing material polycarbonate color light gray, RAL 7035 Flammability UL94 HB-V2, self-extinguishing Temperature operating -20 – +50 °C (-4 – +122 °F) storage 0 – +30 °C (32 – +86 °F) Humidity DIN 40040 class F, 5-93%, the board has a protective coating Protection class (EN 60529) housing gland Certificates EMC Radio IP 64 IP69K emission EN 55022 immunity EN 61000-6-2 ETSI EN 300 220-1 V2.4.1 (2012-05) DIN EN 62479 38/108 Device Descriptions 5.5 Maintenance Instructions 5.5.1 General Inspections Digital-Sensor/Logger Operational state As the GesySense Digital-Logger may be used out of range of a GesySense receiver, its operational state has to be checked regularly. The LED in the lid blinking red indicates normal operation. Connector leads All leads connected to the device must be checked annually by a qualified person in compliance with the electro technical regulations for damage and reliable installation. 5.5.2 Battery Replacement The device is powered by a Lithium battery. The battery status is recorded by the GesySense system. If required, the battery or the entire module is to be replaced. If not –for assembly or maintenance purposes– expressly specified, GesySense devices may only be opened by authorized personnel. ESD protective measures must be followed. The device has to be opened for battery replacement. ESD precautions have to be observed! GesySense/UserDoc/GesySense_HW Manual-EN-v1.1.docx, v 1.1, 08/12/2015 Electrostatic sensitive device! Installation of GesySense equipment should only be performed by qualified and experienced technical personnel. Installation of the devices must be in compliance with the relevant DIN/VDE regulations or the relevant national standards. Exchanging the Battery Remove the cover of the device, and remove the unit from its mounting location. Loosen the connections of the digital inputs from the terminal in order to be able to remove the board. The cable gland must possibly be opened as well. The following steps are now to be performed: 39/108 Device Descriptions Digital-Sensor/Logger 1. Loosen the 4 screws (red circles) by which the board is held in the housing and remove the board. During the entire assembly process make sure that the transparent film which protects the electronics remains in position. Figure 5-4: Logger module open 2. Loosen the connector of the battery on the back of the board. For this lift the locking lever of the plug a little. 3. Cut the cable ties by which the battery is held and remove the battery and cable ties. GesySense/UserDoc/GesySense_HW Manual-EN-v1.1.docx, v 1.1, 08/12/2015 Batteries must be disposed of properly! 4. Insert the new battery and fix it as before with 2 cable ties. Make sure that the protective film is placed correctly. 5. Insert the supply line of the battery into the connector. Checked for tight fastening! 6. Insert the board into its original position again (see. Figure 5-4) and screw it into the housing. 40/108 Device Descriptions Digital-Sensor/Logger 7. Insert the leads on again and tighten the cable gland. Check the position and securing of the leads. 8. Mount the device back in place. 9. To complete the work, fix the cover. Attention The cover of the logger module must be set up so that the light guide is above the LED (red rectangle), cf. Figure 5-1. 5.5.3 Replacing a Wireless Module To exchange a defective wireless module, commission the module and install it at the respective spot. Inform the system administrator stating the module ID of the old and new wireless module and the date of exchange; thus the required modifications in the receiver and any other connected systems can be made. GesySense/UserDoc/GesySense_HW Manual-EN-v1.1.docx, v 1.1, 08/12/2015 5.5.4 Disposal Batteries The wireless module is powered by a battery. Should the device become unsuitable for use, it must be disposed of professionally, such as at recycling centers that accept electronic scrap. Any relevant national laws have to be observed. Batteries exchanged during maintenance have to be treated accordingly. 41/108 Device Descriptions 5.6 Digital-Sensor/Logger Accessories, Spare Parts Batteries Replacement batteries can be purchased from Gesytec under the following order codes: Batteries for wireless modules with box housing Lithium battery, 3.6 V, 2.4 Ah, size AA GesySense/UserDoc/GesySense_HW Manual-EN-v1.1.docx, v 1.1, 08/12/2015 P.WZ0216 42/108 Device Descriptions 6 PT1000-Sensor/Logger PT1000-Sensor/Logger For information on installation and operation of each component read the Installation Instruction and the information provided by this Technical Manual. 6.1 Safety Instructions and Warning Notices Please observe the notes from chapter 1.2 “Safety Instructions and Warning Notices If not –for assembly or maintenance purposes– expressly specified, GesySense devices may only be opened by authorized personnel. ESD protective measures must be followed. This modules has to be opened to connect the probes and for mounting. Installation of GesySense equipment should only be performed by qualified and experienced technical personnel. Installation of the devices must be in compliance with the relevant DIN/VDE regulations or the relevant national standards. 6.1.1 Identification The type label on the device provides information on: GesySense/UserDoc/GesySense_HW Manual-EN-v1.1.docx, v 1.1, 08/12/2015 Product line and device name: GesySense PT1000 Sensor / PT1000 Logger Order code, hardware code: P.W0n1n4-n, TTE.ACAn.n / TTE.ACBn.n manufacturer In particular the 10 digit module ID (T.nnn.nnn.nnn) is stated here, which uniquely identifies the device in the system. The module ID of the PT1000 Sensor starts with the type code T = 6, the Logger starts with T = 6. Figure 6-1: PT1000 Sensor and Logger 43/108 Device Descriptions 6.2 PT1000-Sensor/Logger Usage, Requirements for Operation GesySense is an autonomously functioning system for recording measured values. For that purpose, wireless modules which are fitted with sensing elements, Repeaters and one Receiver are installed. The system components do not feature direct operator facilities. Some however, are fitted with acoustic or optical signals to indicate operational statuses. Manual operation of system components is not intended in normal operation. All settings have to be done using the appropriate software or IT equipment. This is normally done during commissioning. Components may be exchanged by authorized personnel only for maintenance purposes. The GesySense PT1000-Sensor reads the temperature measured with an external PT1000 probe. and radio transmits it directly or via a repeater to the receiver. The PT1000-Logger operates accordingly; however, it provides internal memory into which data is stored in parallel to the transmission. The device is battery powered. As to commissioning (activating, setting parameters), measurements and the transmission of values and parameterization the device operates as described for the system in chapter 2 for wireless sensors and loggers. The following functions are implemented: GesySense/UserDoc/GesySense_HW Manual-EN-v1.1.docx, v 1.1, 08/12/2015 The sensor module detects and sends in a specified time interval the temperature determined in the 2-wire method by a connected PT1000 probe. The timestamped measurements are registered at the receiver of the GesySense wireless sensor network. The logger module additionally internally records the 15 minute values derived from the measurements. Even at a battery failure the values will be preserved. Correct operation of the module is indicated by a LED. 6.2.1 Requirements to Ambient Conditions Measurement and operating conditions are stated in section “Technical Specifications”. 6.2.2 Temperature Measurement with PT1000 The PT1000 Sensor-/Logger modules are factory set for use with PT1000 sensors according to DIN B in the following range: -30 – +40 °C (-22 – 104 °F) accuracy 1 °C (1.8 °F) -40 – +70 °C (-40 – 158 °F) accuracy 2 °C (3.6 °F) The probes listed under “Parts" are compliant with these requirements. 44/108 Device Descriptions PT1000-Sensor/Logger Note: Technically the device offers a measuring range from -99 to +319 °C. If measurements are necessary in a range outside of the standard range stated above basic settings of the device must be changed. This can only be done by Gesytec. 6.2.3 Display and Control Facilities A red flashing LED in the housing cover of the Logger module indicates that the wireless module is running. The sensor module does not provide any LED. 6.3 Mounting For both device variants the PT1000 probe has to be connected to the device prior to initial operation. This can be done in advance in a separate step or in conjunction with the wall mounting on site. Information on approved accessories is in section 6.6, “Accessories, Spare Parts”. To fasten the unit and connect the leads the housing cover must be removed. Caution: When working on the open device, make sure that the electronics are not damaged. ESD precautions must be observed! Electrostatic sensitive device! 6.3.1 Requirements to the Mounting Location GesySense/UserDoc/GesySense_HW Manual-EN-v1.1.docx, v 1.1, 08/12/2015 Operating temperature and humidity stated in section 0 “Commissioning of the device is done in the system using the appropriate software (cf. section 3, “Setting up the Systems”. Technical Specifications” have to be observed. 6.3.1.1 Connection of PT1000 Probe The PT1000 probe is placed on the board inside the device on a 4-pin connecting terminal. 45/108 Device Descriptions 1 2 3 4 Figure 6-2: PT1000-Sensor/Logger 1 2 3 4 Connecting terminal on the board of the PT1000 Module Connect the PT1000 probe to terminals 1 and 2. The polarity is not to be considered. The connecting line is lead in through a M16 cable fitting (range 2 – 7 mm). Attention: Having connected the lines, the cable fitting must be screwed tight in order to guarantee sealing and strain relief of the lines. 6.3.2 Wall Mounting GesySense/UserDoc/GesySense_HW Manual-EN-v1.1.docx, v 1.1, 08/12/2015 For mounting of the device and connections the cover has to be removed. Figure 6-3: Housing dimensions PT1000 Sensor/Logger Mount the device using suitable screws ( 4.8 mm). Note: Take care of the orientation as the closure head of logger modules only fits with the LED in one position. Lead the connecting cable through the PG gland and connect it according to the specification given under 6.3.1.1 “Connection of PT1000 ”. Tighten the PG gland to close the opening around the cable. Put the closure head on the housing and fix it. 46/108 Device Descriptions Attention: PT1000-Sensor/Logger The light conductor of Logger modules must be exactly above the LED, as it will not be visible otherwise, cf. Figure 6-1. The supply line to the PT1000 probe should be routed so that it is not exposed to the risk of accidental damage. 6.3.3 Notes on Commissioning Commissioning of the device is done in the system using the appropriate software (cf. section 3, “Setting up the Systems”. 6.4 Technical Specifications GesySense/UserDoc/GesySense_HW Manual-EN-v1.1.docx, v 1.1, 08/12/2015 PT1000 input Number 1 connection for PT1000 probe Measuring method 2-wire measurement Measuring range device -99 °C – +319 °C (-146 - +606 °F) Applicable range Accuracy for DIN B probes -30 – +40 °C (-22 – 104 °F) 1 °C (1.8 °F) -40 – +70 °C (-40 – 158 °F) 2 °C(3.6 °F) Resolution 0.04 °C (0.72 °F) Connection screwing terminal 0.13 – 1.5 mm² Logger (P.W0x114) Interval Capacity Storage Time stamp Operation indicator settable 1 – 12 000 min, factory setting: 15 min >1 year at 1 value/15 min non-volatile flash memory real time clock 1 LED Radio Data Transmission Emitter low power radio system European ISM band P.W001x4 433-MHz (433.05 – 434.79 MHz), <10 mW American ISM band P.W011x4 915 MHz band (902 – 928 MHz), <1 mW Free field range up to 250 m Emitter identificationunique 10 digits ID Measuring-/transmission interval adjustable from 15 to 3600 s, default: 270 s 47/108 Device Descriptions PT1000-Sensor/Logger Parameterization Receiver, inductive Range ISM 13.56 MHz band <10 cm Power Supply Lithium Battery 3.6 V, 2.4 Ah, size AA Dimensions & Environmental Conditions Weight 210 g Dimensions w/o gland 94 x 94 x 57 [mm] Housing material polycarbonate color light gray, RAL 7035 Flammability UL94 HB-V2, self-extinguishing Temperature operating -20 – +50 °C (-4 – +122 °F), for accuracy stated storage 0 – +30 °C (32 – +86 °F) Humidity DIN 40040 class F, 5-93%, the board has a protective coating Protection class (EN 60529) housing IP 64 gland IP69K Certificates EMC GesySense/UserDoc/GesySense_HW Manual-EN-v1.1.docx, v 1.1, 08/12/2015 Radio emission EN 55022 immunity EN 61000-6-2 ETSI EN 300 220-1 V2.4.1 (2012-05) DIN EN 62479 6.5 Maintenance Instructions 6.5.1 General Inspections Operational state As the GesySense PT1000 Logger may be used out of range of a GesySense receiver, its operational state has to be checked regularly. The LED in the lid blinking red indicates normal operation. Connector leads All leads connected to the device must be checked annually by a qualified person in compliance with the electro technical regulations for damage and reliable installation. 48/108 Device Descriptions 6.5.2 PT1000-Sensor/Logger Calibration of Temperature Measurement The measurement accuracy must be checked annually. If necessary the device has to be calibrated. This procedure is described in the document ““Calibration of PT1000 Modules” [4]. 6.5.3 Battery Replacement The device is powered by a Lithium battery. The battery status is recorded by the GesySense system. If required, the battery or the entire module is to be replaced. If not –for assembly or maintenance purposes– expressly specified, GesySense devices may only be opened by authorized personnel. ESD protective measures must be followed. The device has to be opened for battery replacement. ESD precautions have to be observed! Electrostatic sensitive device! Installation of GesySense equipment should only be performed by qualified and experienced technical personnel. Installation of the devices must be in compliance with the relevant DIN/VDE regulations or the relevant national standards. Exchanging the Battery Remove the cover of the device, and remove the unit from its mounting location. Loosen the connections of the PT1000 probe from the terminal in order to be able to remove the board. The cable gland must possibly be opened as well. GesySense/UserDoc/GesySense_HW Manual-EN-v1.1.docx, v 1.1, 08/12/2015 The following steps are now to be performed: 49/108 Device Descriptions PT1000-Sensor/Logger 1. Loosen the 4 screws (red circles) by which the board is held in the housing and remove the board. During the entire assembly process make sure that the transparent film which protects the electronics remains in position. Figure 6-4: Logger module open 2. Loosen the connector of the battery on the back of the board. For this lift the locking lever of the plug a little. 3. Cut the cable ties by which the battery is held and remove the battery and cable ties. GesySense/UserDoc/GesySense_HW Manual-EN-v1.1.docx, v 1.1, 08/12/2015 Batteries must be disposed of properly! 4. Insert the new battery and fix it as before with 2 cable ties. Make sure that the protective film is placed correctly. 5. Insert the supply line of the battery into the connector. Checked for tight fastening! 6. Insert the board into its original position again (see. Figure 6-4) and screw it into the housing. 50/108 Device Descriptions PT1000-Sensor/Logger 7. Insert the PT1000 leads on again and tighten the cable gland. Check the position and securing of the PT1000 leads. 8. Mount the device back in place. 9. To complete the work, fix the cover. Attention The cover of the logger module must be set up so that the light guide is above the LED (red rectangle), cf. Figure 6-1. 6.5.4 Replacing a Wireless Module To exchange a defective wireless module, commission the module and install it at the respective spot. GesySense/UserDoc/GesySense_HW Manual-EN-v1.1.docx, v 1.1, 08/12/2015 Inform the system administrator stating the module ID of the old and new wireless module and the date of exchange; thus the required modifications in the receiver and any other connected systems can be made. 6.5.5 Disposal Batteries The wireless module is powered by a battery. Should the device become unsuitable for use, it must be disposed of professionally, such as at recycling centers that accept electronic scrap. Any relevant national laws have to be observed. Batteries exchanged during maintenance have to be treated accordingly. 51/108 Device Descriptions 6.6 PT1000-Sensor/Logger Accessories, Spare Parts PT1000 probe PT1000 probes for temperature measurement in the specified standard range are not included in the device’s scope of delivery. They are available from Gesytec with the following order codes: P.WZ0311 PT1000 probe, -50 ... +105 °C, cable 2 m, black P.WZ0312 PT1000 probe, -50 ... +105 °C, cable 5 m, black If other types than those listed above should be required, we will gladly advise you. To use PT1000 probe with a different measurement range requires modifications of the device. Please contact us via [email protected]. Batteries Replacement batteries can be purchased from Gesytec under the following order codes: Batteries for wireless modules with box housing Lithium battery, 3.6 V, 2,4 Ah, size AA GesySense/UserDoc/GesySense_HW Manual-EN-v1.1.docx, v 1.1, 08/12/2015 P.WZ0216 52/108 Device Descriptions 7 T-H-Sensor/Logger T-H-Sensor/Logger For information on installation and operation of each component read the Installation Instruction and the information provided by this Technical Manual. 7.1 Safety Instructions and Warning Notices Please observe the notes from chapter 1.2 “Safety Instructions and Warning Notices” If not –for assembly or maintenance purposes– expressly specified, GesySense devices may only be opened by authorized personnel. ESD protective measures must be followed. Installation of GesySense equipment should only be performed by qualified and experienced technical personnel. Installation of the devices must be in compliance with the relevant DIN/VDE regulations or the relevant national standards. 7.1.1 Identification The type label on the device provides information on: Product line and device name: GesySense T-H Sensor / T-H Logger Order code, hardware code: P.W0n2n8-n, TTH.ABCn.n / TTH.ABAn.n electrical properties, manufacturer GesySense/UserDoc/GesySense_HW Manual-EN-v1.1.docx, v 1.1, 08/12/2015 In particular the 10 digit module ID (T.nnn.nnn.nnn) is stated here, which uniquely identifies the device in the system. The module ID of the T-H modules starts with the type code T = 6. Figure 7-1: T-H-Sensor and Logger 53/108 Device Descriptions 7.2 T-H-Sensor/Logger Usage, Requirements for Operation GesySense is an autonomously functioning system for recording measured values. For that purpose, wireless modules which are fitted with sensing elements, Repeaters and one Receiver are installed. The system components do not feature direct operator facilities. Some however, are fitted with acoustic or optical signals to indicate operational statuses. Manual operation of system components is not intended in normal operation. All settings have to be done using the appropriate software or IT equipment. This is normally done during commissioning. Components may be exchanged by authorized personnel only for maintenance purposes. The GesySense T-H-Sensor measures the environmental temperature and the humidity at the place of installation and radio transmits the values directly or via a repeater to the receiver. The T-H-Logger operates accordingly; however, it provides internal memory into which data is stored in parallel to the transmission. The device is battery powered. The T-H-Senor/-Logger module is suited for condensing humidity. As to commissioning (activating, setting parameters), measurements and the transmission of values and parameterization the device operates as described for the system in chapter 2 for wireless sensors and loggers. GesySense/UserDoc/GesySense_HW Manual-EN-v1.1.docx, v 1.1, 08/12/2015 The following functions are implemented: 7.2.1 In a defined interval the sensor module measures temperature and humidity with an internal chip sensor and transmits them immediately. The time stamped values are received by the receiver of the GesySense wireless sensor system. The logger module additionally internally records the 15 minute values derived from the measurements. Even at a battery failure the values will be preserved. Correct operation of the module is indicated by a LED. Requirements to Ambient Conditions Measurement and operating conditions are stated in section „Technical Specifications“. The T-H-Senor/-Logger module is suited for condensing humidity. 7.2.2 Measuring Temperatures with a Chip-Sensor The GesySense wireless modules for capturing environmental temperature and humidity use an integrated chip by Sensirion for measurement and calculation. 54/108 Device Descriptions T-H-Sensor/Logger According to manufacturer information a calibration is not required. The chip is either operating correctly or it is defective. 7.2.3 Display and Control Facilities A red flashing LED in the housing cover of the Logger module indicates that the wireless module is running. The sensor module does not provide any LED. 7.3 Mounting The installation of these wireless modules is generally realized using an installation adapter with bayonet coupling which is secured against unauthorized removal with a small locking bolt. This ensures secure fastening and easy removal of the module. Additionally there is an assembly plate available allowing for a displacement of the actual fixing point. For this, mounting has to be done in two steps. An installation instruction is part of the delivery. 7.3.1 Requirements to the Mounting Location Operating temperature and humidity stated in section 7.4 “Technical Specifications” have to be observed. 7.3.2 The bayonet mount is directly bolted to the wall or ceiling. A drill jig is available in order to facilitate the alignment of the bayonet mount. GesySense/UserDoc/GesySense_HW Manual-EN-v1.1.docx, v 1.1, 08/12/2015 Straight mounting using 2 screws „Straight" Mounting of Wireless Module 55/108 Device Descriptions T-H-Sensor/Logger The wireless module is attached by putting it on the bayonet mount turning it counter-clockwise until it snaps on. It is locked by tightening the locking bolt. Fixierschraube 7.3.3 Installation Using an Assembly Plate The position of the wireless module relative to the fixing point can be modified by means of the assembly plate. Thus, a wireless module in a chest freezer for instance, can be fixed outside the cooling conducts but still in the relevant measuring range. The bayonet mount is fixed by means of two screws on the assembly plate, which itself is fixed by means of two screws. If necessary, the assembly plate can be carefully bent at the punched bars. The wireless module is then attached as described above. GesySense/UserDoc/GesySense_HW Manual-EN-v1.1.docx, v 1.1, 08/12/2015 7.3.4 Notes on Commissioning Commissioning of the device is done in the system using the appropriate software (cf. section 3, “Setting up the Systems”. For commissioning and data recording of the T-H-Sensor/-Logger the software GesySense LogIt from version 1.0.1.91 can be used. ´ The module has a type code 6. In the Modbus address structure the data of this mixed signal module are recorded at addresses from 3000 onwards, cf. [1]. 56/108 Device Descriptions GesySense/UserDoc/GesySense_HW Manual-EN-v1.1.docx, v 1.1, 08/12/2015 7.4 T-H-Sensor/Logger Technical Specifications Temperature Measuring range Accuracy Resolution 5 – 50 °C, (41 F to 122 F) ±0.2 °C typically 0.01 °C Humidity Measuring range Accuracy Resolution 10 – 90 %RH 1.8 %RH typically 0.04 %RH Logger (P.W0x218) Interval Capacity Storage Time stamp Operation indicator settable 1 – 12 000 min, factory setting: 15 min >1 year at 1 value/15 min non-volatile flash memory real time clock 1 LED Radio Data Transmission Emitter low power radio system European ISM band P.W002x8 433-MHz (433.05 – 434.79 MHz), <10 mW American ISM band P.W012x8 915 MHz band (902 – 928 MHz), <1 mW Free field range up to 250 m Emitter identification unique 10 digits ID Measuring-/transmission interval adjustable from 15 to 3600 s, default: 270 s Parameterization Receiver, inductive^ Range Power Supply Lithium Battery ISM 13.56 MHz band <10 cm 3.6 V, 2.4 Ah, size AA Dimensions & Environmental Conditions Weight 100 g Dimensions 77 x 110 x 18.5 [mm] Housing material ABS, 20% glass fiber reinforced 57/108 Device Descriptions T-H-Sensor/Logger color light gray, RAL 7035 Flammability UL94 HB, self-extinguishing Temperature operating 5 – +50 °C storage 0 – +30 °C Protection class IP 61 according to DIN EN 60 529 Certificates EMC Radio emission EN 55022 immunity EN 61000-6-2 ETSI EN 300 220-2 V2.4.1 DIN EN 62479 7.5 Maintenance Instructions 7.5.1 General Inspections Operational state As the GesySense T-H-Logger may be used out of range of a GesySense receiver, its operational state has to be checked regularly. The LED in the lid blinking red indicates normal operation. 7.5.2 Calibration GesySense/UserDoc/GesySense_HW Manual-EN-v1.1.docx, v 1.1, 08/12/2015 A calibration of the measurement sensor of the wireless module is not necessary. 58/108 GesySense/UserDoc/GesySense_HW Manual-EN-v1.1.docx, v 1.1, 08/12/2015 Device Descriptions 7.5.3 T-H-Sensor/Logger Battery Replacement The device is powered by a Lithium battery. The battery status is recorded by the GesySense system. If required, the battery or the entire module is to be replaced. 59/108 Device Descriptions T-H-Sensor/Logger If not –for assembly or maintenance purposes– expressly specified, GesySense devices may only be opened by authorized personnel. ESD protective measures must be followed. The device has to be opened for battery replacement. ESD precautions have to be observed! Electrostatic sensitive device! Exchanging the Battery To provide a wireless module with a new battery, first remove the module from the bayonet mount by loosening the locking bolt, turning the sensor clockwise and pulling it from the bayonet mount. Note: Write down the ID number of the module, it is needed for documentation of the replacement. Open the housing by carefully inserting a screwdriver into the gap between top and bottom part and detach the top from the bottom. GesySense/UserDoc/GesySense_HW Manual-EN-v1.1.docx, v 1.1, 08/12/2015 Position of board and battery inside the sensor housing Lift board and battery from the housing and flip it over so you can see the battery socket at the back side of the board. Disconnect the plug of the old battery and connect the new battery to the board, making sure the plug is tight. Connection of the battery plug to the board Insert board and battery as shown on the following picture, observing the position of the battery cable: 60/108 Device Descriptions T-H-Sensor/Logger Fitting position of the battery and cable run Close the housing by putting both housing parts above each other and pressing them together. Re-install the module at the bayonet mount and tighten the locking bolt. Note: Inform the system administrator about the battery change stating module ID and date; thus he can reset the battery monitoring for the respective module. 7.5.4 Replacing a Wireless Module To exchange a defective wireless module, commission the module and install it at the respective spot. Inform the system administrator stating the module ID of the old and new wireless module and the date of exchange; thus the required modifications in the receiver and any other connected systems can be made. 7.5.5 Disposal GesySense/UserDoc/GesySense_HW Manual-EN-v1.1.docx, v 1.1, 08/12/2015 Batteries The wireless module is powered by a battery. Should the device become unsuitable for use, it must be disposed of professionally, such as at recycling centers that accept electronic scrap. Any relevant national laws have to be observed. Batteries exchanged during maintenance have to be treated accordingly. 7.6 Accessories, Spare Parts Batteries Replacement batteries can be purchased from Gesytec under the following order codes: P.WZ0215 Batteries for wireless modules with flat housing Lithium battery, 3.6 V, 2,4 Ah, size AA 61/108 Device Descriptions 8 Sensor-Actuator-Module SAM 2PT-2D-1R Sensor-Actuator-Module SAM 2PT-2D-1R For information on installation and operation of each component read the Installation Instruction and the information provided by this Technical Manual. 8.1 Safety Instructions and Warning Notices Please observe the notes from chapter 1.2 “Safety Instructions and Warning Notices If not –for assembly or maintenance purposes– expressly specified, GesySense devices may only be opened by authorized personnel. ESD protective measures must be followed. This modules has to be opened to connect the probes, external power supply, relay connection and for mounting. Installation of GesySense equipment should only be performed by qualified and experienced technical personnel. Installation of the devices must be in compliance with the relevant DIN/VDE regulations or the relevant national standards. 8.1.1 Identification The type label on the device provides information on: GesySense/UserDoc/GesySense_HW Manual-EN-v1.1.docx, v 1.1, 08/12/2015 Product line and device name: GesySense SAM 2PT-2D-1R Order code, hardware code: P.Wnn146-n, BFOn.XXXn electrical properties, manufacturer In particular the 10 digit module ID (T.nnn.nnn.nnn) is stated here, which uniquely identifies the device in the system. The module ID of the SAM starts with the type code T = 5. Figure 8-1: SAM 2PT-2D-1R 62/108 Device Descriptions 8.1.2 Sensor-Actuator-Module SAM 2PT-2D-1R Safety Features The device has a fuse (100 mA F) in the connection of the external power supply, cf. Figure 8-2, . 8.2 Usage, Requirements for Operation The GesySense Sensor-Actuator-Module SAM 2PT-2D-1R reads, records and radio transmits the temperatures measured by PT1000 probes and values of 2 digital inputs and switches an external contact. It gets the parameterization necessary for this by its integrated wireless receiver using the standard operating frequency. In parallel to transmitting them the module stores all measured values in its local memory. Depending on operation mode power is supplied by the built-in battery or externally. Connecting an external supply will interrupt the battery supply. As to commissioning (activating, setting parameters), measurements and the transmission of values and parameterization the device operates as described for the system in chapter 2 for wireless sensors and loggers. The following functions are implemented: The module detects and sends in a specified time interval the temperature determined in the 2-wire method by the connected PT1000 probes and the value of both digital inputs. One of these inputs is used to monitor external power supply. The second can be used to assess a 24-V-signal. The time-stamped measurements are registered at the receiver of the GesySense wireless sensor network. All values are also stored in the local memory of the module. GesySense/UserDoc/GesySense_HW Manual-EN-v1.1.docx, v 1.1, 08/12/2015 As a logger the module additionally internally records the 15 minute values derived from the measurements. Even at a battery failure the values will be preserved. Correct operation of the module is indicated by a LED. Furthermore the device can switch a digital output (open contact) operating on the basis of defined limit values. This can be controlled as well by local control or by direct external commands issued via radio. The local control algorithm is only active if the device runs with external power supply. Only in this operation mode the module can receive commands on the operating frequency. This module is automatically recognized when within the range of a GesySense system receiver. It registers itself automatically in the system. 8.2.1 Requirements to Ambient Conditions Operating temperature and humidity stated in section 0 “Commissioning of the device is done in the system using the appropriate software (cf. section 3, “Setting up the Systems”. 63/108 Device Descriptions Sensor-Actuator-Module SAM 2PT-2D-1R Technical Specifications” have to be observed. The device can be installed as well stationary as in vehicles. 8.2.2 Temperature Measurement with PT1000 The SAM 2PT-2D-1R modules are factory set for use with PT1000 sensors according to DIN B in the following range: -30 – +40 °C (-22 – 104 °F) accuracy 1 °C (1.8 °F) -40 – +70 °C (-40 – 158 °F) accuracy 2 °C (3.6 °F) The probes listed under “parts” are compliant with these requirements. Note: Technically the device offers a measuring range from -99 to +319 °C. If measurements are necessary in a range outside of the standard range stated above basic settings of the device must be changed. This can only be done by Gesytec. 8.2.3 Display and Control Facilities A red flashing LED on the board (or in the housing cover of modules with not transparent cover) indicates that the wireless module is running. 8.3 Mounting GesySense/UserDoc/GesySense_HW Manual-EN-v1.1.docx, v 1.1, 08/12/2015 Depending on the usage the PT1000 probe, external power supply, digital input and a connection to the relay have to be made prior to initial operation. This can be done in advance in a separate step or in conjunction with the wall mounting on site. Information on approved accessories is in section 0, “The wireless module is powered by a battery. Should the device become unsuitable for use, it must be disposed of professionally, such as at recycling centers that accept electronic scrap. Any relevant national laws have to be observed. Batteries exchanged during maintenance have to be treated accordingly. Accessories, Spare Parts” To fasten the unit and connect the leads the housing cover must be removed. Caution: When working on the open device, make sure that the electronics are not damaged. ESD precautions must be observed! Electrostatic sensitive device! 64/108 Device Descriptions 8.3.1 Sensor-Actuator-Module SAM 2PT-2D-1R Requirements to the Mounting Location Operating temperature and humidity stated in section 0 “Commissioning of the device is done in the system using the appropriate software (cf. section 3, “Setting up the Systems”. Technical Specifications” have to be observed. The device can be installed as well stationarity as in vehicles. 8.3.2 Connections All connections are placed on the board inside the device on 2 connecting terminals. 4 3 2 1 1 Figure 8-2: GesySense/UserDoc/GesySense_HW Manual-EN-v1.1.docx, v 1.1, 08/12/2015 2 3 Connections and fuse on electronic board of the SAM module Connecting terminal for 2 PT1000 probe Connecting terminal for power supply, digital input, switching contact Fuse The connecting lines are lead in through 3 cable fittings: from the left (range 2 – 7 mm). 2 x M16 (range 2 – 7 mm) for PT1000 probe, 1 x M20 (5 – 10 mm) for 4 line cable to connecting terminal. Attention: Having connected the lines, the cable fitting must be screwed tight in order to guarantee sealing and strain relief of the lines. 8.3.2.1 Connection of PT1000 Probes Two PT1000 probes can be fixed to the connecting terminal in Figure 8-2 (spring clip 0.2 – 1.5 mm2, designated “ST4” on the board). 65/108 Device Descriptions Channel 1 Channel 2 Sensor-Actuator-Module SAM 2PT-2D-1R 1, 2 (GND) 3, 4 (GND) The names “Channel 1” and “Channel 2” refer to the presentation of measured values in the GesySense system. When connecting the modules planned measurement locations have to be observed accordingly. A polarity is not to be considered. 8.3.2.2 Connections for Power Supply, Digital Input, Relay Contact A connecting terminal in Figure 8-2 (spring clip 0.1 – 3.0 mm2, designated “ST2” on the board) serves to connect external power supply, digital input and relay contact. Note: The use of a 4-wire cable is recommended, e. g. round cable ÖLFLEX CLASSIC 110 BLACK 4x1mm2. The 4 contacts are assigned as follows. Pin 1 Pin 2 Pin 3 Pin 4 1 2 3 4 24 V power supply 24 V common ground digital input contact 24 V relay contact 24 V (A) pins 1, 2, 24 V supply A B C GesySense/UserDoc/GesySense_HW Manual-EN-v1.1.docx, v 1.1, 08/12/2015 Figure 8-3: (B) pins 2, 3 digital 24 V input (C) pins 1, 4 24 V relay contact SAN connections for external supply, digital input, relay contact External power supply of 24 V AC/DC has to be connected to pins 1 and 2. The 24 V digital input has to be connected to pins 2 and 3. The switching contact (open contact) has to be connected to pins 1 and 4. Pin 1, 24 V Pin 4 66/108 Device Descriptions 8.3.3 Sensor-Actuator-Module SAM 2PT-2D-1R Wall Mounting For mounting of the device and connections the cover has to be removed. Figure 8-4: Housing dimensions SAM 2PT-2D-1R Mount the device using suitable screws ( 4.8 mm). Lead the connecting cable through the PG gland and connect it according to the specification given under 8.3.2 “Connections”. Tighten the PG gland to close the opening around the cable. Attention: All supply lines should be routed so that it is not exposed to the risk of accidental damage. When mounted in vehicles damaged by rubbing and chafing has to be prevented. Put the closure head on the housing and fix it. 8.3.4 Notes on Commissioning GesySense/UserDoc/GesySense_HW Manual-EN-v1.1.docx, v 1.1, 08/12/2015 Commissioning of the device is done in the system using the appropriate software (cf. section 3, “Setting up the Systems”. 8.4 Technical Specifications PT1000 Inputs Measuring range of device -99 – +319 °C (-146 – 606 °F) Measuring method 2-wire measurement Applicable range Accuracy for DIN B probes -30 – +40 °C (-22 – 104 °F) 1 °C (1.8 °F) -40 – +70 °C (-40 – 158 °F) 2 °C (3.6 °F) Resolution 0.04 °C (0.72 °F) Connector screwing terminal 0.2 – 1.5 mm² 67/108 Device Descriptions Sensor-Actuator-Module SAM 2PT-2D-1R Digital Input Status Sensor Power supply Connector 1 available contact for 24 V, (19.2 – 26.4 V) 24 V spring clip 0.1 – 3.0 mm2 Relay Output Type Rated voltage Rated current Connector open contact 24 V 3 A, use surge proof fuse max. 6 A (C) spring clip 0.1 – 3.0 mm2 Logger Interval Capacity Storage Time stamp Operation indicator settable 1 – 12 000 min, factory setting: 15 min 32 000 memory locations non-volatile flash memory real time clock 1 LED Radio Transmission of Data and Switching Parameters Emitter, receiver low power radio system European ISM band 433-MHz (433.05 – 434.79 MHz), <10 mW GesySense/UserDoc/GesySense_HW Manual-EN-v1.1.docx, v 1.1, 08/12/2015 Free field range up to 250 m Emitter identificationunique 10 digits ID Measuring-/transmission interval adjustable from 15 to 3600 s, default: 270 s Radio Transmission for Parameterization Receiver, inductive^ ISM 13.56 MHz band Range <10 cm Power Supply External power plug Connector or Lithium battery 24 V AC (19.2 – 26.4 V) spring clip 0.1 – 3.0 mm2 3.6 V, 2.4 Ah, size AA Dimensions & Environmental Conditions Weight 250 g Dimensions w/o gland 130 x 94 x 57 [mm], cf. Figure 8-4 Cable glands 2 x M16, 2 – 7 mm 1 x M20, 5 – 10 mm 68/108 Device Descriptions Sensor-Actuator-Module SAM 2PT-2D-1R Housing material polycarbonate, case fiber-glass reinforced color bottom light gray, RAL 7035 cover transparent Flammability UL94 HB-V2, self-extinguishing Temperature operating 30 – +65 °C (-22 – 149 °F) storage 0 – +30 °C (32 – 86 °F) Humidity DIN 40040 class F, 5-93%, the board has a protective coating Protection class according to DIN EN 60 529 housing IP 64 cable glands IP69K Certificates EMC emission EN 55022 immunity EN 61000-6-2 Radio EC 37/2005 ETSI EN 300 220-1 V2.4.1 (2012-05) DIN EN 62479 DIN EN 12830: class 1: -40 °C to 30 °C class 2: 30 °C to 65 °C environmental conditions: B application area: S, T 8.5 Maintenance Instructions 8.5.1 General Inspections GesySense/UserDoc/GesySense_HW Manual-EN-v1.1.docx, v 1.1, 08/12/2015 Operational state As the device may be used out of range of a GesySense receiver (temperature recoding in vehicles), its operational state has to be checked its operating status must be checked before going on a tour. The LED on the board (or in the lid) blinking red indicates normal operation. Connector leads All leads connected to the device must be checked annually by a qualified person in compliance with the electro technical regulations for damage and reliable installation. 69/108 Device Descriptions Sensor-Actuator-Module SAM 2PT-2D-1R Mounting place Interval in a vehicle 3 months The interval can be longer if the error rate is < 2%. stationary 8.5.2 1 year Calibration of Temperature Measurement The measurement accuracy must be checked annually. If necessary the device has to be calibrated. This procedure is described in the document ““Calibration of PT1000 Modules” [4]. 8.5.3 Battery Replacement The device is powered by a Lithium battery. The battery status is recorded by the GesySense system. If required, the battery or the entire module is to be replaced. If not –for assembly or maintenance purposes– expressly specified, GesySense devices may only be opened by authorized personnel. ESD protective measures must be followed. The device has to be opened for battery replacement. ESD precautions have to be observed! Electrostatic sensitive device! GesySense/UserDoc/GesySense_HW Manual-EN-v1.1.docx, v 1.1, 08/12/2015 Installation of GesySense equipment should only be performed by qualified and experienced technical personnel. Installation of the devices must be in compliance with the relevant DIN/VDE regulations or the relevant national standards. Exchanging the Battery Remove the cover of the device. Depending on the mounting location it may be better to dismount the unit and put it on a desk. 70/108 Device Descriptions Sensor-Actuator-Module SAM 2PT-2D-1R The following steps are now to be performed: Loosen the battery connectors from the clamps. Use a screwdriver to push down the orange lever on the green clamp into which the connectors are lead. Loosen the cable tie. GesySense/UserDoc/GesySense_HW Manual-EN-v1.1.docx, v 1.1, 08/12/2015 This is done by pressing the release lever of the clamp, -> arrow. Replace battery Exchange the old battery with a new one. Take care of the battery polarity which is indicated on the board. 71/108 Device Descriptions Sensor-Actuator-Module SAM 2PT-2D-1R Then retighten the cable ties and insert the battery connections into the clampCheck for tightness! To complete the work, fix the cover or, if applicable, mount it to its location first. Attention: If the device was removed from its location, poisoning and securing of all leads must be checked. 8.5.4 Replacing a Wireless Module To exchange a defective wireless module, commission the module and install it at the respective spot. The module will register itself in the system. Inform the system administrator stating the module ID of the old and new wireless module and the date of exchange; thus the required modifications in any other connected systems can be made. 8.5.5 Disposal Batteries The wireless module is powered by a battery. Should the device become unsuitable for use, it must be disposed of professionally, such as at recycling centers that accept electronic scrap. Any relevant national laws have to be observed. Batteries exchanged during maintenance have to be treated accordingly. 8.6 Accessories, Spare Parts GesySense/UserDoc/GesySense_HW Manual-EN-v1.1.docx, v 1.1, 08/12/2015 PT1000 probe PT1000 probes for temperature measurement in the specified standard range are not included in the device’s scope of delivery. They are available from Gesytec with the following order codes: P.WZ0311 PT1000 probe, -50 ... +105 °C, cable 2 m, black P.WZ0312 PT1000 probe, -50 ... +105 °C, cable 5 m, black P.WZ0316 PT1000 probe, -50 ... +105 °C, cable 2 m, grey If other types than those listed above should be required, we will gladly advise you. To use PT1000 probe with a different measurement range requires modifications of the device. Please contact us via [email protected]. 72/108 Device Descriptions Sensor-Actuator-Module SAM 2PT-2D-1R Battery Replacement batteries can be purchased from Gesytec under the following order codes: P.WZ0217 Batteries for SAM wireless modules Lithium battery, 3.6 V, 2,4 Ah, size AA Connection cable To connect external power supply, digital input and relay contact the following 4-wire cable or compatible has to be used: GesySense/UserDoc/GesySense_HW Manual-EN-v1.1.docx, v 1.1, 08/12/2015 ÖLFLEX CLASSIC 110 BLACK 4x1mm2 73/108 Device Descriptions 9 Receiver/Repeater Receiver/Repeater For information on installation and operation of each component read the Installation Instruction and the information provided by this Technical Manual. 9.1 Safety Instructions and Warning Notices Please observe the notes from chapter 1.2 “Safety Instructions and Warning Notices If not –for assembly or maintenance purposes– expressly specified, GesySense devices may only be opened by authorized personnel. ESD protective measures must be followed. Installation of GesySense equipment should only be performed by qualified and experienced technical personnel. Installation of the devices must be in compliance with the relevant DIN/VDE regulations or the relevant national standards. 9.1.1 Identification The type label on the device provides information on: GesySense/UserDoc/GesySense_HW Manual-EN-v1.1.docx, v 1.1, 08/12/2015 Product line and device name: GesySense Receiver/Repeater Order code, hardware code: P.W0x211-n, TTRn.XXXn electrical properties, manufacturer In particular the 10 digit module ID (T.nnn.nnn.nnn) is stated here, which uniquely identifies the device in the system. The module ID of the Receiver/Repeater starts with the type code T = 8. Figure 9-1: GesySense Repeater/Receiver 74/108 Device Descriptions 9.2 Receiver/Repeater Usage, Requirements for Operation GesySense repeaters and receiver are identical in construction and also use the same firmware. The operation of the device is configured during commissioning. Receiver If the device is used as receiver, it receives the radio messages from the wireless modules and makes the information available to superior systems or stores it on a memory card. Exactly one receiver is required in a GesySense installation. Repeaters receive the messages from the wireless modules, amplifies and forwards them to the receiver. They can be used if the wireless communication between the sensor modules and the receiver is not sufficiently reliable, e.g. because of large distances or building conditions such as walls. Up to seven repeaters can be used in a GesySense installation. The device has a serial connector which can be used either with EIA-232 or with EIA-485. Used as Receiver the EIA 232 connection is used to communicate with the configuration software on a PC. A Modbus master will use the EIA-485 connection to access the data on the Receiver. As radio licensing is different around the globe, there are different versions of the device available for operation in different geographical regions: GesySense/UserDoc/GesySense_HW Manual-EN-v1.1.docx, v 1.1, 08/12/2015 9.2.1 Region ISM Band Power supply 1, Europe, Africa 433 MHz 230 V / 50 Hz 2, America 915 MHz 115 V / 60 Hz Requirements to Ambient Conditions Operating temperature and humidity stated in section 9.4 “Technical Specifications” have to be observed. For proper operation the device requires a permanent and uninterrupted power supply. 9.2.2 LED Signals The operating status of the device is indicated by four multi-color LEDs. Power: green constant light indicates operational readiness, Status: green flashing indicates „OK”, Radio: green flickering indicates radio data transfer, Comm.: yellow flickering indicates data transfer; green flickering indicates that the data connection is active but no data are 75/108 Device Descriptions Receiver/Repeater exchanged. This can be caused by, e.g., permuted data cable wires or wrongly set communication parameters. 9.2.3 Connector Pin Assignment The D-type connector pins are used as follows: Pin Receiver/Repeater D-type socket Signals EIA-232 1 Signals EIA-485 In/Out: 2 Out: TxD 3 In: RxD 4 nc Nc 5 GND GND 6 7 In: /CTS 8 Out: /RTS 9 Table 9-1: RxTx+ In/Out: RxTx- Out: +5V Receiver, pin assignment D type socket The EIA-485 signals are assigned to pins at which a data logger has inputs. Thus there won’t be any conflicts using a standard 1 to 1 cable. If the data logger is also provided with a 9-pin D-type connector, a standard 1:1 cable (modem cable) can be used. GesySense/UserDoc/GesySense_HW Manual-EN-v1.1.docx, v 1.1, 08/12/2015 The EIA-485 interface is provided with a short circuit proof and EMC filtered +5V voltage output, where optionally a terminator can be fitted in the plug. The following communication parameters can be used Data bits Parity Stop bit Transmission rate Table 9-2: EIA-232 EIA-485 8 8 none none 1 1 38 400 19 200 Receiver, communication settings EIA-232 and EIA-485 76/108 Device Descriptions 9.2.4 Receiver/Repeater Relocation of the Antenna In order to improve receiving conditions antenna cables of different lengths are available for the Receiver/Repeater by which the antenna can be mounted in a position offering better conditions. (cf. 9.5.3 “Accessories “). For example devices can thus be mounted in switching cabinets, behind a wall or close to a socket outlet with the antenna itself placed at a favorable position. Additionally an antenna splitter can be inserted to connect 2 antennas to 1 device (e.g. to cover two rooms). Note: The splitter reduces the re receiving quality of each antenna. 9.3 Mounting of Receiver and Repeaters Note the installation instruction accompanying the device. Prior to fixing the device the supplied antenna has to be screwed to it. 9.3.1 Requirements to the Mounting Location Operating temperature and humidity stated in section 9.4 “Technical Specifications” have to be observed. A permanently available mains supply (230 V or 120 V) is required for the device. For selection of the mounting location please refer also to the possibilities described in section 9.2.4 “Relocation of the Antenna”. GesySense/UserDoc/GesySense_HW Manual-EN-v1.1.docx, v 1.1, 08/12/2015 9.3.2 Mounting the Device Repeater and Receiver are identical in construction and are installed in the same way using an assembly bracket Attention: The antenna must be perpendicular to the floor! The supplied assembly bracket can be aligned horizontally or vertically. However, it is important that the Repeater/Receiver is bolted with the assembly bracket, with the antenna perpendicular to the floor. Attention: Distance to walls! Keep a distance of at least 15 cm between antenna and the next wall. This is ensured by the assembly bracket in one direction. However, this distance has to be observed in other directions as well. The device should not be mounted in a corner. Mounting Location Please refer also to section 3, “Setting up the Systems”. 77/108 Device Descriptions Receiver/Repeater The Receiver has to be mounted in a location giving access to superior systems, e.g. a data server. The locations for the repeaters have to be determined individually for each site by measurements of radio signal field strength using GesySense LogIt and the GesySense Configurator. Repeater can be mounted according to a previous planning. However, as the best place only becomes evident during system operation flexibility is required here. The location for the repeaters should only be determined after all sensors and the receiver have been commissioned. Note: In case of demanding radio technical conditions it is recommended to determine the location of the receiver as well via a field strength measurement after all sensors have been commissioned. Mounting alternatives GesySense/UserDoc/GesySense_HW Manual-EN-v1.1.docx, v 1.1, 08/12/2015 The repeater/receiver is bolted to the assembly bracket with two screws. Depending on the alignment on the assembly bracket, different boreholes in the sheet and in the housing of the component are used for this purpose. Thus, if applicable, screws in the housing have to be changed over. Figure 9-2: Mounting variants for the repeater/receiver The assembly bracket can be installed either horizontally or vertically; the required boreholes are already provided. It is important that the antenna is perpendicular to the floor. The assembly bracket is either bolted to the wall or the ceiling. The mains cable is connected to the power supply. Furthermore the receiver is connected via an EIA-485 cable to a data logger or other superior system. A cable strap is attached 78/108 Device Descriptions Receiver/Repeater to the assembly bracket as strain relief for the mains cable, and for the receiver as well for the data cable. Figure 9-3: Fixing power supply and data (only Receiver) cables For strain relief the cables are attached to the assembly bracket by means of a cable strap. Note: If the location for a repeater is only determined after the installation of the other system components, this (including the Repeater number) has to be added to the system documentation. Note: If a repeater is mounted above a suspended ceiling, the location has to be documented and, if applicable, labeled on the ceiling. GesySense/UserDoc/GesySense_HW Manual-EN-v1.1.docx, v 1.1, 08/12/2015 Data connection of Receiver System internal communication is wireless. Only the Receiver has an external data connection by its 9-pin D-type socket. This is described in section 9.2.3, „Connector Pin Assignment“. 9.3.3 Notes on Commissioning The Repeater/Receiver becomes operative as soon as connected to mains supply. Commissioning of the device, setting as a Receiver or assignment of a Repeater number is done in the system using the appropriate software (cf. section 3, “Setting up the Systems”. 79/108 Device Descriptions 9.4 Receiver/Repeater Technical Specifications Radio Data Transmission Receiver, emitter low power radio system European ISM band P.W002xx 433-MHz (433.05 – 434.79 MHz), <10 mW American ISM band P.W012xx 915 MHz band (902 – 928 MHz), <1 mW Free field range up to 250 m Emitter identificationunique 10 digits ID Serial Interface EIA-232 EIA-485 Connector TxD, RxD, GND, CTS, RTS RxTx, GND, RxTx, 5V 9 pin D-type socket Power Supply Supply voltage GesySense/UserDoc/GesySense_HW Manual-EN-v1.1.docx, v 1.1, 08/12/2015 P.W002xx P.W012xx Power Input 230 V, 50 Hz 115 V, 60 Hz 5W Connector internal, fixed, cable length 1.5 m Features Real-time clock, optional Monitoring LEDs battery buffered watchdog timer 4: Power, Status, Radio, Comm. Dimensions & Environmental Conditions Weight 304 g, incl. mains cable Dimensions w/o antenna 40 x 65 x 120 [mm] with antenna 40 x 65 x 285 [mm] Housing material Flammability Temperature operating storage Humidity Protection class Mounting Fitting position Polystyrene UL94 HB, self-extinguishing -20 – +55 °C (-4 – +131 °F) -5 – +35 °C (23 – +95 °F) DIN 40040 class F, 5-93%, no condensation IP 40 according to DIN EN 60 529 wall mounting with assembly bracket vertical 80/108 Device Descriptions Receiver/Repeater Assembly bracket weight dimensions Certificates EMC Radio 9.5 145 g 40 x 65 x 160 [mm] emission EN 55022, residential area (B) immunity EN 61000-6-2 ETSI EN 300 220-1 V2.3.1 (2009-12) DIN EN 50371 Maintenance Instructions Periodic, preventive maintenance is not required for the Repeater/Receiver. A failure or the improper operation of a Repeater/Receiver is detected via the monitoring data on the data server or superior system, e.g. a repeater doesn’t detect any modules any more over a longer period of time. In addition, problems can be discovered by an improper LED signal (see 9.2.4). If problems cannot be explained by modified external conditions (power or data cables, new effects on radio signal, …) which can be corrected, an exchange of the device may become necessary. GesySense/UserDoc/GesySense_HW Manual-EN-v1.1.docx, v 1.1, 08/12/2015 9.5.1 Replacing a Repeater The spare device –usually set as receiver (repeater number “0”)– is mounted in place of the defective repeater. The new repeater module ID is entered, according to the Modbus specification for the GesySense System, by the system administrator via the data server into the respective Modbus address: e.g. if repeater 2 has been exchanged, only the Modbus address 1005 has to be modified and if the module ID exceeds 65536 the Modbus address 1006 has to be modified as well. The Receiver then makes sure that this new repeater is assigned the correct repeater number. The PC configuration program can as well be used to set the repeater number. If the exchange does not resolve the problem, the configuration program should be used for an analysis of the complete radio conditions. 9.5.2 Replacing the Receivers The receiver can be replaced on-site, the cable to the data server is connected and the receiver is connected to the power supply. If the new receiver is not preconfigured, the appropriate data are read in from the data server during start-up or the new receiver has to be configured by the GesySense configuration program. Then the receiver returns to normal operation, to be verified by means of the LEDs. 81/108 Device Descriptions 9.5.3 Receiver/Repeater Firmware Update The device Firmware can be updated using the GesySense configuration program, e.g. GesySense LogIt. 9.6 Accessories Detached Antenna Antenna cable 1.5 m for GesySense Receiver and Repeater P.WZ0203 Antenna cable 5 m for GesySense Receiver and Repeater P.WZ0212 Antenna splitter with antenna, cable 1.5 m for GesySense Receiver and Repeater P.WZ0213 As P.WZ0212, but with 5 m cable GesySense/UserDoc/GesySense_HW Manual-EN-v1.1.docx, v 1.1, 08/12/2015 P.WZ0202 82/108 Device Descriptions 10 Receiver \LAN Receiver \LAN For information on installation and operation of each component read the Installation Instruction and the information provided by this Technical Manual. 10.1 Safety Instructions and Warning Notices Please observe the notes from chapter 1.2 “Safety Instructions and Warning Notices If not –for assembly or maintenance purposes– expressly specified, GesySense devices may only be opened by authorized personnel. ESD protective measures must be followed. Installation of GesySense equipment should only be performed by qualified and experienced technical personnel. Installation of the devices must be in compliance with the relevant DIN/VDE regulations or the relevant national standards. 10.1.1 Identification The type label on the device provides information on: Product line and device name: GesySense Receiver \LAN Order code, hardware code: P.W0n2n4-n, TTRn.XXXn electrical properties, manufacturer GesySense/UserDoc/GesySense_HW Manual-EN-v1.1.docx, v 1.1, 08/12/2015 In particular the 10 digit module ID (T.nnn.nnn.nnn) is stated here, which uniquely identifies the device in the system. The module ID of the Receiver \LAN starts with the type code T = 8. Figure 10-1: GesySense Receiver \LAN 83/108 Device Descriptions 10.2 Receiver \LAN Usage, Requirements for Operation As the receiver of the GesySense wireless system the Receiver \LAN gets the messages from the wireless modules and records them on its memory card. It makes the data available to superior systems by an Ethernet connection using Modbus TCP or by its serial EIA-485 connector using Modbus RTU. The device can be configured through its Ethernet connection. A standard web browser can be used to access measured values and configuration parameters. The latest values received are presented by the web server of the device. The ftpserver implemented allows downloading archived measurements. The device features a serial EIA-485 connector which as well gives Modbus access to the data collected by the receiver. The relay output of the device (switch over) can be controlled by direct commands as well as dependent on evaluated measurements. There are device variants for 90 – 264 V (47 – 63 Hz) mains input or Power over Ethernet (PoE) power supply. 10.2.1 Requirements to Ambient Conditions Operating temperature and humidity stated in section 10.6 “Technical Specifications” have to be observed. For proper operation the device requires a permanent and uninterrupted power supply. GesySense/UserDoc/GesySense_HW Manual-EN-v1.1.docx, v 1.1, 08/12/2015 10.2.2 Display and Control Facilities The basic settings for the Receiver \LAN are made using suitable software via Ethernet. The device indicates its status by 4 LEDs, and 2 Ethernet LEDs. There are 2 push buttons on the device. 84/108 Device Descriptions Receiver \LAN 1 5 4 6 Figure 10-2: 10.2.2.1 Communication Radio Status Stop SD Factory Reset 2 Power / Alarm 3 GND Data+ Data – 7 Connections, LEDs and buttons of Receiver \LAN Relay output Receptacle for microSD card Stop writing push button for SD card EIA-485 Modbus connector Ethernet connector with LINK and TRAFFIC LEDs Factory Reset push button 4 status LEDs next to antenna LED Signals GesySense/UserDoc/GesySense_HW Manual-EN-v1.1.docx, v 1.1, 08/12/2015 There are 4 LEDs (Figure 10-2, ) next to the antenna signaling the following: Power / Alarm: green constant light indicates operational readiness, red: error, Status: green flashing indicates „OK”, Radio: green flickering indicates radio data transfer, Communication: yellow flickering indicates data transfer; green flickering indicates that the data connection is active but no data are exchanged. Two LEDs at the Ethernet connector (Figure 10-2, ) indicate an existing connection (LINK) and the current TRAFFIC. 85/108 Device Descriptions 10.2.3 Receiver \LAN MicroSD Card Receptacle and “Stop SD” Push Button The Micro SD card receptacle takes one microSD card for storing received data. The memory card is inserted into the slot at the long side (Figure 10-2, ). The card is FAT32 formatted. To prevent that data is written on the SD card while removing it, push button in Figure 10-2 (Stop SD) has to be pressed to stop any writing process. 10.2.4 Factory Reset Push Button This function is not implemented yet. 10.2.5 Relocation of the Antenna In order to improve receiving conditions antenna cables of different lengths are available for the Receiver \LAN by which the antenna can be mounted in a position offering better conditions. (cf. 10.8, “Accessories”). For example devices can thus be mounted in switching cabinets, behind a wall or close to a socket outlet with the antenna itself placed at a favorable position. Additionally an antenna splitter can be inserted to connect 2 antennas to 1 device (e.g. to cover two rooms). Note: The splitter reduces the receiving quality of each antenna. 10.3 Mounting Note the detailed installation instruction accompanying the device. GesySense/UserDoc/GesySense_HW Manual-EN-v1.1.docx, v 1.1, 08/12/2015 The Receiver \LAN is delivered with MicroSD card, antenna and a mounting bracket to fix it to wall or ceiling. Prior to fixing the device the supplied antenna has to be screwed to it and the MicroSD card has to be inserted, cf. 10.2.3. 10.3.1 Requirements to the Mounting Location Operating temperature and humidity stated in section 10.6, “Technical Specifications” have to be observed. For proper operation the device requires a permanent and uninterrupted power supply. For selection of the mounting location please refer also to the possibilities described in section 10.2.5, “Relocation of the Antenna”. 86/108 Device Descriptions 10.3.2 Receiver \LAN Mounting the Device The Receiver \LAN is installed using an assembly bracket Attention: The antenna must be perpendicular to the floor! The supplied assembly bracket can be aligned horizontally or vertically. However, it is important that the Receiver \LAN is bolted with the assembly bracket, with the antenna perpendicular to the floor. Attention: Distance to walls! Keep a distance of at least 15 cm between antenna and the next wall. This is ensured by the assembly bracket in one direction. However, this distance has to be observed in other directions as well. The device should not be mounted in a corner. Mounting Location Please refer also to section 3, “Setting up the Systems”. Note: In case of demanding radio technical conditions it is recommended to determine the location of the receiver as well via a field strength measurement after all sensors have been commissioned. Mounting alternatives GesySense/UserDoc/GesySense_HW Manual-EN-v1.1.docx, v 1.1, 08/12/2015 The receiver is bolted to the assembly bracket with two screws. Depending on the alignment on the assembly bracket, different boreholes in the sheet and in the housing of the component are used for this purpose. Thus, if applicable, screws in the housing have to be changed over. Figure 10-3: Mounting variants for the Receiver \LAN The assembly bracket can be installed either horizontally or vertically; the required boreholes are already provided. It is important that the antenna is perpendicular to the floor. 87/108 Device Descriptions Receiver \LAN The assembly bracket is either bolted to the wall or the ceiling. The mains cable is connected to the power supply. Furthermore the receiver is connected via Ethernet (Figure 10-2, ) or an EIA-485 cable (Figure 10-2, , connector pin assignment on the device) to a data logger or other superior system. A cable strap is attached to the assembly bracket as strain relief for the mains and data cables. Figure 10-4: Fixing power supply and data cables For strain relief the cables are attached to the assembly bracket by means of a cable strap. Having connected the device to Ethernet and power supply the Receiver \LAN is ready for final commissioning. Depending on usage, however, the digital output has to be connected and/or the EIA-485 Modbus connection has to be made. GesySense/UserDoc/GesySense_HW Manual-EN-v1.1.docx, v 1.1, 08/12/2015 10.3.3 EIA-485 Modbus Connection If the Receiver \LAN shall communicate with a superior system by serial EIA485 connection instead of Ethernet, the Modbus RTU connection must be made according to the information shown on the device (Figure 10-2, ). The following communication parameters can be used EIA485 8 Data bits none Parity 1 Stop bit Transmission rate Table 10-1: 19 200 Receiver \LAN EIA-485 communication settings 88/108 Device Descriptions 10.3.4 Receiver \LAN Connecting the Digital Output The Receiver \LAN offers one relay output (switch over). Its pin assignment is indicated on the housing (Figure 10-2, ). The output has an electric strength of 230 V (max) and a nominal current of 2 A. Use a 2 A surge proof fuse (C). 10.4 Putting the Device into Operation Commissioning of the GesySense Receiver \LAN is done via its web interface. For this, the following settings have to be made: Set the IP address Define authorized users Check/set system clock The necessary steps to put the device into operation are described in this chapter. Its configuration with respect to wireless modules and repeaters installed is made by a GesySense configuration program e.g. GesySense LogIt. The necessary steps for this are described in the manual of the respective software7. The archive of measured values received from the wireless network and stored in the Receiver \LAN can be directly accessed via Ethernet using FTP. The standard access is, however, via Modbus TCP or the EIA-485 interface with Modbus RTU. For detailed information on the Modbus registers please refer to the documentation ““GesySense Modbus Communication” [1]. GesySense/UserDoc/GesySense_HW Manual-EN-v1.1.docx, v 1.1, 08/12/2015 10.4.1 Connecting to the Receiver’s Web Interface The basic settings for the device itself can be performed through its Web Interface. Furthermore the Web Interface will, after configuration according to the layout of the wireless system, display current measurement values. The Web Interface can be accessed by entering the device’s IP address in the web browser of a computer connected to receiver. By default the Receiver \LAN is delivered with the preset IP address 192.168.100.100 and the subnet mask 255.255.255.0. Is your PC located in a different subnet, you can access the receiver under Microsoft Windows XP, 7 or 8 using the following commands, without the need to set a permanent new IP address in the network settings first. However, this example will only work with devices in delivery status or after a factory reset: 7 s. [2] “GesySense LogIt User Manual 89/108 Device Descriptions Note Receiver \LAN To perform the following commands, administrator rights or a UAC authorization are required. For Windows XP 1. Open the Command Prompt (under All Programs > Accessories), 2. Enter the command route add 192.168.100.0 mask 255.255.255.0 %COMPUTERNAME%8. For Windows 7 and later 1. Open the Command Prompt by right-clicking the Start menu with the mouse and select the option “Run as Administrator” 9, 2. Enter the command ipconfig in order to query the current IPv4 address of your computer, 3. Enter the command route add 192.168.100.100 mask 255.255.255.255 xxx.xxx.xxx.xxx (where xxx.xxx.xxx.xxx corresponds to the current IPv4 address of your computer). 10 GesySense/UserDoc/GesySense_HW Manual-EN-v1.1.docx, v 1.1, 08/12/2015 Now enter the IP address 192.168.100.100 in the address bar of your web browsers in order to access the Web Interface for configuration of the router. 8 9 You can use the command described for windows 7 as well. But the %COMPUTERNAME% part will not work with 7. Alternatively you can click the Windows Start button, type “cmd” into the search area and hit the shift+ctrl+enter keys. 10 route add 192.168.100.0 mask 255.255.255.0 xxx.xxx.xxx.xxx can be used as well. 90/108 Device Descriptions Figure 10-5: 10.4.2 Receiver \LAN The Web Interface of the Receiver \LAN Specifying the IP Address Open the SETTINGS tab and select Local Area Network from the CATEGORIES on the left to change the IP settings. You will be prompted for user name and password. GesySense/UserDoc/GesySense_HW Manual-EN-v1.1.docx, v 1.1, 08/12/2015 Note: To access the setting options of the receiver via the Web Interface, a user with name “gesytec“ and password “admin“ is set upon delivery. Please immediately change the password after initial commissioning. Figure 10-6: Network Settings of Receiver \LAN 91/108 Device Descriptions Receiver \LAN The desired values can now be entered into the fields IP Address, Subnet Mask, Gateway, Primary DNS Server and Secondary DNS Server. Alternatively you may specify the use of dynamic IP address data via the Enable DHCP checkbox. The settings will only be applied after clicking the Save button. Note: In order to avoid collisions, make sure that the IP-Address of the receiver has not already been assigned to another device in your network, as this could disturb the communication. Note: For static IP settings, the fields related to gateway and DNS server may also remain empty. They will be required, however, if external NTP servers shall be used or a remote maintenance is intended. Note: Keep in mind that upon modification of the router’s IP address the current connection to the Web Interface will be lost, meaning it has to be newly established afterwards. If DHCP is used, the new IP address of the router has to be identified first. Note: We discourage from the use of dynamic IP addresses for the receiver, as the connection to the device will be interrupted for some time upon each change of address. However, this can be avoided by setting the DHCP server to always assign the same DHCP lease with the same IP address to the Receiver \LAN. 10.4.3 Changing the Password, Managing Users Upon the first login, please change the password of the default user “gesytec”. Select User Password in the SETTINGS tab under the CATEGORIES on the left. There is just one login to the receiver. Thus, you can enter the name “gesytec" and assign a new password to this name or you can create a new user and a new password. Upper / lower case is relevant. GesySense/UserDoc/GesySense_HW Manual-EN-v1.1.docx, v 1.1, 08/12/2015 Apply Changes will store the modified user and password. Figure 10-7: Change password of Receiver \LAN 92/108 Device Descriptions 10.4.4 Receiver \LAN Adapting the Time Settings For manually setting the device time or enabling an NTP server access open the SETTINGS tab and select Time from the CATEGORIES on the left. Figure 10-8: Note: Time settings of Receiver \LAN Within the GesySense system and in all devices times are given in UTC. This has to be observed for any input or communication with other systems. In order to have a synchronized time across different devices the Receiver \LAN can be set for synchronization with an NTP server (Network Time Protocol). To start this, check the Enable NTP Client Update box and select an NTP server from the list. Note: Keep in mind to enter the details related to Gateway and DNS servers in the IP Settings (see above) when using external time servers. GesySense/UserDoc/GesySense_HW Manual-EN-v1.1.docx, v 1.1, 08/12/2015 Click on the Save button to store the settings. 93/108 Device Descriptions 10.5 Receiver \LAN Data Presentation in Web Interface The Receiver \LAN shows the latest measured of all wireless modules which are defined in its configuration. GesySense/UserDoc/GesySense_HW Manual-EN-v1.1.docx, v 1.1, 08/12/2015 Figure 10-9: Measured values shown in Receiver \LAN web interface Values can be sorted by clicking the column headings. Further to measured values additional information on network operation is shown, e.g. signal Strength and Quality. The Quality is calculated from the ratio of expected messages with the standard interval of 270 s to the number of really received over a period of 30 minutes. Strength refers to the signal strength measured by the first receiving station of the system, which may as well be a repeater. The Battery value is a calculated on amongst other parameters, the start datum of the device and the expected battery life11. 11 If a wireless module has got no start datum a misleading value will be displayed. 94/108 Device Descriptions 10.6 Receiver \LAN Technical Specifications GesySense/UserDoc/GesySense_HW Manual-EN-v1.1.docx, v 1.1, 08/12/2015 Radio Data Transmission Receiver, emitter low power radio system European ISM band P.W002x4 433-MHz (433.05 – 434.79 MHz), <10 mW American ISM band P.W012x4 915 MHz band (902 – 928 MHz), <1 mW Free field range up to 250 m Emitter identificationunique 10 digits ID Interfaces Ethernet Connector LEDs EIA-485 Connector Relay Electric strength Nominal current Connector 10/100 baseT RJ45 link, traffic RxTx, GND, RxTx, 3 pin plug screw connector, 0.14 – 1.5 mm2 switch over 230 V max. 2 A, use 2 A surge proof fuse (C) 3 pin plug screw connector, 0.2 – 2.5 mm2 Power supply P.W0x204 mains supply Power input Connection P.W0x214 Power input 90 – 264 V AC, 47 – 63 Hz 3W internal, fixed, cable length 1.5 m Power over Ethernet, 802.3af, PD 2 W typically, max. 3 W Features Real-time clock, optional Monitoring Local memory battery buffered watchdog timer Slot for microSD card, FAT32 Display & Operation Status LEDs Push buttons 4: Power/Alarm, Status, Radio, Communication Factory Reset Stop SD Dimensions & Environmental Conditions Weight 330 g, incl. cable Dimensions w/o antenna 50 x 80 x 150 [mm] with antenna 50 x 80 x 315 [mm] 95/108 Device Descriptions Housing Flammability Temperature Receiver \LAN ABS UL94 HB, self-extinguishing operating 0 – +55 °C storage -20 – +70 °C Humidity DIN 40040 class F, 5-93%, no condensation Protection class IP 40 according to DIN EN 60 529 Mounting wall mounting with assembly bracket Fitting position vertical Assembly bracket weight 190 g dimensions 40 x 72 x 170 [mm] Certificates EMC Radio 10.7 material emission EN 55022 immunity EN 61000-6-2 ETSI EN 300 220-1 V2.3.1 (2009-12) DIN EN 50371 Maintenance Instructions Periodic, preventive maintenance is not required for the Receiver \LAN. A failure or the improper operation of the Receiver is detected via the monitoring data on the connected data server or superior system. GesySense/UserDoc/GesySense_HW Manual-EN-v1.1.docx, v 1.1, 08/12/2015 In addition, problems can be discovered by an improper LED signal (see 10.2.2.1). If problems cannot be explained by modified external conditions (power or data cables, new effects on radio signal, …) which can be corrected, an exchange of the device may become necessary. To do this the faulty device is replaced by a new one and data and power cables are reconnected. If the new device is not configured yet, it may be configured at startup from the data server (Modbus master) if system operation is set correspondingly. Otherwise the correct configuration (and the assignment as a receiver) has to be loaded from the configuration program. Note: Check proper operation of the new device by its LEDs 10.7.1 Firmware Update For a firmware update of the device a file ttr4_v0_xxx.bin is provided. Using an FTP program this file has to be copied to the UPDATE directory on the device. The device will then update itself automatically. Note: User name and password are required for to access the device via FTP. The default values for these se are provided in chapter 10.4.2. 96/108 Device Descriptions 10.8 Receiver \LAN Accessories Detached Antenna Antenna cable 1.5 m for GesySense Receiver and Repeater P.WZ0203 Antenna cable 5 m for GesySense Receiver and Repeater P.WZ0212 Antenna splitter with antenna, cable 1.5 m for GesySense Receiver and Repeater P.WZ0213 As P.WZ0212, but with 5 m cable GesySense/UserDoc/GesySense_HW Manual-EN-v1.1.docx, v 1.1, 08/12/2015 P.WZ0202 97/108 Device Descriptions 11 Configurator Configurator For information on installation and operation of each component read the Installation Instruction and the information provided by this Technical Manual. 11.1 Safety Instructions and Warning Notices Please observe the notes from chapter 1.2 “Safety Instructions and Warning Notices 11.1.1 Identification The type label on the device provides information on: Product line and device name: Order code, serial number, hardware code TTP.XXXn manufacturer GesySense/UserDoc/GesySense_HW Manual-EN-v1.1.docx, v 1.1, 08/12/2015 Note: This device has not got the 10 digit module ID like the other GesySense wireless devices, as it is not participating in the active wireless system, but an adapter to communication from the PC based the configuration program for commissioning and parameterization. Figure 11-1: 11.2 GesySense Configurator Usage, Requirements for Operation Connected to the USB port of a PC the GesySense Configurator is the bridge from the configuration program running on the PC to the wireless system. It communicates with the wireless system on the operating frequency and transmits 98/108 Device Descriptions Configurator parameterization data to wireless modules at the parameterization frequency 13.56 MHz. Figure 11-2: 11.2.1 GesySense Configurator, radio adapter between PC and wireless modules Requirements to Ambient Conditions Operating temperature and humidity stated in section 11.4 “Technical Specifications” have to be observed. 11.2.2 Display and Control Facilities GesySense/UserDoc/GesySense_HW Manual-EN-v1.1.docx, v 1.1, 08/12/2015 The GesySense Configurator features push button “GO”, a multi-color LED and an acoustic signal. The dashed circle serves to correctly place the device on top of wireless modules for inductive communication. Functionality and meaning of button, LED and sound signal are related to the software program used with the Configurator. Therefore they may differ from the principal operation described here. Please refer to descriptions provided with such programs Figure 11-3: 11.2.2.1 Operating elements of the GesySense Configurator LED and Sound Signals Green Flashing: Power supply is ok but there is no data communication between configuration program on the PC and the Configurator yet (e.g. 99/108 Device Descriptions Configurator because it has not yet been started, or the COM port has not yet been assigned or because an error has occurred), 11.2.2.2 Green Continuous Light: Power supply is ok and the Configurator can communicate with the configuration program, Yellow Flashing, accompanied by an acoustic signal: The Configurator is ready for data exchange with a wireless module, Yellow Continuous Light, accompanied by two acoustic signals: The wireless module has been successfully configured and activated, Red Flashing: ◦ During configuration or activation of a wireless module: An error has occurred. ◦ If in GesySense LogIt “Alarm Broadcasting” is turned on and combined with an acoustic signal: a limit value has been exceeded. Nearfield Communication with Wireless modules GesySense/UserDoc/GesySense_HW Manual-EN-v1.1.docx, v 1.1, 08/12/2015 For data transfer to a module the induction loop of the Configurator has to be placed closely (< 5 cm) above that of the module. For modules with flat housing, e.g. the Thermo-Sensor, it should be like shown in the picture below. For modules with box housing the position should be a central one. Figure 11-4: Nearfield communication of the Configurator The gray circle shown on the Configurator is above the sensitive area of the module, red square in the drawing 11.2.2.3 Push Button For easy commissioning of the wireless modules the Configurator is provided with a „Go” button on the housing. As soon as the data point to be assigned or the wireless module to be configured has been select in the configuration software, the Configurator is „armed“ and pressing the pushbutton launches the ac- 100/108 Device Descriptions Configurator tual configuration process activating the component and assigning it to its particular data point. 11.3 Installation and Commissioning The GesySense Configurator comes with antenna and USB cable. The antenna by which the device receives messages from wireless modules and repeaters has to be screwed into the screw thread. Note: While working close to wireless modules (nearfield communication) the antenna can be temporarily remove for better handling. Attention: Prior to connecting the Configurator to the PC the GesySense configuration program must be installed, as this includes the necessary device drivers for the Configurator. The Configurator is connected to an USB port of the configuration PC after the GesySense software was installed. If the installation assistant for new hardware shows up, select the option “automatic installation”. A warning may be shown that the device didn’t pass the Windows Logo Test. This can be ignored. A permanent green light on the Configurator indicates that it is ready for operation (cf. 11.2.2.1). GesySense/UserDoc/GesySense_HW Manual-EN-v1.1.docx, v 1.1, 08/12/2015 11.4 Technical Specifications Radio Data Transmission European ISM band P.W00401 433-MHz (433.05 – 434.79 MHz), <10 mW American ISM band P.W01401 915 MHz band (902 – 928 MHz), <1 mW Free field range up to 250 m Emitter identificationunique 10 digits ID Parameterization Receiver, inductive^ Range ISM 13.56 MHz band <10 cm Interface USB 2.0 full speed Power supply via USB connection Features LED 1 tricolor: communication, configuration process 101/108 Device Descriptions Configurator Push button Acoustic signal 1 configuration process Dimensions & Environmental Conditions Weight 135 g Dimensions 79 x 117 x 24 [mm] antenna 165 mm Housing material ABS, TPE color light gray, RAL 7035 basalt gray RAL 7012 Flammability Temperature UL94 HB, self-extinguishing operating -30 – +70 °C storage -5 – +35 °C Humidity DIN 40040 class F, 5-93%, the board has a protective coating Protection class IP 30 according to DIN EN 60 529 Certificates EMC Radio 11.5 emission EN 55022 living space (B) immunity EN 61000-6-2 ETSI EN 300 330-1 V1.5.1 ETSI EN 300 220-1 V2.3.1 DIN EN 50371 Maintenance Instructions Periodic, preventive maintenance is not required for the GesySense Configurator. GesySense/UserDoc/GesySense_HW Manual-EN-v1.1.docx, v 1.1, 08/12/2015 11.5.1 Firmware Update The device firmware can be updated using the GesySense configuration program, e.g. GesySense LogIt. 102/108 GesySense/UserDoc/GesySense_HW Manual-EN-v1.1.docx, v 1.1, 08/12/2015 Appendix Configurator Appendix 103/108 Appendix 12 Appendix 12.1 List of Tables Table 9-1: Table 9-2: Table 10-1: GesySense/UserDoc/GesySense_HW Manual-EN-v1.1.docx, v 1.1, 08/12/2015 12.2 Figure 2-1: Figure 2-2: Figure 2-3: Figure 2-4: Figure 2-5: Figure 2-6: Figure 4-1: Figure 5-1: Figure 5-2: Figure 5-3: Figure 5-4: Figure 6-1: Figure 6-2: Figure 6-3: Figure 6-4: Figure 7-1: Figure 8-1: Figure 8-2: Figure 8-3: Figure 8-4: Figure 9-1: Figure 9-2: Figure 9-3: Figure 10-1: Figure 10-2: Figure 10-3: Figure 10-4: Figure 10-5: Figure 10-6: Figure 10-7: Appendix Receiver, pin assignment D type socket .......................................................... 76 Receiver, communication settings EIA-232 and EIA-485 .............................. 76 Receiver \LAN EIA-485 communication settings ........................................... 88 List of Figures Direct transmission to Receiver connected to networked data server ............. 12 Direct transmission to PC ................................................................................ 13 Direct transmission to PC and logging in sensor ............................................. 13 Direct transmission to system Receiver with storage on SD card ................... 14 Direct transmission to networked system Receiver ......................................... 14 Direct transmission to networked DELTA data server ...................................... 15 GesySense Thermo-Sensor and Thermo-Logger ............................................. 24 GesySense Digital-Sensor and Digital-Logger ................................................ 33 Connecting terminal on Digital-Module board ................................................ 36 Housing dimensions Digital-Sensor/Logger .................................................... 37 Logger module open ........................................................................................ 40 PT1000 Sensor and Logger .............................................................................. 43 Connecting terminal on the board of the PT1000 Module .............................. 46 Housing dimensions PT1000 Sensor/Logger................................................... 46 Logger module open ........................................................................................ 50 T-H-Sensor and Logger ................................................................................... 53 SAM 2PT-2D-1R ............................................................................................. 62 Connections and fuse on electronic board of the SAM module ...................... 65 SAN connections for external supply, digital input, relay contact .................. 66 Housing dimensions SAM 2PT-2D-1R ........................................................... 67 GesySense Repeater/Receiver ......................................................................... 74 Mounting variants for the repeater/receiver ..................................................... 78 Fixing power supply and data (only Receiver) cables ..................................... 79 GesySense Receiver \LAN .............................................................................. 83 Connections, LEDs and buttons of Receiver \LAN ......................................... 85 Mounting variants for the Receiver \LAN ....................................................... 87 Fixing power supply and data cables ............................................................... 88 The Web Interface of the Receiver \LAN ........................................................ 91 Network Settings of Receiver \LAN ................................................................ 91 Change password of Receiver \LAN ............................................................... 92 104/108 Appendix Figure 10-8: Figure 10-9: Figure 11-1: Figure 11-2: Figure 11-3: Figure 11-4: GesySense/UserDoc/GesySense_HW Manual-EN-v1.1.docx, v 1.1, 08/12/2015 12.3 Appendix Time settings of Receiver \LAN ...................................................................... 93 Measured values shown in Receiver \LAN web interface ............................... 94 GesySense Configurator .................................................................................. 98 GesySense Configurator, radio adapter between PC and wireless modules .... 99 Operating elements of the GesySense Configurator ........................................ 99 Nearfield communication of the Configurator ............................................... 100 Terminology and Symbols BFO Electronics hardware code of the GesySense Sensor-ActuatorModule; used on type labels. CEPT Conférence Européenne des Administrations des Postes et des Télécommunications. Data server Modbus master device within the concept of the communication protocol. The device reads measurement and status data collected within the GesySense wireless system from the central Receiver. A local data server can be networked with other servers. ETSI European Telecommunications Standards Institute. ISM band Industrial, Scientific and Medical Band; Radio bands reserved internationally for the use of radio frequency energy for the named purposes other than telecommunications. The GesySense system uses these bands. However, there are different regulations to be observed around the world. LogIt Configuration software for GesySense systems; running on Windows PCs. LPR Low Power Radio; Radio devices for which there is a general authorization in accordance with the ISM requirements. MX Mixed signal modules, e.g. for measuring temperature and digital inputs with one device. Modbus Communication protocol used by the GesySense system (Modbus RTU or Modbus TCP) to communicate with other systems. Module ID Each GesySense wireless device has got a unique and unchangeable 10 digit module ID which is affixed to the device (T.nnn.nnn.nnn). This ID is part of every message as well as a consecutive message number 105/108 Appendix Appendix Operating frequency Frequency band used for transmitting the measured values (In contrast to the -> parameterization frequency). Parameterization frequency Nearfield frequency band for configuration of wireless modules. (ISM range) PoE Power over Ethernet, the device is power supplied via its network connection. Receiver Each GesySense system has one receiver to which all messages go. The term is as well used as product name as in its general sense. Currently there are two types of receivers: with or without Ethernet. Repeater is a receiver and emitter device used to extend the transmitting distance or amplify the radio signal GesySense/UserDoc/GesySense_HW Manual-EN-v1.1.docx, v 1.1, 08/12/2015 Receiver/Repeater Certain GesySense Receivers can also be used as Repeater. Their use is determined by the settings assigned during system configuration. SAM Sensor-Actuator module transmits measure values and receives configuration and control parameters on the operating frequency. TTA Electronics hardware code of the GesySense Analog-Sensor. used on type labels. TTE Electronics hardware code of different GesySense sensor and logger modules; used on type labels. TTH Electronics hardware code of the GesySense T-H modules for temperature and humidity measurement; used on type labels. TTP Electronics hardware code of the GesySense Configurator; used on type labels. TTR Electronics hardware code of certain GesySense receivers and repeater; used on type labels. Type code Part of the 10 digit module ID; identifies the device type within the wireless system Wireless module Collective name for sensor and logger modules. Electrostatic sensitive device! When working on an open device ESD protection measures must be observed. 106/108 Appendix GesySense/UserDoc/GesySense_HW Manual-EN-v1.1.docx, v 1.1, 08/12/2015 12.4 Appendix Index accessories battery box housing battery flat housing battery SAM detached antenna PT1000 probe assembly plate battery replacement Digital-Modul PT1000 SAM Thermo-Sensor/-Logger T-H-Sensor/-Logger BFO calibration chip sensor PT1000 Thermo-Sensor/-Logger T-H-Sensor/-Logger Configurator connections Digital Module PT1000 SAM counter module Counter-Sensor device data data server DHCP Digital-Logger battery replacement connections LED maintenance Digital-Sensor battery replacement connections maintenance EIA-485 ETSI external systems firmware 42, 52 32, 61 73 82, 97 52, 72 27, 56 39 49 70 30 59 105 25 49, 70 30 58 16, 98 36 46 65 33 33 35 105 92 33, 34 39 36 25 39 33, 34 39 36 39 75, 76, 84 105 22 22 update gateway inductive transmission initial operation system installation sensors IP address dynamic ISM band LED Configurator Digital Logger PT1000-Logger Receiver \LAN Receiver/Repeater SAM T-H Logger locking bolt logger module LogIt LPR Modbus Modbus EIA-485 Modbus master Modbus RTU Modbus TCP module ID MX operating frequency parameterization frequency password PoE PT1000 probe PT1000-Logger battery replacement maintenance PT1000-Sensor battery replacement maintenance Receiver 22 92 27 19 26, 55 27, 56 91 92 15, 105 99 25 45 85 75 64 55 27, 56 16 105 105 22, 105 88 20 12, 16, 22, 84 22, 84 16, 105 105 15, 106 15, 99, 106 91, 92 84, 106 52, 72 44 49 48 44 49 48 16, 75 107/108 Appendix calibration maintenance technical specifications temperature measurement T-H-Logger battery replacement calibration LED maintenance T-H-Sensor battery replacement calibration maintenance TTA TTE TTH TTP TTR type code unique ID update Configurator firmware receiver Receiver \LAN repeater Web Interface 30 30 28 25 53, 54 59 58 55 58 53, 54 59 58 58 106 106 106 106 106 106 16, 105 102 22 22 96 22 89, 91 GesySense/UserDoc/GesySense_HW Manual-EN-v1.1.docx, v 1.1, 08/12/2015 connector 76 device data 75 LED 75 Receiver/Repeater 74 Repeater 16, 75, 106 connector 76 device data 75 LED 75 replacement 81 SAM 62, 106 battery replacement 70 fuse 63 maintenance 69 sensor replacement 32, 41, 51, 61, 72 sensor module 16 Sensor-Actuator-Module 16, 62, 105 Status-Sensor 33, 34 subnet mask 92 support 4 system configuration 12 Thermo-Logger 24, 25 battery replacement 30 calibration 30 maintenance 30 technical specifications 29 Thermo-Sensor 24, 25 battery replacement 30 Appendix 108/108