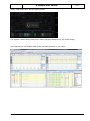
1
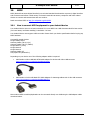
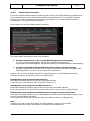
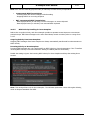
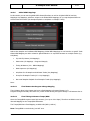
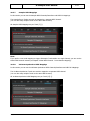
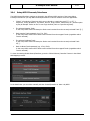
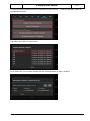
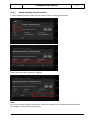
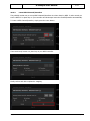
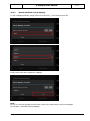
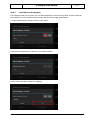
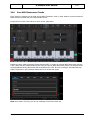
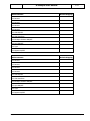
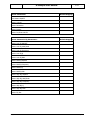
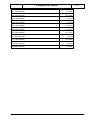
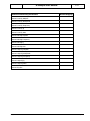
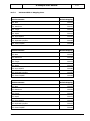
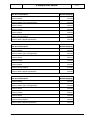
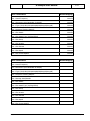
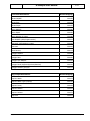
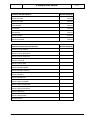
G-Stomper User Manual V.4.5 G-Stomper Studio G-Stomper Rhythm G-Stomper VA-Beast User Manual App Version: Date: Author: 4.5 31/10/2015 planet-h.com Official Website: http://www.planet-h.com/ Contents 20 31/10/2015 MIDI .................................................................................................................................. 2 20.1 20.1.1 How to connect MIDI equipment to your Android device ................................... 2 Connect classic MIDI equipment to your device: ........................................................... 3 20.2 20.2.1 20.2.2 20.2.3 20.2.4 20.2.5 20.2.6 G-Stomper MIDI Overview .................................................................................. 4 Full Roundtrip MIDI ..................................................................................................... 4 Multiple Virtual MIDI Interface support ......................................................................... 4 Transmitted MIDI messages ........................................................................................ 4 Latency Compensation ................................................................................................ 4 MIDI Learn ................................................................................................................. 5 Available MIDI Channel Mappings ................................................................................ 5 20.3 20.3.1 20.3.2 20.3.3 20.3.4 20.3.5 20.3.6 20.3.7 20.3.8 MIDI Setup .......................................................................................................... 7 MIDI Device................................................................................................................ 8 Midi Transmission ....................................................................................................... 8 Default IN/OUT Interfaces ........................................................................................... 9 Latency compensated MIDI Transmission ................................................................... 10 MIDI Velocity Handling for Drum Samplers ................................................................. 11 Global MIDI Mappings ............................................................................................... 12 Sampler MIDI Mappings ............................................................................................ 14 VA-Beast Synthesizer MIDI Mappings ......................................................................... 14 20.4 20.4.1 20.4.2 Setup MIDI Channels/Interfaces ...................................................................... 15 Manual Edit MIDI Channel/Interface ........................................................................... 17 Learn MIDI Channel/Interface .................................................................................... 18 20.5 20.5.1 20.5.2 Setup MIDI CC/Key Mappings ........................................................................... 19 Manual Edit MIDI CC/Key Mapping ............................................................................. 20 Learn MIDI CC/Key Mapping ...................................................................................... 21 20.6 Pure MIDI Instrument Tracks ........................................................................... 22 20.7 20.7.1 20.7.2 20.7.3 20.7.4 MIDI CC & Key Mapping Charts ......................................................................... 23 Global MIDI CC/NRPN Mapping Chart ......................................................................... 23 Global MIDI Key Mapping Chart ................................................................................. 28 Sampler MIDI CC Mapping Chart ................................................................................ 34 VA-Beast MIDI CC Mapping Chart .............................................................................. 37 20.8 20.8.1 MIDI Export ....................................................................................................... 43 Export Pattern as MIDI .............................................................................................. 44 Page 1 G-Stomper User Manual 20 V.4.5 MIDI MIDI (Musical Instrument Digital Interface) is a technical standard that describes a protocol, digital interface and connectors and allows a wide variety of electronic musical instruments, computers and other related devices to connect and communicate with one another. Read more about MIDI on http://en.wikipedia.org/wiki/MIDI. 20.1 How to connect MIDI equipment to your Android device Your Android device must run at least on Android 3.1 to use MIDI over USB. Recommended for best results (for lower latency and better stability) is Android 4.2 or later. Your Android device must support USB host mode. Please check your device specifications before buying any MIDI hardware. Successfully tested devices: Google Galaxy Nexus Samsung Galaxy Tab 10.1(v1) Samsung Galaxy Tab 7.7 (P6800) Google Nexus 7 (2013) Google Nexus 9 Google Nexus 6 Samsung Galaxy S5 Sony Xperia Z3 (Android 5.x) Depending on your device one of the following adapter cables is required: USB Female to Micro USB Male OTG Cable Adapter for devices with Micro USB connector http://www.amazon.com/gp/product/B0081CRXGI USB Female to 30 Pin USB Male OTG Cable Adapter for Samsung tablets with 30 Pin USB connector http://www.amazon.com/gp/product/B0096KJTU2 Most modern MIDI controllers/keyboards can be connected directly over USB using the USB adapter cables mentioned above. 31/10/2015 Page 2 G-Stomper User Manual V.4.5 Successfully tested Controllers: Akai MPK225 Akai MPK25 Akai MPKmini MK2 Note: A good practice is to use self-powered MIDI controllers (which can be used with an external power supply) or controllers with a special low-power mode (like the Akai MPK225) to minimize the battery strain on your Android device. 20.1.1 Connect classic MIDI equipment to your device: To connect Non-USB MIDI hardware equipped with a classic 5 Pin DIN connector, an USB class-compliant MIDI Interface is required (e.g. ESI MIDIMate II). http://www.esi-audio.com/products/midimate2/ 31/10/2015 Page 3 G-Stomper User Manual 20.2 V.4.5 G-Stomper MIDI Overview 20.2.1 Full Roundtrip MIDI All G-Stomper apps, G-Stomper Studio, G-Stomper VA-Beast and G-Stomper Rhythm, come with full MIDI roundtrip integration, which lets you … … control G-Stomper with your MIDI controller … hook up MIDI capable Samplers and Synthesizers … send MIDI feedback to your MIDI feedback capable MIDI Controller, e.g. such with flashing Pads like the AKAI MPK225, with Motor Faders or with LED based Knobs or Faders … synchronize with external MIDI equipment (Master or Slave) 20.2.2 Multiple Virtual MIDI Interface support Some class-compliant MIDI Interfaces/Controllers provide multiple Virtual MIDI Interfaces (to address more than 16 MIDI Channels). These Virtual MIDI Interfaces can be addressed in use of the IN/OUT Interface selectors. The number of available Virtual MIDI Interfaces depends on your MIDI hardware (check the Documentation of your MIDI Interface/Controller). (see also Chapter: MIDI Setup / Default IN/OUT Interfaces) 20.2.3 Transmitted MIDI messages Note Messages: IN/OUT Control Changes: IN/OUT MIDI Clock: IN/OUT MIDI Start/Stop/Continue: IN/OUT Program Changes: IN/OUT (see also Chapter: MIDI Setup / Midi Transmission) 20.2.4 Latency Compensation G-Stomper provides Latency compensation for all sequence related MIDI transmissions. (see also Chapter: MIDI Setup / Latency compensated MIDI Transmission) 31/10/2015 Page 4 G-Stomper User Manual 20.2.5 V.4.5 MIDI Learn G-Stomper provides full MIDI learn capability for … … MIDI Channels and Virtual Interfaces … MIDI CC Mappings … MIDI Key Mappings (see also Chapters: Learn MIDI Channel/Interface, Learn MIDI CC/Key Mapping) 20.2.6 Available MIDI Channel Mappings 20.2.6.1 G-Stomper Studio 1 MIDI Channel for global controls with the option to play all Sampler Tracks at once in one single channel (each on a specific Key/Note) Up to 24 MIDI Channels for the Sampler Tracks 1 MIDI Channel for the selected Sampler Track Up to 12 MIDI Channels for the Synthesizer Tracks 1 MIDI Channel for the selected Synthesizer Track Default setup: The selected Synthesizer track listens to all channels on all virtual interfaces. In other words, if you select Track VT[..] at runtime, then the MIDI events get passed to that particular Track (Synth instance). Note: Mapping more than 16 Channels is only possible if your controller provides multiple Virtual MIDI Interfaces. 20.2.6.2 G-Stomper VA-Beast (standalone) 1 MIDI Channel for global controls Up to 12 MIDI Channels for the Synthesizer Tracks 1 MIDI Channel for the selected Synthesizer Track Default setup: The selected Synthesizer track listens to all channels on all virtual interfaces. In other words, if you select Track VT[..] at runtime, then the MIDI events get passed to that particular Track (Synth instance). Note: Mapping more than 16 Channels is only possible if your controller provides multiple Virtual MIDI Interfaces. 31/10/2015 Page 5 G-Stomper User Manual 20.2.6.3 V.4.5 G-Stomper Rhythm 1 MIDI Channel for global controls with the option to play all Sampler Tracks at once in one single channel (each on a specific Key/Note) Up to 24 MIDI Channels for the Sampler Tracks 1 MIDI Channel for the selected Sampler Track Default setup: Global listens to all channels on all virtual interfaces. In the global channel, by default, the Sampler/Drum Tracks are mapped in a non-tonal way; all tracks (T124) are mapped to the global MIDI channel to the NoteNo 48-71:C3-B4. You’re free to change the mapping either by manually selecting different notes/keys or in use of the MIDI learn feature. (see Chapter: Edit MIDI CC/Key Mappings) Note: Mapping more than 16 Channels is only possible if your controller provides multiple Virtual MIDI Interfaces. 31/10/2015 Page 6 G-Stomper User Manual 20.3 V.4.5 MIDI Setup The MIDI settings are located in the MIDI section of the Setup dialog. 31/10/2015 Page 7 G-Stomper User Manual 20.3.1 V.4.5 MIDI Device The MIDI Device section shows the currently connected MIDI device (brand and model) and its supported transmission directions (IN, OUT, IN/OUT). 20.3.2 Midi Transmission In this section you can globally define, which MIDI messages you want to send and/or receive. Note Messages: Control Changes: Program Changes: MIDI Clock: MIDI Start/Stop/Continue: Send, Send, Send, Send, Send, Receive, Receive, Receive, Receive, Receive, Send & Receive, Off Send & Receive, Off Send & Receive, Off Off Off Note: MIDI Clock and MIDI Start/Stop/Continue are channel-less operations which are sent and received over the Default IN/OUT Interface(s). By default, the default OUT Interface is set to “None”. To be able to send MIDI Clock and/or MIDI Start/Stop/Continue, you must set up a default OUT Interface first (see Chapter: Default IN/OUT Interfaces). 31/10/2015 Page 8 G-Stomper User Manual 20.3.3 V.4.5 Default IN/OUT Interfaces Some class-compliant MIDI Interfaces/Controllers provide multiple Virtual MIDI Interfaces (to address more than 16 MIDI Channels). These Virtual MIDI Interfaces can be addressed in use of the IN/OUT Interface selectors. The number of available Virtual MIDI Interfaces depends on your MIDI hardware (check the Documentation of your MIDI Interface/Controller). In this section you can set the default IN/OUT Interfaces. The default IN/OUT Interfaces are used in two situations: 1. As default Interfaces for Track or Global MIDI Channel/Interface Mappings. You can override the default IN/OUT Interface for each MIDI Channel Mapping (see Chapter: Global MIDI Mappings, Sampler MIDI Mappings, VA-Beast Synthesizer MIDI Mappings) 2. To send/receive MIDI Clock and MIDI Start/Stop/Continue real-time messages. By default, the default OUT Interface is set to “None”. To be able to send MIDI Clock and/or MIDI Start/Stop/Continue, you must set up a default OUT Interface first. What you have to choose as IN/OUT Interfaces strongly depends on your MIDI Hardware (Interface, Controller, Keyboard). These are the three most common cases: MIDI Hardware with One Virtual MIDI Interface: Most MIDI Interfaces/Controllers provide One Virtual MIDI Interface. In this case the correct setting for both IN and OUT Interface is [1]. MIDI Hardware with multiple Virtual MIDI Interfaces: Newer MIDI Interfaces/Controllers may provide more than One Virtual MIDI Interface. In this case the IN and OUT Interface should (most likely) have the same values (e.g. IN[2]/OUT[2]). MIDI Hardware with multiple Virtual MIDI Interfaces mapped to physical DIN cables: Some USB to DIN MIDI Interfaces (e.g. the ESI MIDIMate II) provide multiple Virtual MIDI Interfaces, each wired to a physical IN/OUT DIN Cable. In this special case the IN and OUT Interface MUST have different values (e.g. IN[1]/OUT[2]). Note: A simple way to find out what IN Interface your MIDI Hardware is using is to use the MIDI Channel/Interface learn feature (see Chapter: Setup MIDI Channels/Interfaces). 31/10/2015 Page 9 G-Stomper User Manual 20.3.4 V.4.5 Latency compensated MIDI Transmission When starting and synchronizing over MIDI, or when sequencing external MIDI instruments, the G-Stomper Audio output can be noticeable delayed compared to the external MIDI equipment. This Latency of <N>ms can be compensated directly within G-Stomper. <N> = the complete Latency = Audio Latency + Manual Latency Compensation (see tab AUD) G-Stomper as Sync Master (compensated): When your start G-Stomper, the MIDI start signal will be sent with a delay of <N>ms, exactly in the moment when the G-Stomper Audio output hits the speaker. G-Stomper as Sync Slave (compensated): When you hit start on your external MIDI host, G-Stomper starts at <N>ms rather than at the zero position. This means the first Sequencer Step will be skipped, but the Audio output will be in perfect sync with your external MIDI host. G-Stomper as Sequencer for MIDI Hardware (compensated): When you run a Sequence which sends MIDI events to external hardware, the MIDI events will be sent with a delay of <N>ms, exactly in the moment when the G-Stomper Audio output hits the speaker. Note: If you still notice a delay with the compensation enabled, adjust the 'Manual Latency Compensation' in tab AUD. 31/10/2015 Page 10 G-Stomper User Manual V.4.5 Note: Also note that manually played sounds (in real-time) are NOT Latency compensated. Compensated MIDI Transmissions - Incoming Notes and Control Changes while Recording - Outgoing MIDI from a running Sequence NOT compensated MIDI Transmissions - Manual played Notes (in real-time) from the G-Stomper on-screen Keyboard - Manual played notes (in real-time) from external MIDI Keyboard 20.3.5 MIDI Velocity Handling for Drum Samplers Rather than a regular Velocity, each Drum Sampler provides a separate Accent Sequence to accentuate particular Steps. MIDI Note messages on the other hand always contain a Velocity value in a range from 0..127. Outgoing Velocity from Drum Samplers: Outgoing MIDI messages from Drum Samplers are always automatically transformed from Accentuation to MIDI Velocity. Incoming Velocity to Drum Samplers: Incoming MIDI messages are only transformed from MIDI Velocity to Drum Accentuation, if the “Transform incoming MIDI Velocity to Drum Accentuation“ Setting is enabled (which is the default). Disable the setting to ignore the incoming MIDI Velocity for Drum Samplers and keep the existing Drum Accents. Note: This setting affects only the Drum Samplers. The VA-Beast Synthesizer comes with regular Velocity, which is always transmitted over MIDI. 31/10/2015 Page 11 G-Stomper User Manual 20.3.6 V.4.5 Global MIDI Mappings In this section you can set the global MIDI Channel/Interface as well as all global MIDI CC and Key Mappings. Key Mappings, which are unique in the Global MIDI Mappings, let you map Keyboard Notes to several internal functions (like Sample Playback or Solo/Mute on multiple Tracks). Rather than Sampler and VA-Beast MIDI Mappings, Global MIDI Mappings are not bound to a specific Track. Global MIDI Mapping are either related to global Modules or to a specific Paramter on multiple Tracks (e.g. Solo/Mute). FX, SUM FX, Master (CC Mappings) Pattern Set (CC Mappings + Program Changes) Timing & Measure (CC + NRPN Mappings) Main Sequencer (CC Mappings) Solo/Mute for all Sampler and VA-Beast Tracks (Key Mappings) R-Arp for all Sampler Tracks (CC + Key Mappings) Non-tonal Sampler Playback for all Sampler Tracks (Key Mappings) Note: 20.3.6.1 Fixed Pattern Set Program Change Mapping The 64 Pattern Slots in the Pattern Set have a fixed Mapping to Program Change 0..63. Program Changes internally start from zero, which means sending a Program Change 0 will activate Slot 01. 20.3.6.2 Fixed Timing & Measure Tempo/BPM Since the Tempo/BMP requires extra high accuracy (30.0 up to 300.0 bpm). Therefore an NRPN is used as inbound Mapping for the Tempo/BPM Parameter. The Tempo/BPM has a fixed Mapping to NRPN 138 (MSB 1, LSB 10). Note: Tempo/BPM is received only, but NOT sent. 31/10/2015 Page 12 G-Stomper User Manual 20.3.6.3 V.4.5 Non-tonal Sampler Playback for all Sampler Tracks Key Mappings are unique in the Global MIDI Mappings and let you map Keyboard Notes to several internal functions (like Sample Playback or Solo/Mute on multiple Tracks). By default, the Sampler/Drum Tracks are mapped in a non-tonal way; all tracks (T1-24) are mapped to the Global MIDI Channel, to the NoteNo 48-71:C3-B4. You’re free to change the mapping either by manually selecting different notes/keys or in use of the MIDI learn feature. (see Chapter: Edit MIDI CC/Key Mappings) 31/10/2015 Page 13 G-Stomper User Manual 20.3.7 V.4.5 Sampler MIDI Mappings In this section you can set the Sampler MIDI Channels/Interfaces and MIDI CC Mappings. The Sampler/Drum Tracks can each be mapped to a separate MIDI channel. (You can also map multiple Tracks to the same MIDI channel) All Sampler MIDI Mappings are per Track (T[..]). Note: If you prefer a non-tonal mapping to trigger all Sampler Tracks within one single channel, you can use the Global MIDI channel instead (see Chapter: Global MIDI Channel - Drum Machine Mapping). 20.3.8 VA-Beast Synthesizer MIDI Mappings In this section you can set the VA-Beast Synthesizer MIDI Channels/Interfaces and MIDI CC Mappings. The VA-Beast Synthesizer Tracks can each be mapped to a separate MIDI channel. (You can also map multiple Tracks to the same MIDI channel) All VA-Beast Synthesizer MIDI Mappings are per Track (VT[..]). 31/10/2015 Page 14 G-Stomper User Manual 20.4 V.4.5 Setup MIDI Channels/Interfaces The MIDI Channel/Interface settings are located in the different MIDI sections of the Setup dialog. G-Stomper Studio lets you map MIDI Channels/Interfaces to various modules across the application. “Global”, all modules of functions which are not bound to a particular track T[..] or VT[..]: Sequencer, Timing & Measure, FX, Master, Sum FX, R-Arp, Stutter, Pattern Set, etc., and the option to play all Sampler Tracks at once in one single channel (each on a specific Key/Note). The selected Sampler Track: In this case, MIDI events will always be fired to and received from the currently selected Track T[..]. Each Sampler Track separately (e.g. T01, T02): In this case, MIDI events will be fired to and received from the mapped Tracks (regardless which Track is selected). The selected VA-Beast Track: In this case, MIDI events will always be fired to and received from the currently selected Track VT[..]. Each VA-Beast Track separately (e.g. VT01, VT02): In this case, MIDI events will be fired to and received from the mapped Tracks (regardless which Track is selected). To show the existing Global Channel/Interface, press the “Global Channel, Interface” button in the Global Midi Mappings section. In the detail view you can either manually edit the Channel/Interface or learn it by MIDI. 31/10/2015 Page 15 G-Stomper User Manual V.4.5 To show the existing Channel/Interface of a particular Track, press the “… Channels, Interfaces” button in the appropriate section. Then select the Track you want to show. In the detail view you can either manually edit the Channel/Interface or learn it by MIDI. 31/10/2015 Page 16 G-Stomper User Manual 20.4.1 V.4.5 Manual Edit MIDI Channel/Interface To edit a mapping manually, simply select the desired values from the drop down lists. Finally confirm with OK to update the mapping. Note: Be sure to check out the MIDI Learn function, which is the easiest way to edit MIDI Channels/Interfaces. (see Chapter: Learn MIDI Channel/Interface) 31/10/2015 Page 17 G-Stomper User Manual 20.4.2 V.4.5 Learn MIDI Channel/Interface The probably easiest way to set up MIDI Channels/Interfaces is to learn them by MIDI. In other words you touch a MIDI CC or piano key on your controller and G-Stomper learns the Channel/Interface automatically. To learn a MIDI Channel/Interface, simply press the Learn button. Then touch knob, button or a piano key on your MIDI controller. Finally confirm with OK to update the mapping. 31/10/2015 Page 18 G-Stomper User Manual 20.5 V.4.5 Setup MIDI CC/Key Mappings The MIDI CC and Key mappings are located in the in the different MIDI sections of the Setup dialog. G-Stomper Studio offers a wide range of default MIDI CC/NRPN and Key mappings. You can use them out of the box or you’re of course free to customize them for your personal needs. Note: The default mappings are listed in the Chapters: Global MIDI CC/NRPN Mapping Chart, Global MIDI Key Mapping Chart, Sampler MIDI CC Mapping Chart, VA-Beast MIDI Mapping Chart. To show the existing mappings, press the CC or Key Mappings button in the appropriate section. Then select the mapping which you want to change. In the detail view you can either manually edit the mapping or learn it by MIDI. 31/10/2015 Page 19 G-Stomper User Manual 20.5.1 V.4.5 Manual Edit MIDI CC/Key Mapping To edit a mapping manually, simply select one of the CC#[…] from the drop down list. Finally confirm with OK to update the mapping. Note: Be sure to check out the MIDI Learn function, which is the easiest way to edit your mappings. (see Chapter: Learn MIDI CC/Key Mapping) 31/10/2015 Page 20 G-Stomper User Manual 20.5.2 V.4.5 Learn MIDI CC/Key Mapping The probably easiest way to create your own MIDI mappings is to learn them by MIDI. In other words you turn a MIDI CC on your controller and G-Stomper learns the CC number automatically. To learn a MIDI Mapping, simply press the Learn button. Then touch the desired knob or button on your MIDI controller. Finally confirm with OK to update the mapping. 31/10/2015 Page 21 G-Stomper User Manual 20.6 V.4.5 Pure MIDI Instrument Tracks Every Track in G-Stomper can be used as pure MIDI Instrument Track, in other words to control an external MIDI Instrument rather than the internal Audio Source. Long press one of the Track buttons to show up the Track Menu. Enable the option „MIDI Instrument (Internal Sound OFF)“ to control an external MIDI Instrument with this Track, rather than the internal Audio Source. Using a Track as [MIDI Instrument] means, the internal Sound will be disabled and only MIDI events will be fired from the Track. Be sure to configure the MIDI Channels, IN/OUT Interfaces in the G-Stomper Setup before you enable this option. Note: As a matter of course, you can use a Sampler Track in the same way. 31/10/2015 Page 22 G-Stomper User Manual 20.7 V.4.5 MIDI CC & Key Mapping Charts The following Chapters show the default MIDI CC and Key mapping in G-Stomper Studio. You are of course free to customize the mappings to your own needs. 20.7.1 Global MIDI CC/NRPN Mapping Chart Programmable Multi-Mute: Multi-Mute ON/OFF Common FX Parameters: FX Chain FX1 Parameters: Default Mapping - Default Mapping - Default Mapping FX1: Param1 - FX1: Param2 - FX1: Param3 - FX1: Param4 - FX1: LFO ON/OFF - FX1: LFO Waveform - FX1: Envelope Follower ON/OFF - FX1: Sync ON/OFF - FX1: Type - FX1: Bypass ON/OFF - 31/10/2015 Page 23 G-Stomper User Manual FX2 Parameters: V.4.5 Default Mapping FX2: Param1 - FX2: Param2 - FX2: Param3 - FX2: Param4 - FX2: LFO ON/OFF - FX2: LFO Waveform - FX2: Envelope Follower ON/OFF - FX2: Sync ON/OFF - FX2: Type - FX2: Bypass ON/OFF - FX3 Parameters: Default Mapping FX3: Param1 - FX3: Param2 - FX3: Param3 - FX3: Param4 - FX3: LFO ON/OFF - FX3: LFO Waveform - FX3: Envelope Follower ON/OFF - FX3: Sync ON/OFF - FX3: Type - FX3: Bypass ON/OFF - 31/10/2015 Page 24 G-Stomper User Manual SUM FX1 Parameters: V.4.5 Default Mapping SUM FX1: Param1 - SUM FX1: Param2 - SUM FX1: Param3 - SUM FX1: Param4 - SUM FX1: LFO ON/OFF - SUM FX1: LFO Waveform - SUM FX1: Envelope Follower ON/OFF - SUM FX1: Sync ON/OFF - SUM FX1: Type - SUM FX1: Bypass ON/OFF - SUM FX2 Parameters: Default Mapping SUM FX2: Param1 - SUM FX2: Param2 - SUM FX2: Param3 - SUM FX2: Param4 - SUM FX2: LFO ON/OFF - SUM FX2: LFO Waveform - SUM FX2: Envelope Follower ON/OFF - SUM FX2: Sync ON/OFF - SUM FX2: Type - SUM FX2: Bypass ON/OFF - 31/10/2015 Page 25 G-Stomper User Manual Master Parameters: V.4.5 Default Mapping Lock Master ON/OFF - Master: Volume - Master: Panorama - Master: Bypass - Master: Pre/Post SUM FX - Master Parametric EQ Parameters: Default Mapping Master: Low EQ ON/OFF - Master: Low EQ Shelf/Peak - Master: Low EQ Frequency - Master: Low EQ Q - Master: Low EQ Gain - Master: Mid EQ ON/OFF - Master: Mid EQ Frequency - Master: Mid EQ Q - Master: Mid EQ Gain - Master: High EQ ON/OFF - Master: High EQ Shelf/Peak - Master: High EQ Frequency - Master: High EQ Q - Master: High EQ Gain - Master: EQ Out - 31/10/2015 Page 26 G-Stomper User Manual Patter Set Parameters: V.4.5 Default Mapping Pattern Set: Chain ON/OFF - Pattern Set: Song Mode ON/OFF - Pattern Set: Song Position UP - Pattern Set: Song Position Down - Pattern Set: Pattern Slots 01..64 (Fixed Mapping!) Prog.Change 0..63 Timing & Measure Parameters: Default Mapping Timing & Measure: Tempo/BPM (Fixed Mapping, MIDI IN only!) NRPN 138 (MSB 1, LSB 10) Timing & Measure: Tap Tempo - Timing & Measure: Swing/Shuffle - Timing & Measure: Steps Per Bar - Timing & Measure: Length in Bars - Sequencer Parameters: Default Mapping Sequencer: Loop ON/OFF - Sequencer: R-Arp Rate - Sequencer: R-Arp ON/OFF - Sequencer: Stutter Rate - Sequencer: Stutter ON/OFF - Sequencer: Play - Sequencer: Stop - Sequencer: Record - 31/10/2015 Page 27 G-Stomper User Manual 20.7.2 V.4.5 Global MIDI Key Mapping Chart T[..]: Play/Trigger Sample: Default Mapping T01: Play Sample C3 (048) T02: Play Sample C#3 (049) T03: Play Sample D3 (050) T04: Play Sample D#3 (051) T05: Play Sample E3 (052) T06: Play Sample F3 (053) T07: Play Sample F#3 (054) T08: Play Sample G3 (055) T09: Play Sample G#3 (056) T10: Play Sample A3 (057) T11: Play Sample A#3 (058) T12: Play Sample B3 (059) T13: Play Sample C4 (060) T14: Play Sample C#4 (061) T15: Play Sample D4 (062) T16: Play Sample D#4 (063) T17: Play Sample E4 (064) T18: Play Sample F4 (065) T19: Play Sample F#4 (066) T20: Play Sample G4 (067) T21: Play Sample G#4 (068) T22: Play Sample A4 (069) T23: Play Sample A#4 (070) T24: Play Sample B4 (071) 31/10/2015 Page 28 G-Stomper User Manual T[..]: Rhythm Arp ON/OFF: V.4.5 Default Mapping T01: R-Arp ON/OFF - T02: R-Arp ON/OFF - T03: R-Arp ON/OFF - T04: R-Arp ON/OFF - T05: R-Arp ON/OFF - T06: R-Arp ON/OFF - T07: R-Arp ON/OFF - T08: R-Arp ON/OFF - T09: R-Arp ON/OFF - T10: R-Arp ON/OFF - T11: R-Arp ON/OFF - T12: R-Arp ON/OFF - T13: R-Arp ON/OFF - T14: R-Arp ON/OFF - T15: R-Arp ON/OFF - T16: R-Arp ON/OFF - T17: R-Arp ON/OFF - T18: R-Arp ON/OFF - T19: R-Arp ON/OFF - T20: R-Arp ON/OFF - T21: R-Arp ON/OFF - T22: R-Arp ON/OFF - T23: R-Arp ON/OFF - T24: R-Arp ON/OFF - 31/10/2015 Page 29 G-Stomper User Manual T[..]/VT[..]: Solo ON/OFF V.4.5 Default Mapping T01: Solo ON/OFF - T02: Solo ON/OFF - T03: Solo ON/OFF - T04: Solo ON/OFF - T05: Solo ON/OFF - T06: Solo ON/OFF - T07: Solo ON/OFF - T08: Solo ON/OFF - T09: Solo ON/OFF - T10: Solo ON/OFF - T11: Solo ON/OFF - T12: Solo ON/OFF - T13: Solo ON/OFF - T14: Solo ON/OFF - T15: Solo ON/OFF - T16: Solo ON/OFF - T17: Solo ON/OFF - T18: Solo ON/OFF - T19: Solo ON/OFF - T20: Solo ON/OFF - T21: Solo ON/OFF - T22: Solo ON/OFF - T23: Solo ON/OFF - T24: Solo ON/OFF - VT01: Solo ON/OFF - VT02: Solo ON/OFF - 31/10/2015 Page 30 G-Stomper User Manual V.4.5 VT03: Solo ON/OFF - VT04: Solo ON/OFF - VT05: Solo ON/OFF - VT06: Solo ON/OFF - VT07: Solo ON/OFF - VT08: Solo ON/OFF - VT09: Solo ON/OFF - VT10: Solo ON/OFF - VT11: Solo ON/OFF - VT12: Solo ON/OFF - Reset Solo (all OFF) - 31/10/2015 Page 31 G-Stomper User Manual T[..]/VT[..]: Mute ON/OFF V.4.5 Default Mapping T01: Mute ON/OFF C5 (072) T02: Mute ON/OFF C#5 (073) T03: Mute ON/OFF D5 (074) T04: Mute ON/OFF D#5 (075) T05: Mute ON/OFF E5 (076) T06: Mute ON/OFF F5 (077) T07: Mute ON/OFF F#5 (078) T08: Mute ON/OFF G5 (079) T09: Mute ON/OFF G#5 (080) T10: Mute ON/OFF A5 (081) T11: Mute ON/OFF A#5 (082) T12: Mute ON/OFF B5 (083) T13: Mute ON/OFF C6 (084) T14: Mute ON/OFF C#6 (085) T15: Mute ON/OFF D6 (086) T16: Mute ON/OFF D#6 (087) T17: Mute ON/OFF E6 (088) T18: Mute ON/OFF F6 (089) T19: Mute ON/OFF F#6 (090) T20: Mute ON/OFF G6 (091) T21: Mute ON/OFF G#6 (092) T22: Mute ON/OFF A6 (093) T23: Mute ON/OFF A#6 (094) T24: Mute ON/OFF B6 (095) VT01: Mute ON/OFF C7 (096) VT02: Mute ON/OFF C#7 (097) 31/10/2015 Page 32 G-Stomper User Manual V.4.5 VT03: Mute ON/OFF D7 (098) VT04: Mute ON/OFF D#7 (099) VT05: Mute ON/OFF E7 (100) VT06: Mute ON/OFF F7 (101) VT07: Mute ON/OFF F#7 (102) VT08: Mute ON/OFF G7 (103) VT09: Mute ON/OFF G#7 (104) VT10: Mute ON/OFF A7 (105) VT11: Mute ON/OFF A#7 (106) VT12: Mute ON/OFF B7 (107) Reset Mute (all OFF) C8 (108) 31/10/2015 Page 33 G-Stomper User Manual 20.7.3 V.4.5 Sampler MIDI CC Mapping Chart Sample/Track Parameters: Default Mapping Panorama (Channel: Panorama in general parameters) CC#114 Level CC#071 Accent Amount CC#037 Start CC#073 Length CC#036 Pitch CC#079 Roll CC#072 Roll-Internal Accent ON/OFF CC#075 Normalize ON/OFF CC#056 Reverse ON/OFF CC#107 Fill-in Mode CC#054 Fill-in Hold ON/OFF CC#055 Filter Parameters: Default Mapping Filter Type (LP12/HP12/LP24/HP24/BP/NP/MoogLP/MoogHP) CC#074 Filter Cutoff Frequency CC#042 Filter Resonance (also Bandwidth for BP/NP) CC#044 31/10/2015 Page 34 G-Stomper User Manual Mod Env Parameters: V.4.5 Default Mapping Mod Env Target CC#028 Mod Env Depth CC#029 Mod Env Reverse ON/OFF CC#108 Mod Env Type (Lin/Exp) CC#109 LFO Parameters: Default Mapping LFO Rate CC#019 LFO Waveform CC#020 LFO Target CC#021 LFO Depth CC#022 LFO Sync ON/OFF CC#081 LFO Keyboard Sync ON/OFF CC#082 General Track Parameters: Default Mapping Channel: FX Send CC#118 Channel: FX Input CC#119 Shuffle ON/OFF CC#010 Solo ON/OFF CC#011 Mute ON/OFF CC#012 Channel: Volume CC#113 Channel: Panorama CC#114 31/10/2015 Page 35 G-Stomper User Manual Channel Parametric EQ Parameters: V.4.5 Default Mapping Channel: Low EQ ON/OFF - Channel: Low EQ Shelf/Peak - Channel: Low EQ Frequency - Channel: Low EQ Q - Channel: Low EQ Gain - Channel: Mid EQ ON/OFF - Channel: Mid EQ Frequency - Channel: Mid EQ Q - Channel: Mid EQ Gain - Channel: High EQ ON/OFF - Channel: High EQ Shelf/Peak - Channel: High EQ Frequency - Channel: High EQ Q - Channel: High EQ Gain - Channel: EQ Out - 31/10/2015 Page 36 G-Stomper User Manual 20.7.4 V.4.5 VA-Beast MIDI CC Mapping Chart LFO1 Parameters: Default Mapping LFO1 Rate CC#019 LFO1 Waveform CC#020 LFO1 Target CC#021 LFO1 Depth CC#022 LFO1 Sync ON/OFF CC#081 LFO1 Keyboard Sync/Env CC#082 LFO1 Invert ON/OFF CC#084 LFO2 Parameters: Default Mapping LFO2 Rate CC#023 LFO2 Waveform CC#085 LFO2 Target CC#024 LFO2 Depth CC#025 LFO2 Sync ON/OFF CC#086 LFO2 Keyboard Sync/Env CC#087 LFO2 Invert ON/OFF CC#089 LFO3 Parameters: Default Mapping LFO3 Rate CC#045 LFO3 Waveform CC#048 LFO3 Target CC#049 LFO3 Depth CC#051 LFO3 Sync ON/OFF CC#053 LFO3 Keyboard Sync/Env CC#057 LFO3 Invert ON/OFF CC#058 31/10/2015 Page 37 G-Stomper User Manual Mod Env1 Parameters: V.4.5 Default Mapping Mod Env1 Attack CC#026 Mod Env1 Attack Type (Lin/Exp/Offset) CC#104 Mod Env1 Decay CC#027 Mod Env1 Target CC#028 Mod Env1 Depth CC#029 Mod Env1 Invert ON/OFF CC#108 Mod Env1 Mode (AD/AD Repeat/AHD) CC#109 Mod Env2 Parameters: Default Mapping Mod Env2 Attack CC#060 Mod Env2 Attack Type (Lin/Exp/Offset) CC#061 Mod Env2 Decay CC#077 Mod Env2 Target CC#066 Mod Env2 Depth CC#067 Mod Env2 Invert ON/OFF CC#068 Mod Env2 Mode (AD/AD Repeat/AHD) CC#069 Mod Env3 Parameters: Default Mapping Mod Env3 Attack CC#090 Mod Env3 Attack Type (Lin/Exp/Offset) CC#091 Mod Env3 Decay CC#092 Mod Env3 Target CC#093 Mod Env3 Depth CC#094 Mod Env3 Invert ON/OFF CC#095 Mod Env3 Mode (AD/AD Repeat/AHD) CC#117 31/10/2015 Page 38 G-Stomper User Manual OSC1 Parameters: V.4.5 Default Mapping OSC1 Waveform CC#030 OSC1 Sync/FM ON/OFF CC#035 OSC1 Shape CC#079 OSC1 FM Type (Phase/Log+/Log+-/Lin+/Lin+-) CC#115 OSC2 Parameters Default Mapping OSC2 Waveform CC#031 OSC2 Sync/FM ON/OFF CC#103 OSC2 Shape CC#102 OSC2 FM Type (Phase/Log+/Log+-/Lin+/Lin+-) CC#116 OSC2 Tune (also Noise Freq, Tune1) CC#078 OSC2 FineTune (also NoiseFilter Type, Tune2) CC#033 OSC2 Tune Mode (Semi Tones/Partial No/KB Off Fixed) CC#034 OSC Mod/Mix Parameters: Default Mapping OSC Mix 1/2 CC#008 OSC Mod Depth CC#070 OSC Mod Type (FM/DFM/RM/DIST/FILT/DRM) CC#105 OSC Mod Noise ON/OFF CC#106 Octave Shift CC#017 31/10/2015 Page 39 G-Stomper User Manual Filter 1 Parameters: V.4.5 Default Mapping Filter 1 Cutoff Frequency CC#074 Filter 1 Resonance (also Bandwidth for BP/NP) CC#042 Filter 1 Type (LP12/HP12/LP24/HP24/BP/NP/MoogLP/MoogHP) CC#044 Filter 1 Keyboard Tracking ON/OFF CC#046 Filter 1 Env Attack CC#059 Filter 1 Env Attack Type (Lin/Exp/Offset) CC#063 Filter 1 Env Decay CC#039 Filter 1 Env Sustain CC#040 Filter 1 Env Release CC#041 Filter 1 Env Depth CC#043 Filter 1 Env Invert ON/OFF CC#062 Filter 2 Parameters: Default Mapping Filter 2 Cutoff Frequency - Filter 2 Resonance (also Bandwidth for BP/NP) - Filter 2 Type (LP12/HP12/LP24/HP24/BP/NP/MoogLP/MoogHP) - Filter 2 Keyboard Tracking ON/OFF - Filter 2 Routing Serial/Parallel - Filter 2 Env Attack - Filter 2 Env Attack Type (Lin/Exp/Offset) - Filter 2 Env Decay - Filter 2 Env Sustain - Filter 2 Env Release - Filter 2 Env Depth - Filter 2 Env Invert ON/OFF - 31/10/2015 Page 40 G-Stomper User Manual Voice Mode Parameters: V.4.5 Default Mapping Vibrato ON/OFF CC#056 Vibrato Rate CC#054 Vibrato Depth CC#055 Unison ON/OFF CC#080 Unison Depth CC#083 Unison Number of Voices CC#088 Mono ON/OFF (Glide/Legato section) CC#015 Glide Mode (OFF/ON/Auto Legato) CC#065 Glide Rate CC#005 Chord Memory CC#112 Arpeggio ON/OFF CC#047 Arpeggio Rate CC#050 Arpeggio Sync ON/OFF CC#052 Arpeggio Mode (Up/Down/UpDown/Random) CC#110 Arpeggio Octaves (1/2/3/4) CC#111 Amp/Output Parameters: Default Mapping Amp Env Attack CC#073 Amp Env Attack Type (Lin/Exp) CC#107 Amp Env Decay CC#036 Amp Env Sustain CC#037 Amp Env Release CC#072 Amp Level CC#071 31/10/2015 Page 41 G-Stomper User Manual General Track Parameters: V.4.5 Default Mapping Channel: FX Send CC#118 Channel: FX Input CC#119 Shuffle ON/OFF CC#010 Solo ON/OFF CC#011 Mute ON/OFF CC#012 Channel: Volume CC#113 Channel: Panorama CC#114 Channel Parametric EQ Parameters: Default Mapping Channel: Low EQ ON/OFF - Channel: Low EQ Shelf/Peak - Channel: Low EQ Frequency - Channel: Low EQ Q - Channel: Low EQ Gain - Channel: Mid EQ ON/OFF - Channel: Mid EQ Frequency - Channel: Mid EQ Q - Channel: Mid EQ Gain - Channel: High EQ ON/OFF - Channel: High EQ Shelf/Peak - Channel: High EQ Frequency - Channel: High EQ Q - Channel: High EQ Gain - Channel: EQ Out - 31/10/2015 Page 42 G-Stomper User Manual 20.8 V.4.5 MIDI Export MIDI Export describes the process of exporting a G-Stomper Sequence data as a MIDI (type-1) .mid file. G-Stomper can export single Patterns as MIDI. The following data will be included in the exported .mid files. 1 Tempo Track Pattern Tempo + BPM automation (if any) 1 MIDI Track for all Drum Sampler Tracks together All Triggers of all Drum Sampler Tracks, which have a MIDI Key assigned in the Global Key Mappings in the MIDI Setup. The Triggers in this MIDI Track are non-tonal, in other words every Drum Track has a fixed MIDI Note assigned. N separate MIDI Tracks for each Drum Sampler Track Tonal export for each Drum Track incl. Automations. N separate MIDI Tracks for each VA-Beast Track Tonal export for each VA-Beast Track incl. Automation. Generally only Tracks with audible content are included in a MIDI Export. In other words, muted Tracks and Tracks without a main Sequence will be excluded. All exported MIDI Tracks are set to MIDI Channel 1. Automations are only exported, if the automated parameter is mapped to a MIDI CC in the MIDI Setup. 31/10/2015 Page 43 G-Stomper User Manual 20.8.1 V.4.5 Export Pattern as MIDI Open the Main Menu (on every screen). To export a single Pattern, select the EXP tab, and then choose “Pattern as MIDI”. Choose a name for the exported file. (By default, the exported file is named like the exporting Pattern, with a Tempo/BPM suffix applied) 31/10/2015 Page 44 G-Stomper User Manual V.4.5 Finally, confirm with OK to start the export process. The exported .mid file will be located in the folder ‘gstomper/midiexport‘ on your device storage. Once exported, you can load the MIDI file into the MIDI sequencer of your choice. 31/10/2015 Page 45