1
smar - Symbol Library
First in Fieldbus
USER’S MANUAL
Symbol Library
MAY / 06
Symbol Library
VERSION 8
TM
FOUNDATION
P V I E WS L B M E
www.smar.com
Specifications and information are subject to change without notice.
Up-to-date address information is available on our website.
web: www.smar.com/contactus.asp
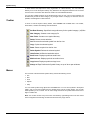
Table of Contents
TABLE OF CONTENTS
SYMBOL LIBRARY ........................................................................................................................................ 5
INTRODUCTION.........................................................................................................................................................5
SYMBOL LIBRARY DESIGN ......................................................................................................................................5
SMART SYMBOLS .............................................................................................................................................................. 5
STAND-ALONE SYMBOL LIBRARY ................................................................................................................................... 9
TOOLBAR .................................................................................................................................................................10
MENUS .....................................................................................................................................................................10
FILE MENU........................................................................................................................................................................ 11
SPECIFYING THE ROOT DIRECTORY............................................................................................................................ 11
RENAMING SYMBOL CATEGORIES ............................................................................................................................... 12
DELETING SYMBOL CATEGORIES................................................................................................................................. 12
PASSWORD-PROTECTING SYMBOL CATEGORIES ..................................................................................................... 12
EDIT MENU ....................................................................................................................................................................... 15
VIEW MENU ...................................................................................................................................................................... 16
SELECTING LANGUAGES ............................................................................................................................................... 16
OPTIONS MENU ............................................................................................................................................................... 17
HELP MENU ...................................................................................................................................................................... 17
CREATING AND STORING SYMBOLS....................................................................................................................17
LOADING SYMBOLS................................................................................................................................................18
CATEGORIES...........................................................................................................................................................18
SCRIPT WIZARDS ............................................................................................................................................................ 19
VBSCRIPT SYMBOLS....................................................................................................................................................... 20
VBA SYMBOLS ................................................................................................................................................................. 21
AUTOMOTIVE SYMBOLS ................................................................................................................................................. 21
BUILDING CONTROL SYMBOLS ..................................................................................................................................... 21
PHARMACEUTICAL SYMBOLS........................................................................................................................................ 21
MACHINE BUILDER SYMBOLS........................................................................................................................................ 21
MISCELLANEOUS SYMBOLS .......................................................................................................................................... 22
OIL AND GAS SYMBOLS.................................................................................................................................................. 22
PANELS SYMBOLS .......................................................................................................................................................... 22
TOUCH SCREEN SYMBOLS ............................................................................................................................................ 22
TRAINING SYMBOLS ....................................................................................................................................................... 22
WATER SYMBOLS............................................................................................................................................................ 22
DOCKABLE SYMBOL TOOLBAR IN GRAPHWORX ...............................................................................................22
OLE AUTOMATION REFERENCE ...........................................................................................................................27
3
Symbol Library
4
Symbol Library
SYMBOL LIBRARY
Introduction
You can use the Symbol Library to create and edit graphic objects as symbols and to build and
maintain symbol categories. A symbol is a group of objects that is treated as a single object. These
symbols can be user-created or loaded from the symbol library categories delivered with
GraphWorX.
GraphWorX supports the use of Smart symbols in displays. Smart symbols contain data-point
connections. If you load a Smart symbol into your display in animation mode, the symbol begins
displaying data immediately based on that data-point connection.
There is no limit to the number of Symbol Library category files (.sdf) you can create, or to the
number of symbols that can exist within each file.
The main purpose of the Symbol Library is to preview and import previously stored GraphWorX
symbols back into GraphWorX. Additional functionality allows you to manage the content of the
Symbol Library by:
•
Creating, renaming, and deleting categories and directories.
•
Storing, renaming, and deleting images in a category.
Symbol Library Design
There are two different modes for the Symbol Library:
•
Standard stand-alone Symbol Library
•
Dockable symbol toolbar in GraphWorX
To launch the Symbol Library from GraphWorX, click the Symbols button on the Draw toolbar in
GraphWorX.
To launch the stand-alone Symbol Library from the Windows Start menu, select Programs > Smar
ProcessView > ProjectWorX > GraphWorX > Symbol Library.
Smart Symbols
The easiest way to understand Smart Symbols is to use a simple example:
1. Go into the “Switches & Sliders” category in the Symbol Library and drag the “UpDown1” symbol
onto your GraphWorX display, as shown in the figure below. This is a simple switch. Go into
runtime mode to see the behavior of this Smart Symbol.
Switch Symbol in GraphWorX Display
5
Symbol Library
2. If you double-click on the light switch, the Property Inspector will tell you that it is a “Symbol,”
and you can see that it also has a Digital Selector and a Pick action associated with it, as
shown in the figure below. But, it is not clear what those actions are connected to or how they
will behave. Click OK to close the property inspector.
Property Inspector for Switch
3. Right-click on the switch and select Edit Connections from the pop-up menu, as shown in the
figure below.
Editing Data Connections
4. This opens the Edit Data Source Connections dialog box, as shown in the figure below. Each
connection represents a dynamic or part of a dynamic action, such as Flash, Hide, Animate,
Rotate, Size, or Pick. The tags or expressions that are connected to each dynamic control each
action. Notice that the light switch in our example is currently controlled by simulation variables,
but in a real world application, you would want to connect it to some electrical output values to
actually monitor when a light switch is on or off. The Edit Data Source Connections allows you
to do precisely that by changing what each dynamic action is pointing to.
6
Symbol Library
Edit Data Source Connections Dialog Box
5. For demonstration purposes, let’s replace the current connections with a different simulation
variable by clicking on the first connection: gwfsim.toggle.bool.
6. This opens the Replace Connections dialog box, as shown in the figure below. In the Replace
field, click the ... button and select Unified Browser from the pop-up menu.
NOTE
In the Unified Data Browser, you can also edit connections to any OPC tag, expression, local
alias, local variable, simulation variable, or global alias.
Replace Connections Dialog Box
7. This opens the Unified Data Browser. In the OPC DA tab, browse to the following tag:
Smar.Simulator.1\SimulatePLC.BOOL.In1, and then click OK, as shown in the figure below.
7
Symbol Library
Simulator Tag Location
8. To ensure that your changes are consistent across the symbol, select the radio button All in the
upper right corner of the Replace Connections dialog box. Click OK.
NOTE
You can also replace connections one-by-one, if you would like to use different tags for each
dynamic.
9. The Edit Data Source Connections dialog box should now appear as shown in the figure
below. Click OK.
10. Go into runtime once more, and note the difference in the switch’s behavior.
8
Symbol Library
Edit Connections Box with Replaced Tags
Stand-Alone Symbol Library
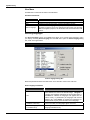
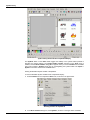
The stand-alone Symbol Library is a GraphWorX-independent program visually similar to Windows
Explorer. As shown in the figure below, there is a Tree View showing directories and categories
(.sdf files) on the left-hand side, and a Control View showing images of the current category on the
right-hand side.
Stand-Alone Symbol Library Screen
The current design supports a multilevel hierarchy of categories. This hierarchy is characterized by
a standard directory structure. This simplifies the reorganization of the library because standard
Windows tools can be used for creating, renaming, moving, and deleting directories.
There can be an unlimited number of categories in any directory. A category is a file containing an
unlimited number of GraphWorX symbols. It stores any type of symbol.
9
Symbol Library
A useful feature that helps with a library organization is a Root Directory. You can mark any
directory as a root for the Symbol Library. Only directories and categories below this root are shown
in the tree view. This feature also allows the creation of several different libraries.
You can have multiple instances of the Symbol Library open at once. Two or more instances can
simultaneously access the same category. Any changes made to a category are stored as soon as
possible, and will appear in other instances.
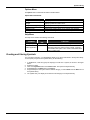
Toolbar
To show or hide the Symbol Library toolbar, select Toolbar from the View menu. The toolbar,
shown below, contains the following command buttons.
Set Root Directory: Specifies the target directory for the symbol category (.sdf) files.
New Category: Creates a new category file.
New Folder: Creates a new symbol directory.
Delete: Deletes current selection.
Cut: Removes the selected symbol from the list view.
Copy: Copies the selected symbol.
Paste: Pastes a symbol into the list view.
Delete Symbol: Deletes the selected symbol.
Undo Delete: Nullifies the last delete action.
Small Icons: Displays symbols as small icons.
Medium Icons: Displays symbols as medium icons.
Large Icons: Displays symbols as large icons.
Always on Top: Positions the Symbol Library on top of other open windows.
Menus
The menu bar of the stand-alone Symbol Library contains the following menus:
• File
•
Edit
•
View
•
Options
•
Help
You can create symbols using objects from the Draw menu. You can store symbols in the Symbol
Library, and you can load symbols from the Symbol Library into the current display. You can also
delete symbols you do not need. You can even change the size of the symbol button and choose a
large or smaller size.
Note: You can also access many of the menu commands by right-clicking items in the tree control
of the Configurator and selecting command functions from the pop-up menus.
10
Symbol Library
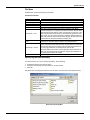
File Menu
The File menu contains the following commands:
File Menu Commands
COMMAND
Root Directory
Add > Category
Add > Folder
Rename
Delete
Passwords > Lock
Passwords > Change
Lock
Passwords > Unlock
Exit
FUNCTION
Specifies the target directory for the symbol category (.sdf) files.
Creates a new symbol category (.sdf) file.
Creates a new symbol directory.
Renames the selected folder or category.
Deletes the current selection.
Sets up the read-write password in the Set Category Write Mode
Password dialog box. The password must be confirmed. Sets the readwrite password to the category, which currently has no locks set, or the
read-only password for the category, which is already opened in readwrite mode. You cannot set the read-only password without setting the
read-write password; this would result in a category file lock that no one
would be able to remove (to modify the category file).
Changes the category file password. You must be granted read-write
permission to open the category with the read-write password.
Opens a locked symbol category. When the category file is initially
locked, it is always locked with read-write access denied. (It could also
have the read-only lock set). Simply enter the read-write password (or
the read-only password if it is configured) to open the file.
When the password is entered, it is recognized as either read-write or
read-only. If the password is accepted, the category file transitions to
the proper state to reflect the change.
Closes the application.
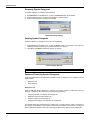
Specifying the Root Directory
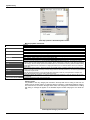
To mark a directory as a root for the Symbol Library, do the following:
1.
2.
3.
Select Root Directory from the File menu.
Select the root directory from the dialog box, as shown below.
Click OK.
Only directories and categories below this root are shown in the tree view of the Symbol Library.
Root Directory Dialog Box
11
Symbol Library
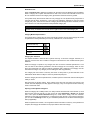
Renaming Symbol Categories
To rename a directory or category, do the following:
1.
2.
3.
Select Rename from the File menu, or click on the Rename button on the toolbar.
Enter the desired name in the field in the dialog box, as shown below.
Enter the desired name in the field, and click OK.
Rename Directory/Category
Deleting Symbol Categories
To delete a directory or category from the tree, do the following:
1.
2.
Select Delete from the File menu, or click the Delete button on the toolbar. This opens the
following message and allows you to delete a directory or a category.
Click OK or press Enter to delete the directory or category.
Delete Category Message
NOTE
The Delete key is not used to delete categories.
Password-Protecting Symbol Categories
A lock is activated when some password is entered or set for a category file. It is possible to set two
different locks:
•
Read-only lock
•
Read-write lock
Read-Only Lock
When a read-only lock is applied to a category file, the file's content is visible but cannot be
changed. A read-only lock prevents the user from doing the following:
•
Changing the label of a symbol in the category file.
•
Deleting a symbol from the category file.
•
Pasting a symbol into the category file.
•
Dragging and dropping a new symbol in the category file.
The Symbol Library also reflects when the category file is system read-only. Again, all symbols in
the category file are visible, but the category itself cannot be modified. The user has to change the
system attributes (remove the read-only access right) to allow for any changes to the category file.
12
Symbol Library
Read-Write Lock
When a read-write lock is applied to a category file, the file's content is visible and can be modified.
When a category file is system read-write and no lock is set, the user has unlimited access to the
file. The unlimited access to the category file is gained when read-write access is granted.
The Symbol Library also tracks the status of every category file. The Symbol Library keeps track of
each file that has been accessed by a user (who has entered the password to open the locked
category file). Thus, when the user selects a category file that already has been accessed, the user
does not have to re-enter the password for that particular category file.
NOTE
The Symbol Library maintains this information until the user closes the application. When the
Symbol Library is restarted, the user will have to regain access to the locked category file.
Category Modes Representation
The Symbol Library category file can exist in the following modes. Each of these category file modes
is represented in the Symbol Library tree view by a different icon, as shown below.
System read-only
Read-only
Read-write
Locked
Category File Transition
The simplest situation is when the file is system read-only. It cannot be changed. Therefore, it is
read-only, and even the user is unable to change its mode unless the user modifies the file system
attributes.
When the category is opened to any changes, the user can set the read-write password to it. The
user can also set the read-only password to the same category file. The category, which is readwrite, stays read-write even with the read-only password (lock) configured. The category must be
read-write according to any changes (such as setting the read-only password).
The category file cannot have a read-only lock active. It always has to go with read-write so the
administrator will be able to modify its content or passwords (locks) set.
Once the category file has the password set, it remains opened in read-write mode until the Symbol
Library is closed.
After launching the Symbol Library, those category files with locks set (active) are locked. Their
content cannot be displayed, and they appear to be empty. They can be opened in either read-only
mode or read-write mode.
Opening Locked Symbol Categories
When the category file is initially locked, it is always locked with read-write access denied. (It could
also have the read-only lock set). To open such a file, select Passwords > Unlock from the File
menu. This opens the Enter Password dialog box, shown below. Simply enter the read-write
password (or the read-only password if it is configured) to open the file. If you forget the password,
you can use the Challenge number to get a substitute password from the Smar technical-support
team (if applicable).
When the password is entered, it is recognized as either read-write or read-only. If the password is
accepted, the category file transitions to the proper state to reflect the change.
13
Symbol Library
Enter Password Dialog Box
Setting the Category Password
When the category file is system read-write, the Passwords > Lock command is enabled on the
File menu.
It is possible to set the read-write password to the category, which currently has no locks set, or the
read-only password for category, which is already opened in read-write mode. The user cannot set
the read-only password without setting the read-write password; this would result in a category file
lock that no one would be able to remove (to modify the category file).
You can set up the read-write password using the Set Write Mode Password dialog box, shown
below. The password must be confirmed.
Set Write Mode Password Dialog Box
When the read-write password is successfully configured, you will be asked whether to set the readonly password to the category too, as shown below.
Enabling Read-Only Password Configuration
Clicking Yes opens the Set Read-Only Password dialog box, shown below.
Set Read-Only Password Dialog Box
14
Symbol Library
When trying to set the password to the file that was previously opened in read-write mode, only the
Set Read-Only Password dialog box will open to allow for the change of the read-only password.
This time, the user is considered to be the administrator having full access to the category file. That
is why the user is able to set the read-only password without entering the old read-only password.
Changing the Category Password
To change the category file passwords, select Passwords > Change Lock from the File menu. This
opens the Change Password for Current Category dialog box, shown below. You must be granted
read-write permission (to open the category with the read-write password).
Change Password for Current Category Dialog Box
The password entered the last time for the selected category is automatically entered into the Old
Password field. Again, the Symbol Library will recognize the type of category password and change
it if the entered values are correct (both the New Password and Confirm New Password strings
match). When successful, a message box pops up with information about which lock was modified.
Edit Menu
The Edit menu commands are listed in the table below.
Edit Menu Commands
COMMAND
Undo
Cut
Copy
Paste
Delete
Edit Label
SHORTCUT
KEYS
CTRL+Z
CTRL+X
CTRL+C
CTRL+V
CTRL+T
FUNCTION
Nullifies the last delete action.
Removes the selected symbol from the list view.
Copies the selected symbol.
Pastes a symbol into the list view.
Deletes the selected symbol.
Renames the selected symbol.
15
Symbol Library
View Menu
The View menu commands are listed in the table below.
View Menu Commands
COMMAND
Toolbar
Status Bar
Split
Select Language
FUNCTION
Shows/hides the toolbar.
Shows/hides the status bar at the bottom of the Symbol Library screen.
Resizes the right and left panes of the Symbol Library window.
Opens the Select Language dialog box (see below). Choose the
language you wish to use for your system (Unicode version only) and click
OK. For navigation purposes, use the buttons and check boxes in the List
section.
Selecting Languages
The Select Language function on the View menu allows you to choose which language to use in
your display. Choosing Select Language from the View menu opens the Select Language dialog
box, shown in the figure below.
NOTE
A language resource .dll is required for language switching.
Select Language Dialog Box
Define the parameters listed in the table below. Then click OK to return to the work area.
Select Language Parameters
PARAMETER
16
DESCRIPTION
List
Lists available languages. Depending on which item you
have selected, the view on the left will change. If English is
checked, the languages will appear as their English name. If
Localized is checked, the languages will appear with the
native country in parentheses (for languages with several
dialects only). When Native is checked, the languages are
displayed the way they would be written in that language.
Installed Locales Only
If this is checked, local languages appear in the box.
Available Language
Translations Only
Checking this box allows you to choose from available
language translations only.
Symbol Library
Options Menu
The Options menu commands are listed in the table below.
Options Menu Commands
COMMAND
Image Size > Small Images
Image Size > Medium
Images
Image Size > Large Images
3D Effect
Always on Top
Background Color
FUNCTION
Displays symbols as small icons.
Displays symbols as medium icons.
Displays symbols as large icons.
Gives the symbols a three-dimensional look.
Positions the Symbol Library on top of other open windows.
Changes the background color of the list view pane.
Help Menu
The Help menu contains the following commands:
COMMAND
Help Topics
About Application
SHORTCUT
KEY
F1
FUNCTION
Launches the online help for the Configurator.
Launches the Smar About Box, which contains
information about the product version number, copyright,
and available disk space. It also contains information about
how to contact Smar.
Creating and Storing Symbols
You can select symbols in your GraphWorX display to be saved and stored in the Symbol Library.
To save (store) a symbol to the Symbol Library, do the following:
1.
2.
3.
4.
5.
6.
In GraphWorX, create and group the object(s) to make into a symbol, as shown in the figure
below.
Select the symbol.
Click on the Symbols button on the Draw toolbar. This opens the Symbol Library.
Select Copy from the Edit menu in GraphWorX.
Drag-and-drop the new symbol into the desired category, or select Paste from the Edit menu of
the Symbol Library.
The symbol from your display is now stored in this category in the Symbol Library.
17
Symbol Library
Storing Symbols
Loading Symbols
The Load function allows you to copy a symbol from the Symbol Library into your GraphWorX
display. Once a copy is placed in your display, the original remains in the library. To load a symbol,
do the following:
Select the symbol in the Symbol Library that you want to insert into your display.
Select Copy from the Edit menu of the Symbol Library.
Go to your display and position the cursor where you want the symbol inserted. Then select Paste
from the Edit menu in GraphWorX. This inserts the symbol into your display. You can also dragand-drop the symbol from the Symbol Library into your display.
Categories
While you are encouraged to import your own symbols into the Symbol Library, the Symbol Library
comes loaded with several general categories of symbols commonly used in displays for industrial
automation purposes, as shown in the figure below:
• Script Wizards
18
•
VB Script Symbols
•
VBA Symbols
•
Automotive
•
Building Controls
•
Pharmaceutical
•
Machine Builders
•
Miscellaneous
•
Oil and Gas
•
Panels
•
Touch Screen Symbols
•
Training
•
Water
Symbol Library
Symbol Categories
Script Wizards
The Script Wizards symbol category contains symbols that, when dragged into your GraphWorX
display, generate various displays (e.g. TrendWorX Viewer, AlarmWorX Viewer, databases, etc.)
using VBScript Wizards and Visual Basic for Applications (VBA) Wizards. Simply drag a symbol into
your GraphWorX display and double-click the symbol to open the Property Inspector, where you can
edit the symbol's properties. This category also features built-in help symbols that provide
information about how to use the wizard symbols. To get help on the wizards, simply drag the Help
symbols into your GraphWorX display and click on the help button in configuration mode, as shown
in the figures below. This opens the Get Help On dialog box, which contains a help button for each
wizard symbol.
VBScript Wizards Symbols Help
19
Symbol Library
VBA Wizards Symbols Help
VBScript Symbols
The VBScript Symbols category contains symbols that, when dragged into your GraphWorX
display, generate buttons that allow you to start and stop various ProcessView applications (e.g.
Alarm Logger, GenBroker, etc.), as well as symbols that provide general information about your
computer system. Simply drag a symbol into your GraphWorX display and double-click the symbol
to open the Property Inspector, where you can edit the symbol's properties. The buttons are
activated when GraphWorX is in runtime mode.
The VBScript Symbols category also contains a category file called "WebHMI Security Login.sdf,"
which contains several symbols that, when dragged into a GraphWorX display, allow users to gain
access to the Security Server. The WebHMI Security Login ActiveX symbol enables WebHMI
users on remote client machines to log in to the Security Server. For example, if the "Login" symbol
button is placed in a GraphWorX display, the user can simply click on the symbol (button) in runtime
mode to launch the Security Login dialog box, as shown in the figure below. Users can also log out
and change their passwords. For more information, please see the Security Server or WebHMI help
documentation.
Logging Into the Security Server
20
Symbol Library
VBA Symbols
The VBA Symbols symbol category contains symbols that, when dragged into your GraphWorX
display, generate buttons that provide general information about your computer system (e.g.
available hard disk space an memory) as well as buttons that allow you to execute general Windows
system commands (e.g. shut down your computer). The buttons are activated when GraphWorX is
in runtime mode. The VBA System Info Symbols category also features built-in help symbols that
provide information about how to use the symbols. To get help, simply drag the Help symbol into
your GraphWorX display and click on the help button in configuration mode, as shown in the figure
below. This opens the Get Help On dialog box, which contains a help button for each symbol in the
category.
VBA System Information Symbols Help
Automotive Symbols
The Automotive symbols category contains standard graphical symbols for robotics and robot
control panels. Simply drag a symbol into your GraphWorX display and double-click the symbol to
open the Property Inspector, where you can edit the symbol's properties.
Building Control Symbols
The Building Controls symbols category contains standard graphical symbols for building control
panels (e.g. coils, valves, HVAC, sensors, ducts, etc.). Simply drag a symbol into your GraphWorX
display and double-click the symbol to open the Property Inspector, where you can edit the symbol's
properties.
Pharmaceutical Symbols
The Pharmaceuticals symbols category contains standard graphical symbols for food processing
and manufacturing operations (e.g. ovens, stirrers, etc.). Simply drag a symbol into your GraphWorX
display and double-click the symbol to open the Property Inspector, where you can edit the symbol's
properties.
Machine Builder Symbols
The Machine Builders symbols category contains standard graphical symbols for various machines
(e.g. pulp and paper). Simply drag a symbol into your GraphWorX display and double-click the
symbol to open the Property Inspector, where you can edit the symbol's properties.
21
Symbol Library
Miscellaneous Symbols
The Miscellaneous symbols category contains many additional graphical symbol categories for
various industries, machines, and machine parts (e.g. tanks, pipes, valves, electrical, mining,
motors, pumps, etc.). Simply drag a symbol into your GraphWorX display and double-click the
symbol to open the Property Inspector, where you can edit the symbol's properties.
Oil and Gas Symbols
The Oil and Gas symbols category contains several graphical symbols for equipment used in oil
and gas operations (e.g. boilers, valves, tanks, heaters, etc.). Simply drag a symbol into your
GraphWorX display and double-click the symbol to open the Property Inspector, where you can edit
the symbol's properties.
Panels Symbols
The Panels symbols category contains several graphical symbols for operator control panels.
Simply drag a symbol into your GraphWorX display and double-click the symbol to open the
Property Inspector, where you can edit the symbol's properties.
Touch Screen Symbols
The Touch Screen symbols category contains several graphical symbols ideal for operator control
panels using touch-screen systems for their AlarmWorX and TrendWorX Viewer displays. The
symbols include large buttons for navigating Viewer displays (e.g. acknowledge alarms, alarm
ToolTips, scrolling, freezing, etc.). Simply drag a symbol into your GraphWorX display and doubleclick the symbol to open the Property Inspector, where you can edit the symbol's properties.
Training Symbols
The Training symbols category contains several graphical symbols used in the ProcessView
training course curriculum. For more information about training classes, please go to the Smar Web
site at www.smar.com.
Water Symbols
The Water symbols category contains several graphical symbols for equipment used in water and
wastewater operations (e.g. static water treatment, smart water treatment, and water components.).
Simply drag a symbol into your GraphWorX display and double-click the symbol to open the
Property Inspector, where you can edit the symbol's properties.
Dockable Symbol Toolbar in GraphWorX
The Symbol Library is available in GraphWorX as a dockable toolbar or a floating window inside
display files. It can be freely floating above a GraphWorX application or docked to any side of the
GraphWorX display: left, top, right, or bottom, as shown in the figure below. Features of the Symbol
Library are fully implemented in the Dockable Symbol Toolbar. You can create, rename, and delete
both category (.sdf) files and symbols within the dockable toolbar, as well as unlock categories with
passwords and change the look of the symbol icons in the view pane. The category (.sdf) file format
of the Dockable Symbol Toolbar is fully compatible with previous versions of the Symbol Library,
and vice versa.
GraphWorX uses two different modes for the Symbol Library:
•
Standard stand-alone Symbol Library
•
Dockable symbol toolbar
To switch between these two modes:
1. Select Application Preferences from the Format menu.
2. The Application Preferences dialog box appears, as shown in the figure below. Select the
Compatibility tab. Under the Symbol Library Style field, you can select Stand-alone mode
or Dockable as Symbol Toolbar mode.
22
Symbol Library
Switching Between Stand-alone and Dockable Symbol Modes
If Stand-alone mode is active, clicking the Symbols button on the Draw toolbar launches the
SymbolLibrary.exe. You can also select Import > Symbol from the Draw menu, as shown in the
figure below.
If the Dockable as Symbol Toolbar option is selected, then the Symbol Library is replaced with a
Symbol toolbar inside the GraphWorX display, as shown in the figure below. You can also position
the symbol toolbar as:
•
A floating window
•
Docked to left
•
Docked to right
•
Docked to bottom
•
Docked to top
23
Symbol Library
Symbol Library Docked Inside a GraphWorX Display
The Symbols button on the Draw toolbar toggles the visibility of the symbol toolbar (instead of
launching the Symbol Library). The Toggle Symbol Toolbar command on the View menu is
enabled, and the Show Toolbars dialog (which appears when you select Toolbars from the View
menu) also includes a Symbols check box for showing/hiding the symbol toolbar. The Import >
Symbol command is removed from the Draw menu.
Viewing the Dockable Symbol Toolbar in GraphWorX
To view the Dockable Symbol Toolbar inside a GraphWorX display:
1. Select Toolbars from the GraphWorX View menu, as shown in the figure below.
Selecting Toolbars in GraphWorX
2. In the Show Toolbars dialog box, check Symbols, as shown in the figure below. Click OK.
24
Symbol Library
Selecting the Symbols Dockable Toolbar
3. This displays the Dockable Symbol Toolbar in the GraphWorX display.
Features of the Dockable Symbol Toolbar
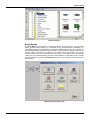
The figure below shows the Dockable Symbol Library as a floating window. The drop-down list at
the top of the window allows you to select from all available category (.sdf) files. GraphWorX
symbols that are contained in the selected category file are displayed in the list control pane, as
shown in the figure below. For maintenance and manipulation of symbols and categories, two popup menus are available.
Dockable Symbol Library as a Floating Window
Symbol Toolbar Menu
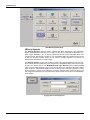
The main pop-up menu for the Docking Symbol Toolbar is displayed when upper-left button is
clicked, as shown in the figure below. You can also right-click anywhere inside the window to access
this menu. This pop-up menu allows you to add, rename, delete, lock and unlock category files, as
well as change the view of the symbol icons in the view pane. You can also cut, copy, paste, delete,
and rename the symbols. The main pop-up menu also allows you to specify the root directory for the
.sdf files. Previous versions of the Symbol Library maintained a tree control hierarchy of category
files; in other words, category files could be placed under different subdirectories. The Dockable
Symbol Library lists all category files as upper-level categories (even those included in
subdirectories) and tracks where particular a category file came from so that no category files are
lost.
NOTE
Please see the Symbol Library Help for complete information about menu functions.
25
Symbol Library
Main Pop-up Menu in Dockable Symbol Toolbar
Main Pop-up Menu Commands
COMMAND
VIEW
CUT
COPY
PASTE
DELETE
RENAME
SET ROOT DIRECTORY
CREATE SUBDIRECTORY
CATEGORY
NEW
LOCK
UNLOCK
CHANGE LOCK
BACKGROUND COLOR
Function
Specifies the size of the symbol icons in the selected category.
Removes the selected symbol from the list view.
Copies the selected symbol.
Pastes a symbol into the list view.
Deletes the selected symbol or symbol category.
Renames the selected symbol or symbol category.
Specifies the target directory for the symbol category (.sdf) files.
Creates a new subdirectory (folder) in the root directory for the symbol category (.sdf) files.
Adds, renames, deletes, locks, and unlocks symbol category files.
Creates a new category file.
Sets up the read-write password in the Set Category Write Mode Password dialog box. The password must be
confirmed. Sets the read-write password to the category, which currently has no locks set, or the read-only password
for the category, which is already opened in read-write mode. You cannot set the read-only password without setting
the read-write password; this would result in a category file lock that no one would be able to remove (to modify the
category file).
Opens a locked symbol category. When the category file is initially locked, it is always locked with read-write access
denied. (It could also have the read-only lock set). Simply enter the read-write password (or the read-only password if it
is configured) to open the file.
When the password is entered, it is recognized as either read-write or read-only. If the password is accepted, the
category file transitions to the proper state to reflect the change.
Changes the category file password. You must be granted read-write permission to open the category with the readwrite password.
Changes the background color of the list view pane.
Category Locks
It is possible to lock any category file included in the drop-down list for writing to and even for
reading from the symbol category. If particular category is locked, it is indicated by different category
icon in the list box, as shown in the figure below. Also, if the category file is locked both for reading
and writing, a message will appear on the Dockable Symbol Toolbar notifying the user about the
lock.
Locked Symbol Category File Indicated
26
Symbol Library
OLE Automation Reference
GraphWorX Display (configuration mode only)
Function InsertLibraryObjectByIndex(category As String, index As Long) As Boolean
If Not ThisDisplay.InsertLibraryObjectByIndex("Misc", 0) Then
MsgBox "Error with InsertLibraryObjectByIndex!"
Else
Msgbox "Library object successfully inserted!"
End If
Function InsertLibraryObjectByName(category As String, symbol As String) As Boolean
If Not ThisDisplay.InsertLibraryObjectByName("Misc", "Check") Then
MsgBox "Error with InsertLibraryObjectByName!"
Else
Msgbox "Library object successfully inserted!"
End If
Function InsertLibraryObject(libraryObject As Object) As Boolean
Dim sl As SymbolLibrary.SymbolLibrary
Set sl = New SymbolLibrary.SymbolLibrary
If sl Is Nothing Then
MsgBox "Symbol Library not instantiated!"
Exit Sub
End If
Dim sc As SymbolCategory
Set sc = sl.GetCategoryFromName("Misc")
If sc Is Nothing Then
MsgBox "Failed to get category from name!"
Exit Sub
End If
Dim symbol As Object
Set symbol = sc.GetSymbolFromName("Check")
If symbol Is Nothing Then
MsgBox "Failed to get symbol from name!"
Exit Sub
End If
If Not ThisDisplay.InsertLibraryObject(symbol) Then
MsgBox "Error with InsertLibraryObject!"
Else
Msgbox "Library object successfully inserted!"
End If
Function ConvertGwxSymbolToLibraryObject(gwxSymbol As Object, libraryObject As Object) As Boolean
27
Symbol Library
Dim newSym As Object
Dim libObj As Object
If Not ThisDisplay.InsertLibraryObjectByName("Misc", "Check") Then
MsgBox "Error with InsertLibraryObjectByName!"
End If
Set newSym = ThisDisplay.GetHeadObject
MsgBox newSym.GetObjectTypeName
If Not ThisDisplay.ConvertGwxSymbolToLibraryObject(newSym, libObj) Then
MsgBox "Error converting symbol to library object!"
Else
Msgbox "GwxSymbol successfully converted to library object!"
End If
SymbolLibrary Interface
AlwaysOnTop As Boolean
Dim sl As SymbolLibrary.SymbolLibrary
Set sl = New SymbolLibrary.SymbolLibrary
If sl Is Nothing Then
MsgBox "Symbol Library not instantiated!"
Exit Sub
End If
MsgBox sl.AlwaysOnTop
sl.AlwaysOnTop = Not sl.AlwaysOnTop
MsgBox sl.AlwaysOnTop
'Should display "False" and then "True"
Function AddNewCategory(category As String) As Object
Dim sl As SymbolLibrary.SymbolLibrary
Set sl = New SymbolLibrary.SymbolLibrary
If sl Is Nothing Then
MsgBox "Symbol Library not instantiated!"
Exit Sub
End If
Dim sc As SymbolCategory
Set sc = sl.AddNewCategory("Test")
If sc Is Nothing Then
MsgBox "Symbol Category not added!"
Exit Sub
Else
Msgbox "Category successfully added!"
End If
Function RenameCategory(oldCategoryName As String, newCategoryName As String) As Boolean
Dim sl As SymbolLibrary.SymbolLibrary
28
Symbol Library
Set sl = New SymbolLibrary.SymbolLibrary
If sl Is Nothing Then
MsgBox "Symbol Library not instantiated!"
Exit Sub
End If
If Not sl.RenameCategory("Test", "Test1") Then
MsgBox "Error renaming category! "
Exit Sub
Else
Msgbox "Category successfully renamed!"
End If
Function DeleteCategory(category As String) As Boolean
Dim sl As SymbolLibrary.SymbolLibrary
Set sl = New SymbolLibrary.SymbolLibrary
If sl Is Nothing Then
MsgBox "Symbol Library not instantiated!"
Exit Sub
End If
If Not sl.DeleteCategory("Test1") Then
MsgBox "Error deleting symbol category!"
Else
MsgBox "Category successfully deleted!"
End If
Function GetNumberOfCategories() As Long
Dim sl As SymbolLibrary.SymbolLibrary
Set sl = New SymbolLibrary.SymbolLibrary
If sl Is Nothing Then
MsgBox "Symbol Library not instantiated!"
Exit Sub
End If
MsgBox "Number of categories: " & sl.GetNumberOfCategories
Function GetCategoryFromIndex(index As Long) As Object
Dim sl As SymbolLibrary.SymbolLibrary
Set sl = New SymbolLibrary.SymbolLibrary
If sl Is Nothing Then
MsgBox "Symbol Library not instantiated!"
Exit Sub
End If
Dim sc As SymbolCategory
Set sc = sl.GetCategoryFromIndex(0)
If sc Is Nothing Then
MsgBox "Failed to get category from index!"
Exit Sub
Else
MsgBox "Category name: " & sc.GetCategoryName
End If
Function GetCategoryFromName(category As String) As Object
(See InsertLibraryObject)
29
Symbol Library
Function SetRootDirectory(directory As String) As Boolean
Dim sl As SymbolLibrary.SymbolLibrary
Set sl = New SymbolLibrary.SymbolLibrary
If sl Is Nothing Then
MsgBox "Symbol Library not instantiated!"
Exit Sub
End If
If Not sl.SetRootDirectory("C:\Program Files\Smar") Then
MsgBox "Error setting root directory!"
Else
MsgBox "Root directory has been set!"
'Verify that it has actually been set correctly
'by reopening the Symbol Library
End If
Function GetRootDirectory() As String
Dim sl As SymbolLibrary.SymbolLibrary
Set sl = New SymbolLibrary.SymbolLibrary
If sl Is Nothing Then
MsgBox "Symbol Library not instantiated!"
Exit Sub
End If
MsgBox sl.GetRootDirectory
Visible As Boolean
Dim sl As SymbolLibrary.SymbolLibrary
Set sl = New SymbolLibrary.SymbolLibrary
If sl Is Nothing Then
MsgBox "Symbol Library not instantiated!"
Exit Sub
End If
MsgBox sl.Visible
sl.Visible = Not sl.Visible
MsgBox sl.Visible
'Should display "False" and then "True"
SymbolCategory Interface
EdgeEffect As Boolean
Dim sl As SymbolLibrary.SymbolLibrary
Set sl = New SymbolLibrary.SymbolLibrary
If sl Is Nothing Then
MsgBox "Symbol Library not instantiated!"
Exit Sub
End If
Dim sc As SymbolCategory
Set sc = sl.GetCategoryFromName("Misc")
If sc Is Nothing Then
MsgBox "Failed to get category from name!"
Exit Sub
End If
30
Symbol Library
MsgBox "Navigate to the Misc category and verify that the"
& vbCr & "edge effect is opposite " & sc.EdgeEffect & "."
sl.Visible = True
sl.AlwaysOnTop = True
sc.EdgeEffect = Not sc.EdgeEffect
MsgBox sc.EdgeEffect
ImageSize As Integer
Dim sl As SymbolLibrary.SymbolLibrary
Set sl = New SymbolLibrary.SymbolLibrary
If sl Is Nothing Then
MsgBox "Symbol Library not instantiated!"
Exit Sub
End If
Dim sc As SymbolCategory
Set sc = sl.GetCategoryFromName("Misc")
If sc Is Nothing Then
MsgBox "Failed to get category from name!"
Exit Sub
End If
sc.ImageSize = BigSize
MsgBox sc.ImageSize
sc.ImageSize = MediumSize
MsgBox sc.ImageSize
sc.ImageSize = SmallSize
MsgBox sc.ImageSize
'Should be 80
'Should be 60
'Should be 40
Function AddSymbol(symbol As Object) As Boolean
Dim sl As SymbolLibrary.SymbolLibrary
Set sl = New SymbolLibrary.SymbolLibrary
If sl Is Nothing Then
MsgBox "Symbol Library not instantiated!"
Exit Sub
End If
Dim sc As SymbolCategory
Set sc = sl.GetCategoryFromName("Misc")
If sc Is Nothing Then
MsgBox "Failed to get category from name!"
Exit Sub
End If
Dim symbol As Object
Set symbol = sc.GetSymbolFromName("Check")
If symbol Is Nothing Then
MsgBox "Failed to get symbol from name!"
Exit Sub
End If
Set sc = sl.GetCategoryFromName("Test1")
If sc Is Nothing Then
MsgBox "Failed to get category from name!"
Exit Sub
End If
31
Symbol Library
If Not sc.AddSymbol(symbol) Then
MsgBox "Error with AddSymbol!"
Else
MsgBox "Symbol successfully added!"
End If
Function RenameSymbol(oldName As String, newName As String) As Boolean
Dim sl As SymbolLibrary.SymbolLibrary
Set sl = New SymbolLibrary.SymbolLibrary
If sl Is Nothing Then
MsgBox "Symbol Library not instantiated!"
Exit Sub
End If
Dim sc As SymbolCategory
Set sc = sl.GetCategoryFromName("Test1")
If sc Is Nothing Then
MsgBox "Failed to get category from name!"
Exit Sub
End If
If Not sc.RenameSymbol("Check", "NewCheck") Then
MsgBox "Error with RenameSymbol!"
Else
MsgBox "Symbol successfully renamed!"
End If
Function DeleteSymbol(symbolName As String) As Boolean
Dim sl As SymbolLibrary.SymbolLibrary
Set sl = New SymbolLibrary.SymbolLibrary
If sl Is Nothing Then
MsgBox "Symbol Library not instantiated!"
Exit Sub
End If
Dim sc As SymbolCategory
Set sc = sl.GetCategoryFromName("Test1")
If sc Is Nothing Then
MsgBox "Failed to get category from name!"
Exit Sub
End If
If Not sc.DeleteSymbol("NewCheck") Then
MsgBox "Error with DeleteSymbol!"
Else
MsgBox "Symbol successfully deleted!"
End If
Function GetNumberOfSymbols() As Long
Dim sl As SymbolLibrary.SymbolLibrary
Set sl = New SymbolLibrary.SymbolLibrary
If sl Is Nothing Then
MsgBox "Symbol Library not instantiated!"
Exit Sub
End If
32
Symbol Library
Dim sc As SymbolCategory
Set sc = sl.GetCategoryFromName("Misc")
If sc Is Nothing Then
MsgBox "Failed to get category from name!"
Exit Sub
End If
MsgBox "Number of symbols in Misc category: " & sc.GetNumberOfSymbols
Function GetSymbolFromIndex(index As Long) As Object
Dim sl As SymbolLibrary.SymbolLibrary
Set sl = New SymbolLibrary.SymbolLibrary
If sl Is Nothing Then
MsgBox "Symbol Library not instantiated!"
Exit Sub
End If
Dim sc As SymbolCategory
Set sc = sl.GetCategoryFromName("Misc")
If sc Is Nothing Then
MsgBox "Failed to get category from name!"
Exit Sub
End If
Dim symbol As Object
Set symbol = sc.GetSymbolFromIndex(0)
If symbol Is Nothing Then
MsgBox "Failed to get symbol from name!"
Exit Sub
Else
MsgBox "Successfully retrieved symbol!"
End If
Function GetSymbolFromName(symbol As String) As Object
(Tested in InsertLibraryObject)
Function GetSymbolName(index As Long) As String
Dim sl As SymbolLibrary.SymbolLibrary
Set sl = New SymbolLibrary.SymbolLibrary
If sl Is Nothing Then
MsgBox "Symbol Library not instantiated!"
Exit Sub
End If
Dim sc As SymbolCategory
Set sc = sl.GetCategoryFromName("Misc")
If sc Is Nothing Then
MsgBox "Failed to get category from name!"
Exit Sub
End If
33
Symbol Library
Dim symname As String
symname = sc.GetSymbolName(0)
If symname = "" Then
MsgBox "Symbol doesn't exist or has no name!"
Exit Sub
Else
MsgBox "Symbol Name: " & symname
End If
Function GetCategoryName(index As Long) As String
Dim sl As SymbolLibrary.SymbolLibrary
Set sl = New SymbolLibrary.SymbolLibrary
If sl Is Nothing Then
MsgBox "Symbol Library not instantiated!"
Exit Sub
End If
Dim sc As SymbolCategory
Set sc = sl.GetCategoryFromIndex(1)
If sc Is Nothing Then
MsgBox "Failed to get category from index!"
Exit Sub
End If
MsgBox "Category name: " & sc.GetCategoryName
34