1
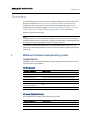
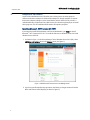
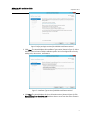
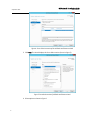
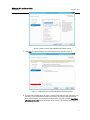
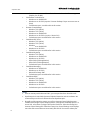
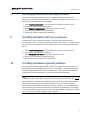
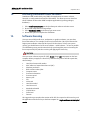
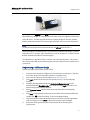
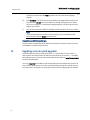
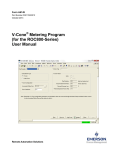
Part Number D301762X012 September 2014 OpenEnterprise™ Version 3.1 Installation Guide Remote Automation Solutions OE Version 3.1 Installation Guide September 2014 D301762X012 Revision Tracking Sheet September 2014 This manual may be revised periodically to incorporate new or updated information. The revision date of each page appears at the bottom of the page opposite the page number. A change in revision date to any page also changes the date of the manual that appears on the front cover. Listed below is the revision date of each page (if applicable): Page All pages Initial issue Revision September 2014 July-2014 Note This manual details the installation and licensing processes for Version 3.1 and Service Pack 1of OpenEnterprise. If you need installation information for Version 2.83 of OpenEnterprise, refer to the OpenEnterprise Installation Reference Guide (V2.83), part number D301494X412. For licensing information for Version 2.83, refer to the OpenEnterprise Licensing User Manual, part number D301711X012. ii OE Version 3.1 Installation Guide D301762X012 September 2014 Overview This guide details the processes required to install OpenEnterprise (OE) in any of its three primary configurations: OE Server, OE Server/ Workstation, and OE Workstation. Each configuration has its own section. OE also has five optional programs which you can install on separate dedicated computers: Remote Comm Manager, Standalone OPC Server, Standalone Reporting, Standalone Messaging, and Standalone ODBC. Each of these programs also has its own section. Note This guide assumes you have experience installing either prior versions of OE or similarly complex software systems. If you do not, contact your Emerson Process Management LBP or the Remote Automation Solutions Systems Group for assistance. Essential to a successful OE installation is a clear understanding of the scale, size, and intent of your intended application, as well as the roles the various computers play in that application. 1. Minimum hardware and operating system requirements Following are the recommended hardware and operating system requirements for each component of an OE installation. OE Workstation System Component CPU Specifications Dual-core (3.1 GHz, 3MB cache) or better Memory 4 GB or better Video Requirements DirectX9 compatible (minimum Windows 7 requirement) HDD Size 80 GB I/O Slots USB for GraphWorX license dongle Preferred/Suggested Hardware Manufacturer Dell Operating System See Section 4, Installation options OE Server (Simplex license) An OE Simplex license supports systems with up to 10 RTUs. System Component CPU Specifications Intel Xeon 4C/4T 3.1 GHz, 8 MB cache or better Memory 8 GB or better Video Requirements SVGA or better (If Server/Workstation DirectX9 compatible) 1 OE Version 3.1 Installation Guide September 2014 D301762X012 System Component HDD Size Specifications 120 GB (see Server disk size note) I/O Slots Specific to deployment RAID Controller RAID 5 (see Server disk size note) Communications (Ethernet) 2 NICs (LAN + redundancy) Communications (Serial) Specific to deployment Preferred/Suggested Hardware Manufacturer Dell Operating System See Section 4, Installation options OE Server (Pro license) An OE Pro license supports systems with up to 100 RTUs. System Component CPU Specifications Intel Xeon 4C/8T 3.4 GHz, 8 MB cache or better Memory 16 GB or better Video Requirements SVGA or better (If Server/Workstation DirectX9 compatible) HDD Size 120 GB(see Server disk size note) I/O Slots Specific to deployment RAID Controller RAID 5 (see Server disk size note) Communications (Ethernet) 2 NICs (LAN + redundancy) Communications (Serial) Specific to deployment Preferred/Suggested Hardware Manufacturer Dell Operating System See Section 4, Installation options OE Server (Max license) An OE Max license supports systems with more than 100 RTUs. 2 System Component CPU Specifications Intel Xeon 4C/8T 3.5 GHz, 8 MB cache or better Memory 24 GB or better Video Requirements SVGA or better (If Server/Workstation DirectX9 compatible) HDD Size 120 GB (see Server disk size note) I/O Slots Specific to deployment RAID Controller RAID 5 (see Server disk size note) Communications (Ethernet) 2 NICs (LAN + redundancy) Communications (Serial) Specific to deployment Preferred/Suggested Hardware Manufacturer Dell Operating System See Section 4, Installation options OE Version 3.1 Installation Guide D301762X012 September 2014 Remote Comm Manager, Standalone OPC Server, Standalone Reporting, Standalone Messaging, Standalone ODBC System Component CPU Specifications Dual-core 3.1 GHz, 3 MB cache or better Memory 4 GB or better Video Requirements If Windows Server SVGA or better If Windows 7 DirectX9 compatible HDD Size 80 GB or better Preferred/Suggested Hardware Manufacturer Dell Operating System See Section 4, Installation options Workstation Terminal Server System Component CPU Specifications Intel Xeon 4C/8T 3.5 GHz, 8 MB cache or better Memory 16 GB or better Video Resolution SVGA or better Video RAM 32 MB or better HDD Size 120 GB or better I/O Slots USB for GraphWorX license dongle RAID Controller Not applicable Communications (Ethernet) 2 NICs (LAN + redundancy) Communications (Serial) Not applicable Preferred/Suggested Hardware Manufacturer Dell Operating System See Section 4, Installation options Server disk size Microsoft’s recommended hard drive size for Windows Server is 120 GB. In addition to the operating system and installed software, an additional 8 GB plus 25 bytes for each historical sample will be required. All server hard drives should be RAID 5 (which requires a minimum of 3 drives) or similar fault-tolerant architecture. For example, assume 1000 signals stored for 1 year on a local hard drive with logging occurring every minute: 1000 x 25 x 1440 x 365 = 13,140,000,000 bytes (12.24 GB) plus 8 GB overhead = 20.24 GB. For larger servers, contact your OE sales representative. 2. Installation wizard To simplify the installation process, OpenEnterprise makes extensive use of software wizards, which guide you through each step of the installation. Once you insert the installation DVD and select the OE product from the splash screen, wizards step you through the process, ensuring the correct sequence and software selections. 3 OE Version 3.1 Installation Guide September 2014 3. D301762X012 Requisite software As part of the installation wizard, OE audits your existing system at various points to determine whether critical pieces of Microsoft software are already installed. If it cannot find certain software packages such as Visual Studio Tools for Office (VSTO), Visual C++ redistributable files, or Microsoft Core XML Services, the wizard may prompt you to install these programs. The OE installation DVD contains all requisite programs. Installing Microsoft .NET Framework 3.5 SP1 If you intend to install OE Workstation or OE Server/Workstation, you must pre-install Microsoft® .NET Framework 3.5 SP1. To install this software on Windows Server 2012 and Windows Server 2012 R2: 1. As shown in Figure 1, in the Server Manager Tool of Windows Server 2012 (R2), select Add Roles and Features item in the Manage menu (see Figure 1). Figure 1. Add Roles and Features item in the Manage menu 2. If you have specified preliminary operations, the Before you begin section of the Add Roles and Feature wizard displays (as shown in Figure 2): 4 OE Version 3.1 Installation Guide D301762X012 September 2014 Figure 2. Before you begin section of the Add Roles and Features wizard 3. Click Next. The wizard displays the Installation Type section (shown in Figure 3). Select the Role-based or feature-based installation option. Use it to configure this server by adding roles, role services, and features. Figure 3. Installation Type section of Add Roles and Features wizard 4. Click Next. The wizard displays the Server Selection section (shown in Figure 4). Click Select a server from the server pool and then select a server from the servers shown in the Server Pool. 5 OE Version 3.1 Installation Guide September 2014 D301762X012 Figure 4. Server Selection section of the Add Roles and Features wizard 5. Click Next. The wizard displays the Server Roles section (shown in Figure 5). Figure 5. Server Roles section of Add Roles and Feature wizard 6. Select options as shown in Figure 6. 6 OE Version 3.1 Installation Guide D301762X012 September 2014 Figure 6 - Features section of the Add Roles and Feature wizard 7. Click Next. The wizard displays the Confirmation section (shown in Figure 7). Figure 7 - Confirmation section of the Add Roles and Features wizard 8. The top of the window shown in Figure 7 displays a warning message, instructing you that one or more installation selections are missing source files on the destination server and prompting you to identify an alternative source path. Click the Specify an alternate source path link (at the bottom of the screen). The wizard displays Figure 8. 7 September 2014 OE Version 3.1 Installation Guide D301762X012 Figure 8 - Specify an alternative source path for NetFx3 source files 9. The required source files for the .Net Framework 3.5 are located either on the Windows Server 2012 (R2) DVD or on the OpenEnterprise Version3.1 installation DVD. In this example, the DVD device is identified as drive F, so the alternative path is F:\Sources\SxS. Click OK. The wizard redisplays Figure 7. 10. Click Install to start the installation process. At the end of a successful install, the Results section shows the installation status displaying the message Installation succeeded (as show in Figure 9). Figure 9 - Result section of Add Roles and Feature wizard 8 OE Version 3.1 Installation Guide D301762X012 4. September 2014 Installation options Note Before you begin installing any OE component, we recommend that you close all other applications. By default, on completion the installation process reboots your system. To prevent loss of critical data, close all applications before you begin an installation. Additionally, disable Sleep Mode on the host computer for any of the following install options. Depending on the requirements of your site, you can install OpenEnterprise in three major configurations: OpenEnterprise Server OpenEnterprise Server/Workstation OpenEnterprise Workstation You can also install the following optional programs, each on their own dedicated computers: Remote Comm Manager Standalone OPC Server Standalone Reporting Standalone Messaging Standalone ODBC Note You can install only one of these optional programs on any computer. For example, you cannot install both Standalone Messaging and Standalone Reporting on the same computer. Installation configurations and OS compatibility Each OE installation configuration supports specific 32-bit/64-bit operating systems: OE Server o Windows 7 SP1 (64-bit) o Windows Server 2008 R2 SP1 o Windows Server 2012 R2 o For hardware specs, see tables earlier in this section based on server (Simplex, Pro, or Max) OE Workstation o Windows 7 SP1 (64-bit) o Windows 7 SP1 (32-bit) o (Requires .NET Framework – See Appendix A) o For hardware specs, see Workstation table earlier in this section OE Server/Workstation o Windows 7 SP1 (64-bit) o Windows Server 2008 R2 SP1 o Windows Server 2012 R2 (requires 1 user CAL) o (Requires .NET Framework – See Appendix A) 9 OE Version 3.1 Installation Guide September 2014 D301762X012 For hardware specs, see tables earlier in this section based on OE server type (Simplex, Pro, or Max) Workstation Terminal Server o Windows Server 2008 R2 SP1 o Windows Server 2012 R2 (requires 1 Remote Desktop CAL per concurrent user or client) o For hardware specs, see table earlier in this section Remote Comm Manager o Windows 7 SP1 (64-bit) o Windows 7 SP1 (32-bit) o Windows Server 2008 R2 SP1 o Windows Server 2012 R2 (requires 1 device CAL) o For hardware specs see table earlier in this section Standalone OPC Server o Windows 7 SP1 (64-bit) o Windows 7 SP1 (32-bit) o Windows Server 2008 R2 SP1 o Windows Server 2012 R2 o For hardware specs see table earlier in this section Standalone Reporting o Windows 7 SP1 (64-bit) o Windows Server 2008 R2 SP1 o Windows Server 2012 R2 o Office 2010 (32-bit application) o Office 2013 (32-bit application) o For hardware specs see table earlier in this section Standalone Messaging o Windows Server 2008 R2 SP1 o Windows Server 2012 R2 o Microsoft Exchange 2007 o For hardware specs see table earlier in this section Standalone ODBC o Windows 7 SP1 (64-bit) o Windows 7 SP1 (32-bit) o Windows Server 2008 R2 SP1 o Windows Server 2012 R2 o For hardware specs see table earlier in this section o Notes: • Emerson cannot provide Microsoft CALS; you must purchase them from Microsoft. 10 • OpenEnterprise is tested with Symantec Endpoint Protection anti-virus software. We recommend you use this on hardware that runs OpenEnterprise. • Regardless of the operating system, turn off User Account Control (which prevents unauthorized changes to your computer) before you begin the installation process. To access UAC, select Start > and type UAC into the search box. Select the Change User Account Control Settings link. When the Change User Control Settings screen displays, move the slider control down to Never Notify and click OK. You need to reboot your OE Version 3.1 Installation Guide D301762X012 September 2014 computer for this change to take effect. Once you complete the OE install, restore your original UAC settings. 5. Installing and licensing OE server software To install and license the OE Server software: 1. Select Install OpenEnterprise on the OpenEnterprise software selection screen. 2. Review and accept the license agreement. 3. Select OpenEnterprise Server on the Setup Type menu screen. Note If a Windows Security dialog displays for Eltima software, accept and install the program. 4. Reboot your computer to complete the installation process. 5. License the server software. a. Open the License Manager application and click Create LRF. b. Click Get Key to display the software registration webpage. c. Sign onto the software registration webpage to display the registration options. d. Click Register and complete the registration details webpage. e. Unlock a software license, submit the license request, then click Key File. f. Save the key file. g. Click Include Key on the License Manager application. h. Reboot your computer to complete the licensing process. 6. Installing and licensing OE server/workstation software To install and license the OE server/workstation software: 1. Install .NET Framework if not already installed. See Appendix A for more information. When .NET is installed, insert the OpenEnterprise DVD in the drive and continue to step 2. 2. Select Install OpenEnterprise on the OpenEnterprise software selection screen. 3. Review and accept the license agreement. 4. Select OpenEnterprise Server/Workstation on the Setup Type menu screen. 5. Review and accept the graphics license agreement. 6. We recommend you accept the default installation location. 7. Click Install to begin the graphics software installation. 8. Select New User in the AppSetupUtility, and enter a User name. 9. Provide and confirm the password. Installation will proceed; it may take several minutes. 10. After reboot, login. It may take several minutes for the desktop to be configured. 11. Review and accept the Sentinel System Driver license agreement. 12. Choose Complete for the Sentinel setup type; then click Install. 13. Review and accept the graphics license agreement. We recommend you accept the default installation location. 11 September 2014 OE Version 3.1 Installation Guide D301762X012 14. Review and accept the GenLic32 notice. 15. Click Install to begin the graphics license installation. The installation validation may take several minutes. 16. Reboot your system and login again to continue the OpenEnterprise Solutions installation. 17. Reboot your system again and login to finish the installation. 18. License the server software. a. Open the License Manager application and click Create LRF. b. Click Get Key to display the software registration webpage. c. Sign onto the software registration webpage to display the registration options. d. Click Register and complete the registration details webpage. e. Unlock a software license, submit the license request, and then click Key File. f. Save the key file. g. Click Include Key on the License Manager application. h. Reboot your computer to complete the licensing process. 19. Proceed to Activating a new OE graphics license on page 16. 7. Installing and licensing OE workstation software This process installs and licenses the OE workstation software on a device defined as a dedicated OE workstation. To install the OE workstation software: 1. Install .NET Framework if not already installed. See Appendix A for more information. When .NET is installed, insert the OpenEnterprise DVD in the drive and continue to step 2. 2. Select Install OpenEnterprise on the OpenEnterprise software selection screen. 3. Read and accept the license agreement. 4. Select OpenEnterprise Workstation on the Setup Type menu screen. 5. Review and accept the graphics license agreement. 6. We recommend you accept the default installation location. 7. Click Install to begin the graphics software installation. 8. Select New User in the AppSetupUtility, and enter a User name. 9. Provide and confirm the password. Installation will proceed; it may take several minutes. 10. After reboot, login. It may take several minutes for the desktop to be configured. 11. Review and accept the Sentinel System Driver license agreement. 12. Choose Complete for the Sentinel setup type; then click Install. 13. Review and accept the graphics license agreement. We recommend you accept the default installation location. 14. Review and accept the GenLic32 notice. 15. Click Install to begin the graphics license installation. The installation validation may take several minutes. 16. Reboot your system and login again to finalize the OpenEnterprise Solutions installation. 17. Provide server hostnames and task credentials. 18. Reboot your system to finalize the workstation installation. 19. Proceed to Activating a new OE graphics license on page 16. 12 OE Version 3.1 Installation Guide D301762X012 8. September 2014 Installing Remote Comm Manager software Remote Comm Manager enables you to create a distributed RTU communications network where RTU serial communications are handled at a remote location, such as a radio tower. To install Remote Comm Manager: 1. 2. 3. 4. 5. 9. Select Install OpenEnterprise on the OpenEnterprise software selection screen. Review and accept the license agreement. Select Remote Comm Manager on the Setup Type menu screen. Provide server hostnames and task credentials. Reboot the system to complete the installation. Installing standalone OPC server software Standalone OPC Server enables you to define a computer to be a dedicated open communication server. This provides third-party access to OE using OPC. You might install this program on a PI integration server to pull OPC data into PI. To install Standalone OPC Server: 1. 2. 3. 4. 5. 10. Select Install OpenEnterprise on the OpenEnterprise software selection screen. Review and accept the license agreement. Select Standalone OPC Server on the Setup Type menu screen. Provide server hostnames and task credentials. Reboot the system to complete the installation. Installing standalone reporting software The Standalone Reporting option defines a computer as a dedicated OE reporting server that connects to the OE database and configures, runs, publishes, and downloads reports. Standalone Reporting provides a suite of reporting tools – Report Scheduler, the Report Configurator, and the Report add-in – to meet your reporting requirements. Note The OpenEnterprise Report Suite requires Excel 2010 or 2012 be installed first. Only 32-bit Microsoft Excel is supported. When installing Excel, ensure that the .NET Programmability Support (Microsoft Office primary interop assemblies “PIAs”) are installed. These are necessary for the OpenEnterprise Report Suite to work with Excel. The "Install Now" option should include this but to confirm, select the "Customize" Excel installation. If you already have Excel installed but do not know if the Excel PIAs are installed, re-install Excel and make sure the .NET Programmability Support option is installed. 13 OE Version 3.1 Installation Guide September 2014 D301762X012 Figure 10. Verifying .NET Programmability Support Note When installing Standalone Reporting, you must disable the Report Scheduler in the OE Session pane on the OE server (or OE server(s) if one of a redundant pair). We also recommend you remove Report Scheduler from the session on the server(s) since Report Scheduler should only run on the computer on which you install standalone reporting software. To install Standalone Reporting: 1. 2. 3. 4. 5. 11. Select Install OpenEnterprise on the OpenEnterprise software selection screen. Review and accept the license agreement. Select Standalone Reporting on the Setup Type menu screen. Provide server hostnames and task credentials. Reboot the system to complete the installation. Installing standalone messaging software Standalone Messaging enables you to define a computer as a dedicated OE Messaging server. This option installs Messaging Server, its configuration tool, and some ODBCrelated files on the identified machine, enabling the Messaging server and the configuration tool to connect to an OE database and provide system-wide messaging functionality. To install Standalone messaging: 1. 2. 3. 4. 5. 14 Select Install OpenEnterprise on the OpenEnterprise software selection screen. Review and accept the license agreement. Select Standalone Messaging on the Setup Type menu screen. Provide server hostnames and task credentials. Reboot the system to complete the installation. OE Version 3.1 Installation Guide D301762X012 12. September 2014 Installing standalone ODBC software Standalone ODBC enables third-party ODBC client applications to extract real-time, historical, or configuration data from the OE database. This allows you to use data from the OE database in these other ODBC-compliant applications (reporting packages, databases). 1. 2. 3. 4. 13. Select Install OpenEnterprise on the OpenEnterprise software selection screen. Review and accept the license agreement. Select Standalone ODBC on the Setup Type menu screen. Reboot the system to complete the installation. Software licensing Once you successfully install server, workstation, or graphics software, you must then license that software. For example, the OE server software has a 30-day trial license that begins upon installation. After that 30-day trail, OE shuts down. To keep your system running, you should license the OE server software – and all software – as soon as possible. The installation process provides wizards to help you through the process of creating the license request file (LRF) and then receiving and applying the license key. CAUTION Once you create a license request file (LRF), do not change any components on the host computer before you apply for a license key. Otherwise the process will fail. In particular, do not change: Hard drive format serial number MAC address of network interface card (NIC) Windows product ID BIOS revision number/date Computer name Processor information Processor speed Memory size SID Video card Hard drive model Hard drive serial Motherboard model CD/DVD drive Sound card Domain We suggest that you complete the creation of the LRF, the request for the license key, and the application of the license key to the host computer in a single continuous un-interrupted session. 15 OE Version 3.1 Installation Guide September 2014 D301762X012 Docking stations/port emulators Performing the installation in a single continuous un-interrupted session is critical if you intend to install the server software on a laptop. If your laptop is usually attached to a docking station or a port emulator, begin and complete the entire licensing process with your laptop either docked or undocked. ICONICS USB-based license dongle To operate the workstation-based graphics software (GraphWorX™ version 9.2 from ICONICS), you must insert a USB license dongle into any workstation using that software. One or more license dongles (secure SafeNet® Sentinel™ USB dongles) is packaged with the OpenEnterprise installation DVD. Refer to Activating a new OE graphics license for further details. Note OpenEnterprise 3.1 requires version 9.22 of GraphWorX. If you already have one or more black USB license dongles, it is likely they have an earlier version of the GraphWorX software and will not work with OE 3.1. You must upgrade the license on these dongles to use them. Contact Customer Support for more information. WARNING If you use a disk defragmentation utility (such as Norton™ Utilities), configure that utility to ensure that the GenLic32.ent, GenLic32.rst, and GenLic32.key files do not move during the defragmentation process. If these files do move, you will lose your software license. For example, with Norton Speed Disk, select File > Options > Customize > Unmoveable Files. Specify that the *.ent, *.rst, and *.key files must not be moved. Then select File > Options > Optimize > Save to secure these settings. WARNING Monitor your hard drive usage to ensure at least 5 MB of free disk space at all times. If the disk becomes completely full, you may lose your software license key. 14. Activating a new OE graphics license Whether you are working with a “thick” workstation or a “thin” terminal services client, you need to activate the OE graphics license, which is housed on a black USB license dongle. These are secure SafeNet™ Sentinel USB dongles, delivered with the OpenEnterprise installation DVDs, and pre-loaded with GraphWorX™ version 9.22. 16 OE Version 3.1 Installation Guide D301762X012 September 2014 OpenEnterprise black USB license dongle (with blue label) OpenEnterprise 3.1 requires version 9.22 of GraphWorX. If you already have one or more black USB license dongles, it is likely they have an earlier version of GraphWorX and will not work with OE 3.1. You must upgrade the license on these dongles to use them. Contact Remote Automation Solutions Customer Support/Lifecycle Services for more information. Note The blue license dongles have been discontinued and will not work with OE 3.1. Before you begin this activation process, you must have the USB license dongle, a product registration (or “P”) number, and a customer key. If you do not have a “P” number, contact Remote Automation Solutions Customer Support. The installation (or upgrade) of OE 3.1 activates a 30-day temporary license. This ensures the continued operation of your SCADA system while your request for a permanent license is processed. Programming a USB license dongle This process applies to both thick and thin clients. 1. 2. 3. 4. 5. 6. 7. 8. Insert the license dongle in a USB port on a PC with Internet connections. (This does not need to be the PC on which the software is eventually used.) Access the OE Graphics Licensing website (www.oelicenses.com). Click Login (located in the menu to the left of the screen). The Login webpage displays. Complete the Email Address field with [email protected] and the Password field with OpenEnterprise (case-sensitive). Click Login to continue. The Web Licensing Utility webpage displays. Select Program License from the menu at the top of the Web Licensing Utility webpage. Click Next. A dialog displays showing the serial number of the attached USB license dongle. Click OK to close that dialog. The license webpage displays. Copy and paste the Product Registration # and Customer Key into the appropriate fields on a single row. Click Next to display the Program License webpage. Review the details (particularly the version number) of the license(s) to be programmed. 17 OE Version 3.1 Installation Guide September 2014 D301762X012 9. Once you confirm that this product is what you need, select the check box to the left of the license details and click Next. A product selection verification webpage displays. 10. Click Complete. The LED on the end of the USB license dongle flashes briefly as the program loads. Do not remove the USB license dongle during this process. When the process completes, a confirmation webpage displays. Print this page to keep a copy for your records. 11. You can now remove the USB license dongle and insert in the PC where it is needed. Note To ensure that the license works on the intended PC, you must install the USB license dongle in that PC before you boot the PC. Upgrading a USB license dongle For instructions on upgrading a black USB license dongle that contains a previous version of GraphWorX, contact Lifecycle Services. 15. Applying a service pack upgrade The September 2014 release of OpenEnterprise 3.1.1 (also known as “Service Pack 1”) adds a number of enhancements and software refinements to OE version 3.1. To simplify the installation process, Remote Automation Solutions has added an Install Service Pack 1 link to the OE splash page. Once you complete the installation and configuration process detailed in the previous 14 steps, click the Install Service Pack 1 link on the splash page to begin the upgrade process. It is wizard-driven, and guides you through the steps involved in upgrading your software. 18 OE Version 3.1 Installation Guide D301762X012 September 2014 Headquarters: Emerson Process Management Remote Automation Solutions 6005 Rogerdale Road Houston, TX 77072 U.S.A. T +1 281 879 2699 | F +1 281 988 4445 www.EmersonProcess.com/Remote Europe: Emerson Process Management Remote Automation Solutions Unit 8, Waterfront Business Park Dudley Road, Brierly Hill Dudley UK DY5 1LX T +44 1384 487200 | F +44 1384 487258 www.EmersonProcess.com/Remote North American/Latin America: Emerson Process Management Remote Automation Solutions 6005 Rogerdale Road Houston TX USA 77072 T +1 281 879 2699 | F +1 281 988 4445 www.EmersonProcess.com/Remote Middle East/Africa: Emerson Process Management Remote Automation Solutions Emerson FZE P.O. Box 17033 Jebel Ali Free Zone – South 2 Dubai U.A.E. T +971 4 8118100 | F +971 4 8865465 www.EmersonProcess.com/Remote Asia-Pacific: Emerson Process Management Remote Automation Solutions 1 Pandan Crescent Singapore 128461 T +65 6777 8211| F +65 6777 0947 www.EmersonProcess.com/Remote © 2014 Remote Automation Solutions, a business unit of Emerson Process Management. All rights reserved. Remote Automation Solutions, a business unit of Emerson Process Management, shall not be liable for technical or editorial errors in this manual or omissions from this manual. REMOTE AUTOMATION SOLUTIONS MAKES NO WARRANTIES, EXPRESSED OR IMPLIED, INCLUDING THE IMPLIED WARRANTIES OF MERCHANTABILITY AND FITNESS FOR A PARTICULAR PURPOSE WITH RESPECT TO THIS MANUAL AND, IN NO EVENT SHALL REMOTE AUTOMATION SOLUTIONS BE LIABLE FOR ANY INCIDENTAL, PUNITIVE, SPECIAL OR CONSEQUENTIAL DAMAGES INCLUDING, BUT NOT LIMITED TO, LOSS OF PRODUCTION, LOSS OF PROFITS, LOSS OF REVENUE OR USE AND COSTS INCURRED INCLUDING WITHOUT LIMITATION FOR CAPITAL, FUEL AND POWER, AND CLAIMS OF THIRD PARTIES. Bristol, Inc., Bristol Canada, BBI SA de CV and Emerson Process Management Ltd, Remote Automation Solutions (UK), are wholly owned subsidiaries of Emerson Electric Co. doing business as Remote Automation Solutions, a business unit of Emerson Process Management. FloBoss, ROCLINK, Bristol, Bristol Babcock, ControlWave, TeleFlow, Helicoid, OpenEnterprise, and METCO are trademarks of Remote Automation Solutions. AMS, PlantWeb and the PlantWeb logo are marks of Emerson Electric Co. The Emerson logo is a trademark and service mark of the Emerson Electric Co. All other marks are property of their respective owners. The contents of this publication are presented for informational purposes only. While every effort has been made to ensure informational accuracy, they are not to be construed as warranties or guarantees, express or implied, regarding the products or services described herein or their use or applicability. Remote Automation Solutions reserves the right to modify or improve the designs or specifications of such products at any time without notice. All sales are governed by Remote Automation Solutions’ terms and conditions which are available upon request. Remote Automation Solutions does not assume responsibility for the selection, use or maintenance of any product. Responsibility for proper selection, use and maintenance of any Remote Automation Solutions product remains solely with the purchaser and end-user. 19