1
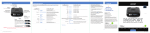
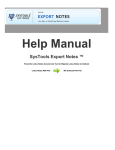
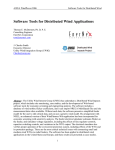
WC 700 Series Color Operator Console Operations Manual Weapons Control System, 2 Lane 1 Operator Console Operation Manual Software revision: E9: 2-14-08 This document describes the various screen images and controls available in Isotec Security’s Second Generation touchscreens, as supplied with various Weapons Control Portal products. This document reflects features supported in the E revision of the software; some features may not exist in earlier versions. The use of the screen is quite intuitive and flows in a very predictable fashion. Each screen, and the various controls that show on that screen, are described in the following sections. MAIN SCREEN In normal operation, the Main screen will be displayed as follows: The outline on the screen represents the portal structure and doors, with the exterior (unprotected) part of the building shown on the right, and the entry lane shown on the top. Indicators are provided that show doors either open or closed, and whether a particular area is occupied. Also shown is a clock showing the current time. Please refer to the flowchart showing a typical entry sequence. 2 Normal Entry Sequence: The static (unoccupied) condition is when all four doors (A-D) are closed, and the B and D doors locked (#1 in the flow chart below). Note that when a door is locked and bonded, a red lock symbol shows by that door. The person entering will open the ‘A’ door then will move into the ‘A’ zone (nearest the outer door). A person symbol appears showing the occupancy of the ‘A’ zone (#2). As the ‘A’ door closes and the person moves toward the ‘B’ zone, he/she is evaluated by the metal detector in the center of the lane. If no metal is detected, the ‘A’ door will lock, the ‘B’ door will unlock (#3), and the user may open the ‘B’ door to enter the facility (#4). This sequence normally happens as a smooth, continuous transition, with minimum delays. Note that the ‘B’ door will not unlock until the ‘A’ door is closed and locked, the ‘A’ zone is unoccupied, and there is no metal detector alarm. An exit sequence (not illustrated) works in the same fashion, and symbols are the same as the entry lane. Operationally, once the ‘C’ zone is occupied and the ‘C’ door closes, the ‘C’ door will lock and will not unlock until the exit lane is completely unoccupied and the ‘D’ door has reclosed. The ‘D’ door will unlock once the ‘D’ zone is occupied and the ‘C’ door is closed and locked . 3 ALERT SCREENS There are five possible alert screens that may appear depending on various conditions that are described below. This chart shows the various screen examples: 4 Metal Detected Alarm: This will occur when someone moves from the ‘A’ zone to the ‘B’ zone carrying a metal object. The MD Alarm screen has a Red background, and is accompanied by a solid alert tone at the operator console, as well as a flashing red light inside the ‘B’ door. The operator then instructs the person (via the intercom) to place all metal objects in the inspection tray and walk back to the ‘A’ zone. After inspecting the contents of the tray using the overhead video camera, the operator will press the Clear Alarm button, resetting the alarm. The person can then move through the metal detector again to demonstrate that no additional metal is being carried. If no additional metal is detected, the ‘B’ door will now unlock as above. Optionally, the system can be configured to automatically reset when the entering person moves back to the ‘A’ zone. This option provides less security, but eliminates the need to have the operator manually reset the alarm. Please see your Isotec Dealer if you would like to consider this configuration. A box to the left of the portal symbol in the Metal Alarm mode may show the words “Possible Tamper”. In normal operation, this will never be displayed; however if tampering with the electronics cabinet is detected, this symbol will be shown. If this occurs, contact your dealer for troubleshooting. The alarm cannot be reset if tampering is detected. System Override 5 The System Override screen is displayed whenever one of the following events occur: Operator depresses the System Override button on the console; The Key Switch on the portal has been turned to the off position (red led); The building Fire Alarm system opens the contact across the fire alarm input. During System Override, all doors are unlocked, and the displays on the portal alternate red and green. System Override displays the FLASHING RED screen shown above at the operator console, accompanied by a solid alert tone. It can only be cancelled by resetting whatever caused it to occur (release the Emergency Release button, turn the Key Switch back on (green led), or end the Fire Alarm). There is a Mute button located on the screen. Pressing this button will disable the alarm tone. Once the Override is cleared, the Mute is automatically reset, and the tone will be heard again the next time Override occurs. You can also program the console to turn this alarm off automatically after 60 seconds using the Setup Screen (see below). Similarly, there is a button to disable the alternating red/green lights in the portal. This is typically used when the System Override button is used to disable the system during nonbusiness hours, and the user does not want the lights flashing at that time. As with the Mute button, this disabling is canceled when the Override is cleared. Timeout Alarm is displayed on the screen if the portal is occupied for more than 45 seconds or any door is held open for more than 15 seconds. These are the default values and are adjustable by your Isotec Dealer. Either or both of these alarms can be disabled, or can be set to a different time, from the Dealer screens. A Timeout alarm can be cleared without clearing the underlying cause, at which point a new timeout will start if the portal is still occupied. A timeout alarm does not disable any normal system operations. It is accompanied by a Orange background, and an alternating alarm tone. 6 Assistance Request This screen is displayed if someone outside the portal presses the optional Assistance Request button. It may be cancelled by pressing the Clear button on that screen, or will clear automatically after a 10 second timeout. The Assistance Request screen is shown with an orange background, with a short beeping tone. The Emergency Release screen is only shown if the system is equipped with emergency release button(s) on the exit lane. In normal operation, if the ‘D’ door is operating properly, the ‘D’ door will unlock when someone approaches that door and the ‘C” door is closed. If the ‘D” door logic is operating properly and is unlocked as noted above, the Emergency Release will have no effect (since the door is already unlocked). If there is some failure in the system and the ‘D’ door does not unlock correctly, a person in the exit lane can press the Emergency Release button, which will start a 30 second (15 second optional) time out, after which the ‘D’ door will be unlocked. Once the Emergency Release button is pressed, the console screen turns red, an alternating tone sounds, and “Emergency Release INITIATED” is displayed during the 30 second countdown. A bar graph showing the timeout remaining is also displayed. At the end of the 30 second time, the screen shows “Emergency Release ACTIVATED” (while the door is actually unlocked). At this point, a RESET button appears on the screen. The door will remain unlocked until reset by the system console (default configuration) or optionally can be set to relock automatically 8 seconds after being opened and then closed. This latter configuration may not be approved by local code authorities. 7 Once the release is initiated, it cannot be cancelled by the portal occupant or the console operator. Please contact your Isotec Dealer for more information on Emergency Release configuration options. TROUBLESHOOTING & SETUP SCREENS This screen is reached by pressing the right arrow ( ) button on the main screen. This Control Screen that provides access to the other diagnostic screens. These screens provide useful information and setup features as well as providing access to the dealer configuration screens which are used by your dealer for initial setup. From each of these Setup screens, the Main screen may be reached by pressing the up arrow/house symbol ( ) button. The Diagnostic screen is reached by pressing the ‘diagnostic’ button on the Control screen. This shows a graphic similar to the main screen. In addition to the door, occupancy, and door bonded symbols (“bond” in a green oval) symbols, there is also a square with the work “lock” that shows if the door lock is powered. This can be useful in troubleshooting a failed component or installation problem. Also shown is a rectangle on the right side of the screen. If the system inputs are all in the condition they should be for the static mode, the words static ok shows in the rectangle. All of the following conditions are required for static ok to be displayed: 8 All doors closed; B & D doors locked and bonded; A & C doors unlocked and unbonded; no occupancy in any zone; no metal detector alarm. The I/O (Input/Output) List screen is reached by the ‘I/O list’ button on the Control screen. This brings up a display of all the inputs and outputs of the PLC, for troubleshooting purposes. The Setup Screen deals with the customer counter, the entry alert tone, and the clock: The color Touchscreen is equipped with an “alert tone” that emits a short beep from the console when the A door is opened. The button on the top left of this screen (shown as “ON” in the view above) can be toggled on and off to enable or disable this beeping tone. The factory default is on. The Customer Counter totals the number of times the B door has been opened. This gives an approximation of the number of people that have passed thru the system. This counter can be reset by pressing the green Reset button located adjacent to the counter indication. This count is NOT maintained when power is removed from the system. 9 Override AutoMute can be set off (Default) or on. When this is turned on, when the system goes into System Override, the alarm tone will automatically mute after 60 seconds. The clock on the main screen is maintained when the power is removed from the system. This is sustained by an internal backup battery (CR2053) located in the rear of the display. The clock can be set by touching the blue Set Clock button on the top right of the screen, bringing up the clock screen. Set the time and date by using the up and down arrows in each field. When done, press the SET button to set the time. Press the ESC button to return to the Setup screen Alarm Log brings up a screen that provides a historical record of various alarm indications and when they occurred. The Alarms that might be displayed, and their meanings, are as follows: Metal Detected – the metal detector has detected a metal object when the portal is occupied. Metal Detect – False Alarm – the metal detector has detected a metal object when the portal is not occupied. 10 Timeout – either the portal was occupied too long or a door has been held open too long. The times for these timeouts can be set by your dealer. Override – whenever one of the override devices has been tripped. (see System Override above for those conditions.) Emergency Release – the emergency release button has been pressed. Possible Tamper – shows if the system thinks that the electronics cabinet has been opened. Power Up – time when power was applied to the system The Alarm history screen as UP and DOWN buttons for scrolling up and down the history log. To erase the Alarm History, press and hold the Clear All button until the screen clears. The Rev(ision)s screen displays the revision of the software in the Touchscreen and also displays the revision of the software loaded in the system processor. 11 LOCK BUTTONS Isotec Portals have the option to be configured so that doors can be locked from the Touchscreen, overriding the normal portal logic. This locking may or may not be allowed by local code authorities; your Isotec Dealer can assist you with determining if these features are allowed, & if so, can enable those desired. The functions available are Lock A door, Lock B door, and Exit Lane Lock If these features are enabled by your dealer, the screen lock buttons will be displayed as shown below: The A door NORMAL and B Door NORMAL buttons each lock their respective door when touched. NORMAL indicates that the door locks work per the normal portal logic; LOCKED is displayed when the button is touched to lock the door. The following shows the A door locked with the top right button: Note that the A door button shows LOCKED, and also that the A door Lock/Bond symbol (the red lock) is displayed. The Exit NORMAL button on the lower left may be used to trap someone in the exit lane. If this button is depressed, then the C door will remain unlocked until someone enters the exit lane. Once C door closes with the exit lane occupied, the C door will lock, and the D door will remain locked, rather than unlocking as it would in a normal exit. Thus the occupant of the lane is trapped until the Exit Lock button is toggled back to Normal. Once the Exit Lock is turned off, the occupant can leave via the D door. 12 REMOTE TRANSMITTERS: Isotec offers the options of either single or two button remote control transmitters, which allow certain functions to be implemented without having to go to the operator console. This might be useful for other officers in the bank to operate the system in parallel with the console operator. On a single button remote, or the left (green) button on a two button remote is used to clear the metal detector alarm. Depressing that button ends the alarm immediately. At that point, the portal will work normally (for example, the B door will unlock if all the normal logic conditions are met) On the two button remote option, the right or red button function is programmable by your Isotec Dealer. The functions available are: A door Lock B door Lock Entry Lock (both A and B doors locked) Exit Lock (same operation as the Exit lock on the Touchscreen) Release All (same function as depressing the Override button on the console – releases all doors.) In the case of the first four functions, the operation of the button is “alternate action” – in other words, the first press turns on the function, and the second press turns off the function. Note that if one transmitter is used to turn on the function, either that transmitter or another transmitter can be used to turn off the function. There is an indicator on the Operator Console that shows when the function is toggled “ON” as shown by the words “Remote On” and the purple diamond on the screen example below: In the case of the Release All function, the remote button acts as a momentary push button (it does not latch as the other functions do). In order to preclude inadvertent operation of the Release All function, this button must be held depressed for 1.5 seconds before the doors release. This button must then be held down to keep the doors released. Holding this button will only hold the doors open for about 10 seconds and is only intended for a temporary door release. If the system needs to be overridden for a longer time period, use the OVERRIDE button on the Operator Console. 13 DATA OUTPUT: Isotec offers an optional system hardware configuration that provides a serial data output port at the portal electronics which can be connected to either a remote data acquisition system or to a printer. The normal configuration of this port is set up to provide a printed record of the Alarms that occur during the system operation, similar to Alarm Log function described above. Normally the printer is located in a secure location, away from the operator console, for archiving purposes. No user involvement is required to operate this printing function. Data output to a data acquisition system can also provide the same Alarm messages to a computer or other device. The following information will be useful in configuring such a remote device: Wiring: RS-232 signal levels SD, RD, Ground signals. Max distance: less than 50 feet (optional RS 485 link available) Configuration: 8 bits Start and stop bits No parity Delimiter: CR + LF Typical Data Format: Date (mm/dd/yy), (space), Time (hh:mm:ss, 24 hour), (two spaces), Message (variable length), Delimiter (CR LF). Example: 01/27/08 13:04:43 Metal Detected Messages Provided as standard: Powered Up (system power applied) Metal Detected (when occupied only – no false alarms reported) Timeout (either occupancy timeout or door open timeout) Emergency Release (activated in the exit lane) Override (system override button or key switch or fire alarm) Numerous other messages and formats can be provided via special order. V8 – 5/1/09 14