1
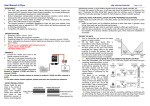
VTR-GP V1.2 Aeroxcraft VTR-GP Tilt/Roll Gimbal User Manual 1 Designs, Images and Content Copyright © Aeroxcraft Ltd. 2013 VTR-GP V1.2 Contents 1. Notes 2. Introduction 3. Installing GoPro camera 4. Connecting to a DJI Naza or Wookong 5. Installing HoverflyGimbal 6. Adjusting centre points (Tools Required) 7. Adjusting centre points of axes 8. Adjusting centre points of axes 9. Adjusting Belt Tension (Roll) 10. Adjusting Belt Tension (Tilt) 11. Fitting Accessories 2 Designs, Images and Content Copyright © Aeroxcraft Ltd. 2013 VTR-GP V1.2 1) Notes REMOVE PROPELLERS AND DISCONNECT MOTORS BEFORE PROCEDING. This document is a work in progress. Information contained within this document may be incorrect and we cannot be held responsible for any damage/injuries caused by following the information contained within this document. If you are unsure what you are doing get advice from someone who does. Do not turn axes by hand. Servos are rated for 333Hz Power servos using a 6V BEC. Do not connect directly to a flight controller such as DJI Wookong or Naza. Multirotor helicopters are dangerous. Operate them away from people and property. Be responsible. If in doubt do not fly. Always remove propellers from motors before carrying out work on your multirotor helicopter. Failure to do so can cause serious injury. It is the owner’s responsibility to ensure this model is assembled and fitted out correctly and safely. Ensure that your model is capable of safely and reliably lifting the payload you are asking it to. This model is dangerous if used in an incorrect manner. Ensure you seek assistance from an experienced flyer if you are unsure. Do not fly near people, property or highways. Do not fly over people, property or highways. There may be laws and regulations governing the use of this model in your area, seek advice from your authorities if you are unsure. Planning your build and installation is key to building a safe and reliable multi rotor. Make sure all wiring is of the correct gauge, properly connected, neat and protected from wear/tear and radio/electrical interference. Make sure all the components you use are suitable for the size and weight of your multi rotor. Do not over tighten screws. Check this product for damaged hardware, loose joints, missing parts or sharp edges before and after assembly and frequently during use. Do not use unless all components are correctly fitted and adjusted. Do not use if any parts are missing, damaged or broken. Assembly is required. Take care when unpacking and assembling; contains small parts and sharp edges. If you require any replacement parts they are all available from Aeroxcraft. Contact us for details. 3 Designs, Images and Content Copyright © Aeroxcraft Ltd. 2013 VTR-GP V1.2 2) Introduction To follow.... 4 Designs, Images and Content Copyright © Aeroxcraft Ltd. 2013 VTR-GP V1.2 3) Installing GoPro camera 5 Designs, Images and Content Copyright © Aeroxcraft Ltd. 2013 VTR-GP V1.2 4) Connecting to a DJI Naza or Wookong REMOVE PROPELLERS AND DISCONNECT MOTORS BEFORE PROCEDING. It is not recommended to connect the gimbal directly to a Naza or Wookong controller. The current drawn by the servos can easily exceed the power that the controller can provide, which in turn can cause the controller to malfunction or become damaged. If this occurs in-flight then it is likely to cause a crash. Crashes can also cause damage to your multirotor and also to people and property. Crashes are bad! In addition to the above issues, the Naza and Wookong controllers output 5 volts from F1 & F2. Most digital servos work best on 6 Volts, giving more speed and torque with the higher voltage. The servos need to connect to the controller and BEC as in the schematic diagram below. 6 Designs, Images and Content Copyright © Aeroxcraft Ltd. 2013 VTR-GP V1.2 To achieve this you need to make wiring harness from some servo extension leads. Below is an example of this. On this harness the roll input has not got a black lead, this is because the 0v is provided already by the black lead on the Tilt input. With this harness both the tilt and roll inputs need to be connected for it to work correctly. Do not drive the servos at a higher frequency then they are rated for. The MKS servos supplied are rated at 333Hz. 7 Designs, Images and Content Copyright © Aeroxcraft Ltd. 2013 VTR-GP V1.2 You can finely adjust the centre positions of the gimbal in the DJI assistant software. Set the gimbal gains in the DJI assistant software so that the gimbal stays level when the multirotor tilts and rolls. Sighting the gimbal against a known level like a doorway or using a digital/spirit level will help when setting the gimbal gains. Typical settings are: 8 Designs, Images and Content Copyright © Aeroxcraft Ltd. 2013 VTR-GP V1.2 5) Installing HoverflyGimbal The gimbal control provided by the DJI Naza is often too slow to react to the movements of a multirotor in flight. If you want to get pro results then you need something better. The HoverflyGimbal controller provides much faster and smoother control of your gimbal. The VTR-GP has a mounting plate on the rear specifically for mounting a HoverflyGimbal board. Before you mount your HoverflyGimbal to your gimbal you need to calibrate the sensors. Details on this are in the HoverflyGimbal manual which is available from hoverflytech.com . Time spent getting this right will save you time later on when you try to fine tune the settings. For the purposes of the VTR-GP we have found that HoverflyGimbal firmware version 1.03 is the best one to use. Mount the HoverflyGimbal as pictured above using the screws and nuts supplied with your VTR-GP gimbal. The power connector should be pointing upwards. Power the HoverflyGimbal with a good quality BEC such as the Castle Creation 10amp BEC set to 6 Volts. Many cheaper BECs are of questionable quality, the output voltage can be 'noisy' and they can also give off excessive radio interference. 9 Designs, Images and Content Copyright © Aeroxcraft Ltd. 2013 VTR-GP V1.2 Set the Mounting Configuration as Back Top in the HoverflyGimbal configurator. When setting the centre points of the servos in the HoverflyGimbal configurator, make sure the gimbal is as level as possible, as indicated in the area below. If you don't have your RX connected to the HoverflyGimbal to adjust the tilt then make sure the Tilt servo 'Transmitter/Receiver Control' is set to 'None'. If you do have your RX connected to the HoverflGimbal, make sure that only the 0v and Signal wires are used. Make sure there is no power (middle red wire) going from the RX to the HoverflyGimbal, failure to ensure this will cause problems and at worst cause damage to your RX or HoverflyGimbal. 1 Designs, Images and Content Copyright © Aeroxcraft Ltd. 2013 VTR-GP V1.2 Below are the servo settings we are using on our HoverflyGimbal for the VTRGP. Note that yours settings may be slightly different. We have found that a digital level is very useful for accurately setting the Centre Points and Scaling factors. You will need to fine tune the settings (the Acc Rate Gain in particular) to get the best results for your rig, flying style and filming style. 1 Designs, Images and Content Copyright © Aeroxcraft Ltd. 2013 VTR-GP V1.2 6) Adjusting centre points (Tools Required) Before you begin, you will need the following items: Hex 2mm allenkey key/screwdriver (eg. Wera 023105) Long thin flat bladed screwdriver (eg. Wera 117996) Something to centre the servo, for eg a servo tester or a TX/RX. A servo tester set to 1520us which is the centre signal for most servos. A typical TX/RX combo. Hex 2mm allenkey key/screwdriver (Wera 023105) Long thin flat bladed screwdriver (Wera 117996) 1 Designs, Images and Content Copyright © Aeroxcraft Ltd. 2013 VTR-GP V1.2 7) Adjusting centre point of Roll Axis Place your flat thin screwdriver down the hollow roll shaft. You should be able to locate the end of the screwdriver into the end of the potentiometer shaft. It will not turn as it is clamped to the roll shaft by the steel collar. Slacken 2.5mm hex grub screw on the steel collar. It needs to be slack enough so you can turn the potentiometer with the screwdriver and also tight enough so that the potentiometer still turns with the roll shaft. 1 Designs, Images and Content Copyright © Aeroxcraft Ltd. 2013 VTR-GP V1.2 IMPORTANT! Remove the 2mm hex tool from the grub screw before proceeding. Failure to do so may damage the gimbal. IMPORTANT! When you connect the servos to the gimbal it may move quickly and unexpectedly. Make sure your fingers and any cables are out of the way and cannot be damaged by the gimbal. Make sure that you can disconnect the power quickly if need be. If the grub screw is too loose when you connect the servo it may continuously spin round. Connect your servo tester and set the position to 1520us. Alternatively connect to a RX, making sure the channel you connect to is at the centre position on the TX (don't forget trims & Sub-trims need to be central). You should now be able to adjust the centre point of the gimbal by turning the end of the potentiometer with the screwdriver. Once you are happy with the position you have set, re-tighten the grub screw in the steel collar. By adjusting the centre point, the roll arm can be configured to be on the other side of the camera. This moves the lens of the GoPro camera nearer to the centre of the roll axis. Some people prefer this but for the Hero3 it means you cannot access the hdmi port whilst the camera is in the gimbal. Similarly you could adjust the camera to be in portrait (rather than landscape). This would make the gimbal a Roll/Pan gimbal. We have not tried this out ourselves, do so at your own risk. It might be of use to someone? 1 Designs, Images and Content Copyright © Aeroxcraft Ltd. 2013 VTR-GP V1.2 8) Adjusting centre point of Tilt Axis Place your flat thin screwdriver down the hollow Tilt shaft. You should be able to locate the end of the screwdriver into the end of the potentiometer shaft. It will not turn as it is clamped to the tilt shaft by the steel collar. Slacken 2.5mm hex grub screw on the steel collar. It needs to be slack enough so you can turn the potentiometer with the screwdriver and also tight enough so that the potentiometer still turns with the tilt shaft. 1 Designs, Images and Content Copyright © Aeroxcraft Ltd. 2013 VTR-GP V1.2 IMPORTANT! Remove the 2mm hex tool from the grub screw before proceeding. Failure to do so may damage the gimbal. IMPORTANT! When you connect the servos to the gimbal it may move quickly and unexpectedly. Make sure your fingers and any cables are out of the way and cannot be damaged by the gimbal. Make sure that you can disconnect the power quickly if need be. If the grub screw is too loose when you connect the servo it may continuously spin round. Connect your servo tester and set the position to 1520us. Alternatively connect to a RX, making sure the channel you connect to is at the centre position on the TX (don't forget trims & Sub-trims need to be central). You should now be able to adjust the centre point of the gimbal by turning the end of the potentiometer with the screwdriver. Once you are happy with the position you have set, re-tighten the grub screw in the steel collar. By adjusting the centre point, the camera housing can be configured so the camera is removed from the front rather than the back. You can also set the camera to be point vertically down. 1 Designs, Images and Content Copyright © Aeroxcraft Ltd. 2013 VTR-GP V1.2 9) Adjusting Belt Tension (Roll) Slacken the 2x 2.5mm hex screws here... ...and here on the other side. Pull the servo like below to achieve the desired tension. Then move the hex spacer against the servo plate and re-tighten tighten the 2 screws. A helper can make this much easier. Do not over-tighten the belt. It needs to be tight enough to stop any slop in the movement of the roll arm, but no tighter. If it is too tight it can damage the servo or the gimbal. 1 Designs, Images and Content Copyright © Aeroxcraft Ltd. 2013 VTR-GP V1.2 10) Adjusting Belt Tension (Tilt) Slacken the 2x 2.5mm hex screws here... ...and here on the other side. Pull the servo like below to achieve the desired tension. Then move the hex spacer against the servo plate and re-tighten tighten the 2 screws. A helper can make this much easier. Do not over-tighten the belt. It needs to be tight enough to stop any slop in the movement of the roll arm, but no tighter. If it is too tight it can damage the servo or the gimbal. 1 Designs, Images and Content Copyright © Aeroxcraft Ltd. 2013 VTR-GP V1.2 11) Fitting Accessories To follow.... Horizontal mounting brackets Changing the rail brackets DJI S800 Mountings Fitting Tilt shaft for PhotoHigher Skyline 1 Designs, Images and Content Copyright © Aeroxcraft Ltd. 2013