1
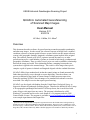
USGS Historical Quadrangles Scanning Project QUAD-G: Automated Georeferencing of Scanned Map Images User Manual Version 2.10 9/3/2014 J.E. Burt, J. White, G.J. Allord1 Overview This document describes software for georeferencing scanned topographic quadrangles and other map images. In other words, the software converts an image from a scanner’s coordinate system to a known spatial reference system. In this case the output reference system is the geographic (latitude, longitude) coordinate system implicit in the original map. The software, known as QUAD-G, operates in much the same way as other georeferencing tools: a small number of points are located in both image coordinates and geographic coordinates. These so-called control points are used to establish a relationship between the image and world. This relationship defines a mapping between the two systems that is applied to the scanned image. The result is a new image whose pixels comprise a grid of squares in latitude and longitude aligned with the cardinal directions. QUAD-G differs from standard tools in that the control points are found automatically rather than provided by a user through on-screen digitizing. Thus the software can process an arbitrarily large batch of scanned images without operator supervision. Generally speaking, QUAD-G has advantages over standard tools whenever one has more than a few maps in a series that require georeferencing. QUAD-G was developed with funding from the United States Geological Survey to support its Historical Quadrangle Scanning Project. Therefore the default QUAD-G setup is for topographic quadrangles and similar USGS map sheets, but it can be used with scans of large-scale maps from any source. The program is distributed as a MS Windows™ executable and in source code format as a C# program under the GNU General Public License. The program is available at www.geography.wisc.edu/Quad-G, as are sample input datasets and output files. 1 QUAD-G was developed under a cooperative agreement between the United States Geological Survey and the University of Wisconsin-Madison Geography Department. The project was a collaborative effort between Gregory J. Allord (USGS), James E. Burt (UW) and Jeremy White (UW), with assistance from AXing Zhu (UW). Jim Burt and Jeremy White coded the program. This manual was drafted by Jim Burt. 1 Use of QUAD-G rests on the following assumptions: 1) The mapped area comprises a rectangle in latitude and longitude. The four corners of the rectangle serve as control marks. Thus the extent of this rectangle is assumed known, as well as the layout of any additional control marks of likewise known latitude and longitude. For example, a 7.5 minute USGS topographic quadrangle has 16 control marks arranged in a 4 x 4 grid with 2.5 minute spacing (Figure 1). The grid need not have the same number of rows as columns, and the spacing in longitude need not match the latitude spacing. The four corners of the map area comprise the minimum required set of control points, but use of edge and interior control points is strongly recommended. As seen in Figure 1, a standard set of shapes is assumed for the control marks. Note that interior, corner and edge marks each have a distinct shape. These shapes are built into QUAD-G in the orientations shown. Thus an interior mark is always a “+” shape, and a top edge mark is always a “┬” shape. No assumptions are made about the number or arrangement of control marks other than that they comprise a regular grid and that all are black in color. The distribution version of QUAD-G assumes the quadrangle is bounded by a black neatline, and that the area outside the neatline is white. The program can be easily modified if these assumptions are not met. Figure 1. Standard control marks in the 4x4 layout of 7.5-minute quadrangles. 2 2) As is true for standard georeferencing tools, we assume a low-degree polynomial can adequately represent the transformation from image to geographic coordinates. As a practical matter, this amounts to assuming the map scale is so large that the map projection is essentially undetectable (e.g., great circles appear straight on the map). Small-scale maps with geodesics that depart drastically from straight lines are outside the design parameters of this project. Thus while QUAD-G is perfectly adequate for scales of 1:100,000 and above, it is not recommended for maps of the full globe. Error statistics computed by the program will alert the user to situations where the polynomial model is inadequate. 3) We have observed that scan operators typical feed map sheets in a “normal” orientation so that the northern border is toward the top of the image. However, sheets that are much wider than they are tall are sometimes fed transversely, with the northern border on the right. As a working hypothesis QUAD-G assumes that the map has been scanned in normal orientation. For quads with more columns than rows of control marks the program compares the aspect ratio of the image to the aspect ratio of the latitude-longitude quadrangle. If the image is inconsistent with the quadrangle, the program assumes the map has been scanned transversely and image coordinates are rotated accordingly. Please note that regardless of input orientation the output image file will always have north toward the top. Use of QUAD-G is straightforward: a data file is provided that describes the images to be georeferenced. The required information for each image includes the image file name, map extent, control mark layout, and several other parameters described below. QUAD-G reads the data file and processes each image in turn. Alternatively, there are options for manual selection and processing of individual images listed in the input file and for direct input of image data via a dialog. Diagnostic statistics are written to a log file for examination outside of QUAD-G. The program can read input images in uncompressed base TIFF format or binary ppm. Other input formats are converted to ppm by a GDAL routine (www.gdal.org). Output images are stored as GeoTIFF rasters in a location determined by the user. (Please see http://trac.osgeo.org/geotiff/ for information about the GeoTIFF format.) Installation QUAD-G is provided as Windows™ binary that can be executed from any directory. There is no install procedure to run nor are any registry changes required. The “installation” consists of copying the executable to any directory. As with any application, users can create desktop or program menu shortcuts pointing to the exe file. The program requires the Microsoft .NET framework version 4 or higher. QUAD-G uses the GDAL raster package as a helper for file conversion. The required GDAL routines are distributed as Windows™ binaries by a variety of groups (see 3 “downloads” at www.gdal.org). One of these packages must be installed for full capabilities of QUAD-G. The program looks for GDAL files in several standard install directories: Program Files, Program Files (x86), and OSGEO4W. If the package is not installed in one of those locations the user will need to modify the QUAD-G source code accordingly. Input Data File A single data file provides information for a suite or “batch” of input images. Typically all of the images in a batch come from one map series, but the definition of a batch is left completely to the user. The only requirement is that all images within a batch reside in the same folder. Likewise, all output images for a batch are placed in a single folder. Input and output folders are specified by the user. The data file must be provided as an Extensible Markup Language (XML) file (see www.w3.org/TR/REC-xml). The XML file consists of a standard preamble and a list of scans. Within the scan list each image is described in an XML block delimited by <scan> and </scan> tags. For example, the following listing shows a data file for georeferencing two images: <?xml version="1.0"?> <ScanList> <Scan> <FileName>500010.tif</FileName> <MapName>Algoma Quadrangle</MapName> <Datum>NAD27</Datum> <ControlMarkSpacing>0.0416666667</ControlMarkSpacing> <Longitude>-87.375</Longitude> <Latitude>44.5</Latitude> <Resolution>600</Resolution> <ControlMarkLayout>4x4</ControlMarkLayout> <ControlMarkSize>0.2in</ControlMarkSize> <OutputGeographicFileName>Algoma_24000.GTIFF</OutputGeographicFileName> </Scan> <Scan> <FileName>AK_Ambler_River_A-2_1985_63360.tif</FileName> <MapName>Ambler River A-2</MapName> <Datum>NAD27</Datum> <Scale>63360</Scale> <ControlMarkLonSpacing>00 15</ControlMarkLonSpacing> <ControlMarkLatSpacing>00 10</ControlMarkLatSpacing> <Longitude>-156.5</Longitude> <Latitude>67</Latitude> <Resolution>600</Resolution> <ControlMarkLayout>4x4</ControlMarkLayout> <ControlMarkSize>0.1</ControlMarkSize> <OutputGeographicFileName>Ambler_River_A-2geo.tif</OutputGeographicFileName> </Scan> <</ScanList> The meaning of each tag is given Table 1 below. 4 Tag Name FileName MapName Datum Longitude Latitude Resolution Scale ControlMarkLayout ControlMarkSpacing ControlMarkLonSpacing ControlMarkLatSpacing PerimeterMarksOnly ControlMarkSize OutputGeographicFileName Meaning Input image file, relative to source image directory. Optional text name of map Optional datum of original map, needed for geoTiff header. Must be one of the examples shown at right. Defaults to NAD27. Longitude of lower right map (see note below) Latitude of lower right map corner (see note below) Scan resolution in dots per inch Optional map scale: denominator in representative fraction. Providing this tag will result in a better edge search. Number of rows and columns of control marks on map when viewed in normal orientation. Do not adjust for transverse orientation. Note rows first, then colums. Control mark grid spacing. Use only if mark spacing is the same in longitude and latitude (see note below) Longitude distance between control marks (see note below) Latitude distance between control marks (see note below) Optional flag indicating interior marks are absent or should be ignored Size of control mark legs. E.g., half the entire width of a “+” mark. Allowed values are IN (inches) pixels, and f (fraction). Fraction means proportion of the image size. Not case sensitive. Inches assumed if no units are given. Optional name for output image file. If omitted, the input filename is used with the extension is removed and replaced by the suffix Geo.tif. Examples Jacoma.tif, 167001.tif West Madison Quadrangle NAD27, NAD83, WGS72, WGS84 -88.5, -88 30 00, -81.375, -81 22 30 42.125, 42 7.5 00, -15.5, -15 30 00, 600 24000, 62500, 100000, 250000 4x4 (a square map in lat-long) 5x9 (5 rows in latitude, 9 columns in longitude) 00 10, 2.5, 0.041666 00 10, 2.5, 0.041666 00 10, 2.5, 0.041666 True, T, t, False, F, f 0.2In, .0001f, 25pixels, 0.2 map1.tif, MadisonWest.tif. If omitted, input file “map.tif” becomes “mapGeo.tif” Table 1. Input XML tags. The XML input file can specify values for latitude, longitude, and grid spacing in either decimal degrees or degrees, minutes, seconds. To obtain a value the program looks for a text string with one to three fields separated by blanks. If there is only one field, it is interpreted as degrees. If the second field is present, it is taken as minutes. If there is a 5 third field, it is interpreted as seconds. Any of the three can have a decimal point. A minus sign means the entire value is negative. Table 2 provides a few examples. Input String 44.5 44 30 44 30 30 44.50833 00 2.5 -81 30 Interpretation 44.5 o (or 44o 30’) 44.5 o (44 o 30’) 44.50833 o (44o 30’ 30”) 44.50833 o (44o 30’ 30”) 2.5’ -81.5o (west longitude) Table 2. Examples of input for latitude and longitude. The control mark grid can have rectangular cells with different spacings in latitude and longitude. In that case use the xml tags ControlMarkLatSpacing and ControlMarkLonSpacing to specify respective values. If the grid is uniform with square cells the same value can be supplied for each, or the tag ControlMarkSpacing can be used. Some map series have control marks only on the quad edges and thus lack the ‘+’ symbols seen in Figure 1. In such cases the PerimeterMarksOnly tag should be set to ‘True’. There is an important distinction between the input XML data values described here and user settings or preferences discussed below. Obviously, data values can vary from scan to scan. One image within a batch could have a scale of 1:24000, whereas another might be at 1:62500. By contrast, user preferences apply to the entire batch. Preferences can be changed in a QUAD-G session, but not while a single image or batch of images is being processed. For example, the pixel error threshold used to flag problem images is constant within a batch. Thus if some images are scanned at 300DPI and others are at 600DPI, it would likely be a mistake to process them in the same batch. An acceptable error at 600DPI might be too large for use at 300DPI. Georeferencing Steps The complete sequence is as follows: 1) Preference File Processing: When QUAD-G is loaded into memory it searches the installation directory for an XML file saved from a previous session. User option values are read from the file if it exists, otherwise they are set to default values. Preference files are not maintained directly by the user, thus its format is not described here. Preference values are changed via a dialog box described in the next section. 2) Input File Processing. The XML <scan> block for an image is processed to obtain the latitude and longitude coordinates for all control points. That is, from the corner location, the grid spacing, and the number of rows and columns the 6 program finds true latitude and longitude for every control point. The image orientation (normal or transverse), is also determined in this step. 3) Find Corners. The input image is searched for the bounding neatline. The search is informed by the quad aspect ratio, which is known given the control mark layout. If the map scale is provided the approximate pixel dimensions of the quad are known and can also be used in the search. The search first finds candidate edges---nearly vertical and horizontal lines2 that might be part of the quadrangle boundary. All combinations of candidate edges are projected to intersections that define a set of candidate quadrangles. The candidate quadrangle whose aspect ratio or size is closest to the known quadrangle is taken as the best guess. This is used to guess at image coordinates of each corner. Windows are placed around each guess to show the results. 4) Adjustment of Corners (optional, manual mode only). If an actual corner is not within its window, it and other control marks will not be successfully located during the pattern search. An option is therefore provided for user adjustment of corner locations. The operator clicks within a window and drags until the actual corner is reasonably close to the center of the window. The arrow keys can be used to move the image one pixel at a time. A shift-arrow combination accelerates movement to 10 pixels. There is no need for fine adjustment of corners; approximate image locations are sufficient. 5) Identify Search Windows. The program uses the grid layout and the image corner locations to guess at control mark locations. That is, a control mark grid is established based on the presumed corner locations. These become the center of search windows for all the control points, including the corner marks. If a control mark is larger than 2/3 of the search window, the mark size is reduced accordingly to avoid the possibility of the mark extending beyond a window boundary. If the PerimeterMarksOnly tag contains “T” or “t”, no interior windows are found. 6) Adjust Search Windows (optional, manual mode only). If a control mark is not within its window, it will not be successfully located during the pattern search. In this case the user should move the window until it is roughly centered over the correct control mark. The adjustment procedure is the same as for corner adjustment. Only approximate placement is required. 7) Search Windows. Each window is searched for its control mark. The proper control mark template is placed over every possible pixel in the search window, and deviations between the template and the underlying image are noted. The pixel location with smallest deviation is taken as the control mark location. 2 In our experience scanned images are typically rotated by a few tenths of degree from vertical. In addition, convergence of meridians guarantees that the quadrangle is not a true rectangle. Thus the edges are only assumed to be within 2o of horizontal or vertical. A trivial change in the program would accommodate other tolerance values. 7 In particular, let I R (u , v), I G (u , v), I B (u , v) be the red, green, blue values of the image search window at coordinates (u,v). A control mark pattern consists of a set of N pixels with red, green, blue components. Let PR (k ), PG (k ), PB (k ) be the colors of the kth pixel of a mark. Pixel locations within a mark are stored as offsets (Δuk , Δvk ) from the center of the mark. Every feasible position (i,j) within the search window evaluated, with the misfit between the pattern and the image at (i,j) given by N ε ij = ∑ [ I R (ui + Δuk , v j + Δvk ) − PR (k )]2 k =1 + I G (ui + Δuk , v j + Δvk ) − PG (k )]2 + I B (ui + Δuk , v j + Δvk ) − PB (k )]2 The location (i,j) with smallest ij is taken as the mark location. Note that this process always gives an “optimum” location whether or not the control mark actually appears in the search window. After the search the root-mean-square misfit ij / N is shown for each window. 8) Control Mark Adjustment (optional, manual mode only). If the search results are unsatisfactory, individual control marks (including corners) can be adjusted before going on to the next step. Because final positions will be used as input data for the fitting procedure, operators should position control marks as precisely as possible. The adjustment procedure is the same as for corner adjustment. 9) Least-squares Fitting and Error Analysis. The input file gives a longitude, latitude pair (λ , φ ) for every control point. The pattern search gives a image coordinates (u,v) for the same marks in the scanned map. This can be visualized in table form: Control Mark No. 1 2 3 … n 1 1 2 2 3 3 u (search result) u1 u2 u3 n n un Longitude (known) Latitude (known) v (search result) v1 v2 v3 vn 8 We seek transformations r (λ , φ ) and s (λ , φ ) that yield a predicted (u,v) for any location. By default, QUAD-G uses 2nd degree polynomials for f and g. That is uˆ r ( , ) a b c d 2 e 2 f (1) vˆ s ( , ) g h i j k l (2) 2 2 where ( û , v̂ ) is the predicted image location. If only the four corner control marks are available, QUAD-G uses a first degree polynomial (in effect d, e ,f, j, k, l are zero). A first degree polynomial can compensate for image rotation, differential stretching in u and v, and shearing. A second degree polynomial is obviously even more flexible. In particular, it captures variations in projection scale that a linear function cannot. The task is to choose the coefficients a through l that are optimal in some sense. As is standard, QUAD-G finds coefficients that reproduce the observed (u,v) as close as possible in a least-squares sense. That is, we solve the following optimization problem: n n i =1 i =1 n n i =1 i =1 Find r (λ , φ ) to minimize Su = ∑ [r (λi , φi ) − ui ]2 = ∑ [uˆi − ui ]2 Find s (λ , φ ) to minimize Sv = ∑ [ s (λi , φi ) − vi ]2 = ∑ [vˆi − vi ]2 (3) (4) The coefficients enter partial derivatives of Su and Sv linearly, so this is a problem in linear regression. However, because the image coordinates result from an automated procedure there is no guarantee they are accurate or even feasible. Precautions are therefore essential to ensure the program does not fail catastrophically during the fitting step. To this end QUAD-G uses a technique known as singular value decomposition (SVD). SVD is certain to return a solution even in pathological situations, such as collinear control points. Numerical accuracy of the fit is improved by scaling all values (λ , φ , u , v) to the unit square before optimization. Solutions to (3) and (4) give the best-fitting polynomial transformation based on all control points. Cross-validation is used to assess the ability of the polynomial to capture the pattern of the control points. If the transformation is a good one, it ought to be able to successfully predict the location of a “new” control point not part of the fitting procedure. Cross-validation implements this idea by excluding a control point from (3) and (4), and using the resulting functions to predict that excluded point. Within QUAD-G, the cross-validation error is reported as the distance in pixels between the predicted and search-window locations of the control mark: 9 e( i ) (uˆ(i ) ui ) 2 (vˆ(i ) vi ) 2 (6) The predicted values (uˆ(i ) , vˆ(i ) ) in (6) are those generated by a model with the ith data point omitted. Each control point is dropped in turn, and the resulting error is computed. Note there are two predictions and two “errors” for each point. First, there are the model predictions and corresponding residuals. In addition, we have the crossvalidation predictions and errors. By default he program displays the model predictions and errors in the thumbnail windows. Selecting “CV-predictions” changes to cross-validation values. Either method provides visual feedback as to whether or not the polynomial successfully models various parts of the map. In addition, a global error measure is found by summing over all excluded points. Cross-validation errors are larger than Su and Sv, because the errors are measured at points not used during optimization. Cross-validation errors are meant to give the error expected with independent data, and are mostly useful for identifying points with a failed search. The model errors give a better estimate overall success of the transformation, thus they are written to an output “error” XML file so they can be examined later. Only images whose model errors are smaller than a user-specified threshold will be georeferenced. In manual mode there is once again an opportunity for user adjustment of the pixel locations used for fitting. After adjustment step 7 must be repeated for adjustments to take effect. 10) Creation of Output Georeferenced Image (optional). The output from QUADG is a new image whose pixels are longitude, latitude (λ , φ ) squares. These pixels lie on a regular grid oriented north-south and east-west. The goal is to match the input image resolution. That is, we desire at least as many output pixels in each direction as were present on the original image. Because input pixels are not squares in (λ , φ ) , this means there will be more pixels in one dimension in the output than were found on the input image. For example, consider a 7.5-minute map. The input image is rectangular---there might be 15,000 pixels in the vertical but only 10,000 in the horizontal. In this case QUAD-G would yield an output image that is approximately 15,000 x 15,000. Obviously, to do otherwise would require non-square output pixels or else a loss of information in the north-south direction. Figure 2 provides an example from a 7.5-minute scan. 10 Figure 2. Sections of input (left) and georeferenced (right) images. On the original the sub-area is rectangular in terms of both land-surface area and image extent, with more pixels in the vertical (Figure 2, left). However, the area shown is roughly square in longitude and latitude. Obviously, with fewer pixels in the horizontal, pixels on the original are wider in longitude than in latitude. Because the area shown is nearly square in (λ , φ ) , the georeferenced image of the same area is nearly square. In order to preserve detail the output image has as many pixels in the vertical as on the original. This results in more output pixels in the horizontal than on the original. Construction of the georeferenced image proceeds as follows. i. First, the output grid is established. The spacing of the grid is determined by the input resolution as discussed above. The grid extent is the mapped area plus an optional map collar. The grid spacing and extent determine the position and size of the grid. At the end of this step the latitude and longitude is computable for every pixel in the output image. ii. The next step assigns a color to each output pixel using the input image. For a given pixel center (λ , φ ) , equations (1) and (2) are used to find the four surrounding image pixels. Red, green, and blue values at those locations are linearly interpolated onto (λ , φ ) and written to a temporary tiff file. iii. After all pixels are processed the temporary file is converted to geoTiff format using GDAL. That is, the input datum and other geographic metadata are composed and written to the final output file along with the pixel data. 11) Quality Analysis of Georeferenced File (optional). The output image has pixels that are square in latitude and longitude. The latitude and longitude of every control point is known. Therefore the expected the pixel coordinates of a control point ( , ) are simply λ − λmin u = (W − 1) λ − λmax v = ( H − 1) φmax − φ φmax − φmin 11 where W and H are the output image width and height respectively, and ( min , min ) and ( max , max ) are the corresponding image longitude/ latitude corners. The quality assessment proceeds by extracting a window surrounding u,v and searching that window for a control mark. This gives a found position ( ', ') The difference between ( , ) and ( ', ') is converted to ground distance errors in meters εg = [(λ − λ ') p(φ )] + [(φ − φ ')q(φ )] 2 2 where p( ) and q ( ) are respectively the length of a degree longitude and latitude at latitude . The errors are stored in the output XML file as “GeoTiffErrors” and they are shown on screen as seen in Figure 3 below. The QA image is also stored in portable network graphics format as a file named xxxxGeoVerify.png where xxxx is the filename prefix used for the georeferenced file. Figure 3. GeoTiff quality analysis screen. Please note that these error measures could be wrong for either of the following reasons: (a) the map ellipsoid might be incorrectly specified leading to the wrong values of p and q, or (b) the pattern search might fail, giving the wrong ( ', ' ). No failed pattern searches have been observed in testing with thousands of images. 12 Numeric error measures are also saved in a comma-separated text file named “verify.csv”. This file is placed in the output image directory and contains summary errors for each georeferenced image. See below for an example: The statistics shown are accumulated over all n available control marks in the image, thus the values provide an aggregate measure of error for the entire image. By sorting on any column, one could use this file to examine a large number of scans for potential problems. Errors for individual marks are available in the xml file mentioned above. Using QUAD-G QUAD-G is a standard Windows™ application. All of its functionality is accessed though menus and buttons displayed on the main screen (Figure 4). The main screen is also used to display diagnostic text and graphical elements enabling a user to monitor progress on a batch of images. This section describes how to use and interpret QUAD-G features. 13 Figure 4. Main Program Screen. Top image shows scan with interior control points. Bottom image shows a case where only edge (perimeter) marks are used. File Menu (Figure 5). This menu is used to open an input XML file, input parameters for a single scan file, and to exit the program. Typically a user will load an XML file for a batch of scans, which has the effect of populating the “File List” box seen in the upperright corner of Figure 4. The list can then be processed with no operator intervention in automatic mode, or individual files can be highlighted and processed in manual mode. Typically a user will first employ automatic mode for a batch, and then return to any problem files in manual mode. The single scan option provides an alternative to input via an XML input file. In this case a dialog opens allowing for direct entry of scan file parameters (see Fig 5b). Figure 5. File Menu 14 Figure 5b. Direct Input Dialog Preferences Menu and Dialog. Opening the Preferences menu exposes the dialog shown in Figure 6. The dialog’s File submenu is used to read an existing preferences XML file. This allows settings saved previously to be easily re-established. The File submenu also provides for saving a modified suite of preferences as a new file. Meanings of the settings are as follows: Thumb Dimensions: controls the display size of search windows. If the thumbnail size is too large for all search windows to fit in the panel, the display size is adjusted downward. However, the search window size is unaffected by this. It remains at the value shown. Search Window Size: determines size of image subareas searched for control marks. The default search window size is 250 by 250 pixels. Large highresolution scans sometimes benefit from a larger window size in order to find a control mark. Smaller sizes result in somewhat faster searches. 15 Crosshair Colors: Sets color of cross-hairs used to display search window locations and model predictions. Error Thresholds: cross-validation errors (equation 6) are flagged with colors indicating increasing levels of severity. Levels 1-3 are simply visual cues. By contrast, the “Error Level” determines whether or not an output image is produced. A georeferenced image will be generated only if all errors are below the threshold. Source Image Directory: location of input images Transformed Image Directory: location of output georeferenced images and quality analysis images. Transformation Information Directory: location of XML files for successfully transformed images (errors below threshold). Control mark locations, transformation errors, etc. are placed in a separate file for each transformation. Error XML File Directory: location of XML information for images whose error threshold was exceed. Information for all scans is put in a single file. This file can be opened later as an input file for individual manual processing of problematic scans. Linear Fit Only Button: use linear rather than quadratic polynomial regardless of control mark count. This can prevent unrealistic extrapolation in areas far from control marks. Never Rotate Button: disable automatic detection and rotation of transverse scans. No Georeferenced Image Button: Control marks and least-squares fit written to output xml file, but the scanned image is not transformed. No QA Button: No quality analysis is performed on the georeferenced image. Apply Button: Apply changes to the current QUAD-G session, but do not save settings. Dialog remains open. Save Button: Apply changes and save settings to the current preference file. Close Button: Apply and close the dialog without saving changes. Any changes made are used in the QUAD-G session, but they are not stored externally for use later. 16 Figure 6. Preferences Dialog Process Buttons: This group invokes the processing steps discussed above. Automatic Mode. In automatic mode the user clicks “Run Batch” and the full sequence is of steps executed for the batch starting with the selected file and continuing to the end of the file list. After a batch starts the “Stop” button becomes enabled and can be used to interrupt the process (Figure 7). 17 Figure 7. Process buttons for automatic mode. Manual Mode. In manual mode a user selects an input image and then progresses through the sequence of processing steps by clicking the appropriate button for that step. Buttons are enabled when the corresponding processing step is appropriate (Figure 8). Figure 8. Process buttons for manual mode as they appear immediately following selection of an input image file. The buttons exposed in manual mode are: Find Corners: XML scan information is read for a single file and corners are located by successive evaluation of candidate quadrilaterals. The main panel is used to display assembly of quadrilaterals during the search. The user may adjust corners after this button executes, and such adjustment is highly recommended if one or more corners are not found. Corner images should be adjusted so that corners are near the center of the search window. As mentioned earlier, exact placement is not essential. This button is enabled whenever an input image file is selected from the file list box seen in Figure 4. Find Windows: Corner information is used to establish search windows presumed to contain control marks. The user may adjust search windows after this step. Once again exact placement is not required. Search Windows. Each window is searched for its mark. After this the user may manually identify its location by positioning the image so that the appropriate edge mark is directly beneath the cross-hair. The adjusted pixel values will be taken as the exact cross-hair location in the least-squares fit, thus it is essential 18 that the user be as precise as possible. Recall that the arrow keys can be used for small movements of control marks. Fit: Performs the least-squares fit and generates error values. As seen in Figure 4, prediction errors are shown for each control mark with color coding determined by the error thresholds. Export : Writes control mark coordinates and least squares fit to output xml file. If requested, create the output image and performs quality analysis on the same. Stop: Interrupts georeferencing at the first available opportunity. Processing will not stop within a swath of pixels or while the GDAL helper is running. Mode Button Group: As seen in Figure 9, three panels of radio buttons control basic attributes of execution. Figure 9. Mode Buttons Mode: In manual mode only a single file is processed, namely that selected in the file list box. In automatic mode the entire list is processed starting with the selected file. The current file will be indicated, and the screen will be updated to show progress through the batch. Extent: This governs the area of the scan that appears in the output file. The “Include Collar” option causes the entire scan to be processed, which includes text and all other material surrounding the map rectangle. If “Lose Collar” is chosen, only the map area within the quad neatline appears in the output georeferenced file. If “Both” is selected two files are output: one with collar, one without. The default file names are xxxxxGeo.tif and xxxxxNoCollarGeo.tif where “xxxxx” is the input file name. If the output file name has been specified in the preferences “NoCollar” will be inserted before the file extension. CV Predictions: Selecting this means cross-validation predictions are plotted and cross-validation errors are shown for each window. Otherwise model values are plotted and printed. 19 Visualization: This controls search window background color (Figure 10). Figure 10. Color (left) and Grayscale (right) visualizations. The visualization setting has no effect on the output file. It is intended primarily for use in manual mode as an aid when adjusting control mark coordinates. Comment Box: Any text entered in this control is copied to the output XML files. This provides a way to include an operator name, short notes or other information in the output stream. 20