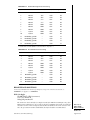
1
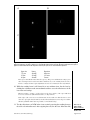
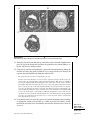
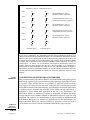
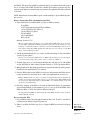
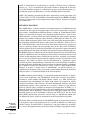
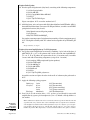
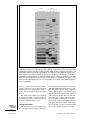
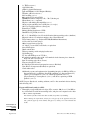
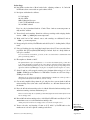
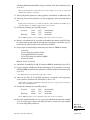
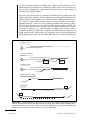
3. Turn on the vacuum slide holder.
IMPORTANT NOTE: The joystick should now be used to move the slide.
4. Use the visualizer to more precisely locate the cells to be microdissected.
The light from the microscope will need to be increased when using the visualizer.
The area to be microdissected should be in the field of view.
The sections are not coverslipped; therefore, the area of interest may be difficult to visualize.
All models of the PixCell System are equipped with a visualizer which acts to diffuse light
and improves resolution; however, the visualizer is engaged differently on different models
(see instrument user’s guide).
Microdissect with the laser
5. Pick up a cap from the loaded cassette module on the right side of the microscope
stage (see instrument users’ guide for instructions on loading the caps into the cassette
module) with the placement arm. Swing the placement arm toward the caps until the
arm overrides the first cap in the cassette module. Ensure that the cassette module is
engaged in the proper indent so that the first available cap is aligned with the arrow
on the microscope stage. Lift the transport arm until the cap detaches from the base
slide in the cassette module.
6. Without lowering the placement arm, swing the arm back toward the tissue section
as far as possible, so that the arm is over the tissue. Make sure that the area to be
microdissected is still in the microscopic field of view by looking through the
microscope eyepieces or at the monitor. Gently lower the arm so that the cap contacts
the tissue section.
If there are folds in the tissue, the cap may not make direct contact with the entire surface
in the area to be microdissected, and transfer efficiency will be compromised; therefore, it
is advisable to inspect the tissue before placing down the cap. If any tissue is mounded or
folded, it is best not to place the cap over that area. Alternatively, the area of the tissue with
folds can be scrapped off the slide using a sterile razor blade, leaving only flat portions of
the tissue section. The tissue section must be dry and cannot be coverslipped for LCM
transfer.
7. Enable the laser by turning the key on the laser electronics box and pushing the
laser-enable button.
The laser-tracking beam should now be visible on the monitor, as well as the area to be
microdissected. If it is not, try lowering the light from the microscope or raising the intensity
of the tracking beam. If it is still not visible, check that the laser is enabled and that the
joystick is perpendicular.
Avoid passing hands through the path of the laser when it is enabled.
8. Using the 20× objective, adjust the focus of the tissue by moving the slide via the
joystick to an area of the slide without tissue. Adjust the laser spot size to 7.5 µm.
Lower the light from the microscope until there is a black monitor screen, except for
the tracking beam. Turn the laser focusing wheel until the tracking beam is a bright
spot with a well-defined edge.
There should be no bright rings surrounding the central spot (Fig. 25A.1.1).
Always focus the laser with the 7.5-ìm spot. Each tissue section and slide will need to be
refocused. Once the 7.5-ìm spot is focused for a particular slide, there is no need to refocus
the 15-ìm or 30-ìm spots, as they are automatically calibrated.
Laser Capture
Microdissection
9. Adjust the laser power and pulse duration settings for the particular spot size to be
used as provided below:
25A.1.10
Supplement 55
Current Protocols in Molecular Biology