1
NLog MIDI Synth
User Manual
NLog MIDI Synth v5.0!
User Manual!
1
Preface
This manual describes NLog MIDI Synth version 5.0
NLog MIDI Synth is a professional level software synthesizer for the iPhone & iPod touch
devices. For iPads we recommend NLogSynth PRO, which is a special version optimized
for iPad devices, although NLog MIDI Synth runs also on iPads using lower screen
resolution.
NLog models a classical analogue style synthesizer with two oscillators, noise generator,
frequency modulation, ring modulator, filter, 3 envelope generators, 2 LFOs and a stereo
effect section containing distortion, chorus and delay.
We believe in high quality audio and sound synthesis. It is our aim to provide highest
standards possible on the used hardware. Carefully tuned algorithms and efficient
machine level programming gives us the freedom we need.
Great user interface design and graphics by David Boldini provides for intuitive and
appealing GUI experience. Maximizing user's creativity is what we want to achieve in our
interface design.
NLog Synth was created by Rolf Wöhrmann in 2008.
Frankfurt, July 2012
© Rolf Wöhrmann, 2012. All rights reserved.
Apple, the Apple logo, Logic Studio, GarageBand, MainStage, iPod, iPod touch, and iTunes are trademarks of Apple Inc., registered in
the U.S. and other countries. iPhone is a trademark of Apple Inc. Line 6 and MIDI Mobilizer are trademarks of Line 6, Inc. Ableton and
Ableton Live are trademarks of Ableton AG. WIST is a trademark and software of KORG INC. All other trademarks are property of their
respective owners.
NLog MIDI Synth v5.0!
User Manual!
2
Content
What’s new in 5.0?!.............................................................................4
Setting Up Your Environment!...........................................................6
On Screen Keyboard!.............................................................................................................6
External MIDI Devices!...........................................................................................................6
Virtual MIDI Connections!.......................................................................................................8
MIDI Configuration!.................................................................................................................8
Menu Structure!...................................................................................9
Performance Screen!........................................................................10
Keyboard Screen!..............................................................................11
Arpeggio!......................................................................................................................13
XY Control!.........................................................................................16
Sound Selection!...............................................................................17
Tape!...................................................................................................19
Metronome!........................................................................................21
Media List!..........................................................................................22
Export!..........................................................................................................................24
Import!..........................................................................................................................27
System Settings!...............................................................................30
Pitch Settings!..............................................................................................................30
Knobs Settings!............................................................................................................31
Control Settings!..........................................................................................................32
Devices Settings!.........................................................................................................33
WIST!....................................................................................................................................33
MIDI Sync!.............................................................................................................................34
Background Mode!...............................................................................................................34
MIDI Settings!..............................................................................................................35
MIDI Learn!...........................................................................................................................35
Synth Editing!....................................................................................36
Oscillators!...................................................................................................................37
Frequency Modulation Synthesis!.........................................................................................37
Ring Modulation!...................................................................................................................37
Noise Generator!...................................................................................................................37
Filter!............................................................................................................................38
Envelopes!...................................................................................................................38
LFOs!...........................................................................................................................39
Modulation Envelope!..................................................................................................40
Amplifier!......................................................................................................................40
Effects!.........................................................................................................................41
Delay!....................................................................................................................................41
Chorus!.................................................................................................................................42
Distortion!..............................................................................................................................42
NLog MIDI Synth v5.0!
User Manual!
3
What’s new in 5.0?
Here is a short overview for the new features of update 5.0:
•
True Mono/Legato Mode
The “Mono” and “Legato” modes are now modified to fully simulate what classical
monophonic analogues synthesizers do: The release tail of each sounding note is stopped
when next note is played. Before, NLog was overlapping release tails which couldn’t be
achieved with monophonic synthesizers.
•
MIDI Learn & Default Values
Hold your finger down on any control and a little panel opens which lets you assign next
incoming MIDI CC controller value to this parameter. Thus, you do not have to know which
CC number your controller sends, just activate MIDI learn in NLog and play your controller.
All controller mappings are stored in a table which you can reach from “Sys” section “MIDI”
and then press “MIDI Learn”. You can delete specific mappings from this table or just look
at them to get an overview.
When you hold you finger down on a control to show the MIDI Learn panel, there is also a
second option with which you can reset the parameter to its default value. This is useful for
example for bipolar parameters to get quickly and exact back to the zero position.
•
Overdub Recording & Looping
There is now an overdub mode for wave recordings. When activated, a new recording will
mix into the existing. This also works with looped audio. With the “undo” button you can
get back to the state before doing the overdub recording session.
•
Sound Bank Import & Export
You can now export and import complete banks of 32 sound patches like you can do
already in the OSX versions. You can im- & export them via email or iTunes file transfer.
Also loading of 3rd party sound banks like from “App Sounds” now becomes very handy.
•
Core MIDI Network
NLog now automatically activates Core MIDI Network in order to connect via WiFi to a Mac
or another iOS device. Still, you can configure inout and output settings for network MIDI in
“Sys” section “Devices.”
•
Full MIDI CC Range
You can now assign the full range of MIDI Controllers from 0-127 to NLog parameter either
via MIDI learn or in the “Sys” page section “MIDI”.
NLog MIDI Synth v5.0!
User Manual!
4
•
Open Media Files in Another App
In the media file list you can reach from the “Tape” screen there is now a new export option
to open a midi or wave file in another app. If there are apps on your iOS device installed
which implement standard iOS file handling for audio or MIDI files, then you can select
from these apps to open a specific file from NLog. iOS will the automatically open then
other app for further processing of this file.
•
Better Default Sound
The “default” sound has been changed and improved to a much easier starting point for
own sound designs. However, this applies only for new installations.
•
Fixes & Other Improvements
Among many other fixes and improvements:
The iPhone/iPod touch version has been optimized for devices with arm7 based CPUs.
The occasional muting of NLog after incoming phone calls has been fixed.
The “Running Phase” parameter has been improved and fixed.
Update to new Akai SDK for Akai SynthStation 25 and further optimizations for this device.
NLog MIDI Synth v5.0!
User Manual!
5
Setting Up Your Environment
There are many ways you can use NLog. This chapter describes a couple of them:
•
•
•
•
•
On Screen Keyboard
External MIDI Controller & DAWs
From other apps via Virtual Core MIDI running in background
Synchronized to other iOS devices via WIST
Synchronized via MIDI Clock to other apps or connected MIDI Hardware or DAWs
On Screen Keyboard
First, NLog can be played from the on-screen keyboard which is further described in the
sections “Keyboard Settings” and “Arpeggio” further below in the manual.
External MIDI Devices
NLog supports external input and output from external MIDI interfaces like Line6' Midi
Mobilizer 1&2, Akai's SynthStation25, IK Multimedia's iRig MIDI, iKingdom's iConnectMIDI
and all other Core MIDI compliant interfaces.
These interfaces are typically plugged into the docking station connector of your iPhone or
iPod touch. They typically provide 5-pin DIN MIDI cables for MIDI In & Out which are
connected to your MIDI equipment. Please refer to the manual of interface manufacturer.
MIDI Wiring
When using classic MIDI 5-pin DIN wiring here is some advice:
• For playing NLog from a MIDI keyboard connect the MIDI Out socket of the keyboard to
the MIDI In port of the interface in use with NLog
• For playing an external sound module from the NLog onscreen keyboard connect the
MIDI Out port from the interface in use with NLog to the MIDI In socket of the sound
module.
• You can utilize both MIDI ports In & Out of an interface in use with NLog simultaneously.
In the "Sys" page you find under the "MIDI" tab the "MIDI Through" setting. When
enabled, NLog forwards external incoming MIDI messages to the MIDI Out port. Since
this can cause unwanted MIDI message loops this setting is disabled by default. Please
check your MIDI setup carefully when enabling this setting.
• You can also connect to any MIDI interface like from your desktop or laptop computer.
For further information about MIDI wiring please refer also to the documentation provided
by your interface vendor.
Akai's SynthStation 25
You can put NLog into the Akai SynthStation 25. NLog detects the SynthStation
automatically and you can play the synth from the keyboard.
NLog MIDI Synth v5.0!
User Manual!
6
NLog interpreted the "program" and "octave" buttons as labeled. The upper row of buttons
are interpreted as follows from left to right:
•
•
•
•
Switch to "Edit" section
Switch to "Perf" screen
Start/Stop recording
Start/Stop playback
WiFi MIDI Connections
You can connect via WiFi to a Core MIDI compatible computer like Macs running OSX.
NLog will automatically create a link which is called “Network Session” in NLog’s device
selector (“Sys”->”Devices”).
Please make sure that your WiFi network is not congested and fast enough. For best
results please create a peer-to-peer network with your computer. Otherwise network
latency may create note and sync latencies. For creating peer-to-peer networks on a Mac,
please go to the WiFi menu on top of the Mac screen and select “Create network...” from
the menu. Afterwards go to the Settings app on your iOS device and link to this WiFi
network.
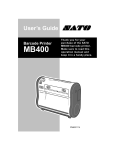
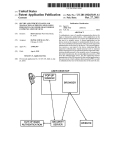
On the Mac you have to go to the Audio/MIDI Setup app (Finder->Utilities) and configure a
network session. You have to activate the checkbox of the session and then add your
device. The setup should look similar like below.
NLog MIDI Synth v5.0!
User Manual!
7
Virtual MIDI Connections
NLog implements virtual MIDI in & out ports. This means, that other apps running on the
same device can send to NLog MIDI data. There are several use cases for this. One is to
have a controller app like SoundPrism PRO running in the foreground playing NLog
running in the background.
Please make sure that the virtual connection is created only once to NLog. You can create
the connection from both apps, so please do it just from either one.
Other apps like SoundPrism PRO are just connecting to everything. So, there is no setup
needed here.
MIDI Configuration
Please check the MIDI channel setting of your device and set it within NLog's "Sys/MIDI"
tab to the same value. NLog uses MIDI channel numbering from 1-16 which is used by
most MIDI devices. If you set NLog to "omni" it plays back MIDI messages received on any
channel.
NLog interprets all incoming MIDI note on & off, modulation wheel, pitch bend, sustain
pedal, program and bank change messages. MIDI Controller messages are interpreted
according to the settings within "sys/MIDI" page. Please see the according section for
more on these settings.
When using NLog for MIDI Output, it will send note on & off messages, modulation wheel,
pitch bend and XY-pad movements into MIDI Controller messages according to the
settings.
NLog MIDI Synth v5.0!
User Manual!
8
Menu Structure
The NLog Synth is structured into different screens. Each screen can be activated by a
menu button on the top. After startup the main menu is shown:
•
•
•
•
•
•
•
•
Edit
Perf
Keyb
XY
Snd
Tape
Sys
Info
The „Info“ menu button activates an info panel with useful information about the software.
By clicking on the icons the respective web page will open.
All other menu screens will be described in the following sections.
The „Edit“ menu button will lead to the sound editing section of the synthesizer which has
its own menu structure. Within the edit section clicking on „Exit“ will lead back to the main
menu.
NLog MIDI Synth v5.0!
User Manual!
9
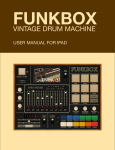
Performance Screen
The performance screen is the default screen shown after starting the app. It can be also
activated by selecting the "Perf" button in the main menu.
The performance menu shows two wheels and four performance knobs. The latter let you
control quickly four main aspects of the selected sound patch without going into the edit
section.
The four parameters can be set in the "Knobs" subpage of the "Sys" section. The selection
which parameters will be displayed will be saved within user preferences. The individual
values of the selected parameters will be saved within each sound patch.
Wheels
The performance as well as the "Keyb", "XY" and "Tape" screens display two wheels for
controlling playback.
The pitch wheel lets you bend the pitch of the currently played notes. After releasing the
wheel it snaps back into neutral middle position. The maximum bend interval can be set in
the "Control" section of the "Sys" menu and will be saved within user preferences.
The other wheel controls a specific parameter of the sound patch like filter cutoff. The
respective parameter can be set in the "Control" section of the "Sys" menu. The parameter
type and position of the wheel parameter will be saved within the sound patch.
NLog MIDI Synth v5.0!
User Manual!
10
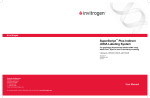
Keyboard Screen
The "Keyb" screen lets you control the configuration of the keyboard. Press "Keyb" from
the main menu to display the keyboard panel. Some of the settings are stored in the user
preferences. Please check the appropriate section.
In the following the buttons will be described from left to right and top to bottom:
Arpeggio
Please see the following chapter.
Lock Mode
The keyboard scrolls normally by dragging a key left or right while holding the key.
However, if the lock button is activated the keyboard stays fix. Sliding your finger over the
keyboard will allow for performing glissando effects.
Press the button for toggling between locked and sliding mode. The lock mode setting is
stored in the user preferences as well as the last scroll positions of both keyboards.
Size
With the "size" button you can control the size of the keyboard. It toggles between four
different sizes in increasing order. The size setting is stored in the user preferences.
Second Keyboard
The button showing two keyboard rows will enable a second keyboard on top. Both
keyboards can be scrolled independently. They share same size, lock mode, and velocity
setting.
If hold is activated, only the lower keyboard is in hold mode. Thus, you can press several
keys on the lower keyboard for constant harmony or bass and freely play melody with the
second keyboard on top.
The second keyboard can be deactivated by clicking on „Keyb“ in the main menu again.
NLog MIDI Synth v5.0!
User Manual!
11
Poly / Mono / Legato
By default NLog Synth runs in polyphonic mode. Some classical analogue synths were not
able to do polyphony. Thus, for the lower keyboard there are two non-polyphonic modes
called "Mono" and "Legato." You can toggle between all three modes by pressing the
button.
In mono mode each new key stroke will trigger a new envelope onset. In legato mode a
new key stroke triggers only a new envelope onset if there has no previous key been still
pressed. Otherwise just the pitch is changed.
If hold is activated and you are in mono or legato mode, each new key stroke with stay
hold, but will release the previously hold key.
If "Unisono" is activated in the "Pitch" submenu of the "Sys" page, the sound by default is
non-polyphonic even if "Poly" is activated. The "Unisono" setting is stored with the sound
patch, while the Poly/Mono/Legato setting is stored in the user preferences.
Velocity
The "Velo" button toggles between on and off state. If activated the vertical position of the
initial touchdown of the key determines the velocity. Thus, dynamic performance is
enabled.
The velocity setting is stored in the user preferences.
Hold
The "Hold" button toggles between on and off state of keyboard hold. While activated all
keys of the lower keyboard will be sticky. After release of your finger the key keeps
pressed and the note continues to sound. For deactivating a note press the key again.
The hold function is applied only for the lower keyboard. See also the Poly/Mono/Legato
section and Arpeggio chapter for specific behavior in these modes.
You can activate as many keys as you like. However, depending on the speed and
hardware capabilities of your device, only a certain maximum number of notes will be able
to sound. If this maximum number is reached, voice stealing will occur and keep the
number for sounds below that maximum. In any case, keys stay pressed.
Octave Control
The NLog Synth covers a range of 6 1/2 octaves. Depending on the size setting only a
certain portion can be displayed on screen.
There are several ways to control which portion of the full range is displayed:
• If lock is not activated, you can slide the keyboard while holding one key pressed.
• With the "Oct +1" and "Oct -1" buttons you can increase or decrease by one octave.
• The gray area in the keyboard pictorial depicts the visual portion of the overall octave
range. Sliding that gray area will change the visual portion accordingly.
NLog MIDI Synth v5.0!
User Manual!
12
Arpeggio
In the top left corner of the "Keyb" display you have to press the "Arp" button. It leads you
to the arpeggio subpage. Here you press the "ArpOn/Off" button to toggle to "Arp On"
mode. Now just press a few keys. The keyboard is automatically switched to "hold" mode
in arpeggio. With the other buttons on the arpeggio subpage you control the arpeggio
style.
Sync On/Off
The "Sync" button activates sync mode. If NLog is setup (see “Devices” Settings section)
either as MIDI or WIST slave, the arp tempo and downbeat position is sync'ed
to the incoming messages. If arp sync is activated and no sync signal is received, there
are no notes emitted from NLog. Thus, you can start & stop NLog's arpeggio from start &
stop of the sync master.
Algorithm
The "Algo" button toggles through a set of different arpeggio algorithms from simple up or
down to more complex ones. Here is the list with schematic explanations:
Up -> 1 2 3 4 1 2 3 4 1 2 3 4 ...
Dwn -> 4 3 2 1 4 3 2 1 4 3 2 1 ...
UpDo -> 1 2 3 4 3 2 1 2 3 4 3 2 1 ...
Up2 -> 1 3 2 4 1 3 2 4 1 3 2 4 ...
Dwn2 -> 4 2 3 1 4 2 3 1 4 2 3 1...
OrgU -> 1 1 2 1 3 1 4 1 1 1 2 1 3 1 4 1 ...
OrgD -> 4 4 3 4 2 4 1 4 4 4 3 4 2 4 1 4 ...
Rand -> random like 3 4 1 2 3 1 3 2 4
OrgR -> random with fixed note 4 1 2 1 3 1 4 1 1 1 2 1 1 1 4 1 ...
Chrd -> chord mode
Octave
The "Oct" button toggles between the range of used additional octaves. In the "Org..."
algorithms every second notes are never affected by the octave setting. Thus, in the
"Org..." algorithms every second note a constant key is repeated independent of the
NLog MIDI Synth v5.0!
User Manual!
13
octave settings.
Rhythm
The "Rthm" button toggles between different rhythmic patterns including accent patterns.
Repeat
The "Rept" button toggles between the number of repetitions of a note before the next note
of the algorithm is played.
Humanize
The "Hum" button toggles between different level of "humanizing" playback in terms of
temporal precision, length variation and accents.
Swing
The "Swng" button controls the swing from even notes (50%) to heavily punctuated notes
(95%).
Note Length
The "Len" button controls the length of the notes relative to the beat from 5% to 95%.
Tempo
The "+" and "-" buttons controls the BPM from 40 to 320. Keeping the button hold will
automatically count the BPM up rsp. down. Alternatively you can tap the tempo in between
both buttons.
To the right side of the "+" button you control the metrical division from 1/4 to 1/32
including some triplets.
Transposition Modes
The "Trans" button controls the transposition modes. In transposition mode you transpose
the arpeggio by simply pressing a single key to which the arpeggio is transposed.
There are three states "Off", "Chrm" and "Diat". The latter two modes puts the keyboard
into a transposition controller:
First, the hold arpeggio notes are moved invisibly to the upper manual (dual keyboard).
Second, the lowest note of the arpeggio is hold on the keyboard.
If you are now changing the hold note by pressing a different key, the arpeggio will be
automatically transposed. Thus, you can play the arpeggio much like a pattern based
player.
The two modes "Chrm" and "Diat" differs in the way the transposition is executed. In
"Chrm" mode the arpeggio is simply transposed chromatically. In "Diat" mode NLog tries to
NLog MIDI Synth v5.0!
User Manual!
14
identify the tonality of the arpeggio and stays in that tonality if the transposition key is also
in that key, e.g.:
Arpeggio is C-E-G-B , thus NLog is detecting a C-Major key. If you now press D as the
transposition key NLog will transpose to D-F-A-C.
In chromatic mode NLog would have transposed this example to D-F#-A-C#
If you switch to "dual mode" with both keyboards on the screen, you can actually see and
control the arpeggio keys at the upper keyboard. However, once you switch transposition
mode to "Off" the arpeggio keys are swapped back to the lower keyboard.
Arpeggio Storage
The arpeggio settings are stored within each sound patch. When transposition mode is
activated, also the arpeggio keys are stored in the patch. Thus, you can store the
transpositional patterns with your sound and make them an inherent ingredient.
Delay Sync Mode
The delay has been extended with a synchronized mode. Please see delay description
within the „Edit“ section.
NLog MIDI Synth v5.0!
User Manual!
15
XY Control
The XY control screen can be selected via the "XY" button of the main menu. It provides a
two dimensional controller based on two selected sound parameters. The parameters can
be selected in the "Sys" menu on the "Control" subpage. The selected parameter are
stored within the sound patch. Thus, each sound patch has it's individual xy parameter
settings.
Both parameters are controlled via moving the knob in the xy display. You can either drag
the knob for a continuous movement or single tap in the display. Double tapping in the
display returns the knob to the default values of the two parameters stored in the sound
patch.
NLog MIDI Synth v5.0!
User Manual!
16
Sound Selection
NLog Synth organizes all sounds within several sound banks each containing 32 sounds.
There are predefined read-only factory banks as well as three user banks in which you can
save your own creations. Press “Snd” to display the sound selection page:
In the display the top row buttons let you select the bank. The left side buttons represent
the factory banks. The right side buttons toggle between the three user banks.
The 32 sounds in each bank are divided in three pages. On the bottom right you can
select between the pages of each sound bank.
In the main area of the sound screen the patches of the selected page / bank are
displayed. Tapping on a patch button will load this patch. All current edits will be lost, so
please make sure that you have saved edits in case you want to keep them.
On the bottom left there are three buttons for exporting specific sound patches via email or
iTunes. You can either export the current sound patch or a whole bank.
Email Export
When choosing email export, the standard email editor opens. The to be exported sounds
are attached to the email as .nlog files rsp. as a single .nlgbank file for bank export. The
recipient of the email simply loads the attachments after receiving the email on their
iPhone or iPod touch device.
For patch files, NLog MIDI Synth will be opened with the save panel preselected. If
NLogSynth PRO is also installed, the user can choose with which app the patch will be
opened. NLogSynth PRO can read all patches of NLog MIDI Synth. To constantly save the
sound the recipient simply saves the sound in one of his user banks.
For banks files, NLog will ask in which user bank slot the file should be loaded.
The .nlog and .nlgbank files can also be exported to Mac OSX computer where NLogPoly
Synth is installed. NLogPoly Synth is the Mac OSX version of NLogSynth and can also
import .nlog patches as well as .nlgbank files.
NLog MIDI Synth v5.0!
User Manual!
17
iTunes Export
When selecting iTunes as export target, the patch rsp. bank will be saved in the iTunes
export folder. When you connect your iOS devices with the docking USB cable to your
computer with iTunes installed, select your device in iTunes, click on the „Apps“ tab and
select „NLog MIDI Synth“ in the app list at the bottom. On the right you will find then the
exported sound patches and banks as well as recordings saved with NLog MIDI Synth.
With the respective buttons you can save & load files including .nlog patches and .nlgbank
files from and to your computer for further work like loading into NLogPoly Synth.
iTunes Import
If you select „Import“ in the „Snd“ screen, a page opens with a list of all patches & banks
within your iTunes folder. Select a patch or bank in the list and click on load. It will then
load the patch or bank into NLog. However for persistent storage of patches, you have to
save the patch into sound bank. Just navigate to „Edit“ and then „Save“.
In the iTunes import list you can also rename or delete patches or banks found in the
iTunes folder. This does not affect any patches in your user bank. In addition, different
sorting options are available.
Importing from iOS Apps
You can also import files into NLog from within other iOS applications if they support the
appropriate iOS standard for doing this. For example, in Mobile Mail you can click and hold
on email attachments for opening them in NLog. If they are NLog sound patch or bank
files, you can select NLog from the list of apps being able to open the attachment.
Afterwards NLog will be automatically opened and the attached file is loaded.
NLog MIDI Synth v5.0!
User Manual!
18
Tape
The tape screen can be reached from main menu via the "Tape" button. It provides
recording facilities as well as the link to the metronome and media list for export and
pasteboard support.
There are two recording modes: Audio waveform and MIDI notes. You can select between
both modes with the top buttons „Wave“ and „MIDI“. Both modes have their independent
recording buffers. Thus a MIDI recording is not overwriting the last Wave recording and
vice versa. MIDI records all keyboard events, Pitch-Bend, Modulation Wheel, Perf Knobs
and XY-Panel. It also saves the current sound patch into the MIDI file.
Recording
Pressing the "Rec." button activates recording mode. The actual recording starts with the
first key pressed. Any played sound will be recorded including all used wheels,
performance knobs, xy controller and sound parameter. It is no problem to leave the tape
page while recording, but you have to come back to stop the recording.
If the metronome is activated, its sound is not included in the recording.
In „Wave“ mode, depending on the used hardware the maximal recording length is
restricted. If the maximal length is reached the recording automatically stops and informs
the user by a dialog panel.
In recording mode the "Rec." button changes its label to "Stop" which needs to be pressed
to finish the recording. It is a good practice to wait after the last pressed note has been
played its release tail and not to cut it off by pressing stop too early.
After the recording has been finished the display is updated with the waveform of the
recording rsp. the MIDI events recorded. It is automatically scaled to the dimensions of the
display.
You have to save the recording to keep it permanently.
NLog MIDI Synth v5.0!
User Manual!
19
Overdub
There is an overdub mode for wave recordings. When activated, a new recording will mix
into the existing. This also works with looped audio. With the “undo” button you can get
back to the state before doing the overdub recording session.
Playback
The last recording can be played back by pressing the "Play" button. In playback mode the
button title changes to "Stop" for finishing playback. If the end of the recording is reached
the playback stops automatically.
The slider on the right controls the playback volume. You can play-along with the actual
sound patch. You can leave the tape screen anytime while playback.
Playback also works with former recordings you have loaded from the media list panel into
the tape display.
Looping
If the "Loop" button is activated playback will operate in loop mode. If activated the button
will be highlighted in blue.
In the tape display the loop is displayed in dark blue. Looping is implemented for both
modes, „Wave“ and „MIDI“ :
On the left and right side of the loop there are handles which you can drag to control start
and end positions of the loop. This can be done even while playback. To avoid clicks in
„Wave“ mode, playback automatically applies very short fade in and fade outs with a
crossfade at each loop cycle.
Other Buttons
The "Save" button lets you save a recording permanently on your device. Please enter an
appropriate name for the recording followed by the return key. The correct file extension
will be added automatically. After performing save operation the media list screen will be
displayed with the saved recording selected in the list.
The "Click" button activates the metronome control. The "Files" button leads to the media
list. See the following sections for detailed description.
NLog MIDI Synth v5.0!
User Manual!
20
Metronome
The metronome panel will be displayed when the "Click" button is pressed from the tape
screen. It displays controls to activate and configure the metronome:
Activation
The left button activates the metronome and toggles between three states of operation:
"Off", "On" and "Rec."
In off state the metronome is deactivated. In on state the metronome runs all the time. In
rec state the metronome runs only while recording in the tape screen is activated.
BPM Control
To the right of the activation button there are three controls for modifying the tempo of the
metronome expressed in BPM (beats per minute).
The plus and minus buttons in- and decrease the tempo. A single tap with operate by a
single BPM unit. When holding one of these buttons after a short delay the BPM is
modified continuously. Thus, you can quickly change the tempo.
In the middle the actual BPM is displayed. Tapping on this display will modify the tempo
according to the speed of the tapping.
Accentuation
The "Acc" button controls accentuation. Pressing the button toggles between various
states. In the "Acc 0" state the accentuation is deactivated. In the "Acc 2" state every
second beat is accentuated, in the "Acc 3" state every third and so on up to every sixth
beat.
Volume Control
The slider controls the playback volume of the metronome.
NLog MIDI Synth v5.0!
User Manual!
21
Media List
The media list can be accessed via the "Files" button from the tape screen. It displays all
saved Wave and MIDI recordings as well as imported files:
Each file is displayed with its name, last modification date and playback length.
Own Wave recordings are stored in „.wav“ format with CD audio quality in 16 bit stereo
and sampling rate of 44.1 kHz. For imported audio files all formats are supported which
Apple‘s Core Audio in iOS supports.
Own MIDI recordings are stored as standard MIDI files with „.mid“ file extension. Imported
MIDI files are listed if they are compatible with standard MIDI file format.
The list can be scrolled by a swiping gesture. For performing further actions on files you
have to select a file by tapping on its file name. The selected file is highlighted in blue.
Load
The "Load" button loads the selected file into to the tape screen. There you can playback
and play-along the file.
Audio files will be automatically converted to 44.1 kHz stereo files when loading them into
the tape buffer. However, the original file in the media list is not changed or converted.
Also, NLog loads only the maximum recording length into the tape buffer.
For MIDI files which have been recorded with NLog, the sound patch stored in the MIDI file
is loaded.
For imported MIDI files which contain more than one track, the user has to select the
respective track before loading.
Play
The "Play" button plays the selected file for quick audition before loading the file. Press
stop for ending the playback before the file has finished.
NLog MIDI Synth v5.0!
User Manual!
22
Rename
The "Rename" button activates a dialog in which you can rename the file. The appropriate
file extension will be automatically set and therefore does not need to be typed in.
Delete
The "Delete" button removes the selected sound file. There is no way to restore it. So,
please think twice before deleting a file.
Sorting
The file list can be sorted by different categories: Date, length, type and name. Pressing
the "Sort" button toggles between these states.
NLog MIDI Synth v5.0!
User Manual!
23
Export
The "Export" button exports the selected file. It will bring up a panel to select the export
destination.
Wave files:
•
•
•
•
•
•
Email
SoundCloud
Sonoma Pasteboard
BeatMaker Pasteboard
WiFi
Open in Another App
MIDI files:
• Email
• WiFi
iTunes
In addition to these export options, all files in the file list are automatically exposed to the
iTunes file sharing mechanism. When you connect your iOS device with the docking USB
cable to your computer with iTunes installed, select your device in iTunes, click on the
„Apps“ tab and select „NLog MIDI Synth“ in the app list at the bottom. On the right you will
find then all files from the media list as well as exported sound patches. With the
respective buttons you can save & load files to and from your computer.
BeatMaker Pasteboards
Pressing on the BeatMaker pasteboard option the panel returns. That's all to be done in
NLog Synth. Quit the app and start BeatMaker 1/2 or any other app compatible to Intua‘s
pasteboard definition, for a list see here: http://code.google.com/p/intua-audio-sharing/wiki/
CompatibleApps.
In BeatMaker version 1 you go to the "Pad" display from the top menu. Press "File" on the
left side and move to the "CLIPBOARD" section by clicking the arrow down button on the
bottom left side a few times. Select "PASTE" and navigate to your preferred folder like "My
Audio Recordings". Press "PASTE" and give the recording an appropriate name. From the
"Sample" menu on the left you can now load your NLog recording by pressing "LOAD" and
navigate to the folder where you have saved the file. Don't forget to select the appropriate
pad button first.
In BeatMaker 2 go to the main menu and select the „sharing“ icon on the top right, press
„Pasteboard“ and then „Import iOS to BM2“. After pressing „Save“ you can assign a name
to the file and use it in BeatMaker 2.
Sonoma Pasteboards
Pressing on the Sonoma pasteboard option show the Sonoma standard AudioCopy panel.
You can give the audio an own name if you like. Otherwise press simply „Copy Audio.“
NLog MIDI Synth v5.0!
User Manual!
24
Press afterwards „Done“ and return to NLog or alternatively select an App from the list to
launch by pressing the respective „launch“ button.
The list shows Sonoma‘s AudioCopy/AudioPaste compatible apps like FourTracks etc. A
full list can also be found here: http://www.sonomawireworks.com/iphone/audiocopy/#apps
In Sonoma compatible apps like "FourTrack" you navigate to "SongTools" and select
"AudioPaste". Select your options and simply press "Paste" and you are done.
The Sonoma AudioPaste standard is currently restricted to 44.1 kHz sampling rate. So, if
you have a Wave file imported from other sources in a different sampling rate, you will not
be able to export it to the Sonoma Pasteboard.
Email Export
Selecting „Email“ will bring an email composing screen with an attachment for the Wave
rsp. MIDI file. Simply complete the email. Pressing „Send“ or „Cancel“ returns to NLog
Synth.
SoundCloud Export
Pressing on the SoundCloud export option show the SoundCloud export panel:
You can get a SoundCloud account here: http://www.soundcloud.com The first time you
access SoundCloud functionality from NLog you have to authenticate yourself at
SoundCloud. NLog will open a Mobile Safari window with the standard SoundCloud
authentication screen. When logged in successfully, Safari returns automatically to NLog
and shows the SoundCloud export panel. For all further activities, this panel is shown
automatically unless you log out from SoundCloud.
With the „Rename“ button you can optionally change the name of the sound file.
The „License“ button toggles between different licensing and copyright options you can set
for your sound file within SoundCloud.
The „Sharing“ setting toggles between „public“ and „private.“
NLog MIDI Synth v5.0!
User Manual!
25
Press „Upload“ to start the uploading process. When done successfully, it returns to the file
list. You can cancel the uploading process with the „Cancel“ button.
The „Log Out“ button logs you out from SoundCloud. This is an optionally step you do not
have to perform.
WiFi Export
Selecting „WiFi“ export will show a panel which gives information about the URL to be
selected in a computer connected to the same WiFi network like your NLog Synth device.
Keep the panel open until you have finished your downloads.
In the web browser there will be a link for each file. Depending on your browser‘s
configuration you have to click or right-click (rsp. option-click) on the links for downloading
the files.
Open in Another App
If there are apps on your iOS device installed which implement standard iOS file handling
for audio or MIDI files, then you can select from these apps to open a specific file from
NLog. iOS will the automatically open then other app for further processing of this file.
NLog MIDI Synth v5.0!
User Manual!
26
Import
The "Import“ button will show a list of import sources you can select from:
•
•
•
•
SoundCloud
Sonoma Pasteboard
BeatMaker Pasteboard
WiFi
For importing audio files all formats are supported which Apple‘s Core Audio standard in
iOS supports.
For importing MIDI all files are supported if they are compatible with the standard MIDI file
format.
You can also import files into NLog from within other iOS applications if they support the
appropriate iOS standard for doing this. For example, in Mobile Mail you can click and hold
on email attachments for opening them in NLog. If they are Audio or MIDI files, you can
select NLog from the list of apps being able to open the attachment. Afterwards NLog will
be automatically opened and the attached file added to NLog‘s media list.
iTunes
In addition to these import options, all files loaded via the iTunes file sharing mechanism
as described in the iTunes section in the Export chapter will be automatically shown in the
media list if the format is accepted. Just connect your iOS devices with the docking USB
cable to your computer with iTunes installed, select your device in iTunes, click on the
„Apps“ tab and select „NLog MIDI Synth“ in the app list at the bottom. On the right you will
find then all files from the media list as well as exported sound patches. With the
respective button you can load files into NLog.
Sonoma Pasteboard
Pressing on the Sonoma pasteboard option show the Sonoma standard AudioPaste panel.
You can select from the list of audio files in the pasteboard and pre-listen them. Otherwise
press simply „Paste.“ Press afterwards „OK“ and a new file is added to the media list which
you can assign an appropriate name.
BeatMaker Pasteboard
After pressing the BetaMaker pasteboard option a new file is added to the media list which
you can assign an appropriate name assuming there was appropriate content in the
pasteboard.
NLog MIDI Synth v5.0!
User Manual!
27
SoundCloud
Selecting „SoundCloud“ for import will show the SoundCloud import panel:
You can get a SoundCloud account here: http://www.soundcloud.com The first time you
access SoundCloud functionality from NLog you have to authenticate yourself at
SoundCloud. NLog will open a Mobile Safari window with the standard SoundCloud
authentication screen. When logged in successfully, Safari returns automatically to NLog
and shows the SoundCloud export panel. For all further activities, this panel is shown
automatically unless you log out from SoundCloud.
Select the file you like to download and press „Import.“ You can cancel the download with
the „Cancel“ button.
If you do not see a file in the list for download you have actually in SoundCloud, please
make sure within the track settings in SoundCloud, that the track is enabled for download.
„Play“ lets you pre-listen a file before downloading it.
The „Log Out“ button logs you out from SoundCloud. This is an optionally step you do not
have to perform.
NLog MIDI Synth v5.0!
User Manual!
28
WiFi
Selecting „WiFi“ import will show a panel which gives information about the URL to be
selected in a computer connected to the same WiFi network like your NLog Synth device.
Keep the panel open until you have finished your uploads.
In the web browser press first „Choose File“, select the file to be uploaded and then the
„Upload“ button. After successful upload the file become listed in the webpage.
Closing the panel in NLog will then list the uploaded file in the media file list.
NLog MIDI Synth v5.0!
User Manual!
29
System Settings
The system settings page can be accessed from the main menu with the "Sys" button. It is
divided into the subpages "Pitch", "Knobs", "Control", "Devices" and „MIDI.“ They can be
reached pressing the appropriate buttons.
Pitch Settings
Tuning
The pitch page controls the overall tuning. By pressing the plus and minus buttons the
pitch is modified in steps of one Hertz. This setting is stored within user preferences.
Transpose
Press the +/- buttons to apply a global transposition +/-12 semitones. Setting is stored
within user preferences.
Unisono
The unisono parameter controls two to four unisono voices. When activated each key
stroke plays not only one note, but the number of unisono voices. For performance
reasons the synth is operated in monophonic mode when unisono is activated. All unisono
settings are stored within the sound patch.
The unisono voices are controlled by detune, pan and delay parameter which modify each
individual unisono voice slightly to the others. Thus, rich and fat sounds can be easily
produced.
Osc Running/Reset Phase
Use reset phase for percussive sounds, and running phase for analogue style sounds. The
difference is very subtle to hear, but important for sound designers. In running phase the
oscillators are kept running after release end that each new note starts with a different
phase as in analogues oscillators. In reset phase mode oscillators are started always with
same phase, which is important for sharp attacks or percussive sounds.
Setting is stored with each patch individually.
NLog MIDI Synth v5.0!
User Manual!
30
Knobs Settings
The four performance knobs on the performance screen can be assigned to four sound
parameters. The parameter assignments will be saved within user preferences.
Pressing one of the parameter assignment buttons will open a dialog for selecting the
sound parameter:
The possible sound parameters are organized in four pages. The pages can be switched
by pressing the page buttons at the right bottom. A parameter is selected by pressing the
respective parameter button which is accordingly highlighted.
Once your are finished with the parameter selection press the "OK" button in the bottom
left corner to assign the parameter or simply "Cancel" to leave the dialog without any
change.
Knobs Mode
Switch between circular & vertical knob modes. Setting is stored permanent.
NLog MIDI Synth v5.0!
User Manual!
31
Control Settings
Pitch Bend Interval
The interval setting of the pitch bend wheel determines the bend interval when the wheel
is at maximum or minimum. The interval can be set with the plus / minus buttons in
halftone steps from 1 to 12. The setting will be stored within the sound patch.
Wheel Parameter
The second wheel can be assigned a sound parameter. Pressing the parameter button
leads to a parameter selection dialog similar to the one described for the "Knobs" settings
page. However, the wheel parameter assignment is stored within the sound patch.
XY Parameter
The XY settings assigns the sound parameters controlled in the XY screen by dragging in
the respective directions. Pressing one of the parameter buttons leads to a parameter
selection dialog similar to the one described for the "Knobs" settings page. However, the
XY parameter assignments are stored within the sound patch.
NLog MIDI Synth v5.0!
User Manual!
32
Devices Settings
The "Device" settings submenu lets you configure each available Core MIDI port.
You can enable/disable receiving MIDI channel data (notes, CCs etc.) with the "IN: Notes"
button as well as MIDI Sync data with the "IN: Clock" button. You can also enable/disable
sending MIDI channel data (notes, CCs etc.) to other devices with the "OUT: Notes"
button.
NLog itself does not act as MIDI Sync master, but only slave. Thus, there is no "OUT:
Clock" button.
On top you find the device selector. All the IN/OUT settings selected made individually per
device. Settings are stored permanently even if the device becomes unavailable, NLog will
remember next time when it becomes available again.
When while running a new device becomes available or disappears this will be reflected
in the devices settings. If there are existing preferences for the new device, they will be
used. If the new device is used with NLog for the first time the default is that "IN: Notes" is
enabled. Thus, for simple setups, the user has nothing to do and it is plug-and-play.
When using “Network Session” with WiFi like connecting a laptop or desktop computer
please make sure that your WiFi network is not congested and fast enough. For best
results please create a peer-to-peer network with your computer. Otherwise network
latency may create note and sync latencies.
When „MIDI Through“ is set to „ON“, NLog forwards external incoming MIDI messages to
the MIDI Out port. Since this can cause unwanted MIDI message loops this setting is
disabled by default. Please check your MIDI setup carefully when enabling this setting.
WIST
WIST is a non-MIDI sync protocol used and conceived by Korg to sync two iOS devices for
common start/stop and tempo. It is Bluetooth-based and works with apps like iMS20,
iElectribe and also TableTop.
NLog can act as WIST master & slave. Please activate WIST by pressing "WIST" button
and also on the other device. After a while you will see a list of found WIST devices. Now,
initiate the connection from the to be slave device by selecting the name of the master
NLog MIDI Synth v5.0!
User Manual!
33
hardware. After a while on the master hardware a panel opens to accept the slave device.
Please do so.
Pressing again on the "WIST" button will cancel the WIST connection. The "About" button
shows a WIST info page from Korg.
In slave mode, NLog's arpeggio is sync'ed and started from the WIST master device.
Please see Arpeggio section above for Arpeggio sync in general.
WIST technology does not by definition update the tempo while running (in contrast to
MIDI Sync), so it keeps the tempo started with. Also WIST is implemented by having a little
delay after pressing start on
the master device.
If NLog is WIST master, you can start/stop the slave device with the button aside of the
"WIST" button. The tempo is the one set in arpeggio.
MIDI Sync
As an alternative to WIST, MIDI Sync slave mode can be used to synchronize NLog's
arpeggio with other MIDI devices or apps. NLog keeps track of tempo changes as much as
possible and syncs to it in arpeggio mode. Please make sure “Sync” is set to “On” in
arpeggio controls.
NLog is running only in MIDI Sync slave mode and does not send or forwards MIDI Sync
messages.
Background Mode
You can activate & deactivate background mode for NLog. In background mode
NLog keeps running and reacts to incoming MIDI events, be it from external devices or
other apps using NLog's virtual MIDI ports.
Please remark, that NLog can receive only from Core MIDI devices when running in
background mode. Non Core MIDI devices like Line 6' Midi Mobilizer v1 or Akai's
SynthStation25 cannot control NLog in background mode due to their non-Core MIDI
nature. Line6' new Midi Mobilizer 2 will be Core MIDI compliant and works with NLog's
background mode.
When running in background mode, NLog is consuming CPU resources. So, please make
sure to deactivate it or kill NLog in order not to waste energy and drain battery.
NLog MIDI Synth v5.0!
User Manual!
34
MIDI Settings
The channel setting selects the channel for receiving MIDI In and sending MIDI Out
messages. When set to „omni“ NLog will interpret all incoming MIDI messages regardless
of their channel setting. MIDI Out messages are sent on channel 1 when setting is „omni“.
The other settings map different MIDI Controller numbers to the X&Y-pad parameters as
well as to the 4 „perf“ parameters. They control the same sound elements of NLog as their
onscreen equivalents.
MIDI Learn
Hold your finger down on any control and a little panel opens which lets you assign next
incoming MIDI CC controller value to this parameter. Thus, you do not have to know which
CC number your controller sends, just activate MIDI learn in NLog and play your controller.
All controller mappings are stored in a table which you can reach from “Sys” section “MIDI”
and then press “MIDI Learn”. You can delete specific mappings from this table or just look
at them to get an overview.
When you hold you finger down on a control to show the MIDI Learn panel, there is also a
second option with which you can reset the parameter to its default value. This is useful for
example for bipolar parameters to get quickly and exact back to the zero position.
NLog MIDI Synth v5.0!
User Manual!
35
Synth Editing
NLog models a classical analogue style synthesizer with two oscillators, noise generator,
frequency modulation, ring modulator, filter, 3 envelope generators, 2 LFOs and a stereo
effect section containing distortion, chorus and delay.
NLog MIDI Synth v5.0!
User Manual!
36
Oscillators
Both oscillators are implemented based on a custom, studio quality alias-free algorithm.
They are separately tunable ("Pitch") with fine grained detuning ("Detune") at the second
one. Both provide 20 waveforms ("Wave") including classic analogue style sine, triangle,
sawtooth and square as well as complex waveforms. The first osc, when waveform is set
to square ("sqr"), also provides pulse-width ("PW") control which can be modulated by
LFO1. The blend between both oscillators can be controlled by the "Osc Mix" button and
modulated with LFO2. You can turn off an oscillator without modifying the blend by simply
selecting the "off" waveform.
Frequency Modulation Synthesis
Osc1 can modulate Osc2's frequency. For classical FM synthesis turn "Osc Mix" to 1.0 to
isolate FM-controlled output of oscillator 2. Intensity of modulation is controlled by "FM"
knob. Play around with different "Pitch" and "Detune" settings as well as different
waveforms. Start with "sin" wave in the beginning, then move to more complex ones. By
modulating the "FM" or Osc1's pitch parameter with LFOs or Envelope 3 you can create
highly complex and fantastic sounds and patches. Blend Osc1's modulation signal into the
mix by turning "Osc Mix" back from 1.0 to lower values. The blend can also be modulated
by LFO 2.
Ring Modulation
Blend with the "Ring" knob into the ring modulated signal of both oscillators. Use this
classic electronic music effect for example to add additional higher partials and make
sounds more crisp and brilliant. You can modulate the "Ring" parameter with LFO 2 or
Envelope 3.
Noise Generator
NLog Synth contains a generator for white noise. The "Noise" knob blends between
oscillator mix and noise. The blend can be modulated by LFO 2 or Envelope 3.
NLog MIDI Synth v5.0!
User Manual!
37
Filter
The filter carefully implements a classical analogue filter. There are 6 genuine filter types:
A lowpass (LP) which damps higher frequencies, a high-pass (HP) which removes low
frequencies, and a bandpass (BP) which selects only a specific range of frequencies. All
LP, HP and BP filter types come in two modes where the steepness of the frequency
reduction is different like LP2 has less steepness than LP4. For compatibility of pre-2.0
versions of NLog there is the "LPv1" compatibility mode for keeping older patches
consistent. By selecting "OFF" as filter type you bypass the filter. The "Cutoff" parameter
selects the respecting frequency range while "Resonance" adds additional frequencies by
adding feedback, which is a classic analogue style effect.
The filter has its own Envelope 2 below in the screen. It modulates the cutoff frequency by
the amount controlled with "-> Cutoff" parameter. The modulation can be positive or
negative for rising or lowering the cutoff frequency. Cutoff can be further modulated by the
note you play. With the "Keytrack" parameter the cutoff rises for higher notes, with the
"Velocity" knob louder notes rise cutoff. Finally, LFO 1 and LFO 2 can modulate the cutoff
as well.
Envelopes
NLog Synth contains 3 envelopes based on classic analogue ADSR model: A means
"Attack" and controls the time to rise to full level when a key is pressed. D means "Decay"
and controls the time for falling again after peak has been reached. S means "Sustain" and
controls the level "Decay" is falling to. R means "Release" and controls the time the note
sounds after a key has been released.
NLog MIDI Synth v5.0!
User Manual!
38
LFOs
LFO stands for low frequency oscillator which are used to modulate various parameters of
NLog Synth. They can be found on "Mod 1" and "Mod 2" pages. Both can be controlled in
frequency and waveform. The "Delay" parameter lets the LFO's modulation fade in
smoothly controlled by the delay time set. LFO 1 also has a "Sync" switch. When selected,
the LFO phases like in a vibrato are synchronized when you play multiple notes at once.
The LFO 2 has a "Keymod" switch. When activated, the amount of modulation is controlled
by sliding on keys vertically when you play notes. This gives additional expression control.
Both LFOs have slightly different modulation target options to give flexibility. Play-around
with each of them to experience their behavior.
NLog MIDI Synth v5.0!
User Manual!
39
Modulation Envelope
There is an independent Envelope 3 for giving extra modulation options without affecting
filter and amplifier envelopes. The specific "Velo->A" parameter lets modulate the "Attack"
time by velocity of keys pressed. Experiment with modulation of oscillator pitch for
implementing drum or sci-fi sounds. The "Noise", "FM" and "Ring" targets let the envelope
modulate various aspects and character of the sound patch.
Amplifier
The amplifier on the "Amp 1" screen simply controls volume, pan and the basic envelope.
The "Velo->A" parameter lets modulate the "Attack" time by velocity of keys pressed. Use
the "Glide" parameter to control speed of the portamento effect when you play notes
legato.
NLog MIDI Synth v5.0!
User Manual!
40
Effects
The "Eff 1" and „Eff 2“ screens let access you an effects section with 3 stereo effects:
Delay, Chorus and Distortion.
Delay
The delay section contains a stereo delay with cross-feedback and damping. "Delay L"
and "Delay R" control the delay time of the respective stereo channel.
A switch toggles between time driven and synchronized mode. In the latter the delay times
left & right are relative to the tempo setting of the arpeggiator. The „DelayL“ & „DelayR“
parameter can be set to different relationships to the tempo. The „Decouple“ parameter
add in synchronized mode some extra time to the delay in order not to be too mechanical.
It does so by adding slightly different values to the right and left channel. Thus, some extra
stereo effect is heard.
"Feed" controls the amount of feedback within each channel, while "X-Feed" controls the
feedback send from one channel to the other.
"HiCut" adds damping to the feedback by implementing a simple lowpass filter within the
feedback loop. With "HiCut" the delayed signal gets smooth and prevents overdriven
feedback.
Be careful with adding feedback, it can become very noisy!
The "Dry/Wet" knob in the right bottom blends between original and delayed signal.
NLog MIDI Synth v5.0!
User Manual!
41
Chorus
The chorus section is simply controlled by "Speed" and "Depth" parameter. Use chorus to
make sounds more rich and fat.
Distortion
The amount of distortion is controlled by the "Drive" parameter. "Dry/Wet" blends between
the distorted and and original signal.
Please be careful with distortion, since sound can be harsh and loud!
NLog MIDI Synth v5.0!
User Manual!
42