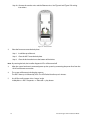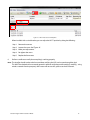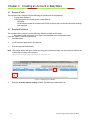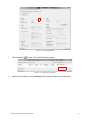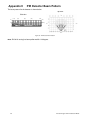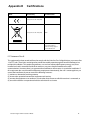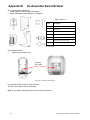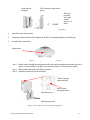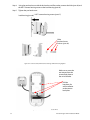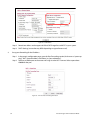
1
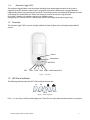
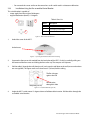
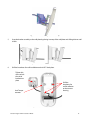
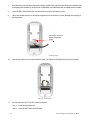
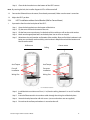
Paradox Insight™
HD77
Installation Guide
Revision 1.00
paradox.com
Paradox Insight™ HD77 Installation Guide
1
Warranty
For complete warranty information on this product, please refer to the Limited Warranty Statement found on
the website www.paradox.com/terms. The terms and conditions are subject to change without notice, from
time to time, at Paradox’s sole discretion. We invite you to visit our website on a regular basis for the latest
Limited Warranty Statement. Your use of the Paradox product signifies your acceptance of all warranty terms
and conditions. Please ensure that your use of the Paradox product is in compliance with local, national, and
international laws.
© 2014 Paradox Security Systems Ltd. All rights reserved. Specifications may change without prior notice. US,
Canadian and international patents may apply. Paradox Insight and Paradox are a trademarks or registered
trademarks of Paradox Security Systems (Bahamas) Ltd. or its affiliates in Canada, the United States and/or
other countries.
This product is manufactured in Canada.
Paradox
780 Industrial Boulevard
St-Eustache, Quebec
Canada, J7R 5V3
Tel: (450) 491-7444
Fax: (450) 491-2313
2
Paradox Insight ™ HD77 Installation Guide
Contents
Warranty . . . . . . . . . . . . . . . . . . . . . . . . . . . . . . . . . . . . . . . . . . . . . . . . . . . . . . . . . . . . . . . . . 2
Contents . . . . . . . . . . . . . . . . . . . . . . . . . . . . . . . . . . . . . . . . . . . . . . . . . . . . . . . . . . . . . . . . . 3
Chapter 1
Introduction . . . . . . . . . . . . . . . . . . . . . . . . . . . . . . . . . . . . . . . . . . . . . 8
1.1
HD77 Key Features . . . . . . . . . . . . . . . . . . . . . . . . . . . . . . . . . . . . . . . . . . . . . . . . . . . . . . . .8
1.2
Overview . . . . . . . . . . . . . . . . . . . . . . . . . . . . . . . . . . . . . . . . . . . . . . . . . . . . . . . . . . . . . . . . .9
1.3
LED Status Indicators . . . . . . . . . . . . . . . . . . . . . . . . . . . . . . . . . . . . . . . . . . . . . . . . . . . . . .9
Chapter 2
Hardware Installation. . . . . . . . . . . . . . . . . . . . . . . . . . . . . . . . . . . . 11
2.1
Requirements . . . . . . . . . . . . . . . . . . . . . . . . . . . . . . . . . . . . . . . . . . . . . . . . . . . . . . . . . . . 11
2.2
Cabling Options . . . . . . . . . . . . . . . . . . . . . . . . . . . . . . . . . . . . . . . . . . . . . . . . . . . . . . . . . 12
2.3
Location and Mounting . . . . . . . . . . . . . . . . . . . . . . . . . . . . . . . . . . . . . . . . . . . . . . . . . 13
Chapter 3
Creating an Account in BabyWare . . . . . . . . . . . . . . . . . . . . . . . . 20
3.1
Required Tools . . . . . . . . . . . . . . . . . . . . . . . . . . . . . . . . . . . . . . . . . . . . . . . . . . . . . . . . . . 20
3.2
Required Software . . . . . . . . . . . . . . . . . . . . . . . . . . . . . . . . . . . . . . . . . . . . . . . . . . . . . . 20
Chapter 4
Programming . . . . . . . . . . . . . . . . . . . . . . . . . . . . . . . . . . . . . . . . . . . 23
4.1
Programming Through BabyWare . . . . . . . . . . . . . . . . . . . . . . . . . . . . . . . . . . . . . . . 23
4.2
Receive Programming . . . . . . . . . . . . . . . . . . . . . . . . . . . . . . . . . . . . . . . . . . . . . . . . . . . 23
4.3
HD77 Programming . . . . . . . . . . . . . . . . . . . . . . . . . . . . . . . . . . . . . . . . . . . . . . . . . . . . . 24
4.4
HD77 Server Parameters . . . . . . . . . . . . . . . . . . . . . . . . . . . . . . . . . . . . . . . . . . . . . . . . . 24
4.5
Static IP for the WAN . . . . . . . . . . . . . . . . . . . . . . . . . . . . . . . . . . . . . . . . . . . . . . . . . . . . 26
4.6
Reserved/Static IP Configuration for the LAN . . . . . . . . . . . . . . . . . . . . . . . . . . . . . 26
Chapter 5
PIR Parameters Programming . . . . . . . . . . . . . . . . . . . . . . . . . . . . 29
5.1
Programming Through the TM50 Touchpad . . . . . . . . . . . . . . . . . . . . . . . . . . . . . 30
5.2
Programming Through the K641 series Keypads and K656 Keypad . . . . . . . . 33
Chapter 6
ParadoxMyHome (PMH) . . . . . . . . . . . . . . . . . . . . . . . . . . . . . . . . . 35
6.1
To Open a ParadoxMyHome Account . . . . . . . . . . . . . . . . . . . . . . . . . . . . . . . . . . . . 35
6.2
Registering/Unregistering your devices to ParadoxMyHome . . . . . . . . . . . . . . 35
6.3
Deleting a Site from PMH . . . . . . . . . . . . . . . . . . . . . . . . . . . . . . . . . . . . . . . . . . . . . . . . 37
Chapter 7
Using a Static IP for the WAN . . . . . . . . . . . . . . . . . . . . . . . . . . . . . 38
Chapter 8
Upgrading Firmware . . . . . . . . . . . . . . . . . . . . . . . . . . . . . . . . . . . . 39
Paradox Insight™ HD77 Installation Guide
3
Appendix: A
Trouble Shooting ......................................................................40
For DHCP ...............................................................................................................................................40
For Static IP ...........................................................................................................................................42
Appendix: B
Specifications ............................................................................45
HD77 Specifications ...........................................................................................................................45
Appendix: C
PIR Detector Beam Pattern .......................................................46
Appendix: D
Certifications .............................................................................47
FCC Statement Class B ......................................................................................................................47
Appendix: E
Un-Assemble Swivel Bracket ....................................................48
Disassemble Swivel ............................................................................................................................48
Appendix: F
Configure IP Router (1 Example) ..............................................52
Setting Up the Router for Port Forwarding ...............................................................................52
Reserve the IP or Bind the IP to a MAC .......................................................................................56
4
Paradox Insight ™ HD77 Installation Guide
List of Figures
Figure 1
Front View . . . . . . . . . . . . . . . . . . . . . . . . . . . . . . . . . . . . . . . . . . . . . . . . . . . . . . . . . . . . . . . .9
Figure 2
LED Arrangement . . . . . . . . . . . . . . . . . . . . . . . . . . . . . . . . . . . . . . . . . . . . . . . . . . . . . . . . .9
Figure 3
HD77 Hardware Connections . . . . . . . . . . . . . . . . . . . . . . . . . . . . . . . . . . . . . . . . . . . . 11
Figure 4
Recommended Wiring Option#1 . . . . . . . . . . . . . . . . . . . . . . . . . . . . . . . . . . . . . . . . . 12
Figure 5
Recommended Wiring Option#2 . . . . . . . . . . . . . . . . . . . . . . . . . . . . . . . . . . . . . . . . . 12
Figure 6
Ethernet Cable Wiring . . . . . . . . . . . . . . . . . . . . . . . . . . . . . . . . . . . . . . . . . . . . . . . . . . . 13
Figure 7
Mounting Guidelines . . . . . . . . . . . . . . . . . . . . . . . . . . . . . . . . . . . . . . . . . . . . . . . . . . . . 13
Figure 8
HD77 Swivel Bracket Parts . . . . . . . . . . . . . . . . . . . . . . . . . . . . . . . . . . . . . . . . . . . . . . . 14
Figure 9
Separating the Module from the HD77 Housing . . . . . . . . . . . . . . . . . . . . . . . . . . 14
Figure 10
Install the Wall Plate (part #1) . . . . . . . . . . . . . . . . . . . . . . . . . . . . . . . . . . . . . . . . . . . . 14
Figure 11
Run the Cable through the Swivel Assembly . . . . . . . . . . . . . . . . . . . . . . . . . . . . . 15
Figure 12
Connect the Bracket Assembly to the Wall . . . . . . . . . . . . . . . . . . . . . . . . . . . . . . . 15
Figure 13
Screw on HD77 Back Plate to Swivel. . . . . . . . . . . . . . . . . . . . . . . . . . . . . . . . . . . . . . 15
Figure 14
Screw Location to Adjust Camera Angle . . . . . . . . . . . . . . . . . . . . . . . . . . . . . . . . . . 16
Figure 15
Wire the HD77 . . . . . . . . . . . . . . . . . . . . . . . . . . . . . . . . . . . . . . . . . . . . . . . . . . . . . . . . . . 16
Figure 16
Knockout Locations . . . . . . . . . . . . . . . . . . . . . . . . . . . . . . . . . . . . . . . . . . . . . . . . . . . . . 17
Figure 17
Wire the HD77 . . . . . . . . . . . . . . . . . . . . . . . . . . . . . . . . . . . . . . . . . . . . . . . . . . . . . . . . . . 18
Figure 18
HD77 Video Stream in BabyWare . . . . . . . . . . . . . . . . . . . . . . . . . . . . . . . . . . . . . . . . 19
Figure 19
BabyWare Account Window . . . . . . . . . . . . . . . . . . . . . . . . . . . . . . . . . . . . . . . . . . . . . 20
Figure 20
IP150 Settings Window . . . . . . . . . . . . . . . . . . . . . . . . . . . . . . . . . . . . . . . . . . . . . . . . . . 21
Figure 21
Locate IP Device on Network . . . . . . . . . . . . . . . . . . . . . . . . . . . . . . . . . . . . . . . . . . . . 21
Figure 22
IP Device Configuration . . . . . . . . . . . . . . . . . . . . . . . . . . . . . . . . . . . . . . . . . . . . . . . . . 22
Figure 23
BabyWare Homepage . . . . . . . . . . . . . . . . . . . . . . . . . . . . . . . . . . . . . . . . . . . . . . . . . . . 23
Figure 24
HD77 Receive Programming . . . . . . . . . . . . . . . . . . . . . . . . . . . . . . . . . . . . . . . . . . . . 24
Figure 25
Write Button . . . . . . . . . . . . . . . . . . . . . . . . . . . . . . . . . . . . . . . . . . . . . . . . . . . . . . . . . . . . 24
Figure 26
Communication Drop Down Menu . . . . . . . . . . . . . . . . . . . . . . . . . . . . . . . . . . . . . . 25
Figure 27
Server Parameters . . . . . . . . . . . . . . . . . . . . . . . . . . . . . . . . . . . . . . . . . . . . . . . . . . . . . . . 26
Figure 28
Command Prompt ipconfig . . . . . . . . . . . . . . . . . . . . . . . . . . . . . . . . . . . . . . . . . . . . . . 27
Figure 29
DHCP Settings . . . . . . . . . . . . . . . . . . . . . . . . . . . . . . . . . . . . . . . . . . . . . . . . . . . . . . . . . . 27
Figure 30
Port Numbering . . . . . . . . . . . . . . . . . . . . . . . . . . . . . . . . . . . . . . . . . . . . . . . . . . . . . . . . . 28
Paradox Insight™ HD77 Installation Guide
5
6
Figure 31
PIR Parameters . . . . . . . . . . . . . . . . . . . . . . . . . . . . . . . . . . . . . . . . . . . . . . . . . . . . . . . . . 29
Figure 32
Flow Through the TM50 Touchscreen . . . . . . . . . . . . . . . . . . . . . . . . . . . . . . . . . . . . 30
Figure 33
Main Screen . . . . . . . . . . . . . . . . . . . . . . . . . . . . . . . . . . . . . . . . . . . . . . . . . . . . . . . . . . . . . 30
Figure 34
Menu Selections Screen . . . . . . . . . . . . . . . . . . . . . . . . . . . . . . . . . . . . . . . . . . . . . . . . . 31
Figure 35
Advanced Screen . . . . . . . . . . . . . . . . . . . . . . . . . . . . . . . . . . . . . . . . . . . . . . . . . . . . . . . 31
Figure 36
Installer Code . . . . . . . . . . . . . . . . . . . . . . . . . . . . . . . . . . . . . . . . . . . . . . . . . . . . . . . . . . . 31
Figure 37
Installer Programming Screen . . . . . . . . . . . . . . . . . . . . . . . . . . . . . . . . . . . . . . . . . . . 32
Figure 38
Installer Programming Screen . . . . . . . . . . . . . . . . . . . . . . . . . . . . . . . . . . . . . . . . . . . 32
Figure 39
Module Serial Number Screen . . . . . . . . . . . . . . . . . . . . . . . . . . . . . . . . . . . . . . . . . . . 32
Figure 40
Programming Section . . . . . . . . . . . . . . . . . . . . . . . . . . . . . . . . . . . . . . . . . . . . . . . . . . . 32
Figure 41
Options Selection Screen . . . . . . . . . . . . . . . . . . . . . . . . . . . . . . . . . . . . . . . . . . . . . . . . 33
Figure 42
Select an HD77 to Register . . . . . . . . . . . . . . . . . . . . . . . . . . . . . . . . . . . . . . . . . . . . . . 35
Figure 43
Registration to PMH . . . . . . . . . . . . . . . . . . . . . . . . . . . . . . . . . . . . . . . . . . . . . . . . . . . . . 35
Figure 44
Register/Unregister to PMH . . . . . . . . . . . . . . . . . . . . . . . . . . . . . . . . . . . . . . . . . . . . . . 36
Figure 45
ParadoxMyHome Registration Page . . . . . . . . . . . . . . . . . . . . . . . . . . . . . . . . . . . . . . 36
Figure 46
Registration Successful . . . . . . . . . . . . . . . . . . . . . . . . . . . . . . . . . . . . . . . . . . . . . . . . . . 36
Figure 47
ParadoxMyHome Site . . . . . . . . . . . . . . . . . . . . . . . . . . . . . . . . . . . . . . . . . . . . . . . . . . . 37
Figure 48
Poll PMH . . . . . . . . . . . . . . . . . . . . . . . . . . . . . . . . . . . . . . . . . . . . . . . . . . . . . . . . . . . . . . . . 38
Figure 49
Select HD77 . . . . . . . . . . . . . . . . . . . . . . . . . . . . . . . . . . . . . . . . . . . . . . . . . . . . . . . . . . . . . 39
Figure 50
Update button . . . . . . . . . . . . . . . . . . . . . . . . . . . . . . . . . . . . . . . . . . . . . . . . . . . . . . . . . . 39
Figure 51
Click Update . . . . . . . . . . . . . . . . . . . . . . . . . . . . . . . . . . . . . . . . . . . . . . . . . . . . . . . . . . . . 39
Figure 52
HD77 — Settings Update Graphic . . . . . . . . . . . . . . . . . . . . . . . . . . . . . . . . . . . . . . . 40
Figure 53
HD77 Settings Window . . . . . . . . . . . . . . . . . . . . . . . . . . . . . . . . . . . . . . . . . . . . . . . . . . 41
Figure 54
HD77 — Settings Update Graphic . . . . . . . . . . . . . . . . . . . . . . . . . . . . . . . . . . . . . . . 42
Figure 55
HD77 Settings Window Update Graphic . . . . . . . . . . . . . . . . . . . . . . . . . . . . . . . . . . 42
Figure 56
Locates Devices Window . . . . . . . . . . . . . . . . . . . . . . . . . . . . . . . . . . . . . . . . . . . . . . . . 43
Figure 57
IP Device Configuration Window . . . . . . . . . . . . . . . . . . . . . . . . . . . . . . . . . . . . . . . . 43
Figure 58
PIR Detector Beam Pattern . . . . . . . . . . . . . . . . . . . . . . . . . . . . . . . . . . . . . . . . . . . . . . 46
Figure 59
HD77 Swivel Bracket Parts . . . . . . . . . . . . . . . . . . . . . . . . . . . . . . . . . . . . . . . . . . . . . . . 48
Figure 60
Assembled Swivel Bracket . . . . . . . . . . . . . . . . . . . . . . . . . . . . . . . . . . . . . . . . . . . . . . . 48
Figure 61
Screw the Slider, HD77 Camera Housing and Back Housing Together . . . . . 49
Figure 62
Separating the Module from the Camera Housing . . . . . . . . . . . . . . . . . . . . . . . . 49
Paradox Insight ™ HD77 Installation Guide
Figure 63
Install the Wall Plate (part #1) and Wall Housing (part #2 . . . . . . . . . . . . . . . . . . 49
Figure 64
Screw the Slider, HD77 Camera Housing and Back Housing Together . . . . . 50
Figure 65
Screw on Camera Back Plate to Swivel. . . . . . . . . . . . . . . . . . . . . . . . . . . . . . . . . . . . 50
Figure 66
Wire the Camera . . . . . . . . . . . . . . . . . . . . . . . . . . . . . . . . . . . . . . . . . . . . . . . . . . . . . . . . 51
Figure 67
Command Prompt ipconfig . . . . . . . . . . . . . . . . . . . . . . . . . . . . . . . . . . . . . . . . . . . . . . 53
Figure 68
DHCP Enable . . . . . . . . . . . . . . . . . . . . . . . . . . . . . . . . . . . . . . . . . . . . . . . . . . . . . . . . . . . . 54
Figure 69
Fill in the Port Forwarding Information . . . . . . . . . . . . . . . . . . . . . . . . . . . . . . . . . . . 54
Figure 70
Port Forwarding . . . . . . . . . . . . . . . . . . . . . . . . . . . . . . . . . . . . . . . . . . . . . . . . . . . . . . . . . 55
Figure 71
Binding or Reserving a Port . . . . . . . . . . . . . . . . . . . . . . . . . . . . . . . . . . . . . . . . . . . . . . 56
Figure 72
HD77 Settings . . . . . . . . . . . . . . . . . . . . . . . . . . . . . . . . . . . . . . . . . . . . . . . . . . . . . . . . . . . 56
Figure 73
Locate Static IP Addresses . . . . . . . . . . . . . . . . . . . . . . . . . . . . . . . . . . . . . . . . . . . . . . . 57
Paradox Insight™ HD77 Installation Guide
7
Chapter 1
Introduction
The Paradox Insight™ HD77 camera is a highly reliable HD video (720p in color) and high-quality audio PIR
camera that delivers unlimited live HD video and audio streaming to allow users to see and hear events and
activities and to protect their homes or businesses anytime, anywhere, directly from a smartphone.
In case of a security breach, the HD77 camera provides HD videos with high-quality audio of events for visual
verification and reporting. When an alarm is triggered, the HD77 sends a pre-recorded video (360p) in color or
black and white (night vision) and 10 images (jpegs) to allow users and the CMS to view what triggered the
alarm. The user can also access HD 720p video and audio recordings, as required.
The HD77 fully complies with CE, and EN 50131certification.
1.1 HD77 Key Features
•
•
•
•
•
•
•
•
•
•
•
•
•
•
•
•
•
1.1.1
HD video / audio - with 360p video and live streaming
Video on Demand (VOD)
Record on Demand (ROD)
Record on Motion (ROM)
Record on Trigger (ROT)
HD video / audio alarm event verification (jpg still images and H.264 video files)
Integrated video verification alarm event reporting to the CMS (IPRS-7 / CMSI) and user (email)
Detection - high reliability PIR, auto pulse, auto dual edge, digital detector with a 110° beam spread
HD 720p color recordings
1.4 mega pixel Image sensor HD video camera equipped with video auto gain control, white balance
and auto exposure
Three second audio / video pre-alarm
Zero-lux vision using high power IR LEDs
LAN connection
Multiple simultaneous multimedia streams
Event file names and video file names are linked through naming convention for easy identification
Digiplex bus connection enables easy HD77 system installation/ integration
Fully compatible with the Paradox EVOHD control panel
Video on Demand (VOD)
The video on demand feature allows up to eight users of the security system (selected as permitted users
through the Paradox Insight™ phone application) to have viewing rights. The permitted users then have access
to the streaming video from the camera. This access is obtained through the Paradox Insight™ phone
application. The master user chooses these permitted users and also sets the permitted user’s viewing rights.
1.1.2
Record on Demand (ROD)
The record on demand feature allows permitted users to start and stop camera recording through the Paradox
Insight™ phone application. Record on demand records up to 2 minute long video files. Recordings are saved as
both 720p and 360p resolution. The 30 first seconds are sent by email to the master user and the user that
made the recording.
1.1.3
Record on Motion (ROM)
The record on motion feature starts the camera recording when the PIR detector in the HD77 camera detects
motion. The recording is started when the system is disarmed. The camera records for 10 seconds during ROM.
8
Paradox Insight ™ HD77 Installation Guide
1.1.4
Record on Trigger (ROT)
The record on trigger feature starts the camera recording when another detector (zone) in the system is
triggered. Up to four detectors (zones) can be assigned to each camera. Whenever an assigned detector is
triggered the camera starts recording for 10 seconds. The recording can be started both if the detector is armed
or disarmed. The recorded files are saved in the camera and can be sent to pre-assigned emails.
Up to 4 HD77 cameras can each be assigned up to 4 different zones.
Configuring HD77 cameras for ROT is done by the master user through the Paradox Insight™ App.
1.2 Overview
The Paradox Insight™ HD77 camera is a highly reliable HD video (720p in color) and high-quality audio PIR
camera.
Camera
Microphone
IR LEDs
LED1
LED2
LED3 LED4 LED5
Information LEDs
Figure 1 – Front View
1.3 LED Status Indicators
The following table describes the HD77 LEDS and their functionality.
TX
RX
LED 1 LED 2
LED 3
LED 4 LED 5
Figure 2 – LED Arrangement
LEDs 1, 2, 4, and 5 are used for installer diagnostics. These LEDs are active when the lock mechanism is opened.
Paradox Insight™ HD77 Installation Guide
9
Table 1: LED Assignment
LED
Functionality
LED Display
LED1
Digiplex Data TX
Flashing green = data
transmission
Off = No data transmission
LED2
Digiplex Data RX
Flashing green = data
reception
Off = No data reception
LED3
(both with the front
cover locked and
unlocked)
HD77 module is up and running. There are currently
no PIR detections or requests for VOD/ROD.
OFF
Firmware upgrade in progress
Flashing Purple
VOD
Blue on
Power-up
Flashing Blue
Locate mode (through the keypad only)
Flashing Blue
General bus failure, wiring problem, or
communication problem
Red on
Bus low power
Flashing Red
PIR alarm
Red for 3 sec
LED4
Active Web connection
Green
LED5
LAN 10/100Mbps link
LAN 10/100Mbps data transfer
Green = LAN active
Off = no connection
Flashing green = data transfer
Flashing red = UPnP failure
Note: LED3 — PIR indication can be set to On or Off by the installer, however, the VOD indication can be turned
off only by the master user using the Paradox Insight™ application.
Note: Turning the VOD LED off may be considered in some countries as a violation of applicable laws. Make
sure to install the HD77 according to local laws.
10
Paradox Insight ™ HD77 Installation Guide
Chapter 2
Hardware Installation
Note: The installer should not leave the house without verifying the VOD can be seen through the App!
This MUST be checked with an external network in order to verify that port forwarding is working – using
wireless network from the property’s WIFI router will not test this, please use the 3G network.
This section explains the hardware requirements and mounting instructions.
2.1 Requirements
2.1.1
Required Infrastructure
Ensure that the mounting location has the following infrastructure:
• CAT5 or higher cable line that connects to a router or an Ethernet switch
• a router with enough ports to connect all of the cameras (1 port for each camera) plus 1 port if you are
using an IP150, 1 port for the installer’s computer, and 1port for the incoming Internet connection
Note: If the installer is connecting wirelessly one less port is needed.
Note: A single CAT5 or higher cable can be used to wire a single HD77 camera. This cable includes 2 twisted
pairs for the 4-wire combus and 2 twisted pairs for the Ethernet lines. When using this option the cable
length is limited to 50 meters. See see section 2.2.1 on page 12.
Note: An alternate wiring scheme is to wire the HD77 with two separate cables. 1 CAT5 or higher cable for the
Ethernet link, and one– 4-wire cable for the combus. Using this wiring option you can run the CAT5
Ethernet cable up to 70 meters. See see section 2.2.2 on page 12.
Note: If the router does not have enough ports you will also need an Ethernet switch.
Figure 3 – HD77 Hardware Connections
Paradox Insight™ HD77 Installation Guide
11
2.2 Cabling Options
2.2.1
Cabling Option #1
A single CAT5 or higher cable can be used to wire a single HD77 camera. This cable includes 2 twisted pairs for
the 4-wire combus and 2 twisted pairs for the Ethernet lines. When using this option the cable length is limited
to 50 meters.
The Ethernet cable goes to the router. The 4 – wire combus goes to EVOHD panel.
See option #2 for an alternate wiring scheme to wire the HD77 with two separate cables.
CAT5e with 4
twisted pairs
4-wire
combus
Table 2: Wire Color
Assignment
EVOHD
R
B
Y
123 4 56 7 8
R B G Y RX-RX+TX-TX+
4-wire combus
G
Ethernet
Label
Wire color
R
B
G
Y
RXRX+
TXTX+
Brown
Blue
Blue stripped
Brown stripped
Green
Green stripped
Orange
Orange stripped
Figure 4 – Recommended Wiring Option#1
2.2.2
Cabling Option #2
This option uses 2 separate cables going to two different locations. One cable to the router and one cable to the
EVOHD. One CAT5 or higher cable for the Ethernet link, and one 4-wire cable for the combus. Using this wiring
option you can run the CAT5 Ethernet cable up to 70 meters.
EVOHD
Table 3: Wire Color
Assignment
4-wire
combus
Ethernet
123 45 67 8
R B G Y RX- RX+ TX-TX+
Label
Wire color
R
B
G
Y
RXRX+
TXTX+
Red
Black
Green
Yellow
Green
Green stripped
Orange
Orange stripped
Figure 5 – Recommended Wiring Option#2
2.2.3
Ethernet Cable Wiring
If you will be connecting Ethernet connectors to the cut Ethernet cable wire the connector in compliance with
the following table.
12
Paradox Insight ™ HD77 Installation Guide
12345678
Ethernet Wire Locations
Wire color
1
Green striped
2
Green
3
Orange striped
4
Blue
5
Blue striped
6
Orange
7
Brown striped
8
Brown
Figure 6 – Ethernet Cable Wiring
2.3 Location and Mounting
2.3.1
Recommendations
•
Install the device at a height between 2.1m to 2.7m (7ft to 9ft), allowing a minimum gap of 2cm (~1 in)
from the ceiling (to allow for opening/closing of the cover).
Figure 7 – Mounting Guidelines
•
•
Install the device in a location where the detector and camera’s field of view is clear of any obstacles.
For LAN connection, use a CAT5/CAT5e/CAT6 Ethernet cable (70m max. for option #2, 50m max. for
option #1 ) between the HD77 and the router.
Note: When using a single CAT5 cable (option#1) to also connect the 4-wire combus, the wire run is limited to
50 meters.
•
2.3.2
Mount the module so that walking traffic cuts across the beam pattern.
Cautions
•
•
•
•
Do not install the device near objects causing temperature changes such as heaters, refrigerators and
ovens.
Do not install the device in the path of air flow from heating and air conditioning vents, fans, or
windows.
Do not install the device in the path of reflective surfaces, direct sunlight or infrared light.
Do not install the device where it is exposed to oil vapors or steam.
Paradox Insight™ HD77 Installation Guide
13
•
2.3.3
Do not touch the sensor surface or the camera lens as this could result in a detector malfunction.
Installation Using the Pre-assembled Swivel Bracket
This swivel bracket is capable of:
• sweep angle from left to right of 90 degrees
• angle of declination (down) is 15 degrees.
1
Table 4: Parts List
3
2
Part #
Description
1
Wall plate
2
4 self tapping screws #6 B type
3
Pre-assembled swivel bracket
Figure 8 – HD77 Swivel Bracket Parts
1.
Unlock the cover of the HD77.
Unlock cover
Figure 9 – Separating the Module from the HD77 Housing
2.
Separate the front cover with module from the back plate of the HD77. Do this by carefully pulling out
the bottom of the front cover and sliding the front cover up. The two parts will separate.
3.
Pull the cable(s) through the wall plate (part #1) and screw the wall plate to the wall (screws and anchors
are not supplied). The upper screws must be at least 3”(7.62cm) from the ceiling.
The flat side goes
against the wall
Wall plate (part #1)
Run the wires
through this hole
Figure 10 – Install the Wall Plate (part #1)
4.
Angle the HD77 swivel mount 15 degrees down to facilitate cable insertion. Pull the cables through the
assembled swivel bracket.
14
Paradox Insight ™ HD77 Installation Guide
Figure 11 – Run the Cable through the Swivel Assembly
5.
Snap the bracket assembly to the wall plate by placing it on top of the wall plate and sliding it down until
it locks.
Figure 12 – Connect the Bracket Assembly to the Wall
6.
Drill the knockouts for wall installation on the HD77 back plate.
Tighten this
screw to lock
the swivel
bracket into
place
Drill the
knockouts for
wall installation
on the camera
housing
Anti-Tamper
actuator
Figure 13 – Screw on HD77 Back Plate to Swivel.
Paradox Insight™ HD77 Installation Guide
15
7.
Write down the serial number and location of the module. After you finish the hardware installation you
can identify each module by serial number in BabyWare and add the location and label to each module.
8.
Screw the HD77 back plate to the swivel bracket using the 4 self tapping screws.
9.
Adjust the bracket position as desired and tighten the screw to lock it in place (through the opening in
the back plate).
Loosen this screw to
adjust the camera
angle
Figure 14 – Screw Location to Adjust Camera Angle
Connect the combus wires and the Ethernet wires. See Figure 4 and Figure 5 for wiring instructions.
10.
Figure 15 – Wire the HD77
11.
Close and lock the HD77 into the camera back plate:
Step 1. Install the top of the unit.
Step 2. Close the HD77 onto the back plate.
16
Paradox Insight ™ HD77 Installation Guide
Step 3. Close the lock mechanism at the bottom of the HD77 camera.
Note: By securing the lock, the installer diagnostic LEDs will be turned off.
12.
Connect the Ethernet line to the router (if not already connected). Make sure the router is turned on.
13.
Adjust the HD77 position.
2.3.4
1.
HD77 Installation without Swivel Bracket (Wall or Corner Mount)
Separate the front from the back plate of the HD77:
Step 1. Open the lock mechanism at the bottom of the device.
Step 2. Pry the cover off from the bottom of the unit.
Step 3. Lift the front cover up and away. On the back of this module you will see the serial number.
Step 4. Knock out the appropriate holes on the back plate. Use an awl or an ice pick.
Step 5. Write down the serial number and location of the module. After you finish the hardware installation you can identify each module by serial number in BabyWare and add the location and
label to each module.
Wall mount
Corner mount
Ceiling
Anti-Tamper
Anti-Tamper
For wall
installation
For corner
installation
Wiring Slot
Wiring Slot
Figure 16 – Knockout Locations
Step 6. Install the device a minimum of 2cm (~1 in) from the ceiling, between 2.1m and 2.7m off the
floor.
Step 7. Insert the Ethernet and 4-wire combus cables through the wiring slot of the back plate.
Step 8. Secure the back plate to the wall with screws. (screws and anchors are not supplied).
Step 9. Ensure that the wall tamper knockout is secured to the wall.
Paradox Insight™ HD77 Installation Guide
17
Step 10. Connect the combus wires and the Ethernet wires. See Figure 4 and Figure 5 for wiring
instructions.
Figure 17 – Wire the HD77
2.
Place the front cover onto the back plate:
Step 1. Install the top of the unit.
Step 2. Close the HD77 onto the back plate.
Step 3. Close the lock mechanism at the bottom of the device.
Note: By securing the lock, the installer diagnostic LEDs will be turned off.
3.
After the system hardware is connected, power up the system by connecting the power lines from the
16V AC transformer to an outlet.
4.
The system will boot-up including the cameras.
The HD77 boot-up is indicated by LED3. The LED flashes blue for up to 3 minutes.
5.
Use VOD to verify camera vision / image / angle.
In BabyWare => HD77 Properties => Video tab => play button
18
Paradox Insight ™ HD77 Installation Guide
Figure 18 – HD77 Video Stream in BabyWare
When installed with a swivel bracket, you can adjust the HD77 position by doing the following.
Step 1. Remove the camera.
Step 2. Loosen the screw. See Figure 14.
Step 3. Make your adjustments.
Step 4. Re-tighten the screw.
Step 5. Replace the front cover.
6.
Perform a walk test to verify that everything is working properly.
Note: The installer should not leave the house without verifying the VOD can be seen through the App!
This MUST be checked with an external network in order to verify that port forwarding is working – using
wireless network from the property’s WIFI router will not test this, please use the 3G network.
Paradox Insight™ HD77 Installation Guide
19
Chapter 3
Creating an Account in BabyWare
3.1 Required Tools
The installer will also need to have the following job specific tools and equipment:
• a laptop with Windows 7
• a connection from your laptop to the system either by:
• 307USB or
• IP150 Internet module to connect to the EVOHD serial port plus an Internet connection through
your computer
3.2 Required Software
The installer will also need to have the following software available on his laptop.
• BabyWare Installer software V 2.8 or higher (downloadable from www.paradox.com)
Once the system is wired and powered up:
1.
Open BabyWare.
2.
On the accounts page, open a new account.
3.
Enter the requested information.
Note: Click the link below and sign in to the site using your Paradox.com login user name and password to see
a video about creating a new account.
http://www.paradox-insight.com/learning/configuration-createanewaccount
Figure 19 – BabyWare Account Window
4.
Open the Connection Options Settings window. The following window opens up.
20
Paradox Insight ™ HD77 Installation Guide
Figure 20 – IP150 Settings Window
5.
Click the Locate
button. A list of all IP150 devices appears.
Figure 21 – Locate IP Device on Network
6.
Select your IP150 device and Click Configure. The IP device configuration window opens.
Paradox Insight™ HD77 Installation Guide
21
Figure 22 – IP Device Configuration
7.
Enter the IP 150 module password.
8.
Click OK to confirm password.
9.
Click OK to finish configuring the IP 150 device.
10.
Click Connect to finalize the connection settings.
22
Paradox Insight ™ HD77 Installation Guide
Chapter 4
Programming
Server parameters must be programmed through BabyWare only.
PIR parameters of the HD77 can be configured by the installer using the TM50 touchpad, the K641 series
keypads and the K656 keypad, and by using BabyWare software.
Note: Due to our constant efforts to improve our products the software screen grabs may not be exactly the
same as your screen.
Note: To program the module sections from a Paradox keypad BabyWare must be disconnected from the
system.
4.1 Programming Through BabyWare
With BabyWare open, locate each device by its serial number and add its label (for example front window) and
its location (for example Living room).
Serial numbers are acquired through the module scan and automatically inserted by Babyware.
Figure 23 – BabyWare Homepage
4.2 Receive Programming
At the BabyWare homepage always start by going to the HD77 security module, right click and select Receive
Programming. This assures that you will start with the latest device configuration parameters.
Note: Do this for each HD77 Camera.
Paradox Insight™ HD77 Installation Guide
23
Figure 24 – HD77 Receive Programming
4.3 HD77 Programming
In BabyWare under the Security Modules heading, double click or right click the HD77 module and Click
Properties. The HD77 Programming screen appears. Wait for the properties to appear.
Before you start programming each camera do a Read of the existing camera parameters.
Whenever you make a change to the HD77 programming the Write button will be enabled and highlighted.
Figure 25 – Write Button
Click Write to implement your changes to the device.
4.4 HD77 Server Parameters
1.
Enter the Installer parameters.
2.
Enter the Central Monitoring Station (CMS) parameters.
4.4.1
Receiver Parameters (Monitoring Station Reporting)
1.
To configure your HD77 to report events to an IPRS7 software, check the Reporting Enabled checkbox.
2.
Enter the Receiver parameters. These parameters come from the Central Monitoring Station.
Step 1. Select Communication from the tool bar.
Step 2. Select Register to IP Receiver.
24
Paradox Insight ™ HD77 Installation Guide
Step 3. Click OK.
Figure 26 – Communication Drop Down Menu
4.4.2
TCP/IP Parameters
4.4.2.1
Universal Plug ‘n Play (UPnP)
This feature automatically sets the port for the IP address. You can turn on the UPnP feature through BabyWare.
Your router must support this universal plug ‘n play (UPnP) feature. Check with your router manufacturer if this
feature is supported.
If you get an error message that the camera was not successfully connected, manually configure your router. If
your router does not support UPnP you will need to set up port forwarding on the router. For port-forwarding
instructions, please refer to your router manufacturer's instructions.
When supported by your router, we recommend to enable DHCP, enable UPnP, and work with the
ParadoxMyHome (PMH) (enable PollPMH, see below). This will allow for easy and fast network installation.
When one of the key parameters needs to be fixed, such as working with a static WAN IP (not using PMH) or
when UPnP is not supported (or fails) in your router, we HIGHLY recommend setting all parameters statically.
Meaning, the IP address of the camera should be static (either with static LAN IP or better with using MAC
binding which will always assign the same IP address to the camera). The port selection should also be static in
order to be able to do port forwarding that will not break in case of port or IP change.
4.4.2.2
Dynamic Configuration WAN
If your ISP assigns a dynamic WAN IP (as in most cases) you must check the Poll PMH(ParadoxMyHome)
checkbox and make sure the Paradox Insight™ App is configured for a Dynamic IP WAN address. See the
Paradox Insight™ App User Manual.
If you do not wish to use the PMH, you must get a static WAN IP from your ISP and uncheck the Poll PMH
(ParadoxMyHome).
4.4.2.3
Dynamic Configuration LAN
1.
From the HD77 programming page set the HD77 Server Parameters, check the DHCP Enabled box.
• If your router supports UPnP check the UPnP (Universal Plug and Play) box. UPnP takes care of the
port forwarding automatically.
Note: If your router does not support UPnP, we HIGHLY recommend setting all parameters statically.
2.
From the HD77 programming page register the HD77 to PMH:
Step 1. Select Communication from the tool bar.
Step 2. Select Register to PMH (ParadoxMyHome).
Step 3. Enter your Installer credentials.
Step 4. Enter a unique Site ID, to identify the system on ParadoxMyHome. This site ID is needed for the
Paradox Insight App.
Step 5. Click OK to finish the successful registration.
Step 6. Click OK and return to the BabyWare homepage.
Paradox Insight™ HD77 Installation Guide
25
Figure 27 – Server Parameters
Note: If your router supports UPnP you are now DONE configuring Server Parameters.
4.5 Static IP for the WAN
If your ISP assigns a dynamic WAN IP (as in most cases) you must check the Poll PMH(ParadoxMyHome)
checkbox.
If you do not wish to use the PMH, you must get a static WAN IP from your ISP and uncheck the Poll PMH
(ParadoxMyHome). Later, you will have to manually key-in this IP address into the Paradox Insight™
Application and the BabyWare application HD77 programming page.
When your ISP gives you a Static IP address for the WAN you must enter this IP address as your static IP. See the
Paradox™ Insight Application User manual for instructions to set a static IP for the WAN.
4.6 Reserved/Static IP Configuration for the LAN
Get the router IP address:
1.
Open a command prompt window. Press the windows button on your keyboard. In the search programs
and files window type in Command.
2.
Select Command Prompt.
26
Paradox Insight ™ HD77 Installation Guide
3.
At the prompt Type ipconfig
4.
Press Enter.
Type in this command
IP Address
Subnet Mask
Default Gateway (router IP address)
Figure 28 – Command Prompt ipconfig
5.
Write down the IPv4 Address, Subnet mask and Default Gateway.
6.
Access your router’s configuration page:
• Refer to your router’s manual for the exact procedure. In most cases, this is done by entering the
router’s IP address in the address bar of your web browser.
• For this instruction sheet, we will use 192.168.1.1 as an example, since it is a commonly used default
router IP address.
• Your router’s IP address may be indicated in the router’s instructions or on a sticker on the router.
7.
In the router’s configuration page, check the DHCP settings:
• If your router supports reserved IP addresses, bind the MAC address to a reserved IP address for the
LAN.
• If you are using a reserved IP address, the camera must be DHCP enabled. The reserved IP address
must be within the DHCP range.
• If you are using a static IP address the camera must be DHCP disabled. Verify that the IP address range
leaves at least one IP address available outside of the range. The static IP address must be outside of
the DHCP range.
• Record one of the addresses outside the DHCP range as the one you will use for the HD77.
• The range shown in following figure, would leave addresses two to four and 101 to 254 available (all
the numbers in an IP address are between 1 and 254.).
Figure 29 – DHCP Settings
Paradox Insight™ HD77 Installation Guide
27
8.
In the router’s configuration page, go to the Port Forwarding section (also known as “Port Mapping” or
“Port Redirection”):
Step 1. Add a service/item, set the Port to >50000, for example 50001, and enter the IP address
selected in the previous step 7 or the HD77 module.
Step 2. If port 50001 is already used, you can use another one, such as 50002 or 50003.
Step 3. Update the camera port parameter in BabyWare.
Note: Each camera needs a unique port number. DO NOT use the same port number more than once.
Port Forwarding (screenshot may differ depending on type of router used).
Note: The starting port and ending port are the
same.
Figure 30 – Port Numbering
9.
Open BabyWare.
Note: The installer should not leave the house without verifying the VOD can be seen through the App!
This MUST be checked with an external network in order to verify that port forwarding is working – using
wireless network from the property’s WIFI router will not test this, please use the 3G network.
28
Paradox Insight ™ HD77 Installation Guide
Chapter 5
PIR Parameters Programming
PIR parameters of the HD77 can be configured by the installer using the TM50 touchpad, the K641 series
keypads and the K656 keypad, and by using BabyWare software.
Note: To program the module sections from a Paradox keypad BabyWare must be disconnected from the
system.
Note: Due to our constant efforts to improve our products the software screen grabs may not be exactly the
same as your screen.
1.
Select the configuration parameters.
Figure 31 – PIR Parameters
Step 1. Show PIR LED – Default is on
Check this box to activate LED#3 to display (LED#3 lights up red) when PIR motion is detected.
When this box is not checked LED#3 stays off when PIR motion is detected.
Step 2. Set PIR sensitivity Level.
PIR Sensitivity Level – Default is #2.
There are 5 levels of sensitivity 0 to 4.
Sensitivity level 0 is low sensitivity, useful for a room with large windows to reduce false alarms
caused by environmental circumstances.
Sensitivity level 4 is high sensitivity, useful for a room with small windows due to the reduced risk of
false alarms caused by environmental circumstances.
Note: These are only two of many conditions to select the proper sensitivity for the camera.
Step 3. Set Security Level
There are three levels if security, Normal, Medium and High.
PIR Security Level – Default is Normal.
Paradox Insight™ HD77 Installation Guide
29
Security level “Normal” is for rooms with curtains, regular sized windows and little direct sunlight
entering the room.
Security level “High” is useful for a room with large windows, light curtains that may move when the
window is open, or a room with windows on the sunny side of the house.
2.
Perform a walk test to verify that everything is working properly.
Note: The installer should not leave the house without verifying the VOD can be seen through the App!
This MUST be checked with an external network in order to verify that port forwarding is working – using
wireless network from the property’s WIFI router will not test this, please use the 3G network.
5.1 Programming Through the TM50 Touchpad
Note: To program the HD77 from any installed keypad, BabyWare must be disconnected from the system.
Note: Only PIR parameters for the HD77 can be configured through the touchpad.
Note: A module reset done via the keypad will RESET ALL Parameters, INCLUDING SERVER PARAMETERS.
The following flow chart shows the programming process through TM50 Touched pad.
Home
Screen
System
Programming
Menu
Enter
[4003]
Installer
Programming
Advanced
Enter Serial
Number
Enter Module
Section
Enter Next
Enter Installer
Code
Select
Options
Figure 32 – Flow Through the TM50 Touchscreen
1.
Select the [Menu] key.
Figure 33 – Main Screen
30
Paradox Insight ™ HD77 Installation Guide
2.
Select the [Advanced] key.
Figure 34 – Menu Selections Screen
3.
Select the [Installer Programming] key.
Figure 35 – Advanced Screen
4.
Enter your [Installer Code]. Default is 000000
Figure 36 – Installer Code
5.
Select the [System Programming] key.
Paradox Insight™ HD77 Installation Guide
31
Figure 37 – Installer Programming Screen
6.
Key in Section [4003].
Figure 38 – Installer Programming Screen
7.
Enter the module’s [Serial Number]. Click Next.
Figure 39 – Module Serial Number Screen
8.
Enter Section [001].
Figure 40 – Programming Section
32
Paradox Insight ™ HD77 Installation Guide
9.
Option 1 is for PIR LED On/Off; Default is On.
On [1] – LED#3 lights up red when PIR motion is detected.
Off [*] – LED#3 stays off when the PIR motion is detected.
Options 2 through 8 are to remain off.
Figure 41 – Options Selection Screen
10.
Enter Section [002].
11.
Select PIR sensitivity level, level 0 to level 4; Default is #2.
12.
Enter Section [003].
13.
Select PIR security level, level 0 to level 2; Default is #0.
5.2 Programming Through the K641 series Keypads and K656 Keypad
Note: To program the HD77 from any installed keypad, BabyWare must be disconnected from the system.
Note: Only PIR parameters for the HD77 can be configured through the keypad.
Note: A module reset done via the keypad will RESET ALL Parameters, INCLUDING SERVER PARAMETERS.
1.
Press and hold the [0] key. You will be asked to input your installer code.
2.
Enter [Installer Code]. The default installer code is 000000.
3.
Key in Section [4003].
4.
Enter the module’s [Serial Number].
5.
Enter Section [001].
Option 1 is for PIR LED On/Off; Default is On
On – LED#3 is red when PIR motion is detected.
Off – LED#3 stays off when the PIR motion is detected.
Options 2 through 8 are to remain off.
6.
Enter Section [002].
7.
Select PIR sensitivity level, level 0 to level 4; Default is level 2.
8.
Enter Section [003].
Paradox Insight™ HD77 Installation Guide
33
9.
Select PIR security level, level 0 to level 2; Default is level 0.
PIR Settings
Description
Section
Setting
Setting Details
Example
1. PIR LED display
[001]
[*] Off
[1] On
PIR LED Off
PIR LED On Default
(1*******)
2. PIR Sensitivity
[002]
[0]
Low (Sensitivity level)
(002) 000-002
as seen on the TM50
Default
(002)
as seen on the
K641series keypads
[1]
[2]
[3]
3 Security Level
34
[003]
[4]
High (Sensitivity level)
[0]
Normal
(Mild environment)
[1]
Medium
[2]
High (Harsh
environment)
Default
(003) 000-000
as seen on the TM50
(000)
as seen on the
K641series keypads
Paradox Insight ™ HD77 Installation Guide
Chapter 6
ParadoxMyHome (PMH)
ParadoxMyHome is a Paradox Domain Name System (DNS) service that enables the installer to remotely access
a Paradox Reporting Device (e.g. IP150 or HD77). A dynamic IP address is assigned automatically, and can
change on a regular basis. ParadoxMyHome keeps track of these changes and associates the current IP address
to the Site ID (e.g. John’s house).
As an installer make sure you have a ParadoxMyHome account.
6.1 To Open a ParadoxMyHome Account
1.
Using any browser go to www.ParadoxMyHome.com.
2.
Click Create Login, and follow the directions.
6.2 Registering/Unregistering your devices to ParadoxMyHome
Once you have a valid ParadoxMyHome account you can proceed to register your customer’s accounts.
To register the HD77 cameras with ParadoxMyHome:
1.
Open BabyWare.
2.
Double click on any connected HD77 module listed in BabyWare.
Figure 42 – Select an HD77 to Register
3.
On the HD77 programing page click Communication.
Figure 43 – Registration to PMH
4.
In the drop down menu select Register to PMH (ParadoxMyHome).
Paradox Insight™ HD77 Installation Guide
35
Figure 44 – Register/Unregister to PMH
Note: To unregister follow the same procedure but select Unregister from PMH at the drop down menu.
5.
Enter the requested information. The SiteID should be unique for the site (up to 4 HD77 cameras).
Installer e-mail address and
password from his
ParadoxMyHome site
This Site ID is to be given to the
end user. He will need it for the
Paradox Insight™ application.
Figure 45 – ParadoxMyHome Registration Page
Figure 46 – Registration Successful
6.
Verify HD77 updated PMH with status, public IP, and ports by opening your PMH account and checking
the site.
36
Paradox Insight ™ HD77 Installation Guide
6.3 Deleting a Site from PMH
When deleting a site from my PMH you may get an error message that the site still exists. If you delete a site
from PMH on the registered devices page you then have to go to the Deleted Devices page and delete it again
from there. Otherwise PMH keeps the site just like the Windows recycle bin makes you empty your recycle bin
after you have already deleted your file.
Note: To delete a site from PMH, first delete the site from the Registered Devices page and then delete it from
the Deleted Devices page. You must delete your site from BOTH pages.
Figure 47 – ParadoxMyHome Site
Paradox Insight™ HD77 Installation Guide
37
Chapter 7
Using a Static IP for the WAN
If the end user does NOT want to use the ParadoxMyHome DNS, he can use a static IP for the WAN. To do this
the end user will need to get a static IP from his Internet Service Provider (ISP).
1.
Get a Static IP from your Internet Service Provider (ISP).
2.
We do not recommend using UPnP with a static WAN IP Address, un-check the UPnP checkbox.
3.
In BabyWare uncheck the PMH polling checkbox.
This DHCP is for the LAN and is not related to the
WAN. It can be checked or not depending on your
choice of DHCP for the LAN.
DHCP MUST be used with MAC binding.
You will have to keep the UPnP box
unchecked and do port forwarding on the
WAN within the router.
Figure 48 – Poll PMH
4.
Open the Paradox Insight™ App.
5.
Through your smart phone configure the app to work with the Static IP.
You will need to enter the IP address supplied by the ISP, along with the ports for the cameras.
For more detailed directions see the Pradox Insight™ Application User Guide.
Note: The installer should not leave the house without verifying the VOD can be seen through the App!
This MUST be checked with an external network in order to verify that port forwarding is working – using
wireless network from the property’s WIFI router will not test this, please use the 3G network.
38
Paradox Insight ™ HD77 Installation Guide
Chapter 8
Upgrading Firmware
1.
Use Babyware to upgrade firmware on all of HD77 cameras on your site. To update firmware on the HD77
you will need BabyWare V2.8 or higher.
2.
Double click on any connected HD77 camera listed in BabyWare.
Figure 49 – Select HD77
3.
On the HD77 programing page click Update
.
Figure 50 – Update button
The following window opens up.
Figure 51 – Click Update
4.
Click Update
in this window. This will take up to 10 minutes.
5.
In order to see if the firmware upgrade was successful, after the HD77 boots, hover your mouse over the
HD77 on the main page and you will see the FW version.
Paradox Insight™ HD77 Installation Guide
39
Appendix A
Trouble Shooting
If BabyWare does not automatically find the IP address and port numbers for your cameras perform the
following procedure.
For DHCP
Go to HD77 — Settings. See (see Figure 54).
6.
Figure 52 – HD77 — Settings Update Graphic
7.
On the HD77 Settings window select Auto Detect.
40
Paradox Insight ™ HD77 Installation Guide
Figure 53 – HD77 Settings Window
8.
Click Refresh
9.
Click OK.
.
Note: The installer should not leave the house without verifying the VOD can be seen through the App!
This MUST be checked with an external network in order to verify that port forwarding is working – using
wireless network from the property’s WIFI router will not test this, please use the 3G network.
Paradox Insight™ HD77 Installation Guide
41
For Static IP
Go to HD77 — Communication — Settings. See (see Figure 54).
1.
Figure 54 – HD77 — Settings Update Graphic
2.
On the HD77 Settings window select IP/Static.
Figure 55 – HD77 Settings Window Update Graphic
42
Paradox Insight ™ HD77 Installation Guide
3.
Click Locate
4.
Select the located static IP address that matches the Default Gateway.
5.
Confirm that the Port # matches the port number assigned in the router port forwarding.
.
6.
Ensure that the router is connected properly as indicated in the router’s instructions.
Set the HD77 camera to IP/Static configuration
1. Un-check the DHCP Enabled checkbox on the HD77 programming page of BabyWare.
2. On the HD77 programming page Select Communications.
3. Select Settings. The settings page opens.
4. On the HD77 Settings window select IP/Static.
5. Click Locate
. The following window opens up.
Figure 56 – Locates Devices Window
6. Write down the IP Address, Port, MAC address and Serial number.
7. Click Configure. After a few seconds the IP Device Configuration window opens.
Figure 57 – IP Device Configuration Window
8. Make sure DHCP is off select the No button.
9. Click OK.
10.Enter the password. Default password is “paradox”.
11.Click OK on each window until you return to the HD77 programming page.
12.In your router administration page:
Step 1. Type the Default Gateway IP address from the command prompt window into your browser.
Step 2. You will be asked for a user name and password. Get these from your ISP.
Step 3. Bind (Reserve) the Mac address to its IP address for each HD77.
Paradox Insight™ HD77 Installation Guide
43
Step 4. Assign the port number from the Locate Devices window to forward the IP address port to the
HD77 camera.
13.Register your camera to ParadoxMyHome.
HD77 Programming page => Communication => Register to PMH.
Your HD77 camera server settings should now be configured for a static IP for the LAN.
Note: The installer should not leave the house without verifying the VOD can be seen through the App!
This MUST be checked with an external network in order to verify that port forwarding is working – using
wireless network from the property’s WIFI router will not test this, please use the 3G network.
44
Paradox Insight ™ HD77 Installation Guide
Appendix B
Specifications
HD77 Specifications
Voltage Input
Nominal: 12VDC, range 9-16VDC
Maximum Current Consumption
200 mA without illumination LEDs
330 mA with illumination LEDs lit
Installation Height
2.1 m - 2.7 m (7 ft - 9 ft)
Purchase Options
IR illumination LEDs
Installation Options
•
•
•
Wall or corner
Optional swivel bracket
One CAT5E cable or two separate cables one Ethernet and one combus
Coverage
12 m x 12 m (40 ft x 40 ft) / 110°
PIR Type
Quad PIR, Auto pulse, Auto dual edge, Digital detector
Micro SD Card Size
4GB
Camera Recording Resolution
720p
Video On Demand Recording Time
2 minutes each
Number Of VOD Files That Can Be Stored
~ 12 files
Alarm/motion Recording Time
10 seconds each
Pre-event Recording
3 seconds prior to PIR activation / alarm
Number of Alarm/motion Files that can be Saved on
the Micro SD Card
~40 files
PIR and Video Linked Files
The file naming conventions link the PIR file with its corresponding video file
Detection Speed
0.2 m/s to 2.5 m/s (0.6 ft/s to 11.5 ft/s)
Image Sensor Type
1.4 Mega pixel, CMOS sensor
Angle of View (Camera)
62.7° (V) x 91.4° (H) x 121.4° (D)
Video Image Resolution
1280 x 720 pixels
Facial Identification
4.5 meters
Facial Recognition
7 meters
Streaming Video
360p H.264 10 FPS
Audio
16 bit, 16KHz sampling rate, 32Kb/s mono
Weight
166g (5.86OZ)
Physical Size
(H x W x D)15 cm x 7.5 cm x 5 cm (6 in x 3 in x 2 in)
Environmental
See the Paradox.com website for the latest certifications for this product.
http://www.paradox.com/terms/
Operating Temperature
-10° C to +40° C (14° F to 104° F)
Paradox Insight™ HD77 Installation Guide
45
Appendix C
PIR Detector Beam Pattern
The beam pattern for the detector is shown below.
Top view
Side view
4
2
0
(5.6)
(13)
2.1m
(6'8")
2
4
(26)
(40)
Feet
(13)
(6'6")
6
8
10
12
14
Meters
Figure 58 – PIR Detector Beam Pattern
Note: EN 50131 testing has been performed for 110 degrees.
46
Paradox Insight ™ HD77 Installation Guide
Appendix D
Certifications
Mark/
Area/Country
level/Grade/Class
European Economic Area (EEA)
European Economic Area (EEA)
WEEE
EN 50131-2-2 Grade 2
Environmental Class II
Certification Body: Applica
Test and Certification
FCC Statement Class B
This equipment has been tested and found to comply with the limits for Class B digital devices, pursuant to Part
15 of FCC rules. These limits are designed to provide reasonable protection against harmful interference in a
residential installation. This equipment generates, uses and can radiate radio frequency energy, and, if not
installed and used in accordance with the instructions, may cause harmful interference to radio
communications. However, there is no guarantee that interference will not occur in a particular installation. If
this equipment does cause harmful interference to equipment intermittently, the user is encouraged to try to
correct the interference by one or more of the following measures:
(1) reorient or relocate the receiving antenna;
(2) increase the separation between the equipment and receiver;
(3) connect the equipment to an outlet on a circuit other than the one to which the receiver is connected, or
(4) consult the dealer or an experienced radio/tv technician for assistance.
Paradox Insight™ HD77 Installation Guide
47
Appendix E
Un-Assemble Swivel Bracket
This swivel bracket is capable of:
• sweep angle from left to right of 90 degrees
• angle of declination (up and down) is 15 degrees
Table 5: Parts List
Part #
Description
1
Wall plate
2
Wall housing
3
Flat washer
4
Lock washer
5
Pan head screw #6-32
6
Back housing with nut installed
7
HD77 camera housing mount
Figure 59 – HD77 Swivel Bracket Parts
Disassemble Swivel
1.
Remove the pan head screw.
Remove
this screw
Figure 60 – Assembled Swivel Bracket
Do not drop the flat washer or the lock washer.
The two swivel sections remain connected.
Note: It is possible to separate the two swivel sections if necessary.
48
Paradox Insight ™ HD77 Installation Guide
swivel (part #6)
and part 2
HD77 camera housing mount
(part 7)
Slider and
pan head
screw with
washers
(parts 3, 4, 5,
and 8)
Figure 61 – Screw the Slider, HD77 Camera Housing and Back Housing Together
2.
Unlock the cover of the camera.
3.
Separate the front cover from the backplate of the HD77 by carefully pulling out and sliding up.
4.
Assemble the swivel mount.
Unlock cover
Figure 62 – Separating the Module from the Camera Housing
Step 1. Pull the cable(s) through the wall plate (part #1) and screw the wall plate to the wall (screws and
anchors are not supplied). The upper screws must be at least 3”(7.62cm) from the ceiling.
Step 2. Pull the cables through the wall housing (part #2).
Step 3. Attach the wall housing to the wall plate.
The flat side goes
against the wall
Run the wires
through this hole.
Wall plate (part 1)
Wall housing (part 2)
Figure 63 – Install the Wall Plate (part #1) and Wall Housing (part #2
Paradox Insight™ HD77 Installation Guide
49
Step 4.
Using the pan head screw with the lock washer and flat washer, connect the slider (part #8) and
the HD77 camera housing mount to the back housing (part #6).
Step 5. Tighten the pan head screw.
back housing (part #6) HD77 camera housing mount (part #7)
Slider
pan head screw
washers (part #8)
Figure 64 – Screw the Slider, HD77 Camera Housing and Back Housing Together
Make sure to screw the
anti-tamper from the
camera back plate to
the swivel bracket.
Drill the
knockouts for
wall installation
on the camera
back plate.
Figure 65 – Screw on Camera Back Plate to Swivel.
50
Paradox Insight ™ HD77 Installation Guide
Step 6. Drill the knockouts for wall installation on the camera housing.
Step 7. Write the serial number of the module into your module table. Include the exact location of this
module. If you are using BabyWare the serial number will be displayed, but you will need to
write down the correct location for each module according to the serial number.
Step 8. Screw the HD77 back plate to the housing mount using the 4 self tapping screws.
Figure 66 – Wire the Camera
Step 9. Connect the combus wires and the Ethernet wires. See Figure 4 and Figure 5 for wiring
instructions.
5.
Close and lock the camera (front plate) into the back plate:
Step 1. Install the top of the unit.
Step 2. Close the HD77 onto the back plate.
Step 3. Close the lock mechanism at the bottom of the device.
Note: By securing the lock, the installer diagnostic LEDs will be turned off.
6.
Connect the Ethernet line to the router (if not already connected). Make sure the router is turned on.
Step 1. Adjust the camera position and confirm camera view using Babyware.
7.
Continue on see section 2. on page 18.
Paradox Insight™ HD77 Installation Guide
51
Appendix F
Configure IP Router (1 Example)
With the IP150 and Cameras wired to the router, In order to configure your system for a static IP perform the
port forwarding and reserve the IP addresses of the IP150 and the HD77cameras.
Note: This procedure is dependent upon the individual router and network security of the end user’s system.
The following provides an example for one type of router. Refer to the router manufacturer's documentation for
detailed instructions. If the end user does not have his router documentation you can find the correct
instructions online.
Setting Up the Router for Port Forwarding
Following is an example of instructions for port forwarding.
Note: Different routers may require different instructions.
1.
Ensure that the router is connected properly as indicated in the router’s instructions.
2.
Access your router’s configuration page:
Step 1. Refer to your router’s manual for the exact procedure. In most cases, this is done by entering
the router’s IP address in the address bar of your web browser. Your router’s IP address may be
indicated in the router’s instructions or on a sticker on the router.
Step 2. If you cannot find the IP address of the router, try the following from your Windows Screen:
52
Step a.
Open a command prompt window. Press the windows button on your keyboard. In
the search programs and files window type in Command.
Step b.
Select Command Prompt.
Step c.
At the prompt Type ipconfig
Step d.
Press Enter.
The router IP address will be the Default Gateway . . . . .:xx.xx.xx.xxx
Paradox Insight ™ HD77 Installation Guide
Figure 67 – Command Prompt ipconfig
Step e.
Enter this IP address into the address bar at the top of the browser page. Press Enter.
Step f.
Put in the user name and password. If you do not know the user name and password,
go to the site www.routerpasswords.com and select your router manufacturer and
model. The default user name and password should be listed.
Step 3. 10.0.0.138 is an example for the router IP address as seen in Figure 67.
Note: Many routers have the IP address 192.168.1.1.
3.
In the router’s configuration page, check the DHCP settings:
Step 1. If DHCP is not enabled, verify that the IP address range is large enough to accommodate all of
your cameras. Four cameras will require 4 IP addresses.
Paradox Insight™ HD77 Installation Guide
53
Figure 68 – DHCP Enable
Step 2. Record one address at the upper end of the DHCP range for each HD77 in your system.
Step 3. DHCP Settings (screenshot may differ depending on type of router used).
4.
Set up port forwarding for the IP address.
Step 1. In the router’s configuration page, go to the Port Forwarding section (also known as “port mapping”, "NAT", (network address translation), or “port redirection”).
Step 2. Select an available port on the router and assign it to the HD77 camera. Select a port above
#50000 for the port.
Figure 69 – Fill in the Port Forwarding Information
54
Paradox Insight ™ HD77 Installation Guide
Figure 70 – Port Forwarding
Note: Example of IP addresses and ports for 4 cameras.
Table 6: Cameras, IP Addresses, and Port Numbers
Camera name
Location
IP Address
HTTP port #
Living room
facing front door
10.0.0.132
50042
Den
facing sliding rear door
10.0.0.133
50053
Safe room
facing the safe
10.0.0.134
50063
2nd floor
looking down the staircase
10.0.0.135
50073
Note: Each camera needs a separate IP address and matching external port.
Paradox Insight™ HD77 Installation Guide
55
Reserve the IP or Bind the IP to a MAC
You need to bind the HD77s mac address to an IP address within the router's DHCP range. This is called
reserving an IP address or binding an IP address.
This is done on the router, just like you connected to the router for port forwarding you will need to connect for
reserving a port. This should be under the LAN properties.
Since each router is different you may need to use the router user manual or search online for instructions for
your particular router.
You can also try searching the Internet for videos on routers and reserving IP addresses (screen shots may differ
depending on type of router used).
Figure 71 – Binding or Reserving a Port
Once the IP is successfully reserved:
1.
Right click the HD77 camera.
2.
Go to Communications => Settings.
Figure 72 – HD77 Settings
3.
Select IP Static. Use the IP address and port number you selected in the router binding and port
forwarding.
56
Paradox Insight ™ HD77 Installation Guide
4.
Click
.
Figure 73 – Locate Static IP Addresses
5.
Select the IP address with port for your static IP.
6.
Click Configure.
7.
Click OK.
8.
Repeat the process for each HD77 camera.
Paradox Insight™ HD77 Installation Guide
57
The whole Paradox team wishes you a successful and easy installation.
We hope this product performs to your complete satisfaction.
Should you have any questions or comments, please contact us.
For support, please contact your local distributor, or dial 1-800-791-1919
(in North America) or +1-450-491-7444 (outside North America), Monday
to Friday, from 8:00 a.m. to 8:00 p.m. EST.
You may also e-mail us at [email protected].
Additional information can be found at PARADOX.COM
Printed in Canada
November, 2014
HD77-EI01
paradox.com