1
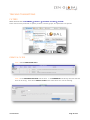
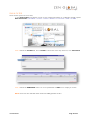
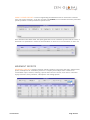
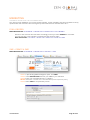
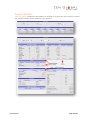
Table of Contents
MENU BAR .......................................................................................................... 1
CUSTOMERS MENU ............................................................................................ 3
LOYALTY......................................................................................................................... 3
Find a Member ............................................................................................................. 3
Update Member Details................................................................................................ 4
Card Replacement/Merges ........................................................................................... 5
Member Points Adjustments......................................................................................... 6
SMS - Create/Send/Report........................................................................................... 7
Email - Create/Send/Report ......................................................................................... 8
Schedule SMS and Emails ............................................................................................ 9
Image Uploads ............................................................................................................. 9
TRACKING TRANSACTIONS .............................................................................. 10
FILTERS ........................................................................................................................ 10
Create a Filter ............................................................................................................ 10
Transaction Filtering .................................................................................................. 11
Product Filtering ........................................................................................................ 11
Run a Filter ................................................................................................................ 13
LOYALTY REPORTS ........................................................................................... 14
MEMBERS REPORTS .................................................................................................... 14
HISTORY REPORTS ...................................................................................................... 15
STATISTICS REPORTS .................................................................................................. 17
MOVEMENT REPORTS .................................................................................................. 18
MARKETING MENU ........................................................................................... 20
Find a Record............................................................................................................. 20
SMS - Create/Send/Report......................................................................................... 20
Email - Create/Send/Report ....................................................................................... 22
SALES MENU..................................................................................................... 22
SALES REPORTS........................................................................................................... 22
Balance Reports ......................................................................................................... 23
Sales Reports ............................................................................................................. 24
Item Movements ........................................................................................................ 26
Specials Reports ........................................................................................................ 27
Control Reports .......................................................................................................... 27
CUSTOMISATION .............................................................................................. 29
FAVOURITE GROUPS .................................................................................................... 29
SUPPORT .......................................................................................................... 30
OFFLINES ..................................................................................................................... 30
USER MANUAL Page 2 of 31 ZEN GLOBAL – HOME SCREEN
MENU BAR The MENU BAR is located across the top of your browser
GETTING TO KNOW YOUR MENU CATEGORIES:
HOME Select to return you
to the Welcome Screen.
Select STATISTICS to view a
snapshot of your database
SUGGESTIONS
is your most frequently used;
MAINTENANCE contains your
company information.
SALES Contains
SALES REPORTS for
both non-loyalty and
loyalty transactions
A ‘learning area’ –
displays the most
used functions
CUSTOMERS This menu tab
LOYALTY maintains, reports and
communicates to loyalty.
MARKETING maintains and
communicates to non-card
holders.
VOUCHERS maintain and
report on vouchers.
HISTORY Records your
current sessions movements
COMPANY Contains your Zen
parameters. Main menu tabs you
will use are;
1.COMPANY MAINTENANCE,
BATCH REPORT to view scheduled
emails/SMS
2. In USERS select PORTAL USERS
to create username and passwords
#To the right of SUGGESTIONS the two most visited functions in your current session will be displayed
? HELP KEY
The icons found immediately to the left of the Help key, will be the print or download functions when viewing reports
USER MANUAL Page 3 of 31 CUSTOMERS MENU
SUB MENU CATEGORIES IN THE CUSTOMERS TAB ARE:
MAINTENANCE, LOYALTY, MARKETING AND VOUCHERS
As a user, the main sub category you will use is LOYALTY to manage, communicate and report on members.
LOYALTY SUB MENU ITEMS WITHIN THE LOYALTY MENU YOU WILL FREQUENTLY VISIT:
Within the loyalty menu there are a number of areas, which can be ignored by the general user.
The main sub categories you will visit for membership related tasks are:
⇒
GENERAL MAINTENANCE – PROCESS LOST CARD
⇒
CARD MAINTENANCE – FIND MEMBER and NEW CARD
⇒
LOYALTY REPORTS – Use this menu to view a series of loyalty based reports
⇒
SMS OUT – Where you send and report on loyalty SMS campaigns
⇒
EMAIL OUT - Where you send and report on loyalty EMAIL campaigns
MANAGING YOUR DATABASE
FIND A MEMBER
MENU NAVIGATION: CUSTOMERS ⇒ LOYALTY ⇒ CARD MAINTENANCE ⇒ FIND MEMBER USER MANUAL Page 4 of 31 Search for a member by using the 4 options; NAME, CARD NUMBER, EMAIL or MOBILE.
*Searching by name: You must use a minimum if 4 characters when using this field
Use the alphabetical tabs in CUSTOM to list all members individual letter
HINT: If searching for a common surname, enter the surname and first initial (eg smith,b)
UPDATING MEMBER DETAILS
MENU NAVIGATION: CUSTOMERS ⇒ LOYALTY ⇒ CARD MAINTENANCE ⇒ FIND MEMBER ⇒SELECT YOUR MEMBER
Once you select the name of the customer you wish to update, the edit box will appear with a series
of tabs. All items with a red (*) need to be complete or filled in with a N/A for the record to save.
Click ADD/UPDATE to save the details before moving to the next tab.
When the record has been updated correctly, the following will appear under the top menu bar:
The Member Detail was Successfully Added / Updated The Member Loyalty Detail was Successfully Added / Updated Extra Member Loyalty Detail was Successfully Added / Updated
Several tabs control member information. The following are HINTS for specific tab:
1. CARD TAB - Ignore the POINTS RULE, CARD ACTIVE and DESCRIPTION FIELDS
2. CONTROL TAB - Leave fields as is unless member has opted out via a manual app form, then update
3. POINTS TAB - POINTS PER, REDEEMED POINTS and DISCOUNT is not to be altered
4. TRANSACTIONS TAB - Select a specific date from DATE column to view members individual transactions
USER MANUAL Page 5 of 31 CARD REPLACEMENT AND DATA MERGES
MENU NAVIGATION: FIND MEMBER ⇒ MAINTENANCE TAB within the selected member record
FOLLOW THESE STEPS TO TRASNFER MEMBER DATA AND POINTS TO A NEW CARD:
STEP 1 Enter the new card number in the REPLACEMENT field
STEP 2 Click REPLACE CARD. A confirmation pop-up box will appear, select OK
STEP 3 NAVIGATE: CUSTOMERS ⇒ LOYALTY ⇒ GENERAL MAINTENANCE ⇒ PROCESS LOST CARD
STEP 4 In PROCESS LOST CARD, click your venues name in the COMPANY column
When the process is complete, the following green text will appear at the top of the screen:
Processing Lost Cards Complete
USER MANUAL Page 6 of 31 MEMBER POINTS ADJUSTMENTS POINTS ADJUSTMENTS MUST BE DONE THROUGH SYSNET SiPOS NOT YOUR ZEN PORTAL
STEP 1 Open SiPOS from your Sysnet dock
STEP 2 Click inside the PLU box and type a semi colon (;) followed by the card number.
E.g. ;61805642598. Then select the ENTER key on your keyboard.
STEP 3 The member name will now appear at the top in the MEMBER SECTION
STEP 4 Click back in the PLU box, press ALT + S to search for a PLU.
Look up and enter PLU called POINTS ADJUSTMENT
STEP 5 Enter the amount of points in the QTY column
NOTE: Place a minus sign (-) in front of the quantity to remove points
STEP 6 Click COMPLETE SALE TO CASH to complete the process
USER MANUAL Page 7 of 31 COMMUNICATE TO YOUR DATABASE
SMS – CREATE YOUR MESSAGE
MENU NAVIGATION: CUSTOMERS ⇒ LOYALTY ⇒ SMS OUT ⇒ EDIT STEP 1 A pre existing SMS message will open, select NEW found at the bottom
right of the screen to start
STEP 2 In the DESCRIPTION field title your SMS for your reference
STEP 3 Enter your message before the <<STOP>>
DO NOT remove the <<STOP>> this is the automated opt out required for privacy
STEP 4 Select SAVE to complete the process SMS – SEND YOUR MESSAGE
MENU NAVIGATION: CUSTOMERS ⇒ LOYALTY ⇒ SMS OUT ⇒ GENERATE *Otherwise if you are in the SMS Edit screen, select GENERATE found at the bottom right STEP 1 Once GENERATE is clicked, the screen below will appear and the following
needs to be selected from the drop down boxes across the screen:
Options: Opt in SMS
Merge Forms: Reference name of the SMS you wish to send
Job Number: Select NEW JOB. Using an old job number will resend a past message
Site: Leave ALL or select your venue from the drop down list
You can then target specific members by using the POINTS, SELECTIONS, FILTERS, GROUP and
CARD TYPE tabs found at the top right. Eg: SELECTIONS tab can be used to select birth months
STEP 2 Click CALCULATE to proceed to the send screen. Screen example below:
USER MANUAL Page 8 of 31 SEND SMS NOW: Select the 2nd ACTION icon (hovering over this will either display SEND NOW or
MERGE SELECTION) Selecting this action sends SMS then and there, it can not be reversed
SEND SMS LATER: Select the 3rd ACTION icon (hovering over this it will either display SEND LATER or
BATCH MERGE SELECTION) A new screen will appear where you enter time and date for the send.
*SMS - NOTES: 1. Zen SMS clock works on Australian Eastern Standard time
2. By not selecting a date and time the SMS will automatically be sent the following day at 3am
SMS – REPORT ON SENT CAMPAIGNS
MENU NAVIGATION: CUSTOMERS ⇒ LOYALTY ⇒ SMS OUT ⇒ SMS REPORTS Select your DATE range to display all sms campaigns sent
EMAIL – CREATE YOUR EMAIL
MENU NAVIGATION: CUSTOMERS ⇒ LOYALTY ⇒ EMAIL OUT ⇒ EMAIL REPORT/TEMPLATE REPORT
This lists the email templates saved. Select the template you wish to use by clicking the
TEMPLATES NAME. This will then open the email editor screen.
USER MANUAL Page 9 of 31 STEP 1 Rename your email within the DESCRIPTION field at the top
STEP 2 Enter the tagline into the SUBJECT LINE field then select SAVE/SAVE EMAIL
STEP 3 Now you can design your email using the editor functions
STEP 4 SEND YOUR EMAIL – Follow the same process as SMS SEND detailed before
HINT: To duplicate an email design select the HTML button, copy all contents, then select
NEW found to the bottom right of the screen, select the HTML button and delete all contents
and paste. This will also duplicate the email. Then enter the details and save.
ADDITIONAL USEFUL EMAIL TOOLS:
1. Click MERGE TAG found at the bottom right of the screen to view codes that can be
implemented into your email content (e.g. customers name/points balance)
2. Once you have SAVED your email select EVALUATE to display the final emails appearance
3. When editing text, type first then: format in this order: Colour, Family then size last
EMAIL – REPORT ON SENT CAMPAIGNS
MENU NAVIGATION: CUSTOMERS ⇒ LOYALTY ⇒ EMAIL OUT ⇒ EMAIL HISTORY REPORTS Select your DATE range to display all email campaigns sent
BATCH REPORTS – VIEW SCHEDULED EMAILS AND SMS
MENU NAVIGATION: COMPANY ⇒ COMPANY MAINTENANCE ⇒ BATCH REPORT Select your SITES as ALL, select DATE range and your OPTIONS: PENDING, PROCESSED, ALL or
AUDIT to display scheduled and past email and sms sends
IMAGE AND ATTACHMENT UPLOAD
MENU NAVIGATION: CUSTOMERS ⇒ LOYALTY ⇒ UPLOADS & FILTERS ⇒ IMAGE UPLOAD
STEP 1 Select the image using the BROWSE tool then select UPDATE
STEP 2 Once image is uploaded, the image title will appear above the browse box
To view the IMAGE GALLERY, select IMAGE REPORT. The same process applies when
uploading PDF’s expect using the ATTACHMENT UPLOAD and ATTACHMENT REPORT
menu tabs found in UPLOADS/ FILTERS.
USER MANUAL Page 10 of 31 TRACKING TRANSACTIONS
FILTERS
MENU NAVIGATION: CUSTOMERS ⇒ LOYALTY ⇒ UPLOADS/FILTERS ⇒ FILTERS
Filters narrow down purchases of specific products, revenue groups, and particular time periods
CREATE A FILTER
STEP 1 Select CREATE NEW Filter
STEP 2 In the DESCRIPTION FIELD title the filter. In the COMMENTS field briefly describe what the
filter will be doing. Then select UPDATE FILTER. Now select Records to set the tracking.
USER MANUAL Page 11 of 31 TRANSACTION FILTERING
Find any member that has transacted within a specific time period.
STEP 1 Select the ADD button next to TRANSACTION
STEP 2 Within the bottom table, OPTION column, change to PRESENT, then select a DATE range and
lastly change the CONDITIONS column to AND. Select UPDATE to complete
SINGLE PRODUCT FILTERING
Find a member that has purchased a particular product. First step is to locate the products PLU.
STEP 1 Select the FIND button next to ITEM CODE and search for the product
USER MANUAL Page 12 of 31 STEP 2 Select the product, then press ADD found next to the FIND button
STEP 3 Within the bottom table, OPTION column, change to PRESENT, then select a DATE range and
lastly change the CONDITIONS column to AND. Select UPDATE to complete
MULTIPLE PRODUCT FILTERING
MENU NAVIGATION: CUSTOMERS ⇒ LOYALTY ⇒ UPLOADS/FILTERS ⇒ ITEM GROUP REPORT
STEP 1 Select CREATE NEW ITEM GROUP
STEP 2 Name your item group in the DESCRIPTION field and press SAVE
STEP 3 Navigate back to ITEM GROUP REPORT, select created item group and click SHOW ITEMS
STEP 4 Click ADD ITEM. Search item and tick box to select item(s), press ADD SELECTED ITEMS
STEP 5 Navigate back to FILTERS and select your filter. Within the filter select the RECORDS tab
STEP 6 Within the LOYALTY ITEM GROUP drop down list, select your item group and click ADD
STEP 7 OPTION column, change to PRESENT, select a DATE range and change the CONDITIONS
column to AND. Select UPDATE to complete
USER MANUAL Page 13 of 31 RUN A FILTER
There are two options to run a filter;
1. Click RUN FILTER found bottom corner of your created filter details or 2. Manually through reports
MENU NAVIGATION: CUSTOMERS ⇒ LOYALTY ⇒ LOYALTY REPORTS ⇒ STATISTCS ⇒ CARD - FILTERED
STEP 2 Select the FILTERS tab, and in FILTER 1: select filter from drop down list, click CALCULATE
STEP 3 Select the DOWNLOAD action icon for a spreadsheet or VIEW icon to display on screen
NOTE: Filters are also available within Email and SMS generate screens
USER MANUAL Page 14 of 31 LOYALTY REPORTS SUB MENU ITEM FOUND UNDER LOYALTY:
MENU NAVIGATION: CUSTOMERS ⇒ LOYALTY ⇒ LOYALTY REPORTS
MEMBERS REPORTS
The MEMBERS REPORT displays the size of the membership database
The drop down box allows the selection to be changed and expands the report from
consolidated to display individual members
USER MANUAL Page 15 of 31 The MEMBER TRANSACTIONS REPORT displays which members transact on specific days.
Displayed as sales, points earned, bonus points earned, transactions, or points redeemed.
HISTORY REPORTS
TIME HOUR REPORT same as in the sales reports, but can be narrowed down to display
only loyalty sales as well as the sites total sales
USER MANUAL Page 16 of 31 ITEM SALES REPORT tracks which items are sold to loyalty customers within the date period
NEW CARDS REPORT tracks new members and which POS user signed up the member
CARD HISTORY REPORT tracks members across different time periods and works as a
ranking report, displaying the top customers for each field
USER MANUAL Page 17 of 31 CARD SALES HISTORY is a very flexible report that can be used for customer rankings.
It can be narrowed down to individual member groupings and on specific product purchases
STATISTICS REPORTS
SALES REPORT is a consolidated report for sales across the venue(s). As per the drop down shown,
the Sales report can track all venue sales, loyalty sales only, average customer spend, % of sales
loyalty (as counts or amount purchased) and sales by postcode
CARD REPORT captures a snap shot of your loyalty customers demographics. It can be used as a
consolidated report or detailed report displaying individual members matching the selection
USER MANUAL Page 18 of 31 CARD FILTERED REPORT is used for segmenting the database based on information collected
from your loyalty customers. It can also be used with FILTERS, to find members that have purchased
specific products or made purchases at specific times.
Once selections have been made, the report generates a list of customers you can view on screen, or
download to a spreadsheet. Please see documentation on filters for more information on their use.
MOVEMENT REPORTS
MOVEMENT REPORTS displays customer statistics within a time period with sales, average sales,
points, redemptions etc. Particularly useful for a company with multiple sites. It starts as a
consolidated report, however, selecting a period within the first column, drills down to individual
loyalty customers, their purchases, redemptions and average spends
USER MANUAL Page 19 of 31 SITE MOVEMENTS REPORT monitors points liability. It shows points awarded, redeemed, net
points, and their value. It can also be used to display historical balances on specific dates
WARNINGS REPORT is designed to report on high value transactions and warn against potential
misuse of the loyalty system
USER MANUAL Page 20 of 31 MARKETING
SUB MENU ITEM WITHIN THE CUSTOMERS MENU:
This section holds databases of non-card holding member, Loyalty members who have completed a survey
questionnaire and customers who have signed up online but have not activated their card:
FIND A RECORD
MENU NAVIGATION: CUSTOMERS ⇒ MARKETING ⇒ MARKETING ⇒ EDIT MEMBER
Search for the customer and edit them accordingly ensure you select UPDATE to save data.
You can also add a new member to marketing by the following steps:
MENU NAVIGATION: CUSTOMERS ⇒ MARKETING ⇒ MARKETING ⇒ NEW CUSTOMER
SMS – CREATE A SMS
MENU NAVIGATION: CUSTOMERS ⇒ MARKETING ⇒ SMS OUT ⇒ EDIT
STEP 1 A pre existing SMS message will open, click NEW
STEP 2 In the DESCRIPTION field title your SMS for your reference
STEP 3 Enter your message before the <<STOP>>
DO NOT remove the <<STOP>> this is the automated opt out required for privacy
STEP 4 Select SAVE to complete the process
USER MANUAL Page 21 of 31 SMS – SEND AN SMS
Marketing sends need to be sent via a survey. There are two options for the send.
OPTION 1 DATABASES OPTION 2 SEND TO ALL (NON-RESPONDENTS)
STEP 1 Select one of the two options and select RUN RELATED FILTERS from the list
STEP 2 Select the send fields as follows:
Options: Opt in SMS
Merge Forms: Reference name of the SMS you wish to send
Job Number: Select NEW JOB. Using an old job number will resend a past message
Site: Leave ALL or select your venue from the drop down list
NOTE: The Selections tab found at the top, can be used to narrow down the database
STEP 3 Click on your selection of either;
ALL RESPONDENTS - Anyone who HAS answered the survey
NON RESPONDENTS - Anyone who HASN’T answered the survey
OTHER FILTERS - Created for specific groups
STEP 4 Select one of the 4 options; DOWNLOAD THIS SELECTION, MERGE THIS SELECTION
(Send Now), BATCH MERGE THIS SELECTION (Send Later) or DISPLAY THIS SELECTION
USER MANUAL Page 22 of 31 EMAIL – CREATE AND SEND
MENU NAVIGATION: CUSTOMERS ⇒ MARKETING ⇒ EMAIL OUT ⇒ EMAIL REPORT/TEMPLATE REPORT
STEP 1 Select the email template you wish to use by selecting the TEMPLATES NAME
STEP 2 Email editor will open, rename the email in the DESCRIPTION field at the top
STEP 2 Enter the tagline into the SUBJECT LINE field then select SAVE/SAVE EMAIL
* You cannot save an email until both the above fields are complete
STEP 3 Now you can design your email using the editor functions
STEP 4 Send email – Follow the same process as MARKETING SMS SEND detailed previously
SALES MENU
ZEN SALES REPORTS
Sales reports include both loyalty and non-loyalty sales
USER MANUAL Page 23 of 31 BALANCE REPORTS
SITE BALANCES displays the sales balance for venue(s) on any given day. By clicking on a specific
day, additional details will be viewable for your selection
USER MANUAL Page 24 of 31 SITE JOURNALS allows specific transaction searches on a specific day
SALES REPORTS
SALES is a flexible report showing sales for day on day, week on week, month on month, etc
USER MANUAL Page 25 of 31 The FILTERS TAB allows you to show different figures within the report
Clicking on the SITE NAME allows you to break the report down into revenue group, sales
or location sales
ITEM SALES list items sold on a particular day. This report can also be broken down by locations or
revenue groups and can show data for sales inc, sales ex, units, cost etc.
USER MANUAL Page 26 of 31 ASSOCIATED ITEMS REPORT allows you to select a product and see what other items have been
purchased with it, within a time frame - this is a handy basket analysis tool that can help with future
promotions etc.
ITEM MOVEMENTS
ITEM PROFITS REPORT Lists items sold in a particular period and the profit made
USER MANUAL Page 27 of 31 SPECIALS REPORT
SALES REPORT displays items that have been flagged in H&L as being 'on special' as a combined
report
ITEM SALES will show you a breakdown by item
CONTROL REPORT
STATISTICS - TIME HOUR gives a breakdown of sales throughout the day. This report can show
count, quantities, sales etc. Clicking on the hour allows further drill down into either viewing finer
intervals (15 minutes), or show the individual transactions within the hour.
USER MANUAL Page 28 of 31 POS REPORTS- CLERK TRANSACTIONS shows sales for individual POS users. Clicking on the user
allows you to drill down to individual clerk transactions, or display the items they have been selling
USER MANUAL Page 29 of 31 CUSTOMISATION
FAVOURITE GROUPS
Favourite Groups allow quick and easy access to the reports you use most frequently. Favourite Groups can be
created for a variety of portal functions or reports e.g. Loyalty Functions or Weekly Sales.
MENU NAVIGATION: COMPANY ⇒ USERS ⇒ PORTAL USERS ⇒ USER REPORT
STEP 1 In your user profile, select SECURITY tab and change the DEFAULT LOGIN SCREEN
to FAVOURITE REPORTS and SAVE
STEP 2 Select your favourite groups MENU NAVIGATION: COMPANY ⇒ USERS ⇒
PORTAL USERS ⇒ FAVOURITE GROUPS and select ENTER NEW GROUP
STEP 3 Enter Group Description and choose colour and layout formats
*
G
ROUP LEVEL indicates which other users will have access to the Favourites Reports. i.e. Own Groups
indicates only you have access to those reports. If you select COMPANY and then the type of user (e.g.
Company Administrator), only these users will see the report.
STEP 4 Select a Report or Function you would like to save in your Favourites Group
On the lower left hand side of the screen, there is a link to create the report you are viewing
as a favourite ADD THIS REPORT TO FAVOURITES
STEP 5 Click on HOME and the FAVOURITES GROUPS you just created should appear
To DELETE REPORTS, MENU NAVIGATION: COMPANY ⇒ USERS ⇒ PORTAL USERS ⇒
FAVOURITES and select the report you wish to delete.
USER MANUAL Page 30 of 31 SUPPORT
OFFLINE MODE
If the system goes into OFFLINE MODE, details of the customer will not be displayed at POS. You will see a
message at the top and bottom of the screen saying “Offline” (e.g. – 6194975359– [Offline] )
The FIRST CHECK made is on the GMS site server that connects the POS to the internet. This is found by
double clicking the blue circular icon in your tool bar on server computer (where transaction server runs)
You can then check if it is online- if it is stopped, you can restart and reconnection will be achieved
If this doesn't work, check whether the network has gone down. If you still have internet and network
connection, check to see if the H&L transaction server is running. If this is not the case, the manager on duty
needs to contact the H&L helpdesk 1300SYSNET (1300-797-638). If you find only one of your POS is down,
then check your network cables.
For other portal issues or assistance in SMS and email sends, please contact a Zen representative at H&L
Australia on 08 8291 9550
USER MANUAL Page 31 of 31