1
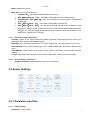
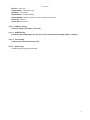
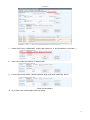
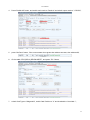
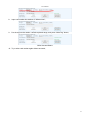
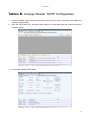
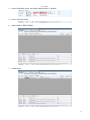
New Passive Reader
Demo
User Manual
Version control
Change
Date
2012/06/10
2015/1/29
Version
Changes
V1.0
V3.2
Initial version
The new interface revision
1
User Manual
Contents
Contents ................................................................................................................................................................... 1
1. Introduction ...................................................................................................................................................... 2
2. Communications ............................................................................................................................................. 3
2.1. RS232 .................................................................................................................................................... 3
2.2. TCPIP .................................................................................................................................................... 4
3. Parameters....................................................................................................................................................... 5
3.1. Base Settings.......................................................................................................................................... 5
3.1.1.
Parameter specifies ................................................................................................................ 6
3.2. Senior Settings ....................................................................................................................................... 7
3.2.1.
Parameter specifies ................................................................................................................ 7
Tables A. Write Card Number................................................................................................................................ 9
Wiegand26 Write Card(3 Byte Card) ........................................................................................................... 9
Wiegand34 Write Card(4 Byte Card) ......................................................................................................... 13
Tables B. Change Reader TCPIP Configuration .............................................................................................. 16
Tables C. Wiegand Configuration....................................................................................................................... 18
Tables D. Read Demo .......................................................................................................................................... 20
1
User Manual
1. Introduction
This demo is used to read and write the 915MHz tags;
Menu
Demonstration
Real Info
Status
2
User Manual
2. Communications
2.1. RS232
2.1.1. Connect reader to the computer with serial port (make sure the right connections, and obtain the
computer serial number);
2.1.2. In “SETTINGS”, switch the method of communication to “Serial Interface”:
2.1.3. set the port name and baud rate in child menu “SETTINGS”;
2.1.4. Click “CONNECT”, if be connected then screen is show as follow;
3
User Manual
2.2. TCPIP
2.2.1. Connect reader to LAN;
2.2.2. In “SETTINGS”, switch the method of communication to “Net Work”:
2.2.3. Input the right IP Address and IP Port in child menu “SETTINGS”;
2.2.4.
Click “CONNECT”, if be connected then screen is show as follow;
4
User Manual
3. Parameters
The software must connect the reader then it can be set parameters, choice the “BASE SETTINGS”
Table;
Change any parameters, need to click on "Set Para" button then the parameters of Reader will be
changed;
3.1. Base Settings
5
User Manual
3.1.1. Parameter specifies
3.1.1.1. Wiegand Parameters Input Zone
Wiegand Parameters is associated with the wiegand interface of controller, just when the output
mode of reader is choice Wiegand26 or Wiegand34 then it can be effective.
Byte Offset: The EPC tag have 12 byte data, default output first 3 or 4 byte data, If you set a byte offset value, the
output data will start from the set value;
Out Interval: invalid;
Pulse Width: be associated with the wiegand interface of controller;
Pulse Period: be associated with the wiegand interface of controller;
3.1.1.2. Basic Parameters Input Zone
Work Mode: Include Command, Active and Passive;
1.
Command: Reader do not work, when PC send command to Reader then it work once, and response
PC;
2.
Active: Reader work, and if read the tag then auto send data to PC;
3.
Passive: Reader work, do not auto send data to PC, when PC send command to reader then it send last
data to PC;
Output Mode: Include RS232、RS485、TCPIP、CANBUS、Syris、Wiegand26 and Wiegand34;
1. RS232: Serial Interface, main to connect PC, one serial interface just can be connect one reader;
2.
RS485: Serial Interface, main to connect PC, one serial interface just can be connect MULT reader(MAX
32);
3.
TCPIP: Net Work,Through LAN or WAN for communication with PC;
4.
CANBUS: Controller Area Net-work Bus;
Syris: Taiwan Syris controller protocol;
Wiegand26: Wiegand controller protocol;
Wiegand34: Wiegand controller protocol;
5.
6.
7.
Data:
Wiegand
RS485
RS232
TCPIP
CANBUS
http://baike.baidu.com/view/557637.html
http://baike.baidu.com/view/196467.htm
http://baike.baidu.com/view/196461.htm
http://baike.baidu.com/view/7649.htm
http://baike.baidu.com/view/985423.htm
Read Interval: the frequency of reader read tag;
Note: Usually more than 10 ms, too small will shorten the service life of the reader.
Power Size: Set the transmit power size, the maximum value of 30;
Trigger: Include Close and Low Trigger
1. Close: Close trigger to read tag;
2. Low Trigger: Trigger level lead connected to the low level effective;
Same id Interval: The same tag data is transmitted only once in the set time;
6
User Manual
Buzzer: enabled the buzzer;
Read Type: type of tag can be read;
1. ISO18000-6B: just read the ISO18000-6B protocol tag;
2. EPC(GEN 2)Single – Tag: just read the EPC(GEN 2) protocol tag at a time;
3. ISO18000-6B + EPC(GEN 2): read the EPC(GEN 2) protocol tag and ISO18000-6B
protocol tag;
4. EPC(GEN 2)Multi – Tag: just read the EPC(GEN 2) protocol tag;
5. EPC(GEN 2)Multi – Data: just read the EPC(GEN 2) protocol tag, In addition to read
default EPC District 12 byte of data can be read in other areas outside the data (select the
category, can be in the advanced parameters set to read other areas of the location of the
data length, a maximum of 12 bytes);
3.1.1.3. Senior Parameter Input Zone
Antenna: Aiming at the multi channel card reader application parameters (split card reader), the
integration of the default 1card reader antenna;
Max Tags: when switch the read type to “EPC (GEN 2) Multi-Tag”, limit max tag count once read;
Other Memory: when switch the read type to “EPC (GEN 2) Multi-Data”, EPC data + Memory bank
data;
Start Address: when switch the read type to “EPC (GEN 2) Multi-Data”, Memory bank data start
address;
Length: when switch the read type to “EPC (GEN 2) Multi-Data”, Memory bank data length;
3.1.1.4. Freq Parameter Input Zone
Hopping Enabled: Enabled hopping; usually choice enabled;
3.2. Senior Settings
3.2.1. Parameter specifies
3.2.1.1. TCPIP Config
IP Address: Local IP address;
7
User Manual
IP Port: Local IP port;
Subnet Mask: Local subnet mask;
Gateway: Local gateway;
Mac Address: Local Mac address;
Network Mode: choice the reader run mode, include server and client;
Server IP: remote IP;
Server Port: remote port;
3.2.1.2. Address Config
Protocol address of reader, can be set;
3.2.1.3. SYRIS Config
Can be set the reader Syris No., this No. can be used when the output mode is “5-Syris”;
3.2.1.4. Time Config
Custom version reader can be used;
3.2.1.5. Soft Config
Custom version reader can be used;
8
User Manual
Tables A. Write Card Number
Wiegand26 Write Card(3 Byte Card)
1.
Connect reader to the computer with serial port (make sure the right connections, and obtain the
computer serial number);
2.
Open the “RFID Demo.exe”; Choice the right serial port, choice 9600 baud rate, and then press the
“Connect” button;
3.
Choice table “BASE SETTINGS”;
9
User Manual
4.
Press “Default All” button, and switch work mode to “Passive” and switch output mode to “1-RS232”;
5.
press “Set Para” button, if the current status show green than said set success, else said set fail;
6.
Choice table “EPC(GEN 2) READ&WRITE”, and press “F8” 5 times;
10
User Manual
7.
switch Card Type to “Wiegand26”, switch Card Position to “0” and checked the “Auto Add 1” ;
8.
Input card number into textbox of “Written Num”;
9.
Put the tag into the reader 's effective placed range, and press “Write Tag” button;
Write Succeed Status
10. Try to write card number again without succeed;
11
User Manual
12
User Manual
Wiegand34 Write Card(4 Byte Card)
1.
Connect reader to the computer with serial port (make sure the right connections, and obtain the
computer serial number);
2.
Open the “RFID Demo.exe”; Choice the right serial port, choice 9600 baud rate, and then press the
“Connect” button;
3.
Choice table “BASE SETTINGS”;
13
User Manual
4.
Press “Default All” button, and switch work mode to “Passive” and switch output mode to “1-RS232”;
5.
press “Set Para” button, if the current status show green than said set success, else said set fail;
6.
Choice table “EPC(GEN 2) READ&WRITE”, and press “F8” 5 times;
7.
switch Card Type to “Wiegand34”, switch Card Position to “0” and checked the “Auto Add 1” ;
14
User Manual
8.
Input card number into textbox of “Written Num”;
9.
Put the tag into the reader 's effective placed range, and press “Write Tag” button;
Write Succeed Status
10. Try to write card number again without succeed;
15
User Manual
Tables B. Change Reader TCPIP Configuration
1.
2.
3.
Connect 915MHz reader computer serial port (make sure the right connections, and obtain the
computer serial number);
Open the “RFID Demo.exe”; Choice the right serial port, choice 9600 baud rate, and then press the
“Connect” button;
Choice table “SENIOR SETTINGS”;
16
User Manual
4.
change the parameters in “TCPIP Config” and Click “Set Para” button to set;
5.
if pop Attention widows, you must reset reader power;
6.
try again if set fail;
17
User Manual
Tables C. Wiegand Configuration
11. Connect reader to the computer with serial port (make sure the right connections, and obtain the
computer serial number);
12. Open the “RFID Demo.exe”; Choice the right serial port, choice 9600 baud rate, and then press the
“Connect” button;
13. Choice table “BASE SETTINGS”;
18
User Manual
14. Press “Default All” button, and switch output mode “6-Wiegand26”or“7-Wiegand34”;
15. press “Set Para” button, if the current status show green than said set success, else said set fail;
16. try again if set fail;
19
User Manual
Tables D. Read Demo
1.
Connect 915MHz reader computer serial port (make sure the right connections, and obtain the
computer serial number);
2.
Open the “RFID Demo.exe”; Choice the right serial port, choice 9600 baud rate, and then press the
“Connect” button;
3.
Choice table “BASE SETTINGS”;
20
User Manual
4.
Press “Default All” button, and switch output mode to “1-RS232”;
5.
Press “Set Para” button;
6.
Switch table to “READ DEMO”;
7.
scanning tag;
21