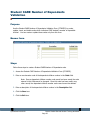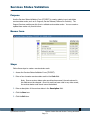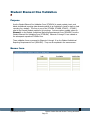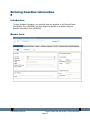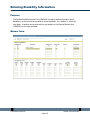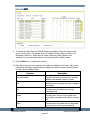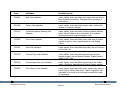
1
Banner Student General Student
Training Workbook
Release 8.1 - October 2008
Updated 5/12/2009
HIGHER EDUCATION
What can we help you achieve?
_________________________________________________________________________________________________________________
SunGard Higher Education
4 Country View Road
Malvern, Pennsylvania 19355
United States of America
(800) 522 - 4827
Customer Support Center website
http://connect.sungardhe.com
Distribution Services e-mail address
[email protected]
Other services
In preparing and providing this publication, SunGard Higher Education is not rendering legal, accounting, or other similar
professional services. SunGard Higher Education makes no claims that an institution's use of this publication or the
software for which it is provided will insure compliance with applicable federal or state laws, rules, or regulations. Each
organization should seek legal, accounting and other similar professional services from competent providers of the
organization's own choosing.
Trademark
Without limitation, SunGard, the SunGard logo, Banner, Campus Pipeline, Luminis, PowerCAMPUS, Matrix, and Plus are
trademarks or registered trademarks of SunGard Data Systems Inc. or its subsidiaries in the U.S. and other countries.
Third-party names and marks referenced herein are trademarks or registered trademarks of their respective owners.
Revision History Log
Publication Date
Summary
October 2008
New version that supports 8.1 software.
May 2009
Add Athletic Compliance
Notice of rights
Copyright © SunGard Higher Education 2005-8. This document is proprietary and confidential information of SunGard
Higher Education Inc. and is not to be copied, reproduced, lent, displayed or distributed, nor used for any purpose other
than that for which it is specifically provided without the express written permission of SunGard Higher Education Inc.
Table of Contents
Introduction ............................................................................................................... 5
Process Introduction...................................................................................................... 7
Set Up ......................................................................................................................... 9
Validation Forms Used in the General Student Module ....................................................10
Student Activity Code Validation ....................................................................................13
Advisor Type Validation ................................................................................................15
Student CARE AFDC Duration Validation ........................................................................16
Academic Standing Code Validation ...............................................................................17
Attribute Validation.......................................................................................................19
Student Attribute Validation ..........................................................................................20
Block Code Validation ...................................................................................................21
Campus Code Validation ...............................................................................................22
Combined Academic Standing Code Validation ...............................................................24
Cohort Code Validation .................................................................................................26
Class Code Validation....................................................................................................28
Comment Type Code Validation.....................................................................................30
Communication Plan Code Validation .............................................................................32
Cohort Reason Code Validation .....................................................................................33
Contact Type Code Validation........................................................................................34
Student CARE Number of Dependents Validation ............................................................36
Disability Type Code Validation......................................................................................37
Degree Level Code Validation ........................................................................................38
Employer Code Validation .............................................................................................40
Eligibility Validation.......................................................................................................42
Education Opportunity Prog/Serv Status Validation .........................................................43
Eligibility Factor Validation ............................................................................................45
Level Code Validation ...................................................................................................47
Student CARE Marital Status Validation ..........................................................................49
Medical Code Validation ................................................................................................51
Originator Code Validation ............................................................................................53
Progress Evaluation Code Validation ..............................................................................55
Appointment Result Code Validation ..............................................................................56
Athlete Attribute Validation ..........................................................................................57
Athletic Academic Eligibility Validation............................................................................58
Athletic Qualifier Status Validation ................................................................................59
Athletic Competition Reason Validation ..........................................................................60
Services Provided Validation..........................................................................................61
State F/A Eligibility Validation ........................................................................................62
Service Provider Validation ............................................................................................64
Disability Service Code Validation ..................................................................................66
Sport Status Validation .................................................................................................67
Service Code Validation.................................................................................................68
Service Result Validation ...............................................................................................70
Services Status Validation .............................................................................................71
Student Status Code Validation .....................................................................................72
Student Type Code Validation .......................................................................................74
Student Element One Validation ....................................................................................76
Acceptance Reason Validation .......................................................................................78
Veteran Type Code Validation .......................................................................................79
Student EOPS/CARE Withdrawal Reason Validation.........................................................80
Student Classification Rules...........................................................................................82
Self Check....................................................................................................................84
Answer Key for Self Check ............................................................................................85
Day-to-Day Operations ............................................................................................ 87
Process Introduction.....................................................................................................89
Creating a General Student Record................................................................................91
Using the Quick Entry Form ..........................................................................................93
Changing a Major and Adding a Minor ...........................................................................98
Processing a Leave of Absence Request .......................................................................101
Entering Veteran Information ......................................................................................103
Adding or Changing Advisor Information......................................................................105
Entering Additional Student Information ......................................................................107
Entering Cooperative Education Information ................................................................109
Creating Communication Plan Information ...................................................................111
Viewing a Student’s Information..................................................................................113
Entering Guardian Information ....................................................................................115
Maintaining Sports Records .........................................................................................119
Maintaining and Monitoring Student Right to Know Reporting .......................................122
Entering Disability Information ....................................................................................126
Entering EOPS Information .........................................................................................129
Maintaining Required Information................................................................................132
Performing Purge Processes ........................................................................................134
General Student Mass Entry ........................................................................................140
Mass Entry Audit ........................................................................................................145
Mass Entry Batch Update ............................................................................................149
Mass Entry Purge Audit...............................................................................................151
Summary ...................................................................................................................153
Self Check..................................................................................................................154
Answer Key for Self Check ..........................................................................................156
Appendix................................................................................................................. 158
Forms Job Aid ............................................................................................................159
Terminology...............................................................................................................166
Introduction
Course goal
The goal of this workbook is to provide you with the knowledge and practice to create and
modify student records. This workbook is divided into these sections:
•
Introduction
•
Set Up
•
Day-to-day Operations
Course objectives
In this course you will learn how to
•
create and modify current information for students
•
change a student’s major
•
change a student’s residency
•
change a student type
•
enter information on career choice
•
add advisors
•
add activities
•
add veteran information
•
enter student classifications
•
enter cooperative information
•
enter Student Right to Know information.
© SunGard 2004-2008
Banner Student General Student Training Workbook
Page 5
Intended audience
Personnel responsible for creating and modifying current student information
Prerequisites
To complete this course, you should have
•
completed the Education Practices computer-based training (CBT) tutorial “Banner 8
Fundamentals,” or have equivalent experience navigating in the Banner system
•
completed the Curriculum, Advising, and Program Plan training workbook
•
completed the General Person training workbook
•
administrative rights to create the rules and set the validation codes in Banner.
To complete the exercises in the Day to Day Section of this workbook, you will also need to
ensure that the rules and validation codes in Banner needed for the General Student module
and the Curriculum, Advising, and Program Plan (CAPP) module have been set up for you.
© SunGard 2004-2008
Banner Student General Student Training Workbook
Page 6
Process Introduction
About the process
An active General Student record is required before a student is able to register for classes
and be assessed tuition and fees. Banner will review the student characteristics during
registration to ensure that the student is eligible to register and to ensure that the student
register’s into the correct courses.
Flow diagram
This diagram highlights where the General Student Module process occurs within the overall
Student process.
© SunGard 2004-2008
Banner Student General Student Training Workbook
Page 7
About the process
•
Validation forms are set up on the Banner system. Unless a new code is required,
this step is only performed once.
•
Rule forms are set up for specific terms and can be either copied as is to a new term
or changed for subsequent terms.
•
The person/employee may view, save, and print online output.
•
Parameters validation criteria are defined for generating the General Student Job
Submission processes and reports.
© SunGard 2004-2008
Banner Student General Student Training Workbook
Page 8
Set Up
Section goal
The purpose of this section is to outline the set-up processes and detail the procedures to
set up your Banner system.
Objectives
In this section you will learn how to create the rules and set parameters used to process
student data.
© SunGard 2004-2008
Banner Student General Student Training Workbook
Page 9
Validation Forms Used in the General Student
Module
List of validation forms
Before performing day-to-day activities related to General Student, a number of forms
require your organization’s data to be entered first. The following validation forms are used
in the General Student module. Review these forms and practice entering information in
each.
Note: Some of these validation forms are shared by various Banner systems. You should
coordinate with other Banner system users at your institution when deciding what codes are
used.
The forms are listed below in alphabetical order by Banner Name for reference purposes; it
is likely you may set them up in a different order from how they are listed here. They are
covered in detail on the pages that follow.
Form Description
Banner Name
Student Activity Code Validation
STVACTC
Advisor Type Code Validation
STVADVR
Student CARE AFDC Duration Validation
STVAFDC
Academic Standing Code Validation
STVASTD
Attribute Validation
STVATTR
Student Attribute Code Validation
STVATTS
Block Code Validation
STVBLCK
Campus Code Validation
STVCAMP
Combined Academic Standing Code Validation
STVCAST
Cohort Code Validation
STVCHRT
Class Code Validation
STVCLAS
Comment Type Code Validation
STVCMTT
© SunGard 2004-2008
Banner Student General Student Training Workbook
Page 10
Form Description
Banner Name
Communication Plan Code Validation
STVCPLN
Cohort Reason Code Validation
STVCREA
Contact Type Code Validation
STVCTYP
Student CARE Number of Dependents Validation
STVDEPS
Disability Type Code Validation
STVDISA
Degree Level Code Validation
STVDLEV
Employer Code Validation
STVEMPL
Eligibility Validation
STVELIG
Education Opportunity Prog/Serv Status Validation
STVEOPS
Eligibility Factor Validation
STVESEL
Level Code Validation
STVLEVL
Student CARE Marital Status Validation
STVMARS
Medical Code Validation
STVMEDI
Progress Evaluation Code Validation
STVPREV
Appointment Result Code Validation
STVRSLT
Athletic Attribute Validation
STVSAAT
Athletic Eligibility Validation
STVSAEL
Athletic Qualifier Status Validation
STVSAQS
Athletic Competition Reason Validation
STVSARE
Services Provided Validation
STVSEPR
State F/A Eligibility Validation
STVSFAE
Service Provider Validation
STVSPRV
Disability Service Code Validation
STVSPSR
Sport Status Code Validation
STVSPST
© SunGard 2004-2008
Banner Student General Student Training Workbook
Page 11
Form Description
Banner Name
Service Code Validation
STVSSER
Service Result Validation
STVSSRS
Services Status Validation
STVSSST
Student Status Code Validation
STVSTST
Student Type Code Validation
STVSTYP
Student Element One (through Ten) Validation
STVSUDA, STVSUDB,
STVSUDC,….,STVSUDJ
Acceptance Reason Validation
STVTRAC
Veteran Type Code Validation
STVVETC
Student EOPS/CARE Withdrawal Reason Validation
STVWTHD
© SunGard 2004-2008
Banner Student General Student Training Workbook
Page 12
Student Activity Code Validation
Purpose
Use the Student Activity Code Validation Form (STVACTC) to create, update, insert, and
delete activity codes. This form is used by other forms to validate activity codes (Debate
Club, Swim Team, ROTC, etc.). You may only create or update activity codes from this
form.
The Category field is validated against the Activity Category Validation Form (STVACCG),
and the Type field is validated against the Activity Type Validation Form (STVACTP).
Notes: All activity codes which are for sports and should be able to be added on the
Student Sport Form (SGASPRT) must have a type code of SPRTS. This type code is a
system-required code on the Activity Type Validation Form (STVACTP).
Use a code of UNASSIGN (in the Type field) for collector table processing with the Print
Detail Report Indicator parameter of the Student Right to Know Report (SGRKNOW).
Warning: All Banner systems share this validation form. You should coordinate with other
Banner system users at your institution when deciding what codes are used on this form.
© SunGard 2004-2008
Banner Student General Student Training Workbook
Page 13
Banner form
Steps
Follow these steps to create a student activity code.
1. Access the Student Activity Code Validation Form (STVACTC).
2. Perform an Insert Record function.
3. Enter a three- or four-character activity code in the Code field.
4. Enter a description of the code in the Description field.
5. Select an activity type in the Type field. This field is optional.
6. Select an activity category in the Category field. This field is optional.
7. Repeat steps 2 – 6 to enter all student activity codes.
8. Click the Save icon.
9. Click the Exit icon.
© SunGard 2004-2008
Banner Student General Student Training Workbook
Page 14
Advisor Type Validation
Purpose
Use the Advisor Type Code Validation Form (STVADVR) to create, update, insert, and delete
advisor type codes for students. Students may have multiple advisors, such as an academic
advisor or an athletic advisor. You may only create or update advisor type codes from this
form.
Banner form
Steps
Follow these steps to create an advisor type code.
1. Access the Advisor Type Code Validation Form (STVADVR).
2. Enter an advisor type code in the Code field.
3. Enter a description of the code in the Description field.
4. Click the Save icon.
5. Click the Exit icon.
© SunGard 2004-2008
Banner Student General Student Training Workbook
Page 15
Student CARE AFDC Duration Validation
Purpose
Use the Student CARE AFDC Duration Validation Form (STVAFDC) to create, update, insert,
and delete CARE AFDC codes. These codes indicate the length of time a CARE student has
been on Aid to Families with Dependent Children (AFDC), at the time of enrollment for the
current term. You can create or update these codes only from this form.
Banner form
Steps
Follow these steps to create a student CARE AFDC duration code.
1. Access the Student CARE AFDC Duration Validation Form (STVAFDC).
2. Enter the code of the CARE AFCD duration in the Code field.
3. Enter a description of the CARE AFDC duration in the Description field.
4. Click the Save icon.
5. Click the Exit icon.
© SunGard 2004-2008
Banner Student General Student Training Workbook
Page 16
Academic Standing Code Validation
Purpose
Use the Academic Standing Code Validation Form (STVASTD) to create, update, insert, and
delete academic standing codes, such as Good Standing, Dean's List, or Suspension. Other
forms use this form to validate these codes, which you can only create or update from this
form.
Note: Calculated code displays in the General Student record.
Banner form
© SunGard 2004-2008
Banner Student General Student Training Workbook
Page 17
Steps
Follow these steps to create an academic standing code.
1. Access the Academic Standing Code Validation Form (STVASTD).
2. Enter a two-character code in the Standing Code field.
3. Enter a description of the standing code in the Description field.
4. Click the Dean’s List checkbox if this code indicates the student is on the Dean’s List.
5. Click the Prob Ind checkbox if this code indicates the student is on academic probation.
6. Click the Proh Reg checkbox if this code means that the student is prohibited from
registering for additional courses.
7. Enter a number in the Minimum Hours field for which a student is required to enroll
when under this academic standing code.
8. Enter a number in the Maximum Hours field for which a student may enroll when
under this academic standing code.
9. Enter a code in the EDI Eqv (Equivalent) field.
Note: The EDI Eqv (Equivalent) field is used to assign the EDI
SPEEDE/ExPRESS academic standing code values to the institution's academic
standing codes. The EDI equivalent value will be used in the transmission of
transcript information electronically via EDI. These values are defined in the EDI
SPEEDE/ExPRESS Implementation Guide under data element #641.
10. Enter a number in the Voice Msg field to assign a number to the recorded message
that describes the academic standing code for telephone applications.
11. Do not check the System Required checkbox.
Note: If the System Required checkbox is checked, the validation table record
cannot be deleted.
12. Click the Save icon.
13. Click the Exit icon.
© SunGard 2004-2008
Banner Student General Student Training Workbook
Page 18
Attribute Validation
Purpose
Use the Attribute Validation Form (STVATTR) to create, update, insert, and delete degree
program codes, such as Affiliated Teaching Requirement, Language Requirement, or Writing
Intensive Requirement. These attributes are also known as Degree Attributes or Program
Attributes in Banner Student. Other forms use this form to validate these codes, which you
can create or update only from this form. You need to create an attribute code for
Remedial Course Attribute, for use in IPEDS reporting.
Banner form
Steps
Follow these steps to create an attribute validation code.
1. Access the Attribute Validation Form (STVATTR).
2. Enter the code of the degree attribute in the Code field.
3. Enter a description of the degree attribute in the Description field.
4. Click the Save icon.
5. Click the Exit icon.
© SunGard 2004-2008
Banner Student General Student Training Workbook
Page 19
Student Attribute Validation
Purpose
You can use the Student Attribute Code Validation Form (STVATTS) to create, update,
insert, and delete student attribute codes such as First Year Student, Achieved Senior
Standing, or Non-degree Student. You can only create or update these codes from this
form
Banner form
Steps
Follow these steps to create a student attribute validation code.
1. Access the Student Attribute Code Validation Form (STVATTS).
2. Enter up to a four-character student attribute code in the Code field.
3. Enter a description of the code in the Description field.
4. Click the Save icon.
5. Click the Exit icon.
© SunGard 2004-2008
Banner Student General Student Training Workbook
Page 20
Block Code Validation
Purpose
Use the Block Code Validation Form (STVBLCK) to create, update, insert, and delete block
codes which are used in Block Scheduling processing. The block codes represent sets or
groupings of sections to which students are assigned in order to be registered more
efficiently. You can only create or update these codes from this form.
Banner form
Steps
Follow these steps to create a block code.
1. Access the Block Code Validation Form (STVBLCK).
2. Enter a block code in the Block Code field.
3. Enter a description of the block code in the Description field.
4. Repeat steps 2 and 3 until all block codes have been established.
5. Click the Save icon.
6. Click the Exit icon.
© SunGard 2004-2008
Banner Student General Student Training Workbook
Page 21
Campus Code Validation
Purpose
Use the Campus Code Validation Form (STVCAMP) to create, update, insert, and delete
campus codes, such as Main Campus, Downtown Campus, or Foreign Campus. This form is
used by other forms to validate the campus codes. You can create or update these codes
only from this form. The District field is validated against the District/Division Code
Validation Form (GTVDICD).
Note: All Banner systems share this validation form. You should coordinate with other
Banner system users at your institution when deciding what codes are used on this form.
Banner form
© SunGard 2004-2008
Banner Student General Student Training Workbook
Page 22
Steps
Follow these steps to create a campus code.
1. Access the Campus Code Validation Form (STVCAMP).
2. Enter campus code in the Code field.
Note: Once a campus code record has been saved, the code entered in this field
cannot be changed. Once this code has been used in any other record, the
campus code record cannot be deleted
3. Enter a description of the campus in the Description field.
4. Enter the code of the district or division with which the campus is associated in the
District field.
5. Click the Save icon.
6. Click the Exit icon.
© SunGard 2004-2008
Banner Student General Student Training Workbook
Page 23
Combined Academic Standing Code Validation
Purpose
The Combined Academic Standing Code Validation Form (STVCAST) is used to create and
define valid combined academic standing codes. The combined academic standing code is
defined by a combination of an academic standing code and a progress evaluation code.
Note: Calculated code displays in the General Student record.
Banner form
© SunGard 2004-2008
Banner Student General Student Training Workbook
Page 24
Steps
Follow these steps to create a combined academic standing code.
1. Access the Combined Academic Standing Code Validation Form (STVCAST).
2. Enter a two-digit combined academic standing code in the Code field.
3. Enter a description of the code in the Description field.
4. Click the Prohibit Registration checkbox if this code means that the student is
prohibited from registering for additional courses.
5. Enter a number in the Minimum Hours field for which a student must enroll when
under this academic standing code.
6. Enter a number in the Maximum Hours field for which a student may enroll when
under this academic standing code.
7. Enter a number in the Voice Message field to assign a number to the recorded
message that describes the academic standing code for telephone applications.
8. Do not check the System Required checkbox.
Note: If the System Required checkbox is checked, the validation table record
cannot be deleted.
9. Click the Save icon.
Result: Banner will fill in the User ID and Activity Date fields.
10. Click the Exit icon.
© SunGard 2004-2008
Banner Student General Student Training Workbook
Page 25
Cohort Code Validation
Purpose
You can use the Cohort Code Validation Form (STVCHRT) to create, update, insert, and
delete cohort codes used in the Recruiting, Admissions, General Student, and Academic
History modules. These codes represent a cohort grouping assigned to students based on
user-defined criteria. These codes provide a tracking mechanism for Student Right to Know
reporting. You may only create or update cohort codes from this form.
Banner form
© SunGard 2004-2008
Banner Student General Student Training Workbook
Page 26
Steps
Follow these steps to create a cohort code.
1. Access the Cohort Code Validation Form (STVCHRT).
2. Enter a code in the Cohort Code field.
3. Enter a description of the code in the Description field.
4. Select a term in the Start Term field.
5. Select an expected graduation term for this cohort in the End Term field.
6. Select the expected degree level for this cohort in the Degree Level field. This field is
optional.
7. Click the Print Indicator checkbox to have data about this cohort included in printed
reports.
8. Click the Save icon.
9. Click the Exit icon.
© SunGard 2004-2008
Banner Student General Student Training Workbook
Page 27
Class Code Validation
Purpose
Use the Class Code Validation Form (STVCLAS) to create, update, insert, and delete class
codes.
Examples: Freshmen, Sophomore, First Year Law, Professional, etc.
Banner form
© SunGard 2004-2008
Banner Student General Student Training Workbook
Page 28
Steps
Follow these steps to create a class code.
1. Access the Class Code Validation Form (STVCLAS).
2. Enter a two-character code in the Class Code field.
3. Enter a description of the code in the Description field.
4. Enter an EDI equivalent value in the EDI Eqv field. This field is optional.
Note: The EDI Eqv (Equivalent) field is used to assign the EDI
SPEEDE/ExPRESS class code values to the institution's class codes. The EDI
equivalent value will be used in the transmission of transcript information
electronically via EDI. These values are defined in the EDI SPEEDE/ExPRESS
Implementation Guide under data element #1131
5. Enter an LMS equivalent value in the LMS Eqv field. This field is optional.
Note: The LMS Eqv (Equivalent Class Code) field is used to display the IA-PLUS
Loan Management System (LMS) class code values that are equivalent to the
Banner class codes. These codes are not validated. The translation to these
LMS codes occurs during the LMS transaction feed interface from Banner
Financial Aid. For more information, please refer to the Financial Aid User Guide
or the IA-PLUS Loan Management System User Manual.
6. Click the Save icon.
7. Click the Exit icon.
© SunGard 2004-2008
Banner Student General Student Training Workbook
Page 29
Comment Type Code Validation
Purpose
You can use the Comment Type Code Validation Form (STVCMTT) to create, update, insert,
and delete comment types and their respective codes (i.e., General Comment, Special
Needs, or Added via ACT Tape). This form is used by other forms to validate the comment
types. You can only create or update the comment types from this form.
Banner form
© SunGard 2004-2008
Banner Student General Student Training Workbook
Page 30
Steps
Follow these steps to create a comment type code.
1. Access the Comment Type Code Validation Form (STVCMTT).
2. Enter a three-digit comment type code in the Code field.
3. Enter a description of the code in the Description field.
4. Click the Save icon.
5. Click the Exit icon.
© SunGard 2004-2008
Banner Student General Student Training Workbook
Page 31
Communication Plan Code Validation
Purpose
You can use the Communication Plan Code Validation Form (STVCPLN) to create, update,
insert, and delete communication plan codes used in the Recruiting, Admissions, and
General Student modules. You may only create or update communication plan codes from
this form.
Banner form
Steps
Follow these steps to create a communication plan code.
1. Access the Communication Plan Code Validation Form (STVCPLN).
2. Enter a four-character communication plan code in the Code field.
3. Enter a description of the code in the Description field.
4. Click the Save icon.
5. Click the Exit icon.
© SunGard 2004-2008
Banner Student General Student Training Workbook
Page 32
Cohort Reason Code Validation
Purpose
Use the Cohort Reason Code Validation Form (STVCREA) to create, update, insert, and
delete cohort reason codes such as Peace Corps, Church Mission, Military Assignment.
These codes are used in conjunction with an inactivation of a cohort for a student to identify
the reason for the inactivation. You may only create or update cohort reason codes from
this form.
Banner form
Steps
Follow these steps to create a cohort reason code.
1. Access the Cohort Reason Code Validation Form (STVCREA).
2. Enter a four-character code in the Code field.
3. Enter a description of the code in the Description field.
4. Repeat steps 2 and 3 until all cohort reasons are entered.
5. Click the Save icon.
6. Click the Exit icon.
© SunGard 2004-2008
Banner Student General Student Training Workbook
Page 33
Contact Type Code Validation
Purpose
Use the Contact Type Code Validation Form (STVCTYP) to create, update, insert, and delete
recruiting contact type codes (i.e., Campus Visit, College Night, or Merit List Letter, etc.).
Note: Several forms in the Recruiting module and the Interface Validation Form (STVINFC)
use this form to validate recruiting contact type codes. You may only create or update
these codes from this form.
Banner form
© SunGard 2004-2008
Banner Student General Student Training Workbook
Page 34
Steps
Follow these steps to create a contact type code.
1. Access the Contact Type Code Validation Form (STVCTYP).
2. Enter a three-character contact type code in the Code field.
3. Enter a description of the code in the Description field.
4. Click the Save icon.
5. Click the Exit icon.
© SunGard 2004-2008
Banner Student General Student Training Workbook
Page 35
Student CARE Number of Dependents
Validation
Purpose
Use the Student CARE Number of Dependents Validation Form (STVDEPS) to create,
update, insert, and delete codes which indicate a CARE student’s number of dependent
children. You can create or update these codes only from this form.
Banner form
Steps
Follow these steps to create a Student CARE Number of Dependents code.
1. Access the Student CARE Number of Dependents Validation Form (STVDEPS).
2. Enter a one-character code of the dependent-children number in the Code field.
Note: Once a dependent-children number code record has been saved, the code
entered in this field cannot be changed. Once this code has been used in any
other record, the dependent-children number code record cannot be deleted.
3. Enter a description of the dependent-children number in the Description field.
4. Click the Save icon.
5. Click the Exit icon.
© SunGard 2004-2008
Banner Student General Student Training Workbook
Page 36
Disability Type Code Validation
Purpose
Use the Disability Type Code Validation Form (STVDISA) to create, update, insert, and
delete disability codes, such as Blind, Multiple Sclerosis, Hearing Impaired, and so forth.
You can create or update these codes only from this form.
Note: All Banner systems share this validation form. You should coordinate with other
Banner system users at your institution when deciding what codes are used on this form.
Banner form
Steps
Follow these steps to create a disability code.
1. Access the Disability Code Validation Form (STVDISA).
2. Enter a two-character code in the Code field.
Note: Once a disability type code record has been saved, the code entered in
this field cannot be changed. Once this code has been used in any other record,
the disability type code record cannot be deleted.
3. Enter a description of the code in the Description field.
4. Click the Save icon.
5. Click the Exit icon.
© SunGard 2004-2008
Banner Student General Student Training Workbook
Page 37
Degree Level Code Validation
Purpose
Use the Degree Level Code Validation Form (STVDLEV) to create, update, insert, and delete
degree level codes (Associate, Bachelor, Master, etc.). Other forms use this form to validate
the degree level codes. You may only create or update degree level codes from this form.
Note: All Banner systems share this validation form. You should coordinate with other
Banner system users at your institution when deciding what codes are used on this form.
Banner form
© SunGard 2004-2008
Banner Student General Student Training Workbook
Page 38
Steps
Follow these steps to create a degree level code.
1. Access the Degree Level Code Validation Form (STVDLEV).
2. Enter a two-character degree level code in the Code field.
3. Enter a description in the Description field.
4. Enter a number in the Numeric Value field.
Note: The Numeric Value field is used to determine a ranking value for the
degree level, which is used in the Cohorts and Student Right to Know tracking
processes. The numeric value should be established with the lowest degree level
having the lowest value and the highest degree level having the highest value.
5. Repeat steps 2-4 to add more degree codes.
6. Click the Save icon.
7. Click the Exit icon.
© SunGard 2004-2008
Banner Student General Student Training Workbook
Page 39
Employer Code Validation
Purpose
Use the Employer Code Validation Form (STVEMPL) to maintain employer codes which
represent the employer's name, address, and phone number. Other forms use this form to
validate this employer information. You may only create or update these codes from this
form.
Note: When a valid ZIP or postal code is selected from the ZIP/Postal Code Validation Form
(GTVZIPC) and entered in the ZIP/PC field, the combination of City, State/Province, and
Nation information which exists in GTVZIPC will default into the appropriate fields. The
related information does not default in when the ZIP/Postal Code is entered manually.
Banner form
© SunGard 2004-2008
Banner Student General Student Training Workbook
Page 40
Steps
Follow these steps to create an employer code.
1. Access the Employer Code Validation Form (STVEMPL).
2. Perform an Insert Record function.
3. Enter up to a four-character employer code in the Code field.
4. Enter the employer name in the un-named field.
5. Enter the street address in the Street Line 1 field.
6. Enter the city in the City field.
7. Select the state or province code in the State or Province field.
8. Enter 157 in the Nation field for the United States of America.
9. Select a zip or postal code in the Zip or Postal Code field.
10. Enter a phone number in the Phone field.
11. Click the Save icon.
12. Click the Exit icon.
© SunGard 2004-2008
Banner Student General Student Training Workbook
Page 41
Eligibility Validation
Purpose
You can use the Eligibility Code Validation Form (STVELIG) to create, update, insert, and
delete eligibility codes. These codes are used in Student Right to Know tracking by the
Student Sport Form (SGASPRT) in the General Student module. You may only create or
update these codes from this form.
Banner form
Steps
Follow these steps to create an eligibility code.
1. Access the Eligibility Validation Form (STVELIG).
2. Enter a two-character code in the Code field.
3. Enter a description of the code in the Description field.
4. Click the Save icon.
5. Click the Exit icon.
© SunGard 2004-2008
Banner Student General Student Training Workbook
Page 42
Education Opportunity Prog/Serv Status
Validation
Purpose
Use the Education Opportunity Prog/Serv Status Validation Form (STVEOPS) to create,
update, insert, and delete EOPS (Educational Opportunity Programs and Services) status
codes, such as No Service, Student is Eligible, or Student is Not Eligible. This form is used
by the Educational Opportunity Programs and Services Form (SGAEOPS) to validate the
EOPS status codes. You can create or update these type codes only from this form.
Banner form
© SunGard 2004-2008
Banner Student General Student Training Workbook
Page 43
Steps
Follow these steps to create an EOPS (Educational Opportunity Programs and Services)
status code.
1. Access the Education Opportunity Prog/Serv Status Validation Form (STVEOPS).
2. Enter a two-character code of the EOPS status in the Code field.
Note: Once an EOPS status code record has been saved, the code entered in
this field cannot be changed. Once this code has been used in any other record,
the EOPS status code record cannot be deleted.
3. Enter a description of the EOPS status in the Description field.
4. Click the Save icon.
5. Click the Exit icon.
© SunGard 2004-2008
Banner Student General Student Training Workbook
Page 44
Eligibility Factor Validation
Purpose
Use the Eligibility Factor Validation Form (STVESEL) to create, update, insert, and delete
eligibility factor codes, such as: Did not graduate HS NO GED; Financial Consideration; H.S.
GPA below 2.5; and so on. The Education Opportunity Programs and Services Form
(SGAEOPS) uses this form to validate eligibility factors. You can create or update these
codes only from this form.
Banner form
© SunGard 2004-2008
Banner Student General Student Training Workbook
Page 45
Steps
Follow these steps to create an eligibility factor code.
1. Access the Eligibility Factor Validation Form (STVESEL).
2. Enter a two-character code for the eligibility factor in the Code field.
Note: Once an eligibility factor code record has been saved, the code entered in
this field cannot be changed. Once this code has been used in any other record,
the eligibility factor code record cannot be deleted.
3. Enter a description of the eligibility factor in the Description field.
4. Click the Save icon.
5. Click the Exit icon.
© SunGard 2004-2008
Banner Student General Student Training Workbook
Page 46
Level Code Validation
Purpose
Use the Level Code Validation Form (STVLEVL) to create, update, insert, and delete level
codes, such as No Level Declared, Undergraduate, Non-Matriculated Graduate, and so on.
Several forms in various modules use this form to validate the level codes. You can create
and update these codes only from this form.
Banner form
© SunGard 2004-2008
Banner Student General Student Training Workbook
Page 47
Steps
Follow these steps to create a level code.
1. Access the Level Code Validation Form (STVLEVL).
2. Enter a two-character code of the level in the Code field.
Note: Once a level code record has been saved, the code entered in this field
cannot be changed. Once this code has been used in any other record, the level
code record cannot be deleted.
3. Enter a description of the level in the Description field.
4. Click the CEU Ind (Continuing Education Indicator) checkbox if the level is a CEU level.
5. Enter a voice response message number, if appropriate, in the Voice Msg field.
6. Enter an EDI equivalent in the EDI Equiv field, if appropriate.
Note: This field is used to assign the EDI SPEEDE/ExPRESS level code values to
an institution's level codes for the level of coursework which is reflected in the
GPA and hours. When an institutional code is not equated with an EDI code, this
field should be blank. The EDI equivalent value is used in the transmission of
transcript information electronically via EDI.
7. Click the Save icon.
8. Click the Exit icon.
© SunGard 2004-2008
Banner Student General Student Training Workbook
Page 48
Student CARE Marital Status Validation
Purpose
Use the Student CARE Marital Status Validation Form (STVMARS) to create, update, insert,
and delete codes which indicate the marital status of a CARE student. You can create and
update these codes only from this form.
Banner form
© SunGard 2004-2008
Banner Student General Student Training Workbook
Page 49
Steps
Follow these steps to create a student CARE marital status code.
1. Access the Student CARE Marital Status Validation Form (STVMARS).
2. Enter a one-character code of the marital status in the Code field.
Note: Once a marital status code record has been saved, the code entered in
this field cannot be changed. Once this code has been used in any other record,
the marital status code record cannot be deleted.
3. Enter a description of the marital status in the Description field.
4. Click the Save icon.
5. Click the Exit icon.
© SunGard 2004-2008
Banner Student General Student Training Workbook
Page 50
Medical Code Validation
Purpose
Use the Medical Code Validation Form (STVMEDI) to create, update, insert, and delete
medical codes, such as Blind, Deaf, Prosthetic Limb, and so on. The Medical Information
Form (GOAMEDI) uses this form to validate the medical codes. You can create and update
these codes only from this form.
Note: All Banner systems share this validation form. You should coordinate with other
Banner system users at your institution when deciding what codes are used on this form.
Banner form
© SunGard 2004-2008
Banner Student General Student Training Workbook
Page 51
Steps
Follow these steps to create a medical code.
1. Access the Medical Code Validation Form (STVMEDI).
2. Enter up to ten-characters for the code of the type of disability in the Code field.
Note: Once a medical code record has been saved, the code entered in this field
cannot be changed. Once this code has been used in any other record, the
medical code record cannot be deleted.
3. Enter a description of the type of disability in the Description field.
4. Click the Save icon.
5. Click the Exit icon.
© SunGard 2004-2008
Banner Student General Student Training Workbook
Page 52
Originator Code Validation
Purpose
Use the Originator Code Validation Form (STVORIG) to create, update, insert, and delete
originator codes, such as Student Accounts Office, Bursar's Office, Dean of Students, and so
on. Forms in several modules use this form to validate the originator codes. You can
create and update these codes only from this form.
Note: The value AUTO, for Generated Automatically, is a required value on this form when
CAPP processing is in use.
Banner form
© SunGard 2004-2008
Banner Student General Student Training Workbook
Page 53
Steps
Follow these steps to create an originator code.
1. Access the Originator Code Validation Form (STVORIG).
2. Enter a four-character code of the originator in the Code field.
Note: Once an originator code record has been saved, the code entered in this
field cannot be changed. Once this code has been used in any other record, the
originator code record cannot be deleted.
3. Enter a description of the originator in the Description field.
4. Click the Save icon.
5. Click the Exit icon.
© SunGard 2004-2008
Banner Student General Student Training Workbook
Page 54
Progress Evaluation Code Validation
Purpose
Use the Progress Evaluation Code Validation Form (STVPREV) to create and define valid
progress evaluation codes.
Note: Calculated code displays in the General Student record.
Banner form
Steps
Follow these steps to create a progress evaluation code.
1. Access the Progress Evaluation Code Validation Form (STVPREV).
2. Enter a two-character progress evaluation code in the Code field.
3. Enter a description of the code in the Description field.
4. Enter a number in the Voice Message field to assign a number to the recorded
message that describes the academic standing code for telephone applications.
5. Click the Save icon.
Result: Banner will fill in the User ID and Activity Date fields.
6. Click the Exit icon.
© SunGard 2004-2008
Banner Student General Student Training Workbook
Page 55
Appointment Result Code Validation
Purpose
Use the Appointment Result Code Validation Form (STVRSLT) to create, update, insert, and
delete appointment result codes such as Attended Interview, Did Not Attend Interview, Late
to Interview.
Note: The Prospect Information Form (SRARECR) and the Person Appointments/Contacts
Form (SOAAPPT) use this form to validate the recruiting appointment result codes. You can
only create and update these codes from this form.
Banner form
Steps
Follow these steps to create an appointment result code.
1. Access the Appointment Result Code Validation Form (STVRSLT).
2. Enter a four-character appointment result code in the Code field.
3. Enter a description of the code in the Description field.
4. Click the Generate Contact checkbox to generate follow-up contact material.
5. Click the Save icon.
6. Click the Exit icon.
© SunGard 2004-2008
Banner Student General Student Training Workbook
Page 56
Athlete Attribute Validation
Purpose
Use the Athlete Attribute Validation Form (STVSAAT) to create, update, insert, and delete
athlete attribute codes.
Note: The Athlete Compliance Form (SGASPRT) and the Mass Entry Athletic Compliance
Form (SGAMSPT) use this form to validate athletic attribute codes. You can only create and
update these codes from this form.
Banner form
Steps
Follow these steps to create an athlete attribute code.
1. Access the Athletic Attribute Validation Form (STVSAAT).
2. Enter a four-character attribute code in the Code field.
3. Enter a description of the code in the Description field.
4. Click the Save icon.
5. Click the Exit icon.
© SunGard 2004-2008
Banner Student General Student Training Workbook
Page 57
Athletic Academic Eligibility Validation
Purpose
Use the Athletic Academic Eligibility Validation Form (STVSAET) to create, update, insert,
and delete athletic academic eligibility codes.
Note: The Athlete Compliance Form (SGASPRT) and the Mass Entry Athletic Compliance
Form (SGAMSPT) use this form to validate athletic attribute codes. You can only create and
update these codes from this form.
Banner form
Steps
Follow these steps to create an athletic academic eligibility code.
1. Access the Athletic Academic Eligibility Validation Form (STVSAEL).
2. Enter a two-character athletic academic eligibility code in the Code field.
3. Enter a description of the code in the Description field.
4. Click the Save icon.
5. Click the Exit icon.
© SunGard 2004-2008
Banner Student General Student Training Workbook
Page 58
Athletic Qualifier Status Validation
Purpose
Use the Athletic Qualifier Status Validation Form (STVSAQS) to create, update, insert, and
delete athletic qualifier status codes.
Note: The Athletic Compliance Form (SGASPRT) use this form to validate athletic qualifier
status codes. You can only create and update these codes from this form.
Banner form
Steps
Follow these steps to create an athletic qualifier status code.
1. Access the Athletic Qualifier Status Validation Form (STVSAQS).
2. Enter a two-character athletic qualifier status code in the Code field.
3. Enter a description of the code in the Description field.
4. Click the Save icon.
5. Click the Exit icon.
© SunGard 2004-2008
Banner Student General Student Training Workbook
Page 59
Athletic Competition Reason Validation
Purpose
Use the Athletic Competition Reason Validation Form (STVSARE) to create, update, insert,
and delete athletic attribute codes.
Note: The Athlete Compliance Form (SGASPRT) use this form to validate athletic
competition reason codes. You can only create and update these codes from this form.
Banner form
Steps
Follow these steps to create an athletic competition reason code.
1. Access the Athletic Competition Reason Validation Form (STVSARE).
2. Enter a four-character athletic competition reason code in the Code field.
3. Enter a description of the code in the Description field.
4. Click the Save icon.
5. Click the Exit icon.
© SunGard 2004-2008
Banner Student General Student Training Workbook
Page 60
Services Provided Validation
Purpose
Use the Services Provided Validation Form (STVSEPR) to create, update, insert, and delete
support services provided codes, such as Services Accepted, Services Provided, or Services
Rejected. The Support Services module uses this form to validate the support services
provided codes. You can create and update these codes only from this form.
Banner form
Steps
Follow these steps to create a services provided code.
1. Access the Services Provided Validation Form (STVSEPR).
2. Enter a two-character code of the support service in the Code field.
Note: Once a support service code record has been saved, the code entered in
this field cannot be changed. Once this code has been used in any other record,
the support service code record cannot be deleted.
3. Enter a description of the support service in the Description field.
4. Click the Save icon.
5. Click the Exit icon.
© SunGard 2004-2008
Banner Student General Student Training Workbook
Page 61
State F/A Eligibility Validation
Purpose
Use the State F/A Eligibility Validation Form (STVSFAE) to create, update, insert, and delete
State F/A Eligibility codes. These codes, which describe the manner in which a student was
accepted into the EOPS (Educational Opportunity Programs and Services) program, are used
by the Educational Opportunity Programs and Services Form (SGAEOPS) for validation. You
can create or update these codes only from this form.
Banner form
© SunGard 2004-2008
Banner Student General Student Training Workbook
Page 62
Steps
Follow these steps to create a State F/A Eligibility code.
1. Access the State F/A Eligibility Validation Form (STVSFAE).
2. Enter a two-character State F/A Eligibility Code in the Code field.
Note: Once a State F/A Eligibility code record has been saved, the code entered
in this field cannot be changed. Once this code has been used in any other
record, the State F/A Eligibility code record cannot be deleted.
3. Enter a description of the State F/A Eligibility in the Description field.
4. Click the Save icon.
5. Click the Exit icon.
© SunGard 2004-2008
Banner Student General Student Training Workbook
Page 63
Service Provider Validation
Purpose
Use the Service Provider Validation Form (STVSPRV) to create, update, and delete the
service provider codes, such as Training Center, Counseling Center, Learning Center). The
Support Services module uses this form to validate the support services provider codes.
You can create and update these codes only from this form.
Banner form
© SunGard 2004-2008
Banner Student General Student Training Workbook
Page 64
Steps
Follow these steps to create a service provider code.
1. Access the Service Provider Validation Form (STVSPRV).
2. Enter up to six characters for the service provider code in the Code field.
Note: Once a service provider code record has been saved, the code entered in
this field cannot be changed. Once this code has been used in any other record,
the service provider code record cannot be deleted.
3. Enter a description of the service provider in the Description field.
4. Click the Save icon.
5. Click the Exit icon.
© SunGard 2004-2008
Banner Student General Student Training Workbook
Page 65
Disability Service Code Validation
Purpose
Use the Disability Service Code Validation Form (STVSPSR) to create, update, insert, and
delete disability service codes, such as County Paratransit Service, Hearing Aid Required,
Disabled Student Services, and so on. The Medical Information Form (GOAMEDI) uses this
form to validate the disability service codes. You can create and update these codes only
from this form.
Banner form
Steps
Follow these steps to create a disability service code.
1. Access the Disability Service Code Validation Form (STVSPSR).
2. Enter a two-character code of the disability service in the Code field.
Note: Once a disability service code record has been saved, the code entered in
this field cannot be changed. Once this code has been used in any other record,
the disability service code record cannot be deleted.
3. Enter a description of the disability service in the Description field.
4. Click the Save icon.
5. Click the Exit icon.
© SunGard 2004-2008
Banner Student General Student Training Workbook
Page 66
Sport Status Validation
Purpose
Use the Sport Status Code Validation Form (STVSPST) to create, update, insert, and delete
sport status codes used in the General Student module. The Student Sport Form
(SGASPRT) uses this form to validate the sport status codes. You may only create or
update these codes from this form.
Banner form
Steps
Follow these steps to create a sport status code.
1. Access the Sport Status Code Validation Form (STVSPST).
2. Enter a two-character code in the Code field.
3. Enter a description of the code in the Description field.
4. Check the Active Indicator if the code indicates an active status.
5. Click the Save icon.
6. Click the Exit icon.
© SunGard 2004-2008
Banner Student General Student Training Workbook
Page 67
Service Code Validation
Purpose
Use the Service Code Validation Form (STVSSER) to create, update, insert, and delete
service codes such as Day Care, Career Planning, Transportation. The Support Services
module uses this form to validate service codes. You can create or update services only
from this form.
Banner form
© SunGard 2004-2008
Banner Student General Student Training Workbook
Page 68
Steps
Follow these steps to create a service code.
1. Access the Service Code Validation Form (STVSSER).
2. Enter a four-character service code in the Code field.
Note: Once a service code record has been saved, the code entered in this field
cannot be changed. Once this code has been used in any other record, the
service code record cannot be deleted.
3. Enter a description of the service in the Description field.
4. Enter a two-character code in the Service Type field to further define the service code.
5. Click the Save icon.
6. Click the Exit iicon.
© SunGard 2004-2008
Banner Student General Student Training Workbook
Page 69
Service Result Validation
Purpose
Use the Service Result Validation Form (STVSSRS) to create, update, insert, and delete
student service result codes, such as Promotion Obtained, Job Obtained, Goal Not Met, and
so on. The Support Services module uses this form to validate service result codes. You
can create or update service result codes only from this form.
Banner form
Steps
Follow these steps to create a student service result code.
1. Access the Service Result Validation Form (STVSSRS).
2. Enter a two-character service result code in the Code field.
Note: Once a service result code record has been saved, the code entered in
this field cannot be changed. Once this code has been used in any other record,
the service result code record cannot be deleted.
3. Enter a description of the service result in the Description field.
4. Click the Save icon.
5. Click the Exit icon.
© SunGard 2004-2008
Banner Student General Student Training Workbook
Page 70
Services Status Validation
Purpose
Use the Services Status Validation Form (STVSSST) to create, update, insert, and delete
services status codes, such as In Progress, Service Refused, Referred to Provider). The
Support Services module uses this form to validate service status codes. You can create or
update these codes only from this form.
Banner form
Steps
Follow these steps to create a services status code.
1. Access the Services Status Validation Form (STVSSST).
2. Enter a four-character services status code in the Code field.
Note: Once a services status code record has been saved, the code entered in
this field cannot be changed. Once this code has been used in any other record,
the services status code record cannot be deleted.
3. Enter a description of the services status in the Description field.
4. Click the Save icon.
5. Click the Exit icon.
© SunGard 2004-2008
Banner Student General Student Training Workbook
Page 71
Student Status Code Validation
Purpose
Use the Student Status Code Validation Form (STVSTST) to create, update, insert, and
delete student status codes (i.e., Active, Withdrawn, Inactive Due to Graduation, etc.).
Forms in several modules use this form to validate the student status codes. You can only
create and update these codes from this form.
Banner form
© SunGard 2004-2008
Banner Student General Student Training Workbook
Page 72
Steps
Follow these steps to create a student status code.
1. Access the Student Status Code Validation Form (STVSTST).
2. Enter a two-character code in the Status Code field.
3. Enter a description of the status code in the Description field.
4. Click the Allow Registration checkbox if registration is allowed with the associated
student status.
5. Do not check System Required checkbox.
Note: If the System Required checkbox is checked, the validation table record
cannot be deleted.
6. Select a status in the Curriculum Status field. (This is only necessary if your
institution does not intend to use delivered processes associated with Curriculum
status.)
7. Click the Save icon.
8. Click the Exit icon.
© SunGard 2004-2008
Banner Student General Student Training Workbook
Page 73
Student Type Code Validation
Purpose
Use the Student Type Code Validation Form (STVSTYP) to create, update, insert, and delete
student type codes (i.e., Returning Freshman, Continuing, Transfer, etc.). Several forms in
various modules use this form to validate the student type codes. You can only create and
update these codes from this form.
The following student type codes should be created for IPEDS reporting:
•
Freshman
•
First Time Freshman
•
Unclassified
•
Continuing
•
First Time Graduate
•
First Time Professional
Banner form
© SunGard 2004-2008
Banner Student General Student Training Workbook
Page 74
Steps
Follow these steps to create a student type code.
1. Access the Student Type Code Validation Form (STVSTYP).
2. Enter a one-character code in the Code field.
3. Enter a description of the code in the Description field.
4. Enter a code in the Next Student Type field to identify the student type to be
assigned, if appropriate, when the Student Type Update Report (SHRTYPE) is run. This
value is generally updated from term to term rather than from year to year on the
General Learner Record.
Example: The Next Student Type for A - First Time Freshman would be C Continuing. The Next Student Type for an E - Adult Continuing Education Code
would be E - Adult Continuing Education since the status for this type of student
would not change from year to year.
5. Do not check the System Required.
Note: The System Required checkbox is used to set up a default when
residency is not entered in the Recruiting module, and the prospect record is
pulled to the Admissions module to build the application. If the System
Required checkbox is checked, the validation table record cannot be deleted.
6. Repeat steps 2-5 until all codes are set up.
7. Click the Save icon.
8. Click the Exit icon.
© SunGard 2004-2008
Banner Student General Student Training Workbook
Page 75
Student Element One Validation
Purpose
Use the Student Element One Validation Form (STVSUDA) to create, update, insert, and
delete institutional reporting data elements specific to an institution’s needs for state or local
reporting for a student. This form is one of ten (STVUDA, STVUDB, STVUDC,…,STVUDJ)
used in the General Student module for this purpose. You can create or update values for
Element 1 on the Student Institutional Reporting Requirements Form (SGAUSDF) from the
Student Element One Validation Form (STVSUDA). Elements 2 through 10 are created on
the subsequent respective STVSUDx form.
These validation forms correspond to Elements 1 through 10 on the Student Institutional
Reporting Requirements Form (SGAUSDF). They are all completed in the same manner.
Banner form
© SunGard 2004-2008
Banner Student General Student Training Workbook
Page 76
Steps
Follow these steps to create an institutional reporting data element.
1. Access the Student Element One Validation Form (STVSUDA).
2. Enter up to fifteen characters for the code of the student institutional reporting element
1 in the Code field.
Note: Once a student institutional reporting element code record has been
saved, the code entered in this field cannot be changed. Once this code has
been used in any other record, the student institutional reporting element code
record cannot be deleted.
3. Enter a description of the student institutional reporting element in the Description
field.
4. Click the Save icon.
5. Click the Exit icon.
© SunGard 2004-2008
Banner Student General Student Training Workbook
Page 77
Acceptance Reason Validation
Purpose
Use the Acceptance Reason Validation Form (STVTRAC) to create, update, insert, an EOPS
(Educational Opportunity Programs and Services) reason of acceptance codes for use in the
General Student module. You can create or update these codes only from this form.
Banner form
Steps
Follow these steps to create an EOPS (Educational Opportunity Programs and Services)
reason of acceptance code.
1. Access the Acceptance Reason Validation Form (STVTRAC).
2. Enter a three-character EOPS acceptance reason code in the Code field.
Note: Once an EOPS acceptance reason code record has been saved, the code
entered in this field cannot be changed. Once this code has been used in any
other record, the EOPS acceptance reason code record cannot be deleted.
3. Enter a description of the EOPS acceptance reason in the Description field.
4. Click the Save icon.
5. Click the Exit icon.
© SunGard 2004-2008
Banner Student General Student Training Workbook
Page 78
Veteran Type Code Validation
Purpose
Use the Veteran Type Code Validation Form (STVVETC) to create, update, insert, and delete
veteran type codes (e.g., Chapter 32 Post Vietnam Vet, Other Veteran, ROTC, etc.). The
General Student Form (SGASTDN) uses this form to validate the veteran type codes. You
can only create and update these codes from this form.
Banner form
Steps
Follow these steps to create a veteran type code.
1. Access the Veteran Type Code Validation Form (STVVETC).
2. Enter a one character veteran code in the Code field.
3. Enter a description of the code in the Description field.
4. Click the Save icon.
5. Click the Exit icon.
© SunGard 2004-2008
Banner Student General Student Training Workbook
Page 79
Student EOPS/CARE Withdrawal Reason
Validation
Purpose
Use the Student EOPS/CARE Withdrawal Reason Validation Form (STVWTHD) to create,
update, insert, and delete codes which indicate a student’s reason for withdrawing from the
EOPS (Educational Opportunity Programs and Services) and/or CARE programs for the
following term, as of the end of the reporting term. Examples are Lack of Resources,
Student or Family Problems, Discontinued (Academic Reasons). You can create or update
these codes only from this form.
Banner form
© SunGard 2004-2008
Banner Student General Student Training Workbook
Page 80
Steps
Follow these steps to create a code which indicate a student’s reason for withdrawing from
the EOPS (Educational Opportunity Programs and Services) and/or CARE programs.
1. Access the Student EOPS/CARE Withdrawal Reason Validation Form (STVWTHD).
2. Enter a one-character EOPS/CARE withdrawal reason code in the Code field.
Note: Once an EOPS withdrawal reason code record has been saved, the code
entered in this field cannot be changed. Once this code has been used in any
other record, the EOPS withdrawal reason code record cannot be deleted.
3. Enter a description of the EOPS withdrawal reason in the Description field.
4. Click the Save icon.
5. Click the Exit icon.
© SunGard 2004-2008
Banner Student General Student Training Workbook
Page 81
Student Classification Rules
Purpose
Use the Student Classification Rules Form (SGACLSR) to establish the academic classification
rules based on the range of hours entered and user-defined student attributes. The To
Hours must be greater than the From Hours when creating a rule.
The Class Code Validation Form (STVCLAS), the Level Code Validation Form (STVLEVL), and
the Attribute Validation Form (STVATTR) must be established prior to entering this form.
When attributes are maintained for a rule, then the student must fall within the credit hour
requirement and have the attribute code for the effective term on the Additional Student
Information Form (SGASADD).
Note: Student classification rules must exist for students of all levels. If classification rules
do not exist for a certain level of students, they will not be reported in the Unduplicated
Headcount Report (SFRHCNT).
Banner form
© SunGard 2004-2008
Banner Student General Student Training Workbook
Page 82
Steps
Follow these steps to create a student classification rule.
1. Access the Student Classification Rules Form (SGACLSR).
2. Perform an Insert Record function.
3. Enter a two-character code in the Level Code field.
4. Enter an amount in the From Hours field.
5. Enter an amount in the To Hours field.
6. Select a class code in the Class Code field.
7. Double-click in the Attribute field and select a class standing student attribute code.
This field is optional.
8. Repeat steps 2-7 as needed.
9. Click the Save icon.
10. Click the Exit icon.
© SunGard 2004-2008
Banner Student General Student Training Workbook
Page 83
Self Check
Directions
Use the information you have learned in this section to complete this self-check activity.
Question 1
What is a communication plan?
Question 2
What is a Student’s Right to Know?
Question 3
Name at least two student type codes that should be created on the Student Type Code
Validation Form (STVSTYP) for IPEDS reporting.
© SunGard 2004-2008
Banner Student General Student Training Workbook
Page 84
Answer Key for Self Check
Question 1
What is a communication plan?
A set of rules designed to implement institution preferences regarding who
should receive which materials and when those materials should be sent.
Materials can be generated (letter or label) or published (department
brochures).
Example: All accepted high school students who apply for admissions into the
Education program receive a letter acknowledging acceptance into both the
university and the Education program. However, all accepted high school
students who apply for admissions into the Nursing program receive a letter
acknowledging acceptance into just the university and instructions for next
steps on how to apply at a later time to the Nursing program. Prospective
nursing students also receive a Nursing program brochure along with their
acceptance letter into the university.
Question 2
What is a Student’s Right to Know?
This legislation requires that an institution of higher education annually disclose
information about its student body’s completion and graduation rates.
For more information, refer to Maintaining and Monitoring Student Right to
Know Reporting in Section C: Day-to-Day Operations of this training workbook.
© SunGard 2004-2008
Banner Student General Student Training Workbook
Page 85
Question 3
Name at least two student type codes that should be created on the Student Type Code
Validation Form (STVSTYP) for IPEDS reporting.
The following student type codes should be created for IPEDS reporting:
•
Freshman
•
First Time Freshman
•
Unclassified
•
Continuing
•
First Time Graduate
•
First Time Professional
© SunGard 2004-2008
Banner Student General Student Training Workbook
Page 86
Day-to-Day Operations
Section goal
The purpose of this section is to explain the process and detail the procedures to use the
General Student Module.
Objectives
In this lesson you will learn how to
•
create a general student record
•
use Mass Entry forms to update multiple student records
•
change a major and add a minor
•
process a leave of absence request
•
enter veteran information
•
add or change advisor information
•
enter additional student information
•
enter cooperative education information
•
view a student’s information
•
enter guardian information
•
maintain sports records
•
maintain and monitor Student Right to Know reporting
•
enter disability information
•
enter EOPS information
•
maintain required information
© SunGard 2004-2008
Banner Student General Student Training Workbook
Page 87
•
perform purge processes.
© SunGard 2004-2008
Banner Student General Student Training Workbook
Page 88
Process Introduction
Introduction
The Banner System requires that there be an Active General Student Record for the term
before a student can register or be registered for courses and have tuition and fees
assessed. The validation tables and rules for the General Student Module are used by the
system to ensure that the student is registered into the correct courses and is assessed the
correct tuition and fees.
Flow diagram
This flow chart highlights specifically what the General Student Module process would look
like on a day to day basis.
© SunGard 2004-2008
Banner Student General Student Training Workbook
Page 89
What happens
The stages of the process are described in this table.
Stage
Description
Registrar
1
Defines general student validation tables and rules
2
Creates Student records by offering a seat to the student and the student,
then accepting the seat
Registrar/Academic Records/Veteran Admin Office
3
Maintain and Update Student Records
4
Produce General Student reports and run General Student related processes
(e.g., The Student Right to Know Report-SGRKNOW, Student ReportSGRSTDN and the Veteran report-SGRVETN Processes: Hold Purge-SGPHOLD,
General Student Purge-SGPSTDN, Cooperative Education Purge-SGPCOOP,
Student Block Load Process-SGPBLCK and Cohort Load Process-SGRCHRT)
© SunGard 2004-2008
Banner Student General Student Training Workbook
Page 90
Creating a General Student Record
Purpose
Information about a student is initially created when a decision is entered on the Admissions
Decision Form (SAADCRV), which indicates that the applicant accepts the institution's offer
of admission, or when an applicant is admitted via the Quick Entry Form (SAAQUIK). An
applicant must accept the institution's offer of admissions to generate an initial general
student record or the Quick Entry Form must have been processed for the student. This
record may not be deleted if registration or academic history records exist for a term or if
associated sports records exist.
The Admissions Decision Form (SAADCRV) is used to enter decisions for an admissions
application. Once a decision is entered or calculated to indicate that the student has
accepted and plans to attend, a general student record is automatically created using the
information entered on the application. This record allows the student to be eligible to
register.
Banner form
© SunGard 2004-2008
Banner Student General Student Training Workbook
Page 91
Steps
Follow these steps to create a General Student record.
Note: A student’s application information must exist or be entered on the Admissions
Application Form (SAAADMS) to use this form.
1. Access the Admissions Decision Form (SAADCRV).
2. Click the down arrow next to the ID field.
3. Enter a few characters of a last name with the wildcard (%) at the end in the Last
Name field and press enter to begin the search.
4. Click on the drop-down by the Results field in the pop-up box to select your applicant.
5. Scroll through the list of names to find the applicant you created and used during the
Admissions Training.
Note: Make a note of the student’s name and ID because they will be used in
future lessons. Each participant must pick a unique student.
6. Perform a Next Block function.
7. Using the scroll bar on the right in the Application Summary block, select the application
of interest.
8. Select a decision code in the Decision Code field. The decision entered should have
the Applicant Acceptance checkbox checked in order for the General Student (Learner)
record to be created.
9. Click the Save icon.
Note: You will see the message, “Note: Student record created for admissions
entry term.”
10. Click the OK button.
Note: You will see the message, “Transaction complete. 1 record applied and
saved.”
11. Click the OK button.
12. Click the Exit icon.
© SunGard 2004-2008
Banner Student General Student Training Workbook
Page 92
Using the Quick Entry Form
Purpose
The Quick Entry Form (SAAQUIK) is used to provide a way to enter and register persons on
the system with minimal effort. This form is combined with the General Person
Identification Form (SPAIDEN), which allows a person to be added to the system along with
addresses (optional). It can also create recruiting and admissions records at the user's
option, and will automatically create a student record that is required for registration.
Default rules for a specific level of applicant can be defined on the Quick Entry Rules Form
(SAAQKER) so that when the ID, Term and Level are entered into the key block, the
majority of data will be defaulted in from SAAQKER.
Banner form
© SunGard 2004-2008
Banner Student General Student Training Workbook
Page 93
Steps
Follow these steps to create a General Student record using the Quick Entry Form.
1. Access the Quick Entry Form (SAAQUIK).
2. Select Generate ID in the Options menu, or enter GENERATED in the ID field and
press Enter to open the Current Identification window.
Result: The Common Matching Entry window opens.
3. Select a Matching Source.
4. Enter values in the Last Name, First Name, and Middle Name fields.
Note: Each participant must create a unique student. Make a note of the
student’s name and ID because they will be used in future lessons.
5. Click the Save or Duplicate Check icon.
6. If there are no matches, select Create New and you will be returned to SAAQUIK.
7. Double-click in the Term field to select a term.
8. Double-click in the Level field and select Undergraduate.
9. Perform a Next Block function.
© SunGard 2004-2008
Banner Student General Student Training Workbook
Page 94
Result: You may receive the message “Defaulting values from Quick Entry Rules
Form.” Note that many of the field values will default in based on the rules that
have been created.
10. Click either the Enter Address checkbox or the Enter Biographical checkbox if you
want to go directly to those tabs to enter that information.
Result: The appropriate tab opens.
11. Complete steps 12 through 20 to enter address information.
12. Click the Enter Address checkbox and enter a date in the From Date field, if desired.
13. Select an address type in the Address Type field.
14. Enter a street address in the Street Line 1 field.
15. Enter a city in the City field.
16. Enter a state or province code in the State or Province field.
17. Enter a zip or postal code in the Zip or Postal Code field.
18. Select a telephone type in the Telephone Type field.
19. Enter a telephone number in the Telephone field.
Complete steps 20 through 30 to enter biographical information.
20. Click the Enter Biographical checkbox and select either the Male or Female Gender
radio button as appropriate.
21. Enter a date in DD-MMM-YYYY (two digit day, three character month, four digit year)
format in the Birth Date field.
22. Enter the appropriate number in the SSN/SIN/TIN field.
23. Select a citizenship code in the Citizenship field.
Note: Your institution may not request this information. If it does not, the field
can be left blank.
24. Enter the marital status in the Marital Status field.
25. Enter the religion in the Religion field, if known.
26. Enter the legacy information in the Legacy field, if known.
27. Select an ethnicity code in the New Ethnicity field.
© SunGard 2004-2008
Banner Student General Student Training Workbook
Page 95
Note: Your institution may not request this information. If it does not, the field
can be left blank.
If you have confirmed this information, click the Ethnicity and Race
Confirmed checkbox and enter a confirmed date in the Confirmed Date field.
28. Enter the appropriate veteran information in the Veteran File Number, Veteran
Category, and Active Duty Separation Date fields, if this information applies.
Otherwise, you may leave these fields blank.
29. Perform a Next Block function to access the Race block.
Result: Information in the fields may default based on what you have selected in
the Ethnicity field.
30. Enter additional race records in the Race field, if appropriate.
Note: You cannot change an existing race.
31. Access the Quick Admit tab.
Note: Some of these fields may have defaulted in, depending on the rules that
have been created. If that is the case, you will not need to complete all fields.
32. Enter a student type code in the Student Type field.
Example: A (1st Time Freshman)
33. Enter a student status code in the Student Status field.
Example: AS (Active)
34. Enter a residence code in the Residence field.
35. Enter F if the student is full time or P if the student is part time in the Full or Part
Time field. This field is optional.
36. Select a rate code in the Rate field. This field is optional.
37. Select an education goal in the Education Goal field. This field is optional.
38. Select an education level in the Education Level field. This field is optional.
39. Click the Create Application Record checkbox.
40. Select the type of admissions in the Admission Type field.
41. Select an application status code in the Application Status field.
42. Select an admissions decision in the Admission Decision field.
© SunGard 2004-2008
Banner Student General Student Training Workbook
Page 96
43. Perform a Next Block function to access the Curriculum block.
44. Select a catalog term in the Catalog Term field.
45. Enter a priority number that identifies curriculum rank in the Priority field.
46. Select a program from the All Program Codes option in the Program field.
Note: The College, Level, and Degree fields may be filled in for you based on
the program selected. If not, select values for these fields.
47. Select a campus code in the Campus field.
48. Enter a field of study priority number in the Priority field.
49. Access the Field of Study block.
50. Select Major in the Type field.
51. Select a status in the Status field.
52. Select a major, minor, or concentration code in the Field of Study field.
53. Click the Save icon.
54. Click the OK button to acknowledge that the records have been saved.
Result: The Communication Plan window opens.
55. Click the Save icon to save the communication plan.
56. Click the Return button.
57. Click the Exit icon.
© SunGard 2004-2008
Banner Student General Student Training Workbook
Page 97
Changing a Major and Adding a Minor
Purpose
The General Student Form (SGASTDN) is used to maintain current and historical information
about a student.
The General Student Form also contains comments, activities, and veteran information.
This record may not be deleted if registration or academic history exists for the term or if
associated sports records exist.
Use the Curriculum window on the General Student Form (SGASTDN) to enter curriculum
information for the student. You may view lists of attached majors, departments, minors,
and concentrations by accessing the Help drop down menu and choosing the Help function
from the corresponding Major, Department, Minor, and Concentration fields in this
window. You may also double-click in the field and select the appropriate choice from the
Option List.
Banner form
© SunGard 2004-2008
Banner Student General Student Training Workbook
Page 98
Steps
Follow these steps to complete the process of changing a major and adding a minor for the
student created in the previous exercises.
Note: It is important to ensure that the major a student is being changed to is valid for the
Program that the student is in. Appropriate combinations of major to program are
established on the Curriculum Rules form (SOACURR).
1. Access the General Student Form (SGASTDN).
2. Enter the ID of the student in the ID field.
Note: If you have forgotten the ID of your student, click the down arrow to find
your student.
3. Select the term where the change will take place in the Term field.
4. Perform a Next Block function.
5. Perform a Duplicate Record function.
6. Click the down arrow in the New Term field.
7. Select Create New Effective Term from the by the New Term LOV list.
8. Click the down arrow in the New Term field again.
9. Select List of Terms .
10. Double-click on a term to return a term to the New Term field.
11. Click the Save icon.
12. Select the Curricula tab.
Result: You are taken to the Curricula tab, which contains two additional tabs:
Curriculum and Field of Study.
© SunGard 2004-2008
Banner Student General Student Training Workbook
Page 99
13. Click the Replace icon while on the curriculum row to be inactivated (it must currently
be active and the most recent record for the priority).
Result: The icon inactivates the curriculum row and inserts a new curriculum
row for the new curriculum record.
14. Complete these fields: Priority, Program, Level, Campus (optional), Degree and
College.
15. Perform a Next Block function.
Result: You are taken to the Field of Study tab, within the Curricula tab.
16. Verify that the correct type is selected in the Type field.
17. Complete additional fields that have not already been completed, if necessary. For
example, you may want to enter information in the Attached to Major and Full or
Part Time fields, if appropriate.
Note: At least one active row with Type = Major must exist. Without a major,
you will not be able to save the record.
18. Click the Save icon.
19. Click the Exit icon.
© SunGard 2004-2008
Banner Student General Student Training Workbook
Page 100
Processing a Leave of Absence Request
Purpose
The General Student Form (SGASTDN) is used to maintain current and historical information
about a student.
The Miscellaneous Student Information window on the General Student Form (SGASTDN) is
used to enter miscellaneous information for the student, such as practical training and leave
information.
Banner form
© SunGard 2004-2008
Banner Student General Student Training Workbook
Page 101
Steps
Follow these steps to process a leave of absence request.
1. Access the General Student Form (SGASTDN).
2. Enter the ID of your student in the ID field.
Note: If you have forgotten the ID of your student, click the down arrow find
your student.
3. Select a term in the Term field.
4. Perform a Next Block function.
5. Select the Miscellaneous tab.
6. Select a code in the Leave of Absence field.
7. Enter a start date in the From Date field.
8. Enter an end date in the To Date field.
9. Click the Save icon.
10. Click the Exit icon.
© SunGard 2004-2008
Banner Student General Student Training Workbook
Page 102
Entering Veteran Information
Purpose
The General Student Form (SGASTDN) is used to maintain current and historical information
about a student.
The Veteran Information window is used to maintain veteran information.
Banner form
© SunGard 2004-2008
Banner Student General Student Training Workbook
Page 103
Steps
Follow these steps to enter veteran information.
1. Access the General Student Form (SGASTDN).
2. Enter the ID of your student in the ID field.
Note: If you have forgotten the ID of your student, click the down arrow to find
your student.
3. Select a term in the Term field.
4. Perform a Next Block function.
5. Select the Veteran tab.
6. Select a code in the Veteran Type field.
7. Select a term in the Term field.
8. Enter a number in the Certification Credit Hours field.
9. Enter a date in DD-MM-YYYY format in the Certification Date field.
10. Click the Save icon.
11. Click the Exit icon.
© SunGard 2004-2008
Banner Student General Student Training Workbook
Page 104
Adding or Changing Advisor Information
Purpose
The Multiple Advisors Form (SGAADVR) allows a student to be associated with an unlimited
number of advisors for an effective term range. It also allows the user to view a student's
existing advisors for an effective term range. Multiple advisors may be designated for any
type of student, not just graduate students. A General Student record must exist to
associate an advisor with a student. The user must designate a primary advisor if multiple
advisors exist. If the primary advisor is deleted, the secondary advisor defaults into the
primary place.
Banner form
© SunGard 2004-2008
Banner Student General Student Training Workbook
Page 105
Steps
Follow these steps to complete the process of adding an advisor to your student’s record.
1. Access the Multiple Advisors Form (SGAADVR).
2. Enter the ID of the student in the ID field.
Note: If you have forgotten the ID of your student, click the down arrow to find
your student.
3. Select a term in the Term field.
4. Perform a Next Block function.
5. Select the down arrow in the ID field in the Advisor Information block.
Result: The Faculty/Advisor Query Form (SIAIQRY) opens.
6. Enter part of the advisor’s last name in the Last Name field.
7. Perform an Execute Query function.
8. Double-click in the ID field to return the information to SGAADVR.
9. Select a code in the Advisor Type field. This field is optional.
10. Click the Primary Indicator checkbox to indicate that this is the student’s primary
advisor.
11. Click the Save icon.
12. Click the Exit icon.
© SunGard 2004-2008
Banner Student General Student Training Workbook
Page 106
Entering Additional Student Information
Purpose
The Additional Student Information Form (SGASADD) maintains cohort codes, as well as
attributes, which are assigned to the student by effective term. The cohort information
records and attributes can be created manually on this form or may be rolled from the
Admissions module upon creating the student record. The person must be defined as a
student for a term that is encompassed by the effective term range for that student on the
General Student Form (SGASTDN).
Banner form
© SunGard 2004-2008
Banner Student General Student Training Workbook
Page 107
Steps
Follow these steps to add cohorts and attributes for your student.
1. Access the Additional Student Information Form (SGASADD).
2. Enter the ID of the student in the ID field.
Note: If you have forgotten the ID of your student, click the down arrow to find
your student.
3. Select a term in the Term field.
4. Select a code in the Cohort Code field.
Result: The From Term and To Term fields default.
5. Select a student attribute code in the Attribute field.
6. Click the Save icon.
7. A box will pop up that says “Changing Student Attribute may impact Registration Fee
Assessment.” Click the OK button.
8. Click the Exit icon.
© SunGard 2004-2008
Banner Student General Student Training Workbook
Page 108
Entering Cooperative Education Information
Purpose
The Cooperative Education Form (SGACOOP) is used to maintain data pertaining to the
student's cooperative education positions. The form contains employer information as well
as comments on the duties involved in each position.
A person must be an active student for the term and level for which the cooperative
education job is being entered. Multiple records for the term/level may be entered. The
student's record cannot be deleted if cooperative education information exists; the
cooperative education record must be deleted first.
Note: Employers entered must exist on the Employer Code Validation Form (STVEMPL).
Banner form
© SunGard 2004-2008
Banner Student General Student Training Workbook
Page 109
Steps
Follow these steps to add cooperative education information to your student’s record.
1. Access the Cooperative Education Form (SGACOOP).
2. Enter the ID of the student in the ID field.
Note: If you have forgotten the ID of your student, click the down arrow to find
your student.
3. Select a term in the Term field.
4. Perform a Next Block function.
5. Select a level code in the Level field.
6. Select a code in the Cooperative Code field.
7. Select a course registration number for the internship in the CRN field.
NOTE: The section must be one that has a schedule type that permits Co-Ops and
the student must already be registered for the section.
8. Enter a start date in the Begin Date field.
9. Enter an end date in the End Date field.
10. Select an employer code in the Employer Code field.
11. Enter a name in the Contact Name field.
12. Enter the person’s title in the Title field.
13. Enter the person’s phone number in the Contact Phone field.
14. Click the Save icon.
15. Click the Exit icon.
© SunGard 2004-2008
Banner Student General Student Training Workbook
Page 110
Creating Communication Plan Information
Purpose
Communication Plans are designed to implement an institution’s rules regarding who should
receive which materials and when those materials should be sent. A material can be
generated (letter or label) or published (department brochures).
The Communication Rules Form (SOACOMM) is used to define the different types of
Communication Plans as applied to campus, level, college, and degree, and to define the
rules for the automatic assignment of communication plans to people and the processing of
the communication plan.
If the campus is X, and the degree level is X, and the college is X, and the degree is X, then
under these conditions a specific code is assigned. All students with these characteristics
will receive the Communication Plan automatically. If you leave the campus blank, then it is
used as a wild card and is applicable on all campuses.
Note: Details about setting up Communications Plans are found in another workbook.
Banner form
© SunGard 2004-2008
Banner Student General Student Training Workbook
Page 111
Steps
Follow these steps to define communication plans.
1. Access the Communication Rules Form (SOACOMM).
2. Perform an Insert Record function.
3. Select a level code in the Level field.
4. Select a campus code in the Campus field.
5. Select a college code in the College field.
6. Select a degree code in the Degree field.
7. Select a program code in the Program field.
8. Select a field of study type and code in the Type and Code fields.
Example: You might select a type of MAJOR and a Code of ACCT for a major in
Accounting.
9. Select a department code in the Department field.
10. Use the drop-down arrow above the Curricula field to specify if the curricular elements
defined on the rule must come from the primary curriculum record, secondary
curriculum record, or any curricula.
11. Select a communication plan code in the Recruit field to select a communication plan.
12. Select a communication plan code in the Admissions field to select a communication
plan.
13. Select a communication plan code in the Student field to select a communication plan.
For the purposes of the General Student manual, only those communication plans that
are defined for Student will be triggered when the SGASTDN record reflects the criteria
from all of the other fields.
14. Click the Save icon.
15. Click the Exit icon.
© SunGard 2004-2008
Banner Student General Student Training Workbook
Page 112
Viewing a Student’s Information
Purpose
The General Student Summary Form (SGASTDQ) is a stand-alone query form that displays
all general student records on file for a student from the term represented in the Key
Information. The person must be a student to be queried on this form. If a term is entered
in the Key Information, those general student records with a term that is earlier in time or is
equal to the term in the Key Information will be displayed. If no term is entered in the Key
Information, all of the student's General Student records will be represented on the form
back to the earliest record on file.
When working in the Student Information section of SGASTDQ, the user may perform a
Count Query Hits function from any existing record to transfer to the General Student Form
(SGASTDN). The user will view the record on SGASTDN that matches the record on which
the cursor was placed in SGASTDQ when the function was performed.
When the General Student Summary Form is accessed from the Committee/Service Form
(SHACOMI), the user may perform a Select function to drag back information for college
and department to SHACOMI.
Banner form
© SunGard 2004-2008
Banner Student General Student Training Workbook
Page 113
Steps
Follow these steps to view your student’s information.
1. Access the General Student Summary Form (SGASTDQ).
2. Enter the ID of the student in the ID field.
Note: If you have forgotten the ID of your student, click the down arrow to find
your student.
3. Enter a term in the Term field.
Note: The query will return information for the term you entered plus any
previous terms that contain information for this student. You can enter
information in the other fields in the key block to narrow your search results.
4. Perform a Next Block function.
5. Use the scroll bar, if necessary, to review the student’s record.
6. Select Detailed Student Information from the Options menu to access the General
Student Form (SGASTDN).
7. Click the Exit icon to return to the General Student Summary Form (SGASTDQ).
8. Click the Exit icon.
© SunGard 2004-2008
Banner Student General Student Training Workbook
Page 114
Entering Guardian Information
Introduction
To enter guardian information, you must first enter the guardian on the General Person
Identification Form (SPAIDEN), and then assign the guardian to a student using the
Guardian Information Form (SOAFOLK).
Banner form
© SunGard 2004-2008
Banner Student General Student Training Workbook
Page 115
Steps
Follow these steps to enter guardian information.
1. Access the General Person Identification Form (SPAIDEN).
2. Enter the ID of the student in the ID field.
Note: If you have forgotten the ID of your student, click the down arrow to find
your student.
3. Select the Address tab.
4. Enter a date in the From Date field.
5. Select an address type representing Parents in the Address Type field.
6. Enter an address in the Street Line 1 field.
7. Enter a city in the City field.
8. Enter a state or province in the State or Province field.
9. Enter a zip or postal code in the Zip or Postal Code field.
10. Select a telephone type in the Telephone Type field.
11. Enter telephone number in the Telephone field.
12. Click the Save icon.
13. Click the Exit icon.
© SunGard 2004-2008
Banner Student General Student Training Workbook
Page 116
Banner form
Steps
Follow these steps to complete the process using the Guardian Information Form
(SOAFOLK).
1. Access the Guardian Information Form (SOAFOLK).
2. Enter the student’s ID number in the ID field.
Note: If you do not know the student ID number, you can select the down
arrow in the ID field to perform a query using the student name.
3. Enter the prefix of the guardian in the Prefix field.
Example: Mr., Ms., Mrs., Pastor
4. Enter the last name of the guardian in the Last Name field.
5. Enter a name in the First Name field.
6. Select the Deceased checkbox if the guardian is deceased.
7. Select a relationship type in the Relationship field.
© SunGard 2004-2008
Banner Student General Student Training Workbook
Page 117
8. Enter values, if applicable, in the Degree, Employer, and Title fields.
Note: These fields can be left blank if information is not requested or is not
available.
9. Enter the address type representing Parents in the Address Type field.
Result: The student’s address information defaults from the student file.
10. Click the Save icon.
11. Click the Exit icon.
© SunGard 2004-2008
Banner Student General Student Training Workbook
Page 118
Maintaining Sports Records
Purpose
Use the Athletic Compliance Form (SGASPRT) to assign sport codes, status, athletic
eligibility, academic eligibility, and athletic aid information by term to an athlete. An athlete
needs at least a general person record (SPRIDEN) in order to be processed on this form. If
your institution requires that an athlete with a compliance (sport) record have an associated
general student record (SGBSTDN), you can do so. A student status is displayed for the
record for the term, for an ID with a general student record.
Compliance records can be created and modified for any term and are not required to have
associated competition data. Compliance records can be modified in any term, regardless of
the existence of competition data. They can also be modified if the athlete is deceased.
Compliance records without competition data can be copied to a future term.
On this form you can also maintain eligibility information, enter general comments, and
review admissions and transfer data by using the form tabs.
Note: Please refer to the Banner Student Athletic Compliance Workbook for more details
about the Athletic Compliance form, associated processes, and the additional new forms
supporting the functionality.
© SunGard 2004-2008
Banner Student General Student Training Workbook
Page 119
Banner form
Steps
Follow these steps to enter compliance records without competition data. You can enter
compliance (sport) records without athletic competition data, athletic attributes, or athletic
comments.
1. Access the Athletic Compliance Form (SGASPRT).
2. Enter the ID for the athlete in the ID field in the Key Block.
3. Perform a Next Block function to the Athletic Compliance Term block.
4. Enter the term for the athletic compliance record in the Term field.
5. Review if the person has a prospect, applicant, or general student record for the term.
Note: If a general student record exists, review the student status.
6. Perform a Next block to the Athletic Compliance Sport block.
7. Enter the sport code in the Sport field for the sport in which the athlete is participating.
8. Enter the status code for the athlete in the Status field.
© SunGard 2004-2008
Banner Student General Student Training Workbook
Page 120
9. Enter the eligibility code for the athlete in the Eligible field.
10. Click the Athletic Aid checkbox if the athlete is receiving athletic aid.
11. Enter the academic eligibility code for the athlete in the Academic Eligibility field.
12. Click the Save icon to save the record.
13. Click the Exit icon if you are not going on to the next exercise.
© SunGard 2004-2008
Banner Student General Student Training Workbook
Page 121
Maintaining and Monitoring Student Right to
Know Reporting
Introduction
The Student Right to Know act proposes regulations that require an institution of higher
education to disclose information about its student body's completion or graduation rates.
This act expands the types of "consumer" information that institutions are required to
disclose to current and prospective students through appropriate publications and mailings.
Institutions are required to report a completion or graduation rate for full-time certificateseeking or degree-seeking undergraduate students. Also, institutions that award athletically
related student aid are required to report completion or graduation rates of various student
populations at the institution, including student athletes. If an institution cannot calculate
the graduation rate of the most recent cohort of students that has had an opportunity to
graduate, the institution would report a persistence rate until it can disclose an actual
graduation rate of an entering cohort of students. This statute requires an institution to
make these disclosures to current and prospective students by July 1, 1993, and annually
thereafter.
The legislation
For references to the "Legislation" in this procedure, refer to the Notice of Proposed Rule
Making that was published in the July 10, 1992 Federal Register. It is recommended that
you read either this information or the Chapter 12 General Student Dear Colleague Letter
from the US Department of Education dated August 21, 1991 before this processing is
implemented.
© SunGard 2004-2008
Page 122
Banner General Student
Sports that require reporting
If your institution awards athletically-related financial aid, your institution is required to
report the graduation rates of certain groups of student athletes in addition to the required
institution-wide graduation rate.
The sports in which the graduation rates of student athletes must be tracked are
•
basketball
•
baseball
•
football
•
cross country/track
•
all other sports combined.
Purpose
The Student Right To Know Report (SGRKNOW) is used to produce data that will assist your
institution in calculating graduation and completion rates by cohort and optionally by sport
codes. If sport reporting is used, those students who receive athletically based financial aid
may be specifically selected to be processed by sport.
© SunGard 2004-2008
Page 123
Banner General Student
Banner form
Steps
Follow these steps to run the Student Right To Know Report.
1. Access the Student Right To Know Report (SGRKNOW).
2. Enter the desired printer name in the Printer field.
Note: You can enter DATABASE to write the report to a table for on-line viewing
and to enable the saving of the report to a shared folder on a designated
network drive.
3. Enter these parameter values.
Req’d?
Parameter
Value
9
Report Term
Enter the term in which you are
running the report.
9
Cohort Start Term
Enter the start term of the cohort
codes to be processed.
© SunGard 2004-2008
Page 124
Banner General Student
Req’d?
9
9
Parameter
Value
Enrollment Term
Enter the term in which students
must have enrollment to be
counted as a cohort.
Cohort Code
Enter the code(s) processed to
those specified with a matching
start term. A wildcard (%) will
process all cohort codes with a
matching start term.
Activity Sport Code
Enter the sport activity code(s) to
be processed for each cohort
code. Enter a wildcard (%) to
process all sport activity codes.
Degree Level
Enter the cohort code(s) to be
processed to match the degree
level as specified on the Cohort
Code Validation Form (STVCHRT),
or a wildcard (%) may be entered
to process all degree levels.
Athletic Aid Indicator
Enter Y to select only those
students with the sport code(s) to
be processed where the Athletic
Aid Indicator for the sport code is
checked.
Print Detail Report Indicator
Enter Y to print a detailed listing
of students in each category.
4. Click the Save Parameter Set as checkbox if you want to save the parameter set for
future use enter a name and description in the Name and Description fields.
5. Click the Submit radio button.
6. Click the Save icon to execute the report.
Result: The Auto hint line displays the job submission number for the report log
and list file.
7. Select Review Output on the Options menu to review the report.
8. Click the Exit icon.
© SunGard 2004-2008
Page 125
Banner General Student
Entering Disability Information
Purpose
The Student Disability Services Form (SGADISA) is used to capture information about
disabilities, as well as services provided for those disabilities, for a student on a term-byterm basis. A student record must exist for the student on the General Student Form
(SGASTDN) for the term specified.
Banner form
© SunGard 2004-2008
Page 126
Banner General Student
Steps
Follow these steps to enter disability information.
1. Access the Student Disability Services Form (SGADISA).
2. Enter the student’s ID in the ID field.
3. Enter the current or appropriate term in the Term field.
4. Perform a Next Block function.
5. Enter the disability code associated with the Student’s disability in the Disability Code
field.
Note: The code comes from the Disability Type Code Validation Form (STVDISA)
and the description will default into the Description field.
6. Enter the appropriate medical code in the Medical Code field.
Note: This code comes from the Medical Code Validation Form (STVMEDI).
7. Enter the service code in the Service Code field.
Note: This code comes from the Disability Service Validation Form (STVSPSR).
8. If appropriate, select the Primary checkbox to indicate that this is the primary
disability.
9. Click the Save icon.
10. Perform a Next Block function.
11. Complete the fields in the Disability Services block as appropriate. Use the following as
a guide to the fields.
Note: Not all these fields are entered with data at the same time; various fields
will be updated with information as that information becomes available
Field
Description
Service Type
Indicates the type of service provided by the institution
for the disability.
Status Code
Indicates the status of the service type provided.
Provided Code
Indicates whether the service type been provided by the
Institution.
© SunGard 2004-2008
Page 127
Banner General Student
Field
Description
Provider Code
Indicates who or what provided the service.
Exemption Code
Indicates whether the student is exempt from having the
service provided.
Result
Result of the Service Type that was provided.
Originator
Originator of the Disability Services record.
Campus
Campus at which the student is enrolled.
Contacts
Number of times the Originator has had contact with the
student.
Service Begin
Date
Date that service is to take effect.
Service End
Date
End date of the service.
12. Click the Save icon.
13. Click the Exit icon.
© SunGard 2004-2008
Page 128
Banner General Student
Entering EOPS Information
Purpose
The purpose of the Education Opportunity Programs and Services Form (SGAEOPS) is to
record and monitor the EOPS information for a student based on an effective term. EOPS
status and multiple eligibility factors may be specified for a student. A general student
record must exist on SGASTDN prior to creating or updating the EOPS information.
Banner form
© SunGard 2004-2008
Page 129
Banner General Student
Steps
Follow these steps to enter EOPS information.
1. Access the Education Opportunity Programs and Services Form (SGAEOPS).
2. Enter the student’s ID in the ID field.
3. Enter the appropriate term in the Term field.
4. Perform a Next Block function.
Note: The Maintenance icon is used to copy the record to a new Effective Term
because more information is available for that new term, and the record needs to be
updated. You can also use this icon to set the End Term of the record.
5. Enter the student’s EOPS status in the EOPS Status field.
6. Enter the student’s eligibility for state financial aid in the State Financial Aid
Eligibility field.
7. Enter the reason for acceptance in the Acceptance Reason field.
8. Enter a withdrawal reason in the Withdrawal Reason field, if applicable.
9. Enter the planned credits in the Planned Credits field.
10. Enter an acceptance date in the Acceptance Date field.
11. Perform a Next Block function to access the Eligibility Factor block.
12. Enter the appropriate code in the Eligibility Factor field.
Result: The description will default into the Description field.
13. Select the Primary Indicator checkbox, if appropriate.
Note: This checkbox indicates whether the eligibility factor is the primary eligibility
factor, or the primary reason for needing the Educational Opportunity Program.
14. Select Other Educational Programs from the Options menu to access the Other
Educational Programs window.
Note: This window allows you to capture Educational Opportunity Program
information for two different programs. Not all fields are required, and can be
entered as the information is received.
© SunGard 2004-2008
Page 130
Banner General Student
15. Enter the student’s EOPS status in the EOPS Status field.
16. Enter the student’s eligibility for state financial aid in the State Financial Aid
Eligibility field.
17. Enter the reason for acceptance in the Accept Reason field.
18. Enter a withdrawal reason in the Withdrawal Reason field, if applicable.
19. Enter the student’s marital status in the Marital Status field.
20. Enter the student’s number of dependents, if applicable, in the Number of
Dependents field.
21. Enter the code for the AFDC duration time in the AFDC Duration field.
22. Enter the student’s planned credits in the Planned Credits field.
23. Enter an acceptance date in the Acceptance Date field.
24. Click the Save icon.
25. Click the Exit icon.
© SunGard 2004-2008
Page 131
Banner General Student
Maintaining Required Information
Purpose
The Institutional Reporting Requirements Form (SGAUSDF) is used to maintain information
about students which is specifically required by the institution on a term-by-term basis. This
form and the supporting validation forms allow an institution to determine which additional
data must be maintained regarding the student.
Each of the reporting elements numbered 1 - 10 is supported by a Student Element
(Number) Validation Form (STVSUDA through STVSUDJ) which is used to create, update,
insert, and delete institutionally specific information. Element 1 values are derived from the
Student Element One Validation Form (STVSUDA), Element 2 values are derived from the
Student Element Two Validation Form (STVSUDB), and Element 3 values are derived from
the Student Element Three Validation Form (STVSUDC), and so on through Element 10 and
the Student
Element Ten Validation Form (STVSUDJ).
Note: A general student record must exist on the General Student Form (SGASTDN) for the
student during the term before information is entered on this form.
Banner form
© SunGard 2004-2008
Page 132
Banner General Student
Steps
Follow these steps to use the Institutional Reporting Requirements Form (SGAUSDF).
1. Access the Institutional Reporting Requirements Form (SGAUSDF).
2. Enter the student’s ID in the ID field.
3. Enter the appropriate term in the Term field.
4. Perform a Next Block function.
5. Enter the appropriate codes in the Element field for Element 1 through Element 10,
as appropriate.
© SunGard 2004-2008
Page 133
Banner General Student
Performing Purge Processes
General Student Purge Purpose
The General Student Purge Process (SGPSTDN) purges the general student information for
a student who never registered based on the user-specified effective term and activity date.
You can choose to leave the High School, Prior College, Guardian, Test Score, and Hold
information on the database also by parameter selection.
General Student information will not be purged if
•
the student has any active holds
•
the student has Academic History information
•
the student has any Financial Aid information.
General Student Purge Banner process
© SunGard 2004-2008
Page 134
Banner General Student
General Student Purge Steps
Follow these steps to run the general student purge.
1. Access the General Student Purge Form (SGPSTDN).
2. Enter the desired printer name in the Printer field.
Note: You can enter DATABASE to write the report to a table for on-line viewing
and to enable the saving of the report to a shared folder on a designated
network drive.
3. Enter these parameter values.
Parameter
Description
Process Term
Enter the term that you want to
process. This parameter is required.
Purge Option
Choose from one of the two purge
options listed in the description:
Purges general student records never
registered by term or by term and
date.
Effective Term
Enter a term for which you want this
process to be effective.
Activity Date
Enter date, two digit day-three
character month-four digit year.
Purge High School Information
Enter Y for Yes or N for No.
Purge Prior College Information
Enter Y for Yes or N for No.
Purge Guardian Information
Enter Y for Yes or N for No.
Purge Test Score Information
Enter Y for Yes or N for No.
Purge Hold Information
Enter Y for Yes or N for No.
Run Mode
Enter A for audit mode or U for update
mode. This parameter is required.
4. Click the Save Parameter Set as checkbox if you want to save the parameter values
for future use.
5. Enter a name and description in the Name and Description fields.
© SunGard 2004-2008
Page 135
Banner General Student
6. Click the Submit radio button.
7. Click the Save icon to execute the report.
Result: The Auto hint line displays the job submission number for the report log
and list file.
8. Select Review Output on the Options menu to review the report.
9. Click the Exit icon.
© SunGard 2004-2008
Page 136
Banner General Student
Hold Purge Process Purpose
The Hold Purge Process (SGPHOLD) purges all expired holds based on the user specified
parameters of expiration date, activity date, and hold type. You can choose one of two
options:
•
Option 1: hold expiration date (date must exist to be purged)
•
Option 2: hold activity date
Warning: Only the Registrar should be permitted to run the process to purge all expired
holds. The purge process is run before the start of registration for the Fall, Spring, and
Summer terms.
Hold Purge Process Banner process
© SunGard 2004-2008
Page 137
Banner General Student
Hold Purge Process Steps
Follow these steps to run the hold purge process.
1. Access the Hold Purge Form (SGPHOLD).
2. Leave the Parameter Set field empty.
3. Perform a Next Block function to access the Printer Control Block.
4. Double-click in the Printer field and select an available printer.
Note: You can enter DATABASE to write the report to a table for on-line viewing
and to enable the saving of the report to a shared folder on a designated network
drive.
5. Perform a Next Block function to navigate to the Parameter Values block.
Note: The system will automatically populate any default parameters.
6. Enter the appropriate values for each parameter in the Values column.
Note: Use the Values Search icon to access tables with appropriate values.
Parameter
Value
Process Term
Enter the term code associated with the process. This
is a required parameter.
Purge Option
Choose from one of the two purge options listed in
the description: hold expiration date or hold activity
date. This is a required parameter.
Hold Expiration Date
Holds with end date less than or equal to the date
entered will be purged.
Hold Activity Date
Holds with activity dates that match the date entered
will be purged.
Excluded Hold Type
Hold types specified will be excluded from the purge
process. Multiple requests are permitted.
Run Mode
Enter A to produce a listing of all selected purge data
without affecting the database. Enter U to update
the database after purging the selected data. This is a
required parameter.
7. Check the Save Parameter Set as checkbox if you want to save the parameter values
© SunGard 2004-2008
Page 138
Banner General Student
for future use.
8. Enter a name and description for your job parameters in the Name and Description
fields.
Note: Run the process in Update Mode.
9. Select the Submit radio button.
10. Click the Save icon.
11. Click the Exit icon.
© SunGard 2004-2008
Page 139
Banner General Student
General Student Mass Entry
Overview
Mass entry processing is based on user-defined search and update criteria. Users can select
students based on form search criteria and update their data based on the update criteria.
The selected students can be reviewed and the updates selectively processed. Updates can
be processed immediately or held for later processing in job submission using a batch
process (SORMEBP). A Results tab is used to view processing results for Mass Entry,
whether the results are processed immediately or via batch. Audit information is retained for
each Mass Entry process, and may later be purged. Data retained includes User ID, date,
timestamp, search criteria, update criteria, students that were processed and the results.
Mass entry forms may also be used to query student information only, in which case audit
results are not retained.
The General Student Mass Entry Form (SGAMSTU) is used for mass entry general student
processing. You can search and update general student records using SGAMSTU when a
general student record exists for the student on SGASTDN for the effective term that is
entered in the search criteria. The effective term is required when any other search criteria
are entered in order to proceed to the Results tab.
Updates can be selected for the processing term on the Update tab. Updates take place for
new and existing student records, if they satisfy the search criteria, regardless of any holds
the students may have.
The search results are displayed by ID and name based on the data required by the mass
entry form, the search criteria, and the population selection, if used. All records returned in
the Results tab can be selected for update, all deselected, or not selected. Individual
records can be selected for update. Records may be added or deleted manually.
When no search criteria are entered, you can still manually enter students for update.
Records that are manually entered require that the student has a general student record
and a valid effective term. Updates cannot be performed when the student has a
registration record for the update criteria learner effective term. Mail submission is also not
updated when a student has a registration record for the search criteria effective term.
© SunGard 2004-2008
Page 140
Banner General Student
Banner Form
Steps
Follow these steps to execute the General Student Mass Entry process.
1. Access the General Student Mass Entry form (SGAMSTU).
2. Search for and enter all the criteria for your search in the Search Criteria section of the
form. Please note that results will only be returned for Students whose records meet
the search criteria on this form AND who have an existing General Student record
(SGASTDN). Effective Term is the only required field.
Note: A new record will be created with a new Effective Term code.
3. Optionally, you may fill in the Population Selection section of the form. This is not
another block, it is accessed by pressing the Tab key to move to the next form field.
Note: Familiarity with Population Selection is a prerequisite for this course.
4. Press Next Block or the Update tab to move to the Update tab.
5. Enter the General Student Update values desired.
NOTE: A term code is required for all general student updates.
© SunGard 2004-2008
Page 141
Banner General Student
Note: These updates will be applied to the General Student record (SGASTDN).
6. After filling in the updated values, you may optionally update the Communication Plan
for all of the selected student records by filling in the Mail Submission section of the
form. This is not a separate Block, but is accessed by pressing Tab to move to the next
form field.
7. Press Next Block or click on the Results tab to move to the Results Tab. All records
that satisfy the requirements specified in the Search Tab, and that have an existing
General Student record (SGASTDN) are listed. You can review the selected records on
this Tab and select All, None or some subset of these records for processing.
Note: Records may be manually entered on this tab, and selected for update. They will
be updated if they have an existing General Student record (SGASTDN).
© SunGard 2004-2008
Page 142
Banner General Student
8. To execute the Mass Entry for General Student immediately, select the Submit check
box, as shown above. To execute it later as a Batch Process, select the Hold for Job
Submission check box. Please see the section Mass Entry Batch Update in this
workbook for more information about running the Mass Entry Batch process.
9. Click the Save icon to execute the process.
10. Once the process has been executed, the results are displayed on this tab. Each record
is displayed with status indicators and a message type which contains more information
for each record’s update results.
Indicator
Description
Manually Added
Checked when the record has been manually
added to the selected group for update.
Yes
Checked when the update has been completed
successfully.
No
Checked when the update has not been
completed at all.
Partial
Checked when one part of the update was
successfully completed while another part was
not.
None
Checked when the update was not attempted,
(such as if the record was not selected).
© SunGard 2004-2008
Page 143
Banner General Student
Indicator
Message
Description
A link to a message explaining the status of
the update for that record.
11. Click the Exit icon.
© SunGard 2004-2008
Page 144
Banner General Student
Mass Entry Audit
Overview
Whenever the Mass Entry process executes, an audit file is saved, capturing all of the
information on the Search/Update tabs and the Results tab for each Mass Entry executed.
These files can be reviewed by opening this Mass Entry Audit form (SOAMAUD). This form
is used to query mass entry event information by session.
These files can be searched by Date, User ID and/or Form Name. The list of saved audit
files that satisfy the search criteria entered are displayed on the Sessions Tab. You can
then view the selected session’s associated search criteria and updated and inserted values
in the Search/Update tab. Depending on whether the updates have been processed directly
on the mass entry form or by batch processing (SORMEBP), the processing results can be
displayed in the Results Tab with any associated result messages and whether the record
was manually added.
Banner Form
© SunGard 2004-2008
Page 145
Banner General Student
Steps
Follow these steps to review Mass Entry Audit files.
1. Access the Mass Entry Audit form (SOAMAUD).
2. Using the Key Block, enter the Submit Date From, Submit Date to, User ID and/or Form
Name to search for Audit Session files. Select one, and move to the Search/Update
tab.
3. Note the following data is contained at the top of the Search/Update Tab:
Field
Description
Date Initiated
The date the Mass Entry was initiated
User ID Initiated
User ID of the individual who initiated the
Mass Entry.
Date Completed
The date the Mass Entry update was
complete; If Batch process has not yet been
run this field will be empty.
© SunGard 2004-2008
Page 146
Banner General Student
Field
Description
User ID Completed
User ID of the individual who ran the update;
If Batch process has not yet been run this field
will be empty.
Batch Process ID
The Batch Process ID assigned by the system
to this session, if Batch processing was
selected. If the update was processed in real
time, this field will be empty.
Form Name
Identifies the form used for Mass Entry
Session Name
The name of the session selected
4. The Search Criteria from the original Mass Entry form is reproduced in the Search
Criteria block on the Search/Update tab.
5. The Update Criteria from the original Mass Entry form is reproduced in the Update
Criteria block on the Search/Update tab.
6. The Mass Entry process updates the mass entry tables with result codes and associated
result messages once updates have taken place. Results may be viewed on the Results
tab, and include both records selected for update, and records that satisfied the Search
criteria that were not selected for update.
Note: The Update radio group in the Results tab show whether the updates were
© SunGard 2004-2008
Page 147
Banner General Student
successful (Yes), partially successful (Partial), not successful (No) or that no updates
were considered (None). The Message field displays related result messages for the
update, such as that shown in the illustration below. The Process Indicator shows
whether that record was selected for processing.
7.
The audit tables are updated when the mass entry updates are processed in real time
on a mass entry form. The tables are also updated when job submission batch
processing (SORMEBP) is run for updates that have been held for later processing.
8. After reviewing the results of your selected session, click on the Exit icon.
© SunGard 2004-2008
Page 148
Banner General Student
Mass Entry Batch Update
Overview
The Process Mass Entry Report (SORMEBP) is used to process mass entry updates in batch
that are held for job submission processing in the Results tab of the mass entry form.
When a process is held for job submission, all of the data is written to the Mass Entry Audit
tables without a date completed or an update result, but with a batch process identifier.
The batch process ID can be submitted through job submission using SORMEBP when you
are ready to process the updates.
This report processes the mass entry updates based on the mass entry form name, the ID
of the user who initiated the updates, the date and time the records were saved for batch
update, and the batch process ID. Only records with no completion date are considered for
update. Output is listed in alphabetical order and can show summary, detail or totals
information.
The report can be run in Audit or Update mode. Audit Mode permits the user to run the
batch process as a “trial,” and the update results and associated messages are not shown
on the report output. When run in Update mode, updates are made to the parent forms of
the mass entry forms, and the audit table is updated with the ID of the user who ran the
report, the date completed, the results and the setting of the Process Indicator on the Audit
form.
Banner form
© SunGard 2004-2008
Page 149
Banner General Student
Steps
Use the following steps to execute the selected Batch process report.
1. Access the Batch Update Process Report (SORMEBP).
2. Leave the Parameter Set field empty.
3. Perform a Next Block function to access the Printer Control Block.
4. Double-click in the Printer field and select an available printer.
Note: You can enter DATABASE to write the report to a table for on-line viewing and to
enable the saving of the report to a shared folder on a designated network drive.
5. Perform a Next Block function to navigate to the Parameter Values block.
6. Enter the Form Name into the Parameter Value block for Parameter 01
7. Parameters 02 – 04 are optional.
8. To find your Batch Process ID for Parameter 05 use the LOV button and select the Batch
Process you wish to run.
9. For the Report Option parameter, enter D to show all students or S to show control
totals.
10. Select the Run Mode. The choices are U (Update) or A (Audit). Update causes the
Batch Process to run. Audit allows you to view the results without running the Batch
process or updating the Student Record(s).
11. Press Next Block to move to the Submission block.
12. To save the parameter set for use again in future queries you can fill in the name and
description fields, and click on the check box for Save Parameter Set as.
13. Click on the Save icon.
14. Click on the Exit icon.
15. To confirm that the Batch process did run, access the Mass Entry Audit form
(SOAMAUD), and navigate to the Audit file associated with the Batch ID you just
processed. You can then review the Results tab to note the results of the Batch
process.
© SunGard 2004-2008
Page 150
Banner General Student
Mass Entry Purge Audit
Overview
Audit tables may be very large, and you may wish to remove them after the processing is
complete and the audit confirms the results. Records can be selected for deletion based on
mass entry form, user ID, from and to dates, delete option (update status to be deleted), or
batch process ID. The update status can be:
•
All completed updates
•
Failed updates
•
Incomplete updates
•
No updates
•
Partial updates
•
Successful updates.
The process can be run in Audit Mode or Update Mode, and can show summary, detail or totals
information.
Banner form
© SunGard 2004-2008
Page 151
Banner General Student
Steps
Follow these steps to purge the Audit file you created earlier.
1. Access the Purge Mass Entry Audit form (SOPMAUD).
2. Leave the Parameter Set field empty.
3. Perform a Next Block function to access the Printer Control Block.
4. Double-click in the Printer field and select an available printer.
Note: You can enter DATABASE to write the report to a table for on-line viewing and to
enable the saving of the report to a shared folder on a designated network drive.
5. Press on Next Block to access the parameter values.
6. The form name is required. In this case, enter SGAMSTU.
7. Enter the Batch ID, if you created one when you executed SGAMSTU. You can also
enter other parameters that will further narrow the list of sessions returned to you, such
as your User ID or the Add Dates.
8. Parameter 05 specifies what you want to delete. Review your options from the LOV.
9. Parameter 07 specifies the type of report. Review your options from the LOV.
10. Click the Save icon to execute the report.
Result: The Auto hint line displays the job submission number for the report log and list
file.
11. Select Review Output on the Options menu to review the report.
12. Click on the Exit icon.
© SunGard 2004-2008
Page 152
Banner General Student
Summary
Let’s review
As a result of completing this workbook, you have
•
created a general student record
•
changed a major and added a minor
•
processed a leave of absence request
•
entered veteran information
•
added or changed advisor information
•
entered additional student information
•
entered cooperative education information
•
created Communication Plan information
•
viewed a student’s information
•
added and maintained a sports record
•
maintained and monitored Right to Know reporting
•
entered disability information
•
entered EOPS information
•
maintained required information
•
performed purge processes
•
performed mass entry of student records
•
performed batch processing of mass entered student records
•
audited mass entry records
•
purged mass entry record audit.
© SunGard 2004-2008
Page 153
Banner General Student
Self Check
Directions
Use the information you have learned in this workbook to complete this self-check activity.
Question 1
What are the two forms you can use to create a student record?
Question 2
On SAAQUIK, which window do you access to add a student’s major?
Question 3
What window on the General Student Form (SGASTDN) do you access to add or change a
major?
Question 4
What other type of information can be entered on the Miscellaneous Student Information
window?
Question 5
What form is used to enter veteran information?
Question 6
On the Multiple Advisors Form (SGAADVR), on which block is information returned to after
an advisor is selected?
Question 7
What are the two ways that cohorts and attributes can be added to a student’s record?
© SunGard 2004-2008
Page 154
Banner General Student
Question 8
Does an employer have to exist in the Banner system before you can add cooperative
education information for a student?
Question 9
What are the validation forms are used with the Student Sport Form (SGASPRT)?
Question 10
What purge process do you run for a student who never registered?
© SunGard 2004-2008
Page 155
Banner General Student
Answer Key for Self Check
Question 1
What are the two forms you can use to create a student record?
Admissions Decision Form (SAADCRV)
Quick Entry Form (SAAQUIK)
Question 2
On SAAQUIK, which window do you access to add a student’s major?
Curricula window
Question 3
What window on the General Student Form (SGASTDN) do you access to add or change a
major?
Curricula window
Question 4
What other type of information can be entered on the Miscellaneous Student Information
window?
Practical training
Question 5
What form is used to enter veteran information?
Veteran Information Form (SGASTDN)
© SunGard 2004-2008
Page 156
Banner General Student
Question 6
On the Multiple Advisors Form (SGAADVR), on which block is information returned to after
an advisor is selected?
Advisor Information block
Question 7
What are the two ways that cohorts and attributes can be added to a student’s record?
•
Created manually on the Additional Student Information Form (SGASADD)
•
Rolled from the Admissions module when creating the student record
Question 8
Does an employer have to exist in the Banner system before you can add cooperative
education information for a student?
No. You can add an employer on the Employer Code Validation Form (STVEMPL).
Question 9
What validation forms are used with the Student Sport Form (SGASPRT)?
Student Activity Code Validation Form (STVACTC)
Sports Status Code Validation Form (STVSPST)
Eligibility Code Validation Form (STVELIG)
Question 10
What purge process do you run for a student who never registered?
The General Student Purge (SGPSTDN)
© SunGard 2004-2008
Page 157
Banner General Student
Appendix
© SunGard 2004-2008
Page 158
Banner General Student
Forms Job Aid
Form
Full Name
Use this Form to...
SAADCRV
Admissions Decision
enter decisions for an admissions application.
SAAQUIK
Quick Entry
quickly enter and register persons on the system.
SGAADVR
Multiple Advisors
associate student with multiple advisors. Also allows a view of
student’s advisors for an effective term range.
SGACLSR
Student Classification Rules
establish and maintain the academic classification rules based
on the range of hours entered and user-defined student
attributes. Requires STVCLAS, STVLEVL and STVATTR be
established prior to creating this form.
SGACOOP
Cooperative Education
maintain data relating to student’s cooperative education
positions, including employer information and comments on
duties involved.
SGADISA
Student Disability Services
capture information about disabilities, as well as services
provided for those disabilities, for a student on a term-by-term
basis.
SGAEOPS
Education Opportunity Programs and
Services
record and monitor the EOPS information for a student based on
an effective term.
SGAMSTU
General Student Mass Entry
create and/or update General Student records for the effective
term. Requires SGASTDN for each ID selected.
© SunGard 2004-2008
Page 159
Banner General Student
Form
Full Name
Use this Form to...
SGASADD
Additional Student Information
maintain cohort codes and attributes assigned to student by
effective term. May be created manually or by rolling from the
Admissions module on creation of student record.
SGASPRT
Student Sport
assign sport codes by term to a student. Track students by
sport code, status code, eligibility code and term. Uses
STVACTC, STVSPST and STVELIG.
SGASTDN
General Student
maintain current and historical information about a student.
SGASTDQ
General Student Summary
display all general student records on file for the specified
term(s) for the student identified in the Key Information.
SGAUSDF
Institutional Reporting Requirements
maintain information about students which is specifically
required by the institution on a term-by-term basis.
SGPHOLD
Hold Purge Process
purge all expired holds based on the user-specified parameters
of expiration date, activity date and hold type.
SGPSTDN
General Student Purge Process
purge the general student information for a student who never
registered based on the user-specified effective term and
activity date.
SGRKNOW
Student Right To Know Report
produce data that will assist your institution in calculating
graduation and completion rates by cohort and optionally by
sport codes.
SOACOMM
Communication Rules
define the different types of Communication Plans as applied to
campus, level, college and degree, and to define the rules for
the automatic assignment of communication plans to people and
the processing of the plan.
© SunGard 2004-2008
Page 160
Banner General Student
Form
Full Name
Use this Form to...
SOAFOLK
Guardian Information
establish and maintain information about a student’s guardian.
Guardian must exist in SPAIDEN first.
SOAMAUD
Mass Entry Audit Form
review mass updates for General Student.
SOPMAUD
Purge Mass Entry Audit
remove Audit table records.
SORMEBP
Mass Entry Batch Update Process
apply mass updates to General Student via batch updates.
SPAIDEN
General Person Identification
add or maintain general person IDs on the system.
STVACTC
Student Activity Code Validation
create, update, insert and delete activity codes, such as Debate
Club or ROTC.
STVADVR
Advisor Type Code Validation
create, update, insert and delete advisor type codes for
students, such as academic advisor or athletic advisor.
STVAFDC
Student CARE AFDC Duration Validation
create, update, insert and delete CARE AFDC codes. These
codes indicate length of time a CARE student has been on AFDC
at the time of enrollment for the current term.
STVASTD
Academic Standing Code Validation
create, update, insert and delete academic standing codes, such
as Good Standing, Deans List or Suspension.
STVATTR
Attribute Validation
create, update, insert and delete degree program codes, such as
Affiliated Teaching Requirement, Language Requirement or
Writing Intensive Requirement.
STVATTS
Student Attribute Code Validation
create, update, insert and delete student attribute codes, such
as First Year Student, Achieved Senior Standing or Non-degree
Student.
© SunGard 2004-2008
Page 161
Banner General Student
Form
Full Name
Use this Form to...
STVBLCK
Block Code Validation
create, update, insert and delete block codes which are used in
Block Scheduling processing. Represent sets or groupings of
class sections.
STVCAMP
Campus Code Validation
create, update, insert and delete campus codes, such as Main
Campus or Downtown Campus.
STVCAST
Combined Academic Standing Code
Validation
create, update, insert and delete combined academic standing
codes, which are defined by a combination of an academic
standing code and a progress evaluation code.
STVCHRT
Cohort Code Validation
create, update, insert and delete cohort codes used in various
modules to track a cohort grouping based on user-defined
criteria.
STVCLAS
Class Code Validation
create, update, insert and delete class codes, such as Freshman
or First Year Law.
STVCMTT
Comment Type Code Validation
create, update, insert and delete comment types and their
respective codes, such as General Comment, Special Needs or
Added via ACT Tape.
STVCPLN
Communication Plan Code Validation
create, update, insert and delete communication plan codes
used in Recruiting, Admissions and General Student modules.
STVCREA
Cohort Reason Code Validation
create, update, insert and delete cohort reason codes, such as
Peace Corps or Military Assignment. Used in conjunction with
inactivation of a cohort for an individual to identify the reason
for inactivation.
© SunGard 2004-2008
Page 162
Banner General Student
Form
Full Name
Use this Form to...
STVCTYP
Contact Type Code Validation
create, update, insert and delete recruiting contact type codes,
such as Campus Visit, College Night or Merit List Letter.
STVDEPS
Student CARE Number of Dependents
Validation
create, update, insert and delete codes indicating a CARE
student’s number of dependent children.
STVDISA
Disability Type Code Validation
create, update, insert and delete disability codes such as Blind,
Multiple Sclerosis or Hearing Impaired.
STVDLEV
Degree Level Code Validation
create, update, insert and delete degree level codes, such as
Associate, Bachelor, Master, etc.
STVELIG
Eligibility Validation
create, update, insert and delete eligibility codes, used in
Student Right to Know tracking by SGASPRT.
STVEMPL
Employer Code Validation
maintain employer codes which represent employer’s name,
address and phone number.
STVEOPS
Education Opportunity Prog/Serv Status
Validation
create, update, insert and delete EOPS status codes, such as No
Service, Student Eligible or Student Not Eligible. Used by
SGAEOPS.
STVESEL
Eligibility Factor Validation
create, update, insert and delete eligibility factor codes, such as
Did Not Graduate HS NO GED, Financial Consideration or HS
GPA below 2.5. Used by SGAEOPS.
STVLEVL
Level Code Validation
create, update, insert and delete level codes, such as No Level
Declared, Undergraduate or Non-matriculated Graduate.
STVMARS
Student CARE Marital Status Validation
create, update, insert and delete codes which indicate marital
status of a CARE student.
© SunGard 2004-2008
Page 163
Banner General Student
Form
Full Name
Use this Form to...
STVMEDI
Medical Code Validation
create, update, insert and delete medical codes, such as Blind,
Deaf, or Prosthetic Limb. Used by GOAMEDI.
STVORIG
Originator Code Validation
create, update, insert and delete originator codes, such as
Bursar’s Office, Student Accounts or Dean of Students.
STVPREV
Progress Evaluation Code Validation
create and define valid progress evaluation codes.
STVRSLT
Appointment Result Code Validation
create, update, insert and delete appointment result codes, such
as Attended Interview, Did not Attend, or Late to Interview.
STVSEPR
Services Provided Validation
create, update, insert and delete support services provided
codes, such as Services Accepted, Services Provided, or Services
Rejected.
STVSFAE
State F/A Eligibility Validation
create, update, insert and delete State F/A Eligibility codes, such
as AFDC Recipient Status or SSi Recipient Status.
STVSPRV
Service Provider Validation
create, update, insert and delete the service provider codes,
such as Training Center, Counseling Center or Learning Center.
STVSPSR
Disability Service Code Validation
create, update, insert and delete disability service codes, such
as County Paratransit Service, Hearing Aid Required or Disabled
Student Services. Used by GOAMEDI.
STVSPST
Sport Status Code Validation
create, update, insert and delete sport status codes. Used by
SGASPRT.
STVSSER
Service Code Validation
create, update, insert and delete service codes, such as Day
Care, Career Planning or Transportation.
© SunGard 2004-2008
Page 164
Banner General Student
Form
Full Name
Use this Form to...
STVSSRS
Service Result Validation
create, update, insert and delete student service result codes,
such as Promotion Obtained, Job Obtained or Goal Not Met.
STVSSST
Services Status Validation
create, update, insert and delete services status codes, such as
In Progress, Service Refused or Referred to Provider.
STVSTST
Student Status Code Validation
create, update, insert and delete student status codes, such as
Active, Withdrawn, Inactive Due to Graduation.
STVSTYP
Student Type Code Validation
create, update, insert and delete student type codes, such as
Returning Freshman, Continuing, Transfer. Specific student type
codes are required for IPEDS reporting.
STVSUDA
(through
STVSUDJ)
Student Element One (through Ten)
Validation
create, update, insert and delete institutional reporting data
elements specific to an institution’s needs for state or local
reporting for a student. See SGAUSDF.
STVTRAC
Acceptance Reason Validation
create, update, insert and delete an EOPS Reason for
Acceptance code, such as Accept Basis: Essay, Accept Basis:
Financial Need or Eligibility Demonstrated.
STVVETC
Veteran Type Code Validation
create, update, insert and delete veteran type codes, such as
Chapter 32 Post Vietnam Vet, Other Veteran or ROTC. Used by
SGASTDN.
STVWTHD
Student EOPS/CARE Withdrawal
Reason Validation
create, update, insert and delete codes which indicate reason
for student’s withdrawal from EOPS and/or CARE programs for
the following term, such as Lack of Resources, Family Problems
or Discontinued (Academic Reasons).
© SunGard 2004-2008
Page 165
Banner General Student
Terminology
Combined Academic Standing
This user defined code is a combination of an academic standing code and a progress evaluation code.
Cohort
A member of a group of students who have similar characteristics such as starting a program at the same time
Communication Plan
A set of rules designed to implement an institution's preferences regarding who should receive which materials and when those
materials should be sent. Materials can be generated (letter or label) or published (department brochures).
Example: All accepted high school students who apply for admissions into the Education program receive a letter acknowledging
acceptance into both the university and the Education program. However, all accepted high school students who apply for admissions
into the Nursing program receive a letter acknowledging acceptance into just the university and instructions for next steps on how to
apply at a later time to the Nursing program. Prospective nursing students also receive a Nursing program brochure along with their
acceptance letter into the university.
EOPS
Education Opportunity Programs and Services.
© SunGard 2004-2008
Page 166
Banner General Student
Student Right to Know Act
This legislation requires that an institution of higher education annually disclose information about its student body’s completion and
graduation rates.
For more information, refer to Maintaining and Monitoring Student Right to Know Reporting in Section: Day-to-Day Operations of this
training workbook.
© SunGard 2004-2008
Page 167
Banner General Student